Tag Archives: Amazon Managed Streaming for Apache Kafka (Amazon MSK)

Amazon MSK backup for Archival, Replay, or Analytics

Post Syndicated from Rohit Yadav original https://aws.amazon.com/blogs/architecture/amazon-msk-backup-for-archival-replay-or-analytics/

Amazon MSK is a fully managed service that helps you build and run applications that use Apache Kafka to process streaming data. Apache Kafka is an open-source platform for building real-time streaming data pipelines and applications. With Amazon MSK, you can use native Apache Kafka APIs to populate data lakes. You can also stream changes to and from databases, and power machine learning and analytics applications.

Amazon MSK simplifies the setup, scaling, and management of clusters running Apache Kafka. MSK manages the provisioning, configuration, and maintenance of resources for a highly available Kafka clusters. It is fully compatible with Apache Kafka and supports familiar community-build tools such as MirrorMaker 2.0, Kafka Connect and Kafka streams.

Introduction

In the past few years, the volume of data that companies must ingest has increased significantly. Information comes from various sources, like transactional databases, system logs, SaaS platforms, mobile, and IoT devices. Businesses want to act as soon as the data arrives. This has resulted in increased adoption of scalable real-time streaming solutions. These solutions scale horizontally to provide the needed throughput to process data in real time, with milliseconds of latency. Customers have adopted Amazon MSK as a top choice of streaming platforms. Amazon MSK gives you the flexibility to retain topic data for longer term (default 7 days). This supports replay, analytics, and machine learning based use cases. When IT and business systems are producing and processing terabytes of data per hour, it can become expensive to store, manage, and retrieve data. This has led to legacy data archival processes moving towards cheaper, reliable, and long-term storage solutions like Amazon Simple Storage Service (S3).

Following are some of the benefits of archiving Amazon MSK topic data to Amazon S3:

  1. Reduced Cost – You only must retain the data in the cluster based on your Recovery Point Objective (RPO). Any historical data can be archived in Amazon S3 and replayed if necessary.
  2. Integration with Enterprise Data Lake – Since your data is available in S3, you can now integrate with other data analytics services like Amazon EMR, AWS Glue, Amazon Athena, to run data aggregation and analytics. For example, you can build reports to visualize month over month changes.
  3. Optimize Machine Learning Workloads – Machine learning applications will be able to train new models and improve predictions using historical streams of data available in Amazon S3. This also enables better integration with Amazon Machine Learning services.
  4. Compliance – Long-term data archival for regulatory and security compliance.
  5. Backloading data to other systems – Ability to rebuild data into other application environments such as pre-prod, testing, and more.

There are many benefits to using Amazon S3 as long-term storage for Amazon MSK topics. Let’s dive deeper into the recommended architecture for this pattern. We will present an architecture to back up Amazon MSK topics to Amazon S3 in real time. In addition, we’ll demonstrate some of the use cases previously mentioned.

Architecture

The diagram following illustrates the architecture for building a real-time archival pipeline to archive Amazon MSK topics to S3. This architecture uses an AWS Lambda function to process records from your Amazon MSK cluster when the cluster is configured as an event source. As a consumer, you don’t need to worry about infrastructure management or scaling with Lambda. You only pay for what you consume, so you don’t pay for over-provisioned infrastructure.

To create an event source mapping, you can add your Amazon MSK cluster in a Lambda function trigger. The Lambda service internally polls for new records or messages from the event source, and then synchronously invokes the target Lambda function. Lambda reads the messages in batches from one or more partitions and provides these to your function as an event payload. The function then processes records, and sends the payload to an Amazon Kinesis Data Firehose delivery stream. We use Kinesis Data Firehose delivery stream because it can natively batch, compress, transform, and encrypt your events before loading to S3.

In this architecture, Kinesis Data Firehose delivers the records received from Lambda in Gzip file to Amazon S3. These files are partitioned in hive style format by Kinesis Data Firehose:

data/year = yyyy/month = MM/day = dd/hour = HH

Figure 1. Archival Architecture

Figure 1. Archival Architecture

Let’s review some of the possible solutions that can be built on this archived data.

Integration with Enterprise Data Lake

The architecture diagram following shows how you can integrate the archived data in Amazon S3 with your Enterprise Data Lake. Since the data files are prefixed in hive style format, you can partition and store the Data Catalog in AWS Glue. With partitioning in place, you can perform optimizations like partition pruning, which enables predicate pushdown for improved performance of your analytics queries. You can also use AWS Data Analytics services like Amazon EMR and AWS Glue for batch analytics. Amazon Athena can be used to run serverless SQL-like interactive queries on visualization and data.

Data currently gets stored in JSON files. Following are some of the services/tools that can be integrated with your archive for reporting, analytics, visualization, and machine learning requirements.

Figure 2. Analytics Architecture

Figure 2. Analytics Architecture

Cloning data into other application environments

There are use cases where you would want to use this data to clone other application environments using this archive.

These clusters could be used for testing or debugging purposes. You could decide to use only a subset of your data from the archive. Let’s say you want to debug an issue beyond the configured retention period, but not replicate all the data to your testing environment. With archived data in S3, you can build downstream jobs to filter data that can be loaded into a new Amazon MSK cluster. The following diagram highlights this pattern:

Figure 3. Replay Architecture

Figure 3. Replay Architecture

Ready for a Test Drive

To help you get started, we would like to introduce an AWS Solution: AWS Streaming Data Solution for Amazon MSK (scroll down and see Option 3 tab). There is a single-click AWS CloudFormation template, which can assist you in quickly provisioning resources. This will get your real-time archival pipeline for Amazon MSK up and running quickly. This solution shortens your development time by removing or reducing the need for you to:

  • Model and provision resources using AWS CloudFormation
  • Set up Amazon CloudWatch alarms, dashboards, and logging
  • Manually implement streaming data best practices in AWS

This solution is data and logic agnostic, enabling you to start with boilerplate code and start customizing quickly. After deployment, use this solution’s monitoring capabilities to transition easily to production.

Conclusion

In this post, we explained the architecture to build a scalable, highly available real-time archival of Amazon MSK topics to long term storage in Amazon S3. The architecture was built using Amazon MSK, AWS Lambda, Amazon Kinesis Data Firehose, and Amazon S3. The architecture also illustrates how you can integrate your Amazon MSK streaming data in S3 with your Enterprise Data Lake.

Validate, evolve, and control schemas in Amazon MSK and Amazon Kinesis Data Streams with AWS Glue Schema Registry

Post Syndicated from Brian Likosar original https://aws.amazon.com/blogs/big-data/validate-evolve-and-control-schemas-in-amazon-msk-and-amazon-kinesis-data-streams-with-aws-glue-schema-registry/

Data streaming technologies like Apache Kafka and Amazon Kinesis Data Streams capture and distribute data generated by thousands or millions of applications, websites, or machines. These technologies serve as a highly available transport layer that decouples the data-producing applications from data processors. However, the sheer number of applications producing, processing, routing, and consuming data can make it hard to coordinate and evolve data schemas, like adding or removing a data field, without introducing data quality issues and downstream application failures. Developers often build complex tools, write custom code, or rely on documentation, change management, and Wikis to protect against schema changes. This is quite error prone because it relies too heavily on human oversight. A common solution with data streaming technologies is a schema registry that provides for validation of schema changes to allow for safe evolution as business needs adjust over time.

AWS Glue Schema Registry, a serverless feature of AWS Glue, enables you to validate and reliably evolve streaming data against Apache Avro schemas at no additional charge. Through Apache-licensed serializers and deserializers, the Glue Schema Registry integrates with Java applications developed for Apache Kafka, Amazon Managed Streaming for Apache Kafka (Amazon MSK), Kinesis Data Streams, Apache Flink, Amazon Kinesis Data Analytics for Apache Flink, and AWS Lambda.

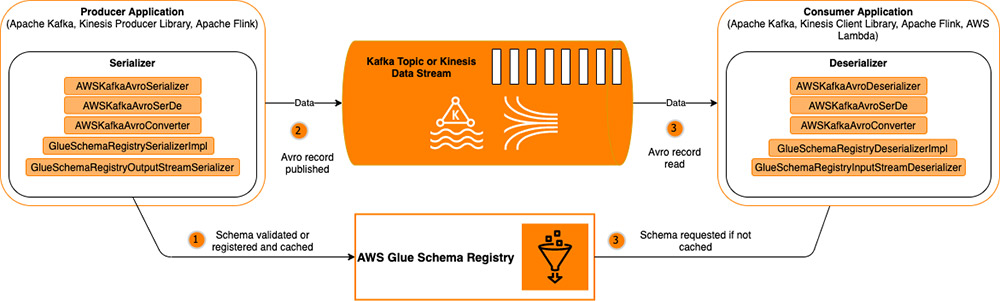
This post explains the benefits of using the Glue Schema Registry and provides examples of how to use it with both Apache Kafka and Kinesis Data Streams.

With the Glue Schema Registry, you can eliminate defensive coding and cross-team coordination, improve data quality, reduce downstream application failures, and use a registry that is integrated across multiple AWS services. Each schema can be versioned within the guardrails of a compatibility mode, providing developers the flexibility to reliably evolve schemas. Additionally, the Glue Schema Registry can serialize data into a compressed format, helping you save on data transfer and storage costs.

Although there are many ways to leverage the Glue Schema Registry (including using the API to build your own integrations), in this post, we show two use cases. The Schema Registry is a free feature that can significantly improve data quality and developer productivity. If you use Avro schemas, you should be using the Schema Registry to supplement your solutions built on Apache Kafka (including Amazon MSK) or Kinesis Data Streams. The following diagram illustrates this architecture.

AWS Glue Schema Registry features

Glue Schema Registry has the following features:

  • Schema discovery – When a producer registers a schema change, metadata can be applied as a key-value pair to provide searchable information for administrators or developers. This metadata can indicate the original source of the data (source=MSK_west), the team name to contact (owner=DataEngineering), or AWS tags (environment=Production). You could potentially encrypt a field in your data on the producing client and use metadata to specify to potential consumer clients which public key fingerprint to use for decryption.
  • Schema compatibility – The versioning of each schema is governed by a compatibility mode. If a new version of a schema is requested to be registered that breaks the specified compatibility mode, the request fails and an exception is thrown. Compatibility checks enable developers building downstream applications to have a bounded set of scenarios to build applications against, which helps to prepare for the changes without issue. Commonly used modes are FORWARD, BACKWARD, and FULL. For more information about mode definitions, see Schema Versioning and Compatibility.
  • Schema validation – Glue Schema Registry serializers work to validate that the schema used during data production is compatible. If it isn’t, the data producer receives an exception from the serializer. This ensures that potentially breaking changes are found earlier in development cycles, and can also help prevent unintentional schema changes due to human error.
  • Auto-registration of schemas – If configured to do so, the producer of data can auto-register schema changes as they flow in the data stream. This is especially useful for use cases where the source of the data is change data capture from a database.
  • IAM support – Thanks to integrated AWS Identity and Access Management (IAM) support, only authorized producers can change certain schemas. Furthermore, only those consumers authorized to read the schema can do so. Schema changes are typically performed deliberately and with care, so it’s important to use IAM to control who performs these changes. Additionally, access control to schemas is important in situations where you might have sensitive information included in the schema definition itself. In the examples that follow, IAM roles are inferred via the AWS SDK for Java, so they are inherited from the Amazon Elastic Compute Cloud (Amazon EC2) instance’s role that the application runs in. IAM roles can also be applied to any other AWS service that could contain this code, such as containers or Lambda functions.
  • Integrations and other support – The provided serializers and deserializers are currently for Java clients using Apache Avro for data serialization. The GitHub repo also contains support for Apache Kafka Streams, Apache Kafka Connect, and Apache Flink—all licensed using the Apache License 2.0. We’re already working on additional language and data serialization support, but we need your feedback on what you’d like to see next.
  • Secondary deserializer – If you have already registered schemas in another schema registry, there’s an option for specifying a secondary deserializer when performing schema lookups. This allows for migrations from other schema registries without having to start anew. If the schema ID being used isn’t known to the Glue Schema Registry, it’s looked for in the secondary deserializer.
  • Compression – Using the Avro format already reduces message size due to its compact, binary format. Using a schema registry can further reduce data payload by no longer needing to send and receive schemas with each message. Glue Schema Registry libraries also provide an option for zlib compression, which can reduce data requirements even further by compressing the payload of the message. This varies by use case, but compression can reduce the size of the message significantly.

Example schema

For this post, we use the following schema to begin each of our use cases:

{
 "namespace": "Customer.avro",
 "type": "record",
 "name": "Customer",
 "fields": [
 {"name": "first_name", "type": "string"},
 {"name": "last_name", "type": "string"}
 ]
}

Using AWS Glue Schema Registry with Amazon MSK and Apache Kafka

You can use the following Apache Kafka producer code to produce Apache Avro formatted messages to a topic with the preceding schema:

package com.amazon.gsrkafka;
import org.apache.kafka.clients.producer.KafkaProducer;
import org.apache.kafka.clients.producer.ProducerConfig;
import org.apache.kafka.clients.producer.ProducerRecord;
import org.apache.kafka.common.serialization.StringSerializer;
import com.amazonaws.services.schemaregistry.serializers.avro.AWSKafkaAvroSerializer;
import com.amazonaws.services.schemaregistry.serializers.avro.AWSAvroSerializer;
import com.amazonaws.services.schemaregistry.utils.AvroRecordType;
import com.amazonaws.services.schemaregistry.utils.AWSSchemaRegistryConstants;
import org.apache.kafka.common.errors.SerializationException;
import org.apache.avro.generic.GenericData;
import org.apache.avro.generic.GenericRecord;
import org.apache.avro.Schema;
import org.apache.avro.Schema.Parser;
import java.util.Properties;
import java.io.IOException;
import java.io.FileInputStream;
import java.io.InputStream;
import java.io.File;

public class gsrkafka {
private static final Properties properties = new Properties();
private static final String topic = "test";
public static void main(final String[] args) throws IOException {
// Set the default synchronous HTTP client to UrlConnectionHttpClient
System.setProperty("software.amazon.awssdk.http.service.impl", "software.amazon.awssdk.http.urlconnection.UrlConnectionSdkHttpService");
properties.put(ProducerConfig.BOOTSTRAP_SERVERS_CONFIG, "localhost:9092");
properties.put(ProducerConfig.KEY_SERIALIZER_CLASS_CONFIG, AWSKafkaAvroSerializer.class.getName());
properties.put(ProducerConfig.VALUE_SERIALIZER_CLASS_CONFIG, AWSKafkaAvroSerializer.class.getName());
properties.put(AWSSchemaRegistryConstants.AWS_REGION, "us-east-2");
properties.put(AWSSchemaRegistryConstants.REGISTRY_NAME, "liko-schema-registry");
properties.put(AWSSchemaRegistryConstants.SCHEMA_NAME, "customer");
properties.put(AWSSchemaRegistryConstants.COMPATIBILITY_SETTING, Compatibility.FULL);
properties.put(AWSSchemaRegistryConstants.SCHEMA_AUTO_REGISTRATION_SETTING, true);
Schema schema_customer = new Parser().parse(new File("Customer.avsc"));
GenericRecord customer = new GenericData.Record(schema_customer);

try (KafkaProducer<String, GenericRecord> producer = new KafkaProducer<String, GenericRecord>(properties)) {
final ProducerRecord<String, GenericRecord> record = new ProducerRecord<String, GenericRecord>(topic, customer);
customer.put("first_name", "Ada");
customer.put("last_name", "Lovelace");
customer.put("full_name", "Ada Lovelace");
producer.send(record);
System.out.println("Sent message");
Thread.sleep(1000L);

customer.put("first_name", "Sue");
customer.put("last_name", "Black");
customer.put("full_name", "Sue Black");
producer.send(record);
System.out.println("Sent message");
Thread.sleep(1000L);

customer.put("first_name", "Anita");
customer.put("last_name", "Borg");
customer.put("full_name", "Anita Borg");
producer.send(record);
System.out.println("Sent message");
Thread.sleep(1000L);

customer.put("first_name", "Grace");
customer.put("last_name", "Hopper");
customer.put("full_name", "Grace Hopper");
producer.send(record);
System.out.println("Sent message");
Thread.sleep(1000L);

customer.put("first_name", "Neha");
customer.put("last_name", "Narkhede");
customer.put("full_name", "Neha Narkhede");
producer.send(record);
System.out.println("Sent message");
Thread.sleep(1000L);
producer.flush();
System.out.println("Successfully produced 5 messages to a topic called " + topic);
} catch (final InterruptedException | SerializationException e) {
e.printStackTrace();
}
}
}

Use the following Apache Kafka consumer code to look up the schema information while consuming from a topic to learn the schema details:

package com.amazon.gsrkafka;
import org.apache.kafka.clients.consumer.KafkaConsumer;
import org.apache.kafka.clients.consumer.ConsumerRecords;
import org.apache.kafka.clients.consumer.ConsumerConfig;
import org.apache.kafka.clients.consumer.ConsumerRecord;
import org.apache.kafka.common.serialization.StringDeserializer;
import com.amazonaws.services.schemaregistry.deserializers.avro.AWSKafkaAvroDeserializer;
import com.amazonaws.services.schemaregistry.deserializers.avro.AWSAvroDeserializer;
import com.amazonaws.services.schemaregistry.utils.AvroRecordType;
import com.amazonaws.services.schemaregistry.utils.AWSSchemaRegistryConstants;
import org.apache.kafka.common.errors.SerializationException;
import org.apache.avro.generic.GenericData;
import org.apache.avro.generic.GenericRecord;
import java.util.Collections;
import java.util.Properties;
import java.io.IOException;
import java.io.FileInputStream;
import java.io.InputStream;
import java.io.File;


public class gsrkafka {
private static final Properties properties = new Properties();
private static final String topic = "test";
public static void main(final String[] args) throws IOException {
// Set the default synchronous HTTP client to UrlConnectionHttpClient
System.setProperty("software.amazon.awssdk.http.service.impl", "software.amazon.awssdk.http.urlconnection.UrlConnectionSdkHttpService");
properties.put(ConsumerConfig.BOOTSTRAP_SERVERS_CONFIG, "localhost:9092");
properties.put(ConsumerConfig.GROUP_ID_CONFIG, "gsr-client");
properties.put(ConsumerConfig.AUTO_OFFSET_RESET_CONFIG, "earliest");
properties.put(ConsumerConfig.KEY_DESERIALIZER_CLASS_CONFIG, AWSKafkaAvroDeserializer.class.getName());
properties.put(ConsumerConfig.VALUE_DESERIALIZER_CLASS_CONFIG, AWSKafkaAvroDeserializer.class.getName());
properties.put(AWSSchemaRegistryConstants.AWS_REGION, "us-east-2");
properties.put(AWSSchemaRegistryConstants.REGISTRY_NAME, "liko-schema-registry");
properties.put(AWSSchemaRegistryConstants.AVRO_RECORD_TYPE, AvroRecordType.GENERIC_RECORD.getName());

try (final KafkaConsumer<String, GenericRecord> consumer = new KafkaConsumer<String, GenericRecord>(properties)) {
consumer.subscribe(Collections.singletonList(topic));
while (true) {
final ConsumerRecords<String, GenericRecord> records = consumer.poll(1000);
for (final ConsumerRecord<String, GenericRecord> record : records) {
final GenericRecord value = record.value();
System.out.println("Received message: value = " + value);
}
			}
} catch (final SerializationException e) {
e.printStackTrace();
}
}
}

Using AWS Glue Schema Registry with Kinesis Data Streams

You can use the following Kinesis Producer Library (KPL) code to publish messages in Apache Avro format to a Kinesis data stream with the preceding schema:

private static final String SCHEMA_DEFINITION = "{"namespace": "Customer.avro",\n"
+ " "type": "record",\n"
+ " "name": "Customer",\n"
+ " "fields": [\n"
+ " {"name": "first_name", "type": "string"},\n"
+ " {"name": "last_name", "type": "string"}\n"
+ " ]\n"
+ "}";

KinesisProducerConfiguration config = new KinesisProducerConfiguration();
config.setRegion("us-west-1")

//[Optional] configuration for Schema Registry.

GlueSchemaRegistryConfiguration schemaRegistryConfig = 
new GlueSchemaRegistryConfiguration("us-west-1");

schemaRegistryConfig.setCompression(true);

config.setGlueSchemaRegistryConfiguration(schemaRegistryConfig);

///Optional configuration ends.

final KinesisProducer producer = 
new KinesisProducer(config);

final ByteBuffer data = getDataToSend();

com.amazonaws.services.schemaregistry.common.Schema gsrSchema = 
new Schema(SCHEMA_DEFINITION, DataFormat.AVRO.toString(), "demoSchema");

ListenableFuture<UserRecordResult> f = producer.addUserRecord(
config.getStreamName(), TIMESTAMP, Utils.randomExplicitHashKey(), data, gsrSchema);

private static ByteBuffer getDataToSend() {
org.apache.avro.Schema avroSchema = 
new org.apache.avro.Schema.Parser().parse(SCHEMA_DEFINITION);

GenericRecord user = new GenericData.Record(avroSchema);
user.put("name", "Emily");
user.put("favorite_number", 32);
user.put("favorite_color", "green");

ByteArrayOutputStream outBytes = new ByteArrayOutputStream();
Encoder encoder = EncoderFactory.get().directBinaryEncoder(outBytes, null);
new GenericDatumWriter<>(avroSchema).write(user, encoder);
encoder.flush();
return ByteBuffer.wrap(outBytes.toByteArray());
}

On the consumer side, you can use the Kinesis Client Library (KCL) (v2.3 or later) to look up schema information while retrieving messages from a Kinesis data stream:

GlueSchemaRegistryConfiguration schemaRegistryConfig = 
new GlueSchemaRegistryConfiguration(this.region.toString());

 GlueSchemaRegistryDeserializer glueSchemaRegistryDeserializer = 
new GlueSchemaRegistryDeserializerImpl(DefaultCredentialsProvider.builder().build(), schemaRegistryConfig);

 RetrievalConfig retrievalConfig = configsBuilder.retrievalConfig().retrievalSpecificConfig(new PollingConfig(streamName, kinesisClient));
 retrievalConfig.glueSchemaRegistryDeserializer(glueSchemaRegistryDeserializer);
 
Scheduler scheduler = new Scheduler(
configsBuilder.checkpointConfig(),
configsBuilder.coordinatorConfig(),
configsBuilder.leaseManagementConfig(),
configsBuilder.lifecycleConfig(),
configsBuilder.metricsConfig(),
configsBuilder.processorConfig(),
retrievalConfig
);

 public void processRecords(ProcessRecordsInput processRecordsInput) {
MDC.put(SHARD_ID_MDC_KEY, shardId);
try {
log.info("Processing {} record(s)", 
processRecordsInput.records().size());
processRecordsInput.records()
.forEach(
r -> 
log.info("Processed record pk: {} -- Seq: {} : data {} with schema: {}", 
r.partitionKey(), r.sequenceNumber(), recordToAvroObj(r).toString(), r.getSchema()));
} catch (Throwable t) {
log.error("Caught throwable while processing records. Aborting.");
Runtime.getRuntime().halt(1);
} finally {
MDC.remove(SHARD_ID_MDC_KEY);
}
 }
 
 private GenericRecord recordToAvroObj(KinesisClientRecord r) {
byte[] data = new byte[r.data().remaining()];
r.data().get(data, 0, data.length);
org.apache.avro.Schema schema = new org.apache.avro.Schema.Parser().parse(r.schema().getSchemaDefinition());
DatumReader datumReader = new GenericDatumReader<>(schema);

BinaryDecoder binaryDecoder = DecoderFactory.get().binaryDecoder(data, 0, data.length, null);
return (GenericRecord) datumReader.read(null, binaryDecoder);
 }

Example of schema evolution

As a producer, let’s say you want to add an additional field to our schema:

{
 "namespace": "Customer.avro",
 "type": "record",
 "name": "Customer",
 "fields": [
 {"name": "first_name", "type": "string"},
 {"name": "last_name", "type": "string"},
 {"name": "full_name", "type": ["string", “null”], “default”: null}
]
}

Regardless of whether you’re following the Apache Kafka or Kinesis Data Streams example, you can use the previously provided producer code to publish new messages using this new schema version with the full_name field. This is simply a concatenation of first_name and last_name.

This schema change added an optional field (full_name), which is indicated by the type field having an option of null in addition to string with a default of null. In adding this optional field, we’ve created a schema evolution. This qualifies as a FORWARD compatible change because the producer has modified the schema and the consumer can read without updating its version of the schema. It’s a good practice to provide a default for a given field. This allows for its eventual removal if necessary. If it’s removed by the producer, the consumer uses the default that it knew for that field from before the removal.

This change is also a BACKWARD compatible change, because if the consumer changes the schema it expects to receive, it can use that default to fill in the value for the field it isn’t receiving. By being both FORWARD and BACKWARD compatible, it is therefore a FULL compatible change. The Glue Schema Registry serializers default to BACKWARD compatible, so we have to add a line declaring it as FULL.

In looking at the full option set, you may find FORWARD_ALL, BACKWARD_ALL, and FULL_ALL. These typically only come into play when you want to change data types for a field whose name you don’t change. The most common observed compatibility mode is BACKWARD, which is why it’s the default.

As a consumer application, however, you don’t want to have to recompile your application to handle the addition of a new field. If you want to reference the customer by full name, that’s your choice in your app instead of being forced to consume the new field and use it. When you consume the new messages you’ve just produced, your application doesn’t crash or have problems, because it’s still using the prior version of the schema, and that schema change is compatible with your application. To experience this in action, run the consumer code in one window and don’t interrupt it. As you run the producer application again, this time with messages following the new schema, you can still see output without issue, thanks to the Glue Schema Registry.

Conclusion

In this post, we discussed the benefits of using the Glue Schema Registry to register, validate, and evolve schemas for data streams as business needs change. We also provided examples of how to use Glue Schema Registry with Apache Kafka and Kinesis Data Streams.

For more information and to get started, see AWS Glue Schema Registry.


About the Authors

Brian Likosar is a Senior Streaming Specialist Solutions Architect at Amazon Web Services. Brian loves helping customers capture value from real-time streaming architectures, because he knows life doesn’t happen in batch. He’s a big fan of open-source collaboration, theme parks, and live music.



Larry Heathcote is a Senior Product Marketing Manager at Amazon Web Services for data streaming and analytics. Larry is passionate about seeing the results of data-driven insights on business outcomes. He enjoys walking his Samoyed Sasha in the mornings so she can look for squirrels to bark at.


Using self-hosted Apache Kafka as an event source for AWS Lambda

Post Syndicated from James Beswick original https://aws.amazon.com/blogs/compute/using-self-hosted-apache-kafka-as-an-event-source-for-aws-lambda/

Apache Kafka is an open source event streaming platform used to support workloads such as data pipelines and streaming analytics. Apache Kafka is a distributed streaming platform that it is conceptually similar to Amazon Kinesis.

With the launch of Kafka as an event source for Lambda, you can now consume messages from a topic in a Lambda function. This makes it easier to integrate your self-hosted Kafka clusters with downstream serverless workflows.

In this blog post, I explain how to set up an Apache Kafka cluster on Amazon EC2 and configure key elements in the networking configuration. I also show how to create a Lambda function to consume messages from a Kafka topic. Although the process is similar to using Amazon Managed Streaming for Apache Kafka (Amazon MSK) as an event source, there are also some important differences.

Overview

Using Kafka as an event source operates in a similar way to using Amazon SQS or Amazon Kinesis. In all cases, the Lambda service internally polls for new records or messages from the event source, and then synchronously invokes the target Lambda function. Lambda reads the messages in batches and provides the message batches to your function in the event payload.

Lambda is a consumer application for your Kafka topic. It processes records from one or more partitions and sends the payload to the target function. Lambda continues to process batches until there are no more messages in the topic.

Configuring networking for self-hosted Kafka

It’s best practice to deploy the Amazon EC2 instances running Kafka in private subnets. For the Lambda function to poll the Kafka instances, you must ensure that there is a NAT Gateway running in the public subnet of each Region.

It’s possible to route the traffic to a single NAT Gateway in one AZ for test and development workloads. For redundancy in production workloads, it’s recommended that there is one NAT Gateway available in each Availability Zone. This walkthrough creates the following architecture:

Self-hosted Kafka architecture

  1. Deploy a VPC with public and private subnets and a NAT Gateway that enables internet access. To configure this infrastructure with AWS CloudFormation, deploy this template.
  2. From the VPC console, edit the default security group created by this template to provide inbound access to the following ports:
    • Custom TCP: ports 2888–3888 from all sources.
    • SSH (port 22), restricted to your own IP address.
    • Custom TCP: port 2181 from all sources.
    • Custom TCP: port 9092 from all sources.
    • All traffic from the same security group identifier.

Security Group configuration

Deploying the EC2 instances and installing Kafka

Next, you deploy the EC2 instances using this network configuration and install the Kafka application:

  1. From the EC2 console, deploy an instance running Ubuntu Server 18.04 LTS. Ensure that there is one instance in each private subnet, in different Availability Zones. Assign the default security group configured by the template.
  2. Next, deploy another EC2 instance in either of the public subnets. This is a bastion host used to access the private instances. Assign the default security group configured by the template.EC2 instances
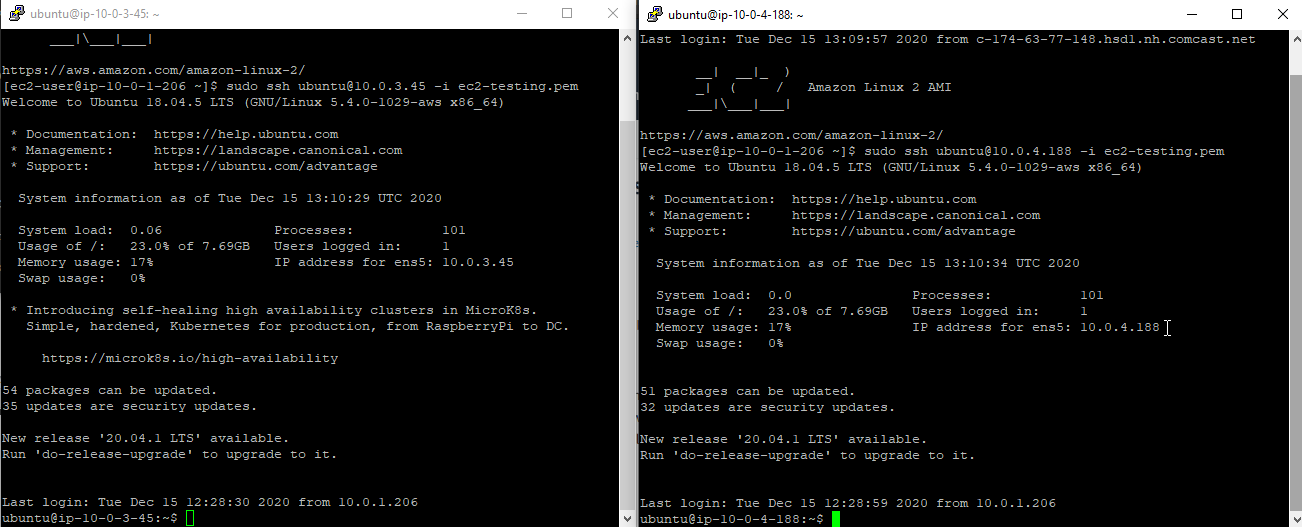
  3. Connect to the bastion host, then SSH to the first private EC2 instance using the method for your preferred operating system. This post explains different methods. Repeat the process in another terminal for the second private instance.EC2 terminals
  4. On each instance, install Java:
    sudo add-apt-repository ppa:webupd8team/java
    sudo apt update
    sudo apt install openjdk-8-jdk
    java –version
  5. On each instance, install Kafka:
    wget http://www-us.apache.org/dist/kafka/2.3.1/kafka_2.12-2.3.1.tgz
    tar xzf kafka_2.12-2.3.1.tgz
    ln -s kafka_2.12-2.3.1 kafka

Configure and start Zookeeper

Configure and start the Zookeeper service that manages the Kafka brokers:

  1. On the first instance, configure the Zookeeper ID:
    cd kafka
    mkdir /tmp/zookeeper
    touch /tmp/zookeeper/myid
    echo "1" >> /tmp/zookeeper/myid
  2. Repeat the process on the second instance, using a different ID value:
    cd kafka
    mkdir /tmp/zookeeper
    touch /tmp/zookeeper/myid
    echo "2" >> /tmp/zookeeper/myid
  3. On the first instance, edit the config/zookeeper.properties file, adding the private IP address of the second instance:
    initLimit=5
    syncLimit=2
    tickTime=2000
    # list of servers: <ip>:2888:3888
    server.1=0.0.0.0:2888:3888 
    server.2=<<IP address of second instance>>:2888:3888
    
  4. On the second instance, edit the config/zookeeper.properties file, adding the private IP address of the first instance:
    initLimit=5
    syncLimit=2
    tickTime=2000
    # list of servers: <ip>:2888:3888
    server.1=<<IP address of first instance>>:2888:3888 
    server.2=0.0.0.0:2888:3888
  5. On each instance, start Zookeeper:bin/zookeeper-server-start.sh config/zookeeper.properties

Configure and start Kafka

Configure and start the Kafka broker:

  1. On the first instance, edit the config/server.properties file:
    broker.id=1
    zookeeper.connect=0.0.0.0:2181, =<<IP address of second instance>>:2181
  2. On the second instance, edit the config/server.properties file:
    broker.id=2
    zookeeper.connect=0.0.0.0:2181, =<<IP address of first instance>>:2181
  3. Start Kafka on each instance:
    bin/kafka-server-start.sh config/server.properties

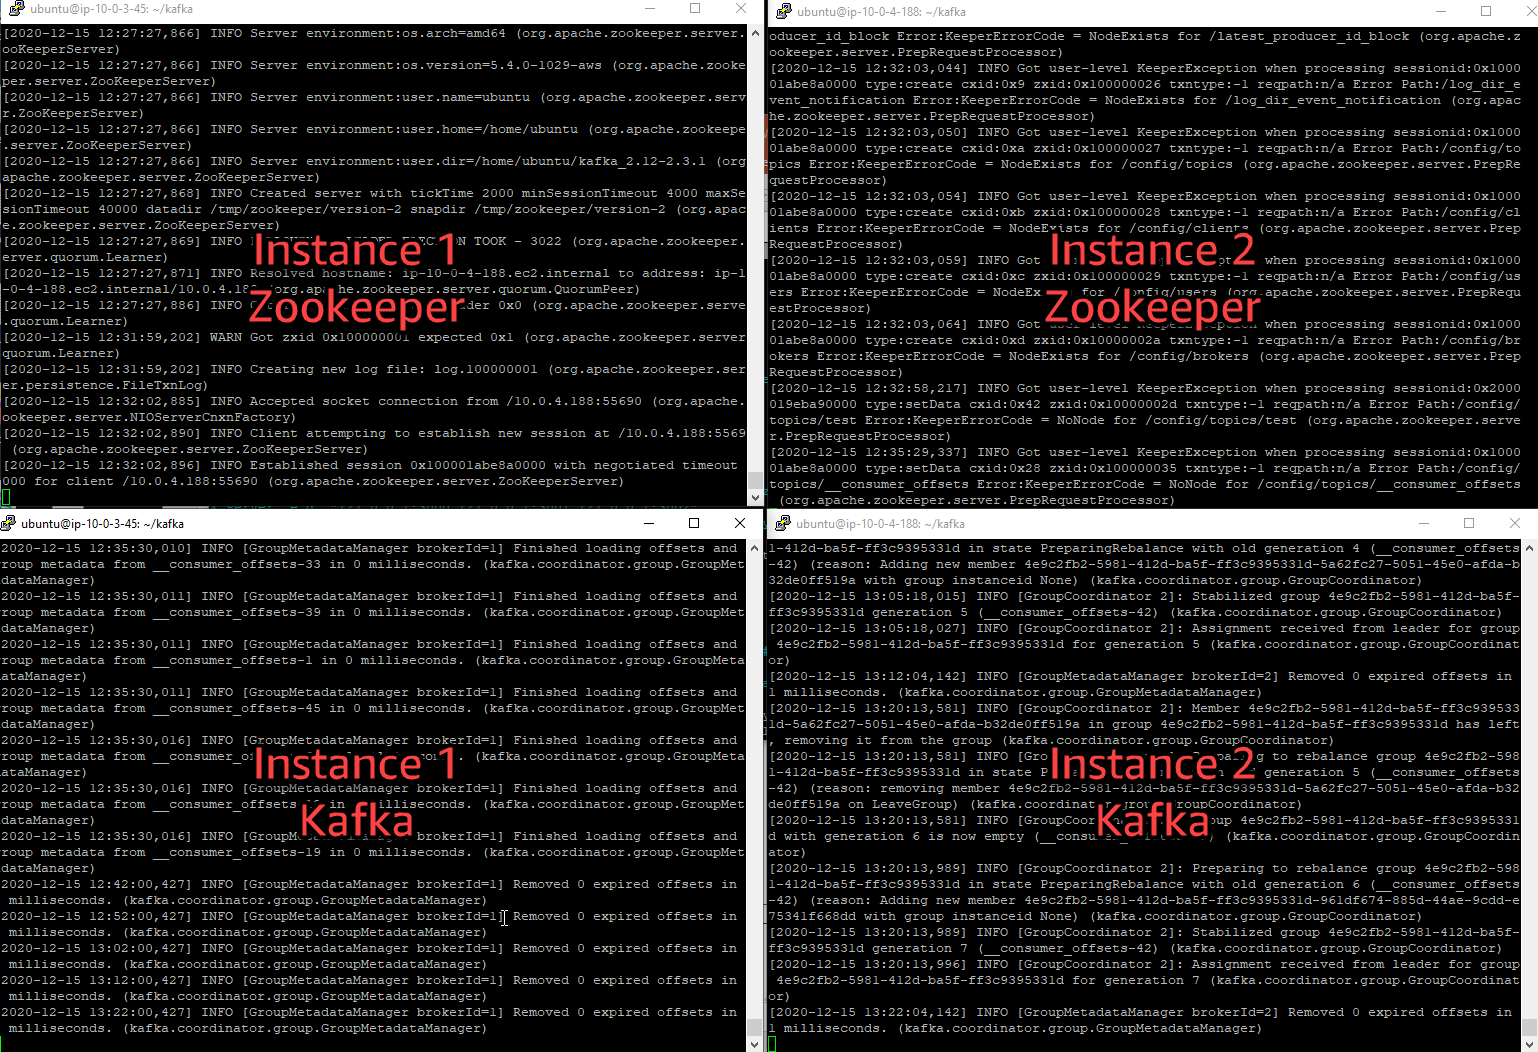
At the end of this process, Zookeeper and Kafka are running on both instances. If you use separate terminals, it looks like this:

Zookeeper and Kafka terminals

Configuring and publishing to a topic

Kafka organizes channels of messages around topics, which are virtual groups of one or many partitions across Kafka brokers in a cluster. Multiple producers can send messages to Kafka topics, which can then be routed to and processed by multiple consumers. Producers publish to the tail of a topic and consumers read the topic at their own pace.

From either of the two instances:

  1. Create a new topic called test:
    bin/kafka-topics.sh --create --bootstrap-server localhost:9092 --replication-factor 2 --partitions 2 --topic test
  2. Start a producer:
    bin/kafka-console-producer.sh --broker-list localhost:9092 –topic
  3. Enter test messages to check for successful publication:Sending messages to the Kafka topic

At this point, you can successfully publish messages to your self-hosted Kafka cluster. Next, you configure a Lambda function as a consumer for the test topic on this cluster.

Configuring the Lambda function and event source mapping

You can create the Lambda event source mapping using the AWS CLI or AWS SDK, which provide the CreateEventSourceMapping API. In this walkthrough, you use the AWS Management Console to create the event source mapping.

Create a Lambda function that uses the self-hosted cluster and topic as an event source:

  1. From the Lambda console, select Create function.
  2. Enter a function name, and select Node.js 12.x as the runtime.
  3. Select the Permissions tab, and select the role name in the Execution role panel to open the IAM console.
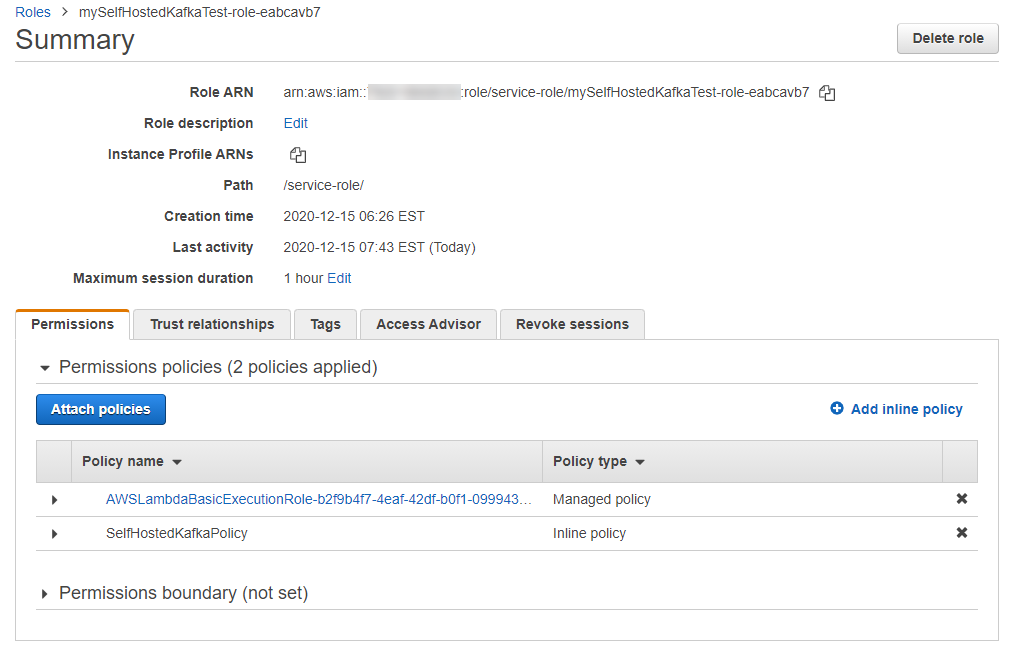
  4. Choose Add inline policy and create a new policy called SelfHostedKafkaPolicy with the following permissions. Replace the resource example with the ARNs of your instances:
    {
        "Version": "2012-10-17",
        "Statement": [
            {
                "Effect": "Allow",
                "Action": [
                    "ec2:CreateNetworkInterface",
                    "ec2:DescribeNetworkInterfaces",
                    "ec2:DescribeVpcs",
                    "ec2:DeleteNetworkInterface",
                    "ec2:DescribeSubnets",
                    "ec2:DescribeSecurityGroups",
                    "logs:CreateLogGroup",
                    "logs:CreateLogStream",
                    "logs:PutLogEvents"
                ],
                "Resource": " arn:aws:ec2:<REGION>:<ACCOUNT_ID>:instance/<instance-id>"
            }
        ]
    }
    

    Create policy

  5. Choose Create policy and ensure that the policy appears in Permissions policies.IAM role page
  6. Back in the Lambda function, select the Configuration tab. In the Designer panel, choose Add trigger.
  7. In the dropdown, select Apache Kafka:
    • For Bootstrap servers, add each of the two instances private IPv4 DNS addresses with port 9092 appended.
    • For Topic name, enter ‘test’.
    • Enter your preferred batch size and starting position values (see this documentation for more information).
    • For VPC, select the VPC created by the template.
    • For VPC subnets, select the two private subnets.
    • For VPC security groups, select the default security group.
    • Choose Add.

Add trigger configuration

The trigger’s status changes to Enabled in the Lambda console after a few seconds. It then takes several minutes for the trigger to receive messages from the Kafka cluster.

Testing the Lambda function

At this point, you have created a VPC with two private and public subnets and a NAT Gateway. You have created a Kafka cluster on two EC2 instances in private subnets. You set up a target Lambda function with the necessary IAM permissions. Next, you publish messages to the test topic in Kafka and see the resulting invocation in the logs for the Lambda function.

  1. In the Function code panel, replace the contents of index.js with the following code and choose Deploy:
    exports.handler = async (event) => {
        // Iterate through keys
        for (let key in event.records) {
          console.log('Key: ', key)
          // Iterate through records
          event.records[key].map((record) => {
            console.log('Record: ', record)
            // Decode base64
            const msg = Buffer.from(record.value, 'base64').toString()
            console.log('Message:', msg)
          }) 
        }
    }
  2. Back in the terminal with the producer script running, enter a test message:Send test message in Kafka
  3. In the Lambda function console, select the Monitoring tab then choose View logs in CloudWatch. In the latest log stream, you see the original event and the decoded message:Log events output

Using Lambda as event source

The Lambda function target in the event source mapping does not need to be connected to a VPC to receive messages from the private instance hosting Kafka. However, you must provide details of the VPC, subnets, and security groups in the event source mapping for the Kafka cluster.

The Lambda function must have permission to describe VPCs and security groups, and manage elastic network interfaces. These execution roles permissions are:

  • ec2:CreateNetworkInterface
  • ec2:DescribeNetworkInterfaces
  • ec2:DescribeVpcs
  • ec2:DeleteNetworkInterface
  • ec2:DescribeSubnets
  • ec2:DescribeSecurityGroups

The event payload for the Lambda function contains an array of records. Each array item contains details of the topic and Kafka partition identifier, together with a timestamp and base64 encoded message:

Event payload example

There is an important difference in the way the Lambda service connects to the self-hosted Kafka cluster compared with Amazon MSK. MSK encrypts data in transit by default so the broker connection defaults to using TLS. With a self-hosted cluster, TLS authentication is not supported when using the Apache Kafka event source. Instead, if accessing brokers over the internet, the event source uses SASL/SCRAM authentication, which can be configured in the event source mapping:

SASL/SCRAM configuration

To learn how to configure SASL/SCRAM authentication your self-hosted Kafka cluster, see this documentation.

Conclusion

Lambda now supports self-hosted Kafka as an event source so you can invoke Lambda functions from messages in Kafka topics to integrate into other downstream serverless workflows.

This post shows how to configure a self-hosted Kafka cluster on EC2 and set up the network configuration. I also cover how to set up the event source mapping in Lambda and test a function to decode the messages sent from Kafka.

To learn more about how to use this feature, read the documentation. For more serverless learning resource, visit Serverless Land.