Post Syndicated from Nitin Arora original https://aws.amazon.com/blogs/big-data/how-amazon-finance-automation-built-a-data-mesh-to-support-distributed-data-ownership-and-centralize-governance/
Amazon Finance Automation (FinAuto) is the tech organization of Amazon Finance Operations (FinOps). Its mission is to enable FinOps to support the growth and expansion of Amazon businesses. It works as a force multiplier through automation and self-service, while providing accurate and on-time payments and collections. FinAuto has a unique position to look across FinOps and provide solutions that help satisfy multiple use cases with accurate, consistent, and governed delivery of data and related services.
In this post, we discuss how the Amazon Finance Automation team used AWS Lake Formation and the AWS Glue Data Catalog to build a data mesh architecture that simplified data governance at scale and provided seamless data access for analytics, AI, and machine learning (ML) use cases.
Challenges
Amazon businesses have grown over the years. In the early days, financial transactions could be stored and processed on a single relational database. In today’s business world, however, even a subset of the financial space dedicated to entities such as Accounts Payable (AP) and Accounts Receivable (AR) requires separate systems handling terabytes of data per day. Within FinOps, we can curate more than 300 datasets and consume many more raw datasets from dozens of systems. These datasets can then be used to power front end systems, ML pipelines, and data engineering teams.
This exponential growth necessitated a data landscape that was geared towards keeping FinOps operating. However, as we added more transactional systems, data started to grow in operational data stores. Data copies were common, with duplicate pipelines creating redundant and often out-of-sync domain datasets. Multiple curated data assets were available with similar attributes. To resolve these challenges, FinAuto decided to build a data services layer based on a data mesh architecture. FinAuto wanted to verify that the data domain owners would retain ownership of their datasets while users got access to the data by using a data mesh architecture.
Solution overview
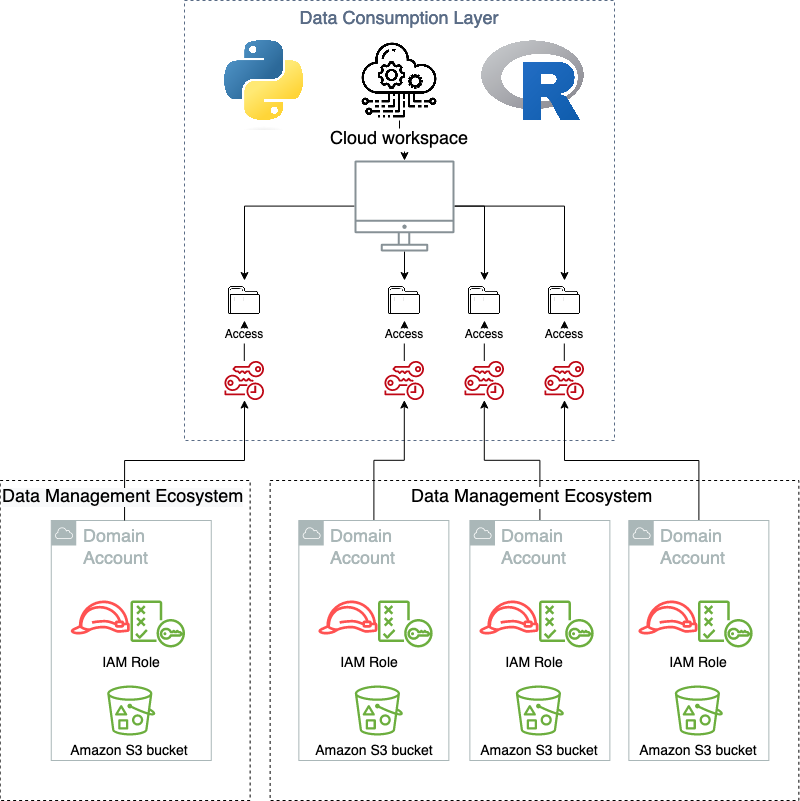
Being customer focused, we started by understanding our data producers’ and consumers’ needs and priorities. Consumers prioritized data discoverability, fast data access, low latency, and high accuracy of data. Producers prioritized ownership, governance, access management, and reuse of their datasets. These inputs reinforced the need of a unified data strategy across the FinOps teams. We decided to build a scalable data management product that is based on the best practices of modern data architecture. Our source system and domain teams were mapped as data producers, and they would have ownership of the datasets. FinAuto provided the data services’ tools and controls necessary to enable data owners to apply data classification, access permissions, and usage policies. It was necessary for domain owners to continue this responsibility because they had visibility to the business rules or classifications and applied that to the dataset. This enabled producers to publish data products that were curated and authoritative assets for their domain. For example, the AR team created and governed their cash application dataset in their AWS account AWS Glue Data Catalog.
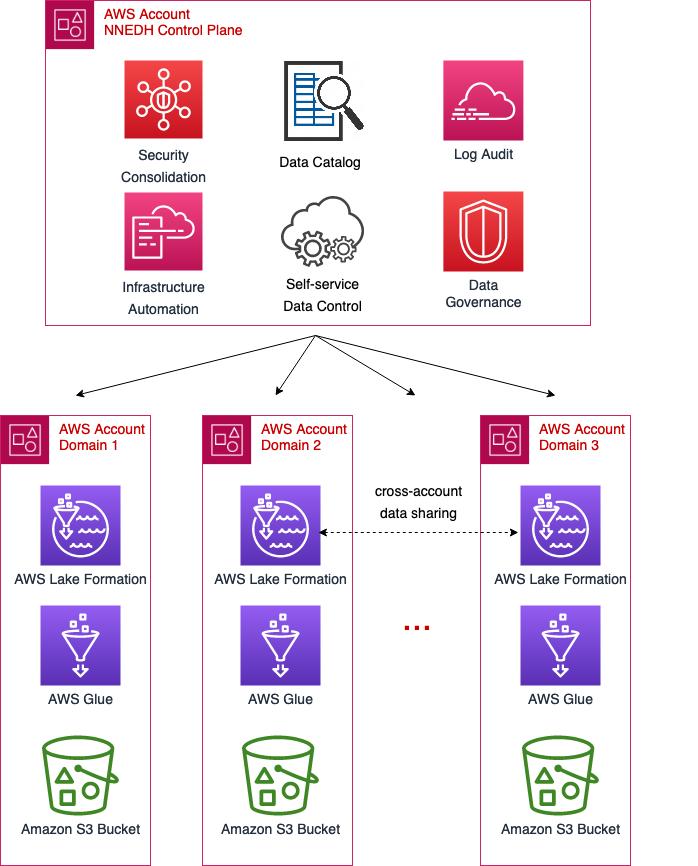
With many such partners building their data products, we needed a way to centralize data discovery, access management, and vending of these data products. So we built a global data catalog in a central governance account based on the AWS Glue Data Catalog. The FinAuto team built AWS Cloud Development Kit (AWS CDK), AWS CloudFormation, and API tools to maintain a metadata store that ingests from domain owner catalogs into the global catalog. This global catalog captures new or updated partitions from the data producer AWS Glue Data Catalogs. The global catalog is also periodically fully refreshed to resolve issues during metadata sync processes to maintain resiliency. With this structure in place, we then needed to add governance and access management. We selected AWS Lake Formation in our central governance account to help secure the data catalog, and added secure vending mechanisms around it. We also built a front-end discovery and access control application where consumers can browse datasets and request access. When a consumer requests access, the application validates the request and routes them to a respective producer via internal tickets for approval. Only after the data producer approves the request are permissions provisioned in the central governance account through Lake Formation.
Solution tenets
A data mesh architecture has its own advantages and challenges. By democratizing the data product creation, we removed dependencies on a central team. We made reuse of data possible with data discoverability and minimized data duplicates. This also helped remove data movement pipelines, thereby reducing data transfer and maintenance costs.
We realized, however, that our implementation could potentially impact day-to-day tasks and inhibit adoption. For example, data producers need to onboard their dataset to the global catalog, and complete their permissions management before they can share that with consumers. To overcome this obstacle, we prioritized self-service tools and automation with a reliable and simple-to-use interface. We made interaction, including producer-consumer onboarding, data access request, approvals, and governance, quicker through the self-service tools in our application.
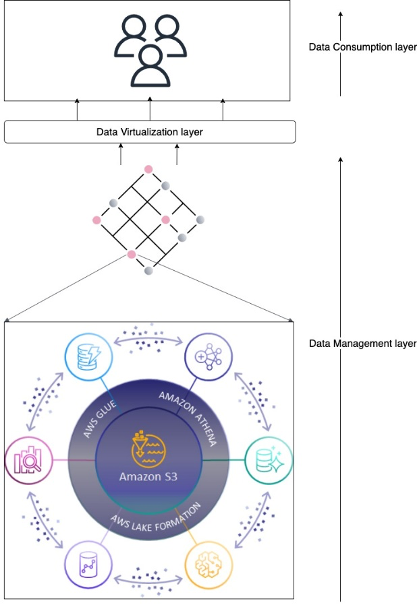
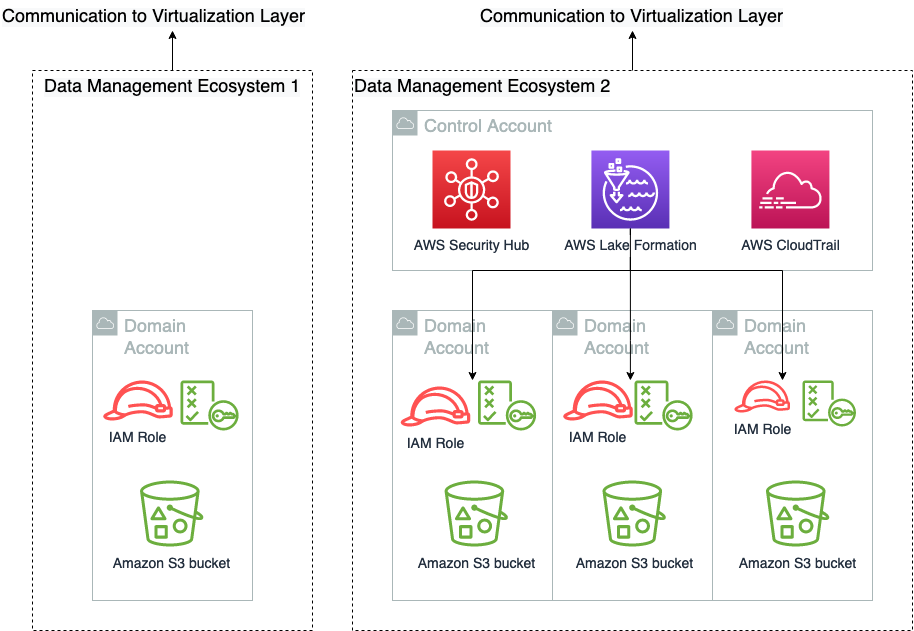
Solution architecture
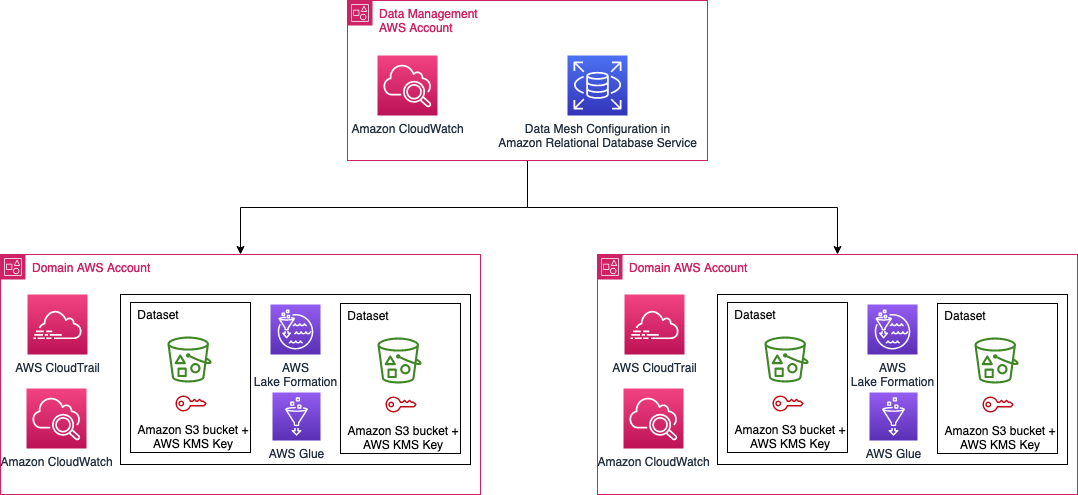
Within Amazon, we isolate different teams and business processes with separate AWS accounts. From a security perspective, the account boundary is one of the strongest security boundaries in AWS. Because of this, the global catalog resides in its own locked-down AWS account.
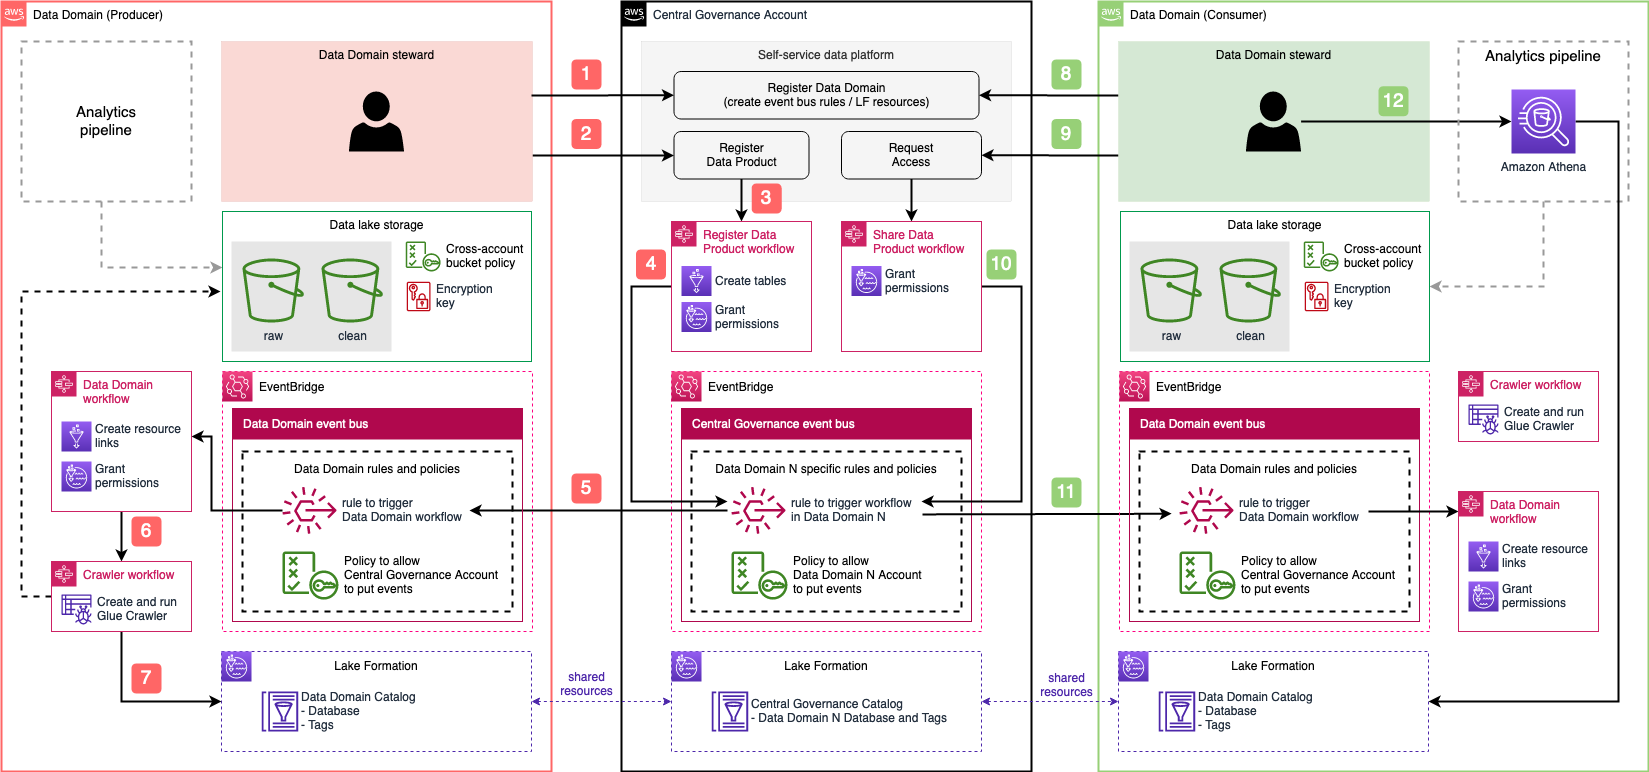
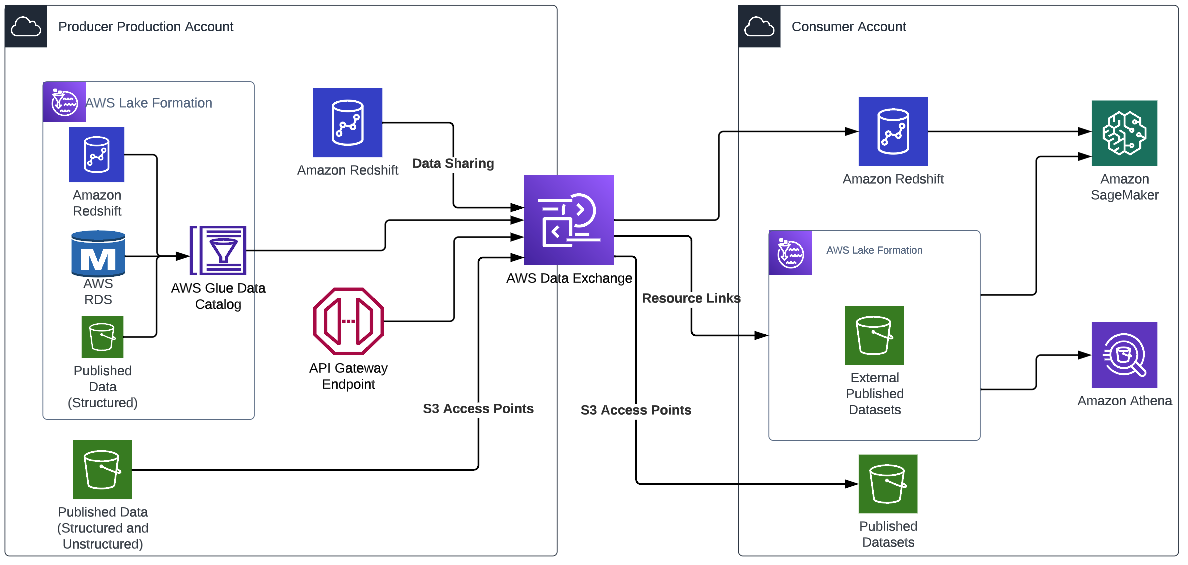
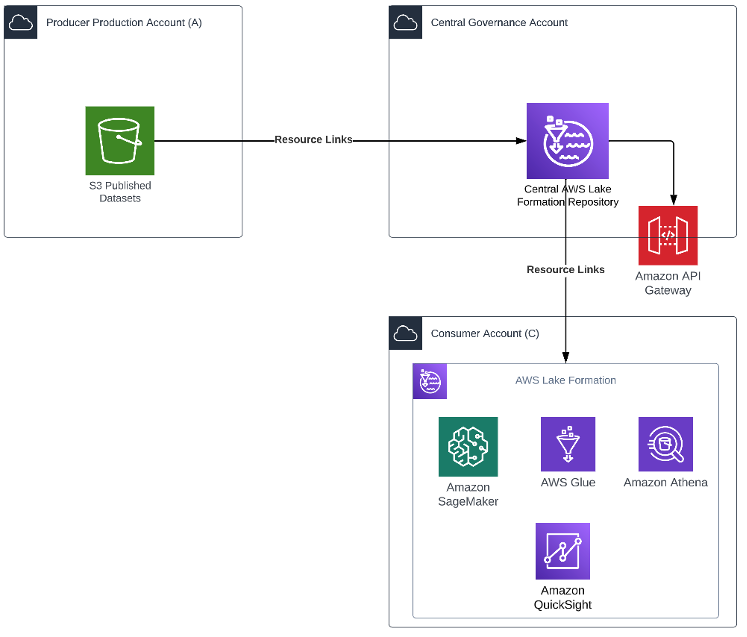
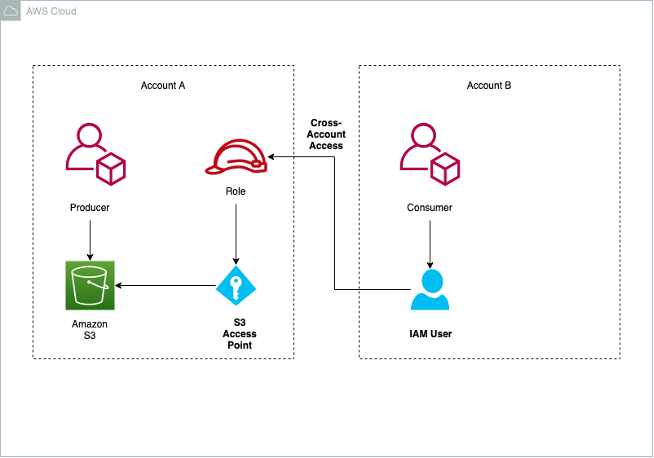
The following diagram shows AWS account boundaries for producers, consumers, and the central catalog. It also describes the steps involved for data producers to register their datasets as well as how data consumers get access. Most of these steps are automated through convenience scripts with both AWS CDK and CloudFormation templates for our producers and consumer to use.

The workflow contains the following steps:
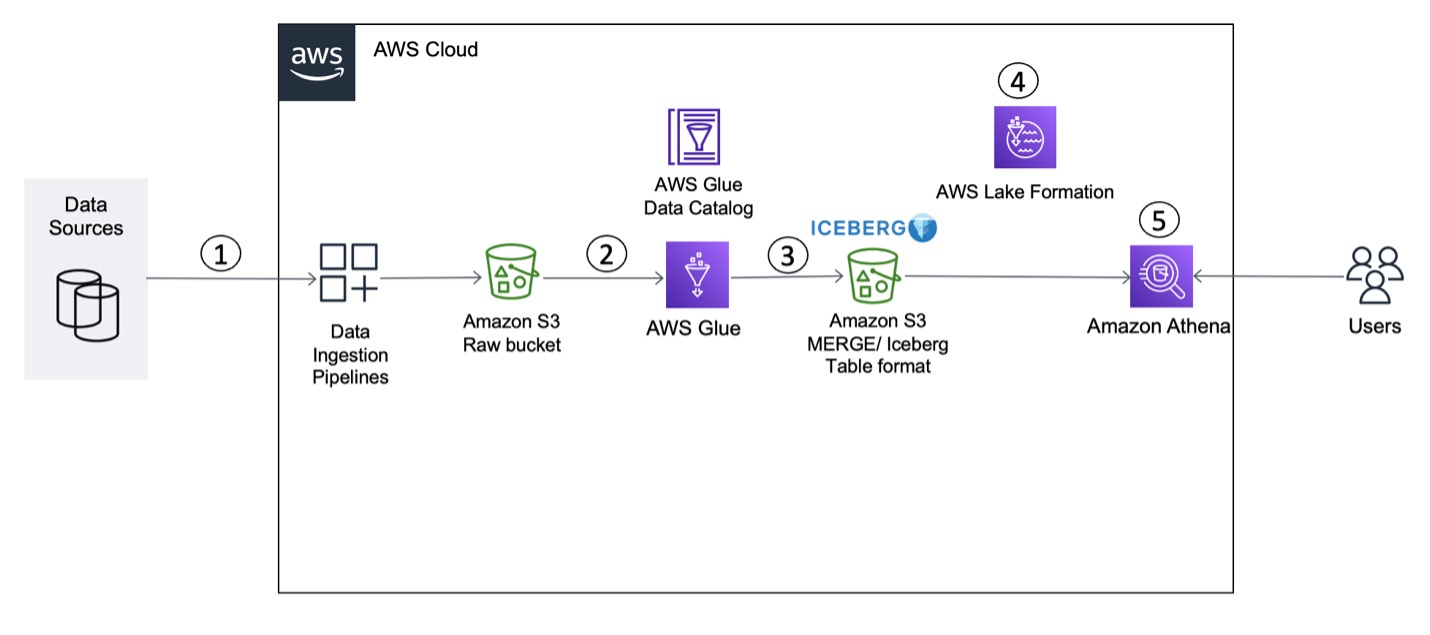
- Data is saved by the producer in their own Amazon Simple Storage Service (Amazon S3) buckets.
- Data source locations hosted by the producer are created within the producer’s AWS Glue Data Catalog.
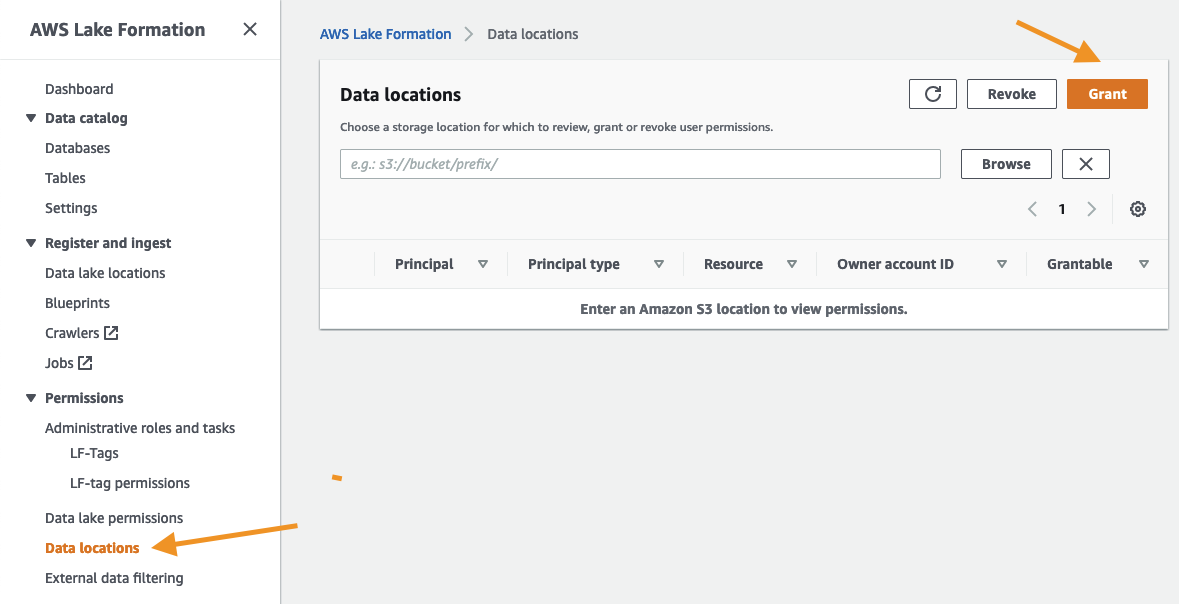
- Data source locations are registered with Lake Formation.
- An onboarding AWS CDK script creates a role for the central catalog to use to read metadata and generate the tables in the global catalog.
- The metadata sync is set up to continuously sync data schema and partition updates to the central data catalog.
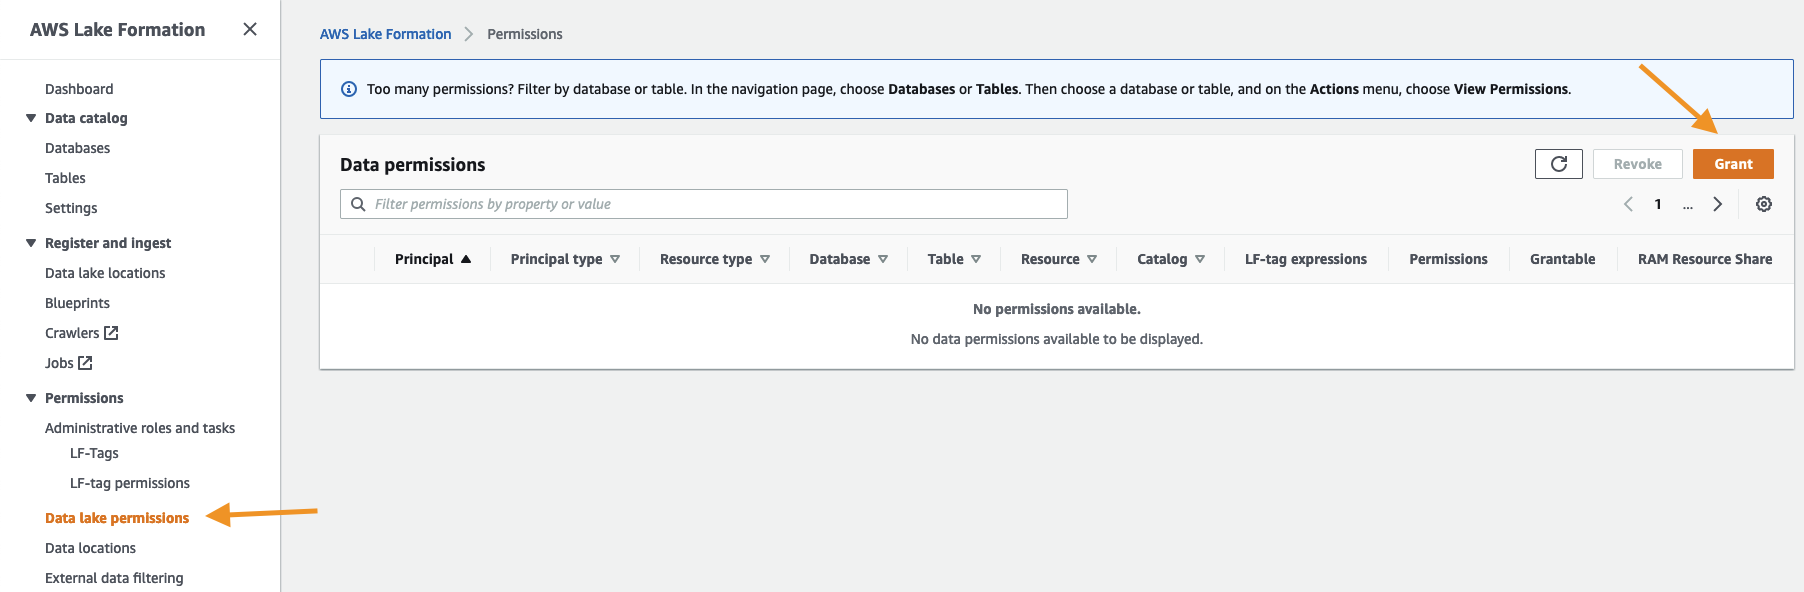
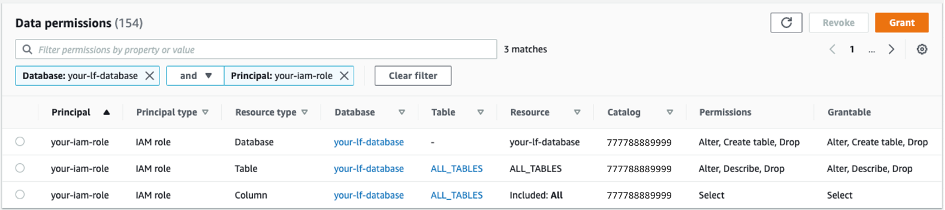
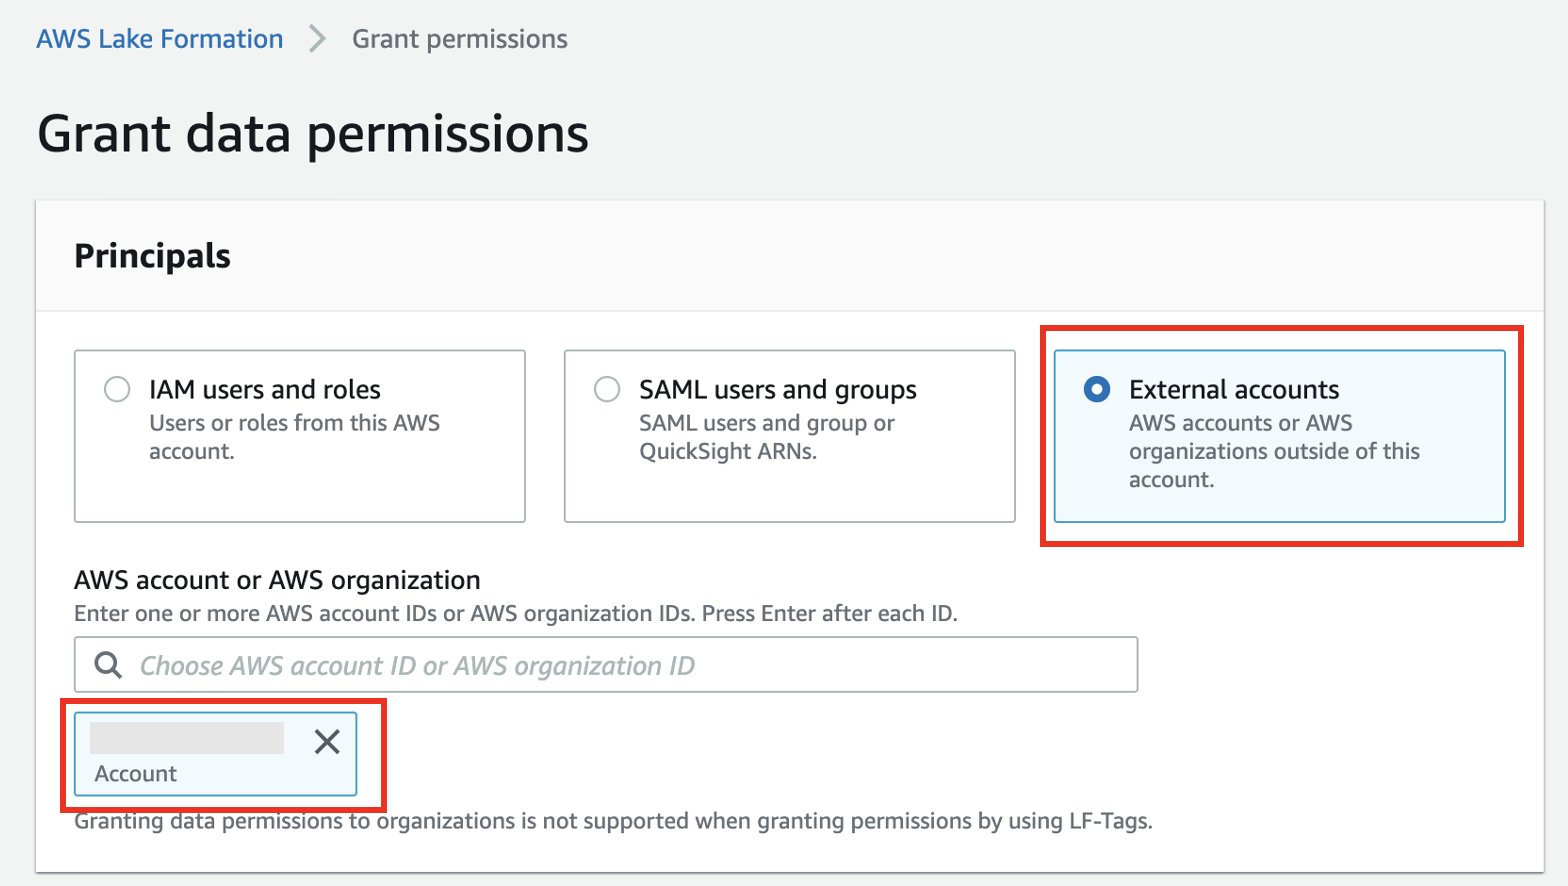
- When a consumer requests table access from the central data catalog, the producer grants Lake Formation permissions to the consumer account AWS Identity and Access Management (IAM) role and tables are visible in the consumer account.
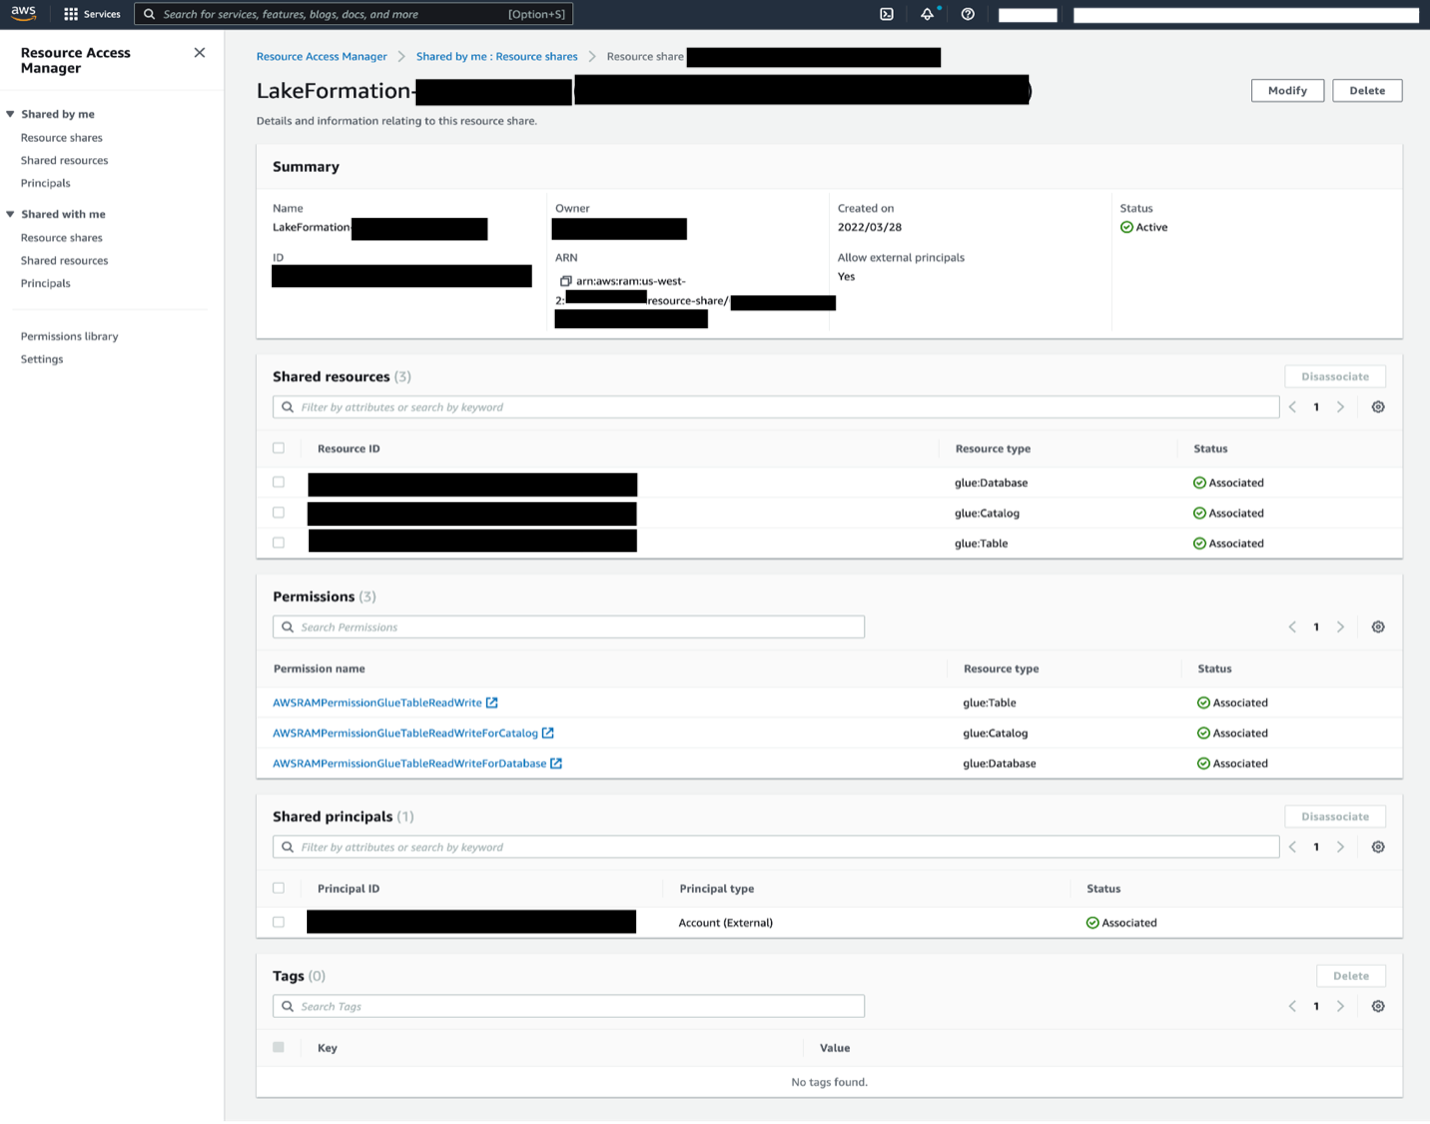
- The consumer account accepts the AWS Resource Access Manager (AWS RAM) share and creates resource links in Lake Formation.
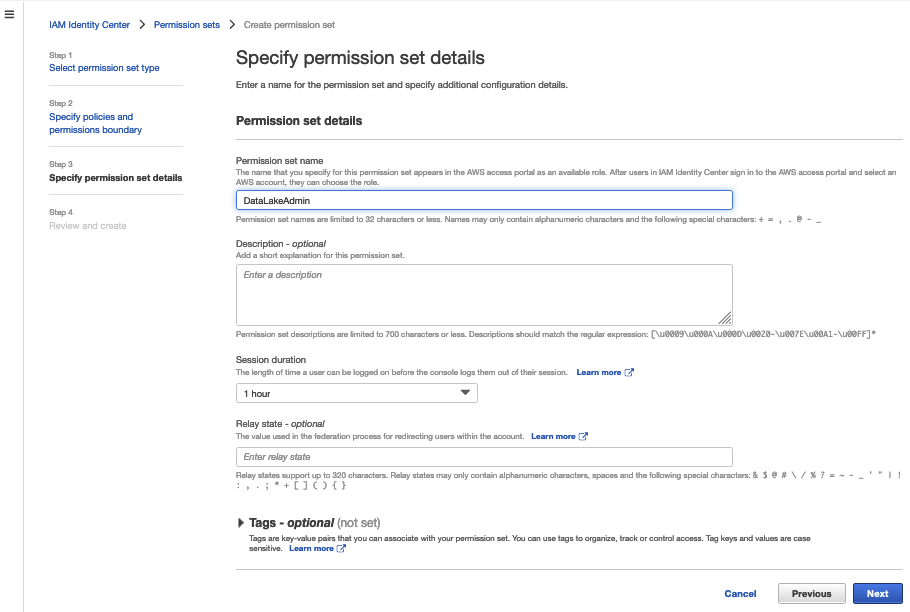
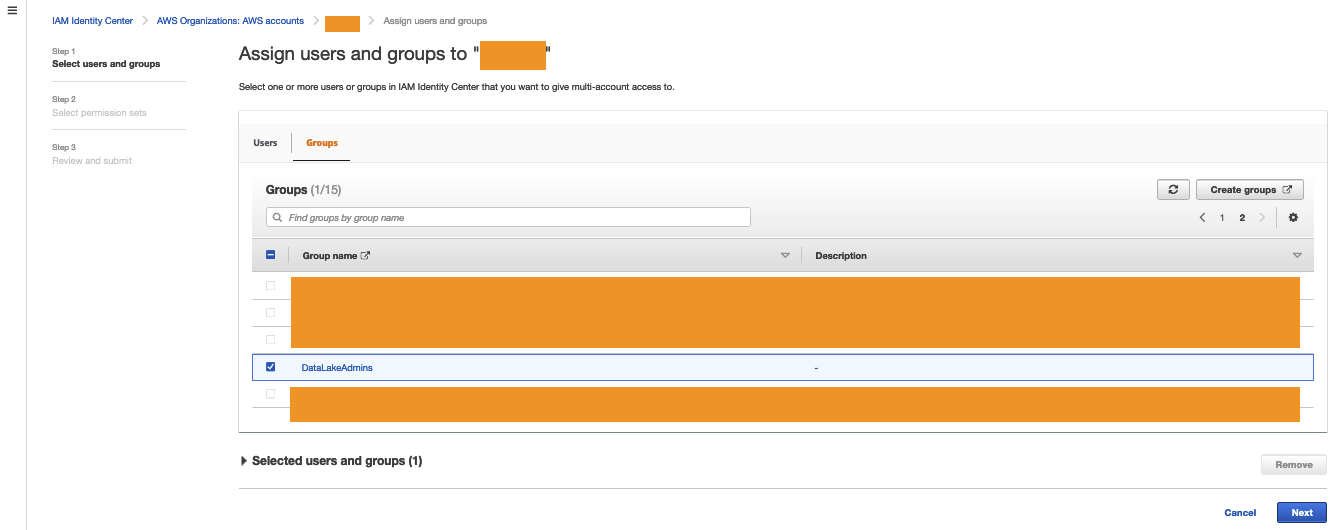
- The consumer data lake admin provides grants to IAM users and roles mapping to data consumers within the account.
The global catalog
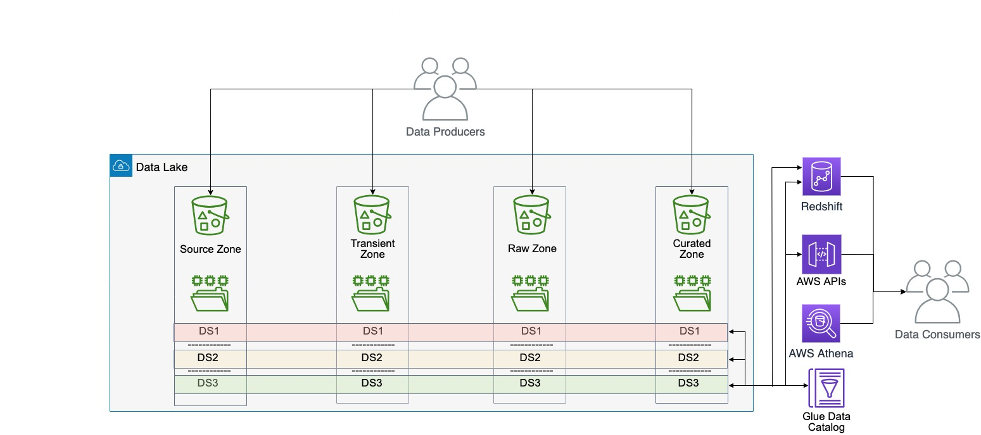
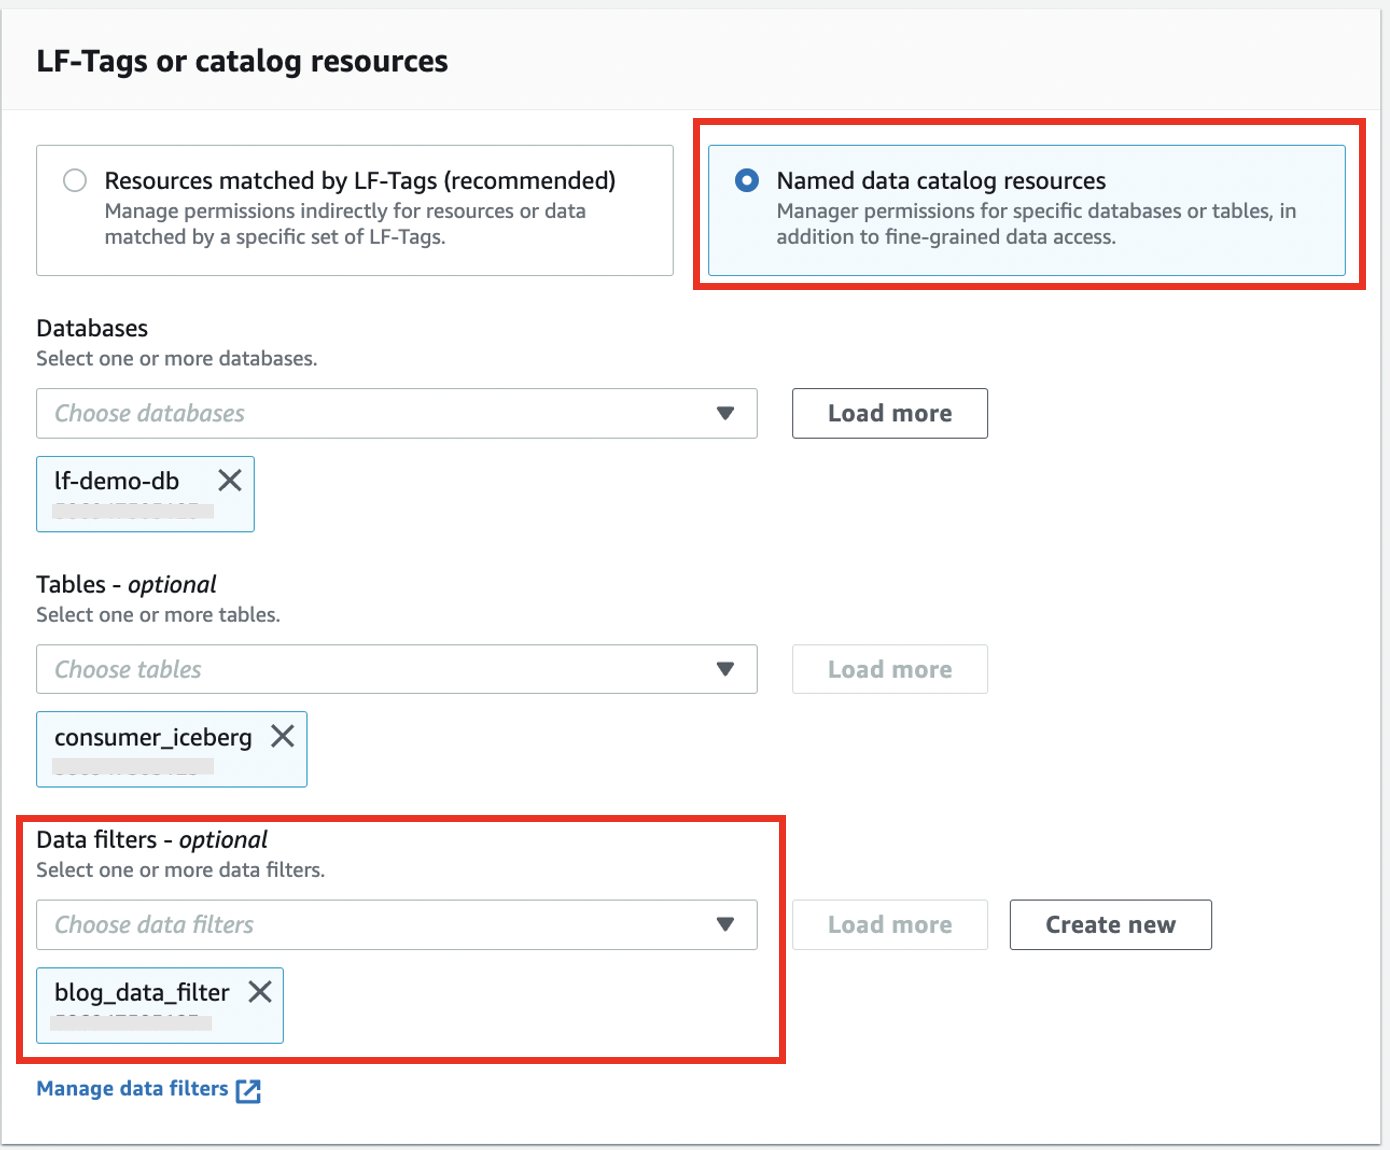
The basic building block of our business-focused solutions are data products. A data product is a single domain attribute that a business understands as accurate, current, and available. This could be a dataset (a table) representing a business attribute like a global AR invoice, invoice aging, aggregated invoices by a line of business, or a current ledger balance. These attributes are calculated by the domain team and are available for consumers who need that attribute, without duplicating pipelines to recreate it. Data products, along with raw datasets, reside within their data owner’s AWS account. Data producers register their data catalog’s metadata to the central catalog. We have services to review source catalogs to identify and recommend classification of sensitive data columns such as name, email address, customer ID, and bank account numbers. Producers can review and accept those recommendations, which results in corresponding tags applied to the columns.
Producer experience
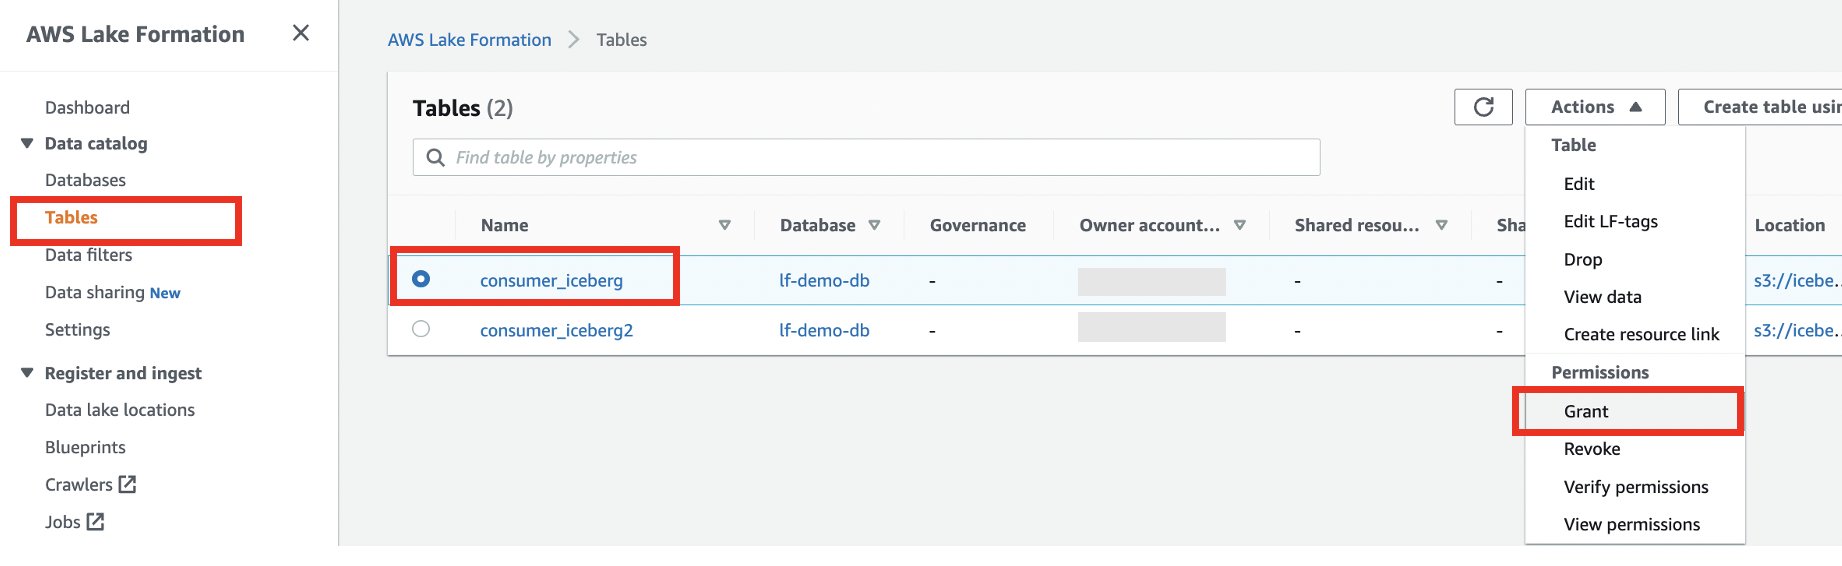
Producers onboard their accounts when they want to publish a data product. Our job is to sync the metadata between the AWS Glue Data Catalog in the producer account with the central catalog account, and register the Amazon S3 data location with Lake Formation. Producers and data owners can use Lake Formation for fine-grained access controls on the table. It is also now searchable and discoverable via the central catalog application.
Consumer experience
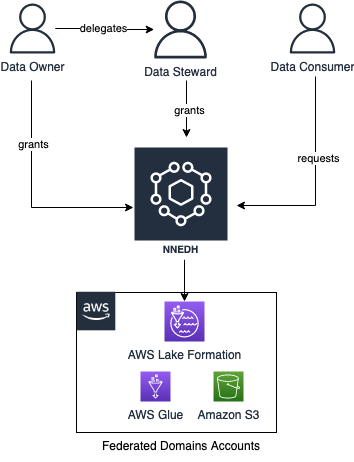
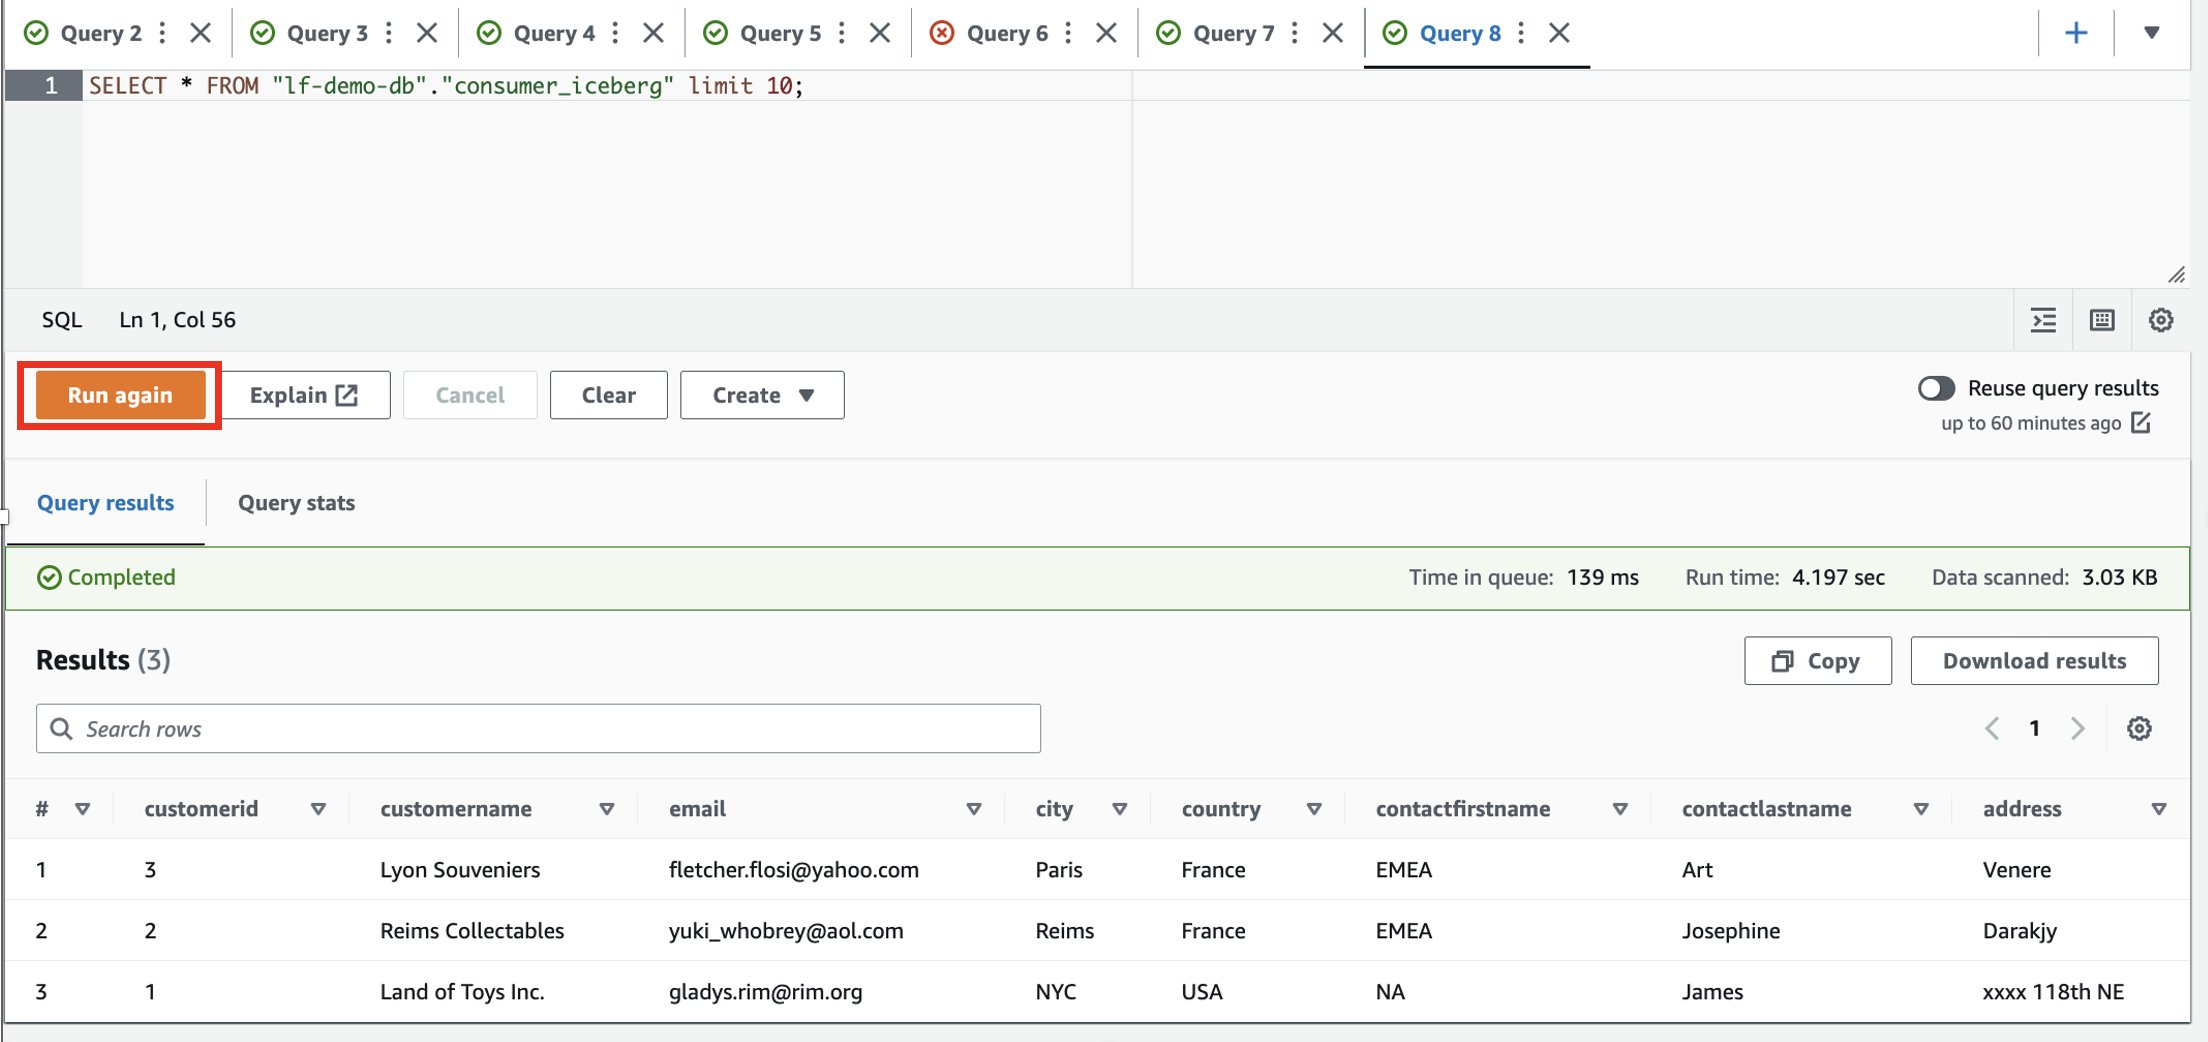
When a data consumer discovers the data product that they’re interested in, they submit a data access request from the application UI. Internally, we route the request to the data owner for the disposition of the request (approval or rejection). We then create an internal ticket to track the request for auditing and traceability. If the data owner approves the request, we run automation to create an AWS RAM resource share to share with the consumer account covering the AWS Glue database and tables approved for access. These consumers can now query the datasets using the AWS analytics services of their choice like Amazon Redshift Spectrum, Amazon Athena, and Amazon EMR.
Operational excellence
Along with building the data mesh, it’s also important to verify that we can operate with efficiency and reliability. We recognize that the metadata sync process is at the heart of this global data catalog. As such, we are hypervigilant of this process and have built alarms, notifications, and dashboards to verify that this process doesn’t fail silently and create a single point of failure for the global data catalog. We also have a backup repair service that syncs the metadata from producer catalogs into the central governance account catalog periodically. This is a self-healing mechanism to maintain reliability and resiliency.
Empowering customers with the data mesh
The FinAuto data mesh hosts around 850 discoverable and shareable datasets from multiple partner accounts. There are more than 300 curated data products to which producers can provide access and apply governance with fine-grained access controls. Our consumers use AWS analytics services such as Redshift Spectrum, Athena, Amazon EMR, and Amazon QuickSight to access their data. This capability with standardized data vending from the data mesh, along with self-serve capabilities, allows you to innovate faster without dependency on technical teams. You can now get access to data faster with automation that continuously improves the process.
By serving the FinOps team’s data needs with high availability and security, we enabled them to effectively support operation and reporting. Data science teams can now use the data mesh for their finance-related AI/ML use cases such as fraud detection, credit risk modeling, and account grouping. Our finance operations analysts are now enabled to dive deep into their customer issues, which is most important to them.
Conclusion
FinOps implemented a data mesh architecture with Lake Formation to improve data governance with fine-grained access controls. With these improvements, the FinOps team is now able to innovate faster with access to the right data at the right time in a self-serve manner to drive business outcomes. The FinOps team will continue to innovate in this space with AWS services to further provide for customer needs.
To learn more about how to use Lake Formation to build a data mesh architecture, see Design a data mesh architecture using AWS Lake Formation and AWS Glue.
About the Authors
 Nitin Arora is a Sr. Software Development Manager for Finance Automation in Amazon. He has over 18 years of experience building business critical, scalable, high-performance software. Nitin leads several data and analytics initiatives within Finance, which includes building Data Mesh. In his spare time, he enjoys listening to music and read.
 Pradeep Misra is a Specialist Solutions Architect at AWS. He works across Amazon to architect and design modern distributed analytics and AI/ML platform solutions. He is passionate about solving customer challenges using data, analytics, and AI/ML. Outside of work, Pradeep likes exploring new places, trying new cuisines, and playing board games with his family. He also likes doing science experiments with his daughters.
 Rajesh Rao is a Sr. Technical Program Manager in Amazon Finance. He works with Data Services teams within Amazon to build and deliver data processing and data analytics solutions for Financial Operations teams. He is passionate about delivering innovative and optimal solutions using AWS to enable data-driven business outcomes for his customers.
 Andrew Long, the lead developer for data mesh, has designed and built many of the big data processing systems that have fueled Amazon’s financial data processing infrastructure. His work encompasses a range of areas, including S3-based table formats for Spark, diverse Spark performance optimizations, distributed orchestration engines and the development of data cataloging systems. Additionally, Andrew finds pleasure in sharing his knowledge of partner acrobatics.
 Kumar Satyen Gaurav, is an experienced Software Development Manager at Amazon, with over 16 years of expertise in big data analytics and software development. He leads a team of engineers to build products and services using AWS big data technologies, for providing key business insights for Amazon Finance Operations across diverse business verticals. Beyond work, he finds joy in reading, traveling and learning strategic challenges of chess.


 Nishchai JM is an Analytics Specialist Solutions Architect at Amazon Web services. He specializes in building Big-data applications and help customer to modernize their applications on Cloud. He thinks Data is new oil and spends most of his time in deriving insights out of the Data.
 Varad Ram is Senior Solutions Architect in Amazon Web Services. He likes to help customers adopt to cloud technologies and is particularly interested in artificial intelligence. He believes deep learning will power future technology growth. In his spare time, he like to be outdoor with his daughter and son.
 Narendra Gupta is a Specialist Solutions Architect at AWS, helping customers on their cloud journey with a focus on AWS analytics services. Outside of work, Narendra enjoys learning new technologies, watching movies, and visiting new places
 Arun A K is a Big Data Solutions Architect with AWS. He works with customers to provide architectural guidance for running analytics solutions on the cloud. In his free time, Arun loves to enjoy quality time with his family


 Jonatan Selsing is former research scientist with a PhD in astrophysics that has turned to the cloud. He is currently the Lead Cloud Engineer at Novo Nordisk, where he enables data and analytics workloads at scale. With an emphasis on reducing the total cost of ownership of cloud-based workloads, while giving full benefit of the advantages of cloud, he designs, builds, and maintains solutions that enable research for future medicines.
 Hassen Riahi is a Sr. Data Architect at AWS Professional Services. He holds a PhD in Mathematics & Computer Science on large-scale data management. He works with AWS customers on building data-driven solutions.
 Alessandro Fior is a Sr. Data Architect at AWS Professional Services. He is passionate about designing and building modern and scalable data platforms that accelerate companies to extract value from their data.


 Vikram Sahadevan is a Senior Resident Architect on the AWS Data Lab team. He enjoys efforts that focus around providing prescriptive architectural guidance, sharing best practices, and removing technical roadblocks with joint engineering engagements between customers and AWS technical resources that accelerate data, analytics, artificial intelligence, and machine learning initiatives.
 Suvendu Kumar Patra possesses 18 years of experience in infrastructure, database design, and data engineering, and he currently holds the position of Senior Resident Architect at Amazon Web Services. He is a member of the specialized focus group, AWS Data Lab, and his primary duties entail working with executive leadership teams of strategic AWS customers to develop their roadmaps for data, analytics, and AI/ML. Suvendu collaborates closely with customers to implement data engineering, data hub, data lake, data governance, and EDW solutions, as well as enterprise data strategy and data management.

 Ashish Prabhu is a Senior Manager of Software Engineering in Morningstar, Inc. He focuses on the solutioning and delivering the different aspects of Data Lake and Data Warehouse for Morningstar’s Enterprise Data and Platform Team. In his spare time he enjoys playing basketball, painting and spending time with his family.
 Stephen Johnston is a Distinguished Software Architect at Morningstar, Inc. His focus is on data lake and data warehousing technologies for Morningstar’s Enterprise Data Platform team.
 Colin Ingarfield is a Lead Software Engineer at Morningstar, Inc. Based in Austin, Colin focuses on access control and data entitlements on Morningstar’s growing Data Lake platform.
 Don Drake is a Senior Analytics Specialist Solutions Architect at AWS. Based in Chicago, Don helps Financial Services customers migrate workloads to AWS.


 Chris Olson is a Software Development Engineer at AWS.
 Xiaoxuan Li is a Software Development Engineer at AWS.


 Venkata Sistla is a Cloud Architect – Data & Analytics at AWS. He specializes in building data processing capabilities and helping customers remove constraints that prevent them from leveraging their data to develop business insights.
 Santosh Chiplunkar is a Principal Resident Architect at AWS. He has over 20 years of experience helping customers solve their data challenges. He helps customers develop their data and analytics strategy and provides them with guidance on how to make it a reality.


 Sandeep Adwankar is a Senior Technical Product Manager at AWS. Based in the California Bay Area, he works with customers around the globe to translate business and technical requirements into products that enable customers to improve how they manage, secure, and access data.
 Srividya Parthasarathy is a Senior Big Data Architect on the AWS Lake Formation team. She enjoys building data mesh solutions and sharing them with the community.
 Jason Berkowitz is a Senior Product Manager with AWS Lake Formation. He comes from a background in machine learning and data lake architectures. He helps customers become data-driven.
 Aarthi Srinivasan is a Senior Big Data Architect with AWS Lake Formation. She enjoys building data lake solutions for AWS customers and partners. When not on the keyboard, she explores the latest science and technology trends and spends time with her family.


 Vivek Shrivastava is a Principal Data Architect, Data Lake in AWS Professional Services. He is a Bigdata enthusiast and holds 13 AWS Certifications. He is passionate about helping customers build scalable and high-performance data analytics solutions in the cloud. In his spare time, he loves reading and finds areas for home automation


 Aarthi Srinivasan is a Senior Big Data Architect with AWS Lake Formation. She likes building data lake solutions for AWS customers and partners. When not on the keyboard, she explores the latest science and technology trends and spends time with her family.
 Srividya Parthasarathy is a Senior Big Data Architect on the AWS Lake Formation team. She enjoys building analytics and data mesh solutions on AWS and sharing them with the community.