Getting credentials for local development with AWS is now simpler and more secure. A new AWS Command Line Interface (AWS CLI) command, aws login, lets you start building immediately after signing up for AWS without creating and managing long-term access keys. You use the same sign-in method you already use for the AWS Management Console.
In this blog, we’ll show you how to get temporary credentials to your workstation for use with the AWS CLI, AWS Software Development Kits (AWS SDKs), and tools or applications built using them with the new aws login command.
Getting started with programmatic access to AWS
You can use the aws login command with your AWS Management Console sign-in method, as described in the following sections.
Scenario 1: Using IAM credentials (root or IAM user)
To obtain programmatic credentials using your root or IAM user username and password:
Install the latest AWS CLI (version 2.32.0 or later).
Run the aws login command.
If you have not set a default Region, the CLI prompts you to specify the AWS Region of your choice (e.g., us-east-2, eu-central-1). The CLI remembers which Region you set once you enter it into this prompt.
Figure 1: CLI Region prompt
The CLI opens your default browser.
Follow the instructions in the browser window:
If you have already signed into the AWS Management Console, you will see a screen that says, “Continue with an active session.”
Figure 2: Sign in to AWS – active session selection
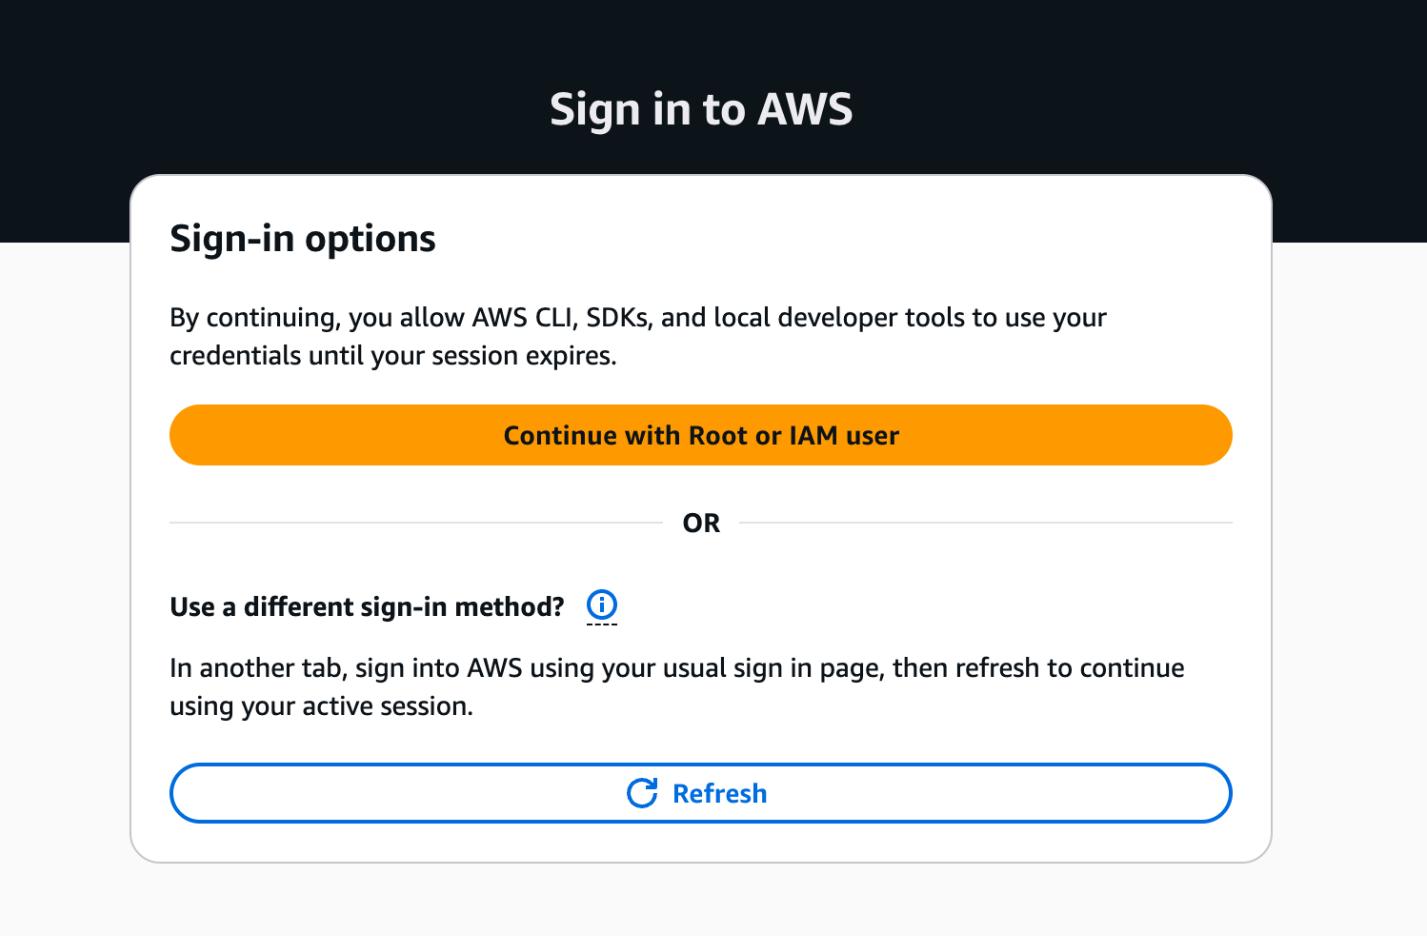
If you haven’t signed into the AWS Management Console, you will see the sign-in options page. Select “Continue with Root or IAM user” and log in to your AWS account.
Figure 3: AWS Sign in to AWS – Sign-in options
Success! You’re ready to run AWS CLI commands. Try the aws sts get-caller-identity command to verify the identity you’re currently using.
Figure 4: Sign in to AWS – completion
Scenario 2: Using federated sign-in
This scenario applies when you authenticate through your organization’s identity provider. To retrieve programmatic credentials for roles you assumed with federation:
Complete steps 1–4 from Scenario 1, then continue with the following instructions.
Follow the instructions in the browser window:
If you have already signed into the AWS Management Console, the browser provides you with the option to select your active IAM role session from federated sign-in to the console. This enables you to switch between 5 active AWS sessions if you have multi-session support enabled on your AWS Management Console.
Figure 5: Sign in to AWS – active IAM role session selection
If you have not signed into the AWS Management Console or want to get temporary credentials for a different IAM role, sign into your AWS account using your current authentication mechanism in another browser tab. Upon successful login, switch back to this tab and select the “Refresh” button. Your console session should now be available under the active sessions.
Return to the AWS CLI once you have successfully completed the aws login process.
Regardless of the console sign-in method you choose, the temporary credentials issued by the aws login command are automatically rotated by the AWS CLI, AWS Tools for PowerShell and AWS SDKs every 15 minutes. They are valid up to the set session duration of the IAM principal (maximum of 12 hours). After reaching the session duration limit, you will be prompted to log in again.
Figure 6: AWS Sign in – session expiration
Accessing AWS using local developer tools
The aws login command supports switching between multiple AWS accounts and roles using profiles. You can configure a profile with aws login --profile <PROFILE_NAME> and run AWS commands with the profile using: aws sts get-caller-identity --profile <PROFILE_NAME>. The short-term credentials issued by aws login work with more than the AWS CLI. You can also use them with:
AWS SDKs: If you use AWS SDKs for development, the SDK clients can use these temporary credentials to authenticate with AWS.
Remote development servers: Use aws login --remote on a remote server without browser access, to deliver temporary credentials from your device with browser access to the AWS console.
Older versions of AWS SDKs that do not support the new console credentials provider: Any software written using these older SDKs can support credentials delivered by aws login by using the credential_process provider with the AWS CLI.
Controlling access to aws login with IAM policies
The aws login command is controlled by two IAM actions: signin:AuthorizeOAuth2Access and signin:CreateOAuth2Token. Use the SignInLocalDevelopmentAccess managed policy or add these actions to your IAM policies to allow IAM users and IAM roles with console access to use this feature.
AWS Organizations customers looking to control the usage of this login feature on member accounts can deny the two actions above using Service Control Policies (SCPs). These IAM actions and their resources are usable in all relevant IAM policies.
AWS recommends using centralized root access management in AWS Organizations to eliminate long-term root credentials from member accounts. This feature allows security teams to perform privileged tasks through short-term, task-scoped root sessions from a central management account. After you enable centralized root management and delete root credentials on member accounts, root login to member accounts is denied, which also prevents programmatic access with root credentials using aws login. For developers using root credentials or IAM users, aws login delivers short-lived credentials to development tools, providing a secure alternative to long-term static access keys.
Logging and security of programmatic access using aws login
AWS Sign-In logs API activity through AWS CloudTrail, which now includes two new events specific to aws login. The service logs two new event names called AuthorizeOAuth2Access and CreateOauth2Token in the AWS Region where the user logs in.
Here’s a CloudTrail sample for an AuthorizeOAuth2Access event:
The aws login command uses the OAuth 2.0 authorization code flow with PKCE (Proof Key for Code Exchange) to protect against authorization code interception attacks. This provides a secure alternative to setting up IAM user access keys for getting started with development on AWS. For guidance on additional modern authentication approaches and alternatives to long-term IAM access keys, see the AWS Security Blog post “Beyond IAM access keys: Modern authentication approaches for AWS.”
Conclusion
The login for AWS local development feature is a secure-by-default enhancement that helps customers eliminate the use of long-term credentials for programmatic access with AWS. With aws login, you can start building immediately using the same credentials you use to sign in to the AWS Management Console. This feature is now available across all AWS commercial Regions (excluding China and GovCloud) at no additional cost to customers.
For more information, visit the authentication and access section in the CLI user guide.
If you have feedback about this post, submit comments in the Comments section below.
AWS launched AWS Security Token Service (AWS STS) in August 2011 with a single global endpoint (https://sts.amazonaws.com), hosted in the US East (N. Virginia) AWS Region. To reduce dependency on a single Region, STS launched AWS STS Regional endpoints (https://sts.{Region_identifier}.{partition_domain}) in February 2015. These Regional endpoints allow you to use STS in the same Region as your workloads, which improves both performance and reliability.
However, many customers and third-party tools continue to call the STS global endpoint, and as a result, these customers don’t get the benefits of STS Regional endpoints. To help improve the resiliency and performance of your applications, we are making changes to the STS global endpoint, with no action required from customers. These changes will be released in the coming weeks.
In this blog post, we discuss the upcoming changes to the STS global endpoint and their benefits, and provide our recommendation on which STS endpoint to use going forward.
Upcoming changes to the STS global endpoint
The changes being made to the STS global endpoint will help enhance resiliency and improve performance. Today, all the requests to the STS global endpoint are served by the US East (N. Virginia) Region. Starting in early 2025, requests to the STS global endpoint will be automatically served in the same Region as your AWS deployed workloads. For example, if your application calls sts.amazonaws.com from the US West (Oregon) Region, your calls will be served locally in the US West (Oregon) Region instead of being served by the US East (N. Virginia) Region.
With this change, requests to the STS global endpoint will be served locally if your request originated from AWS Regions that are enabled by default.1 However, requests to the STS global endpoint will continue to be served in US East (N. Virginia) Region if your request originated from opt-in Regions or if you used STS from outside AWS, such as in your on-premises network or data centers.
We will gradually roll out this change to AWS Regions that are enabled by default by mid-2025, starting with the Europe (Stockholm) Region.
We’ve taken the following measures to help avoid disruptions to your existing processes:
AWS CloudTrail logs for requests made to the STS global endpoints will be sent to the US East (N. Virginia) Region. CloudTrail logs for requests handled by STS Regional endpoints will continue to be logged to their respective Region in CloudTrail, even if the requests are served locally.
CloudTrail logs for operations performed by the STS global and Regional endpoints will have the additional fields endpointType and awsServingRegion to clarify which endpoint and Region served the request.
Requests made to the sts.amazonaws.com endpoints will have a value of us-east-1 for the aws:RequestedRegion condition key, regardless of which Region served the request.
Requests handled by the sts.amazonaws.com endpoints will not share a request quota with the Regional STS endpoints.
1. In addition, for your requests to be served locally, your DNS request for sts.amazonaws.com must be handled by an Amazon DNS Server in Amazon Virtual Private Cloud (Amazon VPC).
Our recommendation
We continue to recommend that you use the appropriate STS Regional endpoints whenever possible. If you’re using STS from outside AWS, such as in your on-premises networks or data centers, we recommend you use the STS Regional endpoint that is hosted in the same Region as the AWS resource that you need STS credentials to access. If you’re building in opt-in Regions such as Asia Pacific (Hong Kong) or Asia Pacific (Jakarta), we recommend that you use the STS endpoint from the opt-in Region that is hosting your workload. By following the steps in the blog post How to use Regional AWS STS endpoints, you can identify workloads that are still using the global STS endpoint and get insights into how to reconfigure them when required.
If you have feedback about this blog post, submit comments in the Comments section below. If you have questions about this post, contact AWS Support.
As independent software vendors (ISVs) shift to a multi-tenant software-as-a-service (SaaS) model, they commonly adopt a shared infrastructure model to achieve cost and operational efficiency. The more ISVs move into a multi-tenant model, the more concern they may have about the potential for one tenant to access the resources of another tenant. SaaS systems include explicit mechanisms that help ensure that each tenant’s resources—even if they run on shared infrastructure—are isolated.
This is what we refer to as tenant isolation. The idea behind tenant isolation is that your SaaS architecture introduces constructs that tightly control access to resources and block attempts to access the resources of another tenant.
AWS Identity and Access Management (IAM) is a service you can use to securely manage identities and access to AWS services and resources. You can use IAM to implement tenant isolation. With IAM, there are three primary isolation methods, as the How to implement SaaS tenant isolation with ABAC and AWS IAM blog post outlines. These are dynamically-generated IAM policies, role-based access control (RBAC), and attribute-based access control (ABAC). The aforementioned blog post provides an example of using the AWS Security Token Service (AWS STS)AssumeRole API operation and session tags to implement tenant isolation with ABAC. If you aren’t familiar with these concepts, we recommend reading that blog post first to understand the security considerations for this pattern.
In this blog post, you will learn about an alternative approach to implement tenant isolation with ABAC by using the AWS STS AssumeRoleWithWebIdentity API operation and https://aws.amazon.com/tags claim in a JSON Web Token (JWT). The AssumeRoleWithWebIdentity API operation verifies the JWT and generates tenant-scoped temporary security credentials based on the tags in the JWT.
Architecture overview
Let’s look at an example multi-tenant SaaS application that uses a shared infrastructure model.
Figure 1 shows the application architecture and the data access flow. The application uses the AssumeRoleWithWebIdentity API operation to implement tenant isolation.
Figure 1: Example multi-tenant SaaS application
The user navigates to the frontend application.
The frontend application redirects the user to the identity provider for authentication. The identity provider returns a JWT to the frontend application. The frontend application stores the tokens on the server side. The identity provider adds the https://aws.amazon.com/tags claim to the JWT as detailed in the configuration section that follows. The tags claim includes the user’s tenant ID.
The frontend application makes a server-side API call to the backend application with the JWT.
The backend application calls AssumeRoleWithWebIdentity, passing its IAM role Amazon Resource Name (ARN) and the JWT.
AssumeRoleWithWebIdentity verifies the JWT, maps the tenant ID tag in the JWT https://aws.amazon.com/tags claim to a session tag, and returns tenant-scoped temporary security credentials.
The backend API uses the tenant-scoped temporary security credentials to get tenant data. The assumed IAM role’s policy uses the aws:PrincipalTag variable with the tenant ID to scope access.
Configuration
Let’s now have a look at the configuration steps that are needed to use this mechanism.
Step 1: Configure an OIDC provider with tags claim
The AssumeRoleWithWebIdentity API operation requires the JWT to include an https://aws.amazon.com/tags claim. You need to configure your identity provider to include this claim in the JWT it creates.
The following is an example token that includes TenantID as a principal tag (each tag can have a single value). Make sure to replace <TENANT_ID> with your own data.
Amazon Cognito recently launched improvements to the token customization flow that allow you to add arrays, maps, and JSON objects to identity and access tokens at runtime by using a pre token generation AWS Lambda trigger. You need to enable advanced security features and configure your user pool to accept responses to a version 2 Lambda trigger event.
Below is a Lambda trigger code snippet that shows how to add the tags claim to a JWT (an ID token in this example):
Next, you need to create an OpenID Connect (OIDC) identity provider in IAM. IAM OIDC identity providers are entities in IAM that describe an external identity provider service that supports the OIDC standard. You use an IAM OIDC identity provider when you want to establish trust between an OIDC-compatible identity provider and your AWS account.
Before you create an IAM OIDC identity provider, you must register your application with the identity provider to receive a client ID. The client ID (also known as audience) is a unique identifier for your app that is issued to you when you register your app with the identity provider.
Step 3: Create an IAM role
The next step is to create an IAM role that establishes a trust relationship between IAM and your organization’s identity provider. This role must identify your identity provider as a principal (trusted entity) for the purposes of federation. The role also defines what users authenticated by your organization’s identity provider are allowed to do in AWS. When you create the trust policy that indicates who can assume the role, you specify the OIDC provider that you created earlier in IAM.
You can use AWS OIDC condition context keys to write policies that limit the access of federated users to resources that are associated with a specific provider, app, or user. These keys are typically used in the trust policy for a role. Define condition keys using the name of the OIDC provider (<YOUR_PROVIDER_ID>) followed by a claim, for an example client ID from Step 2 (:aud).
The following is an IAM role trust policy example. Make sure to replace <YOUR_PROVIDER_ID> and <AUDIENCE> with your own data.
As an example, the application may store tenant assets in Amazon Simple Storage Service (Amazon S3) by using a prefix per tenant. You can implement tenant isolation by using the aws:PrincipalTag variable in the Resource element of the IAM policy. The IAM policy can reference the principal tags as defined in the JWT https://aws.amazon.com/tags claim.
The following is an IAM policy example. Make sure to replace <S3_BUCKET> with your own data.
How AssumeRoleWithWebIdentity differs from AssumeRole
When using the AssumeRole API operation, the application needs to implement the following steps: 1) Verify the JWT; 2) Extract the tenant ID from the JWT and map it to a session tag; 3) Call AssumeRole to assume the application-provided IAM role. This approach provides applications the flexibility to independently define the tenant ID session tag format.
We see customers wrap this functionality in a shared library to reduce the undifferentiated heavy lifting for the application teams. Each application needs to install this library, which runs sensitive custom code that controls tenant isolation. The SaaS provider needs to develop a library for each programming language they use and run library upgrade campaigns for each application.
When using the AssumeRoleWithWebIdentity API operation, the application calls the API with an IAM role and the JWT. AssumeRoleWithWebIdentity verifies the JWT and generates tenant-scoped temporary security credentials based on the tenant ID tag in the JWT https://aws.amazon.com/tags claim. AWS STS maps the tenant ID tag to a session tag. Customers can use readily available AWS SDKs for multiple programming languages to call the API. See the AssumeRoleWithWebIdentity API operation documentation for more details.
Furthermore, the identity provider now enforces the tenant ID session tag format across applications. This is because AssumeRoleWithWebIdentity uses the tenant ID tag key and value from the JWT as-is.
Conclusion
In this post, we showed how to use the AssumeRoleWithWebIdentity API operation to implement tenant isolation in a multi-tenant SaaS application. The post described the application architecture, data access flow, and how to configure the application to use AssumeRoleWithWebIdentity. Offloading the JWT verification and mapping the tenant ID to session tags helps simplify the application architecture and improve security posture.
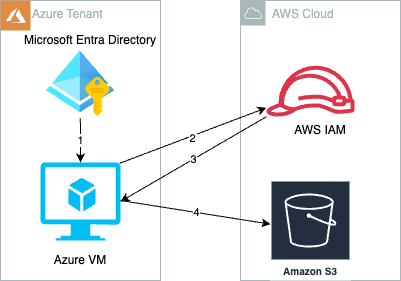
Use of long-term access keys for authentication between cloud resources increases the risk of key exposure and unauthorized secrets reuse. Amazon Web Services (AWS) has developed a solution to enable customers to securely authenticate Azure resources with AWS resources using short-lived tokens to reduce risks to secure authentication.
In this solution, we show you how to obtain temporary credentials in IAM. The solution uses AWS Security Token Service (AWS STS) in conjunction with Azure managed identities and Azure App Registration. This method provides a more secure and efficient way to bridge Azure and AWS clouds, providing seamless integration without compromising secure authentication and authorization standards.
Create and attach an Azure managed identity to an Azure virtual machine (VM).
Azure VM gets an Azure access token from the managed identity and sends it to AWS STS to retrieve temporary security credentials.
An IAM role created with a valid Azure tenant audience and subject validates that the claim is sourced from a trusted entity and sends temporary security credentials to the requesting Azure VM.
Azure VM accesses AWS resources using the AWS STS provided temporary security credentials.
To prepare the authentication process with Microsoft Entra ID, an enterprise application must be created in Microsoft Entra ID. This serves as a sign-in endpoint and provides the necessary user identity information through OIDC access tokens to the identity provider (IdP) of the target AWS account.
Note: You can get short term credentials by providing access tokens from managed identities or enterprise applications. This post covers the enterprise application use case.
Register a new application in Azure
In the Azure portal, select Microsoft Entra ID.
Select App registrations.
Select New registration.
Enter a name for your application and then select an option in Supported account types (in this example, we chose Accounts in this Organization directory only). Leave the other options as is. Then choose Register.
Figure 2: Register an application in the Azure portal
Configure the application ID URI
In the Azure portal, select Microsoft Entra ID.
Select App registrations.
On the App registrations page, select All applications and choose the newly registered application.
On the newly registered application’s overview page, choose Application ID URI and then select Add.
On the Edit application ID URI page, enter the value of the URI, which looks like urn://<name of the application> or api://<name of the application>.
The application ID URI will be used later as the audience in the identity provider(idP) section of AWS.
Figure 3: Configure the application ID URI
Open the newly registered application’s overview page.
In the navigation pane, under Manage, choose App roles.
Select Create app role and then enter a Display name and for Allowed member types, select Both (Users/Groups + Applications).
For Description, enter a description.
Select Do you want to enable this app role? And then choose Apply.
Figure 4: Create and enable an application role
Assign a managed identity—as created in Step 4 of the prerequisites—to the new application role. This operation can only be done by either using the Azure Cloud Shell or running scripts locally by installing the latest version of the Microsoft Graph PowerShell SDK. (For more information about assigning managed identities to application roles using PowerShell, see Azure documentation.)
You must have the following information:
ObjectID: To find the managed identity’s Object (Principal) ID, go to the Managed Identities page, select the identity name, and then select Overview.
Figure 5: Find the ObjectID of the managed identity
ID: To find the ID of the application role, go to App registrations, select the application name, and then select App roles.
Figure 6: Find the ID of the application role
PrincipalID: Same as ObjectID, which is the managed identity’s Object (Principal) ID.
ResourceID: The ObjectID of the resource service principal, which you can find by going to the Enterprise applications page and selection the application. Select Overview and then Properties to find the ObjectID.
Figure 7: Find the ResourceID
With the resource IDs, you can now use Azure Cloud Shell and run the following script in PowerShell terminal with New-AzureADServiceAppRoleAssignment. Replace the variables with the resource IDs.
In the AWS Management Console for IAM, create an IAM Identity Provider.
In the left navigation pane, select Identity providers and then choose Add an identity provider.
For Provider type, choose OpenID Connect.
For Provider URL, enter https://sts.windows.net/<Microsoft Entra Tenant ID>. Replace <Microsoft Entra Tenant ID> with your Tenant ID from Azure. This allows only identities from your Azure tenant to access your AWS resources.
For Audience use the client_id of the Azure managed identity or the application ID URI from enterprise applications.
For Audience, enter the application ID URI that you configured on step 5 of Configure the application ID URI. If you have additional client IDs (also known as audiences) for this IdP, you can add them to the provider detail page later.
You can also use different audiences in the role trust policy in the next step to limit the roles that specific audiences can assume. To do so, you must provide a StringEquals condition in the trust policy of the IAM role.
Figure 8: Adding an audience (client ID)
Using an OIDC principal without a condition can be overly permissive. To make sure that only the intended identities assume the role, provide an audience (aud) and subject (sub) as conditions in the role trust policy for this IAM role.
sts.windows.net/<Microsoft Entra Tenant ID>/:sub represents the identity of your Azure workload that limits access to the specific Azure identity that can assume this role from the Azure tenant. See the following example for conditions.
Replace <Microsoft Entra Tenant ID> with your tenant ID from Azure.
Replace <Application ID URI> with your audience value configured in the previous step.
Replace <Managed Identity’s object (Principal) ID> with your ObjectID captured in the first bullet of Step 12 of Configure the application ID URI.
To test the access, you’ll assign a user assigned managed identity to an existing VM.
Sign in to the Azure portal.
Navigate to the desired VM and select Identity, User assigned, and then choose Add.
Figure 9: Assigning a User assigned Identity
Select the managed identity created as part of prerequisite and then choose Add.
Figure 10: Add a user assigned managed identity
In AWS, we used credential_process in a separate AWS Config profile to dynamically and programmatically retrieve AWS temporary credentials. The credential process calls a bash script that retrieves an access token from Azure and uses the token to obtain temporary credentials from AWS STS. For the syntax and operating system requirements, see Source credentials with an external process. For this post, we created a custom profile called DevTeam-S3ReadOnlyAccess, as shown in the config file:
[profile DevTeam-S3ReadOnlyAccess]
credential_process = /opt/bin/credentials.sh
region = ap-southeast-2
For this example, credentials_process invokes the script /opt/bin/credentials.sh. Replace <111122223333> with your own account ID.
/opt/bin/credentials.sh
#!/bin/bash

# Application ID URI from Azure
AUDIENCE=”urn://dev-aws-account-team-a”
# Role ARN from AWS to assume
ROLE_ARN=”arn:aws:iam::<111122223333>:role/Azure-AWSAssumeRole”

# Retrieve Access Token using Audience
access_token=$(curl “http://169.254.169.254/metadata/identity/oauth2/token?api-version=2018-02-01&resource=${AUDIENCE}” -H “Metadata:true” -s| jq -r ‘.access_token’)

# Create credentials following JSON format required by AWS CLI
credentials=$(aws sts assume-role-with-web-identity –role-arn ${ROLE_ARN} –web-identity-token $access_token –role-session-name AWSAssumeRole|jq ‘.Credentials’ | jq ‘.Version=1’)

# Write credentials to STDOUT for AWS CLI to pick up
echo $credentials
After you configure the AWS Config CLI file for the credential_process script, verify the setup by accessing AWS resources from Azure VM.
Using AWS SDK for Python to run s3AccessFromAzure.py. You should see a list of S3 buckets from your account. This example also demonstrates specifying a profile to use for credential purposes.
S3AccessFromAzure.py
import boto3

# Assume Role with Web Identity Provider profile
session = boto3.Session(profile_name=’DevTeam-S3ReadOnlyAccess’)

# Retrieve the list of existing buckets
s3 = session.client(‘s3’)
response = s3.list_buckets()

# Output the bucket names
print(‘Existing buckets:’)
for bucket in response[‘Buckets’]:
    print(f’  {bucket[“Name”]}’)
Note: The AWS CLI doesn’t cache external process credentials; instead, the AWS CLI calls the credential_process for every CLI request, which creates a new role session. If you use AWS SDKs, the credentials are cached and reused until they expire.
We used Azure VM as an example to access AWS resources, but a similar approach can be used for any compute resources in Azure that are capable of issuing Azure credentials.
Clean up
If you don’t need the resources that you created for this walkthrough, delete them to avoid future charges for the deployed resources:
Delete the VM instance, managed identity, and enterprise applications created in Azure.
Delete the resources that you provisioned on AWS to test the solution.
Conclusion
In this post, we showed you how to securely access AWS resources from Azure workloads using an IAM role assumed with one-time, short-term credentials. By using this solution, your Azure workloads will request temporary security credentials and remove the need for long-term AWS credentials or other secrets usage that are less secure methods of authentication.
Use the following resources to help you get started with AWS IAM federation:
Many Amazon Web Services (AWS) customers choose to use federation with SAML 2.0 in order to use their existing identity provider (IdP) and avoid managing multiple sources of identities. Some customers have previously configured federation by using AWS Identity and Access Management (IAM) with the endpoint signin.aws.amazon.com. Although this endpoint is highly available, it is hosted in a single AWS Region, us-east-1. This blog post provides recommendations that can improve resiliency for customers that use IAM federation, in the unlikely event of disrupted availability of one of the regional endpoints. We will show you how to use multiple SAML sign-in endpoints in your configuration and how to switch between these endpoints for failover.
How to configure federation with multi-Region SAML endpoints
AWS Sign-In allows users to log in into the AWS Management Console. With SAML 2.0 federation, your IdP portal generates a SAML assertion and redirects the client browser to an AWS sign-in endpoint, by default signin.aws.amazon.com/saml. To improve federation resiliency, we recommend that you configure your IdP and AWS federation to support multiple SAML sign-in endpoints, which requires configuration changes for both your IdP and AWS. If you have only one endpoint configured, you won’t be able to log in to AWS by using federation in the unlikely event that the endpoint becomes unavailable.
Let’s take a look at the Region code SAML sign-in endpoints in the AWS General Reference. The table in the documentation shows AWS regional endpoints globally. The format of the endpoint URL is as follows, where <region-code> is the AWS Region of the endpoint: https://<region-code>.signin.aws.amazon.com/saml
All regional endpoints have a region-code value in the DNS name, except for us-east-1. The endpoint for us-east-1 is signin.aws.amazon.com—this endpoint does not contain a Region code and is not a global endpoint. AWS documentation has been updated to reference SAML sign-in endpoints.
In the next two sections of this post, Configure your IdP and Configure IAM roles, I’ll walk through the steps that are required to configure additional resilience for your federation setup.
Important: You must do these steps before an unexpected unavailability of a SAML sign-in endpoint.
Configure your IdP
You will need to configure your IdP and specify which AWS SAML sign-in endpoint to connect to.
To configure your IdP
If you are setting up a new configuration for AWS federation, your IdP will generate a metadata XML configuration file. Keep track of this file, because you will need it when you configure the AWS portion later.
Register the AWS service provider (SP) with your IdP by using a regional SAML sign-in endpoint. If your IdP allows you to import the AWS metadata XML configuration file, you can find these files available for the public,GovCloud, and China Regions.
If you are manually setting the Assertion Consumer Service (ACS) URL, we recommend that you pick the endpoint in the same Region where you have AWS operations.
In SAML 2.0, RelayState is an optional parameter that identifies a specified destination URL that your users will access after signing in. When you set the ACS value, configure the corresponding RelayState to be in the same Region as the ACS. This keeps the Region configurations consistent for both ACS and RelayState. Following is the format of a Region-specific console URL.
https://<region-code>.console.aws.amazon.com/
For more information, refer to your IdP’s documentation on setting up the ACS and RelayState.
Configure IAM roles
Next, you will need to configure IAM roles’ trust policies for all federated human access roles with a list of all the regional AWS Sign-In endpoints that are necessary for federation resiliency. We recommend that your trust policy contains all Regions where you operate. If you operate in only one Region, you can get the same resiliency benefits by configuring an additional endpoint. For example, if you operate only in us-east-1, configure a second endpoint, such as us-west-2. Even if you have no workloads in that Region, you can switch your IdP to us-west-2 for failover. You can log in through AWS federation by using the us-west-2 SAML sign-in endpoint and access your us-east-1 AWS resources.
To configure IAM roles
Log in to the AWS Management Console with credentials to administer IAM. If this is your first time creating the identity provider trust in AWS, follow the steps in Creating IAM SAML identity providers to create the identity providers.
Next, create or update IAM roles for federated access. For each IAM role, update the trust policy that lists the regional SAML sign-in endpoints. Include at least two for increased resiliency.
The following example is a role trust policy that allows the role to be assumed by a SAML provider coming from any of the four US Regions.
When you use a regional SAML sign-in endpoint, the corresponding regional AWS Security Token Service (AWS STS) endpoint is also used when you assume an IAM role. If you are using service control policies (SCP) in AWS Organizations, check that there are no SCPs denying the regional AWS STS service. This will prevent the federated principal from being able to obtain an AWS STS token.
Switch regional SAML sign-in endpoints
In the event that the regional SAML sign-in endpoint your ACS is configured to use becomes unavailable, you can reconfigure your IdP to point to another regional SAML sign-in endpoint. After you’ve configured your IdP and IAM role trust policies as described in the previous two sections, you’re ready to change to a different regional SAML sign-in endpoint. The following high-level steps provide guidance on switching the regional SAML sign-in endpoint.
To switch regional SAML sign-in endpoints
Change the configuration in the IdP to point to a different endpoint by changing the value for the ACS.
Change the configuration for the RelayState value to match the Region of the ACS.
Log in with your federated identity. In the browser, you should see the new ACS URL when you are prompted to choose an IAM role.
Figure 1: New ACS URL
The steps to reconfigure the ACS and RelayState will be different for each IdP. Refer to the vendor’s IdP documentation for more information.
Conclusion
In this post, you learned how to configure multiple regional SAML sign-in endpoints as a best practice to further increase resiliency for federated access into your AWS environment. Check out the updates to the documentation for AWS Sign-In endpoints to help you choose the right configuration for your use case. Additionally, AWS has updated the metadata XML configuration for the public,GovCloud, and China AWS Regions to include all sign-in endpoints.
The simplest way to get started with SAML federation is to use AWS Single Sign-On (AWS SSO). AWS SSO helps manage your permissions across all of your AWS accounts in AWS Organizations.
You can use third-party identity providers (IdPs) such as Okta, Ping, or OneLogin to federate with the AWS Identity and Access Management (IAM) service using SAML 2.0, allowing your workforce to configure services by providing authorization access to the AWS Management Console or Command Line Interface (CLI). When you federate to AWS, you assume a role through the AWS Security Token Service (AWS STS), which through the AssumeRole API returns a set of temporary security credentials you then use to access AWS resources. The use of temporary credentials can make it challenging for administrators to trace which identity was responsible for actions performed.
To address this, with AWS STS you set a unique attribute called SourceIdentity, which allows you to easily see which identity is responsible for a given action.
This post will show you how to set up the AWS STS SourceIdentity attribute when using Okta, Ping, or OneLogin as your IdP. Your IdP administrator can configure a corporate directory attribute, such as an email address, to be passed as the SourceIdentity value within the SAML assertion. This value is stored as the SourceIdentity element in AWS CloudTrail, along with the activity performed by the assumed role. This post will also show you how to set up a sample policy for setting the SourceIdentity when switching roles. Finally, as an administrator reviewing CloudTrail activity, you can use the source identity information to determine who performed which actions. We will walk you through CloudTrail logs from two accounts to demonstrate the continuance of the source identity attribute, showing you how the SourceIdentity will appear in both accounts’ logs.
Configure the SourceIdentity attribute with Okta integration
You will do this portion of the configuration within the Okta administrative console. This procedure assumes that you have a previously configured AWS and Okta integration. If not, you can configure your integration by following the instructions in the Okta AWS Multi-Account Configuration Guide. You will use the Okta to SAML integration and configure an optional attribute to map as the SourceIdentity.
To set up Okta with SourceIdentity
Log in to the Okta admin console.
Navigate to Applications–AWS.
In the top navigation bar, select the Sign On tab, as shown in Figure 1.
Figure 1 – Navigate to attributes in SAML settings on the Okta applications page
Under Sign on methods, select SAML 2.0, and choose the arrow next to Attributes (Optional) to expand, as shown in Figure 2.
Figure 2 – Add new attribute SourceIdentity and map it to Okta provided attribute of your choice
Add the optional attribute definition for SourceIdentity using the following parameters:
For Name, enter: https://aws.amazon.com/SAML/Attributes/SourceIdentity
For Name format, choose URI Reference.
For Value, enter user.login.
Note: The Name format options are the following: Unspecified – can be any format defined by the Okta profile and must be interpreted by your application. URI Reference – the name is provided as a Uniform Resource Identifier string. Basic – a simple string; the default if no other format is specified.
The examples shown in Figure 1 and Figure 2 show how to map an email address to the SourceIdentity attribute by using an on-premises Active Directory sync. The SourceIdentity can be mapped to other attributes from your Active Directory.
Configure the SourceIdentity attribute with PingOne integration
You do this portion of the configuration in the Ping Identity administrative console. This procedure assumes that you have a previously configured AWS and Ping integration. If not, you can set up the PingFederate AWS Connector by following the Ping Identity instructions Configuring an SSO connection to Amazon Web Services.
You’re using the Ping to SAML integration and configuring an optional attribute to map as the source identity.
Configuring PingOne as an IdP involves setting up an identity repository (in this case, the PingOne Directory), creating a user group, and adding users to the individual groups.
Choose the My Applications tab, as shown in Figure 3.
Figure 3. PingOne My Applications tab
On the Amazon Web Services line, choose on the arrow on the right side to show application details to edit and add a new attribute for the source identity.
Choose Continue to Next Step to open the Attribute Mapping section, as shown in Figure 4.
Figure 4. Attribute mappings
In the Attribute Mapping section line 1, for SAML_SUBJECT, choose Advanced.
On the Advanced Attribute Options page, for Name ID Format to send to SP select urn:oasis:names:tc:SAML:2.0:nameid-format:persistent. For IDP Attribute Name or Literal Value, select SAML_SUBJECT, as shown in Figure 4.
Figure 5. Advanced Attribute Options for SAML_SUBJECT
In the Attribute Mapping section line 2 as shown in Figure 4, for the application attribute https://aws.amazon.com/SAML/Attributes/Role, select Advanced.
On the Advanced Attribute Options page, for Name Format, select urn:oasis:names:tc:SAML:2.0:attrname-format:uri, as shown in Figure 6.
Figure 6. Advanced Attribute Options for https://aws.amazon.com/SAML/Attributes/Role
In the Attribute Mapping section line 2 as shown in Figure 4, select As Literal.
For IDP Attribute Name or Literal Value, format the role and provider ARNs (which are not yet created on the AWS side) in the following format. Be sure to replace the placeholders with your own values. Make a note of the role name and SAML provider name, as you will be using these exact names to create an IAM role and an IAM provider on the AWS side.
In the Attribute Mapping section line 3 as shown in Figure 4, for the application attribute https://aws.amazon.com/SAML/Attributes/RoleSessionName, enter Email (Work).
In the Attribute Mapping section as shown in Figure 4, to create line 5, choose Add a new attribute in the lower left.
In the newly added Attribute Mapping section line 5 as shown in Figure 4, add the SourceIdentity.
For Application Attribute, enter: https://aws.amazon.com/SAML/Attributes/SourceIdentity
For Identity Bridge Attribute or Literal Value, enter: SAML_SUBJECT
Choose Continue to Next Step in the lower right.
For Group Access, add your existing PingOne Directory Group to this application.
Review your setup configuration, as shown in Figure 7, and choose Finish.
Figure 7. Review mappings
Configure the SourceIdentity attribute with OneLogin integration
For the OneLogin SAML integration with AWS, you use the Amazon Web Services Multi Account application and configure an optional attribute to map as the SourceIdentity. You do this portion of the configuration in the OneLogin administrative console.
This procedure assumes that you already have a previously configured AWS and OneLogin integration. For information about how to configure the OneLogin application for AWS authentication and authorization, see the OneLogin KB article Configure SAML for Amazon Web Services (AWS) with Multiple Accounts and Roles.
After the OneLogin Multi Account application and AWS are correctly configured for SAML login, you can further customize the application to pass the SourceIdentity parameter upon login.
To change OneLogin configuration to add SourceIdentity attribute
In the OneLogin administrative console, in the Amazon Web Services Multi Account application, on the app administration page, navigate to Parameters, as shown in Figure 8.
Figure 8. OneLogin AWS Multi Account Application Configuration Parameters
To add a parameter, choose the + (plus) icon to the right of Value.
As shown in Figure 9, for Field Name enter https://aws.amazon.com/SAML/Attributes/SourceIdentity, select Include in SAML assertion, then choose Save.
Figure 9. OneLogin AWS Multi Account Application add new field
In the Edit Field page, select the default value you want to use for SourceIdentity. For the example in this blog post, for Value, select Email, then choose Save, as shown in Figure 10.
Figure 10. OneLogin AWS Multi Account Application map new field to email
After you’ve completed this procedure, review the final mapping details, as shown in Figure 11, to confirm that you see the additional parameter that will be passed into AWS through the SAML assertion.
Figure 11. OneLogin AWS Multi Account Application final mapping details
Configuring AWS IAM role trust policy
Now that the IdP configuration is complete, you can enable your AWS accounts to use SourceIdentity by modifying the IAM role trust policy.
For the workforce identity or application to be able to define their source identity when they assume IAM roles, you must first grant them permission for the sts:SetSourceIdentity action, as illustrated in the sample policy document below. This will permit the workforce identity or application to set the SourceIdentity themselves without any need for manual intervention.
To modify an AWS IAM role trust policy
Log in to the AWS Management Console for your account as a user with privileges to configure an IdP, typically an administrator.
Navigate to the AWS IAM service.
For trusted identity, choose SAML 2.0 federation.
From the SAML Provider drop down menu, select the IAM provider you created previously.
Modify the role trust policy and add the SetSourceIdentity action.
Sample policy document
This is a sample policy document attached to a role you assume when you log in to Account1 from the Okta dashboard. Edit your Account1/Role1 trust policy document and add sts:AssumeRoleWithSAML and sts:setSourceIdentity to the Action section.
Notes: The SetSourceIdentity action has to be allowed in the trust policy for assumeRole to work when the IdP is set up to pass SourceIdentity in the assertion. Future version of the sign-in URL may contain a Region code. When this occurs, you will need to modify the URL appropriately.
Policy statement
The following are examples of how the line “Federated”: “arn:aws:iam::<AccountId>:saml-provider/<IdP>” should look, based on the different IdPs specified in this post:
The following is a sample access control policy document in Account2 for Role2 that allows you to switchRole from Account1. Edit the control policy and add sts:AssumeRole and sts:SetSourceIdentity in the Action section.
Validate that the CloudTrail log entries for Account1 contain the Active Directory mapped SourceIdentity.
Use the Switch Role feature to switch to a second account Account2 (444455556666), using a role named Role2.
Create a new Amazon S3 bucket in Account2.
To summarize what you’ve done so far, you have:
Configured your corporate directory to pass a unique attribute to AWS as the source identity.
Configured a role that will persist the SourceIdentity attribute in AWS STS, which an employee will use to federate into your account.
Configured an Amazon S3 bucket that user will access.
Now you’ll observe in CloudTrail the SourceIdentity attribute that will be associated with every IAM action.
To see the SourceIdentity attribute in CloudTrail
From the your preferred IdP dashboard, select the AWS tile to log into the AWS console. The example in Figure 12 shows the Okta dashboard.
Figure 12. Login to AWS from IdP dashboard
Choose the AWS icon, which will take you to the AWS Management Console. Notice how the user has assumed the role you created earlier.
To test the SourceIdentity action, you will create a new Amazon S3 bucket.
Amazon S3 bucket names are globally unique, and the namespace is shared by all AWS accounts, so you will need to create a unique bucket name in your account. For this example, we used a bucket named DOC-EXAMPLE-BUCKET1 to validate CloudTrail log entries containing the SourceIdentity attribute.
Log into an account Account1 (111122223333) using a role named Role1.
Next, create a new Amazon S3 bucket in Account1, and validate that the Account1 CloudTrail logs entries contain the SourceIdentity attribute.
Create an Amazon S3 bucket called DOC-EXAMPLE-BUCKET1, as shown in Figure 13.
Figure 13. Create S3 bucket
In the AWS Management Console go to CloudTrail and check the log entry for bucket creation event, as shown in Figure 14.
Switch to Account2 (444455556666) using assume role, and switch to Account2/assumeRoleSourceIdentity.
Create a new Amazon S3 bucket in Account2 and validate that the Account2 CloudTrail log entries contain the SourceIdentity attribute, as shown in Figure 15.
Figure 15 – Switch role to assumeRoleSourceIdentity
Create a new Amazon S3 bucket in account2 called DOC-EXAMPLE-BUCKET2, as shown in Figure 16.
Figure 16 – Create DOC-EXAMPLE-BUCKET2 bucket while logged into account2 using assumeRoleSourceIdentity
Check the CloudTrail logs for account2 (444455556666) to see if the original SourceIdentity is logged, as shown in Figure 17.
Figure 17 – CloudTrail log entry for the above action
CloudTrail entry showing original SourceIdentity after assuming a role
You logged into Account1/Role1 and switched to Account2/Role2. All the user activities performed in AWS using the Assume Role were also logged with the original user’s sourceIdentity attribute. This makes it simple to trace user activity in CloudTrail.
Conclusion
Now that you have configured your SourceIdentity, you have made it easier for the security team of your organization to use CloudTrail logs to investigate and identify the originating identity of a user. In this post, you learned how to configure the AWS STSSourceIdentity attribute for three different popular IdPs, as well as how to configure each IdP using SAML and their optional attributes. We also provided sample control policy documents outlining how to configure the SourceIdentity for each provider. Additionally, we provide a sample policy for setting the SourceIdentity when switching roles. Lastly, the post walks through how the source identity will show in CloudTrail logs, and provides logs from two accounts to demonstrate the continuance of the source identity attribute. You can now test this capability yourself in your own environment, validate activity in your CloudTrail logs, and determine which user performed a specific action while using the assumeRole functionality.
If you have feedback about this post, submit comments in the Comments section below. If you have questions about this post, contact AWS Support.
Want more AWS Security news? Follow us on Twitter.
The collective thoughts of the interwebz
Manage Consent
To provide the best experiences, we use technologies like cookies to store and/or access device information. Consenting to these technologies will allow us to process data such as browsing behavior or unique IDs on this site. Not consenting or withdrawing consent, may adversely affect certain features and functions.
Functional
Always active
The technical storage or access is strictly necessary for the legitimate purpose of enabling the use of a specific service explicitly requested by the subscriber or user, or for the sole purpose of carrying out the transmission of a communication over an electronic communications network.
Preferences
The technical storage or access is necessary for the legitimate purpose of storing preferences that are not requested by the subscriber or user.
Statistics
The technical storage or access that is used exclusively for statistical purposes.The technical storage or access that is used exclusively for anonymous statistical purposes. Without a subpoena, voluntary compliance on the part of your Internet Service Provider, or additional records from a third party, information stored or retrieved for this purpose alone cannot usually be used to identify you.
Marketing
The technical storage or access is required to create user profiles to send advertising, or to track the user on a website or across several websites for similar marketing purposes.