Tag Archives: AWS Security Token Service

Simplified developer access to AWS with ‘aws login’

Post Syndicated from Shreya Jain original https://aws.amazon.com/blogs/security/simplified-developer-access-to-aws-with-aws-login/

Getting credentials for local development with AWS is now simpler and more secure. A new AWS Command Line Interface (AWS CLI) command, aws login, lets you start building immediately after signing up for AWS without creating and managing long-term access keys. You use the same sign-in method you already use for the AWS Management Console.

In this blog, we’ll show you how to get temporary credentials to your workstation for use with the AWS CLI, AWS Software Development Kits (AWS SDKs), and tools or applications built using them with the new aws login command.

Getting started with programmatic access to AWS

You can use the aws login command with your AWS Management Console sign-in method, as described in the following sections.

Scenario 1: Using IAM credentials (root or IAM user)

To obtain programmatic credentials using your root or IAM user username and password:

  1. Install the latest AWS CLI (version 2.32.0 or later).
  2. Run the aws login command.
  3. If you have not set a default Region, the CLI prompts you to specify the AWS Region of your choice (e.g., us-east-2, eu-central-1). The CLI remembers which Region you set once you enter it into this prompt.
    Figure 1: CLI Region prompt

    Figure 1: CLI Region prompt

  4. The CLI opens your default browser.
  5. Follow the instructions in the browser window:
    1. If you have already signed into the AWS Management Console, you will see a screen that says, “Continue with an active session.”
      Figure 2: Sign in to AWS - active session selection

      Figure 2: Sign in to AWS – active session selection

    2. If you haven’t signed into the AWS Management Console, you will see the sign-in options page. Select “Continue with Root or IAM user” and log in to your AWS account.
      Figure 3: AWS Sign in to AWS - Sign-in options

      Figure 3: AWS Sign in to AWS – Sign-in options

  6. Success! You’re ready to run AWS CLI commands. Try the aws sts get-caller-identity command to verify the identity you’re currently using.
    Figure 4: Sign in to AWS - completion

    Figure 4: Sign in to AWS – completion

Scenario 2: Using federated sign-in

This scenario applies when you authenticate through your organization’s identity provider. To retrieve programmatic credentials for roles you assumed with federation:

  1. Complete steps 1–4 from Scenario 1, then continue with the following instructions.
  2. Follow the instructions in the browser window:
    1. If you have already signed into the AWS Management Console, the browser provides you with the option to select your active IAM role session from federated sign-in to the console. This enables you to switch between 5 active AWS sessions if you have multi-session support enabled on your AWS Management Console.
      Figure 5: Sign in to AWS - active IAM role session selection

      Figure 5: Sign in to AWS – active IAM role session selection

    2. If you have not signed into the AWS Management Console or want to get temporary credentials for a different IAM role, sign into your AWS account using your current authentication mechanism in another browser tab. Upon successful login, switch back to this tab and select the “Refresh” button. Your console session should now be available under the active sessions.
  3. Return to the AWS CLI once you have successfully completed the aws login process.

Regardless of the console sign-in method you choose, the temporary credentials issued by the aws login command are automatically rotated by the AWS CLI, AWS Tools for PowerShell and AWS SDKs every 15 minutes. They are valid up to the set session duration of the IAM principal (maximum of 12 hours). After reaching the session duration limit, you will be prompted to log in again.

Figure 6: AWS Sign in - session expiration

Figure 6: AWS Sign in – session expiration

Accessing AWS using local developer tools

The aws login command supports switching between multiple AWS accounts and roles using profiles. You can configure a profile with aws login --profile <PROFILE_NAME> and run AWS commands with the profile using: aws sts get-caller-identity --profile <PROFILE_NAME>. The short-term credentials issued by aws login work with more than the AWS CLI. You can also use them with:

  • AWS SDKs: If you use AWS SDKs for development, the SDK clients can use these temporary credentials to authenticate with AWS.
  • AWS Tools for PowerShell: Use the Invoke-AWSLogin command.
  • Remote development servers: Use aws login --remote on a remote server without browser access, to deliver temporary credentials from your device with browser access to the AWS console.
  • Older versions of AWS SDKs that do not support the new console credentials provider: Any software written using these older SDKs can support credentials delivered by aws login by using the credential_process provider with the AWS CLI.

Controlling access to aws login with IAM policies

The aws login command is controlled by two IAM actions: signin:AuthorizeOAuth2Access and signin:CreateOAuth2Token. Use the SignInLocalDevelopmentAccess managed policy or add these actions to your IAM policies to allow IAM users and IAM roles with console access to use this feature.

AWS Organizations customers looking to control the usage of this login feature on member accounts can deny the two actions above using Service Control Policies (SCPs). These IAM actions and their resources are usable in all relevant IAM policies.

AWS recommends using centralized root access management in AWS Organizations to eliminate long-term root credentials from member accounts. This feature allows security teams to perform privileged tasks through short-term, task-scoped root sessions from a central management account. After you enable centralized root management and delete root credentials on member accounts, root login to member accounts is denied, which also prevents programmatic access with root credentials using aws login. For developers using root credentials or IAM users, aws login delivers short-lived credentials to development tools, providing a secure alternative to long-term static access keys.

Logging and security of programmatic access using aws login

AWS Sign-In logs API activity through AWS CloudTrail, which now includes two new events specific to aws login. The service logs two new event names called AuthorizeOAuth2Access and CreateOauth2Token in the AWS Region where the user logs in.

Here’s a CloudTrail sample for an AuthorizeOAuth2Access event:

{
    "eventVersion": "1.11",
    "userIdentity": {
        "type": "AssumedRole",
        "principalId": "AROATJHQDX737YZP72NTF:testuser”,
        "arn": "arn:aws:sts::225989345271:assumed-role/Admin/testuser,
        "accountId": “111111111111”,
        "sessionContext": {
            "sessionIssuer": {
                "type": "Role",
                "principalId": "AROATJHQDX737YZP72NTF",
                "arn": "arn:aws:iam::111111111111:role/Admin",
                "accountId": “11111111111”,
                "userName": "Admin"
            },
            "attributes": {
                "creationDate": "2025-11-17T22:50:14Z",
                "mfaAuthenticated": "false"
            }
        }
    },
    "eventTime": "2025-11-17T22:51:32Z",
    "eventSource": "signin.amazonaws.com",
    "eventName": "AuthorizeOAuth2Access",
    "awsRegion": "us-east-1",
    "sourceIPAddress": “192.0.2.2”,
    "userAgent": "Mozilla/5.0 (Macintosh; Intel Mac OS X 10_15_7) AppleWebKit/537.36 (KHTML, like Gecko) Chrome/142.0.0.0 Safari/537.36",
    "requestParameters": {
        "scope": "openid",
        "redirect_uri": "http://127.0.0.1:53037/oauth/callback",
        "code_challenge_method": "SHA-256",
        "client_id": "arn:aws:signin:::devtools/same-device"
    },
    "responseElements": null,
    "additionalEventData": {
        "success": "true",
        "x-amzn-vpce-id": ""
    },
    "requestID": "e2854c76-1cba-4360-9fd1-5037b591466b",
    "eventID": "59e1720d-3deb-44ff-933d-6828be2a860a",
    "readOnly": true,
    "eventType": "AwsApiCall",
    "managementEvent": true,
    "recipientAccountId": “111111111111”,
    "eventCategory": "Management",
    "tlsDetails": {
        "tlsVersion": "TLSv1.3",
        "cipherSuite": "TLS_AES_128_GCM_SHA256",
        "clientProvidedHostHeader": "us-east-1.signin.aws.amazon.com"
    }
}

Here’s a CloudTrail sample for a CreateOAuth2Token event:

{
    "eventVersion": "1.11",
    "userIdentity": {
        "type": "AssumedRole",
        "principalId": "AROATJHQDX737YZP72NTF:testuser-Isengard",
        "arn": "arn:aws:sts::111111111111:assumed-role/Admin/testuser-Isengard",
        "accountId": "111111111111",
        "sessionContext": {
            "sessionIssuer": {
                "type": "Role",
                "principalId": "AROATJHQDX737YZP72NTF",
                "arn": "arn:aws:iam::111111111111:role/Admin",
                "accountId": "111111111111",
                "userName": "Admin"
            },
            "attributes": {
                "creationDate": "2025-11-18T20:38:10Z",
                "mfaAuthenticated": "false"
            }
        }
    },
    "eventTime": "2025-11-18T20:38:44Z",
    "eventSource": "signin.amazonaws.com",
    "eventName": "CreateOAuth2Token",
    "awsRegion": "us-east-1",
    "sourceIPAddress": "192.0.2.2",
    "userAgent": "aws-cli/2.32.0 md/awscrt#0.28.4 ua/2.1 os/macos#24.6.0 md/arch#arm64 lang/python#3.13.9 md/pyimpl#CPython m/b,AA,Z,E cfg/retry-mode#standard md/installer#exe sid/35033f4ca1bd md/prompt#off md/command#login",
    "requestParameters": {
        "client_id": "arn:aws:signin:::devtools/same-device"
    },
    "responseElements": null,
    "additionalEventData": {
        "success": "true",
        "x-amzn-vpce-id": ""
    },
    "requestID": "94562943-c85b-4dc1-bf72-43b0fd42d6de",
    "eventID": "0b338fac-6a10-4740-b34d-1bb6923e799e",
    "readOnly": true,
    "eventType": "AwsApiCall",
    "managementEvent": true,
    "recipientAccountId": "111111111111",
    "eventCategory": "Management",
    "tlsDetails": {
        "tlsVersion": "TLSv1.3",
        "cipherSuite": "TLS_AES_128_GCM_SHA256",
        "clientProvidedHostHeader": "us-east-1.signin.aws.amazon.com"
    }
}

The aws login command uses the OAuth 2.0 authorization code flow with PKCE (Proof Key for Code Exchange) to protect against authorization code interception attacks. This provides a secure alternative to setting up IAM user access keys for getting started with development on AWS. For guidance on additional modern authentication approaches and alternatives to long-term IAM access keys, see the AWS Security Blog post “Beyond IAM access keys: Modern authentication approaches for AWS.”

Conclusion

The login for AWS local development feature is a secure-by-default enhancement that helps customers eliminate the use of long-term credentials for programmatic access with AWS. With aws login, you can start building immediately using the same credentials you use to sign in to the AWS Management Console. This feature is now available across all AWS commercial Regions (excluding China and GovCloud) at no additional cost to customers.

For more information, visit the authentication and access section in the CLI user guide.

If you have feedback about this post, submit comments in the Comments section below.

Shreya Jain

Shreya Jain

Shreya is a Senior Technical Product Manager in AWS Identity. She is energized by bringing clarity and simplicity to complex ideas. When she’s not applying her creative energy at work, you’ll find her at Pilates, dancing, or discovering her next favorite coffee shop.

Sowjanya Rajavaram

Sowjanya Rajavaram

Sowjanya is a Sr Solutions Architect who specializes in Identity and Security in AWS. She works on helping customers of all sizes solve their identity and access management problems. She enjoys traveling and exploring new cultures and food.

Announcing upcoming changes to the AWS Security Token Service global endpoint

Post Syndicated from Palak Arora original https://aws.amazon.com/blogs/security/announcing-upcoming-changes-to-the-aws-security-token-service-global-endpoint/

AWS launched AWS Security Token Service (AWS STS) in August 2011 with a single global endpoint (https://sts.amazonaws.com), hosted in the US East (N. Virginia) AWS Region. To reduce dependency on a single Region, STS launched AWS STS Regional endpoints (https://sts.{Region_identifier}.{partition_domain}) in February 2015. These Regional endpoints allow you to use STS in the same Region as your workloads, which improves both performance and reliability.

However, many customers and third-party tools continue to call the STS global endpoint, and as a result, these customers don’t get the benefits of STS Regional endpoints. To help improve the resiliency and performance of your applications, we are making changes to the STS global endpoint, with no action required from customers. These changes will be released in the coming weeks.

In this blog post, we discuss the upcoming changes to the STS global endpoint and their benefits, and provide our recommendation on which STS endpoint to use going forward.

Upcoming changes to the STS global endpoint

The changes being made to the STS global endpoint will help enhance resiliency and improve performance. Today, all the requests to the STS global endpoint are served by the US East (N. Virginia) Region. Starting in early 2025, requests to the STS global endpoint will be automatically served in the same Region as your AWS deployed workloads. For example, if your application calls sts.amazonaws.com from the US West (Oregon) Region, your calls will be served locally in the US West (Oregon) Region instead of being served by the US East (N. Virginia) Region.

With this change, requests to the STS global endpoint will be served locally if your request originated from AWS Regions that are enabled by default.1 However, requests to the STS global endpoint will continue to be served in US East (N. Virginia) Region if your request originated from opt-in Regions or if you used STS from outside AWS, such as in your on-premises network or data centers.

We will gradually roll out this change to AWS Regions that are enabled by default by mid-2025, starting with the Europe (Stockholm) Region.

We’ve taken the following measures to help avoid disruptions to your existing processes:

  • AWS CloudTrail logs for requests made to the STS global endpoints will be sent to the US East (N. Virginia) Region. CloudTrail logs for requests handled by STS Regional endpoints will continue to be logged to their respective Region in CloudTrail, even if the requests are served locally.
  • CloudTrail logs for operations performed by the STS global and Regional endpoints will have the additional fields endpointType and awsServingRegion to clarify which endpoint and Region served the request.
  • Requests made to the sts.amazonaws.com endpoints will have a value of us-east-1 for the aws:RequestedRegion condition key, regardless of which Region served the request.
  • Requests handled by the sts.amazonaws.com endpoints will not share a request quota with the Regional STS endpoints.

1. In addition, for your requests to be served locally, your DNS request for sts.amazonaws.com must be handled by an Amazon DNS Server in Amazon Virtual Private Cloud (Amazon VPC).

Our recommendation

We continue to recommend that you use the appropriate STS Regional endpoints whenever possible. If you’re using STS from outside AWS, such as in your on-premises networks or data centers, we recommend you use the STS Regional endpoint that is hosted in the same Region as the AWS resource that you need STS credentials to access. If you’re building in opt-in Regions such as Asia Pacific (Hong Kong) or Asia Pacific (Jakarta), we recommend that you use the STS endpoint from the opt-in Region that is hosting your workload. By following the steps in the blog post How to use Regional AWS STS endpoints, you can identify workloads that are still using the global STS endpoint and get insights into how to reconfigure them when required.

If you have feedback about this blog post, submit comments in the Comments section below. If you have questions about this post, contact AWS Support.

Palak Arora
Palak Arora

Palak is a Senior Product Manager at AWS Identity. She has over eight years of cybersecurity experience, with a specialization in the Identity and Access Management (IAM) domain. She has helped various customers across different sectors define their enterprise and customer IAM roadmaps and strategies, and improve their overall technology risk landscape.
Liam Wadman
Liam Wadman

Liam is a Principal Solutions Architect with the AWS Identity team. When he’s not building exciting solutions on AWS or helping customers, he’s often found in the hills of British Columbia on his mountain bike. Liam points out that you cannot spell LIAM without IAM.

Best practices working with self-hosted GitHub Action runners at scale on AWS

Post Syndicated from Shilpa Sharma original https://aws.amazon.com/blogs/devops/best-practices-working-with-self-hosted-github-action-runners-at-scale-on-aws/

Overview

GitHub Actions is a continuous integration and continuous deployment platform that enables the automation of build, test and deployment activities for your workload. GitHub Self-Hosted Runners provide a flexible and customizable option to run your GitHub Action pipelines. These runners allow you to run your builds on your own infrastructure, giving you control over the environment in which your code is built, tested, and deployed. This reduces your security risk and costs, and gives you the ability to use specific tools and technologies that may not be available in GitHub hosted runners. In this blog, I explore security, performance and cost best practices to take into consideration when deploying GitHub Self-Hosted Runners to your AWS environment.

Best Practices

Understand your security responsibilities

GitHub Self-hosted runners, by design, execute code defined within a GitHub repository, either through the workflow scripts or through the repository build process. You must understand that the security of your AWS runner execution environments are dependent upon the security of your GitHub implementation. Whilst a complete overview of GitHub security is outside the scope of this blog, I recommended that before you begin integrating your GitHub environment with your AWS environment, you review and understand at least the following GitHub security configurations.

  • Federate your GitHub users, and manage the lifecycle of identities through a directory.
  • Limit administrative privileges of GitHub repositories, and restrict who is able to administer permissions, write to repositories, modify repository configurations or install GitHub Apps.
  • Limit control over GitHub Actions runner registration and group settings
  • Limit control over GitHub workflows, and follow GitHub’s recommendations on using third-party actions
  • Do not allow public repositories access to self-hosted runners

Reduce security risk with short-lived AWS credentials

Make use of short-lived credentials wherever you can. They expire by default within 1 hour, and you do not need to rotate or explicitly revoke them. Short lived credentials are created by the AWS Security Token Service (STS). If you use federation to access your AWS account, assume roles, or use Amazon EC2 instance profiles and Amazon ECS task roles, you are using STS already!

In almost all cases, you do not need long-lived AWS Identity and Access Management (IAM) credentials (access keys) even for services that do not “run” on AWS – you can extend IAM roles to workloads outside of AWS without requiring you to manage long-term credentials. With GitHub Actions, we suggest you use OpenID Connect (OIDC). OIDC is a decentralized authentication protocol that is natively supported by STS using sts:AssumeRoleWithWebIdentity, GitHub and many other providers. With OIDC, you can create least-privilege IAM roles tied to individual GitHub repositories and their respective actions. GitHub Actions exposes an OIDC provider to each action run that you can utilize for this purpose.

Short lived AWS credentials with GitHub self-hosted runners

Short lived AWS credentials with GitHub self-hosted runners

If you have many repositories that you wish to grant an individual role to, you may run into a hard limit of the number of IAM roles in a single account. While I advocate solving this problem with a multi-account strategy, you can alternatively scale this approach by:

  • using attribute based access control (ABAC) to match claims in the GitHub token (such as repository name, branch, or team) to the AWS resource tags.
  • using role based access control (RBAC) by logically grouping the repositories in GitHub into Teams or applications to create fewer subset of roles.
  • use an identity broker pattern to vend credentials dynamically based on the identity provided to the GitHub workflow.

Use Ephemeral Runners

Configure your GitHub Action runners to run in “ephemeral” mode, which creates (and destroys) individual short-lived compute environments per job on demand. The short environment lifespan and per-build isolation reduces the risk of data leakage , even in multi-tenanted continuous integration environments, as each build job remains isolated from others on the underlying host.

As each job runs on a new environment created on demand, there is no need for a job to wait for an idle runner, simplifying auto-scaling. With the ability to scale runners on demand, you do not need to worry about turning build infrastructure off when it is not needed (for example out of office hours), giving you a cost-efficient setup. To optimize the setup further, consider allowing developers to tag workflows with instance type tags and launch specific instance types that are optimal for respective workflows.

There are a few considerations to take into account when using ephemeral runners:

  • A job will remain queued until the runner EC2 instance has launched and is ready. This can take up to 2 minutes to complete. To speed up this process, consider using an optimized AMI with all prerequisites installed.
  • Since each job is launched on a fresh runner, utilizing caching on the runner is not possible. For example, Docker images and libraries will always be pulled from source.

Use Runner Groups to isolate your runners based on security requirements

By using ephemeral runners in a single GitHub runner group, you are creating a pool of resources in the same AWS account that are used by all repositories sharing this runner group. Your organizational security requirements may dictate that your execution environments must be isolated further, such as by repository or by environment (such as dev, test, prod).

Runner groups allow you to define the runners that will execute your workflows on a repository-by-repository basis. Creating multiple runner groups not only allow you to provide different types of compute environments, but allow you to place your workflow executions in locations within AWS that are isolated from each other. For example, you may choose to locate your development workflows in one runner group and test workflows in another, with each ephemeral runner group being deployed to a different AWS account.

Runners by definition execute code on behalf of your GitHub users. At a minimum, I recommend that your ephemeral runner groups are contained within their own AWS account and that this AWS account has minimal access to other organizational resources. When access to organizational resources is required, this can be given on a repository-by-repository basis through IAM role assumption with OIDC, and these roles can be given least-privilege access to the resources they require.

Optimize runner start up time using Amazon EC2 warm-pools

Ephemeral runners provide strong build isolation, simplicity and security. Since the runners are launched on demand, the job will be required to wait for the runner to launch and register itself with GitHub. While this usually happens in under 2 minutes, this wait time might not be acceptable in some scenarios.

We can use a warm pool of pre-registered ephemeral runners to reduce the wait time. These runners will listen to the incoming GitHub workflow events actively and as soon as an incoming workflow event is queued, it is picked up readily by the warm pool of registered EC2 runners.

While there can be multiple strategies to manage the warm pool, I recommend the following strategy which uses AWS Lambda for scaling up and scaling down the ephemeral runners:

GitHub self-hosted runners warm pool flow

GitHub self-hosted runners warm pool flow

A GitHub workflow event is created on a trigger like push of code in a master repository or a merge of pull request. This event triggers a Lambda function via webhook and Amazon API Gateway endpoint. The Lambda function helps in validating the GitHub workflow event payload and log events for observability & building metrics. It can be used optionally to replenish the warm pool. There are separate backend Lambda functions to launch, scale up and scale down the warm pool of EC2 instances. The EC2 instances or runners are registered with GitHub at the time of launch. The registered runners listens for incoming GitHub work flow events using GitHub’s internal job queue and as soon as workflow events are triggered, its assigned by GitHub to one of the runners in warm pool for job execution. The runner is automatically de-registered once the job completes. A job can be a build, or deploy request as defined in your GitHub workflow.

With warm pool in place, it is expected to help reduce wait time by 70-80%.

Considerations

  • Increased complexity as there is a possibility of over provisioning runners. This will depend on how long a runner EC2 instance requires to launch and reach a ready state and how frequently the scale up Lambda is configured to run. For example, if the scale up Lambda runs every 1 minute and the EC2 runner requires 2 minutes to launch, then the scale up Lambda will launch 2 instances. The mitigation is to use Auto scaling groups to manage the EC2 warm pool and desired capacity with predictive scaling policies tying back to incoming GitHub workflow events i.e. build job requests.
  • This strategy may have to be revised when supporting Windows or Mac based runners given the spin up times can vary.

Use an optimized AMI to speed up the launch of GitHub self-hosted runners

Amazon Machine Images (AMI) provide a pre-configured, optimized image that can be used to launch the runner EC2 instance. By using AMIs, you will be able to reduce the launch time of a new runner since dependencies and tools are already installed. Consistency across builds is guaranteed due to all instances running the same version of dependencies and tools. Runners will benefit from increased stability and security compliance as images are tested and approved before being distributed for use as runner instances.

When building an AMI for use as a GitHub self-hosted runner the following considerations need to be made:

  • Choosing the right OS base image for the builds. This will depend on your tech stack and toolset.
  • Install the GitHub runner app as part of the image. Ensure automatic runner updates are enabled to reduce the overhead of managing running versions. In case a specific runner version must be used you can disable automatic runner updates to avoid untested changes. Keep in mind, if disabled, a runner will need to be updated manually within 30 days of a new version becoming available.
  • Install build tools and dependencies from trusted sources.
  • Ensure runner logs are captured and forwarded to your security information and event management (SIEM) of choice.
  • The runner requires internet connectivity to access GitHub. This may require configuring proxy settings on the instance depending on your networking setup.
  • Configure any artifact repositories the runner requires. This includes sources and authentication.
  • Automate the creation of the AMI using tools such as EC2 Image Builder to achieve consistency.

Use Spot instances to save costs

The cost associated with scaling up the runners as well as maintaining a hot pool can be minimized using Spot Instances, which can result in savings up to 90% compared to On-Demand prices. However, there could be requirements where we can have longer running builds or batch jobs that cannot tolerate the spot instance terminating on 2 minutes notice. So, having a mixed pool of instances will be a good option where such jobs should be routed to on-demand EC2 instances and the rest on the Spot instances to cater for diverse build needs. This can be done by assigning labels to the runner during launch /registration. In that case, the on-demand instances will be launched and we can a savings plan in place to get cost benefits.

Record runner metrics using Amazon CloudWatch for Observability

It is vital for the observability of the overall platform to generate metrics for the EC2 based GitHub self-hosted runners. Examples of the GitHub runners metrics can be: the number of GitHub workflow events queued or completed in a minute, or number of EC2 runners up and available in the warm pool etc.

We can log the triggered workflow events and runner logs in Amazon CloudWatch and then use CloudWatch embedded metrics to collect metrics such as number of workflow events queued, in progress and completed. Using elements like “started_at” and “completed_at” timings which are part of workflow event payload we can calculate build wait time.

As an example, below is the sample incoming GitHub workflow event logged in Amazon Cloud Watch Logs

<p> </p><p><code>{</code></p><p><code>"hostname": "xxx.xxx.xxx.xxx",</code></p><p><code>"requestId": "aafddsd55-fgcf555",</code></p><p><code>"date": "2022-10-11T05:50:35.816Z",</code></p><p><code>"logLevel": "info",</code></p><p><code>"logLevelId": 3,</code></p><p><code>"filePath": "index.js",</code></p><p><code>"fullFilePath": "/var/task/index.js",</code></p><p><code>"fileNa<a class="ab-item" href="https://aws-blogs-prod.amazon.com/devops/" aria-haspopup="true">AWS DevOps Blog</a>me": "index.js",</code></p><p><code>"lineNumber": 83889,</code></p><p><code>"columnNumber": 12,</code></p><p><code>"isConstructor": false,</code></p><p><code>"functionName": "handle",</code></p><p><code>"argumentsArray": [</code></p><p><code>"Processing Github event",</code></p><p><code>"{\"event\":\"workflow_job\",\"repository\":\"testorg-poc/github-actions-test-repo\",\"action\":\"queued\",\"name\":\"jobname-buildanddeploy\",\"status\":\"queued\",\"started_at\":\"2022-10-11T05:50:33Z\",\"completed_at\":null,\"conclusion\":null}"</code></p><p><code>]</code></p><p><code>}</code></p>

In order to use the logged elements of above log into metrics by capturing \”status\”:\”queued\”,\”repository\”:\”testorg-poc/github-actions-test-repo\c, \”name\”:\”jobname-buildanddeploy\” ,and workflow \”event\” , one can build embedded metrics in the application code or AWS metrics Lambda using any of the cloud watch metrics client library Creating logs in embedded metric format using the client libraries – Amazon CloudWatch based on the language of your choice listed.c

Essentially what one of those libraries will do under the hood is map elements from Log event into dimension fields so cloud watch can then read and generate a metric using that.

console.log(<br />      JSON.stringify({<br />        message: '[Embedded Metric]', // Identifier for metric logs in CW logs<br />        build_event_metric: 1, // Metric Name and value<br />        status: `${status}`, // Dimension name and value<br />        eventName: `${eventName}`,<br />        repository: `${repository}`,<br />        name: `${name}`,<br />        <br />        _aws: {<br />          Timestamp: Date.now(),<br />          CloudWatchMetrics: [<br />            {<br />              Namespace: `demo_2`,<br />              Dimensions: [['status','eventName','repository','name']],<br />              Metrics: [<br />                {<br />                  Name: 'build_event_metric',<br />                  Unit: 'Count',<br />                },<br />              ],<br />            },<br />          ],<br />        },<br />      })<br />    );

A sample architecture:

Consumption of GitHub webhook events

Consumption of GitHub webhook events

The cloud watch metrics can be published to your dashboards or forwarded to any external tool based on requirements. Once we have metrics, CloudWatch alarms and notifications can be configured to manage pool exhaustion.

Conclusion

In this blog post, we outlined several best practices covering security, scalability and cost efficiency when using GitHub Actions with EC2 self-hosted runners on AWS. We covered how using short-lived credentials combined with ephemeral runners will reduce security and build contamination risks. We also showed how runners can be optimized for faster startup and job execution AMIs and warm EC2 pools. Last but not least, cost efficiencies can be maximized by using Spot instances for runners in the right scenarios.

Resources:

How to access AWS resources from Microsoft Entra ID tenants using AWS Security Token Service

Post Syndicated from Vasanth Selvaraj original https://aws.amazon.com/blogs/security/how-to-access-aws-resources-from-microsoft-entra-id-tenants-using-aws-security-token-service/

Use of long-term access keys for authentication between cloud resources increases the risk of key exposure and unauthorized secrets reuse. Amazon Web Services (AWS) has developed a solution to enable customers to securely authenticate Azure resources with AWS resources using short-lived tokens to reduce risks to secure authentication.

In this post, we guide you through the configuration of AWS Identity and Access Management (IAM) OpenID Connect (OIDC) identity provider to establish trust with a Microsoft Entra ID tenant. By following the steps outlined in this post, you will enable a Microsoft Azure hosted resources to use an IAM role, with privileges, to access your AWS resources.

Solution overview

In this solution, we show you how to obtain temporary credentials in IAM. The solution uses AWS Security Token Service (AWS STS) in conjunction with Azure managed identities and Azure App Registration. This method provides a more secure and efficient way to bridge Azure and AWS clouds, providing seamless integration without compromising secure authentication and authorization standards.

Figure 1: Azure cloud resources access AWS resources with temporary security credentials

Figure 1: Azure cloud resources access AWS resources with temporary security credentials

As shown in Figure 1, the process is as follows:

  1. Create and attach an Azure managed identity to an Azure virtual machine (VM).
  2. Azure VM gets an Azure access token from the managed identity and sends it to AWS STS to retrieve temporary security credentials.
  3. An IAM role created with a valid Azure tenant audience and subject validates that the claim is sourced from a trusted entity and sends temporary security credentials to the requesting Azure VM.
  4. Azure VM accesses AWS resources using the AWS STS provided temporary security credentials.

Prerequisites

You must have the following before you begin:

  1. An AWS account.
  2. An Azure account subscription.
  3. In your Azure account, ensure there’s an existing managed identity or create a new one for testing this solution. More information can be found in Configure managed identities for Azure resources on a VM using the Azure portal.
  4. Create a VM instance in Azure and attach the managed identity that you created in Step 3.
  5. Install jq, boto3, and AWS Command Line Interface (AWS CLI) version 2 on an Azure VM for testing.

Implementation

To prepare the authentication process with Microsoft Entra ID, an enterprise application must be created in Microsoft Entra ID. This serves as a sign-in endpoint and provides the necessary user identity information through OIDC access tokens to the identity provider (IdP) of the target AWS account.

Note: You can get short term credentials by providing access tokens from managed identities or enterprise applications. This post covers the enterprise application use case.

Register a new application in Azure

  1. In the Azure portal, select Microsoft Entra ID.
  2. Select App registrations.
  3. Select New registration.
  4. Enter a name for your application and then select an option in Supported account types (in this example, we chose Accounts in this Organization directory only). Leave the other options as is. Then choose Register.
    Figure 2: Register an application in the Azure portal

    Figure 2: Register an application in the Azure portal

Configure the application ID URI

  1. In the Azure portal, select Microsoft Entra ID.
  2. Select App registrations.
  3. On the App registrations page, select All applications and choose the newly registered application.
  4. On the newly registered application’s overview page, choose Application ID URI and then select Add.
  5. On the Edit application ID URI page, enter the value of the URI, which looks like urn://<name of the application> or api://<name of the application>.
  6. The application ID URI will be used later as the audience in the identity provider(idP) section of AWS.
    Figure 3: Configure the application ID URI

    Figure 3: Configure the application ID URI

  7. Open the newly registered application’s overview page.
  8. In the navigation pane, under Manage, choose App roles.
  9. Select Create app role and then enter a Display name and for Allowed member types, select Both (Users/Groups + Applications).
  10. For Description, enter a description.
  11. Select Do you want to enable this app role? And then choose Apply.
    Figure 4: Create and enable an application role

    Figure 4: Create and enable an application role

  12. Assign a managed identity—as created in Step 4 of the prerequisites—to the new application role. This operation can only be done by either using the Azure Cloud Shell or running scripts locally by installing the latest version of the Microsoft Graph PowerShell SDK. (For more information about assigning managed identities to application roles using PowerShell, see Azure documentation.)

    You must have the following information:

    • ObjectID: To find the managed identity’s Object (Principal) ID, go to the Managed Identities page, select the identity name, and then select Overview.
      Figure 5: Find the ObjectID of the managed identity

      Figure 5: Find the ObjectID of the managed identity

    • ID: To find the ID of the application role, go to App registrations, select the application name, and then select App roles.
      Figure 6: Find the ID of the application role

      Figure 6: Find the ID of the application role

    • PrincipalID: Same as ObjectID, which is the managed identity’s Object (Principal) ID.
    • ResourceID: The ObjectID of the resource service principal, which you can find by going to the Enterprise applications page and selection the application. Select Overview and then Properties to find the ObjectID.
      Figure 7: Find the ResourceID

      Figure 7: Find the ResourceID

  13. With the resource IDs, you can now use Azure Cloud Shell and run the following script in PowerShell terminal with New-AzureADServiceAppRoleAssignment. Replace the variables with the resource IDs.
    PS /home/user> Connect-AzureAD
    PS /home/user> New-AzureADServiceAppRoleAssignment -ObjectId <ObjectID> -Id <ID> -PrincipalId <PrincipalID> -ResourceId <ResourceID>
    

Configure AWS

  1. In the AWS Management Console for IAM, create an IAM Identity Provider.
    1. In the left navigation pane, select Identity providers and then choose Add an identity provider.
    2. For Provider type, choose OpenID Connect.
    3. For Provider URL, enter https://sts.windows.net/<Microsoft Entra Tenant ID>. Replace <Microsoft Entra Tenant ID> with your Tenant ID from Azure. This allows only identities from your Azure tenant to access your AWS resources.
    4. For Audience use the client_id of the Azure managed identity or the application ID URI from enterprise applications.
      • For Audience, enter the application ID URI that you configured on step 5 of Configure the application ID URI. If you have additional client IDs (also known as audiences) for this IdP, you can add them to the provider detail page later.
      • You can also use different audiences in the role trust policy in the next step to limit the roles that specific audiences can assume. To do so, you must provide a StringEquals condition in the trust policy of the IAM role.
        Figure 8: Adding an audience (client ID)

        Figure 8: Adding an audience (client ID)

  2. Using an OIDC principal without a condition can be overly permissive. To make sure that only the intended identities assume the role, provide an audience (aud) and subject (sub) as conditions in the role trust policy for this IAM role.

    sts.windows.net/<Microsoft Entra Tenant ID>/:sub represents the identity of your Azure workload that limits access to the specific Azure identity that can assume this role from the Azure tenant. See the following example for conditions.

    • Replace <Microsoft Entra Tenant ID> with your tenant ID from Azure.
    • Replace <Application ID URI> with your audience value configured in the previous step.
    • Replace <Managed Identity’s object (Principal) ID> with your ObjectID captured in the first bullet of Step 12 of Configure the application ID URI.
    {
        “Version”: “2012-10-17”,
        “Statement”: [{
            “Effect”: “Allow”,
            “Principal”: {
                “Federated”: “arn:aws:iam::<AWS Account ID>:oidc-provider/sts.windows.net/<Microsoft Entra Tenant ID>/”
            },
            “Action”: “sts:AssumeRoleWithWebIdentity”,
            “Condition”: {
                “StringEquals”: {
                    “sts.windows.net/<Microsoft Entra Tenant ID>/:aud”: “<Application ID URI>”,
                    “sts.windows.net/<Microsoft Entra Tenant ID>/:sub”: “ <Managed Identity’s Object (Principal)ID>”
                }
            }
        }]
    }
    

Test the access

To test the access, you’ll assign a user assigned managed identity to an existing VM.

  1. Sign in to the Azure portal.
  2. Navigate to the desired VM and select Identity, User assigned, and then choose Add.
    Figure 9: Assigning a User assigned Identity

    Figure 9: Assigning a User assigned Identity

  3. Select the managed identity created as part of prerequisite and then choose Add.
    Figure 10: Add a user assigned managed identity

    Figure 10: Add a user assigned managed identity

  4. In AWS, we used credential_process in a separate AWS Config profile to dynamically and programmatically retrieve AWS temporary credentials. The credential process calls a bash script that retrieves an access token from Azure and uses the token to obtain temporary credentials from AWS STS. For the syntax and operating system requirements, see Source credentials with an external process. For this post, we created a custom profile called DevTeam-S3ReadOnlyAccess, as shown in the config file:
    [profile DevTeam-S3ReadOnlyAccess]
    credential_process = /opt/bin/credentials.sh
    region = ap-southeast-2
    

    To use different settings, you can create and reference additional profiles.

  5. For this example, credentials_process invokes the script /opt/bin/credentials.sh. Replace <111122223333> with your own account ID.
    /opt/bin/credentials.sh
    #!/bin/bash
    
    # Application ID URI from Azure
    AUDIENCE=”urn://dev-aws-account-team-a”
    # Role ARN from AWS to assume
    ROLE_ARN=”arn:aws:iam::<111122223333>:role/Azure-AWSAssumeRole”
    
    # Retrieve Access Token using Audience
    access_token=$(curl “http://169.254.169.254/metadata/identity/oauth2/token?api-version=2018-02-01&resource=${AUDIENCE}” -H “Metadata:true” -s| jq -r ‘.access_token’)
    
    # Create credentials following JSON format required by AWS CLI
    credentials=$(aws sts assume-role-with-web-identity –role-arn ${ROLE_ARN} –web-identity-token $access_token –role-session-name AWSAssumeRole|jq ‘.Credentials’ | jq ‘.Version=1’)
    
    # Write credentials to STDOUT for AWS CLI to pick up
    echo $credentials 
    

  6. After you configure the AWS Config CLI file for the credential_process script, verify the setup by accessing AWS resources from Azure VM.
    1. Use AWS CLI to run the following command. You should see list of Amazon Simple Storage Service (Amazon S3) buckets from your account.
      aws s3 ls –profile DevTeam-S3ReadOnlyAccess
      

    2. Using AWS SDK for Python to run s3AccessFromAzure.py. You should see a list of S3 buckets from your account. This example also demonstrates specifying a profile to use for credential purposes.
      S3AccessFromAzure.py
      import boto3
      
      # Assume Role with Web Identity Provider profile
      session = boto3.Session(profile_name=’DevTeam-S3ReadOnlyAccess’)
      
      # Retrieve the list of existing buckets
      s3 = session.client(‘s3’)
      response = s3.list_buckets()
      
      # Output the bucket names
      print(‘Existing buckets:’)
      for bucket in response[‘Buckets’]:
          print(f’  {bucket[“Name”]}’)
      

Note: The AWS CLI doesn’t cache external process credentials; instead, the AWS CLI calls the credential_process for every CLI request, which creates a new role session. If you use AWS SDKs, the credentials are cached and reused until they expire.

We used Azure VM as an example to access AWS resources, but a similar approach can be used for any compute resources in Azure that are capable of issuing Azure credentials.

Clean up

If you don’t need the resources that you created for this walkthrough, delete them to avoid future charges for the deployed resources:

  • Delete the VM instance, managed identity, and enterprise applications created in Azure.
  • Delete the resources that you provisioned on AWS to test the solution.

Conclusion

In this post, we showed you how to securely access AWS resources from Azure workloads using an IAM role assumed with one-time, short-term credentials. By using this solution, your Azure workloads will request temporary security credentials and remove the need for long-term AWS credentials or other secrets usage that are less secure methods of authentication.

Use the following resources to help you get started with AWS IAM federation:

If you have feedback about this post, submit comments in the Comments section below.

Vasanth Selvaraj

Vasanth Selvaraj

Vasanth is a Senior Security Specialist Technical Account Manager based in Sydney, Australia. Vasanth has a strong passion for Cyber Security. In this role, he assists customers in defending against cyber threats and addresses their security and compliance challenges.

Sam Zhang

Sam Zhang

Sam is a Security Specialist Technical Account Manager based in Sydney, Australia. Sam possesses expertise in infrastructure security, IAM, and threat detection. Sam is dedicated to aiding enterprises in establishing secure cloud infrastructure and workloads.

How to use Regional AWS STS endpoints

Post Syndicated from Darius Januskis original https://aws.amazon.com/blogs/security/how-to-use-regional-aws-sts-endpoints/

This blog post provides recommendations that you can use to help improve resiliency in the unlikely event of disrupted availability of the global (now legacy) AWS Security Token Service (AWS STS) endpoint. Although the global (legacy) AWS STS endpoint https://sts.amazonaws.com is highly available, it’s hosted in a single AWS Region—US East (N. Virginia)—and like other endpoints, it doesn’t provide automatic failover to endpoints in other Regions. In this post I will show you how to use Regional AWS STS endpoints in your configurations to improve the performance and resiliency of your workloads.

For authentication, it’s best to use temporary credentials instead of long-term credentials to help reduce risks, such as inadvertent disclosure, sharing, or theft of credentials. With AWS STS, trusted users can request temporary, limited-privilege credentials to access AWS resources.

Temporary credentials include an access key pair and a session token. The access key pair consists of an access key ID and a secret key. AWS STS generates temporary security credentials dynamically and provides them to the user when requested, which eliminates the need for long-term storage. Temporary security credentials have a limited lifetime so you don’t have to manage or rotate them.

To get these credentials, you can use several different methods:

Figure 1: Methods to request credentials from AWS STS

Figure 1: Methods to request credentials from AWS STS

Global (legacy) and Regional AWS STS endpoints

To connect programmatically to an AWS service, you use an endpoint. An endpoint is the URL of the entry point for AWS STS.

AWS STS provides Regional endpoints in every Region. AWS initially built AWS STS with a global endpoint (now legacy) https://sts.amazonaws.com, which is hosted in the US East (N. Virginia) Region (us-east-1). Regional AWS STS endpoints are activated by default for Regions that are enabled by default in your AWS account. For example, https://sts.us-east-2.amazonaws.com is the US East (Ohio) Regional endpoint. By default, AWS services use Regional AWS STS endpoints. For example, IAM Roles Anywhere uses the Regional STS endpoint that corresponds to the trust anchor. For a complete list of AWS STS endpoints for each Region, see AWS Security Token Service endpoints and quotas. You can’t activate an AWS STS endpoint in a Region that is disabled. For more information on which AWS STS endpoints are activated by default and which endpoints you can activate or deactivate, see Regions and endpoints.

As noted previously, the global (legacy) AWS STS endpoint https://sts.amazonaws.com is hosted in a single Region — US East (N. Virginia) — and like other endpoints, it doesn’t provide automatic failover to endpoints in other Regions. If your workloads on AWS or outside of AWS are configured to use the global (legacy) AWS STS endpoint https://sts.amazonaws.com, you introduce a dependency on a single Region: US East (N. Virginia). In the unlikely event that the endpoint becomes unavailable in that Region or connectivity between your resources and that Region is lost, your workloads won’t be able to use AWS STS to retrieve temporary credentials, which poses an availability risk to your workloads.

AWS recommends that you use Regional AWS STS endpoints (https://sts.<region-name>.amazonaws.com) instead of the global (legacy) AWS STS endpoint.

In addition to improved resiliency, Regional endpoints have other benefits:

  • Isolation and containment — By making requests to an AWS STS endpoint in the same Region as your workloads, you can minimize cross-Region dependencies and align the scope of your resources with the scope of your temporary security credentials to help address availability and security concerns. For example, if your workloads are running in the US East (Ohio) Region, you can target the Regional AWS STS endpoint in the US East (Ohio) Region (us-east-2) to remove dependencies on other Regions.
  • Performance — By making your AWS STS requests to an endpoint that is closer to your services and applications, you can access AWS STS with lower latency and shorter response times.

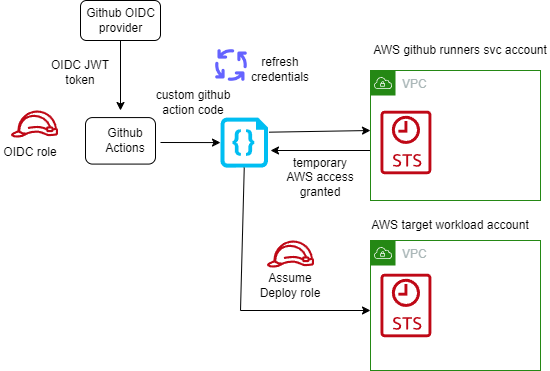
Figure 2 illustrates the process for using an AWS principal to assume an AWS Identity and Access Management (IAM) role through the AWS STS AssumeRole API, which returns a set of temporary security credentials:

Figure 2: Assume an IAM role by using an API call to a Regional AWS STS endpoint

Figure 2: Assume an IAM role by using an API call to a Regional AWS STS endpoint

Calls to AWS STS within the same Region

You should configure your workloads within a specific Region to use only the Regional AWS STS endpoint for that Region. By using a Regional endpoint, you can use AWS STS in the same Region as your workloads, removing cross-Region dependency. For example, workloads in the US East (Ohio) Region should use only the Regional endpoint https://sts.us-east-2.amazonaws.com to call AWS STS. If a Regional AWS STS endpoint becomes unreachable, your workloads shouldn’t call AWS STS endpoints outside of the operating Region. If your workload has a multi-Region resiliency requirement, your other active or standby Region should use a Regional AWS STS endpoint for that Region and should be deployed such that the application can function despite a Regional failure. You should direct STS traffic to the STS endpoint within the same Region, isolated and independent from other Regions, and remove dependencies on the global (legacy) endpoint.

Calls to AWS STS from outside AWS

You should configure your workloads outside of AWS to call the appropriate Regional AWS STS endpoints that offer the lowest latency to your workload located outside of AWS. If your workload has a multi-Region resiliency requirement, build failover logic for AWS STS calls to other Regions in the event that Regional AWS STS endpoints become unreachable. Temporary security credentials obtained from Regional AWS STS endpoints are valid globally for the default session duration or duration that you specify.

How to configure Regional AWS STS endpoints for your tools and SDKs

I recommend that you use the latest major versions of the AWS Command Line Interface (CLI) or AWS SDK to call AWS STS APIs.

AWS CLI

By default, the AWS CLI version 2 sends AWS STS API requests to the Regional AWS STS endpoint for the currently configured Region. If you are using AWS CLI v2, you don’t need to make additional changes.

By default, the AWS CLI v1 sends AWS STS requests to the global (legacy) AWS STS endpoint. To check the version of the AWS CLI that you are using, run the following command: $ aws –version.

When you run AWS CLI commands, the AWS CLI looks for credential configuration in a specific order—first in shell environment variables and then in the local AWS configuration file (~/.aws/config).

AWS SDK

AWS SDKs are available for a variety of programming languages and environments. Since July 2022, major new versions of the AWS SDK default to Regional AWS STS endpoints and use the endpoint corresponding to the currently configured Region. If you use a major version of the AWS SDK that was released after July 2022, you don’t need to make additional changes.

An AWS SDK looks at various configuration locations until it finds credential configuration values. For example, the AWS SDK for Python (Boto3) adheres to the following lookup order when it searches through sources for configuration values:

  1. A configuration object created and passed as the AWS configuration parameter when creating a client
  2. Environment variables
  3. The AWS configuration file ~/.aws/config

If you still use AWS CLI v1, or your AWS SDK version doesn’t default to a Regional AWS STS endpoint, you have the following options to set the Regional AWS STS endpoint:

Option 1 — Use a shared AWS configuration file setting

The configuration file is located at ~/.aws/config on Linux or macOS, and at C:\Users\USERNAME\.aws\config on Windows. To use the Regional endpoint, add the sts_regional_endpoints parameter.

The following example shows how you can set the value for the Regional AWS STS endpoint in the US East (Ohio) Region (us-east-2), by using the default profile in the AWS configuration file:

[default]
region = us-east-2
sts_regional_endpoints = regional

The valid values for the AWS STS endpoint parameter (sts_regional_endpoints) are:

  • legacy (default) — Uses the global (legacy) AWS STS endpoint, sts.amazonaws.com.
  • regional — Uses the AWS STS endpoint for the currently configured Region.

Note: Since July 2022, major new versions of the AWS SDK default to Regional AWS STS endpoints and use the endpoint corresponding to the currently configured Region. If you are using AWS CLI v1, you must use version 1.16.266 or later to use the AWS STS endpoint parameter.

You can use the --debug option with the AWS CLI command to receive the debug log and validate which AWS STS endpoint was used.

$ aws sts get-caller-identity \
$ --region us-east-2 \
$ --debug

If you search for UseGlobalEndpoint in your debug log, you’ll find that the UseGlobalEndpoint parameter is set to False, and you’ll see the Regional endpoint provider fully qualified domain name (FQDN) when the Regional AWS STS endpoint is configured in a shared AWS configuration file or environment variables:

2023-09-11 18:51:11,300 – MainThread – botocore.regions – DEBUG – Calling endpoint provider with parameters: {'Region': 'us-east-2', 'UseDualStack': False, 'UseFIPS': False, 'UseGlobalEndpoint': False}
2023-09-11 18:51:11,300 – MainThread – botocore.regions – DEBUG – Endpoint provider result: https://sts.us-east-2.amazonaws.com

For a list of AWS SDKs that support shared AWS configuration file settings for Regional AWS STS endpoints, see Compatibility with AWS SDKS.

Option 2 — Use environment variables

Environment variables provide another way to specify configuration options. They are global and affect calls to AWS services. Most SDKs support environment variables. When you set the environment variable, the SDK uses that value until the end of your shell session or until you set the variable to a different value. To make the variables persist across future sessions, set them in your shell’s startup script.

The following example shows how you can set the value for the Regional AWS STS endpoint in the US East (Ohio) Region (us-east-2) by using environment variables:

Linux or macOS

$ export AWS_DEFAULT_REGION=us-east-2
$ export AWS_STS_REGIONAL_ENDPOINTS=regional

You can run the command $ (echo $AWS_DEFAULT_REGION; echo $AWS_STS_REGIONAL_ENDPOINTS) to validate the variables. The output should look similar to the following:

us-east-2
regional

Windows

C:\> set AWS_DEFAULT_REGION=us-east-2
C:\> set AWS_STS_REGIONAL_ENDPOINTS=regional

The following example shows how you can configure an STS client with the AWS SDK for Python (Boto3) to use a Regional AWS STS endpoint by setting the environment variable:

import boto3
import os
os.environ["AWS_DEFAULT_REGION"] = "us-east-2"
os.environ["AWS_STS_REGIONAL_ENDPOINTS"] = "regional"

You can use the metadata attribute sts_client.meta.endpoint_url to inspect and validate how an STS client is configured. The output should look similar to the following:

>>> sts_client = boto3.client("sts")
>>> sts_client.meta.endpoint_url
'https://sts.us-east-2.amazonaws.com'

For a list of AWS SDKs that support environment variable settings for Regional AWS STS endpoints, see Compatibility with AWS SDKs.

Option 3 — Construct an endpoint URL

You can also manually construct an endpoint URL for a specific Regional AWS STS endpoint.

The following example shows how you can configure the STS client with AWS SDK for Python (Boto3) to use a Regional AWS STS endpoint by setting a specific endpoint URL:

import boto3
sts_client = boto3.client('sts', region_name='us-east-2', endpoint_url='https://sts.us-east-2.amazonaws.com')

Use a VPC endpoint with AWS STS

You can create a private connection to AWS STS from the resources that you deployed in your Amazon VPCs. AWS STS integrates with AWS PrivateLink by using interface VPC endpoints. The network traffic on AWS PrivateLink stays on the global AWS network backbone and doesn’t traverse the public internet. When you configure a VPC endpoint for AWS STS, the traffic for the Regional AWS STS endpoint traverses to that endpoint.

By default, the DNS in your VPC will update the entry for the Regional AWS STS endpoint to resolve to the private IP address of the VPC endpoint for AWS STS in your VPC. The following output from an Amazon Elastic Compute Cloud (Amazon EC2) instance shows the DNS name for the AWS STS endpoint resolving to the private IP address of the VPC endpoint for AWS STS:

[ec2-user@ip-10-120-136-166 ~]$ nslookup sts.us-east-2.amazonaws.com
Server:         10.120.0.2
Address:        10.120.0.2#53

Non-authoritative answer:
Name:   sts.us-east-2.amazonaws.com
Address: 10.120.138.148

After you create an interface VPC endpoint for AWS STS in your Region, set the value for the respective Regional AWS STS endpoint by using environment variables to access AWS STS in the same Region.

The output of the following log shows that an AWS STS call was made to the Regional AWS STS endpoint:

POST
/

content-type:application/x-www-form-urlencoded; charset=utf-8
host:sts.us-east-2.amazonaws.com

Log AWS STS requests

You can use AWS CloudTrail events to get information about the request and endpoint that was used for AWS STS. This information can help you identify AWS STS request patterns and validate if you are still using the global (legacy) STS endpoint.

An event in CloudTrail is the record of an activity in an AWS account. CloudTrail events provide a history of both API and non-API account activity made through the AWS Management Console, AWS SDKs, command line tools, and other AWS services.

Log locations

  • Requests to Regional AWS STS endpoints sts.<region-name>.amazonaws.com are logged in CloudTrail within their respective Region.
  • Requests to the global (legacy) STS endpoint sts.amazonaws.com are logged within the US East (N. Virginia) Region (us-east-1).

Log fields

  • Requests to Regional AWS STS endpoints and global endpoint are logged in the tlsDetails field in CloudTrail. You can use this field to determine if the request was made to a Regional or global (legacy) endpoint.
  • Requests made from a VPC endpoint are logged in the vpcEndpointId field in CloudTrail.

The following example shows a CloudTrail event for an STS request to a Regional AWS STS endpoint with a VPC endpoint.

"eventType": "AwsApiCall",
"managementEvent": true,
"recipientAccountId": "123456789012",
"vpcEndpointId": "vpce-021345abcdef6789",
"eventCategory": "Management",
"tlsDetails": {
    "tlsVersion": "TLSv1.2",
    "cipherSuite": "ECDHE-RSA-AES128-GCM-SHA256",
    "clientProvidedHostHeader": "sts.us-east-2.amazonaws.com"
}

The following example shows a CloudTrail event for an STS request to the global (legacy) AWS STS endpoint.

"eventType": "AwsApiCall",
"managementEvent": true,
"recipientAccountId": "123456789012",
"eventCategory": "Management",
"tlsDetails": {
    "tlsVersion": "TLSv1.2",
    "cipherSuite": "ECDHE-RSA-AES128-GCM-SHA256",
    "clientProvidedHostHeader": "sts.amazonaws.com"
}

To interactively search and analyze your AWS STS log data, use AWS CloudWatch Logs Insights or Amazon Athena.

CloudWatch Logs Insights

The following example shows how to run a CloudWatch Logs Insights query to look for API calls made to the global (legacy) AWS STS endpoint. Before you can query CloudTrail events, you must configure a CloudTrail trail to send events to CloudWatch Logs.

filter eventSource="sts.amazonaws.com" and tlsDetails.clientProvidedHostHeader="sts.amazonaws.com"
| fields eventTime, recipientAccountId, eventName, tlsDetails.clientProvidedHostHeader, sourceIPAddress, userIdentity.arn, @message
| sort eventTime desc

The query output shows event details for an AWS STS call made to the global (legacy) AWS STS endpoint https://sts.amazonaws.com.

Figure 3: Use a CloudWatch Log Insights query to look for STS API calls

Figure 3: Use a CloudWatch Log Insights query to look for STS API calls

Amazon Athena

The following example shows how to query CloudTrail events with Amazon Athena and search for API calls made to the global (legacy) AWS STS endpoint.

SELECT
    eventtime,
    recipientaccountid,
    eventname,
    tlsdetails.clientProvidedHostHeader,
    sourceipaddress,
    eventid,
    useridentity.arn
FROM "cloudtrail_logs"
WHERE
    eventsource = 'sts.amazonaws.com' AND
    tlsdetails.clientProvidedHostHeader = 'sts.amazonaws.com'
ORDER BY eventtime DESC

The query output shows STS calls made to the global (legacy) AWS STS endpoint https://sts.amazonaws.com.

Figure 4: Use Athena to search for STS API calls and identify STS endpoints

Figure 4: Use Athena to search for STS API calls and identify STS endpoints

Conclusion

In this post, you learned how to use Regional AWS STS endpoints to help improve resiliency, reduce latency, and increase session token usage for the operating Regions in your AWS environment.

AWS recommends that you check the configuration and usage of AWS STS endpoints in your environment, validate AWS STS activity in your CloudTrail logs, and confirm that Regional AWS STS endpoints are used.

If you have questions, post them in the Security Identity and Compliance re:Post topic or reach out to AWS Support.

Want more AWS Security news? Follow us on X.

Darius Januskis

Darius is a Senior Solutions Architect at AWS helping global financial services customers in their journey to the cloud. He is a passionate technology enthusiast who enjoys working with customers and helping them build well-architected solutions. His core interests include security, DevOps, automation, and serverless technologies.

How to use tokenization to improve data security and reduce audit scope

Post Syndicated from Tim Winston original https://aws.amazon.com/blogs/security/how-to-use-tokenization-to-improve-data-security-and-reduce-audit-scope/

Tokenization of sensitive data elements is a hot topic, but you may not know what to tokenize, or even how to determine if tokenization is right for your organization’s business needs. Industries subject to financial, data security, regulatory, or privacy compliance standards are increasingly looking for tokenization solutions to minimize distribution of sensitive data, reduce risk of exposure, improve security posture, and alleviate compliance obligations. This post provides guidance to determine your requirements for tokenization, with an emphasis on the compliance lens given our experience as PCI Qualified Security Assessors (PCI QSA).

What is tokenization?

Tokenization is the process of replacing actual sensitive data elements with non-sensitive data elements that have no exploitable value for data security purposes. Security-sensitive applications use tokenization to replace sensitive data, such as personally identifiable information (PII) or protected health information (PHI), with tokens to reduce security risks.

De-tokenization returns the original data element for a provided token. Applications may require access to the original data, or an element of the original data, for decisions, analysis, or personalized messaging. To minimize the need to de-tokenize data and to reduce security exposure, tokens can retain attributes of the original data to enable processing and analysis using token values instead of the original data. Common characteristics tokens may retain from the original data are:

Format attributes

Length for compatibility with storage and reports of applications written for the original data
Character set for compatibility with display and data validation of existing applications
Preserved character positions such as first 6 and last 4 for credit card PAN

Analytics attributes

Mapping consistency where the same data always results in the same token
Sort order

Retaining functional attributes in tokens must be implemented in ways that do not defeat the security of the tokenization process. Using attribute preservation functions can possibly reduce the security of a specific tokenization implementation. Limiting the scope and access to tokens addresses limitations introduced when using attribute retention.

Why tokenize? Common use cases

I need to reduce my compliance scope

Tokens are generally not subject to compliance requirements if there is sufficient separation of the tokenization implementation and the applications using the tokens. Encrypted sensitive data may not reduce compliance obligations or scope. Such industry regulatory standards as PCI DSS 3.2.1 still consider systems that store, process, or transmit encrypted cardholder data as in-scope for assessment; whereas tokenized data may remove those systems from assessment scope. A common use case for PCI DSS compliance is replacing PAN with tokens in data sent to a service provider, which keeps the service provider from being subject to PCI DSS.

I need to restrict sensitive data to only those with a “need-to-know”

Tokenization can be used to add a layer of explicit access controls to de-tokenization of individual data items, which can be used to implement and demonstrate least-privileged access to sensitive data. For instances where data may be co-mingled in a common repository such as a data lake, tokenization can help ensure that only those with the appropriate access can perform the de-tokenization process and reveal sensitive data.

I need to avoid sharing sensitive data with my service providers

Replacing sensitive data with tokens before providing it to service providers who have no access to de-tokenize data can eliminate the risk of having sensitive data within service providers’ control, and avoid having compliance requirements apply to their environments. This is common for customers involved in the payment process, which provides tokenization services to merchants that tokenize the card holder data, and return back to their customers a token they can use to complete card purchase transactions.

I need to simplify data lake security and compliance

A data lake centralized repository allows you to store all your structured and unstructured data at any scale, to be used later for not-yet-determined analysis. Having multiple sources and data stored in multiple structured and unstructured formats creates complications for demonstrating data protection controls for regulatory compliance. Ideally, sensitive data should not be ingested at all; however, that is not always feasible. Where ingestion of such data is necessary, tokenization at each data source can keep compliance-subject data out of data lakes, and help avoid compliance implications. Using tokens that retain data attributes, such as data-to-token consistency (idempotence) can support many of the analytical capabilities that make it useful to store data in the data lake.

I want to allow sensitive data to be used for other purposes, such as analytics

Your organization may want to perform analytics on the sensitive data for other business purposes, such as marketing metrics, and reporting. By tokenizing the data, you can minimize the locations where sensitive data is allowed, and provide tokens to users and applications needing to conduct data analysis. This allows numerous applications and processes to access the token data and maintain security of the original sensitive data.

I want to use tokenization for threat mitigation

Using tokenization can help you mitigate threats identified in your workload threat model, depending on where and how tokenization is implemented. At the point where the sensitive data is tokenized, the sensitive data element is replaced with a non-sensitive equivalent throughout the data lifecycle, and across the data flow. Some important questions to ask are:

  • What are the in-scope compliance, regulatory, privacy, or security requirements for the data that will be tokenized?
  • When does the sensitive data need to be tokenized in order to meet security and scope reduction objectives?
  • What attack vector is being addressed for the sensitive data by tokenizing it?
  • Where is the tokenized data being hosted? Is it in a trusted environment or an untrusted environment?

For additional information on threat modeling, see the AWS security blog post How to approach threat modeling.

Tokenization or encryption consideration

Tokens can provide the ability to retain processing value of the data while still managing the data exposure risk and compliance scope. Encryption is the foundational mechanism for providing data confidentiality.

Encryption rarely results in cipher text with a similar format to the original data, and may prevent data analysis, or require consuming applications to adapt.

Your decision to use tokenization instead of encryption should be based on the following:

Reduction of compliance scope As discussed above, by properly utilizing tokenization to obfuscate sensitive data you may be able to reduce the scope of certain framework assessments such as PCI DSS 3.2.1.
Format attributes Used for compatibility with existing software and processes.
Analytics attributes Used to support planned data analysis and reporting.
Elimination of encryption key management A tokenization solution has one essential API—create token—and one optional API—retrieve value from token. Managing access controls can be simpler than some non-AWS native general purpose cryptographic key use policies. In addition, the compromise of the encryption key compromises all data encrypted by that key, both past and future. The compromise of the token database compromises only existing tokens.

Where encryption may make more sense

Although scope reduction, data analytics, threat mitigation, and data masking for the protection of sensitive data make very powerful arguments for tokenization, we acknowledge there may be instances where encryption is the more appropriate solution. Ask yourself these questions to gain better clarity on which solution is right for your company’s use case.

Scalability If you require a solution that scales to large data volumes, and have the availability to leverage encryption solutions that require minimal key management overhead, such as AWS Key Management Services (AWS KMS), then encryption may be right for you.
Data format If you need to secure data that is unstructured, then encryption may be the better option given the flexibility of encryption at various layers and formats.
Data sharing with 3rd parties If you need to share sensitive data in its original format and value with a 3rd party, then encryption may be the appropriate solution to minimize external access to your token vault for de-tokenization processes.

What type of tokenization solution is right for your business?

When trying to decide which tokenization solution to use, your organization should first define your business requirements and use cases.

  1. What are your own specific use cases for tokenized data, and what is your business goal? Identifying which use cases apply to your business and what the end state should be is important when determining the correct solution for your needs.
  2. What type of data does your organization want to tokenize? Understanding what data elements you want to tokenize, and what that tokenized data will be used for may impact your decision about which type of solution to use.
  3. Do the tokens need to be deterministic, the same data always producing the same token? Knowing how the data will be ingested or used by other applications and processes may rule out certain tokenization solutions.
  4. Will tokens be used internally only, or will the tokens be shared across other business units and applications? Identifying a need for shared tokens may increase the risk of token exposure and, therefore, impact your decisions about which tokenization solution to use.
  5. How long does a token need to be valid? You will need to identify a solution that can meet your use cases, internal security policies, and regulatory framework requirements.

Choosing between self-managed tokenization or tokenization as a service

Do you want to manage the tokenization within your organization, or use Tokenization as a Service (TaaS) offered by a third-party service provider? Some advantages to managing the tokenization solution with your company employees and resources are the ability to direct and prioritize the work needed to implement and maintain the solution, customizing the solution to the application’s exact needs, and building the subject matter expertise to remove a dependency on a third party. The primary advantages of a TaaS solution are that it is already complete, and the security of both tokenization and access controls are well tested. Additionally, TaaS inherently demonstrates separation of duties, because privileged access to the tokenization environment is owned by the tokenization provider.

Choosing a reversible tokenization solution

Do you have a business need to retrieve the original data from the token value? Reversible tokens can be valuable to avoid sharing sensitive data with internal or third-party service providers in payments and other financial services. Because the service providers are passed only tokens, they can avoid accepting additional security risk and compliance scope. If your company implements or allows de-tokenization, you will need to be able to demonstrate strict controls on the management and use of de-tokenization privilege. Eliminating the implementation of de-tokenization is the clearest way to demonstrate that downstream applications cannot have sensitive data. Given the security and compliance risks of converting tokenized data back into its original data format, this process should be highly monitored, and you should have appropriate alerting in place to detect each time this activity is performed.

Operational considerations when deciding on a tokenization solution

While operational considerations are outside the scope of this post, they are important factors for choosing a solution. Throughput, latency, deployment architecture, resiliency, batch capability, and multi-regional support can impact the tokenization solution of choice. Integration mechanisms with identity and access control and logging architectures, for example, are important for compliance controls and evidence creation.

No matter which deployment model you choose, the tokenization solution needs to meet security standards, similar to encryption standards, and must prevent determining what the original data is from the token values.

Conclusion

Using tokenization solutions to replace sensitive data offers many security and compliance benefits. These benefits include lowered security risk and smaller audit scope, resulting in lower compliance costs and a reduction in regulatory data handling requirements.

Your company may want to use sensitive data in new and innovative ways, such as developing personalized offerings that use predictive analysis and consumer usage trends and patterns, fraud monitoring and minimizing financial risk based on suspicious activity analysis, or developing business intelligence to improve strategic planning and business performance. If you implement a tokenization solution, your organization can alleviate some of the regulatory burden of protecting sensitive data while implementing solutions that use obfuscated data for analytics.

On the other hand, tokenization may also add complexity to your systems and applications, as well as adding additional costs to maintain those systems and applications. If you use a third-party tokenization solution, there is a possibility of being locked into that service provider due to the specific token schema they may use, and switching between providers may be costly. It can also be challenging to integrate tokenization into all applications that use the subject data.

In this post, we have described some considerations to help you determine if tokenization is right for you, what to consider when deciding which type of tokenization solution to use, and the benefits. disadvantages, and comparison of tokenization and encryption. When choosing a tokenization solution, it’s important for you to identify and understand all of your organizational requirements. This post is intended to generate questions your organization should answer to make the right decisions concerning tokenization.

You have many options available to tokenize your AWS workloads. After your organization has determined the type of tokenization solution to implement based on your own business requirements, explore the tokenization solution options available in AWS Marketplace. You can also build your own solution using AWS guides and blog posts. For further reading, see this blog post: Building a serverless tokenization solution to mask sensitive data.

If you have feedback about this post, submit comments in the Comments section below. If you have questions about this post, start a new thread on the Amazon Security Assurance Services or contact AWS Support.

Want more AWS Security news? Follow us on Twitter.

Author

Tim Winston

Tim is a Senior Assurance Consultant with AWS Security Assurance Services. He leverages more than 20 years’ experience as a security consultant and assessor to provide AWS customers with guidance on payment security and compliance. He is a co-author of the “Payment Card Industry Data Security Standard (PCI DSS) 3.2.1 on AWS”.

Author

Kristine Harper

Kristine is a Senior Assurance Consultant and PCI DSS Qualified Security Assessor (QSA) with AWS Security Assurance Services. Her professional background includes security and compliance consulting with large fintech enterprises and government entities. In her free time, Kristine enjoys traveling, outdoor activities, spending time with family, and spoiling her pets.

Author

Michael Guzman

Michael is an Assurance Consultant with AWS Security Assurance Services. Michael is a PCI QSA and HITRUST CCSFP, along with holding several AWS certifications. His background is in Financial Services IT Operations and Administrations, with over 20 years experience within that industry. In his spare time Michael enjoy’s spending time with his family, continuing to improve his golf skills and perfecting his Tri-Tip recipe.