August 17, 2023: We updated the instructions and screenshots in this post to align with changes to the AWS Management Console.
April 25, 2023: We’ve updated this blog post to include more security learning resources.
AD Connector is designed to give you an easy way to establish a trusted relationship between your Active Directory and AWS. When AD Connector is configured, the trust allows you to:
Sign in to AWS applications such as Amazon WorkSpaces, Amazon WorkDocs, and Amazon WorkMail by using your Active Directory credentials.
Seamlessly join Windows instances to your Active Directory domain either through the Amazon EC2 launch wizard or programmatically through the EC2 Simple System Manager (SSM) API.
Provide federated sign-in to the AWS Management Console by mapping Active Directory identities to AWS Identity and Access Management (IAM) roles.
AD Connector cannot be used with your custom applications, as it is only used for secure AWS integration for the three use-cases mentioned above. Custom applications relying on your on-premises Active Directory should communicate with your domain controllers directly or utilize AWS Managed Microsoft AD rather than integrating with AD Connector. To learn more about which AWS Directory Service solution works best for your organization, see the service documentation.
With AD Connector, you can streamline identity management by extending your user identities from Active Directory. It also enables you to reuse your existing Active Directory security policies such as password expiration, password history, and account lockout policies. Also, your users will no longer need to remember yet another user name and password combination. Since AD Connector doesn’t rely on complex directory synchronization technologies or Active Directory Federation Services (AD FS), you can forego the added cost and complexity of hosting a SAML-based federation infrastructure. In sum, AD Connector helps foster a hybrid environment by allowing you to leverage your existing on-premises investments to control different facets of AWS.
This blog post will show you how AD Connector works as well as walk through how to enable federated console access, assign users to roles, and seamlessly join an EC2 instance to an Active Directory domain.
AD Connector – Under the Hood
AD Connector is a dual Availability Zone proxy service that connects AWS apps to your on-premises directory. AD Connector forwards sign-in requests to your Active Directory domain controllers for authentication and provides the ability for applications to query the directory for data. When you configure AD Connector, you provide it with service account credentials that are securely stored by AWS. This account is used by AWS to enable seamless domain join, single sign-on (SSO), and AWS Applications (WorkSpaces, WorkDocs, and WorkMail) functionality. Given AD Connector’s role as a proxy, it does not store or cache user credentials. Rather, authentication, lookup, and management requests are handled by your Active Directory.
In order to create an AD Connector, you must also provide a pair of DNS IP addresses during setup. These are used by AD Connector to retrieve Service (SRV) DNS records to locate the nearest domain controllers to route requests to. The AD connector proxy instances use an algorithm similar to the Active Directory domain controller locator process to decide which domain controllers to connect to for LDAP and Kerberos requests.
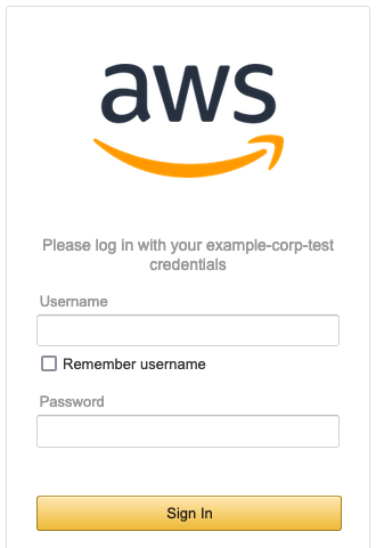
For authentication to AWS applications and the AWS Management Console, you can configure an access URL from the AWS Directory Service console. This access URL is in the format of https://<alias>.awsapps.com and provides a publicly accessible sign-in page. You can visit https://<alias>.awsapps.com/workdocs to sign in to WorkDocs, and https://<alias>.awsapps.com/console to sign in to the AWS Management Console. The following image shows the sign-in page for the AWS Management Console.
Figure 1: Login
For added security you can enable multi-factor authentication (MFA) for AD Connector, but you’ll need to have an existing RADIUS infrastructure in your on-premises network set up to leverage this feature. See AD Connector – Multi-factor Authentication Prerequisites for more information about requirements and configuration. With MFA enabled with AD Connector, the sign-in page hosted at your access URL will prompt users for an MFA code in addition to their standard sign-in credentials.
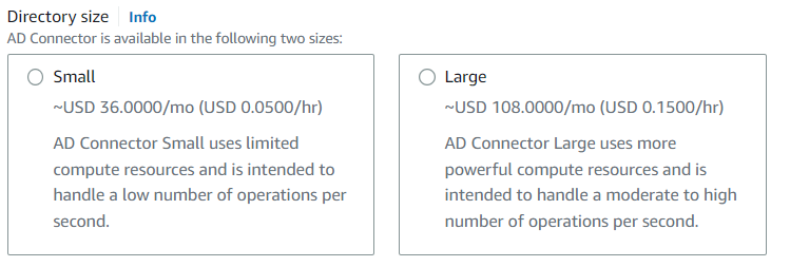
AD Connector comes in two sizes: small and large. A large AD Connector runs on more powerful compute resources and is more expensive than a small AD Connector. Depending on the volume of traffic to be proxied by AD Connector, you’ll want to select the appropriate size for your needs.
Figure 2: Directory size
AD Connector is highly available, meaning underlying hosts are deployed across multiple Availability Zones in the region you deploy. In the event of host-level failure, Directory Service will promptly replace failed hosts. Directory Service also applies performance and security updates automatically to AD Connector.
The following diagram illustrates the authentication flow and network path when you enable AWS Management Console access:
A user opens the secure custom sign-in page and supplies their Active Directory user name and password.
The authentication request is sent over SSL to AD Connector.
AD Connector performs LDAP authentication to Active Directory.
Note: AD Connector locates the nearest domain controllers by querying the SRV DNS records for the domain.
After the user has been authenticated, AD Connector calls the STS AssumeRole method to get temporary security credentials for that user. Using those temporary security credentials, AD Connector constructs a sign-in URL that users use to access the console.
Note: If a user is mapped to multiple roles, the user will be presented with a choice at sign-in as to which role they want to assume. The user session is valid for 1 hour.
Figure 3: Authentication flow and network path
Before getting started with configuring AD Connector for federated AWS Management Console access, be sure you’ve read and understand the prerequisites for AD Connector. For example, as shown in Figure 3 there must be a VPN or Direct Connect circuit in place between your VPC and your on-premises environment. Your domain also has to be running at Windows 2003 functional level or later. Also, various ports have to be opened between your VPC and your on-premises environment to allow AD Connector to communicate with your on-premises directory.
Configuring AD Connector for federated AWS Management Console access
Enable console access
To allow users to sign in with their Active Directory credentials, you need to explicitly enable console access. You can do this by opening the Directory Service console and clicking the Directory ID name (Figure 4).
This opens the Directory Details page, where you’ll find a dropdown menu on the Apps & Services tab to enable the directory for AWS Management Console access.
Figure 4: Directories
Choose the Application management tab as seen in Figure 5.
Figure 5: Application Management
Scroll down to AWS Management Console as shown in Figure 6, and choose Enable from the Actions dropdown list.
Figure 6: Enable console access
After enabling console access, you’re ready to start configuring roles and associating Active Directory users and groups with those roles.
Follow these steps to create a new role. When you create a new role through the Directory Service console, AD Connector automatically adds a trust relationship to Directory Service. The following code example shows the IAM trust policy for the role, after a role is created.
Now that AD Connector is configured and you’ve created a role, your next job is to assign users or groups to those IAM roles. Role mapping is what governs what resources a user has access to within AWS. To do this you’ll need to do the following steps:
In the search bar, type the name of the role you just created.
Select the role that you just created by choosing the name under the IAM role field.
Choose Add, and enter the name to be added to find users or groups for this role.
Choose Add, and the user or group is now assigned to the role.
When you’re finished, you should see the name of the user or group along with the corresponding ID for that object. It is also important to note that this list can be used to remove users or groups from the role. The next time the user signs in to the AWS Management Console from the custom sign-in page, they will be signed in under the EC2ReadOnly security role.
Seamlessly join an instance to an Active Directory domain
Another advantage to using AD Connector is the ability to seamlessly join Windows (EC2) instances to your Active Directory domain. This allows you to join a Windows Server to the domain while the instance is being provisioned instead of using a script or doing it manually. This section of this blog post will explain the steps necessary to enable this feature in your environment and how the service works.
Step 1: Create a role
Until recently you had to manually create an IAM policy to allow an EC2 instance to access the SSM, an AWS service that allows you to configure Windows instances while they’re running and on first launch. Now, there’s a managed policy called AmazonEC2RoleforSSM that you can use instead. The role you are about to create will be assigned to an EC2 instance when it’s provisioned, which will grant it permission to access the SSM service.
To create the role:
Open the IAM console.
Click Roles in the navigation pane.
Click Create Role.
Type a name for your role in the Role Name field.
Under AWS Service Roles, select Amazon EC2 and then click Select.
On the Attach Policy page, select AmazonEC2RoleforSSM and then click Next Step.
On the Review page, click Create Role.
If you click the role you created, you’ll see a trust policy for EC2, which looks like the following code example.
Step 2: Create a new Windows instance from the EC2 console
With this role in place, you can now join a Windows instance to your domain via the EC2 launch wizard. For a detailed explanation about how to do this, see Joining a Domain Using the Amazon EC2 Launch Wizard.
If you’re instantiating a new instance from the API, however, you will need to create an SSM configuration document and upload it to the SSM service beforehand. We’ll step through that process next.
Note: The instance will require internet access to communicate with the SSM service.
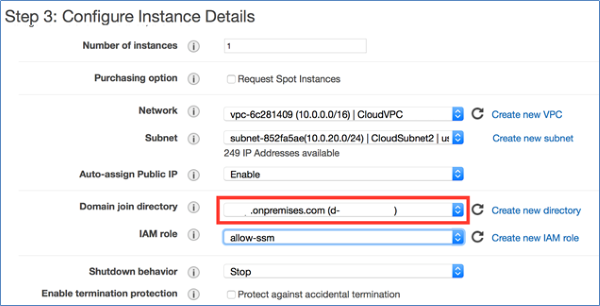
Figure 7: Configure instance details
When you create a new Windows instance from the EC2 launch wizard as shown in Figure 7, the wizard automatically creates the SSM configuration document from the information stored in AD Connector. Presently, the EC2 launch wizard doesn’t allow you to specify which organizational unit (OU) you want to deploy the member server into.
Step 3: Create an SSM document (for seamlessly joining a server to the domain through the AWS API)
If you want to provision new Windows instances from the AWS CLI or API or you want to specify the target OU for your instances, you will need to create an SSM configuration document. The configuration document is a JSON file that contains various parameters used to configure your instances. The following code example is a configuration document for joining a domain.
{
	"schemaVersion": "1.0",
	"description": "Sample configuration to join an instance to a domain",
	"runtimeConfig": {
	   "aws:domainJoin": {
	       "properties": {
	          "directoryId": "d-1234567890",
	          "directoryName": "test.example.com",
	          "directoryOU": "OU=test,DC=example,DC=com",
	          "dnsIpAddresses": [
	             "198.51.100.1",
	             "198.51.100.2"
	          ]
	       }
	   }
	}
}
In this configuration document:
directoryId is the ID for the AD Connector you created earlier.
directoryName is the name of the domain (for example, examplecompany.com).
directoryOU is the OU for the domain.
dnsIpAddresses are the IP addresses for the DNS servers you specified when you created the AD Connector.
For additional information, see aws:domainJoin. When you’re finished creating the file, save it as a JSON file.
Note: The name of the file has to be at least 1 character and at most 64 characters in length.
Step 4: Upload the configuration document to SSM
This step requires that the user have permission to use SSM to configure an instance. If you don’t have a policy that includes these rights, create a new policy by using the following JSON, and assign it to an IAM user or group.
Note: On Linux/Mac systems, you need to add a “/” at the beginning of the path (for example, file:///Users/username/temp).
This command uploads the configuration document you created to the SSM service, allowing you to reference it when creating a new Windows instance from either the AWS CLI or the EC2 launch wizard.
Conclusion
This blog post has shown you how you can simplify account management by federating with your Active Directory for AWS Management Console access. The post also explored how you can enable hybrid IT by using AD Connector to seamlessly join Windows instances to your Active Directory domain. Armed with this information you can create a trust between your Active Directory and AWS. In addition, you now have a quick and simple way to enable single sign-on without needing to replicate identities or deploy additional infrastructure on premises.
We’d love to hear more about how you are using Directory Service, and welcome any feedback about how we can improve the experience. You can post comments below, or visit the Directory Service forum to post comments and questions.
When you use a centralized identity provider (IdP) for human user access, changes that an identity administrator makes to a user within the IdP won’t invalidate the user’s existing active Amazon Web Services (AWS) sessions. This is due to the nature of session durations that are configured on assumed roles. This situation presents a challenge for identity administrators.
When you configure IAM roles, you have the option of configuring a maximum session duration that specifies how long a session is valid. By default, the temporary credentials provided to the user will last for one hour, but you can change this to a value of up to 12 hours.
When a user assumes a role in AWS by using their IdP credentials, that role’s credentials will remain valid for the length of their session duration. It’s convenient for end users to have a maximum session duration set to 12 hours, because this prevents their sessions from frequently timing out and then requiring re-login. However, a longer session duration also poses a challenge if you, as an identity administrator, attempt to revoke or modify a user’s access to AWS from your IdP.
For example, user John Doe is leaving the company and you want to verify that John has his privileges within AWS revoked. If John has access to IAM roles with long-session durations, then he might have residual access to AWS despite having his session revoked or his user identity deleted within the IdP. Perhaps John assumed a role for his daily work at 8 AM and then you revoked his credentials within the IdP at 9 AM. Because John had already assumed an AWS role, he would still have access to AWS through that role for the duration of the configured session, 8 PM if the session was configured for 12 hours. Therefore, as a security best practice, AWS recommends that you do not set the session duration length longer than is needed. This example is displayed in Figure 1.
Figure 1: Session duration overview
In order to restrict access despite the session duration being active, you could update the roles that are assumable from an IdP with a deny-all policy or delete the role entirely. However, this is a disruptive action for the users that have access to this role. If the role was deleted or the policy was updated to deny all, then users would no longer be able to assume the role or access their AWS environment. Instead, the recommended approach is to revoke access based on the specific user’s principalId or sourceIdentity values.
The principalId is the unique identifier for the entity that made the API call. When requests are made with temporary credentials, such as assumed roles through IdPs, this value also includes the session name, such as [email protected]. The sourceIdentity identifies the original user identity that is making the request, such as a user who is authenticated through SAML federation from an IdP. As a best practice, AWS recommends that you configure this value within the IdP, because this improves traceability for user sessions within AWS. You can find more information on this functionality in the blog post, How to integrate AWS STS SourceIdentity with your identity provider.
Identify the principalId and sourceIdentity by using CloudTrail
You can use AWS CloudTrail to review the actions taken by a user, role, or AWS service that are recorded as events. In the following procedure, you will use CloudTrail to identify the principalId and sourceIdentity contained in the CloudTrail record contents for your IdP assumed role.
To identify the principalId and sourceIdentity by using CloudTrail
Assume a role in AWS by signing in through your IdP.
In this event record, you can see that principalId is “AROATVGBKRLCHXEXAMPLE:[email protected]” and sourceIdentity was specified as “[email protected]”. Now that you have these values, let’s explore how you can revoke access by using SCP and IAM policies.
Use an SCP to deny users based on IdP user name or revoke session token
First, you will create an SCP, a policy that can be applied to an organization to offer central control of the maximum available permissions across the accounts in the organization. More information on SCPs, including steps to create and apply them, can be found in the AWS Organizations User Guide.
The SCP will have a deny-all statement with a condition for aws:userid, which will evaluate the principalId field; and a condition for aws:SourceIdentity, which will evaluate the sourceIdentity field. In the following example SCP, the users John Doe and Mary Major are prevented from accessing AWS, in member accounts, regardless of their session duration, because each action will check against their aws:userid and aws:SourceIdentity values and be denied accordingly.
Use an IAM policy to revoke access in the AWS Organizations management account
SCPs do not affect users or roles in the AWS Organizations management account and instead only affect the member accounts in the organization. Therefore, using an SCP alone to deny access may not be sufficient. However, identity administrators can revoke access in a similar way within their management account by using the following procedure.
To create an IAM policy in the management account
Sign in to the AWS Management Console by using your AWS Organizations management account credentials.
At this point, the user actions on the IdP assumable roles within the AWS organization have been blocked. However, there is still an edge case if the target users use role chaining (use an IdP assumedRole credential to assume a second role) that uses a different RoleSessionName than the one assigned by the IdP. In a role chaining situation, the users will still have access by using the cached credentials for the second role.
This is where the sourceIdentity field is valuable. After a source identity is set, it is present in requests for AWS actions that are taken during the role session. The value that is set persists when a role is used to assume another role (role chaining). The value that is set cannot be changed during the role session. Therefore, it’s recommended that you configure the sourceIdentity field within the IdP as explained previously. This concept is shown in Figure 3.
Figure 3: Role chaining with sourceIdentity configured
A user assumes an IAM role via their IdP (#1), and the CloudTrail record displays sourceIdentity: [email protected] (#2). When the user assumes a new role within AWS (#3), that CloudTrail record continues to display sourceIdentity: [email protected] despite the principalId changing (#4).
However, if a second role is assumed in the account through role chaining and the sourceIdentity is not set, then it’s recommended that you revoke the issued session tokens for the second role. In order to do this, you can use the SCP policy at the end of this section, SCP to revoke active sessions for assumed roles. When you use this policy, the issued credentials related to the roles specified will be revoked for the users currently using them, and only users who were not denied through the previous SCP or IAM policies restricting their aws:userid will be able to reassume the target roles to obtain a new temporary credential.
If you take this approach, you will need to use an SCP to apply across the organization’s member accounts. The SCP must have the human-assumable roles for role chaining listed and a token issue time set to a specific time when you want users’ access revoked. (Normally, this time window would be set to the present time to immediately revoke access, but there might be circumstances in which you wish to revoke the access at a future date, such as when a user moves to a new project or team and therefore requires different access levels.) In addition, you will need to follow the same procedures in your management account by creating a customer-managed policy by using the same JSON with the condition statement for aws:PrincipalArn removed. Then attach the customer managed policy to the individual roles that are human-assumable through role chaining.
In this blog post, I demonstrated how you can revoke a federated user’s active AWS sessions by using SCPs and IAM policies that restrict the use of the aws:userid and aws:SourceIdentity condition keys. I also shared how you can handle a role chaining situation with the aws:TokenIssueTime condition key.
This exercise demonstrates the importance of configuring the session duration parameter on IdP assumed roles. As a security best practice, you should set the session duration to no longer than what is needed to perform the role. In some situations, that could mean an hour or less in a production environment and a longer session in a development environment. Regardless, it’s important to understand the impact of configuring the maximum session duration in the user’s environment and also to have proper procedures in place for revoking a federated user’s access.
This post also covered the recommendation to set the sourceIdentity for assumed roles through the IdP. This value cannot be changed during role sessions and therefore persists when a user conducts role chaining. Following this recommendation minimizes the risk that a user might have assumed another role with a different session name than the one assigned by the IdP and helps prevent the edge case scenario of revoking active sessions based on TokenIssueTime.
You should also consider other security best practices, described in the Security Pillar of the AWS Well-Architected Framework, when you revoke users’ AWS access. For example, rotating credentials such as IAM access keys in situations in which IAM access keys are regularly used and shared among users. The example solutions in this post would not have prevented a user from performing AWS actions if that user had IAM access keys configured for a separate IAM user in the environment. Organizations should limit long-lived security credentials such as IAM keys and instead rotate them regularly or avoid their use altogether. Also, the concept of least privilege is highly important to limit the access that users have and scope it solely to the requirements that are needed to perform their job functions. Lastly, you should adopt a centralized identity provider coupled with the AWS IAM Identity Center (successor to AWS Single Sign-On) service in order to centralize identity management and avoid the need for multiple credentials for users.
Many Amazon Web Services (AWS) customers choose to use federation with SAML 2.0 in order to use their existing identity provider (IdP) and avoid managing multiple sources of identities. Some customers have previously configured federation by using AWS Identity and Access Management (IAM) with the endpoint signin.aws.amazon.com. Although this endpoint is highly available, it is hosted in a single AWS Region, us-east-1. This blog post provides recommendations that can improve resiliency for customers that use IAM federation, in the unlikely event of disrupted availability of one of the regional endpoints. We will show you how to use multiple SAML sign-in endpoints in your configuration and how to switch between these endpoints for failover.
How to configure federation with multi-Region SAML endpoints
AWS Sign-In allows users to log in into the AWS Management Console. With SAML 2.0 federation, your IdP portal generates a SAML assertion and redirects the client browser to an AWS sign-in endpoint, by default signin.aws.amazon.com/saml. To improve federation resiliency, we recommend that you configure your IdP and AWS federation to support multiple SAML sign-in endpoints, which requires configuration changes for both your IdP and AWS. If you have only one endpoint configured, you won’t be able to log in to AWS by using federation in the unlikely event that the endpoint becomes unavailable.
Let’s take a look at the Region code SAML sign-in endpoints in the AWS General Reference. The table in the documentation shows AWS regional endpoints globally. The format of the endpoint URL is as follows, where <region-code> is the AWS Region of the endpoint: https://<region-code>.signin.aws.amazon.com/saml
All regional endpoints have a region-code value in the DNS name, except for us-east-1. The endpoint for us-east-1 is signin.aws.amazon.com—this endpoint does not contain a Region code and is not a global endpoint. AWS documentation has been updated to reference SAML sign-in endpoints.
In the next two sections of this post, Configure your IdP and Configure IAM roles, I’ll walk through the steps that are required to configure additional resilience for your federation setup.
Important: You must do these steps before an unexpected unavailability of a SAML sign-in endpoint.
Configure your IdP
You will need to configure your IdP and specify which AWS SAML sign-in endpoint to connect to.
To configure your IdP
If you are setting up a new configuration for AWS federation, your IdP will generate a metadata XML configuration file. Keep track of this file, because you will need it when you configure the AWS portion later.
Register the AWS service provider (SP) with your IdP by using a regional SAML sign-in endpoint. If your IdP allows you to import the AWS metadata XML configuration file, you can find these files available for the public,GovCloud, and China Regions.
If you are manually setting the Assertion Consumer Service (ACS) URL, we recommend that you pick the endpoint in the same Region where you have AWS operations.
In SAML 2.0, RelayState is an optional parameter that identifies a specified destination URL that your users will access after signing in. When you set the ACS value, configure the corresponding RelayState to be in the same Region as the ACS. This keeps the Region configurations consistent for both ACS and RelayState. Following is the format of a Region-specific console URL.
https://<region-code>.console.aws.amazon.com/
For more information, refer to your IdP’s documentation on setting up the ACS and RelayState.
Configure IAM roles
Next, you will need to configure IAM roles’ trust policies for all federated human access roles with a list of all the regional AWS Sign-In endpoints that are necessary for federation resiliency. We recommend that your trust policy contains all Regions where you operate. If you operate in only one Region, you can get the same resiliency benefits by configuring an additional endpoint. For example, if you operate only in us-east-1, configure a second endpoint, such as us-west-2. Even if you have no workloads in that Region, you can switch your IdP to us-west-2 for failover. You can log in through AWS federation by using the us-west-2 SAML sign-in endpoint and access your us-east-1 AWS resources.
To configure IAM roles
Log in to the AWS Management Console with credentials to administer IAM. If this is your first time creating the identity provider trust in AWS, follow the steps in Creating IAM SAML identity providers to create the identity providers.
Next, create or update IAM roles for federated access. For each IAM role, update the trust policy that lists the regional SAML sign-in endpoints. Include at least two for increased resiliency.
The following example is a role trust policy that allows the role to be assumed by a SAML provider coming from any of the four US Regions.
When you use a regional SAML sign-in endpoint, the corresponding regional AWS Security Token Service (AWS STS) endpoint is also used when you assume an IAM role. If you are using service control policies (SCP) in AWS Organizations, check that there are no SCPs denying the regional AWS STS service. This will prevent the federated principal from being able to obtain an AWS STS token.
Switch regional SAML sign-in endpoints
In the event that the regional SAML sign-in endpoint your ACS is configured to use becomes unavailable, you can reconfigure your IdP to point to another regional SAML sign-in endpoint. After you’ve configured your IdP and IAM role trust policies as described in the previous two sections, you’re ready to change to a different regional SAML sign-in endpoint. The following high-level steps provide guidance on switching the regional SAML sign-in endpoint.
To switch regional SAML sign-in endpoints
Change the configuration in the IdP to point to a different endpoint by changing the value for the ACS.
Change the configuration for the RelayState value to match the Region of the ACS.
Log in with your federated identity. In the browser, you should see the new ACS URL when you are prompted to choose an IAM role.
Figure 1: New ACS URL
The steps to reconfigure the ACS and RelayState will be different for each IdP. Refer to the vendor’s IdP documentation for more information.
Conclusion
In this post, you learned how to configure multiple regional SAML sign-in endpoints as a best practice to further increase resiliency for federated access into your AWS environment. Check out the updates to the documentation for AWS Sign-In endpoints to help you choose the right configuration for your use case. Additionally, AWS has updated the metadata XML configuration for the public,GovCloud, and China AWS Regions to include all sign-in endpoints.
The simplest way to get started with SAML federation is to use AWS Single Sign-On (AWS SSO). AWS SSO helps manage your permissions across all of your AWS accounts in AWS Organizations.
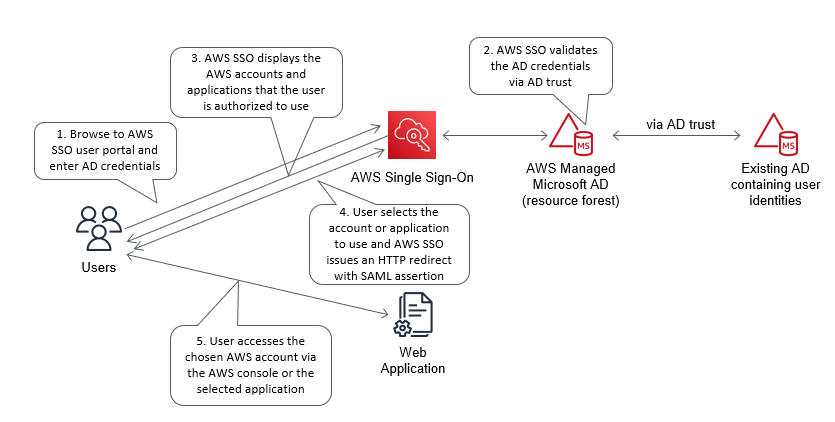
This blog post outlines how to use your existing Microsoft Active Directory (AD) to reliably authenticate access to your Amazon Web Services (AWS) accounts, infrastructure running on AWS, and third-party applications. The architecture we describe is designed to be highly available and extends access to your existing AD to AWS, enabling your users to use their existing credentials to access authorized AWS resources and applications.
Many customers rely on AD as their single source of truth for IT identity management. HR automation processes are often already in place to automatically add, update, and remove employee access within an organization’s AD as staffing changes occur. Using a single source of truth as the basis for all authentication and authorization, both on-premises and in the cloud, makes it easier to manage access across multiple applications and services, because you are creating, managing, and revoking access from a single location. For example, if someone leaves your organization, you can revoke access for all applications and services (including AWS accounts) from one location. Additionally, this reduces risks associated with stranded or forgotten credentials, or users needing to remember multiple different sets of credentials.
Microsoft Active Directory (AD) is deployed on Microsoft Windows Server servers called domain controllers, which replicate the contents of the directory between the domain controllers that are hosting the AD domain. Multiple domain controllers are deployed within a domain to improve the availability and performance of the directory. The AD infrastructure should be designed to provide sufficiently high levels of availability and performance, because it governs access to your organization’s IT resources. This typically requires the placement of at least one domain controller in every customer hosting location, because the lack of availability of your identity store is likely to cause authentication and authorization failures, which in turn prevent access to resources.
These design principles align with the Security Pillar of the AWS Well-Architected Framework, which is focused on implementing a strong identity foundation. The Security Pillar guidance states that you should centralize identity management and aim to eliminate reliance on long-term static credentials. By using your existing AD, you can benefit from centralized identity management and your existing group-based permissions for access to your AWS accounts. Applications that are running on domain-joined servers can use their AD service account credentials when they access other domain-joined resources, which removes the need for those credentials to be stored in application configuration files. As your AWS usage grows, it is important to give serious consideration to effective identity management, both for access to AWS and AWS resources, and for your instances that are running on AWS.
By extending your existing Active Directory to AWS, you can continue to use your existing Active Directory user credentials and group policies to manage your Microsoft Windows Server servers, whether those servers are running on-premises or on AWS, and extend these capabilities to authenticate and authorize access to the AWS Management Console and third-party applications.
This post covers networking requirements and connectivity setup to enable network connectivity to your on-premises AD; the approach to extending your AD to AWS; integrating AWS Single Sign-On with your AD; and joining Amazon Elastic Compute Cloud (Amazon EC2) instances to AD. As part of the setup, you will add additional domain controllers running on Amazon EC2 instances to your existing AD, for availability and latency reasons. You will also build a resource forest to enable your existing AD identities to access AD-integrated AWS services and resources. This enables you to have a highly available single identity source as the source of truth for your user authentication.
Networking prerequisites to extend your Active Directory to AWS
To enable Active Directory–related network communication, network connectivity needs to be established between your on-premises network and your AWS environment. You need to ensure there is connectivity between the on-premises network that is hosting your existing domain controllers and the Amazon Virtual Private Cloud (Amazon VPC) VPC that will host your AD infrastructure on AWS. Typically, hybrid network connectivity is configured within a network account within your organization, where the multiple AWS accounts within your organization are managed by using AWS Organizations. This network account effectively sits between your on-premises network and the resources, including the AD infrastructure, that are deployed in AWS.
You can provide connectivity between your on-premises network and your network account by using AWS Site-to-Site VPN or AWS Direct Connect connections. For an overview of the options to connect your on-premises network to AWS, refer to Amazon Virtual Private Cloud Connectivity Options. The necessary routing and firewall rules need to be configured to allow connectivity between these subnets and the on-premises network that is hosting your existing domain controllers. AWS recommends that you have highly resilient, fault-tolerant connectivity with dynamic routing between your on-premises network and your AWS network. You can achieve high resiliency through the use of redundant AWS Direct Connect connections, or, for less critical workloads, a VPN connection might offer sufficient resilience.
We recommend AWS Transit Gateway to provide connectivity between your AWS accounts. A transit gateway will be in your network account and then shared with your other AWS accounts that have VPCs that require access to on-premises networks or other VPCs. This enables a hub and spoke network architecture, which is used to provide connectivity both between your VPCs as needed and between your VPCs and your on-premises network. You will create a VPC, which we will refer to within this blog as the endpoint VPC, with subnets across two Availability Zones, within the network account. This endpoint VPC will be used later by Amazon Route 53 outbound endpoints for DNS resolution of AD-hosted DNS zones. Other documentation might refer to this endpoint VPC by alternative names, such as outbound VPC or egress VPC.
Your AD infrastructure that is running on AWS is typically deployed within a shared services account, sometimes referred to as an operations account. Within this shared services account, you will create a shared services VPC with at least two subnets within different Availability Zones to host your domain controller infrastructure on AWS. Your domain controller availability is increased when your architecture is configured to use multiple Availability Zones. You will attach this shared services VPC to the transit gateway that is shared from your network account. This VPC attachment provides connectivity between this VPC and your on-premises network through the transit gateway and network account. You will need to configure the subnet route table(s) and transit gateway route table(s) appropriately to provide IP connectivity between the shared services VPC and your on-premises network.
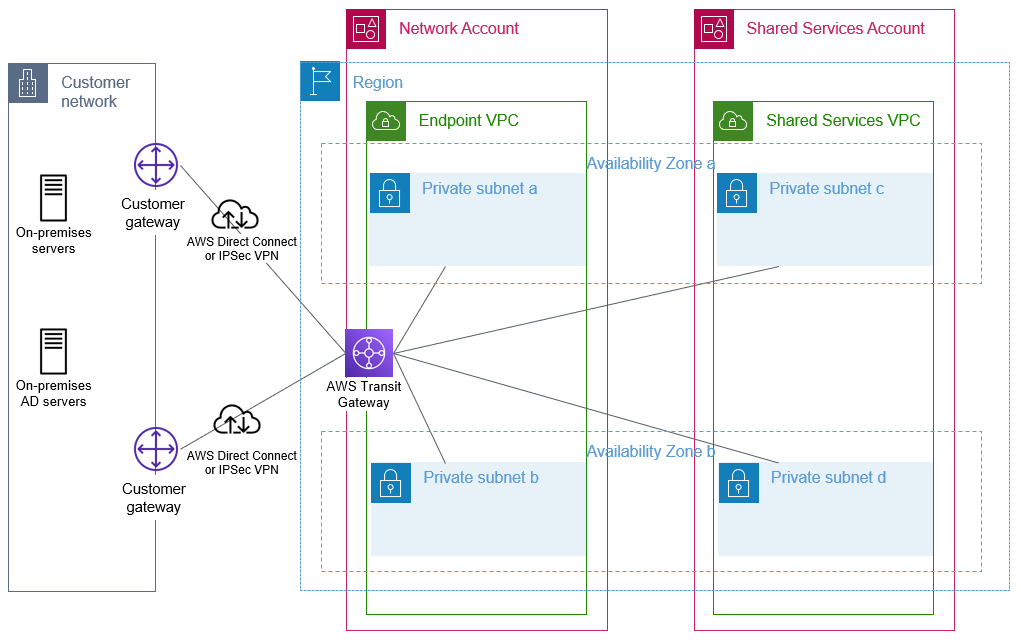
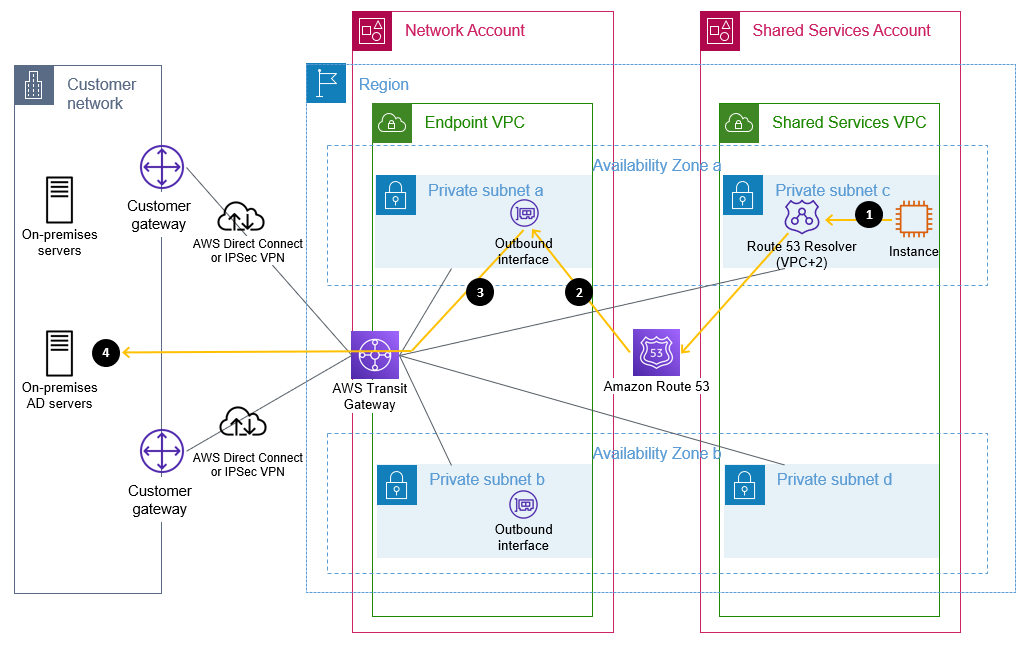
The sample architecture shown in Figure 1 illustrates the use of a transit gateway with two AWS Direct Connect connections to provide resilient connectivity between an on-premises network, the network account, and a VPC within the shared services account.
Figure 1: Foundational network connectivity between on-premises and AWS VPCs
Active Directory relies heavily on Domain Name System (DNS) services and typically hosts its own DNS services on domain controllers. To establish name resolution of your AD-hosted DNS domains from within your VPCs, you should use Route 53 Resolver with outbound resolver endpoints and forwarding rules. Forwarding rules specify the domain name queries to forward from your VPCs to DNS servers that are authoritative for your AD DNS names. The queries will be forwarded through the outbound endpoints. The outbound endpoints will be configured in the network account on the endpoint VPC, and use the previously configured network connectivity to communicate with your existing DNS servers. You will configure your existing DNS servers as targets in the forwarding rules. Configuring Route 53 Resolver with the appropriate forwarding rules will help to enable seamless DNS resolution between your on-premises and AWS hosted resources. You need to share the Route 53 Resolver rules with your organization so that they can be used by your other AWS accounts. These shared rules are then associated with your VPCs, which need to be able to resolve names within AD-hosted DNS domains. Refer to the AWS Hybrid DNS with Active Directory technical guide for detailed step-by-step configuration guidance.
Figure 2 shows a sample flow of a DNS query from an Amazon Elastic Compute Cloud (Amazon EC2) instance through Route 53 Resolver and an outbound interface when resolving an on-premises domain name that matches a forwarding rule. In this example, the domain controllers are also the DNS servers, but splitting the DNS and AD servers is also fully supported.
Figure 2: Flow of a DNS query matching a forwarding rule through a Route 53 outbound endpoint
The flow is as follows:
An Amazon EC2 instance sends a DNS request for an internal name, such as ad.example.com, to the Route 53 Resolver address within the VPC.
Route 53 matches this query against a forwarding rule and directs the query through the configured outbound interface.
The query is sent from the outbound interface towards the target IP address, configured in the forwarding rule, of a server that is authoritative for the domain name.
This target DNS server receives the query and responds.
To extend your existing AD to AWS, domain controllers on Amazon EC2 instances are required, because AWS Managed Microsoft AD does not support being added to an existing forest. An AWS Managed Microsoft AD resource forest is required to enable integration with AWS services that offer AD integration. This is discussed in more detail in the following sections.
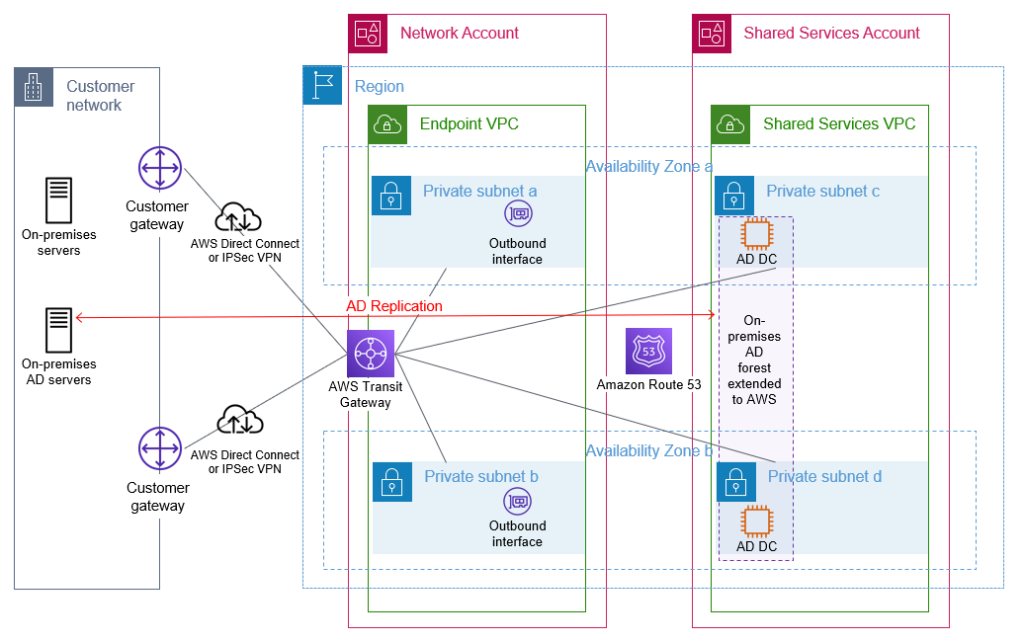
Extend your on-premises AD to AWS
Your first step is to build additional AD domain controllers for your existing AD domain(s) on Amazon EC2 instances that are running Microsoft Windows Server. You would then manage these domain controllers along with your existing domain controllers. By running additional domain controllers within AWS, you remove dependencies on network links and improve reliability and performance of your directory for infrastructure that is running within AWS. Communication between the domain controllers and other domain-joined resources within AWS is designed to remain within the AWS Region. AWS recommends that a minimum of two domain controllers, spread across multiple Availability Zones for resilience, are deployed. You should deploy the domain controllers into the subnets within the shared services VPC.
Depending on your capacity planning considerations and availability goals, you may choose to deploy more than two domain controllers. The number of users, servers, and applications that access your directory will influence the required number of domain controllers. Security considerations, including the required TCP/IP ports, and management options are discussed in the blog post Securely extend and access on-premises Active Directory domain controllers in AWS.
These new domain controllers will be in a new AD site, which includes all your VPC CIDR blocks within your chosen AWS Region. In Active Directory, a site represents a group of IP subnets that are connected with fast and highly reliable network connectivity. Site information is used to locate domain controllers closest to the client, to reduce latency and unnecessary network traffic. AWS recommends that your VPCs within an AWS Region belong to the same new Active Directory site, consisting only of your IP ranges within the chosen AWS Region, and that consistent site names are used in all AD forests that are connected by trusts. Further details are available in the section Designing Active Directory sites and services topology in Active Directory Domain Services on AWS and in Designing the Site Topology.
Update targets in Route 53 Resolver rules
After you have deployed AD-integrated DNS servers to these domain controllers and opened the required TCP/IP ports on the associated security groups, you can update the targets in your Route 53 Resolver forwarding rules to use the IP addresses of these servers. This will improve performance and reliability of DNS resolution, by removing the need for DNS resolution traffic to flow between AWS and on-premises infrastructure.
Figure 3 shows Amazon EC2 instances that are configured as AD domain controllers within a shared services VPC. After they are configured, these domain controllers will replicate with the on-premises domain controllers, using the connectivity that is provided through the transit gateway.
Figure 3: On-premises AD extended to AWS by deploying additional domain controllers
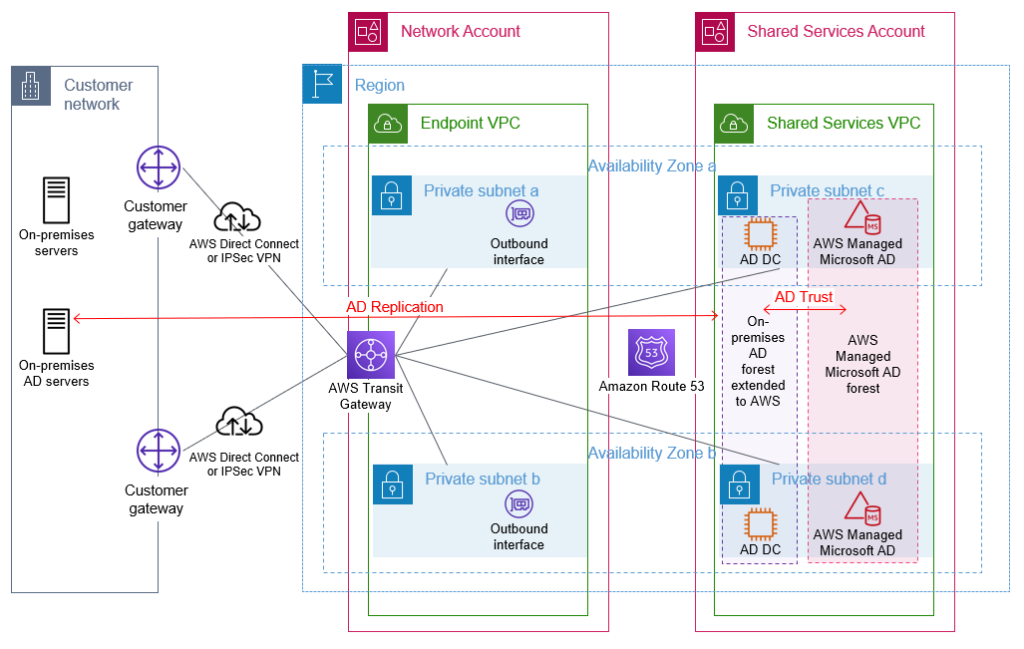
Build a resource forest for AWS hosted infrastructure and applications
When you select and launch this directory type, it is created as a highly available pair of domain controllers that are connected to your virtual private cloud (VPC). The domain controllers run in different Availability Zones in your choice of AWS Region. Host monitoring and recovery, data replication, snapshots, and software updates are automatically configured and managed for you. AWS Managed Microsoft AD is available in Standard and Enterprise Editions.
The AWS Managed Microsoft AD will be shared with your accounts within your organization to enable your other AWS accounts to access this directory and benefit from the features and services outlined previously.
With correct AD site configuration in both forests, communication between the AWS Managed Microsoft AD domain controllers and other domain-joined resources within AWS, and your existing domain’s domain controllers, remains within the chosen AWS Region. This is designed to keep your data within AWS in the country of your chosen AWS Region, to help to address possible data residency concerns.
An example of this architecture is depicted in Figure 4.
Figure 4: AWS Managed Microsoft AD resource forest with trust to on-premises AD
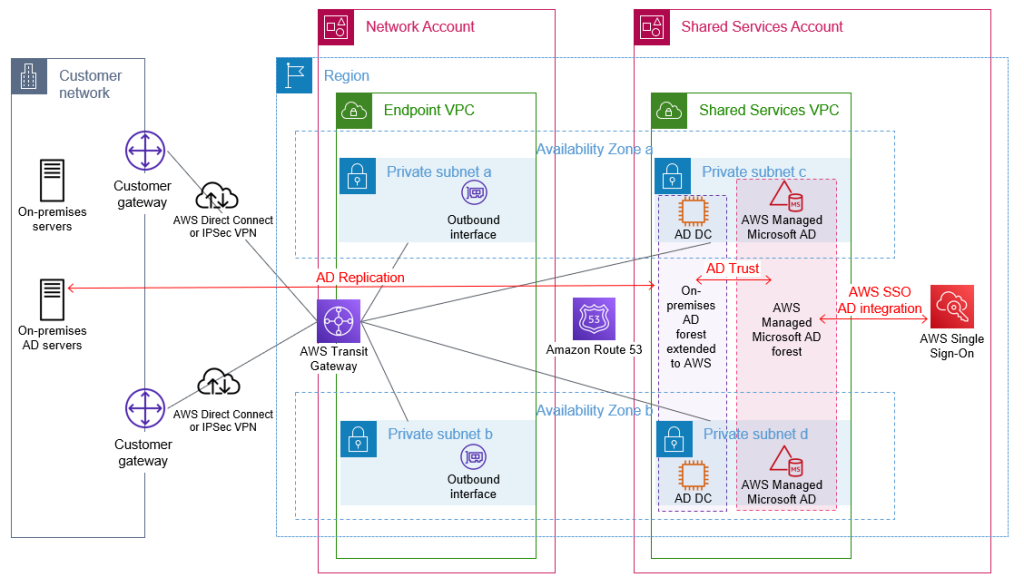
Manage access to your AWS accounts
AWS Single Sign-On (AWS SSO) enables you to centrally manage access across your AWS organization. You can choose to manage access just to your AWS accounts, or to your cloud applications as well. You can create user identities directly in AWS SSO, access your existing identifies by connecting AWS SSO to your existing Active Directory domain, or you can federate them from your Active Directory Federation Services (AD FS) or a standards-based identity provider, such as Okta Universal Directory or Azure AD. Your workforce users get a user portal to access all of their assigned AWS accounts or cloud applications. AWS SSO can be flexibly configured to run alongside or replace AWS account access management through AWS Identity and Access Management (IAM).
Identity federation is a system of trust between two parties for the purpose of authenticating third parties, such as users, and conveying information that is needed to authorize their access to resources. In this system, an identity provider (IdP) is responsible for user authentication, and a service provider (SP), such as a service or an application, controls access to resources. AWS SSO automates the setup of the identity federation that is used to provide authorized users access to your AWS accounts. AWS SSO is acting as an IdP when AWS SSO is connected to your AD and used to give access to your AWS accounts.
Although you can create users and groups directly within AWS SSO, a best practice is to use your existing identity single source of truth to simplify user and permission management. Connecting AWS SSO through to your Active Directory, which has been extended to AWS, will allow authentication of users for access to your AWS accounts to take place entirely within the AWS Region. This practice is designed to reduce dependencies on hybrid networking and resources located on-premises or in other hosting locations.
You should enforce secure access to the user portal, AWS SSO integrated apps, and the AWS CLI by enabling multi-factor authentication (MFA). AWS SSO MFA supports various MFA types, including client-side authenticator apps, security keys, and built-in authenticators. Using MFA is recommended as part of configuring strong sign-in mechanisms.
Connect AWS SSO to your Active Directory
You can connect AWS SSO to your Active Directory on AWS by using AD Connector, or through an AWS Managed Microsoft AD. Using AD Connector is often the primary mechanism considered by customers, but given the lack of support for multi-domain environments as used in this post, this blog post recommends using AWS Managed Microsoft AD.
When you use AWS Managed Microsoft AD with AWS SSO, AWS SSO requires two-way trusts to be in place between this AWS Managed Microsoft AD forest and any other forest that contains the user identities that will authenticate through AWS SSO.
Before AWS SSO supported delegated administration, AWS SSO had to be configured within the management account of your AWS organization, and required the connected AWS Managed Microsoft AD directory to also be within your organization’s management account.
With the announcement of AWS SSO delegated administration support, AWS SSO and the connected AWS Managed Microsoft AD can be configured in an account other than your management account. This post recommends using your shared services account as the AWS SSO delegated administration account. Doing so will enable AWS SSO to use the AWS Managed Microsoft AD that you configured within the shared services account in the preceding Build a resource forest for AWS hosted infrastructure and applications section.
This follows the AWS guidance to avoid deploying workloads to the organization’s management account and to limit access to the management account. Using a delegated administration account for AWS SSO reduces the need for regular access to the management account.
From within your management account, your shared services account needs to be registered as the AWS SSO delegated administration account. You can then configure and manage AWS SSO from within your shared services account. The AWS SSO delegated administration account can manage permissions across your organization, apart from assigning permissions to access the management account. Assignment of permissions to access the management account through AWS SSO needs to be configured from within the management account itself.
Permission sets are a way to define permissions centrally in AWS SSO so that they can be applied to all your AWS accounts. After you have created your permission sets, you will assign them to your Active Directory groups to grant access to the respective AWS accounts, using the defined permission set persona. Your users will then use the AWS SSO user portal to authenticate with their AD credentials and can choose which of the assigned AWS accounts and personas they wish to access. Users can configure AWS CLI to use AWS SSO to access the roles they have been assigned.
Figure 5 shows the complete architecture covered in this blog post. The diagram includes AWS SSO within the shared services account connected to the AWS Managed Microsoft AD that is used to provide access to the forests that contain your user identities.
Figure 5: Complete AD architecture with trusts and AWS SSO using AD as the identity source
Access domain-joined infrastructure resources
By joining your Windows Server servers to your Active Directory resource domain, you can centralize the management of your servers by using native Microsoft tooling. Joining your Amazon EC2 Windows instances to your domain enables you to continue using existing tools, such as group policies, to manage your server estate both on-premises and in AWS.
VPCs with workloads that need to be domain joined, to access on-premises networks, or to access other VPCs will need appropriate network connectivity and DNS configuration in place. You can enable network connectivity between workload VPCs and the shared services VPC and other on-premises networks by attaching your VPCs to the transit gateway shared from the networking account. You can enable DNS resolution of your AD domains by attaching the Route 53 Resolver rules, shared from the networking account, to your workload VPCs.
Join instances to your AD domain
Amazon EC2 Windows instances can be manually or seamlessly joined to your resource domain. Manually joining an instance involves the same steps that you would follow on-premises. Seamlessly joining instances requires the AWS Systems Manager agent, which is installed by default in AWS provided Windows AMIs, on the Amazon EC2 instance and an attached instance profile with sufficient permissions. This instance profile should include the AmazonSSMManagedInstanceCore and AmazonSSMDirectoryServiceAccess policies.
In order to join the domain, either manually or seamlessly, the Amazon EC2 instance must be able to resolve the DNS name for your AD domain. This DNS resolution was enabled by the attachment of the correctly configured shared Route 53 Resolver rules to the workload VPCs. Seamlessly joining instances to the domain also requires that your shared services account AWS Managed Microsoft AD directory be shared with the workload account that contains the Amazon EC2 instances.
After your instances are joined to the domain, applications running on the servers will be able to access other domain-joined resources, if authorized by AD, through the connectivity that is provided by the transit gateway attachment on the workload VPC.
Applications that need to access AWS resources that are not domain joined, such as objects in Amazon Simple Storage Service (Amazon S3), should make use of temporary credentials associated with the attached instance profile to access AWS resources. By using these IAM temporary credentials, you can avoid using static long-term credentials. When an application requires access to credentials or other secrets, and cannot use AD or IAM temporary credentials, such as for database logins or for third-party API tokens, use a service designed to handle management of secrets, such as AWS Secrets Manager. See the AWS Well-Architected Security Pillar Identity Management documentation for further guidance.
Figure 6 shows Active Directory access through the transit gateway. The Route 53 forwarding rules, which are shared from the shared services account, are associated with the workload VPCs to enable DNS resolution of Active Directory–integrated DNS domains. Not shown in the diagram is the sharing of the AWS Managed Microsoft AD for the resource forest with the workload accounts.
Figure 6: Flow of AD network traffic through the transit gateway within the network account
Access applications and third-party services
You might have existing applications that rely on Active Directory or LDAP for user authentication. When you extend your Active Directory environment to AWS, these existing applications can be deployed to your AWS environment, and they will be able to authenticate the users of the application against your AD.
You might already be using a third-party identity provider, such as Azure AD or Okta, to provide your users with access to AWS services such as AWS Client VPN or to third-party business applications such as those on the AWS SSO Cloud applications page. These third-party identity providers will typically offer an agent to replicate or synchronize necessary user information from your Active Directory to their service, in order to offer federated authentication for your users. Using these agents to replicate from your existing Active Directory means that you are still using your Active Directory as the single source of truth. To ensure reliable authentication, you should follow the vendor’s recommendations for the high-availability setup of their agent.
Figure 7 shows the steps that occur when you use AWS SSO to provide identity federation to a web application.
Figure 7: Example flow for identify federation that uses AWS SSO
Conclusion
This post highlights the importance of implementing a cloud authentication and authorization architecture that addresses the variety of requirements for an organization’s AWS Cloud environment. In addition to console access, this post highlights the importance of considering how you will:
Perform authentication to AWS based Windows and Linux instances
Integrate AWS services that need Windows-based authentication capabilities
Integrate authentication for internal user applications
Provide a single identity source as the source of truth for all AWS user authentication
Enable MFA for user authentication
The proposed approach provides a highly available Active Directory (AD) infrastructure, running on AWS and integrated with your existing AD, which addresses these considerations. The approach helps you to attain reduced latencies and higher levels of availability by removing dependencies on on-premises resources, other hosting locations, and external network links. This design stores the identity information that is contained within your existing AD in your chosen AWS Region and country, across multiple Availability Zones, which can also help you meet your data residency requirements.
If you have feedback about this post, submit comments in the Comments section below. If you have questions about this post, contact AWS Support.
Want more AWS Security news? Follow us on Twitter.
You can use third-party identity providers (IdPs) such as Okta, Ping, or OneLogin to federate with the AWS Identity and Access Management (IAM) service using SAML 2.0, allowing your workforce to configure services by providing authorization access to the AWS Management Console or Command Line Interface (CLI). When you federate to AWS, you assume a role through the AWS Security Token Service (AWS STS), which through the AssumeRole API returns a set of temporary security credentials you then use to access AWS resources. The use of temporary credentials can make it challenging for administrators to trace which identity was responsible for actions performed.
To address this, with AWS STS you set a unique attribute called SourceIdentity, which allows you to easily see which identity is responsible for a given action.
This post will show you how to set up the AWS STS SourceIdentity attribute when using Okta, Ping, or OneLogin as your IdP. Your IdP administrator can configure a corporate directory attribute, such as an email address, to be passed as the SourceIdentity value within the SAML assertion. This value is stored as the SourceIdentity element in AWS CloudTrail, along with the activity performed by the assumed role. This post will also show you how to set up a sample policy for setting the SourceIdentity when switching roles. Finally, as an administrator reviewing CloudTrail activity, you can use the source identity information to determine who performed which actions. We will walk you through CloudTrail logs from two accounts to demonstrate the continuance of the source identity attribute, showing you how the SourceIdentity will appear in both accounts’ logs.
Configure the SourceIdentity attribute with Okta integration
You will do this portion of the configuration within the Okta administrative console. This procedure assumes that you have a previously configured AWS and Okta integration. If not, you can configure your integration by following the instructions in the Okta AWS Multi-Account Configuration Guide. You will use the Okta to SAML integration and configure an optional attribute to map as the SourceIdentity.
To set up Okta with SourceIdentity
Log in to the Okta admin console.
Navigate to Applications–AWS.
In the top navigation bar, select the Sign On tab, as shown in Figure 1.
Figure 1 – Navigate to attributes in SAML settings on the Okta applications page
Under Sign on methods, select SAML 2.0, and choose the arrow next to Attributes (Optional) to expand, as shown in Figure 2.
Figure 2 – Add new attribute SourceIdentity and map it to Okta provided attribute of your choice
Add the optional attribute definition for SourceIdentity using the following parameters:
For Name, enter: https://aws.amazon.com/SAML/Attributes/SourceIdentity
For Name format, choose URI Reference.
For Value, enter user.login.
Note: The Name format options are the following: Unspecified – can be any format defined by the Okta profile and must be interpreted by your application. URI Reference – the name is provided as a Uniform Resource Identifier string. Basic – a simple string; the default if no other format is specified.
The examples shown in Figure 1 and Figure 2 show how to map an email address to the SourceIdentity attribute by using an on-premises Active Directory sync. The SourceIdentity can be mapped to other attributes from your Active Directory.
Configure the SourceIdentity attribute with PingOne integration
You do this portion of the configuration in the Ping Identity administrative console. This procedure assumes that you have a previously configured AWS and Ping integration. If not, you can set up the PingFederate AWS Connector by following the Ping Identity instructions Configuring an SSO connection to Amazon Web Services.
You’re using the Ping to SAML integration and configuring an optional attribute to map as the source identity.
Configuring PingOne as an IdP involves setting up an identity repository (in this case, the PingOne Directory), creating a user group, and adding users to the individual groups.
Choose the My Applications tab, as shown in Figure 3.
Figure 3. PingOne My Applications tab
On the Amazon Web Services line, choose on the arrow on the right side to show application details to edit and add a new attribute for the source identity.
Choose Continue to Next Step to open the Attribute Mapping section, as shown in Figure 4.
Figure 4. Attribute mappings
In the Attribute Mapping section line 1, for SAML_SUBJECT, choose Advanced.
On the Advanced Attribute Options page, for Name ID Format to send to SP select urn:oasis:names:tc:SAML:2.0:nameid-format:persistent. For IDP Attribute Name or Literal Value, select SAML_SUBJECT, as shown in Figure 4.
Figure 5. Advanced Attribute Options for SAML_SUBJECT
In the Attribute Mapping section line 2 as shown in Figure 4, for the application attribute https://aws.amazon.com/SAML/Attributes/Role, select Advanced.
On the Advanced Attribute Options page, for Name Format, select urn:oasis:names:tc:SAML:2.0:attrname-format:uri, as shown in Figure 6.
Figure 6. Advanced Attribute Options for https://aws.amazon.com/SAML/Attributes/Role
In the Attribute Mapping section line 2 as shown in Figure 4, select As Literal.
For IDP Attribute Name or Literal Value, format the role and provider ARNs (which are not yet created on the AWS side) in the following format. Be sure to replace the placeholders with your own values. Make a note of the role name and SAML provider name, as you will be using these exact names to create an IAM role and an IAM provider on the AWS side.
In the Attribute Mapping section line 3 as shown in Figure 4, for the application attribute https://aws.amazon.com/SAML/Attributes/RoleSessionName, enter Email (Work).
In the Attribute Mapping section as shown in Figure 4, to create line 5, choose Add a new attribute in the lower left.
In the newly added Attribute Mapping section line 5 as shown in Figure 4, add the SourceIdentity.
For Application Attribute, enter: https://aws.amazon.com/SAML/Attributes/SourceIdentity
For Identity Bridge Attribute or Literal Value, enter: SAML_SUBJECT
Choose Continue to Next Step in the lower right.
For Group Access, add your existing PingOne Directory Group to this application.
Review your setup configuration, as shown in Figure 7, and choose Finish.
Figure 7. Review mappings
Configure the SourceIdentity attribute with OneLogin integration
For the OneLogin SAML integration with AWS, you use the Amazon Web Services Multi Account application and configure an optional attribute to map as the SourceIdentity. You do this portion of the configuration in the OneLogin administrative console.
This procedure assumes that you already have a previously configured AWS and OneLogin integration. For information about how to configure the OneLogin application for AWS authentication and authorization, see the OneLogin KB article Configure SAML for Amazon Web Services (AWS) with Multiple Accounts and Roles.
After the OneLogin Multi Account application and AWS are correctly configured for SAML login, you can further customize the application to pass the SourceIdentity parameter upon login.
To change OneLogin configuration to add SourceIdentity attribute
In the OneLogin administrative console, in the Amazon Web Services Multi Account application, on the app administration page, navigate to Parameters, as shown in Figure 8.
Figure 8. OneLogin AWS Multi Account Application Configuration Parameters
To add a parameter, choose the + (plus) icon to the right of Value.
As shown in Figure 9, for Field Name enter https://aws.amazon.com/SAML/Attributes/SourceIdentity, select Include in SAML assertion, then choose Save.
Figure 9. OneLogin AWS Multi Account Application add new field
In the Edit Field page, select the default value you want to use for SourceIdentity. For the example in this blog post, for Value, select Email, then choose Save, as shown in Figure 10.
Figure 10. OneLogin AWS Multi Account Application map new field to email
After you’ve completed this procedure, review the final mapping details, as shown in Figure 11, to confirm that you see the additional parameter that will be passed into AWS through the SAML assertion.
Figure 11. OneLogin AWS Multi Account Application final mapping details
Configuring AWS IAM role trust policy
Now that the IdP configuration is complete, you can enable your AWS accounts to use SourceIdentity by modifying the IAM role trust policy.
For the workforce identity or application to be able to define their source identity when they assume IAM roles, you must first grant them permission for the sts:SetSourceIdentity action, as illustrated in the sample policy document below. This will permit the workforce identity or application to set the SourceIdentity themselves without any need for manual intervention.
To modify an AWS IAM role trust policy
Log in to the AWS Management Console for your account as a user with privileges to configure an IdP, typically an administrator.
Navigate to the AWS IAM service.
For trusted identity, choose SAML 2.0 federation.
From the SAML Provider drop down menu, select the IAM provider you created previously.
Modify the role trust policy and add the SetSourceIdentity action.
Sample policy document
This is a sample policy document attached to a role you assume when you log in to Account1 from the Okta dashboard. Edit your Account1/Role1 trust policy document and add sts:AssumeRoleWithSAML and sts:setSourceIdentity to the Action section.
Notes: The SetSourceIdentity action has to be allowed in the trust policy for assumeRole to work when the IdP is set up to pass SourceIdentity in the assertion. Future version of the sign-in URL may contain a Region code. When this occurs, you will need to modify the URL appropriately.
Policy statement
The following are examples of how the line “Federated”: “arn:aws:iam::<AccountId>:saml-provider/<IdP>” should look, based on the different IdPs specified in this post:
The following is a sample access control policy document in Account2 for Role2 that allows you to switchRole from Account1. Edit the control policy and add sts:AssumeRole and sts:SetSourceIdentity in the Action section.
Validate that the CloudTrail log entries for Account1 contain the Active Directory mapped SourceIdentity.
Use the Switch Role feature to switch to a second account Account2 (444455556666), using a role named Role2.
Create a new Amazon S3 bucket in Account2.
To summarize what you’ve done so far, you have:
Configured your corporate directory to pass a unique attribute to AWS as the source identity.
Configured a role that will persist the SourceIdentity attribute in AWS STS, which an employee will use to federate into your account.
Configured an Amazon S3 bucket that user will access.
Now you’ll observe in CloudTrail the SourceIdentity attribute that will be associated with every IAM action.
To see the SourceIdentity attribute in CloudTrail
From the your preferred IdP dashboard, select the AWS tile to log into the AWS console. The example in Figure 12 shows the Okta dashboard.
Figure 12. Login to AWS from IdP dashboard
Choose the AWS icon, which will take you to the AWS Management Console. Notice how the user has assumed the role you created earlier.
To test the SourceIdentity action, you will create a new Amazon S3 bucket.
Amazon S3 bucket names are globally unique, and the namespace is shared by all AWS accounts, so you will need to create a unique bucket name in your account. For this example, we used a bucket named DOC-EXAMPLE-BUCKET1 to validate CloudTrail log entries containing the SourceIdentity attribute.
Log into an account Account1 (111122223333) using a role named Role1.
Next, create a new Amazon S3 bucket in Account1, and validate that the Account1 CloudTrail logs entries contain the SourceIdentity attribute.
Create an Amazon S3 bucket called DOC-EXAMPLE-BUCKET1, as shown in Figure 13.
Figure 13. Create S3 bucket
In the AWS Management Console go to CloudTrail and check the log entry for bucket creation event, as shown in Figure 14.
Switch to Account2 (444455556666) using assume role, and switch to Account2/assumeRoleSourceIdentity.
Create a new Amazon S3 bucket in Account2 and validate that the Account2 CloudTrail log entries contain the SourceIdentity attribute, as shown in Figure 15.
Figure 15 – Switch role to assumeRoleSourceIdentity
Create a new Amazon S3 bucket in account2 called DOC-EXAMPLE-BUCKET2, as shown in Figure 16.
Figure 16 – Create DOC-EXAMPLE-BUCKET2 bucket while logged into account2 using assumeRoleSourceIdentity
Check the CloudTrail logs for account2 (444455556666) to see if the original SourceIdentity is logged, as shown in Figure 17.
Figure 17 – CloudTrail log entry for the above action
CloudTrail entry showing original SourceIdentity after assuming a role
You logged into Account1/Role1 and switched to Account2/Role2. All the user activities performed in AWS using the Assume Role were also logged with the original user’s sourceIdentity attribute. This makes it simple to trace user activity in CloudTrail.
Conclusion
Now that you have configured your SourceIdentity, you have made it easier for the security team of your organization to use CloudTrail logs to investigate and identify the originating identity of a user. In this post, you learned how to configure the AWS STSSourceIdentity attribute for three different popular IdPs, as well as how to configure each IdP using SAML and their optional attributes. We also provided sample control policy documents outlining how to configure the SourceIdentity for each provider. Additionally, we provide a sample policy for setting the SourceIdentity when switching roles. Lastly, the post walks through how the source identity will show in CloudTrail logs, and provides logs from two accounts to demonstrate the continuance of the source identity attribute. You can now test this capability yourself in your own environment, validate activity in your CloudTrail logs, and determine which user performed a specific action while using the assumeRole functionality.
If you have feedback about this post, submit comments in the Comments section below. If you have questions about this post, contact AWS Support.
Want more AWS Security news? Follow us on Twitter.
Google Workspace offers a single sign-on service based off of the Security Assertion Markup Language (SAML) 2.0. Users can use this service to access to your AWS resources by using their existing Google credentials. For users to whom you grant access, they will see an additional SAML app in their Google Workspace console. When your users choose this SAML app, they will be redirected to www.google.com the AWS Management Console.
Solution Overview
In this solution, you will create a SAML identity provider in IAM to establish a trusted communication channel across which user authentication information may be securely passed with your Google IdP in order to permit your Google Workspace users to access the AWS Management Console. You, as the AWS administrator, delegate responsibility for user authentication to a trusted IdP, in this case Google Workspace. Google Workspace leverages SAML 2.0 messages to communicate user authentication information between Google and your AWS account. The information contained within the SAML 2.0 messages allows an IAM role to grant the federated user permissions to sign in to the AWS Management Console and access your AWS resources. The IAM policy attached to the role they select determines which permissions the federated user has in the console.
Figure 1: Login process for IAM federation
Figure 1 illustrates the login process for IAM federation. From the federated user’s perspective, this process happens transparently: the user starts at the Google Workspace portal and ends up at the AWS Management Console, without having to supply yet another user name and password.
The portal verifies the user’s identity in your organization. The user begins by browsing to your organization’s portal and selects the option to go to the AWS Management Console. In your organization, the portal is typically a function of your IdP that handles the exchange of trust between your organization and AWS. In Google Workspace, you navigate to https://myaccount.google.com/ and select the nine dots icon on the top right corner. This will show you a list of apps, one of which will log you in to AWS. This blog post will show you how to configure this custom app.
Figure 2: Google Account page
The portal verifies the user’s identity in your organization.
The portal generates a SAML authentication response that includes assertions that identify the user and include attributes about the user. The portal sends this response to the client browser. Although not discussed here, you can also configure your IdP to include a SAML assertion attribute called SessionDuration that specifies how long the console session is valid. You can also configure the IdP to pass attributes as session tags.
The client browser is redirected to the AWS single sign-on endpoint and posts the SAML assertion.
The endpoint requests temporary security credentials on behalf of the user, and creates a console sign-in URL that uses those credentials.
AWS sends the sign-in URL back to the client as a redirect.
The client browser is redirected to the AWS Management Console. If the SAML authentication response includes attributes that map to multiple IAM roles, the user is first prompted to select the role for accessing the console.
The list below is a high-level view of the specific step-by-step procedures needed to set up federated single sign-on access via Google Workspace.
The setup
Follow these top-level steps to set up federated single sign-on to your AWS resources by using Google Apps:
Download the Google identity provider (IdP) information.
Create the IAM SAML identity provider in your AWS account.
Create roles for your third-party identity provider.
Assign the user’s role in Google Workspace.
Set up Google Workspace as a SAML identity provider (IdP) for AWS.
Test the integration between Google Workspace and AWS IAM.
Roll out to a wider user base.
Detailed procedures for each of these steps compose the remainder of this blog post.
Step 1. Download the Google identity provider (IdP) information
First, let’s get the SAML metadata that contains essential information to enable your AWS account to authenticate the IdP and locate the necessary communication endpoint locations:
From the Admin console Home page, select Security > Settings > Set up single sign-on (SSO) with Google as SAML Identity Provider (IdP).
Figure 3: Accessing the “single sign-on for SAML applications” setting
Choose Download Metadata under IdP metadata.
Figure 4: The “SSO with Google as SAML IdP” page
Step 2. Create the IAM SAML identity provider in your account
Now, create an IAM IdP for Google Workspace in order to establish the trust relationship between Google Workspace and your AWS account. The IAM IdP you create is an entity within your AWS account that describes the external IdP service whose users you will configure to assume IAM roles.
Step 3. Create roles for your third-party Identity Provider
For users accessing the AWS Management Console, the IAM role that the user assumes allows access to resources within your AWS account. The role is where you define what you allow a federated user to do after they sign in.
To create an IAM role, go to the AWS IAM console. Select Roles > Create role.
Choose the SAML 2.0 federation role type.
For SAML Provider, select the provider which you created in Step 2.
Choose Allow programmatic and AWS Management Console access to create a role that can be assumed programmatically and from the AWS Management Console.
Review your SAML 2.0 trust information and then choose Next: Permissions.
Figure 6: Reviewing your SAML 2.0 trust information
GoogleSAMLPowerUserRole:
For this walkthrough, you are going to create two roles that can be assumed by SAML 2.0 federation. For GoogleSAMLPowerUserRole, you will attach the PowerUserAccess AWS managed policy. This policy provides full access to AWS services and resources, but does not allow management of users and groups. Choose Filter policies, then select AWS managed – job function from the dropdown. This will show a list of AWS managed policies designed around specific job functions.
Figure 7: Selecting the AWS managed job function
To attach the policy, select PowerUserAccess. Then choose Next: Tags, then Next: Review.
Figure 8: Attaching the PowerUserAccess policy to your role
Finally, choose Create role to finalize creation of your role.
Figure 9: Creating your role
GoogleSAMLViewOnlyRole
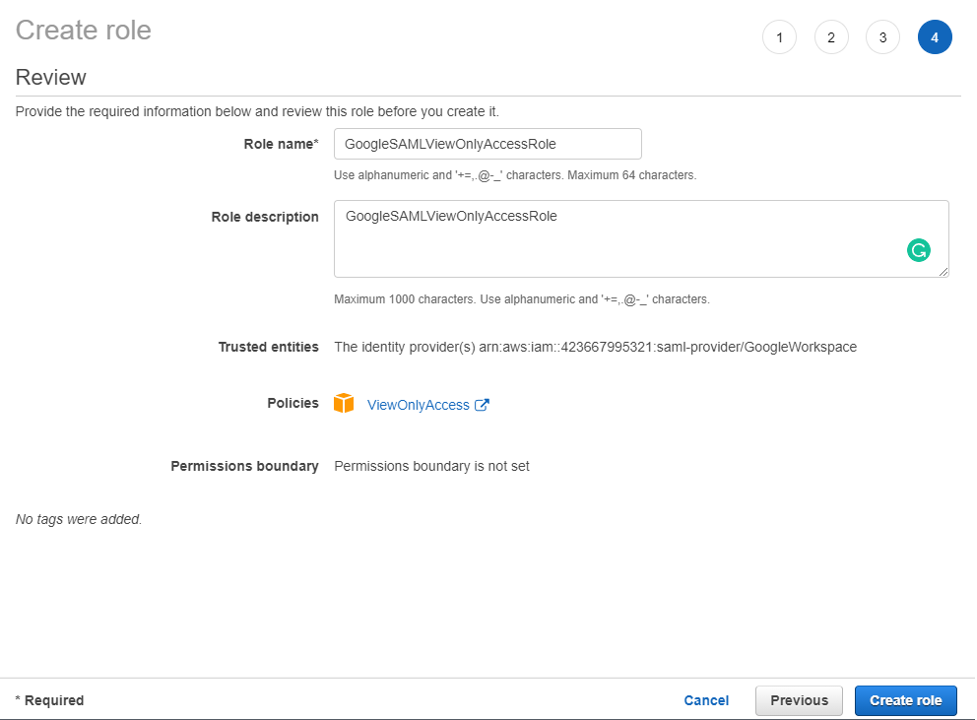
Repeat steps a to g for the GoogleSAMLViewOnlyRole, attaching the ViewOnlyAccess AWS managed policy.
Figure 10: Creating the GoogleSAMLViewOnlyRole
Figure 11: Attaching the ViewOnlyAccess permissions policy
Document the ARN of both roles. The ARN should be similar to
arn:aws:iam::123456789012:role/GoogleSAMLPowerUserRole and
From the Admin console Home page, go to Directory > Users and select Manage custom attributes from the More dropdown, and choose Add Custom Attribute.
Configure the custom attribute as follows:
Category:
AWS
Description:
Amazon Web Services Role Mapping
For Custom fields, enter the following values:
Name:
AssumeRoleWithSaml
Info type:
Text
Visibility:
Visible to user and admin
InNo. of values:
Multi-value
Choose Add. The new category should appear in the Manage user attributes page.
Figure12: Adding the custom attribute
Navigate to Users, and find the user you want to allow to federate into AWS. Select the user’s name to open their account page, then choose User Information.
Select on the custom attribute you recently created, named AWS. Add two rows, each of which will include the values you recorded earlier, using the format below for each AssumeRoleWithSaml row.
The format of the AssumeRoleWithSaml is constructed by using the RoleARN(from Step 3-h) + “,”+ Identity provider ARN (from Step 2-g), this value will be passed as SAML attribute value for attribute with name https://aws.amazon.com/SAML/Attributes/Role. The final result will look similar to below:
Figure 13: Adding the roles that the user can assume
Step 5. Set up Google Workspace as a SAML identity provider (IdP) for AWS
Now you’ll set up the SAML app in your Google Workspace account. This includes adding the SAML attributes that the AWS Management Console expects in order to allow a SAML-based authentication to take place.
From the Admin console Home page, go to Apps > Web and mobile apps.
Choose Add custom SAML app from the Add App dropdown.
Enter AWS Single-Account Access for App name and upload an optional App icon to identify your SAML application, and select Continue.
Figure 14: Naming the custom SAML app and setting the icon
Fill in the following values:
ACS URL:
https://signin.aws.amazon.com/saml
Entity ID:
urn:amazon:webservices
Name ID format:
EMAIL
Name ID:
Basic Information > Primary email
Note: Your primary email will become your role’s AWS session name
Choose CONTINUE.
Figure 15: Adding the custom SAML app
AWS requires the IdP to issue a SAML assertion with some mandatory attributes (known as claims). The AWS documentation explains how to configure the SAML assertion. In short, you need to create an assertion with the following:
An attribute of name https://aws.amazon.com/SAML/Attributes/Role. This element contains one or more AttributeValue elements that list the IAM identity provider and role to which the user is mapped by your IdP. The IAM role and IAM identity provider are specified as a comma-delimited pair of ARNs in the same format as the RoleArn and PrincipalArn parameters that are passed to AssumeRoleWithSAML.
An attribute of name https://aws.amazon.com/SAML/Attributes/RoleSessionName (again, this is just a definition of type, not an actual URL) with a string value. This is the federated user’s role session name in AWS.
A name identifier (NameId) that is used to identify the subject of a SAML assertion.
At the top left, select TEST SAML LOGIN, then choose ALLOW ACCESS within the popup box.
Figure 18: Testing the SAML login
Select ON for everyone in the Service status section, and choose SAVE. This will allow every user in Google Workspace to see the new SAML custom app.
Figure 19: Saving the custom app settings
Now navigate to Web and mobile apps and choose TEST SAML LOGIN again. Amazon Web Services should open in a separate tab and display two roles for users to choose from:
FIgure 20: Testing SAML login again
Figure 21: Selecting the IAM role you wish to assume for console access
Select the desired role and select Sign in.
You should now be redirected to AWS Management Console home page.
Google workspace users should now be able to access the AWS application from their workspace:
Figure 22: Viewing the AWS custom app
Conclusion
By following the steps in this blog post, you’ve configured your Google Workspace directory and AWS accounts to allow SAML-based federated sign-on for selected Google Workspace users. Using this over IAM users helps centralize identity management, making it easier to adopt a multi-account strategy.
If you have feedback about this post, submit comments in the Comments section below. If you have questions about this post, contact AWS Support.
Want more AWS Security news? Follow us on Twitter.
The collective thoughts of the interwebz
Manage Consent
To provide the best experiences, we use technologies like cookies to store and/or access device information. Consenting to these technologies will allow us to process data such as browsing behavior or unique IDs on this site. Not consenting or withdrawing consent, may adversely affect certain features and functions.
Functional
Always active
The technical storage or access is strictly necessary for the legitimate purpose of enabling the use of a specific service explicitly requested by the subscriber or user, or for the sole purpose of carrying out the transmission of a communication over an electronic communications network.
Preferences
The technical storage or access is necessary for the legitimate purpose of storing preferences that are not requested by the subscriber or user.
Statistics
The technical storage or access that is used exclusively for statistical purposes.The technical storage or access that is used exclusively for anonymous statistical purposes. Without a subpoena, voluntary compliance on the part of your Internet Service Provider, or additional records from a third party, information stored or retrieved for this purpose alone cannot usually be used to identify you.
Marketing
The technical storage or access is required to create user profiles to send advertising, or to track the user on a website or across several websites for similar marketing purposes.