Tag Archives: AWS Toolkit for Visual Studio

Best Practices for working with Pull Requests in Amazon CodeCatalyst

Post Syndicated from Fahim Sajjad original https://aws.amazon.com/blogs/devops/best-practices-for-working-with-pull-requests-in-amazon-codecatalyst/

According to the Well-Architected DevOps Guidance, “A peer review process for code changes is a strategy for ensuring code quality and shared responsibility. To support separation of duties in a DevOps environment, every change should be reviewed and approved by at least one other person before merging.” Development teams often implement the peer review process in their Software Development Lifecycle (SDLC) by leveraging Pull Requests (PRs). Amazon CodeCatalyst has recently released three new features to facilitate a robust peer review process. Pull Request Approval Rules enforce a minimum number of approvals to ensure multiple peers review a proposed change prior to a progressive deployment. Amazon Q pull request summaries can automatically summarize code changes in a PR, saving time for both the creator and reviewer. Lastly, Nested Comments allows teams to organize conversations and feedback left on a PR to ensure efficient resolution.

This blog will demonstrate how a DevOps lead can leverage new features available in CodeCatalyst to accomplish the following requirements covering best practices: 1. Require at least two people to review every PR prior to deployment, and 2. Reduce the review time to merge (RTTM).

Prerequisites

If you are using CodeCatalyst for the first time, you’ll need the following to follow along with the steps outlined in the blog post:

Pull request approval rules

Approval rules can be configured for branches in a repository. When you create a PR whose destination branch has an approval rule configured for it, the requirements for the rule must be met before the PR can be merged.

In this section, you will implement approval rules on the default branch (main in this case) in the application’s repository to implement the new ask from leadership requiring that at least two people review every PR before deployment.

Step 1: Creating the application
Pull Request approval rules work with every project but in this blog, we’ll leverage the Modern three-tier web application blueprint for simplicity to implement PR approval rules for merging to the main branch.

The image shows the interface of the Amazon CodeCatalyst platform, which allows users to create new projects in three different ways. The three options are "Start with a blueprint", "Bring your own code", and "Start from scratch". In the image, the "Start with a blueprint" option is selected, and the "Modern three-tier web application" blueprint is chosen.

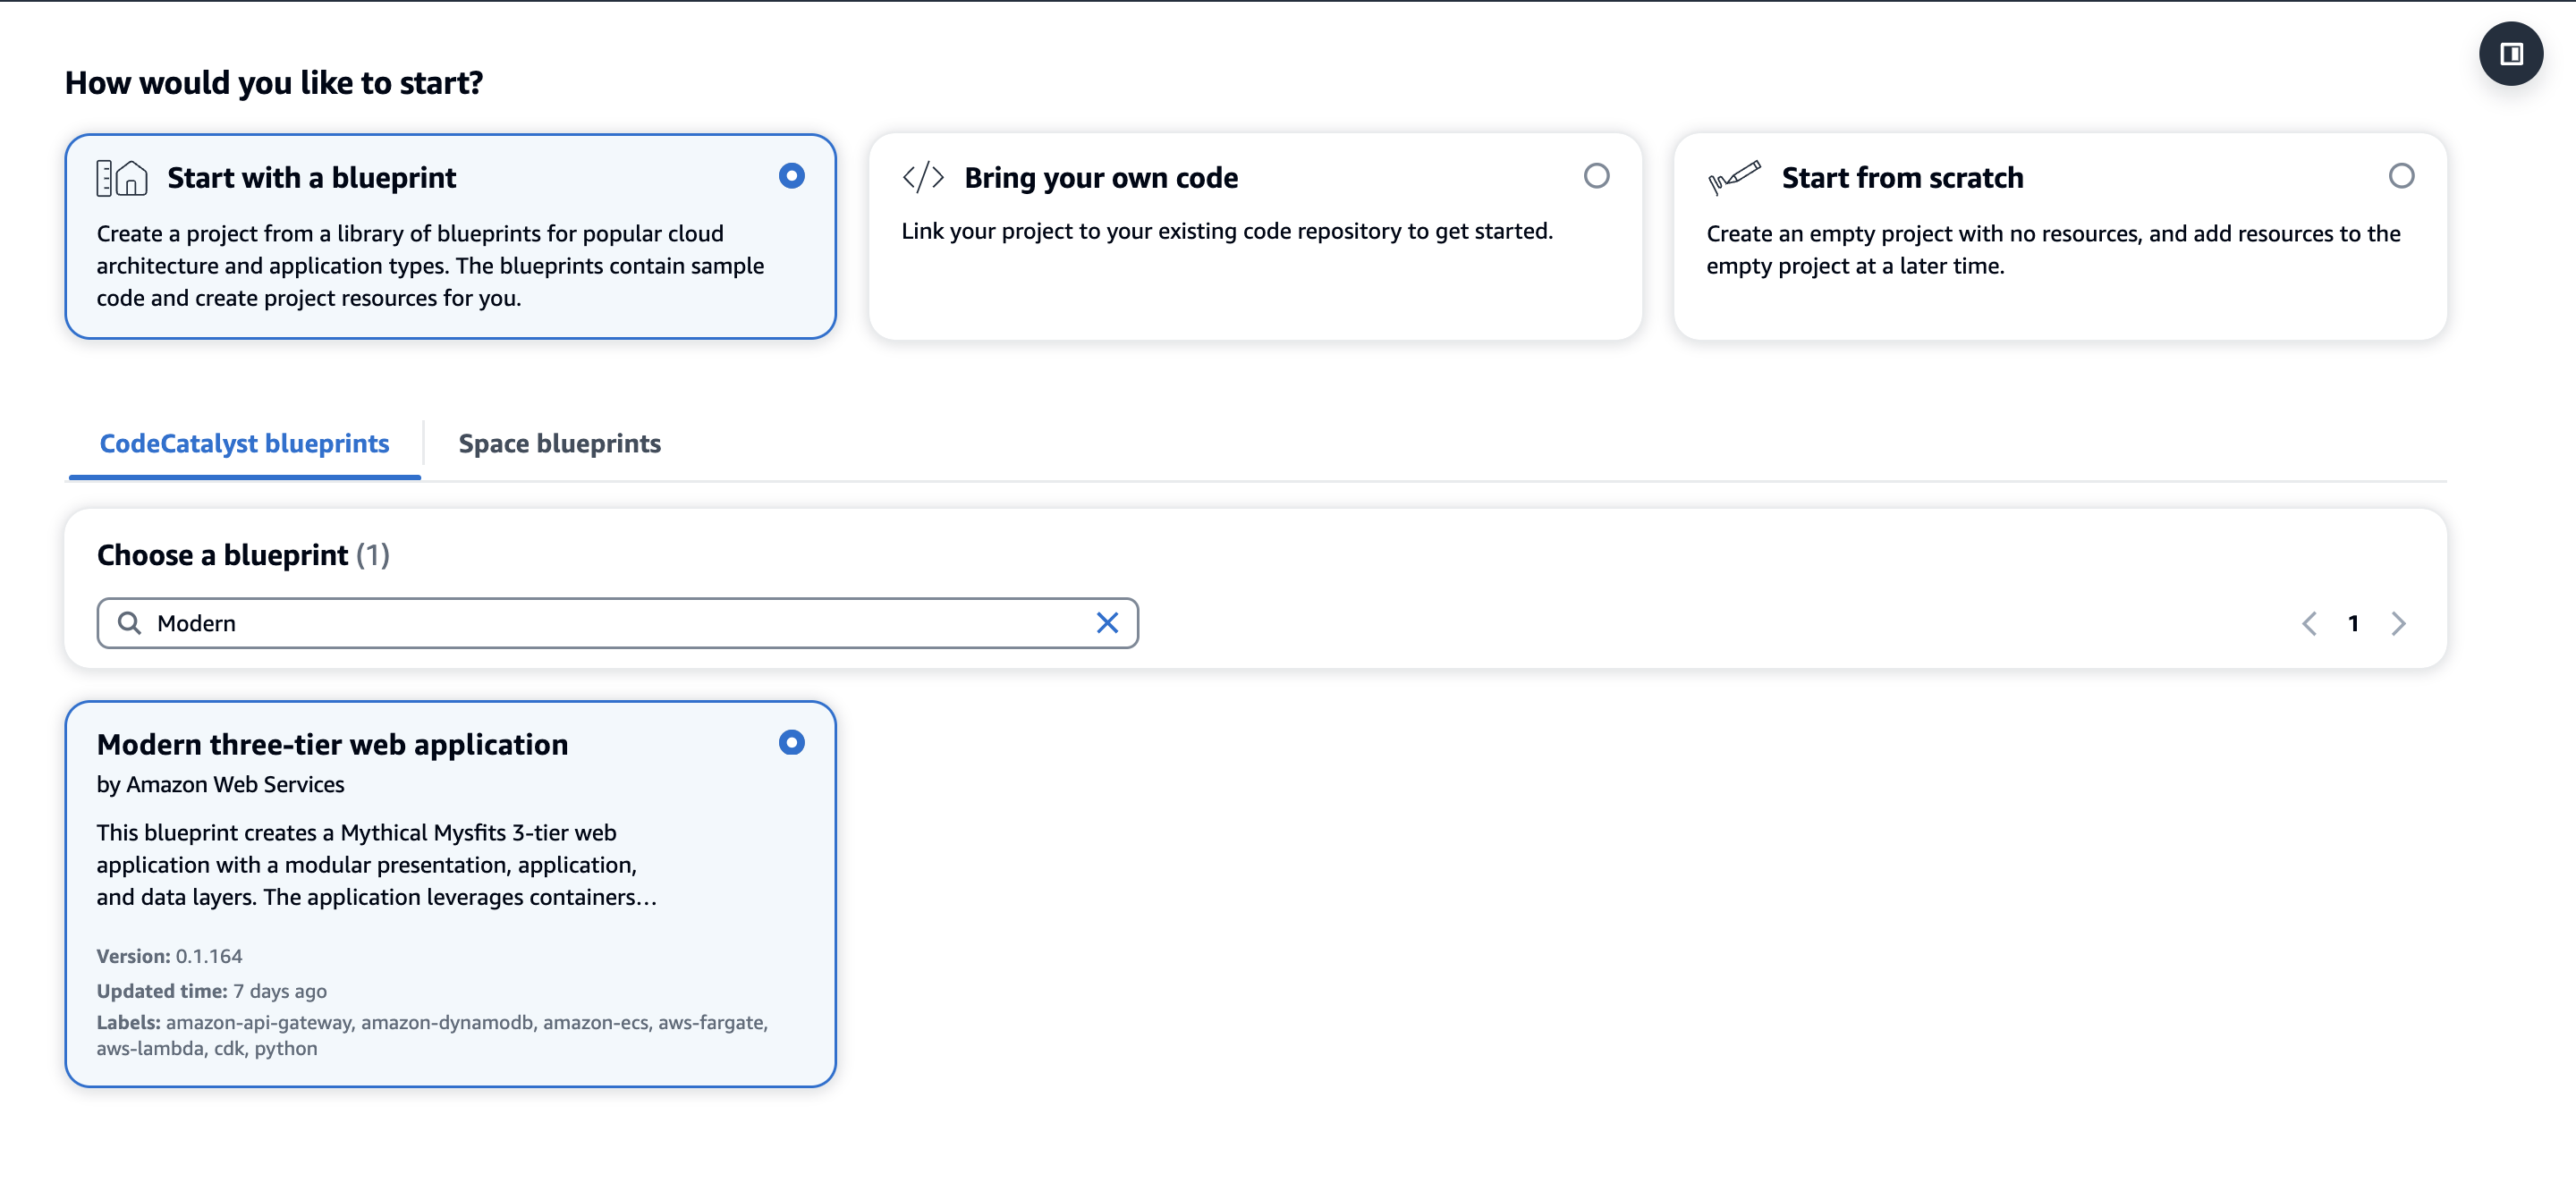
Figure 1: Creating a new Modern three-tier application Blueprint

  1. First, within your space click “Create Project” and select the Modern three-tier web application CodeCatalyst Blueprint as shown above in Figure 1.
  2. Enter a Project name and select: Lambda for the Compute Platform and Amplify Hosting for Frontend Hosting Options. Additionally, ensure your AWS account is selected along with creating a new IAM Role.
  3. Finally, click Create Project and a new project will be created based on the Blueprint.

Once the project is successfully created, the application will deploy via a CodeCatalyst workflow, assuming the AWS account and IAM role were setup correctly. The deployed application will be similar to the Mythical Mysfits website.

Step 2: Creating an approval rule

Next, to satisfy the new requirement of ensuring at least two people review every PR before deployment, you will create the approval rule for members when they create a pull request to merge into the main branch.

  1. Navigate to the project you created in the previous step.
  2. In the navigation pane, choose Code, and then choose Source repositories.
  3. Next, choose the mysfits repository that was created as part of the Blueprint.
    1. On the overview page of the repository, choose Branches.
    2. For the main branch, click View under the Approval Rules column.
  4. In Minimum number of approvals, the number corresponds to the number of approvals required before a pull request can be merged to that branch.
  5. Now, you’ll change the approval rule to satisfy the requirement to ensure at least 2 people review every PR. Choose Manage settings. On the settings page for the source repository, in Approval rules, choose Edit.
  6. In Destination Branch, from the drop-down list, choose main as the name of the branch to configure an approval rule. In Minimum number of approvals, enter 2, and then choose Save.
The image shows an interface for creating an approval rule. It allows users to specify the destination branch and the minimum number of approvals required before a pull request can be merged. In the image, 'main' is selected as the destination branch, and '2' is set as the minimum number of approvals. The interface also provides "Cancel" and "Save" buttons to either discard or commit the approval rule settings.

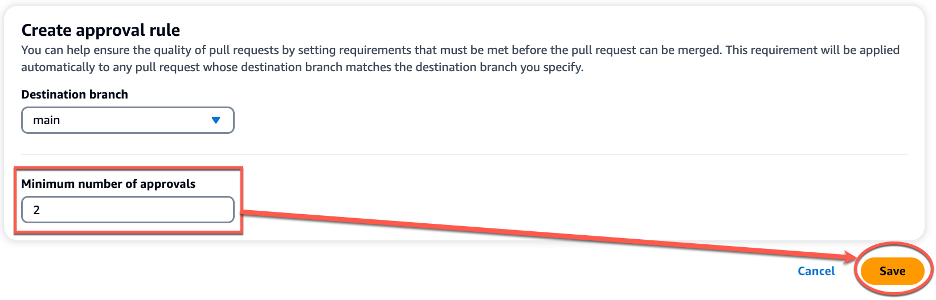
Figure 2: Creating a new approval rule

Note: You must have the Project administrator role to create and manage approval rules in CodeCatalyst projects. You cannot create approval rules for linked repositories.

When implementing approval rules and branch restrictions in your repositories, ensure you take into consideration the following best practices:

  • For branches deemed critical or important, ensure only highly privileged users are allowed to Push to the Branch and Delete the Branch in the branch rules. This prevents accidental deletion of critical or important branches as well as ensuring any changes introduced to the branch are reviewed before deployment.
  • Ensure Pull Request approval rules are in place for branches your team considers critical or important. While there is no specific recommended number due to varying team size and project complexity, the minimum number of approvals is recommended to be at least one and research has found the optimal number to be two.

In this section, you walked through the steps to create a new approval rule to satisfy the requirement of ensuring at least two people review every PR before deployment on your CodeCatalyst repository.

Amazon Q pull request summaries

Now, you begin exploring ways that can help development teams reduce MTTR. You begin reading about Amazon Q pull request summaries and how this feature can automatically summarize code changes and start to explore this feature in further detail.

While creating a pull request, in Pull request description, you can leverage the Write description for me feature, as seen in Figure 5 below, to have Amazon Q create a description of the changes contained in the pull request.

The image displays an interface for a pull request details page. At the top, it shows the source repository where the changes being reviewed are located, which is "mysfits1ru6c". Below that, there are two dropdown menus - one for the destination branch where the changes will be merged, set to "main", and one for the source branch containing the changes, set to "test-branch". The interface also includes a field for the pull request title, which is set to "Updated Title", and an optional description field. The description field has a button labeled "Write description for me" that allows the user to have the system automatically generate a description for the pull request leveraging Amazon Q.

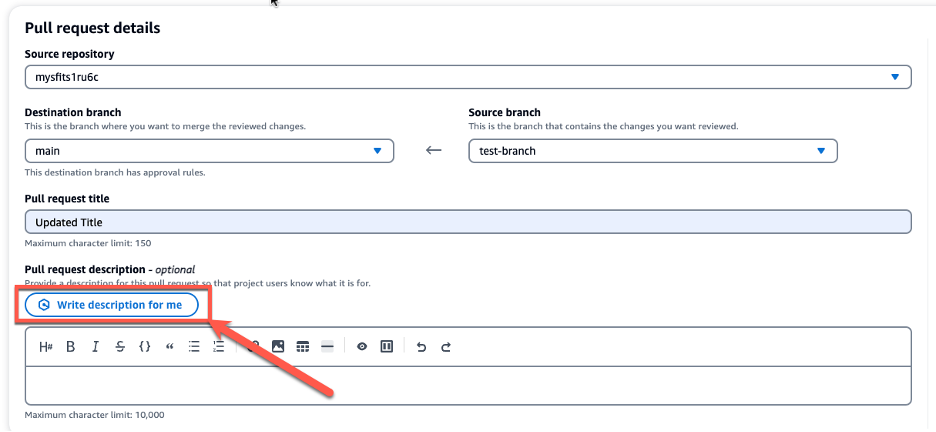
Figure 3: Amazon Q write description for me feature

Once the description is generated, you can Accept and add to description, as seen in Figure 6 below. As a best practice, once Amazon Q has generated the initial PR summary, you should incorporate any specific organizational or team requirements into the summary before creating the PR. This allows developers to save time and reduce MTTR in generating the PR summary while ensuring all requirements are met.

The image displays an interface for a pull request details page. It shows the source repository as "mystits1ruc" and the destination branch as "main", with the source branch set to "test-branch". The interface also includes a field for the pull request title, which is set to "Updated Title". Underneath that is the optional Pull Request description, which is populated with a description generated from Amazon Q. Below the description field, there are two buttons - "Accept and add to description" and "Hide preview" - that allow the user to accept the description and add it to the pull request.

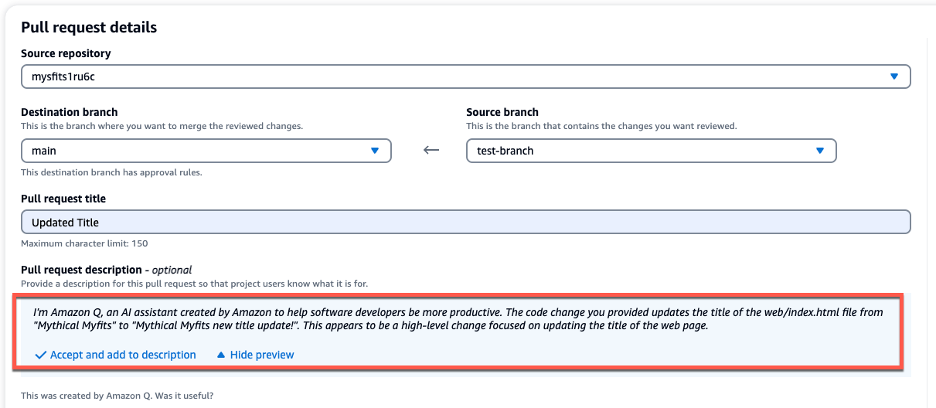
Figure 4: PR Summary generated by Amazon Q

CodeCatalyst offers an Amazon Q feature that summarizes pull request comments, enabling developers to quickly grasp key points. When many comments are left by reviewers, it can be difficult to understand common themes in the feedback, or even be sure that you’ve addressed all the comments in all revisions. You can use the Create comment summary feature to have Amazon Q analyze the comments and provide a summary for you, as seen in Figure 5 below.

The image shows an interface where pull request title is set to "New Title Update," and the description provides details on the changes being made. Below the description, there is a "Comment summary" section that offers instructions for summarizing the pull request comments. Additionally, there is a "Create comment summary" button, which allows the user to generate a summary of the comments using Amazon Q.

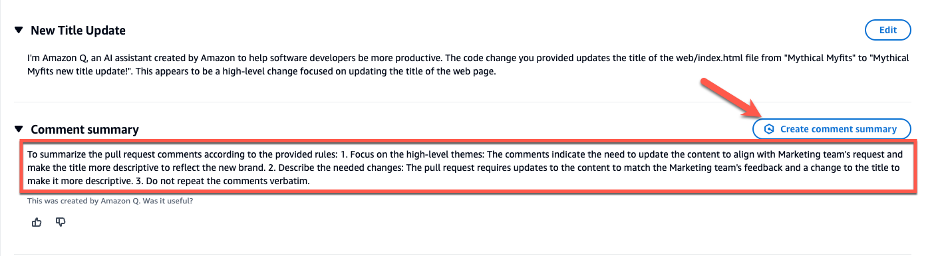
Figure 5: Comment summary

Nested Comments

When reviewing various PRs for the development teams, you notice that feedback and subsequent conversations often happen within disparate and separate comments. This makes reviewing, understanding and addressing the feedback cumbersome and time consuming for the individual developers. Nested Comments in CodeCatalyst can organize conversations and reduce MTTR.

You’ll leverage the existing project to walkthrough how to use the Nested Comments feature:

Step 1: Creating the PR

  1. Click the mysifts repository, and on the overview page of the repository, choose More, and then choose Create branch.
  2. Open the web/index.html file
    • Edit the file to update the text in the <title> block to Mythical Mysfits new title update! and Commit the changes.
  3. Create a pull request by using test-branch as the Source branch and main as the Destination branch. Your PR should now look similar to Figure 6 below:
The image shows the Amazon CodeCatalyst interface, which is used to compare code changes between different revisions of a project. The interface displays a side-by-side view of the "web/index.html" file, highlighting the changes made between the main branch and Revision 1. The differences are ready for review, as indicated by the green message at the top.

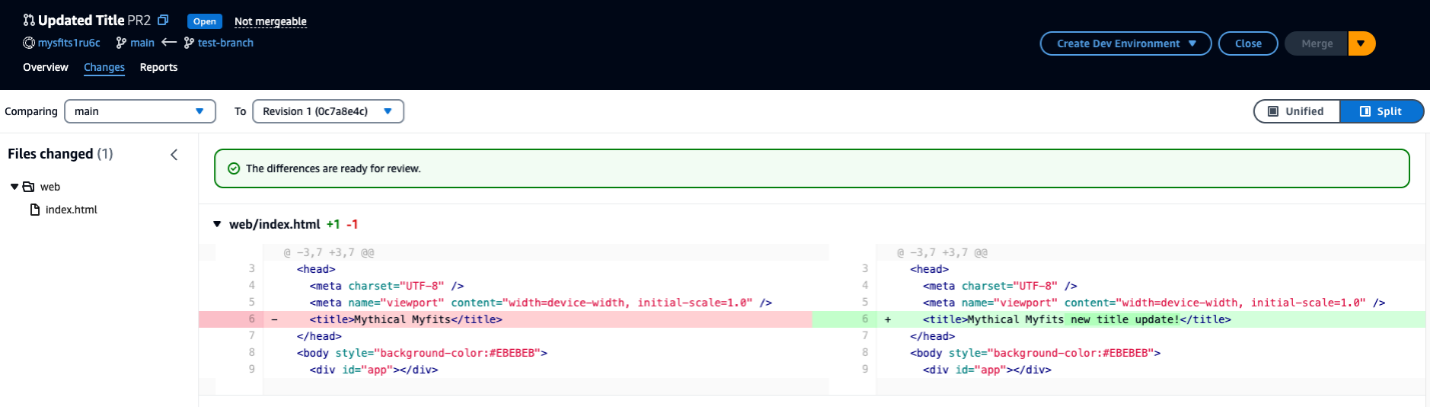
Figure 6: Pull Request with updated Title

Step 2: Review PR and add Comments

  1. Review the PR, ensure you are on the Changes tab (similar to Figure 3), click the Comment icon and leave a comment. Normally this would be done by the Reviewer but you will simulate being both the Reviewer and Developer in this walkthrough.
  2. With the comment still open, hit Reply and add another comment as a response to the initial comment. The PR should now look similar to Figure 7 below.
This image shows a pull request interface where changes have been made to the HTML title of a web page. Below the code changes, there is a section for comments related to this pull request. The comments show a nested comments between two developers where they are discussing and confirming the changes to the title.

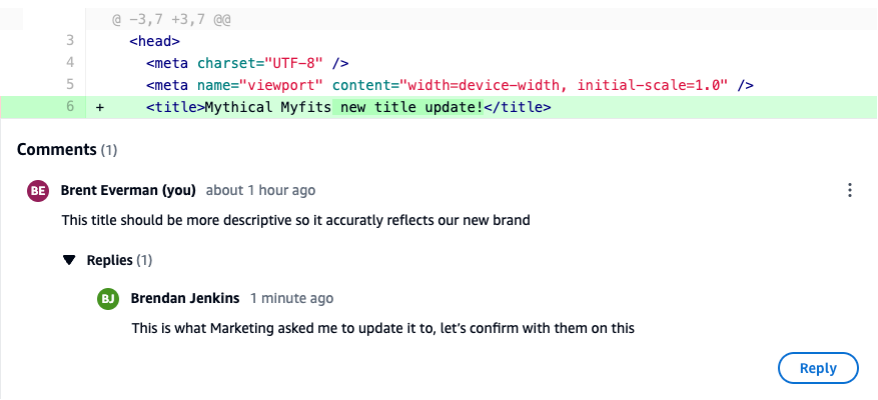
Figure 7: PR with Nested Comments

When leaving comments on PR in CodeCatalyst, ensure you take into consideration the following best practices :

  • Feedback or conversation focused on a specific topic or piece of code should leverage the nested comments feature. This will ensure the conversation can be easily followed and that context and intent are not lost in a sea of individual comments.
  • Author of the PR should address all comments by either making updates to the code or replying to the comment. This indicates to the reviewer that each comment was reviewed and addressed accordingly.
  • Feedback should be constructive in nature on PRs. Research has found that, “destructive criticism had a negative impact on participants’ moods and motivation to continue working.”

Clean-up

As part of following the steps in this blog post, if you upgraded your space to Standard or Enterprise tier, please ensure you downgrade to the Free tier to avoid any unwanted additional charges. Additionally, delete any projects you may have created during this walkthrough.

Conclusion

In today’s fast-paced software development environment, maintaining a high standard for code changes is crucial. With its recently introduced features, including Pull Request Approval Rules, Amazon Q pull request summaries, and nested comments, CodeCatalyst empowers development teams to ensure a robust pull request review process is in place. These features streamline collaboration, automate documentation tasks, and facilitate organized discussions, enabling developers to focus on delivering high-quality code while maximizing productivity. By leveraging these powerful tools, teams can confidently merge code changes into production, knowing that they have undergone rigorous review and meet the necessary standards for reliability and performance.

About the authors

Brent Everman

Brent is a Senior Technical Account Manager with AWS, based out of Pittsburgh. He has over 17 years of experience working with enterprise and startup customers. He is passionate about improving the software development experience and specializes in AWS’ Next Generation Developer Experience services.

Brendan Jenkins

Brendan Jenkins is a Solutions Architect at Amazon Web Services (AWS) working with Enterprise AWS customers providing them with technical guidance and helping achieve their business goals. He has an area of specialization in DevOps and Machine Learning technology.

Fahim Sajjad

Fahim is a Solutions Architect at Amazon Web Services. He helps customers transform their business by helping in designing their cloud solutions and offering technical guidance. Fahim graduated from the University of Maryland, College Park with a degree in Computer Science. He has deep interested in AI and Machine learning. Fahim enjoys reading about new advancements in technology and hiking.

Abdullah Khan

Abdullah is a Solutions Architect at AWS. He attended the University of Maryland, Baltimore County where he earned a degree in Information Systems. Abdullah currently helps customers design and implement solutions on the AWS Cloud. He has a strong interest in artificial intelligence and machine learning. In his spare time, Abdullah enjoys hiking and listening to podcasts.

Amazon Q Developer, now generally available, includes new capabilities to reimagine developer experience

Post Syndicated from Donnie Prakoso original https://aws.amazon.com/blogs/aws/amazon-q-developer-now-generally-available-includes-new-capabilities-to-reimagine-developer-experience/

When Amazon Web Services (AWS) launched Amazon Q Developer as a preview last year, it changed my experience of interacting with AWS services and, at the same time, maximizing the potential of AWS services on a daily basis. Trained on 17 years of AWS knowledge and experience, this generative artificial intelligence (generative AI)–powered assistant helps me build applications on AWS, research best practices, perform troubleshooting, and resolve errors.

Today, we are announcing the general availability of Amazon Q Developer. In this announcement, we have a few updates, including new capabilities. Let’s get started.

New: Amazon Q Developer has knowledge of your AWS account resources
This new capability helps you understand and manage your cloud infrastructure on AWS. With this capability, you can list and describe your AWS resources using natural language prompts, minimizing friction in navigating the AWS Management Console and compiling all information from documentation pages.

To get started, you can navigate to the AWS Management Console and select the Amazon Q Developer icon.

With this new capability, I can ask Amazon Q Developer to list all of my AWS resources. For example, if I ask Amazon Q Developer, “List all of my Lambda functions,” Amazon Q Developer returns the response with a set of my AWS Lambda functions as requested, as well as deep links so I can navigate to each resource easily.

Prompt for you to try: List all of my Lambda functions.

I can also list my resources residing in other AWS Regions without having to navigate through the AWS Management Console.

Prompt for you to try: List my Lambda functions in the Singapore Region.

Not only that, this capability can also generate AWS Command Line Interface (AWS CLI) commands so I can make changes immediately. Here, I ask Amazon Q Developer to change the timeout configuration for my Lambda function.

Prompt for you to try: Change the timeout for Lambda function <NAME of AWS LAMBDA FUNCTION> in the Singapore Region to 10 seconds.

I can see Amazon Q Developer generated an AWS CLI command for me to perform the action. Next, I can copy and paste the command into my terminal to perform the change.

$> aws lambda update-function-configuration --function-name <AWS_LAMBDA_FUNCTION_NAME> --region ap-southeast-1 --timeout 10
{
    "FunctionName": "<AWS_LAMBDA_FUNCTION_NAME>",
    "FunctionArn": "arn:aws:lambda:ap-southeast-1:<ACCOUNT_ID>:function:<AWS_LAMBDA_FUNCTION_NAME>",
    "Runtime": "python3.8",
    "Role": "arn:aws:iam::<ACCOUNT_ID>:role/service-role/-role-1o58f7qb",
    "Handler": "lambda_function.lambda_handler",
    "CodeSize": 399,
    "Description": "",
    "Timeout": 10,
...
<truncated for brevity> }

What I really like about this capability is that it minimizes the time and effort needed to get my account information in the AWS Management Console and generate AWS CLI commands so I can immediately implement any changes that I need. This helps me focus on my workflow to manage my AWS resources.

Amazon Q Developer can now help you understand your costs (preview)
To fully maximize the value of cloud spend, I need to have a thorough understanding of my cloud costs. With this capability, I can get answers to AWS cost-related questions using natural language. This capability works by retrieving and analyzing cost data from AWS Cost Explorer.

Recently, I’ve been building a generative AI demo using Amazon SageMaker JumpStart, and this is the right timing because I need to know the total spend. So, I ask Amazon Q Developer the following prompt to know my spend in Q1 this year.

Prompt for you to try: What were the top three highest-cost services in Q1?

From the Amazon Q response, I can further investigate this result by selecting the Cost Explorer URL, which will bring me to the AWS Cost Explorer dashboard. Then, I can follow up with this prompt:

Prompt for you to try: List services in my account which have the most increment month over month. Provide details and analysis.

In short, this capability makes it easier for me to develop a deep understanding and get valuable insights into my cloud spending.

Amazon Q extension for IDEs
As part of the update, we also released an Amazon Q integrated development environment (IDE) extension for Visual Studio Code and JetBrains IDEs. Now, you will see two extensions in the IDE marketplaces: (1) Amazon Q and (2) AWS Toolkit.

If you’re a new user, after installing the Amazon Q extension, you will see a sign-in page in the IDE with two options: using AWS Builder ID or single sign-on. You can continue to use Amazon Q normally.

For existing users, you will need to update the AWS Toolkit extension in your IDEs. Once you’ve finished the update, if you have existing Amazon Q and Amazon CodeWhisperer connections, even if they’re expired, the new Amazon Q extension will be automatically installed for you.

If you’re using Visual Studio 2022, you can use Amazon Q Developer as part of the AWS Toolkit for Visual Studio 2022 extension.

Free access for advanced capabilities in IDE
As you might know, you can use AWS Builder ID to start using Amazon Q Developer in your preferred IDEs. Now, with this announcement, you have free access to two existing advanced capabilities of Amazon Q Developer in IDE, Amazon Q Developer Agent for software development and Amazon Q Developer Agent for code transformation. I’m really excited about this update!

With the Amazon Q Developer Agent for software development, Amazon Q Developer can help you develop code features for projects in your IDE. To get started, you enter /dev in the Amazon Q Developer chat panel. My colleague Séb shared with me the following screenshot when he was using this capability for his support case project. He used the following prompt to generate an implementation plan for creating a new API in AWS Lambda:

Prompt for you to try: Add an API to list all support cases. Expose this API as a new Lambda function

Amazon Q Developer then provides an initial plan and you can keep on iterating this plan until you’re sure mostly everything is covered. Then, you can accept the plan and select Insert code.

The other capability you can access using AWS Builder ID is Developer Agent for code transformation. This capability will help you in upgrading your Java applications in IntelliJ or Visual Studio Code. Danilo described this capability last year, and you can see his thorough journey in Upgrade your Java applications with Amazon Q Code Transformation (preview).

Improvements in Amazon Q Developer Agent for Code Transformation
The new transformation plan provides details specific to my applications to help me understand the overall upgrade process. To get started, I enter /transform in the Amazon Q Developer chat and provide the necessary details for Amazon Q to start upgrading my java project.

In the first step, Amazon Q identifies and provides details on the Java Development Kit (JDK) version, dependencies, and related code that needs to be updated. The dependencies upgrades now include upgrading popular frameworks to their latest major versions. For example, if you’re building with Spring Boot, it now gets upgraded to version 3 as part of the Java 17 upgrade.

In this step, if Amazon Q identifies any deprecated code that Java language specifications recommend replacing, it will make those updates automatically during the upgrade. This is a new enhancement to Amazon Q capabilities and is available now.

In the third step, this capability will build and run unit tests on the upgraded code, including fixing any issues to ensure the code compilation process will run smoothly after the upgrade.

With this capability, you can upgrade Java 8 and 11 applications that are built using Apache Maven to Java version 17. To get started with the Amazon Q Developer Agent for code transformation capability, you can read and follow the steps at Upgrade language versions with Amazon Q Code Transformation. We also have sample code for you to try this capability.

Things to know

  • Availability — To learn more about the availability of Amazon Q Developer capabilities, please visit Amazon Q Developer FAQs page.
  • Pricing — Amazon Q Developer now offers two pricing tiers – Free (free), and Pro, at $19/month/user.
  • Free self-paced course on AWS Skill Builder — Amazon Q Introduction is a 15-minute course that provides a high-level overview of Amazon Q, a generative AI–powered assistant, and the use cases and benefits of using it. This course is part of Amazon’s AI Ready initiative to provide free AI skills training to 2 million people globally by 2025.

Visit our Amazon Q Developer Center to find deep-dive technical content and to discover how you can speed up your software development work.

Happy building,
Donnie