We recently spoke with Kristian Kielhofner, a developer and entrepreneur who’s on his third go-round as a startup founder and CEO after two very successful exits. He’s built a next-gen, crypto-centric media asset management platform, Tovera, which launched two days ago.
Developer customers are regularly choosing Backblaze B2 as the cloud storage platform that sits under their products and services. We feel lucky to learn about the innovations they are bringing to this world. Kristian found a clearer path to setting up CORS for B2 Cloud Storage and Cloudflare, so we asked him to share why he started Tovera, how he thought through his cloud storage options, and the exact steps he took to go live with his solution.
—Backblaze
The Tovera Backstory: Fighting Deepfakes
One morning, this story really caught my attention.
Like many technology enthusiasts, I’m familiar with deepfakes. That said, the “Pennsylvania Cheerleading Mom” story told me something: As we’ve seen time and time again, technology rapidly evolves beyond its original intended use. Sometimes for our benefit, and (unfortunately) sometimes not so much…
I realized it would only be a matter of time before this incredibly powerful technology would be in the hands of everyone—for uses good or evil. With more research, I found that (not surprisingly) the current approach to stopping misuse of the technology utilizes the same fundamental machine learning approaches powering the deepfakes themselves. It seems that what we now have is a machine learning arms race: a new model to generate deepfakes, a new model to detect them. Around and around we go.
I began thinking of approaching the deepfake problem from the other side of the coin. What if, instead of using machine learning to guess what is fake, we prove what is real? Deepfake detection models can’t provide 100% certainty today (or ever), but cryptographic authentication can. This simple idea was the genesis for Tovera.
What Does Tovera Do?
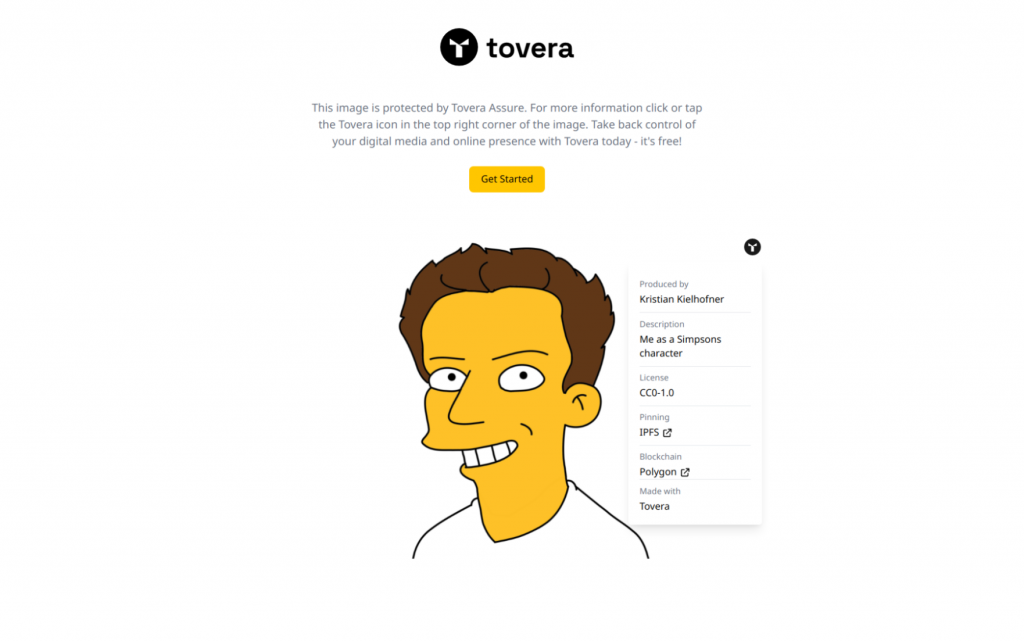
Tovera takes digital media you upload and uses existing cryptography and emerging blockchain technology to create a 100% secure validation record. When published on our platform, we can confirm (with 100% certainty) that your digital media assets are yours and haven’t been tampered with.
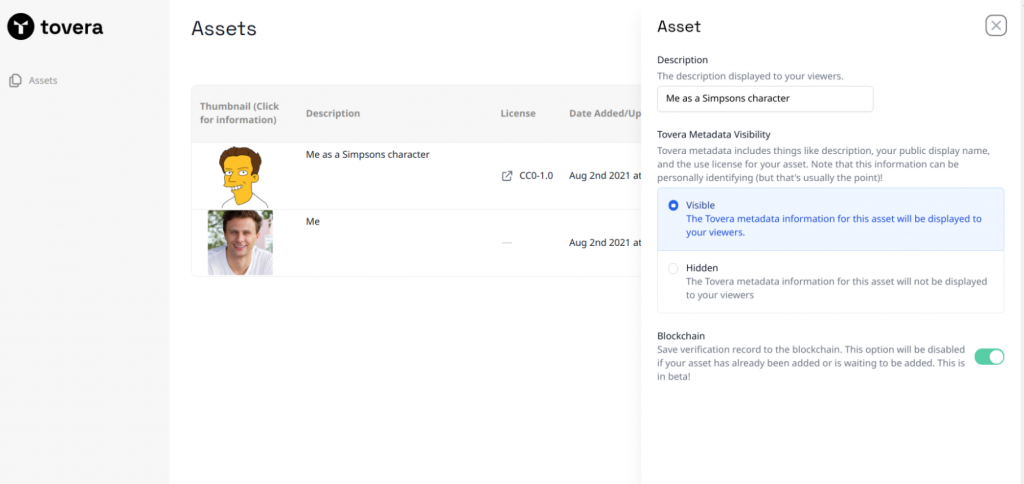
Tovera asset upload and management page.
After working through the initial proof of concept, I had another revelation: “Hey, while we’re hitting our API whenever and wherever digital media is viewed, why don’t we return some extra stuff?” Now, not only can our users validate that their content is really theirs and hasn’t been modified, they can use the features provided by Tovera Publish to dynamically update their released digital content from our dashboard. With Tovera, any changes you make to your digital media and online presence are updated across social media platforms, websites, and devices globally—instantly.
An image served via Tovera, with authentication dropdown.
In keeping with our mission of ensuring everyone can protect, validate, and control their online presence, we provide this technology for free with a simple sign up and onboarding process.
The Tovera Storage Journey
To provide this service, we needed to host the digital media files somewhere. Of course, you have your go-to juggernauts—Amazon, Google, and Microsoft. The problem is Tovera is a tiny startup. Having some prior startup experience, I know that spending your money and time wisely from the beginning is one of the most important things you can do.
I took one look at pricing from the “big three” cloud providers through the lens of someone who has experience buying bandwidth and storage (long story) and I thought, “Wow, this is a good business.” As has been covered on this blog and elsewhere, the storage and (especially) bandwidth markups from the big providers is, to put it mildly, significant.
Like some of you, I’ve also been a fan of Backblaze for a long time. Since it was announced, I’ve kept an eye on their B2 Cloud Storage product. So, one morning I took it upon myself to give Backblaze B2 a try.
Sign up and initial onboarding couldn’t have been easier. I found myself in the Backblaze B2 user dashboard up and running in no time. Creating application keys for my purposes was also extremely easy.
After deciding B2 Cloud Storage would work in theory, I decided to try it out in practice. As I integrated the service into Tovera, I ran into a few different vexing issues. I thought other devs might be able to benefit from my CORS troubleshooting, and so I’m outlining my experience here.
Checking the Backblaze S3 Compatible API
We make it simple for our users to upload their assets directly to our cloud storage provider. Because B2 Cloud Storage has the Backblaze S3 Compatible API, the use of presigned URLs fits the bill. This way, Tovera users can upload their digital media assets directly to Backblaze, securely, and make them available to the world via our platform.
In case you’re not familiar with the presigned URL process, the overall flow looks something like the structure laid out in this blog post.
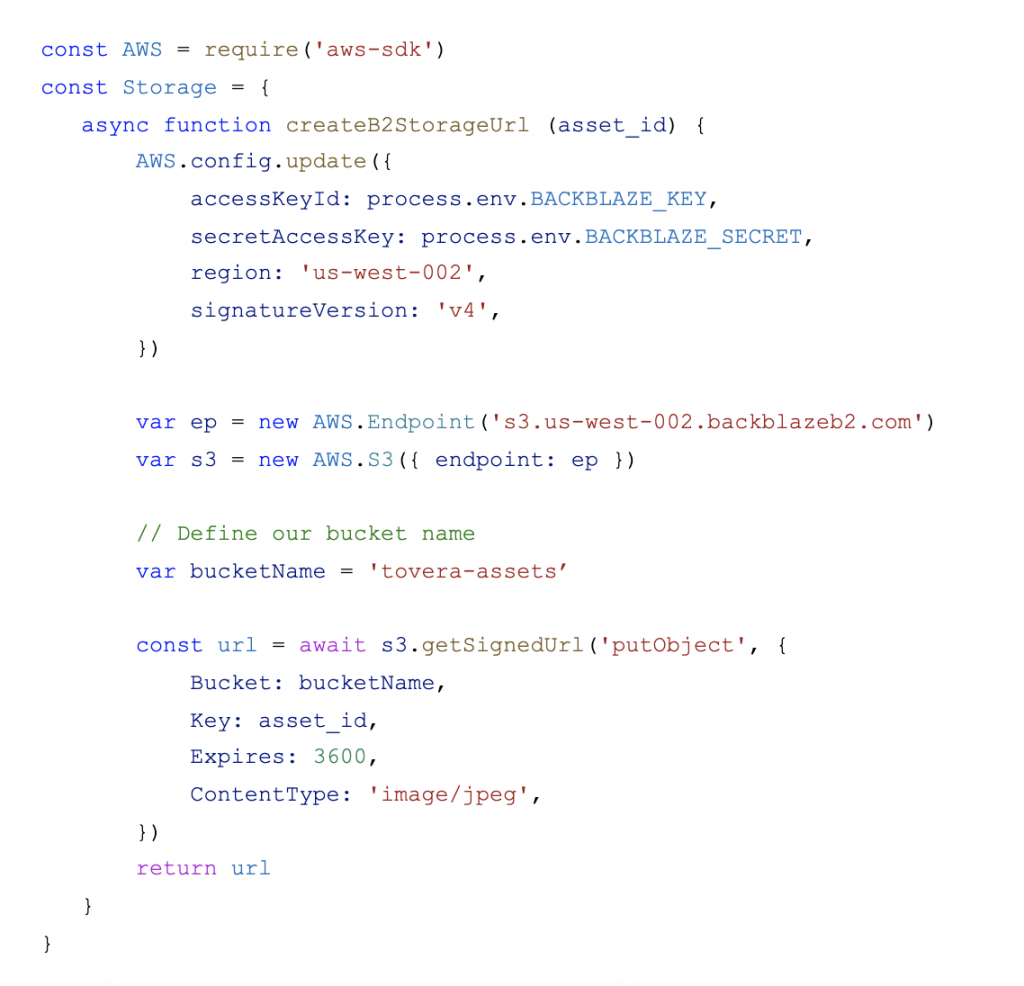
After perusing the available documentation, I started off with the following Node.js Javascript code:
With this Javascript function, Tovera API services provide a URL for our user dashboard to instantly (and securely) upload their assets to our Backblaze account. I had read Backblaze B2 has a 100% Amazon S3 Compatible API but I was a little skeptical. Is this really going to work? Sure enough, it worked on the first attempt!
Integrating Cloudflare and Setting Up CORS
Between the Bandwidth Alliance and having dealt with DDoS attacks and shady internet stuff in general before, I’m also a big fan of Cloudflare. Fortunately, Backblaze provides guidance on how to best use B2 Cloud Storage with Cloudflare to make use of their combined power.
Once I set up Cloudflare to work with B2 Cloud Storage and the Tovera API services were returning valid, presigned URLs for clients to do a direct HTTP PUT, I tried it out in our Next.js-powered user dashboard.
Uh-oh. Dreaded CORS errors. I’ll spare you the details, but here’s where things get interesting… I don’t know about you, but CORS can be a little frustrating. LONG story short, I dug in deep, feeling a little like I was wandering around a dark room looking for the light switch.
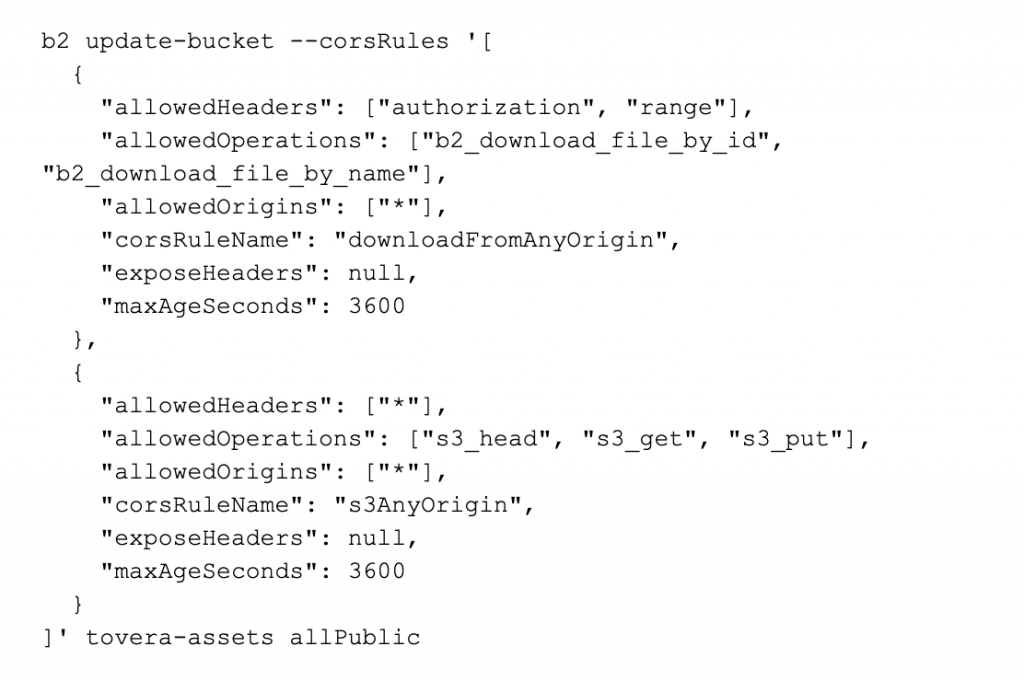
With this usage of the Backblaze B2 command line utility, we’re setting the following CORS rules on our bucket:
Allow users to download Backblaze B2 files from anywhere using the native B2 Cloud Storage interfaces.
Allow users to use the Backblaze S3 Compatible API to download and upload their files from anywhere with the authenticated presigned URL provided by the server side Javascript function above.
With these rules, Tovera users can use our embeddable verification links across any site they provide them to—existing websites, social media networks, and more. In other applications you may want to limit these CORS rules to what makes sense for your use case.
Focusing on What’s Important
With Backblaze B2, we at Tovera can focus on our mission of putting our digital media security, validation, and publishing functionality in the hands of as many people as possible. Tovera users can take back control of their online presence and address the many threats posed by deepfake technologies that threaten their likeness, reputation, and brand.
Kristian Kielhofner works on overall technical architecture, vision, and strategy for Tovera when he’s not out buying yet another whiteboard to scribble on. Kristian previously built, grew, and exited Star2Star Communications—a leading provider of business productivity solutions.
As of June 30, 2021, Backblaze had 181,464 drives spread across four data centers on two continents. Of that number, there were 3,298 boot drives and 178,166 data drives. The boot drives consisted of 1,607 hard drives and 1,691 SSDs. This report will review the quarterly and lifetime failure rates for our data drives, and we’ll compare the failure rates of our HDD and SSD boot drives. Along the way, we’ll share our observations of and insights into the data presented and, as always, we look forward to your comments below.
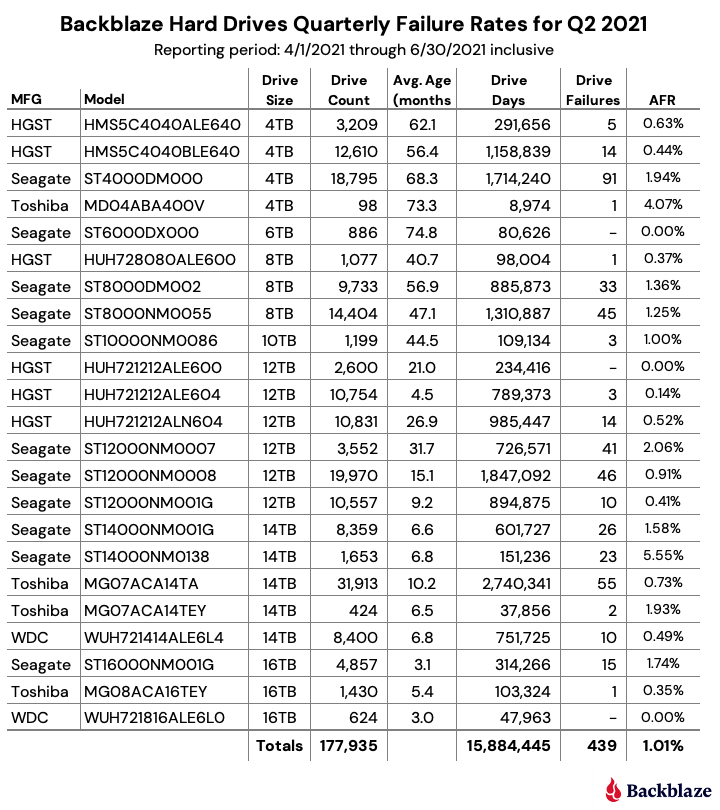
Q2 2021 Hard Drive Failure Rates
At the end of June 2021, Backblaze was monitoring 178,166 hard drives used to store data. For our evaluation, we removed from consideration 231 drives which were used for either testing purposes or as drive models for which we did not have at least 60 drives. This leaves us with 177,935 hard drives for the Q2 2021 quarterly report, as shown below.
Notes and Observations on the Q2 2021 Stats
The data for all of the drives in our data centers, including the 231 drives not included in the list above, is available for download on the Hard Drive Test Data webpage.
Zero Failures
Three drive models recorded zero failures during Q2, let’s take a look at each.
6TB Seagate (ST6000DX000): The average age of these drives is over six years (74 months) and with one failure over the last year, this drive is aging quite well. The low number of drives (886) and drive days (80,626) means there is some variability in the failure rate, but the lifetime failure rate of 0.92% is solid.
12TB HGST (HUH721212ALE600): These drives reside in our Dell storage servers in our Amsterdam data center. After recording a quarterly high of five failures last quarter, they are back on track with zero failures this quarter and a lifetime failure rate of 0.41%.
16TB Western Digital (WUH721816ALE6L0): These drives have only been installed for three months, but no failures in 624 drives is a great start.
Honorable Mention
Three drive models recorded one drive failure during the quarter. They vary widely in age.
On the young side, with an average age of five months, the 16TB Toshiba (MG08ACA16TEY) had its first drive failure out of 1,430 drives installed.
At the other end of the age spectrum, one of our 4TB Toshiba (MD04ABA400V) drives finally failed, the first failure since Q4 of 2018.
In the middle of the age spectrum with an average of 40.7 months, the 8TB HGST drives (HUH728080ALE600) also had just one failure this past quarter.
Outliers
Two drive models had an annualized failure rate (AFR) above 4%, let’s take a closer look.
The 4TB Toshiba (MD04ABA400V) had an AFR of 4.07% for Q2 2021, but as noted above, that was with one drive failure. Drive models with low drive days in a given period are subject to wide swings in the AFR. In this case, one less failure during the quarter would result in an AFR of 0% and one more failure would result in an AFR of over 8.1%.
The 14TB Seagate (ST14000NM0138) drives have an AFR of 5.55% for Q2 2021. These Seagate drives along with 14TB Toshiba drives (MG07ACA14TEY) were installed in Dell storage servers deployed in our U.S. West region about six months ago. We are actively working with Dell to determine the root cause of this elevated failure rate and expect to follow up on this topic in the next quarterly drive stats report.
Overall AFR
The quarterly AFR for all the drives jumped up to 1.01% from 0.85% in Q1 2021 and 0.81% one year ago in Q2 2020. This jump ended a downward trend over the past year. The increase is within our confidence interval, but bears watching going forward.
HDDs vs. SSDs, a Follow-up
In our Q1 2021 report, we took an initial look at comparing our HDD and SSD boot drives, both for Q1 and lifetime timeframes. As we stated at the time, a numbers-to-numbers comparison was suspect as each type of drive was at a different point in its life cycle. The average age of the HDD drives was 49.63 months while the SSDs average age was 12.66 months. As a reminder, the HDD and SSD boot drives perform the same functions which include booting the storage servers and performing reads, writes, and deletes of daily log files and other temporary files.
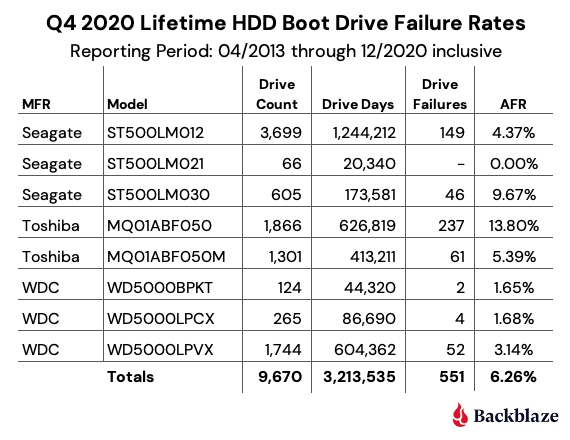
To create a more accurate comparison, we took the HDD boot drives that were in use at the end of Q4 2020 and went back in time to see where their average age and cumulative drive days would be similar to those same attributes for the SDDs at the end of Q4 2020. We found that at the end of Q4 2015 the attributes were the closest.
Let’s start with the HDD boot drives that were active at the end of Q4 2020.
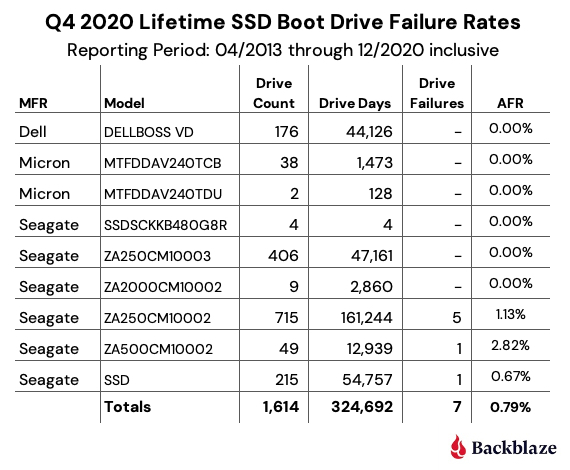
Next, we’ll look at the SSD boot drives that were active at the end of Q4 2020.
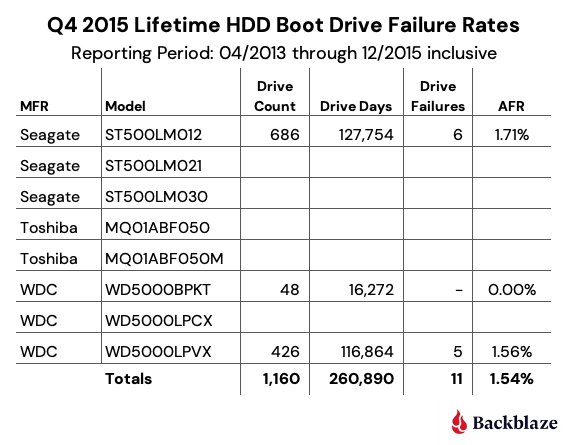
Finally, let’s look at the lifetime attributes of the HDD drives active in Q4 2020 as they were back in Q4 2015.
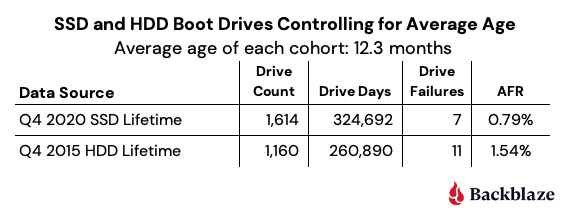
To summarize, when we control using the same drive models, the same average drive age, and a similar number of drive days, HDD and SSD drives failure rates compare as follows:
While the failure rate for our HDD boot drives is nearly two times higher than the SSD boot drives, it is not the nearly 10 times failure rate we saw in the Q1 2021 report when we compared the two types of drives at different points in their lifecycle.
Predicting the Future?
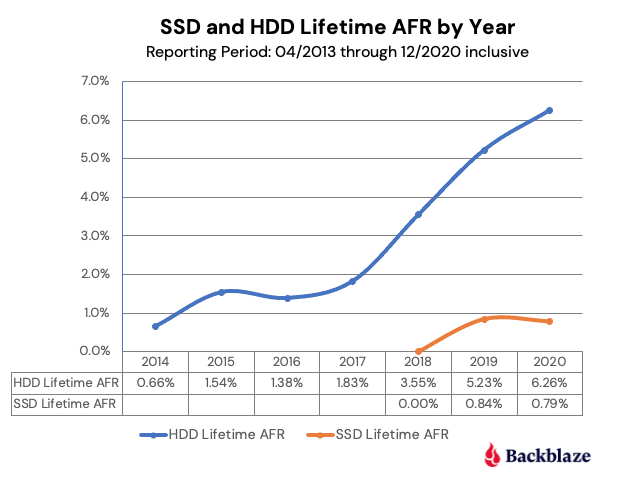
What happened to the HDD boot drives from 2016 to 2020 as their lifetime AFR rose from 1.54% in Q4 2015 to 6.26% in Q4 2020? The chart below shows the lifetime AFR for the HDD boot drives from 2014 through 2020.
As the graph shows, beginning in 2018 the HDD boot drive failures accelerated. This continued in 2019 and 2020 even as the number of HDD boot drives started to decrease when failed HDD boot drives were replaced with SSD boot drives. As the average age of the HDD boot drive fleet increased, so did the failure rate. This makes sense and is borne out by the data. This raises a couple of questions:
Will the SSD drives begin failing at higher rates as they get older?
How will the SSD failure rates going forward compare to what we have observed with the HDD boot drives?
We’ll continue to track and report on SSDs versus HDDs based on our data.
Lifetime Hard Drive Stats
The chart below shows the lifetime AFR of all the hard drive models in production as of June 30, 2021.
Notes and Observations on the Lifetime Stats
The lifetime AFR for all of the drives in our farm continues to decrease. The 1.45% AFR is the lowest recorded value since we started back in 2013. The drive population spans drive models from 4TB to 16TB and varies in average age from three months (WDC 16TB) to over six years (Seagate 6TB).
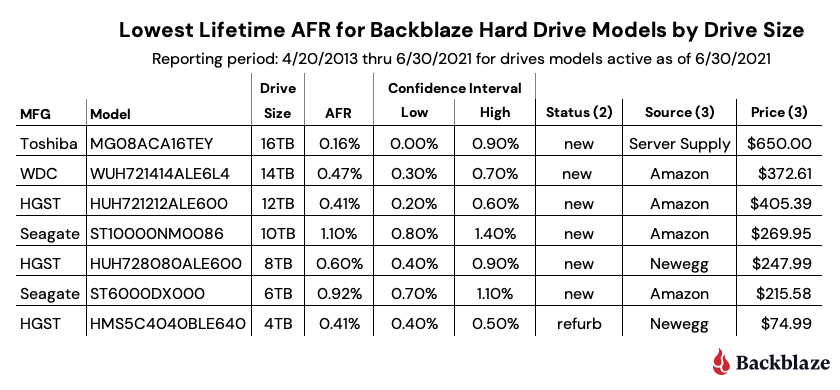
Our best performing drive models in our environment by drive size are listed in the table below.
Notes:
The WDC 16TB drive, model: WUH721816ALE6L0, does not appear to be available in the U.S. through retail channels at this time.
Status is based on what is stated on the website. Further investigation may be required to ensure you are purchasing a new drive versus a refurbished drive marked as new.
The source and price were as of 7/30/2021.
In searching for the Toshiba 16TB drive, model: MG08ACA16TEY, you may find model: MG08ACA16TE for much less ($399.00 or less). These are not the same drive and we have no information on the latter model. The MG08ACA16TEY includes the Sanitize Instant Erase feature.
The Drive Stats Data
The complete data set used to create the information used in this review is available on our Hard Drive Test Data page. You can download and use this data for free for your own purpose. All we ask are three things: 1) you cite Backblaze as the source if you use the data, 2) you accept that you are solely responsible for how you use the data, and 3) you do not sell this data to anyone; it is free.
This post has been updated to reflect new information for Android users. After posting about the Photos+ answer to iCloud, our first comment was a request to help our Android users—seek no further, there’s now a Photos+ app for that. You can try it for free, or sign up today for a 50% discount on your Photos+ subscription. Get started here.
“Storage Full” has to rank up there as one of the least favorite notifications on Apple and Android products, maybe of all products? For photographers, this message can be all the more frustrating, and eventually very expensive if you opt into a higher storage payment plan. That’s why we’re profiling Photos+ today. Photos+ is an application that leverages Backblaze B2 Cloud Storage to offer an easy and reasonable way to manage your data and put “Storage Full” notifications behind you.
Here’s the short story: If you’re storing 200GB or more of photos on iCloud or Google Photos, Photos+ can save you upwards of $100 per year.
With high resolution iPhone cameras, six hours of 4K videos and a few thousand photos is all it takes to exceed 200GB of storage, meaning your photos will no longer be backed up unless you upgrade to the 2TB plan at a cost of $120 per year. This is a steep jump from the 200GB plan at $36 per year. And for Android users, all photos uploaded to Google Photos now count towards the 15GB Google Drive limit, so that for photographers uploading high quality photos, upgrading to the 2TB Google One storage plan will also cost about $120/year. This leads many to ponder what their options are.
Alternatives to Storage Upgrades
Well, for those of you looking, here are your options:
Turn off cloud backups and don’t back up your phone? Not best practice—remember your 3-2-1 backup strategy!
Turn off cloud backups but remember to frequently back up your phone to your computer? This often ends in tears.
Transfer photos to your computer when you run out of space? It works, but it’s time intensive and means you lose access to photos on the go.
Use another service, like Dropbox, to offload photos? Unfortunately, they also feature a leap to 2TB of storage, so you might as well stick with upgrading iCloud or your Google One storage plan.
Or:
Use a service that charges you for exactly the storage you use at $0.005/GB. In this scenario, storing 200GB would cost $1 per month.
How to Avoid Storage Upgrade Bills
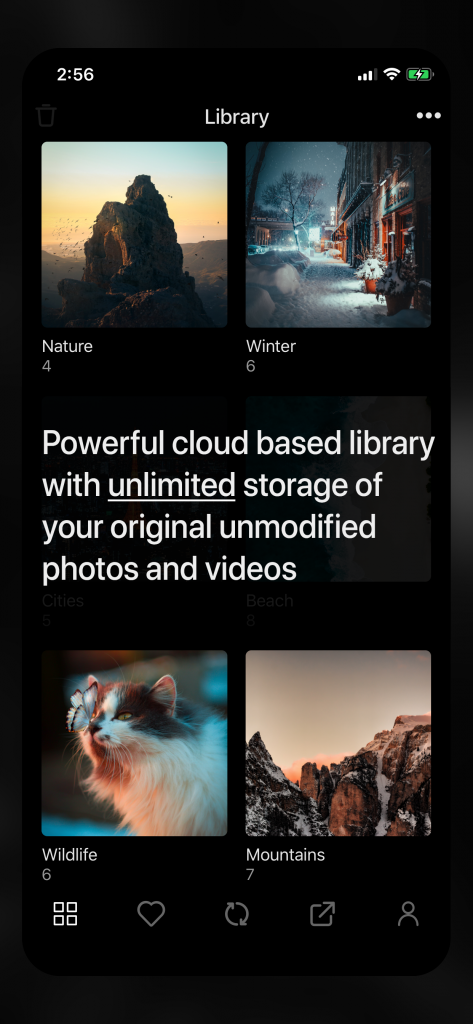
The Photos+ Cloud Library app is an iOS, Android, and web app that allows you to manage photos from your iPhone, Android device, or browser without incurring the costs typically associated with keeping photos on your phone. You can use Photos+ and pay for only what you store with no minimum fees and no upper limits on storage.
Test It for Free
The Photos+ Cloud Library app costs $6/year, and offers a free 14-day trial if you’d like to see how it works. Backblaze B2 costs $0.005/GB/month with the first 10GB free. So if you’d like to give this pairing a try, you’ve got some room to play around before you need to commit to the setup.
Storing 200GB using these two platforms will cost about $18/year instead of $120/year with iCloud or Google Photos.
To try both these platforms for free, download the Photos+ Cloud Library app for iOS or Android and sign up for the Backblaze B2 service (no credit card required). For detailed instructions on setting this up, we’ve developed one here.
Once your photos and videos are safely stored in your own Backblaze B2 account (where you can always verify they have been stored and download them directly from Backblaze or the Photos+ app), you can delete some or all of your photos and videos from your iPhone to open up space, and allow iCloud to back up the rest of your items without exceeding your 50GB or 200GB iCloud storage plan.
For a limited time, Android users can get started with the Photos+ Cloud Library app today and get 50% off your subscription. Sign up here for iPhone, or here for Android.
No More Upgrade Notices
With the lack of upgrade notifications, you’ll have more time to spend paying attention to “Scam Likely” calls and discerning the meaning of the badge numbers accumulating on apps you haven’t opened in years. We wish we could help you with those annoyances too, but for now, here’s hoping Photos+ can ease your cloud backup bill and give you some peace of mind.
In an era when ransomware and cybersecurity attacks on K-12 schools have nearly quadrupled, backups are critical. Today, advances in cloud backup technology like immutability and Object Lock allow school districts to take advantage of the benefits of cloud infrastructure while easing security concerns about sensitive data.
School districts have increasingly adopted cloud-based software as a service applications like video conferencing, collaboration, and learning management solutions, but many continue to operate with legacy on-premises solutions for backup and disaster recovery. If your district is ready to move your backup and recovery infrastructure to the cloud, how do you choose the right cloud partners and protect your school district’s data?
This post explains the benefits school districts can realize from moving infrastructure to the cloud, considerations to evaluate when choosing a cloud provider, and steps for preparing for a cloud migration at your district.
The Benefits of Moving to the Cloud for School Districts
Replacing legacy on-premises tape backup systems or expensive infrastructure results in a number of benefits for school districts, including:
Reduced Capital Expenditure (CapEx): Avoid major investments in new infrastructure.
Budget Predictability: Easily plan for predictable, recurring monthly expenses.
Cost Savings: Pay as you go rather than paying for unused infrastructure.
Elasticity: Scale up or down as seasonal demand fluctuates.
Workload Efficiencies: Refocus IT staff on other priorities rather than managing hardware.
Centralized Backup Management: Manage your backups in a one-stop shop.
Ransomware Protection: Stay one step ahead of hackers with data immutability.
Reduced CapEx. On-premises infrastructure can cost hundreds of thousands of dollars or more, and that infrastructure will need to be replaced or upgraded at some point. Rather than recurring CapEx, the cloud shifts IT budgets to a predictable, monthly operating expenses (OpEx) model. You no longer have to compete with other departments for a share of the capital projects budget to upgrade or replace expensive equipment.
Cloud Migration 101: Kings County
John Devlin, CIO of Kings County, was facing an $80,000 bill to replace all of the physical tapes they used for backups as well as an out-of-warranty tape drive all at once. He was able to avoid the bill by moving backup infrastructure to the cloud.
Costs are down, budgets are predictable, and the move freed up his staff to focus on bigger priorities. He noted, “Now the staff is helping customers instead of playing with tapes.”
Budget Predictability. With cloud storage, if you can accurately anticipate data usage, you can easily forecast your cloud storage budget. Since equipment is managed by the cloud provider, you won’t face a surprise bill when something breaks.
Cost Savings. Even when on-premises infrastructure sits idle, you still pay for its maintenance, upkeep, and power usage. With pay-as-you-go pricing, you only pay for the cloud storage you use rather than paying up front for infrastructure and equipment you may or may not end up needing.
Elasticity. Avoid potentially over-buying on-premises equipment since the cloud provides the ability to scale up or down on demand. If you create less data when school is out of session, you’re not paying for empty storage servers to sit there and draw down power.
Workload Efficiencies. Rather than provisioning and maintaining on-premises hardware or managing a legacy tape backup system, moving infrastructure to the cloud frees up IT staff to focus on bigger priorities. All of the equipment is managed by the cloud provider.
Centralized Backup Management. Managing backups in-house across multiple campuses and systems for staff, faculty, and students can quickly become a huge burden, so many school districts opt for a backup software solution that’s integrated with cloud storage. The integration allows them to easily tier backups to object storage in the cloud. Veeam is one of the most common providers of backup and replication solutions. They provide a one-stop shop for managing backups—including reporting, monitoring, and capacity planning—freeing up district IT staff from hours of manual intervention.
Ransomware Protection.With schools being targeted more than ever, the ransomware protection provided by some public clouds couldn’t be more important. Tools like Object Lock allow you to recreate the “air gap” protection that tape provides, but it’s all in the cloud. With Object Lock enabled, no one can modify, delete, encrypt, or tamper with data for a specific amount of time. Any attempts by a hacker to compromise backups will fail in that time. Object Lock works with offerings like immutability from Veeam so schools can better protect backups from ransomware.
An Important Distinction: Sync vs. Backup
Keep in mind, solutions like Microsoft OneDrive, DropBox, and Google Drive, while enabling collaboration for remote learning, are not the same as a true backup. Sync services allow multiple users across multiple devices to access the same file—which is great for remote learning, but if someone accidentally deletes a file from a sync service, it’s gone. Backup stores a copy of those files somewhere remote from your work environment, oftentimes in an off-site server—like cloud storage. It’s important to know that a “sync” is not a backup, but they can work well together when properly coordinated. You can read more about the differences here.
Considerations for Choosing a Cloud Provider for Your District
Moving to the cloud to manage backups or replace on-premises infrastructure can provide significant benefits for K-12 school districts, but administrators should carefully consider different providers before selecting one to trust with their data. Consider the following factors in an evaluation of any cloud provider:
Security: What are the provider’s ransomware protection capabilities? Does the provider include features like Object Lock to make data immutable? Only a few providers offer Object Lock, but it should be a requirement on any school district’s cloud checklist considering the rising threat of ransomware attacks on school districts. During 2020, the K-12 Cybersecurity Resource Center cataloged 408 publicly-disclosed school incidents versus 122 in 2018.
Compliance: Districts are subject to local, state, and federal laws including HIPAA, so it’s important to ensure a cloud storage provider will be able to comply with all pertinent rules and regulations. Can you easily set lifecycle rules to retain data for specific retention periods to comply with regulatory requirements? How does the provider handle encryption keys, and will that method meet regulations?
Ease of Use: Moving to the cloud means many staff who once kept all of your on-premises infrastructure up and running will instead be managing and provisioning infrastructure in the cloud. Will your IT team face a steep learning curve in implementing a new storage cloud? Test out the system to evaluate ease of use.
Pricing Transparency: With varying data retention requirements, transparent pricing tiers will help you budget more easily. Understand how the provider prices their service including fees for things like egress, required minimums, and other fine print. And seek backup providers that offer pricing sensitive to educational institutions’ needs. Veeam, for example, offers discounted public sector pricing allowing districts to achieve enterprise-level backup that fits within their budgets.
Integrations/Partner Network: One of the risks of moving to the cloud is vendor lock-in. Avoid getting stuck in one cloud ecosystem by researching the providers’ partner network and integrations. Does the provider already work with software you have in place? Will it be easy to change vendors should you need to?
Support: Does your team need access to support services? Understand if your provider offers support and if that support structure will fit your team’s needs.
As you research and evaluate potential cloud providers, create a checklist of the considerations that apply to you and make sure to clearly understand how the provider meets each requirement.
Preparing for a Cloud Migration at Your School District
Even when you know a cloud migration will benefit your district, moving your precious data from one place to another can be daunting at the least. Even figuring out how much data you have can be a challenge, let alone trying to shift a culture that’s accustomed to having hardware on-premises. Having a solid migration plan helps to ensure a successful transition. Before you move your infrastructure to the cloud, take the time to consider the following:
Conduct a thorough data inventory: Make a list of all applications with metadata including the size of the data sets, where they’re located, and any existing security protocols. Are there any data sets that can’t be moved? Will the data need to be moved in phases to avoid disruption? Understanding what and how much data you have to move will help you determine the best approach.
Consider a hybrid approach: Many school districts have already invested in on-premises systems, but still want to modernize their infrastructure. Implementing a hybrid model with some data on-premises and some in the cloud allows districts to take advantage of modern cloud infrastructure without totally abandoning systems they’ve customized and integrated.
Test a proof of concept with your new provider: Migrate a portion of your data while continuing to run legacy systems and test to compare latency, interoperability, and performance.
Plan for the transfer: Armed with your data inventory, work with your new provider to plan the transfer and determine how you’ll move the data. Does the provider have data transfer partners or offer a data migration service above a certain threshold? Make sure you take advantage of any offers to manage data transfer costs.
Execute the migration and verify results: Schedule the migration, configure your transfer solution appropriately, and run checks to ensure the data migration was successful.
An Education in Safe, Reliable Cloud Backups
Like a K-12 school district, Coast Community College District (CCCD) manages data for multiple schools and 60,000+ students. With a legacy on-premises tape backup system, data recovery often took days and all too often failed at that. Meanwhile, staff had to chauffeur tapes from campus to campus for off-site backup data protection. They needed a safer, more reliable solution and wanted to replace tapes with cloud storage.
CCCD implemented Cohesity backup solutions to serve as a NAS device, which will eventually replace 30+ Windows file servers, and eliminated tapes with Backblaze B2 Cloud Storage, safeguarding off-site backups by moving the data farther away. Now, restoring data takes seconds instead of days, and staff no longer physically transfer tapes—it all happens in the cloud.
How Cloud Storage Can Protect School District Data
Cloud-based solutions are integral to successful remote or hybrid learning environments. School districts have already made huge progress in moving to the cloud to enable remote learning. Now, they have the opportunity to capitalize on the benefits of cloud storage to modernize infrastructure as ransomware attacks become all the more prevalent. To summarize, here are a few things to remember when considering a cloud storage solution:
Using cloud storage with Object Lock to store an off-site backup of your data means hackers can’t encrypt, modify, or delete backups within a set timeframe, and schools can more easily restore backups in the event of a disaster or ransomware attack.
Increased ransomware protections allow districts to access the benefits of moving to the cloud like reduced CapEx, workflow efficiencies, and cost savings without sacrificing the security of air gapped backups.
Evaluate a provider’s security offerings, compliance capability, ease of use, pricing tiers, partner network, and support structure before committing to a cloud migration.
Take the time to plan your migration to ensure a successful transition.
Have more questions about cloud storage or how to implement cloud backups in your environment? Let us know in the comments. Ready to get started?
This post was originally published on February 18, 2021 and has been updated to reflect the newest functionality releases for Backblaze Mobile users on both iOS and Android.
Ready to update now? Go to Google Play or the App Store to run updates or download the Backblaze app.
December 20, 2022: Mobile 6.0 Is Available
Today, we’re announcing the arrival of Backblaze Mobile 6.0 featuring an enhanced visual experience, authentication improvements, bug fixes, and many design updates. Check out the specifics below.
What’s New in Backblaze Mobile 6.0?
Backblaze Mobile 6.0 features an overhauled visual experience (so fresh, so clean!).
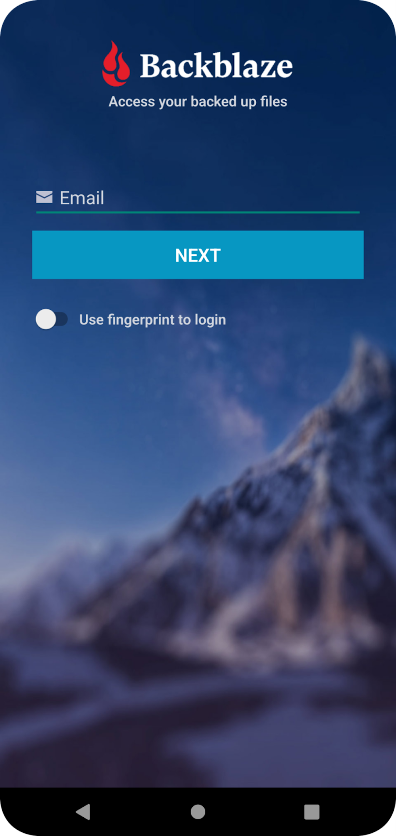
Before: Android login screen
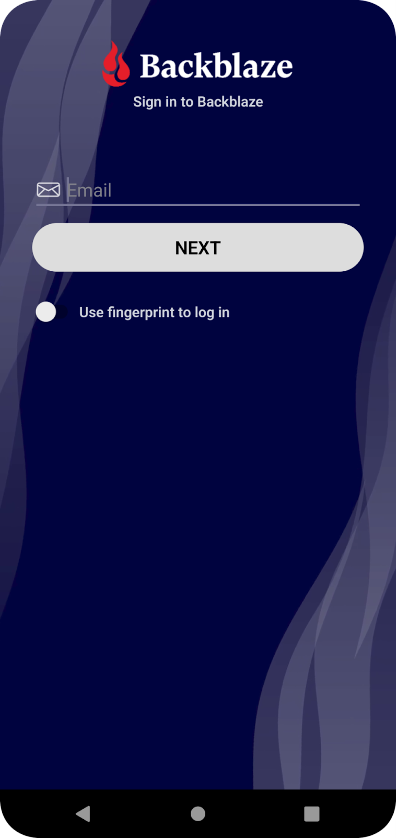
After: Android login screen
The update also features authentication enhancements for both iOS and Android. We’ve made it easier to log in and opt to see your password in plain text as you enter it. We’ve also optimized the stability of our mobile login flow.
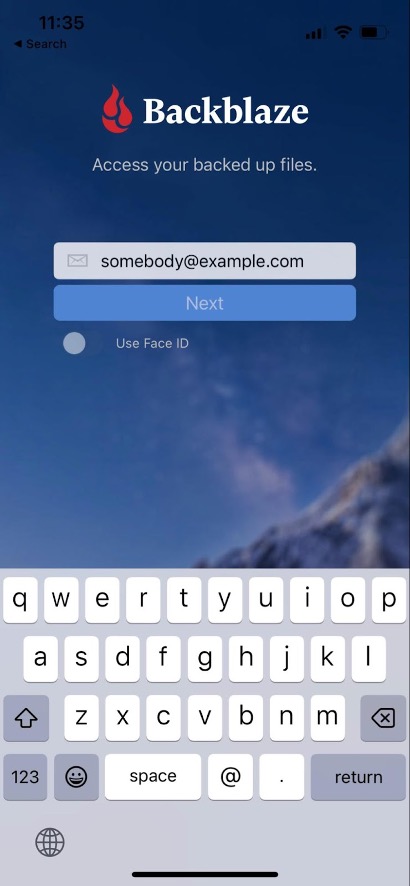
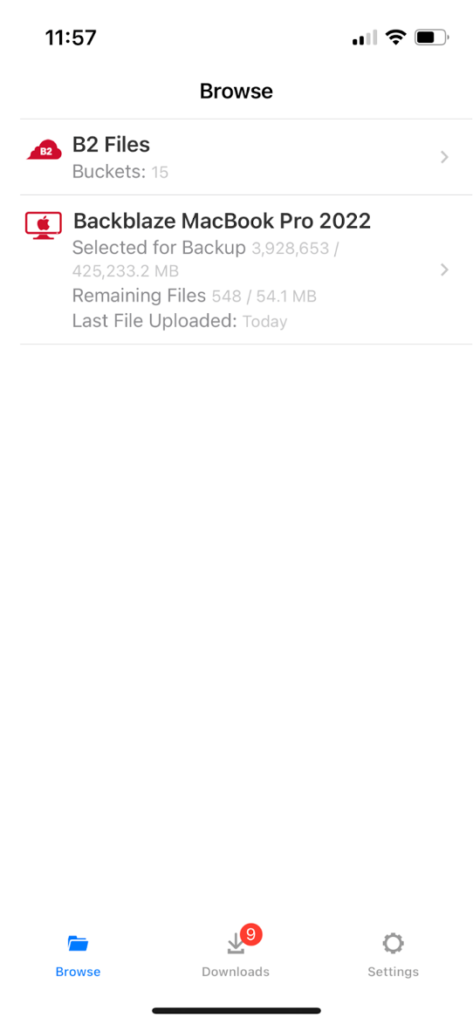
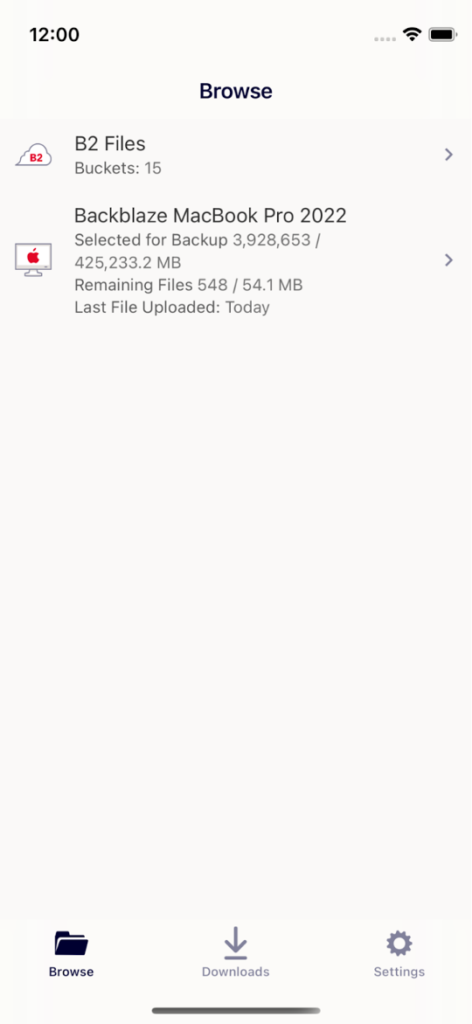
Before: iOS login screen
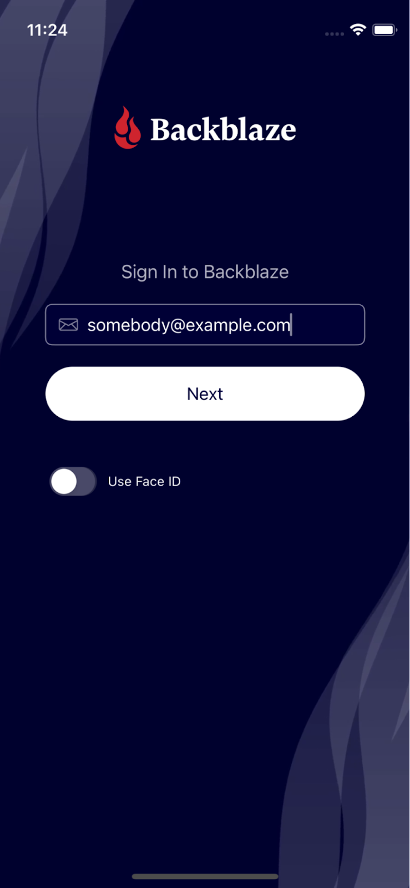
After: iOS login screen
iOS Updates
Design updates: Redesigned login and settings screens, updated icons, and improved upload/download progress animations.
Login updates: Email and password now appear on the same screen when logging in, and you can choose to see your password in plain text as you enter it.
Viewing and previewing files: You can now view downloaded files in full-screen mode on iPhones as well as iPads.
SwiftUI is here: Much of the iOS code has been migrated to use SwiftUI and The Composable Architecture.
Bug fixes and performance improvements: A lot has been tightened up under the hood, including fixing a file download timeout issue and progress messaging display issues.
Before
After
Android Updates
Design updates: A fresh UI and navigation experience comes courtesy of updated material libraries.
Navigation and controls: We’ve also advanced the Android navigation bar, scrollable header and footers, and updated gesture controls for a better Android experience. You can now also see the file path for any file uploaded to Computer Backup or B2 Cloud Storage files.
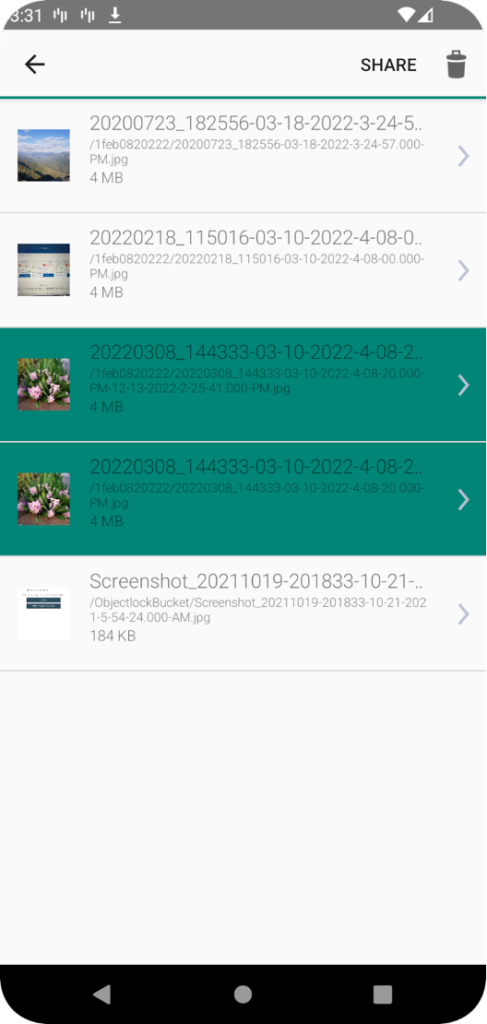
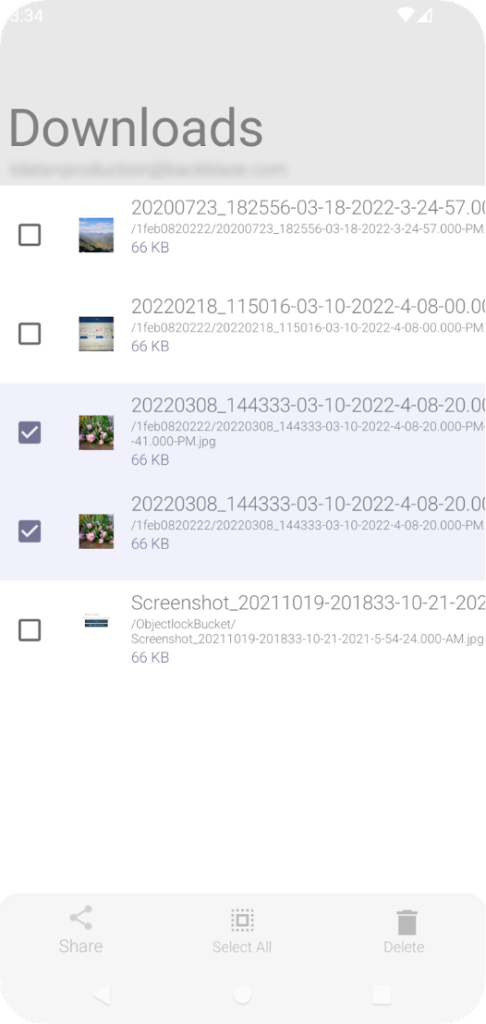
Edit mode and selection capabilities: Navigation and maneuvering inside of edit mode for files, buckets, folders, and downloads has also been improved. We’ve also added multiselection capabilities and swipe-to-delete functionality.
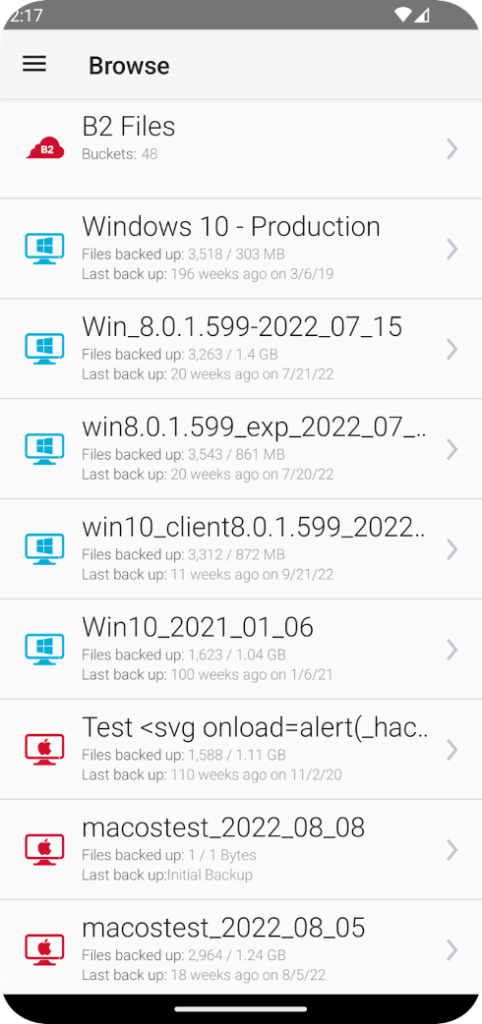
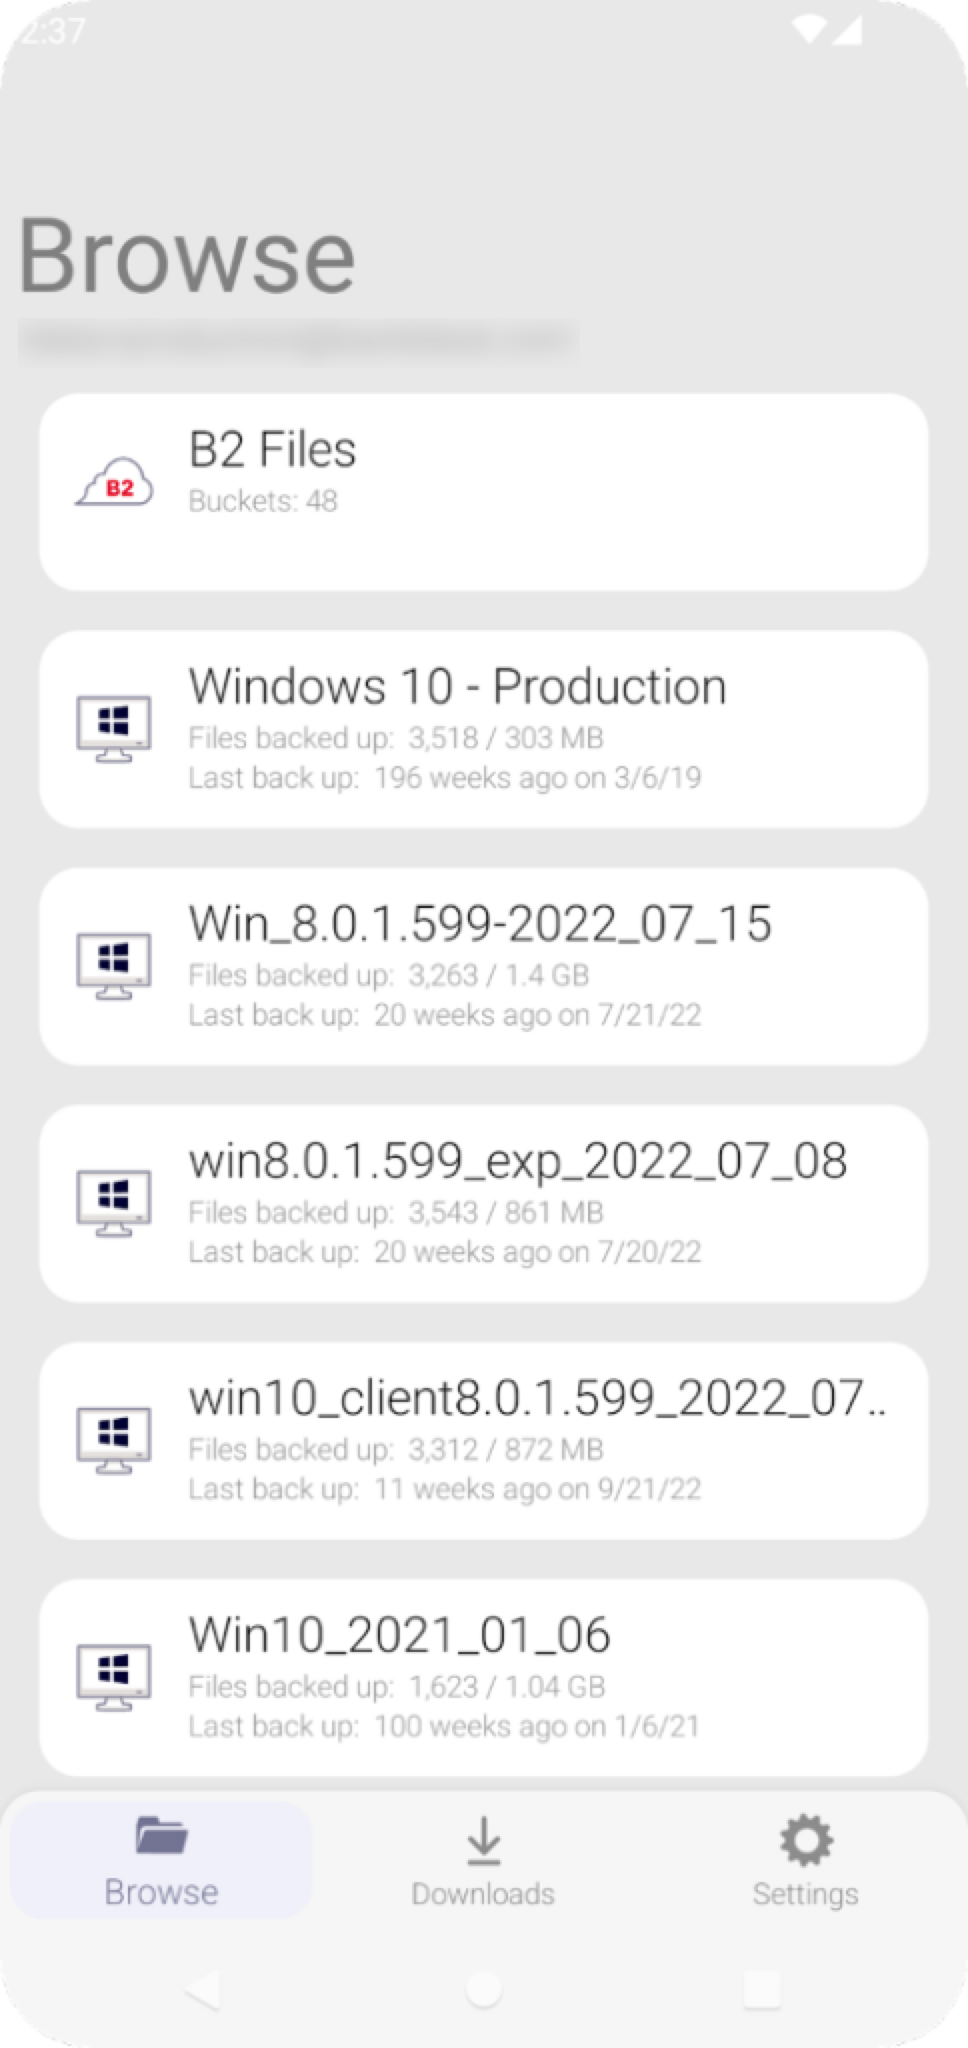
Before
After
Before
After
Backblaze Mobile 6.0 Available Now: Download Today
To get the latest and greatest Backblaze Mobile experience, update your apps or download them today on Google Play or the App Store.
March 28, 2022: Added Folder Creation
Backblaze Mobile users on iOS and Android devices can now create folders directly on their devices with our latest app update. The update is generally available the week of March 27, 2022 for both iOS and Android platforms.
The functionality expands on previous releases to allow users to more easily work from their mobile devices.
November 30, 2021: Added Bucket Creation and Bucket, Folder, and File Deletion
With this update, Backblaze Mobile users on iOS and Android devices can create buckets and delete buckets, folders, and files directly on their devices.
If you routinely work from your mobile device, this means you’ll be able to better manage your cloud storage while you’re away from your workstation. For media and entertainment pros who regularly shoot images and footage on powerful smart devices, for example, this functionality allows you to create buckets for new projects from the field. And if you need to delete a bucket, file, or folder, you can do that on the go, too. With this functionality at your fingertips, you can focus on shooting, producing, and doing more with ease rather than waiting until you’re back at your desktop or laptop to handle organizational tasks.
The update also included bug fixes and an upgrade to Android 11.
Older Releases
In case you missed the last few releases, Backblaze Mobile allows iOS and Android users to preview and download content through the app and upload files directly to Backblaze B2 Cloud Storage buckets.
As network attached storage (NAS) devices have become more advanced, NAS have large storage capacities, include advanced features for virtualization and application hosting, and are one of the more scalable and cost-effective storage options for businesses of all sizes and in a variety of industries.
NAS devices are popular for many types of workflows, including media, enterprise, and backup and archive. Whether you’re a long-time user or first-time buyer, the number of choices and features NAS systems offer today are overwhelming, especially when you’re trying to buy something that will work now and in the future.
This post aims to make your process a little easier. The following content will help you:
Review the benefits of a NAS system.
Navigate the options you’ll need to choose from.
Understand the reason to pair your NAS with cloud storage.
How Can NAS Benefit Your Business?
There are multiple benefits that a NAS system can provide to users on your network, but we’ll recap a few of the key advantages here.
More Storage: It’s a tad obvious, but the primary benefit of a NAS system is that it will provide a significant addition to your storage capacity if you’re relying on workstations and hard drives. NAS systems create a single storage volume from several drives (often arranged in a RAID scheme).
Data Redundancy: Many NAS systems are equipped with RAID (Redundant Array of Independent Disks) configurations, which provide redundancy. This means that even if one or more hard drives fail, the data remains accessible and the system continues to function. While RAID provides protection against physical disk failures, it does not protect against the broader range of events that could result in data loss, including natural disasters, theft, or ransomware attacks. Learn more about RAID configurations in our NAS RAID guide.
Security and Speed: Beyond protection from drive failure, NAS also provides security for your data from outside actors as it is only accessible on your local office network and to user accounts which you can control. Not only that, but it generally works as fast as your local office network speeds. And, there are several ways to optimize NAS performance over time, which gives them a longer shelf life than other types of hardware.
Better Data Management Tools. Fully automated backups, deduplication, compression, and encryption are just a handful of the functions you can put to work on a NAS system—all of which make your data storage more efficient and secure. You can also configure sync workflows to ease collaboration for your team, enable services to manage your users and groups with directory services, and even add services like photo or media management.
If this all sounds useful for your business, read on to learn more about bringing these benefits in-house.
The Network Attached Storage (NAS) Buyer’s Guide
How do you evaluate the differences between different NAS vendors? Or even within a single company’s product line? We’re here to help. This tour of the major components of a NAS system will help you to develop a list for the sizing and features of a system that will fit your needs.
Choosing a NAS: The Components
How your NAS performs is dictated by the components that make up the system, and capability of future upgrades. Let’s walk through the different options.
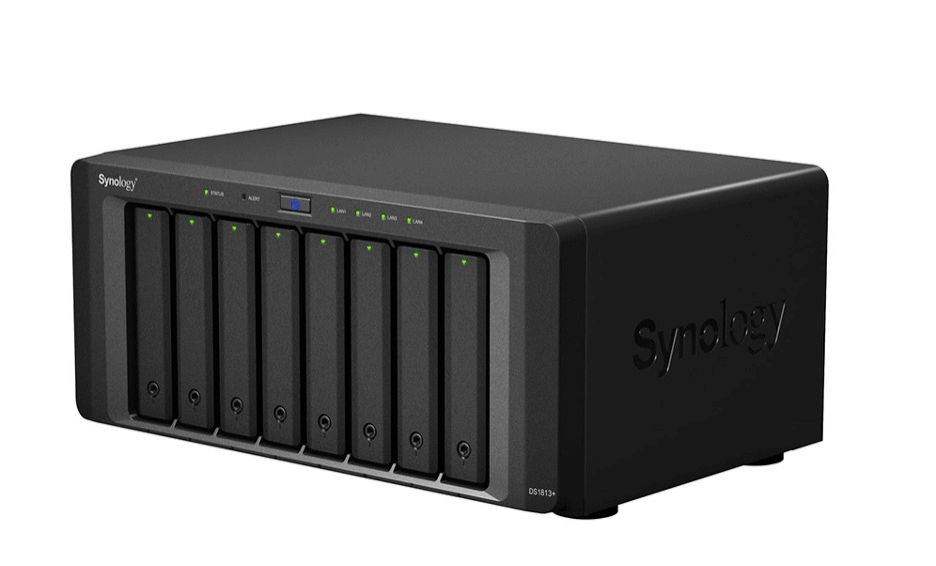
NAS Storage Capacity: How Many Bays Do You Need?
One of the first ways to distinguish between different NAS systems is the number of drive bays a given system offers, as this determines how many disks the system can hold. Generally speaking, the larger the number of drive bays, the more storage you can provide to your users and the more flexibility you have around protecting your data from disk failure.
In a NAS system, storage is defined by the number of drives, the shared volume they create, and their striping scheme (e.g. RAID 0, 1, 5, 6, etc.). For example, a single drive gives no additional performance or protection.
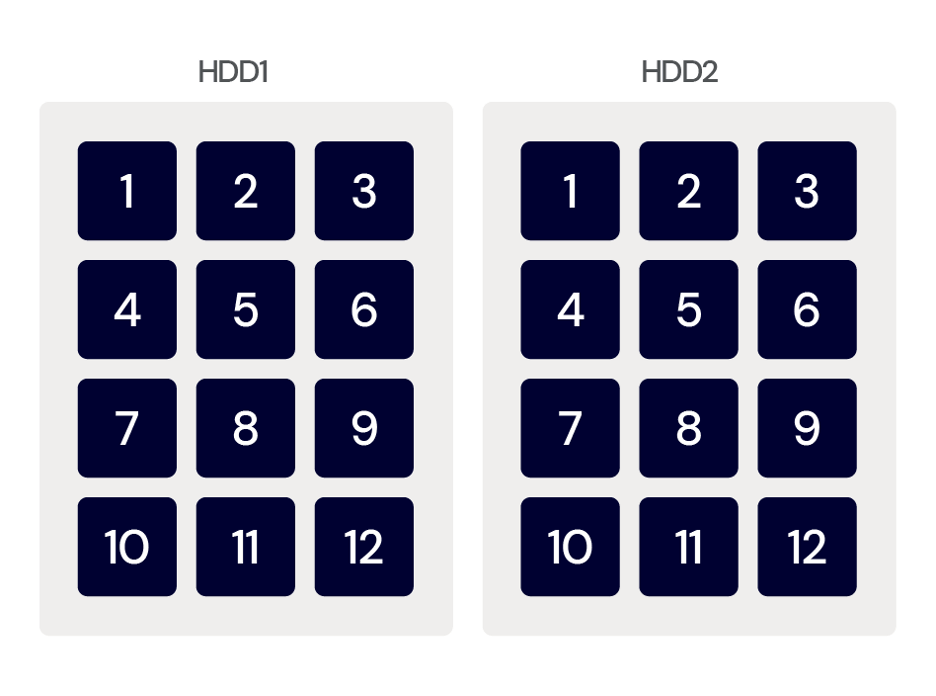
Two (or more) drives allow the option of simple mirroring. Mirroring is also referred to as RAID 1, when one volume is built from two drives, allowing for the failure of one of those drives without data loss.
Mirroring: Data is written simultaneously to two disks, providing redundancy by having two copies of the data. But, mirroring also requires twice as many disks for the same total storage capacity.
Mirroring: Data is written simultaneously to two disks, providing redundancy by having two copies of the data. But, mirroring also requires twice as many disks for the same total storage capacity.
Mirroring: Data is written simultaneously to two disks, providing redundancy by having two copies of the data. But, mirroring also requires twice as many disks for the same total storage capacity.
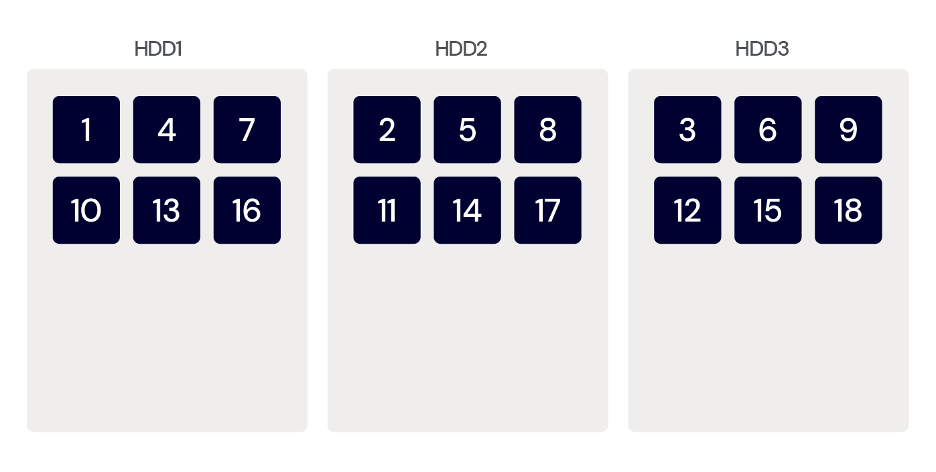
More than two drives also allow for striping—referred to as RAID 0—when one volume is “stretched” across two drives, making a single, larger drive that also gives some performance improvement, but increases risk because the loss of one drive means that the entire volume will be unavailable.
Striping distributes your data over multiple drives. However, striping doesn’t provide any redundancy, and usually is used in combination with other storage techniques.
Striping distributes your data over multiple drives. However, striping doesn’t provide any redundancy, and usually is used in combination with other storage techniques.
Striping distributes your data over multiple drives. However, striping doesn’t provide any redundancy, and usually is used in combination with other storage techniques.
Refresher: How Does RAID Work Again?
A redundant array of independent disks, or RAID, combines multiple hard drives into one or more storage volumes. RAID distributes data and parity (drive recovery information) across the drives in different ways, and each layout provides different degrees of data protection. Learn more about different RAID levels and how to choose the right RAID level in our NAS RAID guide.
Three drives are the minimum for RAID 5, which can survive the loss of one drive, though four drives are a more common NAS system configuration. Five drives allow for RAID 6, which can survive the loss of two drives. Six to eight drives are very common NAS configurations that allow more storage, space, performance, and even drive sparing—the ability to designate a stand-by drive to immediately rebuild a failed drive.
Many believe that, if you’re in the market for a NAS system with multiple bays, you should opt for capacity that allows for RAID 6 if possible. RAID 6 can survive the loss of two drives, and delivers performance nearly equal to RAID 5 with better protection.
It’s understandable to think, “Why do I need to prepare in case two drives fail?” Well, when a drive fails and you replace it with a fresh drive, the rebuilding process to restore that drive’s data and parity information can take a long time. Though it’s rare, it’s possible to have another drive fail during the rebuilding process. In that scenario, if you have RAID 6, you’re likely going to be okay. On the other hand, if you have RAID 5, you may have just lost data.
NAS Drives: Should I Buy a NAS that Includes Drives?
Buyer’s Note: Some systems are sold without drives. Should you buy NAS with or without drives? That decision usually boils down to the size and type of drives you’d like to have.
When buying a NAS system with drives provided:
The drives are usually covered by the manufacturer’s warranty as part of the complete system.
The drives are typically bought directly from the manufacturer’s supply chain and shipped directly from the hard drive manufacturer.
If you choose to buy drives separately from your NAS:
The drives may be a mix of drive production runs, and have been in the supply chain longer. Match the drive capacities and models for the most predictable performance across the RAID volume.
Choose drives rated for NAS systems—NAS vendors publish lists of supported drive types. Here’s a list from QNAP, for example.
Check the warranty and return procedures, and if you are moving a collection of older drives into your NAS, you may also consider how much of the warranty has already run out.
Buyer Takeaway: Choose a system that can support RAID 5 or RAID 6 to allow a combination of more storage space, performance, and drive failure protection. But be sure to check whether the NAS system is sold with or without drives.
Choosing the Right Drive for Your NAS: Hard Disk Drives (HDD) vs. Solid State Drives (SSD)
While most default to using HDDs in NAS drive bays, as NAS have gotten more advanced and the prices of SSDs have dropped, many NAS are compatible with SSDs as well. Some models, like the Synology DiskStation DS923+ can even support both HDDs and SSDs in the same NAS device, giving you maximum flexibility to manage your data.
There are benefits to each drive type, and which one you’d choose depends on your standard workflows. Here’s a breakdown of when you’d choose an HDD vs. an SSD for your NAS device:
Feature
HDD
SSD
Cost per Gigabyte
Lower
Higher
Capacity
Higher (up to 20TB+ per drive)
Lower (typically up to 8TB per drive)
Speed
Slower read/write speeds
Faster read/write speeds
Durability (Moving Parts)
Less durable due to spinning disks
More durable from a hardware perspective; however, limited write cycles can decrease longevity
Noise Level
Can generate noticeable noise due to spinning disks
Silent operation
Power Consumption
(Idle) 2–5 watts
(Active) 2–6 watts
(Idle) 0.5–1 watt
(Active) 2–3 watts
Ideal Use Cases
– Bulk data storage (e.g., media, library, backups)
– Archival storage
– Applications with frequent data access
– Performance-critical applications (e.g., video editing, databases)
– Frequently accessed files
– Applications requiring fast loading times
For cost-effective bulk storage and archival needs, HDDs are the clear choice. Their high capacity per gigabyte makes them ideal for storing large media files, backups, and infrequently accessed data. On the other hand, if you prioritize speed and performance for applications like video editing, databases, or frequently accessed files, SSDs are a better option. They offer significantly faster read/write speeds, resulting in quicker loading times and a smoother overall user experience.
And, you can always have your cake and eat it, too. A hybrid approach lets you leverage the strengths of both technologies: HDDs for bulk storage and SSDs for performance-critical tasks. As we mentioned above, some devices support both drive types, or you can create separate storage and processing pools within your storage architecture.
Buyer takeaway: Ultimately, choosing the right option comes down to budget and use case.
Selecting Drive Capacity for NAS: What Size of Drives Should You Buy?
You can quickly estimate how much storage you’ll need by adding up the hard drives and external drives of all the systems you’ll be backing up in your office, adding the amount of shared storage you’ll want to provide to your users, and factor in any growing demand you project for shared storage.
If you have any historical data under management from previous years, you can calculate a simple growth rate. Generally, plan for systems that are two to four times your current data capacity. For example, if your total storage needs (including hard drives, external drives, and shared storage) amount to 20TB, double that to 40TB to account for growth. Then, divide by a common hard drive size, such as 10TB, indicating that you’ll need at least a four-bay NAS system. With that in mind, you can start shopping for four bay systems and larger.
Formula 1:
((Number of NAS Users x Hard Drive Size ) + Shared Storage) * Growth Factor = NAS Storage Needed
Example: There are six users in an office that will each be backing up their 2TB workstations and laptops. The team will want to use another 6TB of shared storage for documents, images, and videos for everyone to use. Multiplied times a growth factor of two, you’d start shopping for NAS systems that offer at least 36TB of storage.
Example: Continuing the example above, when looking for a new NAS system using 12TB drives, accounting for two additional drives for RAID 6, you’d look for NAS systems that can support five or more drive bays of 12TB hard drives.
(( 36TB / 12TB ) + 2 additional drives ) = 5 drive bays and up
If your budget allows, opting for larger drives and more drive bays will give you more storage overhead that you’ll surely grow into over time. Factor in, however, that if you go too big, you’re paying for unused storage space for a longer period of time. And if you use GAAP accounting, you’ll need to capitalize that investment over the same time window as a smaller NAS system which will hit your bottom line on an annual basis. This is the classic CapEx vs. Opex dilemma you can learn more about here.
If your cash budget is tight you can always purchase a NAS system with more bays but smaller drives, which will significantly reduce your upfront pricing. You can then replace those drives in the future with larger ones when you need them. Hard drive prices generally fall over time, so they will likely be less expensive in the future. You’ll end up purchasing two sets of drives over time, which will be less cash-intensive at the outset, but likely more expensive in the long run.
Similarly, you can partially fill the drive bays. If you want to get an eight bay system, but only have the budget for six drives, just add the other drives later. One of the best parts of NAS systems is the flexibility they allow you for right-sizing your shared storage approach.
Buyer Takeaway: Estimate how much storage you’ll need, add the amount of shared storage you’ll want to provide to your users, and factor in growing demand for shared storage—then balance long term growth potential against cash flow.
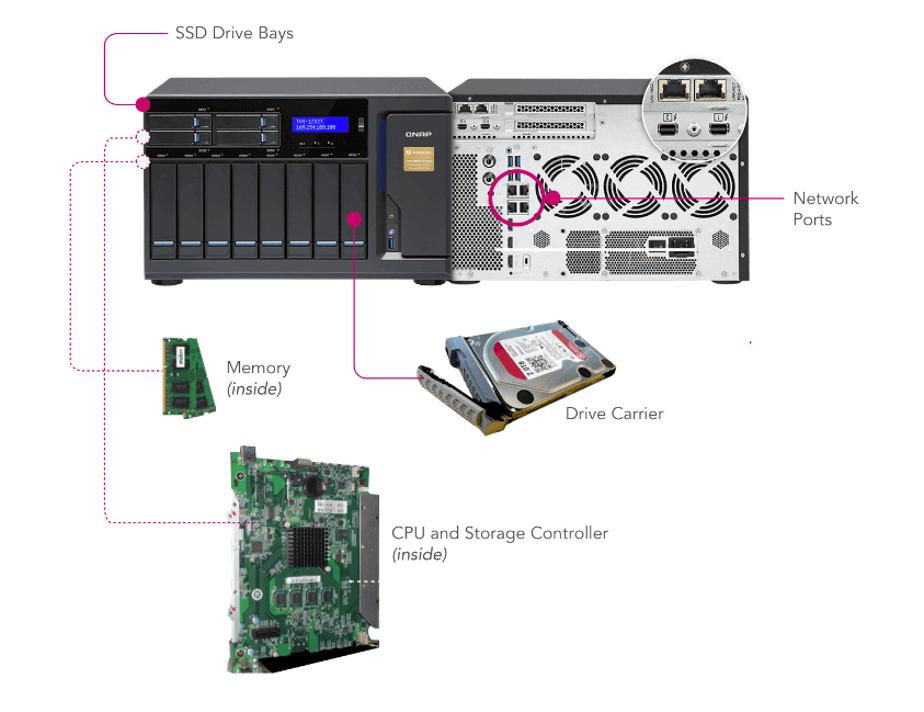
Processor, Controllers, and Memory: What Performance Levels Do You Require?
Is it better to have big onboard processors or controllers? Smaller, embedded chips common in smaller NAS systems provide basic functionality, but might bog down when serving many users or crunching through deduplication and encryption tasks, which are options with many backup solutions. Larger NAS systems typically stored in IT data center racks usually offer multiple storage controllers that can deliver the fastest performance and even failover capability.
Processor: Provides compute power for the system operation, services, and applications.
Controller: Manages the storage volume presentation and health.
Memory: Improves speed of applications and file serving performance.
ARM and Intel Atom chips are suitable for basic systems. For more demanding tasks such as encryption, deduplication, and running on-board applications, processors such as the Intel Corei3 and Corei5 remain reliable options. Additionally, the latest intel Corei7 and i9 processors offer even greater performance for these tasks. Many rack-mounted NAS systems feature Intel Xeon or AMD EPYC server-class processors, providing robust capabilities for enterprise level storage solutions.
So if you’re just looking for basic storage expansion, the entry-level systems with more modest, basic chips will likely suit you just fine. If deduplication, encryption, sync, and other functions many NAS systems offer as optional tools are part of your future workflow, this is one area where you shouldn’t cut corners.
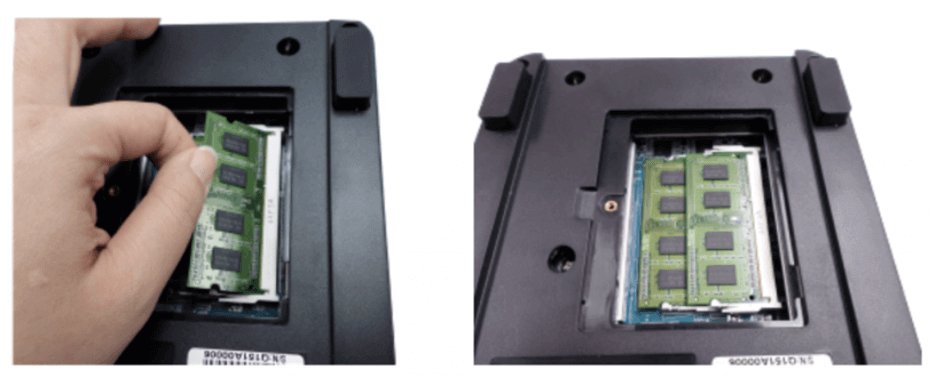
Adding memory modules to your NAS can be a simple performance upgrade.
Adding memory modules to your NAS can be a simple performance upgrade.
Adding memory modules to your NAS can be a simple performance upgrade.
If you have the option to expand the system memory, this can be an easy performance upgrade. Generally, the higher the ratio of memory to drives will benefit the performance of reading and writing to disk and the speed of on-board applications.
Buyer Takeaway: Entry-level NAS systems provide good basic functionality, but you should ensure your components are up to the challenge if you plan to make heavy use of deduplication, encryption, compression, and other functions.
Network and Connections: What Capacity for Speed Do You Need?
A basic NAS typically includes a Gigabit Ethernet connection (1GigE), which provides a throughput of 1 Gb/s, equivalent to 125 MB/s from your storage system. This bandwidth is usually sufficient for serving a few users. However, with increasing data demands, many modern NAS systems now come with built-in 2.5GigE or even 10GigE connections, offering higher throughput to support more users and faster data access. Additionally, most systems include expansion ports, allowing you to upgrade to 10GigE or higher network cards as your needs grow.
An example of a small 10GigE add-in card that can boost your NAS network performance.
An example of a small 10GigE add-in card that can boost your NAS network performance.
An example of a small 10GigE add-in card that can boost your NAS network performance.
While modern NAS systems offer 2.5 Gb/s, 5 Gb/s, or even 10Gb/s connections on their systems for significantly better performance than 1GigE connections, you’d require a compatible network switch, and possibly, USB adapters or expansion cards for every system that will connect to that NAS via the switch. If your office is already wired for 10GigE, make sure your NAS is also 10GigE. Otherwise, the more network ports in the back of the system, the better. If you aren’t ready to get a 10GigE capable system now, but you think you might be in the future, select a system that has expansion capability.
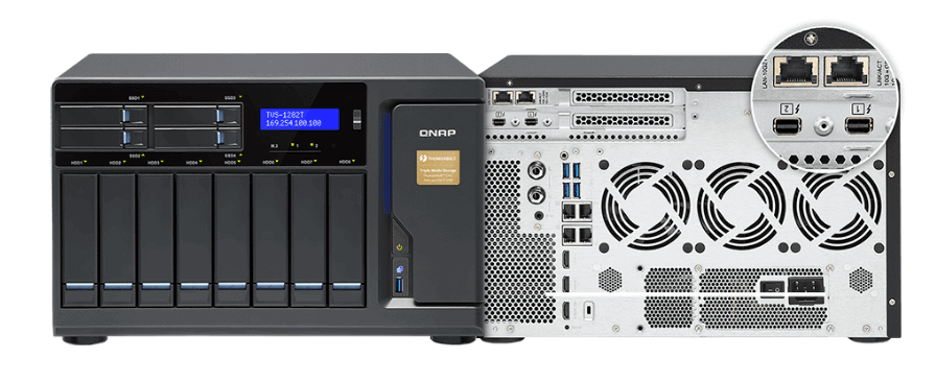
Some systems provide another option of Thunderbolt connections in addition to Ethernet connections. These allow laptops and workstations with Thunderbolt ports to directly connect to the NAS and offer much higher bandwidth—up to 40GigE (5 GB/s)—and are good for systems that need to edit large files directly on the NAS, such as is often the case in video editing. If you’ll be directly connecting systems that need the fastest possible speeds, select a system with Thunderbolt ports, one per Thunderbolt-connected user.
Some NAS systems offer not only multiple network ports, but faster connections as well, such as Thunderbolt.
Some NAS systems offer not only multiple network ports, but faster connections as well, such as Thunderbolt.
Some NAS systems offer not only multiple network ports, but faster connections as well, such as Thunderbolt.
Buyer Takeaway: It’s best to have more network ports in the back of your system. Or, select a system with network expansion card capability.
Caching and Hybrid Drive Features: How Fast Do You Need to Serve Files?
Many of the higher-end NAS systems can complement standard 3.5” hard drives with higher performing, smaller form factor SSD or M.2 drives. These smaller, faster drives can dramatically improve the NAS file serving performance by caching files in most recent, or most frequently requested files. By combining these different types of drives, the NAS can deliver both improved file serving performance, and large capacity.
As the number of users you support in each office grows, these capabilities will become more important as a relatively simple way to boost performance. Like we mentioned earlier, you can purchase a system with these slots unpopulated and add them in later.
Buyer Takeaway: Combine different types of drives, like smaller form factor SSD or M.2 storage with 3.5” hard drives to gain improved file serving performance.
Operating System: What Kind of Management Features Do You Require?
The NAS operating systems of the major vendors generally provide the same services in an operating system (OS)-like interface delivered via an on-board web server. By simply typing in your NAS’s IP address, you can sign in and manage your system’s settings, create and manage the storage volumes, set up groups of users on your network who have access, configure and monitor backup and sync tasks, and more.
Synology Diskstation Manager
Synology Diskstation Manager
Synology Diskstation Manager
If there are specific user management features in your IT environment that you need, or want to test how the NAS OS works, you can test them by spinning up a demonstration virtual machine offered by some NAS vendors. You can test service configuration and get a feel for the interface and tools, but obviously as a virtual environment you won’t be able to manage hardware directly. Here are some options:
Buyer Takeaway: The on-board NAS OS looks similar to a Mac or PC OS to make it easy to navigate system setup and maintenance and allows you to manage settings, storage, and tasks.
Solutions: What Added Services Do You Require?
While the onboard processor and memory on your NAS are primarily for file service, backup, and sync tasks, you can also install other solutions directly onto it. For instance, QNAP and Synology—two popular NAS providers—have app stores accessible from their management software where you can select applications to download and install on your NAS. You might be interested in a backup and sync solution such as Archiware, or integrating with CMS solutions like Joomla or WordPress.
Synology add-on packages.
Synology add-on packages.
Synology add-on packages.
However, beyond backup solutions, you’d benefit from installing mission-critical apps onto a dedicated system rather than on your NAS. For a small number of users, running applications directly on the NAS can be a good temporary use or a pathway to testing something out. But if the application becomes very busy, it could impact the other services of the NAS. Big picture, native apps on your NAS can be useful, but don’t overdo it.
Buyer Takeaway: The main backup and sync apps from the major NAS vendors are excellent—give them a good test drive, but know that there are many excellent backup and sync solutions available as well.
Why Adding Cloud Storage to Your NAS Offers Additional Benefits
When you pair cloud storage with your NAS, you gain access to features that complement the security of your data and your ability to share files both locally and remotely.
To start with, cloud storage provides off-site backup protection. This aligns your NAS setup with the industry standard for data protection: a 3-2-1 backup strategy—which ensures that you have three copies of your data, the source data and two backups. One backup copy is stored on your NAS, and the second backup copy is stored off-site, such as in the cloud. And in the event of data loss, you can restore your systems directly from the cloud even if all the systems in your office are knocked out or destroyed.
While data sent to the cloud is encrypted in-flight via SSL, you can also encrypt your backups so that they are only openable with your team’s encryption key. The cloud can also give you advanced storage options for your backup files like WORM (Write Once, Read Many) or immutability—making your data immutable for a defined period of time—or set custom data lifecycle rules at the bucket level to help match your ideal backup workflow.
Additionally, cloud storage provides valuable access to your data and documents from your NAS through sync capabilities. In case anyone on your team needs to access a file when they are away from the office, or as is more common now, in case your entire team is working from home, they’ll be able to access the files that have been synced to the cloud through your NAS’s secure sync program. You can even sync across multiple locations using the cloud as a two-way sync to quickly replicate data across locations. For employees collaborating across great distances, this helps to ensure they’re not waiting on the internet to deliver critical files—they’re already on-site. The only caveat: It’s important to remember that sync is not backup and to incorporate that into your overall data management strategy.
Refresher: What’s the Difference Between Cloud Sync, Cloud Backup, and Cloud Storage?
Sync services allow multiple users across multiple devices to access the same file. Backup stores a copy of those files somewhere remote from your work environment, oftentimes in an off-site server like cloud storage. While they serve different purposes, they can work well together when properly coordinated. You can read more about the differences in this blog post.
Ready to Set Up Your NAS with Cloud Storage?
To summarize, here are a few things to remember when shopping for a NAS system:
Consider how much storage you’ll need for both local backup and for shared user storage.
Look for a system with three to five drive bays at minimum.
Check that the NAS system is sold with drives—if not, you’ll have to source enough of the same size drives.
Opt for a system that lets you upgrade the memory and network options.
Choose a system that meets your needs today; you can always upgrade in the future.
Coupled with cloud storage like Backblaze B2 Cloud Storage, which works with a wide range of NAS systems including Synology, QNAP, TrueNAS, OWC Jellyfish, and more, you gain necessary backup protection and restoration from the cloud, as well as the capability to sync across locations.
Have more questions about NAS features or how to implement a NAS system in your environment? Ask away in the comments.
This post was originally published in September 2020 and has been updated to align with recent news about the TikTok app and how to download content.
Back in 2020, there was speculation about the U.S. banning TikTok due to privacy concerns about its parent company, ByteDance. Although the app has not been banned to this day, social media is one place where things you want to hold on to can suddenly disappear or become inaccessible for reasons beyond your control.
We’ve gathered a handful of guides to help you protect social content across many different platforms. We’re working on developing this list—please comment below if you’d like to see another platform covered.
We don’t know if there will ever be a TikTok ban in the future, but at Backblaze, we are all about being proactive and saving precious memories. And in the more common case of accidentally getting locked out of your account or if an update wreaks havoc on your apps and their data, having your videos and your favorite creators’ videos downloaded and backed up will save you the stress of losing your data.
Today, we’re focusing on saving the 15 to 60 second clips you know and love on TikTok. In this post, we walk you through how to download your own TikTok videos and your other favorite content and create a backup.
How to Download Your Personal TikTok Data
You can request a copy of your TikTok data and download information like your profile (username, profile photo, profile description, and contact info), your activity (videos, comment history, chat history, purchase history, likes, and favorites), and your app settings (privacy settings, notification settings, and language settings). The steps to download your TikTok data are the same for both iPhones and Androids.
Keep in mind that your TikToks are not automatically downloaded once you receive a copy of your data—you will have to open the data file and download each video manually. We’ll explain that in detail in step 13.
1. Open TikTok on your phone and go to your profile.
2. Click on the three dots that appear at the top right corner.
3. Under “Account,” select “Privacy.”
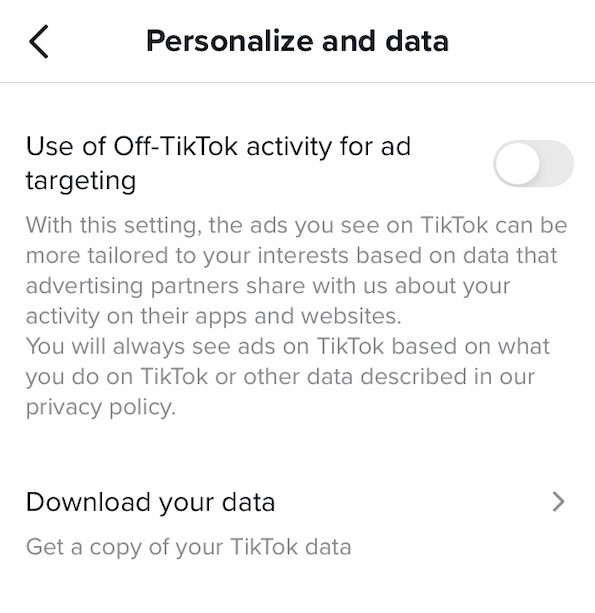
4. Click on “Personalization and data” → “Download your data.”
5. In “Download your data” you will see more information about what you can download. Scroll to the bottom and click “Request data file.”
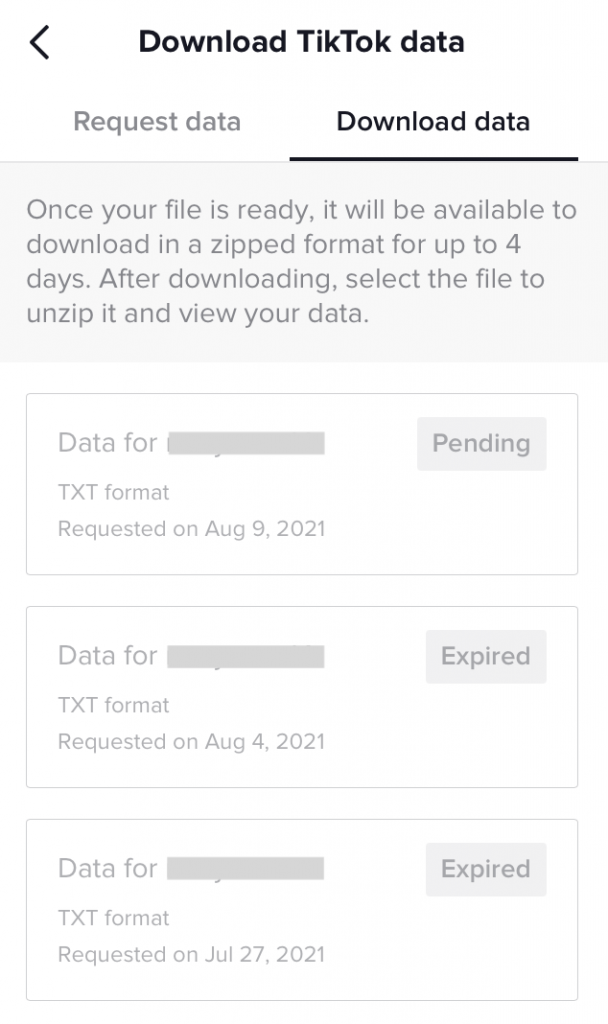
6. In the second tab titled “Download data,” you will see that your request is pending.
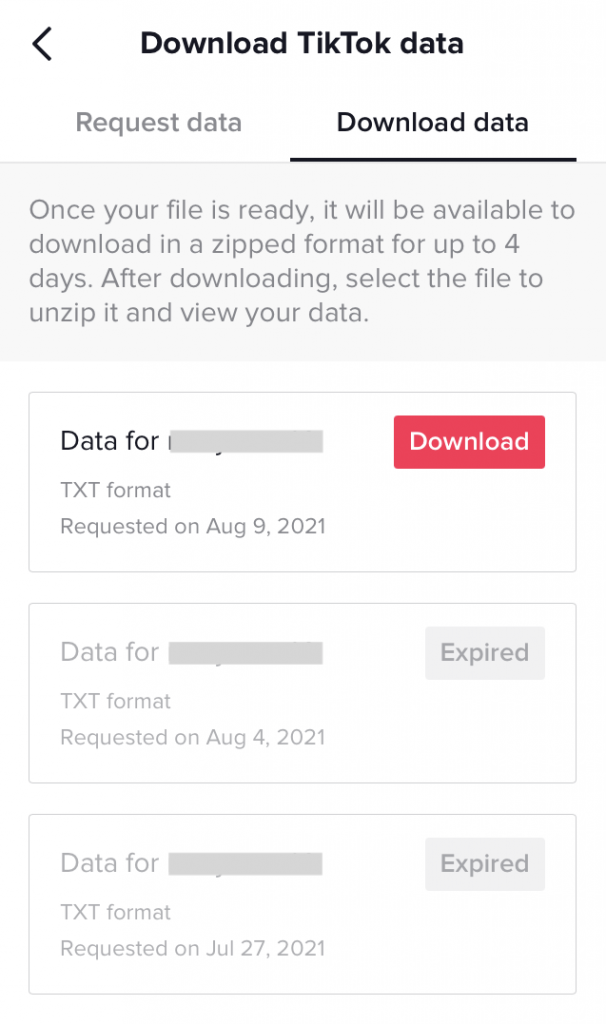
7. Once your data is ready for download, you will receive a message in your TikTok inbox that says “System Notifications: The file you’ve requested containing your Tiktok information is now ready for you to download.” Tap that message and select “Download.” Note: The file will be available to download for up to four days. If you don’t download the file within that time frame, it will expire and you will have to request your file again.
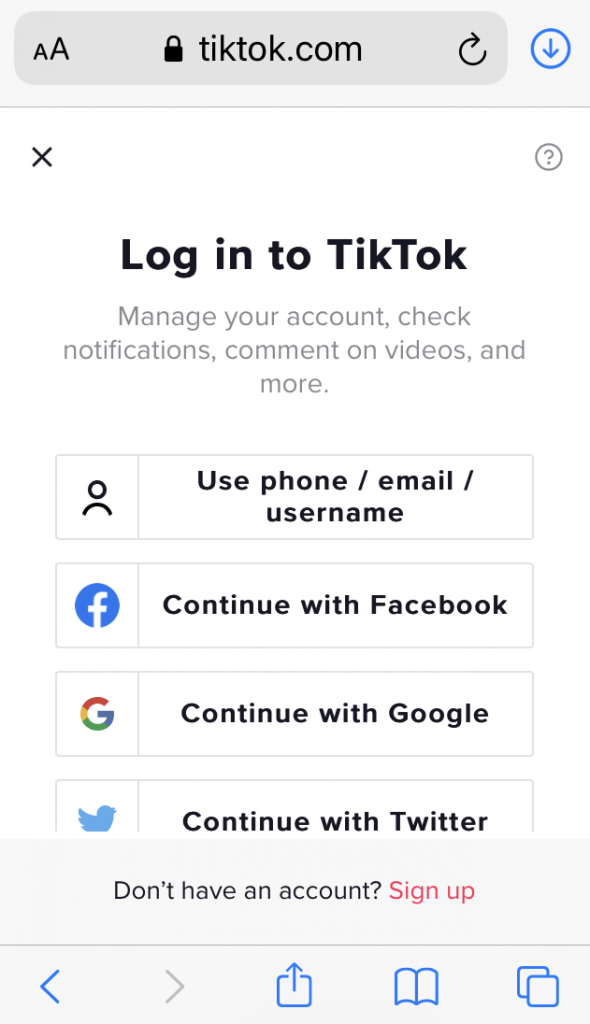
8. Once you click download, you will be redirected to a login page on your mobile browser. After you log in and verify your password, you’ll receive a popup message to download the ZIP file.
9. Click “Download” and then you’ll notice the file getting downloaded at the top right corner. You’ll be redirected back to the login page.
10. Once the file has been downloaded, click on the button with the down arrow at the top right corner.
11. Choose the ZIP file you want to download. This file will open in your “Files” app.
12. Here, you can find all your activity, comments, direct messages, profile, videos, and more.
13. Warning: You are not done yet! The file you’ve received has information about your TikToks like the date you published them, the video link, and the number of likes you got. But it doesn’t include the actual video itself. To archive the video, you need to copy and paste the video link into your web browser, then download the TikTok to your device. Yes, it will take some time to download all your videos, but if they’re worth it, they’re worth the time!
Keep in mind that these are the steps to download the TikToks that you have personally created and uploaded to your account. If you’d like to save TikToks made by other people, keep reading.
How to Download TikToks by Other Creators
The process of downloading other peoples’ TikToks is a little more manual, but unlike requesting your TikTok data like above, there’s no waiting time. Here’s what you’ve got to do:
1. Open TikTok on your phone and go to the video you want to save.
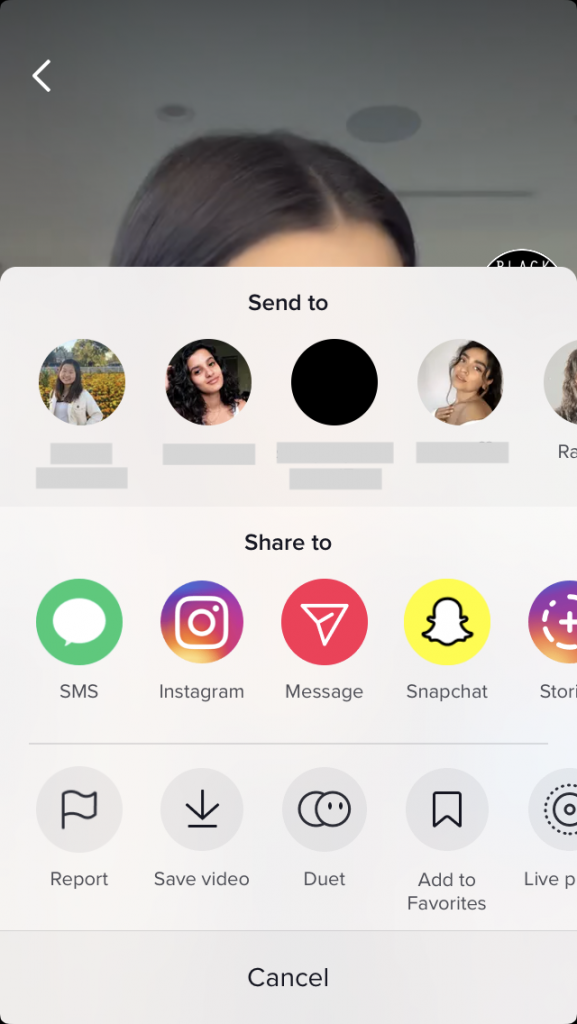
2. On the right side of the video, click on the arrow which indicates the “Send to” button.
3. Under “Share to,” click “Save video.”
4. That’s it—the video is now saved to your phone!
Note: Some people may have set their videos to be non-downloadable. They probably have a good reason for that! It should go without saying, if you’re downloading other people’s content, don’t use it for any purposes they might not offer consent for.
You can also use this TikTok Scraper & Downloader for a faster way to download all of your data or other users’ videos that you want to save in bulk. While it’s a more technical option, all of the documentation for how to install and use the Scraper is available on GitHub.
How to Back Up Your TikToks
Once you’ve got all your TikTok data on your phone, it’s time to back it up. Those of you with iCloud may think you’re in the clear. Unfortunately, iCloud is not a backup service; it simply syncs your data with your other Apple devices. This means that if your Mac and iPhone are synced and you lose the saved TikToks on your iPhone, you will lose them on your Mac too. You can read more about using iCloud here.
Since iCloud shouldn’t be used as a backup service, we recommend you use a computer backup or cloud storage service instead. To do this, you first need to transfer your TikToks from your phone to your computer. And then, it’s time to back it up!
Lucky for you, we already have a detailed blog post about backing up your social media content. The post covers the difference between computer backup vs. cloud storage and how you can use Backblaze B2 Cloud Storage to archive your social media data. With Backblaze, you can store as much data as you’d like with no limitations. So whether you’re an avid TikToker with thousands of videos or just getting started on the social media platform, we’ve got you covered.
To provide the best experiences, we use technologies like cookies to store and/or access device information. Consenting to these technologies will allow us to process data such as browsing behavior or unique IDs on this site. Not consenting or withdrawing consent, may adversely affect certain features and functions.
Functional
Always active
The technical storage or access is strictly necessary for the legitimate purpose of enabling the use of a specific service explicitly requested by the subscriber or user, or for the sole purpose of carrying out the transmission of a communication over an electronic communications network.
Preferences
The technical storage or access is necessary for the legitimate purpose of storing preferences that are not requested by the subscriber or user.
Statistics
The technical storage or access that is used exclusively for statistical purposes.The technical storage or access that is used exclusively for anonymous statistical purposes. Without a subpoena, voluntary compliance on the part of your Internet Service Provider, or additional records from a third party, information stored or retrieved for this purpose alone cannot usually be used to identify you.
Marketing
The technical storage or access is required to create user profiles to send advertising, or to track the user on a website or across several websites for similar marketing purposes.