Post Syndicated from Nikolas Nikravesh original https://aws.amazon.com/blogs/security/automate-the-deployment-of-an-nginx-web-service-using-amazon-ecs-with-tls-offload-in-cloudhsm/
Customers who require private keys for their TLS certificates to be stored in FIPS 140-2 Level 3 certified hardware security modules (HSMs) can use AWS CloudHSM to store their keys for websites hosted in the cloud. In this blog post, we will show you how to automate the deployment of a web application using NGINX in AWS Fargate, with full integration with CloudHSM. You will also use AWS CodeDeploy to manage the deployment of changes to your Amazon Elastic Container Service (Amazon ECS) service.
CloudHSM offers FIPS 140-2 Level 3 HSMs that you can integrate with NGINX or Apache HTTP Server through the OpenSSL Dynamic Engine. The CloudHSM Client SDK 5 includes the OpenSSL Dynamic Engine to allow your web server to use a private key stored in the HSM with TLS versions 1.2 and 1.3 to support applications that are required to use FIPS 140-2 Level 3 validated HSMs.
CloudHSM uses the private key in the HSM as part of the server verification step of the TLS handshake that occurs every time that a new HTTPS connection is established between the client and server. Using the exchanged symmetric key, OpenSSL software performs the key exchange and bulk encryption. For more information about this process and how CloudHSM fits in, see How SSL/TLS offload with AWS CloudHSM works.
Solution overview
This blog post uses the AWS Cloud Development Kit (AWS CDK) to deploy the solution infrastructure. The AWS CDK allows you to define your cloud application resources using familiar programming languages.
Figure 1 shows an overview of the overall architecture deployed in this blog. This solution contains three CDK stacks: The TlsOffloadContainerBuildStack CDK stack deploys the CodeCommit, CodeBuild, and AmazonECR resources. The TlsOffloadEcsServiceStack CDK stack deploys the ECS Fargate service along with the required VPC resources. The TlsOffloadPipelineStack CDK stack deploys the CodePipeline resources to automate deployments of changes to the service configuration.
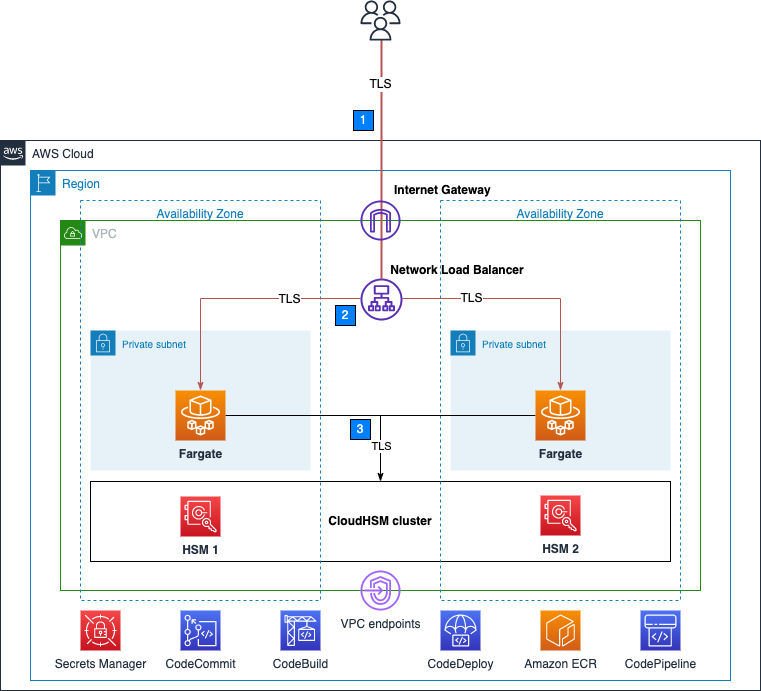
Figure 1: Overall architecture
At a high level, here’s how the solution in Figure 1 works:
- Clients make an HTTPS request to the public IP address exposed by Network Load Balancer to connect to the web server and establish a secure connection that uses TLS.
- Network Load Balancer routes the request to one of the ECS hosts running in private virtual private cloud (VPC) subnets, which are connected to the CloudHSM cluster.
- The NGINX web server that is running on ECS containers performs a TLS handshake by using the private key stored in the HSM to establish a secure connection with the requestor.
Note: Although we don’t focus on perimeter protection in this post, AWS has a number of services that help provide layered perimeter protection for your internet-facing applications, such as AWS Shield and AWS WAF.
Figure 2 shows an overview of the automation infrastructure that is deployed by the TlsOffloadContainerBuildStack and TlsOffloadPipelineStack CDK stacks.

Figure 2: Deployment pipeline
At a high level, here’s how the solution in Figure 2 works:
- A developer makes changes to the service configuration and commits the changes to the AWS CodeCommit repository.
- AWS CodePipeline detects the changes and invokes AWS CodeBuild to build a new version of the Docker image that is used in Amazon ECS.
- CodeBuild builds a new Docker image and publishes it to the Amazon Elastic Container Registry (Amazon ECR) repository.
- AWS CodeDeploy creates a new revision of the ECS task definition for the Amazon ECS service and initiates a deployment of the new service.
Required services
To build this architecture in your account, you need to use a role within your account that can configure the following services and features:
- AWS Identity and Access Management (IAM) to create the required roles.
- Amazon Virtual Private Cloud (Amazon VPC), including subnets and VPC endpoints, and Network Load Balancer, to set up the networking infrastructure.
- CloudHSM to create and configure the HSM cluster.
- AWS Secrets Manager to store HSM-related secrets used to authenticate and interact with the HSM.
- Amazon ECS to host the NGINX web server container applications.
- Amazon ECR to host the Docker containers that are used by Amazon ECS.
- CodeCommit, CodeBuild, CodeDeploy and CodePipeline to automate the deployment lifecycle.
- Amazon CloudWatch to perform logging and metrics.
Prerequisites
To follow this walkthrough, you need to have the following components in place:
- A VPC with at least two public and two private subnets in at least two different Availability Zones (AZs).
- An active and initialized CloudHSM cluster with at least two HSMs in two different AZs for high availability. Place the HSMs in the private subnets. For instructions on how to create, initialize, and activate a CloudHSM cluster, see the CloudHSM Workshop.
- A crypto user (CU) on your HSMs.
- An RSA private key in the HSM with a corresponding fake PEM file and certificate signed by a trusted Certificate Authority for the web server. Fake PEM files are PEM-encoded key files that store a reference to the key on the HSM instead of storing the private key information. For instructions on how to generate this file, see Generate or import a private key and SSL/TLS certificate.
- An environment configured with AWS CDK to deploy the CDK stacks with the relevant resources. For instructions on how to set up this environment, see Getting started with the AWS CDK.
Step 1: Store secrets in Secrets Manager
As with other container projects, you need to decide what to build statically into the container (for example, libraries, code, or packages) and what to set as runtime parameters, to be pulled from a parameter store. In this walkthrough, we use Secrets Manager to store sensitive parameters and use the integration of Amazon ECS with Secrets Manager to securely retrieve them when the container is launched.
Important: You need to store the following information in Secrets Manager as plaintext, not as key/value pairs.
To create a new secret
- Open the Secrets Manager console and choose Store a new secret.
- On the Choose secret type page, do the following:
- For Secret type, choose Other type of secret.
- In Key/value pairs, choose Plaintext and enter your secret just as you would need it in your application.
The following is a list of the required secrets for this solution and how they look in the Secrets Manager console.
- Your cluster-issuing certificate – this is the certificate that corresponds to the private key that you used to sign the cluster’s certificate signing request. In this example, the name of the secret for the certificate is tls/clustercert.

Figure 3: Store the cluster certificate
- The web server certificate – In this example, the name of the secret for the web server certificate is tls/servercert. It will look similar to the following:
Figure 4: Store the web server certificate
- The fake PEM file for the private key stored in the HSM that you generated in the Prerequisites section. In this example, the name of the secret for the fake PEM file is tls/fakepem.
Figure 5: Store the fake PEM
- The HSM pin used to authenticate with the HSMs in your cluster. In this example, the name of the secret for the HSM pin is tls/pin.
Figure 6: Store the HSM pin


After you’ve stored your secrets, you should see output similar to the following:

Figure 7: List of required secrets
Step 2: Download and configure the CDK app
This post uses the AWS CDK to deploy the solution infrastructure. In this section, you will download the CDK app and configure it.
To download and configure the CDK app
- In your CDK environment that you created in the Prerequisites section, check out the source code from the aws-cloudhsm-tls-offload-blog GitHub repository.
- Edit the app_config.json file and update the <placeholder values> with your target configuration:
- Run the following command to build the CDK stacks from the root of the project directory.
- To view the stacks that are available to deploy, run the following command from the root of the project directory.
You should see the following stacks available to deploy:
- TlsOffloadContainerBuildStack — Deploys the CodeCommit, CodeBuild, and ECR repository that builds the ECS container image.
- TlsOffloadEcsServiceStack — Deploys the ECS Fargate service along with the required VPC resources.
- TlsOffloadPipelineStack — Deploys the CodePipeline that automates the deployment of updates to the service.
Step 3: Deploy the container build stack
In this step, you will deploy the container build stack, and then create a build and verify that the image was built successfully.
To deploy the container build stack
Deploy the TlsOffloadContainerBuildStack stack that we described in Figure 2 to your AWS account. In your CDK environment, run the following command:
The command line interface (CLI) will prompt you to approve the changes. After you approve them, you will see the following resources deployed to your newly created CodeCommit repository.
- Dockerfile — This file provides a containerized environment for each of the Fargate containers to run. It downloads and installs necessary dependencies to run the NGINX web server with CloudHSM.
- nginx.conf — This file provides NGINX with the configuration settings to run an HTTPS web server with CloudHSM configured as the SSL engine that performs the TLS handshake. The following nginx.conf values have already been configured in the file; if you want to make changes, update the file before deployment:
- ssl_engine is set to cloudhsm
- the environment variable is env CLOUDHSM_PIN
- error_log is set to stderr so that the Fargate container can capture the logs in CloudWatch
- the server section is set up to listen on port 443
- ssl_ciphers are configured for a server with an RSA private key
- run.sh — This script configures the CloudHSM OpenSSL Dynamic Engine on the Fargate task before the NGINX server is started.
- nginx.service — This file specifies the configuration settings that systemd uses to run the NGINX service. Included in this file is a reference to the file that contains the environment variables for the NGINX service. This provides the HSM pin to the OpenSSL Engine.
- index.html — This file is a sample HTML file that is displayed when you navigate to the HTTPS endpoint of the load balancer in your browser.
- dhparam.pem — This file provides sample Diffie-Hellman parameters for demonstration purposes, but AWS recommends that you generate your own. You can generate your own Diffie-Hellman parameters by running the following command with the OpenSSL CLI. These parameters are not required for TLS but are recommended to provide perfect forward secrecy in your encrypted messages.
Your repository should look like the following:

Figure 8: CodeCommit repository
Before you deploy the Amazon ECS service, you need to build your first Docker image to populate the ECR repository. To successfully deploy the service, you need to have at least one image already present in the repository.
To create a build and verify the image was built successfully
- Open the AWS CodeBuild console.
- Find the CodeBuild project that was created by the CDK deployment and select it.
- Choose Start Build to initiate a new build.
- Wait for the build to complete successfully, and then open the Amazon ECR console.
- Select the repository that the CDK deployment created.
You should now see an image in your repository, similar to the following:

Figure 9: ECR repository
Step 4: Deploy the Amazon ECS service
Now that you have successfully built an ECR image, you can deploy the Amazon ECS service. This step deploys the following resources to your account:
- VPC endpoints for the required AWS services that your ECS task needs to communicate with, including the following:
- Amazon ECR
- Secrets Manager
- CloudWatch
- CloudHSM
- Network Load Balancer, which load balances HTTPS traffic to your ECS tasks.
- A CloudWatch Logs log group to host the logs for the ECS tasks.
- An ECS cluster with ECS tasks using your previously built Docker image that hosts the NGINX service.
To deploy the Amazon ECS service with the CDK
- In your CDK environment, run the following command:
The CLI will prompt you to approve the changes. After you approve them, you will see these resources deploy to your account.
Checkpoint
At this point, you should have a working service. To confirm that you do, in your browser, navigate using HTTPS to the public address associated with the Network Load Balancer. While not covered in this blog, you can additionally configure DNS routing using Amazon Route53 to setup a custom domain name for your web service. You should see a screen similar to the following.

Figure 10: The sample website
Step 5: Use CodePipeline to automate the deployment of changes to the web server
Now that you have deployed a preliminary version of the application, you can take a few steps to automate further releases of the web server. As you maintain this application in production, you might need to update one or more of the following items:
- Your website HTML source and other required libraries (for example, CSS or JavaScript)
- Your Docker environment, such as the OpenSSL libraries, operating system and CloudHSM packages, and NGINX version.
- Re-deploy the service after rotating your web server private key and certificate in Secrets Manager
Next, you will set up a CodePipeline project that orchestrates the end-to-end deployment of a change to the application—from an update to the code in our CodeCommit repo to the deployment of updated container images and the redirection of user traffic by the load balancer to the updated application.
This step deploys to your account a deployment pipeline that connects your CodeCommit, CodeBuild, and Amazon ECS services.
Deploy the CodePipeline stack with CDK
In your CDK environment, run the following command:
The CLI will prompt you to approve the changes. After you approve them, you will see the resources deploy to your account.
Start a deployment
To verify that your automation is working correctly, start a new deployment in your CodePipeline by making a change to your source repository. If everything works, the CodeBuild project will build the latest version of the Dockerfile located in your CodeCommit repository and push it to Amazon ECR. Then, the CodeDeploy application will create a new version of the ECS task definition and deploy new tasks while spinning down the existing tasks.
View your website
Now that the deployment is complete, you should again be able to view your website in your browser by navigating to the website for your application. If you made changes to the source code, such as changes to your index.html file, you should see these changes now.
Verify that the web server is properly configured by checking that the website’s certificate matches the one that you created in the Prerequisites section. Figure 11 shows an example of a certificate.

Figure 11: Certificate for the application
To verify that your NGINX service is using your CloudHSM cluster to offload the TLS handshake, you can view the CloudHSM client logs for this application in CloudWatch in the log group that you specified when you configured the ECS task definition.
To view your CloudHSM client logs in CloudWatch
- Open the CloudWatch console.
- In the navigation pane, select Log Groups.
- Select the log group that was created for you by the CDK deployment.
- Select a log stream entry. Each log stream corresponds to an ECS instance that is running the NGINX web server.
- You should see the client logs for this instance, which will look similar to the following:
Figure 12: Fargate task logs

You can also verify your HSM connectivity by viewing your HSM audit logs.
To view your HSM audit logs
- Open the CloudWatch console.
- In the navigation pane, select Log Groups.
- Select the log group corresponding to your CloudHSM cluster. The log group has the following format: /aws/cloudhsm/<cluster-id>.
- You can see entries similar to the following, which indicates that the NGINX application is connecting and logging in to the HSM to perform cryptographic operations.
Conclusion
In this post, you learned how to set up a NGINX web server on Fargate in a secure, private subnet that offloads the TLS termination to a FIPS 140-2 Level 3 HSM environment that uses the CloudHSM OpenSSL Dynamic Engine. You also learned how to set up a deployment pipeline to automate the Fargate deployments when updates are made.
You can expand this solution to fit your individual use case. For example, you can use the NGINX web server as a reverse proxy for additional servers in your internal network, and set up mutual TLS between these internal servers.
Further reading
- Automated deployment of AWS CloudHSM resources using AWS CloudFormation GitHub repository
- Deploying a NGINX Reverse Proxy Sidecar Container on Amazon ECS blog post
If you have feedback about this post, submit comments in the Comments section below. If you have questions about this post, start a new thread on the AWS CloudHSM re:Post or contact AWS Support.
Want more AWS Security news? Follow us on Twitter.