Tag Archives: foundation-models

Agentic application modernization at scale with Strands and Amazon Transform custom

Post Syndicated from Kanishk Mahajan original https://aws.amazon.com/blogs/devops/use-generative-ai-agents-for-application-modernization-at-scale-with-strands-amazon-transform-custom-and-amazon-bedrock-agentcore/

Introduction

Modernizing applications by upgrading language runtimes, migrating SDKs, and refactoring frameworks is important for cloud adoption but can be labor-intensive at scale. Each repository requires analysis of dependencies and transformation needs; custom transformation logic must be built and validated, and changes are often executed sequentially across codebases. If you have hundreds of applications, this stretches timelines from months to years, while introducing inconsistency across your teams.

To address this, Amazon Web Services (AWS) provides a composable set of building blocks. AWS Transform custom enables reusable, CLI-driven code transformations for upgrading runtimes, SDKs, and frameworks consistently across large portfolios. Strands Agents provides a framework for building multi-agent systems that coordinate complex transformation workflows. Amazon Bedrock AgentCore delivers the managed runtime, memory, and observability to operate these agents reliably in production. Together, they replace manual, sequential modernization with an intelligent, automated approach that scales.

In this post, we show you how to combine these services to build a generative AI–powered, agentic modernization system that can automatically analyze application repositories, determine required changes, create missing transformations, and execute them in parallel at scale.

Solution overview

The solution uses an agentic architecture that separates intelligent decision-making from deterministic execution, enabling automation at scale while maintaining consistency and control. In this post, you will build an AI-driven application modernization system that demonstrates how multi-agent workflows can be applied to large-scale code transformation scenarios. You interact with the system through a React-based frontend or API interface, submitting individual repositories or batch workloads via CSV inputs. Requests are processed asynchronously through an API layer that invokes an orchestrator agent running on Amazon Bedrock AgentCore, which coordinates specialized agents to analyze codebases, identify transformation requirements, and manage execution workflows. Results are stored and surfaced through the interface, allowing users to track progress and review outputs in real time.The workflow begins with repository analysis, where the system inspects application codebases to identify languages, dependencies, and required upgrades such as runtime version changes or SDK migrations. Based on this analysis, the system maps each application to an existing transformation when available. If no suitable transformation exists, a creation agent dynamically generates one using natural language instructions and publishes it to a centralized registry for reuse, creating a continuously improving system where transformation coverage expands over time.

Once transformations are identified or created, an execution agent runs them at scale by invoking AWS Batch jobs that execute the AWS Transform custom CLI, enabling parallel processing across multiple repositories. The orchestrator coordinates all agents, maintains workflow state using Amazon Bedrock AgentCore Memory, and ensures reliable execution through structured task decomposition, tool invocation, and error handling. While the example focuses on application re-platforming, the same architectural pattern can be applied to other large-scale code analysis and automation workflows.

The following architecture diagram (Figure 1) illustrates the various components of our solution as outlined in this section:architecture diagram describing the multi agent strands and agentcore deployment
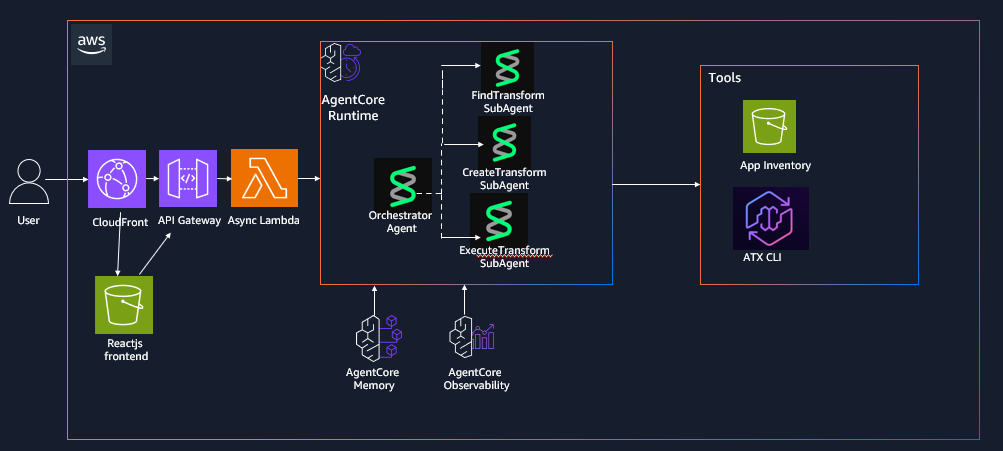
Figure 1: AWS Transform custom Agentic Orchestration Architecture using Strands agents and Amazon Bedrock AgentCore

Prerequisites

Complete the following prerequisites:

  1. Install the AWS Command Line Interface (AWS CLI).
  2. Install the AWS SAM CLI v1.100.0+
  3. Install Docker v20.x+.
  4. Install Node.js v18.x+
  5. Install Python v3.11+
  6. Install the AWS CDK CLI
  7. Enable access to a Bedrock model for the orchestrator in your deployment region. The default model can be configured through the Amazon Bedrock model access console. To use a different model, set `BEDROCK_MODEL_ID` in `deployment/config.env` before Step 3 and enable access to that model instead. Model access approval can take a few minutes in some accounts, so complete this step before deploying.

Dependencies

The Strands Agents implementation has the following dependencies that are packaged in the DockerFile:

  1. Strands multi-agent framework: strands-agents
  2. Strands agent tools and utilities: strands-agents-tools
  3. HTTP library for API calls: requests
  4. Amazon Bedrock AgentCore SDK: bedrock-agentcore
  5. AWS SDK for Python: boto3

Deploy the solution

The solution is available for download on the GitHub repo. This post walks through the CDK + SAM deployment path (Option A in the repository README). The repository also includes a CDK-only option (Option B); see the repository README for details.

Step 1: Clone the repository

git clone https://github.com/aws-samples/aws-transform-custom-samples.git

cd aws-transform-custom-samples/agentic-atx-platform

Step 2: Configure AWS Credentials

# Configure AWS CLI

aws configure

# Verify credentials

aws sts get-caller-identity

Step 3: Deploy ATX CLI Container image and frontend using AWS CDK

# Copy configuration template (defaults work for most setups; edit only to change region or Bedrock model)

cd deployment

cp config.env.template config.env

# Authenticate with Amazon ECR Public (required for the Docker base image pull)

aws ecr-public get-login-password --region us-east-1 | docker login --username AWS --password-stdin public.ecr.aws

# Build the UI placeholder so CDK’s UI stack has ui/dist/ to deploy

cd ../ui && npm install && npx vite build

# Install CDK dependencies and bootstrap (run once per account/region)

cd ../cdk

npm install cdk bootstrap

# Build TypeScript and deploy the three stacks

npx tsc

CDK_DEFAULT_ACCOUNT=$(aws sts get-caller-identity --query Account --output text)

cdk deploy AtxContainerStack AtxInfrastructureStack AtxUiStack --require-approval never

# Note for accounts without a default VPC , pass the VPC context flags to `cdk deploy`:

cdk deploy AtxContainerStack AtxInfrastructureStack AtxUiStack --require-approval never

cdk deploy AtxContainerStack AtxInfrastructureStack AtxUiStack --require-approval never -c existingVpcId=vpc-xxx -c existingSubnetIds=subnet-aaa,subnet-bbb -c existingSecurityGroupId=sg-ccc

# Subnets must be public (auto-assign public IP enabled) or private with a NAT gateway so Fargate tasks can reach Amazon ECR, Amazon S3, and Git repositories.

Step 4: Deploy Strands Agents to AgentCore runtime using AWS SAM

cd ../sam./deploy.sh

# Invoke the deploy Lambda to create the AgentCore Runtime via the bedrock-agentcore-control SDK (takes 2-5 minutes)

aws lambda invoke --function-name atx-deploy-agentcore \ --region us-east-1 \ --cli-binary-format raw-in-base64-out \ --payload '{"action":"deploy"}' \ --cli-read-timeout 900 /tmp/deploy-output.jsoncat /tmp/deploy-output.json

Step 5: Wire the AgentCore runtime ARN into the async invoke Lambda

ACCOUNT_ID=$(aws sts get-caller-identity --query Account --output text)

RUNTIME_ARN=$(python3 -c "import json; print(json.loads(json.load(open('/tmp/deploy-output.json'))['body'])['runtime_arn'])")aws lambda update-function-configuration \ --function-name atx-async-invoke-agent \ --region us-east-1 \ --environment "Variables={AGENT_RUNTIME_ARN=${RUNTIME_ARN},RESULT_BUCKET=atx-custom-output-${ACCOUNT_ID},JOBS_TABLE=atx-transform-jobs}"

Step 6: Rebuild and deploy the frontend with AgentCore API endpoint

# Update the React application with the deployed API endpoint and redeploy it.

API_URL=$(aws cloudformation describe-stacks \ --stack-name AtxAgentCoreSAM \ --region us-east-1 \ --query 'Stacks[0].Outputs[?OutputKey==`ApiEndpoint`].OutputValue' \ --output text)

cd ../ui

VITE_API_ENDPOINT=$API_URL npx vite build./deploy-aws.sh

# This rebuilds the React application with the correct API endpoint, uploads it to Amazon S3, and invalidates the Amazon CloudFront distribution.

Step 7: Access the application

# After deployment completes, retrieve the CloudFront distribution URL from the AWS CloudFormation outputs and open it in your browser to access the application UI.

aws cloudformation describe-stacks \ --stack-name AtxUiStack \ --region us-east-1 \ --query 'Stacks[0].Outputs[?OutputKey==`WebsiteUrl`].OutputValue' \ --output text

Using the application

The UI exposes five tabs covering the complete modernization workflow: browsing available transformations, executing a transformation on a single repository, creating a new custom transformation with natural language, batch-processing a CSV of repositories, and tracking job status. This section walks through two of the most common flows.

Create a custom transformation from natural language

Open the Create Custom tab, describe the transformation in plain English (for example, “Upgrade Spring Boot 2 applications to Spring Boot 3”), and optionally provide a reference repository URL. The creation agent analyzes the source, generates a transformation definition, and publishes it to the ATX registry for reuse across the portfolio.
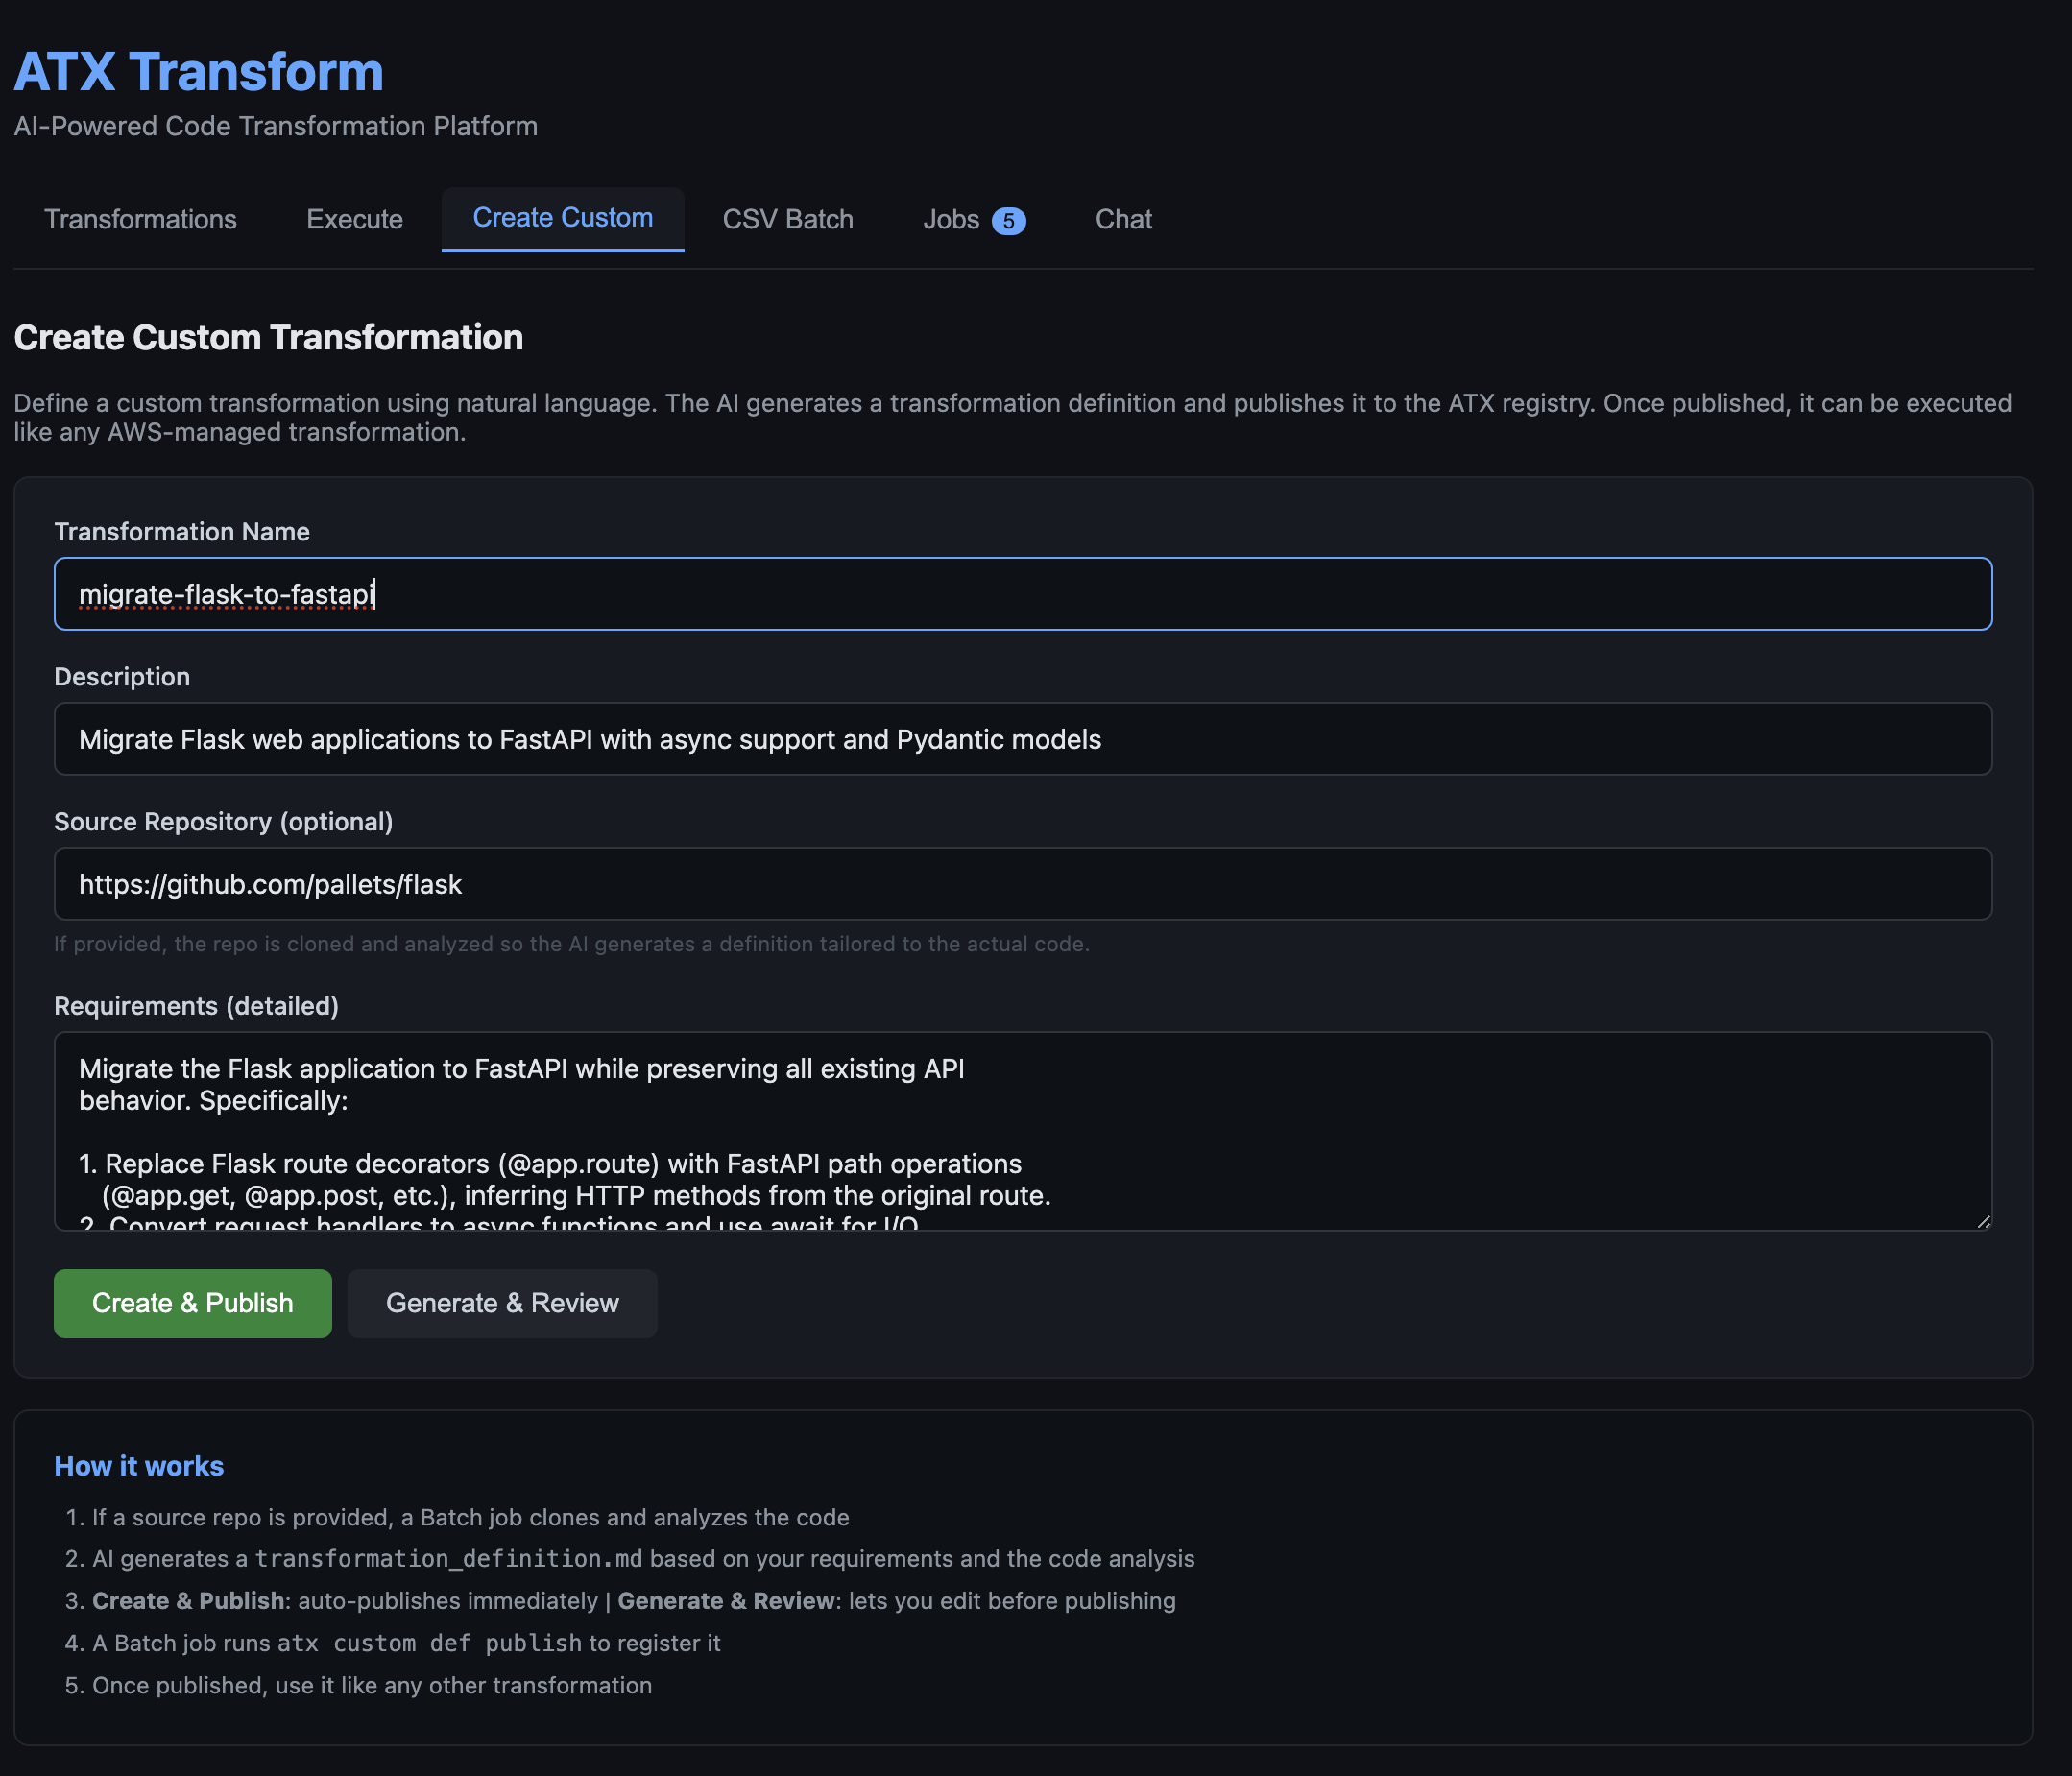
Describing a custom transformation in plain English. The form accepts a name, description, optional reference repository, and natural-language requirements.

Figure 2: Describing a custom transformation in plain English. The form accepts a name, description, optional reference repository, and natural-language requirements.After submitting, the orchestrator clones the reference repository, analyzes the source, and generates a transformation definition tailored to the actual code patterns found in the codebase. This takes 1–5 minutes depending on repository size. The generated definition is then shown for review in the Jobs tab, where it can be edited before publishing to the ATX registry.
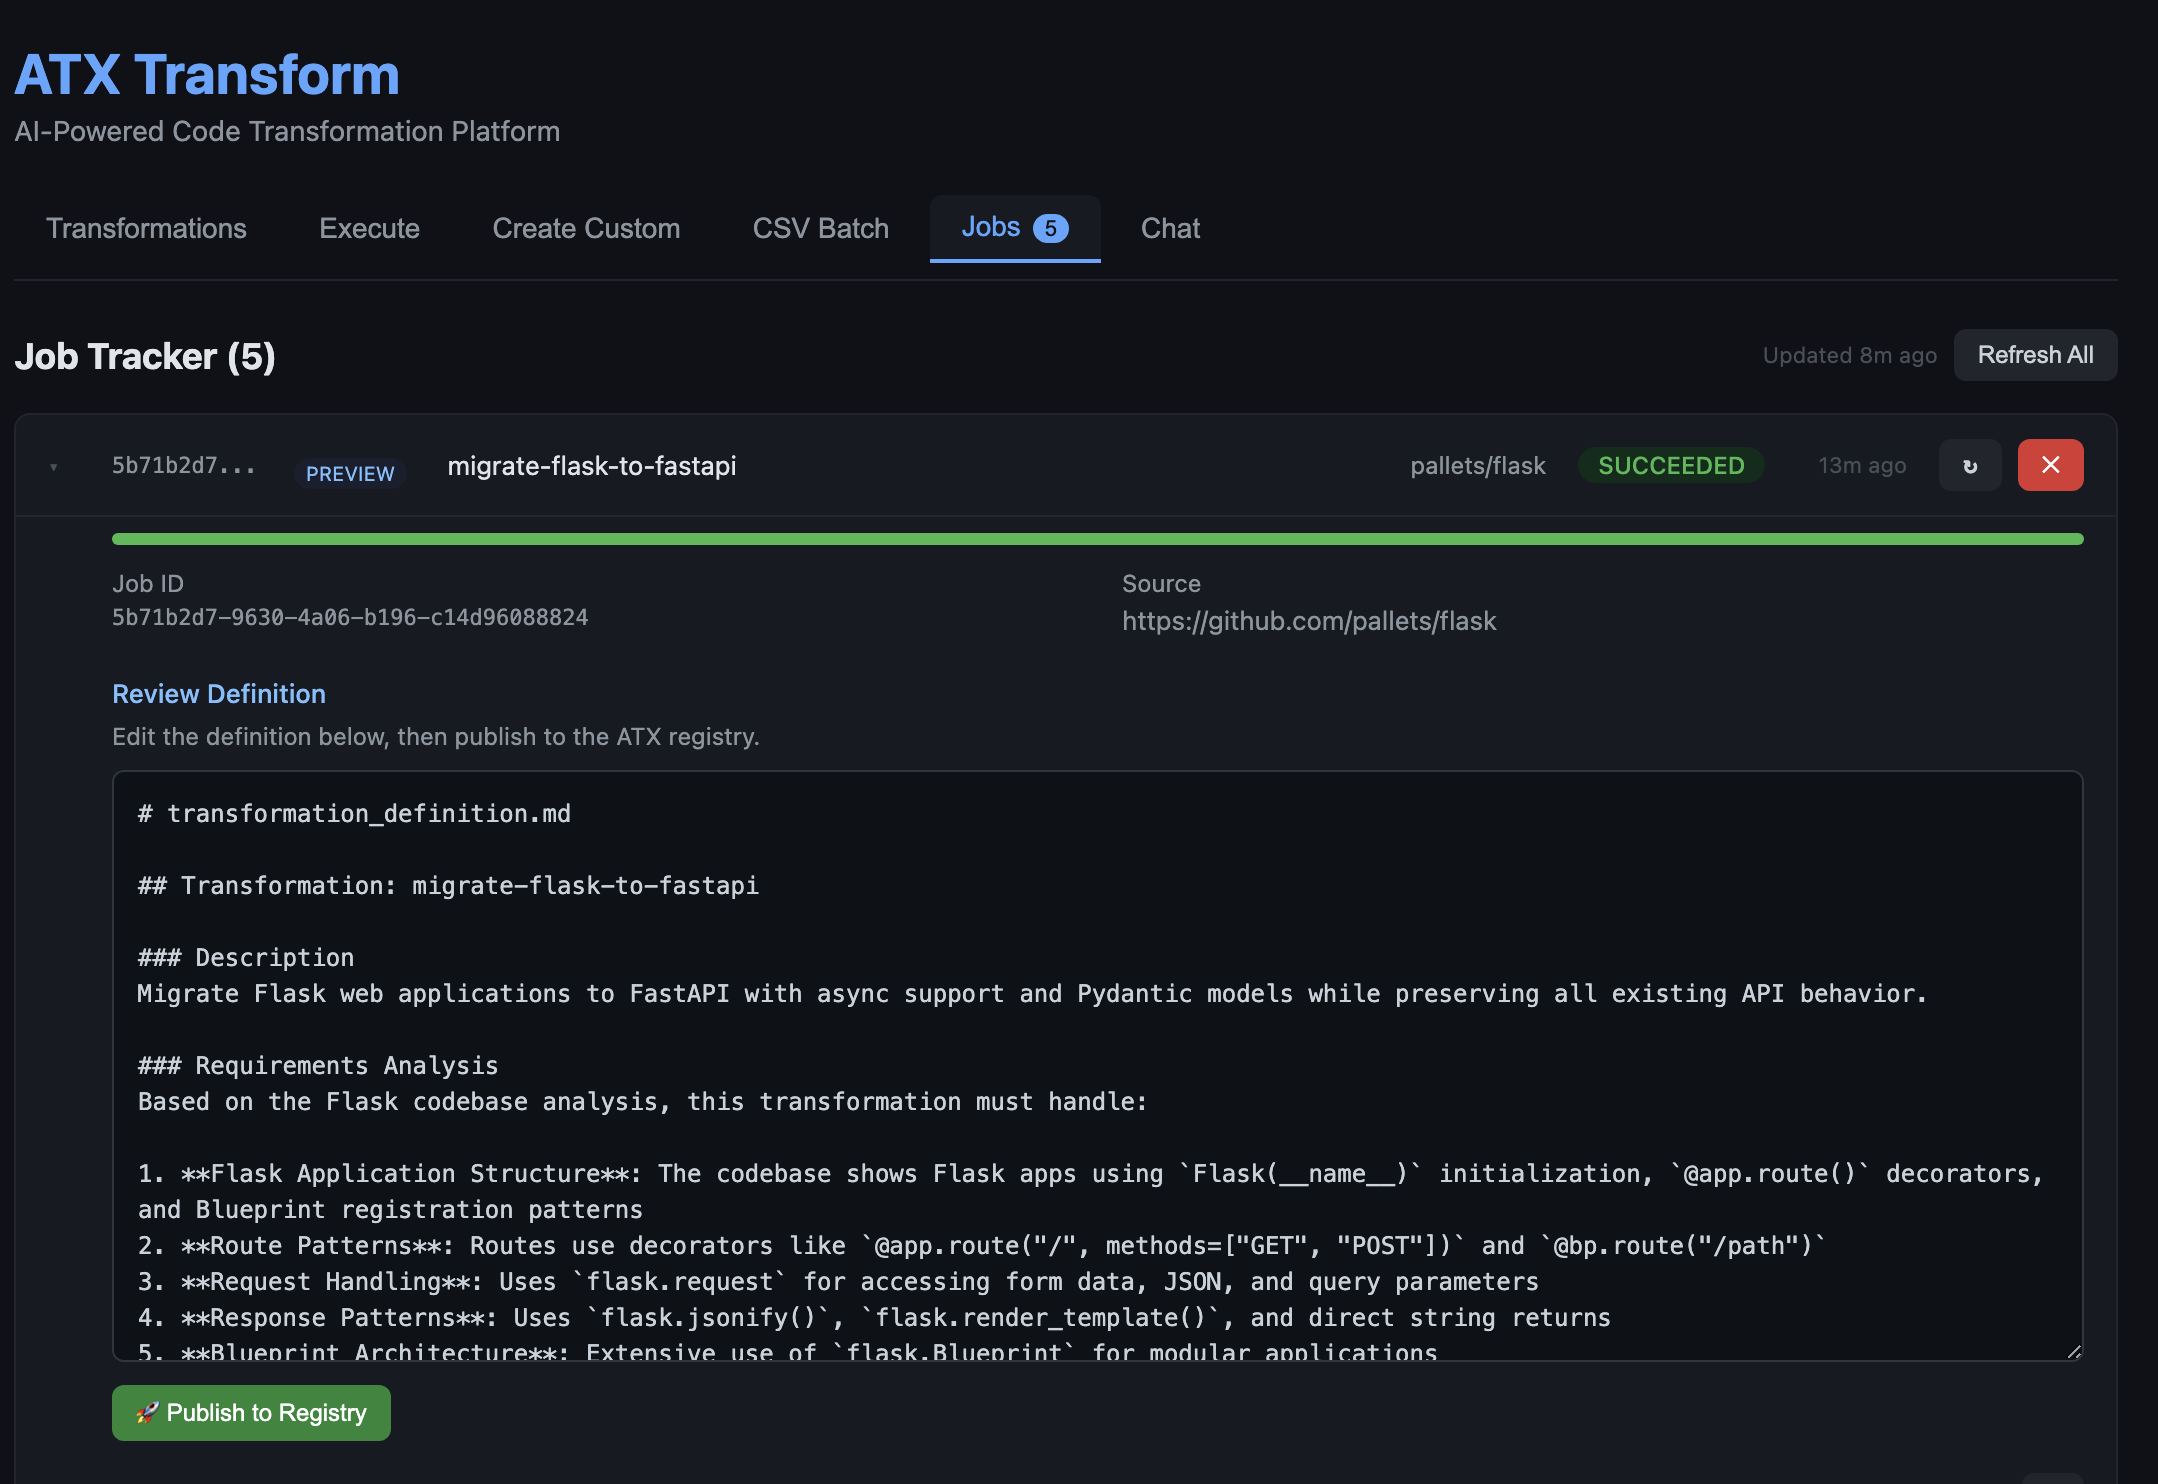
Figure 3: The AI-generated transformation definition shown for review in the Jobs tab. The agent analyzed the Flask codebase and produced a detailed definition covering routes, request handling, response patterns, and Blueprint architecture. The user can edit the definition in-place and click Publish to Registry when ready.Once published, the new transformation appears in the Transformations tab alongside AWS-managed transformations and can be executed the same way on any repository.

Run a batch of repositories from a CSV

Open the CSV Batch tab and upload a CSV listing repository URLs and target transformations. A sample `sample-batch.csv` is included in the repository at `agentic-atx-platform/ui/sample-batch.csv`. The preview shows the parsed rows before submission. On Submit All, each row becomes a separate AWS Batch job running in parallel, and the Jobs tab shows live status as repositories complete.
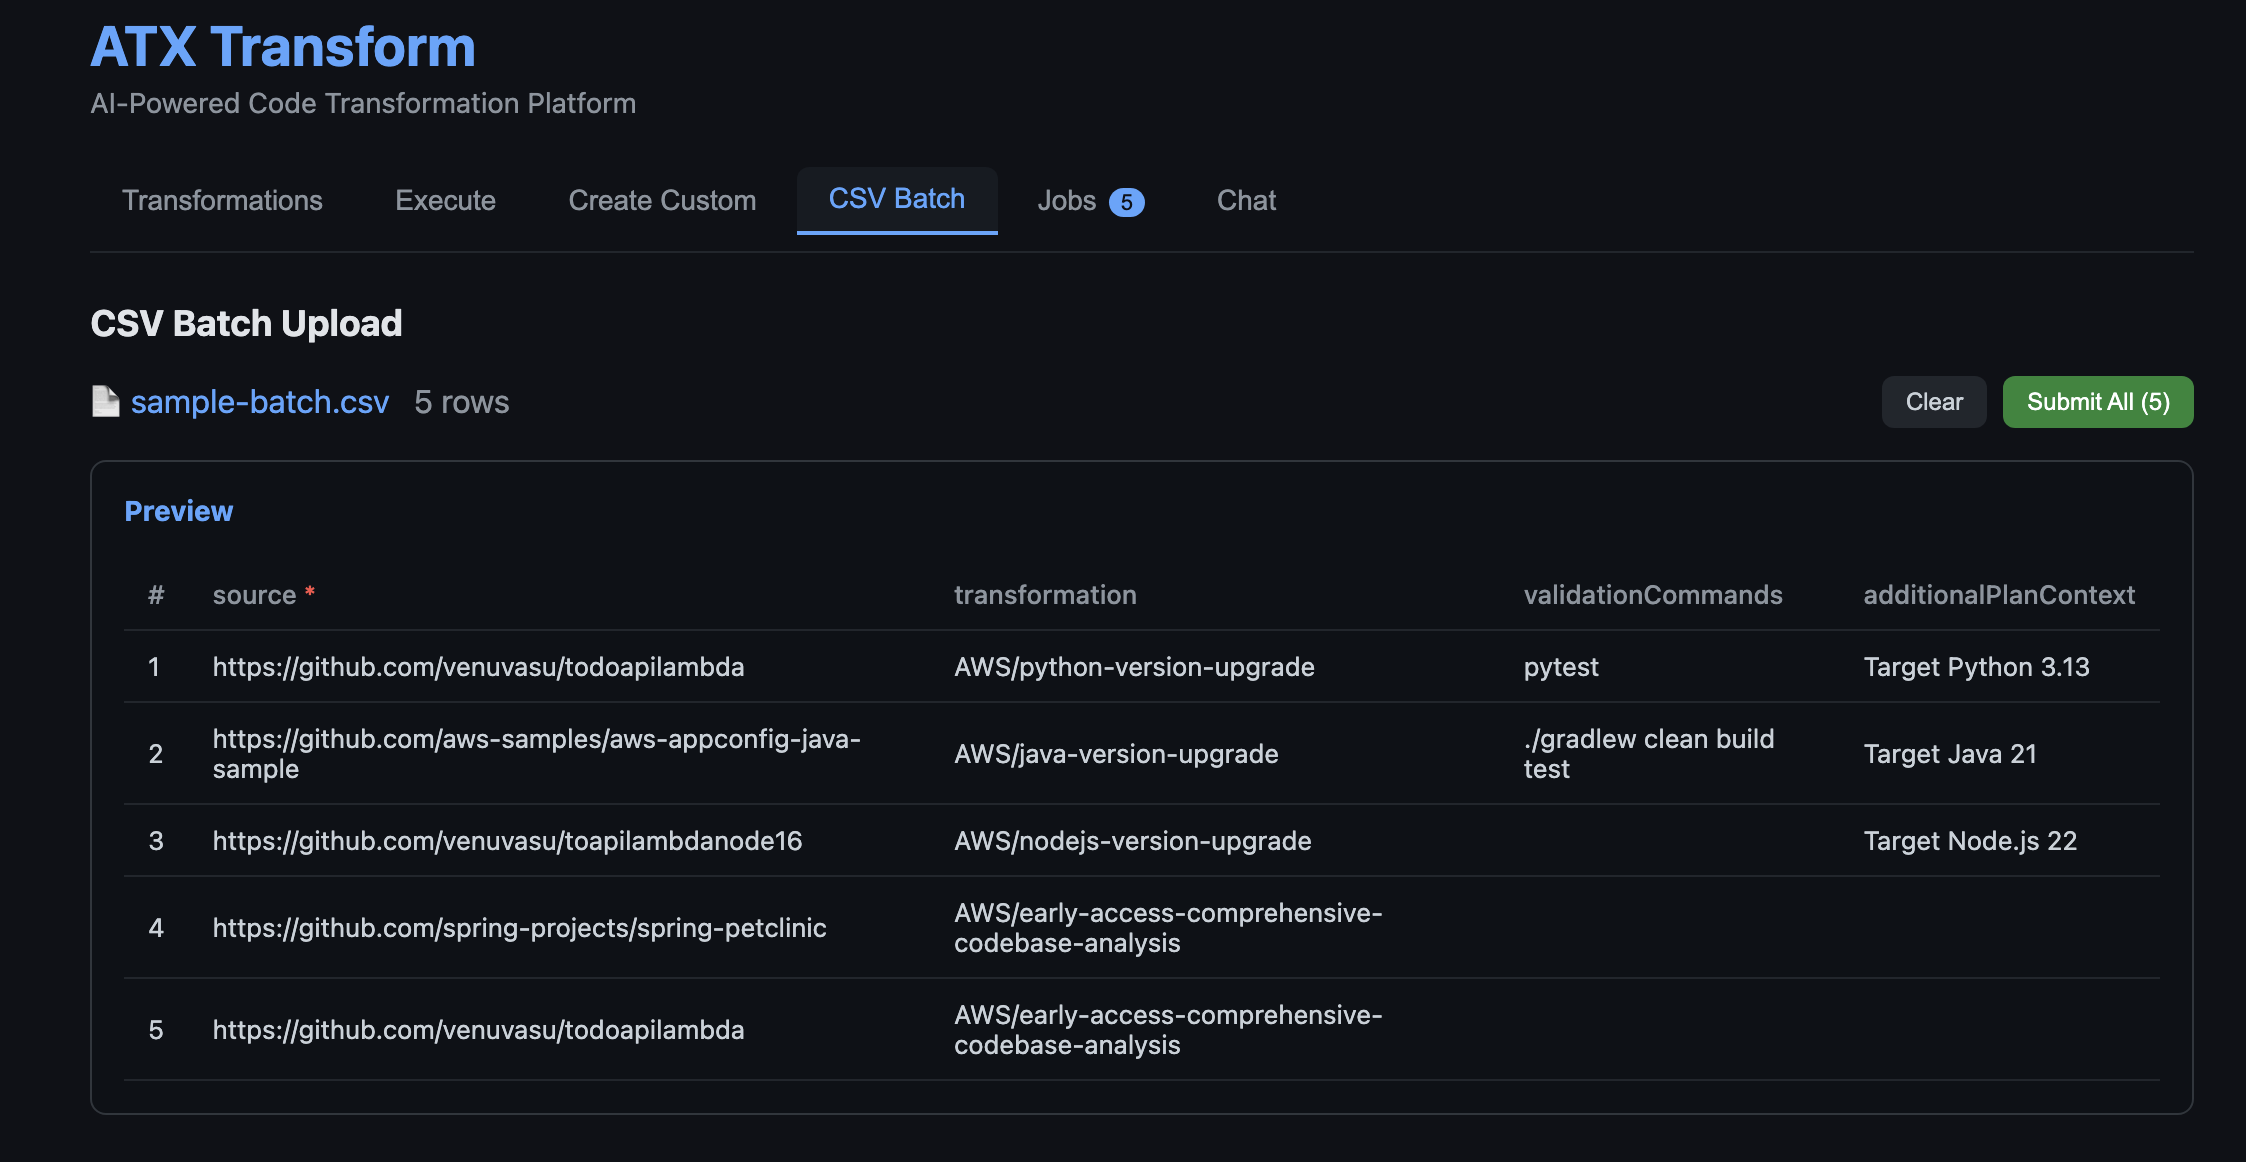
Uploading a batch of repositories for parallel processing. The CSV lists a source repository URL, target transformation, optional validation commands, and additional plan context per row.

Figure 4: Uploading a batch of repositories for parallel processing. The CSV lists a source repository URL, target transformation, optional validation commands, and additional plan context per row. Each row becomes an independent AWS Batch job on submission.

Clean up

To avoid recurring charges, remove the resources after trying the solution.

Step 1: Delete the SAM Stack

sam delete --stack-name AtxAgentCoreSAM --region us-east-1 --no-prompts

Step 2: Delete the CDK Stacks

Remove the three CDK stacks in reverse order. The S3 buckets are configured with `autoDeleteObjects: true`, so CDK will empty them before deletion.

cd cdk

npx cdk destroy AtxUiStack AtxInfrastructureStack AtxContainerStack --force

Conclusion

In this post, you learned how to build a generative AI–powered, agentic system for application modernization that can analyze application repositories, determine required code changes, create missing transformations, and execute those transformations at scale. By combining AWS Transform Custom for transformation execution with Amazon Bedrock AgentCore for orchestration, and Strands Agents for multi-agent coordination and AWS Transform container solution for parallel processing, this approach demonstrates how intelligent automation can be applied to large-scale code transformation workflows.

This solution directly addresses the challenges of traditional modernization approaches. It reduces manual effort by automating repository analysis and transformation mapping, eliminates gaps in transformation coverage by dynamically generating reusable transformations, and significantly improves scalability through parallel execution using AWS Batch.

By introducing a centralized, agent-driven workflow with built-in observability and state management, organizations can achieve faster, more consistent, and governed modernization across large application portfolios. To get started, deploy the solution in your AWS environment, test it with a sample repository or batch workload, and extend it by creating custom transformations tailored to your applications. You can further integrate this approach into your CI/CD pipelines to enable continuous modernization and accelerate your cloud migration initiatives.


About the authors

Kanishk Mahajan is Principal – AI/ML with AWS Professional Services. In this role, he leads GenAI and agentic transformations for some of AWS largest customers in Telco and Media & Entertaintment.

Sandeep Batchu is a Senior Security Architect at Amazon Web Services, with extensive experience in software engineering, solutions architecture, and cybersecurity. Passionate about bridging business outcomes with technological innovation, Sandeep guides customers through their cloud and generative AI journey, helping them design and implement secure, scalable, and resilient architectures in the era of AI-driven transformation.

Venugopalan Vasudeven (Venu) is a Principal Specialist Solutions Architect at AWS, where he leads Agentic AI initiatives focused on AWS Transform. He helps customers adopt and scale AI-powered developer and modernization solutions to accelerate innovation and business outcomes.

Troubleshooting environment with AI analysis in AWS Elastic Beanstalk

Post Syndicated from Chandu Utlapalli original https://aws.amazon.com/blogs/devops/troubleshooting-environment-with-ai-analysis-in-aws-elastic-beanstalk/

Introduction

AWS Elastic Beanstalk simplifies the process of deploying and scaling web applications. You upload your code, and Elastic Beanstalk handles capacity provisioning, load balancing, auto scaling, and application health monitoring.

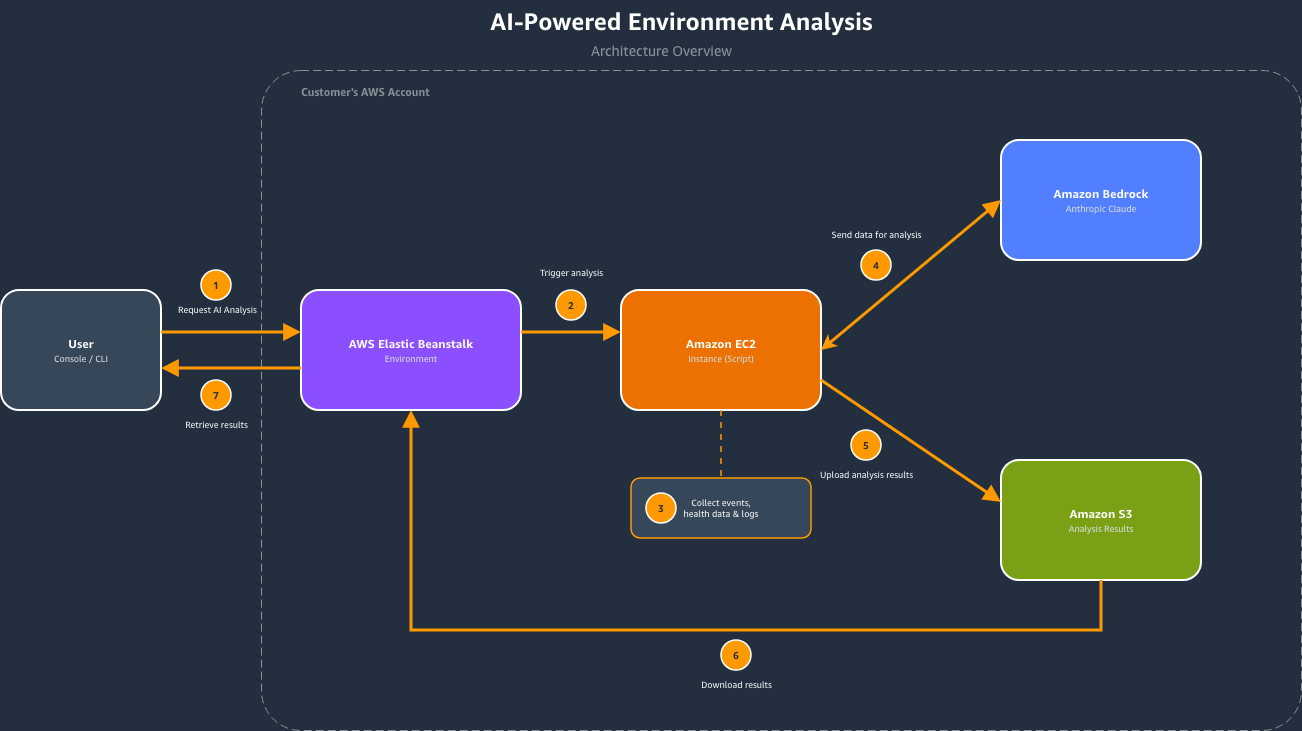
Elastic Beanstalk now offers AI Analysis to help troubleshoot environment health issues. When you request an analysis, Elastic Beanstalk triggers a script on the Amazon EC2 instance in your environment. The script collects environment events, health data, and instance logs, sends them to Amazon Bedrock for analysis, and uploads the results to Amazon S3. The result is a set of step-by-step troubleshooting recommendations tailored to your environment’s specific issues, helping you reduce mean time to resolution (MTTR).

In the Elastic Beanstalk console, the AI Analysis button appears on the environment overview page when your environment’s health status changes to Warning, Degraded, or Severe. AI analysis is also accessible from the logs page in the console, the AWS CLI, or the EB CLI.

Prerequisites

Before getting started, ensure that you have the following:

  • An AWS account with access to AWS Elastic Beanstalk and Amazon Bedrock.
  • A supported Elastic Beanstalk platform version – AI analysis is available on Amazon Linux 2 and AL2023 based platform versions released on or after February 16, 2026. Update your environment to a supported platform version if needed.
  • Instance profile with required permissions – The managed policies AWSElasticBeanstalkWebTier, AWSElasticBeanstalkWorkerTier, and AWSElasticBeanstalkMulticontainerDocker now include the necessary permissions for AI analysis. Attach one or more of these managed policies to your environment’s instance profile based on your environment tier. If you use a custom instance profile, ensure it includes the following permissions:
    • bedrock:InvokeModel
    • bedrock:ListFoundationModels
    • elasticbeanstalk:DescribeEvents
    • elasticbeanstalk:DescribeEnvironmentHealth
  • AWS CLI installed and configured with appropriate permissions. See Installing the AWS CLI.
  • Anthropic use case details – AI analysis uses Anthropic Claude models through Amazon Bedrock. Anthropic requires you to submit a one-time use case details form before you can invoke their models. To submit this form, select an Anthropic model from the model catalog in the Amazon Bedrock console, or call the PutUseCaseForModelAccess API. You only need to do this once per AWS account. If you submit the form from the AWS Organizations management account, it automatically covers member accounts in the organization. For more information, see Access Amazon Bedrock foundation models.
  • GovCloud Regions – If you are using AWS GovCloud (US) Regions, you must enable access to the latest Anthropic Claude Sonnet and/or Opus model in Amazon Bedrock before using AI analysis. For instructions on enabling model access in GovCloud Regions, see Manage access to Amazon Bedrock foundation models. For information about the latest available Anthropic Claude Sonnet and/or Opus model, see Supported Regions and models for inference profiles.

Solution Overview

In the following sections, we demonstrate how to use AI Analysis to diagnose a Node.js application that fails after a deployment.

  1. Create a working environment: Deploy a Node.js application to Elastic Beanstalk using the code snippets provided below.
  2. Break the environment: Update the application with code that requires missing environment variables. This causes the environment health status to transition to Degraded.
  3. Use AI Analysis: Request an AI Analysis from the Elastic Beanstalk console or the AWS CLI to identify the root cause of the health degradation.
  4. Apply the fix and verify: Apply the recommendations generated by AI Analysis and confirm that the environment health returns to Ok.

The following figure shows how AI Analysis works:

Figure 1 – AI Analysis architecture

  1. You initiate a request through the Elastic Beanstalk console (AI Analysis button) or the AWS CLI (RequestEnvironmentInfo API with InfoType set to “analyze”).
  2. Elastic Beanstalk collects environment data, analyzes it using Amazon Bedrock (a fully managed service that provides access to foundation models through API), and stores the results in Amazon S3.
  3. You retrieve the results through the console or the RetrieveEnvironmentInfo API using CLI.

Walkthrough

Follow the steps below to set up the sample application, break it, troubleshoot with AI Analysis, and restore the environment to a healthy state.

To try this feature, open your terminal and follow the steps below to create a sample Elastic Beanstalk environment. First, set the following variables. Replace the values with your own unique S3 bucket name and the latest Node.js solution stack for your region. To find the latest solution stack, run aws elasticbeanstalk list-available-solution-stacks.

S3_BUCKET="your-unique-bucket-name"

SOLUTION_STACK_NAME="64bit Amazon Linux 2023 v6.9.0 running Node.js 22"

Setting up the application

We use two versions of a simple Node.js application. The first version (v1-working) is a basic HTTP server that responds to requests successfully. The second version (v2-broken) introduces a dependency on environment variables that are not configured in the Elastic Beanstalk environment, simulating a common deployment issue.

Create a project directory:

mkdir test-app && cd test-app

Create the working application file (v1-working):

cat << 'EOF' > workingapp.js
const http = require('http');

const server = http.createServer((req, res) => {
    res.writeHead(200, { 'Content-Type': 'application/json' });
    res.end(JSON.stringify({ status: 'healthy', message: 'App is running' }));
});

const port = process.env.PORT || 8080;
server.listen(port, () => {
    console.log(`Server running on port ${port}`);
});
EOF

Create the broken application file (v2-broken):

cat << 'EOF' > brokenapp.js
const http = require('http');

// Application requires these environment variables to function
const VAR_1 = process.env.TEST_VARIABLE_1;
const VAR_2 = process.env.TEST_VARIABLE_2;
const VAR_3 = process.env.TEST_VARIABLE_3;

if (!VAR_1 || !VAR_2 || !VAR_3) {
    throw new Error(
        `Missing required environment variables. ` +
        `TEST_VARIABLE_1: ${VAR_1 ? 'set' : 'MISSING'}, ` +
        `TEST_VARIABLE_2: ${VAR_2 ? 'set' : 'MISSING'}, ` +
        `TEST_VARIABLE_3: ${VAR_3 ? 'set' : 'MISSING'}`
    );
}

const server = http.createServer((req, res) => {
    res.writeHead(200, { 'Content-Type': 'application/json' });
    res.end(JSON.stringify({ status: 'healthy', db: VAR_1 }));
});

const port = process.env.PORT || 8080;
server.listen(port, () => {
    console.log(`Server running on port ${port}`);
});
EOF

Create the package.json:

cat << 'EOF' > package.json
{
  "name": "test-app",
  "version": "1.0.0",
  "description": "Sample app that requires environment variables",
  "main": "app.js",
  "scripts": {
    "start": "node app.js"
  }
}
EOF

Create the working application source bundle:

cp workingapp.js app.js

zip -r nodejs-working-app.zip app.js package.json

Create the broken application source bundle:

cp brokenapp.js app.js

zip -r nodejs-broken-app.zip app.js package.json

Step 1: Create a working environment

First, create the Elastic Beanstalk application and deploy the working version.

Create an S3 bucket:

aws s3 mb s3://$S3_BUCKET --region us-east-1

Upload the working application source bundle:

aws s3 cp nodejs-working-app.zip s3://$S3_BUCKET/nodejs-working-app.zip

Create the Elastic Beanstalk application:

aws elasticbeanstalk create-application \
    --application-name test-app \
    --description "Test application" \
    --region us-east-1

Create the application version:

aws elasticbeanstalk create-application-version \
    --application-name test-app \
    --version-label v1-working \
    --source-bundle S3Bucket="$S3_BUCKET",S3Key="nodejs-working-app.zip" \
    --region us-east-1

Create the environment with the working version:

aws elasticbeanstalk create-environment \
    --application-name test-app \
    --environment-name test-app-env \
    --solution-stack-name "$SOLUTION_STACK_NAME" \
    --version-label v1-working \
    --option-settings \
        Namespace=aws:elasticbeanstalk:environment,OptionName=EnvironmentType,Value=SingleInstance \
        Namespace=aws:autoscaling:launchconfiguration,OptionName=IamInstanceProfile,Value=aws-elasticbeanstalk-ec2-role \
    --region us-east-1

Once your environment is created, verify the health:

aws elasticbeanstalk describe-environment-health \
    --environment-name test-app-env \
    --attribute-names All \
    --region us-east-1

Output:

{
    "EnvironmentName": "test-app-env",
    "HealthStatus": "Ok",
    "Status": "Ready",
    "Color": "Green",
    "Causes": [
        "Initialization completed 31 seconds ago and took 2 minutes."
    ],
    "ApplicationMetrics": {
        "RequestCount": 0
    },
    "InstancesHealth": {
        "NoData": 0,
        "Unknown": 0,
        "Pending": 0,
        "Ok": 1,
        "Info": 0,
        "Warning": 0,
        "Degraded": 0,
        "Severe": 0
    },
    "RefreshedAt": "2026-03-25T16:39:11Z"
}

Figure 2 – Environment health showing Ok (Green) status after initial deployment

Step 2: Break the environment

Now, deploy the broken version that requires missing environment variables.

Upload the broken version:

aws s3 cp nodejs-broken-app.zip s3://$S3_BUCKET/nodejs-broken-app.zip

Create the broken application version:

aws elasticbeanstalk create-application-version \
    --application-name test-app \
    --version-label v2-broken \
    --source-bundle S3Bucket="$S3_BUCKET",S3Key="nodejs-broken-app.zip" \
    --region us-east-1

Deploy the broken version:

aws elasticbeanstalk update-environment \
    --environment-name test-app-env \
    --version-label v2-broken \
    --region us-east-1

Within seconds of the deployment completing, the environment health transitions from Ok to Degraded:

aws elasticbeanstalk describe-environment-health \
    --environment-name test-app-env \
    --attribute-names All \
    --region us-east-1

Output:

{
    "EnvironmentName": "test-app-env",
    "HealthStatus": "Degraded",
    "Status": "Ready",
    "Color": "Red",
    "Causes": [
        "Impaired services on all instances."
    ],
    "ApplicationMetrics": {
        "RequestCount": 0
    },
    "InstancesHealth": {
        "NoData": 0,
        "Unknown": 0,
        "Pending": 0,
        "Ok": 0,
        "Info": 0,
        "Warning": 0,
        "Degraded": 0,
        "Severe": 1
    },
    "RefreshedAt": "2026-03-25T16:43:19Z"
}

Figure 3 – Environment health showing Degraded (Red) status with the AI Analysis button visible

Step 3: Use AI Analysis

Request AI analysis from the AWS CLI or the Elastic Beanstalk console. Both methods produce the same results. The CLI approach is useful for automation and scripting, while the console provides a visual workflow where you can view results directly on the environment page. We’ll cover both options below.

Using the AWS CLI

Request the analysis:

aws elasticbeanstalk request-environment-info \
    --environment-name test-app-env \
    --info-type analyze \
    --region us-east-1

Once the request environment operation is completed, retrieve the results:

aws elasticbeanstalk retrieve-environment-info \
    --environment-name test-app-env \
    --info-type analyze \
    --region us-east-1

The response includes an EnvironmentInfo array with a Message field containing a pre-signed S3 URL to the analysis results:

{
    "EnvironmentInfo": [
        {
            "InfoType": "analyze",
            "Ec2InstanceId": "i-1234567890abcdef0",
            "SampleTimestamp": "2026-03-20T20:49:22.763Z",
            "Message": "https://elasticbeanstalk-us-east-1-123456789012.s3.us-east-1.amazonaws.com/resources/environments/logs/analyze/..."
        }
    ]
}

Download and view the analysis:

ANALYSIS_URL=$(aws elasticbeanstalk retrieve-environment-info \
    --environment-name test-app-env \
    --info-type analyze \
    --region us-east-1 \
    --query 'sort_by(EnvironmentInfo, &SampleTimestamp)[-1].Message' \
    --output text)

curl -s "$ANALYSIS_URL"

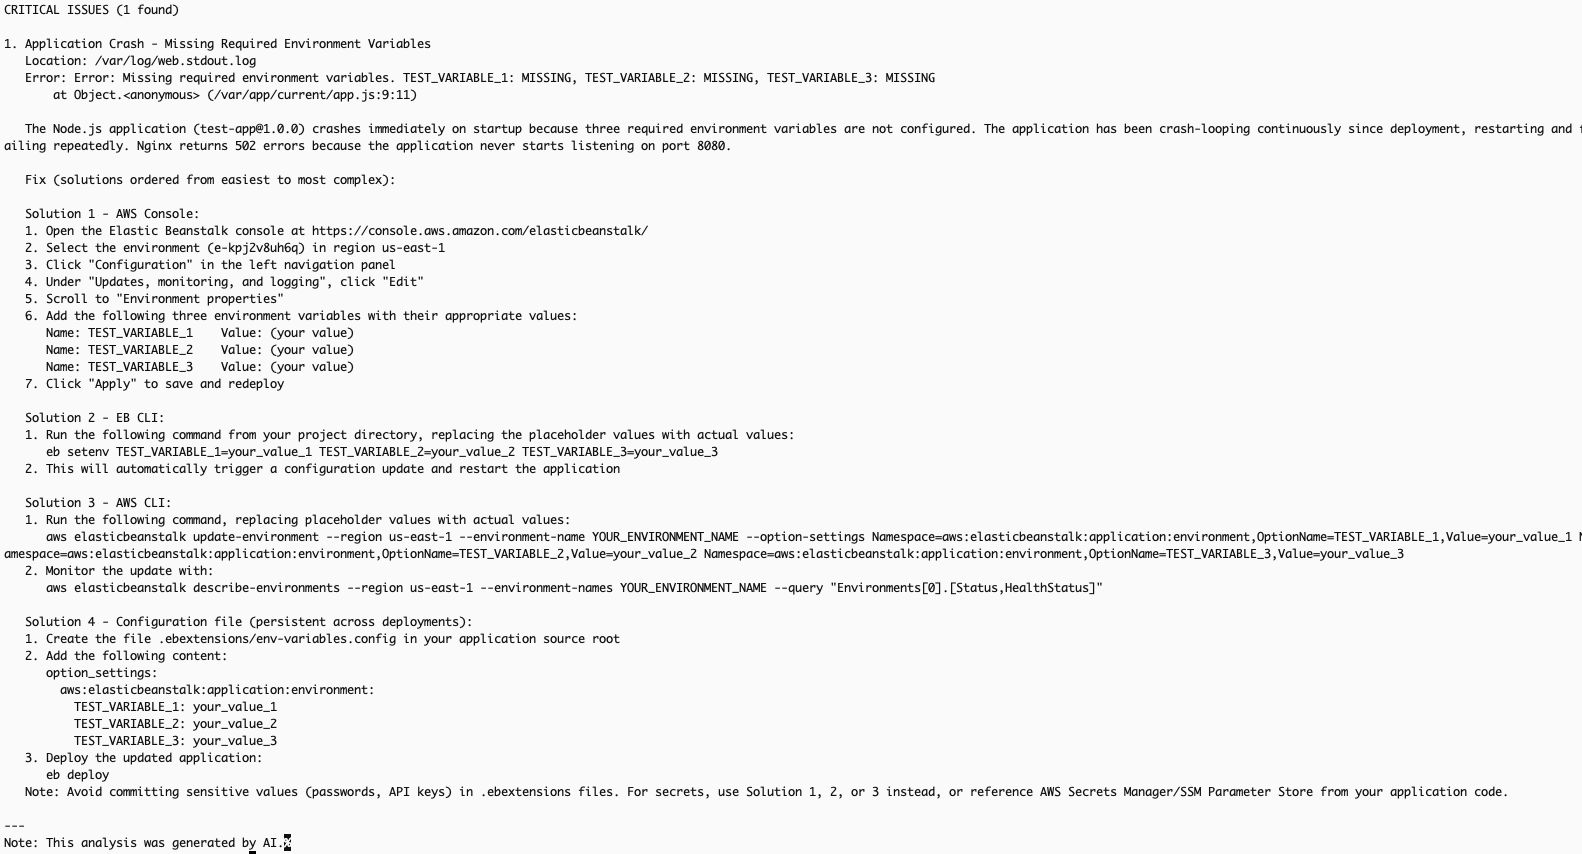
Figure 4 – AI analysis output retrieved via AWS CLI

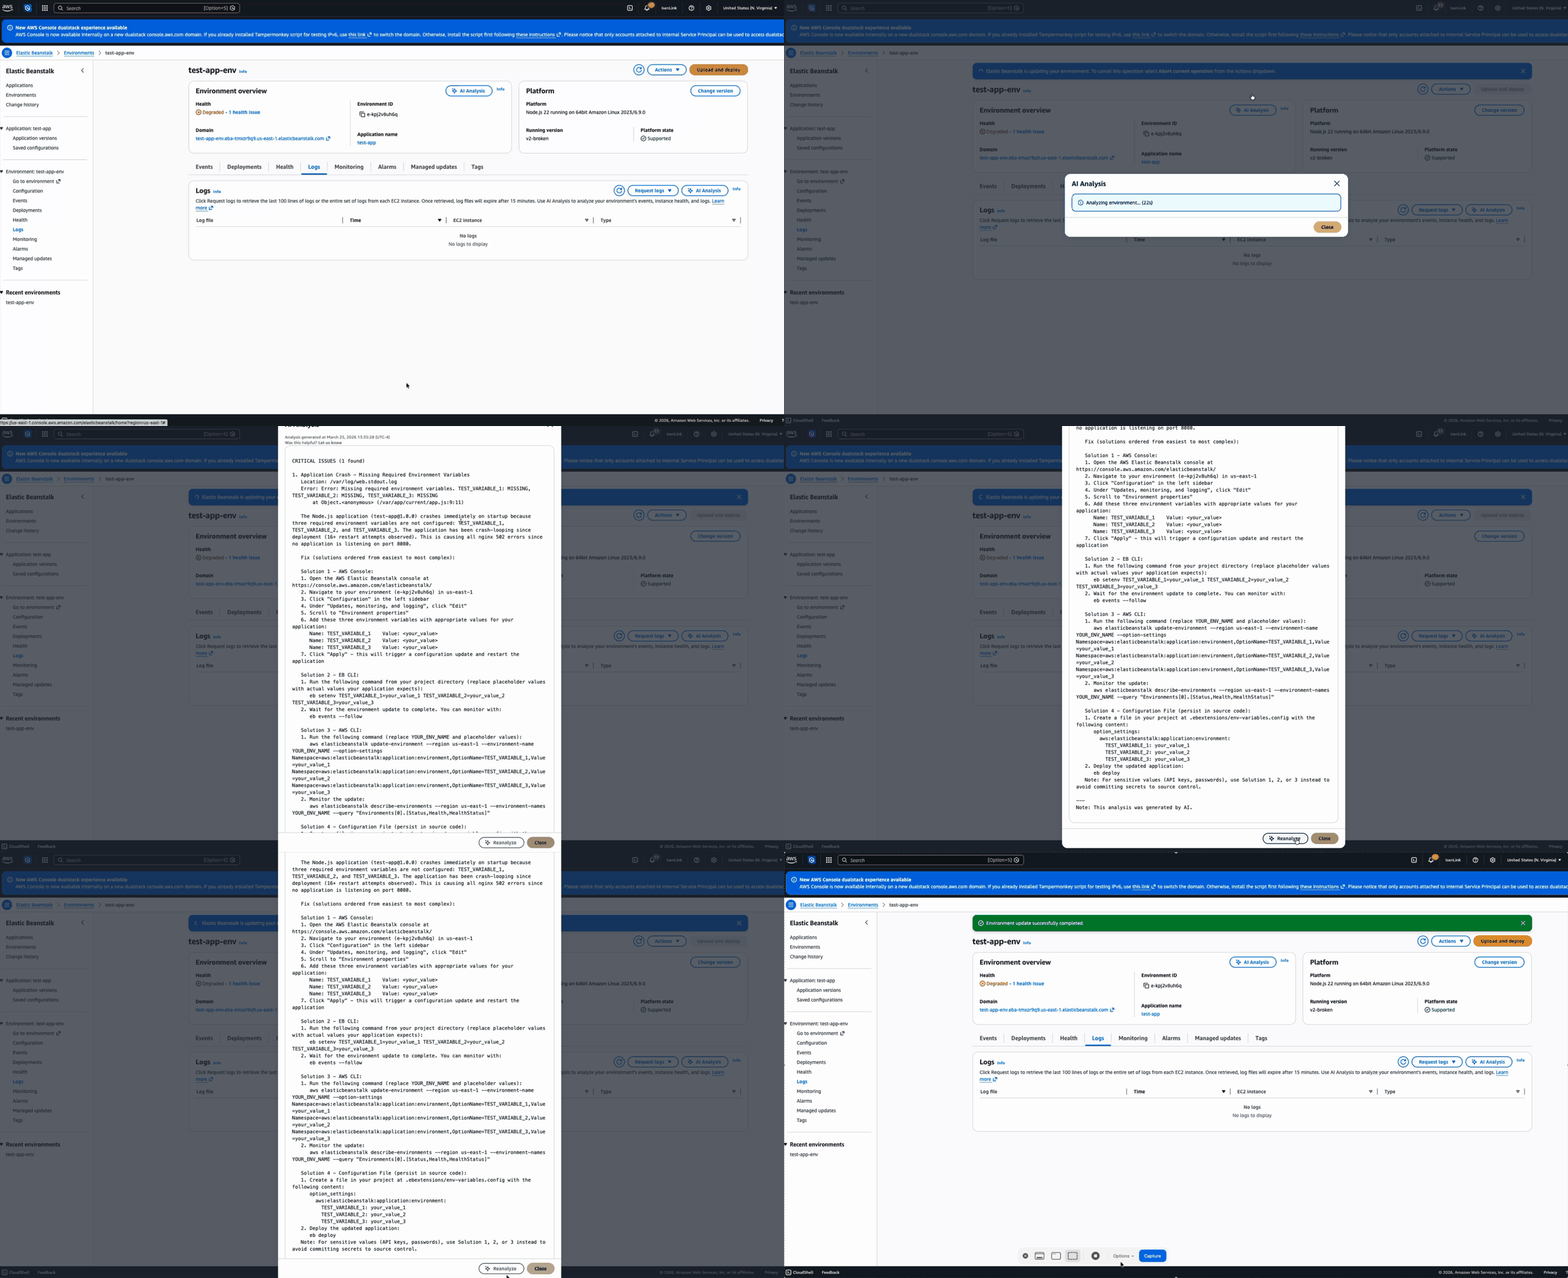
Using the Elastic Beanstalk console

When your environment’s health status is Warning, Degraded, or Severe, the AI Analysis button appears in the environment overview section of the Elastic Beanstalk console.

  1. Navigate to the Elastic Beanstalk console.
  2. Select your environment (test-app-env).
  3. On the environment overview page, locate the AI Analysis button that appears when the health status indicates an issue.
  4. Choose AI Analysis to initiate the analysis.

Video 1 – Requesting AI analysis from the Elastic Beanstalk console

If you want to restart the analysis workflow, you can click on the Reanalyze button to start a new analysis.

Step 4: Apply the fix and verify

The AI analysis identified that the application crashes because the environment does not have three required environment variables configured: TEST_VARIABLE_1, TEST_VARIABLE_2, and TEST_VARIABLE_3. As recommended by the AI analysis, set these environment variables to resolve the issue:

aws elasticbeanstalk update-environment \
    --environment-name test-app-env \
    --option-settings \
        Namespace=aws:elasticbeanstalk:application:environment,OptionName=TEST_VARIABLE_1,Value=value1 \
        Namespace=aws:elasticbeanstalk:application:environment,OptionName=TEST_VARIABLE_2,Value=value2 \
        Namespace=aws:elasticbeanstalk:application:environment,OptionName=TEST_VARIABLE_3,Value=value3 \
    --region us-east-1

After the environment update completes, the application starts successfully and the environment health returns to Ok:

aws elasticbeanstalk describe-environment-health \
    --environment-name test-app-env \
    --attribute-names All \
    --region us-east-1

Output:

{
    "EnvironmentName": "test-app-env",
    "HealthStatus": "Ok",
    "Status": "Ready",
    "Color": "Green",
    "Causes": [
        "Configuration update completed 72 seconds ago and took 54 seconds."
    ],
    "ApplicationMetrics": {
        "RequestCount": 0
    },
    "InstancesHealth": {
        "NoData": 0,
        "Unknown": 0,
        "Pending": 0,
        "Ok": 1,
        "Info": 0,
        "Warning": 0,
        "Degraded": 0,
        "Severe": 0
    },
    "RefreshedAt": "2026-03-25T17:42:47Z"
}

Figure 5 – Environment health restored to Ok (Green) after setting environment variables

Note: The steps in this walkthrough can also be performed using the EB CLI. For more information, see the EB CLI Command Reference.

Best practices

Consider these recommendations to get the most out of AI analysis for your environments.

  1. Use supported platform versions: Ensure your environment is running an Amazon Linux 2 or AL2023 platform version released on or after February 16, 2026. Update your platform if you don’t see the AI Analysis option.
  2. Implement fixes incrementally: If the analysis recommends multiple actions, implement them one at a time to isolate which change resolves the issue.
  3. Review data privacy considerations: The analysis sends environment events and logs to Amazon Bedrock running in your account. For more information about how Amazon Bedrock handles your data, see the Amazon Bedrock security documentation.

Cleaning up

Terminate the environment:

aws elasticbeanstalk terminate-environment \
    --environment-name test-app-env \
    --region us-east-1

Delete the application (after the environment is terminated):

aws elasticbeanstalk delete-application \
    --application-name test-app \
    --terminate-env-by-force \
    --region us-east-1

Delete the S3 bucket used for source bundles:

aws s3 rb s3://$S3_BUCKET --force --region us-east-1

Remove the local project directory:

rm -rf test-app

Conclusion

AI-powered environment analysis in AWS Elastic Beanstalk significantly reduces the time and effort required to diagnose environment health issues. Instead of manually parsing through log files and cross-referencing documentation, you can now get targeted, actionable recommendations with a click of the AI Analysis button in the console or an API call.

Whether you prefer using the Elastic Beanstalk console for visual workflows or the AWS CLI/EB CLI for scripting and automation, AI analysis provides a consistent experience that helps you quickly identify root causes and resolve issues.

To learn more about AI-powered environment analysis, see the AWS Elastic Beanstalk Developer Guide. To learn more about AWS Elastic Beanstalk, visit the product page.

About the Author

Chandu Utlapalli

Chandu is a Software Development Engineer at AWS, working on the Elastic Beanstalk service. He focuses on building scalable cloud solutions and integrating AI capabilities to enhance developer productivity and cloud operations. Outside of work, Chandu enjoys playing cricket.

MediaFM: The Multimodal AI Foundation for Media Understanding at Netflix

Post Syndicated from Netflix Technology Blog original https://netflixtechblog.com/mediafm-the-multimodal-ai-foundation-for-media-understanding-at-netflix-e8c28df82e2d

Avneesh Saluja, Santiago Castro, Bowei Yan, Ashish Rastogi

Introduction

Netflix’s core mission is to connect millions of members around the world with stories they’ll love. This requires not just an incredible catalog, but also a deep, machine-level understanding of every piece of content in that catalog, from the biggest blockbusters to the most niche documentaries. As we onboard new types of content such as live events and podcasts, the need to scalably understand these nuances becomes even more critical to our productions and member-facing experiences.

Many of these media-related tasks require sophisticated long-form video understanding e.g., identifying subtle narrative dependencies and emotional arcs that span entire episodes or films. Previous work has found that to truly grasp the content’s essence, our models must leverage the full multimodal signal. For example, the audio soundtrack is a crucial, non-visual modality that can help more precisely identify clip-level tones or when a new scene starts. Can we use our collection of shows and movies to learn how to a) fuse modalities like audio, video, and subtitle text together and b) develop robust representations that leverage the narrative structure that is present in long form entertainment? Consisting of tens of millions of individual shots across multiple titles, our diverse yet entertainment-specific dataset provides the perfect foundation to train multimodal media understanding models that enable many capabilities across the company such as ads relevancy, clip popularity prediction, and clip tagging.

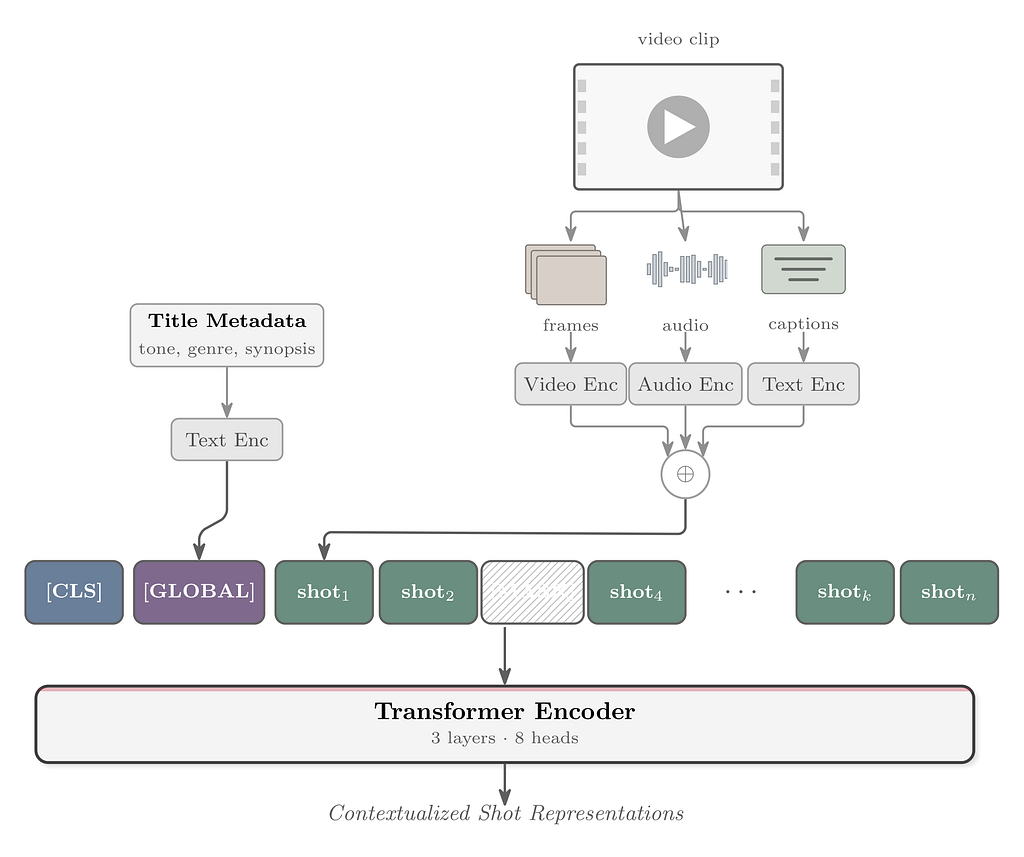
For these reasons, we developed the Netflix Media Foundational Model (MediaFM), our new, in-house, multimodal content embedding model. MediaFM is the first tri-modal (audio, video, text) model pretrained on portions of the Netflix catalog. Its core is a multimodal, Transformer-based encoder designed to generate rich, contextual embeddings¹ for shots from our catalog by learning the temporal relationships between them through integrating visual, audio, and textual information. The resulting shot-level embeddings are powerful representations designed to create a deeper, more nuanced, and machine-readable understanding of our content, providing the critical backbone for effective cold start of newly launching titles in recommendations, optimized promotional assets (like art and trailers), and internal content analysis tools.

Figure 1: MediaFM Architecture

Input Representation & Preprocessing

The model’s fundamental unit of input is a shot, derived by segmenting a movie or episode (collectively referred to as “title”) using a shot boundary detection algorithm. For each shot, we generate three distinct embeddings from its core modalities:

  • Video: an internal model called SeqCLIP (a CLIP-style model fine-tuned on video retrieval datasets) is used to embed frames sampled at uniform intervals from segmented shots
  • Audio: the audio samples from the same shots are embedded using Meta FAIR’s wav2vec2
  • Timed Text: OpenAI’s text-embedding-3-large model is used to encode the corresponding timed text (e.g., closed captions, audio descriptions, or subtitles) for each shot

For each shot, the three embeddings² are concatenated and unit-normed to form a single 2304-dimensional fused embedding vector. The transformer encoder is trained on sequences of shots, so each example in our dataset is a temporally-ordered sequence of these fused embeddings from the same movie or episode (up to 512 shots per sequence). We also have access to title-level metadata which is used to provide global context for each sequence (via the [GLOBAL]token). The title-level embedding is computed by passing title-level metadata (such as synopses and tags) through the text-embedding-3-large model.

Model Architecture and Training Objective

The core of our model is a transformer encoder, architecturally similar to BERT. A sequence of preprocessed shot embeddings is passed through the following stages:

  1. Input Projection: The fused shot embeddings are first projected down to the model’s hidden dimension via a linear layer.
  2. Sequence Construction & Special Tokens: Before entering the Transformer, two special embeddings are prepended to the sequence:
    • a learnable [CLS] embedding is added at the very beginning.
    • the title-level embedding is projected to the model’s hidden dimension and inserted after the [CLS] token as the [GLOBAL] token, providing title-level context to every shot in the sequence and participating in the self-attention process.
  3. Contextualization: The sequence is enhanced with positional embeddings and fed through the Transformer stack to provide shot representations based on their surrounding context.
  4. Output Projection: The contextualized hidden states from the Transformer are passed through a final linear layer, projecting them from the hidden layers back up to the 2304-dimensional fused embedding space for prediction.

We train the model using a Masked Shot Modeling (MSM) objective. In this self-supervised task, we randomly mask 20% of the input shot embeddings in each sequence by replacing them with a learnable [MASK] embedding. The model’s objective is to predict the original, unmasked fused embedding for these masked positions. The model is optimized by minimizing the cosine distance between its predicted embedding and the ground-truth embedding for each masked shot.

We optimized the hidden parameters with Muon and the remaining parameters with AdamW. It’s worth noting that the switch to Muon resulted in noticeable improvements.

Evaluation

To evaluate the learned embeddings, we learn task-specific linear layers on top of frozen representations (i.e., linear probes). Most of the tasks are clip-level, i.e., each example is a short clip ranging from a few seconds to a minute which are often presented to our members while recommending a title to them. When embedding these clips, we find that “embedding in context”, namely extracting the embeddings from within a larger sequence (e.g., the episode containing the clip), naturally does much better than embedding only the shots from a clip.

Tasks

Our embeddings are foundational and we find that they bring value to applications across Netflix. Here are a few:

  • Ad Relevancy: A multilabel classification task to categorize Netflix clips for relevant ad placement, measured by Average Precision. In this task, these representations operate at the retrieval stage, where they help in identifying the candidate set and in turn are fed into the ad serving system for relevance optimization.
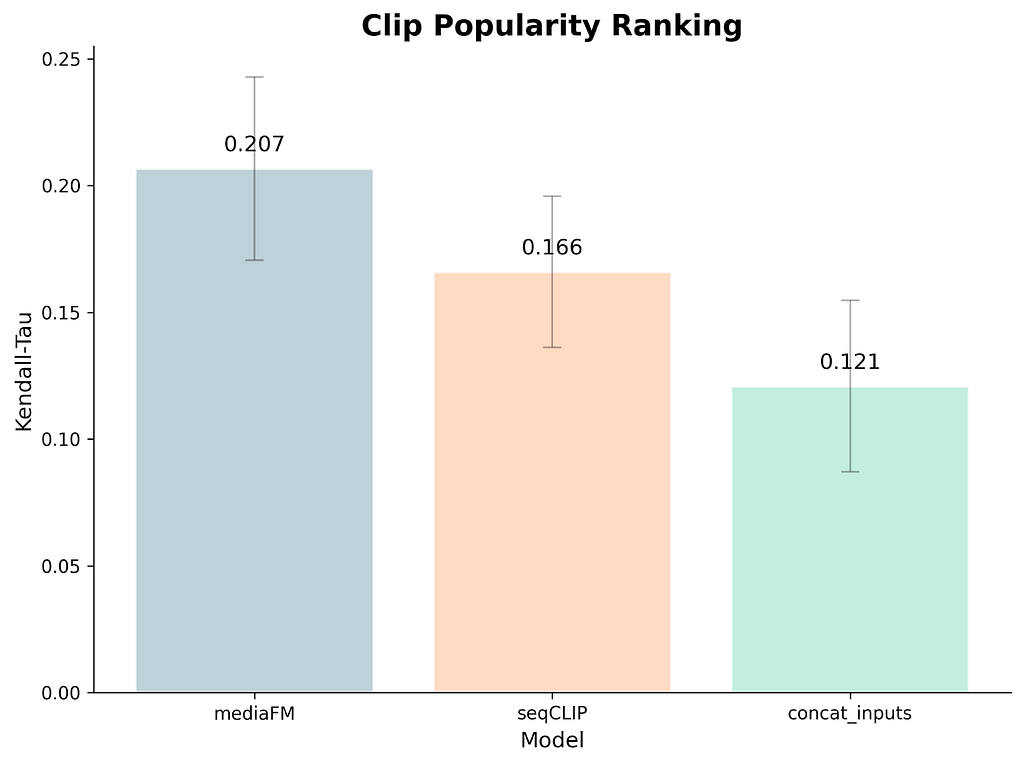
  • Clip Popularity Ranking: A ranking task to predict the relative performance (in click-through rate, CTR) of a media clip relative to other clips from that show or movie, measured by a ten-fold with Kendall’s tau correlation coefficient.
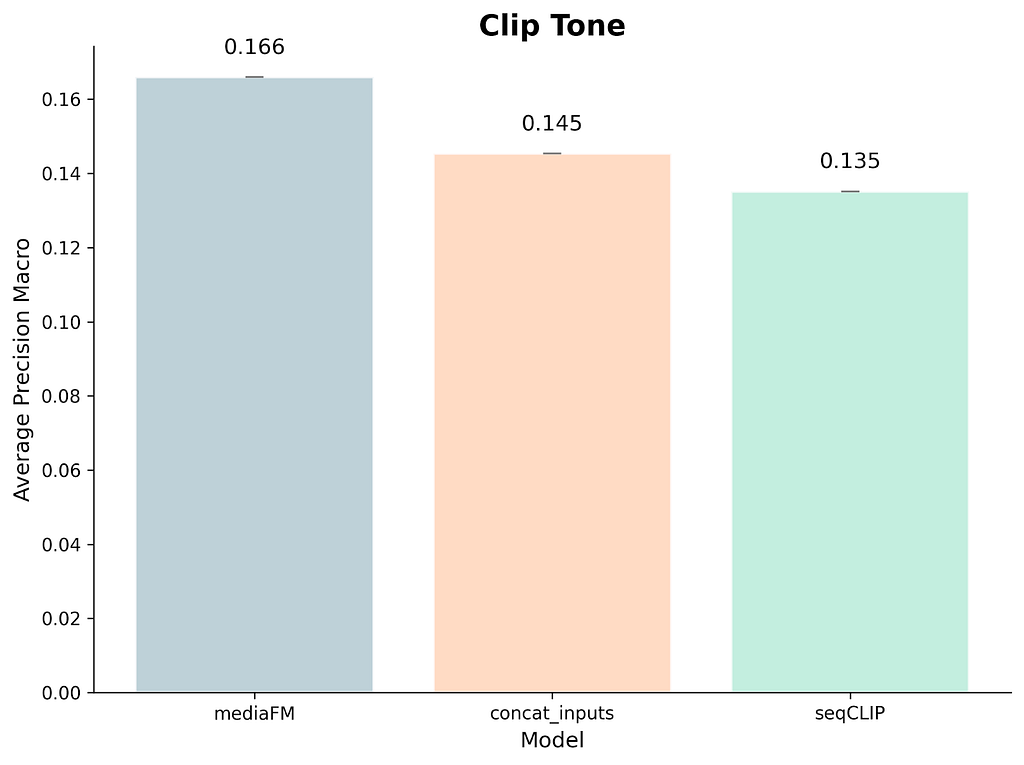
  • Clip Tone: A multi-label classification of hook clips into 100 tone categories (e.g., creepy, scary, humorous) from our internal Metadata & Ratings team, measured by micro Average Precision (averaged across tone categories).
  • Clip Genre: A multi-label classification of clips into eleven core genres (Action, Anime, Comedy, Documentary, Drama, Fantasy, Horror, Kids, Romance, Sci-fi, Thriller) derived from the genre of the parent title, measured by macro Average Precision (averaged across genres).
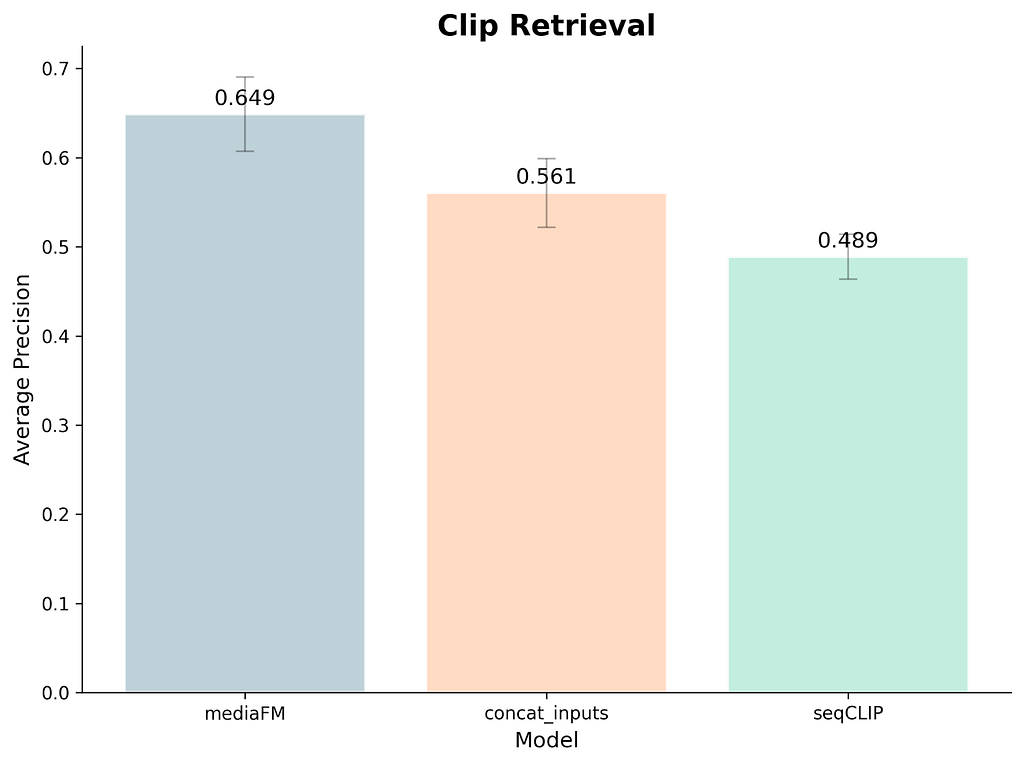
  • Clip Retrieval: a binary classification of clips from movies or episodes into “clip-worthy” (i.e., a good clip to showcase the title) or not, as determined by human annotators, and as measured by Average Precision. The positive to negative clip ratio is 1:3, and for each title we select 6–10 positive clips and the corresponding number of negatives.

It’s worth noting that for the tasks above (as well as other tasks that use our model), the model outputs are utilized as information that the relevant teams use when driving to a decision rather than being used in a completely end-to-end fashion. Many of the improvements are also in various stages of deployment.

Results

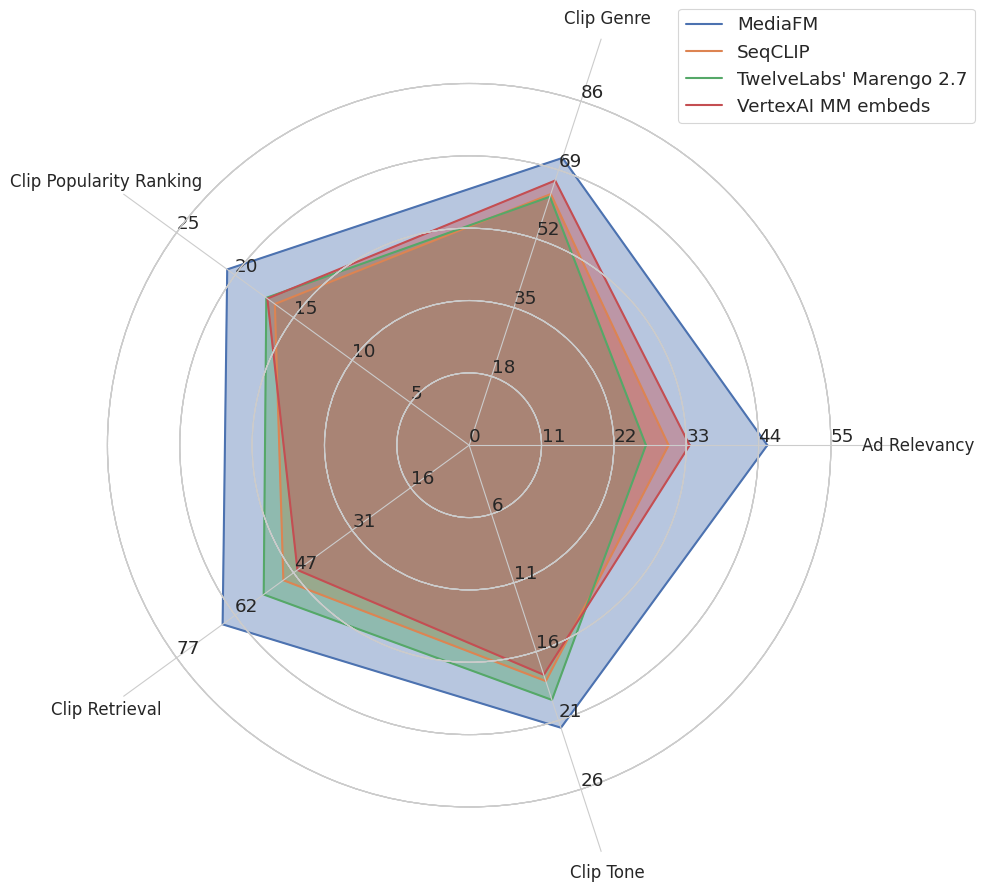
Figure 2³ compares MediaFM to several strong baselines:

Figure 2: Performance of MediaFM vs. external and internal models.

On all tasks, MediaFM is better than the baselines. Improvements seem to be larger for tasks that require more detailed narrative understanding e.g., predicting the most relevant ads for an ad break given the surrounding context. We look further into this next.

Ablations

MediaFM’s primary improvements over previous Netflix work stem from two key areas: combining multiple modalities and learning to contextualize shot representations. To determine the contribution of each factor across different tasks, we compared MediaFM to a baseline. This baseline concatenates the three input embeddings, essentially providing the same complete, shot-level input as MediaFM but without the contextualization step. This comparison allows us to isolate which tasks benefit most from the contextualization aspect.

Additional modalities help somewhat for tone but the main improvement comes from contextualization.

Oddly, multiple uncontextualized modalities hurts the clip popularity ranking model, but adding contextualization significantly improves performance.

For clip retrieval we see a natural progression of around 15% for each improvement.

Next Steps

MediaFM presents a way to learn how to fuse and/or contextualize shot-level information by leveraging Netflix’s catalog in a self-supervised manner. With this perspective, we are actively investigating how pretrained multimodal (audio, video/image, text) LLMs like Qwen3-Omni, where the modality fusion has already been learned, can provide an even stronger starting point for subsequent model generations.

Next in this series of blog posts, we will present our method to embed title-level metadata and adapt it to our needs. Stay tuned!

Footnotes

  1. We chose embeddings over generative text outputs to prioritize modular design. This provides a tighter, cleaner abstraction layer: we generate the representation once, and it is consumed across our entire suite of services. This avoids the architectural fragility of fine-tuning, allowing us to enhance our existing embedding-based workflows with new modalities more flexibly.
  2. All of our data has audio and video; we zero-pad for missing timed text data, which is relatively likely to occur (e.g., in shots without dialogue).
  3. The title-level tasks couldn’t be evaluated with the VertexAI MM and Marengo embedding models as the videos exceed the length limit set by the APIs.


MediaFM: The Multimodal AI Foundation for Media Understanding at Netflix was originally published in Netflix TechBlog on Medium, where people are continuing the conversation by highlighting and responding to this story.

Introducing Amazon Nova 2 Lite, a fast, cost-effective reasoning model

Post Syndicated from Danilo Poccia original https://aws.amazon.com/blogs/aws/introducing-amazon-nova-2-lite-a-fast-cost-effective-reasoning-model/

Today, we’re releasing Amazon Nova 2 Lite, a fast, cost-effective reasoning model for everyday workloads. Available in Amazon Bedrock, the model offers industry-leading price performance and helps enterprises and developers build capable, reliable, and efficient agentic-AI applications. For organizations who need AI that truly understands their domain, Nova 2 Lite is the best model to use with Nova Forge to build their own frontier intelligence.

Nova 2 Lite supports extended thinking, including step-by-step reasoning and task decomposition, before providing a response or taking action. Extended thinking is off by default to deliver fast, cost-optimized responses, but when deeper analysis is needed, you can turn it on and choose from three thinking budget levels: low, medium, or high, giving you control over the speed, intelligence, and cost tradeoff.

Nova 2 Lite supports text, image, video, document as input and offers a one million-token context window, enabling expanded reasoning and richer in-context learning. In addition, Nova 2 Lite can be customized for your specific business needs. The model also includes access to two built-in tools: web grounding and a code interpreter. Web grounding retrieves publicly available information with citations, while the code interpreter allows the model to run and evaluate code within the same workflow.

Amazon Nova 2 Lite demonstrates strong performance across diverse evaluation benchmarks. The model excels in core intelligence across multiple domains including instruction following, math, and video understanding with temporal reasoning. For agentic workflows, Nova 2 Lite shows reliable function calling for task automation and precise UI interaction capabilities. The model also demonstrates strong code generation and practical software engineering problem-solving abilities.

Amazon Nova 2 Lite benchmarks

Nova 2 Lite is built to meet your company’s needs
Nova 2 Lite can be used for a broad range of your everyday AI tasks. It offers the best combination of price, performance, and speed. Early customers are using Nova 2 Lite for customer service chatbots, document processing, and business process automation.

Nova 2 Lite can help support workloads across many different use cases:

  • Business applications – Automate business process workflow, intelligent document processing (IDP), customer support, and web search to improve productivity and outcomes
  • Software engineering – Generate code, debugging, refactoring, and migrating systems to accelerate development and increase efficiency
  • Business intelligence and research – Use long-horizon reasoning and web grounding to analyze internal and external sources to uncover insights, and make informed decisions

For specific requirements, Nova 2 Lite is also available for customization on both Amazon Bedrock and Amazon SageMaker AI.

Using Amazon Nova 2 Lite
In the Amazon Bedrock console, you can use the Chat/Text playground to quickly test the new model with your prompts. To integrate the model into your applications, you can use any AWS SDKs with the Amazon Bedrock InvokeModel and Converse API. Here’s a sample invocation using the AWS SDK for Python (Boto3).

import boto3

AWS_REGION="us-east-1"
MODEL_ID="global.amazon.nova-2-lite-v1:0"
MAX_REASONING_EFFORT="low" # low, medium, high

bedrock_runtime = boto3.client("bedrock-runtime", region_name=AWS_REGION)

# Enable extended thinking for complex problem-solving
response = bedrock_runtime.converse(
    modelId=MODEL_ID,
    messages=[{
        "role": "user",
        "content": [{"text": "I need to optimize a logistics network with 5 warehouses, 12 distribution centers, and 200 retail locations. The goal is to minimize total transportation costs while ensuring no location is more than 50 miles from a distribution center. What approach should I take?"}]
    }],
    additionalModelRequestFields={
        "reasoningConfig": {
            "type": "enabled", # enabled, disabled (default)
            "maxReasoningEffort": MAX_REASONING_EFFORT
        }
    }
)

# The response will contain reasoning blocks followed by the final answer
for block in response["output"]["message"]["content"]:
    if "reasoningContent" in block:
        reasoning_text = block["reasoningContent"]["reasoningText"]["text"]
        print(f"Nova's thinking process:\n{reasoning_text}\n")
    elif "text" in block:
        print(f"Final recommendation:\n{block['text']}")

You can also use the new model with agentic frameworks that supports Amazon Bedrock and deploy the agents using Amazon Bedrock AgentCore. In this way, you can build agents for a broad range of tasks. Here’s the sample code for an interactive multi-agent system using the Strands Agents SDK. The agents have access to multiple tools, including read and write file access and the possibility to run shell commands.

from strands import Agent
from strands.models import BedrockModel
from strands_tools import calculator, editor, file_read, file_write, shell, http_request, graph, swarm, use_agent, think

AWS_REGION="us-east-1"
MODEL_ID="global.amazon.nova-2-lite-v1:0"
MAX_REASONING_EFFORT="low" # low, medium, high

SYSTEM_PROMPT = (
    "You are a helpful assistant. "
    "Follow the instructions from the user. "
    "To help you with your tasks, you can dynamically create specialized agents and orchestrate complex workflows."
)

bedrock_model = BedrockModel(
    region_name=AWS_REGION,
    model_id=MODEL_ID,
    additional_request_fields={
        "reasoningConfig": {
            "type": "enabled", # enabled, disabled (default)
            "maxReasoningEffort": MAX_REASONING_EFFORT
        }
    }
)

agent = Agent(
    model=bedrock_model,
    system_prompt=SYSTEM_PROMPT,
    tools=[calculator, editor, file_read, file_write, shell, http_request, graph, swarm, use_agent, think]
)

while True:
    try:
        prompt = input("\nEnter your question (or 'quit' to exit): ").strip()
        if prompt.lower() in ['quit', 'exit', 'q']:
            break
        if len(prompt) > 0:
            agent(prompt)
    except KeyboardInterrupt:
        break
    except EOFError:
        break

print("\nGoodbye!")

Things to know
Amazon Nova 2 Lite is now available in Amazon Bedrock via global cross-Region inference in multiple locations. For Regional availability and future roadmap, visit AWS Capabilities by Region.

Nova 2 Lite includes built-in safety controls to promote responsible AI use, with content moderation capabilities that help maintain appropriate outputs across a wide range of applications.

To understand the costs, see Amazon Bedrock pricing. To learn more, visit the Amazon Nova User Guide.

Start building with Nova 2 Lite today. To experiment with the new model, visit the Amazon Nova interactive website. Try the model in the Amazon Bedrock console, and share your feedback on AWS re:Post.

Danilo

Analyze media content using AWS AI services

Post Syndicated from Jack Bradham original https://aws.amazon.com/blogs/architecture/analyze-media-content-using-aws-ai-services/

Organizations managing large audio and video archives face significant challenges in extracting value from their media content. Consider a radio network with thousands of broadcast hours across multiple stations and the challenges they face to efficiently verify ad placements, identify interview segments, and analyze programming patterns.

In this post, we demonstrate how you can automatically transform unstructured media files into searchable, analyzable content. By combining Amazon Transcribe, Amazon Bedrock, Amazon QuickSight, and Amazon Q, organizations can achieve the following:

  • Process and transcribe media files upon upload
  • Identify commercials, interviews, and program segments
  • Extract insights using foundation models (FMs)
  • Create a searchable knowledge base
  • Generate rich visualizations for decision-making
  • Enable natural language queries across their media archive
  • Visualize complex information with intuitive graphics

In the following sections, we explore how these AWS services work together to help organizations unlock the full potential of their media content, whether for advertising compliance, content analysis, or discovering specific segments within thousands of hours of recordings.

Solution overview

This solution provides an event-driven media analysis pipeline that transforms how you manage and extract value from your content:

  • Streamline content management – Automatically process media files the moment they’re uploaded, saving time and reducing manual work
  • Unlock deeper insights – Generate accurate transcriptions that capture not just words, but the full context of your content—including speakers, timing, and key moments
  • Harness AI – Automatically extract meaningful insights and uncover hidden patterns in your media without extensive manual review
  • Build a searchable knowledge base – Turn scattered media files into a discoverable catalog that your entire team can use
  • Build a customizable interface – Create a customizable UI to search the catalog
  • Create powerful visualizations – Bring your insights to life with intuitive visualizations that make complex information immediately understandable

The following diagram illustrates our architecture.

Media Analysis Architecture

This event-driven architecture automatically processes and analyzes multimedia content using AWS services. The workflow consists of the following steps:

  1. A user uploads media files to an Amazon Simple Storage Service (Amazon S3) bucket. A “New Media” event triggers the first AWS Step Functions workflow. This workflow handles the initial cataloging based on values in the file name and launches the transcription process.
  2. Amazon Transcribe converts the audio into accurate, readable text. The transcribed content is securely saved to an S3 bucket for further analysis. A “Transcription Complete” event triggers the next step.
  3. A second Step Functions workflow processes the transcription. Using predefined prompts, Amazon Bedrock analyzes the transcripts to extract meaningful information. Key insights extracted from the transcript are stored in an S3 data lake.
  4. The processed results are organized systematically, structured by date (year/month/day) and tagged with relevant attributes. This organized data enables natural language queries through Amazon Q when used as a knowledge base, interactive visualizations using QuickSight, and straightforward content discovery and analysis.
  5. Amazon Athena serves as the data exploration tool to query the data lake. Athena is used as the data source in QuickSight, which turns complex data into clear, compelling visuals.

This architecture automatically transforms raw media content into searchable, analyzable data while maintaining an organized hierarchy for efficient access and analysis. The event-driven design provides automatic processing of new content as it arrives, and the combination of AWS AI services enables deep content understanding and insight extraction. Each AWS service plays a crucial role in transforming your media content:

  • Amazon Bedrock – Reviews content after transcription for insights and entity extraction:
    • Uses advanced FMs to analyze transcripts
    • Identifies commercials, interviews, and program segments
    • Extracts meaningful insights from content
  • Amazon EventBridge – Triggers actions in the cataloging workflow:
    • Monitors for new media files and completed transcriptions
    • Automatically triggers Step Functions workflows
  • AWS Lambda – Handles custom code actions needed in the workflow:
    • Facilitates interaction with Amazon Bedrock
    • Executes custom prompts on transcripts
    • Enables flexible, scalable processing
  • Amazon Q – Serves as the frontend and Retrieval Augmented Generation (RAG) engine:
    • Addresses enterprise generative AI needs by providing a turnkey solution with built-in security features like single sign-on (SSO) integration and responsible AI governance policies
    • Allows businesses to quickly deploy AI assistance while maintaining compliance, data privacy, and security standards
    • Enables natural language queries across the media archive
    • Links results to the source media files
    • Provides conversational access to content
  • Amazon QuickSight – Turns insights in beautiful visualization for better consumption:
    • Creates interactive dashboards and visualizations
    • Displays comprehensive media analytics
    • Helps track advertising, programming, and content patterns
  • Amazon S3 – Stores assets and the catalog:
    • Securely stores raw media files, transcripts, and processed data
    • Automatically triggers processing when new content is uploaded
  • AWS Step Functions – Orchestrates the entire content processing workflow:
    • Manages transcription and AI analysis steps
    • Provides robust error handling and automatic retries
  • Amazon Transcribe – Converts speech to accurate, readable text:
    • Identifies speakers and timestamps
    • Provides accurate transcriptions of audio content

Security considerations

Although this post focuses on the technical implementation of media content analysis, it’s important to acknowledge that production deployments should include comprehensive security measures:

  • Data storage security (Amazon S3):
    • Enable server-side encryption using AWS Key Management Service (AWS KMS) keys
    • Apply bucket policies restricting access to authorized principals only
    • Enable Amazon S3 Block Public Access at account and bucket levels
    • Enable versioning for data recovery
    • Implement lifecycle policies for data retention
    • Enable S3 access logging
    • Use presigned URLs for temporary access
  • Identity and Access Management (IAM):
    • Create dedicated service roles with minimum required permissions for:
      • Step Functions execution
      • Amazon Transcribe jobs
      • Amazon Bedrock API calls
      • Athena queries
    • Implement role-based access control
    • Regularly rotate credentials
    • Enable multi-factor authentication (MFA) for all users
    • Use AWS Organizations for multi-account management
  • Network security:
    • Deploy virtual private cloud (VPC) endpoints for:
      • Amazon S3
      • Athena
      • QuickSight
    • Implement network access control lists (ACLs) and security groups
    • Enable VPC Flow Logs
    • Use AWS PrivateLink where applicable
    • Configure route tables to control traffic flow
  • Data encryption:
    • Implement AWS KMS encryption for S3 objects
    • Use TLS 1.2+ for all API communications
    • Enable automatic key rotation in AWS KMS
    • Implement envelope encryption for sensitive data
  • Monitoring and detection:
    • Enable AWS CloudTrail for API activity logging
    • Configure Amazon GuardDuty for threat detection
    • Set up Amazon CloudWatch:
      • Metrics for service health
      • Alarms for security events
      • Log groups for application logs
    • Enable S3 server access logging
    • Configure VPC Flow Logs
  • Access controls:
    • Implement fine-grained access controls for:
      • Amazon Bedrock model access
      • Athena query permissions
      • QuickSight dashboard sharing
    • Conduct regular access reviews

Additionally, compliance requirements and data governance policies might impact how you implement this solution in your environment.

These security considerations are crucial but beyond the scope of this post. We recommend consulting AWS security best practices and working with your security team to implement appropriate measures for your specific use case. For more information on AWS security best practices, refer to Best Practices for Security, Identity, & Compliance.

The following sections walk you through setting up each component of the architecture to help you transform raw media into actionable insights.

Prerequisites

The following are the prerequisites to follow along this post:

Create S3 buckets

For this solution, we create three distinct buckets to support the media analytics workflow:

  • Raw media bucket for incoming files
  • Transcription outputs bucket
  • Processed insights bucket

For instructions on creating buckets, refer to Creating a general purpose bucket.

Configure EventBridge

You can enable event notifications on the raw media bucket to trigger your automated workflow through EventBridge. Establish your automation backbone by monitoring S3 bucket activities. When new media arrives or transcription completes, EventBridge will trigger the appropriate workflow, providing continuous processing. For further instructions, refer to Creating rules that react to events in Amazon EventBridge.

The following are two example triggers that can be used to filter events and trigger Step Functions workflows. The following is an example filter for new media files:

{
  "source": ["aws.s3"],
  "detail-type": ["Object Created"],
  "detail": {
    "bucket": {
      "name": ["rawinputbucket"]
    }
  }
}

The following is an example filter for new transcripts added to the data lake:

{
  "source": ["aws.s3"],
  "detail-type": ["Object Created"],
  "detail": {
    "bucket": {
      "name": ["business-data-lake"]
    },
    "object": {
      "key": [{
        "suffix": ".transcription"
      }]
    }
  }
}

Create Step Functions workflows

We design the orchestration layer with two key workflows. The first handles media intake and transcription, and the second manages AI analysis. Each workflow includes safeguards for potential failures and retry mechanisms. For further instructions, refer to Learn how to get started with Step Functions.

The following diagram shows an example of processing new media uploads for indexing and transcription.

Media Analysis - Step Function Example

The following diagram shows an example of the Step Functions workflow that analyzes the transcription.

Set up Amazon Transcribe

To create an Amazon Transcribe job, you need permissions to do so. You can implement a speech-to-text conversion with powerful features like language detection, speaker identification, and custom vocabulary support to provide accurate transcription of your media content. For further instructions, refer to How Amazon Transcribe works.

Configure Amazon Bedrock

You can power your AI analysis engine by setting up precise prompts that extract meaningful insights. Amazon Bedrock processes transcripts to identify key segments, speakers, and topics, transforming raw text into structured data. For instructions, refer to Design a prompt.

The following is a sample prompt:

You will be reviewing a radio transcription to identify advertisements and extract relevant details. Your task is to analyze the provided transcript and output the results in a specific JSON format based on a given schema.
Please follow these steps to complete the task:
1. Carefully read through the entire transcript.
2. Identify all advertisements within the transcript. Look for clear indicators such as product mentions, promotional language, or transitions from regular content to commercial content.
3. For each advertisement you identify, determine the following information:
    - Company: The name of the company being advertised
    - Start time: The timestamp in the transcript where the ad begins
    - End time: The timestamp in the transcript where the ad ends
    - Product: The specific product or service being advertised
4. Format your findings into a JSON object that follows the provided schema. Each advertisement should be a separate object within an array.
5. Ensure these fields in your response are provided for each advertisement.. All are required fields: company, starttime, endtime, product. 
6. Use precise timestamps for start and end times. If exact times are not available, make a best estimate based on the transcript's context.
7. If a particular field is unclear or not explicitly mentioned in the transcript, you may use "Unknown" as the value.
8. Only respond with json and nothing else. Do not provide comments or explain your answer. 
9. Surround the JSON response with standard ```json markers
Here's an example of how your output should be formatted:
{
"advertisements": [
        {
            "company": "TechGadgets Inc.",
            "starttime": "00:05:30",
            "endtime": "00:06:15",
            "product": "SmartHome Hub"
        },
        {
            "company": "FreshFoods Market",
            "starttime": "00:15:45",
            "endtime": "00:16:30",
            "product": "Organic Produce Delivery Service"
        }
    ]
}
Do not add any fields that are not specified in the schema, and ensure all required fields are present for each advertisement.

Create a structured data lake

We create a hierarchical data organization strategy that enables efficient access and analysis. You can use AWS Glue crawlers to automatically discover and catalog your media metadata. For instructions, refer to Using crawlers to populate the Data Catalog. Configure Athena tables to enable SQL-based querying of your media insights:

CREATE OR REPLACE VIEW "commercials_view" AS 
SELECT
  metadata.market market
, metadata.station_call station_call
, metadata.format_type format_type
, CAST(metadata.timestamp AS timestamp) timestamp
, ads.company adCompany
, ads.product adProduct
, ads.starttime
, ads.endtime
FROM
  (commercials
CROSS JOIN UNNEST(advertisements) t (ads))

Set Up Amazon Q

You can enable natural language interaction with your media archive using Amazon Q Business. Configure the knowledge base and metadata to make your content searchable and accessible through conversational queries. Use the processed insights S3 buckets to configure the knowledge base. For instructions, refer to Getting started with Amazon Q Business.

The following screenshot shows example conversations with an AI assistant.

Build QuickSight dashboards

With QuickSight, you can create visual analytics that bring your data to life. Connect to Athena views to display advertising patterns, content analysis, and performance metrics in interactive dashboards. For more information, refer to Tutorial: Create an Amazon QuickSight dashboard.

The following screenshots are a few examples of dashboards created for a fictitious radio station as part of our use case.

Validate and optimize your media analytics solution

After you implement your media analytics architecture, follow these critical steps to achieve robust performance and alignment with your organization’s needs. First, configure a comprehensive testing approach. Imagine you’re preparing to launch your media analysis solution. Your testing journey begins with accuracy validation:

  • Compare transcription outputs against original media
  • Verify AI-generated insights for precision
  • Use representative sample sets from your content library

You start by taking a recently processed radio show and comparing its transcription against the original broadcast. Your team meticulously reviews the AI-generated insights, checking if key moments like ad transitions or interview segments are correctly identified. To make sure your system works across all content types, you select diverse samples from your library—perhaps a morning talk show, an evening news segment, and a weekend sports broadcast. Next, you delve into performance benchmarking:

  • Measure processing time for different media types
  • Evaluate resource utilization across AWS services
  • Identify potential bottlenecks in the workflow

Time how long it takes to process different types of media files, from short commercial segments to lengthy program recordings. As you watch how your AWS services respond under various loads, you can monitor resource consumption patterns. This helps you identify processing bottlenecks—for instance, you might discover that certain file types take longer to transcribe or that concurrent processing needs optimization. Finally, you put yourself in your users’ shoes for a thorough user experience assessment:

  • Test natural language queries with Amazon Q
  • Validate search result relevance
  • Gather feedback from potential end-users

Team members can interact with Amazon Q, asking questions they would naturally pose when searching for specific content. For example, you can test whether searching for “interviews about climate change last week” returns relevant results. Gathering feedback from potential users—perhaps a content manager with different needs than a compliance officer—provides invaluable insights. Their real-world experiences guide your refinements and make sure the system serves its intended purpose. This comprehensive testing approach, combining structured evaluation with real-world scenarios, sets the stage for a robust and user-friendly media analysis solution. As your media analysis solution moves from initial deployment to production, optimizing its performance becomes crucial for both cost-efficiency and user satisfaction. A radio network processing thousands of hours of content weekly might find that even small improvements in transcription accuracy or processing speed can lead to significant cost savings and better content discoverability. Similarly, a marketing team analyzing ad placements across multiple stations needs precise insights to make data-driven decisions about advertising effectiveness. With these business imperatives in mind, consider the following configuration optimization strategies:

  • Transcription refinement:
    • Adjust language models for domain-specific terminology
    • Fine-tune speaker identification settings
    • Implement custom vocabularies for improved accuracy
  • AI insight generation:
    • Refine prompts for more targeted analysis
    • Experiment with different AI models
    • Align extraction parameters with business objectives
  • Scalability considerations:
    • Test workflow performance with increasing media volumes
    • Implement appropriate auto scaling configurations
    • Monitor cost-effectiveness of your architecture
  • Continuous improvement:
    • Establish regular review cycles
    • Track key performance metrics
    • Iterate on your solution based on real-world usage

We recommend starting with a pilot implementation and gradually expanding your media analytics capabilities.

Clean up

To avoid incurring ongoing charges, clean up the resources you created as part of this solution:

  1. Delete QuickSight resources:
    1. Delete dashboards created for media analytics.
    2. Delete the datasets connected to Athena.
    3. If no longer needed, delete the QuickSight Enterprise subscription.
  2. Delete S3 buckets:
    1. Empty and delete the raw media bucket, transcription outputs bucket, and processed insights bucket.
  3. Remove EventBridge rules:
    1. Delete the rules created for monitoring S3 bucket activities.
    2. Remove targets associated with these rules.
  4. Delete Step Functions workflows:
    1. Delete the media intake and transcription workflow.
    2. Delete the AI analysis workflow.
  5. Remove Lambda functions:
    1. Delete Lambda functions created for interaction with Amazon Bedrock.
    2. Remove associated IAM roles and policies.
  6. Clean up data lake components:
    1. Delete Athena views and tables.
    2. Remove AWS Glue crawlers and databases.
    3. Delete stored query results.
  7. Remove Amazon Q configurations:
    1. Delete knowledge bases created.
    2. Remove custom configurations.
  8. Remove Amazon Bedrock settings:
    1. Remove custom prompts.
    2. Disable access to FMs if no longer needed.
  9. Delete Amazon Transcribe settings:
    1. Remove custom vocabularies.
    2. Delete stored transcription jobs.
  10. Remove IAM resources:
    1. Delete custom IAM roles created for this solution.
    2. Remove associated IAM policies.
  11. Complete additional cleanup:
    1. Delete CloudWatch Logs groups associated with Lambda functions.
    2. Remove CloudWatch alarms or metrics created for monitoring.
    3. Delete saved queries in Athena.

Common use cases

Organizations in different sectors can use this architecture to unlock value from their audio and video content. You can adapt this solution to meet your specific needs, such as managing broadcast media, corporate communications, educational materials, and more. Let’s explore how different industries might apply this technology:

  • Media and broadcasting:
    • Track advertising compliance
    • Verify media placement accuracy
    • Analyze broadcast content at scale
  • Corporate and enterprise:
    • Convert meeting recordings into searchable knowledge bases
    • Identify key decisions and action items
    • Enhance organizational knowledge management
  • Education and training:
    • Create comprehensive, topic-based course catalogs
    • Index training materials for quick retrieval
    • Support continuous learning initiatives
  • Legal services:
    • Generate precise, timestamped transcripts
    • Develop searchable legal proceeding archives
    • Improve document review efficiency
  • Healthcare:
    • Extract critical medical insights from consultations
    • Categorize patient interaction data
    • Support clinical documentation processes
  • Government and public sector:
    • Build comprehensive public meeting archives
    • Implement automated topic categorization
    • Enhance transparency and accessibility
  • Customer service:
    • Analyze call recordings for quality improvement
    • Identify service trends and customer pain points
    • Drive continuous customer experience enhancement

This media analytics architecture demonstrates notable versatility. By using AI, organizations can transform raw audio and video content into structured, meaningful insights that drive decision-making across industries.

Conclusion

In this post, we demonstrated how to use AWS services to convert unstructured media content into actionable intelligence. By combining Amazon Transcribe, Amazon Bedrock, QuickSight, and Amazon Q, you can create a scalable, automated solution for media analysis that adapts to your organizational needs.

This solution offers the following key architectural advantages:

  • Automated media file processing at scale
  • AI-powered insight generation
  • Natural language search capabilities
  • Interactive decision-making visualizations
  • Flexible, maintainable infrastructure

Organizations can now convert content into searchable knowledge, extract insights automatically, develop data-driven content strategies, and enhance operational efficiency through automation.

As audio and video content generation continues to accelerate, the ability to efficiently process and extract value becomes increasingly critical. This architecture provides a robust foundation for current needs while remaining adaptable to future technological innovations.

We invite you to explore how this media analytics solution can address your organization’s unique challenges. Consider your specific use cases and unlock the insights waiting to be discovered in your media archives.


About the authors

Introducing Claude 4 in Amazon Bedrock, the most powerful models for coding from Anthropic

Post Syndicated from Sébastien Stormacq original https://aws.amazon.com/blogs/aws/claude-opus-4-anthropics-most-powerful-model-for-coding-is-now-in-amazon-bedrock/

Anthropic launched the next generation of Claude models today—Opus 4 and Sonnet 4—designed for coding, advanced reasoning, and the support of the next generation of capable, autonomous AI agents. Both models are now generally available in Amazon Bedrock, giving developers immediate access to both the model’s advanced reasoning and agentic capabilities.

Amazon Bedrock expands your AI choices with Anthropic’s most advanced models, giving you the freedom to build transformative applications with enterprise-grade security and responsible AI controls. Both models extend what’s possible with AI systems by improving task planning, tool use, and agent steerability.

With Opus 4’s advanced intelligence, you can build agents that handle long-running, high-context tasks like refactoring large codebases, synthesizing research, or coordinating cross-functional enterprise operations. Sonnet 4 is optimized for efficiency at scale, making it a strong fit as a subagent or for high-volume tasks like code reviews, bug fixes, and production-grade content generation.

When building with generative AI, many developers work on long-horizon tasks. These workflows require deep, sustained reasoning, often involving multistep processes, planning across large contexts, and synthesizing diverse inputs over extended timeframes. Good examples of these workflows are developer AI agents that help you to refactor or transform large projects. Existing models may respond quickly and fluently, but maintaining coherence and context over time—especially in areas like coding, research, or enterprise workflows—can still be challenging.

Claude Opus 4
Claude Opus 4 is the most advanced model to date from Anthropic, designed for building sophisticated AI agents that can reason, plan, and execute complex tasks with minimal oversight. Anthropic benchmarks show it is the best coding model available on the market today. It excels in software development scenarios where extended context, deep reasoning, and adaptive execution are critical. Developers can use Opus 4 to write and refactor code across entire projects, manage full-stack architectures, or design agentic systems that break down high-level goals into executable steps. It demonstrates strong performance on coding and agent-focused benchmarks like SWE-bench and TAU-bench, making it a natural choice for building agents that handle multistep development workflows. For example, Opus 4 can analyze technical documentation, plan a software implementation, write the required code, and iteratively refine it—while tracking requirements and architectural context throughout the process.

Claude Sonnet 4
Claude Sonnet 4 complements Opus 4 by balancing performance, responsiveness, and cost, making it well-suited for high-volume production workloads. It’s optimized for everyday development tasks with enhanced performance, such as powering code reviews, implementing bug fixes, and new feature development with immediate feedback loops. It can also power production-ready AI assistants for near real-time applications. Sonnet 4 is a drop-in replacement from Claude Sonnet 3.7. In multi-agent systems, Sonnet 4 performs well as a task-specific subagent—handling responsibilities like targeted code reviews, search and retrieval, or isolated feature development within a broader pipeline. You can also use Sonnet 4 to manage continuous integration and delivery (CI/CD) pipelines, perform bug triage, or integrate APIs, all while maintaining high throughput and developer-aligned output.

Opus 4 and Sonnet 4 are hybrid reasoning models offering two modes: near-instant responses and extended thinking for deeper reasoning. You can choose near-instant responses for interactive applications, or enable extended thinking when a request benefits from deeper analysis and planning. Thinking is especially useful for long-context reasoning tasks in areas like software engineering, math, or scientific research. By configuring the model’s thinking budget—for example, by setting a maximum token count—you can tune the tradeoff between latency and answer depth to fit your workload.

How to get started
To see Opus 4 or Sonnet 4 in action, enable the new model in your AWS account. Then, you can start coding using the Bedrock Converse API with model IDanthropic.claude-opus-4-20250514-v1:0 for Opus 4 and anthropic.claude-sonnet-4-20250514-v1:0 for Sonnet 4. We recommend using the Converse API, because it provides a consistent API that works with all Amazon Bedrock models that support messages. This means you can write code one time and use it with different models.

For example, let’s imagine I write an agent to review code before merging changes in a code repository. I write the following code that uses the Bedrock Converse API to send a system and user prompts. Then, the agent consumes the streamed result.

private let modelId = "us.anthropic.claude-sonnet-4-20250514-v1:0"

// Define the system prompt that instructs Claude how to respond
let systemPrompt = """
You are a senior iOS developer with deep expertise in Swift, especially Swift 6 concurrency. Your job is to perform a code review focused on identifying concurrency-related edge cases, potential race conditions, and misuse of Swift concurrency primitives such as Task, TaskGroup, Sendable, @MainActor, and @preconcurrency.

You should review the code carefully and flag any patterns or logic that may cause unexpected behavior in concurrent environments, such as accessing shared mutable state without proper isolation, incorrect actor usage, or non-Sendable types crossing concurrency boundaries.

Explain your reasoning in precise technical terms, and provide recommendations to improve safety, predictability, and correctness. When appropriate, suggest concrete code changes or refactorings using idiomatic Swift 6
"""
let system: BedrockRuntimeClientTypes.SystemContentBlock = .text(systemPrompt)

// Create the user message with text prompt and image
let userPrompt = """
Can you review the following Swift code for concurrency issues? Let me know what could go wrong and how to fix it.
"""
let prompt: BedrockRuntimeClientTypes.ContentBlock = .text(userPrompt)

// Create the user message with both text and image content
let userMessage = BedrockRuntimeClientTypes.Message(
    content: [prompt],
    role: .user
)

// Initialize the messages array with the user message
var messages: [BedrockRuntimeClientTypes.Message] = []
messages.append(userMessage)

// Configure the inference parameters
let inferenceConfig: BedrockRuntimeClientTypes.InferenceConfiguration = .init(maxTokens: 4096, temperature: 0.0)

// Create the input for the Converse API with streaming
let input = ConverseStreamInput(inferenceConfig: inferenceConfig, messages: messages, modelId: modelId, system: [system])

// Make the streaming request
do {
    // Process the stream
    let response = try await bedrockClient.converseStream(input: input)

    // Iterate through the stream events
    for try await event in stream {
        switch event {
        case .messagestart:
            print("AI-assistant started to stream"")

        case let .contentblockdelta(deltaEvent):
            // Handle text content as it arrives
            if case let .text(text) = deltaEvent.delta {
                self.streamedResponse + = text
                print(text, termination: "")
            }

        case .messagestop:
            print("\n\nStream ended")
            // Create a complete assistant message from the streamed response
            let assistantMessage = BedrockRuntimeClientTypes.Message(
                content: [.text(self.streamedResponse)],
                role: .assistant
            )
            messages.append(assistantMessage)

        default:
            break
        }
    }

To help you get started, my colleague Dennis maintains a broad range of code examples for multiple use cases and a variety of programming languages.

Available today in Amazon Bedrock
This release gives developers immediate access in Amazon Bedrock, a fully managed, serverless service, to the next generation of Claude models developed by Anthropic. Whether you’re already building with Claude in Amazon Bedrock or just getting started, this seamless access makes it faster to experiment, prototype, and scale with cutting-edge foundation models—without managing infrastructure or complex integrations.

Claude Opus 4 is available in the following AWS Regions in North America: US East (Ohio, N. Virginia) and US West (Oregon). Claude Sonnet 4 is available not only in AWS Regions in North America but also in APAC, and Europe: US East (Ohio, N. Virginia), US West (Oregon), Asia Pacific (Hyderabad, Mumbai, Osaka, Seoul, Singapore, Sydney, Tokyo), and Europe (Spain). You can access the two models through cross-Region inference. Cross-Region inference helps to automatically select the optimal AWS Region within your geography to process your inference request.

Opus 4 tackles your most challenging development tasks, while Sonnet 4 excels at routine work with its optimal balance of speed and capability.

Learn more about the pricing and how to use these new models in Amazon Bedrock today!

— seb

FM-Intent: Predicting User Session Intent with Hierarchical Multi-Task Learning

Post Syndicated from Netflix Technology Blog original https://netflixtechblog.com/fm-intent-predicting-user-session-intent-with-hierarchical-multi-task-learning-94c75e18f4b8

Authors: Sejoon Oh, Moumita Bhattacharya, Yesu Feng, Sudarshan Lamkhede, Ko-Jen Hsiao, and Justin Basilico

Motivation

Recommender systems have become essential components of digital services across e-commerce, streaming media, and social networks [1, 2]. At Netflix, these systems drive significant product and business impact by connecting members with relevant content at the right time [3, 4]. While our recommendation foundation model (FM) has made substantial progress in understanding user preferences through large-scale learning from interaction histories (please refer to this article about FM @ Netflix), there is an opportunity to further enhance its capabilities. By extending FM to incorporate the prediction of underlying user intents, we aim to enrich its understanding of user sessions beyond next-item prediction, thereby offering a more comprehensive and nuanced recommendation experience.

Recent research has highlighted the importance of understanding user intent in online platforms [5, 6, 7, 8]. As Xia et al. [8] demonstrated at Pinterest, predicting a user’s future intent can lead to more accurate and personalized recommendations. However, existing intent prediction approaches typically employ simple multi-task learning that adds intent prediction heads to next-item prediction models without establishing a hierarchical relationship between these tasks.

To address these limitations, we introduce FM-Intent, a novel recommendation model that enhances our foundation model through hierarchical multi-task learning. FM-Intent captures a user’s latent session intent using both short-term and long-term implicit signals as proxies, then leverages this intent prediction to improve next-item recommendations. Unlike conventional approaches, FM-Intent establishes a clear hierarchy where intent predictions directly inform item recommendations, creating a more coherent and effective recommendation pipeline.

FM-Intent makes three key contributions:

  1. A novel recommendation model that captures user intent on the Netflix platform and enhances next-item prediction using this intent information.
  2. A hierarchical multi-task learning approach that effectively models both short-term and long-term user interests.
  3. Comprehensive experimental validation showing significant performance improvements over state-of-the-art models, including our foundation model.

Understanding User Intent in Netflix

In the Netflix ecosystem, user intent manifests through various interaction metadata, as illustrated in Figure 1. FM-Intent leverages these implicit signals to predict both user intent and next-item recommendations.

Figure 1: Overview of user engagement data in Netflix. User intent can be associated with several interaction metadata. We leverage various implicit signals to predict user intent and next-item.

In Netflix, there can be multiple types of user intents. For instance,

Action Type: Categories reflecting what users intend to do on Netflix, such as discovering new content versus continuing previously started content. For example, when a member plays a follow-up episode of something they were already watching, this can be categorized as “continue watching” intent.

Genre Preference: The pre-defined genre labels (e.g., Action, Thriller, Comedy) that indicate a user’s content preferences during a session. These preferences can shift significantly between sessions, even for the same user.

Movie/Show Type: Whether a user is looking for a movie (typically a single, longer viewing experience) or a TV show (potentially multiple episodes of shorter duration).

Time-since-release: Whether the user prefers newly released content, recent content (e.g., between a week and a month), or evergreen catalog titles.

These dimensions serve as proxies for the latent user intent, which is often not directly observable but crucial for providing relevant recommendations.

FM-Intent Model Architecture

FM-Intent employs a hierarchical multi-task learning approach with three major components, as illustrated in Figure 2.

Figure 2: An architectural illustration of our hierarchical multi-task learning model FM-Intent for user intent and item predictions. We use ground-truth intent and item-ID labels to optimize predictions.

1. Input Feature Sequence Formation

The first component constructs rich input features by combining interaction metadata. The input feature for each interaction combines categorical embeddings and numerical features, creating a comprehensive representation of user behavior.

2. User Intent Prediction

The intent prediction component processes the input feature sequence through a Transformer encoder and generates predictions for multiple intent signals.

The Transformer encoder effectively models the long-term interest of users through multi-head attention mechanisms. For each prediction task, the intent encoding is transformed into prediction scores via fully-connected layers.

A key innovation in FM-Intent is the attention-based aggregation of individual intent predictions. This approach generates a comprehensive intent embedding that captures the relative importance of different intent signals for each user, providing valuable insights for personalization and explanation.

3. Next-Item Prediction with Hierarchical Multi-Task Learning

The final component combines the input features with the user intent embedding to make more accurate next-item recommendations.

FM-Intent employs hierarchical multi-task learning where intent predictions are conducted first, and their results are used as input features for the next-item prediction task. This hierarchical relationship ensures that the next-item recommendations are informed by the predicted user intent, creating a more coherent and effective recommendation model.

Offline Results

We conducted comprehensive offline experiments on sampled Netflix user engagement data to evaluate FM-Intent’s performance. Note that FM-Intent uses a much smaller dataset for training compared to the FM production model due to its complex hierarchical prediction architecture.

Next-Item and Next-Intent Prediction Accuracy

Table 1 compares FM-Intent with several state-of-the-art sequential recommendation models, including our production model (FM-Intent-V0).

Table 1: Next-item and next-intent prediction results of baselines and our proposed method FM-Intent on the Netflix user engagement dataset.

All metrics are represented as relative % improvements compared to the SOTA baseline: TransAct. N/A indicates that a model is not capable of predicting a certain intent. Note that we added additional fully-connected layers to LSTM, GRU, and Transformer baselines in order to predict user intent, while we used original implementations for other baselines. FM-Intent demonstrates statistically significant improvement of 7.4% in next-item prediction accuracy compared to the best baseline (TransAct).

Most baseline models show limited performance as they either cannot predict user intent or cannot incorporate intent predictions into next-item recommendations. Our production model (FM-Intent-V0) performs well but lacks the ability to predict and leverage user intent. Note that FM-Intent-V0 is trained with a smaller dataset for a fair comparison with other models; the actual production model is trained with a much larger dataset.

Qualitative Analysis: User Clustering

Figure 3: K-means++ (K=10) clustering of user intent embeddings found by FM-Intent; FM-Intent finds unique clusters of users that share the similar intent.

FM-Intent generates meaningful user intent embeddings that can be used for clustering users with similar intents. Figure 3 visualizes 10 distinct clusters identified through K-means++ clustering. These clusters reveal meaningful user segments with distinct viewing patterns:

  • Users who primarily discover new content versus those who continue watching recent/favorite content.
  • Genre enthusiasts (e.g., anime/kids content viewers).
  • Users with specific viewing patterns (e.g., Rewatchers versus casual viewers).

Potential Applications of FM-Intent

FM-Intent has been successfully integrated into Netflix’s recommendation ecosystem, can be leveraged for several downstream applications:

Personalized UI Optimization: The predicted user intent could inform the layout and content selection on the Netflix homepage, emphasizing different rows based on whether users are in discovery mode, continue-watching mode, or exploring specific genres.

Analytics and User Understanding: Intent embeddings and clusters provide valuable insights into viewing patterns and preferences, informing content acquisition and production decisions.

Enhanced Recommendation Signals: Intent predictions serve as features for other recommendation models, improving their accuracy and relevance.

Search Optimization: Real-time intent predictions help prioritize search results based on the user’s current session intent.

Conclusion

FM-Intent represents an advancement in Netflix’s recommendation capabilities by enhancing them with hierarchical multi-task learning for user intent prediction. Our comprehensive experiments demonstrate that FM-Intent significantly outperforms state-of-the-art models, including our prior foundation model that focused solely on next-item prediction. By understanding not just what users might watch next but what underlying intents users have, we can provide more personalized, relevant, and satisfying recommendations.

Acknowledgements

We thank our stunning colleagues in the Foundation Model team & AIMS org. for their valuable feedback and discussions. We also thank our partner teams for getting this up and running in production.

References

[1] Amatriain, X., & Basilico, J. (2015). Recommender systems in industry: A netflix case study. In Recommender systems handbook (pp. 385–419). Springer.

[2] Gomez-Uribe, C. A., & Hunt, N. (2015). The netflix recommender system: Algorithms, business value, and innovation. ACM Transactions on Management Information Systems (TMIS), 6(4), 1–19.

[3] Jannach, D., & Jugovac, M. (2019). Measuring the business value of recommender systems. ACM Transactions on Management Information Systems (TMIS), 10(4), 1–23.

[4] Bhattacharya, M., & Lamkhede, S. (2022). Augmenting Netflix Search with In-Session Adapted Recommendations. In Proceedings of the 16th ACM Conference on Recommender Systems (pp. 542–545).

[5] Chen, Y., Liu, Z., Li, J., McAuley, J., & Xiong, C. (2022). Intent contrastive learning for sequential recommendation. In Proceedings of the ACM Web Conference 2022 (pp. 2172–2182).

[6] Ding, Y., Ma, Y., Wong, W. K., & Chua, T. S. (2021). Modeling instant user intent and content-level transition for sequential fashion recommendation. IEEE Transactions on Multimedia, 24, 2687–2700.

[7] Liu, Z., Chen, H., Sun, F., Xie, X., Gao, J., Ding, B., & Shen, Y. (2021). Intent preference decoupling for user representation on online recommender system. In Proceedings of the Twenty-Ninth International Conference on International Joint Conferences on Artificial Intelligence (pp. 2575–2582).

[8] Xia, X., Eksombatchai, P., Pancha, N., Badani, D. D., Wang, P. W., Gu, N., Joshi, S. V., Farahpour, N., Zhang, Z., & Zhai, A. (2023). TransAct: Transformer-based Realtime User Action Model for Recommendation at Pinterest. In Proceedings of the 29th ACM SIGKDD Conference on Knowledge Discovery and Data Mining (pp. 5249–5259).


FM-Intent: Predicting User Session Intent with Hierarchical Multi-Task Learning was originally published in Netflix TechBlog on Medium, where people are continuing the conversation by highlighting and responding to this story.

Llama 4 models from Meta now available in Amazon Bedrock serverless

Post Syndicated from Danilo Poccia original https://aws.amazon.com/blogs/aws/llama-4-models-from-meta-now-available-in-amazon-bedrock-serverless/

The newest AI models from Meta, Llama 4 Scout 17B and Llama 4 Maverick 17B, are now available as a fully managed, serverless option in Amazon Bedrock. These new foundation models (FMs) deliver natively multimodal capabilities with early fusion technology that you can use for precise image grounding and extended context processing in your applications.

Llama 4 uses an innovative mixture-of-experts (MoE) architecture that provides enhanced performance across reasoning and image understanding tasks while optimizing for both cost and speed. This architectural approach enables Llama 4 to offer improved performance at lower cost compared to Llama 3, with expanded language support for global applications.

The models were already available on Amazon SageMaker JumpStart, and you can now use them in Amazon Bedrock to streamline building and scaling generative AI applications with enterprise-grade security and privacy.

Llama 4 Maverick 17B – A natively multimodal model featuring 128 experts and 400 billion total parameters. It excels in image and text understanding, making it suitable for versatile assistant and chat applications. The model supports a 1 million token context window, giving you the flexibility to process lengthy documents and complex inputs.

Llama 4 Scout 17B – A general-purpose multimodal model with 16 experts, 17 billion active parameters, and 109 billion total parameters that delivers superior performance compared to all previous Llama models. Amazon Bedrock currently supports a 3.5 million token context window for Llama 4 Scout, with plans to expand in the near future.

Use cases for Llama 4 models
You can use the advanced capabilities of Llama 4 models for a wide range of use cases across industries:

Enterprise applications – Build intelligent agents that can reason across tools and workflows, process multimodal inputs, and deliver high-quality responses for business applications.

Multilingual assistants – Create chat applications that understand images and provide high-quality responses across multiple languages, making them accessible to global audiences.

Code and document intelligence – Develop applications that can understand code, extract structured data from documents, and provide insightful analysis across large volumes of text and code.

Customer support – Enhance support systems with image analysis capabilities, enabling more effective problem resolution when customers share screenshots or photos.

Content creation – Generate creative content across multiple languages, with the ability to understand and respond to visual inputs.

Research – Build research applications that can integrate and analyze multimodal data, providing insights across text and images.

Using Llama 4 models in Amazon Bedrock
To use these new serverless models in Amazon Bedrock, I first need to request access. In the Amazon Bedrock console, I choose Model access from the navigation pane to toggle access to Llama 4 Maverick 17B and Llama 4 Scout 17B models.

Console screenshot.

The Llama 4 models can be easily integrated into your applications using the Amazon Bedrock Converse API, which provides a unified interface for conversational AI interactions.

Here’s an example of how to use the AWS SDK for Python (Boto3) with Llama 4 Maverick for a multimodal conversation:

import boto3
import json
import os

AWS_REGION = "us-west-2"
MODEL_ID = "us.meta.llama4-maverick-17b-instruct-v1:0"
IMAGE_PATH = "image.jpg"


def get_file_extension(filename: str) -> str:
    """Get the file extension."""
    extension = os.path.splitext(filename)[1].lower()[1:] or 'txt'
    if extension == 'jpg':
        extension = 'jpeg'
    return extension


def read_file(file_path: str) -> bytes:
    """Read a file in binary mode."""
    try:
        with open(file_path, 'rb') as file:
            return file.read()
    except Exception as e:
        raise Exception(f"Error reading file {file_path}: {str(e)}")

bedrock_runtime = boto3.client(
    service_name="bedrock-runtime",
    region_name=AWS_REGION
)

request_body = {
    "messages": [
        {
            "role": "user",
            "content": [
                {
                    "text": "What can you tell me about this image?"
                },
                {
                    "image": {
                        "format": get_file_extension(IMAGE_PATH),
                        "source": {"bytes": read_file(IMAGE_PATH)},
                    }
                },
            ],
        }
    ]
}

response = bedrock_runtime.converse(
    modelId=MODEL_ID,
    messages=request_body["messages"]
)

print(response["output"]["message"]["content"][-1]["text"])

This example demonstrates how to send both text and image inputs to the model and receive a conversational response. The Converse API abstracts away the complexity of working with different model input formats, providing a consistent interface across models in Amazon Bedrock.

For more interactive use cases, you can also use the streaming capabilities of the Converse API:

response_stream = bedrock_runtime.converse_stream(
    modelId=MODEL_ID,
    messages=request_body['messages']
)

stream = response_stream.get('stream')
if stream:
    for event in stream:

        if 'messageStart' in event:
            print(f"\nRole: {event['messageStart']['role']}")

        if 'contentBlockDelta' in event:
            print(event['contentBlockDelta']['delta']['text'], end="")

        if 'messageStop' in event:
            print(f"\nStop reason: {event['messageStop']['stopReason']}")

        if 'metadata' in event:
            metadata = event['metadata']
            if 'usage' in metadata:
                print(f"Usage: {json.dumps(metadata['usage'], indent=4)}")
            if 'metrics' in metadata:
                print(f"Metrics: {json.dumps(metadata['metrics'], indent=4)}")

With streaming, your applications can provide a more responsive experience by displaying model outputs as they are generated.

Things to know
The Llama 4 models are available today with a fully managed, serverless experience in Amazon Bedrock in the US East (N. Virginia) and US West (Oregon) AWS Regions. You can also access Llama 4 in US East (Ohio) via cross-region inference.

As usual with Amazon Bedrock, you pay for what you use. For more information, see Amazon Bedrock pricing.

These models support 12 languages for text (English, French, German, Hindi, Italian, Portuguese, Spanish, Thai, Arabic, Indonesian, Tagalog, and Vietnamese) and English when processing images.

To start using these new models today, visit the Meta Llama models section in the Amazon Bedrock User Guide. You can also explore how our Builder communities are using Amazon Bedrock in their solutions in the generative AI section of our community.aws site.

Danilo


How is the News Blog doing? Take this 1 minute survey!

(This survey is hosted by an external company. AWS handles your information as described in the AWS Privacy Notice. AWS will own the data gathered via this survey and will not share the information collected with survey respondents.)

Foundation Model for Personalized Recommendation

Post Syndicated from Netflix Technology Blog original https://netflixtechblog.com/foundation-model-for-personalized-recommendation-1a0bd8e02d39

By Ko-Jen Hsiao, Yesu Feng and Sudarshan Lamkhede

Motivation

Netflix’s personalized recommender system is a complex system, boasting a variety of specialized machine learned models each catering to distinct needs including “Continue Watching” and “Today’s Top Picks for You.” (Refer to our recent overview for more details). However, as we expanded our set of personalization algorithms to meet increasing business needs, maintenance of the recommender system became quite costly. Furthermore, it was difficult to transfer innovations from one model to another, given that most are independently trained despite using common data sources. This scenario underscored the need for a new recommender system architecture where member preference learning is centralized, enhancing accessibility and utility across different models.

Particularly, these models predominantly extract features from members’ recent interaction histories on the platform. Yet, many are confined to a brief temporal window due to constraints in serving latency or training costs. This limitation has inspired us to develop a foundation model for recommendation. This model aims to assimilate information both from members’ comprehensive interaction histories and our content at a very large scale. It facilitates the distribution of these learnings to other models, either through shared model weights for fine tuning or directly through embeddings.

The impetus for constructing a foundational recommendation model is based on the paradigm shift in natural language processing (NLP) to large language models (LLMs). In NLP, the trend is moving away from numerous small, specialized models towards a single, large language model that can perform a variety of tasks either directly or with minimal fine-tuning. Key insights from this shift include:

  1. A Data-Centric Approach: Shifting focus from model-centric strategies, which heavily rely on feature engineering, to a data-centric one. This approach prioritizes the accumulation of large-scale, high-quality data and, where feasible, aims for end-to-end learning.
  2. Leveraging Semi-Supervised Learning: The next-token prediction objective in LLMs has proven remarkably effective. It enables large-scale semi-supervised learning using unlabeled data while also equipping the model with a surprisingly deep understanding of world knowledge.

These insights have shaped the design of our foundation model, enabling a transition from maintaining numerous small, specialized models to building a scalable, efficient system. By scaling up semi-supervised training data and model parameters, we aim to develop a model that not only meets current needs but also adapts dynamically to evolving demands, ensuring sustainable innovation and resource efficiency.

Data

At Netflix, user engagement spans a wide spectrum, from casual browsing to committed movie watching. With over 300 million users at the end of 2024, this translates into hundreds of billions of interactions — an immense dataset comparable in scale to the token volume of large language models (LLMs). However, as in LLMs, the quality of data often outweighs its sheer volume. To harness this data effectively, we employ a process of interaction tokenization, ensuring meaningful events are identified and redundancies are minimized.

Tokenizing User Interactions: Not all raw user actions contribute equally to understanding preferences. Tokenization helps define what constitutes a meaningful “token” in a sequence. Drawing an analogy to Byte Pair Encoding (BPE) in NLP, we can think of tokenization as merging adjacent actions to form new, higher-level tokens. However, unlike language tokenization, creating these new tokens requires careful consideration of what information to retain. For instance, the total watch duration might need to be summed or engagement types aggregated to preserve critical details.

Figure 1.Tokenization of user interaction history by merging actions on the same title, preserving important information.

This tradeoff between granular data and sequence compression is akin to the balance in LLMs between vocabulary size and context window. In our case, the goal is to balance the length of interaction history against the level of detail retained in individual tokens. Overly lossy tokenization risks losing valuable signals, while too granular a sequence can exceed practical limits on processing time and memory.

Even with such strategies, interaction histories from active users can span thousands of events, exceeding the capacity of transformer models with standard self attention layers. In recommendation systems, context windows during inference are often limited to hundreds of events — not due to model capability but because these services typically require millisecond-level latency. This constraint is more stringent than what is typical in LLM applications, where longer inference times (seconds) are more tolerable.

To address this during training, we implement two key solutions:

  1. Sparse Attention Mechanisms: By leveraging sparse attention techniques such as low-rank compression, the model can extend its context window to several hundred events while maintaining computational efficiency. This enables it to process more extensive interaction histories and derive richer insights into long-term preferences.
  2. Sliding Window Sampling: During training, we sample overlapping windows of interactions from the full sequence. This ensures the model is exposed to different segments of the user’s history over multiple epochs, allowing it to learn from the entire sequence without requiring an impractically large context window.

At inference time, when multi-step decoding is needed, we can deploy KV caching to efficiently reuse past computations and maintain low latency.

These approaches collectively allow us to balance the need for detailed, long-term interaction modeling with the practical constraints of model training and inference, enhancing both the precision and scalability of our recommendation system.

Information in Each ‘Token’: While the first part of our tokenization process focuses on structuring sequences of interactions, the next critical step is defining the rich information contained within each token. Unlike LLMs, which typically rely on a single embedding space to represent input tokens, our interaction events are packed with heterogeneous details. These include attributes of the action itself (such as locale, time, duration, and device type) as well as information about the content (such as item ID and metadata like genre and release country). Most of these features, especially categorical ones, are directly embedded within the model, embracing an end-to-end learning approach. However, certain features require special attention. For example, timestamps need additional processing to capture both absolute and relative notions of time, with absolute time being particularly important for understanding time-sensitive behaviors.

To enhance prediction accuracy in sequential recommendation systems, we organize token features into two categories:

  1. Request-Time Features: These are features available at the moment of prediction, such as log-in time, device, or location.
  2. Post-Action Features: These are details available after an interaction has occurred, such as the specific show interacted with or the duration of the interaction.

To predict the next interaction, we combine request-time features from the current step with post-action features from the previous step. This blending of contextual and historical information ensures each token in the sequence carries a comprehensive representation, capturing both the immediate context and user behavior patterns over time.

Considerations for Model Objective and Architecture

As previously mentioned, our default approach employs the autoregressive next-token prediction objective, similar to GPT. This strategy effectively leverages the vast scale of unlabeled user interaction data. The adoption of this objective in recommendation systems has shown multiple successes [1–3]. However, given the distinct differences between language tasks and recommendation tasks, we have made several critical modifications to the objective.

Firstly, during the pretraining phase of typical LLMs, such as GPT, every target token is generally treated with equal weight. In contrast, in our model, not all user interactions are of equal importance. For instance, a 5-minute trailer play should not carry the same weight as a 2-hour full movie watch. A greater challenge arises when trying to align long-term user satisfaction with specific interactions and recommendations. To address this, we can adopt a multi-token prediction objective during training, where the model predicts the next n tokens at each step instead of a single token[4]. This approach encourages the model to capture longer-term dependencies and avoid myopic predictions focused solely on immediate next events.

Secondly, we can use multiple fields in our input data as auxiliary prediction objectives in addition to predicting the next item ID, which remains the primary target. For example, we can derive genres from the items in the original sequence and use this genre sequence as an auxiliary target. This approach serves several purposes: it acts as a regularizer to reduce overfitting on noisy item ID predictions, provides additional insights into user intentions or long-term genre preferences, and, when structured hierarchically, can improve the accuracy of predicting the target item ID. By first predicting auxiliary targets, such as genre or original language, the model effectively narrows down the candidate list, simplifying subsequent item ID prediction.

Unique Challenges for Recommendation FM

In addition to the infrastructure challenges posed by training bigger models with substantial amounts of user interaction data that are common when trying to build foundation models, there are several unique hurdles specific to recommendations to make them viable. One of unique challenges is entity cold-starting.

At Netflix, our mission is to entertain the world. New titles are added to the catalog frequently. Therefore the recommendation foundation models require a cold start capability, which means the models need to estimate members’ preferences for newly launched titles before anyone has engaged with them. To enable this, our foundation model training framework is built with the following two capabilities: Incremental training and being able to do inference with unseen entities.

  1. Incremental training : Foundation models are trained on extensive datasets, including every member’s history of plays and actions, making frequent retraining impractical. However, our catalog and member preferences continually evolve. Unlike large language models, which can be incrementally trained with stable token vocabularies, our recommendation models require new embeddings for new titles, necessitating expanded embedding layers and output components. To address this, we warm-start new models by reusing parameters from previous models and initializing new parameters for new titles. For example, new title embeddings can be initialized by adding slight random noise to existing average embeddings or by using a weighted combination of similar titles’ embeddings based on metadata. This approach allows new titles to start with relevant embeddings, facilitating faster fine-tuning. In practice, the initialization method becomes less critical when more member interaction data is used for fine-tuning.
  2. Dealing with unseen entities : Even with incremental training, it’s not always guaranteed to learn efficiently on new entities (ex: newly launched titles). It’s also possible that there will be some new entities that are not included/seen in the training data even if we fine-tune foundation models on a frequent basis. Therefore, it’s also important to let foundation models use metadata information of entities and inputs, not just member interaction data. Thus, our foundation model combines both learnable item id embeddings and learnable embeddings from metadata. The following diagram demonstrates this idea.
Figure 2. Titles are associated with various metadata, such as genres, storylines, and tones. Each type of metadata could be represented by averaging its respective embeddings, which are then concatenated to form the overall metadata-based embedding for the title.

To create the final title embedding, we combine this metadata-based embedding with a fully-learnable ID-based embedding using a mixing layer. Instead of simply summing these embeddings, we use an attention mechanism based on the “age” of the entity. This approach allows new titles with limited interaction data to rely more on metadata, while established titles can depend more on ID-based embeddings. Since titles with similar metadata can have different user engagement, their embeddings should reflect these differences. Introducing some randomness during training encourages the model to learn from metadata rather than relying solely on ID embeddings. This method ensures that newly-launched or pre-launch titles have reasonable embeddings even with no user interaction data.

Downstream Applications and Challenges

Our recommendation foundation model is designed to understand long-term member preferences and can be utilized in various ways by downstream applications:

  1. Direct Use as a Predictive Model The model is primarily trained to predict the next entity a user will interact with. It includes multiple predictor heads for different tasks, such as forecasting member preferences for various genres. These can be directly applied to meet diverse business needs..
  2. Utilizing embeddings The model generates valuable embeddings for members and entities like videos, games, and genres. These embeddings are calculated in batch jobs and stored for use in both offline and online applications. They can serve as features in other models or be used for candidate generation, such as retrieving appealing titles for a user. High-quality title embeddings also support title-to-title recommendations. However, one important consideration is that the embedding space has arbitrary, uninterpretable dimensions and is incompatible across different model training runs. This poses challenges for downstream consumers, who must adapt to each retraining and redeployment, risking bugs due to invalidated assumptions about the embedding structure. To address this, we apply an orthogonal low-rank transformation to stabilize the user/item embedding space, ensuring consistent meaning of embedding dimensions, even as the base foundation model is retrained and redeployed.
  3. Fine-Tuning with Specific Data The model’s adaptability allows for fine-tuning with application-specific data. Users can integrate the full model or subgraphs into their own models, fine-tuning them with less data and computational power. This approach achieves performance comparable to previous models, despite the initial foundation model requiring significant resources.

Scaling Foundation Models for Netflix Recommendations

In scaling up our foundation model for Netflix recommendations, we draw inspiration from the success of large language models (LLMs). Just as LLMs have demonstrated the power of scaling in improving performance, we find that scaling is crucial for enhancing generative recommendation tasks. Successful scaling demands robust evaluation, efficient training algorithms, and substantial computing resources. Evaluation must effectively differentiate model performance and identify areas for improvement. Scaling involves data, model, and context scaling, incorporating user engagement, external reviews, multimedia assets, and high-quality embeddings. Our experiments confirm that the scaling law also applies to our foundation model, with consistent improvements observed as we increase data and model size.

Figure 3. The relationship between model parameter size and relative performance improvement. The plot demonstrates the scaling law in recommendation modeling, showing a trend of increased performance with larger model sizes. The x-axis is logarithmically scaled to highlight growth across different magnitudes.

Conclusion

In conclusion, our Foundation Model for Personalized Recommendation represents a significant step towards creating a unified, data-centric system that leverages large-scale data to increase the quality of recommendations for our members. This approach borrows insights from Large Language Models (LLMs), particularly the principles of semi-supervised learning and end-to-end training, aiming to harness the vast scale of unlabeled user interaction data. Addressing unique challenges, like cold start and presentation bias, the model also acknowledges the distinct differences between language tasks and recommendation. The Foundation Model allows various downstream applications, from direct use as a predictive model to generate user and entity embeddings for other applications, and can be fine-tuned for specific canvases. We see promising results from downstream integrations. This move from multiple specialized models to a more comprehensive system marks an exciting development in the field of personalized recommendation systems.

Acknowledgements

Contributors to this work (name in alphabetical order): Ai-Lei Sun Aish Fenton Anne Cocos Anuj Shah Arash Aghevli Baolin Li Bowei Yan Dan Zheng Dawen Liang Ding Tong Divya Gadde Emma Kong Gary Yeh Inbar Naor Jin Wang Justin Basilico Kabir Nagrecha Kevin Zielnicki Linas Baltrunas Lingyi Liu Luke Wang Matan Appelbaum Michael Tu Moumita Bhattacharya Pablo Delgado Qiuling Xu Rakesh Komuravelli Raveesh Bhalla Rob Story Roger Menezes Sejoon Oh Shahrzad Naseri Swanand Joshi Trung Nguyen Vito Ostuni Wei Wang Zhe Zhang

Reference

  1. C. K. Kang and J. McAuley, “Self-Attentive Sequential Recommendation,” 2018 IEEE International Conference on Data Mining (ICDM), Singapore, 2018, pp. 197–206, doi: 10.1109/ICDM.2018.00035.
  2. F. Sun et al., “BERT4Rec: Sequential Recommendation with Bidirectional Encoder Representations from Transformer,” Proceedings of the 28th ACM International Conference on Information and Knowledge Management (CIKM ‘19), Beijing, China, 2019, pp. 1441–1450, doi: 10.1145/3357384.3357895.
  3. J. Zhai et al., “Actions Speak Louder than Words: Trillion-Parameter Sequential Transducers for Generative Recommendations,” arXiv preprint arXiv:2402.17152, 2024.
  4. F. Gloeckle, B. Youbi Idrissi, B. Rozière, D. Lopez-Paz, and G. Synnaeve, “Better & Faster Large Language Models via Multi-token Prediction,” arXiv preprint arXiv:2404.19737, Apr. 2024.


Foundation Model for Personalized Recommendation was originally published in Netflix TechBlog on Medium, where people are continuing the conversation by highlighting and responding to this story.