Post Syndicated from Jack Bradham original https://aws.amazon.com/blogs/architecture/analyze-media-content-using-aws-ai-services/
Organizations managing large audio and video archives face significant challenges in extracting value from their media content. Consider a radio network with thousands of broadcast hours across multiple stations and the challenges they face to efficiently verify ad placements, identify interview segments, and analyze programming patterns.
In this post, we demonstrate how you can automatically transform unstructured media files into searchable, analyzable content. By combining Amazon Transcribe, Amazon Bedrock, Amazon QuickSight, and Amazon Q, organizations can achieve the following:
- Process and transcribe media files upon upload
- Identify commercials, interviews, and program segments
- Extract insights using foundation models (FMs)
- Create a searchable knowledge base
- Generate rich visualizations for decision-making
- Enable natural language queries across their media archive
- Visualize complex information with intuitive graphics
In the following sections, we explore how these AWS services work together to help organizations unlock the full potential of their media content, whether for advertising compliance, content analysis, or discovering specific segments within thousands of hours of recordings.
Solution overview
This solution provides an event-driven media analysis pipeline that transforms how you manage and extract value from your content:
- Streamline content management – Automatically process media files the moment they’re uploaded, saving time and reducing manual work
- Unlock deeper insights – Generate accurate transcriptions that capture not just words, but the full context of your content—including speakers, timing, and key moments
- Harness AI – Automatically extract meaningful insights and uncover hidden patterns in your media without extensive manual review
- Build a searchable knowledge base – Turn scattered media files into a discoverable catalog that your entire team can use
- Build a customizable interface – Create a customizable UI to search the catalog
- Create powerful visualizations – Bring your insights to life with intuitive visualizations that make complex information immediately understandable
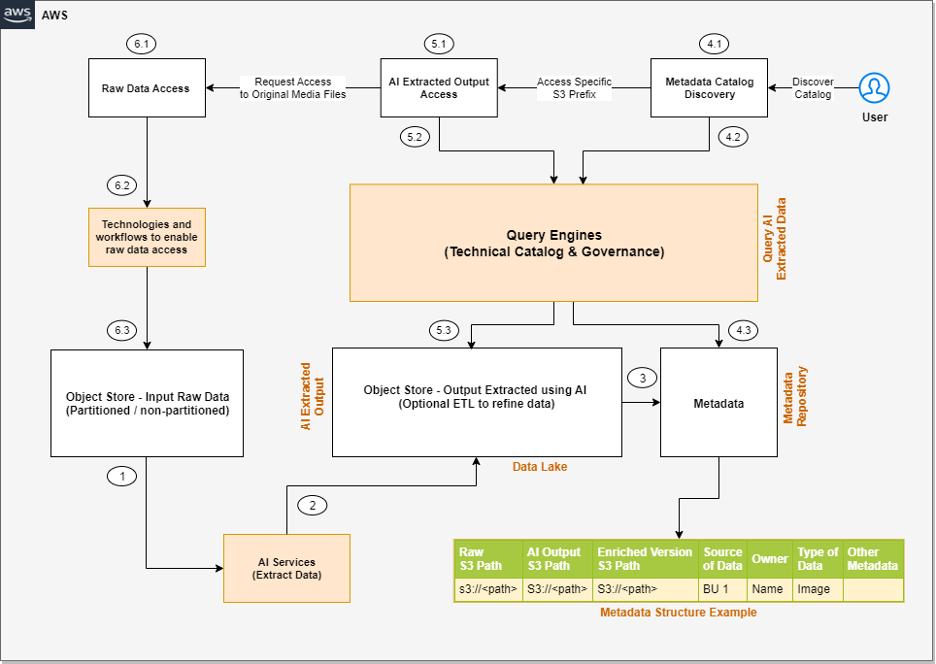
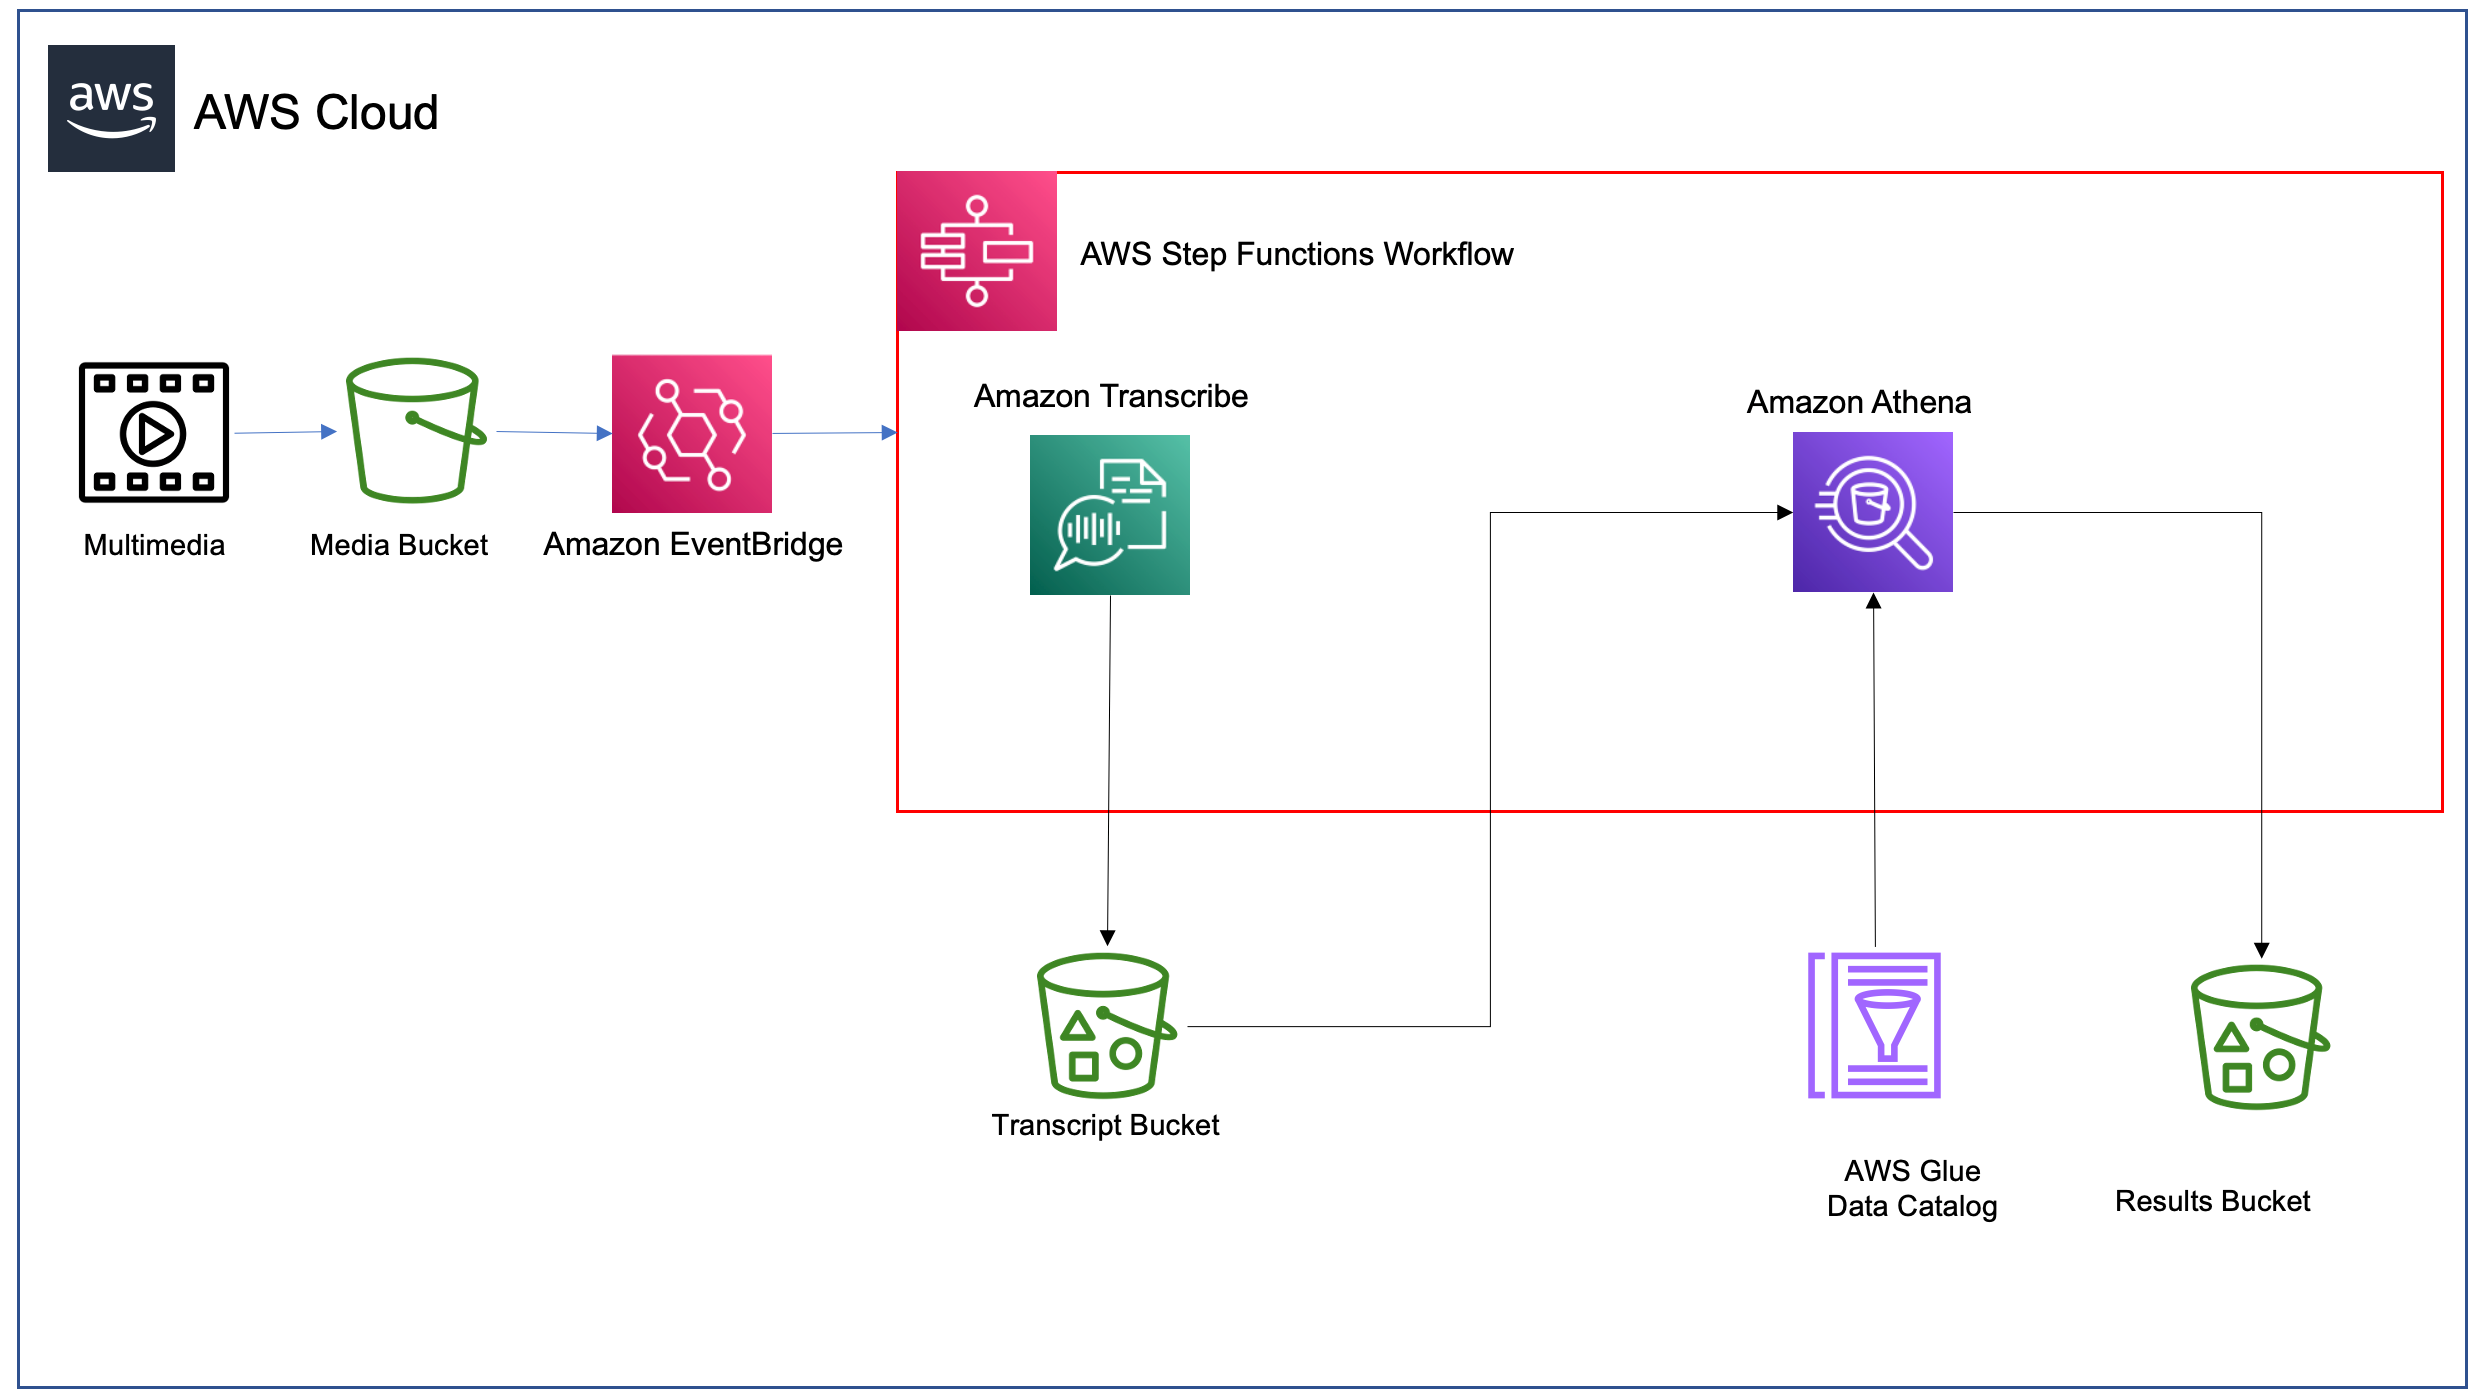
The following diagram illustrates our architecture.

This event-driven architecture automatically processes and analyzes multimedia content using AWS services. The workflow consists of the following steps:
- A user uploads media files to an Amazon Simple Storage Service (Amazon S3) bucket. A “New Media” event triggers the first AWS Step Functions workflow. This workflow handles the initial cataloging based on values in the file name and launches the transcription process.
- Amazon Transcribe converts the audio into accurate, readable text. The transcribed content is securely saved to an S3 bucket for further analysis. A “Transcription Complete” event triggers the next step.
- A second Step Functions workflow processes the transcription. Using predefined prompts, Amazon Bedrock analyzes the transcripts to extract meaningful information. Key insights extracted from the transcript are stored in an S3 data lake.
- The processed results are organized systematically, structured by date (year/month/day) and tagged with relevant attributes. This organized data enables natural language queries through Amazon Q when used as a knowledge base, interactive visualizations using QuickSight, and straightforward content discovery and analysis.
- Amazon Athena serves as the data exploration tool to query the data lake. Athena is used as the data source in QuickSight, which turns complex data into clear, compelling visuals.
This architecture automatically transforms raw media content into searchable, analyzable data while maintaining an organized hierarchy for efficient access and analysis. The event-driven design provides automatic processing of new content as it arrives, and the combination of AWS AI services enables deep content understanding and insight extraction. Each AWS service plays a crucial role in transforming your media content:
- Amazon Bedrock – Reviews content after transcription for insights and entity extraction:
- Uses advanced FMs to analyze transcripts
- Identifies commercials, interviews, and program segments
- Extracts meaningful insights from content
- Amazon EventBridge – Triggers actions in the cataloging workflow:
- Monitors for new media files and completed transcriptions
- Automatically triggers Step Functions workflows
- AWS Lambda – Handles custom code actions needed in the workflow:
- Facilitates interaction with Amazon Bedrock
- Executes custom prompts on transcripts
- Enables flexible, scalable processing
- Amazon Q – Serves as the frontend and Retrieval Augmented Generation (RAG) engine:
- Addresses enterprise generative AI needs by providing a turnkey solution with built-in security features like single sign-on (SSO) integration and responsible AI governance policies
- Allows businesses to quickly deploy AI assistance while maintaining compliance, data privacy, and security standards
- Enables natural language queries across the media archive
- Links results to the source media files
- Provides conversational access to content
- Amazon QuickSight – Turns insights in beautiful visualization for better consumption:
- Creates interactive dashboards and visualizations
- Displays comprehensive media analytics
- Helps track advertising, programming, and content patterns
- Amazon S3 – Stores assets and the catalog:
- Securely stores raw media files, transcripts, and processed data
- Automatically triggers processing when new content is uploaded
- AWS Step Functions – Orchestrates the entire content processing workflow:
- Manages transcription and AI analysis steps
- Provides robust error handling and automatic retries
- Amazon Transcribe – Converts speech to accurate, readable text:
- Identifies speakers and timestamps
- Provides accurate transcriptions of audio content
Security considerations
Although this post focuses on the technical implementation of media content analysis, it’s important to acknowledge that production deployments should include comprehensive security measures:
- Data storage security (Amazon S3):
- Enable server-side encryption using AWS Key Management Service (AWS KMS) keys
- Apply bucket policies restricting access to authorized principals only
- Enable Amazon S3 Block Public Access at account and bucket levels
- Enable versioning for data recovery
- Implement lifecycle policies for data retention
- Enable S3 access logging
- Use presigned URLs for temporary access
- Identity and Access Management (IAM):
- Create dedicated service roles with minimum required permissions for:
- Step Functions execution
- Amazon Transcribe jobs
- Amazon Bedrock API calls
- Athena queries
- Implement role-based access control
- Regularly rotate credentials
- Enable multi-factor authentication (MFA) for all users
- Use AWS Organizations for multi-account management
- Create dedicated service roles with minimum required permissions for:
- Network security:
- Deploy virtual private cloud (VPC) endpoints for:
- Amazon S3
- Athena
- QuickSight
- Implement network access control lists (ACLs) and security groups
- Enable VPC Flow Logs
- Use AWS PrivateLink where applicable
- Configure route tables to control traffic flow
- Deploy virtual private cloud (VPC) endpoints for:
- Data encryption:
- Implement AWS KMS encryption for S3 objects
- Use TLS 1.2+ for all API communications
- Enable automatic key rotation in AWS KMS
- Implement envelope encryption for sensitive data
- Monitoring and detection:
- Enable AWS CloudTrail for API activity logging
- Configure Amazon GuardDuty for threat detection
- Set up Amazon CloudWatch:
- Metrics for service health
- Alarms for security events
- Log groups for application logs
- Enable S3 server access logging
- Configure VPC Flow Logs
- Access controls:
- Implement fine-grained access controls for:
- Amazon Bedrock model access
- Athena query permissions
- QuickSight dashboard sharing
- Conduct regular access reviews
- Implement fine-grained access controls for:
Additionally, compliance requirements and data governance policies might impact how you implement this solution in your environment.
These security considerations are crucial but beyond the scope of this post. We recommend consulting AWS security best practices and working with your security team to implement appropriate measures for your specific use case. For more information on AWS security best practices, refer to Best Practices for Security, Identity, & Compliance.
The following sections walk you through setting up each component of the architecture to help you transform raw media into actionable insights.
Prerequisites
The following are the prerequisites to follow along this post:
- An AWS account with an IAM user who has permissions to Lambda, Amazon Bedrock, Amazon S3, Amazon Transcribe, Step Functions, and IAM.
- Access to the FMs that you are planning to use in Amazon Bedrock. For instructions, see Access Amazon Bedrock foundation models.
- A QuickSight enterprise account. For instructions, see Setting up for Amazon QuickSight.
Create S3 buckets
For this solution, we create three distinct buckets to support the media analytics workflow:
- Raw media bucket for incoming files
- Transcription outputs bucket
- Processed insights bucket
For instructions on creating buckets, refer to Creating a general purpose bucket.
Configure EventBridge
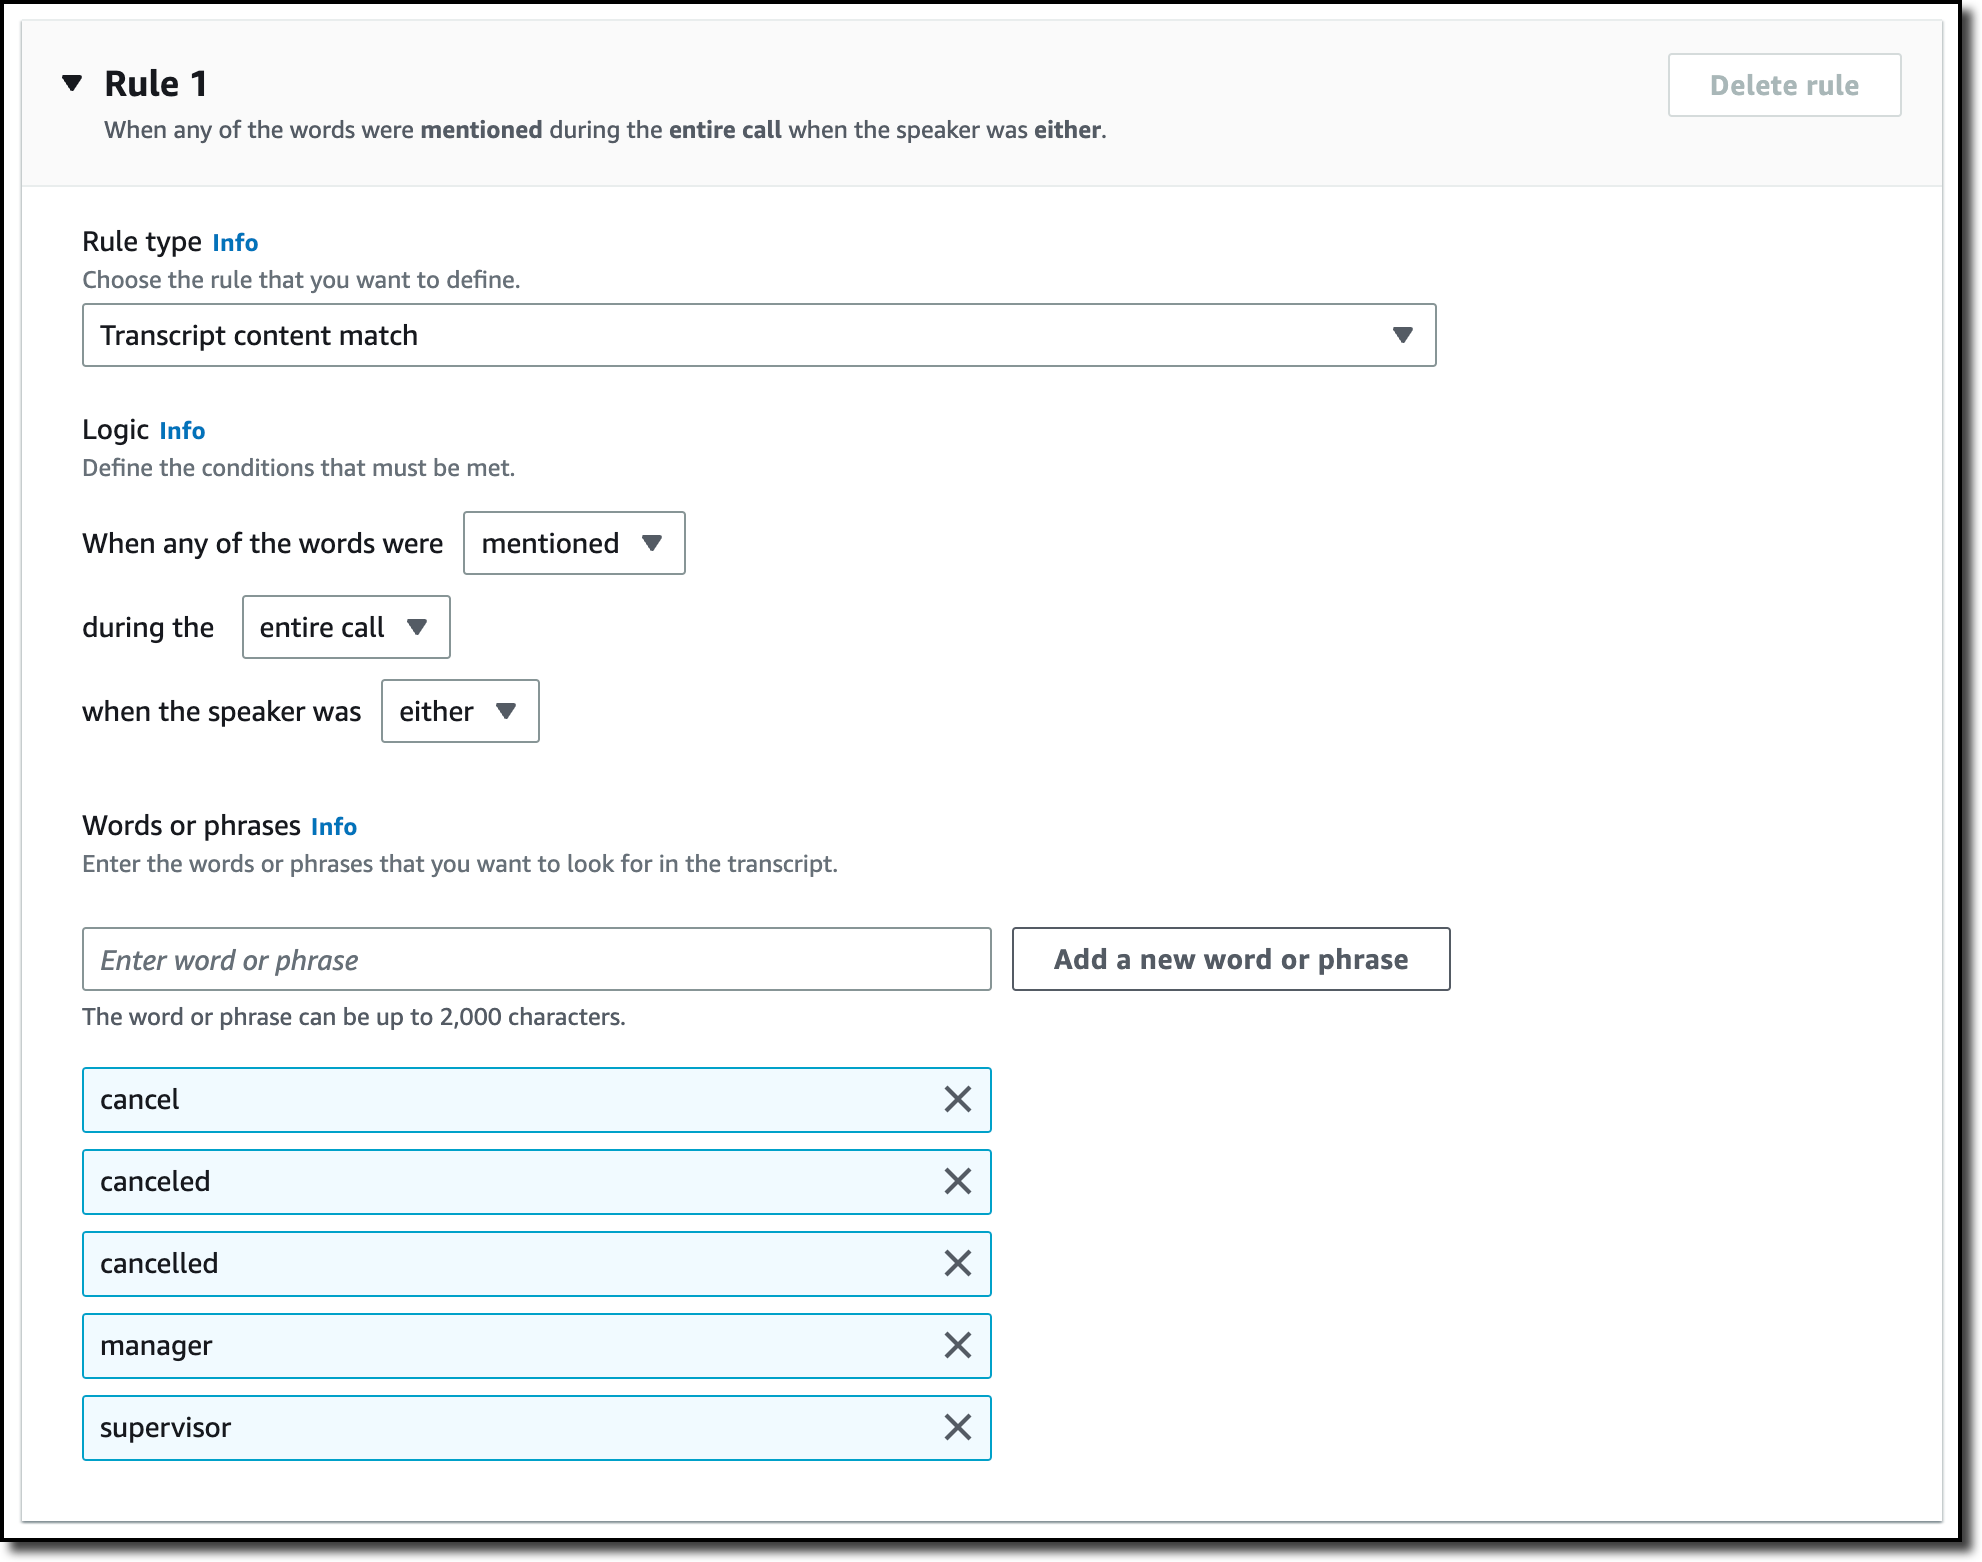
You can enable event notifications on the raw media bucket to trigger your automated workflow through EventBridge. Establish your automation backbone by monitoring S3 bucket activities. When new media arrives or transcription completes, EventBridge will trigger the appropriate workflow, providing continuous processing. For further instructions, refer to Creating rules that react to events in Amazon EventBridge.
The following are two example triggers that can be used to filter events and trigger Step Functions workflows. The following is an example filter for new media files:
The following is an example filter for new transcripts added to the data lake:
Create Step Functions workflows
We design the orchestration layer with two key workflows. The first handles media intake and transcription, and the second manages AI analysis. Each workflow includes safeguards for potential failures and retry mechanisms. For further instructions, refer to Learn how to get started with Step Functions.
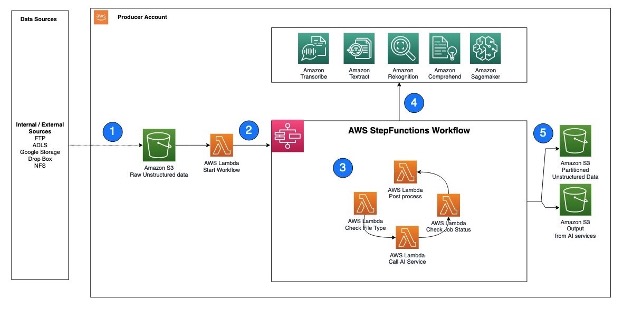
The following diagram shows an example of processing new media uploads for indexing and transcription.

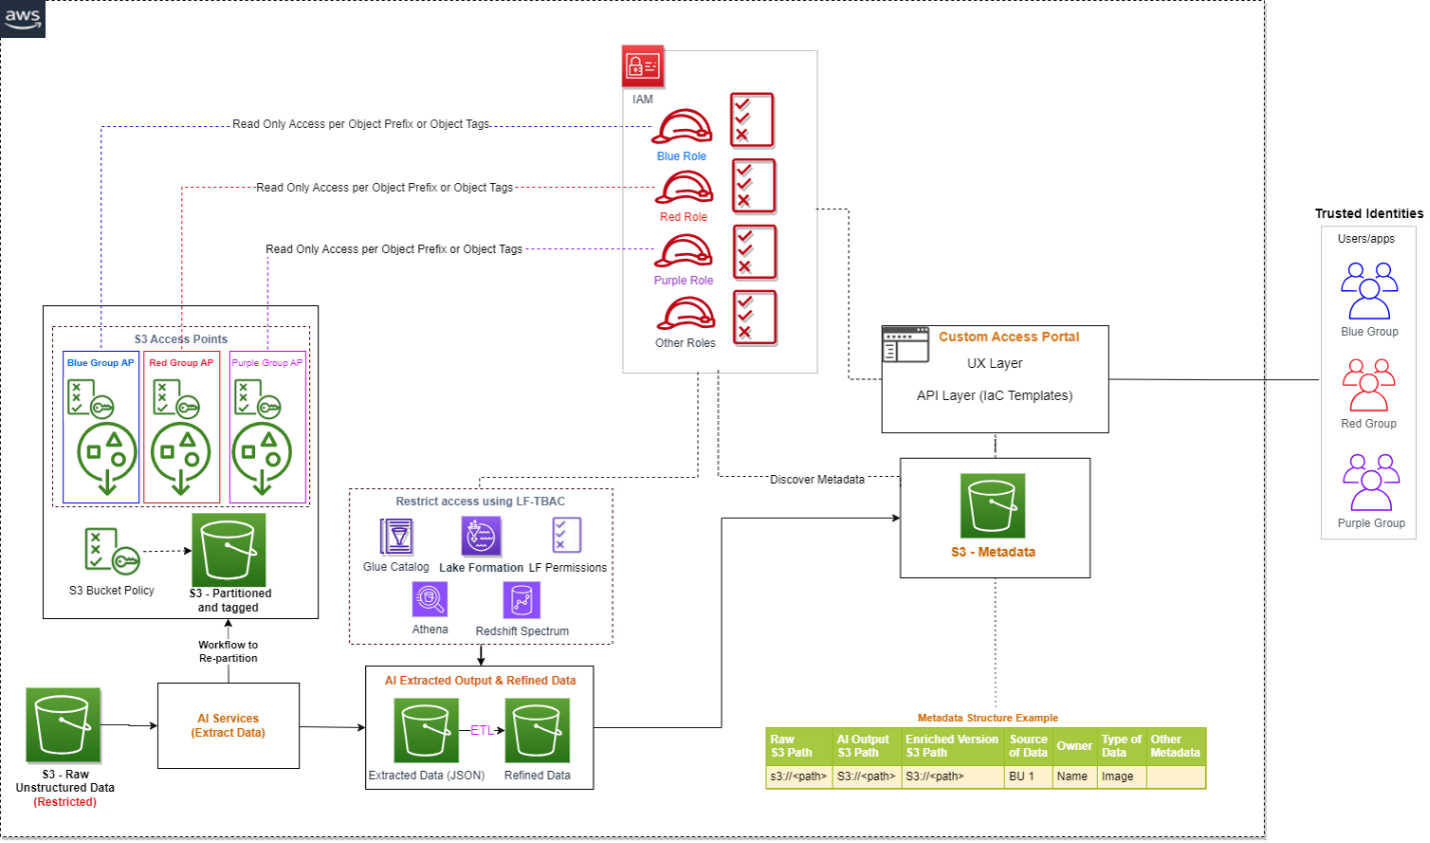
The following diagram shows an example of the Step Functions workflow that analyzes the transcription.

Set up Amazon Transcribe
To create an Amazon Transcribe job, you need permissions to do so. You can implement a speech-to-text conversion with powerful features like language detection, speaker identification, and custom vocabulary support to provide accurate transcription of your media content. For further instructions, refer to How Amazon Transcribe works.
Configure Amazon Bedrock
You can power your AI analysis engine by setting up precise prompts that extract meaningful insights. Amazon Bedrock processes transcripts to identify key segments, speakers, and topics, transforming raw text into structured data. For instructions, refer to Design a prompt.
The following is a sample prompt:
Create a structured data lake
We create a hierarchical data organization strategy that enables efficient access and analysis. You can use AWS Glue crawlers to automatically discover and catalog your media metadata. For instructions, refer to Using crawlers to populate the Data Catalog. Configure Athena tables to enable SQL-based querying of your media insights:
Set Up Amazon Q
You can enable natural language interaction with your media archive using Amazon Q Business. Configure the knowledge base and metadata to make your content searchable and accessible through conversational queries. Use the processed insights S3 buckets to configure the knowledge base. For instructions, refer to Getting started with Amazon Q Business.
The following screenshot shows example conversations with an AI assistant.

Build QuickSight dashboards
With QuickSight, you can create visual analytics that bring your data to life. Connect to Athena views to display advertising patterns, content analysis, and performance metrics in interactive dashboards. For more information, refer to Tutorial: Create an Amazon QuickSight dashboard.
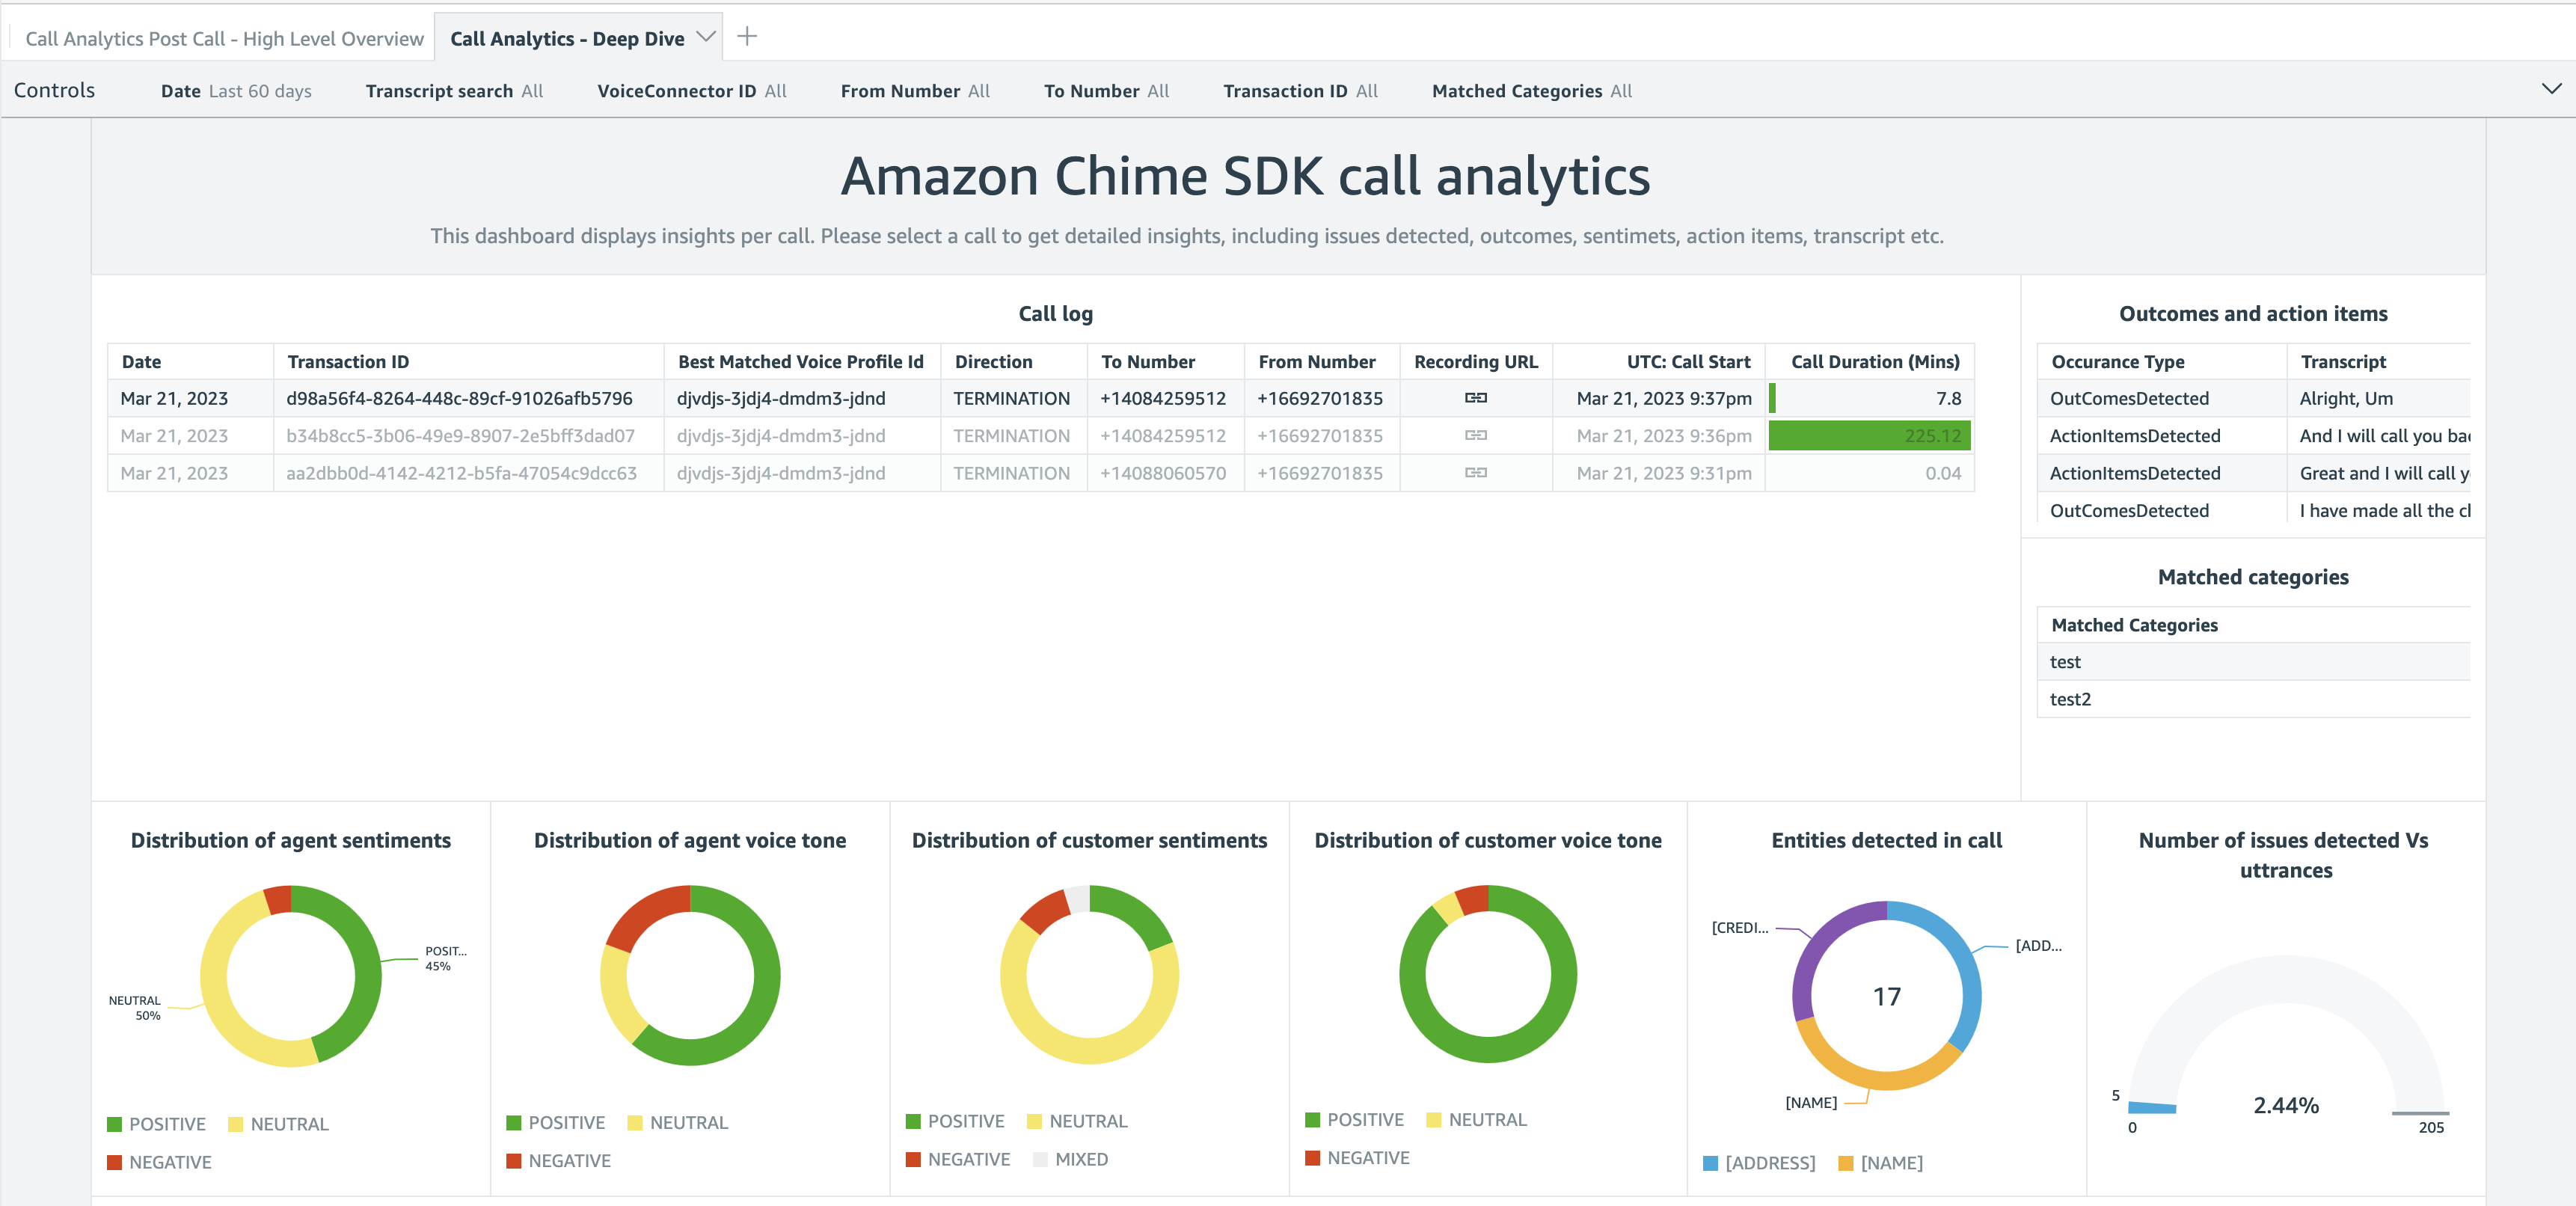
The following screenshots are a few examples of dashboards created for a fictitious radio station as part of our use case.


Validate and optimize your media analytics solution
After you implement your media analytics architecture, follow these critical steps to achieve robust performance and alignment with your organization’s needs. First, configure a comprehensive testing approach. Imagine you’re preparing to launch your media analysis solution. Your testing journey begins with accuracy validation:
- Compare transcription outputs against original media
- Verify AI-generated insights for precision
- Use representative sample sets from your content library
You start by taking a recently processed radio show and comparing its transcription against the original broadcast. Your team meticulously reviews the AI-generated insights, checking if key moments like ad transitions or interview segments are correctly identified. To make sure your system works across all content types, you select diverse samples from your library—perhaps a morning talk show, an evening news segment, and a weekend sports broadcast. Next, you delve into performance benchmarking:
- Measure processing time for different media types
- Evaluate resource utilization across AWS services
- Identify potential bottlenecks in the workflow
Time how long it takes to process different types of media files, from short commercial segments to lengthy program recordings. As you watch how your AWS services respond under various loads, you can monitor resource consumption patterns. This helps you identify processing bottlenecks—for instance, you might discover that certain file types take longer to transcribe or that concurrent processing needs optimization. Finally, you put yourself in your users’ shoes for a thorough user experience assessment:
- Test natural language queries with Amazon Q
- Validate search result relevance
- Gather feedback from potential end-users
Team members can interact with Amazon Q, asking questions they would naturally pose when searching for specific content. For example, you can test whether searching for “interviews about climate change last week” returns relevant results. Gathering feedback from potential users—perhaps a content manager with different needs than a compliance officer—provides invaluable insights. Their real-world experiences guide your refinements and make sure the system serves its intended purpose. This comprehensive testing approach, combining structured evaluation with real-world scenarios, sets the stage for a robust and user-friendly media analysis solution. As your media analysis solution moves from initial deployment to production, optimizing its performance becomes crucial for both cost-efficiency and user satisfaction. A radio network processing thousands of hours of content weekly might find that even small improvements in transcription accuracy or processing speed can lead to significant cost savings and better content discoverability. Similarly, a marketing team analyzing ad placements across multiple stations needs precise insights to make data-driven decisions about advertising effectiveness. With these business imperatives in mind, consider the following configuration optimization strategies:
- Transcription refinement:
- Adjust language models for domain-specific terminology
- Fine-tune speaker identification settings
- Implement custom vocabularies for improved accuracy
- AI insight generation:
- Refine prompts for more targeted analysis
- Experiment with different AI models
- Align extraction parameters with business objectives
- Scalability considerations:
- Test workflow performance with increasing media volumes
- Implement appropriate auto scaling configurations
- Monitor cost-effectiveness of your architecture
- Continuous improvement:
- Establish regular review cycles
- Track key performance metrics
- Iterate on your solution based on real-world usage
We recommend starting with a pilot implementation and gradually expanding your media analytics capabilities.
Clean up
To avoid incurring ongoing charges, clean up the resources you created as part of this solution:
- Delete QuickSight resources:
- Delete dashboards created for media analytics.
- Delete the datasets connected to Athena.
- If no longer needed, delete the QuickSight Enterprise subscription.
- Delete S3 buckets:
- Empty and delete the raw media bucket, transcription outputs bucket, and processed insights bucket.
- Remove EventBridge rules:
- Delete the rules created for monitoring S3 bucket activities.
- Remove targets associated with these rules.
- Delete Step Functions workflows:
- Delete the media intake and transcription workflow.
- Delete the AI analysis workflow.
- Remove Lambda functions:
- Delete Lambda functions created for interaction with Amazon Bedrock.
- Remove associated IAM roles and policies.
- Clean up data lake components:
- Delete Athena views and tables.
- Remove AWS Glue crawlers and databases.
- Delete stored query results.
- Remove Amazon Q configurations:
- Delete knowledge bases created.
- Remove custom configurations.
- Remove Amazon Bedrock settings:
- Remove custom prompts.
- Disable access to FMs if no longer needed.
- Delete Amazon Transcribe settings:
- Remove custom vocabularies.
- Delete stored transcription jobs.
- Remove IAM resources:
- Delete custom IAM roles created for this solution.
- Remove associated IAM policies.
- Complete additional cleanup:
- Delete CloudWatch Logs groups associated with Lambda functions.
- Remove CloudWatch alarms or metrics created for monitoring.
- Delete saved queries in Athena.
Common use cases
Organizations in different sectors can use this architecture to unlock value from their audio and video content. You can adapt this solution to meet your specific needs, such as managing broadcast media, corporate communications, educational materials, and more. Let’s explore how different industries might apply this technology:
- Media and broadcasting:
- Track advertising compliance
- Verify media placement accuracy
- Analyze broadcast content at scale
- Corporate and enterprise:
- Convert meeting recordings into searchable knowledge bases
- Identify key decisions and action items
- Enhance organizational knowledge management
- Education and training:
- Create comprehensive, topic-based course catalogs
- Index training materials for quick retrieval
- Support continuous learning initiatives
- Legal services:
- Generate precise, timestamped transcripts
- Develop searchable legal proceeding archives
- Improve document review efficiency
- Healthcare:
- Extract critical medical insights from consultations
- Categorize patient interaction data
- Support clinical documentation processes
- Government and public sector:
- Build comprehensive public meeting archives
- Implement automated topic categorization
- Enhance transparency and accessibility
- Customer service:
- Analyze call recordings for quality improvement
- Identify service trends and customer pain points
- Drive continuous customer experience enhancement
This media analytics architecture demonstrates notable versatility. By using AI, organizations can transform raw audio and video content into structured, meaningful insights that drive decision-making across industries.
Conclusion
In this post, we demonstrated how to use AWS services to convert unstructured media content into actionable intelligence. By combining Amazon Transcribe, Amazon Bedrock, QuickSight, and Amazon Q, you can create a scalable, automated solution for media analysis that adapts to your organizational needs.
This solution offers the following key architectural advantages:
- Automated media file processing at scale
- AI-powered insight generation
- Natural language search capabilities
- Interactive decision-making visualizations
- Flexible, maintainable infrastructure
Organizations can now convert content into searchable knowledge, extract insights automatically, develop data-driven content strategies, and enhance operational efficiency through automation.
As audio and video content generation continues to accelerate, the ability to efficiently process and extract value becomes increasingly critical. This architecture provides a robust foundation for current needs while remaining adaptable to future technological innovations.
We invite you to explore how this media analytics solution can address your organization’s unique challenges. Consider your specific use cases and unlock the insights waiting to be discovered in your media archives.


 Sakti Mishra is a Principal Solutions Architect at AWS, where he helps customers modernize their data architecture and define their end-to-end data strategy, including data security, accessibility, governance, and more. He is also the author of the book
  Bhavana Chirumamilla is a Senior Resident Architect at AWS with a strong passion for data and machine learning operations. She brings a wealth of experience and enthusiasm to help enterprises build effective data and ML strategies. In her spare time, Bhavana enjoys spending time with her family and engaging in various activities such as traveling, hiking, gardening, and watching documentaries.
 Sheela Sonone is a Senior Resident Architect at AWS. She helps AWS customers make informed choices and trade-offs about accelerating their data, analytics, and AI/ML workloads and implementations. In her spare time, she enjoys spending time with her family—usually on tennis courts.
 Daniel Bruno is a Principal Resident Architect at AWS. He had been building analytics and machine learning solutions for over 20 years and splits his time helping customers build data science programs and designing impactful ML products.
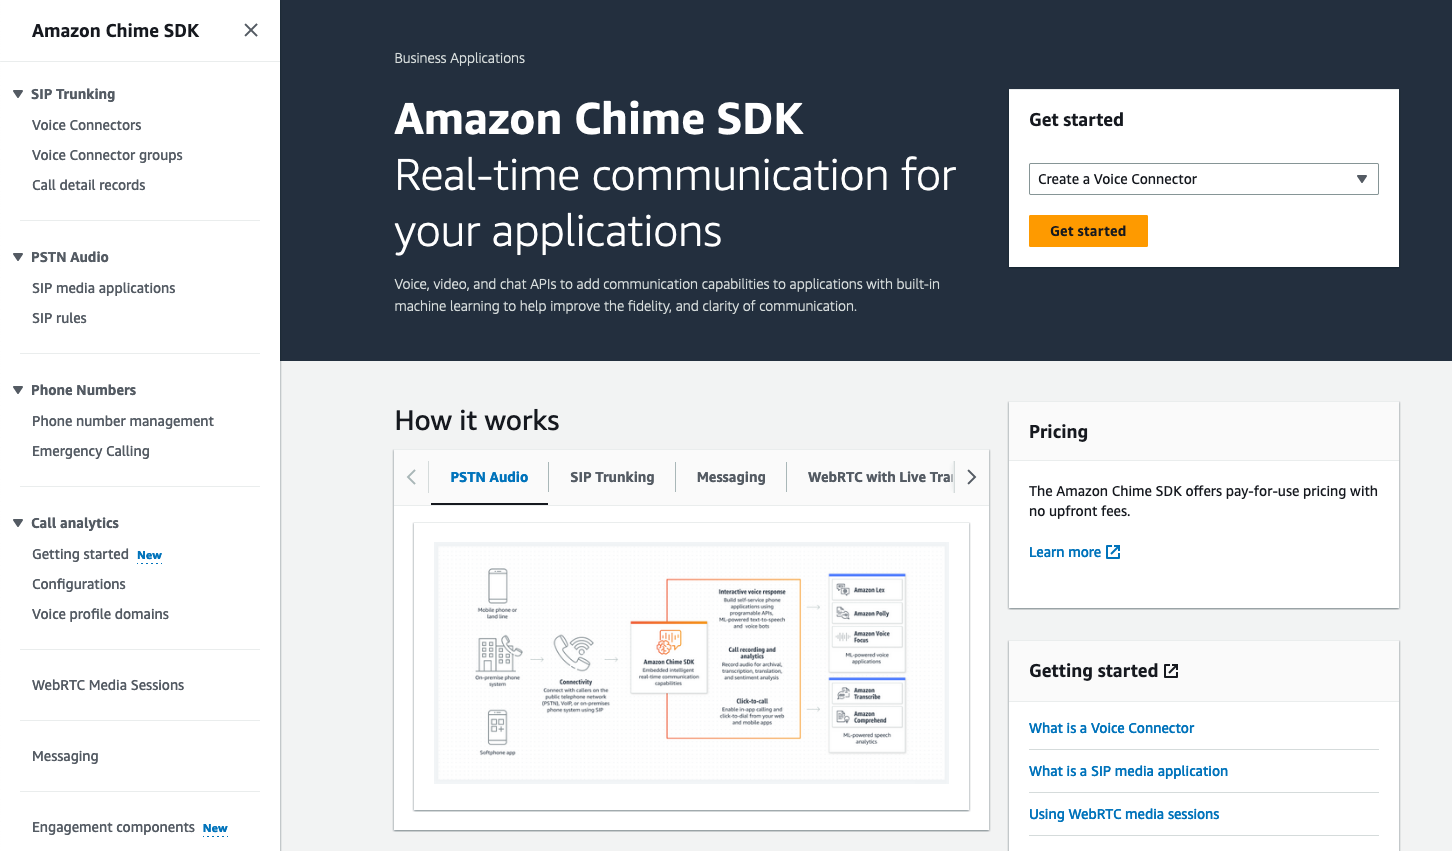


 We also have more


