Tag Archives: home automation

Deter burglars with a Raspberry Pi chatbot

Post Syndicated from Ashley Whittaker original https://www.raspberrypi.org/blog/deter-burglars-with-a-raspberry-pi-chatbot/

How to improve upon the standard burglar deterring method of leaving lights switched on? Dennis Mellican turned to Raspberry Pi for a much more effective solution. It actually proved too effective when a neighbour stopped by, but more on that in a bit.

Here you can see Dennis’s system in action scaring off a trespasser:

Good job, Raspberry Pi chatbots!

The burglar deterrent started out as Dennis’s regular home automation system. Not content with the current software offerings, and having worked in DevOps, Dennis decided to create his own solution. Enter Raspberry Pi (well, several of them).

Chatterboxes

Dennis has multiple Raspberry Pi–powered devices dotted around his home, doing things such as turning on lights, powering up a garden sprinkler, and playing fake dog barks on wireless speakers. All these burglar deterrents work together and are run by a chat bot.

A simulation of the chatbots responding to Dennis’ commands

Each Raspberry Pi controls a single automated item in Dennis’s home. All the Raspberry Pis communicate with each other via Slack. Dennis issues commands if he, for example, wants lights to turn on while he is away, but the Raspberry Pis can also talk to each other when a trigger event occurs, such as when a motion sensor is tripped.

Smart sound

speaker, chromecast device, cctv camera and the Raspberry Pi connected for the anti burglary chatbot
Speaker, Google Chromecast, CCTV camera and Raspberry Pi

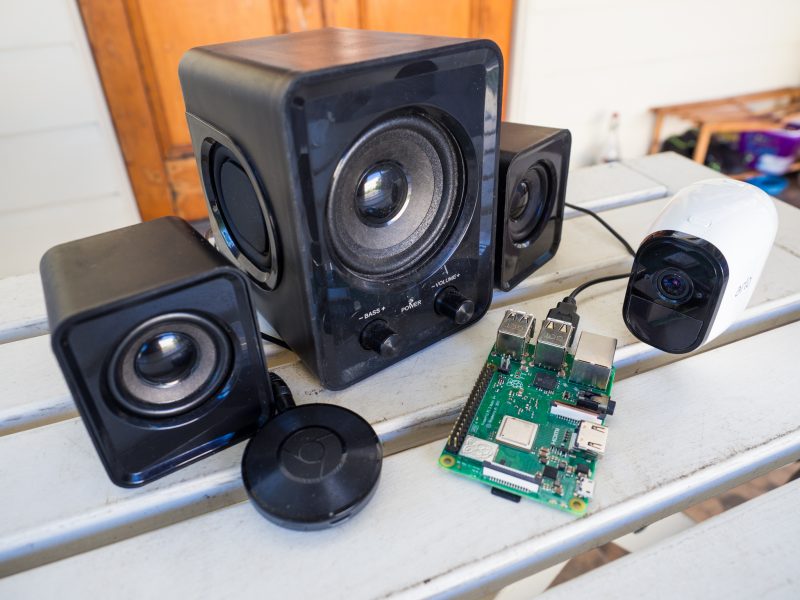
Google Chromecast enables ‘dumb’ speakers to be smart. Dennis has such speakers set up inside, close to windows at the front and back of the house, and they play an .mp3 file of a fake dog bark when commanded.

The security cameras Dennis uses in his home setup are a wireless CCTV variety, and the lights are a mix of TP-Link and Lifx smart bulbs.

Here’s all the Python code running Dennis’ entire security system.

Too effective?

Dennis’s smart system has backfired on him a few times. Once a neighbour visited while he was out and thought Dennis was rudely not answering the door, because she saw the lights go on inside, making it appear like he was home. Awkward.

The fake dog barking has also startled the postman and a few joggers — Dennis says it adds to the realism.

You’re cute, but you wreck stuff, so get out

The troupe of Raspberry Pis has also scared away an Australian possum (video above). These critters are notorious for making nests in roof cavities, so Dennis dodged another problematic home invasion there.

Future upgrades

Dennis is a maker after our own hearts when explaining where he’d like to go next with his anti-burglary build:

“I feel like Kevin McCallister from Home Alone, with these home security ‘traps’. I’m still waiting to catch the Wet Bandits for the sequel to this story. So far only stray cats have been caught by the sprinkler. Perhaps the next adventure of the chat bot is to order pizza and have Gangster ‘Johnny’ complete the transaction when the pizza delivery triggers the sensors.”

Go for it, Dennis!

The post Deter burglars with a Raspberry Pi chatbot appeared first on Raspberry Pi.

Hire Raspberry Pi as a robot sous-chef in your kitchen

Post Syndicated from Ashley Whittaker original https://www.raspberrypi.org/blog/hire-raspberry-pi-as-a-robot-sous-chef-in-your-kitchen/

Design Engineering student Ben Cobley has created a Raspberry Pi–powered sous-chef that automates the easier pan-cooking tasks so the head chef can focus on culinary creativity.

Ben named his invention OnionBot, as the idea came to him when looking for an automated way to perfectly soften onions in a pan while he got on with the rest of his dish. I have yet to manage to retrieve onions from the pan before they blacken so… *need*.

OnionBot robotic sous-chef set up in a kitchen
The full setup (you won’t need a laptop while you’re cooking, so you’ll have counter space)

A Raspberry Pi 4 Model B is the brains of the operation, with a Raspberry Pi Touch Display showing the instructions, and a Raspberry Pi Camera Module keeping an eye on the pan.

OnionBot robotic sous-chef hardware mounted on a board
Close up of the board-mounted hardware and wiring

Ben’s affordable solution is much better suited to home cooking than the big, expensive robotic arms used in industry. Using our tiny computer also allowed Ben to create something that fits on a kitchen counter.

OnionBot robotic sous-chef hardware list

What can OnionBot do?

  • Tells you on-screen when it is time to advance to the next stage of a recipe
  • Autonomously controls the pan temperature using PID feedback control
  • Detects when the pan is close to boiling over and automatically turns down the heat
  • Reminds you if you haven’t stirred the pan in a while
OnionBot robotic sous-chef development stages
Images from Ben’s blog on DesignSpark

How does it work?

A thermal sensor array suspended above the stove detects the pan temperature, and the Raspberry Pi Camera Module helps track the cooking progress. A servo motor controls the dial on the induction stove.

Screenshot of the image classifier of OnionBot robotic sous-chef
Labelling images to train the image classifier

No machine learning expertise was required to train an image classifier, running on Raspberry Pi, for Ben’s robotic creation; you’ll see in the video that the classifier is a really simple drag-and-drop affair.

Ben has only taught his sous-chef one pasta dish so far, and we admire his dedication to carbs.

Screenshot of the image classifier of OnionBot robotic sous-chef
Training the image classifier to know when you haven’t stirred the pot in a while

Ben built a control panel for labelling training images in real time and added labels at key recipe milestones while he cooked under the camera’s eye. This process required 500–1000 images per milestone, so Ben made a LOT of pasta while training his robotic sous-chef’s image classifier.

Diagram of networked drivers and devices in OnionBot robotic sous-chef

Ben open-sourced this project so you can collaborate to suggest improvements or teach your own robot sous-chef some more dishes. Here’s OnionBot on GitHub.

The post Hire Raspberry Pi as a robot sous-chef in your kitchen appeared first on Raspberry Pi.

Talk to your Raspberry Pi | HackSpace 36

Post Syndicated from Andrew Gregory original https://www.raspberrypi.org/blog/talk-to-your-raspberry-pi-hackspace-36/

In the latest issue of HackSpace Magazine, out now, @MrPJEvans shows you how to add voice commands to your projects with a Raspberry Pi 4 and a microphone.

You’ll need:

It’s amazing how we’ve come from everything being keyboard-based to so much voice control in our lives. Siri, Alexa, and Cortana are everywhere and happy to answer questions, play you music, or help automate your household.

For the keen maker, these offerings may not be ideal for augmenting their latest project as they are closed systems. The good news is, with a bit of help from Google, you can add voice recognition to your project and have complete control over what happens. You just need a Raspberry Pi 4, a speaker array, and a Google account to get started.

Set up your microphone

This clever speaker uses four microphones working together to increase accuracy. A ring of twelve RGB LEDs can be coded to react to events, just like an Amazon Echo

For a home assistant device, being able to hear you clearly is an essential. Many microphones are either too low-quality for the task, or are unidirectional: they only hear well in one direction. To the rescue comes Seeed’s ReSpeaker, an array of four microphones with some clever digital processing to provide the kind of listening capability normally found on an Amazon Echo device or Google Assistant. It’s also in a convenient HAT form factor, and comes with a ring of twelve RGB LEDs, so you can add visual effects too. Start with a Raspberry Pi OS Lite installation, and follow these instructions to get your ReSpeaker ready for use.

Install Snowboy

You’ll see later on that we can add the power of Google’s speech-to-text API by streaming audio over the internet. However, we don’t want to be doing that all the time. Snowboy is an offline ‘hotword’ detector. We can have Snowboy running all the time, and when your choice of word is ‘heard’, we switch to Google’s system for accurate processing. Snowboy can only handle a few words, so we only use it for the ‘trigger’ words. It’s not the friendliest of installations so, to get you up and running, we’ve provided step-by-step instructions.

There’s also a two-microphone ReSpeaker for the Raspberry Pi Zero

Create your own hotword

As we’ve just mentioned, we can have a hotword (or trigger word) to activate full speech recognition so we can stay offline. To do this, Snowboy must be trained to understand the word chosen. The code that describes the word (and specifically your pronunciation of it) is called the model. Luckily, this whole process is handled for you at snowboy.kitt.ai, where you can create a model file in a matter of minutes and download it. Just say your choice of words three times, and you’re done. Transfer the model to your Raspberry Pi 4 and place it in your home directory.

Let’s go Google

ReSpeaker can use its multiple mics to detect distance and direction

After the trigger word is heard, we want Google’s fleet of super-servers to help us transcribe what is being said. To use Google’s speech-to-text API, you will need to create a Google application and give it permissions to use the API. When you create the application, you will be given the opportunity to download ‘credentials’ (a small text file) which will allow your setup to use the Google API. Please note that you will need a billable account for this, although you get one hour of free speech-to-text per month. Full instructions on how to get set up can be found here.

Install the SDK and transcriber

To use Google’s API, we need to install the firm’s speech-to-text SDK for Python so we can stream audio and get the results. On the command line, run the following:pip3 install google-cloud-speech
(If you get an error, run sudo apt install python3-pip then try again).
Remember that credentials file? We need to tell the SDK where it is:
export GOOGLE_APPLICATION_CREDENTIALS="/home/pi/[FILE_NAME].json"
(Don’t forget to replace [FILE_NAME] with the actual name of the JSON file.)
Now download and run this test file. Try saying something and see what happens!

Putting it all together

Now we can talk to our Raspberry Pi, it’s time to link the hotword system to the Google transcription service to create our very own virtual assistant. We’ve provided sample code so that you can see these two systems running together. Run it, then say your chosen hotword. Now ask ‘what time is it?’ to get a response. (Don’t forget to connect a speaker to the audio output if you’re not using HDMI.) Now it’s over to you. Try adding code to respond to certain commands such as ‘turn the light on’, or ‘what time is it?’

Get HackSpace magazine 36 Out Now!

Each month, HackSpace magazine brings you the best projects, tips, tricks and tutorials from the makersphere. You can get it from the Raspberry Pi Press online store, The Raspberry Pi store in Cambridge, or your local newsagents.

Each issue is free to download from the HackSpace magazine website.

The post Talk to your Raspberry Pi | HackSpace 36 appeared first on Raspberry Pi.