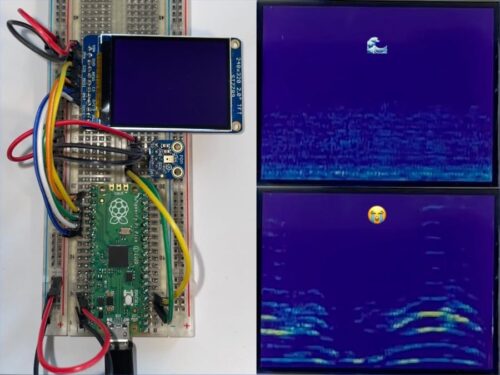
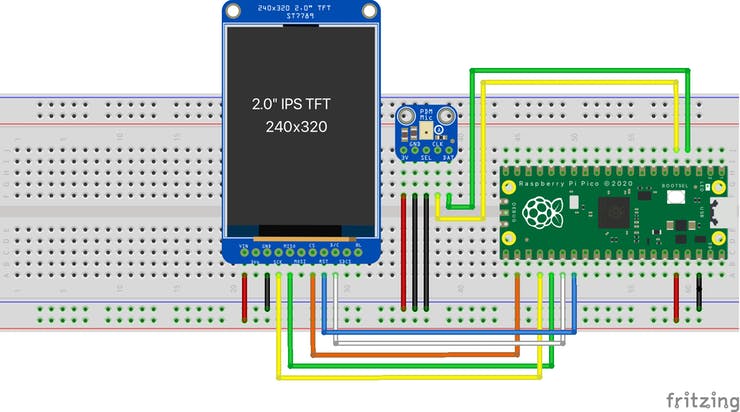
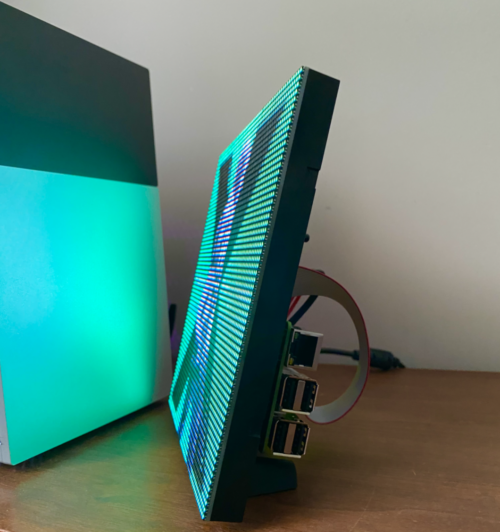
Raspberry Pi Pico powers this real-time audio spectrogram visualiser using a digital microphone to pick up the sound and an LCD display to show us what those sounds ‘look’ like.
First things first
OK firstly, let’s make sure we know what all of those words mean, because ‘audio spectrogram visualiser’ is a bit of a mouthful:
A ‘spectrogram’ is a visual way of representing signal strength, or “loudness”, of a signal.
The ‘visualiser’ bit comes in when these frequencies are presented as waveforms on the little screen.
And the ‘audio‘ is simply because Sandeep is visualising sounds in this project.
Sadly, Sandeep’s machine can’t tell you why the baby is crying
Perfectly portable sound monitor
This pocket-sized device can be carried around with you and lets you see a visual representation of your surrounding audio environment in real-time. So, if you wander into a peaceful bird reserve or something, the LCD display will show you something very different than if you were in, say, Wembley Stadium during an FA Cup final.
Above, you can see Sandeep’s creation in action in the vicinity of a crying baby.
In the video below, you can see there is a direct correlation between the original audio signal’s amplitude (on the left) and the audio spectrogram’s representation of the signal on the right.
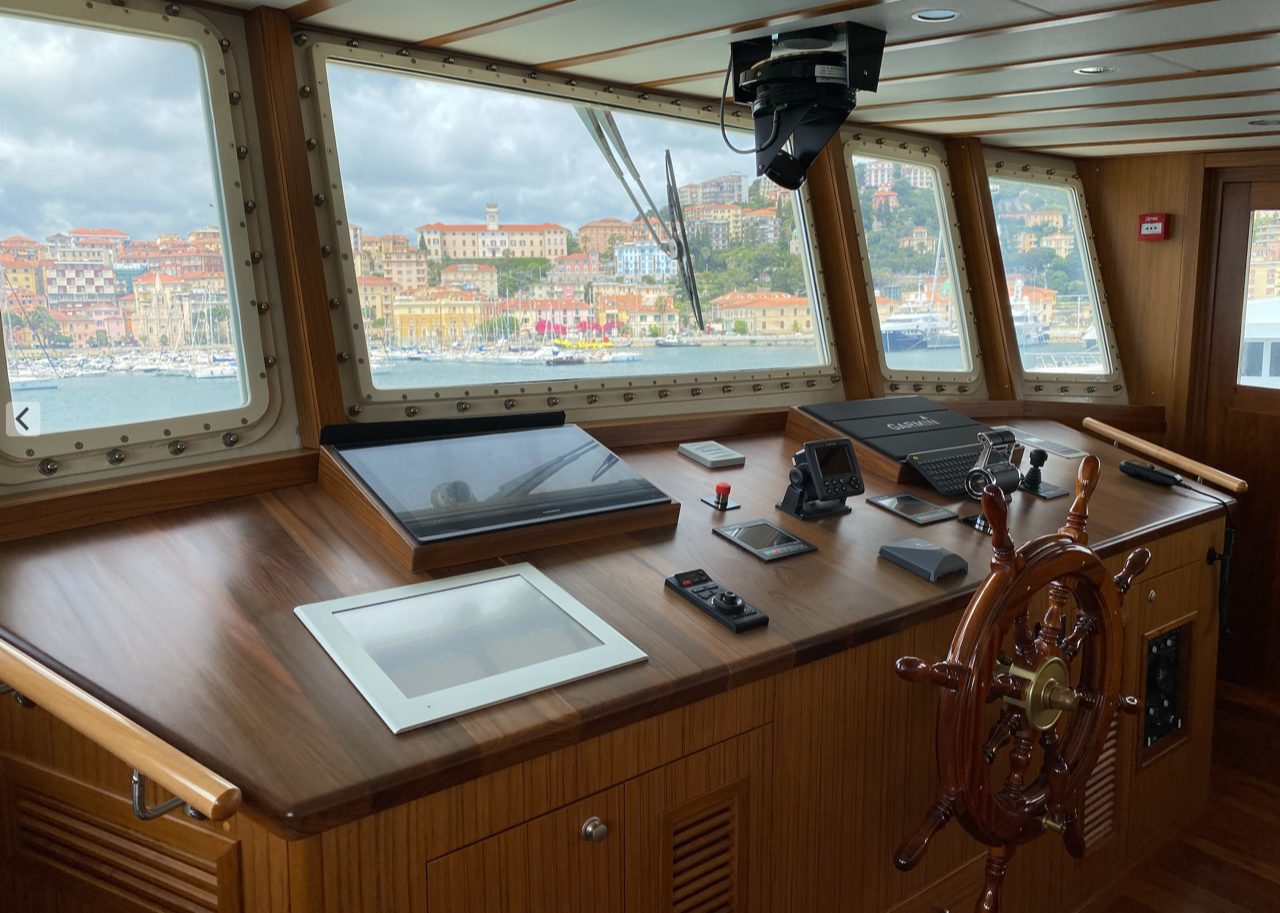
Baltic is a handsome 1962 vintage tugboat that was built in Norway, where she operated until the 1980s. She’s now in English waters, having been registered in Southampton once renovations were complete. After some initial hull restoration work in France she sailed to the western Ligurian coast in Italy, where it took about five years to complete the work. The boat’s original exterior was restored, while the inside was fully refurbished to the standard of a luxury yacht.
You need quite a large crane to do this
But where is the Raspberry Pi?
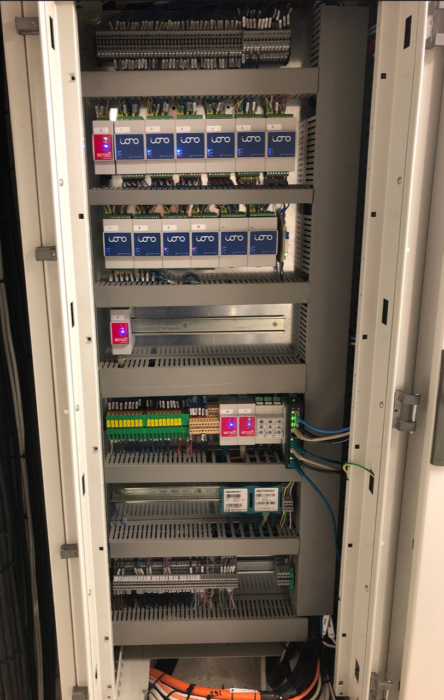
Ulderico Arcidiaco, who coordinated the digital side of Baltic’s makeover, is the CEO of Sfera Labs, so naturally he turned to Raspberry Pi Compute Module 3+ in the guise of Sfera’s Strato Pi CM Duo for the new digital captain of the vessel.
Strato Pi CM Duo is an industrial server comprising a Raspberry Pi Compute Module 3+ inside a DIN-rail case with a slew of additional features. The MagPi magazine took a good look at them when they launched.
Beats the view from our windows
The Strato Pi units are the four with red front panels in the cabinet pictured below. There are four other Raspberry Pi Compute Modules elsewhere onboard. Two are identical to the Strato Pi CM Duos in this photo; another is inside an Iono Pi Max; and there’s a Compute Module 4 inside an Exo Sense Pi down in the galley.
No spaghetti here
Thoroughly modern makeover
Baltic now has fully integrated control of all core and supplementary functions, from power distribution to tanks and pump control, navigation, alarms, fire, lighting, stabilisers, chargers, inverters, battery banks, and video. All powered by Raspberry Pi.
What a beauty
Ulderico says:
“When it was built sixty years ago, not even the wildest science fiction visionary could have imagined she would one day be fully computer controlled, and not by expensive dedicated computer hardware, but by a tiny and inexpensive device that any kid can easily buy and play with to have fun learning.
And, if there is some old-fashioned patriotism in things, the Raspberry Pi on board will surely like the idea of being back under their home British Flag.”
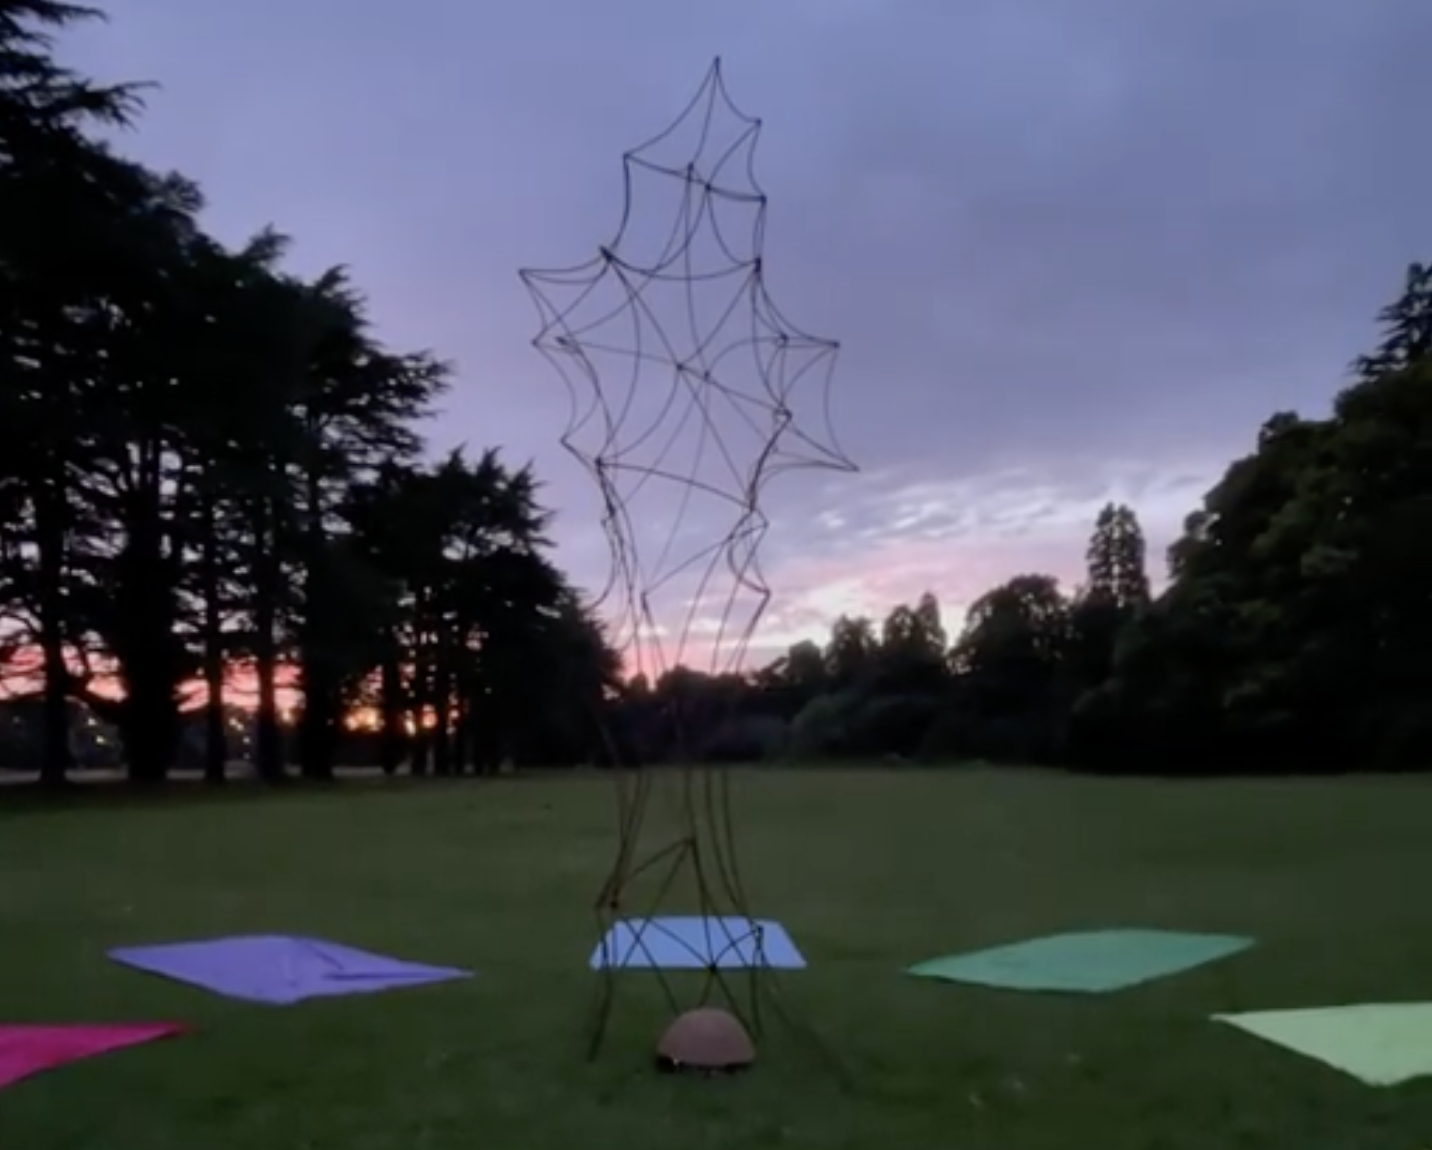
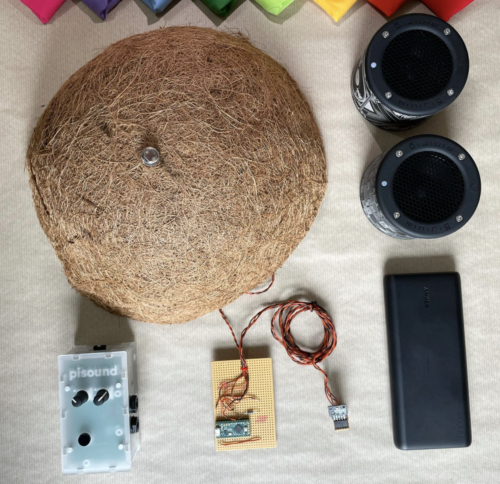
The Sky Vane provides the soundtrack to an immersive sky-driven experience. Just lie down on the grass, gaze up at the sky, and listen to the changing soundscape through the day.
The structure is impressive, but it’s everything inside that little “shroom pod” at the bottom that powers this build
A Raspberry Pi powers the arresting structure in the middle of the circle of comfy skygazing mats in the photo above, and is connected to an array of atmospheric sensors. These sensors detect changes in light, temperature, pressure, and humidity. Then they send real-time data to the Raspberry Pi computer in order to create a dynamic soundtrack.
The Sky Vane’s creators produced a carefully written soundtrack for the experience. Raspberry Pi triggers changes to the number of musical layers, sequences, audio effects processing, and so on, based on the information the sensors read. That’s the “dynamic” bit. A huge gust of wind, for example, leads to a different musical change than the setting sun.
A portable Minirig sound system generates a seriously high-fidelity audio experience that can be heard clearly within a 25-metre radius of The Sky Vane.
Everything hides underneath the dome-shaped “shroom pod”, which in turn sits beneath the big sculpture
Inspiration behind the installation
The Sky Vane is the latest installation from pyka, a collective of experienced designers who create digital artefacts that enable you to explore the world of sound. Commissioned by Tin Shed Theatre Company and Our Living Levels, The Sky Vane’s big debut was at the Big Skies 2021 event in south Wales.
When they were planning this installation, the creators at pyka weren’t sure how it would go down in a post-pandemic world. They’re used to building things that bring people together, but they were mindful of people’s anxiety around shared public activities. This led to a design that promotes quiet contemplation and mindfulness whilst enjoying the freedom of the outdoors. We think it’s lovely.
You sit down with your six-string, ready to bash out that new song you recently mastered, but find you’re out of tune. Redditor u/thataintthis (Guyrandy Jean-Gilles) has taken the pain out of tuning your guitar, so those of us lacking this necessary skill can skip the boring bit and get back to playing.
Before you dismiss this project as just a Raspberry Pi Pico-powered guitar tuning box, read on, because when the maker said this is a fully automatic tuner, they meant it.
How does it work?
Guyrandy’s device listens to the sound of a string being plucked and decides which note it needs to be tuned to. Then it automatically turns the tuning keys on the guitar’s headstock just the right amount until it achieves the correct note.
Genius.
If this were a regular tuning box, it would be up to the musician to fiddle with the tuning keys while twanging the string until they hit a note that matches the one being made by the tuning box.
It’s currently hardcoded to do standard tuning, but it could be tweaked to do things like Drop D tuning.
Waiting for that green light
Upgrade suggestions
Commenters were quick to share great ideas to make this build even better. Issues of harmonics were raised, and possible new algorithms to get around it were shared. Another commenter noticed the maker wrote their own code in C and suggested making use of the existing ulab FFT in MicroPython. And a final great idea was training the Raspberry Pi Pico to accept the guitar’s audio output as input and analyse the note that way, rather than using a microphone, which has a less clear sound quality.
These upgrades seemed to pique the maker’s interest. So maybe watch this space for a v2.0 of this project…
Shred, Otto, shred
(Watch out for some spicy language in the comments section of the original reddit post. People got pretty lively when articulating their love for this build.)
Inspiration
This project was inspired by the Roadie automatic tuning device. Roadie is sleek but it costs big cash money. And it strips you of the hours of tinkering fun you get from making your own version.
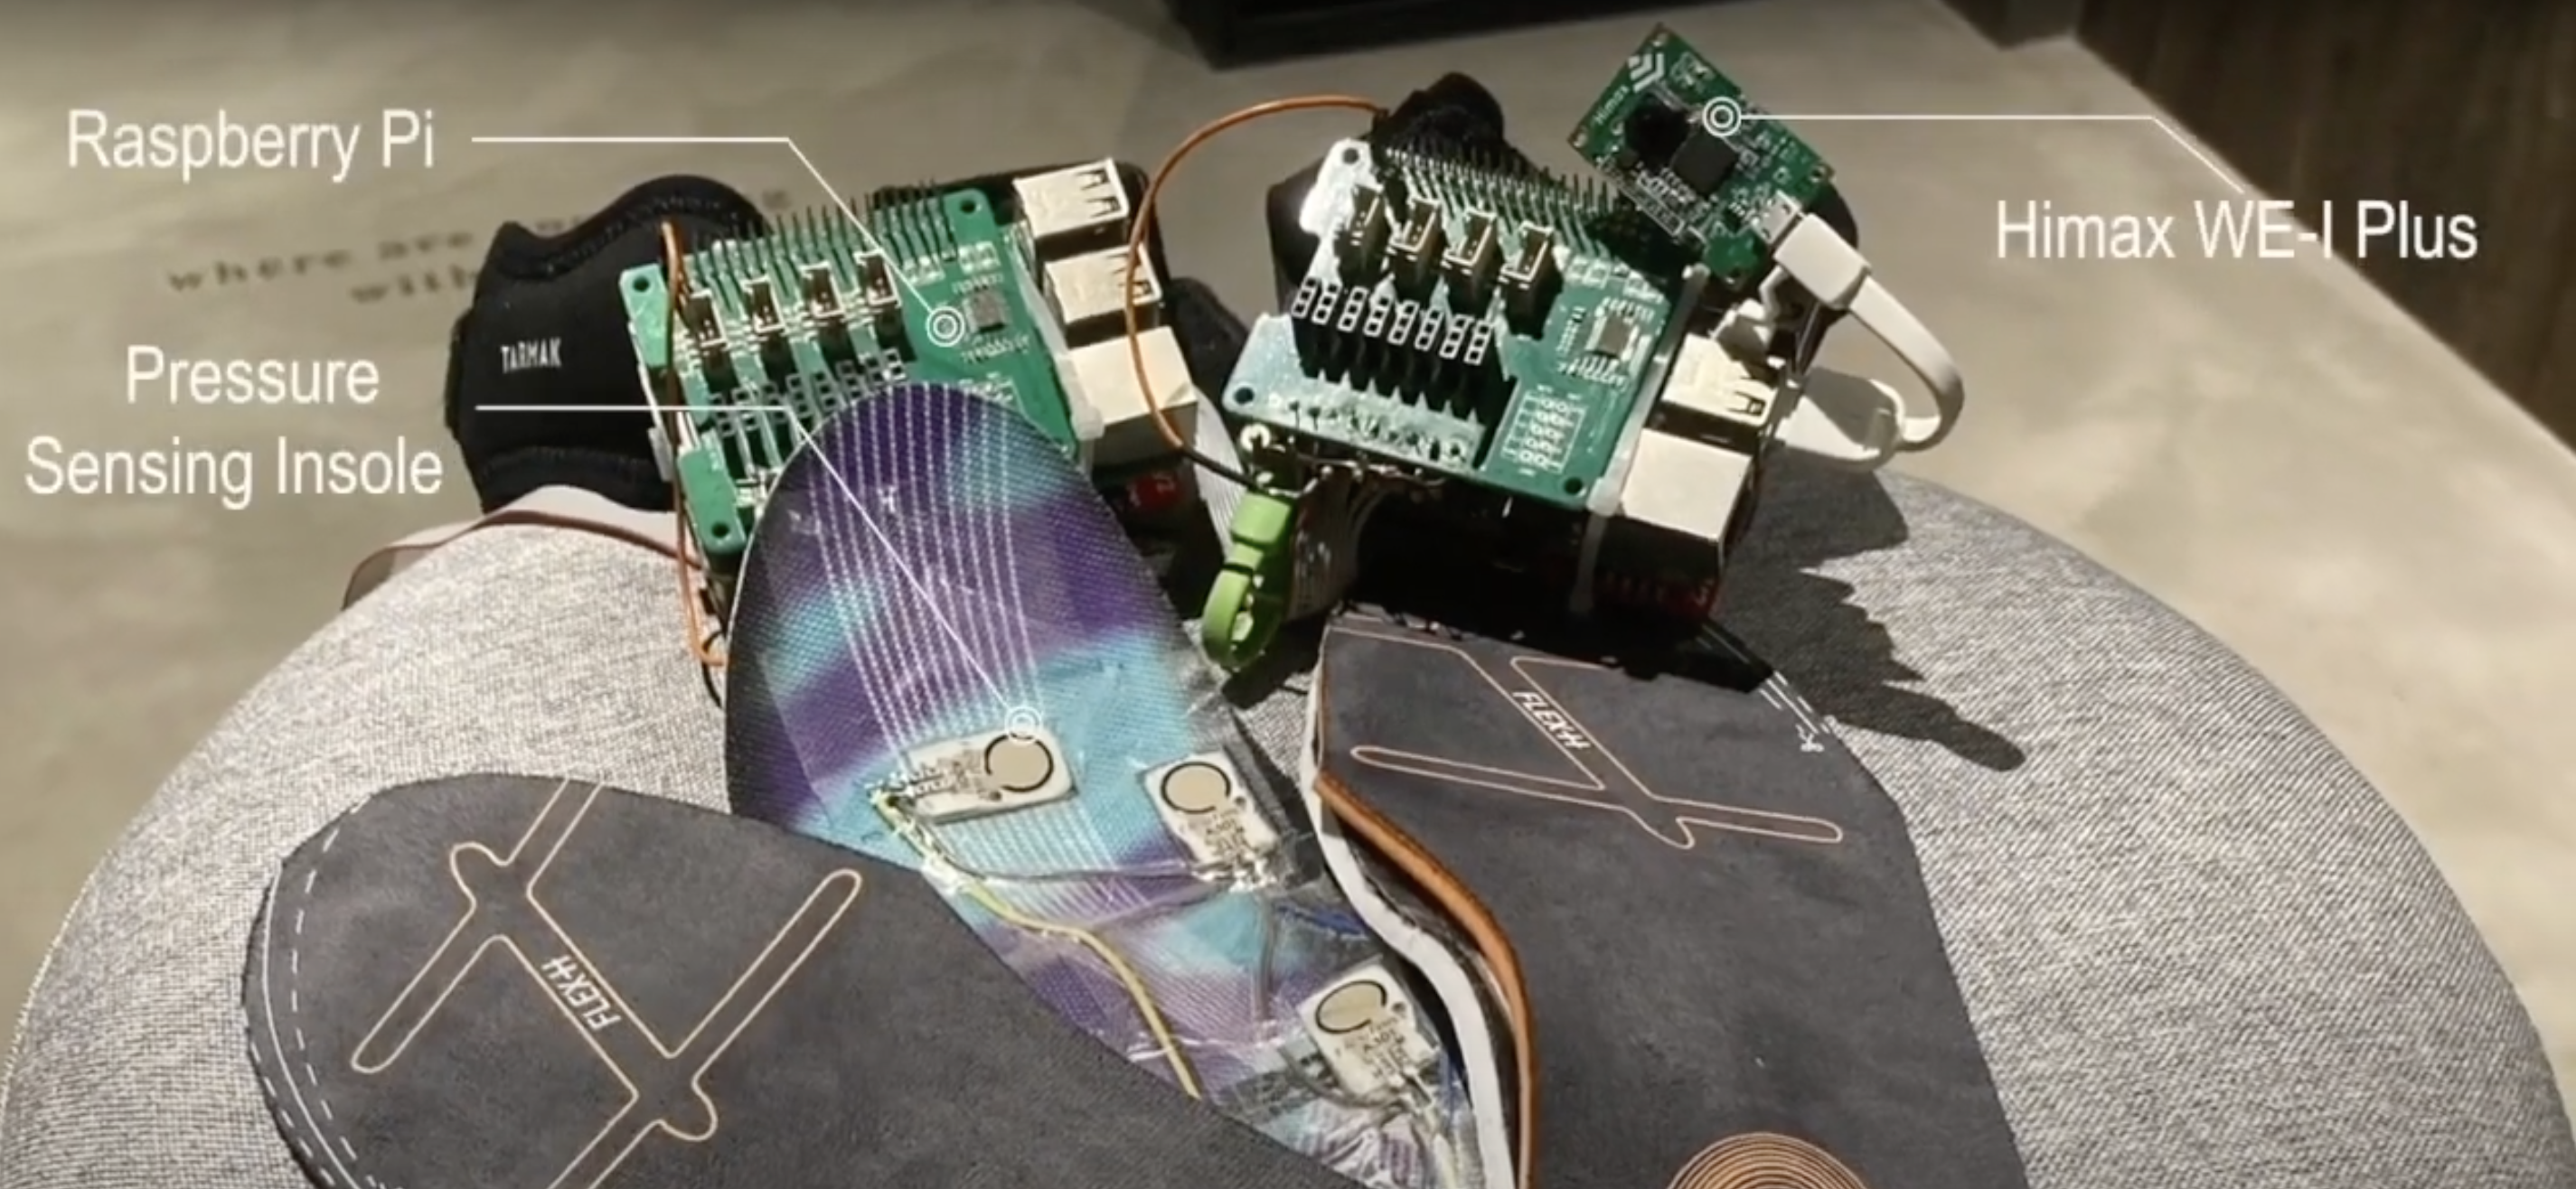
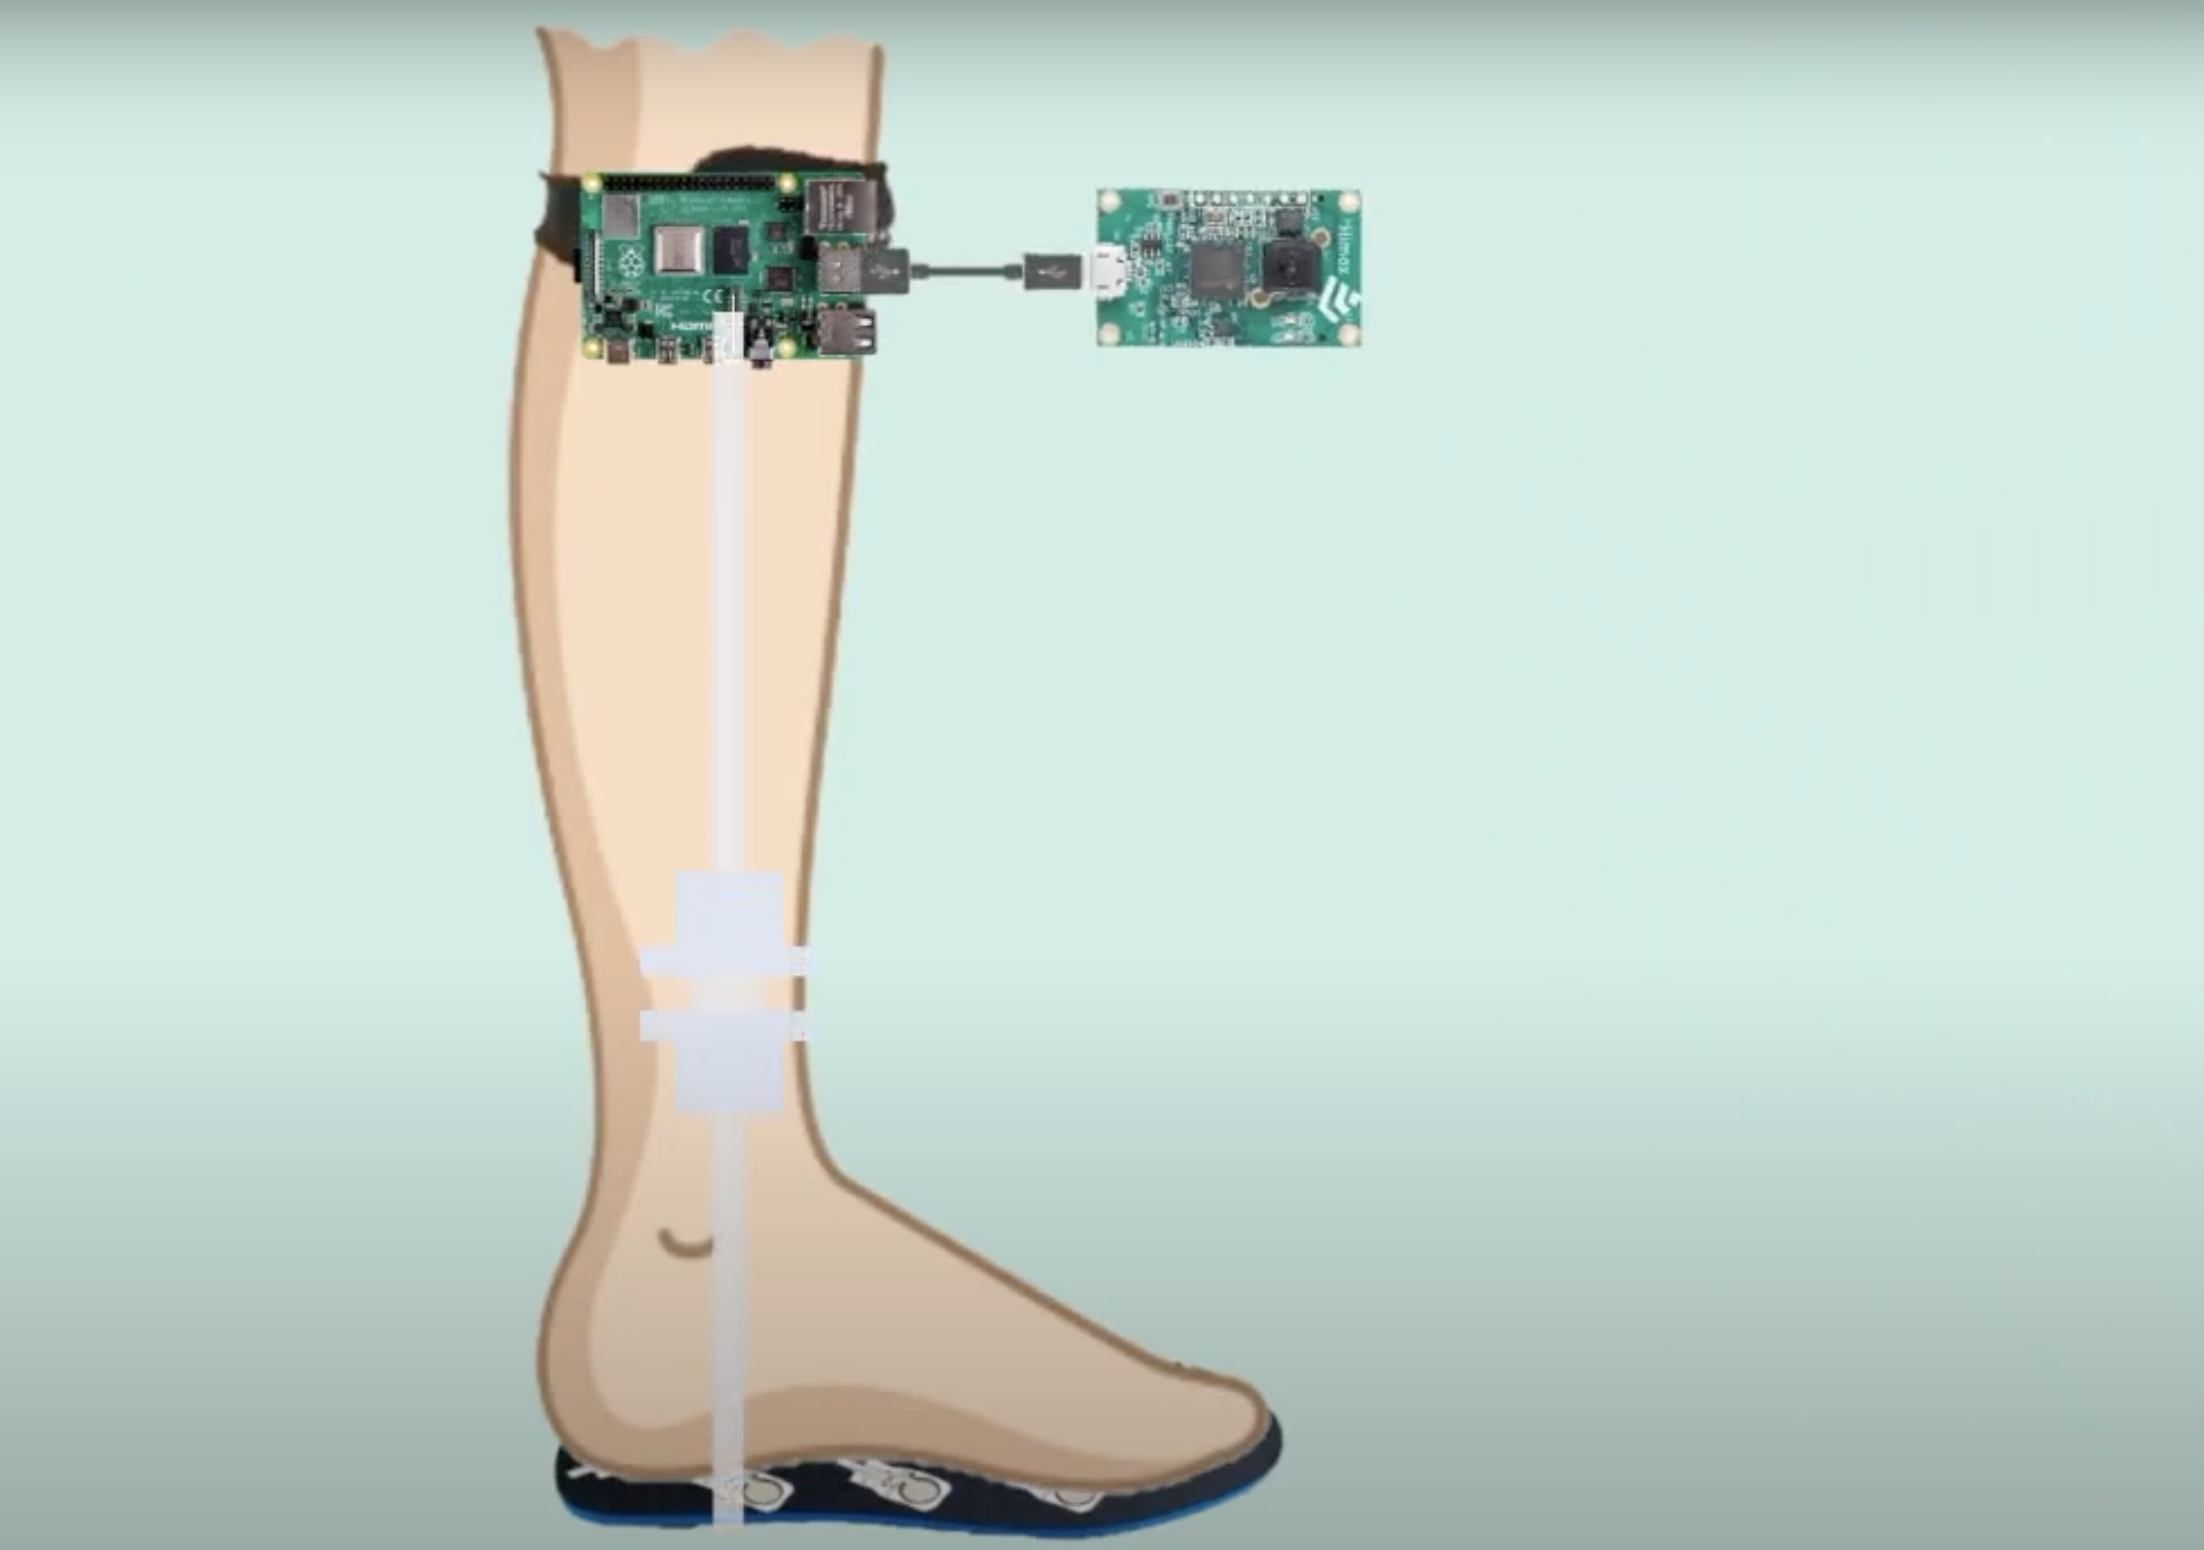
A team from National Yang Ming Chiao Tung University has developed a foot-pressure-sensing insole to detect Parkinson’s disease. Using our tiny computers, they managed to create something discreet that can monitor people as they walk around in their own shoes.
Check out Team Forelook‘s project video
What is Parkinson’s disease?
Parkinson’s disease is a neurodegenerative disorder that mostly affects people aged over 60, though it can affect younger people too. One symptom that can suggest a diagnosis of Parkinson’s disease is an abnormal gait – that is, when someone’s walk has changed from its usual pattern. It’s this that the project aims to detect.
While there is currently no cure for Parkinson’s, many people respond well to treatment with medication and physical therapy, and early detection gives people a better chance of a good quality of life for as long as possible.
Hardware
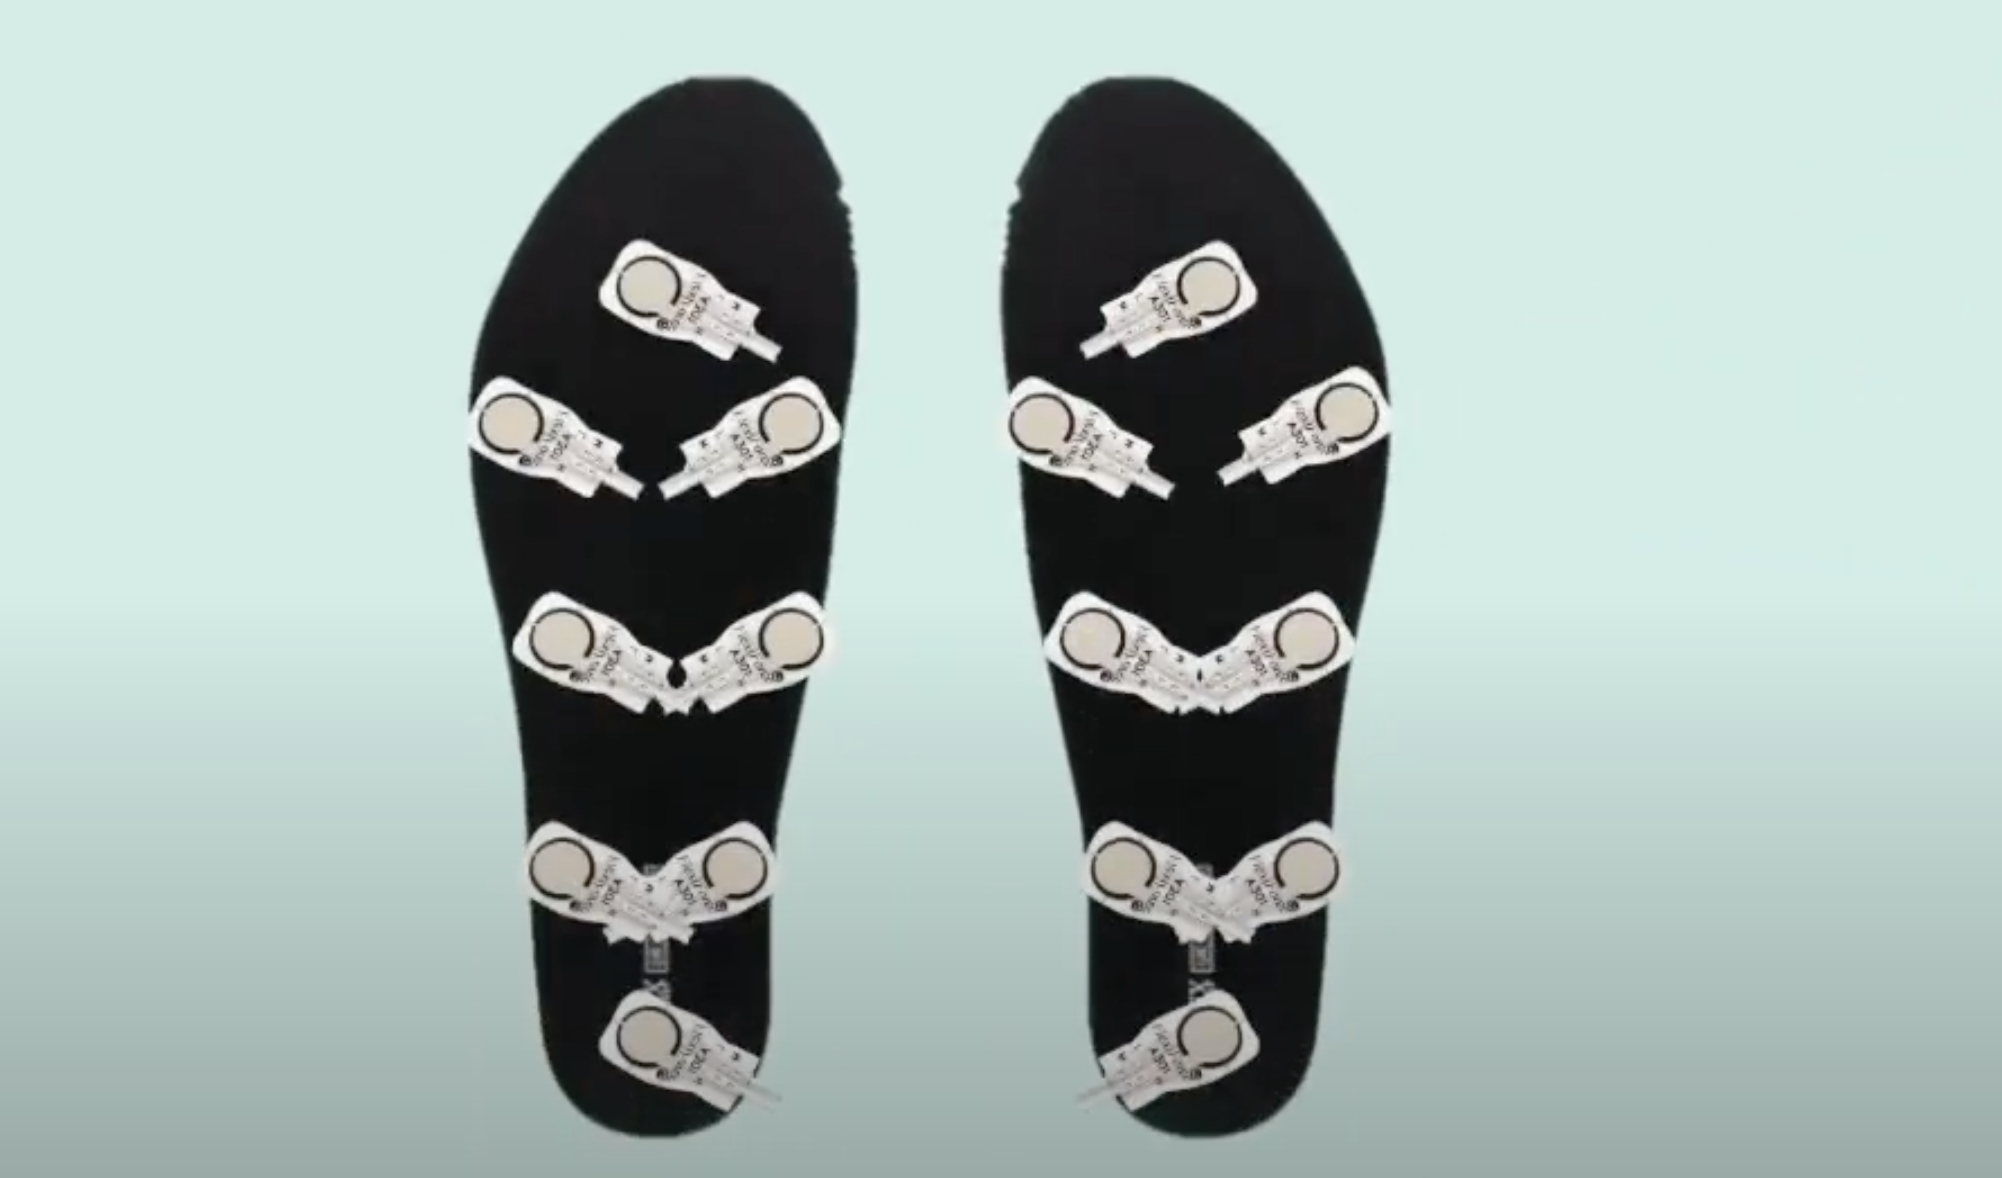
Eight FlexiForce sensors are placed evenly on each insole of a user’s shoes to measure their gait as they go about their day:
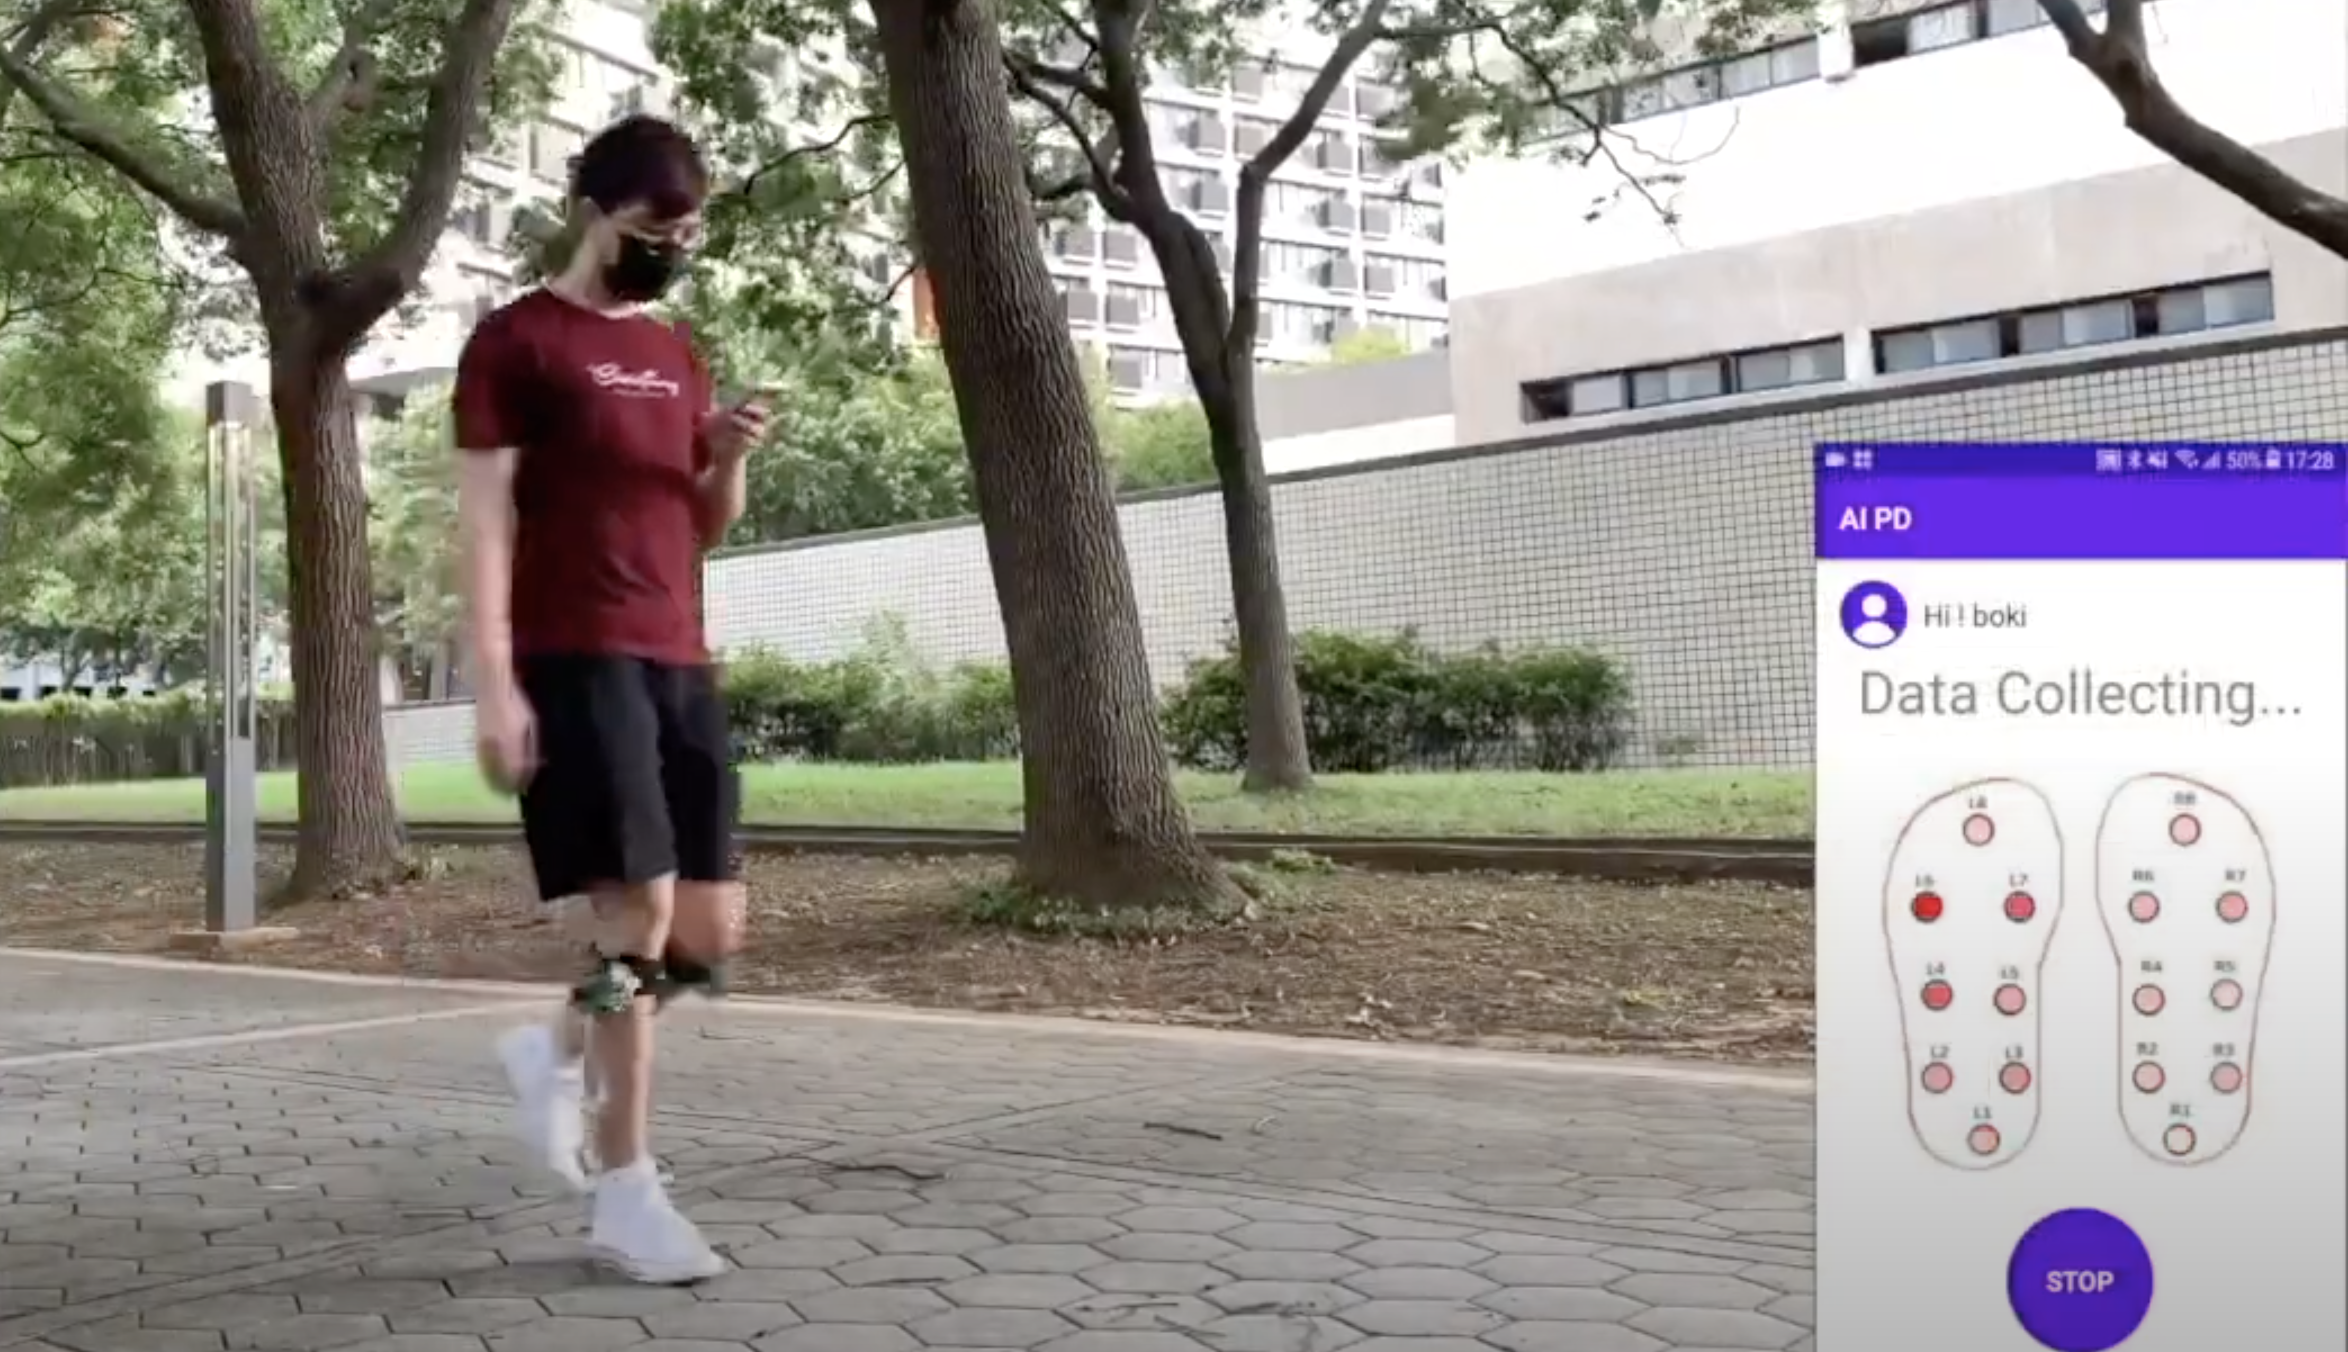
A Raspberry Pi 3 is fixed to a strap around the user’s knee and paired with Himax WE-I Plus. Cables connect the knee- strapped hardware to the sensors in the insoles.
How does it work?
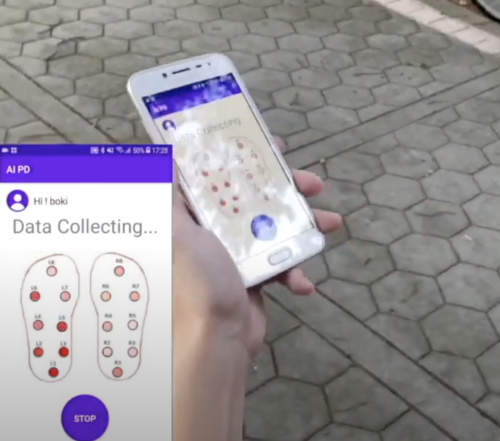
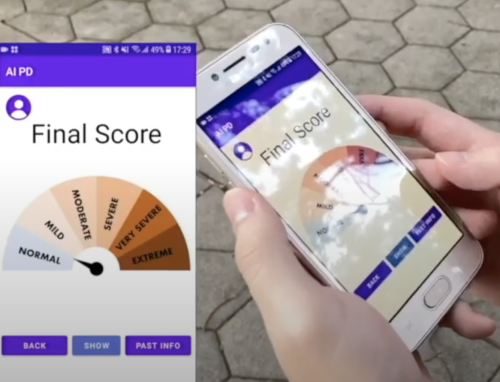
The sensors in the user’s shoes detect pressure across the whole foot while walking. Data is then processed by the Raspberry Pi and the user’s gait is assessed. Users pair the device with a mobile app to see their results. The app also shows real-time data while they’re walking.
A user with the devices strapped to their knees, checking out real-time data from the sensors in their shoes
The team took advantage of a free online database that collects foot pressure data from both Parkinson’s disease patients and people without Parkinson’s who have a typical gait. They used this to train their own machine learning model, which predicts whether a user has a gait that may indicate Parkinson’s disease.
Check out a live demo from this point in the project video.
Award-winning design
The team submitted this project in the 2021 Synopsys ARC AIoT Design Contest and scored a second-place prize. Check out more project videos from this year’s submissions.
Assessing gait as part of a diagnosis of potential Parkinson’s disease usually requires that patients take trips to the hospital to have tests on large pressure-sensored walking mats. The team’s new device offers a much more portable and affordable approach.
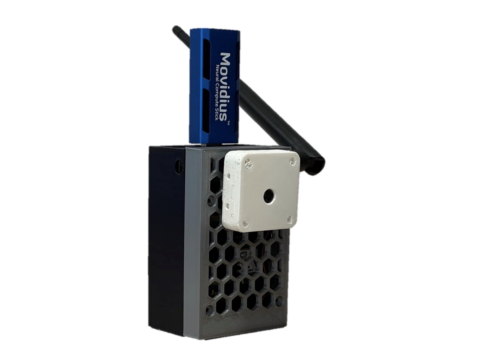
Researchers from the University of Trento have developed a Raspberry Pi-powered device that automatically detects pests in fruit orchards so they can get sorted out before they ruin a huge amount of crop. There’s no need for farmer intervention either, saving their time as well as their harvest.
One of the prototypes used during indoor testing
The researchers devised an embedded system that uses machine learning to process images captured inside pheromone traps. The pheromones lure the potential pests in to have their picture taken.
Hardware
Each trap is built on a custom hardware platform that comprises:
Sony IMX219 image sensor to collect images (chosen because it’s small and low-power)
Intel Neural Compute module for machine learning optimisation
Long-range radio chip for communication
Solar energy-harvesting power system
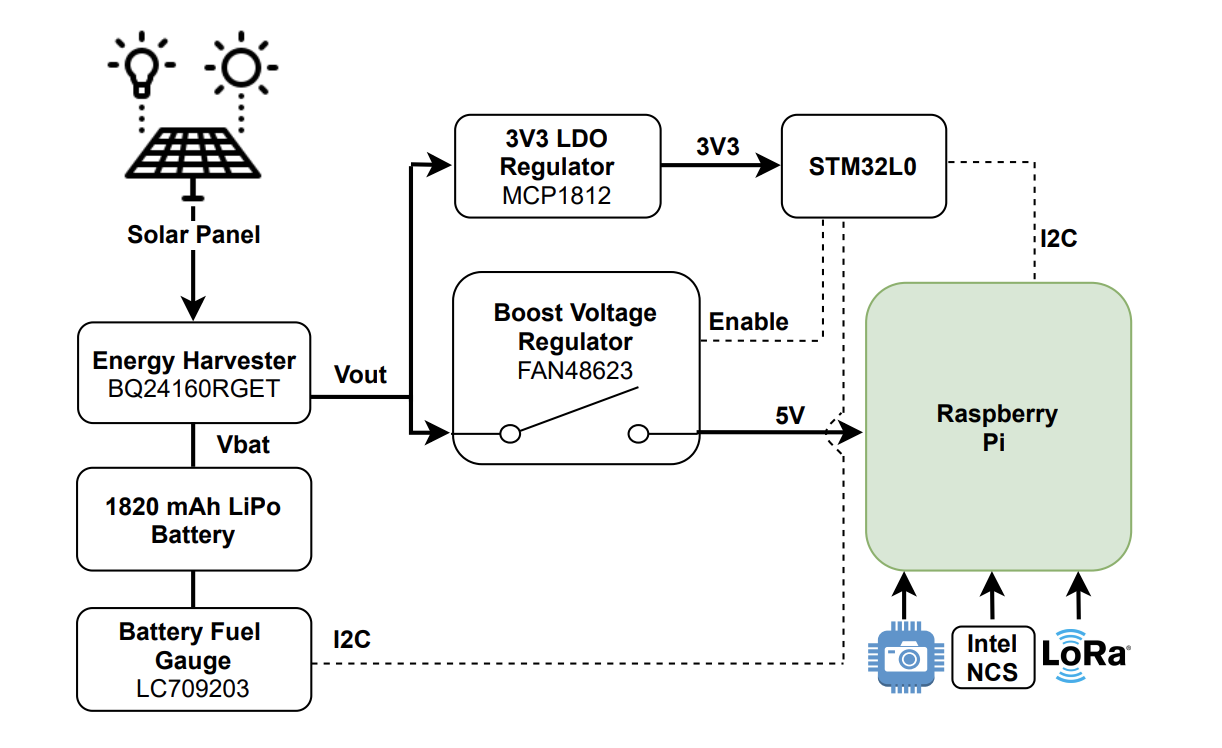
Here’s a diagram showing how all the hardware works together
The research paper mentions that Raspberry Pi 3 was chosen because it offered the best trade-off between computing capability, energy demand, and cost. However, we don’t know which Raspberry Pi 3 they used. But we’re chuffed nonetheless.
How does it work?
The Raspberry Pi computer manages the sensor, processing the captured images and transmitting them for classification.
Then the Intel Neural Compute Stick is activated to perform the machine learning task. It provides a boost to the project by reducing the inference time, so we can tell more quickly whether a potentially disruptive bug has been caught, or just a friendly bug.
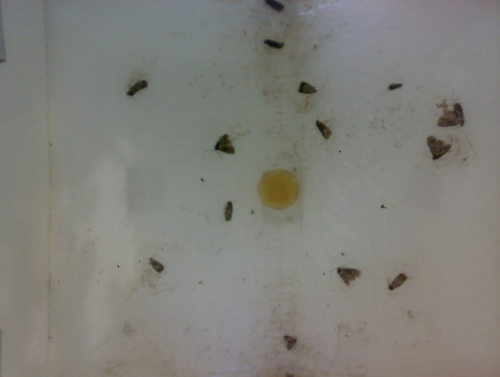
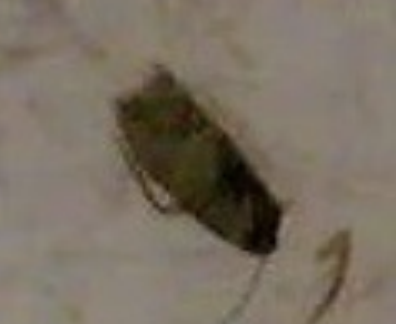
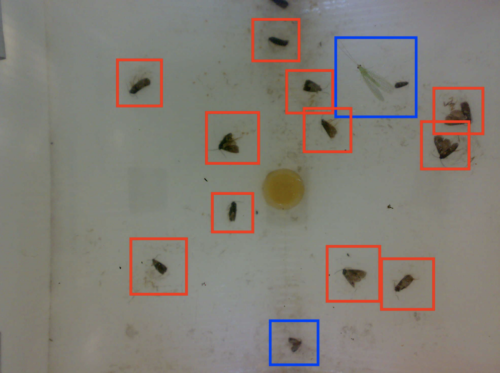
The image on the far left is a photo taken inside a pheromone based trap by the smart camera. The images in the middle and on the right are examples of extracted regions of interest with a single insect
In this case, it’s codling moths we want to watch out for. They are major pests to agricultural crops, mainly fruits, and they’re the reason you end up with apples that look like they’ve been feasted on by hundreds of maggots.
Red boxes = bad codling moths Blue boxes = friendly bugs
When this task is done manually, farmers typically check codling moth traps twice a week. But this automated system checks the pheromone traps twice every day, making it much more likely to detect an infestation before it gets out of hand.
Maker Mellow was inspired by watching the progress of NASA’s Perseverance Mars rover and wanted in on the interplanetary robot scene. Their first idea was to build a scale version of Perseverance, but when their partner stepped in to suggest that starting smaller might be a little easier, Zippy was born.
ProtoTank (a bolt-together modular tank-style robotics platform)
Inside Zippy
Zippy’s basic parts haven’t changed much through its three iterations. You can follow the journey of Zippy 1.0 through 3.0 on Mellow’s website. You’ll see that some additional hardware was required when Mellow made some improvements.
Baby Zippy
The first version of Mellow’s mini Mars rover was just a motor on a 3D-printed body, controlled by plugging in wires to the battery. But Mellow was desperate to level up their robot and build something that could be controlled by an Xbox controller. They reached that goal with Zippy 2.0 and can drive the mini Mars rover remotely via Bluetooth. However, the range is quite tight, so slow runners need not apply for the job of pilot.
Zippy 3.0 comes complete with a DJI Osmo Action camera to capture its adventures.
Baby Zippy 1.0 playing on the carpet
What surfaces can Zippy ride on?
Our favourite part of Mellow’s original project post is the list rating how good Zippy is at navigating various types of terrain (some of which are showcased in the video up top):
Sand – NO it gets stuck in the wheels
Big rocks – NO the robot is too low to the ground and gets stuck
Pebbles – with determination
Grass – only very short grass
Human bodies – surprisingly well
Carpets – Zippy loves carpets
Flat terrain – definitely
Zippy 2.0 out on the road
Here’s all the code you need to build your own mini Mars rover.
Follow the real thing on Mars
Keep up with NASA’s Perseverance Mars rover on Twitter. Perseverance spent its summer drilling into rocks, and has photos to prove it.
Redditor u/gonnabuysomewindows was looking for a fun project combining Raspberry Pi and Adafruit’s LED matrix, and has created the latest cool album art display to grace our blog.
The maker turned to PowerShell – a cross-platform task automation solution – to create a script (available on GitHub) that tells the Raspberry Pi which album is playing, and sends it the album artwork for display on the LED matrix.
Raspberry Pi runs a flaschen-taschen server to display the album artwork. The PowerShell script runs a ‘send image’ command every time the album art updates. Then the Raspberry Pi switches the display to reflect what is now playing. In the demo video, the maker runs this from iTunes, but says that any PowerShell-compatible music player (ie: Spotify) will work too.
Setting up your own LED album art display
The maker’s original reddit post shares a step-by-step guide to follow on the software side of things. And they detail the terminal code you’ll need to run on the Raspberry Pi to get your LED Matrix displaying the correct image.
The maker of this robotic waiter had almost all of the parts for this project just sat around collecting dust on a shelf. We’re delighted they decided to take the time to pick up the few extra bits they needed online, then take the extra hour (just an hour?!) to write a program in Python to get this robotic waiter up and running.
It’s learning! Bartending is hard
We are also thrilled to report (having spotted it in the reddit post we found this project on) that the maker had “so much fun picking up and sometimes crushing small things with this claw.” The line between serving drinks and wanting to crush things is thinner than you might imagine.
And in even better news, all the code you need to recreate this build is on GitHub.
One of our favourite things about finding Raspberry Pi-powered projects on reddit is the comments section. It’s (usually) the perfect mix of light adoration, constructive suggestions, and gateways to tangents we cannot ignore.
Like this one recalling the Rick and Morty sketch in which a cute tiny robot realises their sole purpose is to pass butter:
No swears in this scene! But it is an adult cartoon in general
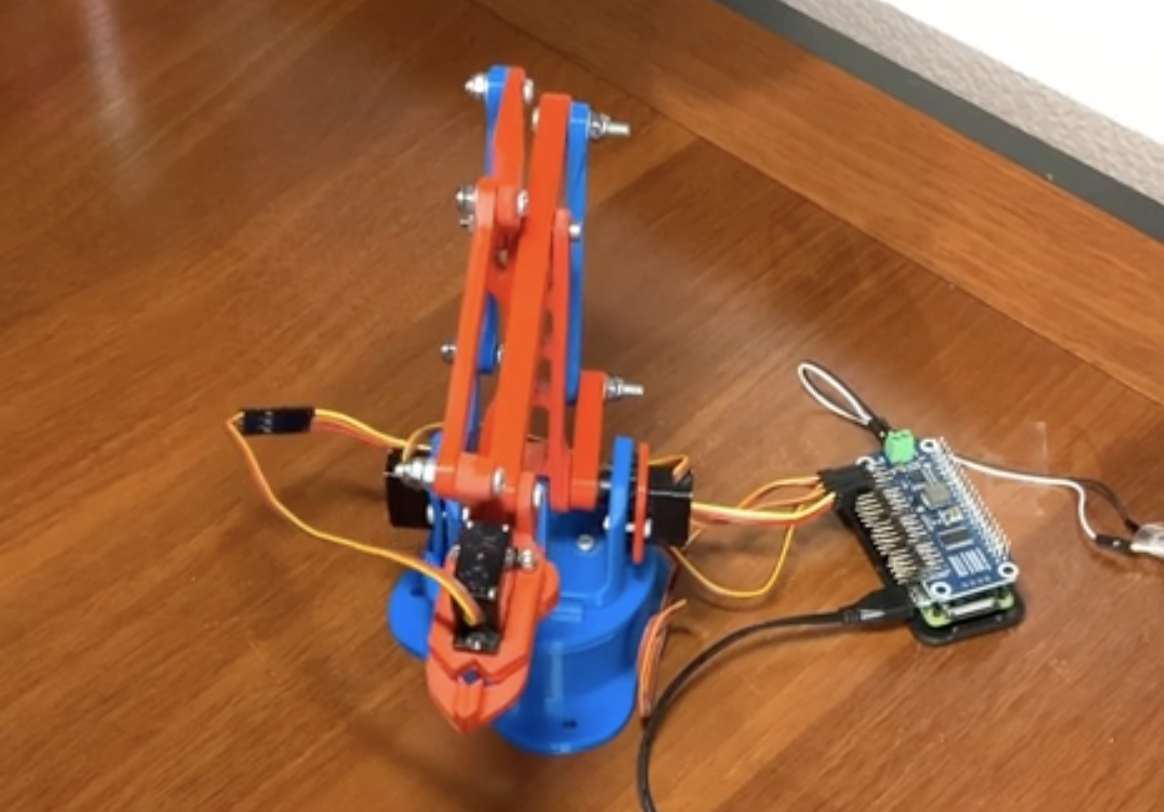
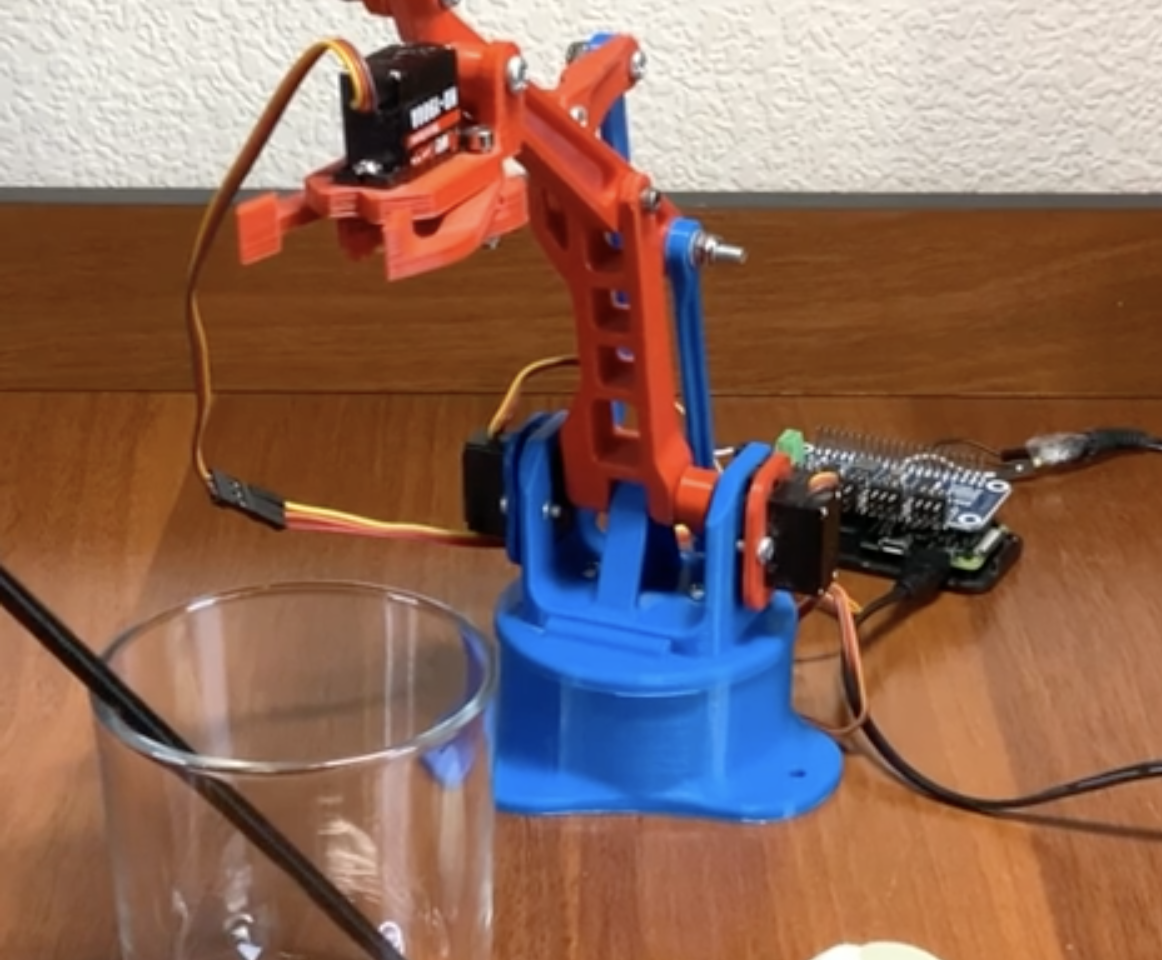
And also this one pointing us to another robotic arm having a grand old time picking up a tiny ball, sending it down a tiny slide, and then doing it all over again. Because it’s important we know how to make our own fun:
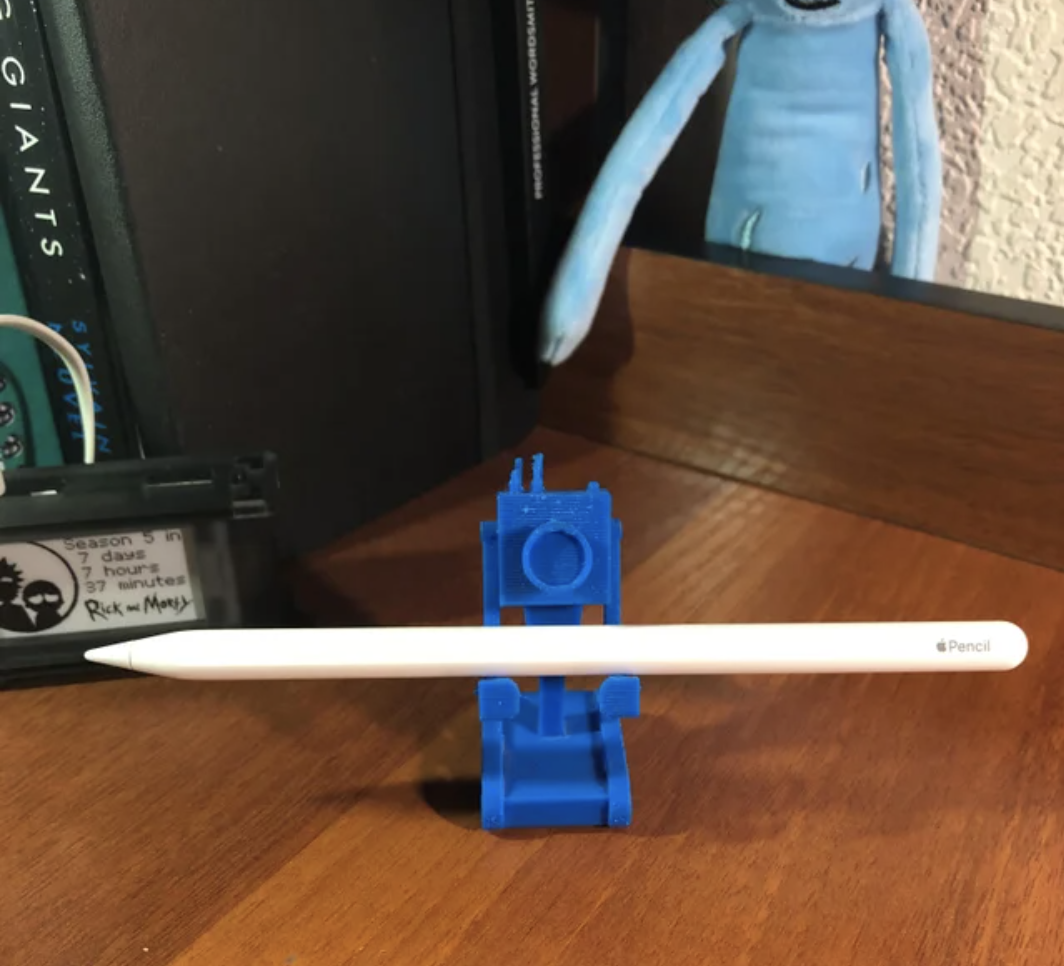
We also greatly enjoyed the fact that the original maker couldn’t use the Rick and Morty “what is my purpose” line to share this project because they are such an uber fan that they already used it for a project they posted just the day before. This cute creation’s sole reason for existing is to hold an Apple pencil while looking fabulous. And we are HERE for it:
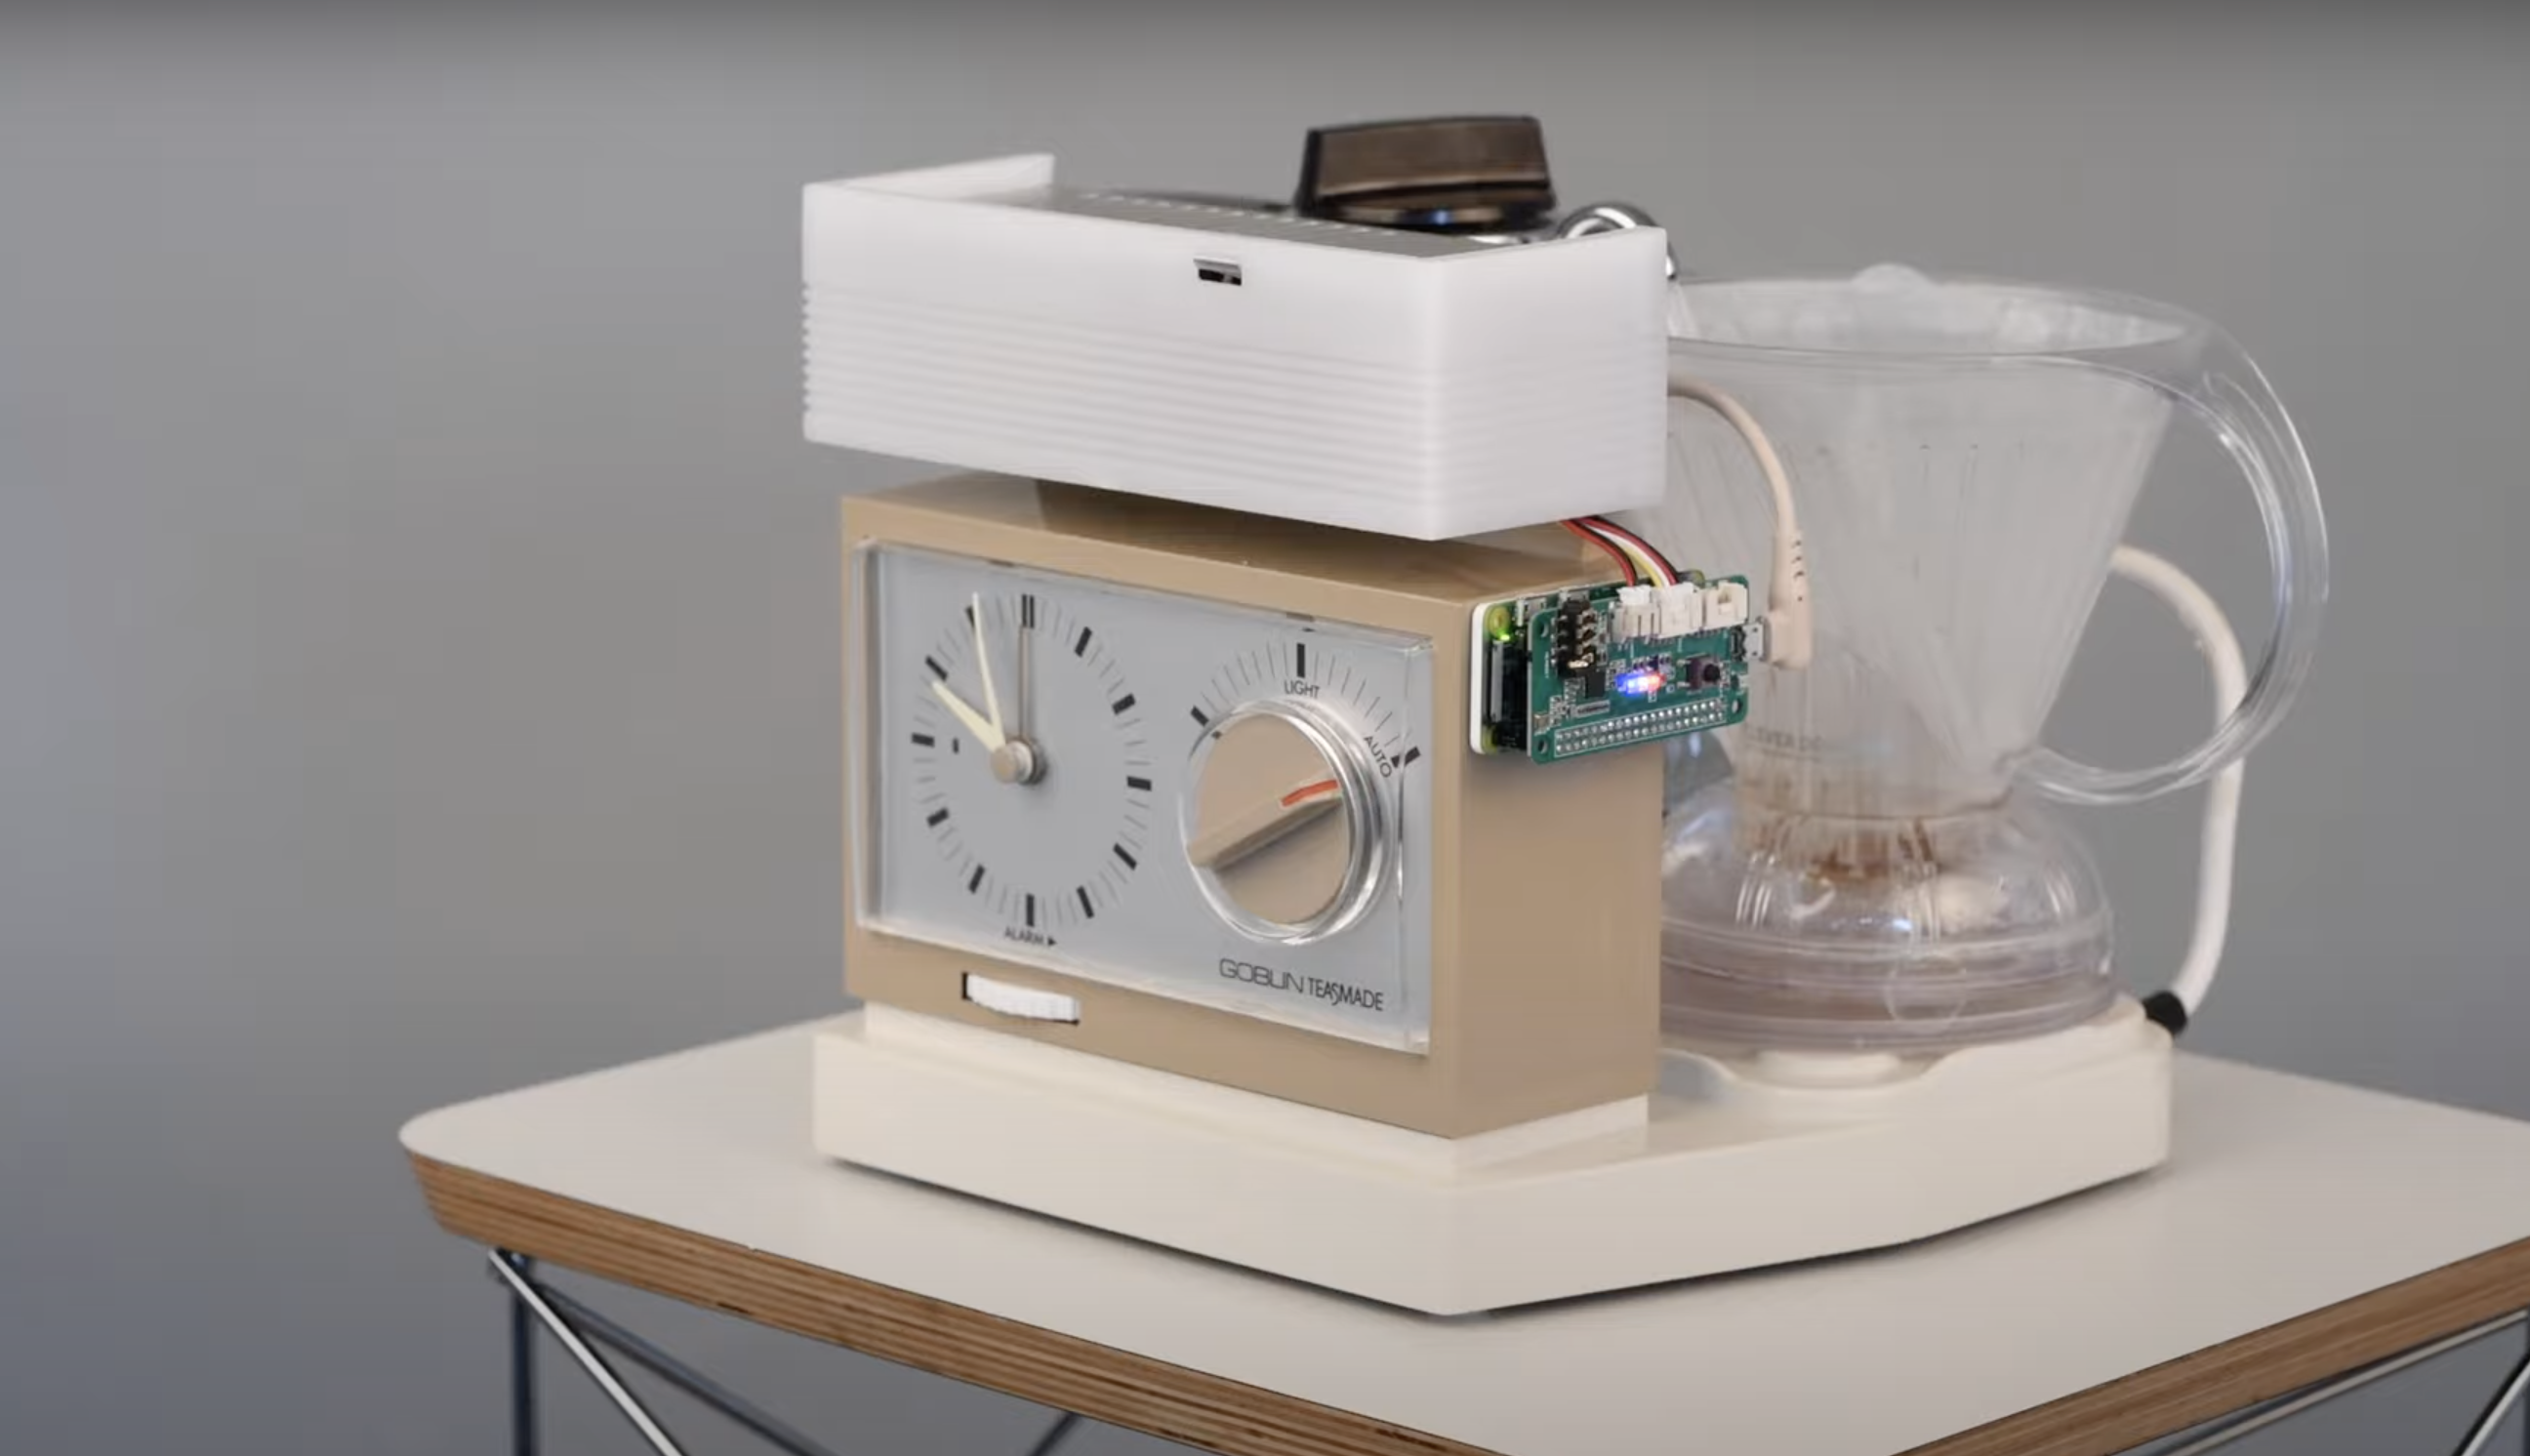
It hurts our aged soul to think how many of you won’t know what a teasmade is. So here is a quick overview of this classic 20th-century technology. Now we will tell you how VEEB brought such a contraption back to life with Raspberry Pi.
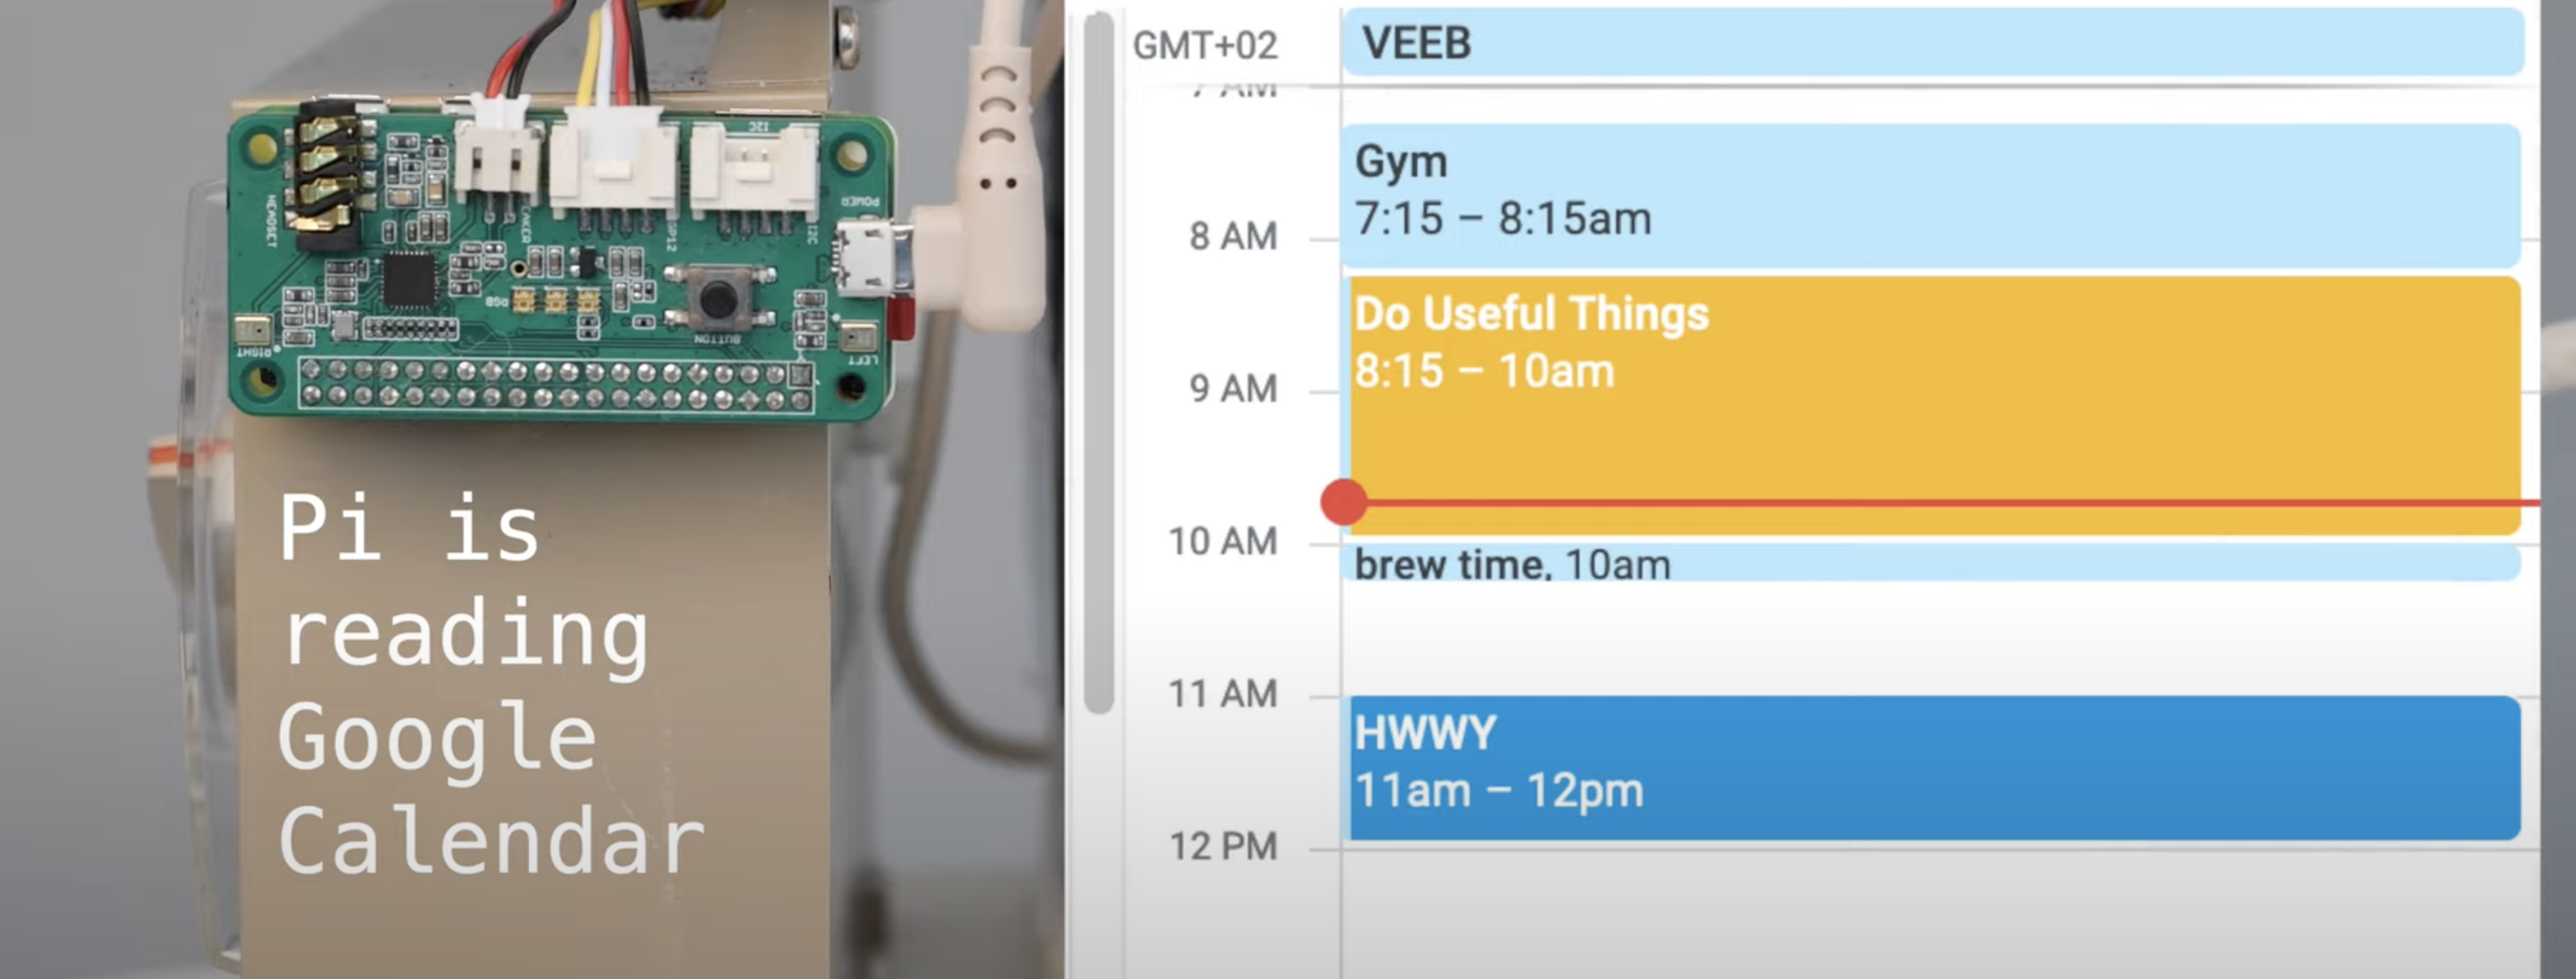
Yeah, we love the project video as much as you do. The clattering trolley rolling in with this ancient tea-making machine on top. Then loudly making a Google calendar note to brew the tea for you while you do something more useful. Genius.
Look how cute we look stuck on the side of a Teasmade
How does it work?
Raspberry Pi reads your Google calendar and automatically activates the kettle ten minutes before the time when you’ve said you want a coffee.
Then it gets super noisy. Teasmades are like that. But it’s worth it, trust me. To cover the sound of the janky old machine, VEEB has added a speaker that plays God save the Queen as the water heats up and pours into the clever dripper with the coffee filter in it. I’m not sure there is anything more English than that, other than if this project actually made tea and not coffee. I think coffee belongs to Seattle, but I’m not sure Seattle has a national anthem of its own. Correct me in the comments. Maybe Nirvana?
You have to log that brew time
Anywho, then you sprinkle your coffee grounds into the hot water, give it a stir with a spoon, and hey presto, you have [kind of automatically brewed] coffee!
File this in the list of projects we love because engineers like to spend several hours building something to automate an activity that takes one second. In this case, switching on a kettle to boil water for your coffee.
A quick PSA to share with those not in the know the wonder that is the limited television series Father Ted. The Mrs Doyle character was infamous for her fervent insistence on making everyone a cup of tea and she was crushed when her parochial employer, Father Ted, gave her a Teasmade for Christmas to take the “misery” out of making tea. It is not a miserable task. It is a calming, soothing ritual. Stupid Father Ted.
If you want to watch the whole episode, it’s the 1996 Christmas special
Clem from element14 found a discarded Super 8 camera and wanted to channel his inner filmmaking hipster, but he didn’t want to spend tons of money on analogue film, so he digitised the camera with Raspberry Pi.
Clem recreated an original Super 8 cartridge and packed it with tiny hardware to do the job of the 8mm analogue film digitally. Doing it this way also means you can just drop the new cartridge into any Super 8 camera and use it as a digital device. It also means you don’t need to cut up any part of your gorgeous retro device in the process.
You can download the files for the 3D-printed case and buttons from the original project post.
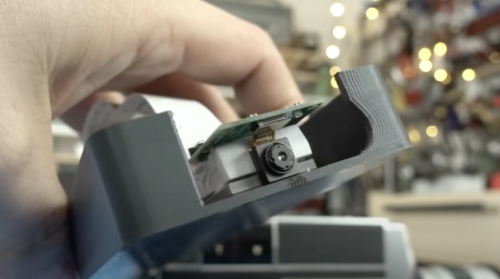
Tight spaces, lens alignment and controls
Getting the Raspberry Pi camera lens lined up perfectly with the original lens was the hardest part of this build. But using our tiny camera meant that the lens could be placed at exactly the right angle, because it doesn’t have to be fixed to the PCB.
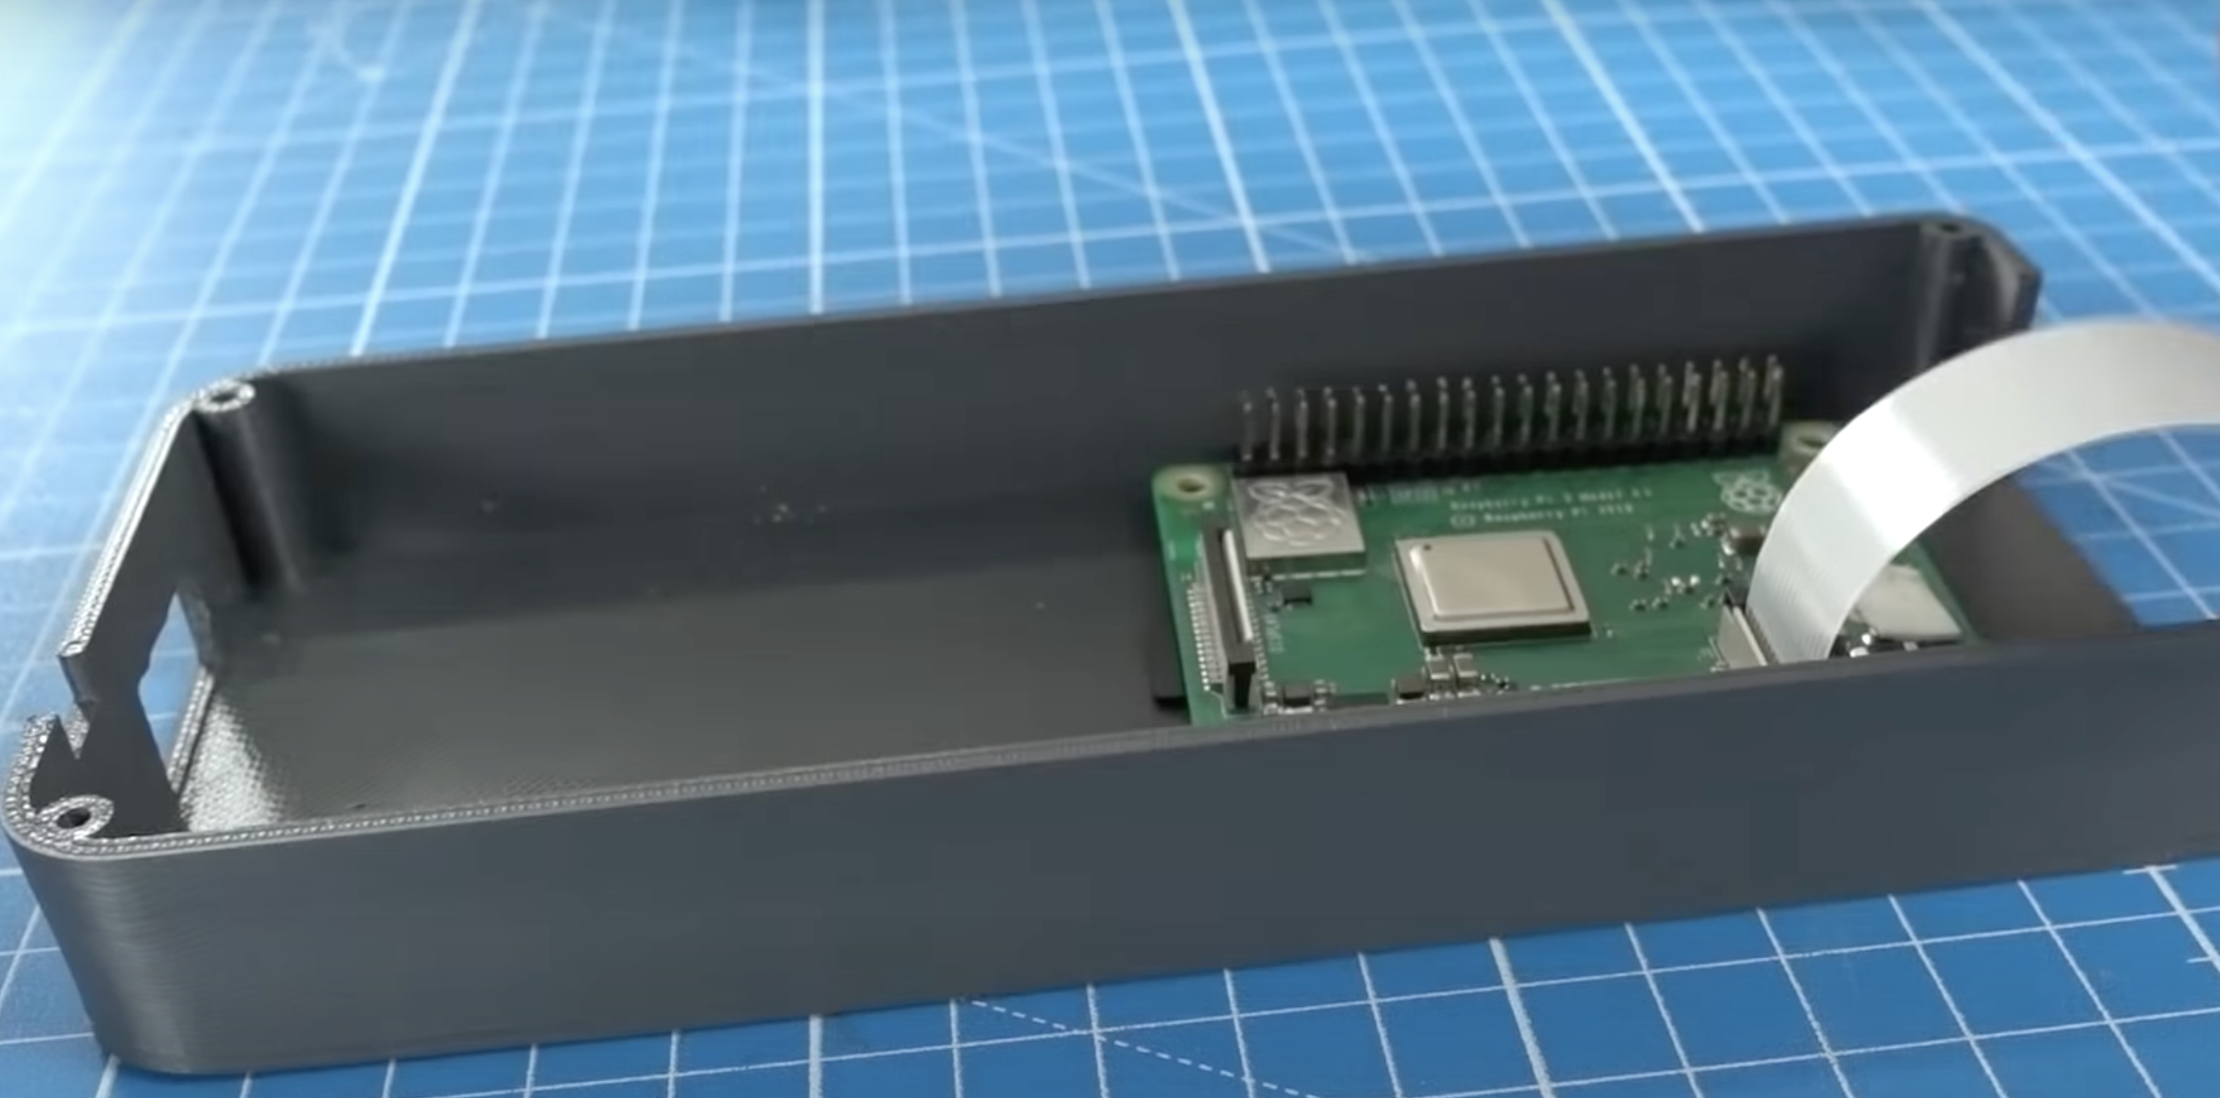
Super 8 cartridges are pretty small, so the super compact Raspberry Pi 3A+ was just the right size for this project, especially as Clem needed wireless connectivity. He had to get the power supply, Raspberry Pi brain, camera, and all the wires into a tight space.
Raspberry Pi 3A+ is small but it still takes up half the space in the tiny Super 8 cartridge
Clem wanted to be able to walk around and use the Super 8 as originally intended, so an external screen with a keyboard and a mouse wouldn’t have worked to control the device. Instead, he rigged up some buttons and an LED to the Raspberry Pi’s GPIO ports. He explains it all from this point in the build video.
We love that the final output looks just like the kind of films the original camera would have captured back in the day.
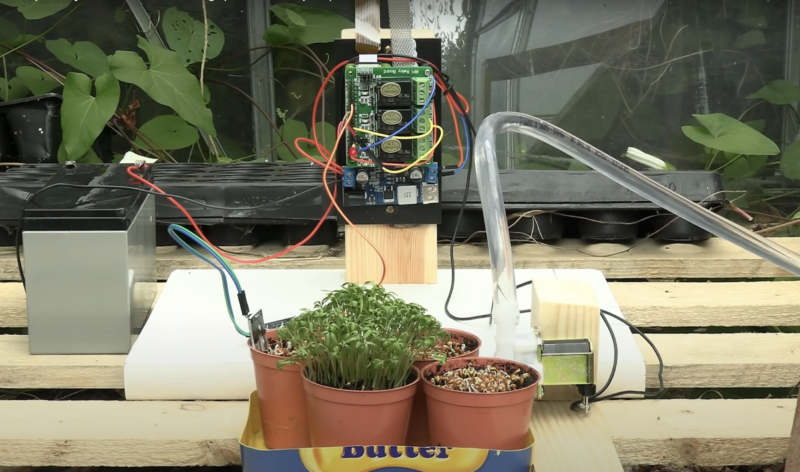
We’re not going to lie — the thing we like most about this automated plant watering project is the timelapse at the very end of the build video. But we also thought now might be a good time to show you another Raspberry Pi project for keeping an eye on your plants, since some of us are getting back to something more like our usual routines and our houseplants are no longer our best friends, so they might need a little extra automated attention.
Raspberry Pi can’t make your plants grow this fast in real life, sorry
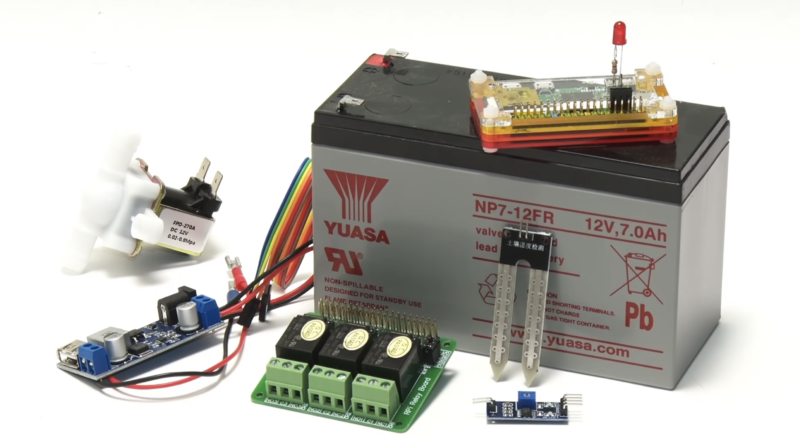
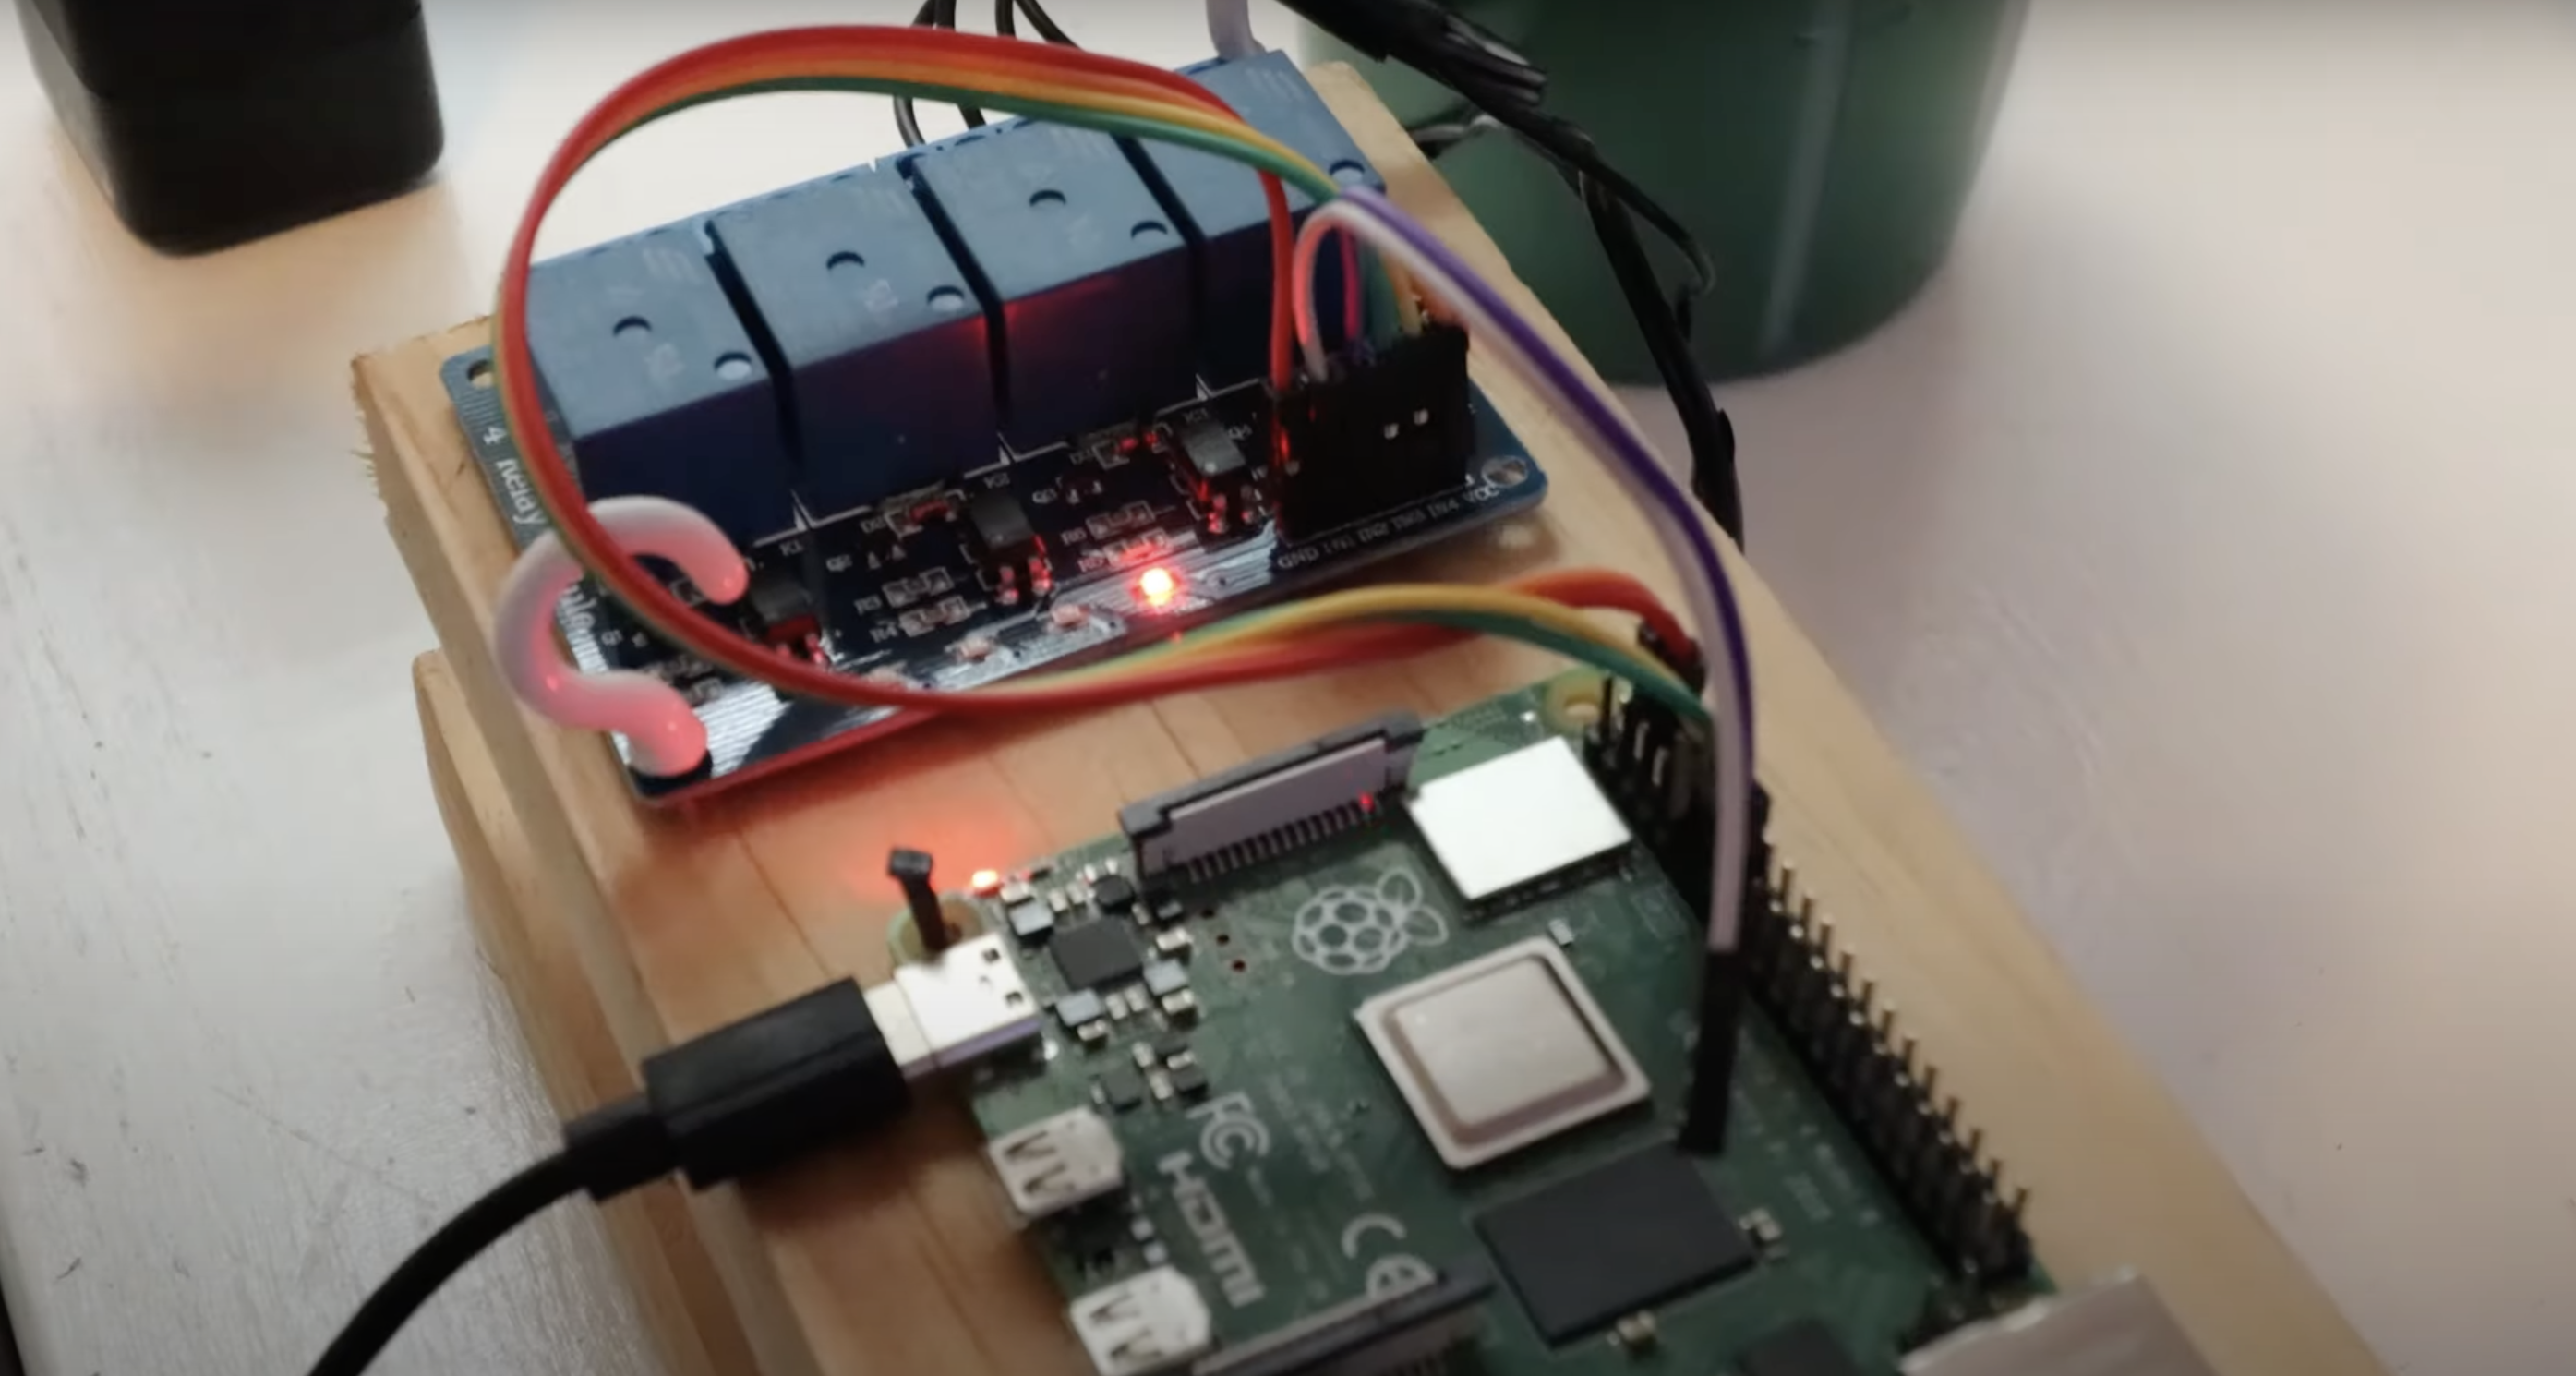
Maker Christopher Barnatt chose Raspberry Pi Zero for this project because although Raspberry Pi Pico could handle it, he needed a camera connector to record timelapse video of his plants’ growth.
Christopher is a gem and has included links to all the hardware he used. There are also some cheaper, smaller alternatives listed in the info section of his build video.
The moisture sensor checks every half hour to determine whether or not the plant has enough water, and communicates with the Raspberry Pi. Water flow is controlled by the solenoid valve, and if the Raspberry Pi finds the soil is too dry, it opens the valve for a set amount of time to let water out.
Check out the full build video for detailed setup instructions and code tests
Code your own plant watering machine
Christopher has shared all the code you need to make your own plant watering system:
Watering.py — the final watering system and timelapse code
Check out Christopher’s YouTube channel Explaining Computers where he posts new videos every week on topics like PC hardware, single board computers such as Raspberry Pi, AI, Big Data, and quantum computing.
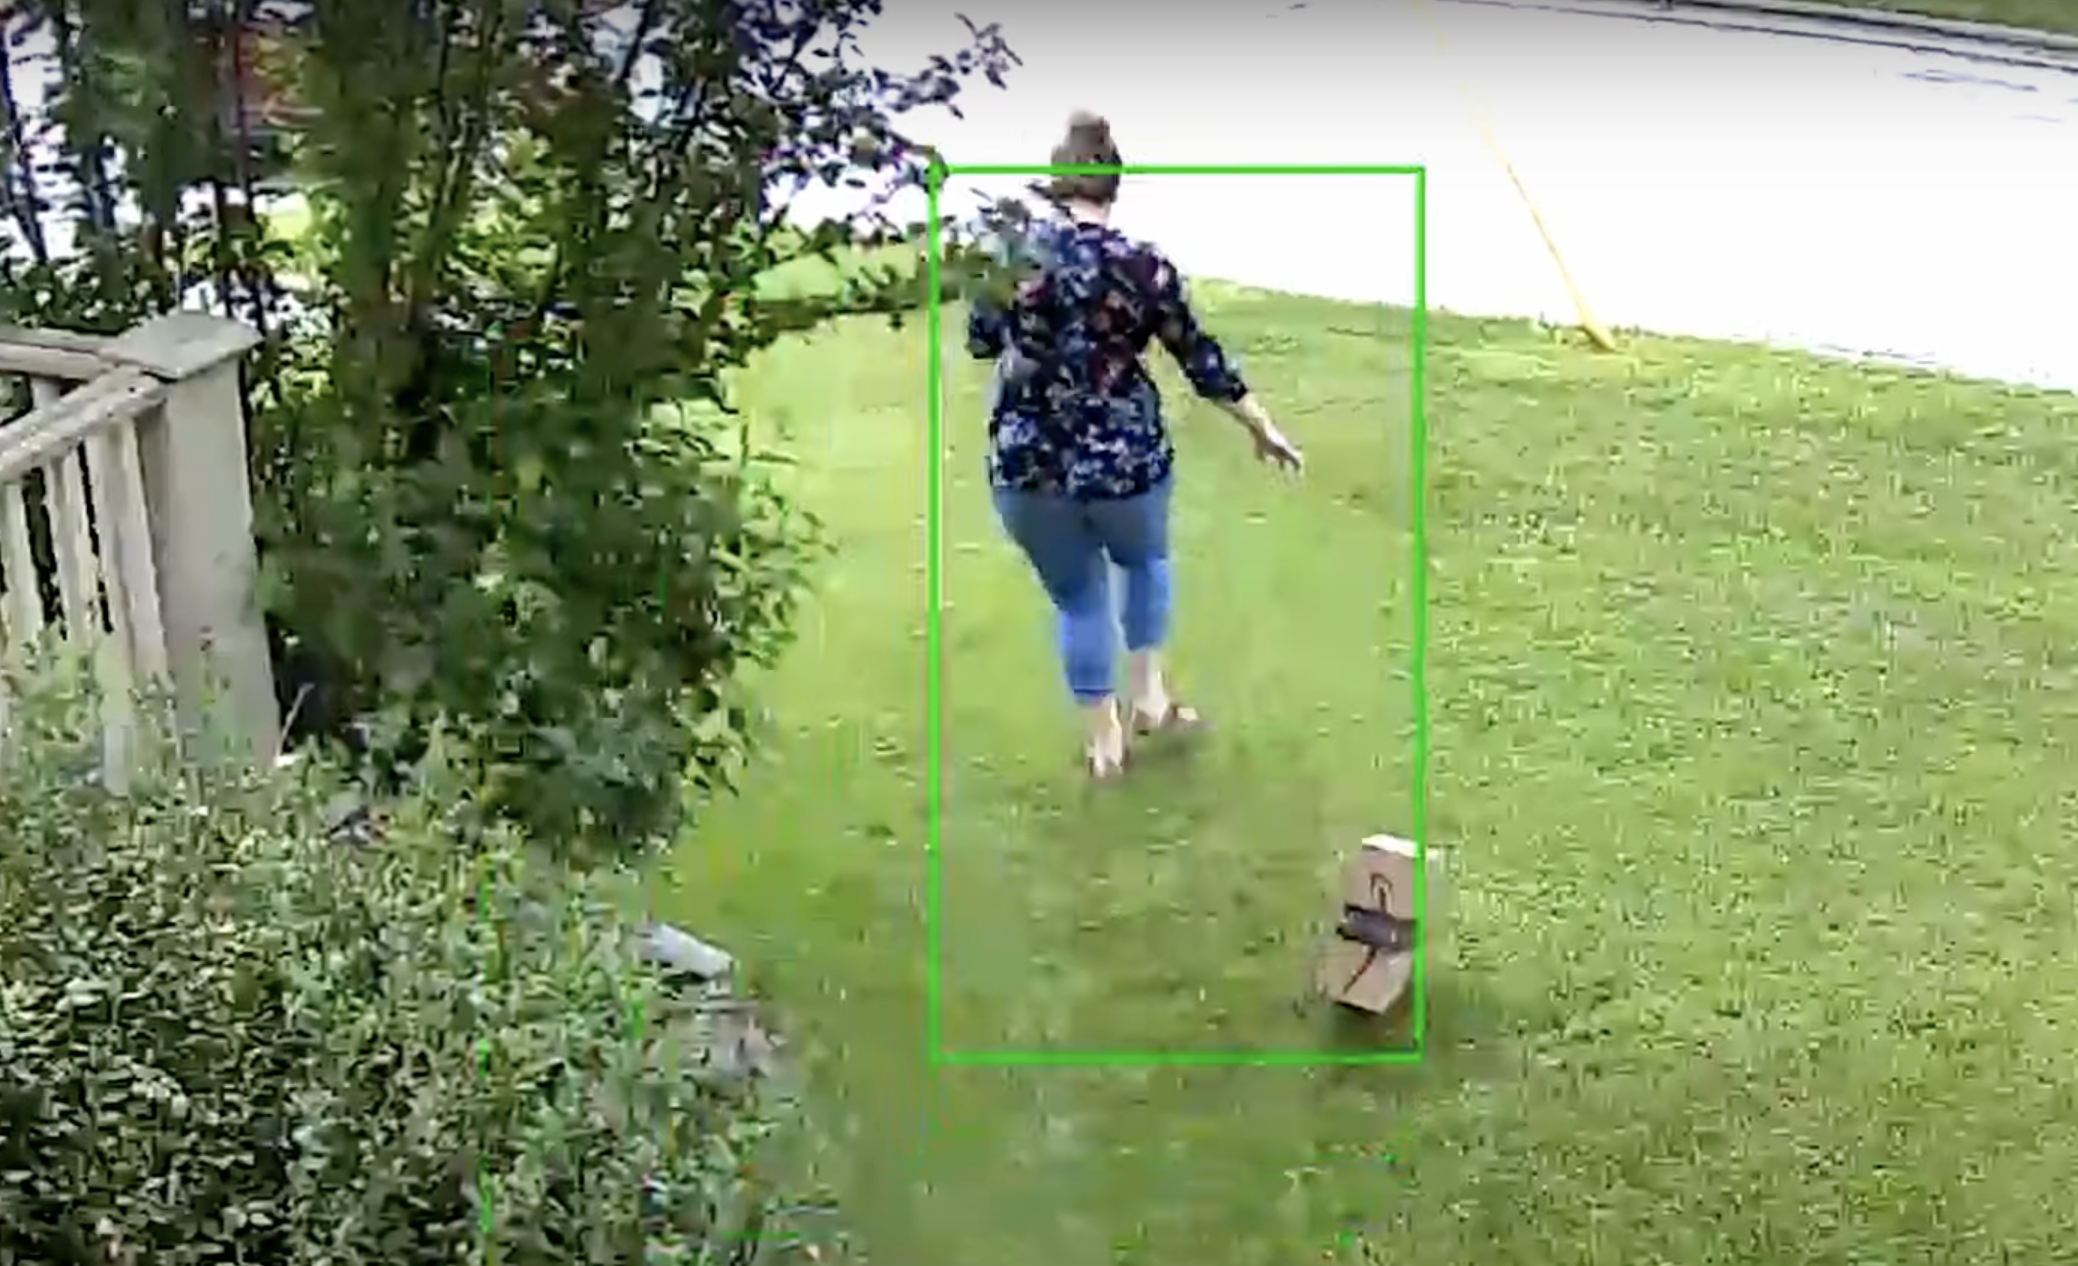
This Raspberry Pi-based build aims to deter porch pirates from stealing packages left at your front door. In recent times, we’ve all relied on home-delivered goods more than ever, and more often than not we ask our delivery drivers to stash our package somewhere if we’re not home, leaving them vulnerable to thieves.
Watch the full build video: ‘Fighting porch pirates with artificial intelligence (and flour)’
Flashing lights, sirens, flour and sprinklers
When internet shopper and AI project maker Ryder had a package stolen from his porch, he wanted to make sure that didn’t happen again. He figured that package stealers would be deterred by blaring sirens and flashing red lights. He also went one step further, wanting to hamper the thief’s escape with motion-activated water sprinklers and a blast of flour ready to catch them as they run away.
A would-be package thief dropping their swag and running away from the sprinkler
A simple motion detector wouldn’t work because it would set off Ryder’s booby traps whenever an unsuspecting cat or legitimate visitor happened across his porch, or if Ryder himself arrived home and didn’t fancy a watery flour bath. So some machine learning and a Python script needed to be employed.
How does it catch package thieves?
It’s what’s on the inside that counts. Us. We’re on the inside.
The camera keeps an eye on Ryder’s porch and is connected wirelessly to a Raspberry Pi 4, which works with a custom TensorFlow machine learning model trained to recognise when a package is or isn’t present. If the system detects a package, it gets ready to deploy the anti-thief traps. The Raspberry Pi sets everything off if it detects that someone other than Ryder has removed the package from the camera’s view.
And Ryder had an interesting technique to train the machine learning model to recognise him:
That’s Ryder, he’s OK
That’s Voldemort. He is not OK
If you want to make your own anti-porch pirate device, Ryder has shared everything you need on GitHub.
If you’re not familiar with Ryder’s dog-detecting (and happiness-boosting) build, check it out below. We also blogged about this project when we needed a good dopamine boost during lockdown.
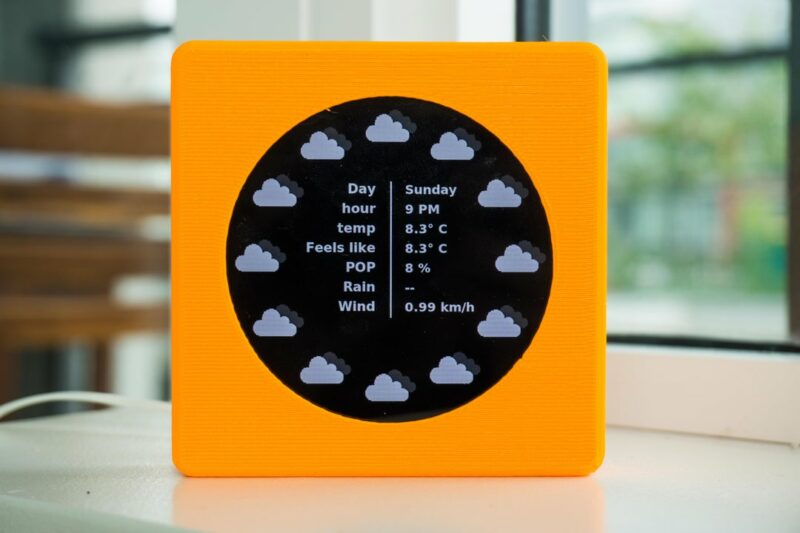
Meet Eli’s WeatherClock, a digital–analogue timepiece that displays the weather at each hour of the day as well as the time. Here’s an example: every day at 3pm, instead of the hour hand just pointing to a number three on the clock’s face, it also points to a visual representation of what the weather is doing. Obviously, Eli’s WeatherClock still tells the time using the standard positions of the hour and minute hands, but it does two jobs in one, and it looks much more interesting than a regular clock.
We agree, she is lovely (sound on for the video will make that make sense)
Detailed forecast
You can also press on every hour position of the watch’s touchscreen display to see more detailed meteorological information, such as temperature and the likelihood of rain. Then once you’ve gotten all the detail you need, you return to the simple analogue resting face to by pressing the centre of the touchscreen.
weatherClock can give you more detail if you want it to
Under the hood
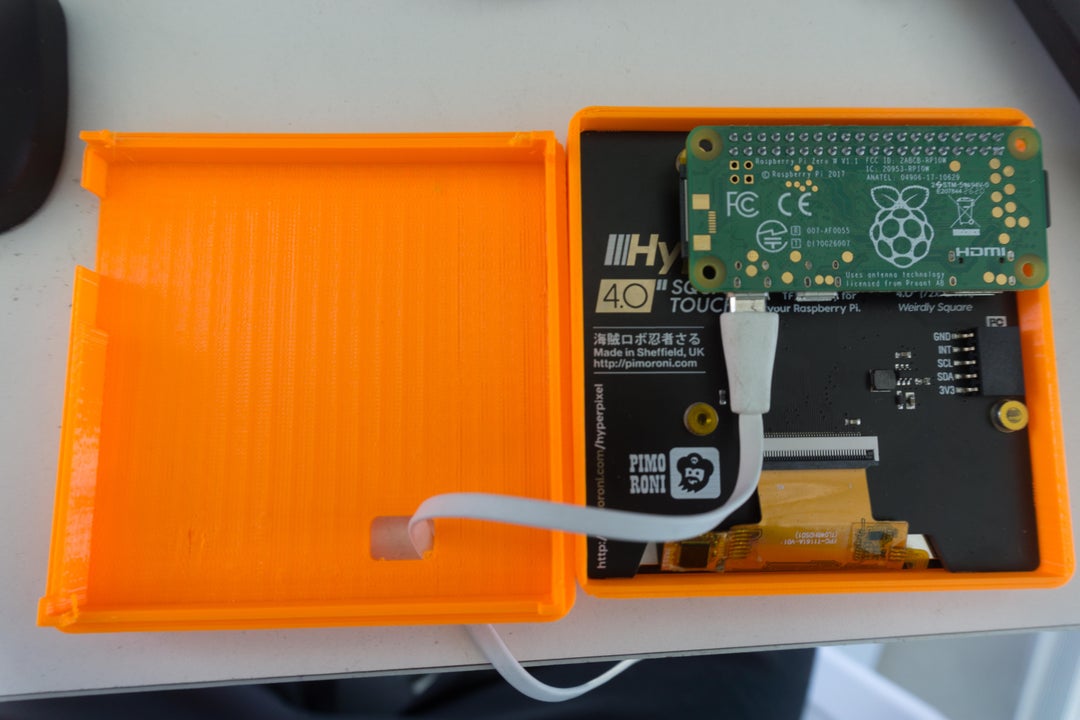
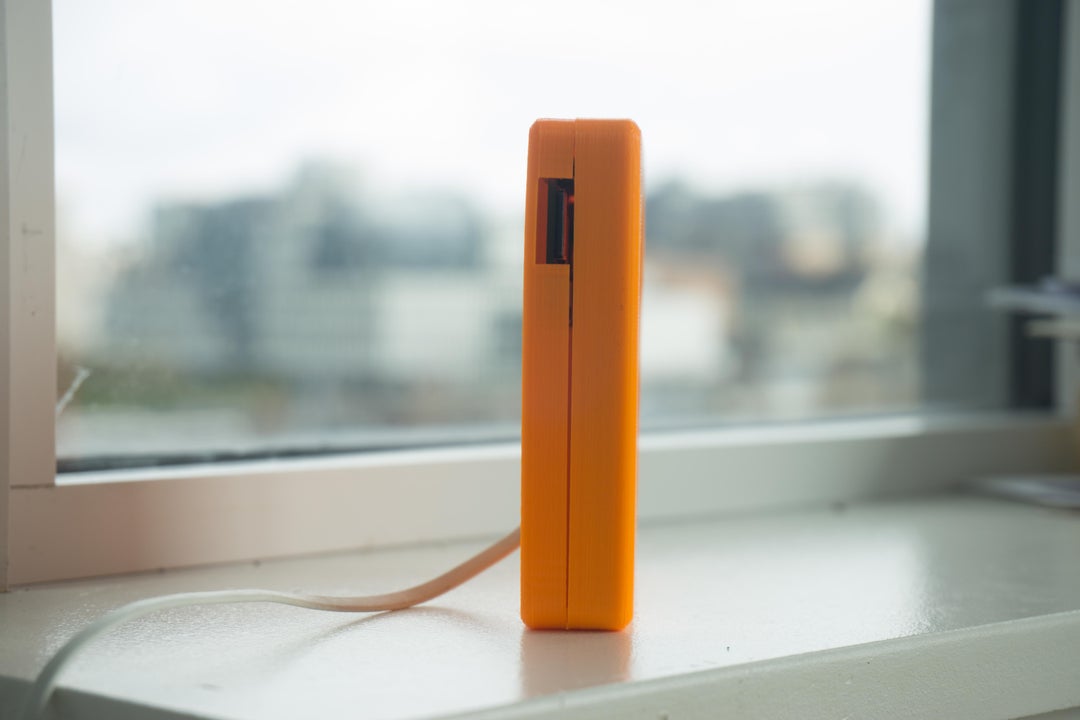
The device uses the openWeatherMap API to fetch weather data for your location. It’s a simple build powered by Raspberry Pi Zero W with a Pimoroni 4″ HyperPixel Hi-Res Display providing the user interface. And its slim, pocket-sized design means you can take it with you on your travels.
We found this creation on The Digital Vagrant‘s YouTube channel. A friend named Eli gave them the idea so the maker named the project after him. The Digital Vagrant liked the idea of being able to quickly check the weather before leaving the house — no need to check a computer or get your phone out of your bag.
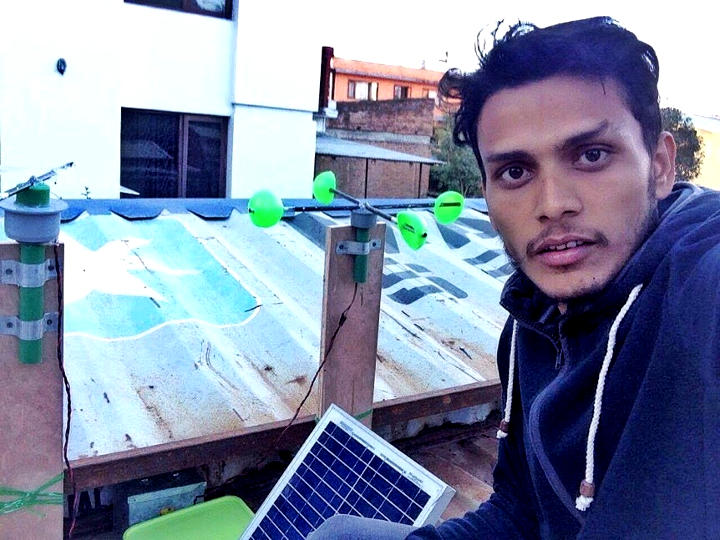
This Raspberry Pi-powered weather station is a vital tool for Nepalese farmers, who work in remote, changeable conditions, and rely heavily on monitoring the environment.
All the parts had to be low-cost and easy to maintain
It’s hard to forecast the weather in Nepal. Conditions can vary a lot within a small area because the country is so mountainous. Plus, there is no national weather service. This makes life even harder for farmers working in remote villages. There were a few essentials elements that any solution had to have:
Low-cost
Reliable and easy to maintain
Solar-powered
Able to run off readily available motorcycle batteries when the solar panels don’t get enough sun
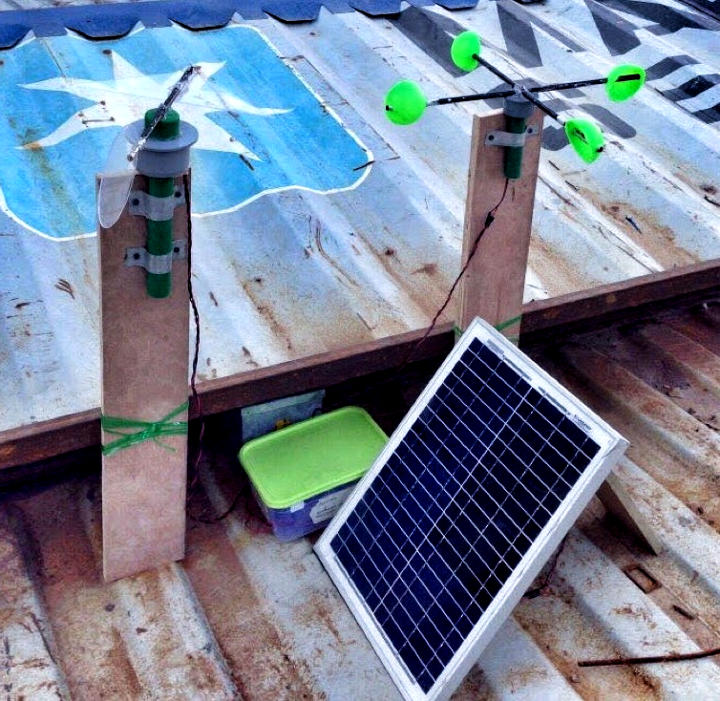
A simple plastic food container keeps the hardware safe and dry
How was it made?
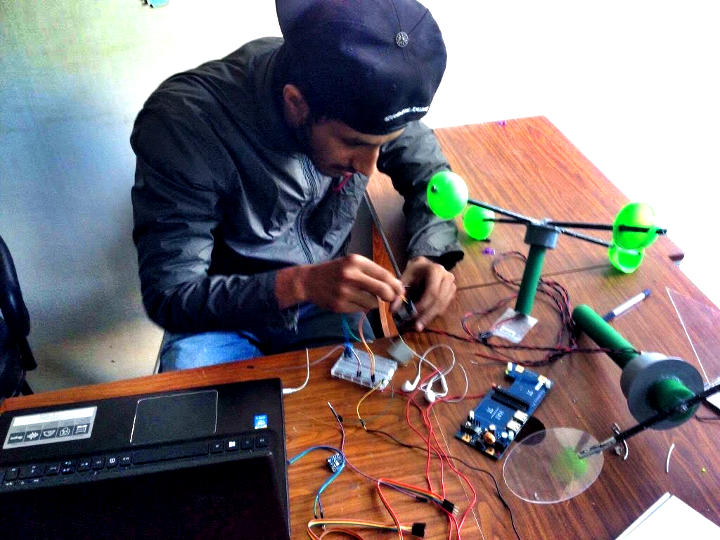
Prabesh Sapkota and Binod Kandel from the Robotics Association of Nepal led the team that built the solar-powered weather station with battery back-up. They were able to complete the project affordably using Raspberry Pi. Prabesh and his team wrote the software and created a display dashboard in Raspberry Pi OS Jessie.
The core components put together as a prototype with a breadboard to check everything worked
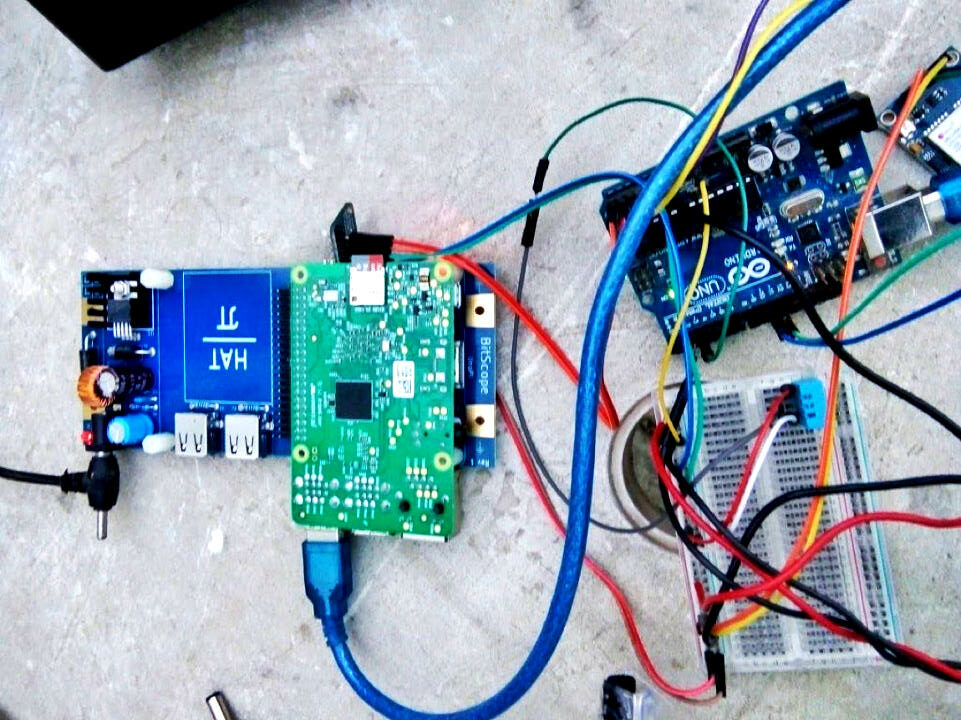
One of the challenges they faced was being able to power the Raspberry Pi and Arduino reliably, and that’s where the BitScope Blade Uno came in to play (more on that later).
The weather station sensors measure temperature, barometric pressure, humidity, wind direction and wind speed, and all of the sensors are connected to the Arduino, which records the data and sends it to the Raspberry Pi to display on the dashboard.
BitScope Blade Uno (directly powers Raspberry Pi and Arduino)
GPS module (NEO-6M-0-001)
Pressure sensor (BMP180)
Humidity sensor (DHT11)
12V Lead-acid battery
20 Watt solar panel
Hall effect sensor (used together with magnets in an anemometer to measure wind speed)
8 reed switches (used with a wind vane that has an attached magnet to sense wind direction)
Testing out the weather station on the roof
The team is working with an Australian sponsor to run workshops on basic electronics, with the intention of helping people build more of these affordable weather stations for rural schools and remote areas.
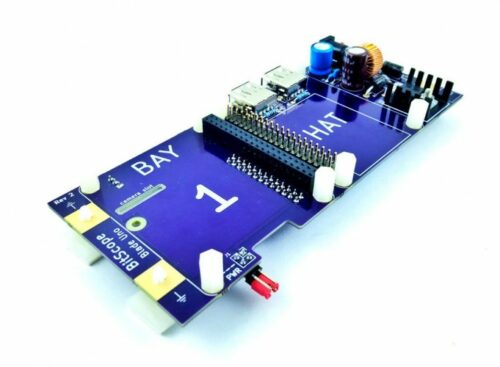
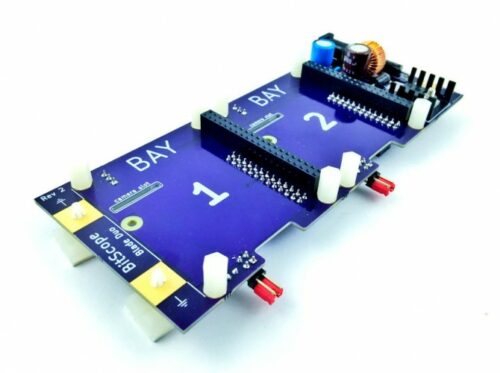
What is Bitscope Blade?
This weather station is an inspiring application of BitScope Blade, available to buy from element14. BitScope developed these power and mounting solutions for people working in challenging conditions, making them perfect for remote areas of Nepal without access to reliable power. They’re designed for industrial deployment as well as being suitable for off-grid hobbyist and educational applications.
You can choose from three variants, according to how many Raspberry Pi computers you need to support: BitScope Blade Uno for one Raspberry Pi and optional HAT, useful for makers and students; Duo for a pair of Raspberry Pis, ideal for building a standalone desktop and server system; and Quattro for four Raspberry Pis in applications such as compute clusters, private clouds or build farms.
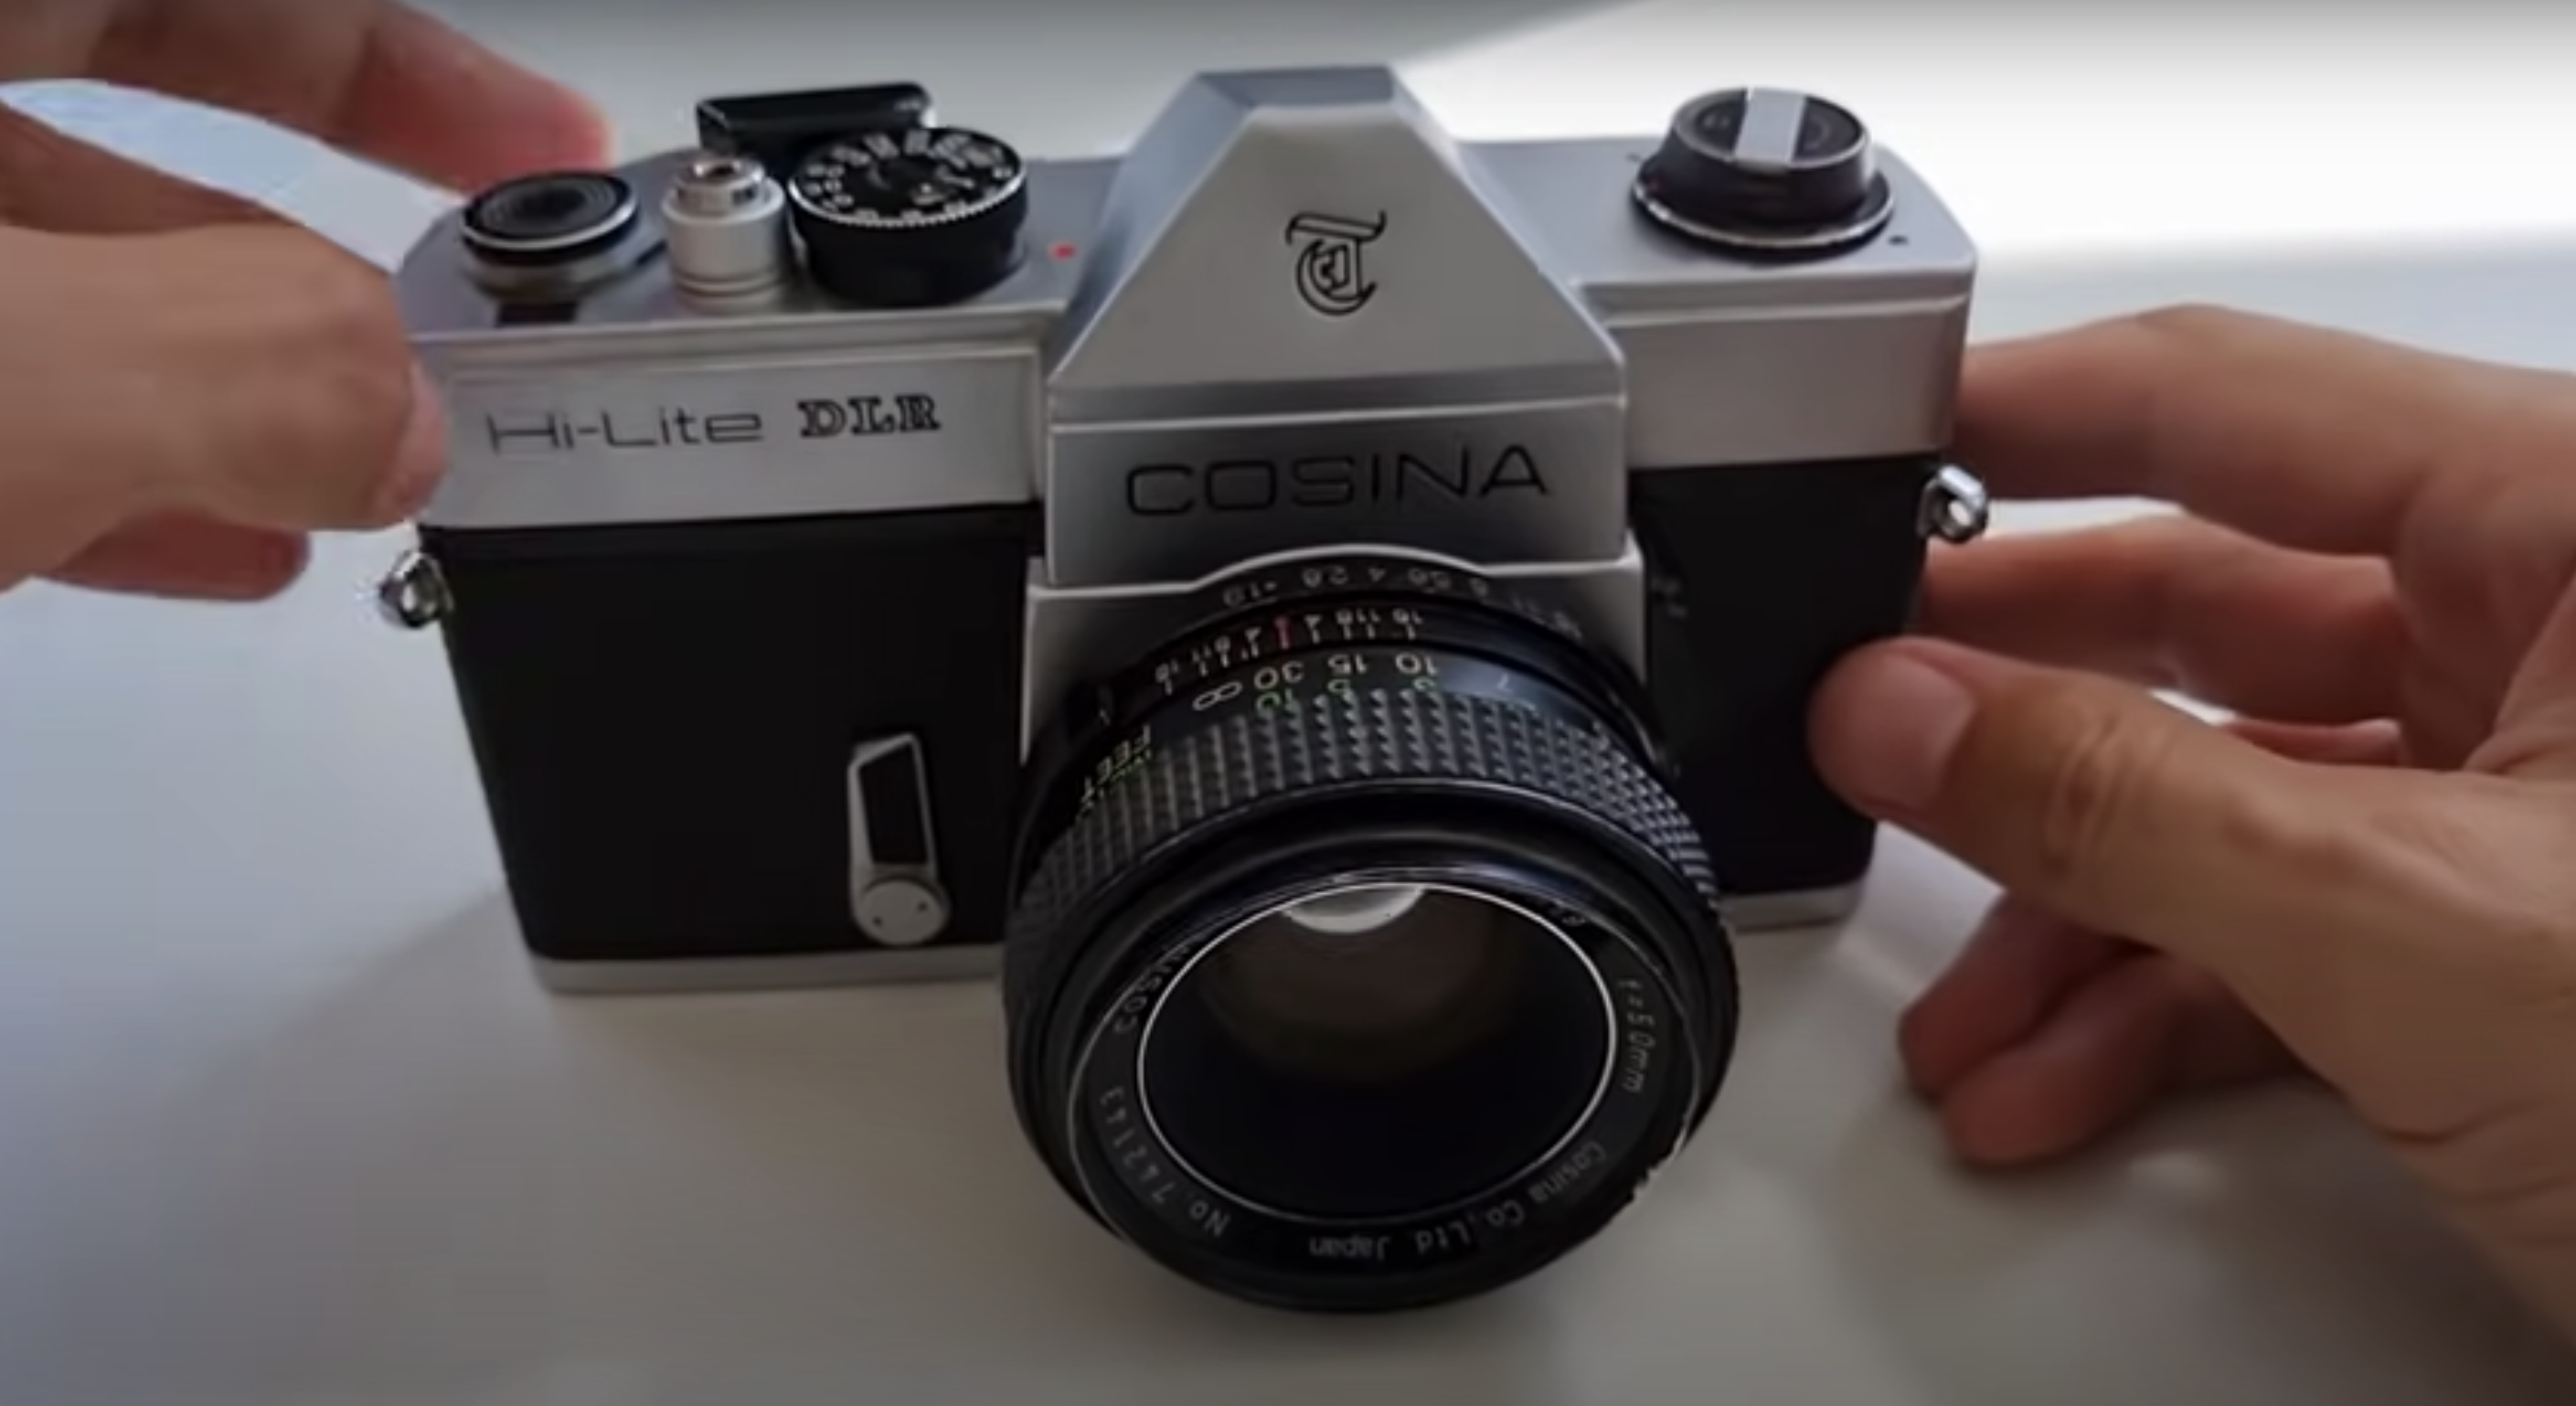
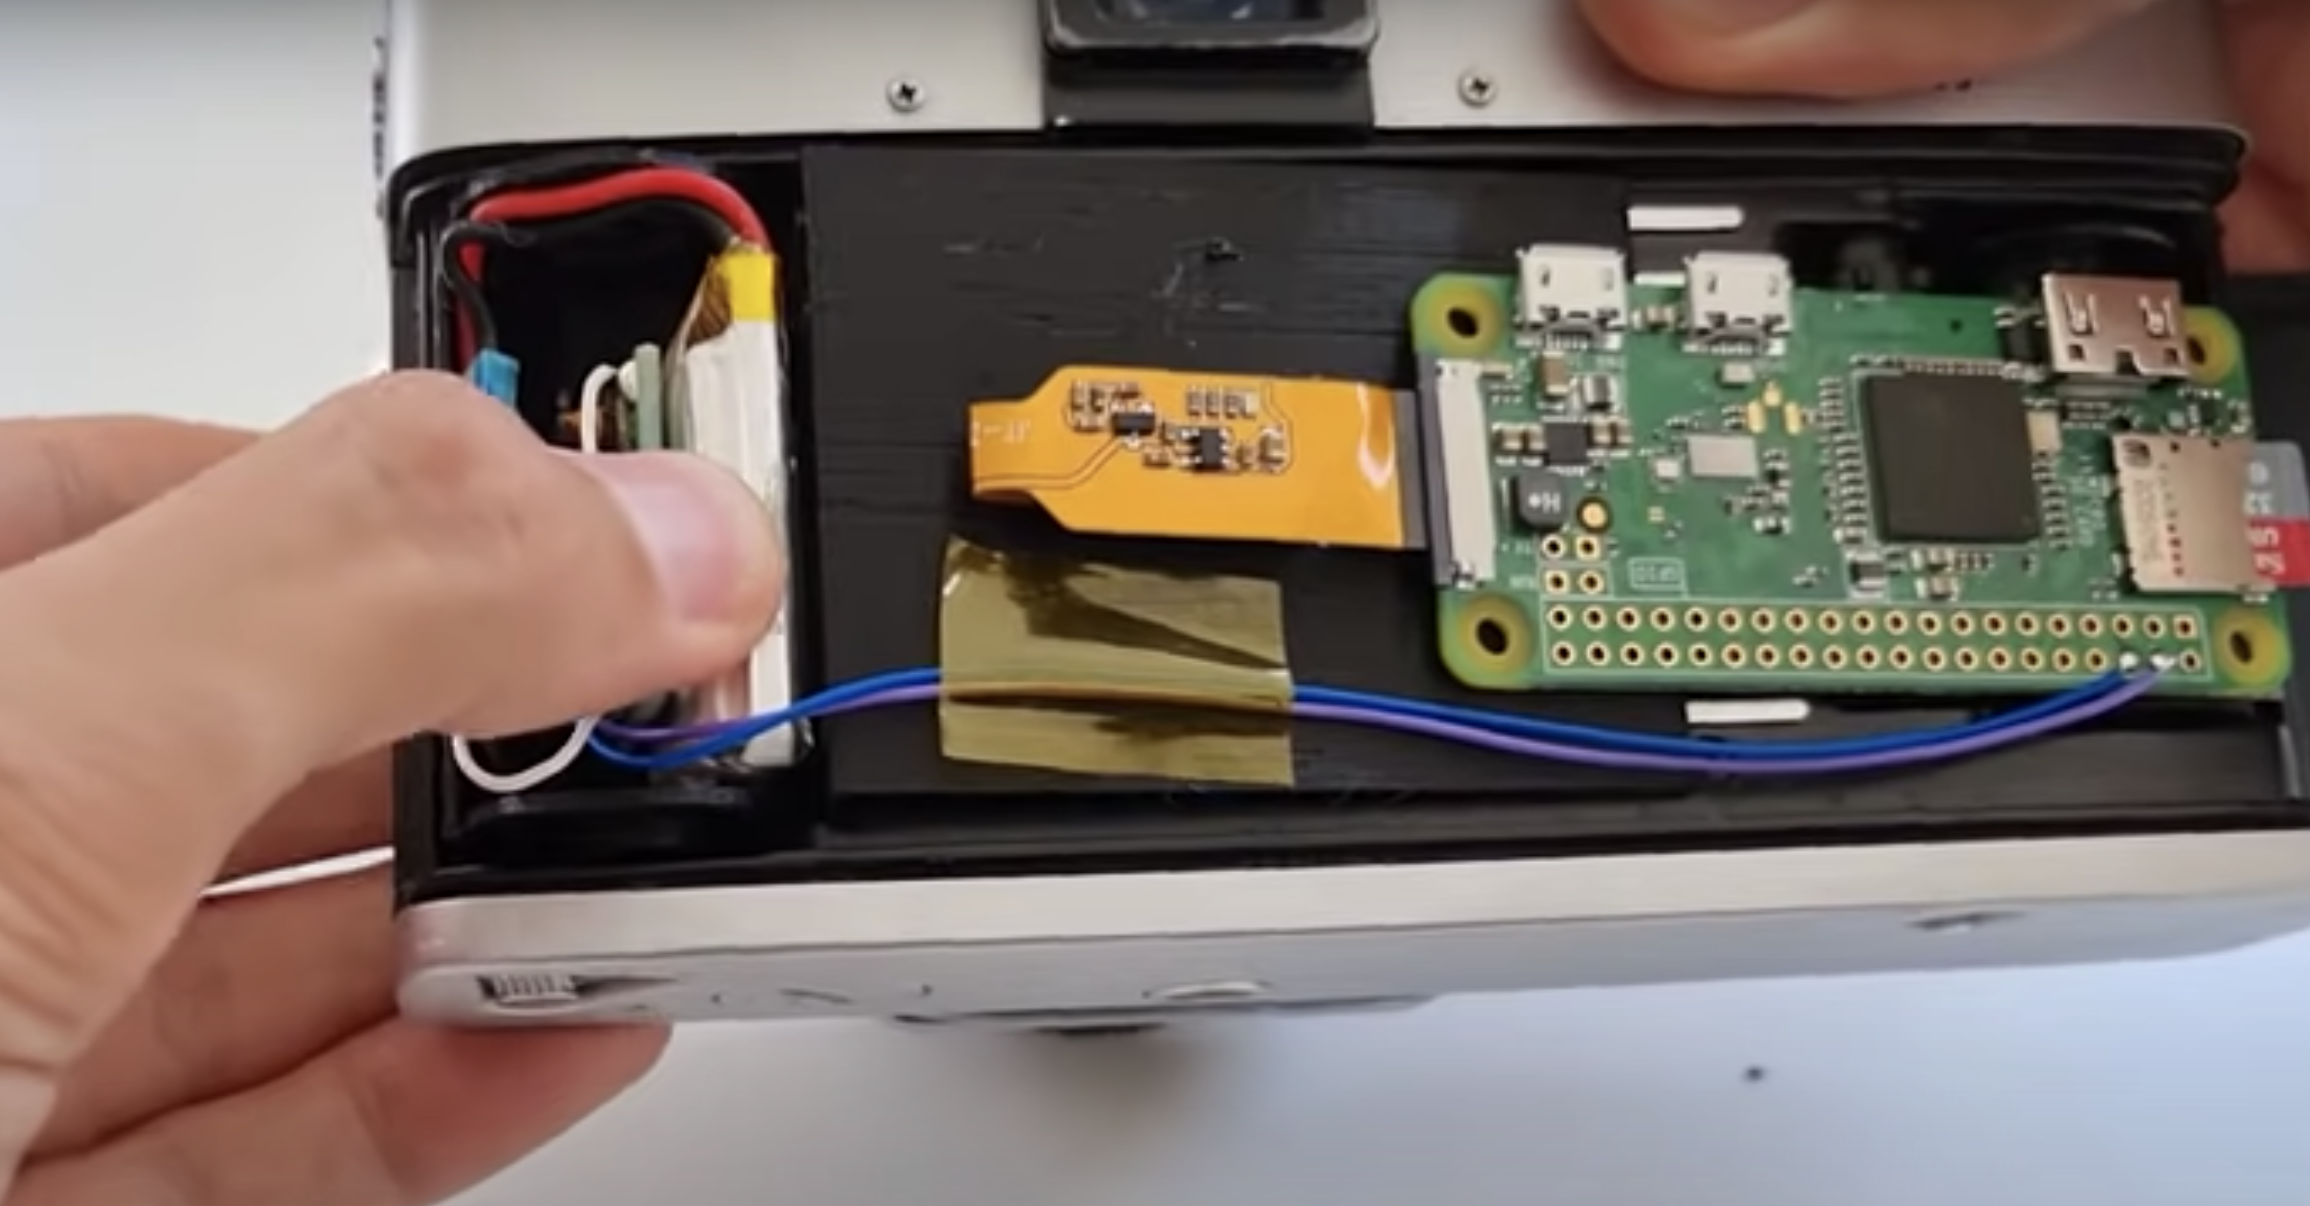
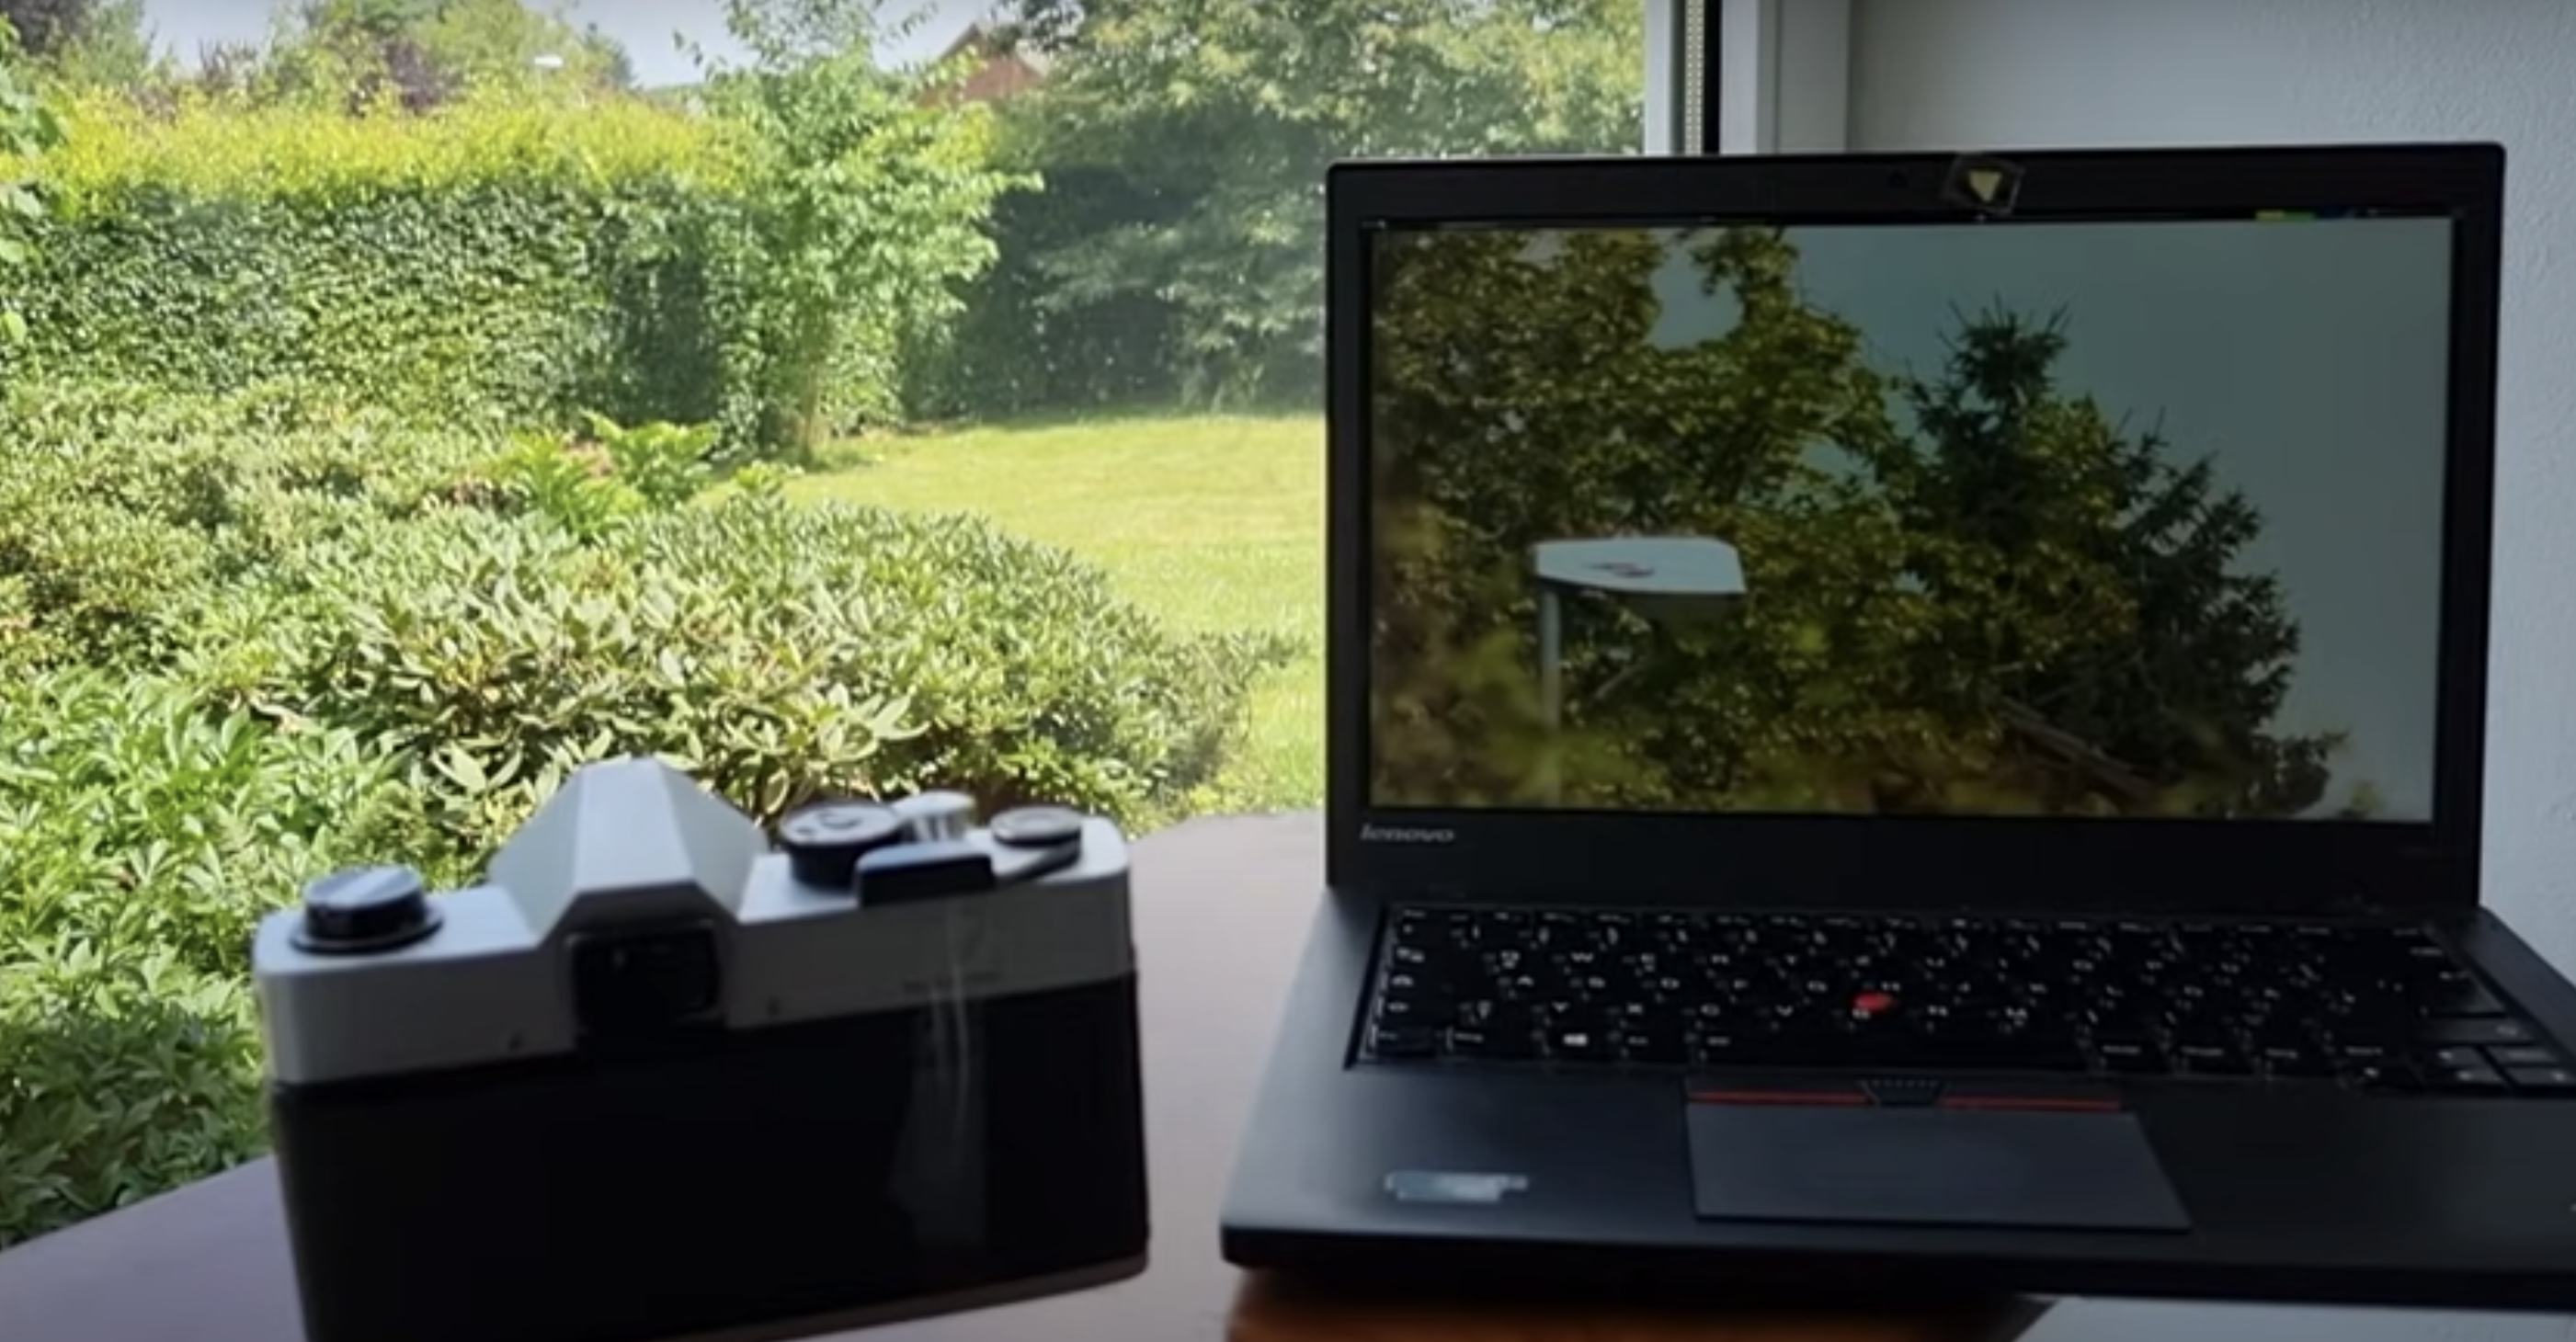
Befinitiv has built a custom film cartridge, using a Raspberry Pi Zero W, that turned their gorgeous old analogue camera into a digital one, and enabled it to take digital photos, videos, and even wirelessly live stream to the Internet.
A quick, simple build video for a smooth-running project
The analogue camera they used in the build was considered state-of-the-art around fifty years ago, but it lives on to capture another day, all thanks to a tiny computer we made just a few years ago.
It’s a beauty
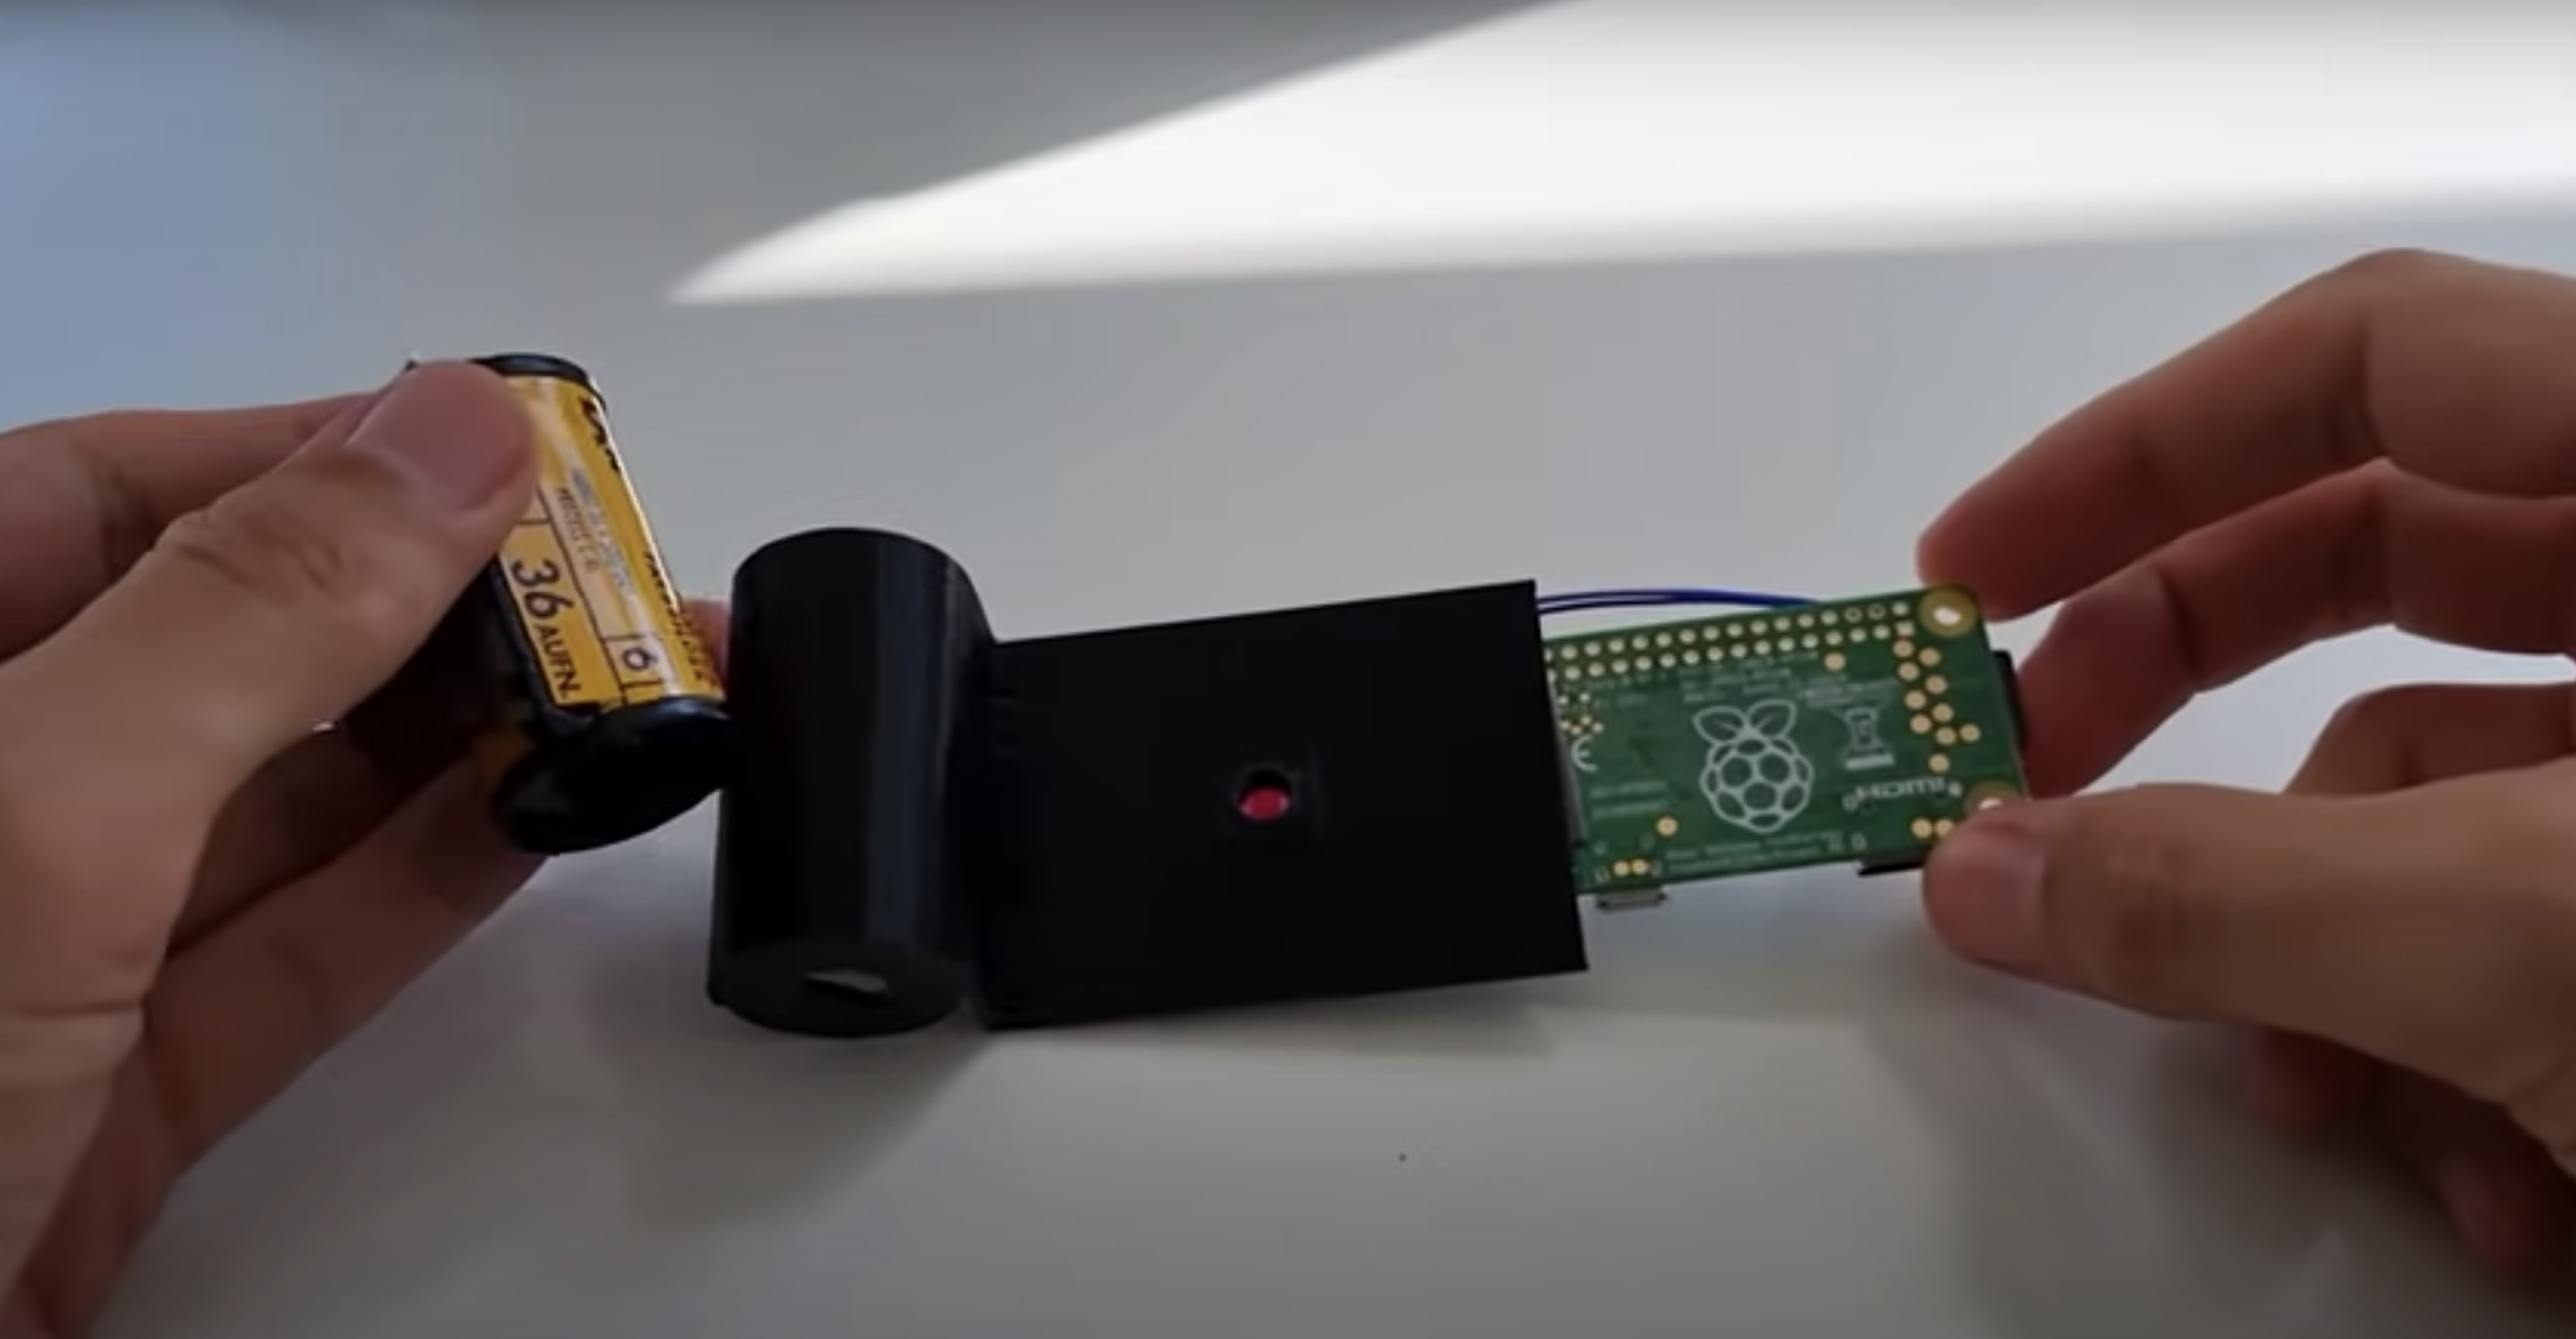
The maker replaced the old-fashioned camera film roll with a digital cartridge housing a tiny Raspberry Pi camera — with the lens removed — and a Raspberry Pi Zero W. The housing was designed to fit in the back of the camera where original photographers would have clipped the film roll in, and then spooled it over.
Designed to fit
Along with the camera and the Raspberry Pi Zero W, the custom-built cartridge also houses a LiPo battery and a DC to DC converter, used to boost the power supply to the Raspberry Pi up to +5V.
Teeny tech packed into a teeny space
The whole project took just two hours to complete from start to finish, everything worked first time. Befinitiv had wanted to use the Raspberry Pi High Quality Camera, but space inside the housing was just too tight. Maybe next time? Perhaps they can use one of those giant ancient cameras, where the photographer had to flip a blanket over their head, all while holding a stick in the air with the flash.
This old analogue camera is now fully digital
More retro projects from the maker
Fancy more where this retrofit goodness came from? The maker has also upgraded a flip phone from the year 2000. Oh! I just realised the year 2000 was more than 20 years ago. Watch the build video while I go and burn all of my skater boy jeans and slogan t-shirts…
Don’t let your old flip phone die
They also did something weird but cool sounding with this noisy teletype machine. Is it a teletype machine? What’s a teletype machine? I saw a fax machine once..?
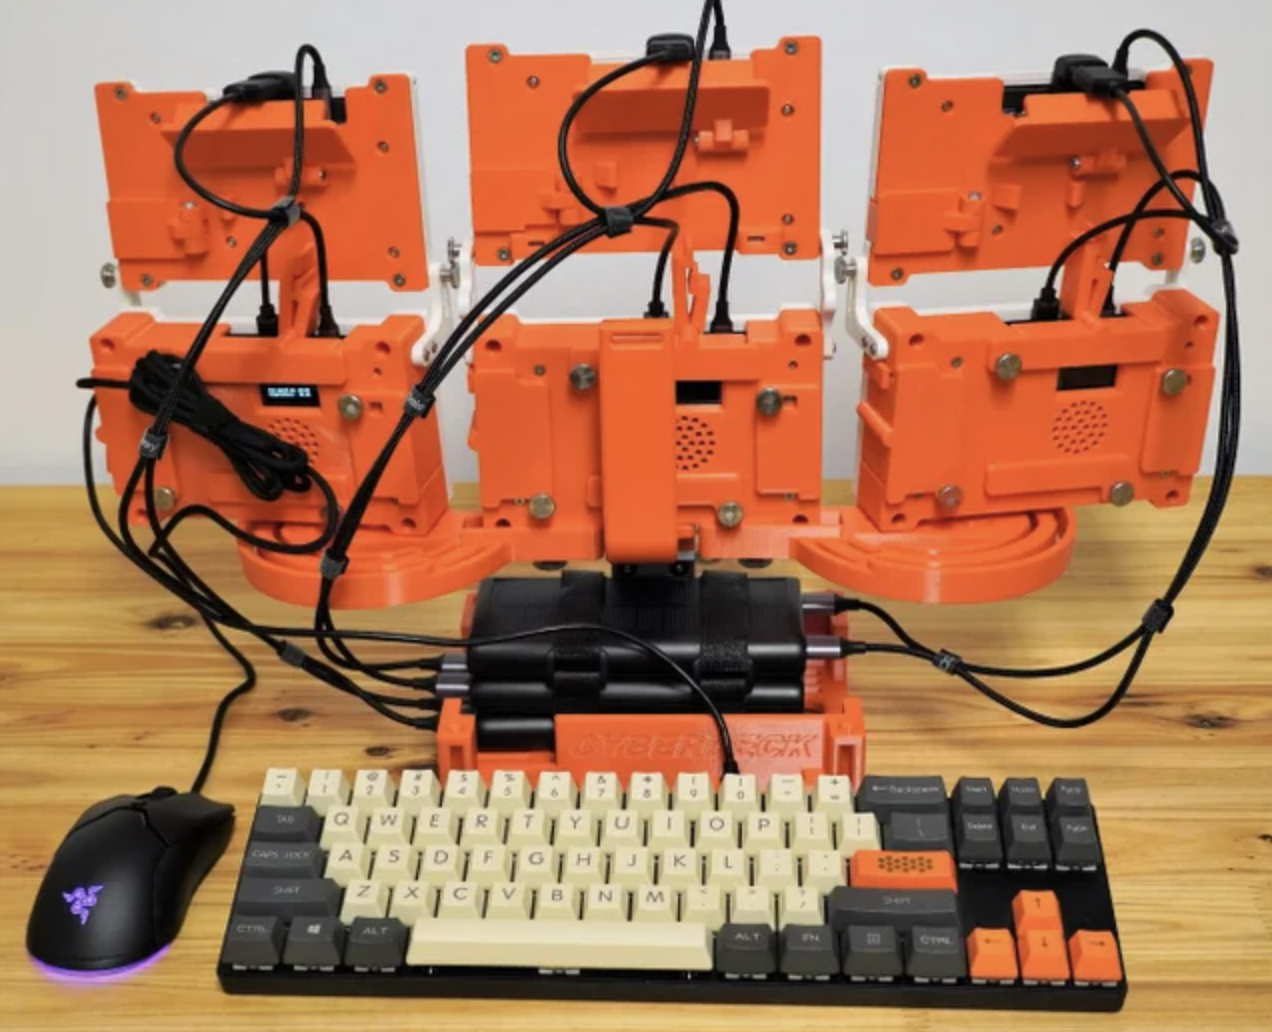
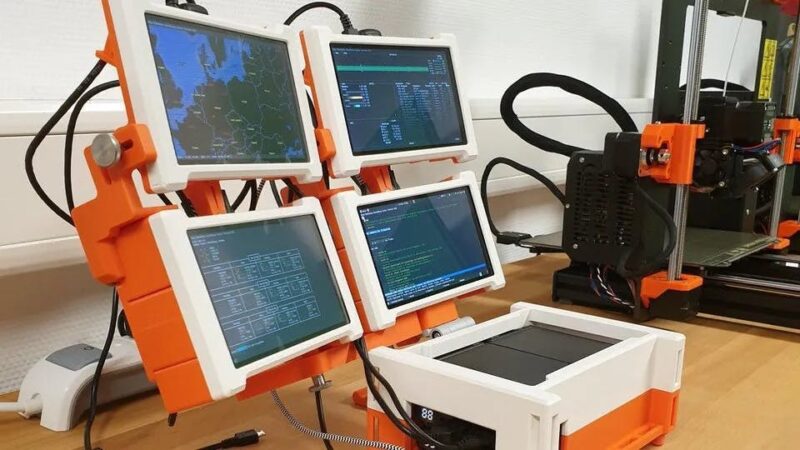
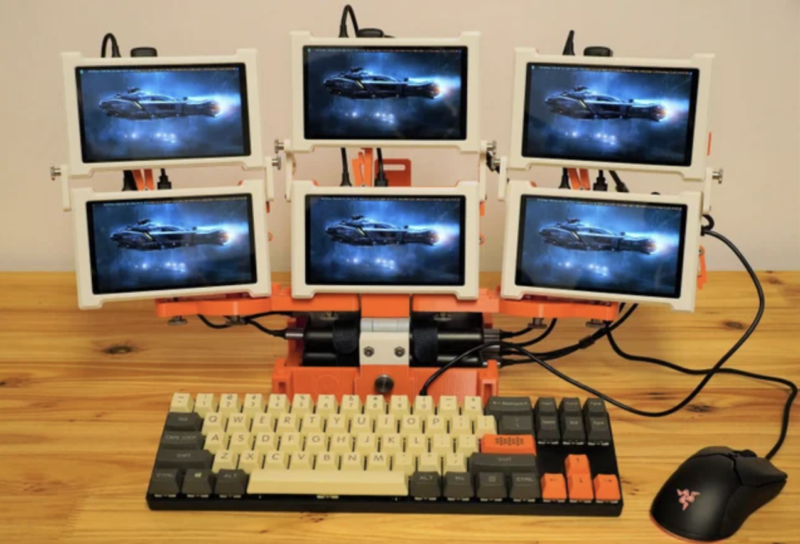
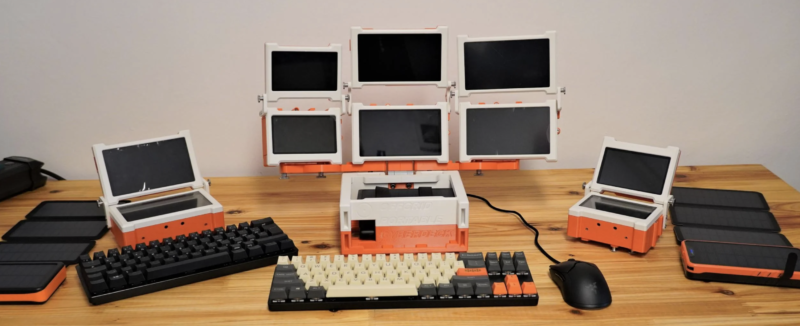
Holy cyberdecks! Redditor Holistech (aka Sören Gebbert) really leaned in to the “more is more” idiom when building this big orange cyberdeck using three Raspberry Pis. Why use just one screen to manipulate enemy cyberware and take down your cyberpunk foes, when you can have six?
Rear view (keep reading for the big reveal)
From four to six
We first came across Sören’s work on hackster.io and we were impressed with what we found, which was this four‑screen creation running Linux Mint on a dual Raspberry Pi setup:
The first, four-screen, iteration of this project is still impressive
So imagine our surprise when we clicked through to check out Holistech on reddit, only to be confronted with this six‑screen monstrosity of brilliance:
Level up
He’s only gone and levelled up his original creation already. And before we even had the chance to properly swoon over the original.
Under the hood
Originally, Sören wanted to use Raspberry Pi Zero because they’re tiny and easily hidden away inside projects. He needed more power though, so he went with Raspberry Pi 4 instead.
The whole family
Sören 3D-printed the distinctive orange frame. On the back of the rig are openings for a fan for active cooling and a mini control display that shows the CPU temperature and the fan speed.
Six 5.5″ HD resolution screens are the eyes of the project. And everything is powered by hefty 26,000 mAh battery power banks.
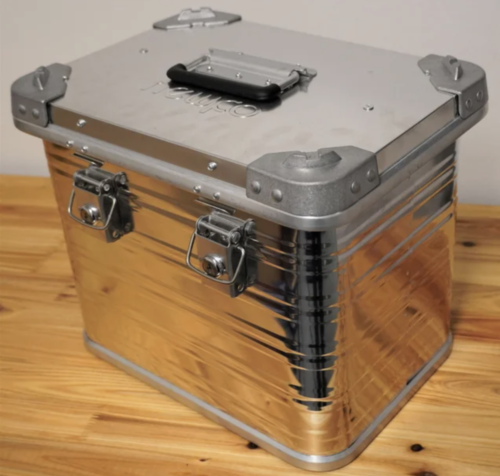
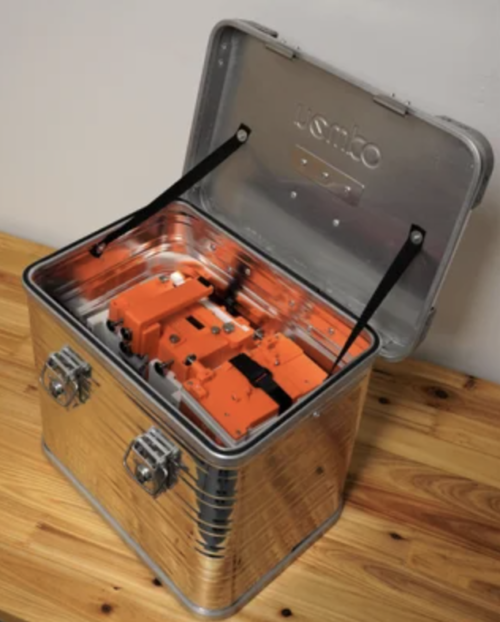
Carry on
And it gets even better: this whole multi-screen thing is portable. Yes, portable. You can fold it up, pack it away in its suitably steampunk metal box, and carry it with you.
There are plenty more photos. Head to Instagram to take a closer look at how Sören’s genius design folds in on itself to enable portability.
It’s the worst feeling in the world: waking up and realising you forgot to put your electric car on charge overnight. What do you do now? Dig a bike out of the shed? Wait four hours until there’s enough juice in the battery to get you where you need to be? Neither option works if you’re running late. If only there were a way to automate the process, so that when you park up, the charger find its way to the charging port on its own. That would make life so much easier.
This is quite the build
Of course, this is all conjecture, because I drive a car made in the same year I started university. Not even the windows go up and down automatically. But I can dream, and I still love this automatic Tesla charger built with Raspberry Pi.
Wait, don’t Tesla make those already?
Back in 2015 Tesla released a video of their own prototype which can automatically charge their cars. But things have gone quiet, and nothing seems to be coming to market any time soon – nothing directly from Tesla, anyway. And while we like the slightly odd snake-charmer vibes the Tesla prototype gives off, we really like Pat’s commitment to spending hours tinkering in order to automate a 20-second manual job. It’s how we do things around here.
This video makes me feel weird
Electric vehicle enthusiast Andrew Erickson has been keeping up with the prototype’s whereabouts, and discussed it on YouTube in 2020.
How did Pat build his home-made charger?
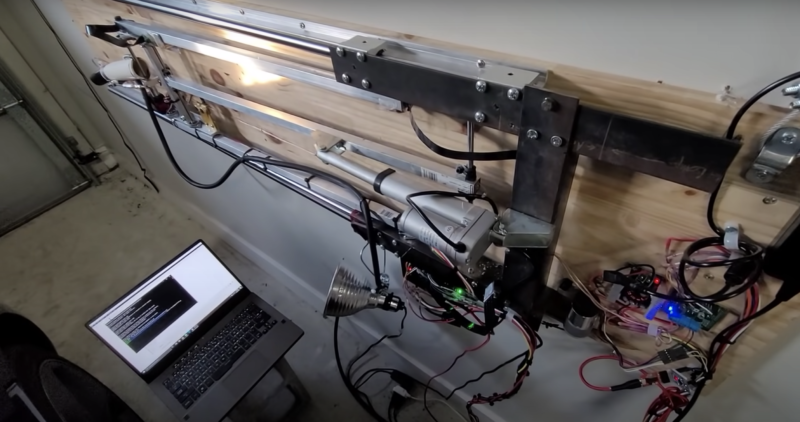
Tired of waiting on Tesla, Pat took matters into his own hands and developed a home-made solution with Raspberry Pi 4. Our tiny computer is the “brains of everything”, and is mounted to a carriage on Pat’s garage wall.
The entire rig mounted to Pat’s garage wall
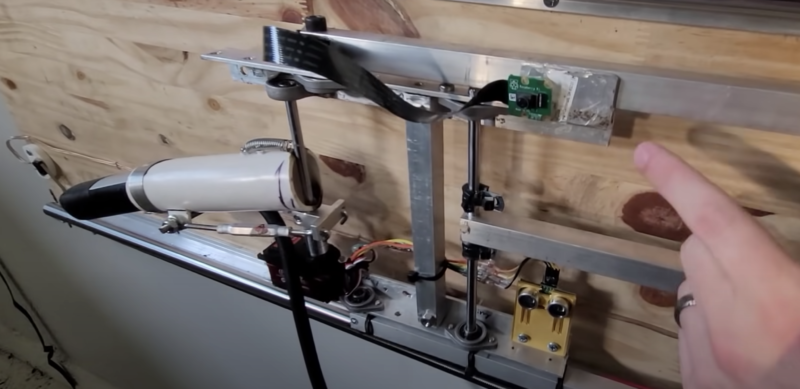
There’s a big servo at the end of the carriage, which rotates the charging arm out when it’s needed. And an ultrasonic distance sensor ensures none of the home-made apparatus hits the car.
Big white thing on the left is the charging arm. Pat pointing to the little green Raspberry Pi camera module up top. And the yellow box at the bottom is the distance sensor
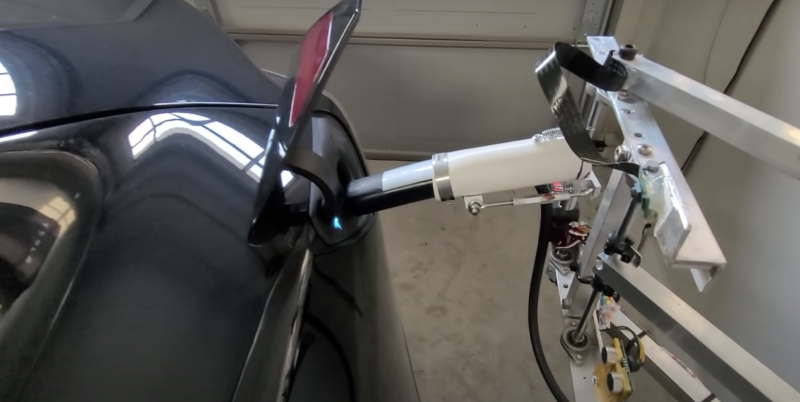
How does the charger find the charging port?
A Raspberry Pi Camera Module takes photos and sends them back to a machine learning model (Pat used TensorFlow Lite) running on his Raspberry Pi 4. This is how the charging arm finds its way to the port. You can watch the model in action from this point in the build video.
“Marco!” “Polo!” “Marco!” “Polo!”
Top stuff, Pat. Now I just need to acquire a Tesla from somewhere so I can build one for my own garage. Wait, I don’t have a garage either…
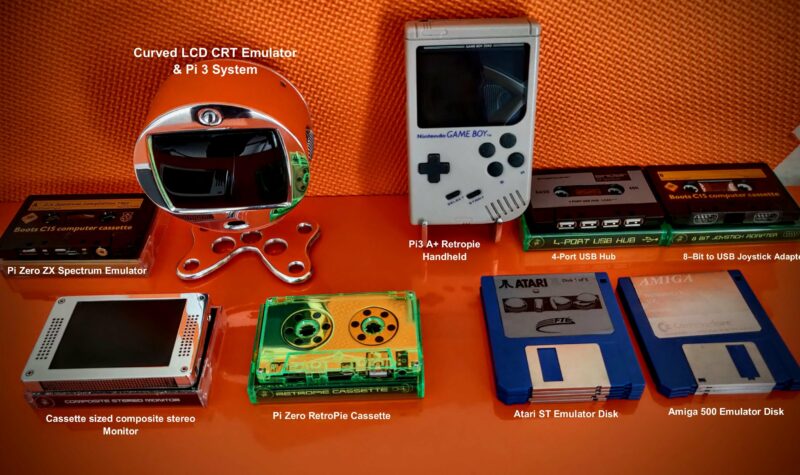
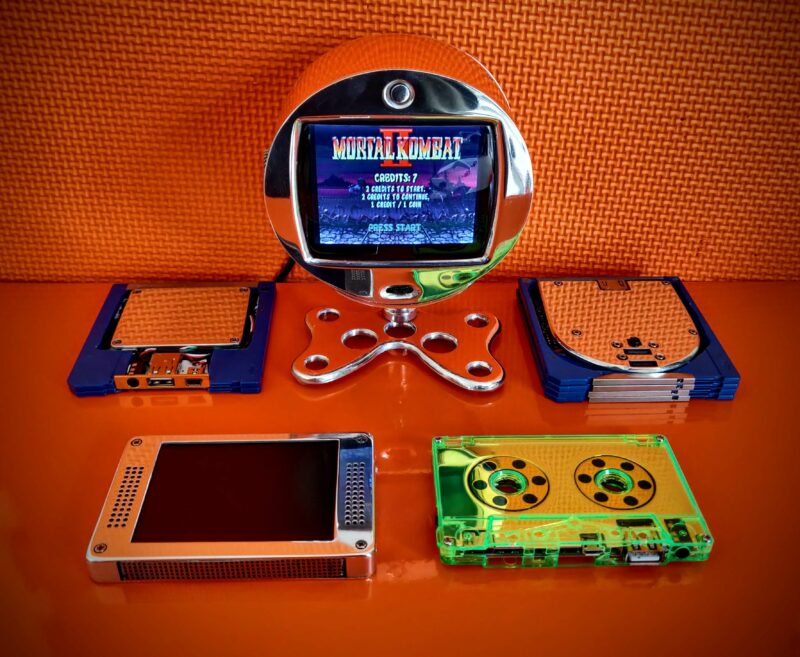
During lockdown, Stuart (aka JamHamster) wanted to keep busy whilst between jobs, and ended up building a mini empire of rescued retro systems. Cassette tapes, Game Boys, and floppy disks were all among the treasures he reclaimed.
Stuart calls this the “shelf of deceit” – where nothing is what it appears to be
Cassette tape starter
Stuart got started by fitting a TZXDuino tape loader into a cassette tape shell. Remember those? This allows him to load software onto a ZX Spectrum by inserting a tape into the tape deck, just as Nature intended. He has since improved the design (check out V2 on YouTube) and carefully documented it on GitHub, so people can build their own.
Here’s how the cassette tape project went down
With that first project in the bag and getting attention on a Facebook group (Spectrum for Everyone), Stuart went forth and sourced more retro tech to revive with tiny pieces of new technology.
Twitter lit up for Stuart’s retrofit cassette tape
Enter Raspberry Pi
Then Stuart discovered our tiny computer and realised there was heaps of scope for hiding them inside older tech. Although we can’t quite officially endorse Stuart’s method of “carefully” removing a port on his Raspberry Pi – it’ll void your warranty – we will say that we like people who go about intentionally voiding their warranties. It’s a cool video.
You can see all the modern devices labelled alongside the retro tech they’re encased in
He has since created loads of retrofit projects with Raspberry Pi. Let’s take a quick look at a few of them.
First up is a Game Boy build with a Raspberry Pi 3 Model A+. Stuart built an aluminium chassis from scrap, and this sandwiches the Raspberry Pi to hold it in place inside the Game Boy enclosure, as well as acting as a heatsink. There’s a grille in the cartridge and he also added four rear buttons. The hardest part of this build, apparently, was soldering the custom HDMI cable.
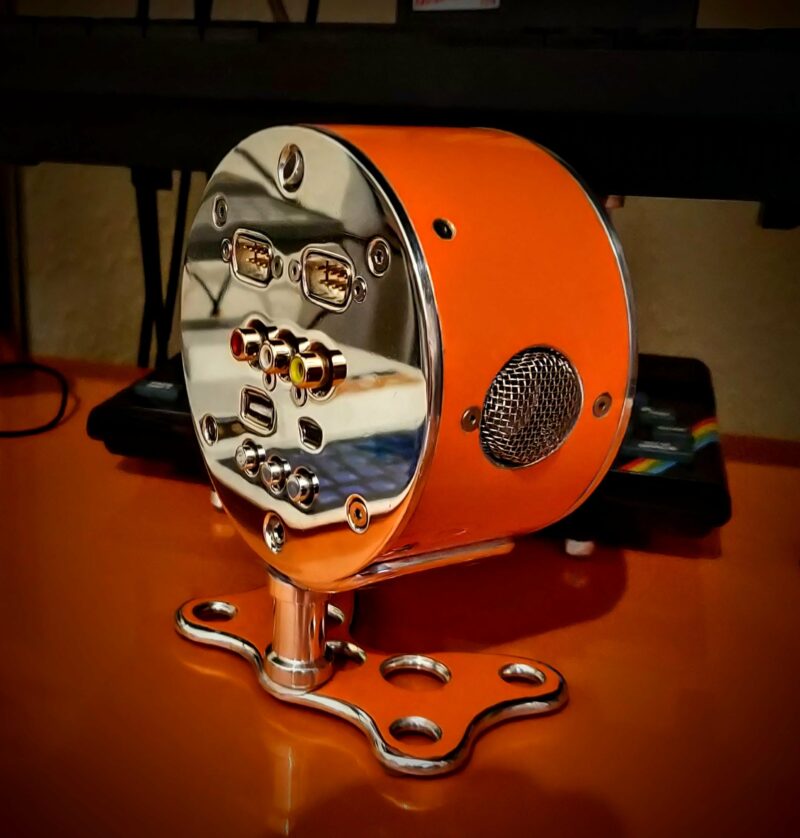
Better-than-real CRT screen
Stuart liked the look of an old-fashioned CRT (cathode-ray tube) screen for playing retro games on, but they chew through energy and aren’t that portable. So he had the idea to make a space-efficient LCD system that sits on a desktop and just looks like a retro TV.
Wait for the heroes in half-shells at the end
This project features a 3.5-inch screen of the type that’s usually found on a car dashboard to help the driver to reverse. Stuart converted it to 5V, and added a cut-down Raspberry Pi 3 and a custom-machined chassis. A custom-ground curved lens makes it look like a real CRT, and he added ports on the back for two Atari joysticks, as well as an external composite input and USB.
This Raspberry Pi-powered “CRT” display has two onboard Atari joystick ports and plenty of connectors for other machines
Stuart’s sister gave him her Game Gear to fix, but the batteries leaked and killed it so he converted it to a Raspberry Pi 3B portable gaming system. And because it was for his sister, he went all out, spending six weeks refining it.
He also ended up rewriting elements of the Arduino Joystick library for responsiveness and ease of configuration. Here’s the Github link for those interested in that part of the build.
Check out the carnage that Stuart rescued with Raspberry Pi 3B
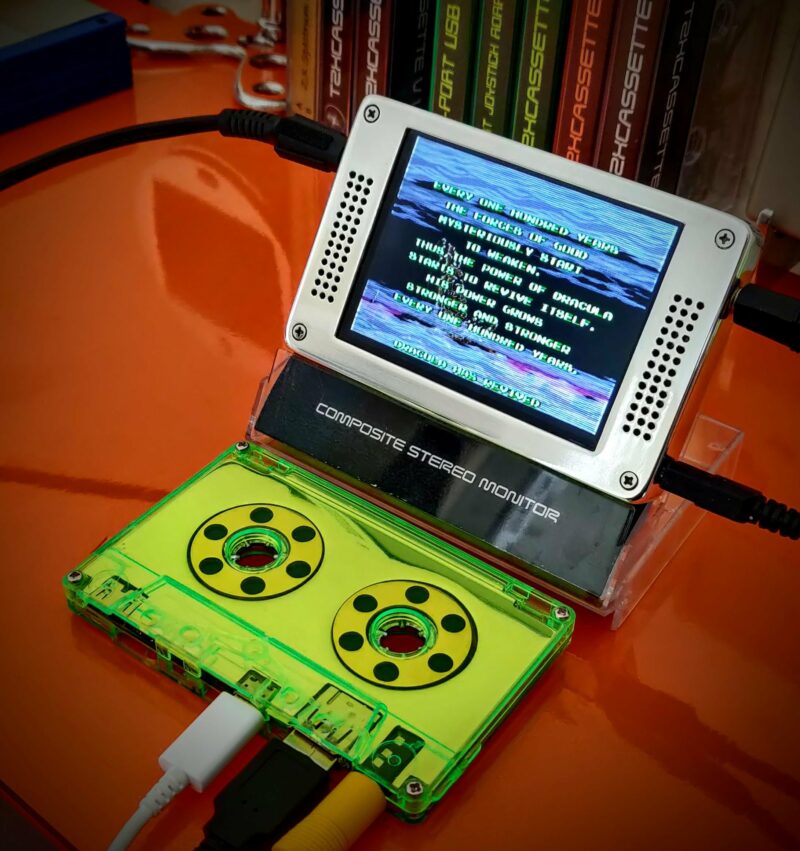
RetroPie cassette
Stuart’s latest cassette build features a Raspberry Pi Zero running RetroPie. He wanted to make one with a transparent case, so he encased the Raspberry Pi in a heatsink sandwich to hide the wiring. He added a full-size USB port and a 3.5 mm media connector for sound and visuals. Here are some shots of the inside.
I love the 80s green
Try new things, expect failure, enjoy the process
There were far too many cracking retro builds for us to list here, so follow Stuart on Twitter @RealJamHamster and subscribe to JamHamster on YouTube to properly check everything out.
They need hefty heatsinks, but Stuart likes working with metal and had fun with some of the designs
Makers, tinkerers, and crafters don’t always have a practical reason for embarking on projects, and Stuart is no different. Here’s what he had to say about why projects like this make him happy:
“I will be happy to admit that I have no clue what I’m doing most of the time, and I am by no means an expert, but I believe everyone should try new things as you never know what you’ll be good at. 9 out of 10 of my ideas don’t work but that tenth one is generally pretty good. I’ve been between roles during lockdown so I am building these out of scrap metal and whatever I have lying around, which is an extra challenge. My philosophy is to try new things, expect failure, learn to enjoy the process and that it’ll be done when it’s done.”
Has your fitness suffered during locked down? Have you been able to keep up diligently with your usual running routine? Maybe you found it easy to recreate you regular gym classes in your lounge with YouTube coaches. Or maybe, like a lot of us, you’ve not felt able to do very much at all, and needed a really big push to keep moving.
Maker James Wong took to Raspberry Pi to develop something that would hold him accountable for his daily HIIT workouts, and hopefully keep his workouts on track while alone in lockdown.
What is a HIIT workout?
HIIT is the best kind of exercise, in that it doesn’t last long and it’s effective. You do short bursts of high-intensity physical movement between short, regular rest periods. HIIT stands for High Intensity Interval Training.
James’s model can detect how well you perform a burpee, as well as many other exercise movements
James was attracted to HIIT during lockdown as it didn’t require any gym visits or expensive exercise equipment. He had access to endless online training sessions, but felt he needed that extra level of accountability to make sure he kept up with his at-home fitness regime. Hence, HIIT Pi.
So what does HIIT Pi actually do?
HIIT Pi is a web app that uses machine learning on Raspberry Pi to help track your workout in real time. Users can interact with the app via any web browser running on the same local network as the Raspberry Pi, be that on a laptop, tablet, or smartphone.
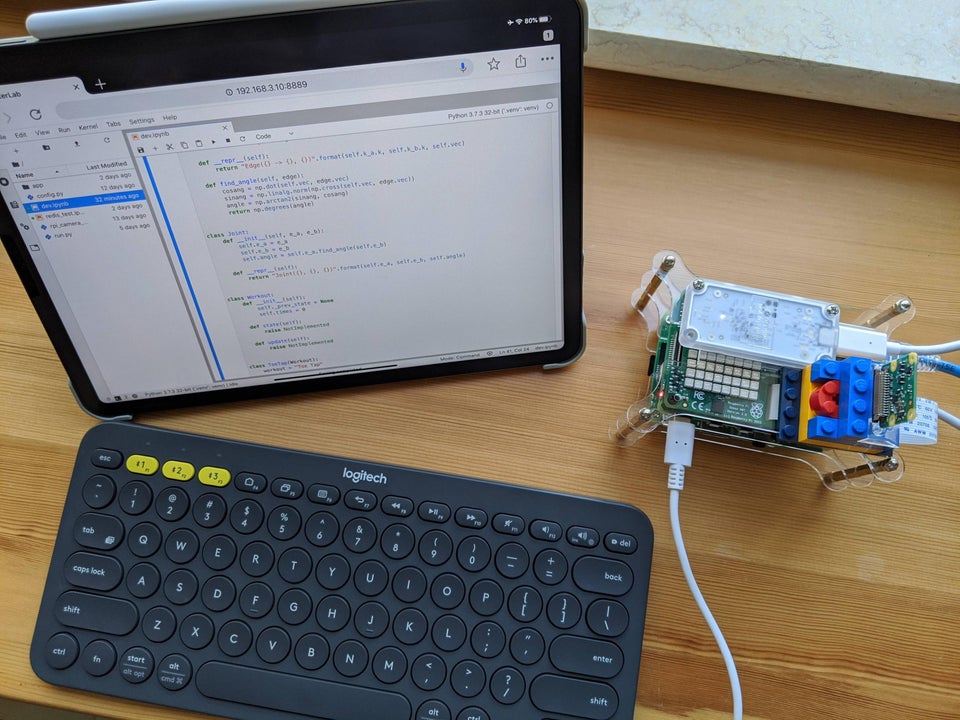
An iPad accessing a remote server running on James’s Raspberry Pi
HIIT Pi is simple in that it only does two things:
Uses computer vision to automatically capture and track detected poses and movement
Scores them according to a set of rules and standards
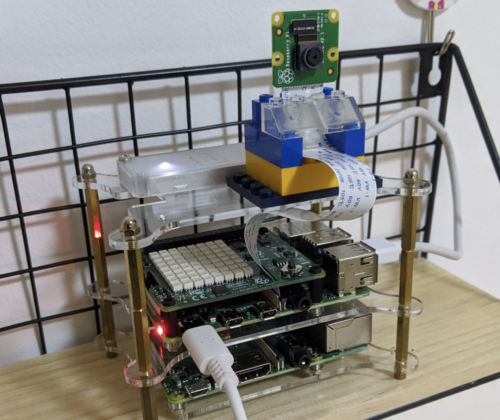
HIIT Pi is watching you via a Raspberry Pi camera module (top right)
So, essentially, you’ve got a digital personal trainer in the room monitoring your movements and letting you know whether they’re up to standard and whether you’re likely to achieve your fitness goals.
James calls HIIT Pi an “electronic referee”, and we agree that if we had one of those in the room while muddling through a Yoga With Adriene session on YouTube, we would try a LOT harder.
How does it work?
A Raspberry Pi camera module streams raw image data from the sensor roughly at 30 frames per second. James devised a custom recording stream handler that works off this pose estimation model and takes frames from the video stream, spitting out pose confidence scores using pre-set keypoint position coordinates.
HIIT Pi uses Dash, a laudable open source tool from the Plotly team
James’s original project post details the inner workings. You can also grab the code needed to create your own at-home Raspberry Pi personal trainer.
By continuing to use the site, you agree to the use of cookies. more information
The cookie settings on this website are set to "allow cookies" to give you the best browsing experience possible. If you continue to use this website without changing your cookie settings or you click "Accept" below then you are consenting to this.