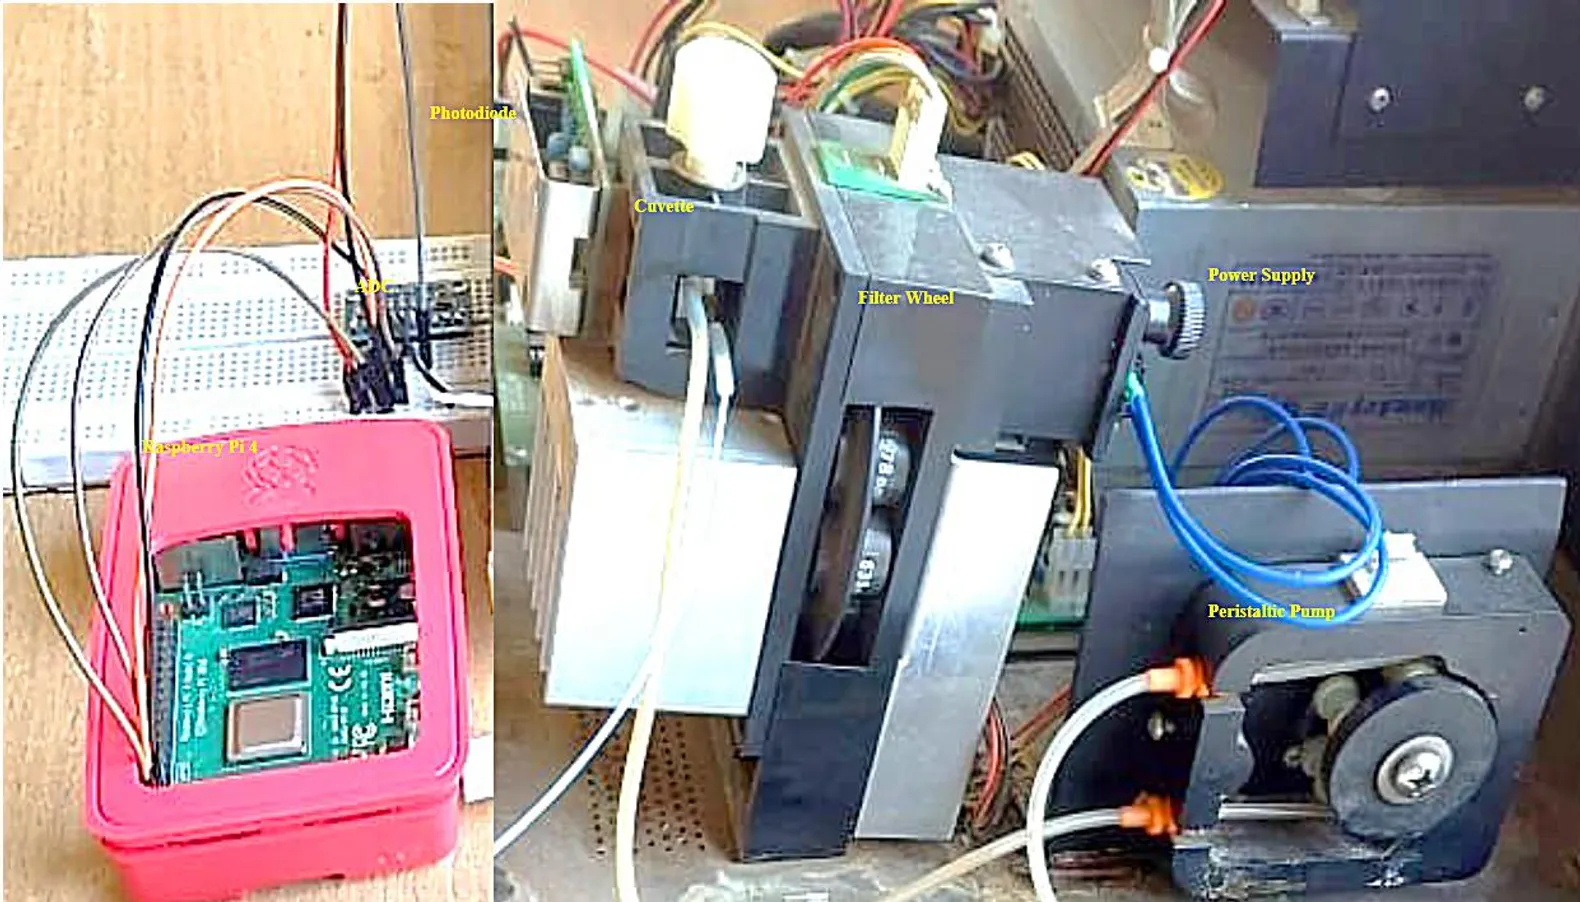
A portable, affordable Raspberry Pi-powered blood analyser is helping to “establish a robust healthcare ecosystem” in remote parts of India. Samples can be tested in just 30 seconds, and the cost and size of the parts make it an attractive solution for rural and resource-strapped areas.
It is the work of researchers Sangeeta Palekar and Jayu Kalambe from the Department of Electronics Engineering at Shri Ramdeobaba College of Engineering and Management.
(Image credit: Shri Ramdeobaba / College of Engineering And Management)
Tiny computer — massive processing power
Regular blood tests are vital in the tracking and elimination of many diseases, but there is a huge time and monetary cost currently tied to this type of laboratory work.
The researchers’s device measures light absorbance through a blood sample, a common type of analysis, and they harnessed the processing capability of Raspberry Pi 4 Model B to analyse the absorbance data. Their Raspberry Pi-powered solution was found to perform on a par with the kind of expensive lab-based blood test typically used.
Quick and easy
Sangeeta and Jayu’s analyser is not only cheaper to build and maintain than the lab-based version, it also does the job better. Using the lab-based method means that samples from patients in rural areas must be sent away for analysis, with results communicated back to patients at a much later date. In contrast, Sangeeta and Jayu’s device can process blood samples there and then. All you need is an electricity source. Patients get their results immediately, and there is no need to transport delicate samples across rural terrain.
Incorporating an IoT element into their design, which would allow for remote monitoring, is the next step for the researchers. They also intend to develop their invention to allow it to carry out different types of blood analyses.
Read more about the science behind the creation
The full research paper is behind a paywall, but the abstract does a great job succinctly explaining all the science. Sangeeta herself also explains a lot of the magic behind her creation in this interview with IEEE Spectrum.
Inspired by NASA’s attempt to launch a helicopter on Mars, one maker made an Earth-bound one of her own. And she tells Rosie Hattersley all about it in the latest issue of The MagPi Magazine, out now.
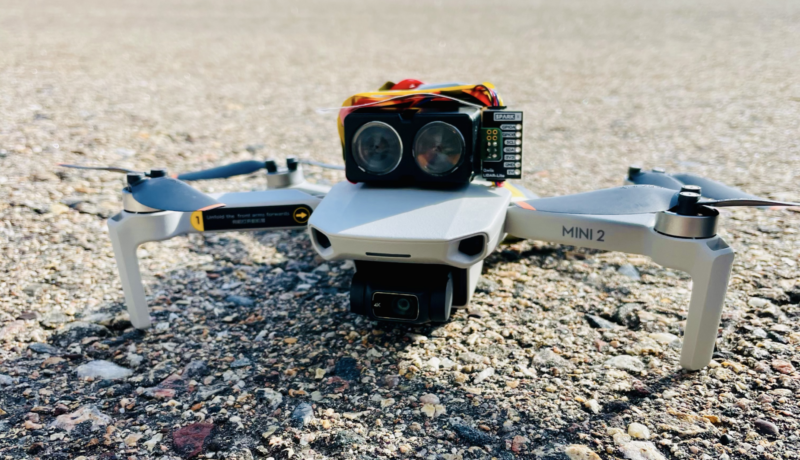
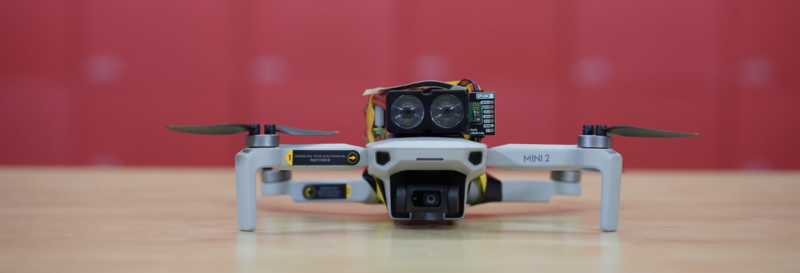
To avoid being swiped by the drone’s rotors, the Raspberry Pi 4, which uses NASA’s especially written F Prime code for telemetry, had to be positioned very carefully
Like millions of us, in April Avra Saslow watched with bated breath as NASA’s Perseverance rover touched down on the surface of Mars.
Like most of us, Avra knew all about the other ground-breaking feat being trialled alongside Perseverance: a helicopter launch called Ingenuity, that was to be the first flight on another planet – “a fairly lofty goal”, says Avra, since “the atmosphere on Mars is 60 times less dense than Earth’s.”
With experience of Raspberry Pi-based creations, Avra was keen to emulate Ingenuity back here on earth.
Avra’s videographer colleague lent her the drone that enables Epigone to achieve lift-off
NASA chose to use open-source products and use commercially available parts for its helicopter build. It just so happened that Avra had recently begun working at SparkFun, a Colorado-based reseller that sells the very same Garmin LIDAR-Lite v3 laser altimeter that NASA’s helicopter is based on. “It’s a compact optical distance measurement sensor that gives the helicopter ‘eyes’ to see how far it hovers above ground,” Avra explains.
NASA posted the Ingenuity helicopter’s open-source autonomous space-flight software, written specifically for use with Raspberry Pi, on GitHub. Avra took all this as a sign she “just had to experiment with the same technology they sent to Mars.”
F Prime and shine
Her plan was to see whether she could get GPS and lidar working within NASA’s framework, “and then take the sensors up on a drone and see how it all performed in the air.” Helpfully, NASA’s GitHub post included a detailed F Prime tutorial based around Raspberry Pi. Avra says understanding and using F Prime (F´) was the hardest part of her Epigone drone project. “It’s a beast to take on from an electronics enthusiast standpoint,” she says. Even so, she emphatically encourages others to explore F´ and the opportunity to make use of NASA’s code.
NASA recognises that Raspberry Pi offers a way to “dip your toe in embedded systems,” says Avra, and “encourages the idea that Linux can run on two planets in the solar system”
Raspberry Pi 4 brain
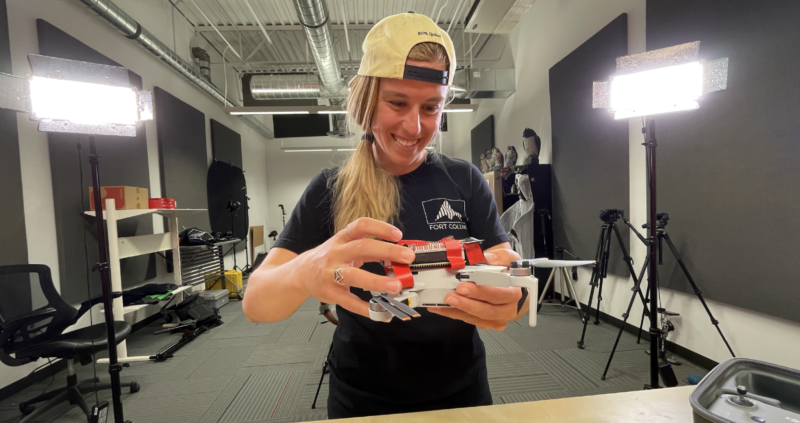
The Epigone Drone is built around Raspberry Pi 4 Model B; Garmin’s LIDAR-Lite v4, which connects to a Qwiic breakout board and has a laser rather than an LED; a battery pack; and a DJI Mini 2 drone borrowed from a videographer colleague. Having seen how small the drone was, Avra realised 3D-printing an enclosure case would make everything far too heavy. As it was, positioning the Epigone onto its host drone was challenging enough: the drone’s rotors passed worryingly close to the project’s Raspberry Pi, even when precisely positioned in the centre of the drone’s back. The drone has its own sensors to allow for controlled navigation, which meant Avra’s design had to diverge from NASA’s and have its lidar ‘eyes’ on its side rather than underneath.
Although her version piggybacks on an existing drone, Avra was amazed when her Epigone creation took flight:
“I honestly thought [it] would be too heavy to achieve lift, but what do ya know, it flew! It went up maybe 30 ft and we were able to check the sensors by moving it close and far from the SparkFun HQ [where she works].”
While the drone’s battery depleted in “a matter of minutes” due to its additional load, the Epigone worked well and could be deployed to map small areas of land such as elevation changes in a garden, Avra suggests.
The MagPi #107 out NOW!
You can grab the brand-new issue right now from the Raspberry Pi Press store, or via our app on Android or iOS. You can also pick it up from supermarkets and newsagents. There’s also a free PDF you can download.
In the latest issue of HackSpace Magazine, out now, @MrPJEvans shows you how to add voice commands to your projects with a Raspberry Pi 4 and a microphone.
It’s amazing how we’ve come from everything being keyboard-based to so much voice control in our lives. Siri, Alexa, and Cortana are everywhere and happy to answer questions, play you music, or help automate your household.
For the keen maker, these offerings may not be ideal for augmenting their latest project as they are closed systems. The good news is, with a bit of help from Google, you can add voice recognition to your project and have complete control over what happens. You just need a Raspberry Pi 4, a speaker array, and a Google account to get started.
Set up your microphone
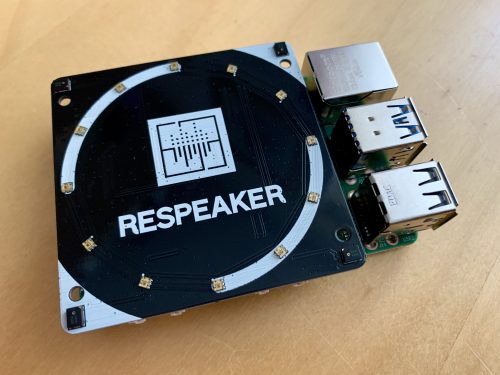
This clever speaker uses four microphones working together to increase accuracy. A ring of twelve RGB LEDs can be coded to react to events, just like an Amazon Echo
For a home assistant device, being able to hear you clearly is an essential. Many microphones are either too low-quality for the task, or are unidirectional: they only hear well in one direction. To the rescue comes Seeed’s ReSpeaker, an array of four microphones with some clever digital processing to provide the kind of listening capability normally found on an Amazon Echo device or Google Assistant. It’s also in a convenient HAT form factor, and comes with a ring of twelve RGB LEDs, so you can add visual effects too. Start with a Raspberry Pi OS Lite installation, and follow these instructions to get your ReSpeaker ready for use.
Install Snowboy
You’ll see later on that we can add the power of Google’s speech-to-text API by streaming audio over the internet. However, we don’t want to be doing that all the time. Snowboy is an offline ‘hotword’ detector. We can have Snowboy running all the time, and when your choice of word is ‘heard’, we switch to Google’s system for accurate processing. Snowboy can only handle a few words, so we only use it for the ‘trigger’ words. It’s not the friendliest of installations so, to get you up and running, we’ve provided step-by-step instructions.
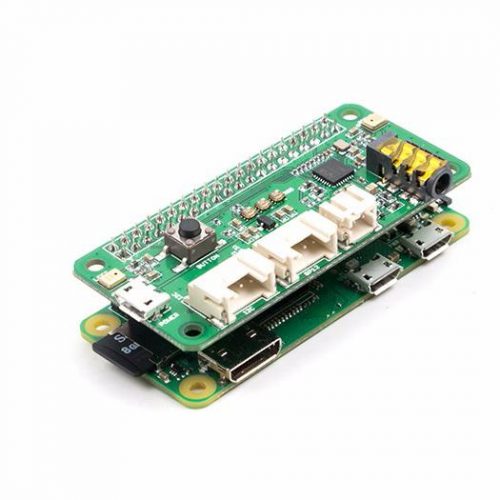
There’s also a two-microphone ReSpeaker for the Raspberry Pi Zero
Create your own hotword
As we’ve just mentioned, we can have a hotword (or trigger word) to activate full speech recognition so we can stay offline. To do this, Snowboy must be trained to understand the word chosen. The code that describes the word (and specifically your pronunciation of it) is called the model. Luckily, this whole process is handled for you at snowboy.kitt.ai, where you can create a model file in a matter of minutes and download it. Just say your choice of words three times, and you’re done. Transfer the model to your Raspberry Pi 4 and place it in your home directory.
Let’s go Google
ReSpeaker can use its multiple mics to detect distance and direction
After the trigger word is heard, we want Google’s fleet of super-servers to help us transcribe what is being said. To use Google’s speech-to-text API, you will need to create a Google application and give it permissions to use the API. When you create the application, you will be given the opportunity to download ‘credentials’ (a small text file) which will allow your setup to use the Google API. Please note that you will need a billable account for this, although you get one hour of free speech-to-text per month. Full instructions on how to get set up can be found here.
Install the SDK and transcriber
To use Google’s API, we need to install the firm’s speech-to-text SDK for Python so we can stream audio and get the results. On the command line, run the following:pip3 install google-cloud-speech (If you get an error, run sudo apt install python3-pip then try again). Remember that credentials file? We need to tell the SDK where it is: export GOOGLE_APPLICATION_CREDENTIALS="/home/pi/[FILE_NAME].json" (Don’t forget to replace [FILE_NAME] with the actual name of the JSON file.) Now download and run this test file. Try saying something and see what happens!
Putting it all together
Now we can talk to our Raspberry Pi, it’s time to link the hotword system to the Google transcription service to create our very own virtual assistant. We’ve provided sample code so that you can see these two systems running together. Run it, then say your chosen hotword. Now ask ‘what time is it?’ to get a response. (Don’t forget to connect a speaker to the audio output if you’re not using HDMI.) Now it’s over to you. Try adding code to respond to certain commands such as ‘turn the light on’, or ‘what time is it?’
Get HackSpace magazine 36 Out Now!
Each month, HackSpace magazine brings you the best projects, tips, tricks and tutorials from the makersphere. You can get it from the Raspberry Pi Press online store, The Raspberry Pi store in Cambridge, or your local newsagents.
Welcome to October, the month in which spiderwebs become decor and anything vaguely gruesome is considered ‘seasonal’. Such as bats. Bats are in fact cute, furry creatures, but as they are part of the ‘Halloweeny animal’ canon, I have a perfect excuse to sing their praises.
SEE? Baby bats wrapped up cute like baby humans
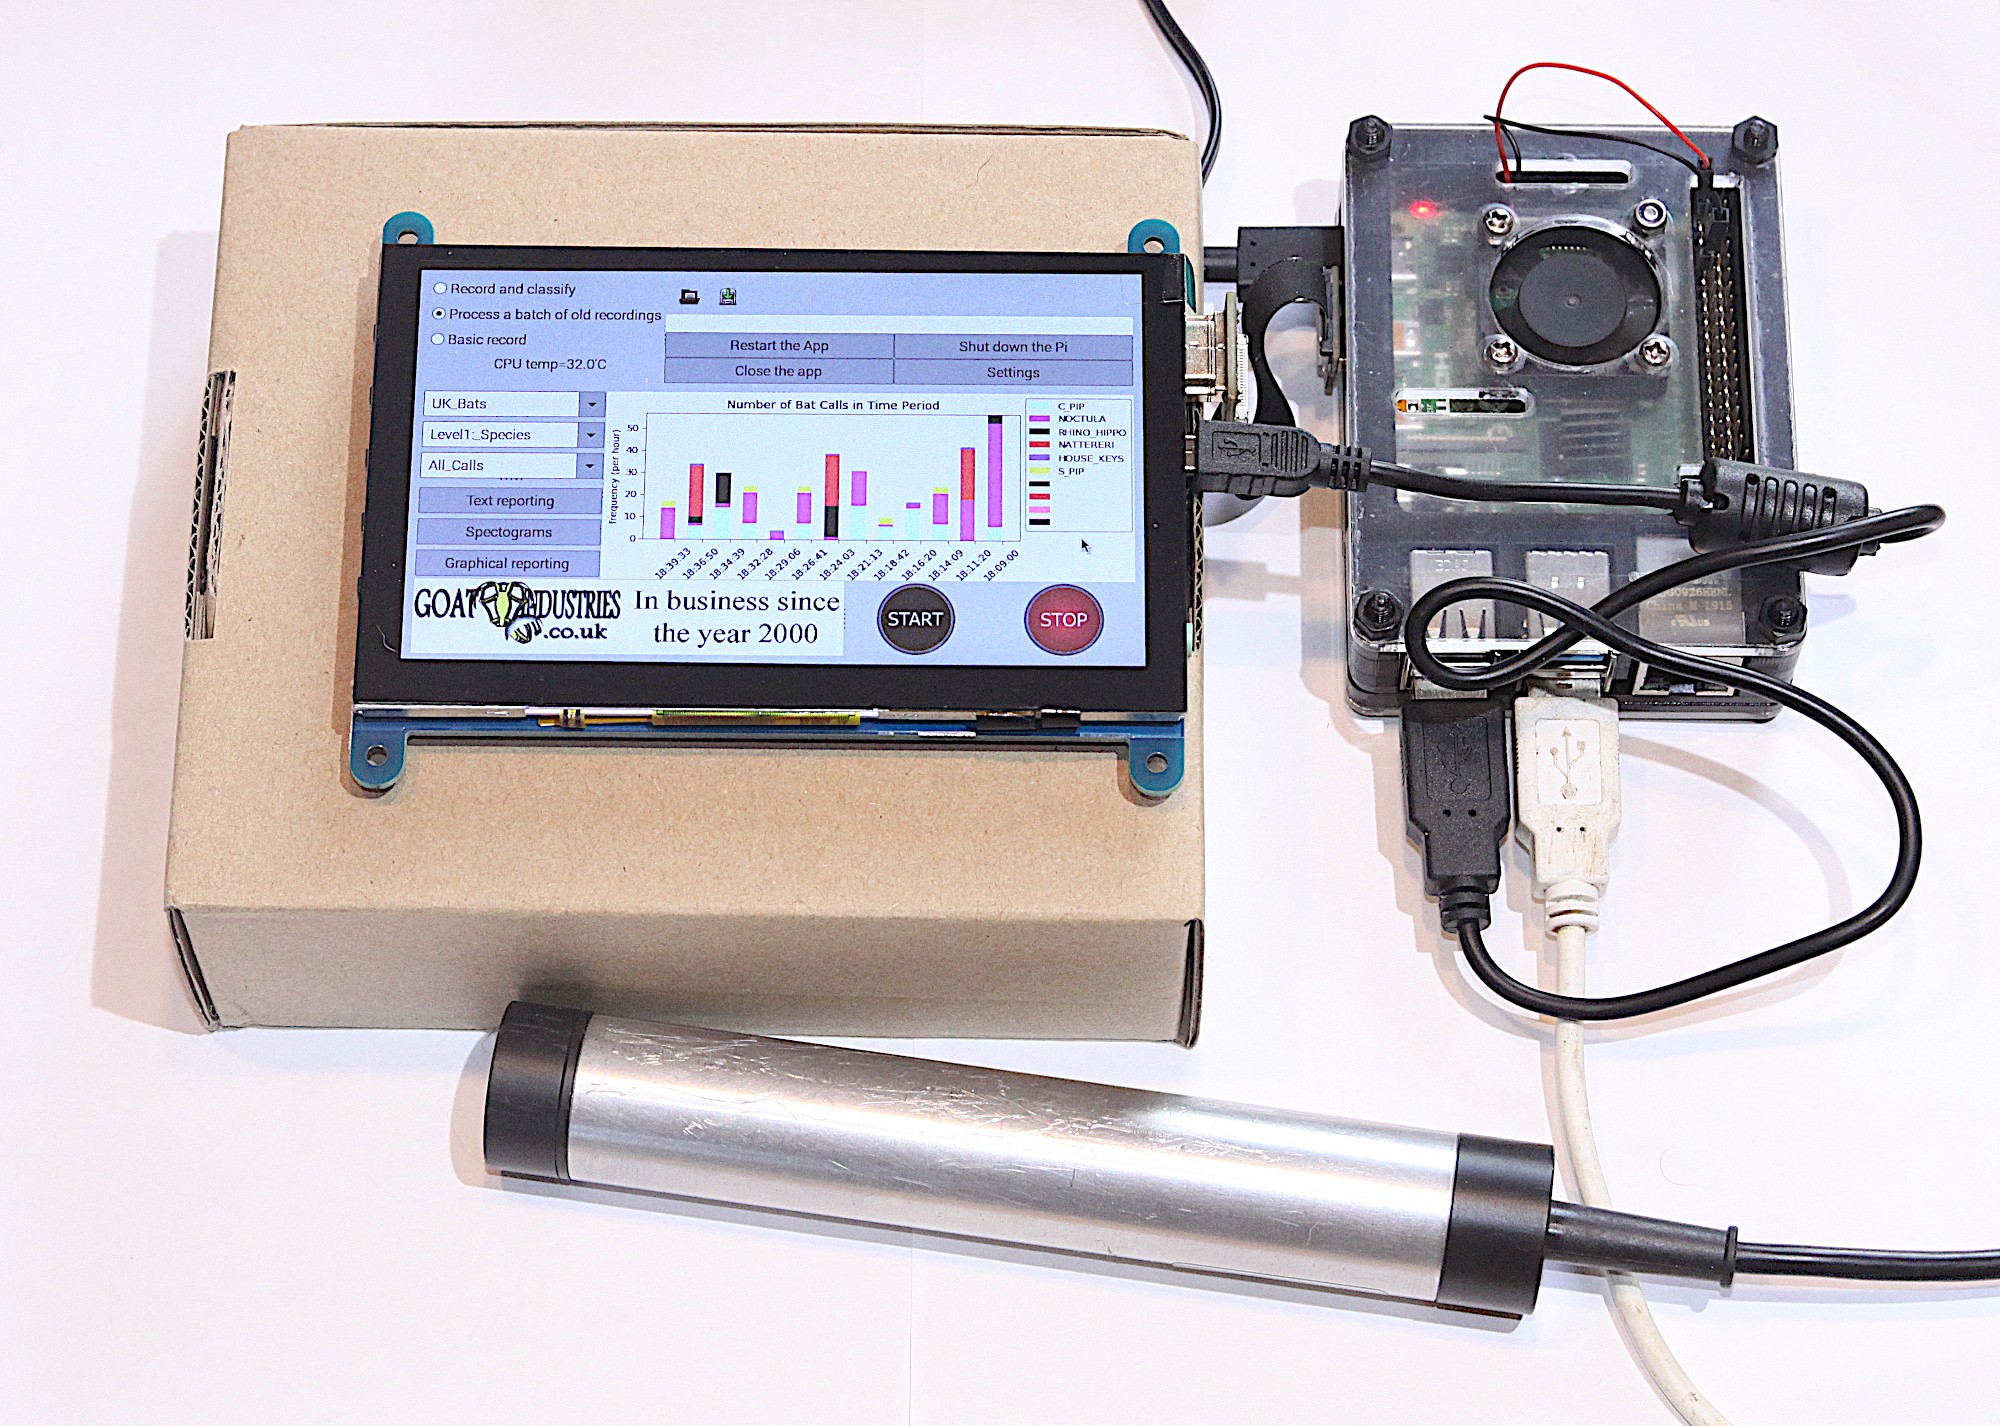
Tegwyn Twmffat was tasked with doing a bat survey on a derelict building, and they took to DesignSpark to share their Raspberry Pi–powered solution.
UK law protects nesting birds and roosting bats, so before you go knocking buildings down, you need a professional to check that no critters will be harmed in the process.
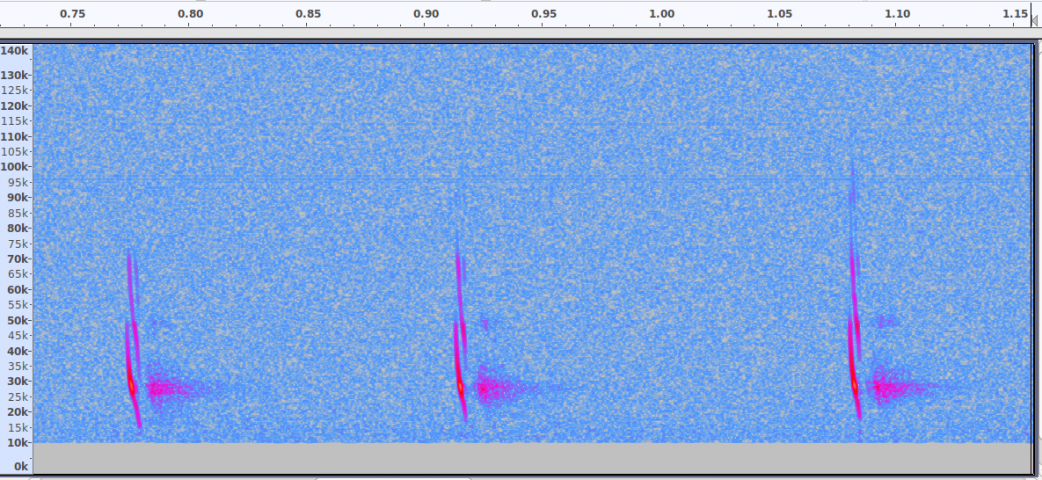
The acoustic signature of an echo-locating brown long-eared bat
The problem with bats, compared to birds, is they are much harder to spot and have a tendency to hang out in tiny wall cavities. Enter this big ultrasonic microphone.
Raspberry Pi 4 Model B provided the RAM needed for this build
After the building was declared safely empty of bats, Tegwyn decided to keep hold of the expensive microphone (the metal tube in the image above) and have a crack at developing their own auto-classification system to detect which type of bats are about.
How does it work?
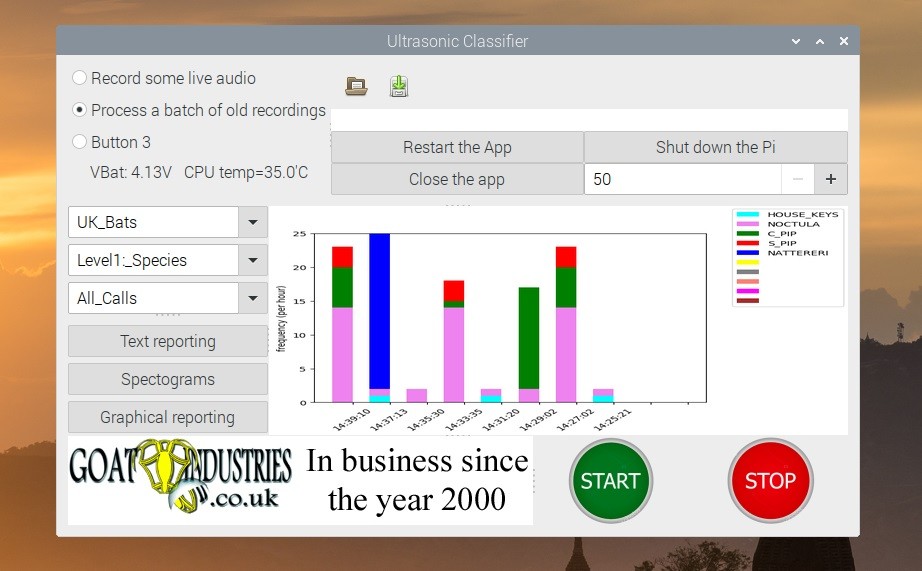
The ultrasonic mic picks up the audio data using an STM M0 processor and streams it to Raspberry Pi via USB. Raspberry Pi runs Alsa driver software and uses the bash language to receive the data.
Tegwyn turned to the open-source GTK software to process the audio data
It turns out there are no publicly available audio records of bats, so Tegwyn took to their own back garden and found 6 species to record. And with the help of a few other bat enthusiasts, they cobbled together an audio dataset of 9 of the 17 bat species found in the UK!
More baby bats
Tegwyn’s original post about their project features a 12-step walkthrough, as well as all the code and commands you’ll need to build your own system. And here’s the GitHub repository, where you can check for updates.
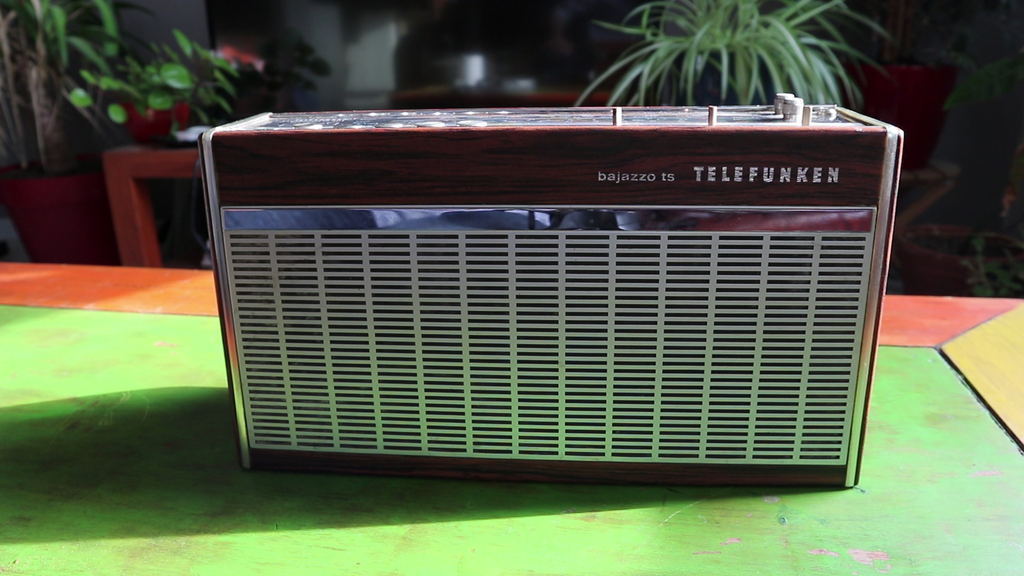
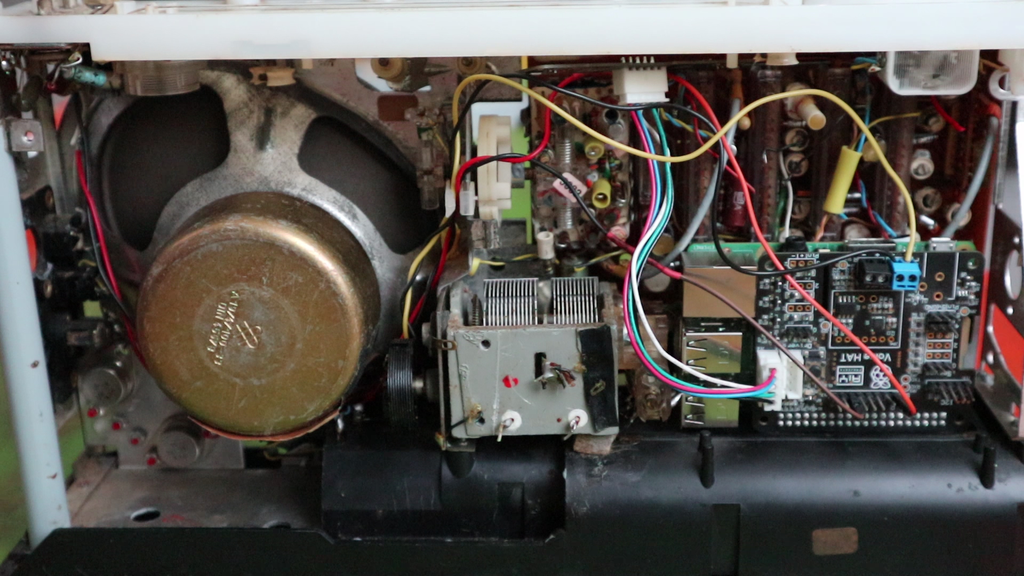
8 Bits and a Byte created this voice-controllable, interactive, storytelling device, hidden inside a 1960s radio for extra aesthetic wonderfulness.
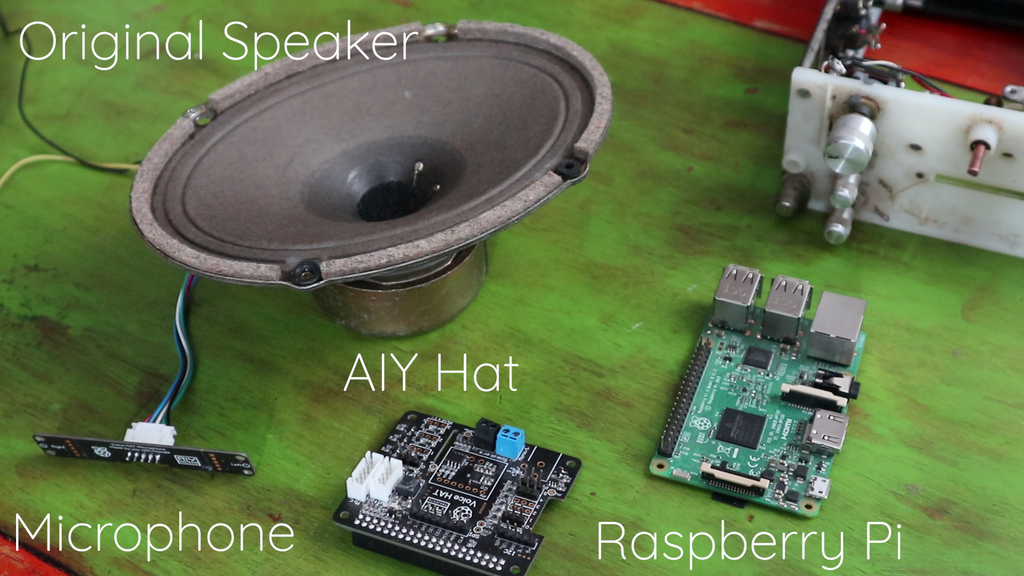
A Raspberry Pi 3B works with an AIY HAT, a microphone, and the device’s original speaker to run chatbot and speech-to-text artificial intelligence.
This creature is a Bajazzo TS made by Telefunken some time during the 1960s in West Germany, and this detail inspired the espionage-themed story that 8 Bits and a Byte retrofitted it to tell. Users are intelligence agents whose task is to find the evil Dr Donogood.
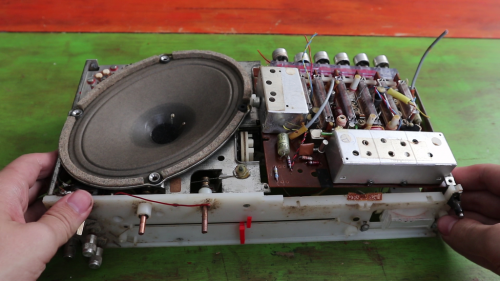
Out with the old electronics
The device works like one of those ‘choose your own adventure’ books, asking you a series of questions and offering you several options. The story unfolds according to the options you choose, and leads you to a choice of endings.
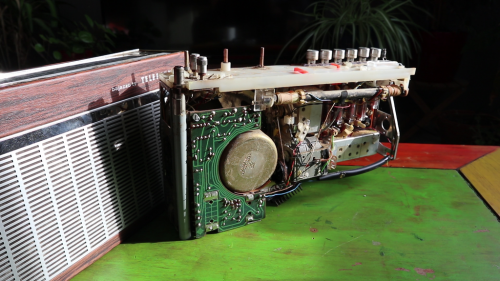
In with the new (Raspberry Pi tucked in the lower right corner)
What’s the story?
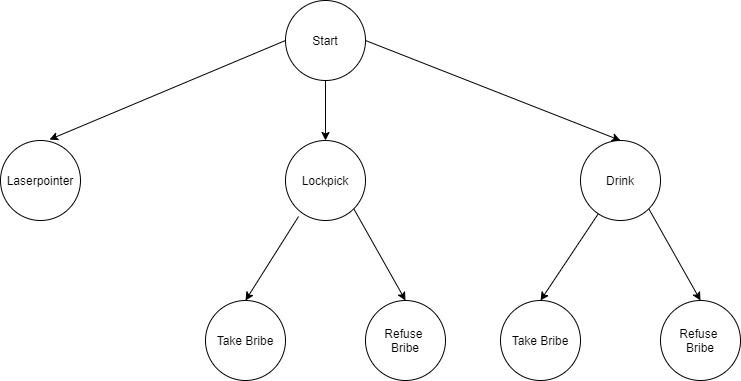
8 Bits and a Byte designed a decision tree to provide a tight story frame, so users can’t go off on question-asking tangents.
When you see the ‘choose your own adventure’ frame set out like this, you can see how easy it is to create something that feels interactive, but really only needs to understand the difference between a few phrases: ‘laser pointer’; ‘lockpick’; ‘drink’; take bribe’, and ‘refuse bribe’.
How does it interact with the user?
Skip to 03mins 30secs to see the storytelling in action
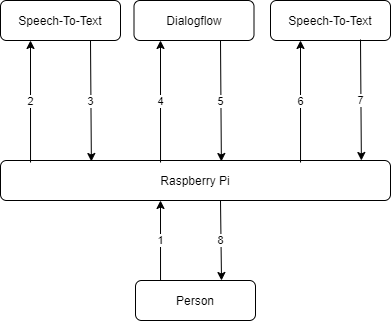
Google Dialogflow is a free natural language understanding platform that makes it easy to design a conversational user interface, which is long-speak for ‘chatbot’.
There are a few steps between the user talking to the radio, and the radio figuring out how to respond. The speech-to-text and chatbot software need to work in tandem. For this project, the data flow runs like so:
1: The microphone detects that someone is speaking and records the audio.
2-3: Google AI (the Speech-To-Text box) processes the audio and extracts the words the user spoke as text.
4-5: The chatbot (GoogleDialogflow) receives this text and matches it with the correct response, which is sent back to the Raspberry Pi.
6-7: Some more artificial intelligence uses this text to generate artificial speech.
8: This audio is played to the user via the speaker.
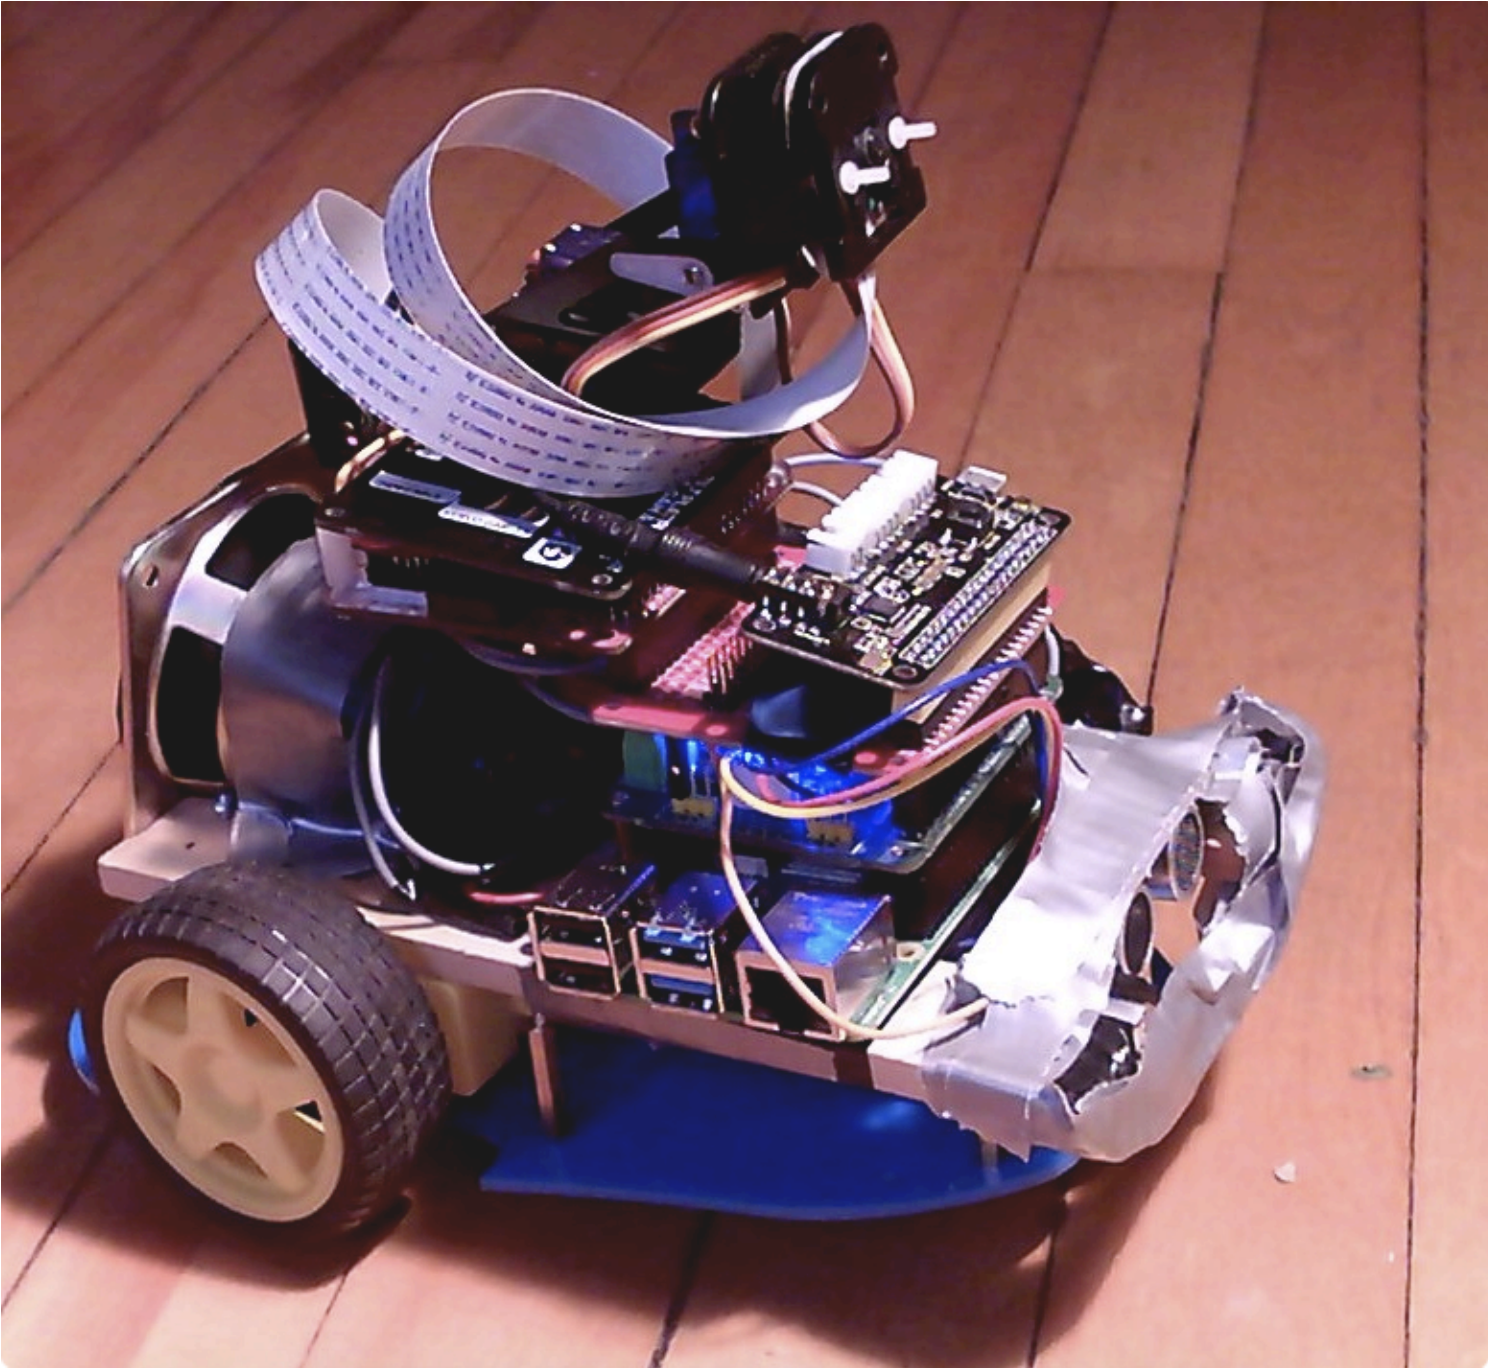
Nandu Vadakkath was inspired by a line-following robot built (literally) entirely from salvage materials that could wait patiently and purchase beer for its maker in Tamil Nadu, India. So he set about making his own, but with the goal of making it capable of slightly more sophisticated tasks.
Robot comes when called, and recognises you as its special human
Software
Nandu had ambitious plans for his robot: navigation, speech and listening, recognition, and much more were on the list of things he wanted it to do. And in order to make it do everything he wanted, he incorporated a lot of software, including:
Robot shares Nandu’s astrological chart
Python 3
virtualenv, a tool for creating isolating virtual Python environments
the OpenCV open source computer vision library
the spaCy open source natural language processing library
the TensorFlow open source machine learning platform
Haar cascade algorithms for object detection
A ResNet neural network with the COCO dataset for object detection
DeepSpeech, an open source speech-to-text engine
eSpeak NG, an open source speech synthesiser
The MySQL database service
So how did Nandu go about trying to make the robot do some of the things on his wishlist?
Context and intents engine
The engine uses spaCy to analyse sentences, classify all the elements it identifies, and store all this information in a MySQL database. When the robot encounters a sentence with a series of possible corresponding actions, it weighs them to see what the most likely context is, based on sentences it has previously encountered.
Getting to know you
The robot has been trained to follow Nandu around but it can get to know other people too. When it meets a new person, it takes a series of photos and processes them in the background, so it learns to remember them.
There she blows!
Speech
Nandu didn’t like the thought of a basic robotic voice, so he searched high and low until he came across the MBROLA UK English voice. Have a listen in the videos above!
Object and people detection
The robot has an excellent group photo function: it looks for a person, calculates the distance between the top of their head and the top of the frame, then tilts the camera until this distance is about 60 pixels. This is a lot more effort than some human photographers put into getting all of everyone’s heads into the frame.
Nandu has created a YouTube channel for his robot companion, so be sure to keep up with its progress!
To provide the best experiences, we use technologies like cookies to store and/or access device information. Consenting to these technologies will allow us to process data such as browsing behavior or unique IDs on this site. Not consenting or withdrawing consent, may adversely affect certain features and functions.
Functional
Always active
The technical storage or access is strictly necessary for the legitimate purpose of enabling the use of a specific service explicitly requested by the subscriber or user, or for the sole purpose of carrying out the transmission of a communication over an electronic communications network.
Preferences
The technical storage or access is necessary for the legitimate purpose of storing preferences that are not requested by the subscriber or user.
Statistics
The technical storage or access that is used exclusively for statistical purposes.The technical storage or access that is used exclusively for anonymous statistical purposes. Without a subpoena, voluntary compliance on the part of your Internet Service Provider, or additional records from a third party, information stored or retrieved for this purpose alone cannot usually be used to identify you.
Marketing
The technical storage or access is required to create user profiles to send advertising, or to track the user on a website or across several websites for similar marketing purposes.