Tag Archives: Image Optimization

How we built AI face cropping for Images

Post Syndicated from Deanna Lam original https://blog.cloudflare.com/ai-face-cropping-for-images/

During Developer Week 2024, we introduced AI face cropping in private beta. This feature automatically crops images around detected faces, and marks the first release in our upcoming suite of AI image manipulation capabilities.

AI face cropping is now available in Images for everyone. To bring this feature to general availability, we moved our CPU-based prototype to a GPU-based implementation in Workers AI, enabling us to address a number of technical challenges, including memory leaks that could hamper large-scale use.


Photograph by Suad Kamardeen (@suadkamardeen) on Unsplash

Turning raw images into production-ready assets

We developed face cropping with two particular use cases in mind:

Social media platforms and AI chatbots. We observed a lot of traffic from customers who use Images to turn unedited images of people into smaller profile pictures in neat, fixed shapes.

E-commerce platforms. The same product photo might appear in a grid of thumbnails on a gallery page, then again on an individual product page with a larger view. The following example illustrates how cropping can change the emphasis from the model’s shirt to their sunglasses.


Photograph by Media Modifier (@mediamodifier) on Unsplash

When handling high volumes of media content, preparing images for production can be tedious. With Images, you don’t need to manually generate and store multiple versions of the same image. Instead, we serve copies of each image, each optimized to your specifications, while you continue to store only the original image.

Crop everything, everywhere, all at once

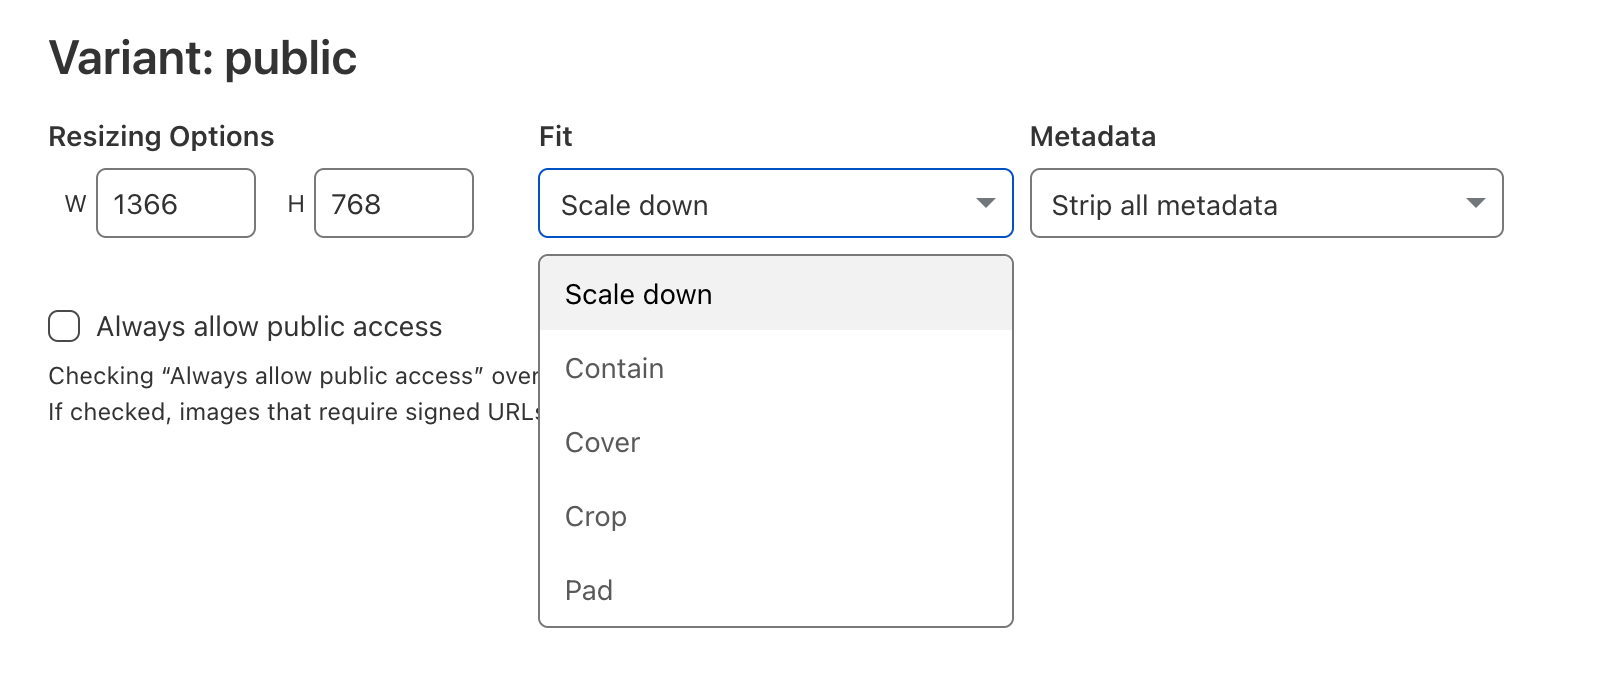
Cloudflare provides a library of parameters to manipulate how an image is served to the end user. For example, you can crop an image to a square by setting its width and height dimensions to 100×100.

By default, images are cropped toward the center coordinates of the original image. The gravity parameter can affect how an image gets cropped by changing its focal point. You can specify coordinates to use as the focal point of an image or allow Cloudflare to automatically determine a new focal point.


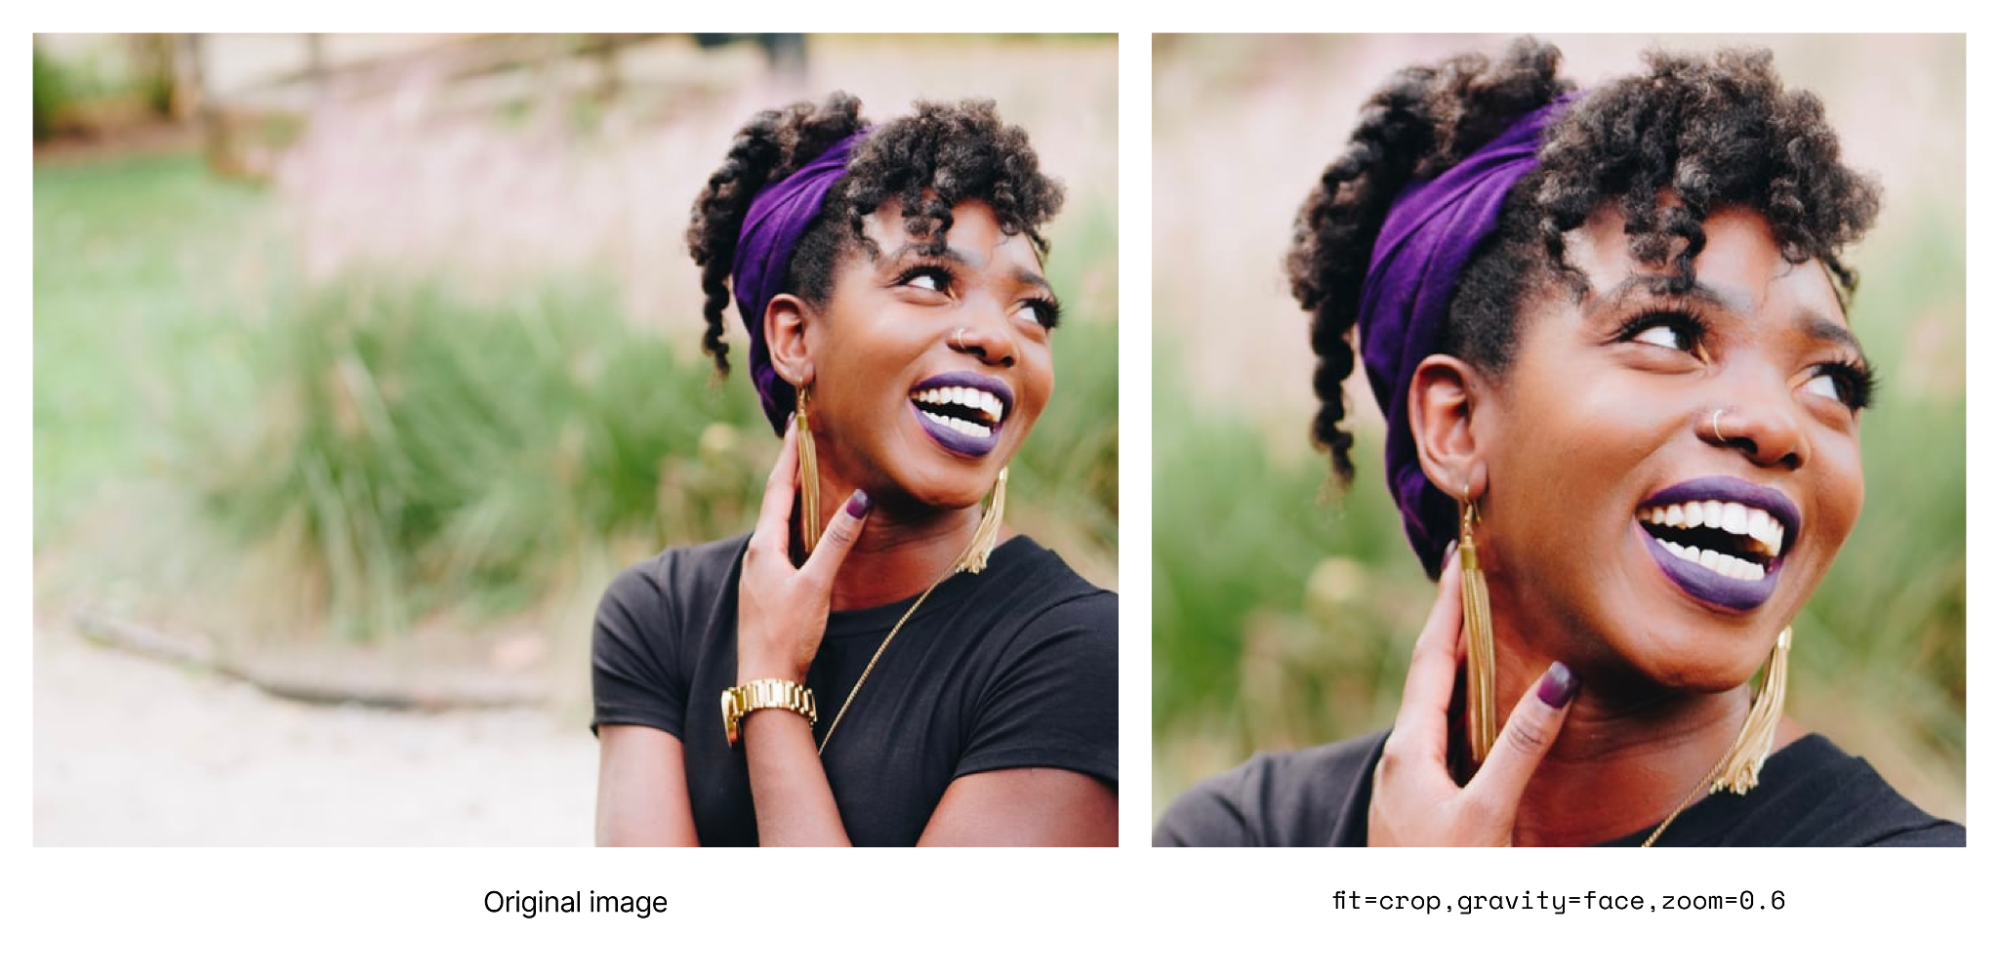
The gravity parameter is useful when cropping images with off-centered subjects. Photograph by Andrew Small (@andsmall) on Unsplash

The gravity=auto option uses a saliency algorithm to pick the most optimal focal point of an image. Saliency detection identifies the parts of an image that are most visually important; the cropping operation is then applied toward this region of interest. Our algorithm analyzes images using visual cues such as color, luminance, and texture, but doesn’t consider context within an image. While this setting works well on images with inanimate objects like plants and skyscrapers, it doesn’t reliably account for subjects as contextually meaningful as people’s faces.

And yet, images of people comprise the majority of bandwidth usage for many applications, such as an AI chatbot platform that uses Images to serve over 45 million unique transformations each month. This presented an opportunity for us to improve how developers can optimize images of people.

AI face cropping can be performed by using the gravity=face option, which automatically detects which pixels represent the face (or faces) and uses this information to crop the image. You can also affect how closely the image is cropped toward the face; the zoom parameter controls the threshold for how much of the surrounding area around the face will be included in the image.

We carefully designed our model pipeline with privacy and confidentiality top of mind. This feature doesn’t support facial identification or recognition. In other words, when you optimize with Cloudflare, we’ll never know that two different images depict the same person, or identify the specific people in a given image. Instead, AI face cropping with Images is intentionally limited to face detection, or identifying the pixels that represent a human face.

From pixels to people

Our first step was to select an open-source model that met our requirements. Behind the scenes, our AI face cropping uses RetinaFace, a convolutional neural network model that classifies images with human faces.

A neural network is a type of machine learning process that loosely resembles how the human brain works. A basic neural network has three parts: an input layer, one or more hidden layers, and an output layer. Nodes in each layer form an interconnected network to transmit and process data, where each input node is connected to nodes in the next layer.


A fully connected layer passes data from one layer to the next.

Data enters through the input layer, where it is analyzed before being passed to the first hidden layer. All of the computation is done in the hidden layers, where a result is eventually delivered through the output layer.

A convolutional neural network (CNN) mirrors how humans look at things. When we look at other people, we start with abstract features, like the outline of their body, before we process specific features, like the color of their eyes or the shape of their lips.

Similarly, a CNN processes an image piece-by-piece before delivering the final result. Earlier layers look for abstract features like edges and colors and lines; subsequent layers become more complex and are each responsible for identifying the various features that comprise a human face. The last fully connected layer combines all categorized features to produce one final classification of the entire image. In other words, if an image contains all of the individual features that define a human face (e.g. eyes, nose), then the CNN concludes that the image contains a human face.

We needed a model that could determine whether an image depicts a person (image classification), as well as exactly where they are in the image (object detection). When selecting a model, some factors we considered were:

  • Performance on the WIDERFACE dataset. This is the state-of-the-art face detection benchmark dataset, which contains 32,203 images of 393,703 labeled faces with a high degree of variability in scale, pose, and occlusion.

  • Speed (in frames per second). Most of our image optimization requests occur on delivery (rather than before an image gets uploaded to storage), so we prioritized performance for end-user delivery.

  • Model size. Smaller model sizes run more efficiently.

  • Quality. The performance boost from smaller models often gets traded for the quality—the key is balancing speed with results.

Our initial test sample contained 500 images with varying factors like the number of faces in the image, face size, lighting, sharpness, and angle. We tested various models, including BlazeFast, R-CNN (and its successors Fast R-CNN and Faster R-CNN), RetinaFace, and YOLO (You Only Look Once).

Two-stage detectors like BlazeFast and R-CNN propose potential object locations in an image, then identify objects in those regions of interest. One-stage detectors like RetinaFace and YOLO predict object locations and classes in a single pass. In our research, we observed that two-stage detector methods provided higher accuracy, but performed too slowly to be practical for real traffic. On the other hand, one-stage detector methods were efficient and performant while still highly accurate.

Ultimately, we selected RetinaFace, which showed the highest precision of 99.4% and performed faster than other models with comparable values. We found that RetinaFace delivered strong results even with images containing multiple blurry faces:


Photograph by Anne Nygård (@polarmermaid) on Unsplash

Inference—the process of using training models to make decisions—can be computationally demanding, especially with very large images. To maintain efficiency, we set a maximum size limit of 1024×1024 pixels when sending images to the model.

We pass images within these dimensions directly to the model for analysis. But if either width or height dimension exceeds 1024 pixels, then we instead create an inference image to send to the model; this is a smaller copy that retains the same aspect ratio as the original image and does not exceed 1024 pixels in either dimension. For example, a 125×2000 image will be downscaled to 64×1024. Creating this resized, temporary version reduces the amount of data that the model needs to analyze, enabling faster processing.

The model draws all of the bounding boxes, or the regions within an image that define the detected faces. From there, we construct a new, outer bounding box that encompasses all of the individual boxes, calculating its top-left and bottom-right points based on the boxes that are closest to the top, left, bottom, and right edges of the image.

The top-left point uses the x coordinate from the left-most box and the y coordinate from the top-most box. Similarly, the bottom-right point uses the x coordinate from the right-most box and the y coordinate from the bottom-most box. These coordinates can be taken from the same bounding boxes; if a single box is closest to both the top and left edges, then we would use its top-left corner as the top-left point of the outer bounding box.


AI face cropping identifies regions that represent faces, then determines an outer bounding box and focal point based on the top-most, left-most, right-most, and bottom-most bounding boxes.

Once we define the outer bounding box, we use its center coordinates as the focal point when cropping the image. From our experiments, we found that this produced better and more balanced results for images with multiple faces compared to other methods, like establishing the new focal point around the largest detected face.

The cropped image area is calculated based on the dimensions of the outer bounding box (“d”) and a specified zoom level (“z”) in the formula (1 ÷ z) × d. The zoom parameter accepts floating points between 0 and 1, where we crop the image to the bounding box when zoom=1 and include more of the area around the box as zoom trends toward 0.

Consider an original image that is 2048×2048. First, we create an inference image that is 1024×1024 to meet our size limits for face detection. Second, we define the outer bounding box using the model’s predictions—we’ll use 100×500 for this example. At zoom=0.5, our formula generates a crop area that is twice as large as the bounding box, with new width (“w”) and height (“h”) dimensions of 200×1000:


We also apply a min function that chooses the smaller number between the input dimensions and the calculated dimensions, ensuring that the new width and height never exceed the dimensions of the image itself. In other words, if you try to zoom out too much, then we use the full width or height of the image instead of defining a crop area that will extend beyond the edge of the image. For example, at zoom=0.25, our formula yields an initial crop area of 400×2000. Here, since the calculated height (2000) is larger than the input height (1024), we use the input height to set the crop area to 400×1024.

Finally, we need to scale the crop area back to the size of the original image. This applies only when a smaller inference image is created.

We initially downscaled the original 2048×2048 image by a factor of 2 to create the 1024×1024 inference image. This means that we need to multiply the dimensions of the crop area—400×1024 in our latest example—by 2 to produce our final result: a cropped image that is 800×2048.

The architecture behind the earliest build

In the beta version, we rewrote the model using TensorFlow Rust to make it compatible with our existing Rust-based stack. All of the computations for inference—where the model classifies and locates human faces—were executed on CPUs within our network.

Initially, this worked well and we saw near-realtime results.

However, the underlying limitations of our implementation became apparent when we started receiving consistent alerts that our underlying Images service was nearing its limits for memory usage. The increased memory usage didn’t line up with any recent deployments around this time, but a hunch led us to discover that the face cropping compute time graph had an uptick that matched the uptick in memory usage. Further tracing confirmed that AI face cropping was at the root of the problem.

When a service runs out of memory, it terminates its processes to free up memory and prevent the system from crashing. Since CPU-based implementations share RAM with other processes, this can potentially cause errors for other image optimization operations. In response, we switched our memory allocator from glibc malloc to jemalloc. This allowed us to use less memory at runtime, saving about 20 TiB of RAM globally. We also started culling the number of face cropping requests to limit CPU usage.

At this point, AI face cropping was already limited to our own internal uses and a small number of beta customers. These steps only temporarily reduced our memory consumption. They weren’t sufficient for handling global traffic, so we looked toward a more scalable design for long-term use.

Doing more with less (memory)

With memory usage alerts looming in the distance, it became clear that we needed to move to a GPU-based approach.

Unlike with CPUs, a GPU-based implementation avoids contention with other processes because memory access is typically dedicated and managed more tightly. We partnered with the Workers AI team, who created a framework for internal teams to integrate payloads into their model catalog for GPU access.

Some Workers AI models have their own standalone containers; this isn’t practical for every model, as routing traffic to multiple containers can be expensive. When using a GPU through Workers AI, the data needs to travel over the network, which can introduce latency. This is where model size is especially relevant, as network transport overhead becomes more noticeable with larger models.

To address this, Workers AI wraps smaller models in a single container and utilizes a latency-sensitive routing algorithm to identify the best instance to serve each payload. This means that models can be offloaded when there is no traffic.


A scheduler is used to optimize how—and when—models in the same container interact with GPUs.

RetinaFace runs on 1 GB of VRAM on the smallest GPU; it’s small enough that it can be hot swapped at runtime alongside similarly sized models. If there is a call for the RetinaFace model, then the Python code will be loaded into the environment and executed.

As expected, we saw a significant drop in memory usage after we moved the feature to Workers AI. Now, each instance of our Images service consumes about 150 MiB of memory.


With this new approach, memory leaks pose less concern to the overall availability of our service. Workers AI executes models within containers, so they can be terminated and restarted as needed without impacting other processes. Since face cropping runs separately from our Images service, restarting it won’t halt our other image optimization operations.

Applying AI face cropping to our blog

As part of our beta launch, we updated the Cloudflare blog to apply AI face cropping on author images.

Authors can submit their own images, which appear as circular profile pictures in both the main blog feed and individual blog posts. By default, CSS centers images within their containers, making off-centered head positions more obvious. When two profile pictures include different amounts of negative space, this can also lead to a visual imbalance where authors’ faces appear at different scales:


AI face cropping makes posts with multiple authors appear more balanced.

In the example above, Austin’s original image is cropped tightly around his face. On the other hand, Taylor’s original image includes his torso and a larger margin of the background. As a result, Austin’s face appears larger and closer to the center than Taylor’s does. After we applied AI face cropping to profile pictures on the blog, their faces appear more similar in size, creating more balance and cohesion on their co-authored post.

A new era of image editing, now in Images

Many developers already use Images to build scalable media pipelines. Our goal is to accelerate image workflows by automating rote, manual tasks.

For the Images team, this is only the beginning. We plan to release new AI capabilities, including features like background removal and generative upscale. You can try AI face cropping for free by enabling transformations in the Images dashboard.

Improve your media pipelines with the Images binding for Cloudflare Workers

Post Syndicated from Deanna Lam original https://blog.cloudflare.com/improve-your-media-pipelines-with-the-images-binding-for-cloudflare-workers/

When building a full-stack application, many developers spend a surprising amount of time trying to make sure that the various services they use can communicate and interact with each other. Media-rich applications require image and video pipelines that can integrate seamlessly with the rest of your technology stack.

With this in mind, we’re excited to introduce the Images binding, a way to connect the Images API directly to your Worker and enable new, programmatic workflows. The binding removes unnecessary friction from application development by allowing you to transform, overlay, and encode images within the Cloudflare Developer Platform ecosystem.

In this post, we’ll explain how the Images binding works, as well as the decisions behind local development support. We’ll also walk through an example app that watermarks and encodes a user-uploaded image, then uploads the output directly to an R2 bucket.

The challenges of fetch()

Cloudflare Images was designed to help developers build scalable, cost-effective, and reliable image pipelines. You can deliver multiple copies of an image — each resized, manipulated, and encoded based on your needs. Only the original image needs to be stored; different versions are generated dynamically, or as requested by a user’s browser, then subsequently served from cache.

With Images, you have the flexibility to transform images that are stored outside the Images product. Previously, the Images API was based on the fetch() method, which posed three challenges for developers:

First, when transforming a remote image, the original image must be retrieved from a URL. This isn’t applicable for every scenario, like resizing and compressing images as users upload them from their local machine to your app. We wanted to extend the Images API to broader use cases where images might not be accessible from a URL.

Second, the optimization operation — the changes you want to make to an image, like resizing it — is coupled with the delivery operation. If you wanted to crop an image, watermark it, then resize the watermarked image, then you’d need to serve one transformation to the browser, retrieve the output URL, and transform it again. This adds overhead to your code, and can be tedious and inefficient to maintain. Decoupling these operations means that you no longer need to manage multiple requests for consecutive transformations.

Third, optimization parameters — the way that you specify how an image should be manipulated — follow a fixed order. For example, cropping is performed before resizing. It’s difficult to build a flow that doesn’t align with the established hierarchy — like resizing first, then cropping — without a lot of time, trial, and effort.

But complex workflows shouldn’t require complex logic. In February, we released the Images binding in Workers to make the development experience more accessible, intuitive, and user-friendly. The binding helps you work more productively by simplifying how you connect the Images API to your Worker and providing more fine-grained control over how images are optimized.

Extending the Images workflow


Since optimization parameters follow a fixed order, we’d need to output the image to resize it after watermarking. The binding eliminates this step.

Bindings connect your Workers to external resources on the Developer Platform, allowing you to manage interactions between services in a few lines of code. When you bind the Images API to your Worker, you can create more flexible, programmatic workflows to transform, resize, and encode your images — without requiring them to be accessible from a URL.

Within a Worker, the Images binding supports the following functions:

  • .transform(): Accepts optimization parameters that specify how an image should be manipulated

  • .draw(): Overlays an image over the original image. The overlaid image can be optimized through a child transform() function.

  • .output(): Defines the output format for the transformed image.

  • .info(): Outputs information about the original image, like its format, file size, and dimensions.

The life of a binding request

At a high level, a binding works by establishing a communication channel between a Worker and the binding’s backend services.

To do this, the Workers runtime needs to know exactly which objects to construct when the Worker is instantiated. Our control plane layer translates between a given Worker’s code and each binding’s backend services. When a developer runs wrangler deploy, any invoked bindings are converted into a dependency graph. This describes the objects and their dependencies that will be injected into the env of the Worker when it runs. Then, the runtime loads the graph, builds the objects, and runs the Worker.

In most cases, the binding makes a remote procedure call to the backend services of the binding. The mechanism that makes this call must be constructed and injected into the binding object; for Images, this is implemented as a JavaScript wrapper object that makes HTTP calls to the Images API.

These calls contain the sequence of operations that are required to build the final image, represented as a tree structure. Each .transform() function adds a new node to the tree, describing the operations that should be performed on the image. The .draw() function adds a subtree, where child .transform() functions create additional nodes that represent the operations required to build the overlay image. When .output() is called, the tree is flattened into a list of operations; this list, along with the input image itself, is sent to the backend of the Images binding.

For example, let’s say we had the following commands:

env.IMAGES.input(image)
  .transform(rotate:90})
  .draw(
    env.IMAGES.input(watermark)
      .transform({width:32})
  )
  .transform({blur:5})
  .output({format:"image/png"})

Put together, the request would look something like this:


To communicate with the backend, we chose to send multipart forms. Each binding request is inherently expensive, as it can involve decoding, transforming, and encoding. Binary formats may offer slightly lower overhead per request, but given the bulk of the work in each request is the image processing itself, any gains would be nominal. Instead, we stuck with a well-supported, safe approach that our team had successfully implemented in the past.

Meeting developers where they are

Beyond the core capabilities of the binding, we knew that we needed to consider the entire developer lifecycle. The ability to test, debug, and iterate is a crucial part of the development process.

Developers won’t use what they can’t test; they need to be able to validate exactly how image optimization will affect the user experience and performance of their application. That’s why we made the Images binding available in local development without incurring any usage charges.

As we scoped out this feature, we reached a crossroad with how we wanted the binding to work when developing locally. At first, we considered making requests to our production backend services for both unit and end-to-end testing. This would require open-sourcing the components of the binding and building them for all Wrangler-supported platforms and Node versions.

Instead, we focused our efforts on targeting individual use cases by providing two different methods. In Wrangler, Cloudflare’s command-line tool, developers can choose between an online and offline mode of the Images binding. The online mode makes requests to the real Images API; this requires Internet access and authentication to the Cloudflare API. Meanwhile, the offline mode requests a lower fidelity fake, which is a mock API implementation that supports a limited subset of features. This is primarily used for unit tests, as it doesn’t require Internet access or authentication. By default, wrangler dev uses the online mode, mirroring the same version that Cloudflare runs in production.

See the binding in action

Let’s look at an example app that transforms a user-uploaded image, then uploads it directly to an R2 bucket.

To start, we created a Worker application and configured our wrangler.toml file to add the Images, R2, and assets bindings:

[images]
binding = "IMAGES"

[[r2_buckets]]
binding = "R2"
bucket_name = "<BUCKET>"

[assets]
directory = "./<DIRECTORY>"
binding = "ASSETS"

In our Worker project, the assets directory contains the image that we want to use as our watermark.

Our frontend has a <form> element that accepts image uploads:

const html = `
<!DOCTYPE html>
        <html>
          <head>
            <meta charset="UTF-8">
            <title>Upload Image</title>
          </head>
          <body>
            <h1>Upload an image</h1>
            <form method="POST" enctype="multipart/form-data">
              <input type="file" name="image" accept="image/*" required />
              <button type="submit">Upload</button>
            </form>
          </body>
        </html>
`;

export default {
  async fetch(request, env) {
    if (request.method === "GET") {
      return new Response(html, {headers:{'Content-Type':'text/html'},})
    }
    if (request.method ==="POST") {
      // This is called when the user submits the form
    }
  }
};

Next, we set up our Worker to handle the optimization.

The user will upload images directly through the browser; since there isn’t an existing image URL, we won’t be able to use fetch() to get the uploaded image. Instead, we can transform the uploaded image directly, operating on its body as a stream of bytes.

Once we read the image, we can manipulate the image. Here, we apply our watermark and encode the image to AVIF before uploading the transformed image to our R2 bucket: 

var __defProp = Object.defineProperty;
var __name = (target, value) => __defProp(target, "name", { value, configurable: true });

function assetUrl(request, path) {
	const url = new URL(request.url);
	url.pathname = path;
	return url;
}
__name(assetUrl, "assetUrl");

export default {
  async fetch(request, env) {
    if (request.method === "GET") {
      return new Response(html, {headers:{'Content-Type':'text/html'},})
    }
    if (request.method === "POST") {
      try {
        // Parse form data
        const formData = await request.formData();
        const file = formData.get("image");
        if (!file || typeof file.arrayBuffer !== "function") {
          return new Response("No image file provided", { status: 400 });
        }
        
        // Read uploaded image as array buffer
        const fileBuffer = await file.arrayBuffer();

	     // Fetch image as watermark
        let watermarkStream = (await env.ASSETS.fetch(assetUrl(request, "watermark.png"))).body;

        // Apply watermark and convert to AVIF
        const imageResponse = (
          await env.IMAGES.input(fileBuffer)
              // Draw the watermark on top of the image
              .draw(
                env.IMAGES.input(watermarkStream)
                  .transform({ width: 100, height: 100 }),
                { bottom: 10, right: 10, opacity: 0.75 }
              )
              // Output the final image as AVIF
              .output({ format: "image/avif" })
          ).response();

          // Add timestamp to file name
          const fileName = `image-${Date.now()}.avif`;
          
          // Upload to R2
          await env.R2.put(fileName, imageResponse.body)
         
          return new Response(`Image uploaded successfully as ${fileName}`, { status: 200 });
      } catch (err) {
        console.log(err.message)
      }
    }
  }
};

We’ve also created a gallery in our documentation to demonstrate ways that you can use the Images binding. For example, you can transcode images from Workers AI or draw a watermark from KV on an image that is stored in R2.

Looking ahead, the Images binding unlocks many exciting possibilities to seamlessly transform and manipulate images directly in Workers. We aim to create an even deeper connection between all the primitives that developers use to build AI and full-stack applications.

Have some feedback for this release? Let us know in the Community forum.

What’s new with Cloudflare Media: updates for Calls, Stream, and Images

Post Syndicated from Deanna Lam original https://blog.cloudflare.com/whats-next-for-cloudflare-media


Our customers use Cloudflare Calls, Stream, and Images to build live, interactive, and real-time experiences for their users. We want to reduce friction by making it easier to get data into our products. This also means providing transparent pricing, so customers can be confident that costs make economic sense for their business, especially as they scale.

Today, we’re introducing four new improvements to help you build media applications with Cloudflare:

  • Cloudflare Calls is in open beta with transparent pricing
  • Cloudflare Stream has a Live Clipping API to let your viewers instantly clip from ongoing streams
  • Cloudflare Images has a pre-built upload widget that you can embed in your application to accept uploads from your users
  • Cloudflare Images lets you crop and resize images of people at scale with automatic face cropping

Build real-time video and audio applications with Cloudflare Calls

Cloudflare Calls is now in open beta, and you can activate it from your dashboard. Your usage will be free until May 15, 2024. Starting May 15, 2024, customers with a Calls subscription will receive the first terabyte each month for free, with any usage beyond that charged at $0.05 per real-time gigabyte. Additionally, there are no charges for inbound traffic to Cloudflare.

To get started, read the developer documentation for Cloudflare Calls.

Live Instant Clipping: create clips from live streams and recordings

Live broadcasts often include short bursts of highly engaging content within a longer stream. Creators and viewers alike enjoy being able to make a “clip” of these moments to share across multiple channels. Being able to generate that clip rapidly enables our customers to offer instant replays, showcase key pieces of recordings, and build audiences on social media in real-time.

Today, Cloudflare Stream is launching Live Instant Clipping in open beta for all customers. With the new Live Clipping API, you can let your viewers instantly clip and share moments from an ongoing stream – without re-encoding the video.

When planning this feature, we considered a typical user flow for generating clips from live events. Consider users watching a stream of a video game: something wild happens and users want to save and share a clip of it to social media. What will they do?

First, they’ll need to be able to review the preceding few minutes of the broadcast, so they know what to clip. Next, they need to select a start time and clip duration or end time, possibly as a visualization on a timeline or by scrubbing the video player. Finally, the clip must be available quickly in a way that can be replayed or shared across multiple platforms, even after the original broadcast has ended.

That ideal user flow implies some heavy lifting in the background. We now offer a manifest to preview recent live content in a rolling window, and we provide the timing information in that response to determine the start and end times of the requested clip relative to the whole broadcast. Finally, on request, we will generate on-the-fly that clip as a standalone video file for easy sharing as well as an HLS manifest for embedding into players.

Live Instant Clipping is available in beta to all customers starting today! Live clips are free to make; they do not count toward storage quotas, and playback is billed just like minutes of video delivered. To get started, check out the Live Clipping API in developer documentation.

Integrate Cloudflare Images into your application with only a few lines of code

Building applications with user-uploaded images is even easier with the upload widget, a pre-built, interactive UI that lets users upload images directly into your Cloudflare Images account.

Many developers use Cloudflare Images as an end-to-end image management solution to support applications that center around user-generated content, from AI photo editors to social media platforms. Our APIs connect the frontend experience – where users upload their images – to the storage, optimization, and delivery operations in the backend.

But building an application can take time. Our team saw a huge opportunity to take away as much extra work as possible, and we wanted to provide off-the-shelf integration to speed up the development process.

With the upload widget, you can seamlessly integrate Cloudflare Images into your application within minutes. The widget can be integrated in two ways: by embedding a script into a static HTML page or by installing a package that works with your favorite framework. We provide a ready-made Worker template that you can deploy directly to your account to connect your frontend application with Cloudflare Images and authorize users to upload through the widget.

To try out the upload widget, sign up for our closed beta.

Optimize images of people with automatic face cropping for Cloudflare Images

Cloudflare Images lets you dynamically manipulate images in different aspect ratios and dimensions for various use cases. With face cropping for Cloudflare Images, you can now crop and resize images of people’s faces at scale. For example, if you’re building a social media application, you can apply automatic face cropping to generate profile picture thumbnails from user-uploaded images.

Our existing gravity parameter uses saliency detection to set the focal point of an image based on the most visually interesting pixels, which determines how the image will be cropped. We expanded this feature by using a machine learning model called RetinaFace, which classifies images that have human faces. We’re also introducing a new zoom parameter that you can combine with face cropping to specify how closely an image should be cropped toward the face.

To apply face cropping to your image optimization, sign up for our closed beta.

Photo by Eye for Ebony on Unsplash
https://example.com/cdn-cgi/image/fit=crop,width=500,height=500,gravity=face,zoom=0.6/https://example.com/images/picture.jpg

Meet the Media team over Discord

As we’re working to build the next set of media tools, we’d love to hear what you’re building for your users. Come say hi to us on Discord. You can also learn more by visiting our developer documentation for Calls, Stream, and Images.

Cloudflare Images introduces AVIF, Blur and Bundle with Stream

Post Syndicated from Marc Lamik original https://blog.cloudflare.com/images-avif-blur-bundle/

Cloudflare Images introduces AVIF, Blur and Bundle with Stream

Cloudflare Images introduces AVIF, Blur and Bundle with Stream

Two months ago we launched Cloudflare Images for everyone, and we are amazed about the adoption and the feedback we received.

Let’s start with some numbers:

More than 70 million images delivered per day on average in the week of November 5 to 12.

More than 1.5 million images have been uploaded so far, growing faster every day.

But we are just getting started and are happy to announce the release of the most requested features, first we talk about the AVIF support for Images, converting as many images as possible with AVIF results in highly compressed, fast delivered images without compromising on the quality.

Secondly we introduce blur. By blurring an image, in combination with the already supported protection of private images via signed URL, we make Cloudflare Images a great solution for previews for paid content.

For many of our customers it is important to be able to serve Images from their own domain and not only via imagedelivery.net. Here we show an easy solution for this using a custom Worker or a special URL.

Last but not least we announce the launch of new attractively priced bundles for both Cloudflare Images and Stream.

Images supports AVIF

We announced support for the new AVIF image format in Image Resizing product last year.

Last month we added AVIF support in Cloudflare Images. It compresses images significantly better than older-generation formats such as WebP and JPEG. Today, AVIF image format is supported both in Chrome and Firefox. Globally, almost 70% of users have a web browser that supports AVIF.

What is AVIF

As we explained previously, AVIF is a combination of the HEIF ISO standard, and a royalty-free AV1 codec by Mozilla, Xiph, Google, Cisco, and many others.

“Currently, JPEG is the most popular image format on the web. It’s doing remarkably well for its age, and it will likely remain popular for years to come thanks to its excellent compatibility. There have been many previous attempts at replacing JPEG, such as JPEG 2000, JPEG XR, and WebP. However, these formats offered only modest compression improvements and didn’t always beat JPEG on image quality. Compression and image quality in AVIF is better than in all of them, and by a wide margin.”1

How Cloudflare Images supports AVIF

As a reminder, image delivery is done through the Cloudflare managed imagedelivery.net domain. It is powered by Cloudflare Workers. We have the following logic to request the AVIF format based on the Accept HTTP request header:

const WEBP_ACCEPT_HEADER = /image\/webp/i;
const AVIF_ACCEPT_HEADER = /image\/avif/i;

addEventListener("fetch", (event) => {
  event.respondWith(handleRequest(event));
});

async function handleRequest(event) {
  const request = event.request;
  const url = new URL(request.url);
  
  const headers = new Headers(request.headers);

  const accept = headers.get("accept");

  let format = undefined;

  if (WEBP_ACCEPT_HEADER.test(accept)) {
    format = "webp";
  }

  if (AVIF_ACCEPT_HEADER.test(accept)) {
    format = "avif";
  }

  const resizingReq = new Request(url, {
    headers,
    cf: {
      image: { ..., format },
    },
  });

  return fetch(resizingReq);
}

Based on the Accept header, the logic in the Worker detects if WebP or AVIF format can be served. The request is passed to Image Resizing. If the image is available in the Cloudflare cache it will be served immediately, otherwise the image will be resized, transformed, and cached. This approach ensures that for clients without AVIF format support we deliver images in WebP or JPEG formats.

The benefit of Cloudflare Images product is that we added AVIF support without a need for customers to change a single line of code from their side.

The transformation of an image to AVIF is compute-intensive but leads to a significant benefit in file-size. We are always weighing the cost and benefits in the decision which format to serve.

It Is worth noting that all the conversions to WebP and AVIF formats happen on the request phase for image delivery at the moment. We will be adding the ability to convert images on the upload phase in the future.

Introducing Blur

One of the most requested features for Images and Image Resizing was adding support for blur. We recently added the support for blur both via URL format and with Cloudflare Workers.

Cloudflare Images uses variants. When you create a variant, you can define properties including variant name, width, height, and whether the variant should be publicly accessible. Blur will be available as a new option for variants via variant API:

curl -X POST "https://api.cloudflare.com/client/v4/accounts/9a7806061c88ada191ed06f989cc3dac/images/v1/variants" \
     -H "Authorization: Bearer <api_token>" \
     -H "Content-Type: application/json" \
     --data '{"id":"blur","options":{"metadata":"none","blur":20},"neverRequireSignedURLs":true}'

One of the use cases for using blur with Cloudflare Images is to control access to the premium content.

The customer will upload the image that requires an access token:

curl -X POST "https://api.cloudflare.com/client/v4/accounts/9a7806061c88ada191ed06f989cc3dac/images/v1" \
     -H "Authorization: Bearer <api_token>"
     --form 'file=@./<file_name>' \
     --form 'requireSignedURLs=true'

Using the variant we defined via API we can fetch the image without providing a signature:

Cloudflare Images introduces AVIF, Blur and Bundle with Stream

To access the protected image a valid signed URL will be required:

Cloudflare Images introduces AVIF, Blur and Bundle with Stream
Lava lamps in the Cloudflare lobby. Courtesy of @mahtin

The combination of image blurring and restricted access to images could be integrated into many scenarios and provides a powerful tool set for content publishers.

The functionality to define a variant with a blur option is coming soon in the Cloudflare dashboard.

Serving images from custom domains

One important use case for Cloudflare Images customers is to serve images from custom domains. It could improve latency and loading performance by not requiring additional TLS negotiations on the client. Using Cloudflare Workers customers can add this functionality today using the following example:

const IMAGE_DELIVERY_HOST = "https://imagedelivery.net";

addEventListener("fetch", async (event) => {
  event.respondWith(handleRequest(event.request));
});

async function handleRequest(request) {
  const url = new URL(request.url);
  const { pathname, search } = url;

  const destinationURL = IMAGE_DELIVERY_HOST + pathname + search;
  return fetch(new Request(destinationURL));
}

For simplicity, the Workers script makes the redirect from the domain where it’s deployed to the imagedelivery.net. We assume the same format as for Cloudflare Images URLs:

https://<customdomain.net>/<encoded account id>/<image id>/<variant name>

The Worker could be adjusted to fit customer needs like:

  • Serving images from a specific domains’ path e.g. /images/
  • Populate account id or variant name automatically
  • Map Cloudflare Images to custom URLs altogether

For customers who just want the simplicity of serving Cloudflare Images from their domains on Cloudflare we will be adding the ability to serve Cloudflare Images using the following format:

https://<customdomain.net>/cdn-cgi/imagedelivery/<encrypted_account_id>/<_image_id>/<variant_name>

Image delivery will be supported from all customer domains under the same Cloudflare account where Cloudflare Images subscription is activated. This will be available to all Cloudflare Images customers before the holidays.

Images and Stream Bundle

Creator platforms, eCommerce, and many other products have one thing in common: having an easy and accessible way to upload, store and deliver your images and videos in the best and most affordable way is vital.

We teamed up with the Stream team to create a set of bundles that make it super easy to get started with your product.

The Starter bundle is perfect for experimenting and a first MVP. For just $10 per month it is 50% cheaper than the unbundled option, and includes enough to get started:

  • Stream: 1,000 stored minutes and 5,000 minutes served
  • Images: 100,000 stored images and 500,000 images served

For larger and fast scaling applications we have the Creator Bundle for $50 per month which saves over 60% compared to the unbundled products. It includes everything to start scaling:

  • Stream: 10,000 stored minutes and 50,000 minutes served
  • Images: 500,000 stored images and 1,000,000 images served

Cloudflare Images introduces AVIF, Blur and Bundle with Stream

These new bundles will be available to all customers from the end of November.

What’s next

We are not stopping here, and we already have the next features for Images lined up. One of them is Images Analytics. Having great analytics for a product is vital, and so we will be introducing analytics functionality for Cloudflare Images for all customers to be able to keep track of all images and their usage.


1/generate-avif-images-with-image-resizing/#what-is-avif

Cloudflare Images Now Available to Everyone

Post Syndicated from Zaid Farooqui original https://blog.cloudflare.com/announcing-cloudflare-images/

Cloudflare Images Now Available to Everyone

Cloudflare Images Now Available to Everyone

Today, we are launching Cloudflare Images for all customers. Images is a single product that stores, resizes, optimizes and serves images. We built Cloudflare Images so customers of all sizes can build a scalable and affordable image pipeline in minutes.

Store images efficiently

Many legacy image pipelines are architected to take an image and create multiple copies of it to account for different sizes and formats. These copies are then stored in a storage bucket and delivered using a CDN. This architecture can be hard to maintain and adds infrastructure cost in unpredictable ways.

With Cloudflare Images, you don’t need to worry about creating and storing multiple versions of the same image in different sizes and formats. Cloudflare Images makes a clear distinction between your stored images and the variants. Once you upload an image, you can apply any defined variant to the uploaded image. The variants and different formats don’t count towards your stored images quota.

This means that when a user uploads a picture that you need to resize in three different ways and serve in two different formats, you pay for one stored image instead of seven different images (the original, plus three variants for each of the two formats.)

Built-in access control

Every image that is uploaded to Cloudflare Images can be marked private, so it can only be accessed using an expiring signed URL token. This is ideal for use cases like membership sites that sell premium content.

Signed URLs give you the flexibility to validate if someone is a paying member using your custom logic and only give them access to the set of images they have paid for.

Eliminate egress costs

Egress cost is the cost of getting your data out of a storage provider. The most common case being when you serve an image from storage you pay for the bits transmitted. And you end up paying every, single time that same image is displayed. It is easy to not account for this cost when you are doing cost-benefit analysis between different solutions. But egress costs add up rapidly, and it is not uncommon for customers to pay their storage provider a very large multiple of their total storage cost in egress.

When you use a multi-vendor solution for your image pipeline, you might use vendor A for storage, vendor B for resizing the images and vendor C for delivering the images. At face value, this solution might appear cheaper because you think “we’ve picked the most affordable option for each piece of our image pipeline.” But in this setup, the resizing service (vendor B) and the CDN (vendor C) still need to request images from vendor A.

With Cloudflare Images, you never have to worry about egress costs because the images are stored, optimized and delivered by a single product. And you will see only two line items on your bill for Cloudflare Images. You pay \$5/month for every 100,000 stored images and \$1 per 100,000 delivered images. There are no additional resizing, compute or egress costs.

Uploading Images

Cloudflare Images offers multiple ways to upload your images. We accept all the common file formats including JPEG, GIF and WEBP. Each image uploaded to Images can be up to 10 MB.

If you only have a few images or simply want a taste of the product, you can use the Images Dashboard. Simply drag and drop one or more images:

Cloudflare Images Now Available to Everyone
Cloudflare Images Dashboard

If you have an app that lets your users upload images, you can use the Direct Creator Uploads feature of Cloudflare Images.

The Direct Creator Uploads API lets you request single-use tokens. These one-time upload URLs can be used by your app to upload your user’s submissions without exposing your API Key or Token. Here is an example cURL that returns a one-use upload url:

curl --request POST \
  --url https://api.cloudflare.com/client/v4/accounts/:account_id/images/v1/direct_upload \
  --header 'Content-Type: application/json' \
  --header 'Authorization: Bearer :token'

If the call is successful, you’ll receive a response that looks like this:

{
  "result": {
    "id": "2cdc28f0-017a-49c4-9ed7-87056c839c2",
    "uploadURL": "https://upload.imagedelivery.net/2cdc28f0-017a-49c4-9ed7-87056c839c2"
  },
  "result_info": null,
  "success": true,
  "errors": [],
  "messages": []
}

Your client-side app can now upload the image directly to the uploadURL without exposing your account credentials to the client.

Resizing with Variants

Cloudflare Images lets you define variants and apply them to your uploaded images. You can define up to 20 different variants to support different use cases. Each variant has properties including the width and height of resized images.

Cloudflare Images Now Available to Everyone
Configure variants in Cloudflare Images

You can also configure the fit property to describe how the width and height dimensions should be interpreted.

Fit Option Behavior
Scale Down Image will be shrunk in size to fully fit within the given width or height, but won’t be enlarged.
Contain Image will be resized (shrunk or enlarged) to be as large as possible within the given width or height while preserving the aspect ratio.
Cover Image will be resized to exactly fill the entire area specified by width and height, and will be cropped if necessary.
Crop Image will be shrunk and cropped to fit within the area specified by width and height. The image won’t be enlarged. For images smaller than the given dimensions it’s the same as scale-down. For images larger than the given dimensions, it’s the same as cover.
Pad Image will be resized (shrunk or enlarged) to be as large as possible within the given width or height while preserving the aspect ratio, and the extra area will be filled with a background color (white by default)

We plan to add more properties to give you maximum flexibility. If there is a particular property you’d love to see, let us know.

Once you define your variants, you can begin using them with any image. From the Dashboard, simply click on Variants to quickly preview how any image would be rendered using each of your variants.

Cloudflare Images Now Available to Everyone
Previewing variants in Cloudflare Images

Optimized image delivery

Once you’ve uploaded your first image, you will see the Image Delivery URL in your Images Dashboard:

Cloudflare Images Now Available to Everyone
Serving images with Cloudflare Images

A typical Image Delivery URL looks like this:

https://imagedelivery.net/ZWd9g1K7eljCn_KDTu_OWA/:image_id/:variant_name

You can use this url template to form the final URL that returns any image and variant combination.

When a client requests an image, Cloudflare Images will pick the optimal format between WebP, PNG, JPEG and GIF. The format served to the eyeball is determined by client headers and the image type. Cloudflare Images will soon support AVIF, offering further compression. One of the best parts of using Cloudflare Images is that when we add support for newer formats such as AVIF, you will get the upside without needing to make any changes to your codebase.

What’s next

All Cloudflare customers can sign up to use Cloudflare Images this week. We built Cloudflare Images for developers. Check out the Cloudflare Images developer docs for examples of implementing common use-cases such as letting your users upload images directly to Images and using signed URLs to implement access control.

We’re just getting started with Cloudflare Images. Here are some of the features we plan to support soon:

  • AVIF support for even smaller file sizes and faster load times.
  • Variants that add a blur effect to your images.
  • Analytics to better understand your use of Images.