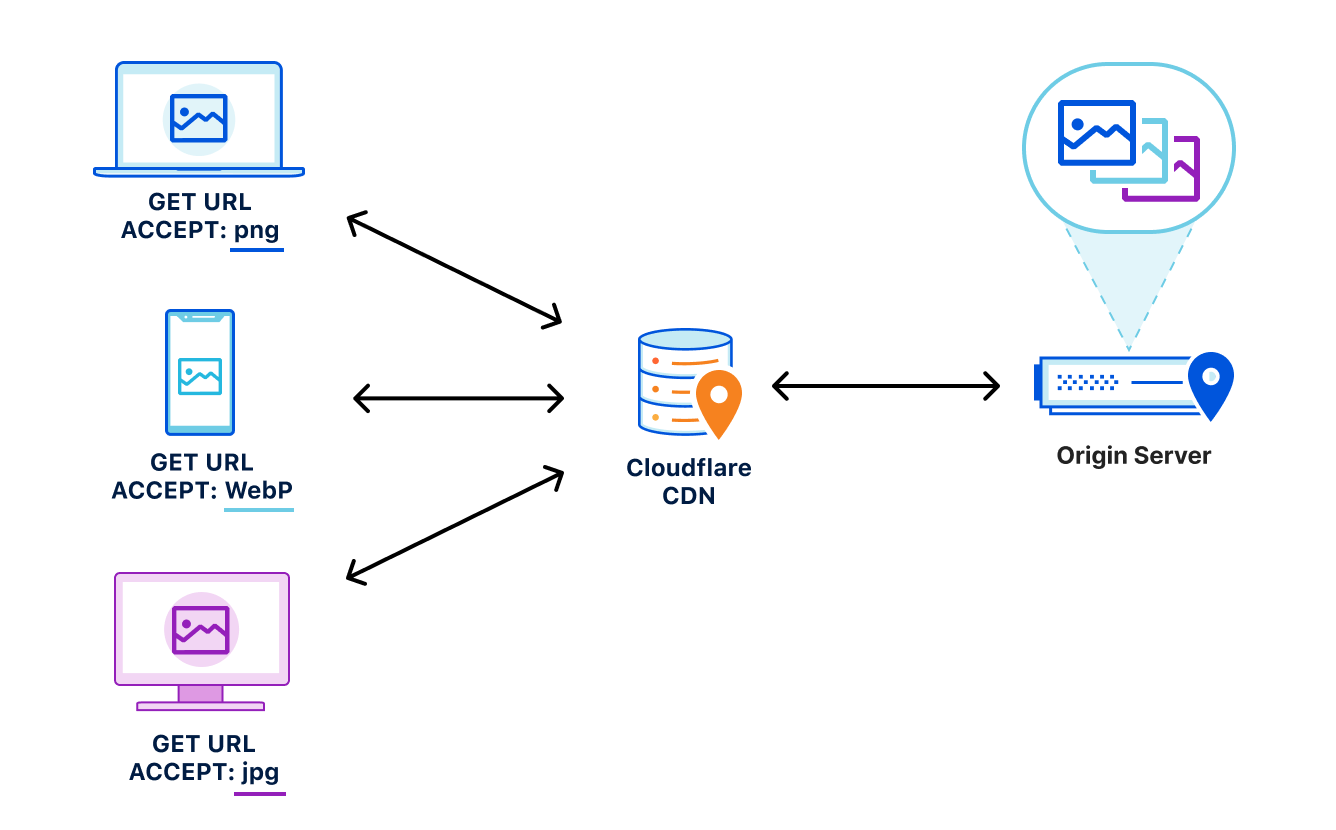
Tag Archives: Cloudflare Images

What’s new with Cloudflare Media: updates for Calls, Stream, and Images

Post Syndicated from Deanna Lam original https://blog.cloudflare.com/whats-next-for-cloudflare-media


Our customers use Cloudflare Calls, Stream, and Images to build live, interactive, and real-time experiences for their users. We want to reduce friction by making it easier to get data into our products. This also means providing transparent pricing, so customers can be confident that costs make economic sense for their business, especially as they scale.

Today, we’re introducing four new improvements to help you build media applications with Cloudflare:

  • Cloudflare Calls is in open beta with transparent pricing
  • Cloudflare Stream has a Live Clipping API to let your viewers instantly clip from ongoing streams
  • Cloudflare Images has a pre-built upload widget that you can embed in your application to accept uploads from your users
  • Cloudflare Images lets you crop and resize images of people at scale with automatic face cropping

Build real-time video and audio applications with Cloudflare Calls

Cloudflare Calls is now in open beta, and you can activate it from your dashboard. Your usage will be free until May 15, 2024. Starting May 15, 2024, customers with a Calls subscription will receive the first terabyte each month for free, with any usage beyond that charged at $0.05 per real-time gigabyte. Additionally, there are no charges for inbound traffic to Cloudflare.

To get started, read the developer documentation for Cloudflare Calls.

Live Instant Clipping: create clips from live streams and recordings

Live broadcasts often include short bursts of highly engaging content within a longer stream. Creators and viewers alike enjoy being able to make a “clip” of these moments to share across multiple channels. Being able to generate that clip rapidly enables our customers to offer instant replays, showcase key pieces of recordings, and build audiences on social media in real-time.

Today, Cloudflare Stream is launching Live Instant Clipping in open beta for all customers. With the new Live Clipping API, you can let your viewers instantly clip and share moments from an ongoing stream – without re-encoding the video.

When planning this feature, we considered a typical user flow for generating clips from live events. Consider users watching a stream of a video game: something wild happens and users want to save and share a clip of it to social media. What will they do?

First, they’ll need to be able to review the preceding few minutes of the broadcast, so they know what to clip. Next, they need to select a start time and clip duration or end time, possibly as a visualization on a timeline or by scrubbing the video player. Finally, the clip must be available quickly in a way that can be replayed or shared across multiple platforms, even after the original broadcast has ended.

That ideal user flow implies some heavy lifting in the background. We now offer a manifest to preview recent live content in a rolling window, and we provide the timing information in that response to determine the start and end times of the requested clip relative to the whole broadcast. Finally, on request, we will generate on-the-fly that clip as a standalone video file for easy sharing as well as an HLS manifest for embedding into players.

Live Instant Clipping is available in beta to all customers starting today! Live clips are free to make; they do not count toward storage quotas, and playback is billed just like minutes of video delivered. To get started, check out the Live Clipping API in developer documentation.

Integrate Cloudflare Images into your application with only a few lines of code

Building applications with user-uploaded images is even easier with the upload widget, a pre-built, interactive UI that lets users upload images directly into your Cloudflare Images account.

Many developers use Cloudflare Images as an end-to-end image management solution to support applications that center around user-generated content, from AI photo editors to social media platforms. Our APIs connect the frontend experience – where users upload their images – to the storage, optimization, and delivery operations in the backend.

But building an application can take time. Our team saw a huge opportunity to take away as much extra work as possible, and we wanted to provide off-the-shelf integration to speed up the development process.

With the upload widget, you can seamlessly integrate Cloudflare Images into your application within minutes. The widget can be integrated in two ways: by embedding a script into a static HTML page or by installing a package that works with your favorite framework. We provide a ready-made Worker template that you can deploy directly to your account to connect your frontend application with Cloudflare Images and authorize users to upload through the widget.

To try out the upload widget, sign up for our closed beta.

Optimize images of people with automatic face cropping for Cloudflare Images

Cloudflare Images lets you dynamically manipulate images in different aspect ratios and dimensions for various use cases. With face cropping for Cloudflare Images, you can now crop and resize images of people’s faces at scale. For example, if you’re building a social media application, you can apply automatic face cropping to generate profile picture thumbnails from user-uploaded images.

Our existing gravity parameter uses saliency detection to set the focal point of an image based on the most visually interesting pixels, which determines how the image will be cropped. We expanded this feature by using a machine learning model called RetinaFace, which classifies images that have human faces. We’re also introducing a new zoom parameter that you can combine with face cropping to specify how closely an image should be cropped toward the face.

To apply face cropping to your image optimization, sign up for our closed beta.

Photo by Eye for Ebony on Unsplash
https://example.com/cdn-cgi/image/fit=crop,width=500,height=500,gravity=face,zoom=0.6/https://example.com/images/picture.jpg

Meet the Media team over Discord

As we’re working to build the next set of media tools, we’d love to hear what you’re building for your users. Come say hi to us on Discord. You can also learn more by visiting our developer documentation for Calls, Stream, and Images.

Image optimization made simpler and more predictable: we’re merging Cloudflare Images and Image Resizing

Post Syndicated from Deanna Lam original http://blog.cloudflare.com/merging-images-and-image-resizing/

Image optimization made simpler and more predictable: we’re merging Cloudflare Images and Image Resizing

Image optimization made simpler and more predictable: we’re merging Cloudflare Images and Image Resizing

Starting November 15, 2023, we’re merging Cloudflare Images and Image Resizing.

All Image Resizing features will be available as part of the Cloudflare Images product. To let you calculate your monthly costs more accurately and reliably, we’re changing how we bill to resize images that aren’t stored at Cloudflare. Our new pricing model will cost $0.50 per 1,000 unique transformations.

For existing Image Resizing customers, you can continue to use the legacy version of Image Resizing. When the merge is live, then you can opt into the new pricing model for more predictable pricing.

In this post, we'll cover why we came to this decision, what's changing, and how these changes might impact you.

Simplifying our products

When you build an application with images, you need to think about three separate operations: storage, optimization, and delivery.

In 2019, we launched Image Resizing, which can optimize and transform any publicly available image on the Internet based on a set of parameters. This enables our customers to deliver variants of a single image for each use case without creating and storing additional copies.

For example, an e-commerce platform for furniture retailers might use the same image of a lamp on both the individual product page and the gallery page for all lamps. They can use Image Resizing to optimize the image in its original aspect for a slider view, or manipulate and crop the image for a thumbnail view.

Image optimization made simpler and more predictable: we’re merging Cloudflare Images and Image Resizing

Two years later, we released Images to let developers build an end-to-end image management pipeline. Developers no longer need to use different vendors to handle storage, optimization, and delivery. With Images, customers can store and deliver their images from a single bucket at Cloudflare to streamline their workflow and eliminate egress fees.

Both products have overlapping features to optimize and manipulate images, which can be confusing for customers. Over the years, we've received numerous questions about which product is optimal for which use cases.

To simplify our products, we're merging Cloudflare Images and Image Resizing to let customers store, optimize, and deliver their images all from one product. Customers can continue to optimize their images without using Cloudflare for storage or purchase storage to manage their entire image pipeline through Cloudflare.

Transparent and predictable pricing

Pricing can cause headaches for Image Resizing customers.

We often hear from customers seeking guidance for calculating how much Image Resizing will cost each month. Today, you are billed for Image Resizing by the number of uncached requests to transform an image. However, caching behavior is often unpredictable, and you can't guarantee how long a given image stays cached. This means that you can't reliably predict their costs.

If you make 1M total requests to Image Resizing each month, then you won't know whether you'll be billed for 10K or 100K of these requests because our pricing model relies on cache. Since assets can be ejected from cache for a variety of reasons, bills for Image Resizing are unpredictable month over month. In some cases, the monthly bills are inconsistent even when traffic remains constant. In other cases, the monthly bill is much higher than our customers expected.

With the new Cloudflare Images, you will be billed only once per 30 days for each unique request to transform an image stored outside of Cloudflare, whether the transformation is cached. Customers will be billed $0.50 per 1,000 unique transformations per month.

In other words, if you resize one image to 100×100, then our new pricing model guarantees that you will be billed only once per month, whether there are 10K or 100K uncached requests to deliver the image at this size. If you resize 200 images to 100×100, then you will be billed for only 200 unique transformations — one for each image at this size — each month.

This change aligns more closely with how our customers think about their usage, as well as ensures that our customers can accurately estimate their costs with confidence. You won't need to consider how your cache hit ratio will affect your bill. To estimate your costs, you'll need to know only the number of unique images and the number of different ways that you need to transform those images each month.

Resize without storage with Cloudflare Images

For developers who only want to resize and optimize images, Cloudflare Images now offers a zero-storage plan. This new plan enables you to transform images while keeping your existing storage and delivery solution unchanged (just like the current Image Resizing product does).

Image optimization made simpler and more predictable: we’re merging Cloudflare Images and Image Resizing

If you want to store your images with Cloudflare Images, then you can always upgrade your plan to purchase storage at any time.

Image Resizing is currently available only for accounts with a Pro or higher plan. The merged Cloudflare Images product will be available for all customers, with pricing plans that are tailored to meet specific use cases.

Existing customers can opt into new pricing

The new version of Cloudflare Images is available on November 15, 2023.

If you currently use Image Resizing, you will have the option to migrate to the new Cloudflare Images at no cost, or continue using Image Resizing.

The functionality and usability of the product will remain the same. You will still manage stored images under the Cloudflare Images tab and can enable transformations from the Speed tab.

As we execute, we'll continue to make improvements in the Dashboard to bring a more centralized and unified experience for Cloudflare Images.
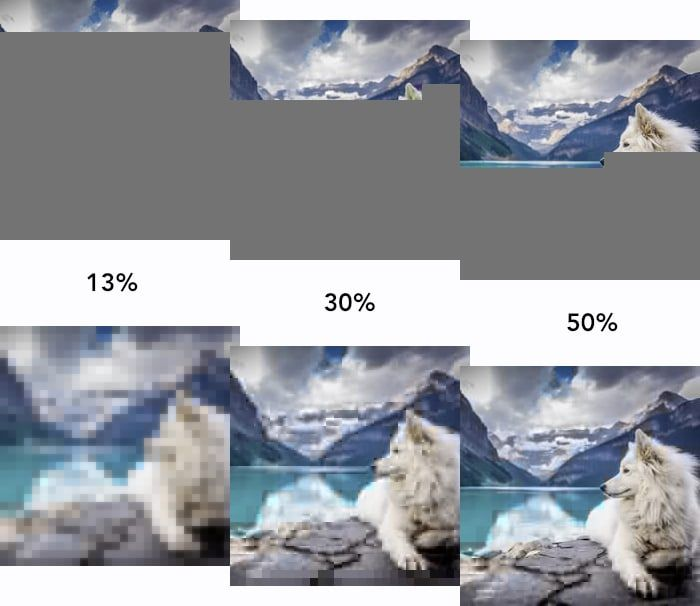
You can learn more about our current image optimization capabilities in the Developer Docs. If you have feedback or thoughts, we'd love to hear from you on the Cloudflare Developers Discord.

How Cloudflare Images addressed the aCropalypse vulnerability

Post Syndicated from Nicholas Skehin original http://blog.cloudflare.com/how-cloudflare-images-addressed-the-acropalypse-vulnerability/

How Cloudflare Images addressed the aCropalypse vulnerability

How Cloudflare Images addressed the aCropalypse vulnerability

Acropalypse (CVE-2023-21036) is a vulnerability caused by image editing tools failing to truncate images when editing has made them smaller, most often seen when images are cropped. This leaves remnants of the cropped contents written in the file after the image has finished. The remnants (written in a ‘trailer’ after the end-of-image marker) are ignored by most software when reading the image, but can be used to partially reconstruct the original image by an attacker.

The general class of vulnerability can, in theory, affect any image format if it ignores data written after the end of the image. In this case the applications affected were the ‘Markup’ screenshot editor that shipped with Google Pixel phones from the Pixel 3 (saving its images in the PNG format) and the Windows Snipping tool (with both PNG and JPEG formats).

Our customers deliver their images using Cloudflare Images products and may have images that are affected. We would like to ensure their images are protected from this vulnerability if they have been edited using a vulnerable editor.

As a concrete example, imagine a Cloudflare customer running a social network, delivering images using Cloudflare Images. A user of the social network might take a screenshot of an invoice containing their address after ordering a product, crop their address out and share the cropped image on the social network. If the image was cropped using an editor affected by aCropalypse an attacker would be able to recover their address, violating their expectation of privacy.

How Cloudflare Images products works

Cloudflare Images and Image Resizing use a proxy as the upstream for requests. This proxy fetches the original image (from either Cloudflare Images storage or the customer’s upstream), applies any transformations (from the variant definition for Cloudflare Images, or from the URL/worker parameters for Image Resizing) and then responds with the transformed image.

This naturally provides protection against aCropalypse for our customers: the proxy will ignore any trailing data in the input, so it won’t be present in the re-encoded image.

However, for certain requests, the proxy might respond with the original. This occurs when two conditions hold: the original can satisfy the request and the re-encoded image has a larger file size. The original satisfies the request if we can guarantee that if the requested format is supported the original format will be supported, it has the same dimensions, it doesn’t have any metadata that needs stripping and it doesn’t have any other transformations such as sharpening or overlays.

Even if the original can satisfy the request, it is fairly unlikely the original will be smaller for images affected by aCropalypse as the leaked information in the trailer will increase the file size. So Cloudflare Images and Image Resizing should provide protection against aCropalypse without adding any additional mitigations.

That being said, we couldn’t guarantee that images affected by aCropalypse would always be re-encoded. We wanted to be able to offer this guarantee for customers of Cloudflare Images and Image Resizing.

How we addressed the issue for JPEG and PNG file format

To ensure that no images with a trailer will ever be passed through, we can add another requirement to reply with the original image — if the original image is a PNG or a JPEG (so might have been affected by aCropalypse), it must not have a trailer. Then we just need to be able to detect trailers for both formats.

As a first idea we might consider simply checking that the image ends with the correct end-of-image marker, which for JPEG is the byte sequence [0xFF 0xD9] and for PNG is the byte sequence [0x00 0x00 0x00 0x00 0x49 0x45 0x4E 0x44 0xAE 0x42 0x60 0x82]. But this won’t work for images affected by aCropalypse: because the original image was a valid image, the trailer that results from overwriting the start of the file will be the end of a valid image. We also can’t check whether there is more than one end-of-image marker in the file; both formats have chunks of variable-length bytestrings in which the end-of-image marker could appear. We need to do it properly by parsing the image’s structure and checking there is no data after its end.

For JPEGs, we use a Rust wrapper of the library libjpeg-turbo for decoding. Libjpeg-turbo allows fine control of resource usage; for example it allows decompressing and re-compressing a JPEG file a scanline at a time. This flexibility allows us to easily detect trailers using the library’s API: we just have to check that once we have consumed the end-of-image marker all of the input has been consumed. In our proxy we use an in-memory buffer as input, so we can check that there are no bytes left in the buffer:

pub fn consume_eoi_marker(&mut self) -> bool {
    // Try to consume the EOI marker of the image
    unsafe {
        (ffi::jpeg_input_complete(&self.dec.cinfo) == 1) || {
            ffi::jpeg_consume_input(&mut self.dec.cinfo);
            ffi::jpeg_input_complete(&self.dec.cinfo) == 1
        }
    }
}

pub fn has_trailer(&mut self) -> io::Result<bool> {
    if self.consume_eoi_marker() {
        let src = unsafe {
            NonNull::new(self.dec.cinfo.src)
                .ok_or_else(|| {
                    io::Error::new(
                        io::ErrorKind::Other,
                        "source manager not set".to_string()
                    )
                })?
                .as_ref()
        };

        // We have a trailer if we have any bytes left over in the buffer
        Ok(src.bytes_in_buffer != 0)
    } else {
        // We didn't consume the EOI - we can't say if there is a trailer
        Err(io::Error::new(
            io::ErrorKind::Other,
            "EOI not reached".to_string(),
        ))
    }
}

For PNGs, we use the lodepng library. This has a much simpler API surface that decodes an image in one shot when you call lodepng_decode. This doesn’t tell us how many bytes were read or provide an interface to detect if we have a trailer.

Luckily the PNG format has a very consistent and simple internal structure:

  • First the PNG prelude, the byte sequence [0x89, 0x50, 0x4e, 0x47, 0x0d, 0x0a, 0x1a, 0x0a]
  • Then a series of chunks, which each consist of
  1. 4 bytes length as a big-endian integer N
  2. 4 bytes chunk type
  3. N bytes of data (whose meaning depends on the chunk type)
  4. 4 bytes of checksum — CRC-32 of the type and data

The file is terminated by a chunk of type IEND with no data.

As the format is so regular, it’s easy to write a separate parser that just reads the prelude, loops through the chunks until we see IEND, and then checks if we have any bytes left. We can perform this check after decoding the image with lodepng, as this allows us to skip validating the checksums as lodepng has already checked them for us:

const PNG_PRELUDE: &[u8] = &[0x89, 0x50, 0x4e, 0x47, 0x0d, 0x0a, 0x1a, 0x0a];

enum ChunkStatus {
    SeenEnd { has_trailer: bool },
    MoreChunks,
}

fn consume_chunks_until_iend(buf: &[u8]) -> Result<(ChunkStatus, &[u8]), &'static str> {
    let (length_bytes, buf) = consume(buf, 4)?;
    let (chunk_type, buf) = consume(buf, 4)?;

    // Infallible: We've definitely consumed 4 bytes
    let length = u32::from_be_bytes(length_bytes.try_into().unwrap());

    let (_data, buf) = consume(buf, length as usize)?;

    let (_checksum, buf) = consume(buf, 4)?;

    if chunk_type == b"IEND" && buf.is_empty() {
        Ok((ChunkStatus::SeenEnd { has_trailer: false }, buf))
    } else if chunk_type == b"IEND" && !buf.is_empty() {
        Ok((ChunkStatus::SeenEnd { has_trailer: true }, buf))
    } else {
        Ok((ChunkStatus::MoreChunks, buf))
    }
}

pub(crate) fn has_trailer(png_data: &[u8]) -> Result<bool, &'static str> {
    let (magic, mut buf) = consume(png_data, PNG_PRELUDE.len())?;

    if magic != PNG_PRELUDE {
        return Err("expected prelude");
    }

    loop {
        let (status, tmp_buf) = consume_chunks_until_iend(buf)?;
        buf = tmp_buf;
        if let ChunkStatus::SeenEnd { has_trailer } = status {
            return Ok(has_trailer)
        }
    }
}

Conclusion

Customers using Cloudflare Images or Image Resizing products are protected against the aCropalypse vulnerability. The Images team addressed the vulnerability in a way that didn’t require any changes to the original images or cause any increased latency or regressions for customers.

SVG support in Cloudflare Images

Post Syndicated from Paulo Costa original https://blog.cloudflare.com/svg-support-in-cloudflare-images/

SVG support in Cloudflare Images

SVG support in Cloudflare Images

Cloudflare Images was announced one year ago on this very blog to help you solve the problem of delivering images in the right size, right quality and fast. Very fast.

It doesn’t really matter if you only run a personal blog, or a portal with thousands of vendors and millions of end-users. Doesn’t matter if you need one hundred images to be served one thousand times each at most, or if you deal with tens of millions of new, unoptimized, images that you deliver billions of times per month.

We want to remove the complexity of dealing with the need to store, to process, resize, re-encode and serve the images using multiple platforms and vendors.

At the time we wrote:

Images is a single product that stores, resizes, optimizes and serves images. We built Cloudflare Images, so customers of all sizes can build a scalable and affordable image pipeline in minutes.

We supported the most common formats, such as JPG, WebP, PNG and GIF.

We did not feel the need to support SVG files. SVG files are inherently scalable, so there is nothing to resize on the server side before serving them to your audience. One can even argue that SVG files are documents that can generate images through mathematical formulas of vectors and nodes, but are not images per se.

There was also the clear notion that SVG files were a potential risk due to known and well documented vulnerabilities. We knew we could do something from the security angle, but still, why go through that workload if it didn’t make sense in the first place to consider an SVG as a supported format.

Not supporting SVG files, though, did bring a set of challenges to an increasing number of our customers. Some stats already show that around 50% of websites serve SVG files, which matches the pulse we got from talking with many of you, customers and community.

If you relied on SVGs, you had to select a second storage location or a second image platform elsewhere. That commonly resulted in an egress fee when serving an uncached file from that source, and it goes against what we want for our product: one image pipeline to cover all your needs.

We heard loud and clear, and starting from today, you can store and serve SVG files, safely, with Cloudflare Images.
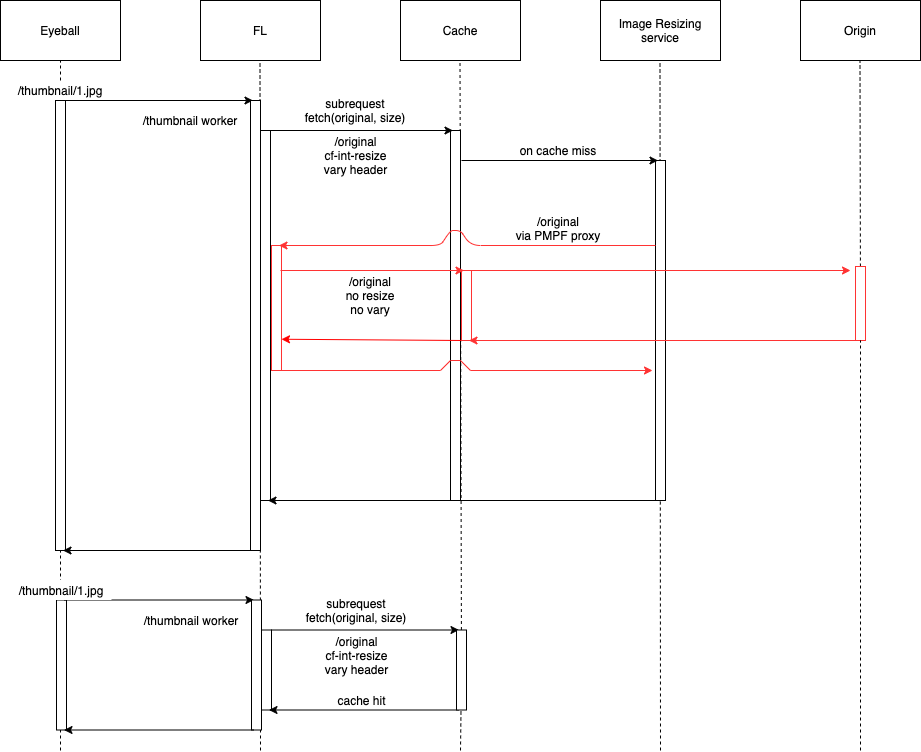
SVG, what is so special about them?

The Scalable Vector Graphics file type is great for serving all kinds of illustrations, charts, logos, and icons.

SVG files don’t represent images as pixels, but as geometric shapes (lines, arcs, polygons) that can be drawn with perfect sharpness at any resolution.

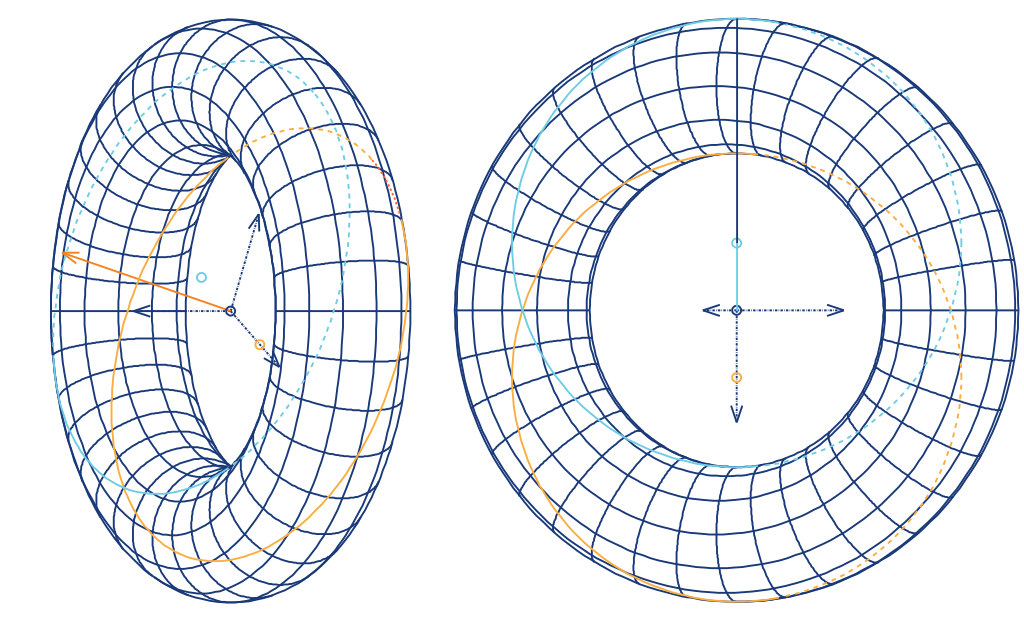
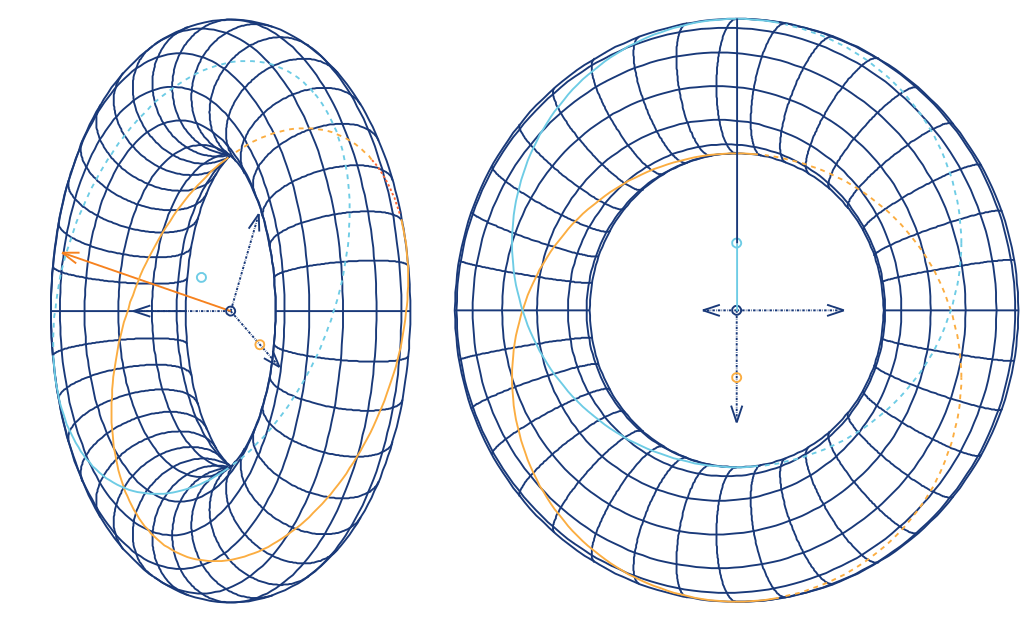
Let’s use now a complex image as an example, filled with more than four hundred paths and ten thousand nodes:

SVG support in Cloudflare Images

Contrary to the bitmaps where pixels arrange together to create the visual perception of an image to the human eye, that vector image can be resized with no quality loss. That happens because resizing that SVG to 300% of its original size is redefining the size of the vectors to 300%, not expanding pixels to 300%.

This becomes evident when we’re dealing with small resolution images.
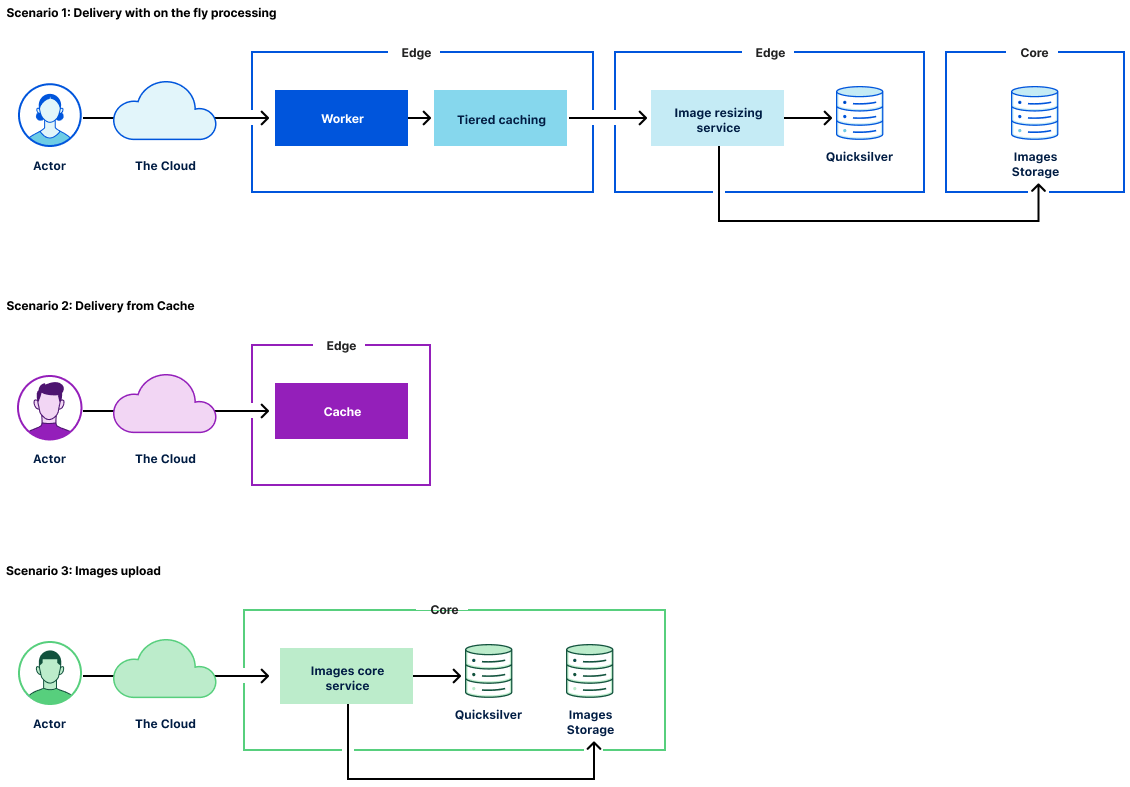
Here is the 100px width SVG from the Toroid shown above:

SVG support in Cloudflare Images

and the correspondent 100 pixels width PNG:

SVG support in Cloudflare Images

Now here is the same SVG with the HTML width attribute set at 300px:

SVG support in Cloudflare Images

and the same PNG you saw before, but, upscaled by 3x, so the width is also 300px:

SVG support in Cloudflare Images

The visual quality loss on the PNG is obvious when it gets scaled up.

Keep in mind: The Toroid shown above is stored in an SVG file of 142Kb. And that is a very complex and heavy SVG file already.

Now, if you do want to display a PNG with an original width of 1024px to present a high quality image of the same Toroid above, the size will become an issue:

SVG support in Cloudflare Images

The new 1024px PNG, however, weighs 344 KB. That’s about 2.4 times the weight of the unique SVG that you could use in any size.

Think about the storage and bandwidth savings when all you need to do with an SVG, to get the exact same displayed image is use a width=”1024” in your HTML. It requires less than half of the kilobytes used on the PNG.

Couple all of this with the flexibility of using attributes like viewbox in your HTML code, and you can pan, zoom, crop, scale, all without ever needing anything other than the one and original SVG file.

Here’s an example of an SVG being resized on the client side, with no visual quality loss:

Let’s do a quick summary of what we covered so far: SVG files are wonderful for vector images like illustrations, charts, logos, and are infinitely scalable with no need to resize on the server side;

the same generated image, but on a bitmap is either heavier than the SVG when used in high resolutions, or with very noticeable loss of visual quality when scaled up from a lower resolution.

So, what are the downsides of using SVG files?

SVG files aren’t just images. They are XML-based documents that are as powerful as HTML pages. They can contain arbitrary JavaScript, fetch external content from other URLs or embed HTML elements. This gives SVG files much more power than expected from a simple image.

Throughout the years, numerous exploits have been known, identified and corrected.

Some old attacks were very rudimentary, yet effective. The famous Billion Laughs exploited how XML uses Entities and declares them in the Document Type Definition, and how it handles recursion.

Entities can be something as simple as a declaration of a text string, or a nested reference to other previous entities.

If you defined a first entity with a simple string, and then created a second entity calling 10 times the first one, and then a third entity calling 10 times the second one up until a 10th one of the same kind, you were requiring a parser to generate an output of a billion strings as defined on the very simple first entity. This would most commonly exhaust resources on the server parsing the XML, and form a DoS. While that particular limitation from the XML parsing got widely addressed through XML parser memory caps and lazy loading of entities, more complex attacks became a regular thing in recent years.

The common themes in these more recent attacks have been XSS (cross-site-scripting) and foreign objects referenced in the XML content. In both cases, using SVG inside <object> tags in your HTML is an invitation for any ill-intended file to reach your end-users. So, what exactly can we do about it and make you trust any SVG file you serve?

The SVG filter

We’ve developed a filter that simplifies SVG files to only features used for images, so that serving SVG images from any source is just as safe as serving a JPEG or PNG, while preserving SVG’s vector graphics capabilities.

  • We remove scripting. This prevents SVG files from being used for cross-site scripting attacks. Although browsers don’t allow scripts in <img>, they would run scripts when SVG files are opened directly as a top-level document.
  • We remove hyperlinks to other documents. This makes SVG files less attractive for SEO spam and phishing.
  • We remove references to cross-origin resources. This stops 3rd parties from tracking who is viewing the image.

What’s left is just an image.

SVG files can also contain embedded images in other formats, like JPEG and PNG, in the form of Data URLs. We treat these embedded images just like other images that we process, and optimize them too. We don’t support SVG files embedded in SVG recursively, though. It does open the door to recursive parsing leading to resource exhaustion on the parser. While the most common browsers are already limiting SVG recursion to one level, the potential to exploit that door led us to not include, at least for now, this capability on our filter.

We do set Content-Security-Policy (CSP) headers in all our HTTP response headers to disable unwanted features, and that alone acts as first defense, but filtering acts in more depth in case these headers are lost (e.g. if the image was saved as a file and served elsewhere).

Our tool is open-source. It’s written in Rust and can filter SVG files in a streaming fashion without buffering, so it’s fast enough for filtering on the fly.

The SVG format is pretty complex, with lots of features. If there is safe SVG functionality that we don’t support yet, you can report issues and contribute to development of the filter.

You can see how the tool actually works by looking at the tests folder in the open-source repository,  where a sample unfiltered XML and the already filtered version are present.

Here’s how a diff of those files looks like:

SVG support in Cloudflare Images

Removed are the external references, foreignObjects and any other potential threats.

How you can use SVG files in Cloudflare Images

Starting now you can upload SVG files to Cloudflare Images and serve them at will. Uploading the images can be done like for any other supported format, via UI or API.

Variants, named or flexible, are intended to transform bitmap (raster) images into whatever size you want to serve them.

SVG files, as vector images, do not require resizing inside the Images pipeline.

This results in a banner with the following message when you’re previewing an SVG in the UI:

SVG support in Cloudflare Images

And as a result, all variants listed will show the exact same image in the exact same dimensions.

Because an image is worth a thousand words, especially when trying to describe behaviors, here is what will it look like if you scroll through the variants preview:

With Cloudflare Images you do get a default Public Variant listed when you start using the product, and so you can immediately start serving your SVG files using it, just like this:

https://imagedelivery.net/<your_account_hash>/<your_SVG_ID>/public

And, as shown from above, you can use any of your variant names to serve the image, as it won’t affect the output at all.

If you’re an Image Resizing customer, you can also benefit from serving your files with our tool. Make sure you head to the Developer Documentation pages to see how.

What’s next?

You can subscribe to Cloudflare Images directly in the dashboard, and starting from today you can use the product to store and serve SVG files.

If you want to contribute to further developments of the filtering too and help expand its abilities, check out our SVG-Hush Tool repo.

You can also connect directly with the team in our Cloudflare Developers Discord Server.

Announcing the Cloudflare Images Sourcing Kit

Post Syndicated from Paulo Costa original https://blog.cloudflare.com/cloudflare-images-sourcing-kit/

Announcing the Cloudflare Images Sourcing Kit

Announcing the Cloudflare Images Sourcing Kit

When we announced Cloudflare Images to the world, we introduced a way to store images within the product and help customers move away from the egress fees met when using remote sources for their deliveries via Cloudflare.

To store the images in Cloudflare, customers can upload them via UI with a simple drag and drop, or via API for scenarios with a high number of objects for which scripting their way through the upload process makes more sense.

To create flexibility on how to import the images, we’ve recently also included the ability to upload via URL or define custom names and paths for your images to allow a simple mapping between customer repositories and the objects in Cloudflare. It’s also possible to serve from a custom hostname to create flexibility on how your end-users see the path, to improve the delivery performance by removing the need to do TLS negotiations or to improve your brand recognition through URL consistency.

Still, there was no simple way to tell our product: “Tens of millions of images are in this repository URL. Go and grab them all from me”.  

In some scenarios, our customers have buckets with millions of images to upload to Cloudflare Images. Their goal is to migrate all objects to Cloudflare through a one-time process, allowing you to drop the external storage altogether.

In another common scenario, different departments in larger companies use independent systems configured with varying storage repositories, all of which they feed at specific times with uneven upload volumes. And it would be best if they could reuse definitions to get all those new Images in Cloudflare to ensure the portfolio is up-to-date while not paying egregious egress fees by serving the public directly from those multiple storage providers.

These situations required the upload process to Cloudflare Images to include logistical coordination and scripting knowledge. Until now.

Announcing the Cloudflare Images Sourcing Kit

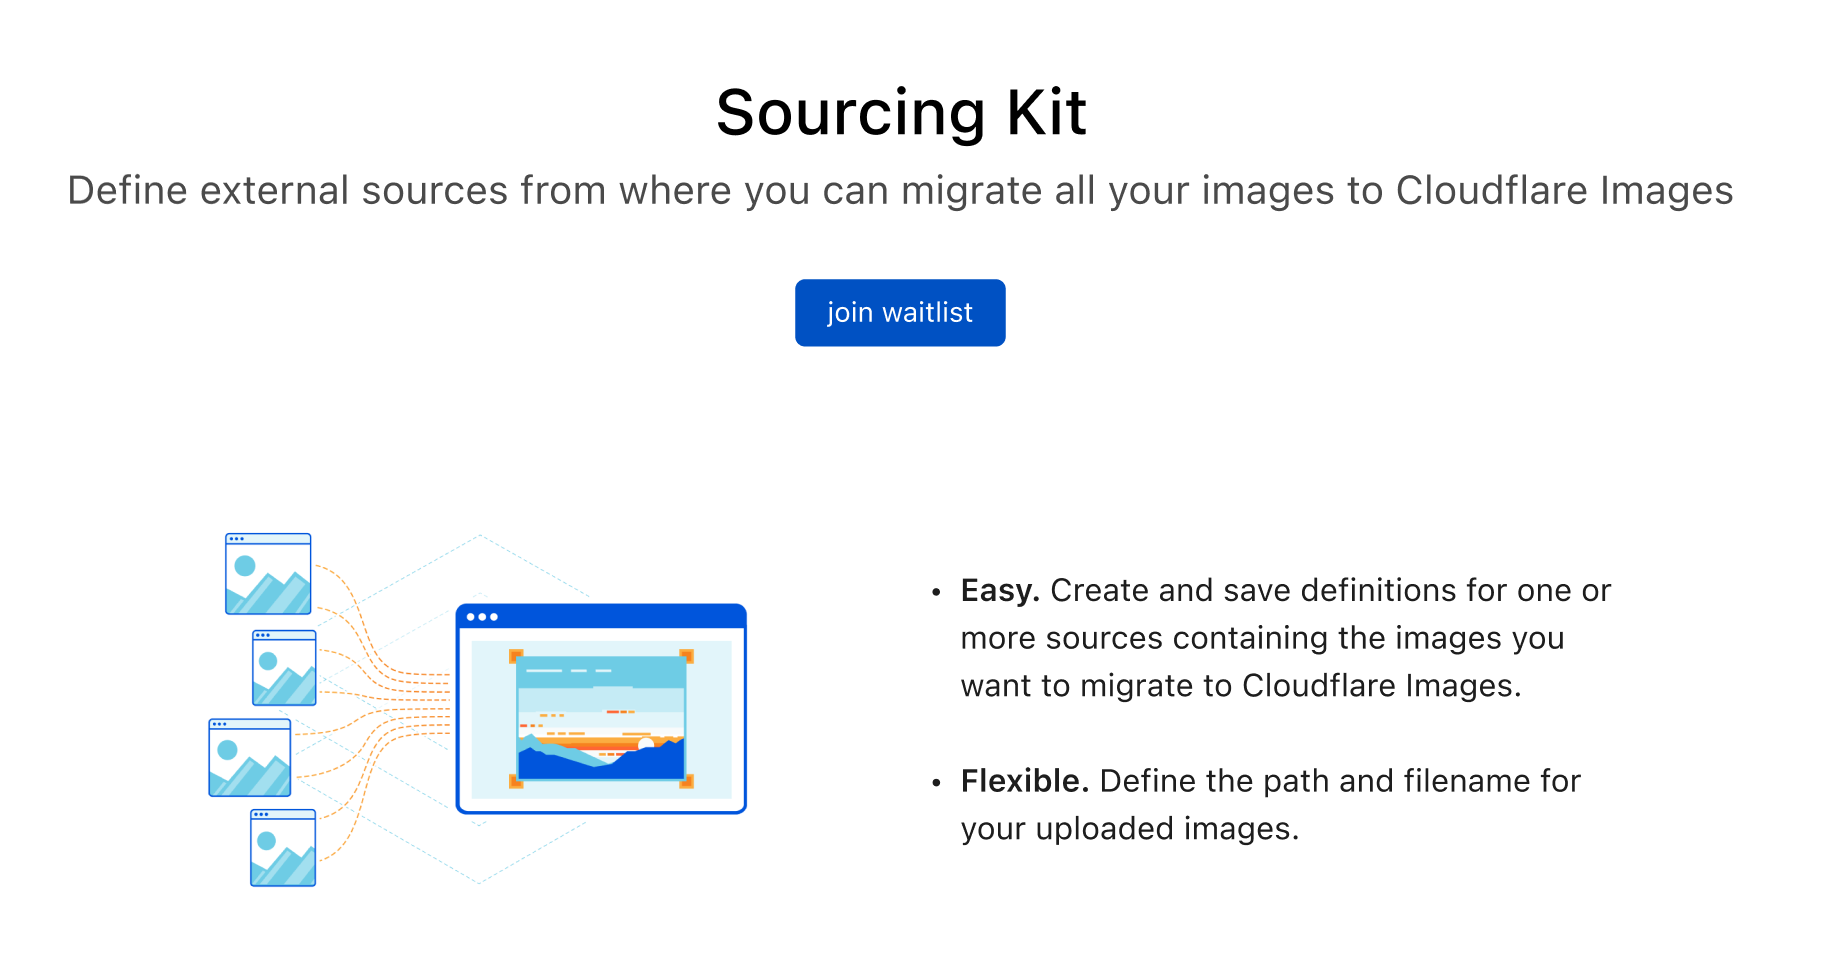
Today, we are happy to share with you our Sourcing Kit, where you can define one or more sources containing the objects you want to migrate to Cloudflare Images.

But, what exactly is Sourcing? In industries like manufacturing, it implies a number of operations, from selecting suppliers, to vetting raw materials and delivering reports to the process owners.

So, we borrowed that definition and translated it into a Cloudflare Images set of capabilities allowing you to:

  1. Define one or multiple repositories of images to bulk import;
  2. Reuse those sources and import only new images;
  3. Make sure that only actual usable images are imported and not other objects or file types that exist in that source;
  4. Define the target path and filename for imported images;
  5. Obtain Logs for the bulk operations;

The new kit does it all. So let’s go through it.

How the Cloudflare Images Sourcing Kit works

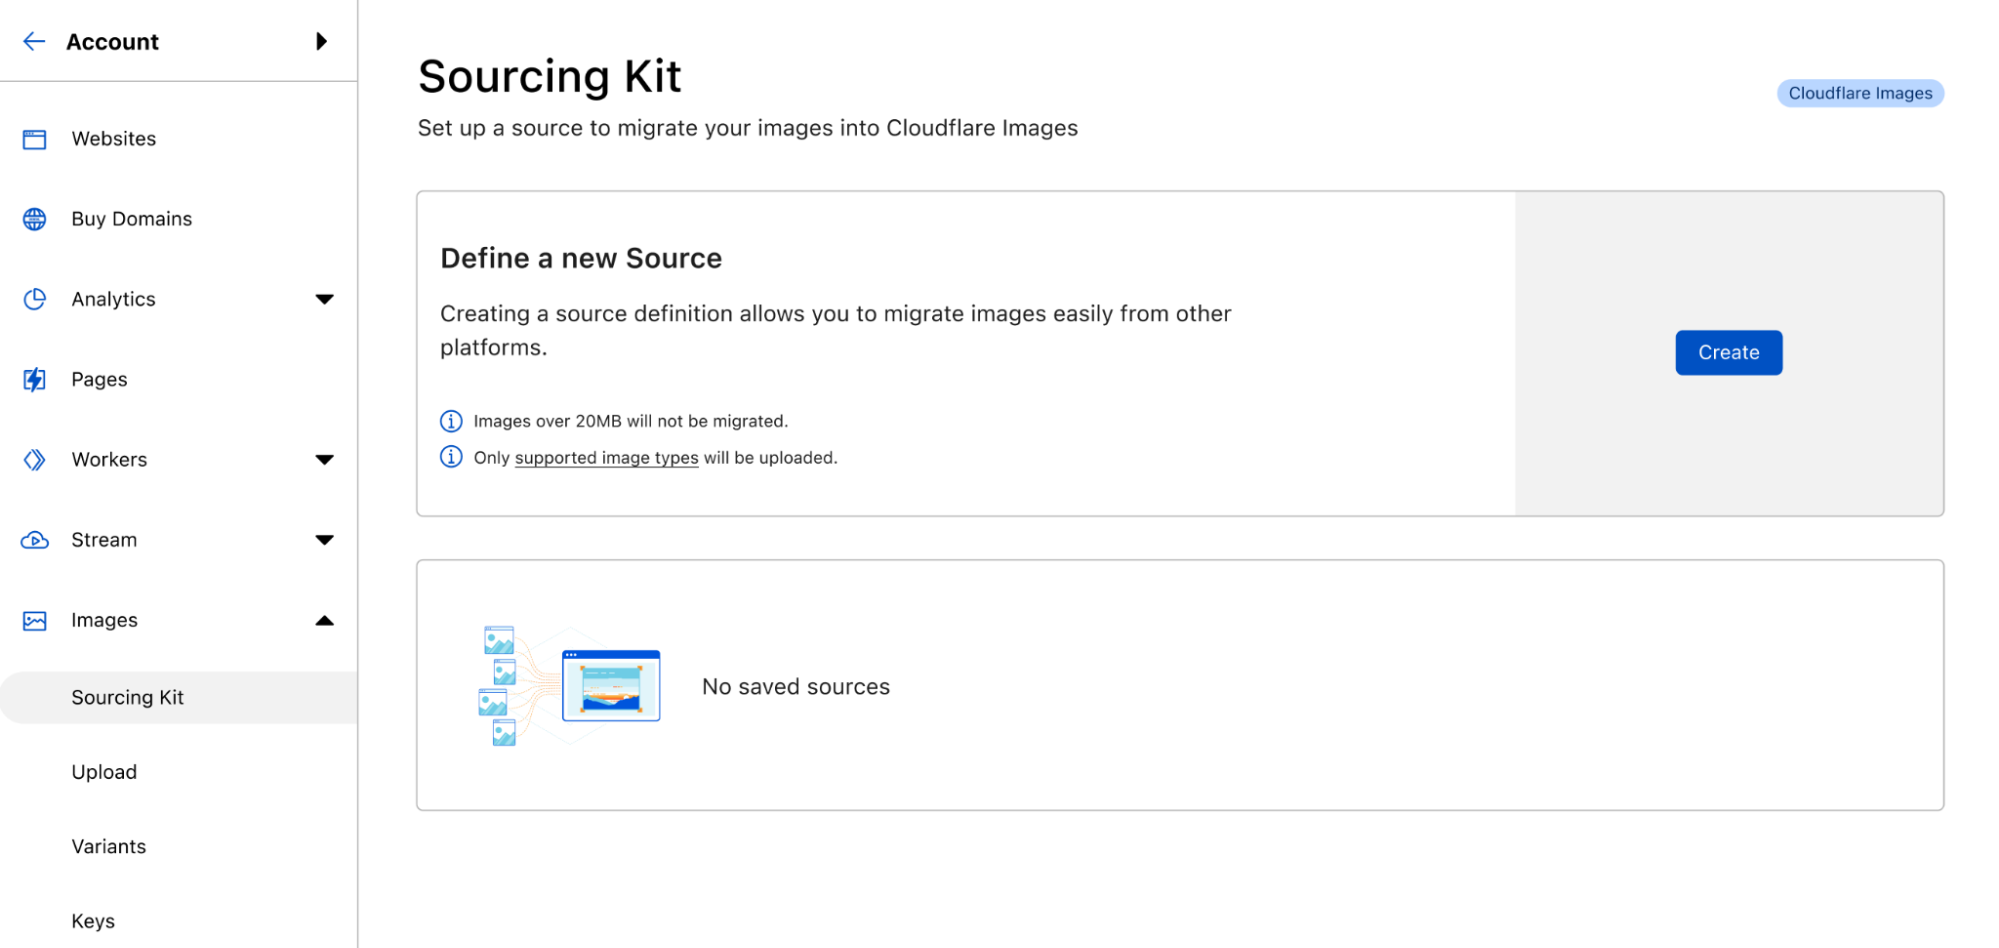
In the Cloudflare Dashboard, you will soon find the Sourcing Kit under Images.

In it, you will be able to create a new source definition, view existing ones, and view the status of the last operations.

Announcing the Cloudflare Images Sourcing Kit

Clicking on the create button will launch the wizard that will guide you through the first bulk import from your defined source:

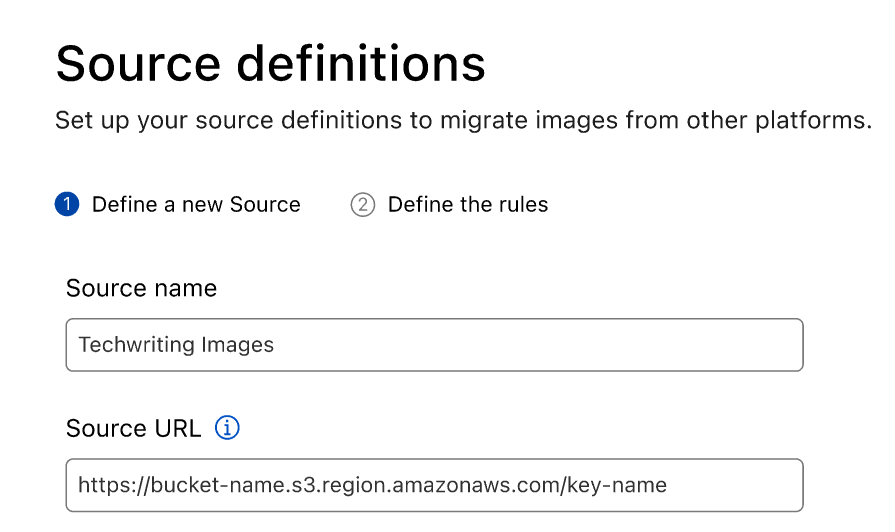
Announcing the Cloudflare Images Sourcing Kit

First, you will need to input the Name of the Source and the URL for accessing it. You’ll be able to save the definitions and reuse the source whenever you wish.
After running the necessary validations, you’ll be able to define the rules for the import process.

The first option you have allows an Optional Prefix Path. Defining a prefix allows a unique identifier for the images uploaded from this particular source, differentiating the ones imported from this source.

Announcing the Cloudflare Images Sourcing Kit

The naming rule in place respects the source image name and path already, so let’s assume there’s a puppy image to be retrieved at:

https://my-bucket.s3.us-west-2.amazonaws.com/folderA/puppy.png

When imported without any Path Prefix, you’ll find the image at

https://imagedelivery.net/<AccountId>/folderA/puppy.png

Now, you might want to create an additional Path Prefix to identify the source, for example by mentioning that this bucket is from the Technical Writing department. In the puppy case, the result would be:

https://imagedelivery.net/<AccountId>/techwriting/folderA/puppy.png

Custom Path prefixes also provide a way to prevent name clashes coming from other sources.

Still, there will be times when customers don’t want to use them. And, when re-using the source to import images, a same path+filename destinations clash might occur.

By default, we don’t overwrite existing images, but we allow you to select that option and refresh your catalog present in the Cloudflare pipeline.

Announcing the Cloudflare Images Sourcing Kit

Once these inputs are defined, a click on the Create and start migration button at the bottom will trigger the upload process.

Announcing the Cloudflare Images Sourcing Kit

This action will show the final wizard screen, where the migration status is displayed. The progress log will report any errors obtained during the upload and is also available to download.

Announcing the Cloudflare Images Sourcing Kit

You can reuse, edit or delete source definitions when no operations are running, and at any point, from the home page of the kit, it’s possible to access the status and return to the ongoing or last migration report.

Announcing the Cloudflare Images Sourcing Kit

What’s next?

With the Beta version of the Cloudflare Images Sourcing Kit, we will allow you to define AWS S3 buckets as a source for the imports. In the following versions, we will enable definitions for other common repositories, such as the ones from Azure Storage Accounts or Google Cloud Storage.

And while we’re aiming for this to be a simple UI, we also plan to make everything available through CLI: from defining the repository URL to starting the upload process and retrieving a final report.

Apply for the Beta version

We will be releasing the Beta version of this kit in the following weeks, allowing you to source your images from third party repositories to Cloudflare.

If you want to be the first to use Sourcing Kit, request to join the waitlist on the Cloudflare Images dashboard.

Announcing the Cloudflare Images Sourcing Kit

Building a full stack application with Cloudflare Pages

Post Syndicated from Greg Brimble original https://blog.cloudflare.com/building-full-stack-with-pages/

Building a full stack application with Cloudflare Pages

Building a full stack application with Cloudflare Pages

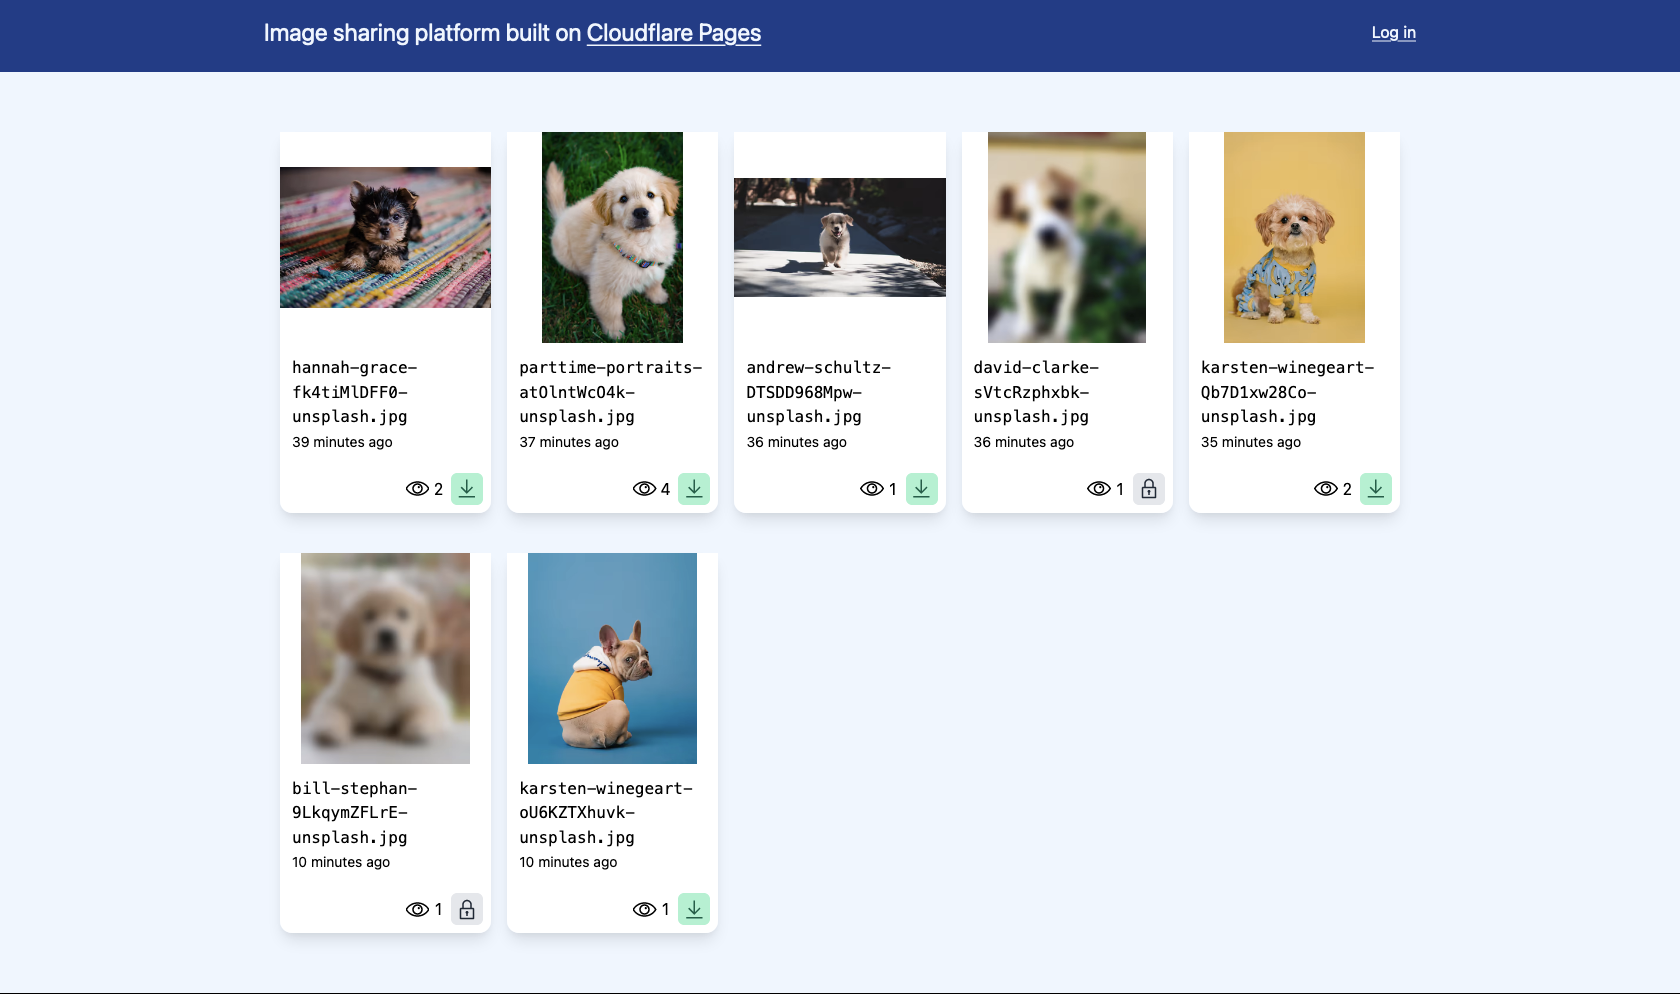
We were so excited to announce support for full stack applications in Cloudflare Pages that we knew we had to show it off in a big way. We’ve built a sample image-sharing platform to demonstrate how you can add serverless functions right from within Pages with help from Cloudflare Workers. With just one new file to your project, you can add dynamic rendering, interact with other APIs, and persist data with KV and Durable Objects. The possibilities for full-stack applications, in combination with Pages’ quick development cycles and unlimited preview environments, gives you the power to create almost any application.

Today, we’re walking through our example image-sharing platform. We want to be able to share pictures with friends while still also keeping some images private. We’ll build a JSON API with Functions (storing data on KV and Durable Objects), integrate with Cloudflare Images and Cloudflare Access, and use React for our front end.

If you’re wanting to dive right into the good stuff, our demo instance is published here, and the code is on GitHub, but stick around for a more gentle approach.

Building a full stack application with Cloudflare Pages

Building serverless functions with Cloudflare Pages

File-based routing

If you’re not already familiar, Cloudflare Pages connects with your git provider (GitHub and GitLab), and automates the deployment of your static site to Cloudflare’s network. Functions lets you enhance these apps by sprinkling in dynamic data. If you haven’t already, you can sign up here.

In our project, let’s create a new function:

// ./functions/time.js


export const onRequest = () => {
  return new Response(new Date().toISOString())
}

git commit-ing and pushing this file should trigger a build and deployment of your first Pages function. Any requests for /time will be served by this function, and all other requests will fall-back to the static assets of your project. Placing Functions files in directories works as you’d expect: ./functions/api/time.js would be available at /api/time and ./functions/some_directory/index.js would be available at /some_directory.

We also support TypeScript (./functions/time.ts would work just the same), as well as parameterized files:

  • ./functions/todos/[id].js with single square brackets will match all requests like /todos/123;
  • and ./functions/todos/[[path]].js with double square brackets, will match requests for any number of path segments (e.g. /todos/123/subtasks).

We declare a PagesFunction type in the @cloudflare/workers-types library which you can use to type-check your Functions.

Dynamic data

So, returning to our image-sharing app, let’s assume we already have some images uploaded, and we want to display them on the homepage. We’ll need an endpoint which will return a list of these images, which the front-end can call:

// ./functions/api/images.ts

export const jsonResponse = (value: any, init: ResponseInit = {}) =>
  new Response(JSON.stringify(value), {
    headers: { "Content-Type": "application/json", ...init.headers },
    ...init,
  });

const generatePreviewURL = ({
  previewURLBase,
  imagesKey,
  isPrivate,
}: {
  previewURLBase: string;
  imagesKey: string;
  isPrivate: boolean;
}) => {
  // If isPrivate, generates a signed URL for the 'preview' variant
  // Else, returns the 'blurred' variant URL which never requires signed URLs
  // https://developers.cloudflare.com/images/cloudflare-images/serve-images/serve-private-images-using-signed-url-tokens

  return "SIGNED_URL";
};

export const onRequestGet: PagesFunction<{
  IMAGES: KVNamespace;
}> = async ({ env }) => {
  const { imagesKey } = (await env.IMAGES.get("setup", "json")) as Setup;

  const kvImagesList = await env.IMAGES.list<ImageMetadata>({
    prefix: `image:uploaded:`,
  });

  const images = kvImagesList.keys
    .map((kvImage) => {
      try {
        const { id, previewURLBase, name, alt, uploaded, isPrivate } =
          kvImage.metadata as ImageMetadata;

        const previewURL = generatePreviewURL({
          previewURLBase,
          imagesKey,
          isPrivate,
        });

        return {
          id,
          previewURL,
          name,
          alt,
          uploaded,
          isPrivate,
        };
      } catch {
        return undefined;
      }
    })
    .filter((image) => image !== undefined);

  return jsonResponse({ images });
};

Eagle-eyed readers will notice we’re exporting onRequestGet which lets us only respond to GET requests.

We’re also using a KV namespace (accessed with env.IMAGES) to store information about images that have been uploaded. To create a binding in your Pages project, navigate to the “Settings” tab.

Building a full stack application with Cloudflare Pages

Interfacing with other APIs

Cloudflare Images is an inexpensive, high-performance, and featureful service for hosting and transforming images. You can create multiple variants to render your images in different ways and control access with signed URLs. We’ll add a function to interface with this service’s API and upload incoming files to Cloudflare Images:

// ./functions/api/admin/upload.ts

export const onRequestPost: PagesFunction<{
  IMAGES: KVNamespace;
}> = async ({ request, env }) => {
  const { apiToken, accountId } = (await env.IMAGES.get(
    "setup",
    "json"
  )) as Setup;

  // Prepare the Cloudflare Images API request body
  const formData = await request.formData();
  formData.set("requireSignedURLs", "true");
  const alt = formData.get("alt") as string;
  formData.delete("alt");
  const isPrivate = formData.get("isPrivate") === "on";
  formData.delete("isPrivate");

  // Upload the image to Cloudflare Images
  const response = await fetch(
    `https://api.cloudflare.com/client/v4/accounts/${accountId}/images/v1`,
    {
      method: "POST",
      body: formData,
      headers: {
        Authorization: `Bearer ${apiToken}`,
      },
    }
  );

  // Store the image metadata in KV
  const {
    result: {
      id,
      filename: name,
      uploaded,
      variants: [url],
    },
  } = await response.json<{
    result: {
      id: string;
      filename: string;
      uploaded: string;
      requireSignedURLs: boolean;
      variants: string[];
    };
  }>();

  const metadata: ImageMetadata = {
    id,
    previewURLBase: url.split("/").slice(0, -1).join("/"),
    name,
    alt,
    uploaded,
    isPrivate,
  };

  await env.IMAGES.put(
    `image:uploaded:${uploaded}`,
    "Values stored in metadata.",
    { metadata }
  );
  await env.IMAGES.put(`image:${id}`, JSON.stringify(metadata));

  return jsonResponse(true);
};

Persisting data

We’re already using KV to store information that is read often but rarely written to. What about features that require a bit more synchronicity?

Let’s add a download counter to each of our images. We can create a highres variant in Cloudflare Images, and increment the counter every time a user requests a link. This requires a bit more setup, but unlocking the power of Durable Objects in your projects is absolutely worth it.

We’ll need to create and publish the Durable Object class capable of maintaining this download count:

// ./durable_objects/downloadCounter.js
ts#example---counter

export class DownloadCounter {
  constructor(state) {
    this.state = state;
    // `blockConcurrencyWhile()` ensures no requests are delivered until initialization completes.
    this.state.blockConcurrencyWhile(async () => {
      let stored = await this.state.storage.get("value");
      this.value = stored || 0;
    });
  }

  async fetch(request) {
    const url = new URL(request.url);
    let currentValue = this.value;

    if (url.pathname === "/increment") {
      currentValue = ++this.value;
      await this.state.storage.put("value", currentValue);
    }

    return jsonResponse(currentValue);
  }
}

Middleware

If you need to execute some code (such as authentication or logging) before you run your function, Pages offers easy-to-use middleware which can be applied at any level in your file-based routing. By creating a _middleware.ts file in a directory, we know to first run this file, and then execute your function when next() is called.

In our application, we want to prevent unauthorized users from uploading images (/api/admin/upload) or deleting images (/api/admin/delete). Cloudflare Access lets us apply role-based access control to all or part of our application, and you only need a single file to integrate it into our serverless functions. We create  ./functions/api/admin/_middleware.ts which will apply to all incoming requests at /api/admin/*:

// ./functions/api/admin/_middleware.ts

const validateJWT = async (jwtAssertion: string | null, aud: string) => {
  // If the JWT is valid, return the JWT payload
  // Else, return false
  // https://developers.cloudflare.com/cloudflare-one/identity/users/validating-json

  return jwtPayload;
};

const cloudflareAccessMiddleware: PagesFunction<{ IMAGES: KVNamespace }> =
  async ({ request, env, next, data }) => {
    const { aud } = (await env.IMAGES.get("setup", "json")) as Setup;

    const jwtPayload = await validateJWT(
      request.headers.get("CF-Access-JWT-Assertion"),
      aud
    );

    if (jwtPayload === false)
      return new Response("Access denied.", { status: 403 });

    // We could also use the data object to pass information between middlewares
    data.user = jwtPayload.email;

    return await next();
  };

export const onRequest = [cloudflareAccessMiddleware];

Middleware is a powerful tool at your disposal allowing you to easily protect parts of your application with Cloudflare Access, or quickly integrate with observability and error logging platforms such as Honeycomb and Sentry.

Integrating as Jamstack

The “Jam” of “Jamstack” stands for JavaScript, API and Markup. Cloudflare Pages previously provided the ‘J’ and ‘M’, and with Workers in the middle, you can truly go full-stack Jamstack.

We’ve built the front end of this image sharing platform with Create React App as an approachable example, but Cloudflare Pages natively integrates with an ever-growing number of frameworks (currently 23), and you can always configure your own entirely custom build command.

Your front end simply needs to make a call to the Functions we’ve already configured, and render out that data. We’re using SWR to simplify things, but you could do this with entirely vanilla JavaScript fetch-es, if that’s your preference.

// ./src/components/ImageGrid.tsx

export const ImageGrid = () => {
  const { data, error } = useSWR<{ images: Image[] }>("/api/images");

  if (error || data === undefined) {
    return <div>An unexpected error has occurred when fetching the list of images. Please try again.</div>;
  }


  return (
    <div>
      {data.images.map((image) => (
        <ImageCard image={image} key={image.id} />
      ))}
    </div>
  );

}

Local development

No matter how fast it is, iterating on a project like this can be painful if you have to push up every change in order to test how it works. We’ve released a first-class integration with wrangler for local development of Pages projects, including full support for Functions, Workers, secrets, environment variables and KV. Durable Objects support is coming soon.

Install from npm:

npm install wrangler@beta

and either serve a folder of static assets, or proxy your existing tooling:

# Serve a directory
npx wrangler pages dev ./public

# or integrate with your other tools
npx wrangler pages dev -- npx react-scripts start

Go forth, and build!

If you like puppies, we’ve deployed our image-sharing application here, and if you like code, that’s over on GitHub. Feel free to fork and deploy it yourself! There’s a five-minute setup wizard, and you’ll need Cloudflare Images, Access, Workers, and Durable Objects.

We are so excited about the future of the Pages platform, and we want to hear what you’re building! Show off your full-stack applications in the #what-i-built channel, or get assistance in the #pages-help channel on our Discord server.

Building a full stack application with Cloudflare Pages

Optimizing images on the web

Post Syndicated from Greg Brimble original https://blog.cloudflare.com/optimizing-images/

Optimizing images on the web

Optimizing images on the web

Images are a massive part of the Internet. On the median web page, images account for 51% of the bytes loaded, so any improvement made to their speed or their size has a significant impact on performance.

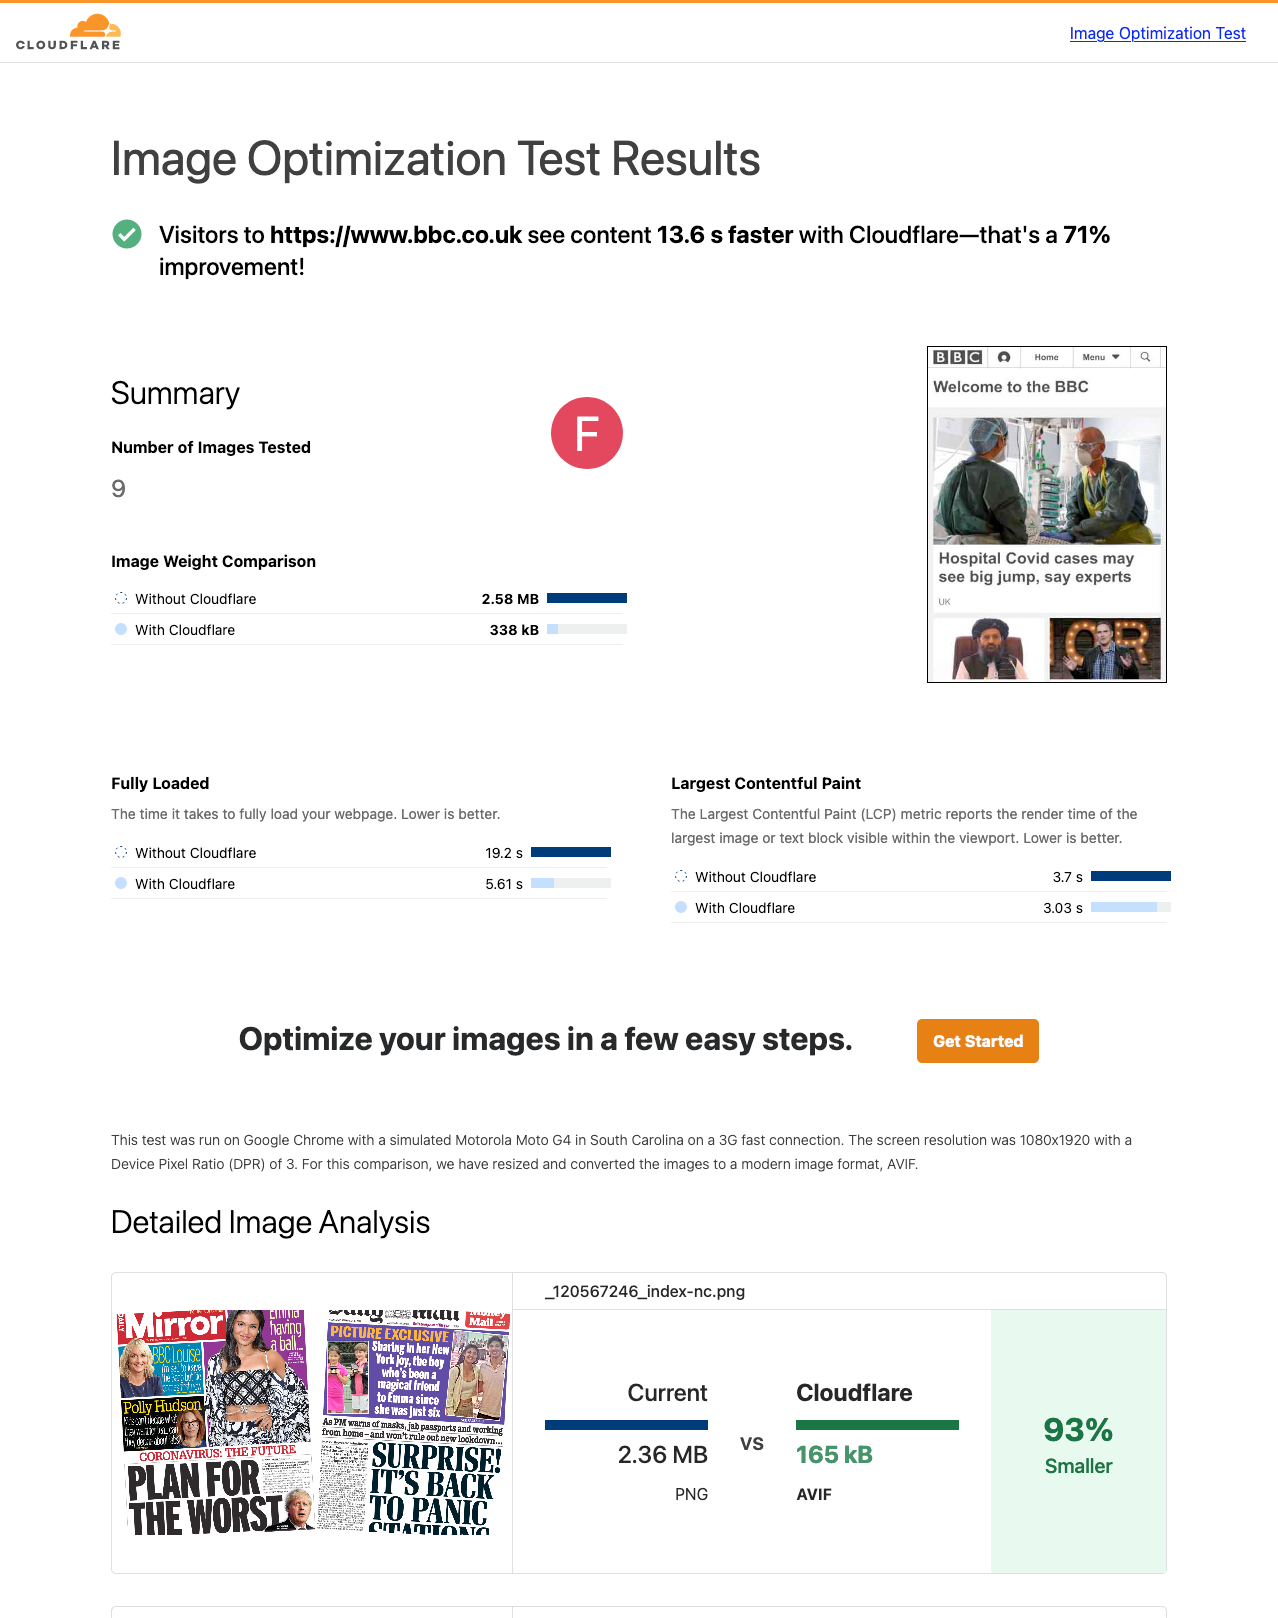
Today, we are excited to announce Cloudflare’s Image Optimization Testing Tool. Simply enter your website’s URL, and we’ll run a series of automated tests to determine if there are any possible improvements you could make in delivering optimal images to visitors.

Optimizing images on the web

How users experience speed

Everyone who has ever browsed the web has experienced a website that was slow to load. Often, this is a result of poorly optimized images on that webpage that are either too large for purpose or that were embedded on the page with insufficient information.

Images on a page might take painfully long to load as pixels agonizingly fill in from top-to-bottom; or worse still, they might cause massive shifts of the page layout as the browser learns about their dimensions. These problems are a serious annoyance to users and as of August 2021, search engines punish pages accordingly.

Understandably, slow page loads have an adverse effect on a page’s “bounce rate” which is the percentage of visitors which quickly move off of the page. On e-commerce sites in particular, the bounce rate typically has a direct monetary impact and pages are usually very image-heavy. It is critically important to optimize all the images on your webpages to reduce load on and egress from your origin, to improve your performance in search engine rankings and, ultimately, to provide a great experience for your users.

Measuring speed

Since the end of August 2021, Google has used the Core Web Vitals to quantify page performance when considering search results rankings. These metrics are three numbers: Largest Contentful Paint (LCP), First Input Delay (FID), and Cumulative Layout Shift (CLS). They approximate the experience of loading, interactivity and visual stability respectively.

CLS and LCP are the two metrics we can improve by optimizing images. When CLS is high, this indicates that large amounts of the page layout is shifting as it loads. LCP measures the time it takes for the single largest image or text block in the viewport to render.

These can both be measured “in the field” with Real User Monitoring (RUM) analytics such as Cloudflare’s Web Analytics, or in a “lab environment” using Cloudflare’s Image Optimization Testing Tool.

How to optimize for speed

Dimensions

One of the most impactful performance improvements a website author can make is ensuring they deliver images with appropriate dimensions. Images taken on a modern camera can be truly massive, and some recent flagship phones have gigantic sensors. The Samsung Galaxy S21 Ultra, for example, has a 108 MP sensor which captures a 12,000 by 9,000 pixel image. That same phone has a screen width of only 1440 pixels. It is physically impossible to show every pixel of the photo on that device: for a landscape photo, only 12% of pixel columns can be displayed.

Embedding this image on a webpage presents the same problem, but this time, that image and all of its unused pixels are sent over the Internet. Ultimately, this creates unnecessary load on the server, higher egress costs, and longer loading times for visitors.. This is exacerbated even further for visitors on mobile since they are often using a slower connection and have limits on their data usage. On a fast 3G connection, that 108 MP photo might consume 26 MB of both the visitor’s data plan and the website’s egress bandwidth, and take more than two minutes to load!

It might be tempting to always deliver images with the highest possible resolution to avoid “blocky” or pixelated images, but when resizing is done correctly, this is not a problem. “Blocky” artifacts typically occur when an image is processed multiple times (for example, an image is repeatedly uploaded and downloaded by users on a platform which compresses that image). Pixelated images occur when an image has been shrunk to a size smaller than the screen it is rendered on.

So, how can website authors avoid these pitfalls and ensure a correctly sized image is delivered to visitors’ devices? There are two main approaches:

  • Media conditions with srcset and sizes

When embedding an image on a webpage, traditionally the author would simply pass a src attribute on an img tag:

<img src="hello_world_12000.jpg" alt="Hello, world!" />

Since 2017, all modern browsers have supported the more dynamic srcset attribute. This allows authors to set multiple image sources, depending on the matching media condition of the visitor’s browser:

<img srcset="hello_world_1500.jpg 1500w,
             hello_world_2000.jpg 2000w,
             hello_world_12000.jpg 12000w"
     sizes="(max-width: 1500px) 1500px,
            (max-width: 2000px) 2000px,
            12000px"
     src="hello_world_12000.jpg"
     alt="Hello, world!" />

Here, with the srcset attribute, we’re informing the browser that there are three variants of the image, each with a different intrinsic width: 1,500 pixels, 2,000 pixels and the original 12,000 pixels. The browser then evaluates the media conditions in the sizes attribute ( (max-width: 1500px) and (max-width: 2000px)) in order to select the appropriate image variant from the srcset attribute. If the browser’s viewport width is less than 1500px, the hello_world_1500.jpg image variant will be loaded; if the browser’s viewport width is between 1500px and 2000px, the hello_world_2000.jpg image variant will be loaded; and finally, if the browser’s viewport width is larger than 2000px, the browser will fallback to loading the hello_world_12000.jpg image variant.

Similar behavior is also possible with a picture element, using the source child element which supports a variety of other selectors.

  • Client Hints

Client Hints are a standard that some browsers are choosing to implement, and some not. They are a set of HTTP request headers which tell the server about the client’s device. For example, the browser can attach a Viewport-Width header when requesting an image which informs the server of the width of that particular browser’s viewport (note this header is currently in the process of being renamed to Sec-CH-Viewport-Width).

This simplifies the markup in the previous example greatly — in fact, no changes are required from the original simple HTML:

<img src="hello_world_12000.jpg" alt="Hello, world!" />

If Client Hints are supported, when the browser makes a request for hello_world_12000.jpg, it might attach the following header:

Viewport-Width: 1440

The server could then automatically serve a smaller image variant (e.g. hello_world_1500.jpg), despite the request originally asking for hello_world_12000.jpg image.

By enabling browsers to request an image with appropriate dimensions, we save bandwidth and time for both your server and for your visitors.

Format

JPEG, PNG, GIF, WebP, and now, AVIF. AVIF is the latest image format with widespread industry support, and it often outperforms its preceding formats. AVIF supports transparency with an alpha channel, it supports animations, and it is typically 50% smaller than comparable JPEGs (vs. WebP’s reduction of only 30%).

We added the AVIF format to Cloudflare’s Image Resizing product last year as soon as Google Chrome added support. Firefox 93 (scheduled for release on October 5, 2021) will be Firefox’s first stable release, and with both Microsoft and Apple as members of AVIF’s Alliance for Open Media, we hope to see support in Edge and Safari soon. Before these modern formats, we also saw innovative approaches to improving how an image loads on a webpage. BlurHash is a technique of embedding a very small representation of the image inside the HTML markup which can be immediately rendered and acts as a placeholder until the final image loads. This small representation (hash) produced a blurry mix of colors similar to that of the final image and so eased the loading experience for users.

Progressive JPEGs are similar in effect, but are a built-in feature of the image format itself. Instead of encoding the image bytes from top-to-bottom, bytes are ordered in increasing levels of image detail. This again produces a more subtle loading experience, where the user first sees a low quality image which progressively “enhances” as more bytes are loaded.

Optimizing images on the web

Quality

The newer image formats (WebP and AVIF) support lossless compression, unlike their predecessor, JPEG. For some uses, lossless compression might be appropriate, but for the majority of websites, speed is prioritized and this minor loss in quality is worth the time and bytes saved.

Optimizing where to set the quality is a balancing act: too aggressive and artifacts become visible on your image; too little and the image is unnecessarily large. Butteraugli and SSIM are examples of algorithms which approximate our perception of image quality, but this is currently difficult to automate and is therefore best set manually. In general, however, we find that around 85% in most compression libraries is a sensible default.

Markup

All of the previous techniques reduce the number of bytes an image uses. This is great for improving the loading speed of those images and the Largest Contentful Paint (LCP) metric. However, to improve the Cumulative Layout Shift (CLS) metric, we must minimize changes to the page layout. This can be done by informing the browser of the image size ahead of time.

On a poorly optimized webpage, images will be embedded without their dimensions in the markup. The browser fetches those images, and only once it has received the header bytes of the image can it know about the dimensions of that image. The effect is that the browser first renders the page where the image takes up zero pixels, and then suddenly redraws with the dimensions of that image before actually loading the image pixels themselves. This is jarring to users and has a serious impact on usability.

It is important to include dimensions of the image inside HTML markup to allow the browser to allocate space for that image before it even begins loading. This prevents unnecessary redraws and reduces layout shift. It is even possible to set dimensions when dynamically loading responsive images: by informing the browser of the height and width of the original image, assuming the aspect ratio is constant, it will automatically calculate the correct height, even when using a width selector.

<img height="9000"
     width="12000"
     srcset="hello_world_1500.jpg 1500w,
             hello_world_2000.jpg 2000w,
             hello_world_12000.jpg 12000w"
     sizes="(max-width: 1500px) 1500px,
            (max-width: 2000px) 2000px,
            12000px"
     src="hello_world_12000.jpg"
     alt="Hello, world!" />

Finally, lazy-loading is a technique which reduces the work that the browser has to perform right at the onset of page loading. By deferring image loads to only just before they’re needed, the browser can prioritize more critical assets such as fonts, styles and JavaScript. By setting the loading property on an image to lazy, you instruct the browser to only load the image as it enters the viewport. For example, on an e-commerce site which renders a grid of products, this would mean that the page loads faster for visitors, and seamlessly fetches images below the fold, as a user scrolls down. This is supported by all major browsers except Safari which currently has this feature hidden behind an experimental flag.

<img loading="lazy" … />

Hosting

Finally, you can improve image loading by hosting all of a page’s images together on the same first-party domain. If each image was hosted on a different domain, the browser would have to perform a DNS lookup, create a TCP connection and perform the TLS handshake for every single image. When they are all co-located on a single domain (especially so if that is the same domain as the page itself), the browser can re-use the connection which improves the speed it can load those images.

Test your website

Today, we’re excited to announce the launch of Cloudflare’s Image Optimization Testing Tool. Simply enter your website URL, and we’ll run a series of automated tests to determine if there are any possible improvements you could make in delivering optimal images to visitors.

We use WebPageTest and Lighthouse to calculate the Core Web Vitals on two versions of your page: one as the original, and one with Cloudflare’s best-effort automatic optimizations. These optimizations are performed using a Cloudflare Worker in combination with our Image Resizing product, and will transform an image’s format, quality, and dimensions.

We report key summary metrics about your webpage’s performance, including the aforementioned Cumulative Layout Shift (CLS) and Largest Contentful Page (LCP), as well as a detailed breakdown of each image on your page and the optimizations that can be made.

Cloudflare Images

Cloudflare Images can help you to solve a number of the problems outlined in this post. By storing your images with Cloudflare and configuring a set of variants, we can deliver optimized images from our edge to your website or app. We automatically set the optimal image format and allow you to customize the dimensions and fit for your use-cases.

We’re excited to see what you build with Cloudflare Images, and you can expect additional features and integrations in the near future. Get started with Images today from $6/month.

Building Cloudflare Images in Rust and Cloudflare Workers

Post Syndicated from Yevgen Safronov original https://blog.cloudflare.com/building-cloudflare-images-in-rust-and-cloudflare-workers/

Building Cloudflare Images in Rust and Cloudflare Workers

Building Cloudflare Images in Rust and Cloudflare Workers

This post explains how we implemented the Cloudflare Images product with reusable Rust libraries and Cloudflare Workers. It covers the technical design of Cloudflare Image Resizing and Cloudflare Images. Using Rust and Cloudflare Workers helps us quickly iterate and deliver product improvements over the coming weeks and months.

Reuse of code in Rusty image projects

We developed Image Resizing in Rust. It’s a web server that receives HTTP requests for images along with resizing options, fetches the full-size images from the origin, applies resizing and other image processing operations, compresses, and returns the HTTP response with the optimized image.

Rust makes it easy to split projects into libraries (called crates). The image processing and compression parts of Image Resizing are usable as libraries.

We also have a product called  Polish, which is a Golang-based service that recompresses images in our cache. Polish was initially designed to run command-line programs like jpegtran and pngcrush. We took the core of Image Resizing and wrapped it in a command-line executable. This way, when Polish needs to apply lossy compression or generate WebP images or animations, it can use Image Resizing via a command-line tool instead of a third-party tool.

Reusing libraries has allowed us to easily unify processing between Image Resizing and Polish (for example, to ensure that both handle metadata and color profiles in the same way).

Cloudflare Images is another product we’ve built in Rust. It added support for a custom storage back-end, variants (size presets), support for signing URLs and more. We made it as a collection of Rust crates, so we can reuse pieces of it in other services running anywhere in our network. Image Resizing provides image processing for Cloudflare Images and shares libraries with Images to understand the new URL scheme, access the storage back-end, and database for variants.

How Image Resizing works

Building Cloudflare Images in Rust and Cloudflare Workers

The Image Resizing service runs at the edge and is deployed on every server of the Cloudflare global network. Thanks to Cloudflare’s global Anycast network, the closest Cloudflare data center will handle eyeball image resizing requests. Image Resizing is tightly integrated with the Cloudflare cache and handles eyeball requests only on a cache miss.

There are two ways to use Image Resizing. The default URL scheme provides an easy, declarative way of specifying image dimensions and other options. The other way is to use a JavaScript API in a Worker. Cloudflare Workers give powerful programmatic control over every image resizing request.

How Cloudflare Images work

Building Cloudflare Images in Rust and Cloudflare Workers

Cloudflare Images consists of the following components:

  • The Images core service that powers the public API to manage images assets.
  • The Image Resizing service responsible for image transformations and caching.
  • The Image delivery Cloudflare Worker responsible for serving images and passing corresponding parameters through to the Imaging Resizing service.
  • Image storage that provides access and storage for original image assets.

To support Cloudflare Images scenarios for image transformations, we made several changes to the Image Resizing service:

  • Added access to Cloudflare storage with original image assets.
  • Added access to variant definitions (size presets).
  • Added support for signing URLs.

Image delivery

The primary use case for Cloudflare Images is to provide a simple and easy-to-use way of managing images assets. To cover egress costs, we provide image delivery through the Cloudflare managed imagedelivery.net domain. It is configured with Tiered Caching to maximize the cache hit ratio for image assets. imagedelivery.net provides image hosting without a need to configure a custom domain to proxy through Cloudflare.

A Cloudflare Worker powers image delivery. It parses image URLs and passes the corresponding parameters to the image resizing service.

How we store Cloudflare Images

There are several places we store information on Cloudflare Images:

  • image metadata in Cloudflare’s core data centers
  • variant definitions in Cloudflare’s edge data centers
  • original images in core data centers
  • optimized images in Cloudflare cache, physically close to eyeballs.

Image variant definitions are stored and delivered to the edge using Cloudflare’s distributed key-value store called Quicksilver. We use a single source of truth for variants. The Images core service makes calls to Quicksilver to read and update variant definitions.

The rest of the information about the image is stored in the image URL itself:
https://imagedelivery.net/<encoded account id>/<image id>/<variant name>

<image id> contains a flag, whether it’s publicly available or requires access verification. It’s not feasible to store any image metadata in Quicksilver as the data volume would increase linearly with the number of images we host. Instead, we only allow a finite number of variants per account, so we responsibly utilize available disk space on the edge. The downside of storing image metadata as part of <image id> is that <image id> will change on access change.

How we keep Cloudflare Images up to date

The only way to access images is through the use of variants. Each variant is a named image resizing configuration. Once the image asset is fetched, we cache the transformed image in the Cloudflare cache. The critical question is how we keep processed images up to date. The answer is by purging the Cloudflare cache when necessary. There are two use cases:

  • access to the image is changed
  • the variant definition is updated

In the first instance, we purge the cache by calling a URL:
https://imagedelivery.net/<encoded account id>/<image id>

Then, the customer updates the variant we issue a cache purge request by tag:
account-id/variant-name

To support cache purge by tag, the image resizing service adds the necessary tags for all transformed images.

How we restrict access to Cloudflare Images

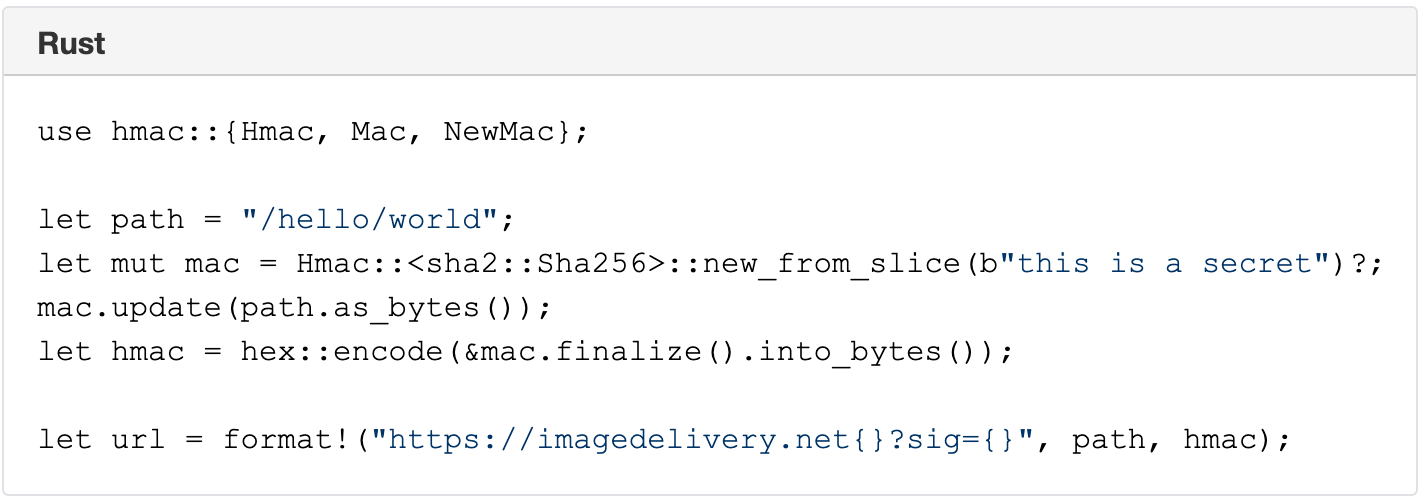
The Image resizing service supports restricted access to images by using URL signatures with expiration. URLs are signed with an SHA-256 HMAC key. The steps to produce valid signatures are:

  1. Take the path and query string (the path starts with /).
  2. Compute the path’s SHA-256 HMAC with the query string, using the Images’ URL signing key as the secret. The key is configured in the Dashboard.
  3. If the URL is meant to expire, compute the Unix timestamp (number of seconds since 1970) of the expiration time, and append ?exp= and the timestamp as an integer to the URL.
  4. Append ? or & to the URL as appropriate (? if it had no query string; & if it had a query string).
  5. Append sig= and the HMAC as hex-encoded 64 characters.

A signed URL looks like this:

Building Cloudflare Images in Rust and Cloudflare Workers

A signed URL with an expiration timestamp looks like this:

Building Cloudflare Images in Rust and Cloudflare Workers

Signature of /hello/world URL with a secret ‘this is a secret’ is 6293f9144b4e9adc83416d1b059abcac750bf05b2c5c99ea72fd47cc9c2ace34.

https://imagedelivery.net/hello/world?sig=6293f9144b4e9adc83416d1b059abcac750bf05b2c5c99ea72fd47cc9c2ace34

Building Cloudflare Images in Rust and Cloudflare Workers

Direct creator uploads with Cloudflare Worker and KV

Similar to Cloudflare Stream, Images supports direct creator uploads. That allow users to upload images without API tokens. Everyday use of direct creator uploads is by web apps, client-side applications, or mobile apps where users upload content directly to Cloudflare Images.

Once again, we used our serverless platform to support direct creator uploads. The successful API call stores the account’s information in Workers KV with the specified expiration date. A simple Cloudflare Worker handles the upload URL, which reads the KV value and grants upload access only on a successful call to KV.

Future Work

Cloudflare Images product has an exciting product roadmap. Let’s review what’s possible with the current architecture of Cloudflare Images.

Resizing hints on upload

At the moment, no image transformations happen on upload. That means we can serve the image globally once it is uploaded to Image storage. We are considering adding resizing hints on image upload. That won’t necessarily schedule image processing in all cases but could provide a valuable signal to resize the most critical image variants. An example could be to generate an AVIF variant for the most vital image assets.

Serving images from custom domains

We think serving images from a domain we manage (with Tiered Caching) is a great default option for many customers. The downside is that loading Cloudflare images requires additional TLS negotiations on the client-side, adding latency and impacting loading performance. On the other hand, serving Cloudflare Images from custom domains will be a viable option for customers who set up a website through Cloudflare. The good news is that we can support such functionality with the current architecture without radical changes in the architecture.

Conclusion

The Cloudflare Images product runs on top of the Cloudflare global network. We built Cloudflare Images in Rust and Cloudflare Workers. This way, we use Rust reusable libraries in several products such as Cloudflare Images, Image Resizing, and Polish. Cloudflare’s serverless platform is an indispensable tool to build Cloudflare products internally. If you are interested in building innovative products in Rust and Cloudflare Workers, we’re hiring.

How Cloudflare Images can make your life easier

Post Syndicated from Rita Soares original https://blog.cloudflare.com/how-cloudflare-images-can-make-your-life-easier/

How Cloudflare Images can make your life easier

How Cloudflare Images can make your life easier

Imagine how a customer would feel if they get to your website, and it takes forever to load all the images you serve. This would become a negative user experience that might lead to lower overall site traffic and high bounce rates.

The good news is that regardless of whether you need to store and serve 100,000 or one million images, Cloudflare Images gives you the tools you need to build an entire image pipeline from scratch.

Customer pains

After speaking with many of Cloudflare customers, we quickly understood that whether you are an e-commerce retailer, a blogger or have a platform for creators, everyone shares the same problems:

  • Egress fees. Each time an image needs to go from Product A (storage) to Product B (optimize) and to Product C (delivery) there’s a fee. If you multiply this by the millions of images clients serve per day it’s easy to understand why their bills are so high.
  • Buckets everywhere. Our customers’ current pipelines involve uploading images to and from services like AWS, then using open source products to optimize images, and finally to serve the images they need to store them in another cloud bucket since CDN don’t have long-term storage. This means that there is a dependency on buckets at each step of the pipeline.
  • Load times. When an image is not correctly optimized the image can be much larger than needed resulting in an unnecessarily long download time. This can lead to a bad end user experience that might result in loss of overall site traffic.
  • High Maintenance. To maintain an image pipeline companies need to rely on several AWS and open source products, plus an engineering team to build and maintain that pipeline. This takes the focus away from engineering on the product itself.

How can Cloudflare Images help?  

Zero Egress Costs

The majority of cloud providers allow you to store images for a small price, but the bill starts to grow every time you need to retrieve that image to optimize and deliver. The good news is that with Cloudflare Images customers don’t need to worry about egress costs, since all storage, optimization and delivery are part of the same tool.

The buckets stop with Cloudflare Images

One small step for humankind, one giant leap for image enthusiasts!

With Cloudflare Images the bucket pain stops now, and customers have two options:

  1. One image upload can generate up to 100 variants, which allows developers to stop placing image sizes in URLs. This way, if a site gets redesigned there isn’t a need to change all the image sizes because you already have all the variants you need stored in Cloudflare Images.
  2. Give your users a one-time permission to upload one file to your server. This way developers don’t need to write additional code to move files from users into a bucket — they will be automatically uploaded into your Cloudflare storage.

Minimal engineering effort

Have you ever dreamed about your team focusing entirely on product development instead of maintaining infrastructure? We understand, and this is why we created a straightforward set of APIs as well as a UI in the Cloudflare Dashboard. This allows your team to serve and optimize images without the need to set up and maintain a pipeline from scratch.

Once you get access to Cloudflare Images your team can start:

  • Uploading, deleting and updating images via API.
  • Setting up preferred variants.
  • Editing with Image Resizing both with the UI and API.
  • Serving an image with one click.

Process images on the fly

We all know that Google and many other search engines use the loading speed as one of their ranking factors; Cloudflare Images helps you be on the top of that list. We automatically detect what browser your clients are using and serve the most optimized version of the image, so that you don’t need to worry about file extensions, configuring origins for your image sets or even cache hit rates.

Curious to have a sneak peek at Cloudflare Images? Sign up now!

Vary for Images: Serve the Correct Images to the Correct Browsers

Post Syndicated from Alex Krivit original https://blog.cloudflare.com/vary-for-images-serve-the-correct-images-to-the-correct-browsers/

Vary for Images: Serve the Correct Images to the Correct Browsers

Vary for Images: Serve the Correct Images to the Correct Browsers

Today, we’re excited to announce support for Vary, an HTTP header that ensures different content types can be served to user-agents with differing capabilities.

At Cloudflare, we’re obsessed with performance. Our job is to ensure that content gets from our network to visitors quickly, and also that the correct content is served. Serving incompatible or unoptimized content burdens website visitors with a poor experience while needlessly stressing a website’s infrastructure. Lots of traffic served from our edge consists of image files, and for these requests and responses, serving optimized image formats often results in significant performance gains. However, as browser technology has advanced, so too has the complexity required to serve optimized image content to browsers all with differing capabilities — not all browsers support all image formats! Providing features to ensure that the correct images are served to the correct requesting browser, device, or screen is important!

Serving images on the modern web

In the web’s early days, if you wanted to serve a full color image, JPEGs reigned supreme and were universally supported. Since then, the state of the art in image encoding has advanced by leaps and bounds, and there are now increasingly more advanced and efficient codecs like WebP and AVIF that promise reduced file sizes and improved quality.

This sort of innovation is exciting, and delivers real improvements to user experience. However, it makes the job of web servers and edge networks more complicated. As an example, until very recently, WebP image files were not universally supported by commonly used browsers. A specific browser not supporting an image file becomes a problem when “intermediate caches”, like Cloudflare, are involved in delivering content.

Let’s say, for example, that a website wants to provide the best experience to whatever browser requests the site. A desktop browser sends a request to the website and the origin server responds with the website’s content including images. This response is cached by a CDN prior to getting sent back to the requesting browser.

Now let’s say a mobile browser comes along and requests that same website with those images. In the situation where a cached image is a WebP file, and WebP is not supported by the mobile browser, the website will not load properly because the content returned from cache is not supported by the mobile browser. That’s a problem.

To help solve this issue, today we’re excited to announce our support of the Vary header for images.

How Vary works

Vary is an HTTP response header that allows origins to serve variants of the same content from a single URL, and have intermediate caches serve the correct variant to each user-agent that comes along.

Smashing Magazine has an excellent deep dive on how Vary negotiation works here.

When browsers send a request for a website, they include a variety of request headers. A fairly common example might look something like:

GET /page.html HTTP/1.1
Host: example.com
Connection: keep-alive
Accept:
text/html,application/xhtml+xml,application/xml;q=0.9,image/avif,image/webp,image/apng,*/*;q=0.8,application/signed-exchange;v=b3;q=0.9
User-Agent: Mozilla/5.0 (Macintosh; Intel Mac OS X 10_15_7) AppleWebKit/537.36 (KHTML, like Gecko) Chrome/91.0.4472.164 Safari/537.36
Accept-Encoding: gzip, deflate, br

As we can see above, the browser sends a lot of information in these headers along with the GET request for the URL. What’s important for Vary for Images is the Accept header. The Accept header tells the origin what sort of content the browser is capable of handling (file types, etc.) and provides a list of content preferences.

When the origin gets the request, it sees the Accept header which details the content preference for the browser’s request. In the origin’s response, Vary tells the browser that content returned was different depending on the value of the Accept header in the request. Thus if a different browser comes along and sends a request with different Accept header values, this new browser can get a different response from the origin. An example origin response may look something like:

HTTP/1.1 200 OK
Content-Length: 123456
Vary: Accept

How Vary works with Cloudflare’s cache

Now, let’s add Cloudflare to the mix. Cloudflare sits in between the browser and the origin in the above example. When Cloudflare receives the origin’s response, we cache the specific image variant so that subsequent requests from browsers with the same image preferences can be served from cache. This also means that serving multiple image variants for the same asset will create distinct cache entries.

Accept header normalization

Caching variants in intermediate caches can be difficult to get right. Naive caching of variants can cause problems by serving incorrect or unsupported image variants to browsers. Some solutions that reduce the potential for caching incorrect variants generally provide those safeguards at the expense of performance.

For example, through a process known as content-negotiation, the correct variant is directed to the requesting browser through a process of multiple requests and responses. The browser could send a request to the origin asking for a list of available resource variants. When the origin responds with the list, the browser can make an additional request for the desired resources from that list, which the server would then respond to. These redundant calls to narrow down which type of content that the browser accepts and the server has available can cause performance delays.

Vary for Images: Serve the Correct Images to the Correct Browsers

Vary for Images reduces the need for these redundant negotiations to an origin by parsing the request’s Accept header and sending that on to the origin to ensure that the origin knows exactly what content it needs to deliver to the browser. Additionally because the expected variant values can be set in Cloudflare’s API (see below), we make an end-run around the negotiation process because we are sure what to ask for and expect from the origin. This reduces the needless back-and-forth between browsers and servers.

How to Enable Vary for Images

You can enable Vary for Images from Cloudflare’s API for Pro, Business, and Enterprise Customers.

Things to keep in mind when using Vary:

  • Vary for Images enables varying on the following file extensions: avif, bmp, gif, jpg, jpeg, jp2, jpg2, png, tif, tiff, webp. These extensions can have multiple variants served so long as the origin server sends the Vary: Accept response header.
  • If the origin server sends Vary: Accept but does not serve the expected variant, the response will not be cached. This will be indicated with the BYPASS cache status in the response headers.
  • The list of variant types the origin serves for each extension must be configured so that Cloudflare can decide which variant to serve without having to contact the origin server.

Enabling Vary in action

Enabling Vary functionality currently requires the use of the Cloudflare API. Here’s an example of how to enable variant support for a zone that wants to serve JPEGs in addition to WebP and AVIF variants for jpeg and jpg extensions.

Create a variants rule:

curl -X PATCH
"https://api.cloudflare.com/client/v4/zones/023e105f4ecef8ad9ca31a8372d0 c353/cache/variants" \ 
	-H "X-Auth-Email: [email protected]" \ 
	-H "X-Auth-Key: 3xamp1ek3y1234" \ 
	-H "Content-Type: application/json" \ 
	--data 
'{"value":{"jpeg":["image/webp","image/avif"],"jpg":["image/webp","image/avif"]}}' 

Modify to only allow WebP variants:

curl -X PATCH 
"https://api.cloudflare.com/client/v4/zones/023e105f4ecef8ad9ca31a8372d0 c353/cache/variants" \ 
	-H "X-Auth-Email: [email protected]" \ 
	-H "X-Auth-Key: 3xamp1ek3y1234" \ 
	-H "Content-Type: application/json" \ 
	--data 
'{"value":{"jpeg":["image/webp"],"jpg":["image/webp"]}}' 

Delete the rule:

curl -X DELETE 
"https://api.cloudflare.com/client/v4/zones/023e105f4ecef8ad9ca31a8372d0c353/cache/variants" \ 
	-H "X-Auth-Email: [email protected]" \ 
	-H "X-Auth-Key: 3xamp1ek3y1234" 

Get the rule:

curl -X GET 
"https://api.cloudflare.com/client/v4/zones/023e105f4ecef8ad9ca31a8372d0c353/cache/variants" \
	-H "X-Auth-Email: [email protected]" \ 
	-H "X-Auth-Key: 3xamp1ek3y1234"

Purging variants

Any purge of varied images will purge all content variants for that URL. That way, if the image changes, you can easily update the cache with a single purge versus chasing down how many potential out-of-date variants may exist. This behavior is true regardless of purge type (single file, tag, or hostname) used.

Other image optimization tools available at Cloudflare

Providing an additional option for customers to optimize the delivery of images also allows Cloudflare to support more customer configurations. For other ways Cloudflare can help you serve images to visitors quickly and efficiently, you can check out:

  • Polish — Cloudflare’s automatic product that strips image metadata and applies compression. Polish accelerates image downloads by reducing image size.
  • Image Resizing — Cloudflare’s image resizing product works as a proxy on top of the Cloudflare edge cache to apply the adjustments to an image’s size and quality.  
  • Cloudflare for Images — Cloudflare’s all-in-one service to host, resize, optimize, and deliver all of your website’s images.

Try Vary for Images Out

Vary for Images provides options that ensure the best images are served to the browser based on the browser’s capabilities and preferences. If you’re looking for more control over how your images are delivered to browsers, we encourage you to try this new feature out.