Tag Archives: data security

Best practices for setting up Amazon Macie with AWS Organizations

Post Syndicated from Jonathan Nguyen original https://aws.amazon.com/blogs/security/best-practices-for-setting-up-amazon-macie-with-aws-organizations/

In this post, we’ll walk through the best practices to implement before you enable Amazon Macie across all of your AWS accounts within AWS Organizations.

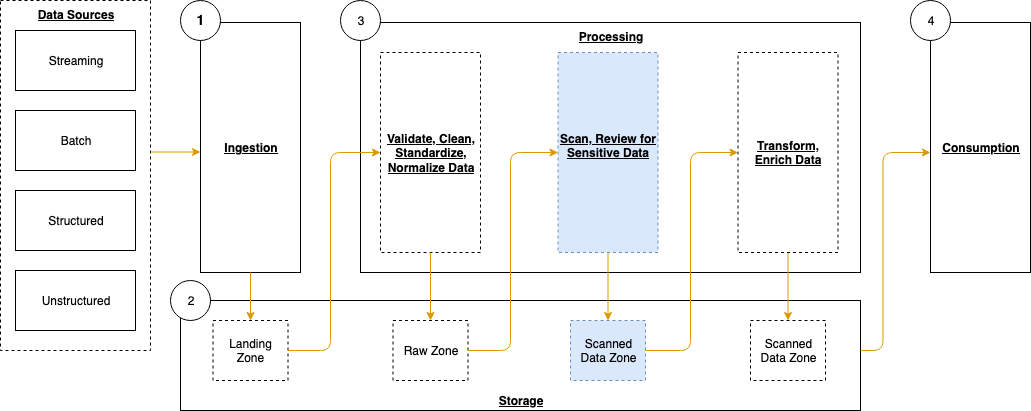
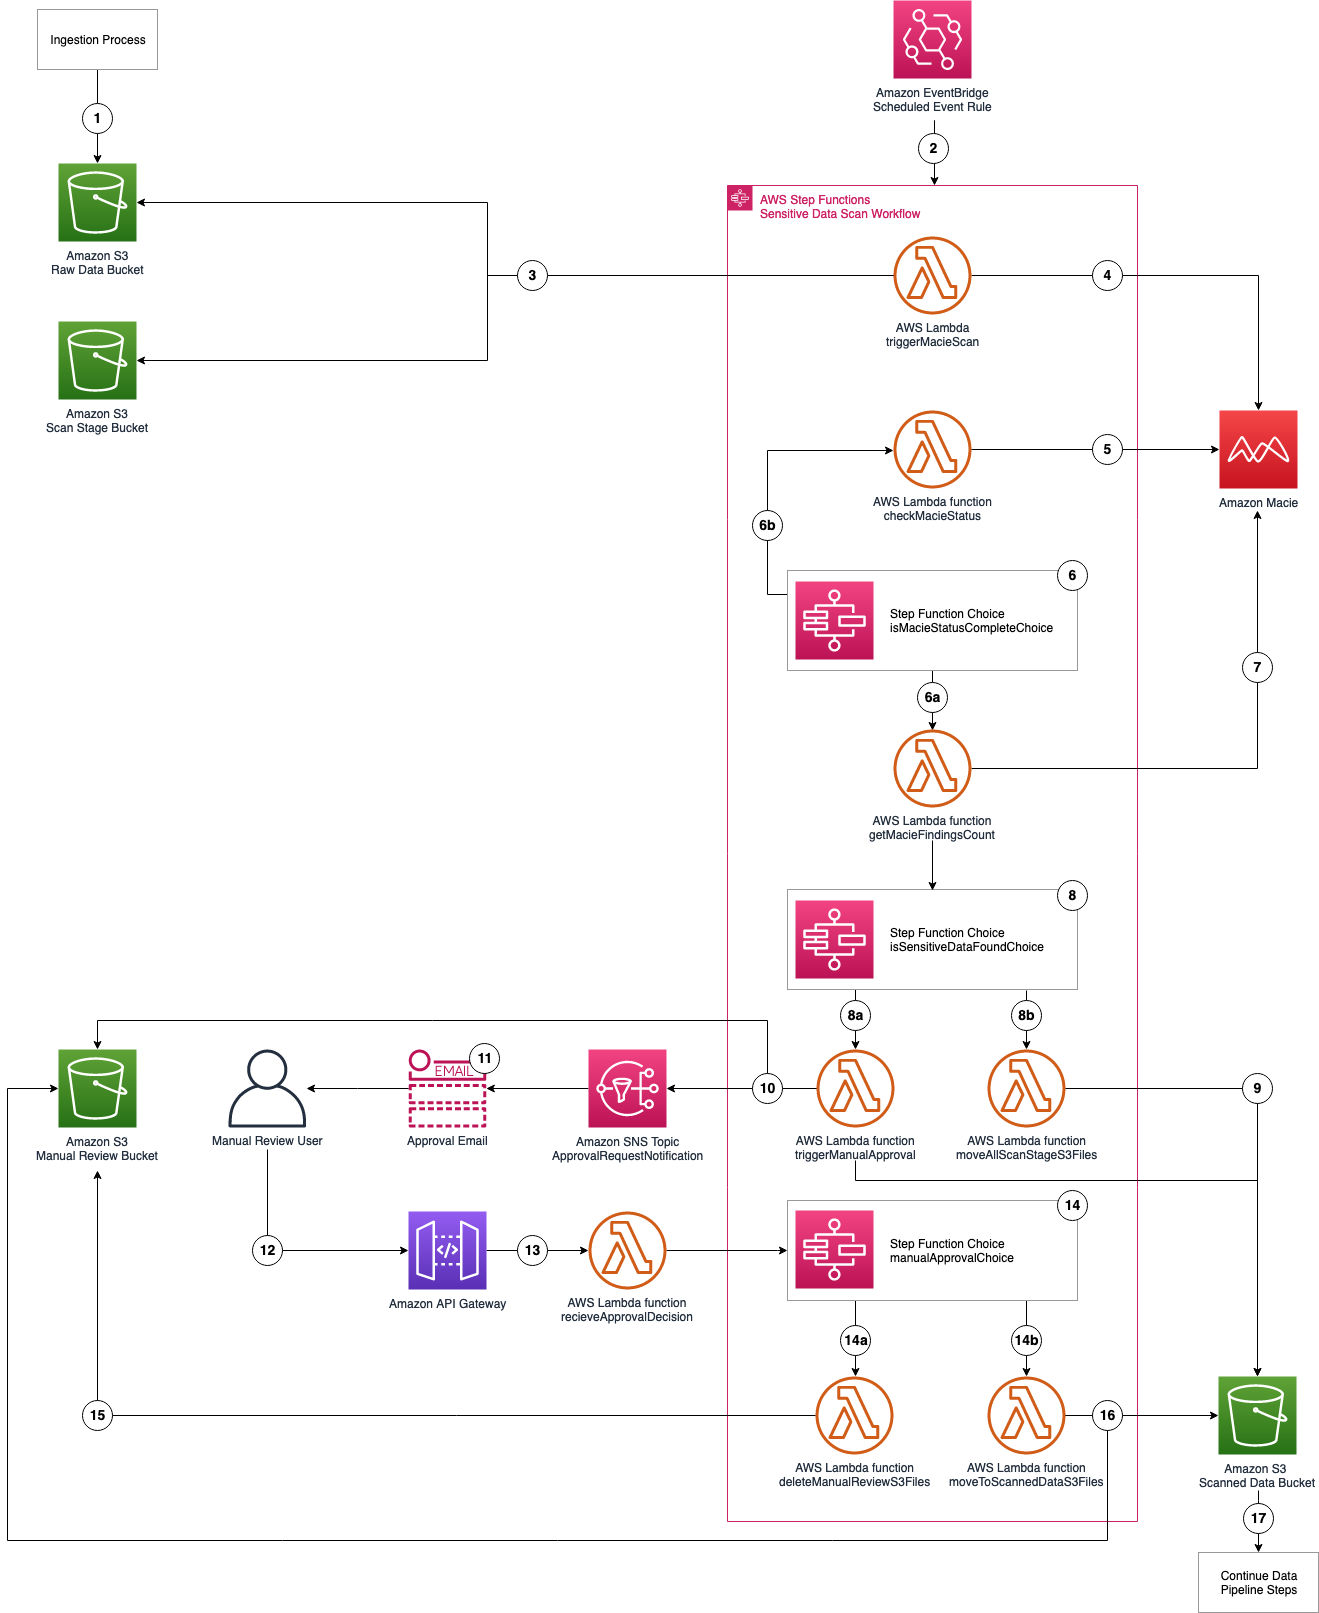
Amazon Macie is a data classification and data protection service that uses machine learning and pattern matching to help secure your critical data in AWS. To do this, Macie first automatically provides an inventory of Amazon Simple Storage Service (Amazon S3) buckets in AWS accounts managed by Macie and identifies S3 buckets with security risks, including unencrypted buckets, publicly accessible buckets, and buckets shared with AWS accounts external to AWS Organizations. Second, Macie applies machine learning and pattern matching techniques to the buckets you select to discover, identify, and create alerts for sensitive data, such as personally identifiable information (PII). With the visibility provided by Macie, you can centrally manage your sensitive data findings across your data estate and automate and take actions on Macie findings.

By enabling Amazon Macie within AWS Organizations, you immediately start receiving the benefits of viewing your Macie policy findings and sensitive data findings from jobs that ran for member AWS accounts. When you enable Macie for member accounts, a service-linked role is created within each member AWS account. Macie uses a service-linked role (AWSServiceRoleForAmazonMacie) to monitor resources on your behalf. The service-linked role has a trust relationship with the Macie service (macie.amazonaws.com). For more information about using Macie in your AWS Organizations architecture, see the AWS Security Reference Architecture (AWS SRA).

The best practices we’ll walk through include how to create least-privilege AWS Identity and Access Management (IAM) policies for Macie-delegated administrators and for security engineers who will use Macie on a day-to-day basis. We’ll also show you how to create classification buckets, provide you with the correct resource permissions to allow the Macie service-linked role in each AWS account, and cover how to troubleshoot common issues.

IAM roles to provision for Amazon Macie

The least-privilege principle is important when managing access to sensitive data within your AWS accounts. In this section, we’ll show you how to create least-privilege IAM roles for the following personas for Macie:

  1. Data administrator
  2. Data security engineers
  3. DevOps/DevSecOps engineer
  4. Macie sensitive data findings reviewer

The personas can vary based on your organization, and this list is primarily meant to serve as an example. You will need to align the appropriate permissions to each role in order to enable Macie with the principle of least privilege. You can create your own customer managed policies after you know the specific permissions required for each persona.

Important: In general, AWS strongly recommends you limit the use of wildcards where possible. However, in some of the persona policies that follow, wildcards are necessary to accomplish the task. To implement the principle of least privilege where wildcards must be used, you should put limits on the resources that the persona can access. You can do this by adding condition keys for Macie; or if you deployed Macie by using AWS Organizations, you can add a condition for aws:ResourceOrgId.

Persona 1: Data administrator

This persona is a data administrator who is responsible for setting up and configuring Macie within AWS Organizations. To enforce separation of duties, this persona is not able to view or access Macie findings. You can perform the following steps to verify that the entity has the required permissions to enable the Macie-delegated administrator, and onboard the member AWS accounts within AWS Organizations. You can find the full procedure for each step by following the links to the Macie User Guide.

  1. Verify your permissions
  2. Designate the delegated Macie administrator account
  3. Automatically enable and add new organization accounts
  4. Enable and add existing organization accounts

It’s important to note that Macie is a Regional service. This means that the designation of a Macie administrator account is a Regional designation. A Macie administrator account in a specific AWS Region can manage Macie for member accounts only in that Region. To centrally manage Macie accounts in multiple Regions, the management account must log in to each Region where the organization uses Macie, and then designate the Macie administrator account in each of those Regions. You can use a single Macie administrator account to centrally manage up to 5,000 AWS accounts.

In the following policy, replace <account-id> with the Macie-delegated administrator account ID.

{
    "Version": "2012-10-17",
    "Statement": [
        {
            "Sid": "OrganizationsReadAccess",
            "Effect": "Allow",
            "Action": [
                "organizations:ListDelegatedAdministrators",
                "organizations:ListAccounts",
                "organizations:DescribeOrganization",
                "organizations:ListAWSServiceAccessForOrganization"
            ],
            "Resource": "*"
        },
        {
            "Sid": "AWSServiceAccess",
            "Effect": "Allow",
            "Action": "organizations:EnableAWSServiceAccess",
            "Resource": "*",
            "Condition": {
                "StringLikeIfExists": {
                    "organizations:ServicePrincipal": "macie.amazonaws.com"
                }
            }
        },
        {
            "Sid": "RegisterDelegatedAdministrator",
            "Effect": "Allow",
            "Action": "organizations:RegisterDelegatedAdministrator",
            "Resource": "arn:*:organizations::*:<account-id>",
            "Condition": {
                "StringLikeIfExists": {
                    "organizations:ServicePrincipal": "macie.amazonaws.com"
                }
            }
        }
    ]
}

Persona 2: Data security engineer

This persona is a data security engineer who has day-to-day responsibility for reviewing Macie findings or Macie sensitive data discovery job configurations. Depending on your use case, you may need to separate this persona into two distinct personas where one is responsible to view Macie findings and the other to set Macie job configurations. To allow an IAM principal read-only permissions to view the Macie dashboard, configurations, and features, you can use the following policy. To enforce least privilege and restrict the resources to the Macie-delegated administrator, replace <region> with the AWS Region in which the delegated administrator is designated, and replace <account-id> with the Macie delegated administrator account ID.

{
    "Version": "2012-10-17",
    "Statement": [
        {
            "Sid": "MacieJobConfiguration",
            "Effect": "Allow",
            "Action": [
                "macie2:GetFindingsFilter",
                "macie2:DescribeClassificationJob",
                "macie2:GetCustomDataIdentifier",
                "macie2:BatchGetCustomDataIdentifiers",
                "macie2:ListTagsForResource",
                "macie2:GetMember",
                "macie2:GetAllowList"
            ],
            "Resource": [
                "arn:aws:macie2:<region>:<account-id>:custom-data-identifier/*",
                "arn:aws:macie2:<region>:<account-id>:findings-filter/*",
                "arn:aws:macie2:<region>:<account-id>:member/*",
                "arn:aws:macie2:<region>:<account-id>:classification-job/*",
                "arn:aws:macie2:<region>:<account-id>:allow-list/*"
            ]
        },
        {
            "Sid": "MacieFindings",
            "Effect": "Allow",
            "Action": [
                "macie2:ListFindings",
                "macie2:ListClassificationJobs",
                "macie2:ListFindingsFilters",
                "macie2:GetFindings",
                "macie2:GetUsageTotals",
                "macie2:GetSensitiveDataOccurrencesAvailability",
                "macie2:GetFindingsPublicationConfiguration",
                "macie2:GetSensitiveDataOccurrences",
                "macie2:GetClassificationExportConfiguration",
                "macie2:GetUsageStatistics",
                "macie2:GetRevealConfiguration",
                "macie2:GetFindingStatistics",
                "macie2:GetBucketStatistics",
                "macie2:GetMacieSession",
                "macie2:ListMembers",
                "macie2:ListAllowLists",
                "macie2:DescribeBuckets",
                "macie2:ListCustomDataIdentifiers",
                "macie2:ListManagedDataIdentifiers",
                "macie2:SearchResources",
                "macie2:ListInvitations"
            ],
            "Resource": "*"
        }
    ]
}

Persona 3: DevOps/DevSecOps engineer

This persona is a DevOps or DevSecOps engineer who is responsible for building and maintaining applications that run on AWS resources. These application builders typically receive top-level security guidance from central security, and they are directly responsible for the security of the applications that they design, build, and operate in AWS. DevSecOps engineers might need limited additional IAM permissions to configure Macie discovery jobs, depending on how Macie will be used within AWS Organizations. To allow an IAM principal the ability to pause or stop Macie jobs, you can add the following policy. Be sure to replace <region> with the AWS Region in which the delegated administrator is designated, and replace <account-id> with the Macie delegated administrator AWS account number.

{
    "Version": "2012-10-17",
    "Statement": [
        {
            "Sid": "MacieUpdateJobs",
            "Effect": "Allow",
            "Action": [
                "macie2:UpdateClassificationJob",
                "macie2:DescribeClassificationJob"
            ],
            "Resource": "arn:aws:macie2:<region>:<account-id>:classification-job/*"
        },
        {
            "Sid": "MacieListJobs",
            "Effect": "Allow",
            "Action": [
                "macie2:GetClassificationExportConfiguration",
                "macie2:GetMacieSession",
                "macie2:ListClassificationJobs"
            ],
            "Resource": "*"
        }
    ]
}

Persona 4: Macie sensitive data findings reviewer

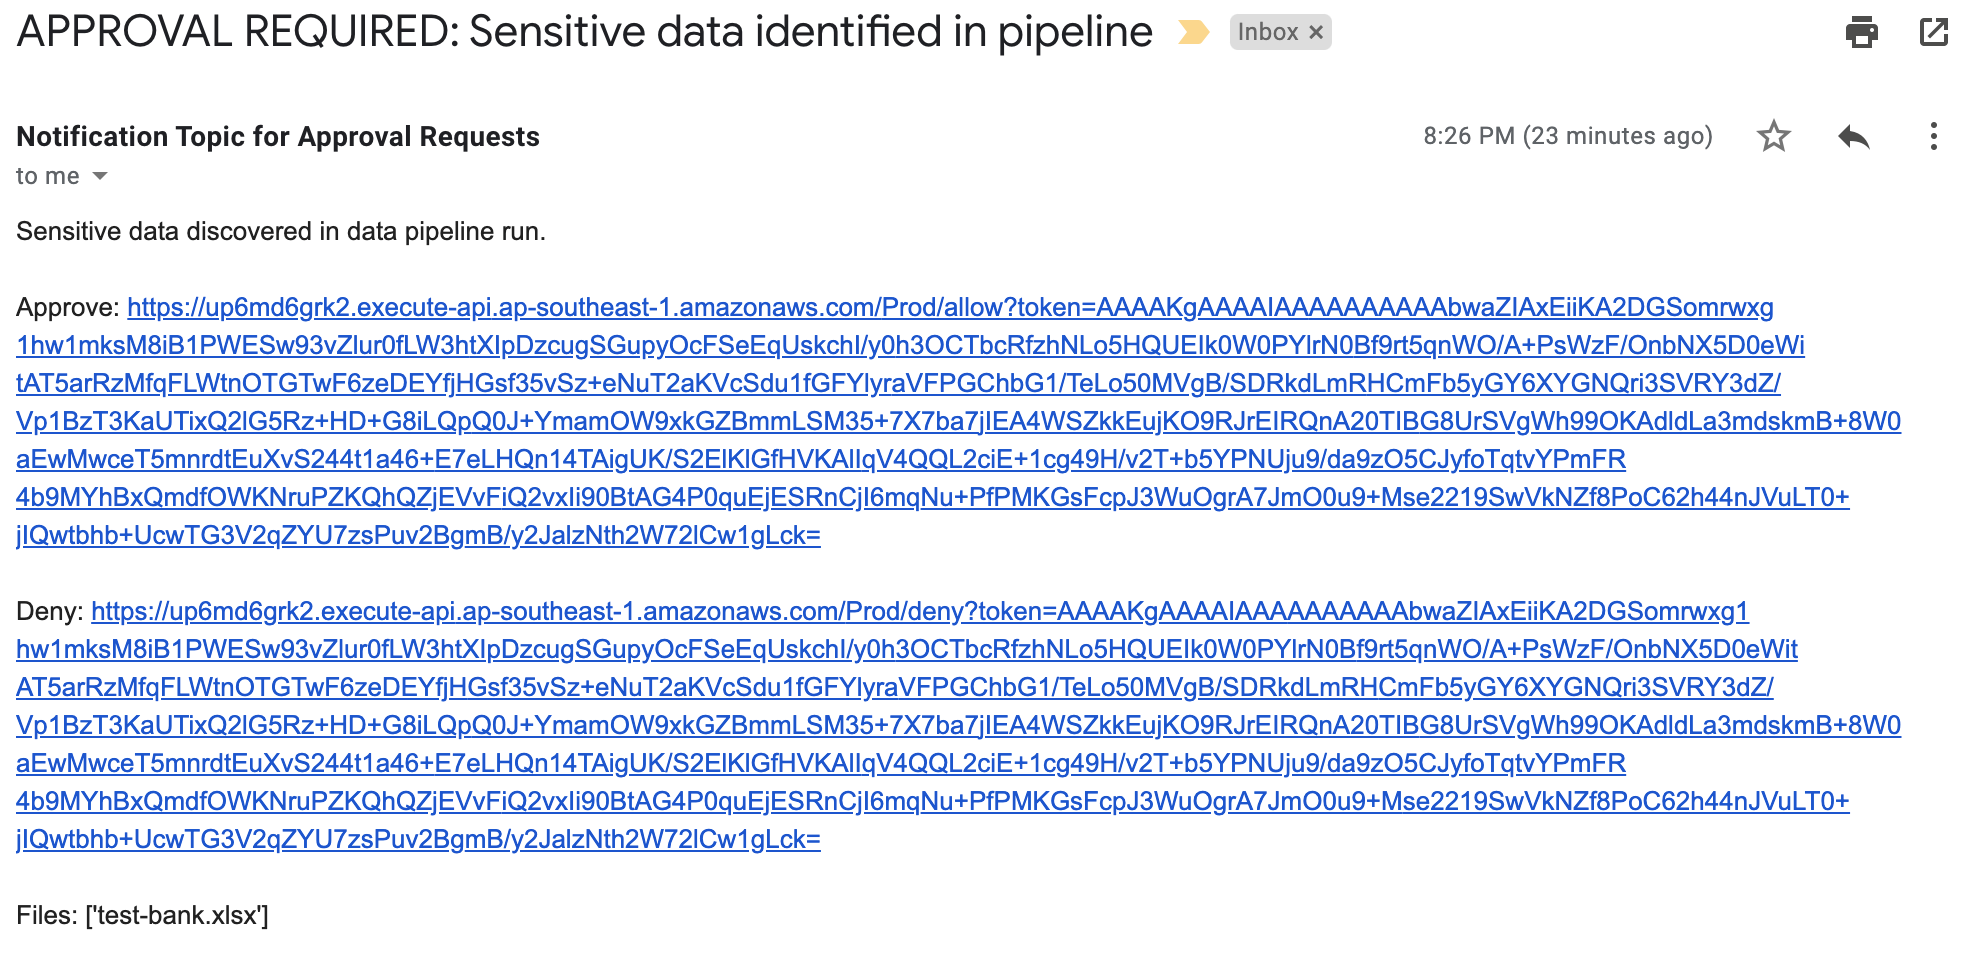
This persona is a reviewer (usually a security engineer) who is responsible for investigating the sensitive data associated with Macie findings. There are a number of ways this persona can be set up, based on your specific use case and the needs of your organization. In this section, we will describe two of the options for setting up this persona.

Option 1: Enable and use Macie to retrieve and reveal sensitive data samples from the delegated Macie account where findings are consolidated

In this option, Macie doesn’t use the Macie service-linked role for your account to perform these tasks. Instead, you use your IAM identity to locate, retrieve, encrypt, and reveal the samples for sensitive findings. You can retrieve and reveal sensitive data samples for a finding if you’re allowed to access the requisite resources and data, and you’re allowed to perform the requisite actions. All the requisite actions are logged in AWS CloudTrail. In the following policy, be sure to replace <account-id>, <region>, and <key-id> with your own values.

{
    "Version": "2012-10-17",
    "Statement": [
        {
            "Sid": "MacieReveal",
            "Effect": "Allow",
"Action": [
"macie2: UpdateRevealConfiguration",
"macie2:GetRevealConfiguration
],
            "Resource": " arn:aws:macie2:*:<account-id>:*"
        },
        {
            "Sid": "KMSPermissions",
            "Effect": "Allow",
            "Action": [
                "kms:Decrypt",
                "kms:DescribeKey",
                "kms:GenerateDataKey"
],
"Resource": "arn:aws:kms:<region>:<account-id>:key/<key-id>"
        }

    ]
}

Option 2: Create IAM roles to review findings and objects in the same AWS account where objects are located

For a command line utility to help you investigate the sensitive data, you can use the Macie Finding Data Reveal project. The Macie Finding Data Reveal project needs permissions to invoke macie:GetFindings on the account and s3:GetObject on the specific object reported in the finding.

In the following policy, be sure to replace <DOC-EXAMPLE-BUCKET> with the values for the S3 bucket where the finding is reported; and replace <account-id>, <region>, and <key-id> with your own values. You will also need to configure the KMS key and S3 bucket resource policies to allow permissions to your IAM role.

{
    "Version": "2012-10-17",
    "Statement": [
        {
            "Sid": "InvokeMacieFindings",
            "Effect": "Allow",
            "Action": "macie2:GetFindings",
            "Resource": "*"
        },
        {
            "Sid": "ReportedS3Object",
            "Effect": "Allow",
            "Action": "s3:GetObject",
            "Resource": " arn:aws:s3:::<DOC-EXAMPLE-BUCKET>/*"
        },
     {
               "Sid": "KMSPermissions",
               "Effect": "Allow",
               "Action": [
                   "kms:Decrypt",
                   "kms:DescribeKey",
                   "kms:GenerateDataKey"
   ],
   "Resource": "arn:aws:kms:<region>:<account-id>:key/<key-id>"
        }
    ]
}

If you use an IAM role in the same AWS account, you can specify permissions to access the object and encryption key by using resource policies, and you can leave off the ReportedS3Object and KMSPermissions statement ID (Sid).

Apply SCPs to restrict unauthorized changes to Macie

After you create the personas, you need to verify that the Macie configurations to manage Macie members within AWS Organizations are only updated by authorized IAM principals. The following is an example service control policy (SCP) that you can use to prevent users from disabling Macie, or from modifying Macie configurations within the organization. Make sure to replace <account-id> and <data-admin-role-name> with your own values for the authorized IAM principal.

Note: When you use SCPs within a multi-account structure, it is important to keep in mind quotas that affect AWS Organizations.

{
    "Version": "2012-10-17",
    "Statement": [
        {
            "Sid": "RestrictAmazonMacie",
            "Effect": "Deny",
            "Action": [
                "macie2:DeleteMember",
                "macie2:DisableMacie",
                "macie2:DisableOrganizationAdminAccount",
                "macie2:DisassociateFromAdministratorAccount",
                "macie2:DisassociateMember",
                "macie2:UpdateMacieSession",
                "macie2:UpdateMemberSession"
            ],
            "Resource": [
                "*"
            ],
            "Condition": {
                "StringNotLike": {
                    "aws:PrincipalArn": [
                        "arn:aws:iam::<account-id>:role/<data-admin-role-name>"
                    ]
                }
            }
        }
    ]
}

Allow the Macie service-linked IAM role to scan S3 objects

When Macie analyzes files, it needs permissions to analyze encrypted files. This is important so that you don’t have blind spots in your data protection initiatives.

Before you run a Macie job against S3 objects, make sure that existing KMS keys that are used to encrypt the S3 buckets also grant the Macie service-linked IAM role in the AWS account the necessary permissions to decrypt the S3 objects. For more information, see Service-linked roles for Amazon Macie. To confirm that Macie can scan encrypted objects, the associated KMS key resource policies must allow the Macie service-linked role to use the KMS key to decrypt objects.

Furthermore, depending on the object’s type of encryption, Macie might not be able to fully scan the object. The following table summarizes types of object encryption and the ability Macie has to scan the object. For more information, see Macie supported encryption types.

S3 object encryption type Macie scan ability
Client-side encryption Macie cannot decrypt and analyze the object. Macie can only store and report metadata for the object.
Server-side encryption with Amazon S3 managed keys (SSE-S3) Macie can decrypt and analyze the object.
Server-side encryption with AWS managed AWS KMS encryption (AWS-KMS) Macie can decrypt and analyze the object.
Server-side encryption with customer managed AWS KMS encryption (SSE-KMS) Macie can decrypt and analyze the object if Macie is authorized to use the KMS key. Otherwise, Macie can only store and report metadata for the object.
Server-side encryption with customer provided key (SSE-C) Macie cannot decrypt and analyze the object. Macie can only store and report metadata for the object.

Investigating failed Macie scans of S3 objects

In the event Macie is unable to scan an S3 object, you can view the logs in an S3 bucket configured in the Macie delegated administrator account for sensitive data discovery results, or in centralized AWS CloudTrail logs. The following are common reasons why Macie might not be able to scan S3 objects, and the associated steps for remediating each issue.

KMS implicit deny

The Macie service-linked role (AWSServiceRoleForAmazonMacie) is not authorized to decrypt S3 objects in Macie member accounts, because no resource-based policy allows the kms:Decrypt action. Check for the following error message in AWS CloudTrail if the AWS KMS resource-based policy implicitly denies the Macie service-linked role. Your error message will show <account-id> and <region> as your own values.

sourceIPAddress: "macie.amazonaws.com" and eventSource : "kms.amazonaws.com" and eventName : "Decrypt" and errorCode : "AccessDenied" Filter the results by error message: “User: arn:aws:sts::<account-id>:assumed-role/AWSServiceRoleForAmazonMacie/classifier-content-fetcher is not authorized to perform: kms:Decrypt on resource: arn:aws:kms:<region>:key/key-id because no resource-based policy allows the kms:Decrypt action…”

In order to remediate a KMS implicit deny error for a customer-managed key, add the following to the customer managed key policy. Be sure to replace <account_name> with your own value.

{
            "Sid": "Allow Macie Decrypt S3",
            "Effect": "Allow",
            "Principal": {
                "AWS": "*"
            },
            "Action": [
                "kms:Decrypt",
                "kms:DescribeKey"
            ],
            "Resource": "*",
            "Condition": {
                "StringEquals": {
                    "aws:PrincipalArn": "arn:aws:iam::<account_name>:role/aws-service-role/macie.amazonaws.com/AWSServiceRoleForAmazonMacie"              
            }
          }
  }

KMS explicit deny

The Macie service-linked role (AWSServiceRoleForAmazonMacie) is not authorized to decrypt S3 objects in Macie member accounts, because resource-based policies explicitly deny the kms:Decrypt action for the Macie service-linked role. Check for the following error message in AWS CloudTrail if the AWS KMS resource-based policy explicitly denies the Macie service-linked role. Your error message will show <account_name> and <region> as your own values.

sourceIPAddress : "macie.amazonaws.com" and eventSource : "kms.amazonaws.com" and eventName : "Decrypt" and errorCode : "AccessDenied" Filter the results by error message:
“User:arn:aws:sts::<account_name>:assumed-role/AWSServiceRoleForAmazonMacie/classifier-content-fetcher is not authorized to perform: kms:Decrypt on resource: arn:aws:kms:<region>:key/key-id with an explicit deny in resource-based policy…”

In order to remediate a KMS explicit deny error, update the policy statement to allow the Macie service-linked role access to decrypt and describe key actions. Be sure to replace <account_name> with your own value.

{
            "Sid": "Deny Macie Decrypt S3",
            "Effect": "Deny",
            "Principal": {
                "AWS": "*"
            },
            "Action": [
                "kms:Decrypt",
                "kms:DescribeKey"
            ],
            "Resource": "*",
            "Condition": {
                "StringEquals": {
                    "aws:PrincipalArn": "arn:aws:iam::<account_name>:role/aws-service-role/macie.amazonaws.com/AWSServiceRoleForAmazonMacie"              
              }
            }
 }

S3 explicit deny

The Macie service-linked role (AWSServiceRoleForAmazonMacie) is explicitly denied in the S3 bucket policy. Check for the following error messages in AWS CloudTrail for S3 explicit deny.

userIdentity.sessionContext.sessionIssuer.userName: "AWSServiceRoleForAmazonMacie" and eventSource: "s3.amazonaws.com" and eventName: " GetBucketEncryption" and errorcode: “ServerSideEncryptionConfigurationNotFoundError” and errormessage: “The server side encryption configuration was not found” OR userIdentity.sessionContext.sessionIssuer.userName: "AWSServiceRoleForAmazonMacie" and eventSource: "s3.amazonaws.com" and eventName: "GetBucketReplication" and errorcode: " ReplicationConfigurationNotFoundError" and errormessage: “The replication configuration was not found” OR userIdentity.sessionContext.sessionIssuer.userName: "AWSServiceRoleForAmazonMacie" and eventSource: "s3.amazonaws.com" and eventName: " GetBucketTagging" and errorcode: " NoSuchTagSet" and errormessage: “The TagSet does not exist” OR userIdentity.sessionContext.sessionIssuer.userName: "AWSServiceRoleForAmazonMacie" and eventSource: "s3.amazonaws.com" and eventName: "GetBucketAcl" and responseElements: "null" OR userIdentity.sessionContext.sessionIssuer.userName: "AWSServiceRoleForAmazonMacie" and eventSource: "s3.amazonaws.com" and eventName: " GetBucketPublicAccessBlock" and responseElements: "null" OR userIdentity.sessionContext.sessionIssuer.userName: "AWSServiceRoleForAmazonMacie" and eventSource: "s3.amazonaws.com" and eventName: "GetBucketLocation" and responseElements: "null" OR userIdentity.sessionContext.sessionIssuer.userName: "AWSServiceRoleForAmazonMacie" and eventSource: "s3.amazonaws.com" and eventName: "GetBucketVersioning" and responseElements: "null" OR userIdentity.sessionContext.sessionIssuer.userName: "AWSServiceRoleForAmazonMacie" and eventSource: "s3.amazonaws.com" and eventName: " GetBucketPolicy" and errorcode: "NoSuchBucketPolicy" and errormessage: “The bucket policy does not exist” OR userIdentity.sessionContext.sessionIssuer.userName: "AWSServiceRoleForAmazonMacie" and eventSource: "s3.amazonaws.com" and eventName: " GetBucketEncryption" and responseElements: "null" OR userIdentity.sessionContext.sessionIssuer.userName: "AWSServiceRoleForAmazonMacie" and eventSource: "s3.amazonaws.com" and eventName: " GetBucketPolicy" and responseElements: "null"

Note: Nearly all S3 explicit deny and S3 object ownership error messages have the same event names. See the Ensure S3 and KMS resource policy compliance section in this post to view the S3 object ownership setting.

Macie cannot decrypt and analyze S3 objects if there is an explicit deny in the S3 bucket policy. The following is an example of an S3 bucket policy that explicitly denies the Macie service-linked role. Be sure to replace <DOC-EXAMPLE-BUCKET> and <account_id> with your own values.

{
    "Version": "2012-10-17",
    "Statement": [
        {
            "Sid": "S3ExplicitDeny",
            "Effect": "Deny",
            "Principal": {
                "AWS": "*"
            },
            "Action": [
                "s3:GetObject",
                "s3:GetObjectTagging"
            ],
            "Resource": [
                "arn:aws:s3:::<DOC-EXAMPLE-BUCKET>/*",
                "arn:aws:s3:::<DOC-EXAMPLE-BUCKET>"
            ],
            "Condition": {
                "StringEquals": {
                    "aws:PrincipalArn": "arn:aws:iam::<account_id>:role/aws-service-role/macie.amazonaws.com/AWSServiceRoleForAmazonMacie"
                }
            }
        }
    ]
}

Macie can decrypt and analyze S3 objects if there is no explicit deny in the S3 bucket. The following is an example of the permission for the S3 bucket policy to explicitly allow the Macie service-linked role to have access to your S3 bucket. Be sure to replace <DOC-EXAMPLE-BUCKET> and <account-id> with your own values.

{
    "Version": "2012-10-17",
    "Statement": [
        {
            "Sid": "Allow Macie S3 Read",
            "Effect": "Allow",
            "Principal": {
                "AWS": "*"
            },
            "Action": [
                "s3:ListBucket",
                "s3:GetReplicationConfiguration",
                "s3:GetObject*",
                "s3:GetLifecycleConfiguration",
                "s3:GetEncryptionConfiguration",
                "s3:GetBucket*"
            ],
            "Resource": [
                "arn:aws:s3:::<DOC-EXAMPLE-BUCKET>/*",
                "arn:aws:s3:::<DOC-EXAMPLE-BUCKET>"
            ],
            "Condition": {
                "StringEquals": {
                    "aws:PrincipalArn": "arn:aws:iam::<account-id>:role/aws-service-role/macie.amazonaws.com/AWSServiceRoleForAmazonMacie“
                }
            }
        }
    ]
  }

S3 Object Ownership

Macie is unable to scan S3 objects that are owned by another AWS account, due to access control list (ACL) settings and permissions. Event names are identical for both S3 explicit deny errors and S3 Object Ownership errors. S3 explicit deny has the following additional two event names.

userIdentity.sessionContext.sessionIssuer.userName: "AWSServiceRoleForAmazonMacie" and eventSource: "s3.amazonaws.com" and eventName: " GetBucketEncryption" and errorcode: “ServerSideEncryptionConfigurationNotFoundError” and errormessage: “The server side encryption configuration was not found” OR userIdentity.sessionContext.sessionIssuer.userName: "AWSServiceRoleForAmazonMacie" and eventSource: "s3.amazonaws.com" and eventName: " GetBucketPolicy" and errorcode: "NoSuchBucketPolicy" and errormessage: “The bucket policy does not exist”

The S3 Object Ownership feature has the following three settings that you can use to control ownership of objects that are uploaded to your bucket, and to disable or enable ACLs. We recommend that you disable ACLs on your S3 buckets.

  • Bucket owner enforced (recommended) – ACLs are disabled, and the bucket owner automatically owns and has full control over every object in the bucket. ACLs no longer affect permissions to data in the S3 bucket. The bucket uses policies to define access control.
  • Bucket owner preferred – The bucket owner owns and has full control over new objects that other accounts write to the bucket with the bucket-owner-full-control canned ACL.
  • Object writer (default) – The AWS account that uploads an object owns the object, has full control over it, and can grant other users access to it through ACLs.

In order to remediate an S3 object ownership issue, there are two options available:

Option 1: Change object ownership settings to bucket owner enforced (recommended). When you disable ACLs, it changes the ownership of existing objects to the bucket owner account. You should consider the following scenarios prior to changing the S3 Object Ownership setting.

S3 objects in the source bucket (account A) are encrypted with a customer-managed key, and you copy the object in the destination bucket (account B) that has the object writer object ownership setting and its own customer managed key. If you copy S3 objects from the source bucket (account A) to the destination bucket (account B), and you do not specify a customer-managed key to use during the copy command, and the object ownership setting in the destination bucket (account B) is bucket owner enforced (ACLs disabled), then this will result in an object ownership change to bucket owner. These actions will also set the object’s server-side encryption to use the encryption settings in the destination bucket (account B).

However, if you specify a customer-managed key during the S3 copy command, then the object’s server-side encryption remains with the source bucket account (account A) customer managed key.

Option 2: Use S3 batch operations to copy objects and set ACLs. Changing the object ownership

setting to bucket owner preferred only applies to new objects and not the existing objects. You can use one one-time batch operation to set ACLs on existing objects.

Ensure S3 and KMS resource policy compliance

Another best practice to follow when you enable Macie with AWS Organizations is to use Macie to verify your organization’s policy compliance for S3 objects and KMS resources. In the Macie-delegated admin account, the summary page provides an overview of S3 data and security and access control in your organization in AWS Organizations. Users can view information about S3 security posture, such as whether S3 buckets are public or not, server-side encryption of S3 buckets, and whether S3 buckets are shared inside or outside of your organization. Data privacy and compliance groups can get organization-wide visibility across their accounts and buckets.

Your organization is responsible for introducing guardrails based on your organization’s security policies. To automate compliance checks for S3 objects and KMS resources, make sure to update your continuous integration and continuous deployment (CI/CD) pipeline. This will allow you to set up continuous compliance checks for the Macie service-linked role by using tools like CloudFormation Guard or Open Policy Agent.

In order to check S3 object ownership settings, you can use AWS Command Line Interface (AWS CLI) commands to view bucket ownership settings. Currently, Macie and AWS Config do not report on S3 object ownership as part of the resource configuration. You can run the following AWS CLI command in AWS accounts within AWS Organizations, making sure to replace <DOC-EXAMPLE-BUCKET> with your own value, to view bucket ownership settings. This can be scripted to list all AWS accounts within AWS Organizations, list all S3 buckets within the AWS account, then get the bucket ownership configuration.

aws s3api get-bucket-ownership-controls --bucket <DOC-EXAMPLE-BUCKET>

After checking these ownership settings, you can run the following AWS CLI commands to view the S3 objects ownership settings, making sure to replace <DOC-EXAMPLE-BUCKET> with your own value.

aws s3api list-objects-v2 —bucket <DOC-EXAMPLE-BUCKET> —fetch-owner—query ”Contents[?Owner.ID!='CURRENT-ID'].{Key:Key,Owner:Owner.DisplayName}" —output

Additional Macie best practices

You should also consider the following recommendations before you enable Macie, so that you can manage Macie findings and member accounts efficiently at scale:

  • Enable Macie using AWS Organizations to manage multiple accounts and to govern your environment as you grow and scale your AWS resources.
  • Enable Macie in all Regions where you have workloads with S3 buckets.
  • Enable Security Hub and Amazon Macie integration to send Macie findings to Security Hub (enabled by default).
  • Enable Security Hub Region aggregation to consolidate Macie findings in a single Region.
  • Ingest logs from AWS CloudWatch Logs to enable custom alerting for Macie sensitive data discovery job results.
  • In Macie settings, turn on the Auto-enable setting. That way, Macie will automatically be enabled for new accounts when the accounts are added to your organization in AWS Organizations.
  • Store sensitive data discovery results in an S3 bucket, with default encryption enabled, after you have configured your Macie delegated administrator account.

Conclusion

In this blog post, we walked you through the best practices to implement before you enable Amazon Macie across your AWS accounts within AWS Organizations. In order to efficiently use Macie within AWS Organizations, it is important to understand why failures can occur, how to investigate the logs, and how to remediate the issues for both existing and future resources.

Now that you have a better understanding of how to prepare for using Macie, try running a Macie sensitive data discovery job. The next aspect to start thinking about is how to review and respond to Macie findings. You can deploy another solution to automatically send notifications with Slack when Macie findings are generated.

If you have feedback about this post, submit comments in the Comments section below. If you have any questions about this post, start a thread on the Amazon Macie forum.

Want more AWS Security news? Follow us on Twitter.

Jonathan Nguyen

Jonathan Nguyen

Jonathan is a Shared Delivery Team Senior Security Consultant at AWS. His background is in AWS Security with a focus on threat detection and incident response. Today, he helps enterprise customers develop a comprehensive security strategy and deploy security solutions at scale, and he trains customers on AWS Security best practices.

Ajay Rawat

Ajay Rawat

Ajay is a Security Consultant in a shared delivery team at AWS. He is a technology enthusiast who enjoys working with customers to solve their technical challenges and to improve their security posture in the cloud.

Learn more about the new allow list feature in Macie

Post Syndicated from Jonathan Nguyen original https://aws.amazon.com/blogs/security/learn-more-about-the-new-allow-list-feature-in-macie/

Amazon Macie is a fully managed data security and data privacy service that uses machine learning and pattern matching to discover and help you protect your sensitive data in Amazon Web Services (AWS). The data that is available within your AWS account can grow rapidly, which increases your need to verify that all sensitive data is identified and protected. Macie provides you with the ability to use both managed data identifiers and custom data identifiers, but enabling these identifiers for every job could result in a large number of security findings that might not take into account how data is used within your AWS account. So that you can tailor the detection and creation of findings within Macie, Macie now has an allow list feature available for use with your scanning jobs.

In this blog post, we show you how to set up an allow list in Macie and run a Macie scan that uses the allow list to ignore the specified values when creating sensitive data findings. The allow list feature can help your sensitive data management team by reducing false positives due to data text or formats in your environment that do not require action. This makes it easier for your team to focus on Macie findings that need to be reviewed and remediated. By increasing the overall confidence in findings presented by Macie, you can improve the performance of automated workflows and solutions.

Prerequisites

To get started, you’ll need the following prerequisites:

  1. An active AWS account
  2. Amazon Macie enabled within your AWS account
  3. (Optional) Member AWS accounts are enabled using AWS Organizations and a delegated Macie administrator account

Create an allow list in Macie

You can configure allow lists with either regular expressions (regex) or predefined text. Use a predefined text allow list if you have a list of specific values you want to exclude, like a list of example fake names or addresses that are used in test data sets. Alternatively, if you don’t have the exact values but know the pattern to exclude, you can use a regex allow list. Some use cases for a regex allow list could be to exclude tracking IDs or public reference numbers that could resemble a Macie managed data identifier or custom data identifier.

It is important to note that allow lists, and S3 objects if using predefined text, must be created in the same AWS account where the Macie job is created.

  1. If Macie jobs are created from the Macie delegated administrator AWS account to scan member AWS accounts, then the allow lists must be centrally configured in the Macie delegated administrator account.
  2. If Macie jobs are created from the member AWS account to scan buckets within the same AWS account, then the allow lists must be configured in the same AWS account where the Macie job is created.

To create an allow list by using the Amazon Macie Console

  1. In the Amazon Macie Console, navigate to Macie.
  2. Under Settings, choose Allow lists.
  3. Choose Create.
  4. Choose a list type.
    1. If you’re creating a regex allow list, choose Regular expression. For List settings, enter the following settings for the allow list.
      1. For Name, enter the name of the list.
      2. For Description, enter a description (optional).
      3. For Regular expression, enter the regular expression. Macie will not create findings for any matches on the allow list regex.
      4. Evaluate with sample data if needed to test your regex. Macie provides an Evaluate option so you can test your regex against sample data sets to make sure it’s working as expected.
    2. If you’re creating a predefined text allow list, choose Predefined text. For this option, you will need to create a plaintext file and upload the file to an Amazon Simple Storage Service (Amazon S3) bucket. Once you upload the file, you can then reference the Amazon S3 object in the allow list.
      1. Enter the name of the list.
      2. Enter a description for the list (optional).
      3. Enter the S3 bucket name.
      4. Enter the S3 object name of the plaintext file.

    Note: The Macie service-linked role must have the ability to read the S3 object for the predefined text. When you run Macie jobs that use allow lists with predefined text, the Macie service-linked role will read the S3 object. If there is any error reading the S3 object, the Macie job will continue to run without using the predefined text allow list. You will need to periodically check your allow lists to make sure they are in an OK status. You can check the status of each allow list in the Amazon Macie console or via the AWS CLI using the get-allow-list API.

    More information and explanation for status of allow list can be found in the Amazon Macie User Guide.

  5. Choose Create to create the allow list.

    Note: An allow list must be stored in an S3 bucket in the same AWS account and AWS Region as your Macie account. Macie cannot access an allow list if it is stored in a different Region or account.

You can also create and manage allow lists by using the Amazon Macie console, AWS Command Line Interface (AWS CLI) or AWS CloudFormation.

To create or manage an allow list by using the AWS CloudFormation

Below is an example enabling Amazon Macie for an account. The session resource configures Macie to publish updated policy findings for the account.

AWSTemplateFormatVersion: 2010-09-09
Description:<insert-template-description>
Resources:
  EnableMacieSession:
Type: AWS::Macie::Session
Properties:
    	    FindingPublishingFrequency: <insert-finding-publishing-frequency>
    Status: ENABLED

Below is an example of creating an allow list that uses a regular expression to specify a text pattern to ignore. Like other Macie resources, the DependsOn attribute is a required dependency for creating a Macie allow list.

AWSTemplateFormatVersion: 2010-09-09
Description:<insert-template-description>
Resources:
  RegularExpressionAllowList:
Type: AWS::Macie::AllowList
DependsOn: Session
Properties:
  Criteria:
    Regex: “<insert-regex-expression>”
  Description: <insert-allow-list-description>
  Name: <insert-allow-list-name>
  Tags:
    - Key: <insert-tag-key-name>
      Value: <insert-tag-key-value>

Below is an example creating an allow list that specifies a list of predefined text to ignore.

AWSTemplateFormatVersion: 2010-09-09
Description:<insert-template-description>
Resources:
PredefinedAllowList:
Type: AWS::Macie::AllowList
DependsOn: Session
Properties:
  Criteria:
    S3WordsList:
      BucketName: <DOC-EXAMPLE-BUCKET>
      ObjectKey: <OBJECT-EXAMPLE-KEY>
  Description: <insert-allow-list-description>
  Name: <insert-allow-list-name>
  Tags:
  - Key: <insert-tag-key-name>
    Value: <insert-tag-key-value>

To create or manage an allow list by using the AWS CLI

  1. In the AWS CLI, run the following commands to create an allow list with a regular expression.
    aws macie2 create-allow-list \
    --criteria '{"regex":"<insert-regex-expression>"}' \
    --name "<insert-allow-list-name>" \
    --description "<insert-allow-list-description>"
  2. In the AWS CLI, run the following commands to create an allow list with predefined text.
    aws macie2 create-allow-list \
    --criteria '{"s3WordsList":{"bucketName":"<DOC-EXAMPLE-BUCKET>","objectKey":"<OBJECT-EXAMPLE-KEY>"}}' \
    --name "<insert-allow-list-name>" \
    --description "<insert-allow-list-description>"
  3. In the AWS CLI, run the following commands to update an existing allow list.
    aws macie2 update-allow-list --id <GUID-for-Macie-allow-list> example --description <insert-new-description>
  4. In the AWS CLI, run the following commands to delete an existing allow list.
    aws macie2 delete-allow-list --id <GUID-for-Macie-allow-list> example --ignoreJobChecks false
  5. In the AWS CLI, run the following commands to get existing allow lists.
    aws macie2 get-allow-list –id <GUID-for-Macie-allow-list>

For a detailed list of available AWS CLI commands, refer to the AWS CLI documentation for Amazon Macie.

Use the allow list in a Macie scan

After you create allow lists, you can create and run sensitive data discovery jobs in Macie. This will enable you to review, analyze, and compare findings about the affected resources in Amazon S3 buckets with or without allow lists.

Option 1: Create a Macie job with the allow list by using the console

  1. Go to the Amazon Macie Console and navigate to Macie.
  2. In the navigation pane, choose Jobs, and then choose Create job.
  3. On the Choose Amazon S3 buckets page, choose Select specific buckets.

    Note: Macie displays a list of all the buckets managed by your AWS account, including members if configured, in the current Region.

    • Under Select Amazon S3 buckets, optionally choose Refresh to retrieve the latest bucket metadata from Amazon S3.
  4. In the table, select each bucket you want the job to analyze, and then choose Next.
  5. Review and optionally adjust the list of S3 buckets that you selected for the job, and then choose Next.
  6. Refine the scope of the job, if needed. Use these settings to specify how often you want the job to run and the depth and scope of the job’s analysis, and then choose Next.
  7. Select any managed data identifiers you want to use, and then choose Next.
  8. Select any custom data identifiers that you want to use, and then choose Next.
  9. Select the allow lists that you created to ignore either predefined text or regular expression patterns for any objects in the job, and then choose Next.

    Figure 1: Selecting allow lists for a Macie job

    Figure 1: Selecting allow lists for a Macie job

  10. In General settings, enter a name for the job. You can also enter a description and assign tags to the job. Choose Next.
  11. Review and create the job, and then choose Submit.

Option 2: Create a Macie job with the allow list by using the AWS CLI

  1. In the AWS CLI, run the following command.
    aws macie2 create-classification-job \
    --generate-cli-skeleton > <insert-macie-job-input-json>
  2. Input the GUID for the Macie allow list as part of the Macie job input in the JSON file.
  3. Run the following command.
    aws macie2 create-classification-job \
    --cli-input-json file://<insert-macie-job-input-json>

Review Macie findings before and after allow lists

It is important to note that for any existing jobs you configured in your AWS account or organization prior to the Macie allow list feature being released, you will need to recreate those Macie jobs and reference the allow lists you want the job to use. This is only required if you want to have existing jobs use allow lists.

Before you run a Macie job that uses predefined text allow lists, verify that existing Amazon Key Management Service (AWS KMS) keys that are used to encrypt buckets and S3 bucket policy grant the Macie service-linked role the necessary permissions to decrypt the S3 objects.

Figure 2 shows an example of predefined text allow lists for sensitive data discovery jobs, that include credit card numbers, Social Security Numbers (SSNs), and first and last names. The values in the S3 object allow lists will not create Macie findings when the sensitive data discovery job inspects S3 objects.

Figure 2: Example list of existing allow lists

Figure 2: Example list of existing allow lists

Figure 3 shows a sensitive data discovery job that does not include the predefined text allow lists.

Figure 3: Macie job example without allow list configured

Figure 3: Macie job example without allow list configured

Since there are no allow lists configured, Macie creates findings for credit card numbers, United States SSNs, and names, as shown in Figure 4.

Figure 4: Macie job scan without allow list results

Figure 4: Macie job scan without allow list results

Figure 5 shows a sensitive data discovery job that does include the use of a predefined text allow lists.

Figure 5: Macie job example with allow list configured

Figure 5: Macie job example with allow list configured

Because we have configured an allow list for this job, Macie creates no findings for credit card numbers, United States SSNs, and names. Figure 6 shows the lack of findings.

Figure 6: Macie job results with allow list configured

Figure 6: Macie job results with allow list configured

Conclusion

In this post, we walked through how to create, manage, and use Macie allow lists with your Macie jobs. Reducing Macie false-positive findings can help your security team to efficiently identify and protect sensitive data within your AWS environment.

Now that we’ve showed you how to create an allow list in Macie, you can use this feature to tailor Macie in your AWS environment, based on your use cases and workloads. After you’ve reduced the false positives in your environment, you can start looking at how to add in automation to respond to Macie findings with allow lists configured.

Try implementing the solution in this blog post for auto-remediation behavior based on finding type and finding severity. Alternatively, since Macie is automatically integrated with AWS Security Hub, you could implement this automated solution to respond to Macie findings by using by Security Hub custom actions.

If you have feedback about this post, submit comments in the Comments section below. If you have questions about this post, contact AWS Support.

Want more AWS Security news? Follow us on Twitter.

Jonathan Nguyen

Jonathan Nguyen

Jonathan is a Shared Delivery Team Senior Security Consultant at AWS. His background is in AWS Security with a focus on threat detection and incident response. Today, he helps enterprise customers develop a comprehensive security strategy and deploy security solutions at scale, and he trains customers on AWS Security best practices.

Ajay Rawat

Ajay Rawat

Ajay is a Security Consultant in a shared delivery team at AWS. He is a technology enthusiast who enjoys working with customers to solve their technical challenges and to improve their security posture in the cloud.

AWS launches AWS Wickr ATAK Plugin

Post Syndicated from Anne Grahn original https://aws.amazon.com/blogs/security/aws-launches-aws-wickr-atak-plugin/

AWS is excited to announce the launch of the AWS Wickr ATAK Plugin, which makes it easier for ATAK users to maintain secure communications.

The Android Team Awareness Kit (ATAK)—also known as Android Tactical Assault Kit (ATAK) for military use—is a smartphone geospatial infrastructure and situational awareness application. It provides mapping, messaging, and geofencing capabilities to enable safe collaboration over geography.

ATAK users, referred to as operators, can view the location of other operators and potential hazards—a major advantage over relying on hand-held radio transmissions. While ATAK was initially designed for use in combat zones, the technology has been adapted to fit the missions of local, state, and federal agencies.

ATAK is currently in use by over 40,000 US Department of Defense (DoD) users—including the Air Force, Army, Special Operations, and National Guard—along with the Department of Justice (DOJ), the Department of Homeland Security (DHS), and 32,000 nonfederal users.

Using AWS Wickr with ATAK

AWS Wickr is a secure collaboration service that provides enterprises and government agencies with advanced security and administrative controls to help them meet security and compliance requirements. The AWS Wickr service is now in preview.

With AWS Wickr, communication mechanisms such as one-to-one and group messaging, audio and video calling, screen sharing, and file sharing are protected with 256-bit end-to-end encryption (E2EE). Encryption takes place locally, on the endpoint. Every message, call, and file is encrypted with a new random key, and no one but the intended recipients can decrypt them. Flexible administrative features enable organizations to deploy at scale, and facilitate information governance.

AWS Wickr supports many agencies that use ATAK. However, until now, ATAK operators have had to leave the ATAK application in order to use AWS Wickr, which creates operational risk.

AWS Wickr ATAK Plugin

AWS Wickr has developed a plugin that enhances ATAK with secure communications features. ATAK operators are provided with a Wickr Enterprise or Wickr Pro account, so they can use AWS Wickr within ATAK for secure messaging, calling, and file transfer. This helps reduce interruptions, and the complexity of configuration with ATAK chat features.

Use cases

The AWS Wickr ATAK Plugin has multiple use cases.

Military

The military uses ATAK for blue force tracking to locate team members, red force tracking to locate enemies, terrain and weather analysis, and to visually communicate their movements to friendly forces.

The AWS Wickr ATAK Plugin enhances the ability of military personnel to maintain the situational awareness ATAK provides, while quickly receiving and reacting to Wickr communications. Ephemeral messaging options allow unit leaders to send mission plans, GPS points of interest, and set burn-on-read and expiration timers. Information can be deleted from the device, while being retained on the AWS Wickr service to help meet compliance requirements, and facilitate the creation of after-action reports.

Law enforcement

ATAK is a powerful tool for team tracking and mission planning that promotes a safer and better response to critical law enforcement and public-safety events.

The AWS Wickr ATAK Plugin adds to the capabilities of ATAK by supporting secure communications between tactical, negotiation, and investigative teams.

First responders

ATAK aids in search-and-rescue and multi-jurisdictional natural disaster responses, such as hurricane relief efforts.

The AWS Wickr ATAK Plugin provides secure, uninterrupted communication between all levels of first responders to help them get oriented quickly, and support complex coordination needs.

Getting started

AWS customers can sign up to use AWS Wickr at no cost during the preview period. For more information about the AWS Wickr ATAK Plugin, email [email protected], and visit the AWS Wickr web page.

If you have feedback about this blog post, let us know in the Comments section below.

Want more AWS Security news? Follow us on Twitter.

Anne Grahn

Anne Grahn

Anne is a Senior Worldwide Security GTM Specialist at AWS based in Chicago. She has more than a decade of experience in the security industry, and has a strong focus on privacy risk management. She maintains a Certified Information Systems Security Professional (CISSP) certification.

Randy Brumfield

Randy Brumfield

Randy leads technology business for new initiatives and the Cloud Support Engineering team at Wickr, an AWS Company. Prior to Wickr (and AWS), Randy spent close to two and a half decades in Silicon Valley across several start-ups, networking companies, and system integrators in various corporate development, product management, and operations roles. Randy currently resides in San Jose, California.

Use Macie to discover sensitive data as part of automated data pipelines

Post Syndicated from Brandon Wu original https://aws.amazon.com/blogs/security/use-macie-to-discover-sensitive-data-as-part-of-automated-data-pipelines/

Data is a crucial part of every business and is used for strategic decision making at all levels of an organization. To extract value from their data more quickly, Amazon Web Services (AWS) customers are building automated data pipelines—from data ingestion to transformation and analytics. As part of this process, my customers often ask how to prevent sensitive data, such as personally identifiable information, from being ingested into data lakes when it’s not needed. They highlight that this challenge is compounded when ingesting unstructured data—such as files from process reporting, text files from chat transcripts, and emails. They also mention that identifying sensitive data inadvertently stored in structured data fields—such as in a comment field stored in a database—is also a challenge.

In this post, I show you how to integrate Amazon Macie as part of the data ingestion step in your data pipeline. This solution provides an additional checkpoint that sensitive data has been appropriately redacted or tokenized prior to ingestion. Macie is a fully managed data security and privacy service that uses machine learning and pattern matching to discover sensitive data in AWS.

When Macie discovers sensitive data, the solution notifies an administrator to review the data and decide whether to allow the data pipeline to continue ingesting the objects. If allowed, the objects will be tagged with an Amazon Simple Storage Service (Amazon S3) object tag to identify that sensitive data was found in the object before progressing to the next stage of the pipeline.

This combination of automation and manual review helps reduce the risk that sensitive data—such as personally identifiable information—will be ingested into a data lake. This solution can be extended to fit your use case and workflows. For example, you can define custom data identifiers as part of your scans, add additional validation steps, create Macie suppression rules to archive findings automatically, or only request manual approvals for findings that meet certain criteria (such as high severity findings).

Solution overview

Many of my customers are building serverless data lakes with Amazon S3 as the primary data store. Their data pipelines commonly use different S3 buckets at each stage of the pipeline. I refer to the S3 bucket for the first stage of ingestion as the raw data bucket. A typical pipeline might have separate buckets for raw, curated, and processed data representing different stages as part of their data analytics pipeline.

Typically, customers will perform validation and clean their data before moving it to a raw data zone. This solution adds validation steps to that pipeline after preliminary quality checks and data cleaning is performed, noted in blue (in layer 3) of Figure 1. The layers outlined in the pipeline are:

  1. Ingestion – Brings data into the data lake.
  2. Storage – Provides durable, scalable, and secure components to store the data—typically using S3 buckets.
  3. Processing – Transforms data into a consumable state through data validation, cleanup, normalization, transformation, and enrichment. This processing layer is where the additional validation steps are added to identify instances of sensitive data that haven’t been appropriately redacted or tokenized prior to consumption.
  4. Consumption – Provides tools to gain insights from the data in the data lake.


Figure 1: Data pipeline with sensitive data scan

Figure 1: Data pipeline with sensitive data scan

The application runs on a scheduled basis (four times a day, every 6 hours by default) to process data that is added to the raw data S3 bucket. You can customize the application to perform a sensitive data discovery scan during any stage of the pipeline. Because most customers do their extract, transform, and load (ETL) daily, the application scans for sensitive data on a scheduled basis before any crawler jobs run to catalog the data and after typical validation and data redaction or tokenization processes complete.

You can expect that this additional validation will add 5–10 minutes to your pipeline execution at a minimum. The validation processing time will scale linearly based on object size, but there is a start-up time per job that is constant.

If sensitive data is found in the objects, an email is sent to the designated administrator requesting an approval decision, which they indicate by selecting the link corresponding to their decision to approve or deny the next step. In most cases, the reviewer will choose to adjust the sensitive data cleanup processes to remove the sensitive data, deny the progression of the files, and re-ingest the files in the pipeline.

Additional considerations for deploying this application for regular use are discussed at the end of the blog post.

Application components

The following resources are created as part of the application:

Note: the application uses various AWS services, and there are costs associated with these resources after the Free Tier usage. See AWS Pricing for details. The primary drivers of the solution cost will be the amount of data ingested through the pipeline, both for Amazon S3 storage and data processed for sensitive data discovery with Macie.

The architecture of the application is shown in Figure 2 and described in the text that follows.
 

Figure 2: Application architecture and logic

Figure 2: Application architecture and logic

Application logic

  1. Objects are uploaded to the raw data S3 bucket as part of the data ingestion process.
  2. A scheduled EventBridge rule runs the sensitive data scan Step Functions workflow.
  3. triggerMacieScan Lambda function moves objects from the raw data S3 bucket to the scan stage S3 bucket.
  4. triggerMacieScan Lambda function creates a Macie sensitive data discovery job on the scan stage S3 bucket.
  5. checkMacieStatus Lambda function checks the status of the Macie sensitive data discovery job.
  6. isMacieStatusCompleteChoice Step Functions Choice state checks whether the Macie sensitive data discovery job is complete.
    1. If yes, the getMacieFindingsCount Lambda function runs.
    2. If no, the Step Functions Wait state waits 60 seconds and then restarts Step 5.
  7. getMacieFindingsCount Lambda function counts all of the findings from the Macie sensitive data discovery job.
  8. isSensitiveDataFound Step Functions Choice state checks whether sensitive data was found in the Macie sensitive data discovery job.
    1. If there was sensitive data discovered, run the triggerManualApproval Lambda function.
    2. If there was no sensitive data discovered, run the moveAllScanStageS3Files Lambda function.
  9. moveAllScanStageS3Files Lambda function moves all of the objects from the scan stage S3 bucket to the scanned data S3 bucket.
  10. triggerManualApproval Lambda function tags and moves objects with sensitive data discovered to the manual review S3 bucket, and moves objects with no sensitive data discovered to the scanned data S3 bucket. The function then sends a notification to the ApprovalRequestNotification Amazon SNS topic as a notification that manual review is required.
  11. Email is sent to the email address that’s subscribed to the ApprovalRequestNotification Amazon SNS topic (from the application deployment template) for the manual review user with the option to Approve or Deny pipeline ingestion for these objects.
  12. Manual review user assesses the objects with sensitive data in the manual review S3 bucket and selects the Approve or Deny links in the email.
  13. The decision request is sent from the Amazon API Gateway to the receiveApprovalDecision Lambda function.
  14. manualApprovalChoice Step Functions Choice state checks the decision from the manual review user.
    1. If denied, run the deleteManualReviewS3Files Lambda function.
    2. If approved, run the moveToScannedDataS3Files Lambda function.
  15. deleteManualReviewS3Files Lambda function deletes the objects from the manual review S3 bucket.
  16. moveToScannedDataS3Files Lambda function moves the objects from the manual review S3 bucket to the scanned data S3 bucket.
  17. The next step of the automated data pipeline will begin with the objects in the scanned data S3 bucket.

Prerequisites

For this application, you need the following prerequisites:

You can use AWS Cloud9 to deploy the application. AWS Cloud9 includes the AWS CLI and AWS SAM CLI to simplify setting up your development environment.

Deploy the application with AWS SAM CLI

You can deploy this application using the AWS SAM CLI. AWS SAM uses AWS CloudFormation as the underlying deployment mechanism. AWS SAM is an open-source framework that you can use to build serverless applications on AWS.

To deploy the application

  1. Initialize the serverless application using the AWS SAM CLI from the GitHub project in the aws-samples repository. This will clone the project locally which includes the source code for the Lambda functions, Step Functions state machine definition file, and the AWS SAM template. On the command line, run the following:
    sam init --location gh: aws-samples/amazonmacie-datapipeline-scan
    

    Alternatively, you can clone the Github project directly.

  2. Deploy your application to your AWS account. On the command line, run the following:
    sam deploy --guided
    

    Complete the prompts during the guided interactive deployment. The first deployment prompt is shown in the following example.

    Configuring SAM deploy
    ======================
    
            Looking for config file [samconfig.toml] :  Found
            Reading default arguments  :  Success
    
            Setting default arguments for 'sam deploy'
            =========================================
            Stack Name [maciepipelinescan]:
    

  3. Settings:
    • Stack Name – Name of the CloudFormation stack to be created.
    • AWS RegionRegion—for example, us-west-2, eu-west-1, ap-southeast-1—to deploy the application to. This application was tested in the us-west-2 and ap-southeast-1 Regions. Before selecting a Region, verify that the services you need are available in those Regions (for example, Macie and Step Functions).
    • Parameter StepFunctionName – Name of the Step Functions state machine to be created—for example, maciepipelinescanstatemachine).
    • Parameter BucketNamePrefix – Prefix to apply to the S3 buckets to be created (S3 bucket names are globally unique, so choosing a random prefix helps ensure uniqueness).
    • Parameter ApprovalEmailDestination – Email address to receive the manual review notification.
    • Parameter EnableMacie – Whether you need Macie enabled in your account or Region. You can select yes or no; select yes if you need Macie to be enabled for you as part of this template, select no, if you already have Macie enabled.
  4. Confirm changes and provide approval for AWS SAM CLI to deploy the resources to your AWS account by responding y to prompts, as shown in the following example. You can accept the defaults for the SAM configuration file and SAM configuration environment prompts.
    #Shows you resources changes to be deployed and require a 'Y' to initiate deploy
    Confirm changes before deploy [y/N]: y
    #SAM needs permission to be able to create roles to connect to the resources in your template
    Allow SAM CLI IAM role creation [Y/n]: y
    ReceiveApprovalDecisionAPI may not have authorization defined, Is this okay? [y/N]: y
    ReceiveApprovalDecisionAPI may not have authorization defined, Is this okay? [y/N]: y
    Save arguments to configuration file [Y/n]: y
    SAM configuration file [samconfig.toml]: 
    SAM configuration environment [default]:
    

    Note: This application deploys an Amazon API Gateway with two REST API resources without authorization defined to receive the decision from the manual review step. You will be prompted to accept each resource without authorization. A token (Step Functions taskToken) is used to authenticate the requests.

  5. This creates an AWS CloudFormation changeset. Once the changeset creation is complete, you must provide a final confirmation of y to Deploy the changeset? [y/N] when prompted as shown in the following example.
    Changeset created successfully. arn:aws:cloudformation:ap-southeast-1:XXXXXXXXXXXX:changeSet/samcli-deploy1605213119/db681961-3635-4305-b1c7-dcc754c7XXXX
    
    
    Previewing CloudFormation changeset before deployment
    ======================================================
    Deploy this changeset? [y/N]:
    

Your application is deployed to your account using AWS CloudFormation. You can track the deployment events in the command prompt or via the AWS CloudFormation console.

After the application deployment is complete, you must confirm the subscription to the Amazon SNS topic. An email will be sent to the email address entered in Step 3 with a link that you need to select to confirm the subscription. This confirmation provides opt-in consent for AWS to send emails to you via the specified Amazon SNS topic. The emails will be notifications of potentially sensitive data that need to be approved. If you don’t see the verification email, be sure to check your spam folder.

Test the application

The application uses an EventBridge scheduled rule to start the sensitive data scan workflow, which runs every 6 hours. You can manually start an execution of the workflow to verify that it’s working. To test the function, you will need a file that contains data that matches your rules for sensitive data. For example, it is easy to create a spreadsheet, document, or text file that contains names, addresses, and numbers formatted like credit card numbers. You can also use this generated sample data to test Macie.

We will test by uploading a file to our S3 bucket via the AWS web console. If you know how to copy objects from the command line, that also works.

Upload test objects to the S3 bucket

  1. Navigate to the Amazon S3 console and upload one or more test objects to the <BucketNamePrefix>-data-pipeline-raw bucket. <BucketNamePrefix> is the prefix you entered when deploying the application in the AWS SAM CLI prompts. You can use any objects as long as they’re a supported file type for Amazon Macie. I suggest uploading multiple objects, some with and some without sensitive data, in order to see how the workflow processes each.

Start the Scan State Machine

  1. Navigate to the Step Functions state machines console. If you don’t see your state machine, make sure you’re connected to the same region that you deployed your application to.
  2. Choose the state machine you created using the AWS SAM CLI as seen in Figure 3. The example state machine is maciepipelinescanstatemachine, but you might have used a different name in your deployment.
     
    Figure 3: AWS Step Functions state machines console

    Figure 3: AWS Step Functions state machines console

  3. Select the Start execution button and copy the value from the Enter an execution name – optional box. Change the Input – optional value replacing <execution id> with the value just copied as follows:
    {
        “id”: “<execution id>”
    }
    

    In my example, the <execution id> is fa985a4f-866b-b58b-d91b-8a47d068aa0c from the Enter an execution name – optional box as shown in Figure 4. You can choose a different ID value if you prefer. This ID is used by the workflow to tag the objects being processed to ensure that only objects that are scanned continue through the pipeline. When the EventBridge scheduled event starts the workflow as scheduled, an ID is included in the input to the Step Functions workflow. Then select Start execution again.
     

    Figure 4: New execution dialog box

    Figure 4: New execution dialog box

  4. You can see the status of your workflow execution in the Graph inspector as shown in Figure 5. In the figure, the workflow is at the pollForCompletionWait step.
     
    Figure 5: AWS Step Functions graph inspector

    Figure 5: AWS Step Functions graph inspector

The sensitive discovery job should run for about five to ten minutes. The jobs scale linearly based on object size, but there is a start-up time per job that is constant. If sensitive data is found in the objects uploaded to the <BucketNamePrefix>-data-pipeline-upload S3 bucket, an email is sent to the address provided during the AWS SAM deployment step, notifying the recipient requesting of the need for an approval decision, which they indicate by selecting the link corresponding to their decision to approve or deny the next step as shown in Figure 6.
 

Figure 6: Sensitive data identified email

Figure 6: Sensitive data identified email

When you receive this notification, you can investigate the findings by reviewing the objects in the <BucketNamePrefix>-data-pipeline-manual-review S3 bucket. Based on your review, you can either apply remediation steps to remove any sensitive data or allow the data to proceed to the next step of the data ingestion pipeline. You should define a standard response process to address discovery of sensitive data in the data pipeline. Common remediation steps include review of the files for sensitive data, deleting the files that you do not want to progress, and updating the ETL process to redact or tokenize sensitive data when re-ingesting into the pipeline. When you re-ingest the files into the pipeline without sensitive data, the files will not be flagged by Macie.

The workflow performs the following:

  • If you select Approve, the files are moved to the <BucketNamePrefix>-data-pipeline-scanned-data S3 bucket with an Amazon S3 SensitiveDataFound object tag with a value of true.
  • If you select Deny, the files are deleted from the <BucketNamePrefix>-data-pipeline-manual-review S3 bucket.
  • If no action is taken, the Step Functions workflow execution times out after five days and the file will automatically be deleted from the <BucketNamePrefix>-data-pipeline-manual-review S3 bucket after 10 days.

Clean up the application

You’ve successfully deployed and tested the sensitive data pipeline scan workflow. To avoid ongoing charges for resources you created, you should delete all associated resources by deleting the CloudFormation stack. In order to delete the CloudFormation stack, you must first delete all objects that are stored in the S3 buckets that you created for the application.

To delete the application

  1. Empty the S3 buckets created in this application (<BucketNamePrefix>-data-pipeline-raw S3 bucket, <BucketNamePrefix>-data-pipeline-scan-stage, <BucketNamePrefix>-data-pipeline-manual-review, and <BucketNamePrefix>-data-pipeline-scanned-data).
  2. Delete the CloudFormation stack used to deploy the application.

Considerations for regular use

Before using this application in a production data pipeline, you will need to stop and consider some practical matters. First, the notification mechanism used when sensitive data is identified in the objects is email. Email doesn’t scale: you should expand this solution to integrate with your ticketing or workflow management system. If you choose to use email, subscribe a mailing list so that the work of reviewing and responding to alerts is shared across a team.

Second, the application is run on a scheduled basis (every 6 hours by default). You should consider starting the application when your preliminary validations have completed and are ready to perform a sensitive data scan on the data as part of your pipeline. You can modify the EventBridge Event Rule to run in response to an Amazon EventBridge event instead of a scheduled basis.

Third, the application currently uses a 60 second Step Functions Wait state when polling for the Macie discovery job completion. In real world scenarios, the discovery scan will take 10 minutes at a minimum, likely several orders of magnitude longer. You should evaluate the typical execution times for your application execution and tune the polling period accordingly. This will help reduce costs related to running Lambda functions and log storage within CloudWatch Logs. The polling period is defined in the Step Functions state machine definition file (macie_pipeline_scan.asl.json) under the pollForCompletionWait state.

Fourth, the application currently doesn’t account for false positives in the sensitive data discovery job results. Also, the application will progress or delete all objects identified based on the decision by the reviewer. You should consider expanding the application to handle false positives through automation rather than manual review / intervention (such as deleting the files from the manual review bucket or removing the sensitive data tags applied).

Last, the solution will stop the ingestion of a subset of objects into your pipeline. This behavior is similar to other validation and data quality checks that most customers perform as part of the data pipeline. However, you should test to ensure that this will not cause unexpected outcomes and address them in your downstream application logic accordingly.

Conclusion

In this post, I showed you how to integrate sensitive data discovery using Macie as an additional validation step in an automated data pipeline. You’ve reviewed the components of the application, deployed it using the AWS SAM CLI, tested to validate that the application functions as expected, and cleaned up by removing deployed resources.

You now know how to integrate sensitive data scanning into your ETL pipeline. You can use automation and—where required—manual review to help reduce the risk of sensitive data, such as personally identifiable information, being inadvertently ingested into a data lake. You can take this application and customize it to fit your use case and workflows, such as using custom data identifiers as part of your scans, adding additional validation steps, creating Macie suppression rules to define cases to archive findings automatically, or only request manual approvals for findings that meet certain criteria (such as high severity findings).

If you have feedback about this post, submit comments in the Comments section below. If you have questions about this post, start a new thread on the Amazon Macie forum.

Want more AWS Security how-to content, news, and feature announcements? Follow us on Twitter.

Author

Brandon Wu

Brandon is a security solutions architect helping financial services organizations secure their critical workloads on AWS. In his spare time, he enjoys exploring outdoors and experimenting in the kitchen.