Post Syndicated from Marc Borntraeger original https://aws.amazon.com/blogs/security/reduce-risk-by-implementing-httponly-cookie-authentication-in-amazon-api-gateway/
Some web applications need to protect their authentication tokens or session IDs from cross-site scripting (XSS). It’s an Open Web Application Security Project (OWASP) best practice for session management to store secrets in the browsers’ cookie store with the HttpOnly attribute enabled. When cookies have the HttpOnly attribute set, the browser will prevent client-side JavaScript code from accessing the value. This reduces the risk of secrets being compromised.
In this blog post, you’ll learn how to store access tokens and authenticate with HttpOnly cookies in your own workloads when using Amazon API Gateway as the client-facing endpoint. The tutorial in this post will show you a solution to store OAuth2 access tokens in the browser cookie store, and verify user authentication through Amazon API Gateway. This post describes how to use Amazon Cognito to issue OAuth2 access tokens, but the solution is not limited to OAuth2. You can use other kinds of tokens or session IDs.
The solution consists of two decoupled parts:
- OAuth2 flow
- Authentication check
Note: This tutorial takes you through detailed step-by-step instructions to deploy an example solution. If you prefer to deploy the solution with a script, see the api-gw-http-only-cookie-auth GitHub repository.
Prerequisites
- You should have an AWS account.
- You should have level 200-300 knowledge about the OAuth2 protocol.
- You should have the AWS Command Line Interface (AWS CLI) installed.
- You should have the AWS Toolkit for Visual Studio Code installed, so you can simply upload your code.
- You should have Node.js installed on your local machine.
- This solution uses the following services:
No costs should incur when you deploy the application from this tutorial because the services you’re going to use are included in the AWS Free Tier. However, be aware that small charges may apply if you have other workloads running in your AWS account and exceed the free tier. Make sure to clean up your resources from this tutorial after deployment.
Solution architecture
This solution uses Amazon Cognito, Amazon API Gateway, and AWS Lambda to build a solution that persists OAuth2 access tokens in the browser cookie store. Figure 1 illustrates the solution architecture for the OAuth2 flow.
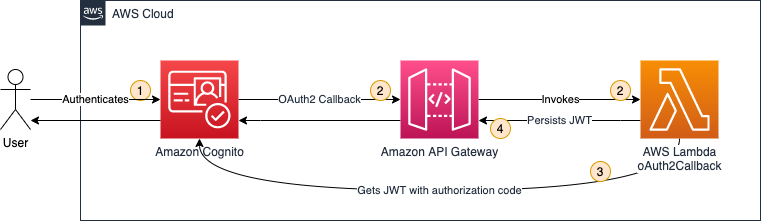
Figure 1: OAuth2 flow solution architecture
- A user authenticates by using Amazon Cognito.
- Amazon Cognito has an OAuth2 redirect URI pointing to your API Gateway endpoint and invokes the integrated Lambda function
oAuth2Callback. - The
oAuth2CallbackLambda function makes a request to the Amazon Cognito token endpoint with the OAuth2 authorization code to get the access token. - The Lambda function returns a response with the Set-Cookie header, instructing the web browser to persist the access token as an HttpOnly cookie. The browser will automatically interpret the
Set-Cookieheader, because it’s a web standard. HttpOnly cookies can’t be accessed through JavaScript—they can only be set through theSet-Cookieheader.
After the OAuth2 flow, you are set up to issue and store access tokens. Next, you need to verify that users are authenticated before they are allowed to access your protected backend. Figure 2 illustrates how the authentication check is handled.
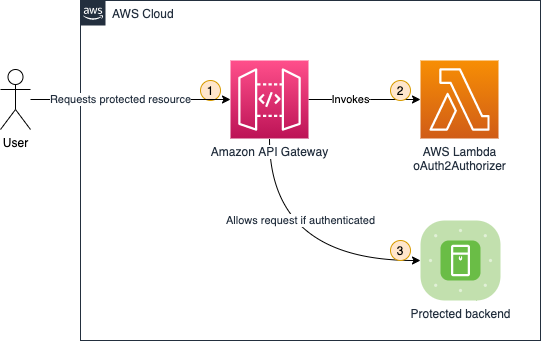
Figure 2: Authentication check solution architecture
- A user requests a protected backend resource. The browser automatically attaches HttpOnly cookies to every request, as defined in the web standard.
- The Lambda function
oAuth2Authorizeracts as the Lambda authorizer for HTTP APIs. It validates whether requests are authenticated. If requests include the proper access token in the request cookie header, then it allows the request. - API Gateway only passes through requests that are authenticated.
Amazon Cognito is not involved in the authentication check, because the Lambda function can validate the OAuth2 access tokens by using a JSON Web Token (JWT) validation check.
1. Deploying the OAuth2 flow
In this section, you’ll deploy the first part of the solution, which is the OAuth2 flow. The OAuth2 flow is responsible for issuing and persisting OAuth2 access tokens in the browser’s cookie store.
1.1. Create a mock protected backend
As shown in in Figure 2, you need to protect a backend. For the purposes of this post, you create a mock backend by creating a simple Lambda function with a default response.
To create the Lambda function
- In the Lambda console, choose Create function.
Note: Make sure to select your desired AWS Region.
- Choose Author from scratch as the option to create the function.
- In the Basic information section as shown in , enter or select the following values:
- For Function name, enter getProtectedResource.
- For Runtime, select Node.js 16.x.
- For Architecture, select arm64, because arm64 is designed to be faster and cheaper.
- Choose Create function.

Figure 3: Configuring the getProtectedResource Lambda function

The default Lambda function code returns a simple Hello from Lambda message, which is sufficient to demonstrate the concept of this solution.
1.2. Create an HTTP API in Amazon API Gateway
Next, you create an HTTP API by using API Gateway. Either an HTTP API or a REST API will work. In this example, choose HTTP API because it’s offered at a lower price point (for this tutorial you will stay within the free tier).
To create the API Gateway API
- In the API Gateway console, under HTTP API, choose Build.
- On the Create and configure integrations page, as shown in Figure 4, choose Add integration, then enter or select the following values:
- Select Lambda.
- For Lambda function, select the getProtectedResource Lambda function that you created in the previous section.
- For API name, enter a name. In this example, I used MyApp.
- Choose Next.

Figure 4: Configuring API Gateway integrations and API name
- On the Configure routes page, as shown in Figure 5, enter or select the following values:
- For Method, select GET.
- For Resource path, enter / (a single forward slash).
- For Integration target, select the getProtectedResource Lambda function.
- Choose Next.
Figure 5: Configuring API Gateway routes
- On the Configure stages page, keep all the default options, and choose Next.
- On the Review and create page, choose Create.
- Note down the value of Invoke URL, as shown in Figure 6.
Figure 6: Note down the invoke URL


Now it’s time to test your API Gateway API. Paste the value of Invoke URL into your browser. You’ll see the following message from your Lambda function: Hello from Lambda.
1.3. Use Amazon Cognito
You’ll use Amazon Cognito user pools to create and maintain a user directory, and add sign-up and sign-in to your web application.
To create an Amazon Cognito user pool
- In the Amazon Cognito console, choose Create user pool.
- On the Authentication providers page, as shown in Figure 7, for Cognito user pool sign-in options, select Email, then choose Next.
Figure 7: Configuring authentication providers
- In the Multi-factor authentication pane of the Configure Security requirements page, as shown in Figure 8, choose your MFA enforcement. For this example, choose No MFA to make it simpler for you to test your solution. However, in production for data sensitive workloads you should choose Require MFA – Recommended. Choose Next.
Figure 8: Configuring MFA
- On the Configure sign-up experience page, keep all the default options and choose Next.
- On the Configure message delivery page, as shown in Figure 9, choose your email provider. For this example, choose Send email with Cognito to make it simple to test your solution. In production workloads, you should choose Send email with Amazon SES – Recommended. Choose Next.
Figure 9: Configuring email
- In the User pool name section of the Integrate your app page, as shown in Figure 10, enter or select the following values:
- For User pool name, enter a name. In this example, I used MyUserPool.

Figure 10: Configuring user pool name
- In the Hosted authentication pages section, as shown in Figure 11, select Use the Cognito Hosted UI.
Figure 11: Configuring hosted authentication pages
- In the Domain section, as shown in Figure 12, for Domain type, choose Use a Cognito domain. For Cognito domain, enter a domain name. Note that domains in Cognito must be unique. Make sure to enter a unique name, for example by appending random numbers at the end of your domain name. For this example, I used https://http-only-cookie-secured-app.
Figure 12: Configuring an Amazon Cognito domain
- In the Initial app client section, as shown in Figure 13, enter or select the following values:
- For App type, keep the default setting Public client.
- For App client name, enter a friendly name. In this example, I used MyAppClient.
- For Client secret, keep the default setting Don’t generate a client secret.
- For Allowed callback URLs, enter <API_GW_INVOKE_URL>/oauth2/callback, replacing <API_GW_INVOKE_URL> with the invoke URL you noted down from API Gateway in the previous section.
Figure 13: Configuring the initial app client
- Choose Next.
- For User pool name, enter a name. In this example, I used MyUserPool.
- Choose Create user pool.


Next, you need to retrieve some Amazon Cognito information for later use.
To note down Amazon Cognito information
- In the Amazon Cognito console, choose the user pool you created in the previous steps.
- Under User pool overview, make note of the User pool ID value.
- On the App integration tab, under Cognito Domain, make note of the Domain value.
- Under App client list, make note of the Client ID value.
- Under App client list, choose the app client name you created in the previous steps.
- Under Hosted UI, make note of the Allowed callback URLs value.
Next, create the user that you will use in a later section of this post to run your test.
To create a user
- In the Amazon Cognito console, choose the user pool you created in the previous steps.
- Under Users, choose Create user.
- For Email address, enter [email protected]. For this tutorial, you don’t need to send out actual emails, so the email address does not need to actually exist.
- Choose Mark email address as verified.
- For password, enter a password you can remember (or even better: use a password generator).
- Remember the email and password for later use.
- Choose Create user.
1.4. Create the Lambda function oAuth2Callback
Next, you create the Lambda function oAuth2Callback, which is responsible for issuing and persisting the OAuth2 access tokens.
To create the Lambda function oAuth2Callback
- In the Lambda console, choose Create function.
Note: Make sure to select your desired Region.
- For Function name, enter oAuth2Callback.
- For Runtime, select Node.js 16.x.
- For Architecture, select arm64.
- Choose Create function.
After you create the Lambda function, you need to add the code. Create a new folder on your local machine and open it with your preferred integrated development environment (IDE). Add the package.json and index.js files, as shown in the following examples.
package.json
{
  "name": "oAuth2Callback",
  "version": "0.0.1",
  "dependencies": {
    "axios": "^0.27.2",
    "qs": "^6.11.0"
  }
}
In a terminal at the root of your created folder, run the following command.
$ npm install
In the index.js example code that follows, be sure to replace the placeholders with your values.
index.js
const qs = require("qs");
const axios = require("axios").default;
exports.handler = async function (event) {
  const code = event.queryStringParameters?.code;
  if (code == null) {
    return {
      statusCode: 400,
      body: "code query param required",
    };
  }
  const data = {
    grant_type: "authorization_code",
    client_id: "<your client ID from Cognito>",
    // The redirect has already happened, but you still need to pass the URI for validation, so a valid oAuth2 access token can be generated
    redirect_uri: encodeURI("<your callback URL from Cognito>"),
    code: code,
  };
  // Every Cognito instance has its own token endpoints. For more information check the documentation: https://docs.aws.amazon.com/cognito/latest/developerguide/token-endpoint.html
  const res = await axios.post(
    "<your App Client Cognito domain>/oauth2/token",
    qs.stringify(data),
    {
      headers: {
        "Content-Type": "application/x-www-form-urlencoded",
      },
    }
  );
  return {
    statusCode: 302,
    // These headers are returned as part of the response to the browser.
    headers: {
      // The Location header tells the browser it should redirect to the root of the URL
      Location: "/",
      // The Set-Cookie header tells the browser to persist the access token in the cookie store
      "Set-Cookie": `accessToken=${res.data.access_token}; Secure; HttpOnly; SameSite=Lax; Path=/`,
    },
  };
};
Along with the HttpOnly attribute, you pass along two additional cookie attributes:
Secure– Indicates that cookies are only sent by the browser to the server when a request is made with thehttps:scheme.SameSite– Controls whether or not a cookie is sent with cross-site requests, providing protection against cross-site request forgery attacks. You set the value toLaxbecause you want the cookie to be set when the user is forwarded from Amazon Cognito to your web application (which runs under a different URL).
For more information, see Using HTTP cookies on the MDN Web Docs site.
Afterwards, upload the code to the oAuth2Callback Lambda function as described in Upload a Lambda Function in the AWS Toolkit for VS Code User Guide.
1.5. Configure an OAuth2 callback route in API Gateway
Now, you configure API Gateway to use your new Lambda function through a Lambda proxy integration.
To configure API Gateway to use your Lambda function
- In the API Gateway console, under APIs, choose your API name. For me, the name is MyApp.
- Under Develop, choose Routes.
- Choose Create.
- Enter or select the following values:
- For method, select GET.
- For path, enter /oauth2/callback.
- Choose Create.
- Choose GET under /oauth2/callback, and then choose Attach integration.
- Choose Create and attach an integration.
- For Integration type, choose Lambda function.
- For Lambda function, choose oAuth2Callback from the last step.
- Choose Create.
Your route configuration in API Gateway should now look like Figure 14.
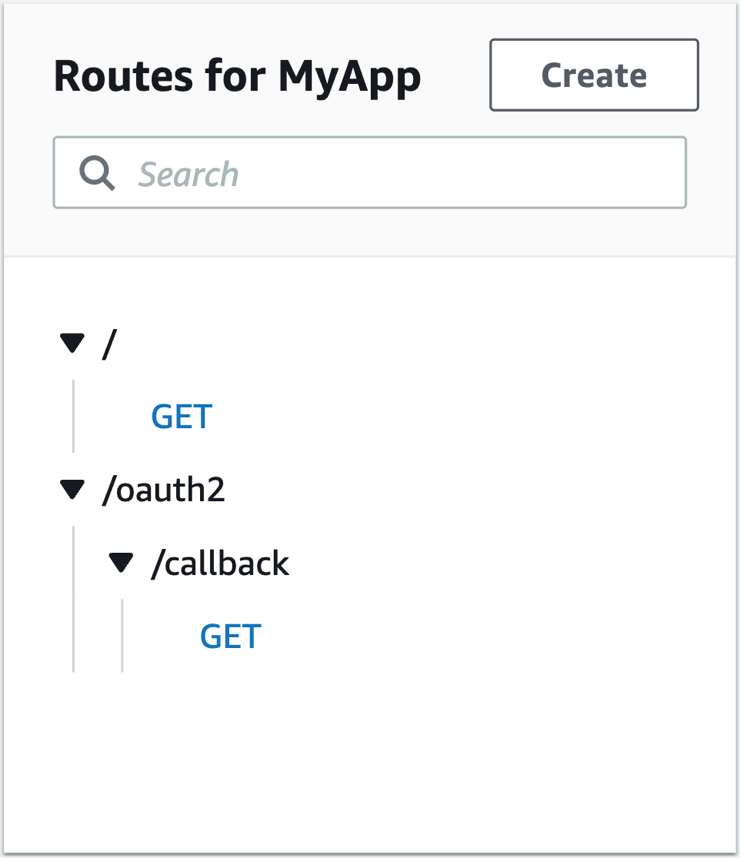
Figure 14: Routes for API Gateway
2. Testing the OAuth2 flow
Now that you have the components in place, you can test your OAuth2 flow. You test the OAuth2 flow by invoking the login on your browser.
To test the OAuth2 flow
- In the Amazon Cognito console, choose your user pool name. For me, the name is MyUserPool.
- Under the navigation tabs, choose App integration.
- Under App client list, choose your app client name. For me, the name is MyAppClient.
- Choose View Hosted UI.
- In the newly opened browser tab, open your developer tools, so you can inspect the network requests.
- Log in with the email address and password you set in the previous section. Change your password, if you’re asked to do so. You can also choose the same password as you set in the previous section.
- You should see your
Hello from Lambdamessage.
To test that the cookie was accurately set
- Check your browser network tab in the browser developer settings. You’ll see the
/oauth2/callbackrequest, as shown in Figure 15.
Figure 15: Callback network request
The response headers should include a
set-cookieheader, as you specified in your Lambda function. With theset-cookieheader, your OAuth2 access token is set as an HttpOnly cookie in the browser, and access is prohibited from any client-side code. - Alternatively, you can inspect the cookie in the browser cookie storage, as shown in Figure 16.
- If you want to retry the authentication, navigate in your browser to your Amazon Cognito domain that you chose in the previous section and clear all site data in the browser developer tools. Do the same with your API Gateway invoke URL. Now you can restart the test with a clean state.


3. Deploying the authentication check
In this section, you’ll deploy the second part of your application: the authentication check. The authentication check makes it so that only authenticated users can access your protected backend. The authentication check works with the HttpOnly cookie, which is stored in the user’s cookie store.
3.1. Create the Lambda function oAuth2Authorizer
This Lambda function checks that requests are authenticated.
To create the Lambda function
- In the Lambda console, choose Create function.
Note: Make sure to select your desired Region.
- For Function name, enter oAuth2Authorizer.
- For Runtime, select Node.js 16.x.
- For Architecture, select arm64.
- Choose Create function.
After you create the Lambda function, you need to add the code. Create a new folder on your local machine and open it with your preferred IDE. Add the package.json and index.js files as shown in the following examples.
package.json
{
  "name": "oAuth2Authorizer",
  "version": "0.0.1",
  "dependencies": {
    "aws-jwt-verify": "^3.1.0"
  }
}
In a terminal at the root of your created folder, run the following command.
$ npm install
In the index.js example code, be sure to replace the placeholders with your values.
index.js
const { CognitoJwtVerifier } = require("aws-jwt-verify");
function getAccessTokenFromCookies(cookiesArray) {
  // cookieStr contains the full cookie definition string: "accessToken=abc"
  for (const cookieStr of cookiesArray) {
    const cookieArr = cookieStr.split("accessToken=");
    // After splitting you should get an array with 2 entries: ["", "abc"] - Or only 1 entry in case it was a different cookie string: ["test=test"]
    if (cookieArr[1] != null) {
      return cookieArr[1]; // Returning only the value of the access token without cookie name
    }
  }
  return null;
}
// Create the verifier outside the Lambda handler (= during cold start),
// so the cache can be reused for subsequent invocations. Then, only during the
// first invocation, will the verifier actually need to fetch the JWKS.
const verifier = CognitoJwtVerifier.create({
  userPoolId: "<your user pool ID from Cognito>",
  tokenUse: "access",
  clientId: "<your client ID from Cognito>",
});
exports.handler = async (event) => {
  if (event.cookies == null) {
    console.log("No cookies found");
    return {
      isAuthorized: false,
    };
  }
  // Cookies array looks something like this: ["accessToken=abc", "otherCookie=Random Value"]
  const accessToken = getAccessTokenFromCookies(event.cookies);
  if (accessToken == null) {
    console.log("Access token not found in cookies");
    return {
      isAuthorized: false,
    };
  }
  try {
    await verifier.verify(accessToken);
    return {
      isAuthorized: true,
    };
  } catch (e) {
    console.error(e);
    return {
      isAuthorized: false,
    };
  }
};
After you add the package.json and index.js files, upload the code to the oAuth2Authorizer Lambda function as described in Upload a Lambda Function in the AWS Toolkit for VS Code User Guide.
3.2. Configure the Lambda authorizer in API Gateway
Next, you configure your authorizer Lambda function to protect your backend. This way you control access to your HTTP API.
To configure the authorizer Lambda function
- In the API Gateway console, under APIs, choose your API name. For me, the name is MyApp.
- Under Develop, choose Routes.
- Under / (a single forward slash) GET, choose Attach authorization.
- Choose Create and attach an authorizer.
- Choose Lambda.
- Enter or select the following values:
- For Name, enter oAuth2Authorizer.
- For Lambda function, choose oAuth2Authorizer.
- Clear Authorizer caching. For this tutorial, you disable authorizer caching to make testing simpler. See the section Bonus: Enabling authorizer caching for more information about enabling caching to increase performance.
- Under Identity sources, choose Remove.
Note: Identity sources are ignored for your Lambda authorizer. These are only used for caching.
- Choose Create and attach.
- Under Develop, choose Routes to inspect all routes.
Now your API Gateway route /oauth2/callback should be configured as shown in Figure 17.
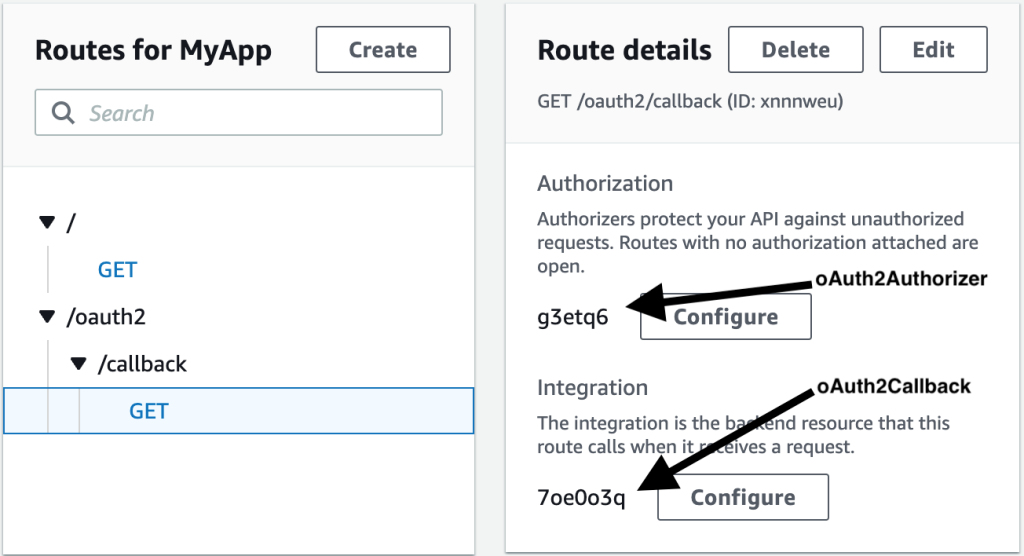
Figure 17: API Gateway route configuration
4. Testing the OAuth2 authorizer
You did it! From your last test, you should still be authenticated. So, if you open the API Gateway Invoke URL in your browser, you’ll be greeted from your protected backend.
In case you are not authenticated anymore, you’ll have to follow the steps again from the section Testing the OAuth2 flow to authenticate.
When you inspect the HTTP request that your browser makes in the developer tools as shown in Figure 18, you can see that authentication works because the HttpOnly cookie is automatically attached to every request.

Figure 18: Browser requests include HttpOnly cookies
To verify that your authorizer Lambda function works correctly, paste the same Invoke URL you noted previously in an incognito window. Incognito windows do not share the cookie store with your browser session, so you see a {"message":"Forbidden"} error message with HTTP response code 403 – Forbidden.
Cleanup
Delete all unwanted resources to avoid incurring costs.
To delete the Amazon Cognito domain and user pool
- In the Amazon Cognito console, choose your user pool name. For me, the name is MyUserPool.
- Under the navigation tabs, choose App integration.
- Under Domain, choose Actions, then choose Delete Cognito domain.
- Confirm by entering your custom Amazon Cognito domain, and choose Delete.
- Choose Delete user pool.
- Confirm by entering your user pool name (in my case, MyUserPool), and then choose Delete.
To delete your API Gateway resource
- In the API Gateway console, select your API name. For me, the name is MyApp.
- Under Actions, choose Delete and confirm your deletion.
To delete the AWS Lambda functions
- In the Lambda console, select all three of the Lambda functions you created.
- Under Actions, choose Delete and confirm your deletion.
Bonus: Enabling authorizer caching
As mentioned earlier, you can enable authorizer caching to help improve your performance. When caching is enabled for an authorizer, API Gateway uses the authorizer’s identity sources as the cache key. If a client specifies the same parameters in identity sources within the configured Time to Live (TTL), then API Gateway uses the cached authorizer result, rather than invoking your Lambda function.
To enable caching, your authorizer must have at least one identity source. To cache by the cookie request header, you specify $request.header.cookie as the identity source. Be aware that caching will be affected if you pass along additional HttpOnly cookies apart from the access token.
For more information, see Working with AWS Lambda authorizers for HTTP APIs in the Amazon API Gateway Developer Guide.
Conclusion
In this blog post, you learned how to implement authentication by using HttpOnly cookies. You used Amazon API Gateway and AWS Lambda to persist and validate the HttpOnly cookies, and you used Amazon Cognito to issue OAuth2 access tokens. If you want to try an automated deployment of this solution with a script, see the api-gw-http-only-cookie-auth GitHub repository.
The application of this solution to protect your secrets from potential cross-site scripting (XSS) attacks is not limited to OAuth2. You can protect other kinds of tokens, sessions, or tracking IDs with HttpOnly cookies.
In this solution, you used NodeJS for your Lambda functions to implement authentication. But HttpOnly cookies are widely supported by many programing frameworks. You can find more implementation options on the OWASP Secure Cookie Attribute page.
Although this blog post gives you a tutorial on how to implement HttpOnly cookie authentication in API Gateway, it may not meet all your security and functional requirements. Make sure to check your business requirements and talk to your stakeholders before you adopt techniques from this blog post.
Furthermore, it’s a good idea to continuously test your web application, so that cookies are only set with your approved security attributes. For more information, see the OWASP Testing for Cookies Attributes page.
If you have feedback about this post, submit comments in the Comments section below. If you have questions about this post, start a new thread on the Amazon API Gateway re:Post or contact AWS Support.
Want more AWS Security news? Follow us on Twitter.


