Post Syndicated from Peter Foster original https://blog.cloudflare.com/protecting-apis-from-abuse-using-sequence-learning-and-variable-order-markov
Consider the case of a malicious actor attempting to inject, scrape, harvest, or exfiltrate data via an API. Such malicious activities are often characterized by the particular order in which the actor initiates requests to API endpoints. Moreover, the malicious activity is often not readily detectable using volumetric techniques alone, because the actor may intentionally execute API requests slowly, in an attempt to thwart volumetric abuse protection. To reliably prevent such malicious activity, we therefore need to consider the sequential order of API requests. We use the term sequential abuse to refer to malicious API request behavior. Our fundamental goal thus involves distinguishing malicious from benign API request sequences.
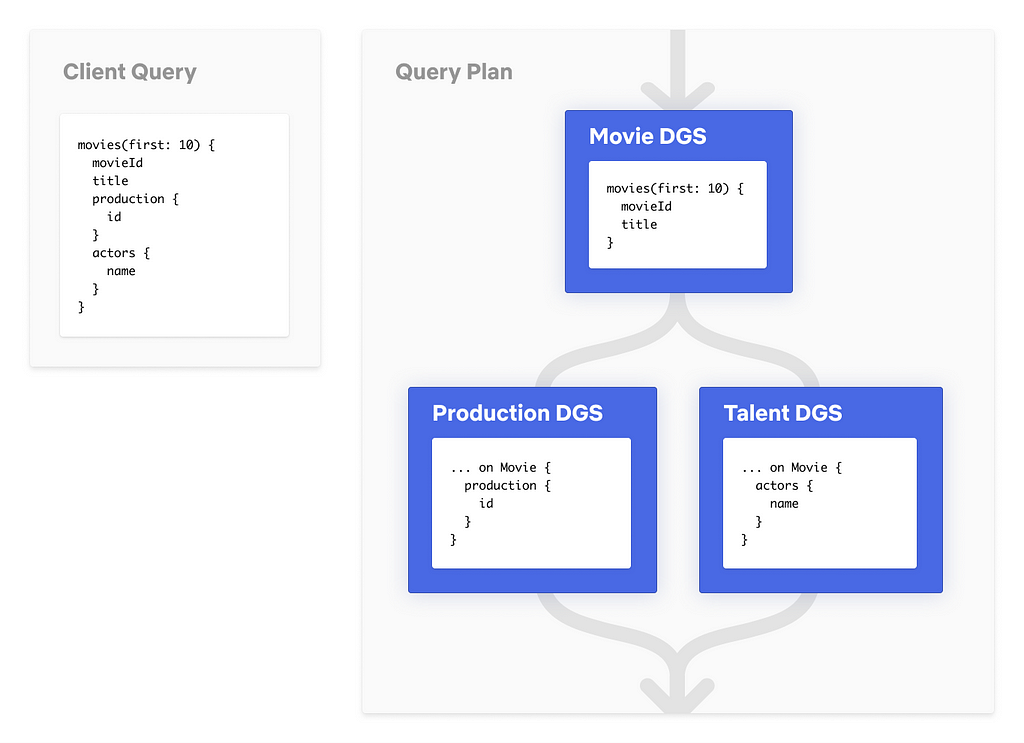
In this blog post, you’ll learn about how we address the challenge of helping customers protect their APIs against sequential abuse. To this end, we’ll unmask the statistical machine learning (ML) techniques currently underpinning our Sequence Analytics product. We’ll build on the high-level introduction to Sequence Analytics provided in a previous blog post.
API sessions
Introduced in the previous blog post, let’s consider the idea of a time-ordered series of HTTP API requests initiated by a specific user. These occur as the user interacts with a service, such as while browsing a website or using a mobile app. We refer to the user’s time-ordered series of API requests as a session. Choosing a familiar example, the session for a customer interacting with a banking service might look like:
| Time Order | Method | Path | Description |
|---|---|---|---|
| 1 | POST | /api/v1/auth | Authenticates a user |
| 2 | GET | /api/v1/accounts/{account_id} | Displays account balance, where account_id is an account belonging to the user |
| 3 | POST | /api/v1/transferFunds | Containing a request body detailing an account to transfer funds from, an account to transfer funds to, and an amount of money to transfer |
One of our aims is to enable our customers to secure their APIs by automatically suggesting rules applicable to our Sequence Mitigation product for enforcing desired sequential behavior. If we enforce the expected behavior, we can prevent unwanted sequential behavior. In our example, desired sequential behavior might entail that /api/v1/auth must always precede /api/v1/accounts/{account_id}.
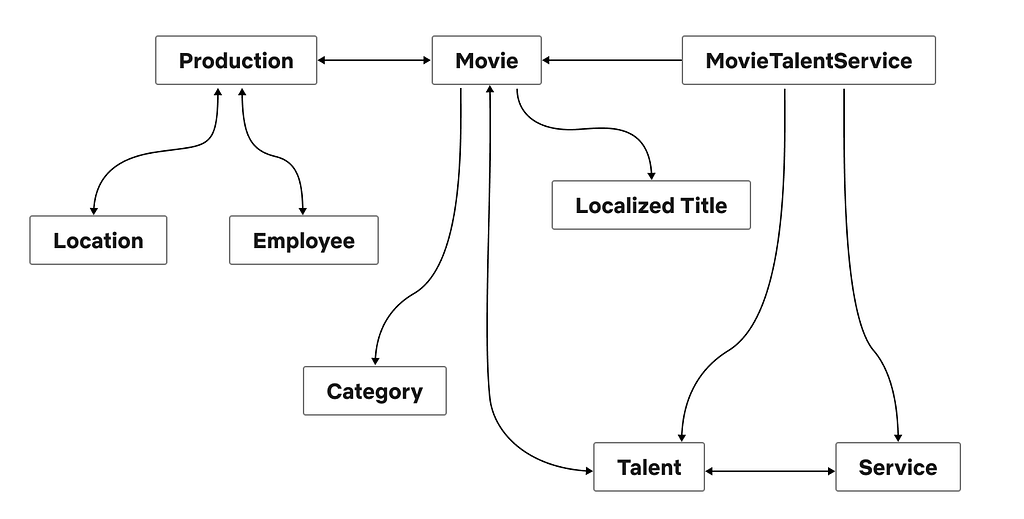
One important challenge we had to address is that the number of possible sessions grows rapidly as the session length increases. To see why, we can consider the alternative ways in which a user might interact with the example banking service: The user may, for example, execute multiple transfers, and/or check the balance of multiple accounts, in any order. Assuming that there are 3 possible endpoints, the following graph illustrates possible sessions when the user interacts with the banking service:
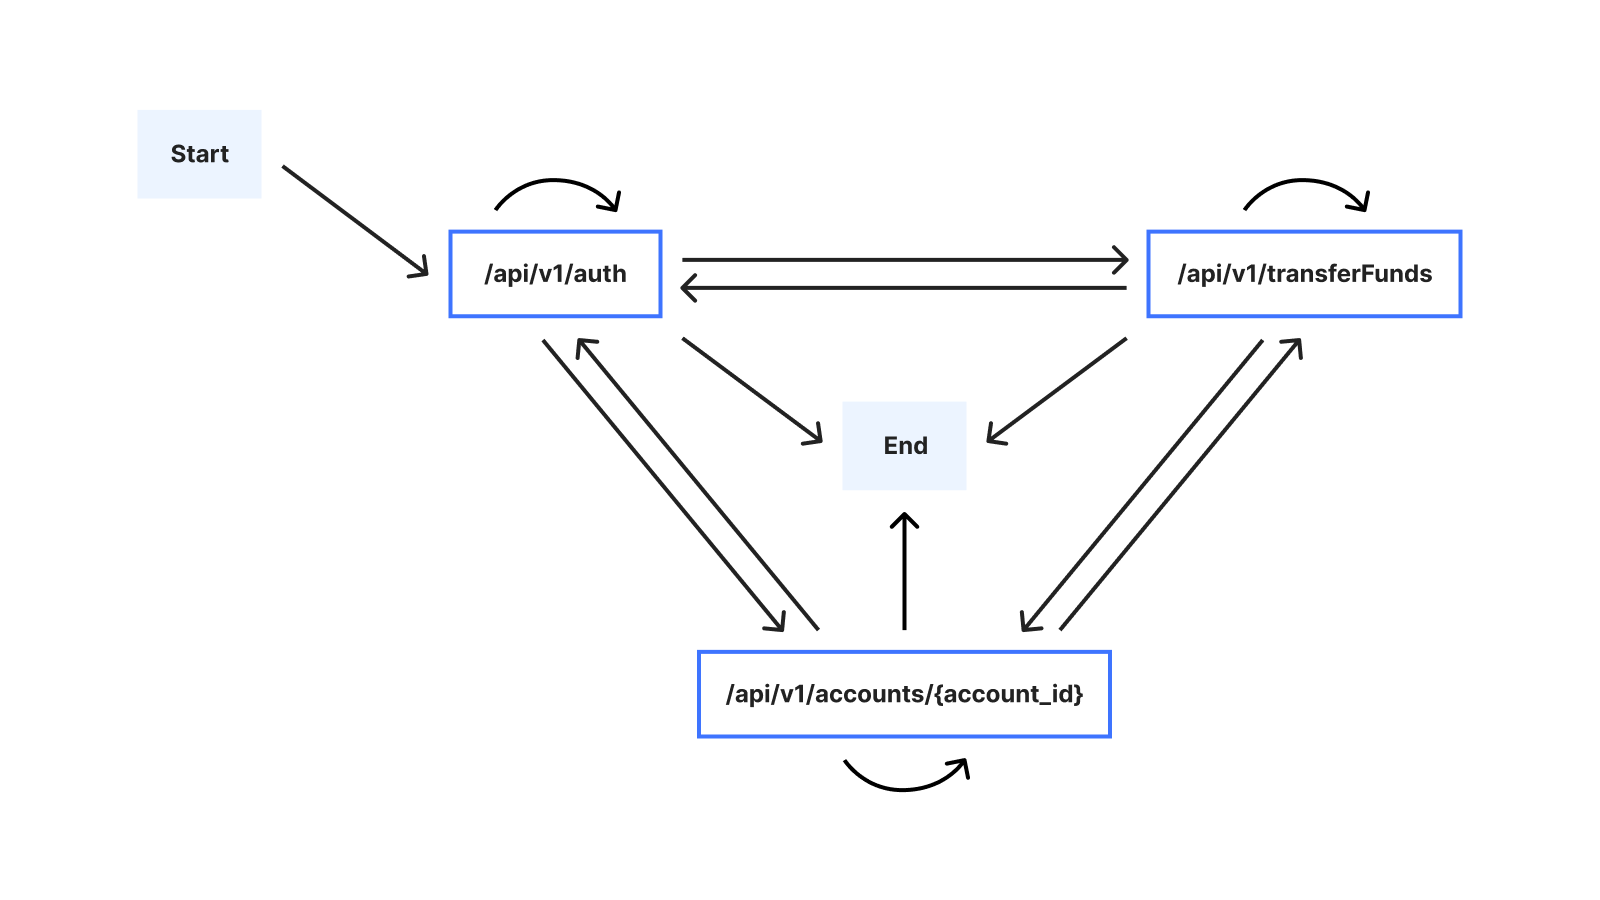
Because of this large number of possible sessions, suggesting mitigation rules requires that we address the challenge of summarizing sequential behavior from past session data as an intermediate step. We’ll refer to a series of consecutive endpoints in a session (for example /api/v1/accounts/{account_id} → /api/v1/transferFunds) in our example as a sequence. Specifically, a challenge we needed to address is that the sequential behavior relevant for creating rules isn’t necessarily apparent from volume alone: Consider for example that /api/transferFunds might nearly always be preceded by /api/v1/accounts/{account_id}, but also that the sequence /api/v1/transferFunds → /api/v1/accounts/{account_id} might occur relatively rarely, compared to the sequence /api/v1/auth → /api/v1/accounts/{account_id}. It is therefore conceivable that if we were to summarize based on volume alone, we might potentially deem the sequence /api/v1/accounts/{account_id} → /api/v1/transferFunds as unimportant, when in fact we ought to surface it as a potential rule.
Learning important sequences from API sessions
A widely-applied modeling approach applicable to sequential data is the Markov chain, in which the probability of each endpoint in our session data depends only on a fixed number of preceding endpoints. First, we’ll show how standard Markov chains can be applied to our session data, while pointing out some of their limitations. Second, we’ll show how we use a less well-known, but powerful, type of Markov chain to determine important sequences.
For illustrative purposes, let’s assume that there are 3 possible endpoints in our session data. We’ll represent these endpoints using the letters a, b and c:
-
a: /api/v1/auth
-
b: /api/v1/accounts/{account_id}
-
c: /api/v1/transferFunds
In its simplest form, a Markov chain is nothing more than a table which tells us the probability of the next letter, given knowledge of the immediately preceding letter. If we were to model past session data using the simplest kind of Markov chain, we might end up with a table like this one:
| Known preceding endpoint in the session | Estimated probability of next endpoint in the session | ||
| a | b | c | |
| a | 0.10 (1555) | 0.89 (13718) | 0.01 (169) |
| b | 0.03 (9618) | 0.63 (205084) | 0.35 (113382) |
| c | 0.02 (3340) | 0.67 (109896) | 0.31 (51553) |
Table 1
Table 1 lists the parameters of the Markov chain, namely the estimated probabilities of observing a, b or c as the next endpoint in a session, given knowledge of the immediately preceding endpoint in the session. For example, the 3rd row cell with value 0.67 means that given knowledge of immediately preceding endpoint c, the estimated probability of observing b as the next endpoint in a session is 67%, regardless of whether c was preceded by any endpoints. Thus, each entry in the table corresponds to a sequence of two endpoints. The values in brackets are the number of times we saw each two-endpoint sequence in past session data and are used to compute the probabilities in the table. For example, the value 0.01 is the result of evaluating the fraction 169 / (1555+13718+169). This method of estimating probabilities is known as maximum likelihood estimation.
To determine important sequences, we rely on credible intervals for estimating probabilities instead of maximum likelihood estimation. Instead of producing a single point estimate (as described above), credible intervals represent a plausible range of probabilities. This range reflects the amount of data available, i.e. the total number of sequence occurrences in each row. More data produces narrower credible intervals (reflecting a greater degree of certainty) and conversely less data produces wider credible intervals (reflecting a lesser degree of certainty). Based on the values in brackets in the table above, we thus might obtain the following credible intervals (entries in boldface will be explained further on):
| Known preceding endpoint in the session | Estimated probability of next endpoint in the session | ||
| a | b | c | |
| a | 0.09-0.11 (1555) | 0.88-0.89 (13718) | 0.01-0.01 (169) |
| b | 0.03-0.03 (9618) | 0.62-0.63 (205084) | 0.34-0.35 (113382) |
| c | 0.02-0.02 (3340) | 0.66-0.67 (109896) | 0.31-0.32 (51553) |
Table 2
For brevity, we won’t demonstrate here how to work out the credible intervals by hand (they involve evaluating the quantile function of a beta distribution). Notwithstanding, the revised table indicates how more data causes credible intervals to shrink: note the first row with a total of 15442 occurrences in comparison to the second row with a total of 328084 occurrences.
To determine important sequences, we use slightly more complex Markov chains than those described above. As an intermediate step, let’s first consider the case where each table entry corresponds to a sequence of 3 endpoints (instead of 2 as above), exemplified by the following table:
| Known preceding endpoints in the session | Estimated probability of next endpoint in the session | ||
| a | b | c | |
| aa | 0.09-0.13 (173) | 0.86-0.90 (1367) | 0.00-0.02 (13) |
| ba | 0.09-0.11 (940) | 0.88-0.90 (8552) | 0.01-0.01 (109) |
| ca | 0.09-0.12 (357) | 0.87-0.90 (2945) | 0.01-0.02 (35) |
| ab | 0.02-0.02 (272) | 0.56-0.58 (7823) | 0.40-0.42 (5604) |
| bb | 0.03-0.03 (6067) | 0.60-0.60 (122796) | 0.37-0.37 (75801) |
| cb | 0.03-0.03 (3279) | 0.68-0.68 (74449) | 0.29-0.29 (31960) |
| ac | 0.01-0.09 (6) | 0.77-0.91 (144) | 0.06-0.19 (19) |
| bc | 0.02-0.02 (2326) | 0.77-0.77 (87215) | 0.21-0.21 (23612) |
| cc | 0.02-0.02 (1008) | 0.43-0.44 (22527) | 0.54-0.55 (27919) |
Table 3
Table 3 again lists the estimated probabilities of observing a, b or c as the next endpoint in a session, but given knowledge of 2 immediately preceding endpoints in the session (instead of 1 immediately preceding endpoint as before). That is, the 3rd row cell with interval 0.09-0.13 means that given knowledge of immediately preceding endpoints ca, the probability of observing a as the next endpoint has a credible interval spanning 9% and 13%, regardless of whether ca was preceded by any endpoints. In parlance, we say that the above table represents a Markov chain of order 2. This is because the entries in the table represent probabilities of observing the next endpoint, given knowledge of 2 immediately preceding endpoints as context.
As a special case, the Markov chain of order 0 simply represents the distribution over endpoints in a session. We can tabulate the probabilities as follows, in relation to a single row corresponding to an ‘empty context’:
| Known preceding endpoints in the session | Estimated probability of next endpoint in the session | ||
| a | b | c | |
| 0.03-0.03 (15466) | 0.64-0.65 (328732) | 0.32-0.33 (165117) |
Table 4
Note that the probabilities in Table 4 do not solely represent the case where there were no preceding endpoints in the session. Rather, the probabilities are for the occurrence of endpoints in the session, for the general case where we have no knowledge of the preceding endpoints and regardless of how many endpoints previously occurred.
Returning to our task of identifying important sequences, one possible approach might be to simply use a Markov chain of some fixed order N. For example, if we were to apply a threshold of 0.85 to the lower bounds of credible intervals in Table 3, we’d retain 3 sequences in total. On the other hand, this approach comes with two noteworthy limitations:
-
We need a way to select a suitable value for the model order N.
-
Since the model order remains fixed, identified sequences all have the same length N+1.
Variable order Markov chains
Variable order Markov chains (VOMCs) are a more powerful extension of the described fixed-order Markov chains which address the preceding limitations. VOMCs make use of the fact that for some chosen value of the Markov chain of fixed order N, the probability table might include statistically redundant information: Let’s compare Tables 3 and 2 above and consider in Table 3 the rows in boldface corresponding to contexts aa, ba, ca (these 3 contexts all share a as their suffix).
For all the 3 possible next endpoints a, b, c, these rows specify credible intervals which overlap with their respective estimates in Table 2 corresponding to context a (also indicated in boldface). We can interpret these overlapping intervals as representing no discernible difference between probability estimates, given knowledge of a as the preceding endpoint. With no discernible effect of what preceded a on the probability of the next endpoint, we can consider these 3 rows in Table 3 redundant: We may ‘collapse’ them by replacing them with the row in Table 2 corresponding to context a.
The result of revising Table 3 as described looks as follows (with the new row indicated in boldface):
| Known preceding endpoints in the session | Estimated probability of next endpoint in the session | ||
| a | b | c | |
| a | 0.09-0.11 (1555) | 0.88-0.89 (13718) | 0.01-0.01 (169) |
| ab | 0.02-0.02 (272) | 0.56-0.58 (7823) | 0.40-0.42 (5604) |
| ac | 0.03-0.03 (6067) | 0.60-0.60 (122796) | 0.37-0.37 (75801) |
| bb | 0.03-0.03 (3279) | 0.68-0.68 (74449) | 0.29-0.29 (31960) |
| bc | 0.01-0.09 (6) | 0.77-0.91 (144) | 0.06-0.19 (19) |
| cb | 0.02-0.02 (2326) | 0.77-0.77 (87215) | 0.21-0.21 (23612) |
| cc | 0.02-0.02 (1008) | 0.43-0.44 (22527) | 0.54-0.55 (27919) |
Table 5
Table 5 represents a VOMC, because the context length varies: In the example, we have context lengths 1 and 2. It follows that entries in the table represent sequences of length varying between 2 and 3 endpoints, depending on context length. Generalizing the described approach of collapsing contexts leads to the following algorithm sketch for learning a VOMC in an offline setting:
(1) Define the table T containing the estimated probability of the next endpoint in a session, given alternatively 0, 1, 2, …, N_max preceding endpoints in the session. That is, form a single table by concatenating the rows corresponding to Markov chains of fixed orders 0, 1, 2, …, N_max.
(2) is_modified := true
(3) DO WHILE is_modified
(4) D := all contexts in T which are not suffixes of at least 1 other context in T
(5) is_modified = false
(6) FOR ctx IN C
(7) IF length(ctx) > 0
(8) parent_ctx := the context obtained by deleting the leftmost endpoint in ctx
(9) IF is_collapsible(ctx, parent_ctx)
(10) Modify T by discarding ctx
(11) is_modified = true
In the pseudo-code, length(ctx) is the length of context ctx. On line 9, is_collapsible() involves comparing credible intervals for the contexts ctx and parent_ctx in the manner described for generating Table 5: is_collapsible() evaluates to true, if and only if we observe that all credible intervals overlap, when comparing contexts ctx and parent_ctx separately for each of the possible next endpoints. The maximum sequence length is N_max+1, where N_max is some constant. On line 4, we say that context q is a suffix of another context p if we can form p by prepending zero or more endpoints to q. (According to this definition, the ‘empty context’ mentioned above for the order 0 model is a suffix of all contexts in T.) The above algorithm sketch is a variant of the ideas first introduced by Rissanen [1], Ron et al. [2].
Finally, we take the entries in the resulting table T as our important sequences. Thus, the result of applying VOMCs is a set of sequences that we deem important. For Sequence Analytics however, we believe that it is additionally useful to rank sequences. We do this by computing a ‘precedence score’ between 0.0 and 1.0, which is the number of occurrences of the sequence divided by the number of occurrences of the last endpoint in the sequence. Thus, precedence scores close to 1.0 indicate that a given endpoint is nearly always preceded by the remaining endpoints in the sequence. In this way, manual inspection of the highest-scoring sequences is a semi-automated heuristic for creating precedence rules in our Sequence Mitigation product.
Learning sequences at scale
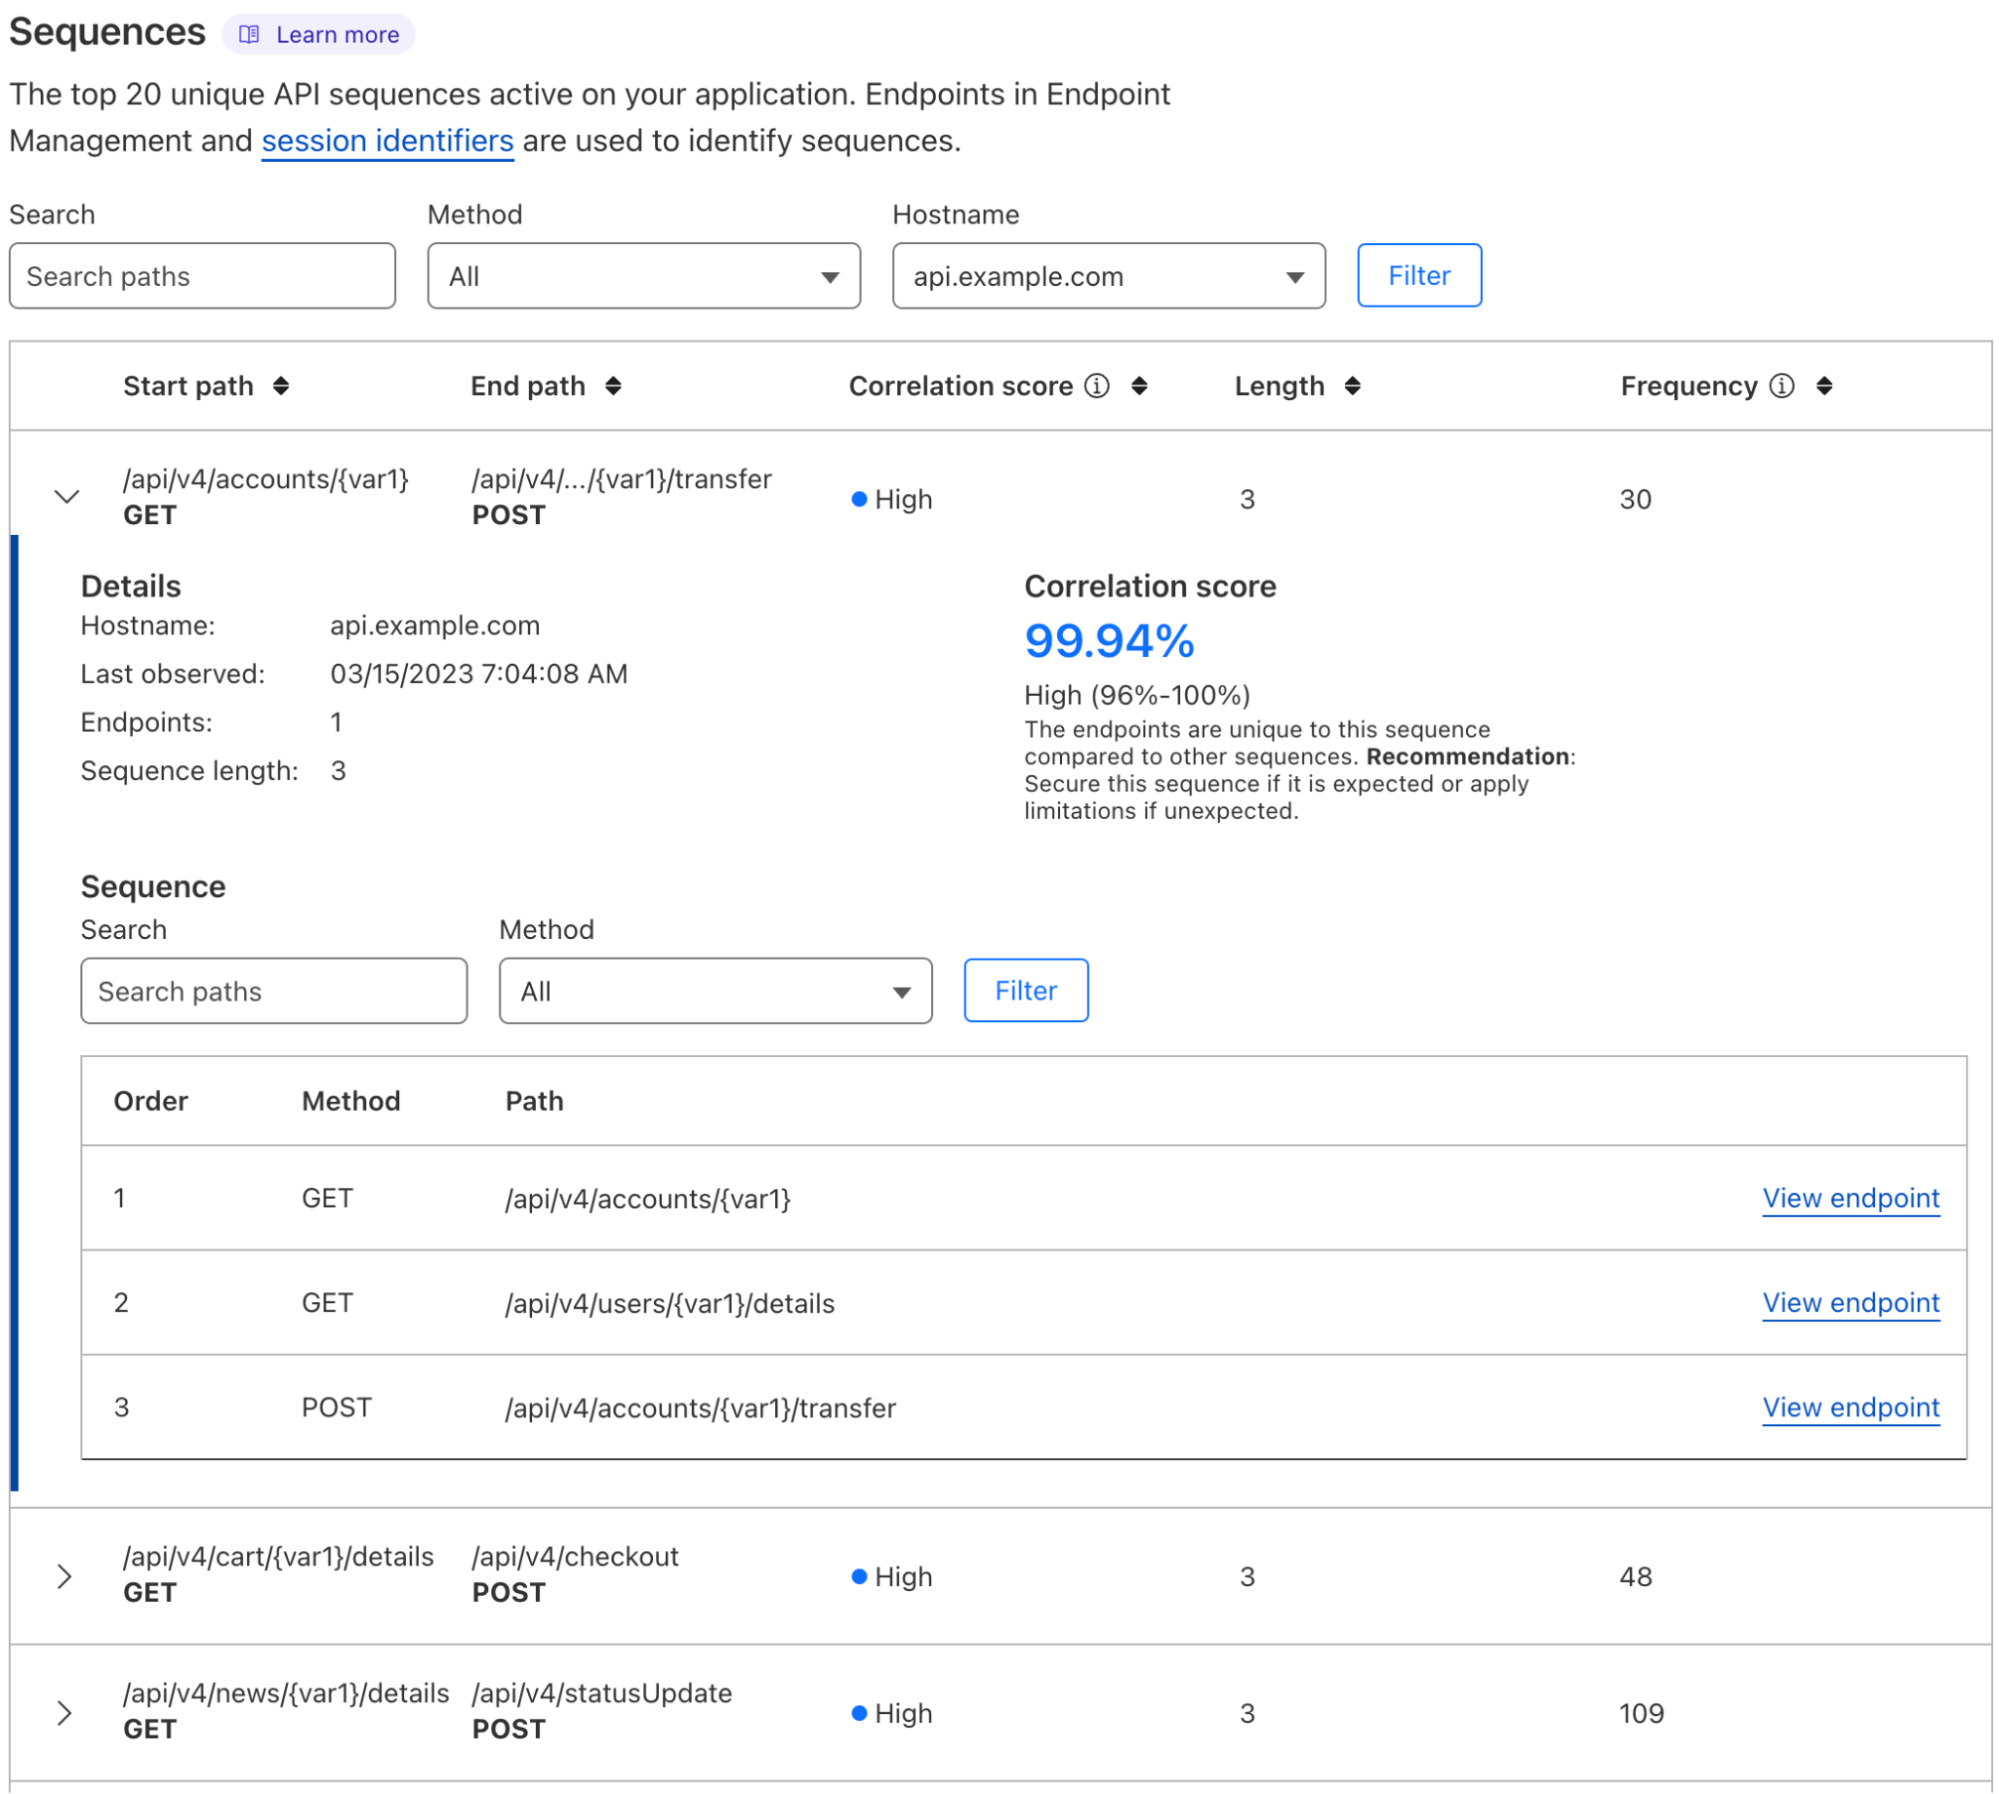
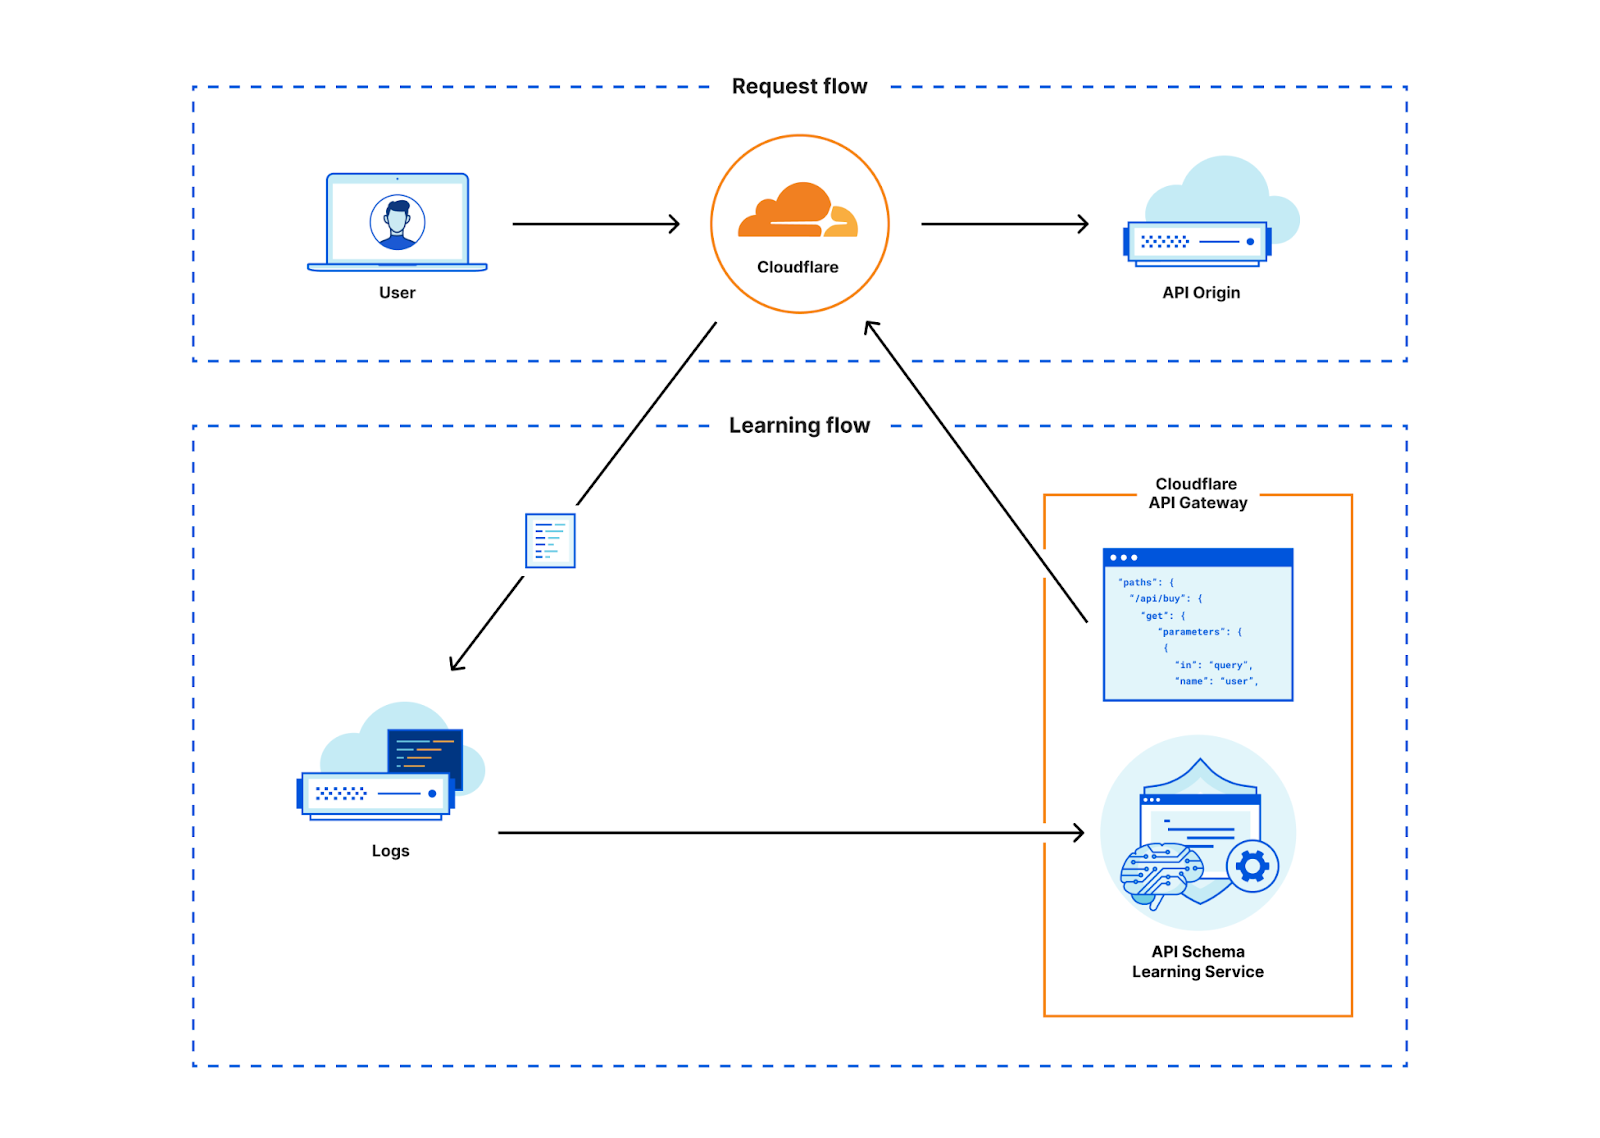
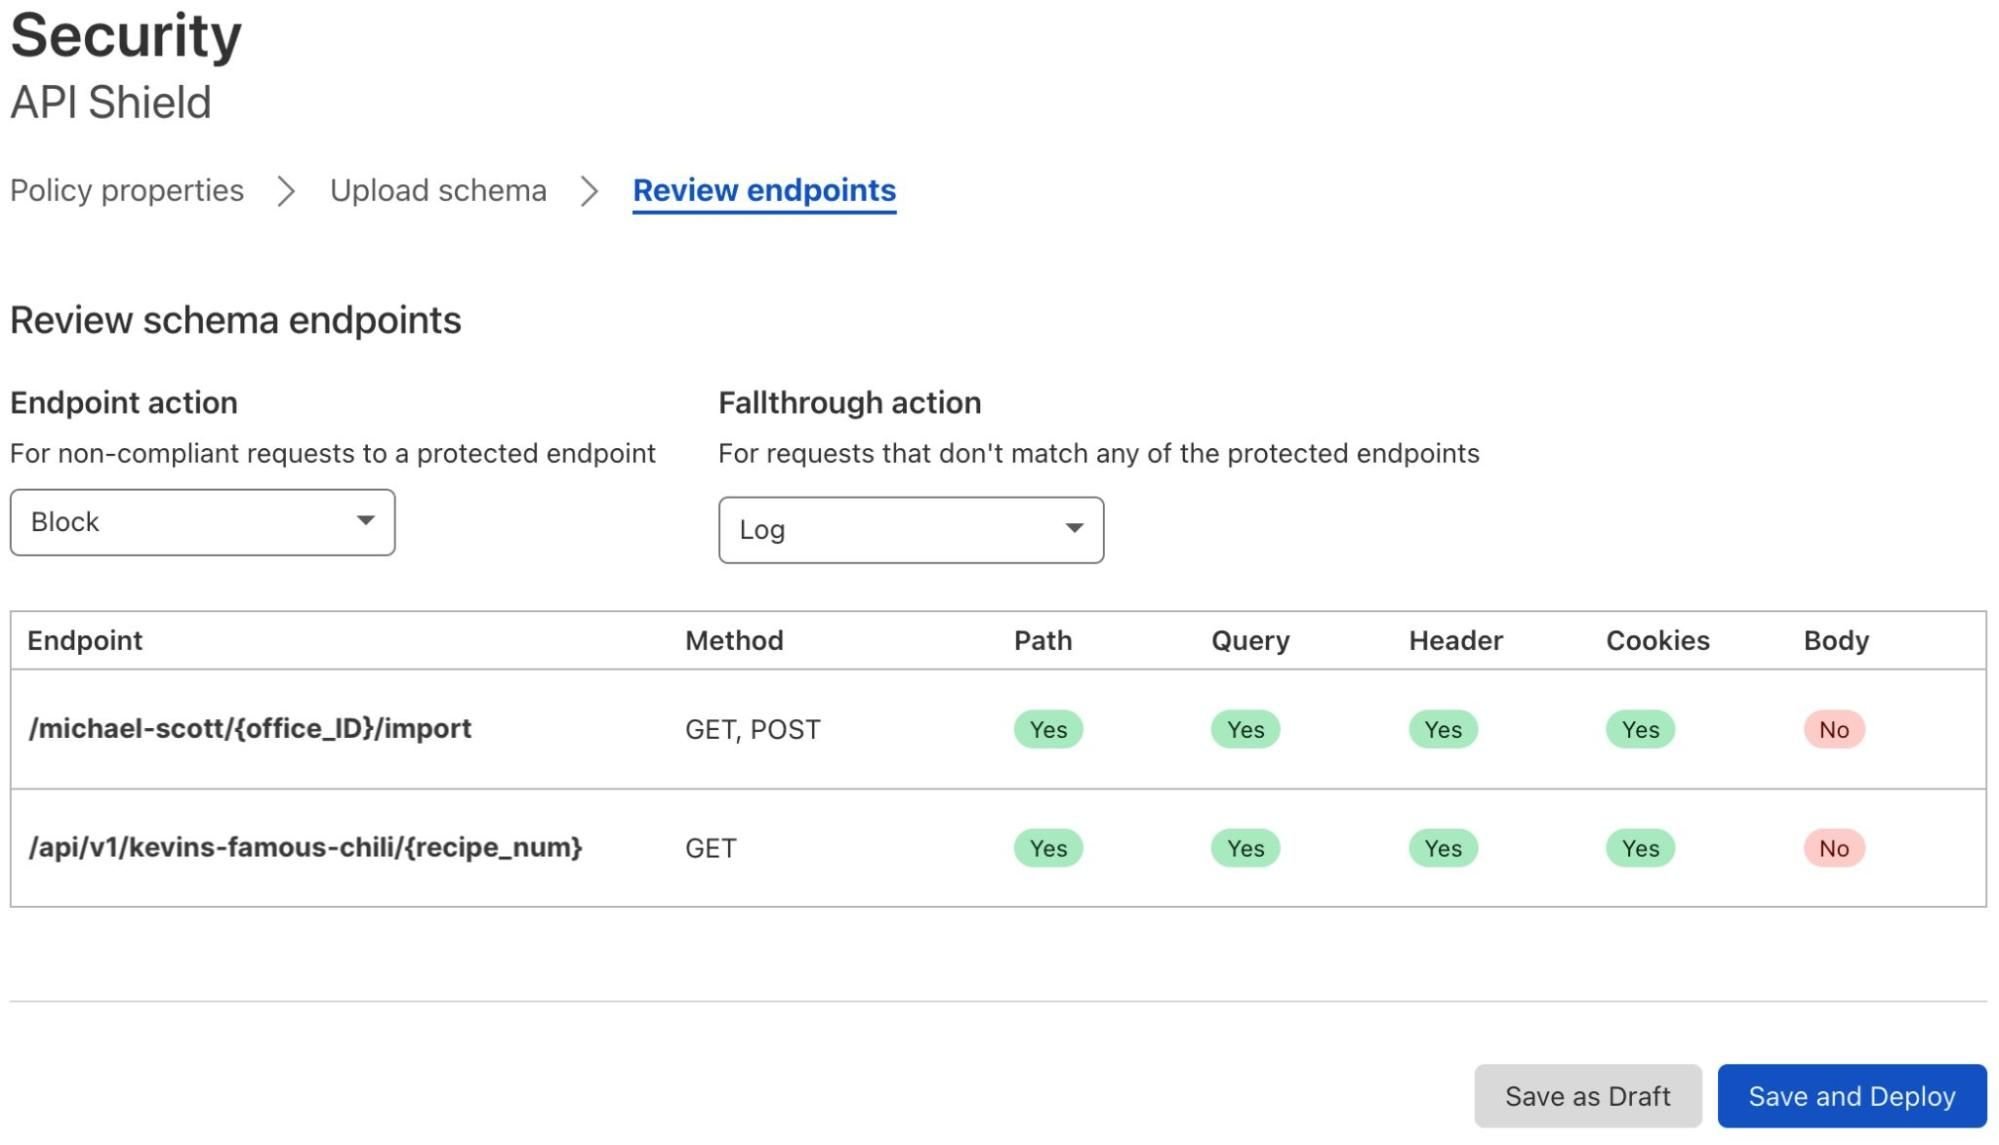
The preceding represents a very high-level overview of the statistical ML techniques that we use in Sequence Analytics. In practice, we have devised an efficient algorithm which does not require an upfront training step, but rather updates the model continuously as the data arrive and generates a frequently-updating summary of important sequences. This approach allows us to overcome additional challenges around memory cost not touched on in this blog post. Most significantly, a straightforward implementation of the algorithm sketch above would still result in the number of table rows (contexts) exploding with increasing maximum sequence length. A further challenge we had to address is how to ensure that our system is able to deal with high-volume APIs, without adversely impacting CPU load. We use a horizontally scalable adaptive sampling strategy upfront, such that more aggressive sampling is applied to high-volume APIs. Our algorithm then consumes the sampled streams of API requests. After a customer onboards, sequences are assembled and learned over time, so that the current summary of important sequences represents a sliding window with a look-back interval of approximately 24 hours. Sequence Analytics further stores sequences in Clickhouse and exposes them via a GraphQL API and via the Cloudflare dashboard. Customers who would like to enforce sequence rules can do so using Sequence Mitigation. Sequence Mitigation is what is responsible for ensuring that rules are shared and matched in distributed fashion on Cloudflare’s global network — another exciting topic for a future blog post!
What’s next
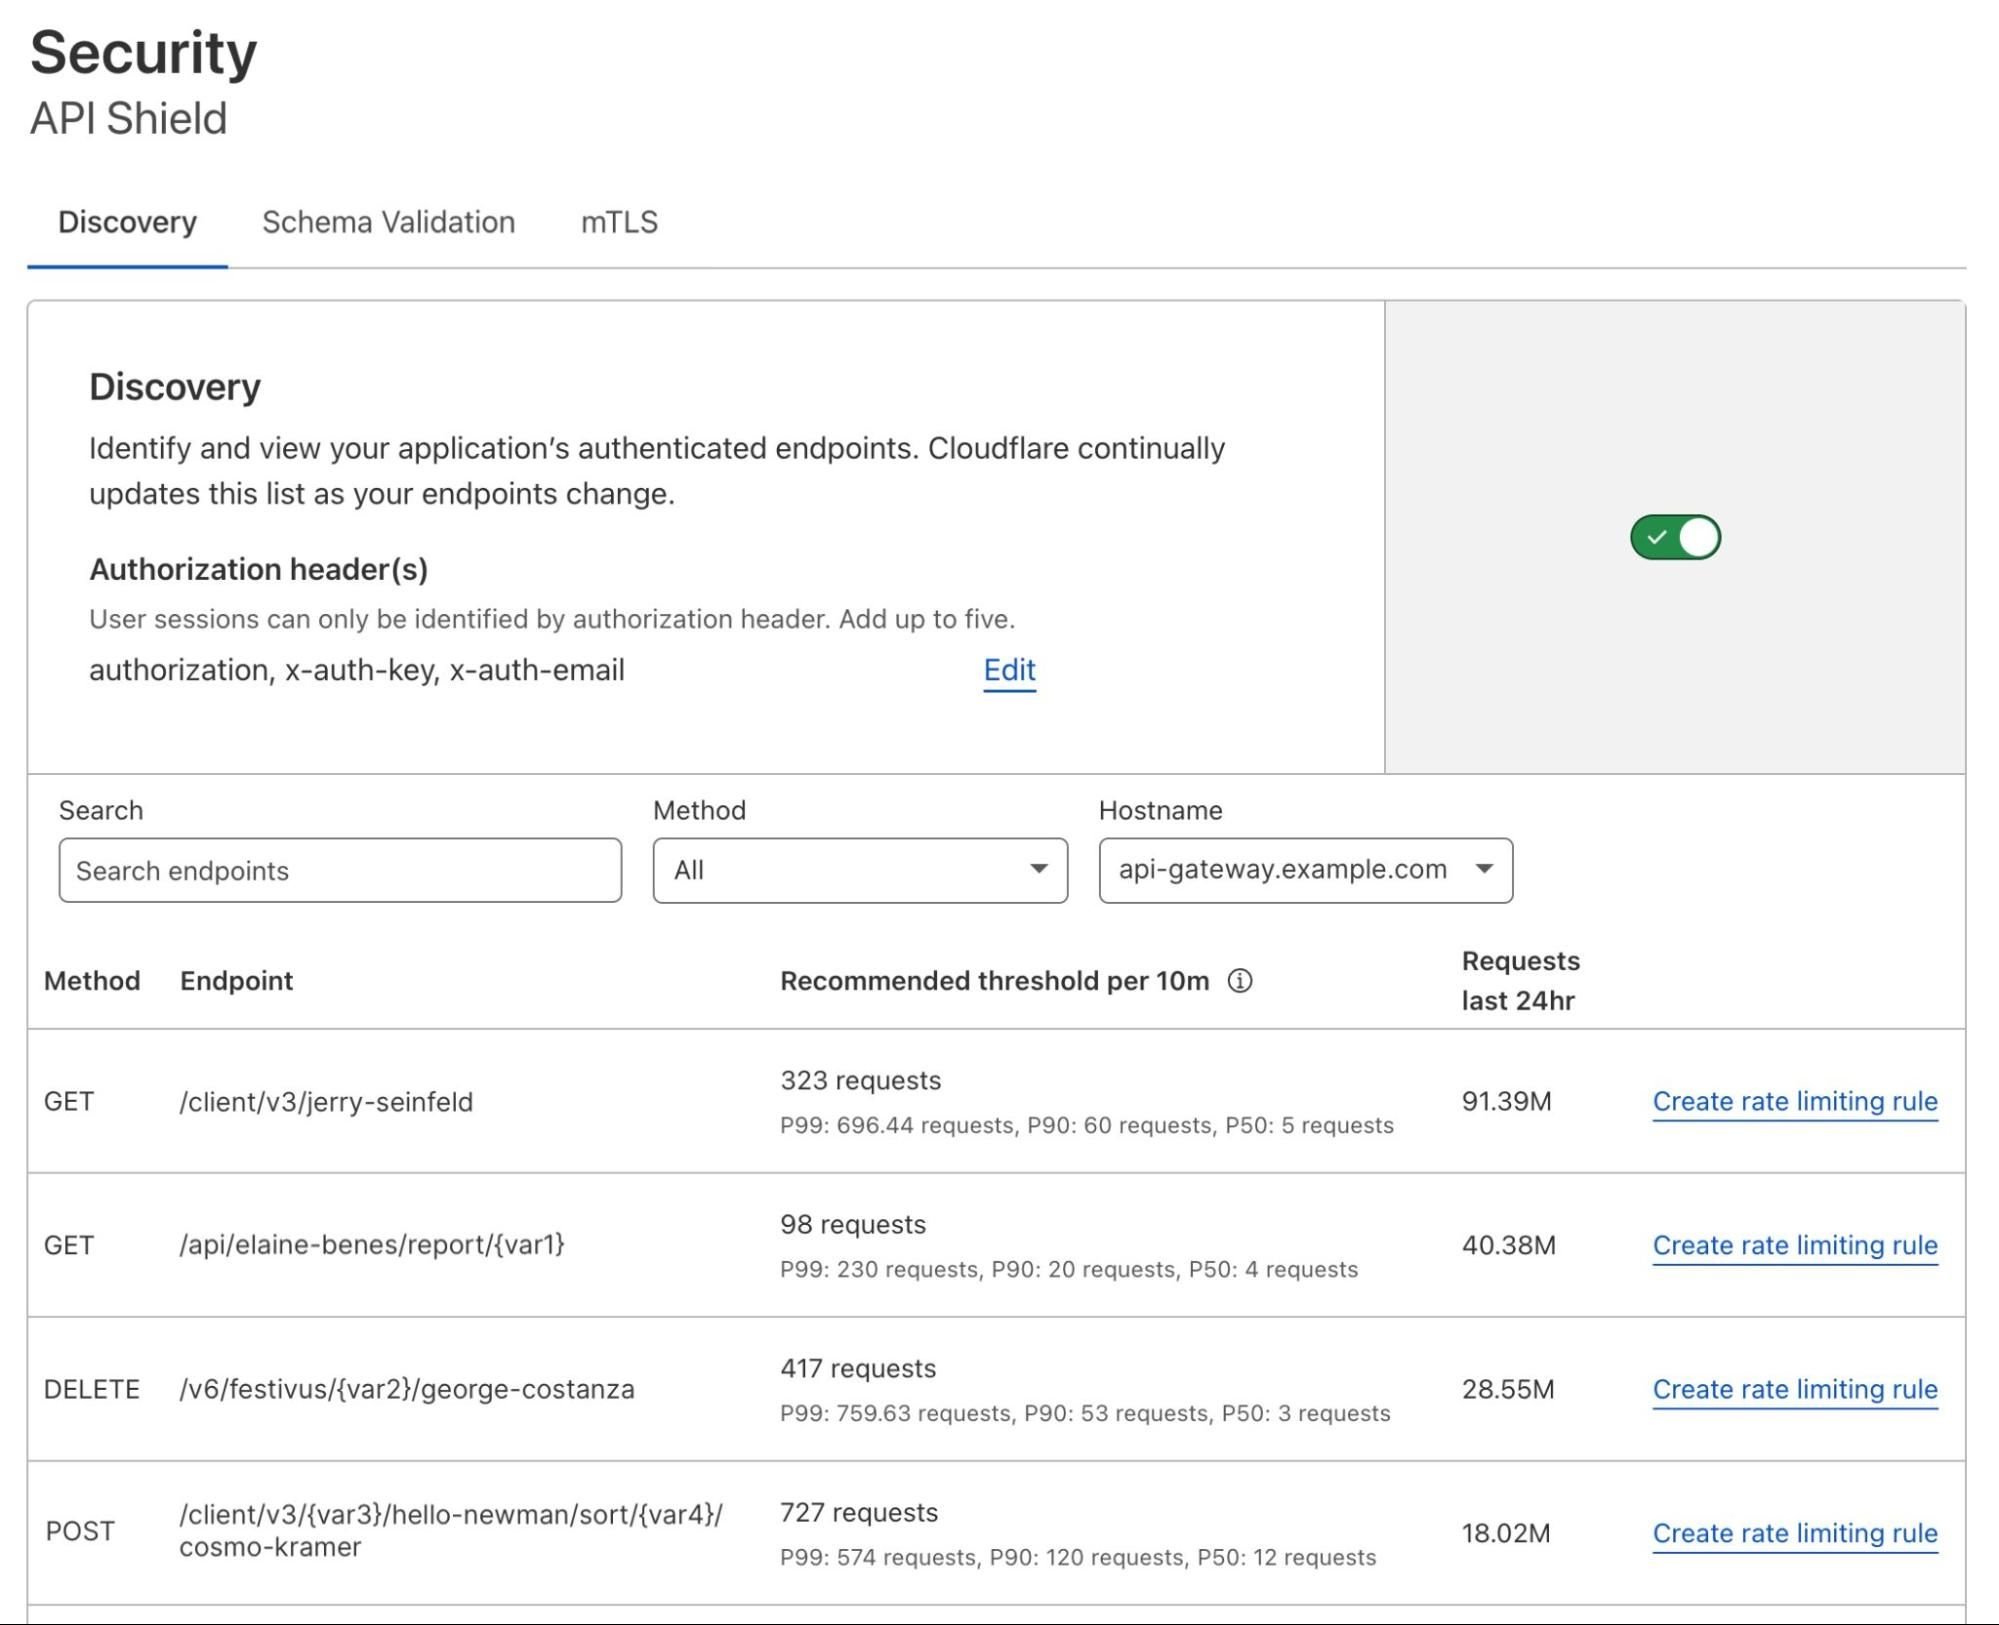
Now that you have a better understanding of how we surface important API request sequences, stay tuned for a future blog post in this series, where we’ll describe how we find the anomalous API request sequences that customers may want to stop. For now, API Gateway customers can get started in two ways: with Sequence Analytics to explore important API request sequences and with Sequence Mitigation to enforce sequences of API requests. Enterprise customers that haven’t purchased API Gateway can get started by enabling the API Gateway trial inside the Cloudflare Dashboard or contacting their account manager.