Post Syndicated from Matheus Guimaraes original https://aws.amazon.com/blogs/aws/amazon-rds-for-oracle-and-rds-for-sql-server-add-new-capabilities-to-enhance-performance-and-optimize-costs/
Managing database environments demands a balance of resource efficiency and scalability. Organizations need flexible options across their entire database lifecycle, spanning development, testing, and production workloads with diverse storage and compute requirements.
To address these needs, we’re announcing four new capabilities for Amazon Relational Database Service (Amazon RDS) to help customers optimize their costs as well as improve efficiency and scalability for their Amazon RDS for Oracle and Amazon RDS for SQL Server databases. These enhancements include SQL Server Developer Edition support and expanded storage capabilities for both RDS for Oracle and RDS for SQL Server. Additionally, you can have CPU optimization options for RDS for SQL Server on M7i and R7i instances, which offer price reductions from previous generation instances and separately billed licensing fees.
Let’s explore what’s new.
SQL Server Developer Edition support
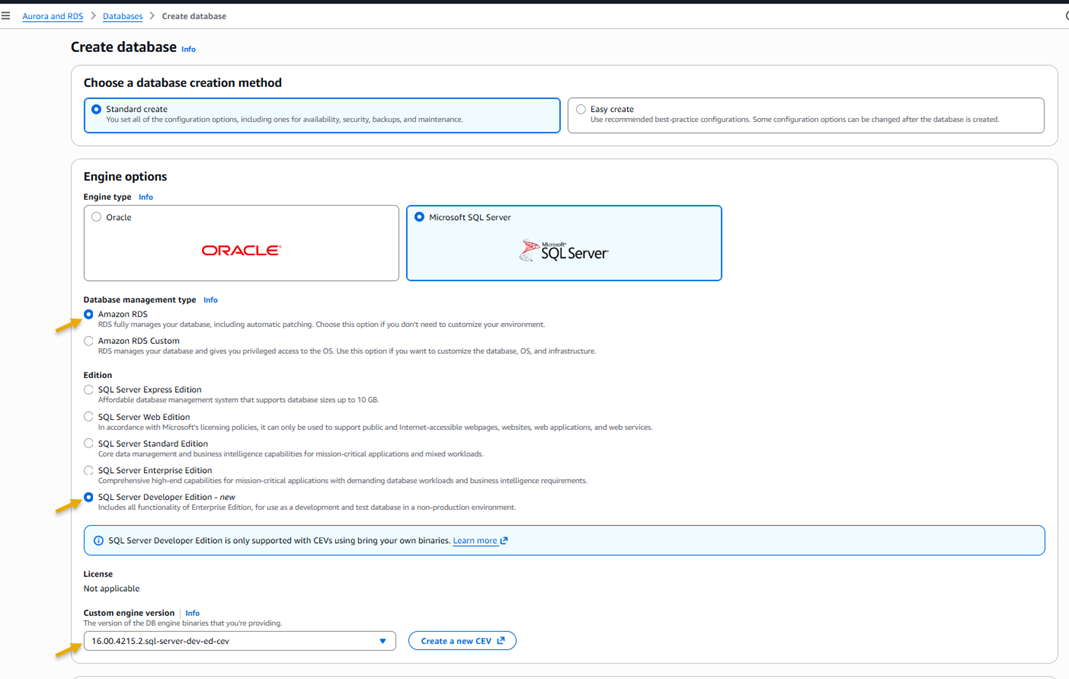
SQL Server Developer Edition is now available on RDS for SQL Server, offering a free SQL Server edition that includes all the Enterprise Edition functionalities. Developer Edition is licensed specifically for non-production workloads, so you can build and test applications without incurring SQL Server licensing costs in your development and testing environments.
This release brings significant cost savings to your development and testing environments, while maintaining consistency with your production configurations. You’ll have access to all Enterprise Edition features in your development environment, making it easier to test and validate your applications. Additionally, you’ll benefit from the full suite of Amazon RDS features, including automated backups, software updates, monitoring, and encryption capabilities throughout your development process.
To get started, upload your SQL Server binary files to Amazon Simple Storage Service (Amazon S3) and use them to create your Developer Edition instance. You can migrate existing data from your Enterprise or Standard Edition instances to Developer Edition instances using built-in SQL Server backup and restore operations.
M7i/R7i instances on RDS for SQL Server with support for optimize CPU
You can now use M7i and R7i instances on Amazon RDS for SQL Server to achieve several key benefits. These instances offer significant cost savings over previous generation instances. You also get improved transparency over your database costs with licensing fees and Amazon RDS DB instances costs billed separately.
RDS for SQL Server M7i/R7i instances offer up to 55% lower costs compared to previous generation instances. 

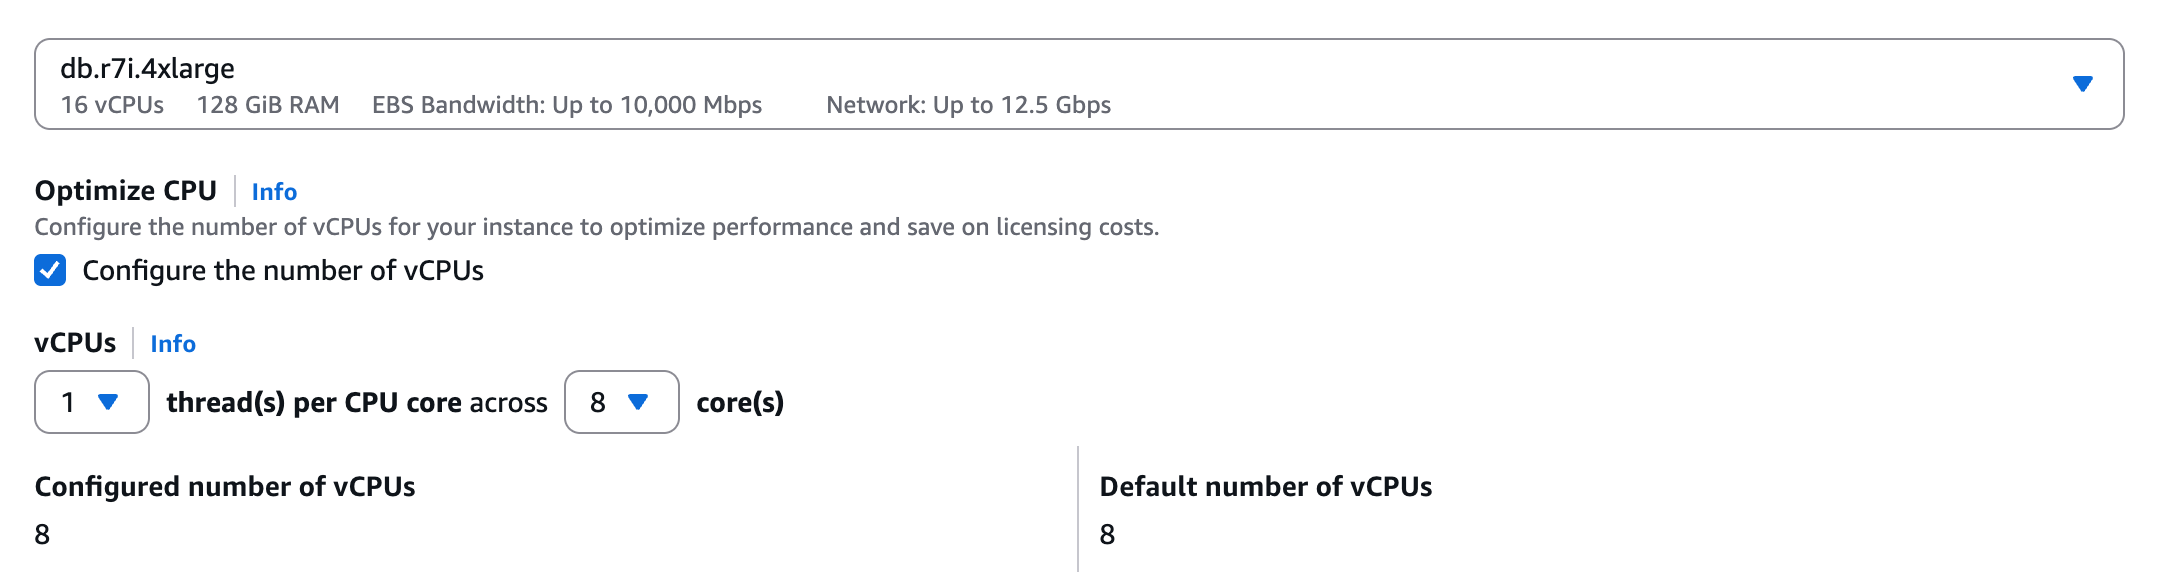
Using the optimize CPU capability on these instances, you can customize the number of vCPUs on license-included RDS for SQL Server instances. This enhancement is particularly valuable for database workloads that require high memory and input/output operations per second (IOPS), but lower vCPU counts
This feature provides substantial benefits for your database operations. You can significantly reduce vCPU-based licensing costs while maintaining the same memory and IOPS performance levels your applications require. The capability supports higher memory-to-vCPU ratios and automatically disables hyperthreading while maintaining instance performance. Most importantly, you can fine-tune your CPU settings to precisely match your specific workload requirements, providing optimal resource utilization.
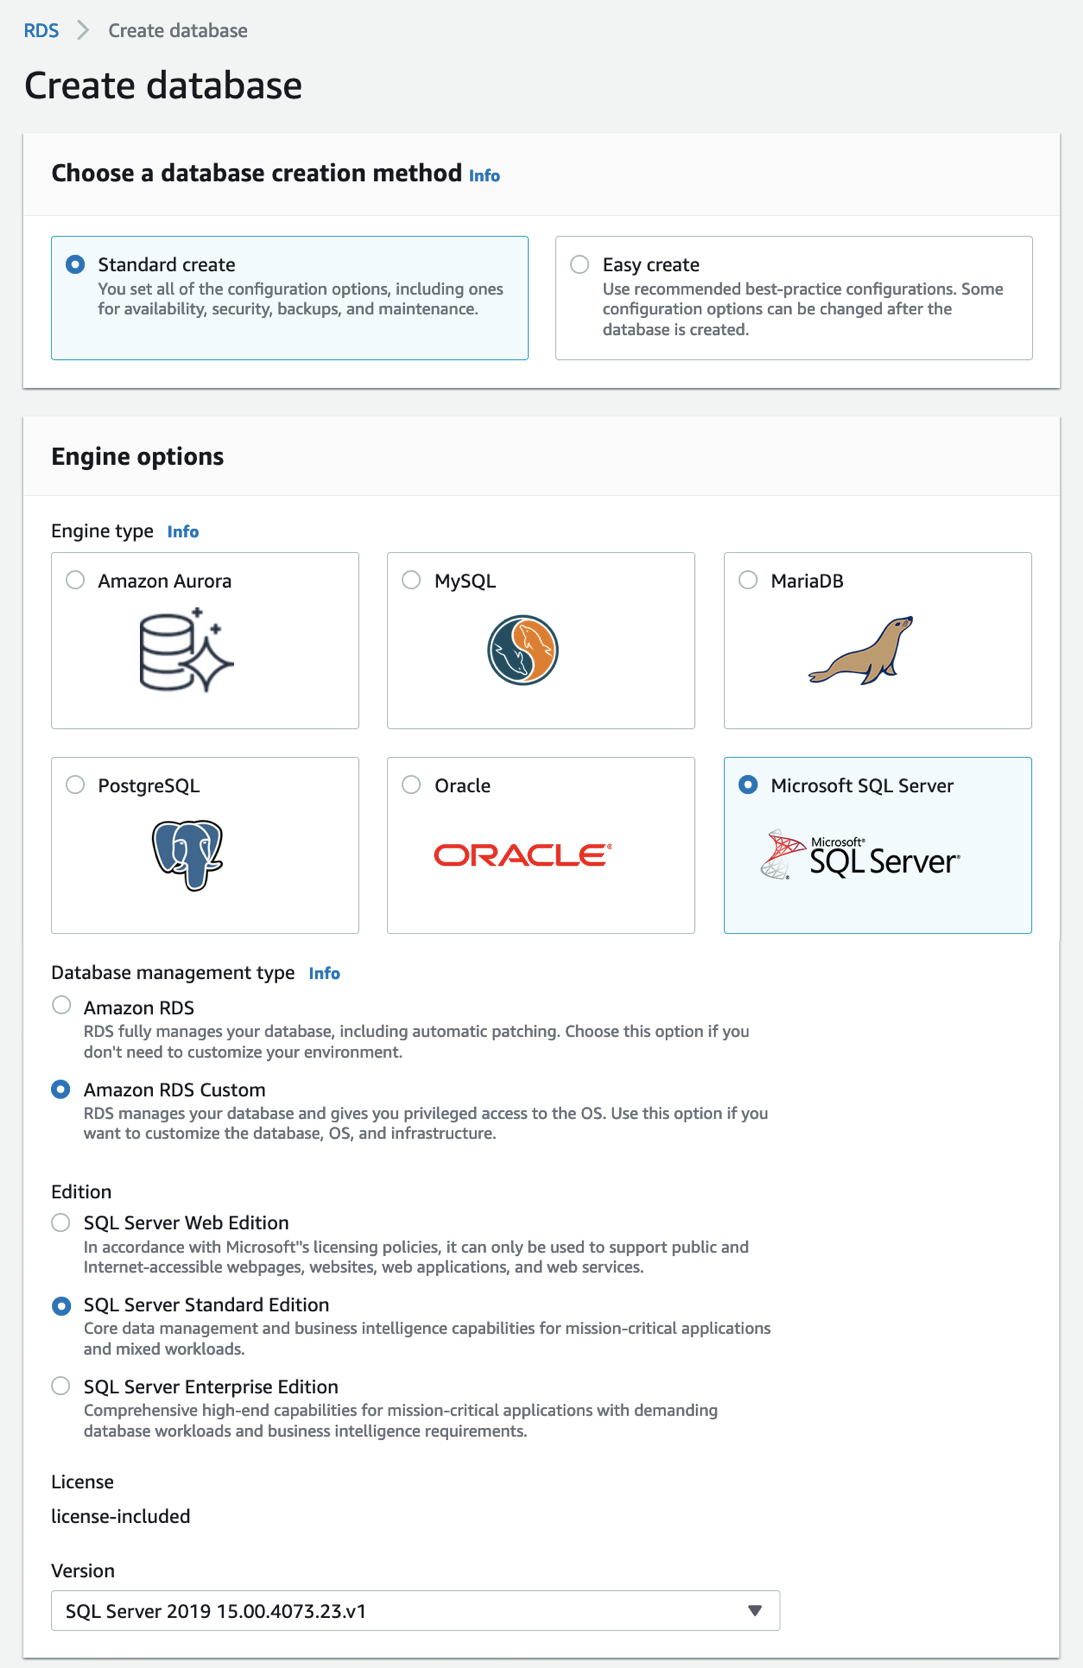
To get started, select SQL Server with an M7i or R7i instance type when creating a new database instance. Under Optimize CPU select Configure the number of vCPUs and set your desired vCPU count.
Additional storage volumes for RDS for Oracle and SQL Server
Amazon RDS for Oracle and Amazon RDS for SQL Server now support up to 256 TiB storage size, a fourfold increase in storage size per database instance, through the addition of up to three additional storage volumes.
The additional storage volumes provide extensive flexibility in managing your database storage needs. You can configure your volumes using both io2 and gp3 volumes to create an optimal storage strategy. You can store frequently accessed data on high-performance Provisioned IOPS SSD (io2) volumes while keeping historical data on cost-effective General Purpose SSD (gp3) volumes, which balances performance and cost. For temporary storage needs, such as month-end processing or data imports, you can add storage volumes as needed. After these operations are complete, you can empty the volumes and then remove them to reduce unnecessary storage costs.
These storage volumes offer operational flexibility with zero downtime and you can add or remove additional storage volumes without interrupting your database operations. You can also scale up multiple volumes in parallel to quickly meet growing storage demands. For Multi-AZ deployments, all additional storage volumes are automatically replicated to maintain high availability.
You can add storage volumes to new or existing database instances through the AWS Management Console, AWS Command Line Interface (AWS CLI), or AWS SDKs.
Let me show you a quick example. I’ll add a storage volume to an existing RDS for Oracle database instance.
First, I navigate to the RDS console, then to my RDS for Oracle database instance detail page. I look under Configuration and I find the Additional storage volumes section.
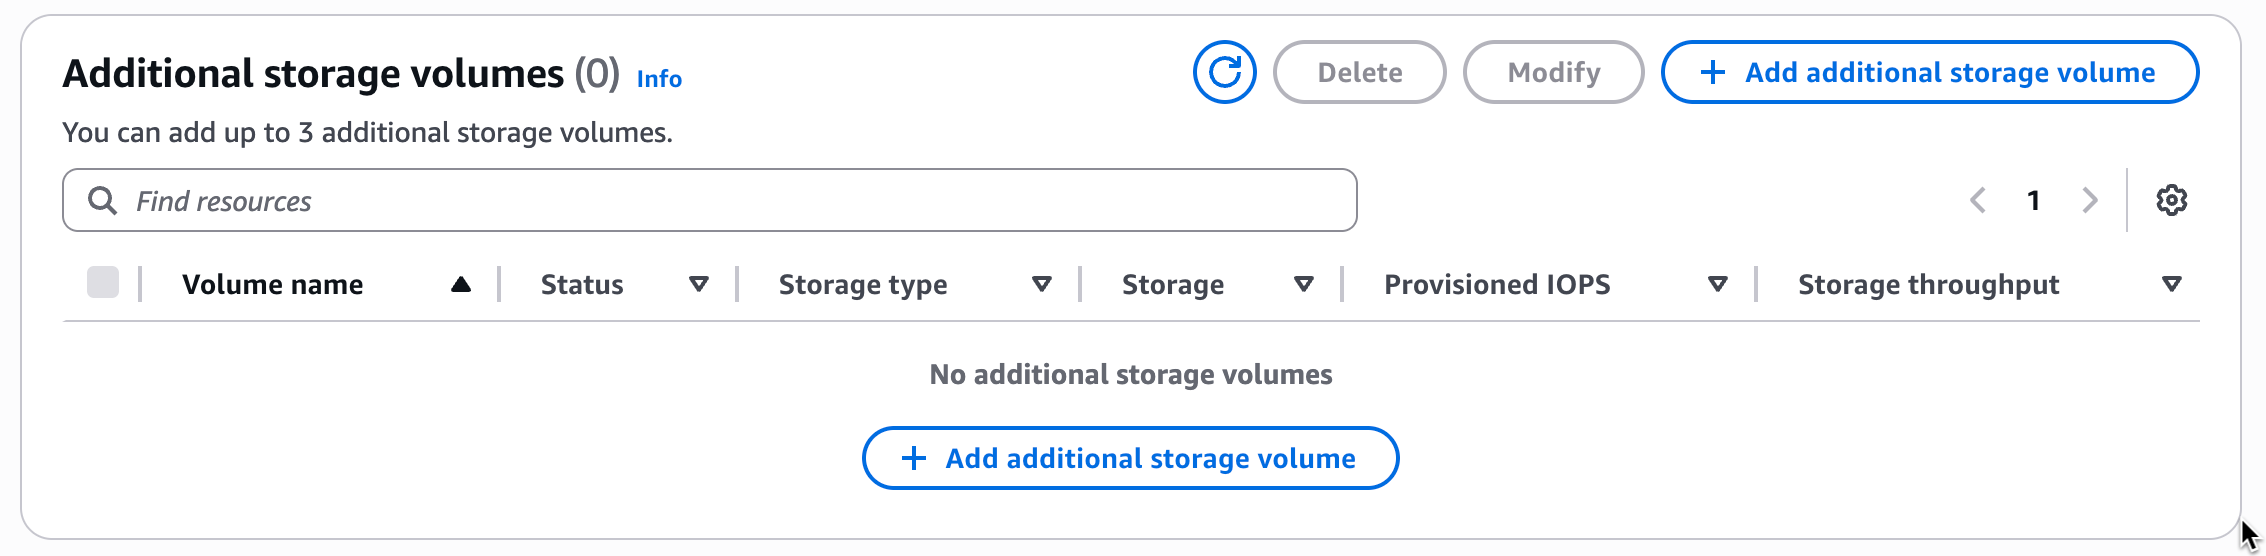
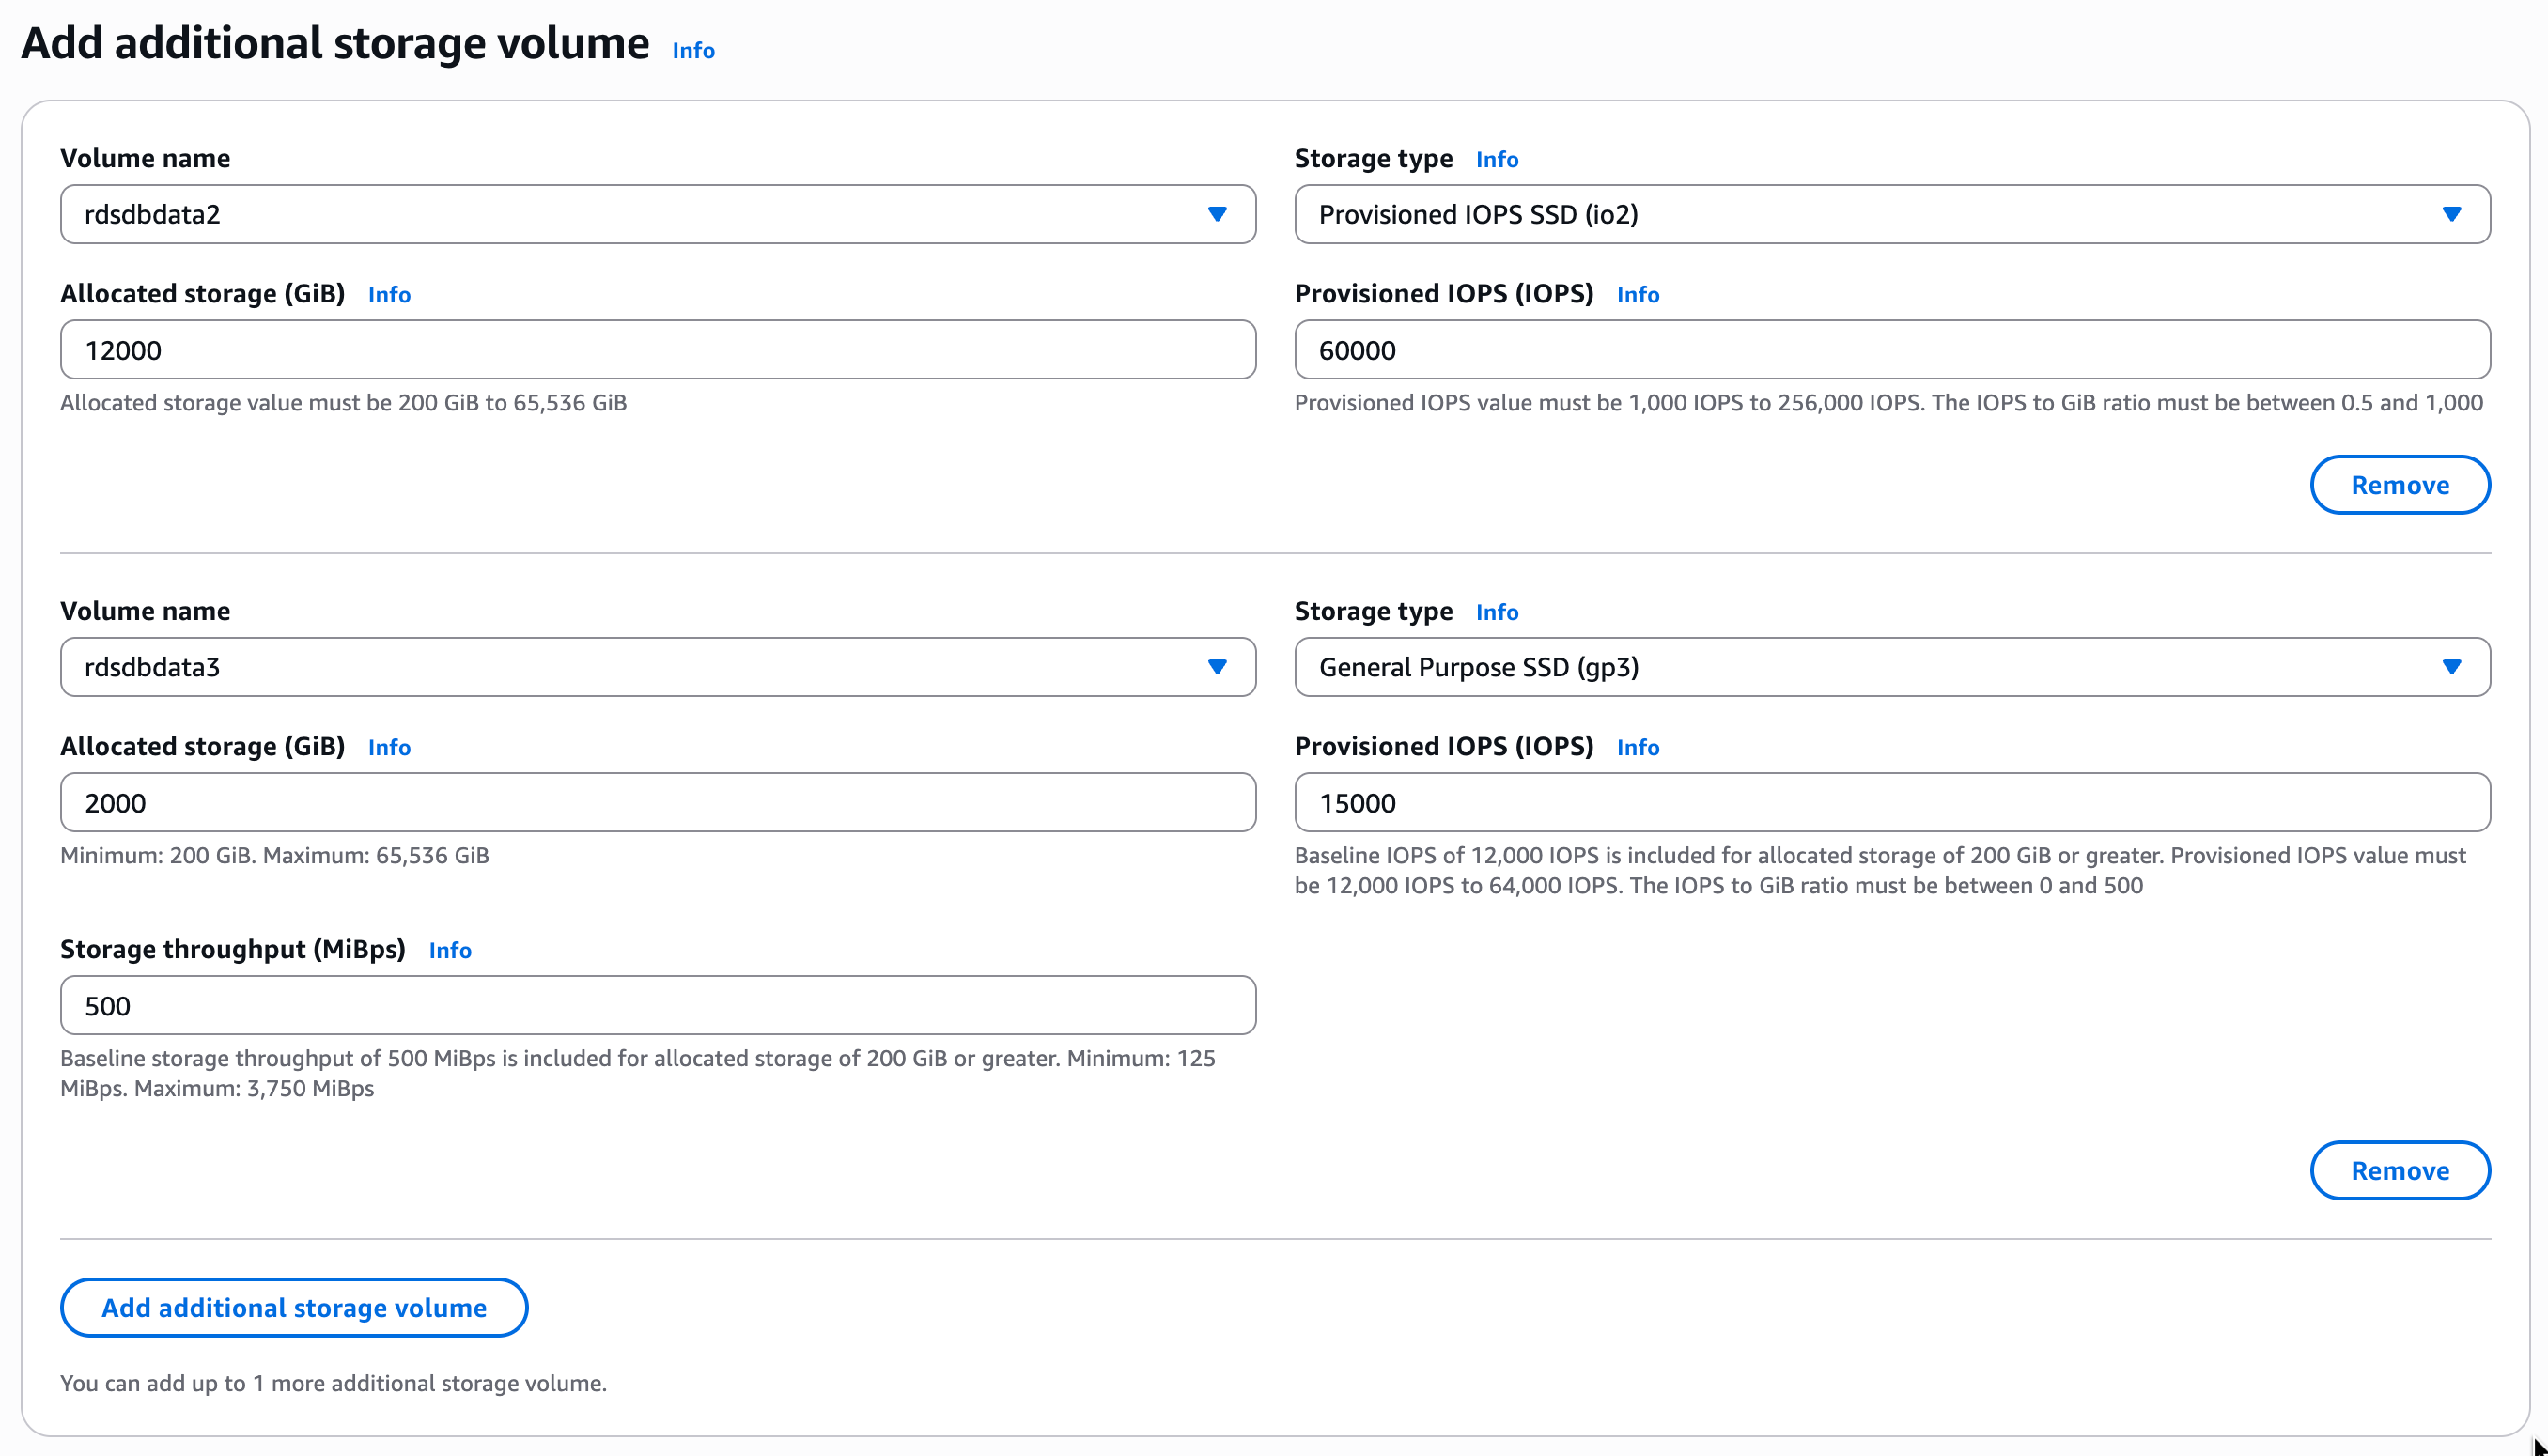
You can add up to three additional storage volumes and each must be named according to a naming convention. Storage volumes can’t have the same name and you must choose between rdsdbdata2, rdsdbdata3, and rdsdbdata4. For RDS for Oracle database instances, I can add additional storage volumes to the database instance with the primary storage volume size of 200 GiB or higher.
I’m going to add two volumes, so I choose Add additional storage volume and then fill in all the required information. I choose rdsdbdata2 as the volume name and give it 12000 GiB of allocated storage with 60000 provisioned IOPS on an io2 storage type. For my second additional storage volume, rdsdbdata3, I choose to have 2000 GiB on gp3 with 15000 provisioned IOPS.
After confirmation, I wait for Amazon RDS to process my request and then my additional volumes are available.
You can also use the AWS CLI to add volumes during creation of database instances or when modifying them.
Things to know
These capabilities are now available in all commercial AWS Regions and the AWS GovCloud (US) Regions where Amazon RDS for Oracle and Amazon RDS for SQL Server are offered.
You can learn more about each of these capabilities in the Amazon RDS documentation for Developer Edition, optimize CPU, additional storage volumes for RDS for Oracle and additional storage volumes for RDS for SQL Server.
To learn more about the unbundled pricing structure for M7i and R7i instances on RDS for SQL Server, visit the Amazon RDS for SQL Server pricing page.
To get started with any of these capabilities, go to the Amazon RDS console or learn more by visiting the Amazon RDS documentation.


 For this specific example, we use the following information for our Azure SQL Instance: