Post Syndicated from Nick Hengeveld original https://github.blog/engineering/engineering-principles/how-we-improved-availability-through-iterative-simplification/
Solving and staying ahead of problems when scaling up a system of GitHub’s size is a delicate process. The stack is complex, and even small changes can have a big ripple effect. Here’s a look at some of the tools in GitHub’s toolbox, and how we’ve used them to solve problems. We’ll also share some of our wins and lessons we learned along the way.
Methods and tools
There are several tools that we use to keep pace with our growing system. While we can’t list them all, here are some that have been instrumental for our growth.
- As we serve requests, there is a constant stream of related numbers that we care about. For example, we might want to know how often events are happening or how traffic levels compare to expected use. We can record metrics for each event in Datadog to see patterns over time and break them down across different dimensions, identifying areas that need focus.
- Events also contain context that can help identify details for issues we’re troubleshooting. We send all this context to Splunk for further analysis.
- Much of our application data is stored in MySQL, and query performance can degrade over time due to factors like database size and query frequency. We have written custom monitors that detect and report slow and timed-out queries for further investigation and remediation.
- When we introduce changes, we often need to know how those changes affect performance. We use Scientist to test proposed changes. With this tool, we measure and report results before making the changes permanent.
- When we’re ready to release a change, we roll it out incrementally to ensure it works as expected for all use cases. We also need to be able to roll back in the event of unexpected behavior. We use Flipper to limit the rollout to early access users, then to an increasing percentage of users as we build the confidence.
Achieving faster database queries
We recently observed a SQL query causing a high number of timeouts. Our investigation in Splunk tracked it down to GitHub’s Command Palette feature, which was loading a list of repositories. The code to generate that list looked something like this:
org_repo_ids = Repository.where(owner: org).pluck(:id)
suggested_repo_ids = Contribution.where(user: viewer, repository_id: org_repo_ids).pluck(:repository_id)
If an org has many active repositories, the second line could generate a SQL query with a large IN (...) clause with an increased risk of timing out. While we’d seen this type of problem before, there was something unique about this particular use case. We might be able to improve performance by querying the user first since a given user contributes to a relatively small number of repositories.
contributor_repo_ids = Contribution.where(user: viewer).pluck(:repository_id)
suggested_repo_ids = Repository.where(owner: org, id: contributor_repo_ids)
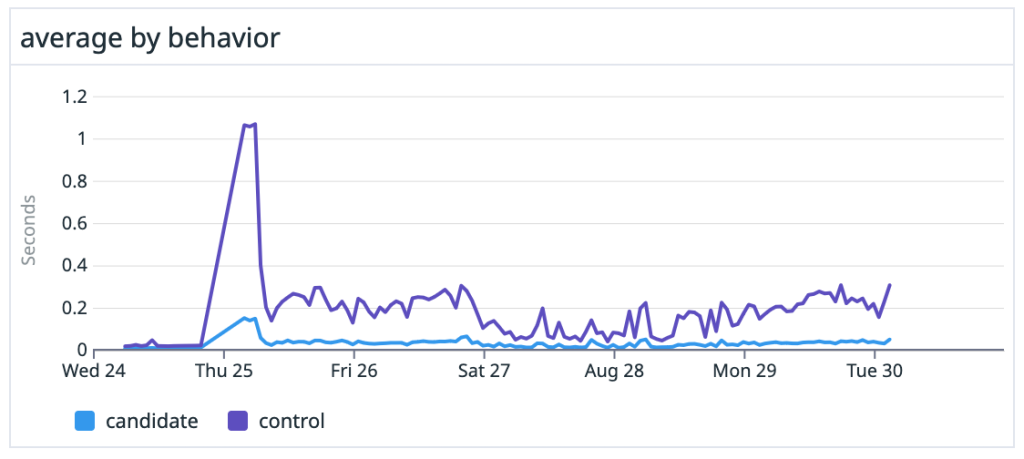
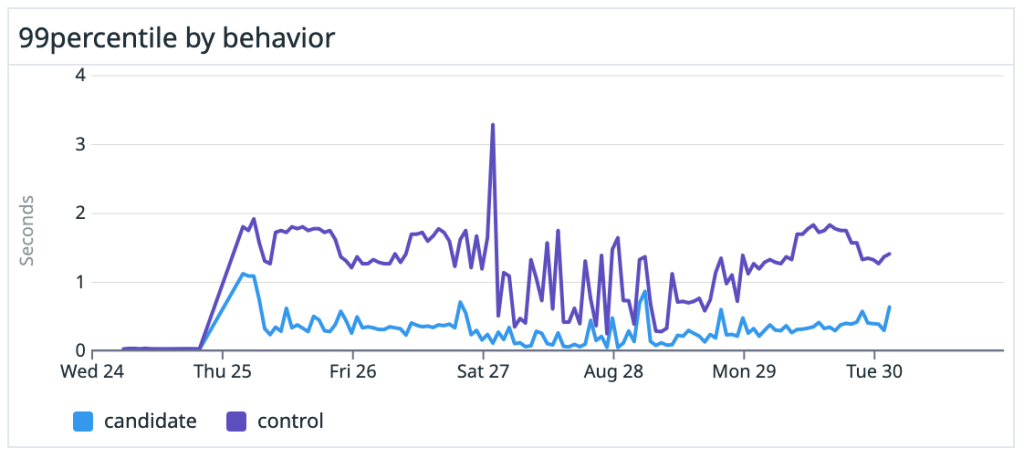
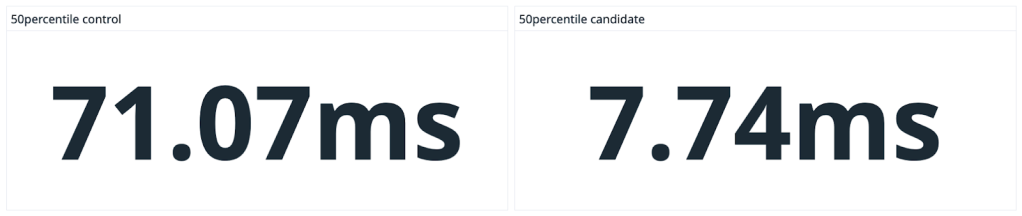
We created a Scientist experiment with a new candidate code block to evaluate performance. The Datadog dashboard for the experiment confirmed two things: the candidate code block returned the same results and improved performance by 80-90%.
We also did a deeper dive into the queries this feature was generating and found a couple of possible additional improvements.
The first involved eliminating a SQL query and sorting results in the application rather than asking the SQL server to sort. We followed the same process with a new experiment and found that the candidate code block performed 40-80% worse than the control. We removed the candidate code block and ended the experiment.
The second was a query filtering results based on the viewer’s level of access and did so by iterating through the list of results. The access check we needed can be batched. So, we started another experiment to do the filtering with a single batched query and confirmed that the candidate code block improved performance by another 20-80%.
While we were wrapping up these experiments, we checked for similar patterns in related code and found a similar filter we could batch. We confirmed a 30-40% performance improvement with a final experiment, and left the feature in a better place that made our developers, database administrators, and users happier.
Removing unused code
While our tooling does surface problem areas to focus on, it’s preferable to get ahead of performance issues and fix problematic areas before they cause a degraded experience. We recently analyzed the busiest request endpoints for one of our teams and found room to improve one of them before it escalated to an urgent problem.
Data for each request to the GitHub Rails application is logged in Splunk and tagged with the associated controller and action. We started by querying Splunk for the top 10 controller/action pairs in the endpoints owned by the team. We used that list to create a Datadog dashboard with a set of graphs for each controller/action that showed the total request volume, average and P99 request latency, and max request latency. We found that the busiest endpoint on the dashboard was an action responsible for a simple redirect, and that performance regularly degraded to the timeout threshold.
We needed to know what was slowing these requests down, so we dug into Datadog’s APM feature to show requests for the problematic controller/endpoint. We sorted those requests by elapsed request time to see the slowest requests first. We identified a pattern where slow requests spent a long time performing an access check that wasn’t required to send the redirect response.
Most requests to the GitHub Rails application generate HTML responses where we need to be careful to ensure that all data in the response is accessible to the viewer. We’re able to simplify the code involved by using shared Rails controller filters to verify that the viewer is allowed to see the resources they’re requesting that run before the server renders a response. These checks aren’t required for the redirect, so we wanted to confirm we could serve those requests using a different set of filters and that this approach would improve performance.
Since Rails controller filters are configured when the application boots rather than when each request is processed, we weren’t able to use a Scientist experiment to test a candidate code block. However, filters can be configured to run conditionally, which enabled us to use a Flipper feature flag to change behavior. We identified the set of filters that weren’t required for the redirect, and configured the controller to skip those filters when the feature flag was enabled. The feature flag controls let us ramp up this behavior while monitoring both performance and request status via Datadog and keeping watch for unexpected problems via Splunk.
After confirming that performance improved for P75/P99 request latency—and more importantly, reduced max latency to be more consistent and much less likely to time out—we graduated the feature and generalized the behavior so other similar controllers can use it.
What did we learn?
There are several lessons we learned throughout this process. Here are some of the main points we keep in mind.
- The investment in observability is totally worth it! We identified and solved problems quickly because of the metric and log information we track.
- Even when you’re troubleshooting a problem that’s been traditionally difficult to solve, the use case may be subtly different in a way that presents a new solution.
- When you’re working on a fix, look around at adjacent code. There may be related issues you can tackle while you’re there.
- Performance problems are a moving target. Keeping an eye open for the next one helps you fix it when it’s gotten slow rather than when it starts causing timeouts and breaking things.
- Make small changes in ways that you can control with a gradual rollout and measure results.
The post How we improved availability through iterative simplification appeared first on The GitHub Blog.