Tag Archives: troubleshooting

Debug deployment failures faster with the Deployments tab in AWS Elastic Beanstalk

Post Syndicated from Ben Lazar original https://aws.amazon.com/blogs/devops/debug-deployment-failures-faster-with-the-deployments-tab-in-aws-elastic-beanstalk/

Introduction

When a deployment fails, finding the root cause often means piecing together information from multiple sources. You wait for the deployment to finish, request a log bundle, download it, and then search through files like eb-engine.log and cfn-init.log to find the error. If you’re not familiar with Elastic Beanstalk’s log file structure, you might not know which file to check first, and the process can take longer than fixing the actual problem.

Elastic Beanstalk now provides a Deployments tab in the environment dashboard that gives you a consolidated view of your deployment history and real-time deployment logs. You can see what’s happening during a deployment as it runs, and when something fails, the deployment log shows you the error output directly in the console.

In this post, you create an Elastic Beanstalk environment, trigger different types of deployments, deploy a broken application to see how the Deployments tab surfaces errors, and then fix and redeploy. By the end, you’ll know how to use deployment logs to diagnose failures without connecting to instances over SSH or downloading log bundles.

Solution overview

The Deployments tab displays a history of recent deployments for your environment, including application deployments, configuration updates, and environment launches. Each deployment has a detail page with two tabs: Events, which shows a filtered timeline of events for that deployment, and Deployment Logs, which shows a consolidated log from the instance.

Deployment logs capture each step of the deployment process: dependency installation, application builds, .ebextensions commands, platform hooks, and application startup output. The logs are designed to be concise. On success, you see summary messages showing which steps ran and completed. On failure, the log includes up to 50 lines of output from the failed step, so you can see what went wrong without searching through verbose output.

During a deployment, one instance uploads its log to Amazon Simple Storage Service (Amazon S3) as the deployment progresses. The Elastic Beanstalk console reads from Amazon S3, which means you can monitor progress in real time without connecting to the instance. After the deployment completes, the console fetches the final log to ensure you see the complete output. For environments with multiple instances, the deployment log is captured from one representative instance. To view logs from all instances, use the Request Logs feature.

Prerequisites

Before getting started, ensure that you have the following:

  • An AWS account with permissions to create Elastic Beanstalk environments and associated resources (Amazon Elastic Compute Cloud (Amazon EC2) instances, Amazon S3 buckets, security groups). For the minimum AWS Identity and Access Management (IAM) permissions required, see Managing Elastic Beanstalk service roles. Follow the principle of least privilege and avoid using AWS account root or unrestricted administrator credentials.
  • The default Elastic Beanstalk instance profile, aws-elasticbeanstalk-ec2-role. New AWS accounts may not have this role created automatically. If your environment fails to launch because the role is missing, see Instance profile for Amazon EC2 instances in your Elastic Beanstalk environment.
  • A supported Elastic Beanstalk platform version. Deployment logs are available on Amazon Linux 2 and Amazon Linux 2023 platform versions released on or after March 11, 2026, and on Windows Server platform versions 2.23.0 and later.
  • AWS Command Line Interface (AWS CLI) installed and configured with appropriate permissions. See Installing the AWS CLI.
  • A Bash-compatible shell (Bash or Zsh). The commands in this walkthrough use Bash syntax (heredocs, &&, and shell variables).

Walkthrough

Follow the steps below to create an environment, explore the Deployments tab, deploy a broken application, and then fix it.

Open your terminal and set the following variables. Replace the values with your own unique Amazon S3 bucket name and the latest Node.js solution stack for your Region. This walkthrough uses us-east-1. You can substitute your preferred Region, but use the same Region consistently across all commands in the walkthrough. To find the latest solution stack, run aws elasticbeanstalk list-available-solution-stacks.

S3_BUCKET="your-unique-bucket-name"

# Replace with the latest Node.js solution stack for your Region
SOLUTION_STACK_NAME="64bit Amazon Linux 2023 v6.11.1 running Node.js 22"

Setting up the application

This walkthrough uses two versions of a Node.js application. The first version is a working HTTP server. The second version introduces a dependency on a non-existent npm package, simulating a common deployment failure where a dependency cannot be installed.

Create a project directory:

mkdir deployments-tab-demo && cd deployments-tab-demo

Create the working application file:

cat << 'EOF' > workingapp.js
const http = require('http');

const server = http.createServer((req, res) => {
  res.writeHead(200, { 'Content-Type': 'application/json' });
  res.end(JSON.stringify({ status: 'healthy', message: 'App is running' }));
});

const port = process.env.PORT || 8080;
server.listen(port, () => {
  console.log(`Server running on port ${port}`);
});
EOF

Create the working package.json:

cat << 'EOF' > working-package.json
{
  "name": "deployments-tab-demo",
  "version": "1.0.0",
  "description": "Sample app for Deployments tab walkthrough",
  "main": "app.js",
  "scripts": {
    "start": "node app.js"
  }
}
EOF

Create the broken package.json with a non-existent dependency:

cat << 'EOF' > broken-package.json
{
  "name": "deployments-tab-demo",
  "version": "2.0.0",
  "description": "Sample app for Deployments tab walkthrough",
  "main": "app.js",
  "scripts": {
    "start": "node app.js"
  },
  "dependencies": {
    "this-package-does-not-exist-abc123": "^1.0.0"
  }
}
EOF

Create the working application source bundle:

cp workingapp.js app.js
cp working-package.json package.json
zip -r nodejs-working-app.zip app.js package.json

Create the broken application source bundle:

cp broken-package.json package.json
zip -r nodejs-broken-app.zip app.js package.json

Step 1: Create an environment and explore the Deployments tab

Create an Amazon S3 bucket and upload the source bundles. This walkthrough uses default bucket settings for simplicity. For production workloads, enable server-side encryption and restrict bucket access to only the principals that need it.

aws s3 mb s3://$S3_BUCKET --region us-east-1

aws s3 cp nodejs-working-app.zip s3://$S3_BUCKET/nodejs-working-app.zip
aws s3 cp nodejs-broken-app.zip s3://$S3_BUCKET/nodejs-broken-app.zip

Create the Elastic Beanstalk application and the working version:

aws elasticbeanstalk create-application \
--application-name deployments-tab-demo \
--description "Deployments tab walkthrough" \
--region us-east-1

aws elasticbeanstalk create-application-version \
--application-name deployments-tab-demo \
--version-label v1-working \
--source-bundle S3Bucket="$S3_BUCKET",S3Key="nodejs-working-app.zip" \
--region us-east-1

Create the environment:

aws elasticbeanstalk create-environment \
--application-name deployments-tab-demo \
--environment-name deployments-tab-demo-env \
--solution-stack-name "$SOLUTION_STACK_NAME" \
--version-label v1-working \
--option-settings \
Namespace=aws:elasticbeanstalk:environment,OptionName=EnvironmentType,Value=SingleInstance \
Namespace=aws:autoscaling:launchconfiguration,OptionName=IamInstanceProfile,Value=aws-elasticbeanstalk-ec2-role \
--region us-east-1

Don’t wait for the environment to finish creating. Instead, open the Elastic Beanstalk console right away, navigate to your environment, and choose the Deployments tab.

You should see one deployment in the history table with a status of In Progress and a type of Environment Creation. The table also shows the request ID, start time, and duration (which updates as the deployment runs). Choose the Request ID link to open the deployment detail page.
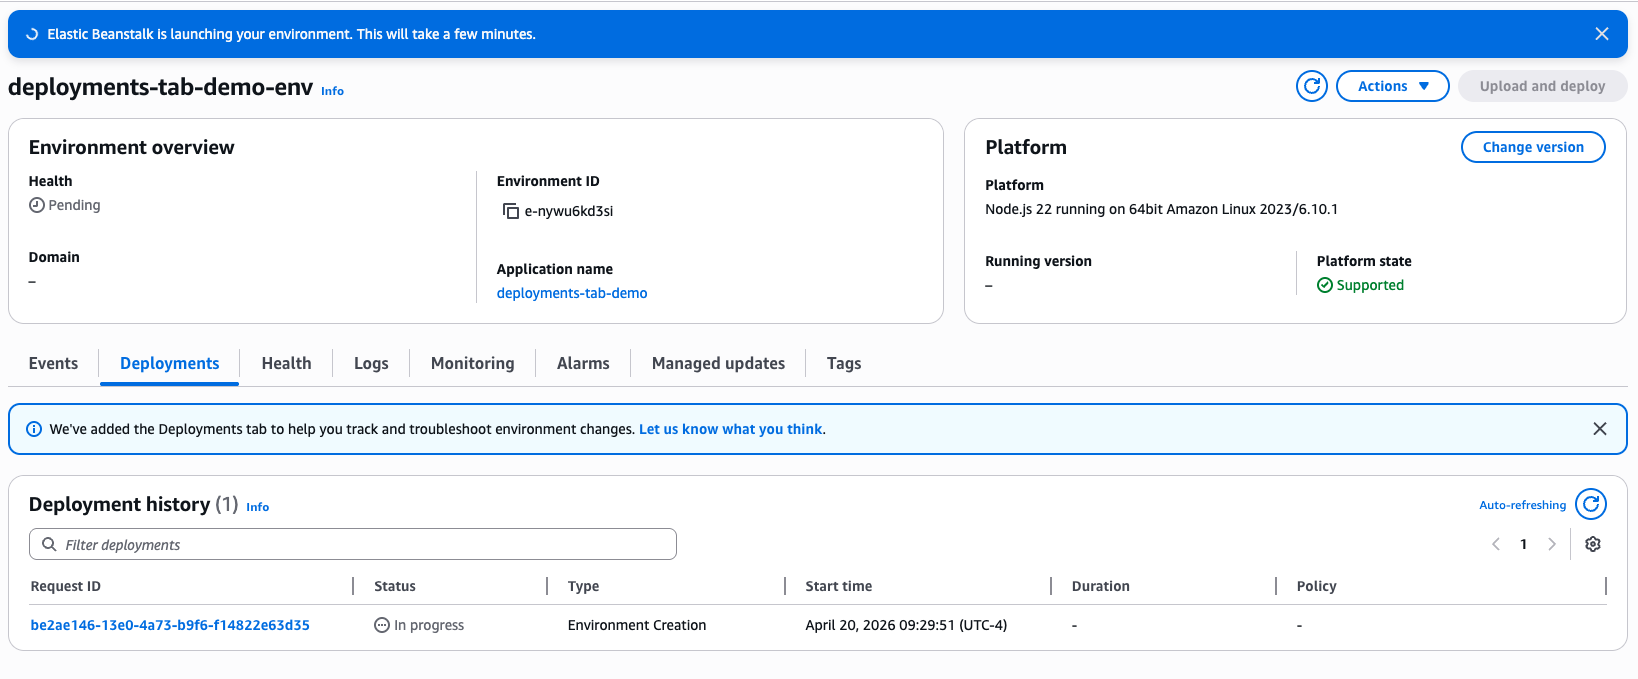
Elastic Beanstalk environment overview page showing the new Deployments tab selected, with a Deployment history table listing one in-progress Environment Creation deployment.

Figure 1 – Deployments tab history table showing the in-progress Environment Creation deployment

The detail page has a summary section with the deployment metadata and two tabs below it:

  • Events shows a filtered timeline of events for this deployment. As the environment creation progresses, new events appear automatically.
  • Deployment Logs shows the consolidated deployment log from the instance.

Select the Deployment Logs tab. At first, the tab may show a message indicating that the log is not yet available. This is expected. The deployment log is written on the EC2 instance and uploaded to Amazon S3, so it won’t appear until the instance launches and begins the deployment process. Once the instance is running, log entries start appearing and the tab refreshes automatically to show new entries as they are written. You can watch dependency installation, platform hooks, and application startup happen in real time.
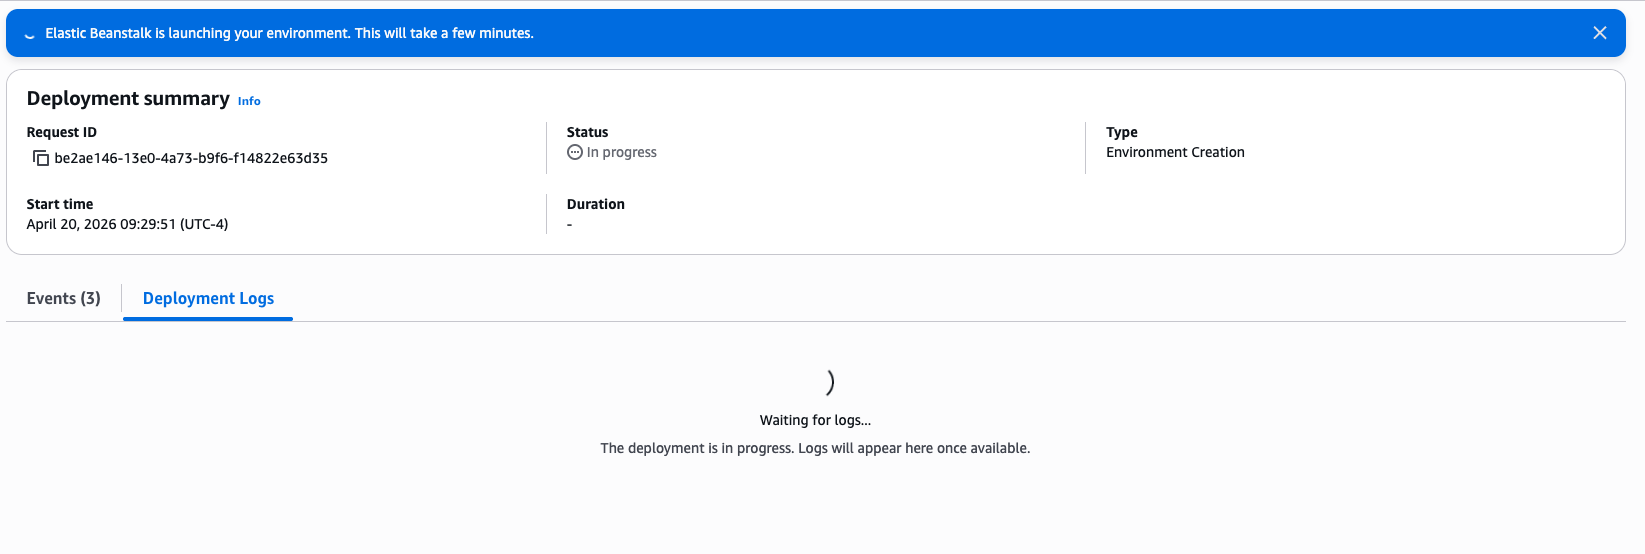
Deployment details page showing a Deployment summary card (Request ID, Status: In progress, Type: Environment Creation) with the Deployment Logs tab selected and a "Waiting for logs..." placeholder.

Figure 2 – Deployment Logs tab showing “log not yet available” message during early environment creation

After the environment creation completes, the deployment status changes to Succeeded and the log shows the final state. Because this deployment succeeded, the log contains only summary messages for each step. Take notice of how the log captures each phase of the deployment in order: .ebextensions commands, dependency installation (npm), container commands, and then the application startup. Pay attention to the Application Output section near the end of the log. It shows the initial stdout from your application process, confirming that it started and is listening on the expected port. This section is useful for verifying that your application launched correctly after a deployment.

You can also check the environment status from the CLI:

aws elasticbeanstalk describe-environments \
--environment-names deployments-tab-demo-env \
--query 'Environments[0].{Status:Status,Health:Health}' \
--region us-east-1
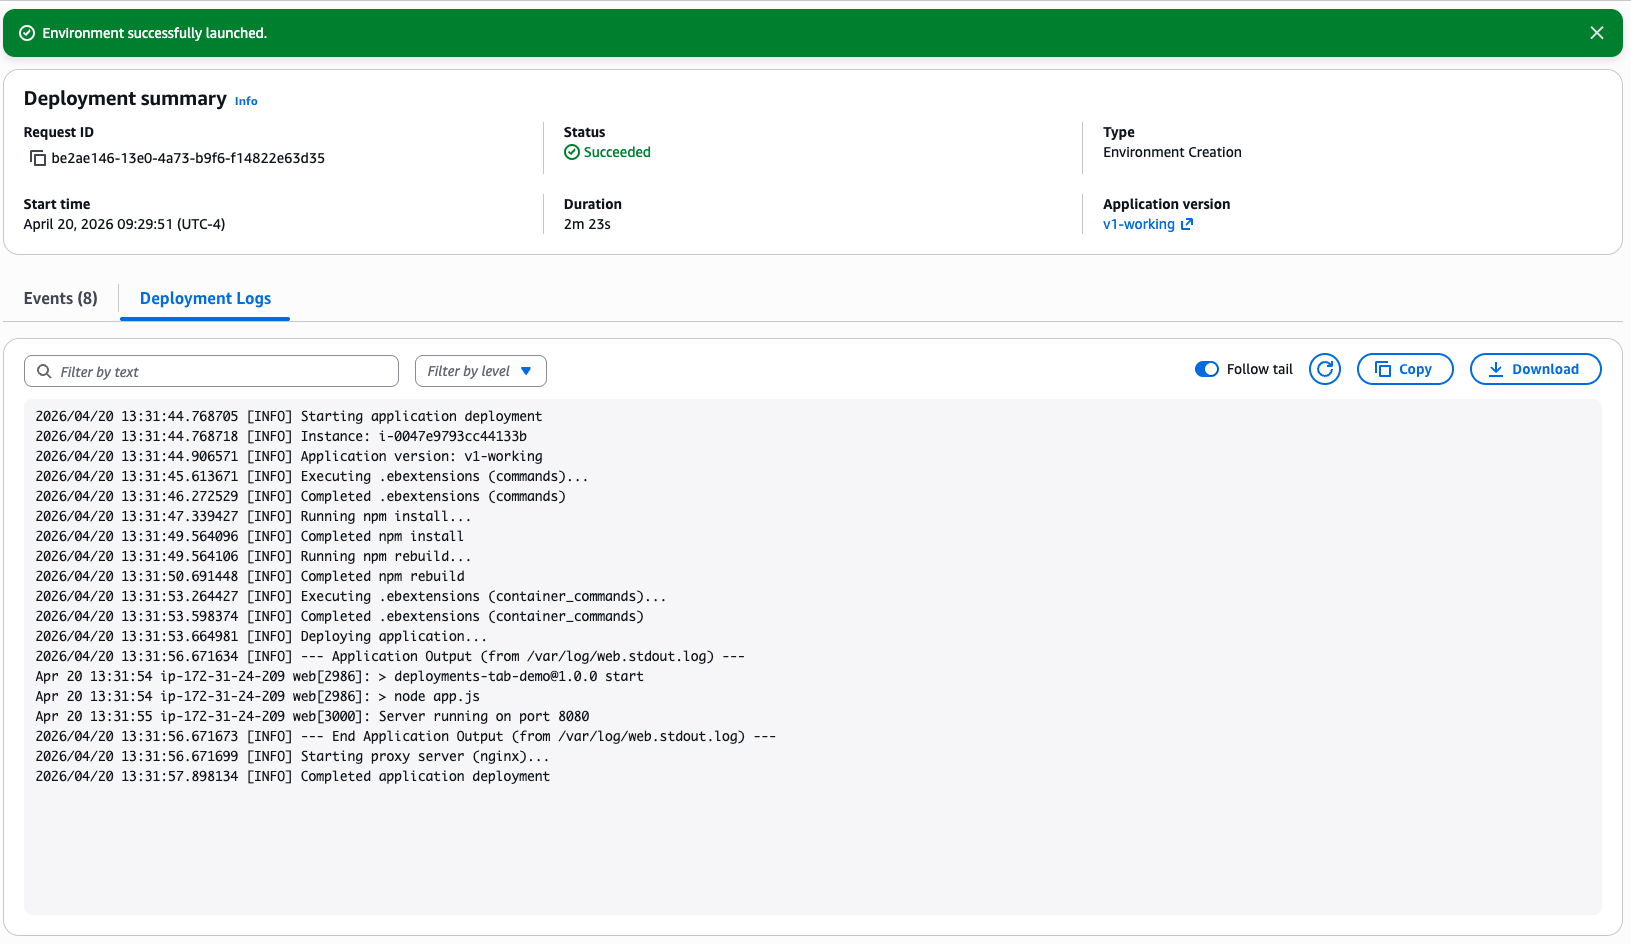
Successful deployment details page with green "Environment successfully launched" banner, Deployment summary showing Status: Succeeded, and the Deployment Logs tab displaying streamed eb-engine and eb-hooks log entries.

Figure 3 – Deployment detail page showing the completed Deployment Logs tab with successful log output

Step 2: Trigger a configuration update

To see how different deployment types appear in the Deployments tab, add an environment variable to your environment:

aws elasticbeanstalk update-environment \
--environment-name deployments-tab-demo-env \
--option-settings \
Namespace=aws:elasticbeanstalk:application:environment,OptionName=APP_ENV,Value=production \
--region us-east-1

While the update is in progress, go back to the Deployments tab in the console. You should see a second deployment appear in the history with a status of In Progress and a type of Environment Update. Choose the request ID to open the detail page, and select the Deployment Logs tab. The log updates automatically as new entries are written, so you can watch the deployment progress in real time.

After the update completes, the deployment status changes to Succeeded. You now have two deployments in your history, each with its own type and duration.
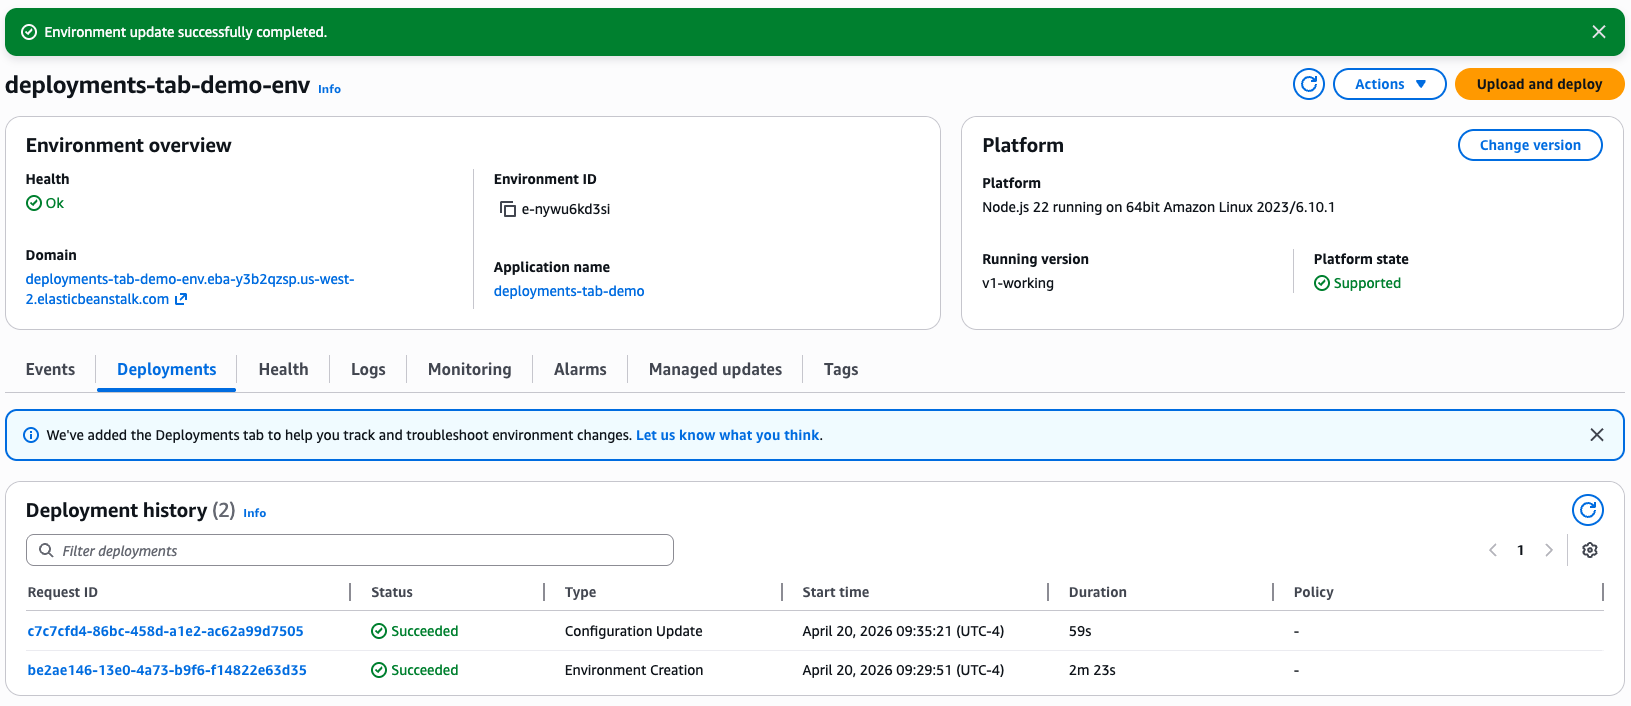
Elastic Beanstalk environment page after a successful configuration update, showing Health: Ok and a Deployment history table with two Succeeded entries: a Configuration Update and an Environment Creation.

Figure 4 – Deployments tab showing two deployments: Environment Creation and Environment Update

Step 3: Deploy a broken application

This is where the Deployments tab shows its value. Create and deploy a broken application version that references a non-existent npm package:

aws elasticbeanstalk create-application-version \
--application-name deployments-tab-demo \
--version-label v2-broken \
--source-bundle S3Bucket="$S3_BUCKET",S3Key="nodejs-broken-app.zip" \
--region us-east-1

aws elasticbeanstalk update-environment \
--environment-name deployments-tab-demo-env \
--version-label v2-broken \
--region us-east-1

As soon as the deployment starts, go back to the Deployments tab in the console. You should see a new Application Deployment with a status of In Progress. Choose the request ID to open the deployment detail page and select the Deployment Logs tab.

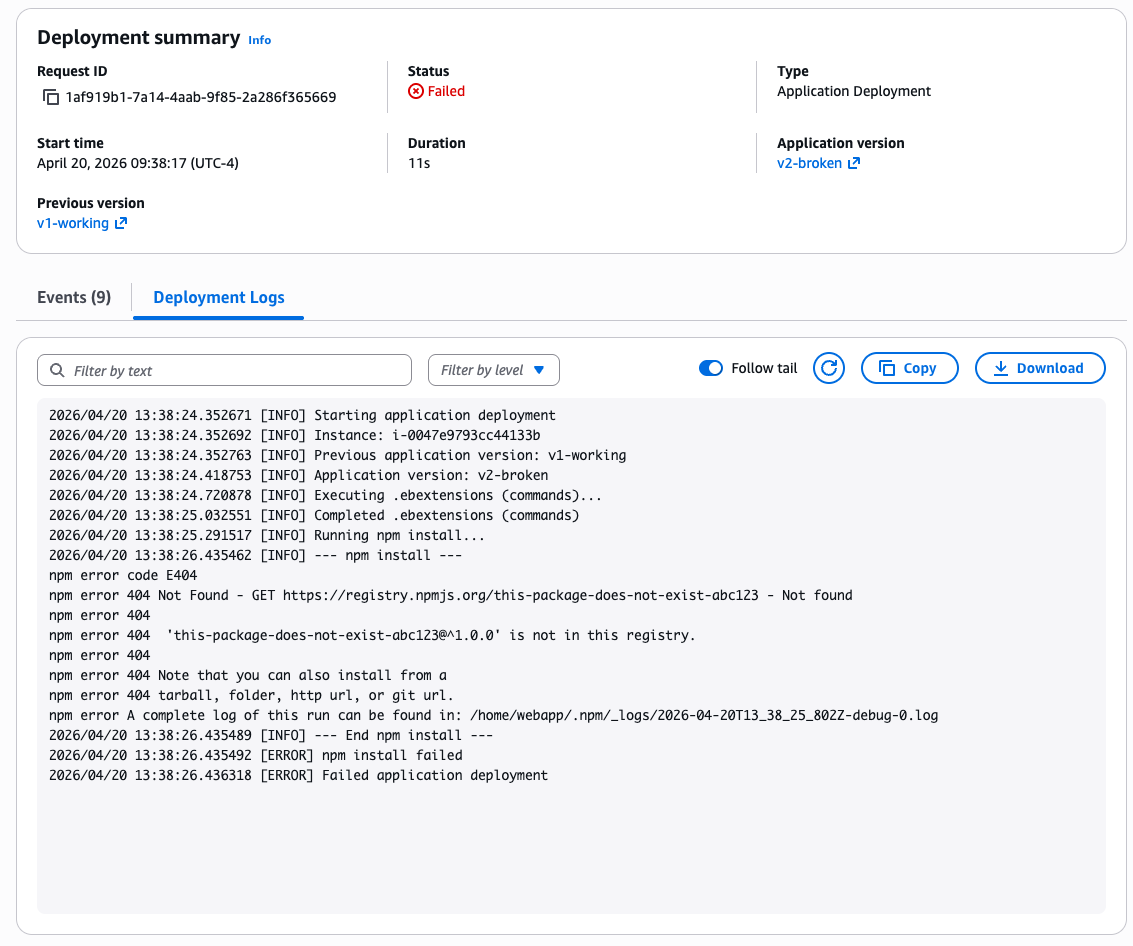
Watch as the log streams in real time. You will see the deployment start, .ebextensions commands run, and then npm install begin. Shortly after, the error appears with the relevant output from the failed step, showing the exact npm error indicating that the package could not be found. The deployment status changes to Failed.

Elastic Beanstalk automatically rolls back to the previous working version, so your environment returns to a healthy state. Without the Deployments tab, diagnosing what went wrong would still require requesting a log bundle, downloading it, extracting it, and searching through the log files. With the Deployments tab, the diagnosis is immediate. There is no need to connect to the instance via SSH or download log bundles. The error is right there in the console.
Deployment details page for a failed Application Deployment, showing Status: Failed in the summary and Deployment Logs containing yum package errors ("No package eb-noti-abc123-1.0.0 available").

Figure 5 – Deployment detail page showing the failed deployment error and npm install output

Compare this to the successful deployment logs from Step 1. The successful log showed only summary messages. The failed log automatically includes the detailed error output. This smart verbosity means you don’t have to search through verbose logs on success, but you get the detail you need on failure.

Step 4: Deploy a fixed version

Although Elastic Beanstalk rolled back to the working version automatically, let’s deploy it explicitly to see what a successful application deployment log looks like after a failure:

aws elasticbeanstalk update-environment \
--environment-name deployments-tab-demo-env \
--version-label v1-working \
--region us-east-1

After the deployment completes, open the deployment detail page from the Deployments tab. The deployment log shows only summary messages for each step. The npm step completes without errors, the application starts, and the deployment finishes. Compare this to the failed deployment log from Step 3, where the error and detailed npm output appeared automatically.
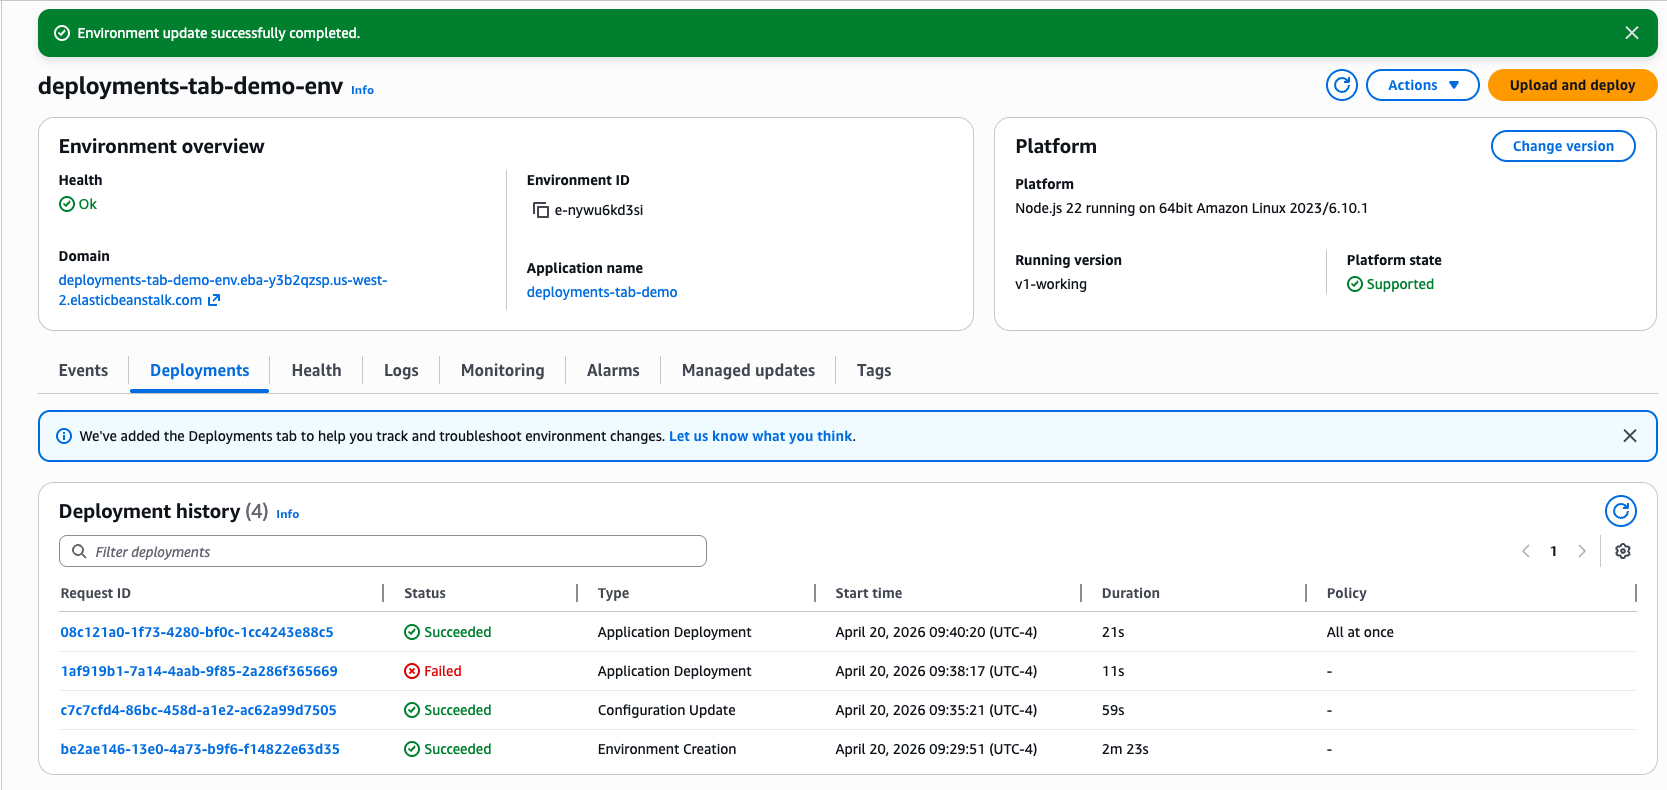
Elastic Beanstalk environment Deployments tab showing a Deployment history of four entries — two Application Deployments (one Succeeded, one Failed), one Configuration Update, and one Environment Creation.

Figure 6 – Deployments tab showing all four deployments with their statuses

Cleaning up

To avoid ongoing charges, terminate the environment and delete the associated resources.

Terminate the environment:

aws elasticbeanstalk terminate-environment \
--environment-name deployments-tab-demo-env \
--region us-east-1

Delete the application (after the environment is terminated):

aws elasticbeanstalk delete-application \
--application-name deployments-tab-demo \
--terminate-env-by-force \
--region us-east-1

Delete the S3 bucket used for source bundles:

aws s3 rb s3://$S3_BUCKET --force --region us-east-1

Remove the local project directory. Before running the following command, make sure your current working directory is not inside deployments-tab-demo:

rm -rf deployments-tab-demo

Conclusion

The Deployments tab in AWS Elastic Beanstalk gives you a single place to view your deployment history and read deployment logs, including while a deployment is still running. When a deployment fails, the log shows you the error output from the failed step directly in the console, so you can identify the root cause without connecting to instances over SSH or downloading log bundles.

Deployment logs are available on Amazon Linux 2 and Amazon Linux 2023 platform versions released on or after March 11, 2026, and on Windows Server platform versions 2.23.0 and later, in all AWS Commercial Regions and AWS GovCloud (US) Regions. To get started, update your environment to a supported platform version and navigate to the Deployments tab in the Elastic Beanstalk console.

To learn more about deployment logs, see Viewing deployment logs in the AWS Elastic Beanstalk Developer Guide. For more information about AWS Elastic Beanstalk, visit the product page.
Ben Lazar

Ben Lazar is a Software Development Engineer II at Amazon Web Services (AWS) on the Elastic Beanstalk team. He maintains the Elastic Beanstalk platforms that customers use to run their web applications.

Java 21 Virtual Threads – Dude, Where’s My Lock?

Post Syndicated from Netflix Technology Blog original https://netflixtechblog.com/java-21-virtual-threads-dude-wheres-my-lock-3052540e231d

Getting real with virtual threads

By Vadim Filanovsky, Mike Huang, Danny Thomas and Martin Chalupa

Intro

Netflix has an extensive history of using Java as our primary programming language across our vast fleet of microservices. As we pick up newer versions of Java, our JVM Ecosystem team seeks out new language features that can improve the ergonomics and performance of our systems. In a recent article, we detailed how our workloads benefited from switching to generational ZGC as our default garbage collector when we migrated to Java 21. Virtual threads is another feature we are excited to adopt as part of this migration.

For those new to virtual threads, they are described as “lightweight threads that dramatically reduce the effort of writing, maintaining, and observing high-throughput concurrent applications.” Their power comes from their ability to be suspended and resumed automatically via continuations when blocking operations occur, thus freeing the underlying operating system threads to be reused for other operations. Leveraging virtual threads can unlock higher performance when utilized in the appropriate context.

In this article we discuss one of the peculiar cases that we encountered along our path to deploying virtual threads on Java 21.

The problem

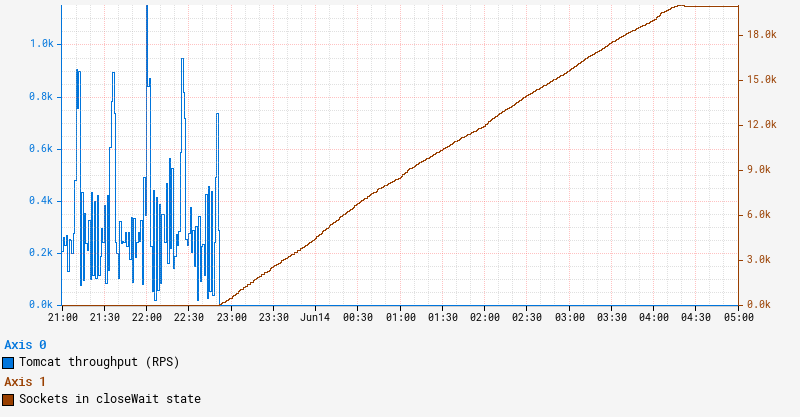
Netflix engineers raised several independent reports of intermittent timeouts and hung instances to the Performance Engineering and JVM Ecosystem teams. Upon closer examination, we noticed a set of common traits and symptoms. In all cases, the apps affected ran on Java 21 with SpringBoot 3 and embedded Tomcat serving traffic on REST endpoints. The instances that experienced the issue simply stopped serving traffic even though the JVM on those instances remained up and running. One clear symptom characterizing the onset of this issue is a persistent increase in the number of sockets in closeWait state as illustrated by the graph below:

Collected diagnostics

Sockets remaining in closeWait state indicate that the remote peer closed the socket, but it was never closed on the local instance, presumably because the application failed to do so. This can often indicate that the application is hanging in an abnormal state, in which case application thread dumps may reveal additional insight.

In order to troubleshoot this issue, we first leveraged our alerts system to catch an instance in this state. Since we periodically collect and persist thread dumps for all JVM workloads, we can often retroactively piece together the behavior by examining these thread dumps from an instance. However, we were surprised to find that all our thread dumps show a perfectly idle JVM with no clear activity. Reviewing recent changes revealed that these impacted services enabled virtual threads, and we knew that virtual thread call stacks do not show up in jstack-generated thread dumps. To obtain a more complete thread dump containing the state of the virtual threads, we used the “jcmd Thread.dump_to_file” command instead. As a last-ditch effort to introspect the state of JVM, we also collected a heap dump from the instance.

Analysis

Thread dumps revealed thousands of “blank” virtual threads:

#119821 "" virtual

#119820 "" virtual

#119823 "" virtual

#120847 "" virtual

#119822 "" virtual
...

These are the VTs (virtual threads) for which a thread object is created, but has not started running, and as such, has no stack trace. In fact, there were approximately the same number of blank VTs as the number of sockets in closeWait state. To make sense of what we were seeing, we need to first understand how VTs operate.

A virtual thread is not mapped 1:1 to a dedicated OS-level thread. Rather, we can think of it as a task that is scheduled to a fork-join thread pool. When a virtual thread enters a blocking call, like waiting for a Future, it relinquishes the OS thread it occupies and simply remains in memory until it is ready to resume. In the meantime, the OS thread can be reassigned to execute other VTs in the same fork-join pool. This allows us to multiplex a lot of VTs to just a handful of underlying OS threads. In JVM terminology, the underlying OS thread is referred to as the “carrier thread” to which a virtual thread can be “mounted” while it executes and “unmounted” while it waits. A great in-depth description of virtual thread is available in JEP 444.

In our environment, we utilize a blocking model for Tomcat, which in effect holds a worker thread for the lifespan of a request. By enabling virtual threads, Tomcat switches to virtual execution. Each incoming request creates a new virtual thread that is simply scheduled as a task on a Virtual Thread Executor. We can see Tomcat creates a VirtualThreadExecutor here.

Tying this information back to our problem, the symptoms correspond to a state when Tomcat keeps creating a new web worker VT for each incoming request, but there are no available OS threads to mount them onto.

Why is Tomcat stuck?

What happened to our OS threads and what are they busy with? As described here, a VT will be pinned to the underlying OS thread if it performs a blocking operation while inside a synchronized block or method. This is exactly what is happening here. Here is a relevant snippet from a thread dump obtained from the stuck instance:

#119515 "" virtual
java.base/jdk.internal.misc.Unsafe.park(Native Method)
java.base/java.lang.VirtualThread.parkOnCarrierThread(VirtualThread.java:661)
java.base/java.lang.VirtualThread.park(VirtualThread.java:593)
java.base/java.lang.System$2.parkVirtualThread(System.java:2643)
java.base/jdk.internal.misc.VirtualThreads.park(VirtualThreads.java:54)
java.base/java.util.concurrent.locks.LockSupport.park(LockSupport.java:219)
java.base/java.util.concurrent.locks.AbstractQueuedSynchronizer.acquire(AbstractQueuedSynchronizer.java:754)
java.base/java.util.concurrent.locks.AbstractQueuedSynchronizer.acquire(AbstractQueuedSynchronizer.java:990)
java.base/java.util.concurrent.locks.ReentrantLock$Sync.lock(ReentrantLock.java:153)
java.base/java.util.concurrent.locks.ReentrantLock.lock(ReentrantLock.java:322)
zipkin2.reporter.internal.CountBoundedQueue.offer(CountBoundedQueue.java:54)
zipkin2.reporter.internal.AsyncReporter$BoundedAsyncReporter.report(AsyncReporter.java:230)
zipkin2.reporter.brave.AsyncZipkinSpanHandler.end(AsyncZipkinSpanHandler.java:214)
brave.internal.handler.NoopAwareSpanHandler$CompositeSpanHandler.end(NoopAwareSpanHandler.java:98)
brave.internal.handler.NoopAwareSpanHandler.end(NoopAwareSpanHandler.java:48)
brave.internal.recorder.PendingSpans.finish(PendingSpans.java:116)
brave.RealSpan.finish(RealSpan.java:134)
brave.RealSpan.finish(RealSpan.java:129)
io.micrometer.tracing.brave.bridge.BraveSpan.end(BraveSpan.java:117)
io.micrometer.tracing.annotation.AbstractMethodInvocationProcessor.after(AbstractMethodInvocationProcessor.java:67)
io.micrometer.tracing.annotation.ImperativeMethodInvocationProcessor.proceedUnderSynchronousSpan(ImperativeMethodInvocationProcessor.java:98)
io.micrometer.tracing.annotation.ImperativeMethodInvocationProcessor.process(ImperativeMethodInvocationProcessor.java:73)
io.micrometer.tracing.annotation.SpanAspect.newSpanMethod(SpanAspect.java:59)
java.base/jdk.internal.reflect.DirectMethodHandleAccessor.invoke(DirectMethodHandleAccessor.java:103)
java.base/java.lang.reflect.Method.invoke(Method.java:580)
org.springframework.aop.aspectj.AbstractAspectJAdvice.invokeAdviceMethodWithGivenArgs(AbstractAspectJAdvice.java:637)
...

In this stack trace, we enter the synchronization in brave.RealSpan.finish(RealSpan.java:134). This virtual thread is effectively pinned — it is mounted to an actual OS thread even while it waits to acquire a reentrant lock. There are 3 VTs in this exact state and another VT identified as “<redacted> @DefaultExecutor – 46542” that also follows the same code path. These 4 virtual threads are pinned while waiting to acquire a lock. Because the app is deployed on an instance with 4 vCPUs, the fork-join pool that underpins VT execution also contains 4 OS threads. Now that we have exhausted all of them, no other virtual thread can make any progress. This explains why Tomcat stopped processing the requests and why the number of sockets in closeWait state keeps climbing. Indeed, Tomcat accepts a connection on a socket, creates a request along with a virtual thread, and passes this request/thread to the executor for processing. However, the newly created VT cannot be scheduled because all of the OS threads in the fork-join pool are pinned and never released. So these newly created VTs are stuck in the queue, while still holding the socket.

Who has the lock?

Now that we know VTs are waiting to acquire a lock, the next question is: Who holds the lock? Answering this question is key to understanding what triggered this condition in the first place. Usually a thread dump indicates who holds the lock with either “- locked <0x…> (at …)” or “Locked ownable synchronizers,” but neither of these show up in our thread dumps. As a matter of fact, no locking/parking/waiting information is included in the jcmd-generated thread dumps. This is a limitation in Java 21 and will be addressed in the future releases. Carefully combing through the thread dump reveals that there are a total of 6 threads contending for the same ReentrantLock and associated Condition. Four of these six threads are detailed in the previous section. Here is another thread:

#119516 "" virtual
java.base/java.lang.VirtualThread.park(VirtualThread.java:582)
java.base/java.lang.System$2.parkVirtualThread(System.java:2643)
java.base/jdk.internal.misc.VirtualThreads.park(VirtualThreads.java:54)
java.base/java.util.concurrent.locks.LockSupport.park(LockSupport.java:219)
java.base/java.util.concurrent.locks.AbstractQueuedSynchronizer.acquire(AbstractQueuedSynchronizer.java:754)
java.base/java.util.concurrent.locks.AbstractQueuedSynchronizer.acquire(AbstractQueuedSynchronizer.java:990)
java.base/java.util.concurrent.locks.ReentrantLock$Sync.lock(ReentrantLock.java:153)
java.base/java.util.concurrent.locks.ReentrantLock.lock(ReentrantLock.java:322)
zipkin2.reporter.internal.CountBoundedQueue.offer(CountBoundedQueue.java:54)
zipkin2.reporter.internal.AsyncReporter$BoundedAsyncReporter.report(AsyncReporter.java:230)
zipkin2.reporter.brave.AsyncZipkinSpanHandler.end(AsyncZipkinSpanHandler.java:214)
brave.internal.handler.NoopAwareSpanHandler$CompositeSpanHandler.end(NoopAwareSpanHandler.java:98)
brave.internal.handler.NoopAwareSpanHandler.end(NoopAwareSpanHandler.java:48)
brave.internal.recorder.PendingSpans.finish(PendingSpans.java:116)
brave.RealScopedSpan.finish(RealScopedSpan.java:64)
...

Note that while this thread seemingly goes through the same code path for finishing a span, it does not go through a synchronized block. Finally here is the 6th thread:

#107 "AsyncReporter <redacted>"
java.base/jdk.internal.misc.Unsafe.park(Native Method)
java.base/java.util.concurrent.locks.LockSupport.park(LockSupport.java:221)
java.base/java.util.concurrent.locks.AbstractQueuedSynchronizer.acquire(AbstractQueuedSynchronizer.java:754)
java.base/java.util.concurrent.locks.AbstractQueuedSynchronizer$ConditionObject.awaitNanos(AbstractQueuedSynchronizer.java:1761)
zipkin2.reporter.internal.CountBoundedQueue.drainTo(CountBoundedQueue.java:81)
zipkin2.reporter.internal.AsyncReporter$BoundedAsyncReporter.flush(AsyncReporter.java:241)
zipkin2.reporter.internal.AsyncReporter$Flusher.run(AsyncReporter.java:352)
java.base/java.lang.Thread.run(Thread.java:1583)

This is actually a normal platform thread, not a virtual thread. Paying particular attention to the line numbers in this stack trace, it is peculiar that the thread seems to be blocked within the internal acquire() method after completing the wait. In other words, this calling thread owned the lock upon entering awaitNanos(). We know the lock was explicitly acquired here. However, by the time the wait completed, it could not reacquire the lock. Summarizing our thread dump analysis:

There are 5 virtual threads and 1 regular thread waiting for the lock. Out of those 5 VTs, 4 of them are pinned to the OS threads in the fork-join pool. There’s still no information on who owns the lock. As there’s nothing more we can glean from the thread dump, our next logical step is to peek into the heap dump and introspect the state of the lock.

Inspecting the lock

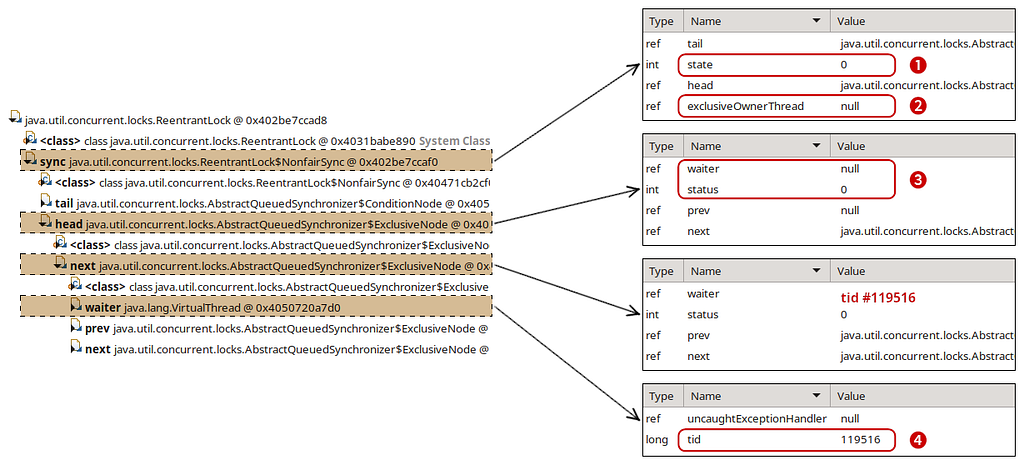
Finding the lock in the heap dump was relatively straightforward. Using the excellent Eclipse MAT tool, we examined the objects on the stack of the AsyncReporter non-virtual thread to identify the lock object. Reasoning about the current state of the lock was perhaps the trickiest part of our investigation. Most of the relevant code can be found in the AbstractQueuedSynchronizer.java. While we don’t claim to fully understand the inner workings of it, we reverse-engineered enough of it to match against what we see in the heap dump. This diagram illustrates our findings:

First off, the exclusiveOwnerThread field is null (2), signifying that no one owns the lock. We have an “empty” ExclusiveNode (3) at the head of the list (waiter is null and status is cleared) followed by another ExclusiveNode with waiter pointing to one of the virtual threads contending for the lock — #119516 (4). The only place we found that clears the exclusiveOwnerThread field is within the ReentrantLock.Sync.tryRelease() method (source link). There we also set state = 0 matching the state that we see in the heap dump (1).

With this in mind, we traced the code path to release() the lock. After successfully calling tryRelease(), the lock-holding thread attempts to signal the next waiter in the list. At this point, the lock-holding thread is still at the head of the list, even though ownership of the lock is effectively released. The next node in the list points to the thread that is about to acquire the lock.

To understand how this signaling works, let’s look at the lock acquire path in the AbstractQueuedSynchronizer.acquire() method. Grossly oversimplifying, it’s an infinite loop, where threads attempt to acquire the lock and then park if the attempt was unsuccessful:

while(true) {
if (tryAcquire()) {
return; // lock acquired
}
park();
}

When the lock-holding thread releases the lock and signals to unpark the next waiter thread, the unparked thread iterates through this loop again, giving it another opportunity to acquire the lock. Indeed, our thread dump indicates that all of our waiter threads are parked on line 754. Once unparked, the thread that managed to acquire the lock should end up in this code block, effectively resetting the head of the list and clearing the reference to the waiter.

To restate this more concisely, the lock-owning thread is referenced by the head node of the list. Releasing the lock notifies the next node in the list while acquiring the lock resets the head of the list to the current node. This means that what we see in the heap dump reflects the state when one thread has already released the lock but the next thread has yet to acquire it. It’s a weird in-between state that should be transient, but our JVM is stuck here. We know thread #119516 was notified and is about to acquire the lock because of the ExclusiveNode state we identified at the head of the list. However, thread dumps show that thread #119516 continues to wait, just like other threads contending for the same lock. How can we reconcile what we see between the thread and heap dumps?

The lock with no place to run

Knowing that thread #119516 was actually notified, we went back to the thread dump to re-examine the state of the threads. Recall that we have 6 total threads waiting for the lock with 4 of the virtual threads each pinned to an OS thread. These 4 will not yield their OS thread until they acquire the lock and proceed out of the synchronized block. #107 “AsyncReporter <redacted>” is a regular platform thread, so nothing should prevent it from proceeding if it acquires the lock. This leaves us with the last thread: #119516. It is a VT, but it is not pinned to an OS thread. Even if it’s notified to be unparked, it cannot proceed because there are no more OS threads left in the fork-join pool to schedule it onto. That’s exactly what happens here — although #119516 is signaled to unpark itself, it cannot leave the parked state because the fork-join pool is occupied by the 4 other VTs waiting to acquire the same lock. None of those pinned VTs can proceed until they acquire the lock. It’s a variation of the classic deadlock problem, but instead of 2 locks we have one lock and a semaphore with 4 permits as represented by the fork-join pool.

Now that we know exactly what happened, it was easy to come up with a reproducible test case.

Conclusion

Virtual threads are expected to improve performance by reducing overhead related to thread creation and context switching. Despite some sharp edges as of Java 21, virtual threads largely deliver on their promise. In our quest for more performant Java applications, we see further virtual thread adoption as a key towards unlocking that goal. We look forward to Java 23 and beyond, which brings a wealth of upgrades and hopefully addresses the integration between virtual threads and locking primitives.

This exploration highlights just one type of issue that performance engineers solve at Netflix. We hope this glimpse into our problem-solving approach proves valuable to others in their future investigations.


Java 21 Virtual Threads – Dude, Where’s My Lock? was originally published in Netflix TechBlog on Medium, where people are continuing the conversation by highlighting and responding to this story.

Understanding memory usage in your Java application with Amazon CodeGuru Profiler

Post Syndicated from Fernando Ciciliati original https://aws.amazon.com/blogs/devops/understanding-memory-usage-in-your-java-application-with-amazon-codeguru-profiler/

“Where has all that free memory gone?” This is the question we ask ourselves every time our application emits that dreaded OutOfMemoyError just before it crashes. Amazon CodeGuru Profiler can help you find the answer.

Thanks to its brand-new memory profiling capabilities, troubleshooting and resolving memory issues in Java applications (or almost anything that runs on the JVM) is much easier. AWS launched the CodeGuru Profiler Heap Summary feature at re:Invent 2020. This is the first step in helping us, developers, understand what our software is doing with all that memory it uses.

The Heap Summary view shows a list of Java classes and data types present in the Java Virtual Machine heap, alongside the amount of memory they’re retaining and the number of instances they represent. The following screenshot shows an example of this view.

Amazon CodeGuru Profiler heap summary view example

Figure: Amazon CodeGuru Profiler Heap Summary feature

Because CodeGuru Profiler is a low-overhead, production profiling service designed to be always on, it can capture and represent how memory utilization varies over time, providing helpful visual hints about the object types and the data types that exhibit a growing trend in memory consumption.

In the preceding screenshot, we can see that several lines on the graph are trending upwards:

  • The red top line, horizontal and flat, shows how much memory has been reserved as heap space in the JVM. In this case, we see a heap size of 512 MB, which can usually be configured in the JVM with command line parameters like -Xmx.
  • The second line from the top, blue, represents the total memory in use in the heap, independent of their type.
  • The third, fourth, and fifth lines show how much memory space each specific type has been using historically in the heap. We can easily spot that java.util.LinkedHashMap$Entry and java.lang.UUID display growing trends, whereas byte[] has a flat line and seems stable in memory usage.

Types that exhibit constantly growing trend of memory utilization with time deserve a closer look. Profiler helps you focus your attention on these cases. Associating the information presented by the Profiler with your own knowledge of your application and code base, you can evaluate whether the amount of memory being used for a specific data type can be considered normal, or if it might be a memory leak – the unintentional holding of memory by an application due to the failure in freeing-up unused objects. In our example above, java.util.LinkedHashMap$Entry and java.lang.UUIDare good candidates for investigation.

To make this functionality available to customers, CodeGuru Profiler uses the power of Java Flight Recorder (JFR), which is now openly available with Java 8 (since OpenJDK release 262) and above. The Amazon CodeGuru Profiler agent for Java, which already does an awesome job capturing data about CPU utilization, has been extended to periodically collect memory retention metrics from JFR and submit them for processing and visualization via Amazon CodeGuru Profiler. Thanks to its high stability and low overhead, the Profiler agent can be safely deployed to services in production, because it is exactly there, under real workloads, that really interesting memory issues are most likely to show up.

Summary

For more information about CodeGuru Profiler and other AI-powered services in the Amazon CodeGuru family, see Amazon CodeGuru. If you haven’t tried the CodeGuru Profiler yet, start your 90-day free trial right now and understand why continuous profiling is becoming a must-have in every production environment. For Amazon CodeGuru customers who are already enjoying the benefits of always-on profiling, this new feature is available at no extra cost. Just update your Profiler agent to version 1.1.0 or newer, and enable Heap Summary in your agent configuration.


Happy profiling!