Tag Archives: zabbix_utils

Using the zabbix_utils Library for Tool Development

Post Syndicated from Aleksandr Iantsen original https://blog.zabbix.com/python-zabbix-utils-alert-tracker-tool/29010/

In this article, we will explore a practical example of using the zabbix_utils library to solve a non-trivial task – obtaining a list of alert recipients for triggers associated with a specific Zabbix host. You will learn how to easily automate the process of collecting this information, and see examples of real code that can be adapted to your needs.

Over the last year, the zabbix_utils library has become one of the most popular tools for working with the Zabbix API. It is a convenient tool that simplifies interacting with the Zabbix server, proxy, or agent, especially for those who automate monitoring and management tasks.

Due to its ease of use and extensive functionality, zabbix_utils has found a following among system administrators, monitoring, and DevOps engineers. According to data from PyPI, the library has already been downloaded over 140,000 times since its release, confirming its demand within the community. It’s all thanks to you and your attention to zabbix_utils!

Task Description

Administrators often need to check which Zabbix users receive alerts for specific triggers in the Zabbix monitoring system. This can be useful for auditing, configuring new notifications, or simply for a quick diagnosis of issues. The task becomes especially relevant when you have plenty of hosts containing numerous triggers, and manually checking the recipients for each trigger through the Zabbix interface becomes very time-consuming. 

In such cases, it is advisable to use a custom solution based on the Zabbix API. You can directly access all the required data using the API, and then use additional logic to determine the final alert recipients. The zabbix_utils library makes working with the Zabbix API more convenient and allows you to automate this process. In this project, we use the zabbix_utils library to write a Python script that collects a list of alert recipients for the triggers of the selected Zabbix host. This will allow you to obtain the necessary information faster and with minimal effort.

Environment Setup and Installation

To get started with zabbix_utils, you need to install the library and configure the connection to the Zabbix API. This article provides more details and examples on getting started with the library. However, it would be better if I describe the basic steps to prepare the environment here. 

The library supports several installation methods described in the official README, making it convenient for use in different environments.

1. Installation via pip

The simplest and most common installation method is using the pip package manager. To do this, execute the command:

~$ pip install zabbix_utils

To install all necessary dependencies for asynchronous work, you can use the command:

~$ pip install zabbix_utils[async]

This method is suitable for most users, as pip automatically installs all required dependencies.

2. Installation from Zabbix Repository

Since writing the previous articles, we have added one more installation method – from the official Zabbix repository. First and foremost, you need to add the repository to your system if it has not been installed yet. Official Zabbix packages for Red Hat Enterprise Linux and Debian-based distributions are available on the Zabbix website.

For Red Hat Enterprise Linux and derivatives:

~# dnf install python3-zabbix-utils

For Debian / Ubuntu and derivatives:

~# apt install python3-zabbix-utils

3. Installation from Source Code

If you require the latest version of the library that has not yet been published on PyPI, or you want to customize the code, you can install the library directly from GitHub:

1. Clone the repository from GitHub:

~$ git clone https://github.com/zabbix/python-zabbix-utils

2. Navigate to the project folder:

~$ cd python-zabbix-utils/

3. Install the library by executing the command:

~$ python3 setup.py install

4. Testing the Connection to Zabbix API

After installing zabbix_utils, it is a good idea to check the connection to your Zabbix server via the API. To do this, use the URL to the Zabbix server, the token, or the username and password of the user who has permission to access the Zabbix API.

Example code for checking the connection:

from zabbix_utils import ZabbixAPI ZABBIX_AUTH = {     "url": "your_zabbix_server",     "user": "your_username",     "password": "your_password" } api = ZabbixAPI(**ZABBIX_AUTH) hosts = api.host.get(     output=['hostid', 'name'] ) print(hosts) api.logout()

Main Steps of the Task Solution

Now that the environment is set up, let’s look at the main steps for solving the task of retrieving the list of alert recipients for triggers associated with a specific Zabbix host in Zabbix.

In zabbix_utils, asynchronous API interaction support is built in through the AsyncZabbixAPI class. This allows multiple requests to be sent simultaneously and their results to be handled as they become ready, significantly reducing latencies when making multiple API calls. Therefore, we will use the AsyncZabbixAPI class and the asynchronous approach in this project.

Below are the main steps for solving the task, and code examples for each step. Please note that the code in this project is for demonstration purposes, may not be optimal, or could contain errors. Use it as an example or a base for your project, but not as a complete tool.

Step 1. Obtain Host ID

The first step is to identify the host for which we will retrieve information about triggers and alerts. We need to find the hostid using its name/host to do this. The Zabbix API provides a method to obtain this information, and using zabbix_utils makes this process much simpler.

Example of obtaining the host ID by its name:

host = api.host.get(     output=["hostid"],     filter={"name": "your_host_name"} )

This method returns a unique identifier for the host, which can be used further. However, for our test project, we will use a manually specified host identifier.

Step 2. Retrieve Host Triggers

With the hostid in hand, the next step is to retrieve all triggers associated with this host. Triggers contain the conditions that trigger the alerts. We need to collect information about all triggers so that we can then use it to select actions that match all the conditions.

Example of retrieving node triggers:

triggers = api.trigger.get(     hostids=[hostid],     selectTags="extend",     selectHosts=["hostid"],     selectHostGroups=["groupid"],     selectDiscoveryRule=["templateid"],     output="extend", )

This request returns complete information about the triggers for the host. We get not only the triggers but also their tags, associated host and host groups, and discovery rule information. All this information will be necessary to check the conditions of the actions.

Step 3. Initialize Trigger Metadata

At this stage, objects for each trigger are created to store their metadata. This is done using the Trigger class, which includes information about the trigger such as its name, ID, associated host groups, hosts, tags, templates, and operations.

Here’s the code defining the Trigger class:

class Trigger:     def __init__(self, trigger):         self.name = trigger["description"]         self.triggerid = trigger["triggerid"]         self.hostgroups = [g["groupid"] for g in trigger["hostgroups"]]         self.hosts = [h["hostid"] for h in trigger["hosts"]]         self.tags = {t["tag"]: t["value"] for t in trigger["tags"]}         self.tmpl_triggerid = self.triggerid         self.lld_rule = trigger["discoveryRule"] or {}         if trigger["templateid"] != "0":             self.tmpl_triggerid = trigger["templateid"]         self.templates = []         self.messages = []         self._conditions = {             "0": self.hostgroups,             "1": self.hosts,             "2": [self.triggerid],             "3": trigger["event_name"] or trigger["description"],             "4": trigger["priority"],             "13": self.templates,             "25": self.tags.keys(),             "26": self.tags,         }     def eval_condition(self, operator, value, trigger_data):         # equals or does not equal         if operator in ["0", "1"]:             equals = operator == "0"             if isinstance(value, dict) and isinstance(                 trigger_data, dict):                 if value["tag"] in trigger_data:                     if value["value"] == trigger_data[                         value["tag"]]:                         return equals             elif value in trigger_data and isinstance(                 trigger_data, list):                 return equals             elif value == trigger_data:                 return equals             return not equals         # contains or does not contain         if operator in ["2", "3"]:             contains = operator == "2"             if isinstance(value, dict) and isinstance(                 trigger_data, dict):                 if value["tag"] in trigger_data:                     if value["value"] in trigger_data[                         value["tag"]]:                         return contains             elif value in trigger_data:                 return contains             return not contains           # is greater/less than or equals         if operator in ["5", "6"]:             greater = operator != "5"             try:                 if int(value) < int(trigger_data):                     return not greater                 if int(value) == int(trigger_data):                     return True                 if int(value) > int(trigger_data):                     return greater             except:                 raise ValueError(                     "Values must be numbers to compare them"                 )       def select_templates(self, templates):         for template in templates:             if self.tmpl_triggerid in [                 t["triggerid"] for t in template["triggers"]]:                 self.templates.append(template["templateid"])             if self.lld_rule.get("templateid") in [                 d["itemid"] for d in template["discoveries"]             ]:                 self.templates.append(template["templateid"])     def select_actions(self, actions):         selected_actions = []         for action in actions:             conditions = []             if "filter" in action:                 conditions = action["filter"]["conditions"]                 eval_formula = action["filter"]["eval_formula"]             # Add actions without conditions directly             if not conditions:                 selected_actions.append(action)                 continue             condition_check = {}             for condition in conditions:                 if (                     condition["conditiontype"] != "6"                     and condition["conditiontype"] != "16"                 ):                     if (                         condition["conditiontype"] == "26"                         and isinstance(condition["value"], str)                     ):                         condition["value"] = {                             "tag": condition["value2"],                             "value": condition["value"],                         }                     if condition["conditiontype"] in self._conditions:                         condition_check[                             condition["formulaid"]                         ] = self.eval_condition(                             condition["operator"],                             condition["value"],                             self._conditions[                                 condition["conditiontype"]                             ],                         )                 else:                     condition_check[                         condition["formulaid"]                     ] = True             for formulaid, bool_result in condition_check.items():                 eval_formula = eval_formula.replace(                     formulaid, str(bool_result))
            # Evaluate the final condition formula             if eval(eval_formula):                 selected_actions.append(action)         return selected_actions       def select_operations(self, actions, mediatypes):         messages_metadata = []         for action in self.select_actions(actions):             messages_metadata += self.check_operations(                 "operations", action, mediatypes             )             messages_metadata += self.check_operations(                 "update_operations", action, mediatypes             )             messages_metadata += self.check_operations(                 "recovery_operations", action, mediatypes             )         return messages_metadata
    def check_operations(self, optype, action, mediatypes):         messages_metadata = []         optype_mapping = {             "operations": "0",  # Problem event             "recovery_operations": "1",  # Recovery event             "update_operations": "2",  # Update event         }         operations = copy.deepcopy(action[optype])         # Processing "notify all involved" scenarios         for idx, _ in enumerate(operations):             if operations[idx]["operationtype"] not in ["11", "12"]:                 continue             # Copy operation as a template for reuse             op_template = copy.deepcopy(operations[idx])             del operations[idx]             # Checking for message sending operations             for key in [                 k for k in ["operations", "update_operations"] if k != optype             ]:                 if not action[key]:                     continue                 # Checking for message sending type operations                 for op in [                     o for o in action[key] if o["operationtype"] == "0"                 ]:                     # Copy template for the current operation                     operation = copy.deepcopy(op_template)                     operation.update(                         {                             "operationtype": "0",                             "opmessage_usr": op["opmessage_usr"],                             "opmessage_grp": op["opmessage_grp"],                         }                     )                     operation["opmessage"]["mediatypeid"] = op[                         "opmessage"                     ]["mediatypeid"]                     operations.append(operation)         for operation in operations:             if operation["operationtype"] != "0":                 continue             # Processing "all mediatypes" scenario             if operation["opmessage"]["mediatypeid"] == "0":                 for mediatype in mediatypes:                     operation["opmessage"]["mediatypeid"] = mediatype[                         "mediatypeid"                     ]                     messages_metadata.append(                         self.create_messages(                             optype_mapping[optype], action, operation, [                                 mediatype                             ]                         )                     )             else:                 messages_metadata.append(                     self.create_messages(                         optype_mapping[optype],                         action,                         operation,                         mediatypes                     )                 )         return messages_metadata       def create_messages(self, optype, action, operation, mediatypes):         message = Message(optype, action, operation)         message.select_mediatypes(mediatypes)         self.messages.append(message)         return message

The code for creating Trigger class objects for each of the retrieved triggers:

for trigger in triggers:     triggers_metadata[trigger["triggerid"]] = Trigger(trigger)

This loop iterates through all triggers and saves them in a dictionary called triggers_metadata, where the key is the triggerid and the value is the trigger object.

Step 4. Retrieve Template Information

The next step is to obtain data about the templates associated with all the triggers:

templates = api.template.get(     triggerids=list(set([t.tmpl_triggerid for t in triggers_metadata.values()])),     selectTriggers=["triggerid"],     selectDiscoveries=["itemid"],     output=["templateid"], )

This request returns information about all templates linked to the host’s triggers being examined. Executing a single query for all triggers is a more optimal solution than making individual requests for each trigger. This information will be needed for evaluating the “Template” condition in actions.

Step 5. Get Actions and Media Types

Next, we obtain the list of actions and media types configured in the system:

actions = api.action.get(     selectFilter="extend",     selectOperations="extend",     selectRecoveryOperations="extend",     selectUpdateOperations="extend",     filter={"eventsource": 0, "status": 0},     output=["actionid", "esc_period", "eval_formula", "name"], )
mediatypes = api.mediatype.get(     selectUsers="extend",     selectActions="extend",     selectMessageTemplates="extend",     filter={"status": 0},     output=["mediatypeid", "name"], )

Here we retrieve actions that define how and to whom alerts are sent, and mediatypes through which users can receive notifications (for example, email or SMS).

Step 6. Match Triggers with Templates and Actions

At this stage, each trigger is associated with the corresponding templates and actions:

for trigger in triggers_metadata.values():     trigger.select_templates(templates)     messages += trigger.select_operations(actions, mediatypes)

Here, for each trigger, we update information about its templates and configured actions for sending notifications. The list of associated actions is determined by checking the conditions specified in them against the accumulated data for each trigger.

For each operation of the corresponding trigger action, a Message class object is created:

class Message:     def __init__(self, optype, action, operation):         self.optype = optype         self.mediatypename = ""         self.actionid = action["actionid"]         self.actionname = action["name"]         self.operationid = operation["operationid"]         self.mediatypeid = operation["opmessage"]["mediatypeid"]         self.subject = operation["opmessage"]["subject"]         self.message = operation["opmessage"]["message"]         self.default_msg = operation["opmessage"]["default_msg"]         self.users = [u["userid"] for u in operation["opmessage_usr"]]         self.groups = [g["usrgrpid"] for g in operation["opmessage_grp"]]         self.recipients = []         # Escalation period set to action's period if not specified         self.esc_period = operation.get("esc_period", "0")         if self.esc_period == "0":             self.esc_period = action["esc_period"]         # Use action's escalation period if unset         self.esc_step_from = self.multiply_time(             self.esc_period, int(operation.get("esc_step_from", "1")) - 1         )         if operation.get("esc_step_to", "0") != "0":             self.repeat_count = str(                 int(operation["esc_step_to"]) - int(operation["esc_step_from"]) + 1             )         # If not a problem event, set repeat count to 1         elif self.optype != "0":             self.repeat_count = "1"         # Infinite repeat count if esc_step_to is 0         else:             self.repeat_count = “&infin;”       def multiply_time(self, time_str, multiplier):         # Multiply numbers within the time string         result = re.sub(             r"(\d+)",             lambda m: str(int(m.group(1)) * multiplier),             time_str         )         if result[0] == "0":             return "0"         return result       def select_mediatypes(self, mediatypes):         for mediatype in mediatypes:             if mediatype["mediatypeid"] == self.mediatypeid:                 self.mediatypename = mediatype["name"]                 # Select message templates related to operation type                 msg_template = [                     m                     for m in mediatype["message_templates"]                     if (                         m["recovery"] == self.optype                         and m["eventsource"] == "0"                     )                 ]                 # Use default message if applicable                 if msg_template and self.default_msg == "1":                     self.subject = msg_template[0]["subject"]                     self.message = msg_template[0]["message"]       def select_recipients(self, user_groups, recipients):         for groupid in self.groups:             if groupid in user_groups:                 self.users += user_groups[groupid]         for userid in self.users:             if userid in recipients:                 recipient = copy.deepcopy(recipients[userid])                 if self.mediatypeid in recipient.sendto:                     recipient.mediatype = True                 self.recipients.append(recipient)

Each such object represents a separate message sent to users (recipients) and will contain all message information – its subject, text, recipients, and escalation parameters.

Step 7. Collect User and Group Identifiers

After matching the triggers with actions, the process of collecting unique identifiers for users and groups starts:

userids = set() groupids = set() for message in messages:     userids.update(message.users)     groupids.update(message.groups)

This code snippet collects the IDs of all users and groups involved in the operations for each trigger. This is necessary to perform only one request to the Zabbix API for all involved users and their groups, rather than making separate requests for each trigger.

Step 8. Obtain User and Group Information

The next step is to collect detailed information about users and user groups:

usergroups = {     group["usrgrpid"]: group     for group in api.usergroup.get(         selectUsers=["userid"],         selectHostGroupRights="extend",         output=["usrgrpid", "role"],     ) }   users = {     user["userid"]: user     for user in api.user.get(         selectUsrgrps=["usrgrpid"],         selectMedias=["mediatypeid", "active", "sendto"],         selectRole=["roleid", "type"],         filter={"status": 0},         output=["userid", "username", "name", "surname"],     ) }

Here we gather data about users, including their role and media types through which they receive notifications, as well as data about user groups, including access rights to host groups and the list of users in each group. All this information will be needed to check access to the host with the triggers we are working with.

Step 9. Match Users and Groups with Triggers

After obtaining user information, we match users and groups with their respective rights to receive notifications. Here we also link users with groups, updating the information regarding rights and groups for each user.

for userid in userids:     if userid in users:         user = users[userid]         recipients[userid] = Recipient(user)         for group in user["usrgrps"]:             if group["usrgrpid"] in usergroups:                 recipients[userid].permissions.update([                     h["id"]                     for h in usergroups[group["usrgrpid"]]["hostgroup_rights"]                     if int(h["permission"]) > 1                 ])   for groupid in groupids:     if groupid in usergroups:         group = usergroups[groupid]         user_groups[group["usrgrpid"]] = []         for user in group["users"]:             user_groups[group["usrgrpid"]].append(user["userid"])             if user["userid"] in recipients:                 recipients[user["userid"]].groups.update(group["usrgrpid"])             elif user["userid"] in users:                 recipients[user["userid"]] = Recipient(users[user["userid"]])             recipients[user["userid"]].permissions.update([                 h["id"]                 for h in group["hostgroup_rights"]                 if int(h["permission"]) > 1             ])

This code fragment connects each user with their groups and vice versa, creating a complete list of users with their access rights to the host, and thus their eligibility to receive notifications about events for this host.

For each recipient, a Recipient class object is created containing data about the recipient, such as the notification address, access rights to hosts, configured mediatypes, etc.

Here’s the code that describes the Recipient class:

class Recipient:     def __init__(self, user):         self.userid = user["userid"]         self.username = user["username"]         self.fullname = "{name} {surname}".format(**user).strip()         self.type = user["role"]["type"]         self.groups = set([g["usrgrpid"] for g in user["usrgrps"]])         self.has_right = False         self.permissions = set()         self.sendto = {             m["mediatypeid"]: m["sendto"] for m in user["medias"] if m["active"] == "0"         }         # Check if the user is a super admin (type 3)         if self.type == "3":             self.has_right = True

Step 10. Match Messages with Recipients

Finally, we match recipients with specific messages from Step 6:

for message in messages:     message.select_recipients(user_groups, recipients)

This step completes the main process – each message is assigned to the relevant recipients.

Step 11. Check Recipient Access Rights and Output the Result

Before the actual output of the result with the list of recipients, we can perform a check of the recipients’ message rights and filter only those who have the corresponding rights to receive notifications for the events related to the trigger, or those who have all configured media types specified and active. After these actions, the information can be output in any convenient way – whether it be exporting to a file or displaying it on the screen:

for trigger in triggers_metadata.values():     for message in trigger.messages:         for recipient in message.recipients:             recipient.show = True             if not recipient.has_right:                 recipient.has_right = (len([gid                     for gid in trigger.hostgroups                     if gid in recipient.permissions                 ]) > 0)             if not recipient.has_right and not show_unavail:                 recipient.show = False

Example Implementation

All the examples and code snippets described above have been compiled to create a solution demonstrating the algorithm for obtaining notification recipients for triggers associated with the selected host. We have implemented this algorithm as a simple web interface to make the result more illustrative and convenient for familiarization.

This interface allows users to enter the host’s ID. The script then processes the data and provides a list of notification recipients associated with the triggers on that host. The web interface uses asynchronous requests to the Zabbix API and the zabbix_utils library to ensure fast data processing and ease of use with many triggers and users.

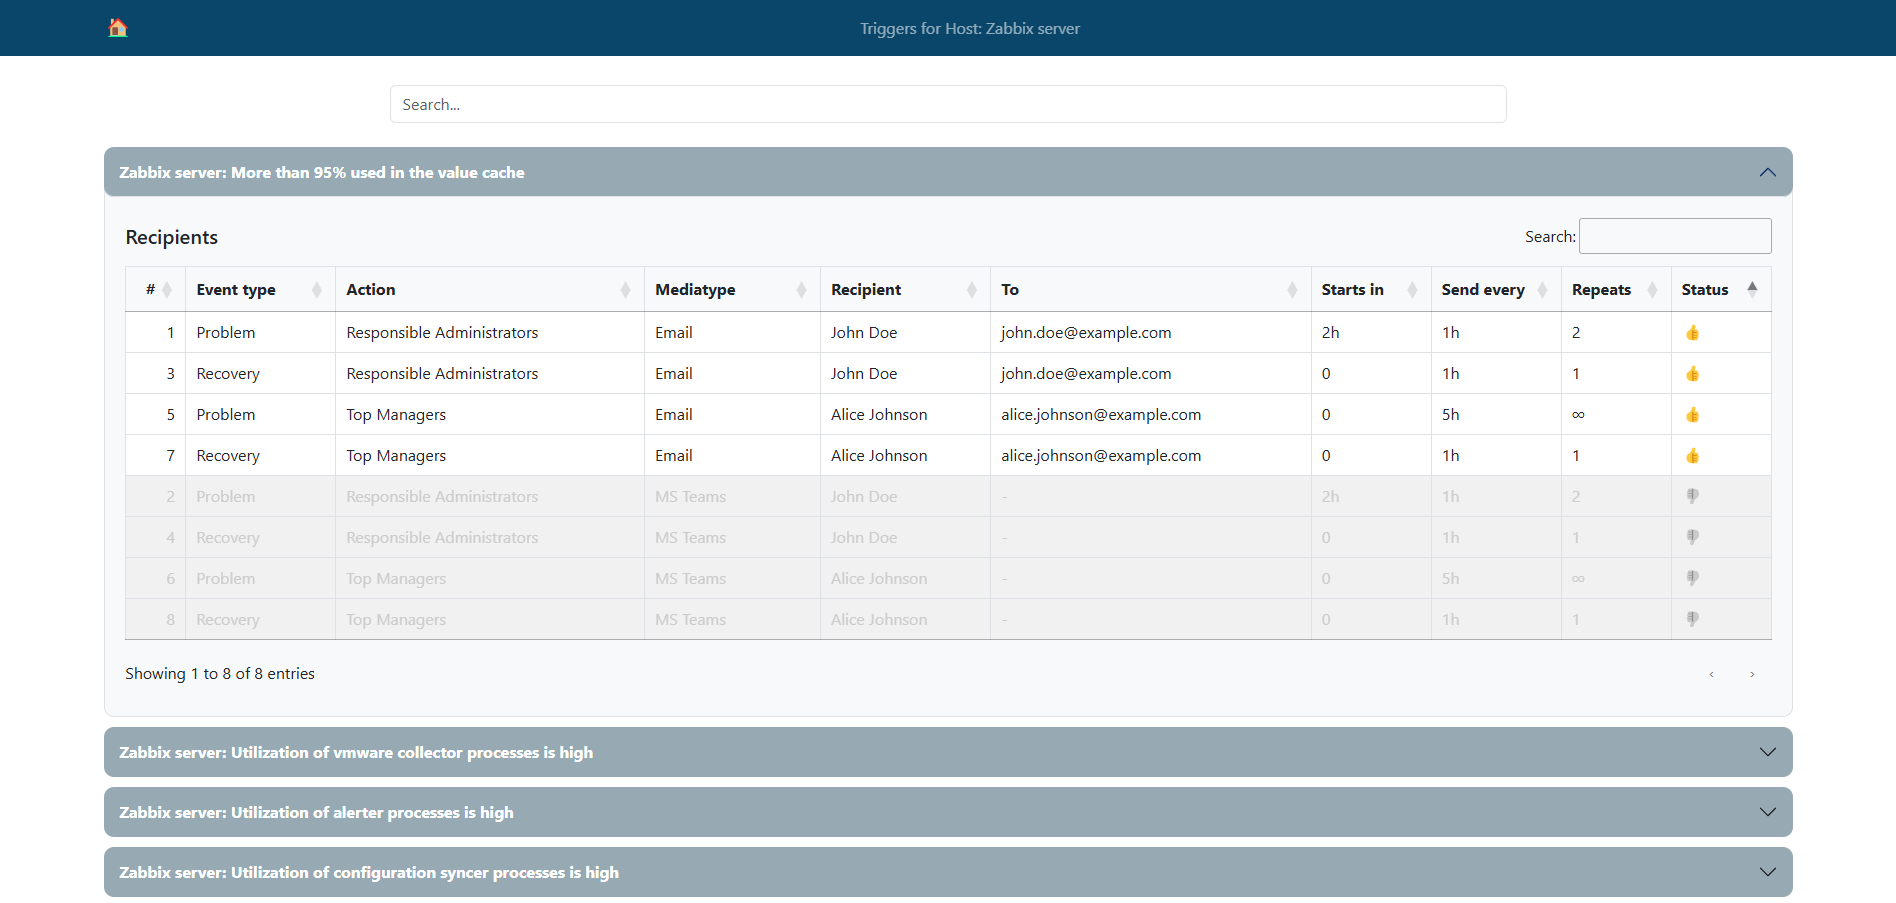
This lets you familiarize yourself with the theoretical steps and code examples and also try to put this solution into action.

Please note once again that the code in this project is for demonstration purposes, may not be optimal, or could contain errors. Use it as an example or a base for your project, but not as a complete tool.

The web interface’s complete source code and installation instructions can be found on GitHub.

Conclusion

In this article, we explored a practical example of using the zabbix_utils library to solve the task of obtaining alert recipients for triggers associated with a selected Zabbix host using the Zabbix API. We detailed the key steps, from setting up the environment and initializing trigger metadata to working with notification recipients and optimizing performance with asynchronous requests.

Using zabbix_utils allowed us to optimize and accelerate interaction with the Zabbix API, expanding the capabilities of the  Zabbix web interface and increasing efficiency when working with large volumes of data. Thanks to support for asynchronous processing and selective API requests, it is possible to significantly reduce the load on the server and improve system performance when working with Zabbix, which is especially important in large infrastructures.

We hope this example will assist you in implementing your own solutions based on the Zabbix API and zabbix_utils, and demonstrate the possibilities for optimizing your interaction with the Zabbix API.

The post Using the zabbix_utils Library for Tool Development appeared first on Zabbix Blog.

Make your interaction with Zabbix API faster: Async zabbix_utils.

Post Syndicated from Aleksandr Iantsen original https://blog.zabbix.com/make-your-interaction-with-zabbix-api-faster-async-zabbix_utils/27837/

In this article, we will explore the capabilities of the new asynchronous modules of the zabbix_utils library. Thanks to asynchronous execution, users can expect improved efficiency, reduced latency, and increased flexibility in interacting with Zabbix components, ultimately enabling them to create efficient and reliable monitoring solutions that meet their specific requirements.

There is a high demand for the Python library zabbix_utils. Since its release and up to the moment of writing this article, zabbix_utils has been downloaded from PyPI more than 15,000 times. Over the past week, the library has been downloaded more than 2,700 times. The first article about the zabbix_utils library has already gathered around 3,000 views. Among the array of tools available, the library has emerged as a popular choice, offering developers and administrators a comprehensive set of functions for interacting with Zabbix components such as Zabbix server, proxy, and agents.

Considering the demand from users, as well as the potential of asynchronous programming to optimize interaction with Zabbix, we are pleased to present a new version of the library with new asynchronous modules in addition to the existing synchronous ones. The new zabbix_utils modules are designed to provide a significant performance boost by taking advantage of the inherent benefits of asynchronous programming to speed up communication between Zabbix and your service or script.

You can read the introductory article about zabbix_utils for a more comprehensive understanding of working with the library.

Benefits and Usage Scenarios

From expedited data retrieval and real-time event monitoring to enhanced scalability, asynchronous programming empowers you to build highly efficient, flexible, and reliable monitoring solutions adapted to meet your specific needs and challenges.

The new version of zabbix_utils and its asynchronous components may be useful in the following scenarios:

  • Mass data gathering from multiple hosts: When it’s necessary to retrieve data from a large number of hosts simultaneously, asynchronous programming allows requests to be executed in parallel, significantly speeding up the data collection process;
  • Mass resource exporting: When templates, hosts or problems need to be exported in parallel. This parallel execution reduces the overall export time, especially when dealing with a large number of resources;
  • Sending alerts from or to your system: When certain actions need to be performed based on monitoring conditions, such as sending alerts or running scripts, asynchronous programming provides rapid condition processing and execution of corresponding actions;
  • Scaling the monitoring system: With an increase in the number of monitored resources or the volume of collected data, asynchronous programming provides better scalability and efficiency for the monitoring system.

Installation and Configuration

If you already use the zabbix_utils library, simply updating the library to the latest version and installing all necessary dependencies for asynchronous operation is sufficient. Otherwise, you can install the library with asynchronous support using the following methods:

  • By using pip:
~$ pip install zabbix_utils[async]

Using [async] allows you to install additional dependencies (extras) needed for the operation of asynchronous modules.

  • By cloning from GitHub:
~$ git clone https://github.com/zabbix/python-zabbix-utils
~$ cd python-zabbix-utils/
~$ pip install -r requirements.txt
~$ python setup.py install

The process of working with the asynchronous version of the zabbix_utils library is similar to the synchronous one, except for some syntactic differences of asynchronous code in Python.

Working with Zabbix API

To work with the Zabbix API in asynchronous mode, you need to import the AsyncZabbixAPI class from the zabbix_utils library:

from zabbix_utils import AsyncZabbixAPI

Similar to the synchronous ZabbixAPI, the new AsyncZabbixAPI can use the following environment variables: ZABBIX_URL, ZABBIX_TOKEN, ZABBIX_USER, ZABBIX_PASSWORD. However, when creating an instance of the AsyncZabbixAPI class you cannot specify a token or a username and password, unlike the synchronous version. They can only be passed when calling the login() method. The following usage scenarios are available here:

  • Use preset values of environment variables, i.e., not pass any parameters to AsyncZabbixAPI:
~$ export ZABBIX_URL="https://zabbix.example.local"
api = AsyncZabbixAPI()
  • Pass only the Zabbix API address as input, which can be specified as either the server IP/FQDN address or DNS name (in this case, the HTTP protocol will be used) or as an URL of Zabbix API:
api = AsyncZabbixAPI(url="127.0.0.1")

After declaring an instance of the AsyncZabbixAPI class, you need to call the login() method to authenticate with the Zabbix API. There are two ways to do this:

  • Using environment variable values:
~$ export ZABBIX_USER="Admin"
~$ export ZABBIX_PASSWORD="zabbix"

or

~$ export ZABBIX_TOKEN="xxxxxxxx"

and then:

await api.login()
  • Passing the authentication data when calling login():
await api.login(user="Admin", password="zabbix")

Like ZabbixAPI, the new AsyncZabbixAPI class supports version getting and comparison:

# ZabbixAPI version field
ver = api.version
print(type(ver).__name__, ver) # APIVersion 6.0.29

# Method to get ZabbixAPI version
ver = api.api_version()
print(type(ver).__name__, ver) # APIVersion 6.0.29

# Additional methods
print(ver.major)     # 6.0
print(ver.minor)     # 29
print(ver.is_lts())  # True

# Version comparison
print(ver < 6.4)        # True
print(ver != 6.0)       # False
print(ver != "6.0.24")  # True

After authentication, you can make any API requests described for all supported versions in the Zabbix documentation.

The format for calling API methods looks like this:

await api_instance.zabbix_object.method(parameters)

For example:

await api.host.get()

After completing all needed API requests, it is necessary to call logout() to close the API session if authentication was done using username and password, and also close the asynchronous sessions:

await api.logout()

More examples of usage can be found here.

Sending Values to Zabbix Server/Proxy

The asynchronous class AsyncSender has been added, which also helps to send values to the Zabbix server or proxy for items of the Zabbix Trapper data type.

AsyncSender can be imported as follows:

from zabbix_utils import AsyncSender

Values ​​can be sent in a group, for this it is necessary to import ItemValue:

import asyncio
from zabbix_utils import ItemValue, AsyncSender


items = [
    ItemValue('host1', 'item.key1', 10),
    ItemValue('host1', 'item.key2', 'Test value'),
    ItemValue('host2', 'item.key1', -1, 1702511920),
    ItemValue('host3', 'item.key1', '{"msg":"Test value"}'),
    ItemValue('host2', 'item.key1', 0, 1702511920, 100)
]

async def main():
    sender = AsyncSender('127.0.0.1', 10051)
    response = await sender.send(items)
    # processing the received response

asyncio.run(main())

As in the synchronous version, it is possible to specify the size of chunks when sending values in a group using the parameter chunk_size:

sender = AsyncSender('127.0.0.1', 10051, chunk_size=2)
response = await sender.send(items)

In the example, the chunk size is set to 2. So, 5 values passed in the code above will be sent in three requests of two, two, and one value, respectively.

Also it is possible to send a single value:

sender = AsyncSender(server='127.0.0.1', port=10051)
resp = await sender.send_value('example_host', 'example.key', 50, 1702511920))

If your server has multiple network interfaces, and values need to be sent from a specific one, the AsyncSender provides the option to specify a source_ip for sent values:

sender = AsyncSender(
    server='zabbix.example.local',
    port=10051,
    source_ip='10.10.7.1'
)
resp = await sender.send_value('example_host', 'example.key', 50, 1702511920)

AsyncSender also supports reading connection parameters from the Zabbix agent/agent2 configuration file. To do this, you need to set the use_config flag and specify the path to the configuration file if it differs from the default /etc/zabbix/zabbix_agentd.conf:

sender = AsyncSender(
    use_config=True,
    config_path='/etc/zabbix/zabbix_agent2.conf'
)

More usage examples can be found here.

Getting values from Zabbix Agent/Agent2 by item key.

In cases where you need the functionality of our standart zabbix_get utility but native to your Python project and working asynchronously, consider using the AsyncGetter class. A simple example of its usage looks like this:

import asyncio
from zabbix_utils import AsyncGetter

async def main():
    agent = AsyncGetter('10.8.54.32', 10050)
    resp = await agent.get('system.uname')
    print(resp.value) # Linux zabbix_server 5.15.0-3.60.5.1.el9uek.x86_64

asyncio.run(main())

Like AsyncSender, the AsyncGetter class supports specifying the source_ip address:

agent = AsyncGetter(
    host='zabbix.example.local',
    port=10050,
    source_ip='10.10.7.1'
)

More usage examples can be found here.

Conclusions

The new version of the zabbix_utils library provides users with the ability to implement efficient and scalable monitoring solutions, ensuring fast and reliable communication with the Zabbix components. Asynchronous way of interaction gives a lot of room for performance improvement and flexible task management when handling a large volume of requests to Zabbix components such as Zabbix API and others.

We have no doubt that the new version of zabbix_utils will become an indispensable tool for developers and administrators, helping them create more efficient, flexible, and reliable monitoring solutions that best meet their requirements and expectations.

The post Make your interaction with Zabbix API faster: Async zabbix_utils. appeared first on Zabbix Blog.

Introducing zabbix_utils – the official Python library for Zabbix API

Post Syndicated from Aleksandr Iantsen original https://blog.zabbix.com/python-zabbix-utils/27056/

Zabbix is a flexible and universal monitoring solution that integrates with a wide variety of different systems right out of the box. Despite actively expanding the list of natively supported systems for integration (via templates or webhook integrations), there may still be a need to integrate with custom systems and services that are not yet supported. In such cases, a library taking care of implementing interaction protocols with the Zabbix API, Zabbix server/proxy, or Agent/Agent2 becomes extremely useful. Given that Python is widely adopted among DevOps and SRE engineers as well as server administrators, we decided to release a library for this programming language first.

We are pleased to introduce zabbix_utils – a Python library for seamless interaction with Zabbix API, Zabbix server/proxy, and Zabbix Agent/Agent2. Of course, there are popular community solutions for working with these Zabbix components in Python. Keeping this fact in mind, we have tried to consolidate popular issues and cases along with our experience to develop as convenient a tool as possible. Furthermore, we made sure that transitioning to the tool is as straightforward and clear as possible. Thanks to official support, you can be confident that the current version of the library is compatible with the latest Zabbix release.

In this article, we will introduce you to the main capabilities of the library and provide examples of how to use it with Zabbix components.

Usage Scenarios

The zabbix_utils library can be used in the following scenarios, but is not limited to them:

  • Zabbix automation
  • Integration with third-party systems
  • Custom monitoring solutions
  • Data export (hosts, templates, problems, etc.)
  • Integration into your Python application for Zabbix monitoring support
  • Anything else that comes to mind

You can use zabbix_utils for automating Zabbix tasks, such as scripting the automatic monitoring setup of your IT infrastructure objects. This can involve using ZabbixAPI for the direct management of Zabbix objects, Sender for sending values to hosts, and Getter for gathering data from Agents. We will discuss Sender and Getter in more detail later in this article.

For example, let’s imagine you have an infrastructure consisting of different branches. Each server or workstation is deployed from an image with an automatically configured Zabbix Agent and each branch is monitored by a Zabbix proxy since it has an isolated network. Your custom service or script can fetch a list of this equipment from your CMDB system, along with any additional information. It can then use this data to create hosts in Zabbix and link the necessary templates using ZabbixAPI based on the received information. If the information from CMDB is insufficient, you can request data directly from the configured Zabbix Agent using Getter and then use this information for further configuration and decision-making during setup. Another part of your script can access AD to get a list of branch users to update the list of users in Zabbix through the API and assign them the appropriate permissions and roles based on information from AD or CMDB (e.g., editing rights for server owners).

Another use case of the library may be when you regularly export templates from Zabbix for subsequent import into a version control system. You can also establish a mechanism for loading changes and rolling back to previous versions of templates. Here a variety of other use cases can also be implemented – it’s all up to your requirements and the creative usage of the library.

Of course, if you are a developer and there is a requirement to implement Zabbix monitoring support for your custom system or tool, you can implement sending data describing any events generated by your custom system/tool to Zabbix using Sender.

Installation and Configuration

To begin with, you need to install the zabbix_utils library. You can do this in two main ways:

  • By using pip:
~$ pip install zabbix_utils
  • By cloning from GitHub:
~$ git clone https://github.com/zabbix/python-zabbix-utils
~$ cd python-zabbix-utils/
~$ python setup.py install

No additional configuration is required. But you can specify values for the following environment variables: ZABBIX_URL, ZABBIX_TOKEN, ZABBIX_USER, ZABBIX_PASSWORD if you need. These use cases are described in more detail below.

Working with Zabbix API

To work with Zabbix API, it is necessary to import the ZabbixAPI class from the zabbix_utils library:

from zabbix_utils import ZabbixAPI

If you are using one of the existing popular community libraries, in most cases, it will be sufficient to simply replace the ZabbixAPI import statement with an import from our library.

At that point you need to create an instance of the ZabbixAPI class. T4here are several usage scenarios:

  • Use preset values of environment variables, i.e., not pass any parameters to ZabbixAPI:
~$ export ZABBIX_URL="https://zabbix.example.local"
~$ export ZABBIX_USER="Admin"
~$ export ZABBIX_PASSWORD="zabbix"
from zabbix_utils import ZabbixAPI


api = ZabbixAPI()
  • Pass only the Zabbix API address as input, which can be specified as either the server IP/FQDN address or DNS name (in this case, the HTTP protocol will be used) or as an URL, and the authentication data should still be specified as values for environment variables:
~$ export ZABBIX_USER="Admin"
~$ export ZABBIX_PASSWORD="zabbix"
from zabbix_utils import ZabbixAPI

api = ZabbixAPI(url="127.0.0.1")
  • Pass only the Zabbix API address to ZabbixAPI, as in the example above, and pass the authentication data later using the login() method:
from zabbix_utils import ZabbixAPI

api = ZabbixAPI(url="127.0.0.1")
api.login(user="Admin", password="zabbix")
  • Pass all parameters at once when creating an instance of ZabbixAPI; in this case, there is no need to subsequently call login():
from zabbix_utils import ZabbixAPI

api = ZabbixAPI(
    url="127.0.0.1",
    user="Admin",
    password="zabbix"
)

The ZabbixAPI class supports working with various Zabbix versions, automatically checking the API version during initialization. You can also work with the Zabbix API version as an object as follows:

from zabbix_utils import ZabbixAPI

api = ZabbixAPI()

# ZabbixAPI version field
ver = api.version
print(type(ver).__name__, ver) # APIVersion 6.0.24

# Method to get ZabbixAPI version
ver = api.api_version()
print(type(ver).__name__, ver) # APIVersion 6.0.24

# Additional methods
print(ver.major)    # 6.0
print(ver.minor)    # 24
print(ver.is_lts()) # True

As a result, you will get an APIVersion object that has major and minor fields returning the respective minor and major parts of the current version, as well as the is_lts() method, returning true if the current version is LTS (Long Term Support), and false otherwise. The APIVersion object can also be compared to a version represented as a string or a float number:

# Version comparison
print(ver < 6.4)      # True
print(ver != 6.0)     # False
print(ver != "6.0.5") # True

If the account and password (or starting from Zabbix 5.4 – token instead of login/password) are not set as environment variable values or during the initialization of ZabbixAPI, then it is necessary to call the login() method for authentication:

from zabbix_utils import ZabbixAPI

api = ZabbixAPI(url="127.0.0.1")
api.login(token="xxxxxxxx")

After authentication, you can make any API requests described for all supported versions in the Zabbix documentation.

The format for calling API methods looks like this:

api_instance.zabbix_object.method(parameters)

For example:

api.host.get()

After completing all the necessary API requests, it’s necessary to execute logout() if authentication was done using login and password:

api.logout()

More examples of usage can be found here.

Sending Values to Zabbix Server/Proxy

There is often a need to send values to Zabbix Trapper. For this purpose, the zabbix_sender utility is provided. However, if your service or script sending this data is written in Python, calling an external utility may not be very convenient. Therefore, we have developed the Sender, which will help you send values to Zabbix server or proxy one by one or in groups. To work with Sender, you need to import it as follows:

from zabbix_utils import Sender

After that, you can send a single value:

from zabbix_utils import Sender

sender = Sender(server='127.0.0.1', port=10051)
resp = sender.send_value('example_host', 'example.key', 50, 1702511920)

Alternatively, you can put them into a group for simultaneous sending, for which you need to additionally import ItemValue:

from zabbix_utils import ItemValue, Sender


items = [
    ItemValue('host1', 'item.key1', 10),
    ItemValue('host1', 'item.key2', 'Test value'),
    ItemValue('host2', 'item.key1', -1, 1702511920),
    ItemValue('host3', 'item.key1', '{"msg":"Test value"}'),
    ItemValue('host2', 'item.key1', 0, 1702511920, 100)
]

sender = Sender('127.0.0.1', 10051)
response = sender.send(items)

For cases when there is a necessity to send more values than Zabbix Trapper can accept at one time, there is an option for fragmented sending, i.e. sequential sending in separate fragments (chunks). By default, the chunk size is set to 250 values. In other words, when sending values in bulk, the 400 values passed to the send() method for sending will be sent in two stages. 250 values will be sent first, and the remaining 150 values will be sent after receiving a response. The chunk size can be changed, to do this, you simply need to specify your value for the chunk_size parameter when initializing Sender:

from zabbix_utils import ItemValue, Sender


items = [
    ItemValue('host1', 'item.key1', 10),
    ItemValue('host1', 'item.key2', 'Test value'),
    ItemValue('host2', 'item.key1', -1, 1702511920),
    ItemValue('host3', 'item.key1', '{"msg":"Test value"}'),
    ItemValue('host2', 'item.key1', 0, 1702511920, 100)
]

sender = Sender('127.0.0.1', 10051, chunk_size=2)
response = sender.send(items)

In the example above, the chunk size is set to 2. So, 5 values passed will be sent in three requests of two, two, and one value, respectively.

If your server has multiple network interfaces, and values need to be sent from a specific one, the Sender provides the option to specify a source_ip for the sent values:

from zabbix_utils import Sender

sender = Sender(
    server='zabbix.example.local',
    port=10051,
    source_ip='10.10.7.1'
)
resp = sender.send_value('example_host', 'example.key', 50, 1702511920)

It also supports reading connection parameters from the Zabbix Agent/Agent2 configuration file. To do this, set the use_config flag, after which it is not necessary to pass connection parameters when creating an instance of Sender:

from zabbix_utils import Sender

sender = Sender(
    use_config=True,
    config_path='/etc/zabbix/zabbix_agent2.conf'
)
response = sender.send_value('example_host', 'example.key', 50, 1702511920)

Since the Zabbix Agent/Agent2 configuration file can specify one or even several Zabbix clusters consisting of multiple Zabbix server instances, Sender will send data to the first available server of each cluster specified in the ServerActive parameter in the configuration file. In case the ServerActive parameter is not specified in the Zabbix Agent/Agent2 configuration file, the server address from the Server parameter with the standard Zabbix Trapper port – 10051 will be taken.

By default, Sender returns the aggregated result of sending across all clusters. But it is possible to get more detailed information about the results of sending for each chunk and each cluster:

print(response)
# {"processed": 2, "failed": 0, "total": 2, "time": "0.000108", "chunk": 2}

if response.failed == 0:
    print(f"Value sent successfully in {response.time}")
else:
    print(response.details)
    # {
    #     127.0.0.1:10051: [
    #         {
    #             "processed": 1,
    #             "failed": 0,
    #             "total": 1,
    #             "time": "0.000051",
    #             "chunk": 1
    #         }
    #     ],
    #     zabbix.example.local:10051: [
    #         {
    #             "processed": 1,
    #             "failed": 0,
    #             "total": 1,
    #             "time": "0.000057",
    #             "chunk": 1
    #         }
    #     ]
    # }
    for node, chunks in response.details.items():
        for resp in chunks:
            print(f"processed {resp.processed} of {resp.total} at {node.address}:{node.port}")
            # processed 1 of 1 at 127.0.0.1:10051
            # processed 1 of 1 at zabbix.example.local:10051

More usage examples can be found here.

Getting values from Zabbix Agent/Agent2 by item key.

Sometimes it can also be useful to directly retrieve values from the Zabbix Agent. To assist with this task, zabbix_utils provides the Getter. It performs the same function as the zabbix_get utility, allowing you to work natively within Python code. Getter is straightforward to use; just import it, create an instance by passing the Zabbix Agent’s address and port, and then call the get() method, providing the data item key for the value you want to retrieve:

from zabbix_utils import Getter

agent = Getter('10.8.54.32', 10050)
resp = agent.get('system.uname')

In cases where your server has multiple network interfaces, and requests need to be sent from a specific one, you can specify the source_ip for the Agent connection:

from zabbix_utils import Getter

agent = Getter(
    host='zabbix.example.local',
    port=10050,
    source_ip='10.10.7.1'
)
resp = agent.get('system.uname')

The response from the Zabbix Agent will be processed by the library and returned as an object of the AgentResponse class:

print(resp)
# {
#     "error": null,
#     "raw": "Linux zabbix_server 5.15.0-3.60.5.1.el9uek.x86_64",
#     "value": "Linux zabbix_server 5.15.0-3.60.5.1.el9uek.x86_64"
# }

print(resp.error)
# None

print(resp.value)
# Linux zabbix_server 5.15.0-3.60.5.1.el9uek.x86_64

More usage examples can be found here.

Conclusions

The zabbix_utils library for Python allows you to take full advantage of monitoring using Zabbix, without limiting yourself to the integrations available out of the box. It can be valuable for both DevOps and SRE engineers, as well as Python developers looking to implement monitoring support for their system using Zabbix.

In the next article, we will thoroughly explore integration with an external service using this library to demonstrate the capabilities of zabbix_utils more comprehensively.

Questions

Q: Which Agent versions are supported for Getter?

A: Supported versions of Zabbix Agents are the same as Zabbix API versions, as specified in the readme file. Our goal is to create a library with full support for all Zabbix components of the same version.

Q: Does Getter support Agent encryption?

A: Encryption support is not yet built into Sender and Getter, but you can create your wrapper using third-party libraries for both.

from zabbix_utils import Sender

def psk_wrapper(sock, tls):
    # ...
    # Implementation of TLS PSK wrapper for the socket
    # ...

sender = Sender(
    server='zabbix.example.local',
    port=10051,
    socket_wrapper=psk_wrapper
)

More examples can be found here.

Q: Is it possible to set a timeout value for Getter?

A: The response timeout value can be set for the Getter, as well as for ZabbixAPI and Sender. In all cases, the timeout is set for waiting for any responses to requests.

# Example of setting a timeout for Sender
sender = Sender(server='127.0.0.1', port=10051, timeout=30)

# Example of setting a timeout for Getter
agent = Getter(host='127.0.0.1', port=10050, timeout=30)

Q: Is parallel (asynchronous) mode supported?

A: Currently, the library does not include asynchronous classes and methods, but we plan to develop asynchronous versions of ZabbixAPI and Sender.

Q: Is it possible to specify multiple servers when sending through Sender without specifying a configuration file (for working with an HA cluster)?

A: Yes, it’s possible by the following way:

from zabbix_utils import Sender


zabbix_clusters = [
    [
        'zabbix.cluster1.node1',
        'zabbix.cluster1.node2:10051'
    ],
    [
        'zabbix.cluster2.node1:10051',
        'zabbix.cluster2.node2:20051',
        'zabbix.cluster2.node3'
    ]
]

sender = Sender(clusters=zabbix_clusters)
response = sender.send_value('example_host', 'example.key', 10, 1702511922)

print(response)
# {"processed": 2, "failed": 0, "total": 2, "time": "0.000103", "chunk": 2}

print(response.details)
# {
#     "zabbix.cluster1.node1:10051": [
#         {
#             "processed": 1,
#             "failed": 0,
#             "total": 1,
#             "time": "0.000050",
#             "chunk": 1
#         }
#     ],
#     "zabbix.cluster2.node2:20051": [
#         {
#             "processed": 1,
#             "failed": 0,
#             "total": 1,
#             "time": "0.000053",
#             "chunk": 1
#         }
#     ]
# }

The post Introducing zabbix_utils – the official Python library for Zabbix API appeared first on Zabbix Blog.