Post Syndicated from Ashok Padmanabhan original https://aws.amazon.com/blogs/big-data/optimize-industrial-iot-analytics-with-amazon-data-firehose-and-amazon-s3-tables-with-apache-iceberg/
Manufacturing organizations are racing to digitize their operations through Industry 4.0 initiatives. A key challenge they face is capturing, processing, and analyzing real-time data from industrial equipment to enable data-driven decision making.Modern manufacturing facilities generate massive amounts of real-time data from their production lines. Capturing this valuable data requires a two-tier architecture: first, an edge device that understands industrial protocols collects data directly from the shop floor sensors. Then, these edge gateways securely buffer and transmit the data to AWS Cloud, providing reliability during network interruptions.
In this post, we show how to use AWS service integrations to minimize custom code while providing a robust platform for industrial data ingestion, processing, and analytics. By using Amazon S3 Tables and its built-in optimizations, you can maximize query performance and minimize costs without additional infrastructure setup. Additionally, AWS IoT Greengrass supports VPC endpoints, and you can securely communicate between the edge gateway (hosted on premises) and AWS.
Solution overview
Let’s consider a manufacturing line with and equipment sensors capturing flow rate, temperature, and pressure. To perform analysis on this data, you ingest real-time streaming data from these sensors into the AWS environment using an edge gateway. After data lands in AWS, you can use various analytics services to gain insights.
To demonstrate the data flow from the edge to the cloud, we have assets, machines, and tools publish data using MQTT. Optionally, we use a simulated edge device that publishes data to a local MQTT endpoint. We use an edge gateway with an AWS IoT Greengrass V2 edge runtime to stream data through Amazon Data Firehose in the cloud to S3 Tables.
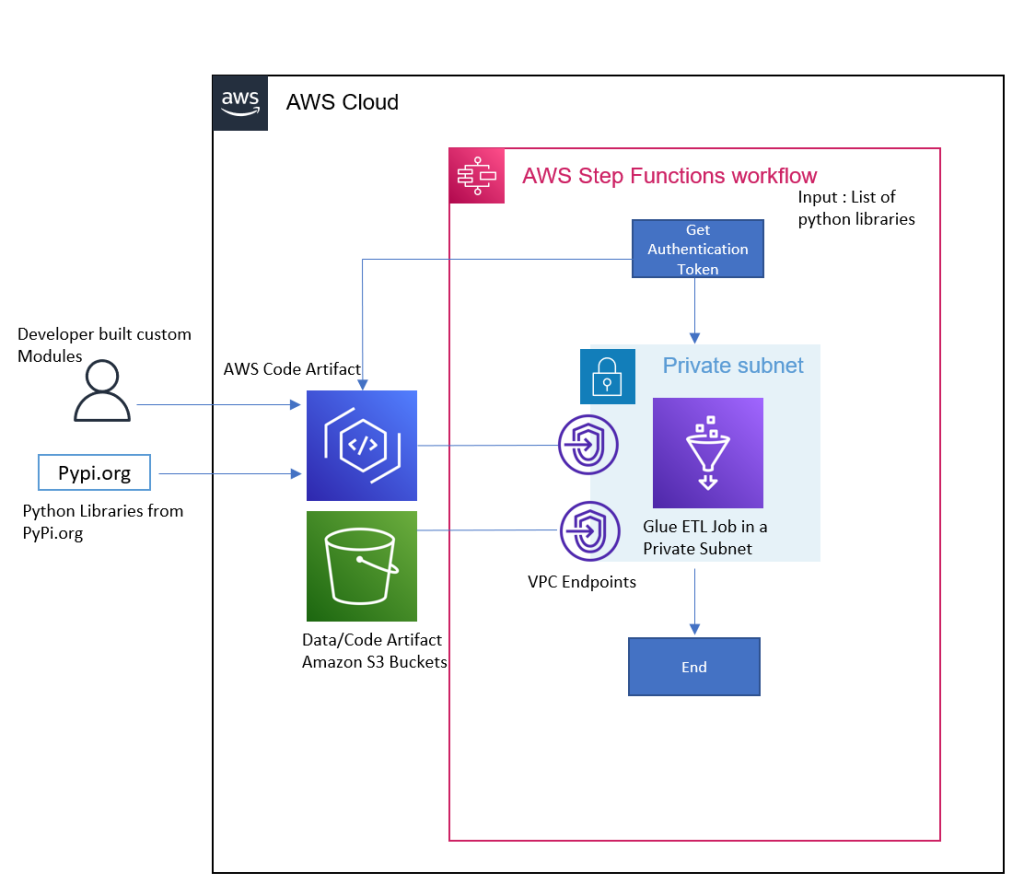
The following diagram illustrates the solution architecture.
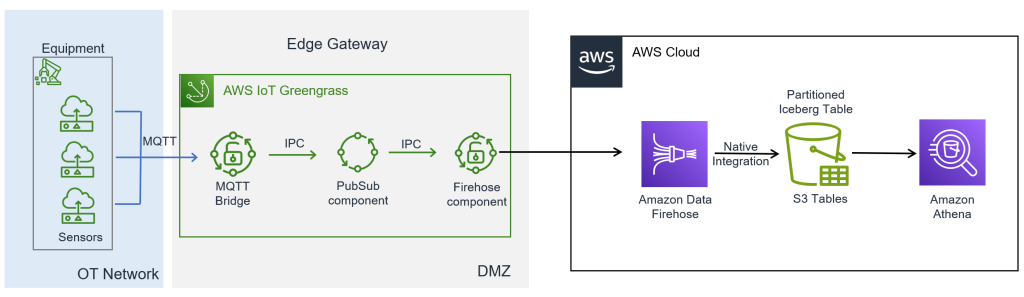
Fig 1 : High Level Architecture
The workflow consists of the following steps:
- Collect data from Internet of Things (IoT) sensors and stream real-time data from edge devices to the AWS Cloud using AWS IoT Greengrass.
- Ingest, transform, and land data in near real time using Data Firehose, with the Firehose component on AWS IoT Greengrass, and S3 Tables integration.
- Store and organize the tabular data using S3 Tables, which provides purpose-built storage for Apache Iceberg format with a simple, performant, and cost-effective querying solution.
- Query and analyze the tabular data using Amazon Athena.
The edge data flow consists of the following key components:
- IoT device to local MQTT broker – A simulated device used to generate data for the purposes of this post. In a typical production implementation, this would be your equipment or gateway that supports MQTT. IoT devices can publish messages to a local MQTT broker (Moquette) running on AWS IoT Greengrass.
- MQTT bridge – The MQTT bridge component relays messages between:
- MQTT broker (where client devices communicate)
- Local AWS IoT Greengrass publish/subscribe (IPC)
- Local PubSub (custom) component – This component completes the following tasks:
- Subscribes to the local IPC messages.
- Forwards messages to the
kinesisfirehose/messagetopic. - Uses the IPC interface to subscribe to messages.
- Firehose component – The Firehose component subscribes to the
kinesisfirehose/messagetopic. The component then streams the data to Data Firehose in the cloud. It uses QoS 1 for reliable message delivery.
You can scale this solution to multiple edge locations, so you have a seamless view of data across multiple locations of the manufacturing site, as a low-code solution.In the following sections, we walk through the steps to configure the cloud data ingestion flow:
- Create an S3 Tables bucket and enable integration with AWS analytics services.
- Create a namespace in the table bucket using the AWS Command Line Interface (AWS CLI).
- Create a table in the table bucket with the defined schema using the AWS CLI.
- Create an AWS Identity and Access Management (IAM) role for Data Firehose with necessary permissions.
- Configure AWS Lake Formation permissions:
- Grant Super permissions on specific tables for the Data Firehose role.
- Set up a Data Firehose stream:
- Choose Direct PUT as the source and Iceberg tables as the destination.
- Configure the destination settings with database and table names.
- Specify an Amazon Simple Storage Service (Amazon S3) bucket for error output.
- Associate the IAM role created earlier.
- Verify and query data using Athena:
- Grant Lake Formation permissions for Athena access.
- Query the table to verify data ingestion.
Prerequisites
You must have the following prerequisites:
- An AWS account
- The required IAM privileges to launch AWS IoT Greengrass on an edge gateway (or another supported device)
- An Amazon Elastic Compute Cloud (Amazon EC2) instance with a supported operating system to perform a proof of concept
Install AWS IoT Greengrass on the edge gateway
For instructions to install AWS IoT Greengrass, refer to Install the AWS IoT Greengrass Core software. After you complete the installation, you will have a core device provisioned, as shown in the following screenshot. The status of the device says Healthy, which means that your account is able to communicate with the device successfully.
For a proof of concept, you can use an Ubuntu-based EC2 instance as your edge gateway.

Fig 2: Greengrass Core Device
Provision a Data Firehose stream
For detailed steps on setting up Data Firehose to deliver data to Iceberg tables, refer to Deliver data to Apache Iceberg Tables with Amazon Data Firehose. For S3 Tables integration, refer to Build a data lake for streaming data with Amazon S3 Tables and Amazon Data Firehose.
Because you’re using AWS IoT Greengrass to stream data, you can skip the Kinesis Data Generator steps mentioned in these tutorials. The data will instead flow from your edge devices through the Greengrass components to Data Firehose.After you complete these steps, you will have a Firehose stream and S3 Tables bucket, as shown in the following screenshot. Note the Amazon Resource Name (ARN) of the Firehose stream to use in subsequent steps.
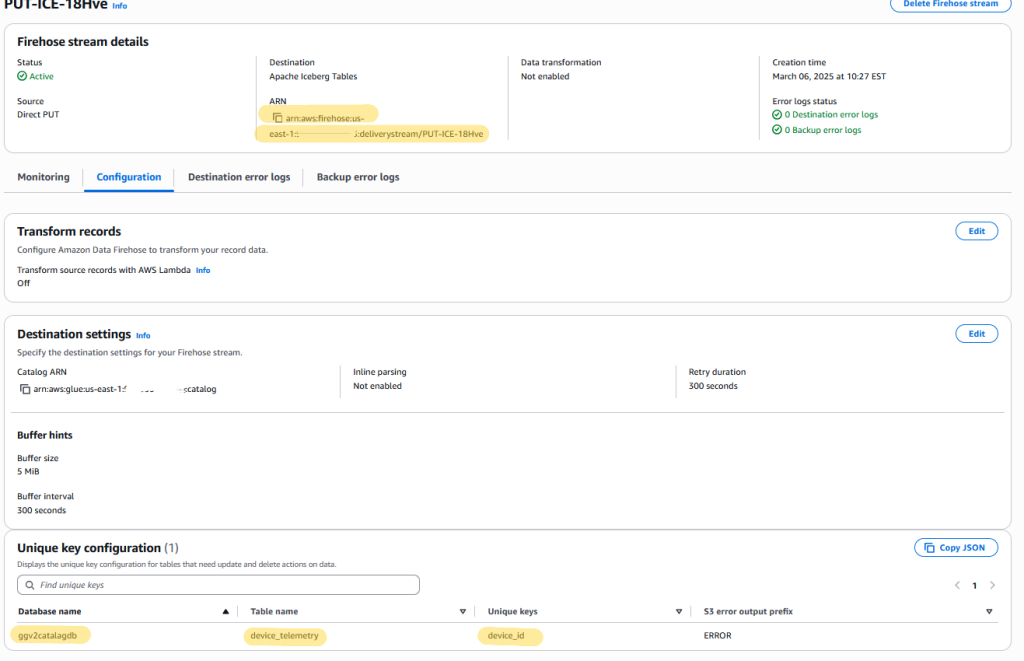
Fig 3: Amazon Data Firehose Stream
Deploy the Greengrass components
Complete the following steps to configure and deploy the Greengrass components. For more details, refer to Create deployments.
- Use the following configuration to enable message routing from local MQTT to the AWS IoT Greengrass PubSub component. Note the topic in the code. This is the MQTT topic where the devices will send the data to.
- Use the following configuration to deploy the Firehose component. Use the Firehose stream ARN that you noted earlier.
- Use the following configuration to deploy the legacy subscription router component (Note that this is a dependent component to the Firehose component):
- Create and deploy a custom PubSub component. You can use the following sample code snippet in your preferred language to deploy as a Greengrass component. You can use gdk to create custom components.
After you deploy the components, you will see them on the Components tab of your core device.
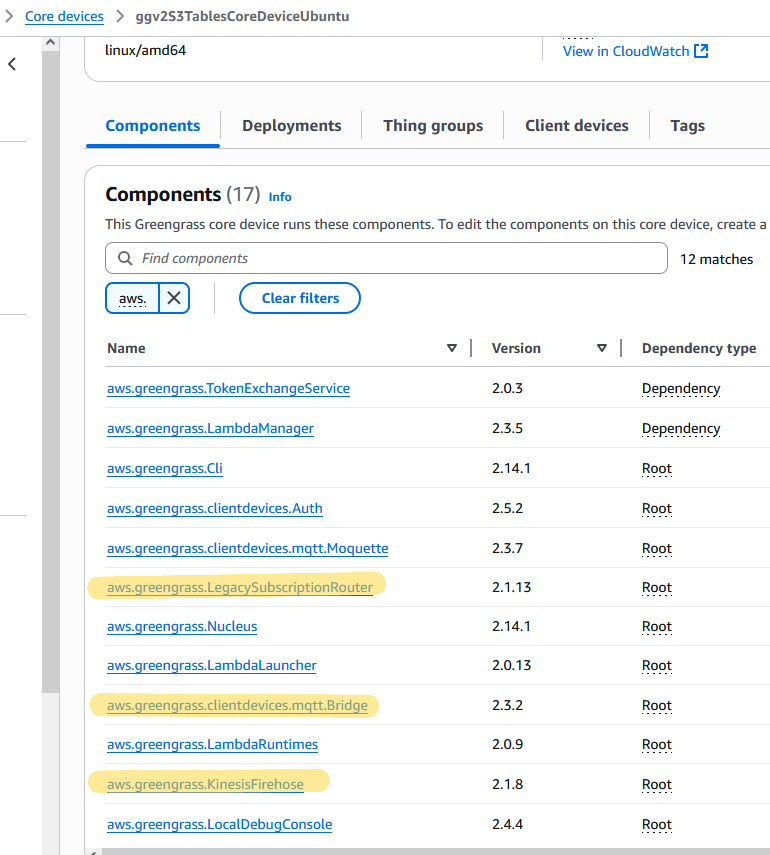
Fig 4: AWS IoT Greengrass components
Ingest data
In this step, you ingest the data from your device to AWS IoT Greengrass, which will subsequently land in Data Firehose. Complete the following steps:
- From your edge device that is MQTT aware, or your edge gateway, publish the data to the topic defined earlier (
client/#). For example, we publish the data to theclient/devices/telemetryMQTT topic. - If you want to do this as a proof of concept, refer to Create a virtual device with Amazon EC2 to create a sample IoT device.
The following code is a sample payload for our example:
For additional details on how to publish messages from a sample device, refer to Just-in-time provisioning.
The MQTT bridge component will route the payload from the MQTT topic (client/devices/telemetry) to an IPC topic by the same name. The custom component that you deployed earlier will listen to the IPC topic client/devices/telemetry and publish to the IPC topic kinesisfirehose/message. The message must follow the structure described in Input data.
Validate the data in Athena
You can now query the data published from the edge IoT device using Athena. On the Athena console, find the catalog and database that you set up, and run the following query:SELECT * FROM <<database>>."device_telemetry" limit 10;You should see the data displayed as shown in the following screenshot. Note the database and table name that you had defined as part of the “Provision a Data Firehose” stream step.
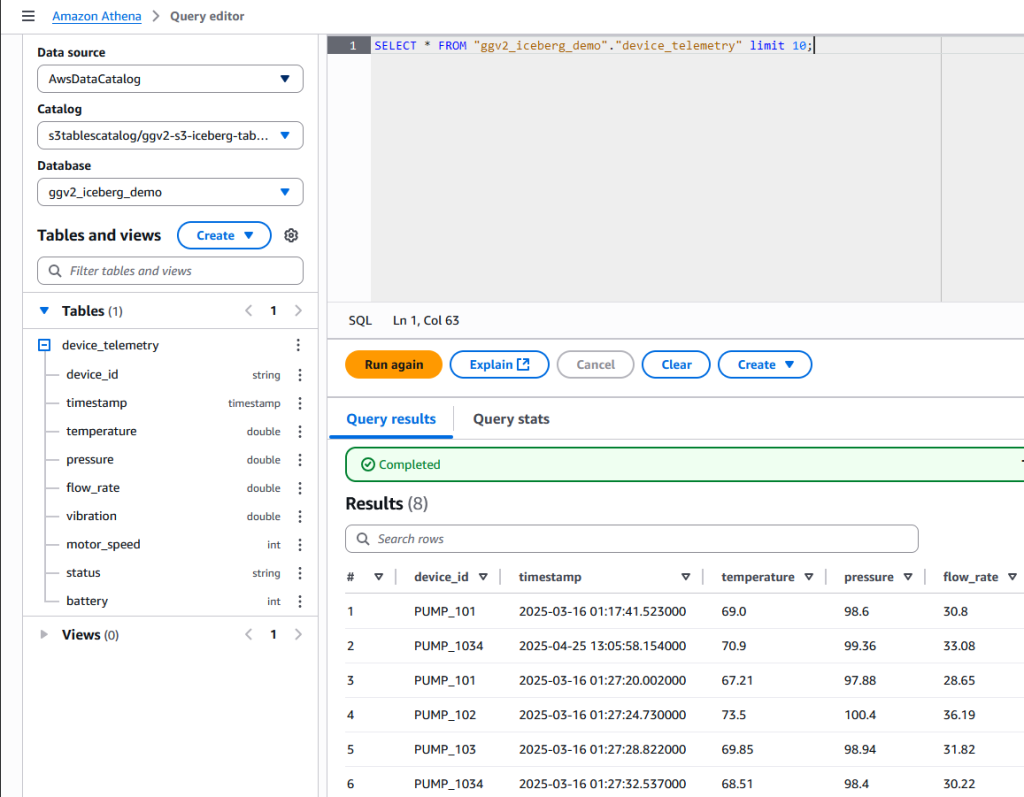
Fig 5: Validate Data in Athena
Scale out the solution
In the preceding sections, we showed how multiple equipments can ingest data into the cloud using a single Greengrass edge gateway device. Because manufacturing locations are distributed in a real-world scenario, you might set up Greengrass devices at other sites and publish the data to the same Firehose stream. This makes sure the data from different sites is landed into a single S3 bucket, is partitioned appropriately (Device_Id in our example), and can be queried seamlessly.
Clean up
After you validate the results, you can delete the following resources to avoid incurring additional costs:
- Delete the EC2 Ubuntu instance you created for your proof of concept.
- Delete the Firehose delivery stream and associated resources.
- Drop the Athena tables created for querying the data.
- Delete the S3 Tables bucket you provisioned.
Conclusion
In this post, we showed how to set up a scalable edge-to-cloud near real-time data ingestion framework using AWS IoT Greengrass and start performing analytics on the data within AWS services using a low-code approach. We demonstrated how to optimize the data storage into Iceberg format with S3 Tables, and transform the streaming data before it lands on the storage layer using Data Firehose. We also discussed how you can scale this solution horizontally across multiple manufacturing locations (plants or sites) to create a low-code solution to analyze data in near real time.
To learn more, refer to the following resources:
- Amazon Data Firehose Developer Guide
- Working with Amazon S3 Tables and table buckets
- Build a data lake for streaming data with Amazon S3 Tables and Amazon Data Firehose
About the authors
 Joyson Neville Lewis is a Sr. Conversational AI Architect with AWS Professional Services. Joyson worked as a Software/Data engineer before diving into the Conversational AI and Industrial IoT space. He assists AWS customers to materialize their AI visions using Voice Assistant/Chatbot and IoT solutions.
 Anil Vure is a Sr. IoT Data Architect with AWS Professional services. Anil has extensive experience building large-scale data platforms and works with manufacturing customers designing high-speed data ingestion systems.
 Ashok Padmanabhan is a Sr. IoT Data Architect with AWS Professional Services. Ashok primarily works with manufacturing and automotive customers to design and build Industry 4.0 solutions.