Post Syndicated from Ashok Srirama original https://aws.amazon.com/blogs/big-data/apply-ci-cd-devops-principles-to-amazon-redshift-development/
CI/CD in the context of application development is a well-understood topic, and developers can choose from numerous patterns and tools to build their pipelines to handle the build, test, and deploy cycle when a new commit gets into version control. For stored procedures or even schema changes that are directly related to the application, this is typically part of the code base and is included in the code repository of the application. These changes are then applied when the application gets deployed to the test or prod environment.
This post demonstrates how you can apply the same set of approaches to stored procedures, and even schema changes to data warehouses like Amazon Redshift.
Stored procedures are considered code and as such should undergo the same rigor as application code. This means that the pipeline should involve running tests against changes to make sure that no regressions are introduced to the production environment. Because we automate the deployment of both stored procedures and schema changes, this significantly reduces inconsistencies in between environments.
Solution overview
The following diagram illustrates our solution architecture. We use AWS CodeCommit to store our code, AWS CodeBuild to run the build process and test environment, and AWS CodePipeline to orchestrate the overall deployment, from source, to test, to production.
Database migrations and tests also require connection information to the relevant Amazon Redshift cluster; we demonstrate how to integrate this securely using AWS Secrets Manager.

We discuss each service component in more detail later in the post.
You can see how all these components work together by completing the following steps:
- Clone the GitHub repo.
- Deploy the AWS CloudFormation template.
- Push code to the CodeCommit repository.
- Run the CI/CD pipeline.
Clone the GitHub repository
The CloudFormation template and the source code for the example application are available in the GitHub repo. Before you get started, you need to clone the repository using the following command:
This creates a new folder, amazon-redshift-devops-blog, with the files inside.
Deploy the CloudFormation template
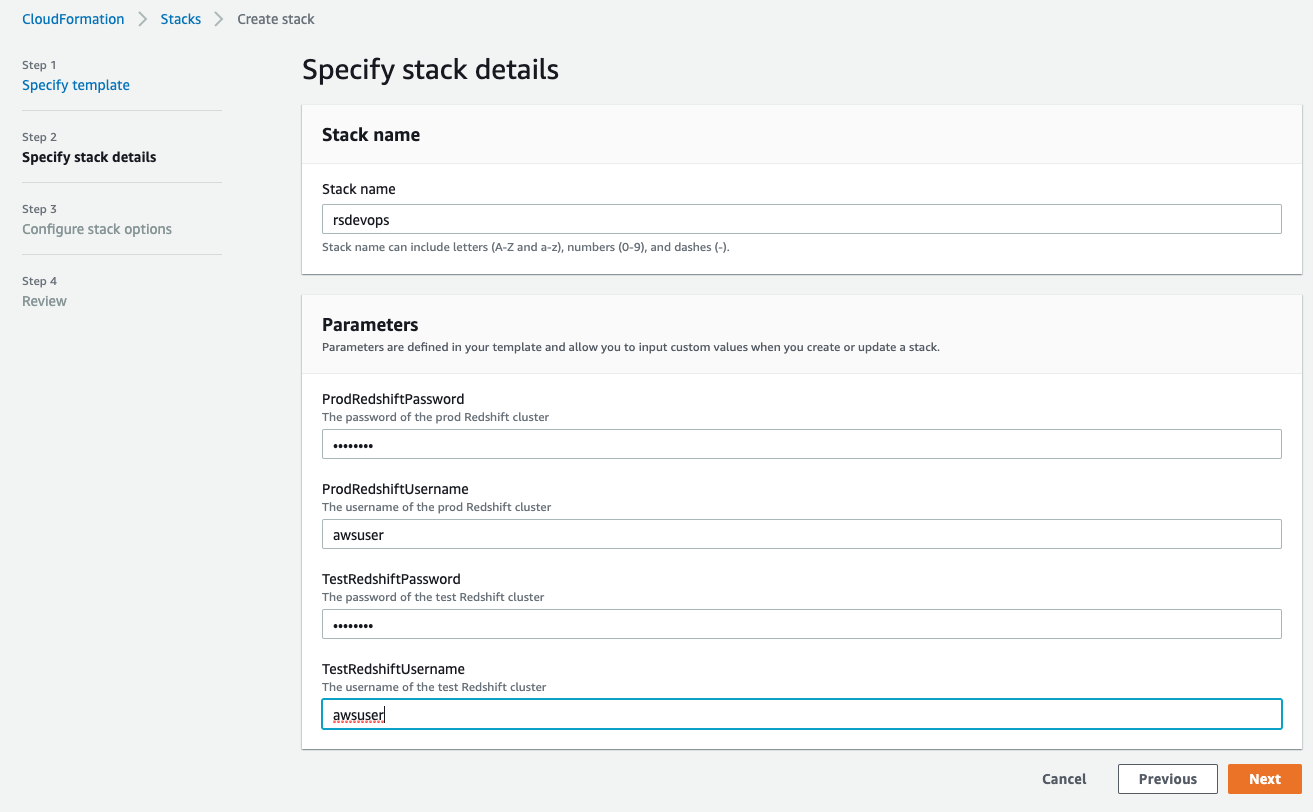
The CloudFormation stack creates the VPC, Amazon Redshift clusters, CodeCommit repository, CodeBuild projects for both test and prod, and the pipeline using CodePipeline to orchestrate the change release process.
- On the AWS CloudFormation console, choose Create stack.
- Choose With new resources (standard).
- Select Upload a template file.
- Choose Choose file and locate the template file (
<cloned_directory>/cloudformation_template.yml). - Choose Next.

- For Stack name, enter a name.
- In the Parameters section, provide the primary user name and password for both the test and prod Amazon Redshift clusters.

The username must be 1–128 alphanumeric characters, and it can’t be a reserved word.
The password has the following criteria:
- Must be 8-64 characters
- Must contain at least one uppercase letter
- Must contain at least one lowercase letter
- Must contain at least one number
- Can only contain ASCII characters (ASCII codes 33–126), except ‘ (single quotation mark), ” (double quotation mark), /, \, or @
Please note that production credentials could be created separately by privileged admins, and you could pass in the ARN of a pre-existing secret instead of the actual password if you so choose.
- Choose Next.

- Leave the remaining settings at their default and choose Next.

- Select I acknowledge that AWS CloudFormation might create IAM resources.
- Choose Create stack.


You can choose the refresh icon on the stack’s Events page to track the progress of the stack creation.

Push code to the CodeCommit repository
When stack creation is complete, go to the CodeCommit console. Locate the redshift-devops-repo repository that the stack created. Choose the repository to view its details.
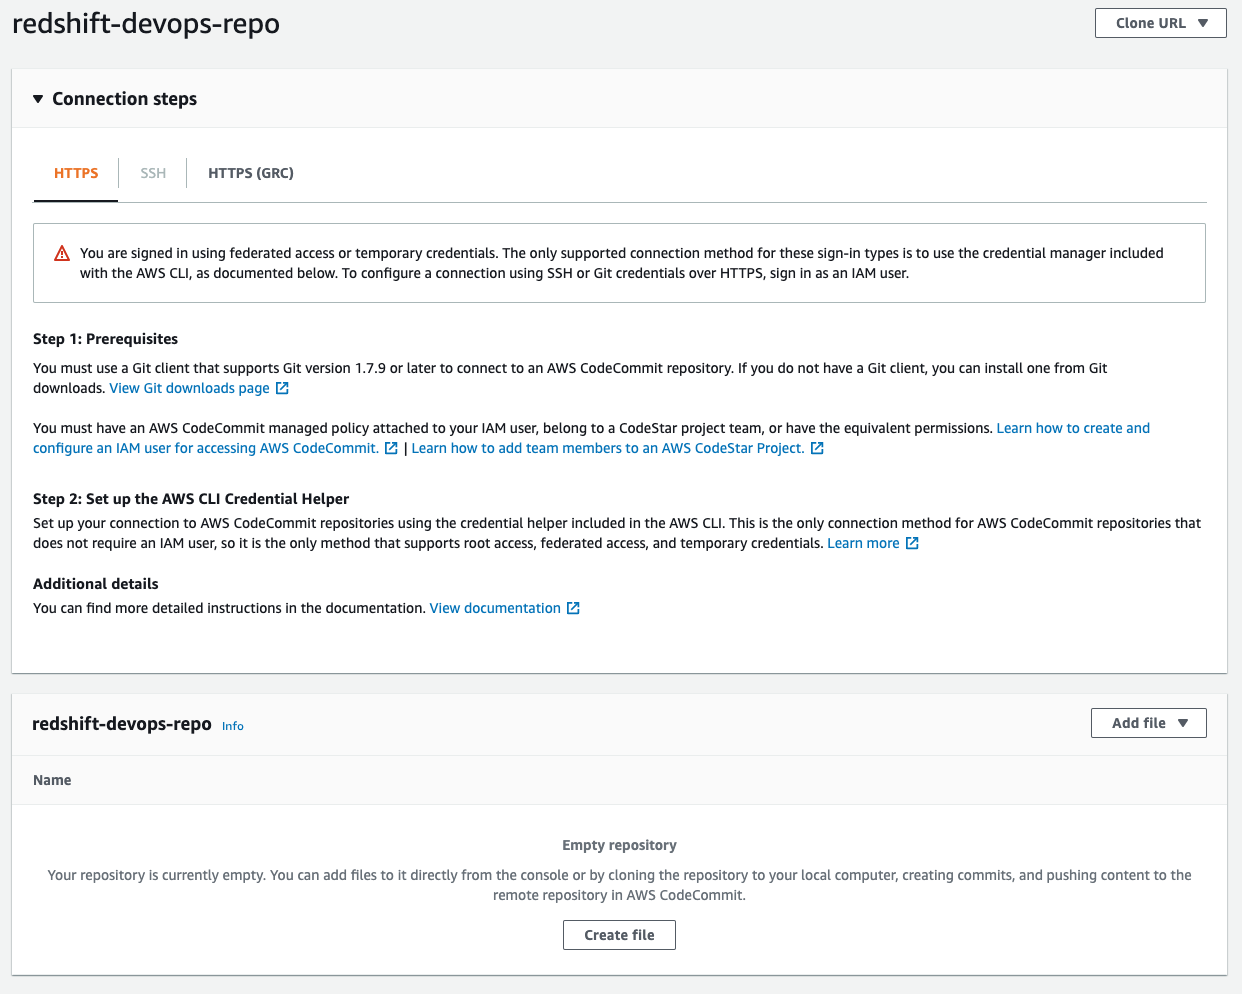
Before you can push any code into this repo, you have to set up your Git credentials using instructions here Setup for HTTPS users using Git credentials. At Step 4 of the Setup for HTTPS users using Git credentials, copy the HTTPS URL, and instead of cloning, add the CodeCommit repo URL into the code that we cloned earlier:
The last step populates the repository; you can check it by refreshing the CodeCommit console. If you get prompted for a user name and password, enter the Git credentials that you generated and downloaded from Step 3 of the Setup for HTTPS users using Git credentials
Run the CI/CD pipeline
After you push the code to the CodeCommit repository, this triggers the pipeline to deploy the code into both the test and prod Amazon Redshift clusters. You can monitor the progress on the CodePipeline console.
To dive deeper into the progress of the build, choose Details.

You’re redirected to the CodeBuild console, where you can see the run logs as well as the result of the test.
Components and dependencies
Although from a high-level perspective the test and prod environment look the same, there are some nuances with regards to how these environments are configured. Before diving deeper into the code, let’s look at the components first:
- CodeCommit – This is the version control system where you store your code.
- CodeBuild – This service runs the build process and test using Maven.
- Build – During the build process, Maven uses FlyWay to connect to Amazon Redshift to determine the current version of the schema and what needs to be run to bring it up to the latest version.
- Test – In the test environment, Maven runs JUnit tests against the test Amazon Redshift cluster. These tests may involve loading data and testing the behavior of the stored procedures. The results of the unit tests are published into the CodeBuild test reports.
- Secrets Manager – We use Secrets Manager to securely store connection information to the various Amazon Redshift clusters. This includes host name, port, user name, password, and database name. CodeBuild refers to Secrets Manager for the relevant connection information when a build gets triggered. The underlying CodeBuild service role needs to have the corresponding permission to access the relevant secrets.
- CodePipeline – CodePipeline is responsible for the overall orchestration from source to test to production.
As referenced in the components, we also use some additional dependencies at the code level:
- Flyway – This framework is responsible for keeping different Amazon Redshift clusters in different environments in sync as far as schema and stored procedures are concerned.
- JUnit – Unit testing framework written in Java.
- Apache Maven – A dependency management and build tool. Maven is where we integrate Flyway and JUnit.
In the following sections, we dive deeper into how these dependencies are integrated.
Apache Maven
For Maven, the configuration file is pom.xml. For an example, you can check out the pom file from our demo app. The pertinent part of the xml is the build section:
This section describes two things:
- By default, the Surefire plugin triggers during the test phase of Maven. The plugin runs the unit tests and generates reports based on the results of those tests. These reports are stored in the
target/surefire-reportsfolder. We reference this folder in the CodeBuild section. - Flyway is triggered during the
process-resourcesphase of Maven, and it triggers the migrate goal of Flyway. Looking at Maven’s lifecycle, this phase is always triggered first and deploys the latest version of stored procedures and schemas to the test environment before running test cases.
Flyway
Changes to the database are called migrations, and these can be either versioned or repeatable. Developers can define which type of migration by the naming convention used by Flyway to determine which one is which. The following diagram illustrates the naming convention.

A versioned migration consists of the regular SQL script that is run and an optional undo SQL script to reverse the specific version. You have to create this undo script in order to enable the undo functionality for a specific version. For example, a regular SQL script consists of creating a new table, and the corresponding undo script consists of dropping that table. Flyway is responsible for keeping track of which version a database is currently at, and runs N number of migrations depending on how far back the target database is compared to the latest version. Versioned migrations are the most common use of Flyway and are primarily used to maintain table schema and keep reference or lookup tables up to date by running data loads or updates via SQL statements. Versioned migrations are applied in order exactly one time.
Repeatable migrations don’t have a version; instead they’re rerun every time their checksum changes. They’re useful for maintaining user-defined functions and stored procedures. Instead of having multiple files to track changes over time, we can just use a single file and Flyway keeps track of when to rerun the statement to keep the target database up to date.
By default, these migration files are located in the classpath under db/migration, the full path being src/main/resources/db/migration. For our example application, you can find the source code on GitHub.
JUnit
When Flyway finishes running the migrations, the test cases are run. These test cases are under the folder src/test/java. You can find examples on GitHub that run a stored procedure via JDBC and validate the output or the impact.
Another aspect of unit testing to consider is how the test data is loaded and maintained in the test Amazon Redshift cluster. There are a couple of approaches to consider:
- As per our example, we’re packaging the test data as part of our version control and loading the data when the first unit test is run. The advantage of this approach is that you get flexibility of when and where you run the test cases. You can start with either a completely empty or partially populated test cluster and you get with the right environment for the test case to run. Other advantages are that you can test data loading queries and have more granular control over the datasets that are being loaded for each test. The downside of this approach is that, depending on how big your test data is, it may add additional time for your test cases to complete.
- Using an Amazon Redshift snapshot dedicated to the test environment is another way to manage the test data. With this approach, you have a couple more options:
- Transient cluster – You can provision a transient Amazon Redshift cluster based on the snapshot when the CI/CD pipeline gets triggered. This cluster stops after the pipeline completes to save cost. The downside of this approach is that you have to factor in Amazon Redshift provisioning time in your end-to-end runtime.
- Long-running cluster – Your test cases can connect to an existing cluster that is dedicated to running test cases. The test cases are responsible for making sure that data-related setup and teardown are done accordingly depending on the nature of the test that’s running. You can use
@BeforeAlland@AfterAllJUnit annotations to trigger the setup and teardown, respectively.
CodeBuild
CodeBuild provides an environment where all of these dependencies run. As shown in our architecture diagram, we use CodeBuild for both test and prod. The differences are in the actual commands that run in each of those environments. These commands are stored in the buildspec.yml file. In our example, we provide a separate buildspec file for test and a different one for prod. During the creation of a CodeBuild project, we can specify which buildspec file to use.
There are a few differences between the test and prod CodeBuild project, which we discuss in the following sections.
Buildspec commands
In the test environment, we use mvn clean test and package the Surefire reports so the test results can be displayed via the CodeBuild console. While in the prod environment, we just run mvn clean process-resources. The reason for this is because in the prod environment, we only need to run the Flyway migrations, which are hooked up to the process-resources Maven lifecycle, whereas in the test environment, we not only run the Flyway migrations, but also make sure that it didn’t introduce any regressions by running test cases. These test cases might have an impact on the underlying data, which is why we don’t run it against the production Amazon Redshift cluster. If you want to run the test cases against production data, you can use an Amazon Redshift production cluster snapshot and run the test cases against that.
Secrets via Secrets Manager
Both Flyway and JUnit need information to identify and connect to Amazon Redshift. We store this information in Secrets Manager. Using Secrets Manager has several benefits:
- Secrets are encrypted automatically
- Access to secrets can be tightly controlled via fine-grained AWS Identity and Access Management (IAM) policies
- All activity with secrets is recorded, which enables easy auditing and monitoring
- You can rotate secrets securely and safely without impacting applications
For our example application, we define the secret as follows:
CodeBuild is integrated with Secrets Manager, so we define the following environment variables as part of the CodeBuild project:
- TEST_HOST:
arn:aws:secretsmanager:<region>:<AWS Account Id>:secret:<secret name>:host - TEST_JDBC_USER:
arn:aws:secretsmanager:<region>:<AWS Account Id>:secret:<secret name>:username - TEST_JDBC_PASSWORD:
arn:aws:secretsmanager:<region>:<AWS Account Id>:secret:<secret name>:password - TEST_PORT:
arn:aws:secretsmanager:<region>:<AWS Account Id>:secret:<secret name>:port - TEST_DB_NAME:
arn:aws:secretsmanager:<region>:<AWS Account Id>:secret:<secret name>:dbName - TEST_REDSHIFT_IAM_ROLE:
<ARN of IAM role>(This can be in plaintext and should be attached to the Amazon Redshift cluster) - TEST_DATA_S3_BUCKET:
<bucket name>(This is where the test data is staged)
CodeBuild automatically retrieves the parameters from Secrets Manager and they’re available in the application as environment variables. If you look at the buildspec_prod.yml example, we use the preceding variables to populate the Flyway environment variables and JDBC connection URL.
VPC configuration
For CodeBuild to be able to connect to Amazon Redshift, you need to configure which VPC it runs in. This includes the subnets and security group that it uses. The Amazon Redshift cluster’s security group also needs to allow access from the CodeBuild security group.
CodePipeline
To bring all these components together, we use CodePipeline to orchestrate the flow from the source code through prod deployment. CodePipeline also has additional capabilities. For example, you can add an approval step between test and prod so a release manager can review the results of the tests before releasing the changes to production.
Example scenario
You can use tests as a form of documentation of what is the expected behavior of a function. To further illustrate this point, let’s look at a simple stored procedure:
If you deployed the example app from the previous section, you can follow along by copying the stored procedure code and pasting it in src/main/resources/db/migration/R__MergeStagedProducts.sql. Save it and push the change to the CodeCommit repository by issuing the following commands (assuming that you’re at the top of the project folder):
After you push the changes to the CodeCommit repository, you can follow the progress of the build and test stages on the CodePipeline console.
We implement a basic Slowly Changing Dimension Type 2 approach in which we mark old data as CLOSED and append newer versions of the data. Although the stored procedure works as is, our test has the following expectations:
- The number of
closedstatus in the products table needs to correspond to the number of duplicate entries in the staging table. - The products table has a
close_datecolumn that needs to be populated so we know when it was deprecated - At the end of the merge, the staging table needs to be cleared for subsequent ETL runs
The stored procedure will pass the first test, but fail later tests. When we push this change to CodeCommit and the CI/CD process runs, we can see results like in the following screenshot.

The tests show that the second and third tests failed. Failed tests result in the pipeline stopping, which means these bad changes don’t end up in production.
We can update the stored procedure and push the change to CodeCommit to trigger the pipeline again. The updated stored procedure is as follows:
All the tests passed this time, which allows CodePipeline to proceed with deployment to production.

We used Flyway’s repeatable migrations to make the changes to the stored procedure. Code is stored in a single file and Flyway verifies the checksum of the file to detect any changes and reapplies the migration if the checksum is different from the one that’s already deployed.
Clean up
After you’re done, it’s crucial to tear down the environment to avoid incurring additional charges beyond your testing. Before you delete the CloudFormation stack, go to the Resources tab of your stack and make sure the two buckets that were provisioned are empty. If they’re not empty, delete all the contents of the buckets.

Now that the buckets are empty, you can go back to the AWS CloudFormation console and delete the stack to complete the cleanup of all the provisioned resources.
Conclusion
Using CI/CD principles in the context of Amazon Redshift stored procedures and schema changes greatly improves confidence when updates are getting deployed to production environments. Similar to CI/CD in application development, proper test coverage of stored procedures is paramount to capturing potential regressions when changes are made. This includes testing both success paths as well as all possible failure modes.
In addition, versioning migrations enables consistency across multiple environments and prevents issues arising from schema changes that aren’t applied properly. This increases confidence when changes are being made and improves development velocity as teams spend more time developing functionality rather than hunting for issues due to environment inconsistencies.
We encourage you to try building a CI/CD pipeline for Amazon Redshift using these steps described in this blog.
About the Authors
 Ashok Srirama is a Senior Solutions Architect at Amazon Web Services, based in Washington Crossing, PA. He specializes in serverless applications, containers, devops, and architecting distributed systems. When he’s not spending time with his family, he enjoys watching cricket, and driving his bimmer.
 Indira Balakrishnan is a Senior Solutions Architect in the AWS Analytics Specialist SA Team. She is passionate about helping customers build cloud-based analytics solutions to solve their business problems using data-driven decisions. Outside of work, she volunteers at her kids’ activities and spends time with her family.
 Vaibhav Agrawal is an Analytics Specialist Solutions Architect at AWS.Throughout his career, he has focused on helping customers design and build well-architected analytics and decision support platforms.
 Rajesh Francis is a Sr. Analytics Customer Experience Specialist at AWS. He specializes in Amazon Redshift and works with customers to build scalable Analytic solutions.
 Jeetesh Srivastva is a Sr. Manager, Specialist Solutions Architect at AWS. He specializes in Amazon Redshift and works with customers to implement scalable solutions using Amazon Redshift and other AWS Analytic services. He has worked to deliver on-premises and cloud-based analytic solutions for customers in banking and finance and hospitality industry verticals.