Post Syndicated from BK Das original https://aws.amazon.com/blogs/devops/snyk-cli-scan-python-codecommit-codepipeline-codebuild/
One of the primary advantages of working in the cloud is achieving agility in product development. You can adopt practices like continuous integration and continuous delivery (CI/CD) and GitOps to increase your ability to release code at quicker iterations. Development models like these demand agility from security teams as well. This means your security team has to provide the tooling and visibility to developers for them to fix security vulnerabilities as quickly as possible.
Vulnerabilities in cloud-native applications can be roughly classified into infrastructure misconfigurations and application vulnerabilities. In this post, we focus on enabling developers to scan vulnerable data around Python open-source packages using the Snyk Command Line Interface (CLI).
The world of package dependencies
Traditionally, code scanning is performed by the security team; they either ship the code to the scanning instance, or in some cases ship it to the vendor for vulnerability scanning. After the vendor finishes the scan, the results are provided to the security team and forwarded to the developer. The end-to-end process of organizing the repositories, sending the code to security team for scanning, getting results back, and remediating them is counterproductive to the agility of working in the cloud.
Let’s take an example of package A, which uses package B and C. To scan package A, you scan package B and C as well. Similar to package A having dependencies on B and C, packages B and C can have their individual dependencies too. So the dependencies for each package get complex and cumbersome to scan over time. The ideal method is to scan all the dependencies in one go, without having manual intervention to understand the dependencies between packages.
Building on the foundation of GitOps and Gitflow
GitOps was introduced in 2017 by Weaveworks as a DevOps model to implement continuous deployment for cloud-native applications. It focuses on the developer ability to ship code faster. Because security is a non-negotiable piece of any application, this solution includes security as part of the deployment process. We define the Snyk scanner as declarative and immutable AWS Cloud Development Kit (AWS CDK) code, which instructs new Python code committed to the repository to be scanned.
Another continuous delivery practice that we base this solution on is Gitflow. Gitflow is a strict branching model that enables project release by enforcing a framework for managing Git projects. As a brief introduction on Gitflow, typically you have a main branch, which is the code sent to production, and you have a development branch where new code is committed. After the code in development branch passes all tests, it’s merged to the main branch, thereby becoming the code in production. In this solution, we aim to provide this scanning capability in all your branches, providing security observability through your entire Gitflow.
AWS services used in this solution
We use the following AWS services as part of this solution:
- AWS CDK – The AWS CDK is an open-source software development framework to define your cloud application resources using familiar programming languages. In this solution, we use Python to write our AWS CDK code.
- AWS CodeBuild – CodeBuild is a fully managed build service in the cloud. CodeBuild compiles your source code, runs unit tests, and produces artifacts that are ready to deploy. CodeBuild eliminates the need to provision, manage, and scale your own build servers.
- AWS CodeCommit – CodeCommit is a fully managed source control service that hosts secure Git-based repositories. It makes it easy for teams to collaborate on code in a secure and highly scalable ecosystem. CodeCommit eliminates the need to operate your own source control system or worry about scaling its infrastructure. You can use CodeCommit to securely store anything from source code to binaries, and it works seamlessly with your existing Git tools.
- AWS CodePipeline – CodePipeline is a continuous delivery service you can use to model, visualize, and automate the steps required to release your software. You can quickly model and configure the different stages of a software release process. CodePipeline automates the steps required to release your software changes continuously.
- Amazon EventBridge – EventBridge rules deliver a near-real-time stream of system events that describe changes in AWS resources. With simple rules that you can quickly set up, you can match events and route them to one or more target functions or streams.
- AWS Systems Manager Parameter Store – Parameter Store, a capability of AWS Systems Manager, provides secure, hierarchical storage for configuration data management and secrets management. You can store data such as passwords, database strings, Amazon Machine Image (AMI) IDs, and license codes as parameter values.
Prerequisites
Before you get started, make sure you have the following prerequisites:
- An AWS account (use a Region that supports CodeCommit, CodeBuild, Parameter Store, and CodePipeline)
- A Snyk account
- An existing CodeCommit repository you want to test on
Architecture overview
After you complete the steps in this post, you will have a working pipeline that scans your Python code for open-source vulnerabilities.
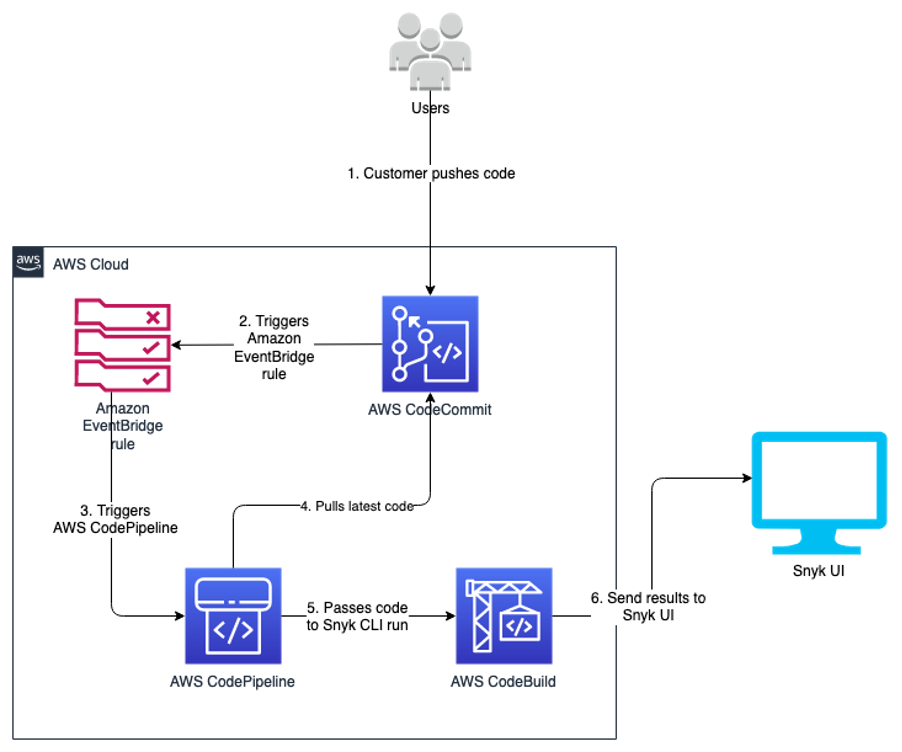
We use the Snyk CLI, which is available to customers on all plans, including the Free Tier, and provides the ability to programmatically scan repositories for vulnerabilities in open-source dependencies as well as base image recommendations for container images. The following reference architecture represents a general workflow of how Snyk performs the scan in an automated manner. The design uses DevSecOps principles of automation, event-driven triggers, and keeping humans out of the loop for its run.
As developers keep working on their code, they continue to commit their code to the CodeCommit repository. Upon each commit, a CodeCommit API call is generated, which is then captured using the EventBridge rule. You can customize this event rule for a specific event or feature branch you want to trigger the pipeline for.
When the developer commits code to the specified branch, that EventBridge event rule triggers a CodePipeline pipeline. This pipeline has a build stage using CodeBuild. This stage interacts with the Snyk CLI, and uses the token stored in Parameter Store. The Snyk CLI uses this token as authentication and starts scanning the latest code committed to the repository. When the scan is complete, you can review the results on the Snyk console.
This code is built for Python pip packages. You can edit the buildspec.yml to incorporate for any other language that Snyk supports.
The following diagram illustrates our architecture.
Code overview
The code in this post is written using the AWS CDK in Python. If you’re not familiar with the AWS CDK, we recommend reading Getting started with AWS CDK before you customize and deploy the code.
Repository URL: https://github.com/aws-samples/aws-cdk-codecommit-snyk
This AWS CDK construct uses the Snyk CLI within the CodeBuild job in the pipeline to scan the Python packages for open-source package vulnerabilities. The construct uses CodePipeline to create a two-stage pipeline: one source, and one build (the Snyk scan stage). The construct takes the input of the CodeCommit repository you want to scan, the Snyk organization ID, and Snyk auth token.
Resources deployed
This solution deploys the following resources:
- An EventBridge rule
- A CodeBuild project
- Four AWS Identity and Access Management (IAM) roles with inline policies
- A CodePipeline pipeline
- An Amazon Simple Storage Service (Amazon S3) bucket
- An AWS Key Management Service (AWS KMS) key and alias
For the deployment, we use the AWS CDK construct in the codebase cdk_snyk_construct/cdk_snyk_construct_stack.py in the AWS CDK stack cdk-snyk-stack. The construct requires the following parameters:
- ARN of the CodeCommit repo you want to scan
- Name of the repository branch you want to be monitored
- Parameter Store name of the Snyk organization ID
- Parameter Store name for the Snyk auth token
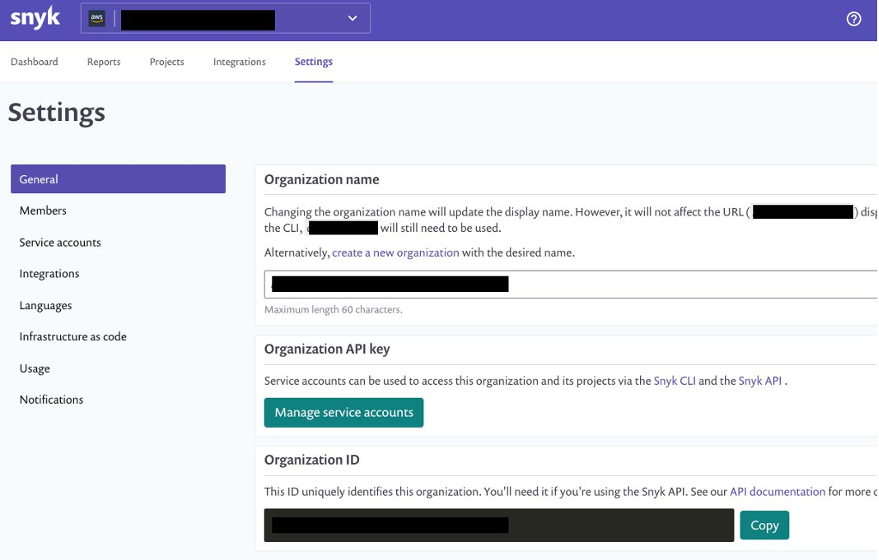
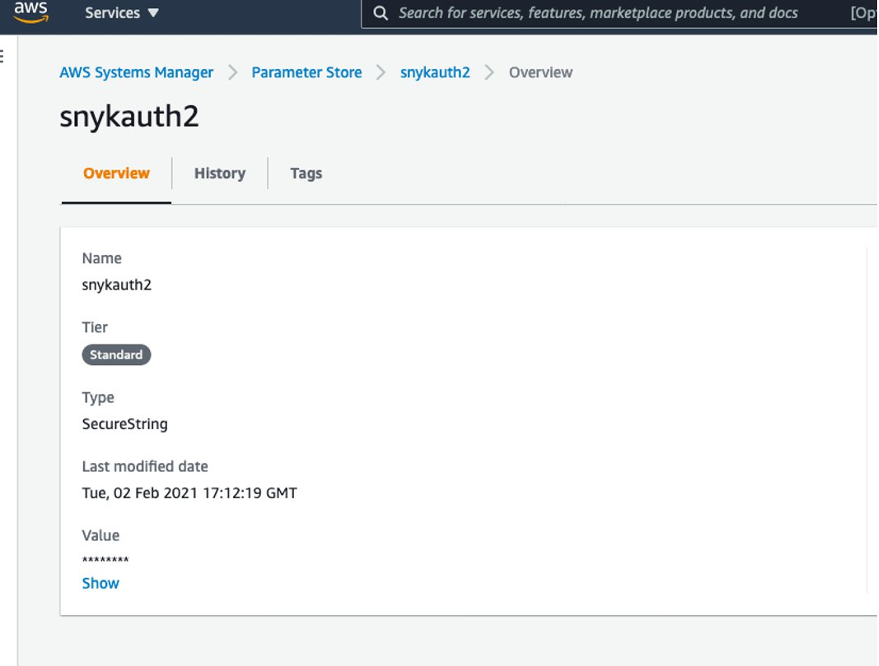
Set up the organization ID and auth token before deploying the stack. Because these are confidential and sensitive data, you should deploy them as a separate stack or manual process. In this solution, the parameters have been stored as a SecureString parameter type and encrypted using the AWS-managed KMS key.
You create the organization ID and auth token on the Snyk console. On the Settings page, choose General in the navigation page to add these parameters.
You can retrieve the names of the parameters on the Systems Manager console by navigating to Parameter Store and finding the name on the Overview tab.
Create a requirements.txt file in the CodeCommit repository
We now create a repository in CodeCommit to store the code. For simplicity, we primarily store the requirements.txt file in our repository. In Python, a requirements file stores the packages that are used. Having clearly defined packages and versions makes it easier for development, especially in virtual environments.
For more information on the requirements file in Python, see Requirement Specifiers.
To create a CodeCommit repository, run the following AWS Command Line Interface (AWS CLI) command in your AWS accounts:
aws codecommit create-repository --repository-name snyk-repo \
--repository-description "Repository for Snyk to scan Python packages"
Now let’s create a branch called main in the repository using the following command:
aws codecommit create-branch --repository-name snyk-repo \
--branch-name main
After you create the repository, commit a file named requirements.txt with the following content. The following packages are pinned to a particular version that they have a vulnerability with. This file is our hypothetical vulnerable set of packages that have been committed into your development code.
PyYAML==5.3.1
Pillow==7.1.2
pylint==2.5.3
urllib3==1.25.8
For instructions on committing files in CodeCommit, see Connect to an AWS CodeCommit repository.
When you store the Snyk auth token and organization ID in Parameter Store, note the parameter names—you need to pass them as parameters during the deployment step.
Now clone the CDK code from the GitHub repository with the command below:
git clone https://github.com/aws-samples/aws-cdk-codecommit-snyk.git
After the cloning is complete you should see a directory named aws-cdk-codecommit-snyk on your machine.
When you’re ready to deploy, enter the aws-cdk-codecommit-snyk directory, and run the following command with the appropriate values:
cdk deploy cdk-snyk-stack \
--parameters RepoName=<name-of-codecommit-repo> \
--parameters RepoBranch=<branch-to-be-scanned> \
--parameters SnykOrgId=<value> \
--parameters SnykAuthToken=<value>
After the stack deployment is complete, you can see a new pipeline in your AWS account, which is configured to be triggered every time a commit occurs on the main branch.
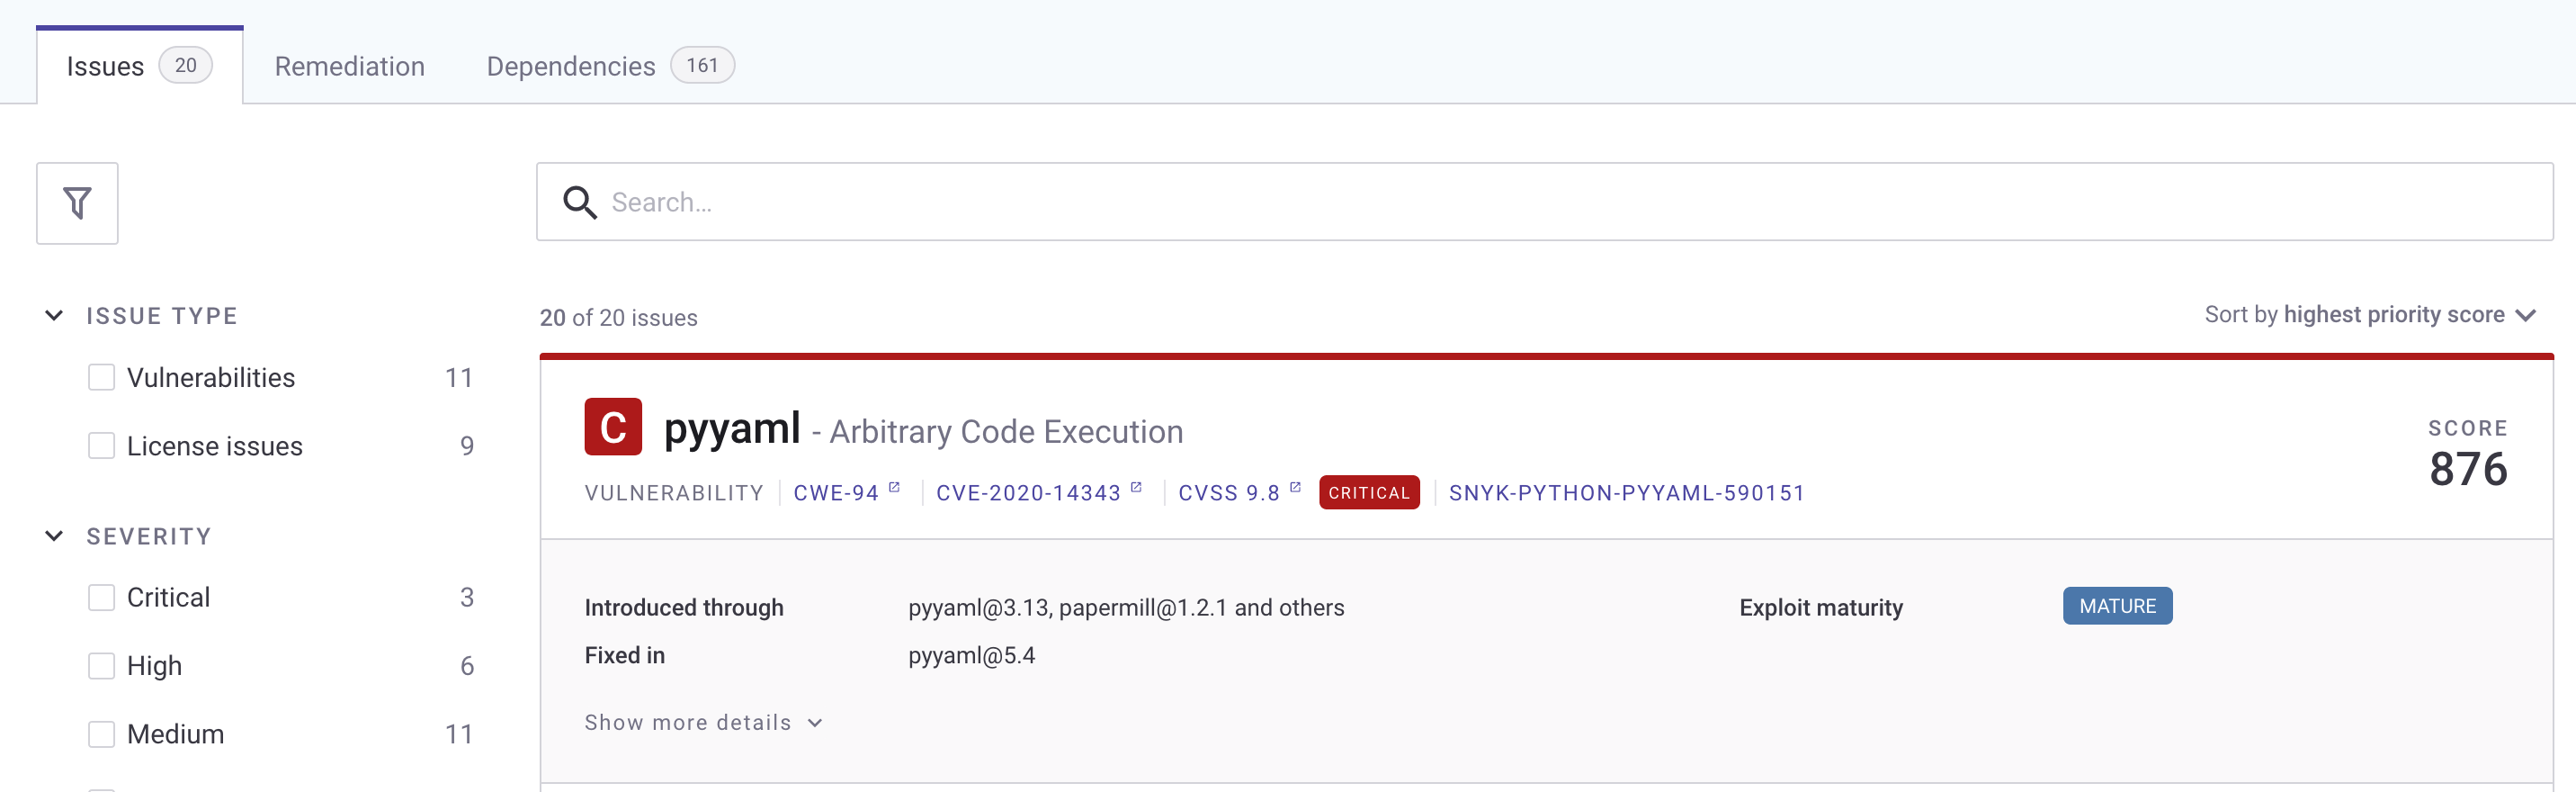
You can view the results of the scan on the Snyk console. After the pipeline runs, log in to snyk.io and you should see a project named as per your repository (see the following screenshot).
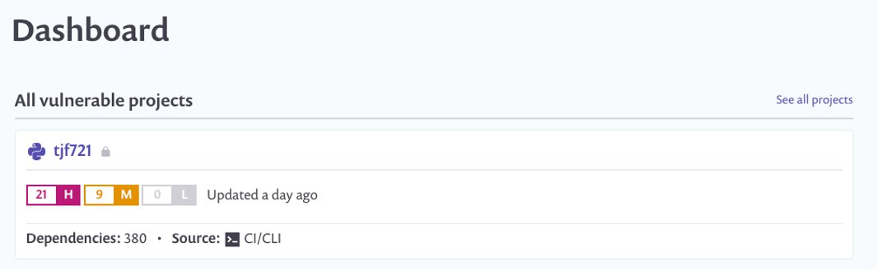
Choose the repo name to get a detailed view of the vulnerabilities found. Depending on what packages you put in your requirements.txt, your report will differ from the following screenshot.
To fix the vulnerability identified, you can change the version of these packages in the requirements.txt file. The edited requirements file should look like the following:
PyYAML==5.4
Pillow==8.2.0
pylint==2.6.1
urllib3==1.25.9
After you update the requirements.txt file in your repository, push your changes back to the CodeCommit repository you created earlier on the main branch. The push starts the pipeline again.
After the commit is performed to the targeted branch, you don’t see the vulnerability reported on the Snyk dashboard because the pinned version 5.4 doesn’t contain that vulnerability.
Clean up
To avoid accruing further cost for the resources deployed in this solution, run cdk destroy to remove all the AWS resources you deployed through CDK.
As the CodeCommit repository was created using AWS CLI, the following command deletes the CodeCommit repository:
aws codecommit delete-repository --repository-name snyk-repo
Conclusion
In this post, we provided a solution so developers can self- remediate vulnerabilities in their code by monitoring it through Snyk. This solution provides observability, agility, and security for your Python application by following DevOps principles.
A similar architecture has been used at NFL to shift-left the security of their code. According to the shift-left design principle, security should be moved closer to the developers to identify and remediate security issues earlier in the development cycle. NFL has implemented a similar architecture which made the total process, from committing code on the branch to remediating 15 times faster than their previous code scanning setup.
Here’s what NFL has to say about their experience:
“NFL used Snyk to scan Python packages for a service launch. Traditionally it would have taken 10days to scan the packages through our existing process but with Snyk we were able to follow DevSecOps principles and get the scans completed, and reviewed within matter of days. This simplified our time to market while maintaining visibility into our security posture.” – Joe Steinke (Director, Data Solution Architect)

