Tag Archives: Amazon CodePipeline

How to add notifications and manual approval to an AWS CDK Pipeline

Post Syndicated from Jehu Gray original https://aws.amazon.com/blogs/devops/how-to-add-notifications-and-manual-approval-to-an-aws-cdk-pipeline/

A deployment pipeline typically comprises several stages such as dev, test, and prod, which ensure that changes undergo testing before reaching the production environment. To improve the reliability and stability of release processes, DevOps teams must review Infrastructure as Code (IaC) changes before applying them in production. As a result, implementing a mechanism for notification and manual approval that grants stakeholders improved access to changes in their release pipelines has become a popular practice for DevOps teams.

Notifications keep development teams and stakeholders informed in real-time about updates and changes to deployment status within release pipelines. Manual approvals establish thresholds for transitioning a change from one stage to the next in the pipeline. They also act as a guardrail to mitigate risks arising from errors and rework because of faulty deployments.

Please note that manual approvals, as described in this post, are not a replacement for the use of automation. Instead, they complement automated checks within the release pipeline.

In this blog post, we describe how to set up notifications and add a manual approval stage to AWS Cloud Development Kit (AWS CDK) Pipeline.

Concepts

CDK Pipeline

CDK Pipelines is a construct library for painless continuous delivery of CDK applications. CDK Pipelines can automatically build, test, and deploy changes to CDK resources. CDK Pipelines are self-mutating which means as application stages or stacks are added, the pipeline automatically reconfigures itself to deploy those new stages or stacks. Pipelines need only be manually deployed once, afterwards, the pipeline keeps itself up to date from the source code repository by pulling the changes pushed to the repository.

Notifications

Adding notifications to a pipeline provides visibility to changes made to the environment by utilizing the NotificationRule construct. You can also use this rule to notify pipeline users of important changes, such as when a pipeline starts execution. Notification rules specify both the events and the targets, such as Amazon Simple Notification Service (Amazon SNS) topic or AWS Chatbot clients configured for Slack which represents the nominated recipients of the notifications. An SNS topic is a logical access point that acts as a communication channel while Chatbot is an AWS service that enables DevOps and software development teams to use messaging program chat rooms to monitor and respond to operational events.

Manual Approval

In a CDK pipeline, you can incorporate an approval action at a specific stage, where the pipeline should pause, allowing a team member or designated reviewer to manually approve or reject the action. When an approval action is ready for review, a notification is sent out to alert the relevant parties. This combination of notifications and approvals ensures timely and efficient decision-making regarding crucial actions within the pipeline.

Solution Overview

The solution explains a simple web service that is comprised of an AWS Lambda function that returns a static web page served by Amazon API Gateway. Since Continuous Deployment and Continuous Integration (CI/CD) are important components to most web projects, the team implements a CDK Pipeline for their web project.

There are two important stages in this CDK pipeline; the Pre-production stage for testing and the Production stage, which contains the end product for users.

The flow of the CI/CD process to update the website starts when a developer pushes a change to the repository using their Integrated Development Environment (IDE). An Amazon CloudWatch event triggers the CDK Pipeline. Once the changes reach the pre-production stage for testing, the CI/CD process halts. This is because a manual approval gate is between the pre-production and production stages. So, it becomes a stakeholder’s responsibility to review the changes in the pre-production stage before approving them for production. The pipeline includes an SNS notification that notifies the stakeholder whenever the pipeline requires manual approval.

After approving the changes, the CI/CD process proceeds to the production stage and the updated version of the website becomes available to the end user. If the approver rejects the changes, the process ends at the pre-production stage with no impact to the end user.

The following diagram illustrates the solution architecture.


This diagram shows the CDK pipeline process in the solution and how applications or updates are deployed using AWS Lambda Function to end users.

Figure 1. This image shows the CDK pipeline process in our solution and how applications or updates are deployed using AWS Lambda Function to end users.

Prerequisites

For this walkthrough, you should have the following prerequisites:

Add notification to the pipeline

In this tutorial, perform the following steps:

  • Add the import statements for AWS CodeStar notifications and SNS to the import section of the pipeline stack py
import aws_cdk.aws_codestarnotifications as notifications
import aws_cdk.pipelines as pipelines
import aws_cdk.aws_sns as sns
import aws_cdk.aws_sns_subscriptions as subs
  • Ensure the pipeline is built by calling the ‘build pipeline’ function.

pipeline.build_pipeline()

  • Create an SNS topic.

topic = sns.Topic(self, "MyTopic1")

  • Add a subscription to the topic. This specifies where the notifications are sent (Add the stakeholders’ email here).

topic.add_subscription(subs.EmailSubscription("[email protected]"))

  • Define a rule. This contains the source for notifications, the event trigger, and the target .

rule = notifications.NotificationRule(self, "NotificationRule", )

  • Assign the source the value pipeline.pipeline The first pipeline is the name of the CDK pipeline(variable) and the .pipeline is to show it is a pipeline(function).

source=pipeline.pipeline,

  • Define the events to be monitored. Specify notifications for when the pipeline starts, when it fails, when the execution succeeds, and finally when manual approval is needed.
events=["codepipeline-pipeline-pipeline-execution-started", "codepipeline-pipeline-pipeline-execution-failed","codepipeline-pipeline-pipeline-execution-succeeded", 
"codepipeline-pipeline-manual-approval-needed"],
  • For the complete list of supported event types for pipelines, see here
  • Finally, add the target. The target here is the topic created previously.

targets=[topic]

The combination of all the steps becomes:

pipeline.build_pipeline()
topic = sns.Topic(self, "MyTopic1")
topic.add_subscription(subs.EmailSubscription("[email protected]"))
rule = notifications.NotificationRule(self, "NotificationRule",
source=pipeline.pipeline,
events=["codepipeline-pipeline-pipeline-execution-started", "codepipeline-pipeline-pipeline-execution-failed","codepipeline-pipeline-pipeline-execution-succeeded", 
"codepipeline-pipeline-manual-approval-needed"],
targets=[topic]
)

Adding Manual Approval

  • Add the ManualApprovalStep import to the aws_cdk.pipelines import statement.
from aws_cdk.pipelines import (
CodePipeline,
CodePipelineSource,
ShellStep,
ManualApprovalStep
)
  • Add the ManualApprovalStep to the production stage. The code must be added to the add_stage() function.
 prod = WorkshopPipelineStage(self, "Prod")
        prod_stage = pipeline.add_stage(prod,
            pre = [ManualApprovalStep('PromoteToProduction')])

When a stage is added to a pipeline, you can specify the pre and post steps, which are arbitrary steps that run before or after the contents of the stage. You can use them to add validations like manual or automated gates to the pipeline. It is recommended to put manual approval gates in the set of pre steps, and automated approval gates in the set of post steps. So, the manual approval action is added as a pre step that runs after the pre-production stage and before the production stage .

  • The final version of the pipeline_stack.py becomes:
from constructs import Construct
import aws_cdk as cdk
import aws_cdk.aws_codestarnotifications as notifications
import aws_cdk.aws_sns as sns
import aws_cdk.aws_sns_subscriptions as subs
from aws_cdk import (
    Stack,
    aws_codecommit as codecommit,
    aws_codepipeline as codepipeline,
    pipelines as pipelines,
    aws_codepipeline_actions as cpactions,
    
)
from aws_cdk.pipelines import (
    CodePipeline,
    CodePipelineSource,
    ShellStep,
    ManualApprovalStep
)


class WorkshopPipelineStack(cdk.Stack):
    def __init__(self, scope: Construct, id: str, **kwargs) -> None:
        super().__init__(scope, id, **kwargs)
        
        # Creates a CodeCommit repository called 'WorkshopRepo'
        repo = codecommit.Repository(
            self, "WorkshopRepo", repository_name="WorkshopRepo",
            
        )
        
        #Create the Cdk pipeline
        pipeline = pipelines.CodePipeline(
            self,
            "Pipeline",
            
            synth=pipelines.ShellStep(
                "Synth",
                input=pipelines.CodePipelineSource.code_commit(repo, "main"),
                commands=[
                    "npm install -g aws-cdk",  # Installs the cdk cli on Codebuild
                    "pip install -r requirements.txt",  # Instructs Codebuild to install required packages
                    "npx cdk synth",
                ]
                
            ),
        )

        
         # Create the Pre-Prod Stage and its API endpoint
        deploy = WorkshopPipelineStage(self, "Pre-Prod")
        deploy_stage = pipeline.add_stage(deploy)
    
        deploy_stage.add_post(
            
            pipelines.ShellStep(
                "TestViewerEndpoint",
                env_from_cfn_outputs={
                    "ENDPOINT_URL": deploy.hc_viewer_url
                },
                commands=["curl -Ssf $ENDPOINT_URL"],
            )
    
        
        )
        deploy_stage.add_post(
            pipelines.ShellStep(
                "TestAPIGatewayEndpoint",
                env_from_cfn_outputs={
                    "ENDPOINT_URL": deploy.hc_endpoint
                },
                commands=[
                    "curl -Ssf $ENDPOINT_URL",
                    "curl -Ssf $ENDPOINT_URL/hello",
                    "curl -Ssf $ENDPOINT_URL/test",
                ],
            )
            
        )
        
        # Create the Prod Stage with the Manual Approval Step
        prod = WorkshopPipelineStage(self, "Prod")
        prod_stage = pipeline.add_stage(prod,
            pre = [ManualApprovalStep('PromoteToProduction')])
        
        prod_stage.add_post(
            
            pipelines.ShellStep(
                "ViewerEndpoint",
                env_from_cfn_outputs={
                    "ENDPOINT_URL": prod.hc_viewer_url
                },
                commands=["curl -Ssf $ENDPOINT_URL"],
                
            )
            
        )
        prod_stage.add_post(
            pipelines.ShellStep(
                "APIGatewayEndpoint",
                env_from_cfn_outputs={
                    "ENDPOINT_URL": prod.hc_endpoint
                },
                commands=[
                    "curl -Ssf $ENDPOINT_URL",
                    "curl -Ssf $ENDPOINT_URL/hello",
                    "curl -Ssf $ENDPOINT_URL/test",
                ],
            )
            
        )
        
        # Create The SNS Notification for the Pipeline
        
        pipeline.build_pipeline()
        
        topic = sns.Topic(self, "MyTopic")
        topic.add_subscription(subs.EmailSubscription("[email protected]"))
        rule = notifications.NotificationRule(self, "NotificationRule",
            source = pipeline.pipeline,
            events = ["codepipeline-pipeline-pipeline-execution-started", "codepipeline-pipeline-pipeline-execution-failed", "codepipeline-pipeline-manual-approval-needed", "codepipeline-pipeline-manual-approval-succeeded"],
            targets=[topic]
            )


When a commit is made with git commit -am "Add manual Approval" and changes are pushed with git push, the pipeline automatically self-mutates to add the new approval stage.

Now when the developer pushes changes to update the build environment or the end user application, the pipeline execution stops at the point where the approval action was added. The pipeline won’t resume unless a manual approval action is taken.

Image showing the CDK pipeline with the added Manual Approval action on the AWS Management Console

Figure 2. This image shows the pipeline with the added Manual Approval action.

Since there is a notification rule that includes the approval action, an email notification is sent with the pipeline information and approval status to the stakeholder(s) subscribed to the SNS topic.

Image showing the SNS email notification sent when the pipeline starts

Figure 3. This image shows the SNS email notification sent when the pipeline starts.

After pushing the updates to the pipeline, the reviewer or stakeholder can use the AWS Management Console to access the pipeline to approve or deny changes based on their assessment of these changes. This process helps eliminate any potential issues or errors and ensures only changes deemed relevant are made.

Image showing the review action on the AWS Management Console that gives the stakeholder the ability to approve or reject any changes.

Figure 4. This image shows the review action that gives the stakeholder the ability to approve or reject any changes. 

If a reviewer rejects the action, or if no approval response is received within seven days of the pipeline stopping for the review action, the pipeline status is “Failed.”

Image showing when a stakeholder rejects the action

Figure 5. This image depicts when a stakeholder rejects the action.

If a reviewer approves the changes, the pipeline continues its execution.

Image showing when a stakeholder approves the action

Figure 6. This image depicts when a stakeholder approves the action.

Considerations

It is important to consider any potential drawbacks before integrating a manual approval process into a CDK pipeline. one such consideration is its implementation may delay the delivery of updates to end users. An example of this is business hours limitation. The pipeline process might be constrained by the availability of stakeholders during business hours. This can result in delays if changes are made outside regular working hours and require approval when stakeholders are not immediately accessible.

Clean up

To avoid incurring future charges, delete the resources. Use cdk destroy via the command line to delete the created stack.

Conclusion

Adding notifications and manual approval to CDK Pipelines provides better visibility and control over the changes made to the pipeline environment. These features ideally complement the existing automated checks to ensure that all updates are reviewed before deployment. This reduces the risk of potential issues arising from bugs or errors. The ability to approve or deny changes through the AWS Management Console makes the review process simple and straightforward. Additionally, SNS notifications keep stakeholders updated on the status of the pipeline, ensuring a smooth and seamless deployment process.
Jehu Gray

Jehu Gray is an Enterprise Solutions Architect at Amazon Web Services where he helps customers design solutions that fits their needs. He enjoys exploring whats possible with IaC such as CDK.

Abiola Olanrewaju

Abiola Olanrewaju is an Enterprise Solutions Architect at Amazon Web Services where he helps customers design and implement scalable solutions that drive business outcomes. He has a keen interest in Data Analytics, Security and Automation.

Serge Poueme

Serge Poueme is a Solutions Architect on the AWS for Games Team. He started his career as a software development engineer and enjoys building new products. At AWS, Serge focuses on improving Builders Experience for game developers and optimize servers hosting using Containers. When he is not working he enjoys playing Far Cry or Fifa on his XBOX

Using AWS CodePipeline for deploying container images to AWS Lambda Functions

Post Syndicated from Kirankumar Chandrashekar original https://aws.amazon.com/blogs/devops/using-aws-codepipeline-for-deploying-container-images-to-aws-lambda-functions/

AWS Lambda launched support for packaging and deploying functions as container images at re:Invent 2020. In the post working with Lambda layers and extensions in container images, we demonstrated packaging Lambda Functions with layers while using container images. This post will teach you to use AWS CodePipeline to deploy docker images for microservices architecture involving multiple Lambda Functions and a common layer utilized as a separate container image. Lambda functions packaged as container images do not support adding Lambda layers to the function configuration. Alternatively, we can use a container image as a common layer while building other container images along with Lambda Functions shown in this post. Packaging Lambda functions as container images enables familiar tooling and larger deployment limits.

Here are some advantages of using container images for Lambda:

  • Easier dependency management and application building with container
    • Install native operating system packages
    • Install language-compatible dependencies
  • Consistent tool set for containers and Lambda-based applications
    • Utilize the same container registry to store application artifacts (Amazon ECR, Docker Hub)
    • Utilize the same build and pipeline tools to deploy
    • Tools that can inspect Dockerfile work the same
  • Deploy large applications with AWS-provided or third-party images up to 10 GB
    • Include larger application dependencies that previously were impossible

When using container images with Lambda, CodePipeline automatically detects code changes in the source repository in AWS CodeCommit, then passes the artifact to the build server like AWS CodeBuild and pushes the container images to ECR, which is then deployed to Lambda functions.

Architecture diagram


DevOps Architecture

Lambda-docker-images-DevOps-Architecture

Application Architecture

lambda-docker-image-microservices-app

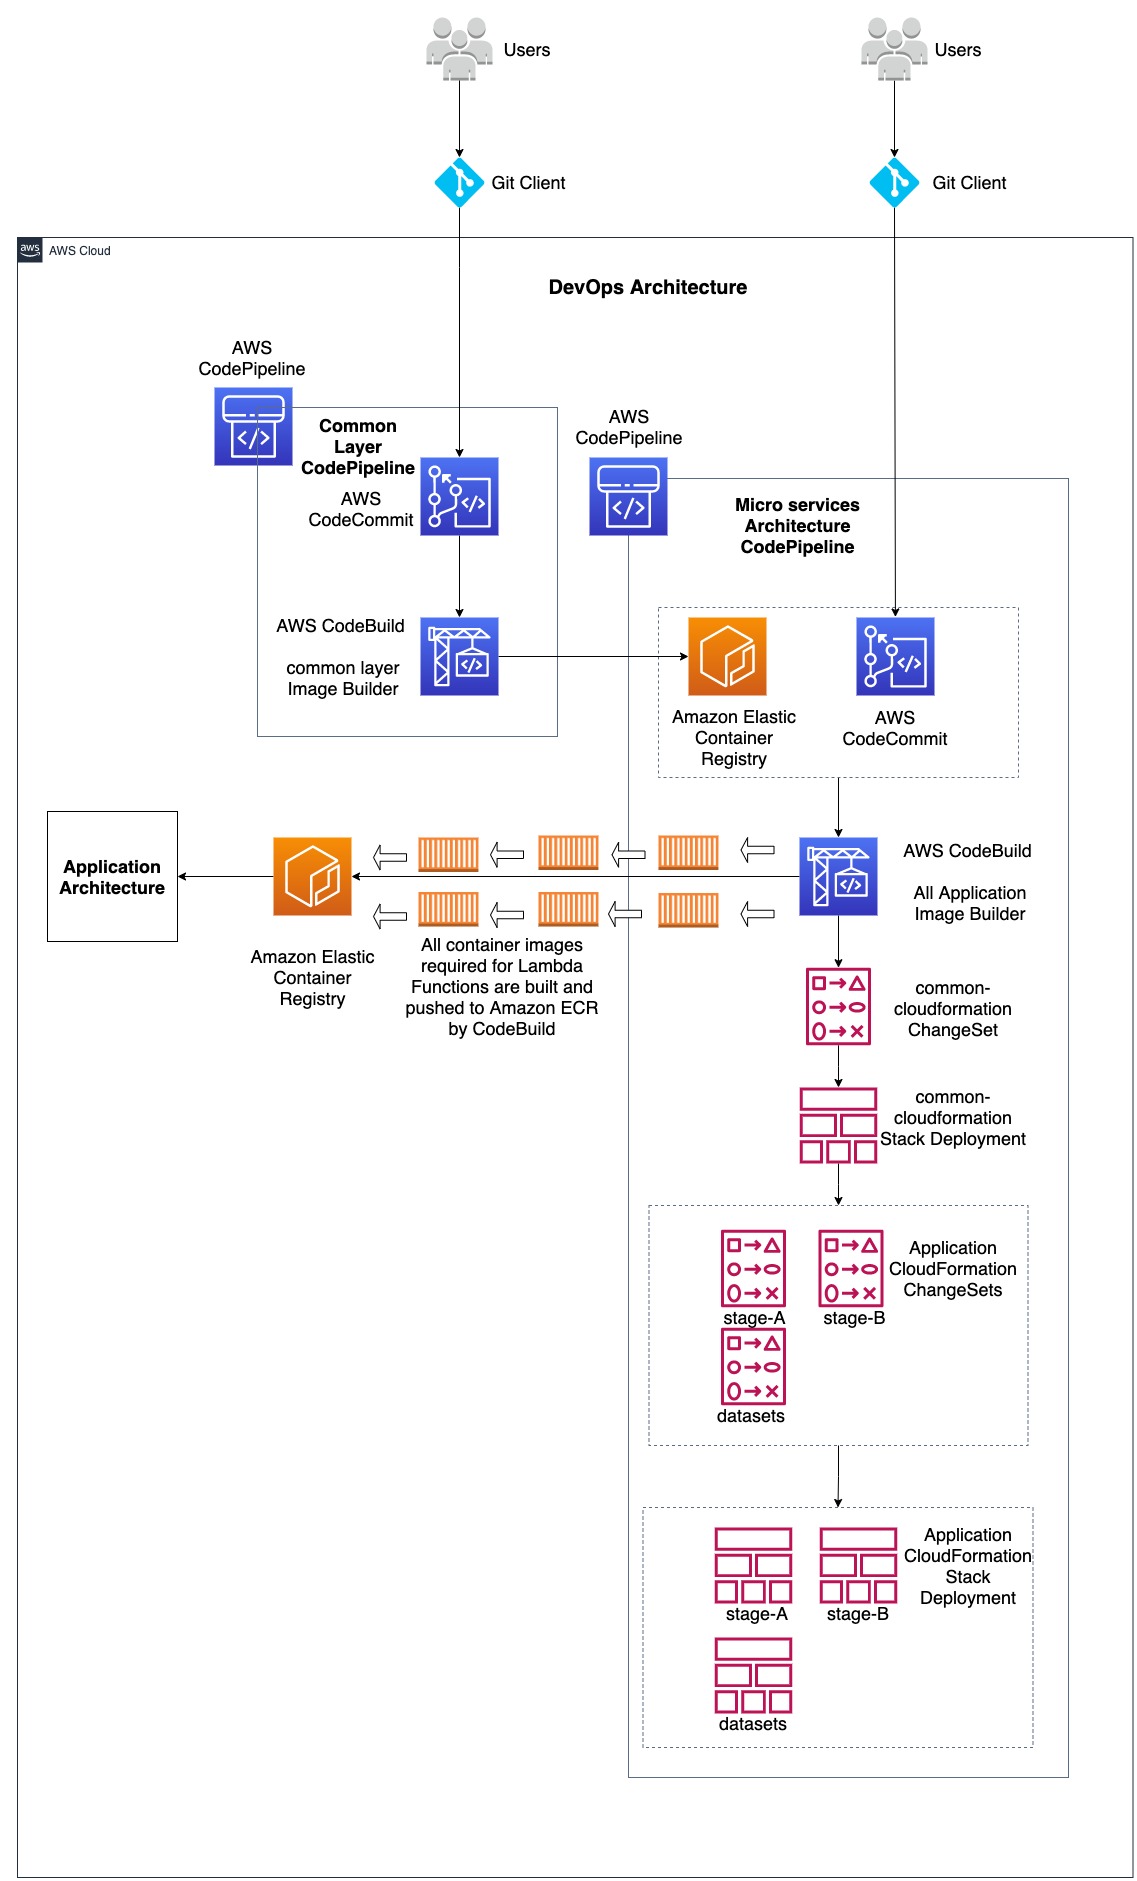
In the above architecture diagram, two architectures are combined, namely 1, DevOps Architecture and 2, Microservices Application Architecture. DevOps architecture demonstrates the use of AWS Developer services such as AWS CodeCommit, AWS CodePipeline, AWS CodeBuild along with Amazon Elastic Container Repository (ECR) and AWS CloudFormation. These are used to support Continuous Integration and Continuous Deployment/Delivery (CI/CD) for both infrastructure and application code. Microservices Application architecture demonstrates how various AWS Lambda Functions that are part of microservices utilize container images for application code. This post will focus on performing CI/CD for Lambda functions utilizing container containers. The application code used in here is a simpler version taken from Serverless DataLake Framework (SDLF). For more information, refer to the AWS Samples GitHub repository for SDLF here.

DevOps workflow

There are two CodePipelines: one for building and pushing the common layer docker image to Amazon ECR, and another for building and pushing the docker images for all the Lambda Functions within the microservices architecture to Amazon ECR, as well as deploying the microservices architecture involving Lambda Functions via CloudFormation. Common layer container image functions as a common layer in all other Lambda Function container images, therefore its code is maintained in a separate CodeCommit repository used as a source stage for a CodePipeline. Common layer CodePipeline takes the code from the CodeCommit repository and passes the artifact to a CodeBuild project that builds the container image and pushes it to an Amazon ECR repository. This common layer ECR repository functions as a source in addition to the CodeCommit repository holding the code for all other Lambda Functions and resources involved in the microservices architecture CodePipeline.

Due to all or the majority of the Lambda Functions in the microservices architecture requiring the common layer container image as a layer, any change made to it should invoke the microservices architecture CodePipeline that builds the container images for all Lambda Functions. Moreover, a CodeCommit repository holding the code for every resource in the microservices architecture is another source to that CodePipeline to get invoked. This has two sources, because the container images in the microservices architecture should be built for changes in the common layer container image as well as for the code changes made and pushed to the CodeCommit repository.

Below is the sample dockerfile that uses the common layer container image as a layer:

ARG ECR_COMMON_DATALAKE_REPO_URL
FROM ${ECR_COMMON_DATALAKE_REPO_URL}:latest AS layer
FROM public.ecr.aws/lambda/python:3.8
# Layer Code
WORKDIR /opt
COPY --from=layer /opt/ .
# Function Code
WORKDIR /var/task
COPY src/lambda_function.py .
CMD ["lambda_function.lambda_handler"]

where the argument ECR_COMMON_DATALAKE_REPO_URL should resolve to the ECR url for common layer container image, which is provided to the --build-args along with docker build command. For example:

export ECR_COMMON_DATALAKE_REPO_URL="0123456789.dkr.ecr.us-east-2.amazonaws.com/dev-routing-lambda"
docker build --build-arg ECR_COMMON_DATALAKE_REPO_URL=$ECR_COMMON_DATALAKE_REPO_URL .

Deploying a Sample

  • Step1: Clone the repository Codepipeline-lambda-docker-images to your workstation. If using the zip file, then unzip the file to a local directory.
    • git clone https://github.com/aws-samples/codepipeline-lambda-docker-images.git
  • Step 2: Change the directory to the cloned directory or extracted directory. The local code repository structure should appear as follows:
    • cd codepipeline-lambda-docker-images

code-repository-structure

  • Step 3: Deploy the CloudFormation stack used in the template file CodePipelineTemplate/codepipeline.yaml to your AWS account. This deploys the resources required for DevOps architecture involving AWS CodePipelines for common layer code and microservices architecture code. Deploy CloudFormation stacks using the AWS console by following the documentation here, providing the name for the stack (for example datalake-infra-resources) and passing the parameters while navigating the console. Furthermore, use the AWS CLI to deploy a CloudFormation stack by following the documentation here.
  • Step 4: When the CloudFormation Stack deployment completes, navigate to the AWS CloudFormation console and to the Outputs section of the deployed stack, then note the CodeCommit repository urls. Three CodeCommit repo urls are available in the CloudFormation stack outputs section for each CodeCommit repository. Choose one of them based on the way you want to access it. Refer to the following documentation Setting up for AWS CodeCommit. I will be using the git-remote-codecommit (grc) method throughout this post for CodeCommit access.
  • Step 5: Clone the CodeCommit repositories and add code:
      • Common Layer CodeCommit repository: Take the value of the Output for the key oCommonLayerCodeCommitHttpsGrcRepoUrl from datalake-infra-resources CloudFormation Stack Outputs section which looks like below:

    commonlayercodeoutput

      • Clone the repository:
        • git clone codecommit::us-east-2://dev-CommonLayerCode
      • Change the directory to dev-CommonLayerCode
        • cd dev-CommonLayerCode
      •  Add contents to the cloned repository from the source code downloaded in Step 1. Copy the code from the CommonLayerCode directory and the repo contents should appear as follows:

    common-layer-repository

      • Create the main branch and push to the remote repository
        git checkout -b main
        git add ./
        git commit -m "Initial Commit"
        git push -u origin main
      • Application CodeCommit repository: Take the value of the Output for the key oAppCodeCommitHttpsGrcRepoUrl from datalake-infra-resources CloudFormation Stack Outputs section which looks like below:

    appcodeoutput

      • Clone the repository:
        • git clone codecommit::us-east-2://dev-AppCode
      • Change the directory to dev-CommonLayerCode
        • cd dev-AppCode
      • Add contents to the cloned repository from the source code downloaded in Step 1. Copy the code from the ApplicationCode directory and the repo contents should appear as follows from the root:

    app-layer-repository

    • Create the main branch and push to the remote repository
      git checkout -b main
      git add ./
      git commit -m "Initial Commit"
      git push -u origin main

What happens now?

  • Now the Common Layer CodePipeline goes to the InProgress state and invokes the Common Layer CodeBuild project that builds the docker image and pushes it to the Common Layer Amazon ECR repository. The image tag utilized for the container image is the value resolved for the environment variable available in the AWS CodeBuild project CODEBUILD_RESOLVED_SOURCE_VERSION. This is the CodeCommit git Commit Id in this case.
    For example, if the CommitId in CodeCommit is f1769c87, then the pushed docker image will have this tag along with latest
  • buildspec.yaml files appears as follows:
    version: 0.2
    phases:
      install:
        runtime-versions:
          docker: 19
      pre_build:
        commands:
          - echo Logging in to Amazon ECR...
          - aws --version
          - $(aws ecr get-login --region $AWS_DEFAULT_REGION --no-include-email)
          - REPOSITORY_URI=$ECR_COMMON_DATALAKE_REPO_URL
          - COMMIT_HASH=$(echo $CODEBUILD_RESOLVED_SOURCE_VERSION | cut -c 1-7)
          - IMAGE_TAG=${COMMIT_HASH:=latest}
      build:
        commands:
          - echo Build started on `date`
          - echo Building the Docker image...          
          - docker build -t $REPOSITORY_URI:latest .
          - docker tag $REPOSITORY_URI:latest $REPOSITORY_URI:$IMAGE_TAG
      post_build:
        commands:
          - echo Build completed on `date`
          - echo Pushing the Docker images...
          - docker push $REPOSITORY_URI:latest
          - docker push $REPOSITORY_URI:$IMAGE_TAG
  • Now the microservices architecture CodePipeline goes to the InProgress state and invokes all of the application image builder CodeBuild project that builds the docker images and pushes them to the Amazon ECR repository.
    • To improve the performance, every docker image is built in parallel within the codebuild project. The buildspec.yaml executes the build.sh script. This has the logic to build docker images required for each Lambda Function part of the microservices architecture. The docker images used for this sample architecture took approximately 4 to 5 minutes when the docker images were built serially. After switching to parallel building, it took approximately 40 to 50 seconds.
    • buildspec.yaml files appear as follows:
      version: 0.2
      phases:
        install:
          runtime-versions:
            docker: 19
          commands:
            - uname -a
            - set -e
            - chmod +x ./build.sh
            - ./build.sh
      artifacts:
        files:
          - cfn/**/*
        name: builds/$CODEBUILD_BUILD_NUMBER/cfn-artifacts
    • build.sh file appears as follows:
      #!/bin/bash
      set -eu
      set -o pipefail
      
      RESOURCE_PREFIX="${RESOURCE_PREFIX:=stg}"
      AWS_DEFAULT_REGION="${AWS_DEFAULT_REGION:=us-east-1}"
      ACCOUNT_ID=$(aws sts get-caller-identity --query Account --output text 2>&1)
      ECR_COMMON_DATALAKE_REPO_URL="${ECR_COMMON_DATALAKE_REPO_URL:=$ACCOUNT_ID.dkr.ecr.$AWS_DEFAULT_REGION.amazonaws.com\/$RESOURCE_PREFIX-common-datalake-library}"
      pids=()
      pids1=()
      
      PROFILE='new-profile'
      aws configure --profile $PROFILE set credential_source EcsContainer
      
      aws --version
      $(aws ecr get-login --region $AWS_DEFAULT_REGION --no-include-email)
      COMMIT_HASH=$(echo $CODEBUILD_RESOLVED_SOURCE_VERSION | cut -c 1-7)
      BUILD_TAG=build-$(echo $CODEBUILD_BUILD_ID | awk -F":" '{print $2}')
      IMAGE_TAG=${BUILD_TAG:=COMMIT_HASH:=latest}
      
      cd dockerfiles;
      mkdir ../logs
      function pwait() {
          while [ $(jobs -p | wc -l) -ge $1 ]; do
              sleep 1
          done
      }
      
      function build_dockerfiles() {
          if [ -d $1 ]; then
              directory=$1
              cd $directory
              echo $directory
              echo "---------------------------------------------------------------------------------"
              echo "Start creating docker image for $directory..."
              echo "---------------------------------------------------------------------------------"
                  REPOSITORY_URI=$ACCOUNT_ID.dkr.ecr.$AWS_DEFAULT_REGION.amazonaws.com/$RESOURCE_PREFIX-$directory
                  docker build --build-arg ECR_COMMON_DATALAKE_REPO_URL=$ECR_COMMON_DATALAKE_REPO_URL . -t $REPOSITORY_URI:latest -t $REPOSITORY_URI:$IMAGE_TAG -t $REPOSITORY_URI:$COMMIT_HASH
                  echo Build completed on `date`
                  echo Pushing the Docker images...
                  docker push $REPOSITORY_URI
              cd ../
              echo "---------------------------------------------------------------------------------"
              echo "End creating docker image for $directory..."
              echo "---------------------------------------------------------------------------------"
          fi
      }
      
      for directory in *; do 
         echo "------Started processing code in $directory directory-----"
         build_dockerfiles $directory 2>&1 1>../logs/$directory-logs.log | tee -a ../logs/$directory-logs.log &
         pids+=($!)
         pwait 20
      done
      
      for pid in "${pids[@]}"; do
        wait "$pid"
      done
      
      cd ../cfn/
      function build_cfnpackages() {
          if [ -d ${directory} ]; then
              directory=$1
              cd $directory
              echo $directory
              echo "---------------------------------------------------------------------------------"
              echo "Start packaging cloudformation package for $directory..."
              echo "---------------------------------------------------------------------------------"
              aws cloudformation package --profile $PROFILE --template-file template.yaml --s3-bucket $S3_BUCKET --output-template-file packaged-template.yaml
              echo "Replace the parameter 'pEcrImageTag' value with the latest built tag"
              echo $(jq --arg Image_Tag "$IMAGE_TAG" '.Parameters |= . + {"pEcrImageTag":$Image_Tag}' parameters.json) > parameters.json
              cat parameters.json
              ls -al
              cd ../
              echo "---------------------------------------------------------------------------------"
              echo "End packaging cloudformation package for $directory..."
              echo "---------------------------------------------------------------------------------"
          fi
      }
      
      for directory in *; do
          echo "------Started processing code in $directory directory-----"
          build_cfnpackages $directory 2>&1 1>../logs/$directory-logs.log | tee -a ../logs/$directory-logs.log &
          pids1+=($!)
          pwait 20
      done
      
      for pid in "${pids1[@]}"; do
        wait "$pid"
      done
      
      cd ../logs/
      ls -al
      for f in *; do
        printf '%s\n' "$f"
        paste /dev/null - < "$f"
      done
      
      cd ../
      

The function build_dockerfiles() loops through each directory within the dockerfiles directory and runs the docker build command in order to build the docker image. The name for the docker image and then the ECR repository is determined by the directory name in which the DockerFile is used from. For example, if the DockerFile directory is routing-lambda and the environment variables take the below values,

ACCOUNT_ID=0123456789
AWS_DEFAULT_REGION=us-east-2
RESOURCE_PREFIX=dev
directory=routing-lambda
REPOSITORY_URI=$ACCOUNT_ID.dkr.ecr.$AWS_DEFAULT_REGION.amazonaws.com/$RESOURCE_PREFIX-$directory

Then REPOSITORY_URI becomes 0123456789.dkr.ecr.us-east-2.amazonaws.com/dev-routing-lambda
And the docker image is pushed to this resolved REPOSITORY_URI. Similarly, docker images for all other directories are built and pushed to Amazon ECR.

Important Note: The ECR repository names match the directory names where the DockerFiles exist and was already created as part of the CloudFormation template codepipeline.yaml that was deployed in step 3. In order to add more Lambda Functions to the microservices architecture, make sure that the ECR repository name added to the new repository in the codepipeline.yaml template matches the directory name within the AppCode repository dockerfiles directory.

Every docker image is built in parallel in order to save time. Each runs as a separate operating system process and is pushed to the Amazon ECR repository. This also controls the number of processes that could run in parallel by setting a value for the variable pwait within the loop. For example, if pwait 20, then the maximum number of parallel processes is 20 at a given time. The image tag for all docker images used for Lambda Functions is constructed via the CodeBuild BuildId, which is available via environment variable $CODEBUILD_BUILD_ID, in order to ensure that a new image gets a new tag. This is required for CloudFormation to detect changes and update Lambda Functions with the new container image tag.

Once every docker image is built and pushed to Amazon ECR in the CodeBuild project, it builds every CloudFormation package by uploading all local artifacts to Amazon S3 via AWS Cloudformation package CLI command for the templates available in its own directory within the cfn directory. Moreover, it updates every parameters.json file for each directory with the ECR image tag to the parameter value pEcrImageTag. This is required for CloudFormation to detect changes and update the Lambda Function with the new image tag.

After this, the CodeBuild project will output the packaged CloudFormation templates and parameters files as an artifact to AWS CodePipeline so that it can be deployed via AWS CloudFormation in further stages. This is done by first creating a ChangeSet and then deploying it at the next stage.

Testing the microservices architecture

As stated above, the sample application utilized for microservices architecture involving multiple Lambda Functions is a modified version of the Serverless Data Lake Framework. The microservices architecture CodePipeline deployed every AWS resource required to run the SDLF application via AWS CloudFormation stages. As part of SDLF, it also deployed a set of DynamoDB tables required for the applications to run. I utilized the meteorites sample for this, thereby the DynamoDb tables should be added with the necessary data for the application to run for this sample.

Utilize the AWS console to write data to the AWS DynamoDb Table. For more information, refer to this documentation. The sample json files are in the utils/DynamoDbConfig/ directory.

1. Add the record below to the octagon-Pipelines-dev DynamoDB table:

{
"description": "Main Pipeline to Ingest Data",
"ingestion_frequency": "WEEKLY",
"last_execution_date": "2020-03-11",
"last_execution_duration_in_seconds": 4.761,
"last_execution_id": "5445249c-a097-447a-a957-f54f446adfd2",
"last_execution_status": "COMPLETED",
"last_execution_timestamp": "2020-03-11T02:34:23.683Z",
"last_updated_timestamp": "2020-03-11T02:34:23.683Z",
"modules": [
{
"name": "pandas",
"version": "0.24.2"
},
{
"name": "Python",
"version": "3.7"
}
],
"name": "engineering-main-pre-stage",
"owner": "Yuri Gagarin",
"owner_contact": "y.gagarin@",
"status": "ACTIVE",
"tags": [
{
"key": "org",
"value": "VOSTOK"
}
],
"type": "INGESTION",
"version": 127
}

2. Add the record below to the octagon-Pipelines-dev DynamoDB table:

{
"description": "Main Pipeline to Merge Data",
"ingestion_frequency": "WEEKLY",
"last_execution_date": "2020-03-11",
"last_execution_duration_in_seconds": 570.559,
"last_execution_id": "0bb30d20-ace8-4cb2-a9aa-694ad018694f",
"last_execution_status": "COMPLETED",
"last_execution_timestamp": "2020-03-11T02:44:36.069Z",
"last_updated_timestamp": "2020-03-11T02:44:36.069Z",
"modules": [
{
"name": "PySpark",
"version": "1.0"
}
],
"name": "engineering-main-post-stage",
"owner": "Neil Armstrong",
"owner_contact": "n.armstrong@",
"status": "ACTIVE",
"tags": [
{
"key": "org",
"value": "NASA"
}
],
"type": "TRANSFORM",
"version": 4
}

3. Add the record below to the octagon-Datsets-dev DynamoDB table:

{
"classification": "Orange",
"description": "Meteorites Name, Location and Classification",
"frequency": "DAILY",
"max_items_process": 250,
"min_items_process": 1,
"name": "engineering-meteorites",
"owner": "NASA",
"owner_contact": "[email protected]",
"pipeline": "main",
"tags": [
{
"key": "cost",
"value": "meteorites division"
}
],
"transforms": {
"stage_a_transform": "light_transform_blueprint",
"stage_b_transform": "heavy_transform_blueprint"
},
"type": "TRANSACTIONAL",
"version": 1
}


If you want to create these samples using AWS CLI, please refer to this documentation.

Record 1:

aws dynamodb put-item --table-name octagon-Pipelines-dev --item '{"description":{"S":"Main Pipeline to Merge Data"},"ingestion_frequency":{"S":"WEEKLY"},"last_execution_date":{"S":"2021-03-16"},"last_execution_duration_in_seconds":{"N":"930.097"},"last_execution_id":{"S":"e23b7dae-8e83-4982-9f97-5784a9831a14"},"last_execution_status":{"S":"COMPLETED"},"last_execution_timestamp":{"S":"2021-03-16T04:31:16.968Z"},"last_updated_timestamp":{"S":"2021-03-16T04:31:16.968Z"},"modules":{"L":[{"M":{"name":{"S":"PySpark"},"version":{"S":"1.0"}}}]},"name":{"S":"engineering-main-post-stage"},"owner":{"S":"Neil Armstrong"},"owner_contact":{"S":"n.armstrong@"},"status":{"S":"ACTIVE"},"tags":{"L":[{"M":{"key":{"S":"org"},"value":{"S":"NASA"}}}]},"type":{"S":"TRANSFORM"},"version":{"N":"8"}}'

Record 2:

aws dynamodb put-item --table-name octagon-Pipelines-dev --item '{"description":{"S":"Main Pipeline to Ingest Data"},"ingestion_frequency":{"S":"WEEKLY"},"last_execution_date":{"S":"2021-03-28"},"last_execution_duration_in_seconds":{"N":"1.75"},"last_execution_id":{"S":"7e0e04e7-b05e-41a6-8ced-829d47866a6a"},"last_execution_status":{"S":"COMPLETED"},"last_execution_timestamp":{"S":"2021-03-28T20:23:06.031Z"},"last_updated_timestamp":{"S":"2021-03-28T20:23:06.031Z"},"modules":{"L":[{"M":{"name":{"S":"pandas"},"version":{"S":"0.24.2"}}},{"M":{"name":{"S":"Python"},"version":{"S":"3.7"}}}]},"name":{"S":"engineering-main-pre-stage"},"owner":{"S":"Yuri Gagarin"},"owner_contact":{"S":"y.gagarin@"},"status":{"S":"ACTIVE"},"tags":{"L":[{"M":{"key":{"S":"org"},"value":{"S":"VOSTOK"}}}]},"type":{"S":"INGESTION"},"version":{"N":"238"}}'

Record 3:

aws dynamodb put-item --table-name octagon-Pipelines-dev --item '{"description":{"S":"Main Pipeline to Ingest Data"},"ingestion_frequency":{"S":"WEEKLY"},"last_execution_date":{"S":"2021-03-28"},"last_execution_duration_in_seconds":{"N":"1.75"},"last_execution_id":{"S":"7e0e04e7-b05e-41a6-8ced-829d47866a6a"},"last_execution_status":{"S":"COMPLETED"},"last_execution_timestamp":{"S":"2021-03-28T20:23:06.031Z"},"last_updated_timestamp":{"S":"2021-03-28T20:23:06.031Z"},"modules":{"L":[{"M":{"name":{"S":"pandas"},"version":{"S":"0.24.2"}}},{"M":{"name":{"S":"Python"},"version":{"S":"3.7"}}}]},"name":{"S":"engineering-main-pre-stage"},"owner":{"S":"Yuri Gagarin"},"owner_contact":{"S":"y.gagarin@"},"status":{"S":"ACTIVE"},"tags":{"L":[{"M":{"key":{"S":"org"},"value":{"S":"VOSTOK"}}}]},"type":{"S":"INGESTION"},"version":{"N":"238"}}'

Now upload the sample json files to the raw s3 bucket. The raw S3 bucket name can be obtained in the output of the common-cloudformation stack deployed as part of the microservices architecture CodePipeline. Navigate to the CloudFormation console in the region where the CodePipeline was deployed and locate the stack with the name common-cloudformation, navigate to the Outputs section, and then note the output bucket name with the key oCentralBucket. Navigate to the Amazon S3 Bucket console and locate the bucket for oCentralBucket, create two path directories named engineering/meteorites, and upload every sample json file to this directory. Meteorites sample json files are available in the utils/meteorites-test-json-files directory of the previously cloned repository. Wait a few minutes and then navigate to the stage bucket noted from the common-cloudformation stack output name oStageBucket. You can see json files converted into csv in pre-stage/engineering/meteorites folder in S3. Wait a few more minutes and then navigate to the post-stage/engineering/meteorites folder in the oStageBucket to see the csv files converted to parquet format.


Cleanup

Navigate to the AWS CloudFormation console, note the S3 bucket names from the common-cloudformation stack outputs, and empty the S3 buckets. Refer to Emptying the Bucket for more information.

Delete the CloudFormation stacks in the following order:
1. Common-Cloudformation
2. stagea
3. stageb
4. sdlf-engineering-meteorites
Then delete the infrastructure CloudFormation stack datalake-infra-resources deployed using the codepipeline.yaml template. Refer to the following documentation to delete CloudFormation Stacks: Deleting a stack on the AWS CloudFormation console or Deleting a stack using AWS CLI.


Conclusion

This method lets us use CI/CD via CodePipeline, CodeCommit, and CodeBuild, along with other AWS services, to automatically deploy container images to Lambda Functions that are part of the microservices architecture. Furthermore, we can build a common layer that is equivalent to the Lambda layer that could be built independently via its own CodePipeline, and then build the container image and push to Amazon ECR. Then, the common layer container image Amazon ECR functions as a source along with its own CodeCommit repository which holds the code for the microservices architecture CodePipeline. Having two sources for microservices architecture codepipeline lets us build every docker image. This is due to a change made to the common layer docker image that is referred to in other docker images, and another source that holds the code for other microservices including Lambda Function.


About the Author

kirankumar.jpeg Kirankumar Chandrashekar is a Sr.DevOps consultant at AWS Professional Services. He focuses on leading customers in architecting DevOps technologies. Kirankumar is passionate about DevOps, Infrastructure as Code, and solving complex customer issues. He enjoys music, as well as cooking and traveling.


Use the Snyk CLI to scan Python packages using AWS CodeCommit, AWS CodePipeline, and AWS CodeBuild

Post Syndicated from BK Das original https://aws.amazon.com/blogs/devops/snyk-cli-scan-python-codecommit-codepipeline-codebuild/

One of the primary advantages of working in the cloud is achieving agility in product development. You can adopt practices like continuous integration and continuous delivery (CI/CD) and GitOps to increase your ability to release code at quicker iterations. Development models like these demand agility from security teams as well. This means your security team has to provide the tooling and visibility to developers for them to fix security vulnerabilities as quickly as possible.

Vulnerabilities in cloud-native applications can be roughly classified into infrastructure misconfigurations and application vulnerabilities. In this post, we focus on enabling developers to scan vulnerable data around Python open-source packages using the Snyk Command Line Interface (CLI).

The world of package dependencies

Traditionally, code scanning is performed by the security team; they either ship the code to the scanning instance, or in some cases ship it to the vendor for vulnerability scanning. After the vendor finishes the scan, the results are provided to the security team and forwarded to the developer. The end-to-end process of organizing the repositories, sending the code to security team for scanning, getting results back, and remediating them is counterproductive to the agility of working in the cloud.

Let’s take an example of package A, which uses package B and C. To scan package A, you scan package B and C as well. Similar to package A having dependencies on B and C, packages B and C can have their individual dependencies too. So the dependencies for each package get complex and cumbersome to scan over time. The ideal method is to scan all the dependencies in one go, without having manual intervention to understand the dependencies between packages.

Building on the foundation of GitOps and Gitflow

GitOps was introduced in 2017 by Weaveworks as a DevOps model to implement continuous deployment for cloud-native applications. It focuses on the developer ability to ship code faster. Because security is a non-negotiable piece of any application, this solution includes security as part of the deployment process. We define the Snyk scanner as declarative and immutable AWS Cloud Development Kit (AWS CDK) code, which instructs new Python code committed to the repository to be scanned.

Another continuous delivery practice that we base this solution on is Gitflow. Gitflow is a strict branching model that enables project release by enforcing a framework for managing Git projects. As a brief introduction on Gitflow, typically you have a main branch, which is the code sent to production, and you have a development branch where new code is committed. After the code in development branch passes all tests, it’s merged to the main branch, thereby becoming the code in production. In this solution, we aim to provide this scanning capability in all your branches, providing security observability through your entire Gitflow.

AWS services used in this solution

We use the following AWS services as part of this solution:

  • AWS CDK – The AWS CDK is an open-source software development framework to define your cloud application resources using familiar programming languages. In this solution, we use Python to write our AWS CDK code.
  • AWS CodeBuild – CodeBuild is a fully managed build service in the cloud. CodeBuild compiles your source code, runs unit tests, and produces artifacts that are ready to deploy. CodeBuild eliminates the need to provision, manage, and scale your own build servers.
  • AWS CodeCommit – CodeCommit is a fully managed source control service that hosts secure Git-based repositories. It makes it easy for teams to collaborate on code in a secure and highly scalable ecosystem. CodeCommit eliminates the need to operate your own source control system or worry about scaling its infrastructure. You can use CodeCommit to securely store anything from source code to binaries, and it works seamlessly with your existing Git tools.
  • AWS CodePipeline – CodePipeline is a continuous delivery service you can use to model, visualize, and automate the steps required to release your software. You can quickly model and configure the different stages of a software release process. CodePipeline automates the steps required to release your software changes continuously.
  • Amazon EventBridge – EventBridge rules deliver a near-real-time stream of system events that describe changes in AWS resources. With simple rules that you can quickly set up, you can match events and route them to one or more target functions or streams.
  • AWS Systems Manager Parameter Store – Parameter Store, a capability of AWS Systems Manager, provides secure, hierarchical storage for configuration data management and secrets management. You can store data such as passwords, database strings, Amazon Machine Image (AMI) IDs, and license codes as parameter values.

Prerequisites

Before you get started, make sure you have the following prerequisites:

  • An AWS account (use a Region that supports CodeCommit, CodeBuild, Parameter Store, and CodePipeline)
  • A Snyk account
  • An existing CodeCommit repository you want to test on

Architecture overview

After you complete the steps in this post, you will have a working pipeline that scans your Python code for open-source vulnerabilities.

We use the Snyk CLI, which is available to customers on all plans, including the Free Tier, and provides the ability to programmatically scan repositories for vulnerabilities in open-source dependencies as well as base image recommendations for container images. The following reference architecture represents a general workflow of how Snyk performs the scan in an automated manner. The design uses DevSecOps principles of automation, event-driven triggers, and keeping humans out of the loop for its run.

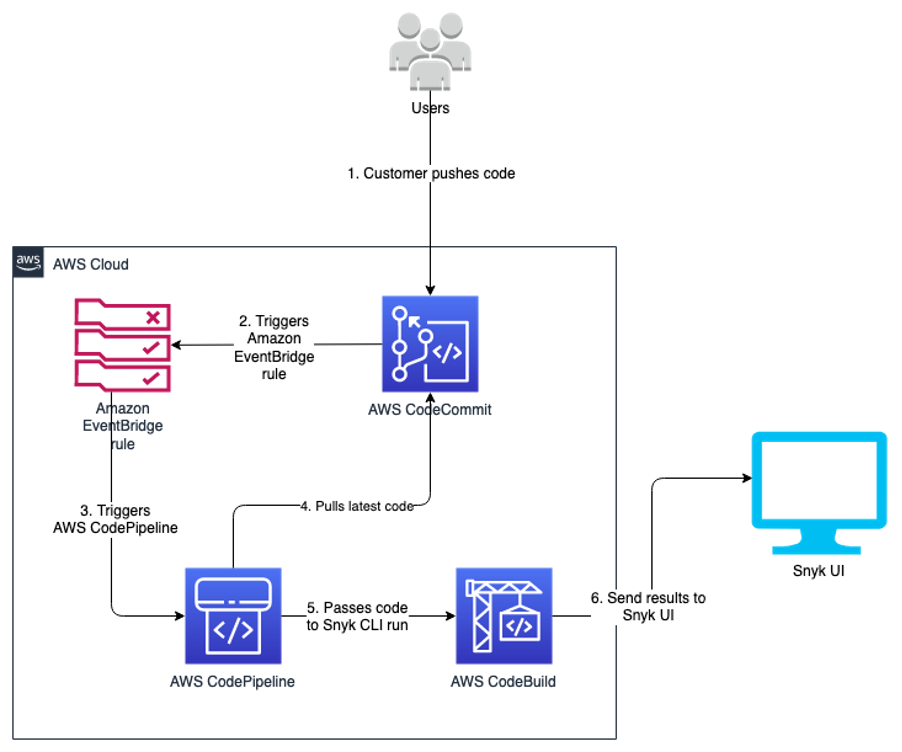
As developers keep working on their code, they continue to commit their code to the CodeCommit repository. Upon each commit, a CodeCommit API call is generated, which is then captured using the EventBridge rule. You can customize this event rule for a specific event or feature branch you want to trigger the pipeline for.

When the developer commits code to the specified branch, that EventBridge event rule triggers a CodePipeline pipeline. This pipeline has a build stage using CodeBuild. This stage interacts with the Snyk CLI, and uses the token stored in Parameter Store. The Snyk CLI uses this token as authentication and starts scanning the latest code committed to the repository. When the scan is complete, you can review the results on the Snyk console.

This code is built for Python pip packages. You can edit the buildspec.yml to incorporate for any other language that Snyk supports.

The following diagram illustrates our architecture.

snyk architecture codepipeline

Code overview

The code in this post is written using the AWS CDK in Python. If you’re not familiar with the AWS CDK, we recommend reading Getting started with AWS CDK before you customize and deploy the code.

Repository URL: https://github.com/aws-samples/aws-cdk-codecommit-snyk

This AWS CDK construct uses the Snyk CLI within the CodeBuild job in the pipeline to scan the Python packages for open-source package vulnerabilities. The construct uses CodePipeline to create a two-stage pipeline: one source, and one build (the Snyk scan stage). The construct takes the input of the CodeCommit repository you want to scan, the Snyk organization ID, and Snyk auth token.

Resources deployed

This solution deploys the following resources:

For the deployment, we use the AWS CDK construct in the codebase cdk_snyk_construct/cdk_snyk_construct_stack.py in the AWS CDK stack cdk-snyk-stack. The construct requires the following parameters:

  • ARN of the CodeCommit repo you want to scan
  • Name of the repository branch you want to be monitored
  • Parameter Store name of the Snyk organization ID
  • Parameter Store name for the Snyk auth token

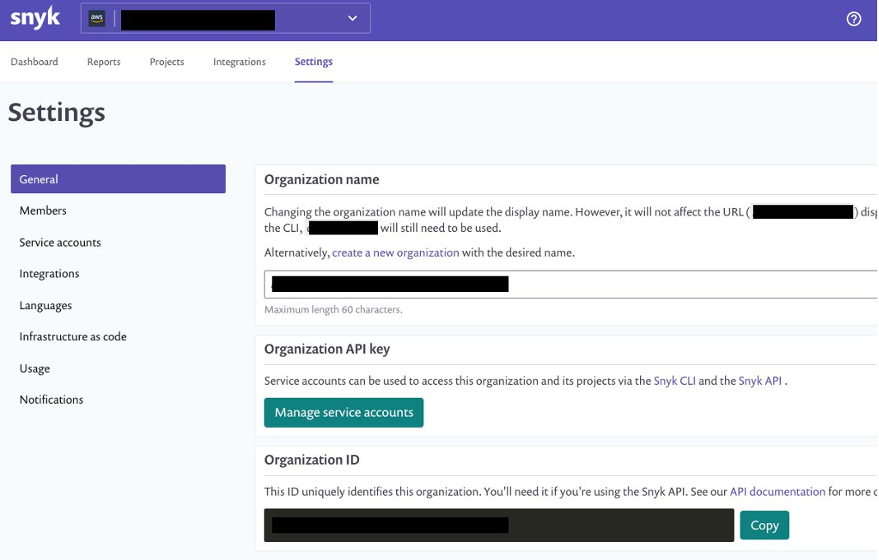
Set up the organization ID and auth token before deploying the stack. Because these are confidential and sensitive data, you should deploy them as a separate stack or manual process. In this solution, the parameters have been stored as a SecureString parameter type and encrypted using the AWS-managed KMS key.

You create the organization ID and auth token on the Snyk console. On the Settings page, choose General in the navigation page to add these parameters.

snyk settings console


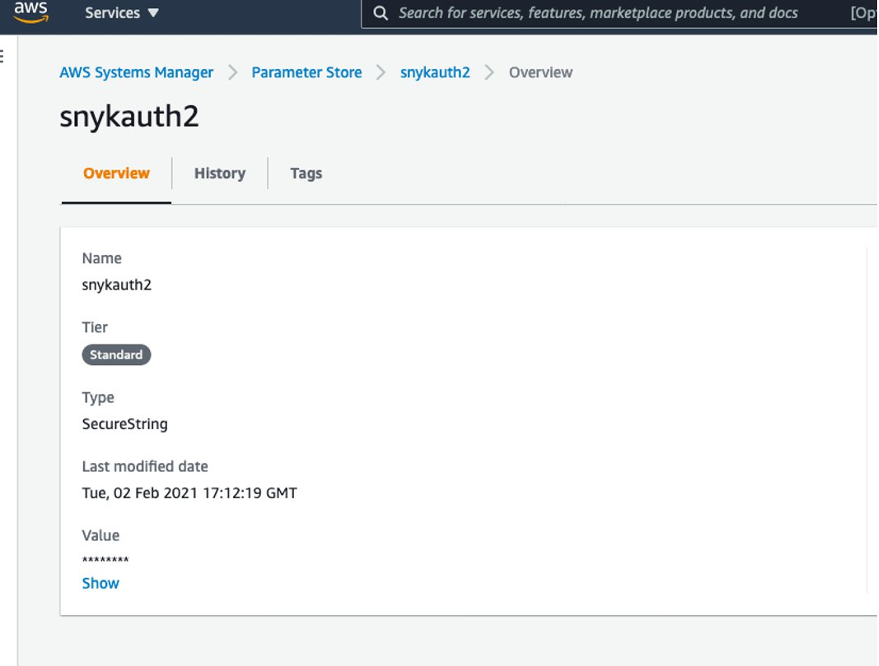
You can retrieve the names of the parameters on the Systems Manager console by navigating to Parameter Store and finding the name on the Overview tab.

SSM Parameter Store

Create a requirements.txt file in the CodeCommit repository

We now create a repository in CodeCommit to store the code. For simplicity, we primarily store the requirements.txt file in our repository. In Python, a requirements file stores the packages that are used. Having clearly defined packages and versions makes it easier for development, especially in virtual environments.

For more information on the requirements file in Python, see Requirement Specifiers.

To create a CodeCommit repository, run the following AWS Command Line Interface (AWS CLI) command in your AWS accounts:

aws codecommit create-repository --repository-name snyk-repo \
--repository-description "Repository for Snyk to scan Python packages"

Now let’s create a branch called main in the repository using the following command:

aws codecommit create-branch --repository-name snyk-repo \
--branch-name main

After you create the repository, commit a file named requirements.txt with the following content. The following packages are pinned to a particular version that they have a vulnerability with. This file is our hypothetical vulnerable set of packages that have been committed into your development code.

PyYAML==5.3.1
Pillow==7.1.2
pylint==2.5.3
urllib3==1.25.8


For instructions on committing files in CodeCommit, see Connect to an AWS CodeCommit repository.

When you store the Snyk auth token and organization ID in Parameter Store, note the parameter names—you need to pass them as parameters during the deployment step.

Now clone the CDK code from the GitHub repository with the command below:

git clone https://github.com/aws-samples/aws-cdk-codecommit-snyk.git

After the cloning is complete you should see a directory named aws-cdk-codecommit-snyk on your machine.

When you’re ready to deploy, enter the aws-cdk-codecommit-snyk directory, and run the following command with the appropriate values:

cdk deploy cdk-snyk-stack \
--parameters RepoName=<name-of-codecommit-repo> \
--parameters RepoBranch=<branch-to-be-scanned>  \
--parameters SnykOrgId=<value> \
--parameters SnykAuthToken=<value>

After the stack deployment is complete, you can see a new pipeline in your AWS account, which is configured to be triggered every time a commit occurs on the main branch.

You can view the results of the scan on the Snyk console. After the pipeline runs, log in to snyk.io and you should see a project named as per your repository (see the following screenshot).

snyk dashboard


Choose the repo name to get a detailed view of the vulnerabilities found. Depending on what packages you put in your requirements.txt, your report will differ from the following screenshot.

snyk-vuln-details


To fix the vulnerability identified, you can change the version of these packages in the requirements.txt file. The edited requirements file should look like the following:

PyYAML==5.4
Pillow==8.2.0
pylint==2.6.1
urllib3==1.25.9

After you update the requirements.txt file in your repository, push your changes back to the CodeCommit repository you created earlier on the main branch. The push starts the pipeline again.

After the commit is performed to the targeted branch, you don’t see the vulnerability reported on the Snyk dashboard because the pinned version 5.4 doesn’t contain that vulnerability.

Clean up

To avoid accruing further cost for the resources deployed in this solution, run cdk destroy to remove all the AWS resources you deployed through CDK.

As the CodeCommit repository was created using AWS CLI, the following command deletes the CodeCommit repository:

aws codecommit delete-repository --repository-name snyk-repo

Conclusion

In this post, we provided a solution so developers can self- remediate vulnerabilities in their code by monitoring it through Snyk. This solution provides observability, agility, and security for your Python application by following DevOps principles.

A similar architecture has been used at NFL to shift-left the security of their code. According to the shift-left design principle, security should be moved closer to the developers to identify and remediate security issues earlier in the development cycle. NFL has implemented a similar architecture which made the total process, from committing code on the branch to remediating 15 times faster than their previous code scanning setup.

Here’s what NFL has to say about their experience:

“NFL used Snyk to scan Python packages for a service launch. Traditionally it would have taken 10days to scan the packages through our existing process but with Snyk we were able to follow DevSecOps principles and get the scans completed, and reviewed within matter of days. This simplified our time to market while maintaining visibility into our security posture.” – Joe Steinke (Director, Data Solution Architect)