Post Syndicated from Brendan Jenkins original https://aws.amazon.com/blogs/devops/new-and-improved-amazon-q-developer-experience-in-the-aws-management-console/
Amazon Q Developer just launched a new agentic experience within the AWS Management Console, that enables builders to get deeper insights about their AWS resources and improve their operational troubleshooting efficiency. This expands the agentic capabilities of Amazon Q Developer from both the integrated development environment (IDE) and command line interface (CLI) to the AWS console. Amazon Q Developer now functions as a resource analysis and operational troubleshooting assistant, able to consult multiple information sources and resolve complex queries, to get deeper insight into AWS environments faster and more easily than before. These capabilities are also available in chat applications such as Microsoft Teams and Slack. Now users can ask any question about AWS services and their resources, leaving Amazon Q Developer to automatically identify appropriate tools for the task, selecting from any AWS API across all services. It breaks queries into executable steps, asks for clarification when needed and combines information from multiple services to solve the task at hand. It can help analyze relationships between resources across multiple AWS services, examine configurations spanning different parts of infrastructure, synthesize information from various data sources to provide comprehensive insights, and respond to complex queries with detailed, actionable information.
For example, while troubleshooting an AWS Lambda function, a builder can simply ask, “How is this Lambda function getting invoked?” or “What are the IAM roles and permissions of my Lambda function?” and Amazon Q Developer will provide insights about the dependencies and interdependencies, evaluating their integration with other AWS services – all from a single natural language prompt. This enhancement allows builders to quickly obtain nuanced, contextual information about their AWS environment, significantly reducing the time and effort required for complex infrastructure analysis.
In this blog post, I’ll showcase several examples of complex prompts to demonstrate how Amazon Q Developer now delivers relevant and insightful responses based on the builder’s specific resources. Specifically, we’ll deep-dive into two main use cases: deeper resource introspection analysis and increased operational troubleshooting efficiency.
Deeper resource introspection and analysis
Amazon Q Developer now offers enhanced capabilities that make it even easier for builders to understand their AWS resources. With a single prompt, builders can now get comprehensive insights about their AWS services that previously required multiple steps. For example, when analyzing Amazon Simple Notification Service (SNS) topics and their subscribers, builders can simply ask “Show me all my SNS topics and their subscribers” to get a complete view of their configurations. This streamlined approach saves valuable time and effort, allowing developers to focus on building rather than navigating through multiple queries.
These new enhanced capabilities enable builders to simply ask for the insight needed, and Amazon Q Developer will perform the necessary multi-step reasoning based on a builder’s prompt. When the request is made, Amazon Q Developer determines the analytical steps required, retrieves information about the resources from multiple data sources, analyzes the relationships and configurations, and provides a comprehensive answer that addresses the need. Rather than builders having to think about which APIs to call or which services to check, Amazon Q Developer handles the complexity of the analysis, allowing builders to focus on understanding infrastructure rather than querying it.
To illustrate Amazon Q Developer’s capability in handling complex queries, let’s consider an example. Suppose a builder has a three-tier web application in an AWS account and they need to identify which Amazon Elastic Compute Cloud (Amazon EC2) instances, based on their Amazon Machine Images (AMIs) in the application layer, are actively communicating with Amazon Relational Database (RDS) in the backend. With this new update, a builder could open a new Amazon Q Developer chat in the AWS Management Console, and enter a prompt such as “List the AMIs used by my running EC2 instances in us-west-2 that can communicate with my RDS cluster”.

Figure 1: Prompt to Amazon Q Developer and Amazon RDS database
Based on Amazon Q Developer’s response shown in figure 1 above, Amazon Q Developer was able to list the steps it took to gather the information, pulled applicable information from each service API, and gave one comprehensive and detailed insight about which AMIs were being used to communicate with the Amazon RDS cluster. This shows how Amazon Q Developer can take a single prompt, pull in information from multiple resources and give a comprehensive insight.
Let’s move to another example around AWS Lambda. Suppose a builder wants to know which AWS CloudFormation stacks are managing Lambda function resources. To do this, a builder could enter a prompt such as “List my AWS Lambda functions and the CloudFormation stacks that manage those resources”.
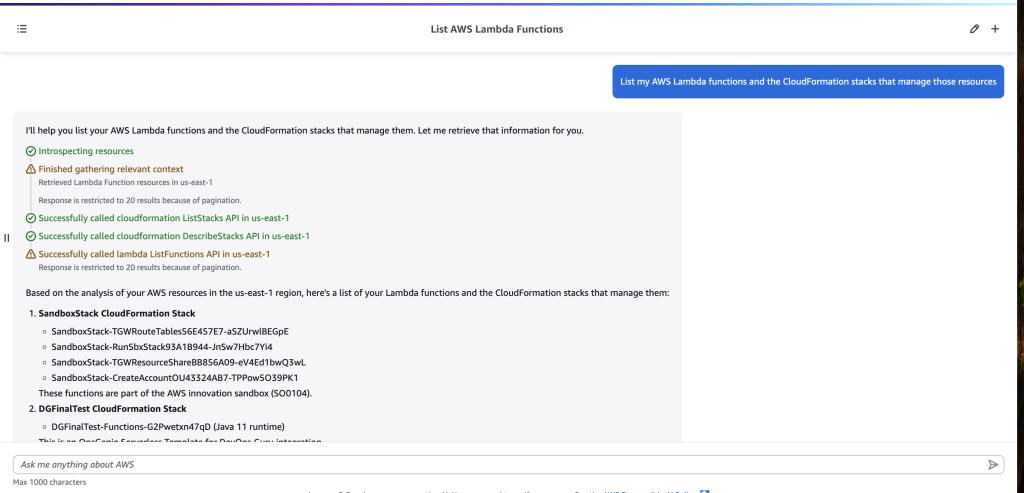
Figure 2: Prompt to Amazon Q Developer about Lambda and AWS CloudFormation
As shown above in figure 2, Amazon Q Developer was able to pull AWS CloudFormation information related to the AWS Lambda resources, and list each stack that was associated with the Lambda functions in the account. This, for example, can help many development and IT professionals better understand and manage their account resources by leveraging the complex reasoning of Amazon Q Developer.
Proceeding with one more example around AWS Lambda, let’s now suppose a builder wants to use Amazon Q Developer to see if there are any Amazon Simple Storage Service (Amazon S3) buckets invoking an AWS Lambda function in their AWS account. To identify this, a builder could enter a prompt such as “What AWS Lambda functions do I have in us-east-1 and are any of them invoked by an Amazon S3 bucket in the same region?”.
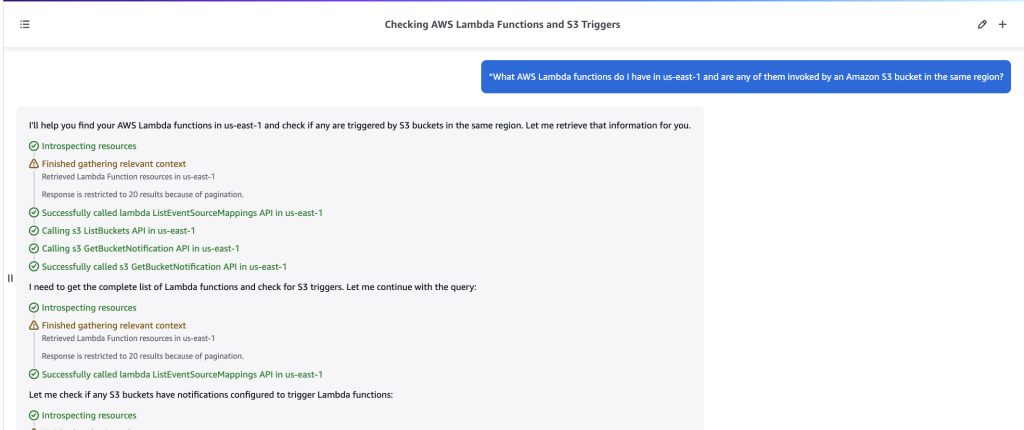
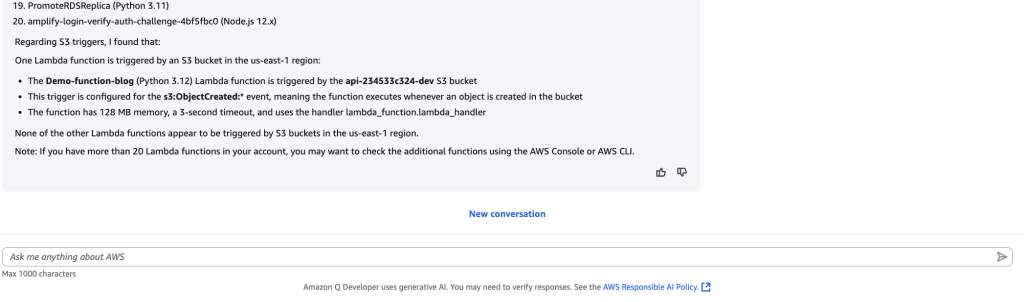
Figure 3: Prompt and response from Amazon Q Developer about Amazon S3 and AWS Lambda
As shown in figure 3 above, Amazon Q Developer again called applicable service APIs to analyze Amazon S3 and AWS Lambda resources and was able to find that there was one AWS Lambda function with S3 as an event trigger.
Furthermore, building on our previous example, builders can try prompts around costs as well. For example, a builder can now prompt Amazon Q Developer “How much did I spend on Lambda functions that are invoked by my S3 bucket?” and Amazon Q will use its deeper resource introspection to tie costs to the resources that are connected.
These examples demonstrate Amazon Q Developer’s enhanced capability to process complex prompts involving multiple resource relationships. This improvement allows builders to obtain comprehensive answers with fewer steps, streamlining the overall process of asking questions about resources in accounts and making it easier to understand and manage AWS resources.
Improved Operational Troubleshooting
Amazon Q Developer can not only discover resources, their configurations, and their relationships, but also correlate that information with logs, metrics, and events to identify, analyze, and determine the root cause while troubleshooting operational issues in the AWS console. This helps streamline the process of resolving issues to enable quick troubleshooting.
To illustrate Amazon Q Developer’s capability in improved operational troubleshooting, let’s consider an example. Suppose a builder has a simple payment processing application consisting of Amazon API Gateway, AWS Lambda, and Amazon RDS in the backend. Furthermore, the application is returning 500 internal server errors causing downstream issues. Now, a builder can prompt Amazon Q Developer “Why is my user-profile-service-prod Lambda function throwing a 500 Internal server error?”.
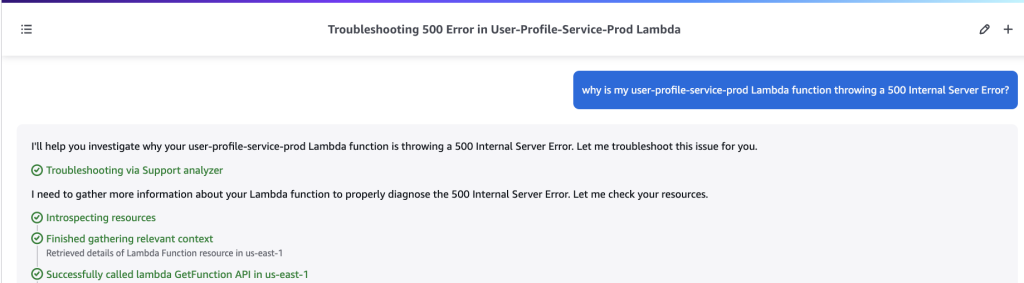
Figure 4: Prompt to Amazon Q Developer about internal server error
As shown above in figure 4, Amazon Q Developer automatically begins to gather relevant Amazon CloudWatch metrics, examines the function’s configuration and permissions, checks connected services like API Gateway and Amazon RDS, and analyzes recent changes
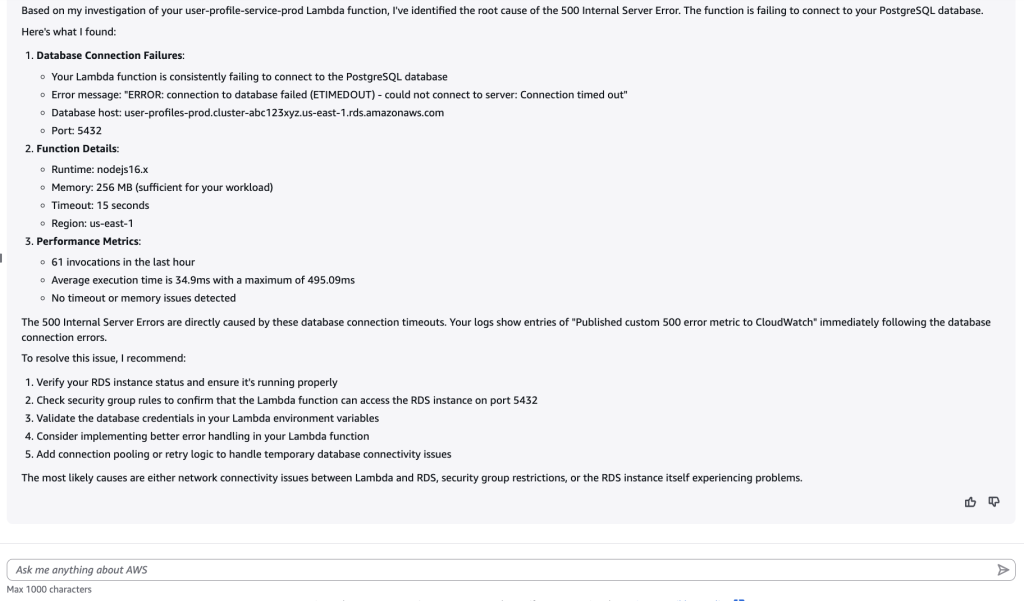
Figure 5: Response from Q Developer for database timeouts
As shown above in figure 5, after querying applicable resources, Amazon Q Developer identified the root cause of the 500 internal server error. It shared information it pulled from the database and Lambda function logs and referenced a custom CloudWatch metric dashboard for evidence that the issue is due to database connection timeouts. Lastly, Amazon Q Developer also provided a list of ways to resolve the issue it identified. This example showcases how this new capability streamlines the process of analyzing operational issues, enabling quick troubleshooting.
Conclusion
The examples we’ve shown demonstrate how Amazon Q Developer handles the heavy lifting for users even better than before – from breaking down requests into analytical steps, to gathering data from multiple sources, to delivering meaningful insights about infrastructure, costs, and providing troubleshooting assistance.
As we continue to enhance Amazon Q Developer’s multi-step reasoning capabilities, builders will see it tackle even more complex analysis scenarios, helping them better understand and optimize AWS environments. Whether analyzing security configurations, examining resource relationships, or troubleshooting infrastructure issues, Amazon Q Developer can help save time and provide deeper insights into AWS resources.
To learn more and get started, visit Amazon Q Developer and Chatting with Amazon Q Developer in AWS Console Documentation.


![] Response from Amazon Q for the breakdown of EC2 costs in the last month](https://d2908q01vomqb2.cloudfront.net/7719a1c782a1ba91c031a682a0a2f8658209adbf/2025/02/03/figure12.png)


 Figure 8 – connectivity troubleshooting response generated by Amazon Q