All posts by Greg Brimble

Modernizing the toolbox for Cloudflare Pages builds

Post Syndicated from Greg Brimble original http://blog.cloudflare.com/moderizing-cloudflare-pages-builds-toolbox/

Modernizing the toolbox for Cloudflare Pages builds

Modernizing the toolbox for Cloudflare Pages builds

Cloudflare Pages launched over two years ago in December 2020, and since then, we have grown Pages to build millions of deployments for developers. In May 2022, to support developers with more complex requirements, we opened up Pages to empower developers to create deployments using their own build environments — but that wasn't the end of our journey. Ultimately, we want to be able to allow anyone to use our build platform and take advantage of the git integration we offer. You should be able to connect your repository and have it just work on Cloudflare Pages.

Today, we're introducing a new beta version of our build system (a.k.a. "build image") which brings the default set of tools and languages up-to-date, and sets the stage for future improvements to builds on Cloudflare Pages. We now support the latest versions of Node.js, Python, Hugo and many more, putting you on the best path for any new projects that you undertake. Existing projects will continue to use the current build system, but this upgrade will be available to opt-in for everyone.

New defaults, new possibilities

The Cloudflare Pages build system has been updated to not only support new versions of your favorite languages and tools, but to also include new versions by default. The versions of 2020 are no longer relevant for the majority of today's projects, and as such, we're bumping these to their more modern equivalents:

  • Node.js' default is being increased from 12.18.0 to 18.16.0,
  • Python 2.7.18 and 3.10.5 are both now available by default,
  • Ruby's default is being increased from 2.7.1 to 3.2.2,
  • Yarn's default is being increased from 1.22.4 to 3.5.1,
  • And we're adding pnpm with a default version of 8.2.0.

These are just some of the headlines — check out our documentation for the full list of changes.

We're aware that these new defaults constitute a breaking change for anyone using a project without pinning their versions with an environment variable or version file. That's why we're making this new build system opt-in for existing projects. You'll be able to stay on the existing system without breaking your builds. If you do decide to adventure with us, we make it easy to test out the new system in your preview environments before rolling out to production.

Modernizing the toolbox for Cloudflare Pages builds

Additionally, we're now making your builds more reproducible by taking advantage of lockfiles with many package managers. npm ci and yarn --pure-lockfile are now used ahead of your build command in this new version of the build system.

For new projects, these updated defaults and added support for pnpm and Yarn 3 mean that more projects will just work immediately without any undue setup, tweaking, or configuration. Today, we're launching this update as a beta, but we will be quickly promoting it to general availability once we're satisfied with its stability. Once it does graduate, new projects will use this updated build system by default.

We know that this update has been a long-standing request from our users (we thank you for your patience!) but part of this rollout is ensuring that we are now in a better position to make regular updates to Cloudflare Pages' build system. You can expect these default languages and tools to now keep pace with the rapid rate of change seen in the world of web development.

We very much welcome your continued feedback as we know that new tools can quickly appear on the scene, and old ones can just as quickly drop off. As ever, our Discord server is the best place to engage with the community and Pages team. We’re excited to hear your thoughts and suggestions.

Our modular and scalable architecture

Powering this updated build system is a new architecture that we've been working on behind-the-scenes. We're no strangers to sweeping changes of our build infrastructure: we've done a lot of work to grow and scale our infrastructure. Moving beyond purely static site hosting with Pages Functions brought a new wave of users, and as we explore convergence with Workers, we expect even more developers to rely on our git integrations and CI builds. Our new architecture is being rolled out without any changes affecting users, so unless you're interested in the technical nitty-gritty, feel free to stop reading!

The biggest change we're making with our architecture is its modularity. Previously, we were using Kubernetes to run a monolithic container which was responsible for everything for the build. Within the same image, we'd stream our build logs, clone the git repository, install any custom versions of languages and tools, install a project's dependencies, run the user's build command, and upload all the assets of the build. This was a lot of work for one container! It meant that our system tooling had to be compatible with versions in the user's space and therefore new default versions were a massive change to make. This is a big part of why it took us so long to be able to update the build system for our users.

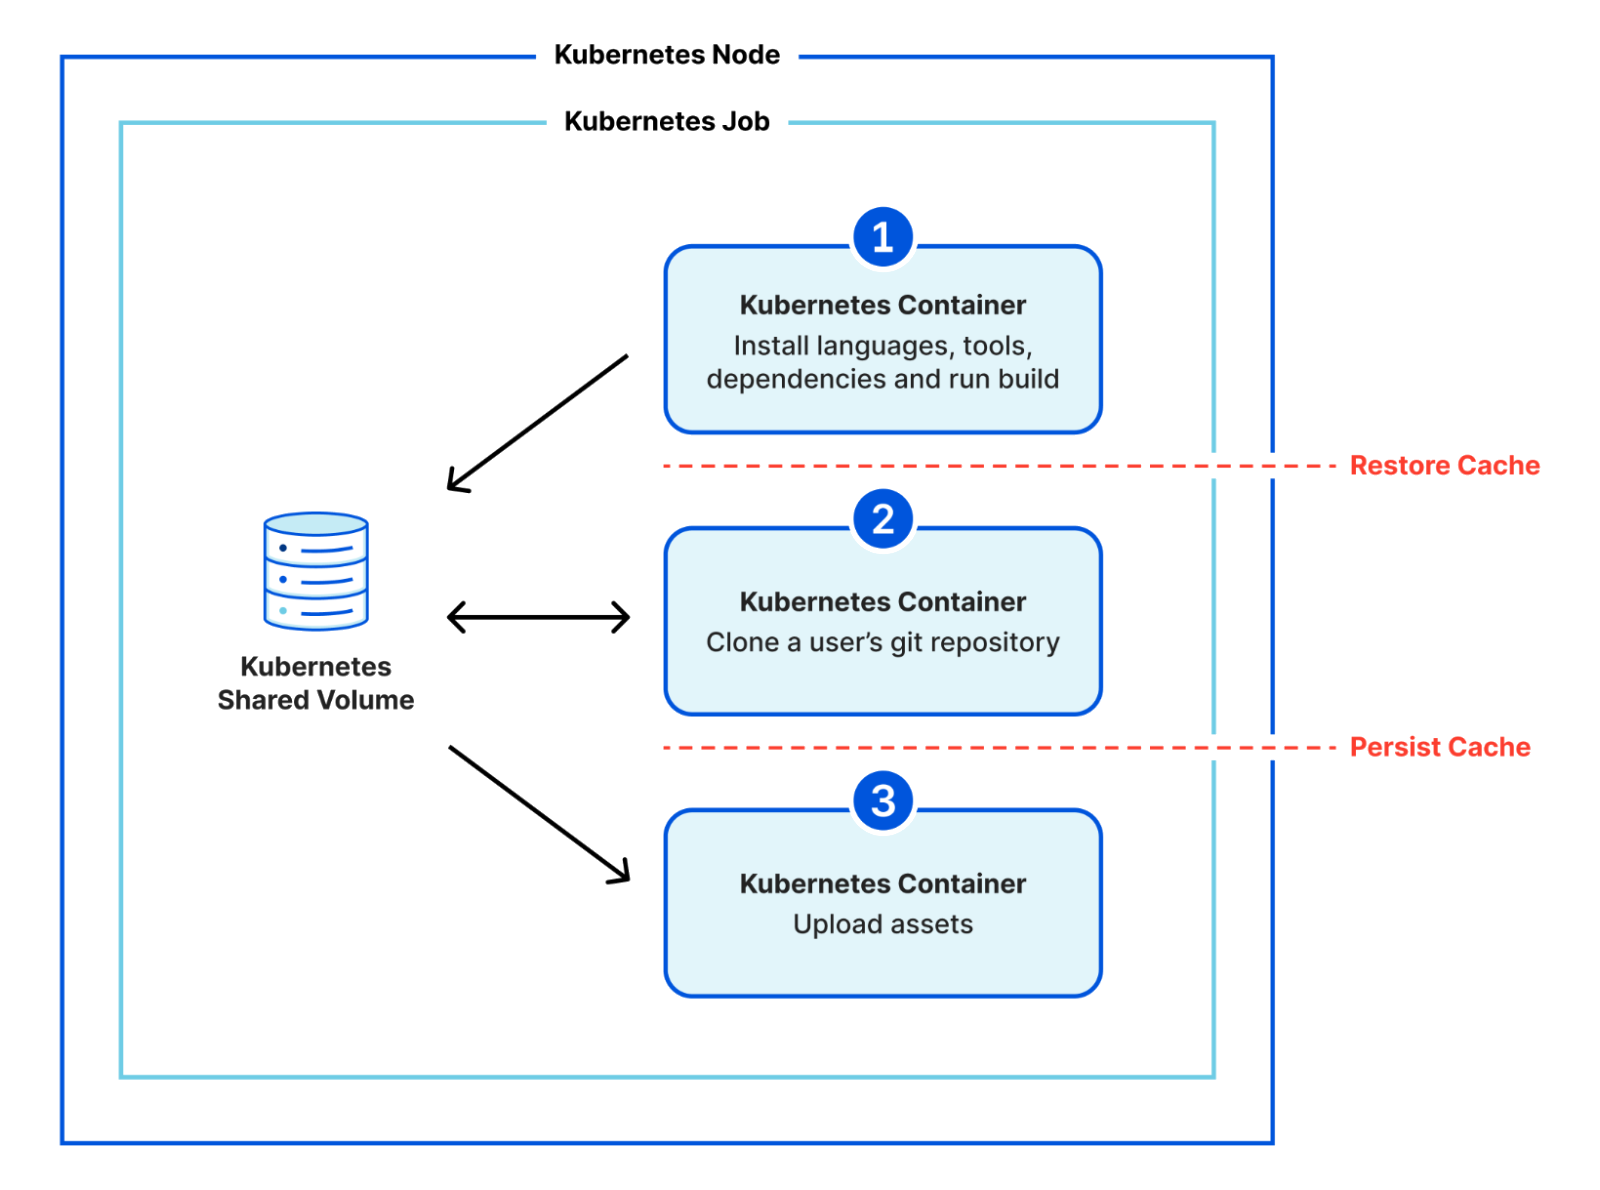
In the new architecture, we've broken these steps down into multiple separate containers. We make use of Kubernetes' init containers feature and instead of one monolithic container, we have three that execute sequentially:

  1. clone a user's git repository,
  2. install any custom versions of languages and tools, install a project's dependencies, run the user's build command, and
  3. upload all the assets of a build.

We use a shared volume to give the build a persistent workspace to use between containers, but now there is clear isolation between system stages (cloning a repository and uploading assets) and user stages (running code that the user is responsible for). We no longer need to worry about conflicting versions, and we've created an additional layer of security by isolating a user's control to a separate environment.

Modernizing the toolbox for Cloudflare Pages builds

We're also aligning the final stage, the one responsible for uploading static assets, with the same APIs that Wrangler uses for Direct Upload projects. This reduces our maintenance burden going forward since we'll only need to consider one way of uploading assets and creating deployments. As we consolidate, we're exploring ways to make these APIs even faster and more reliable.

Logging out

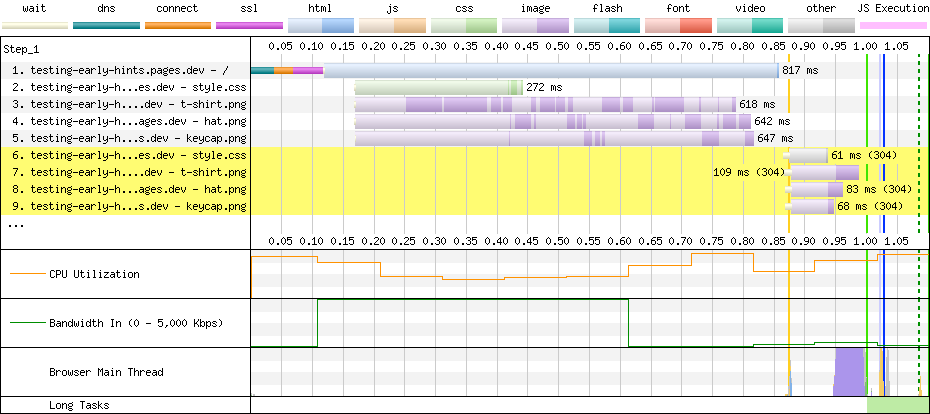
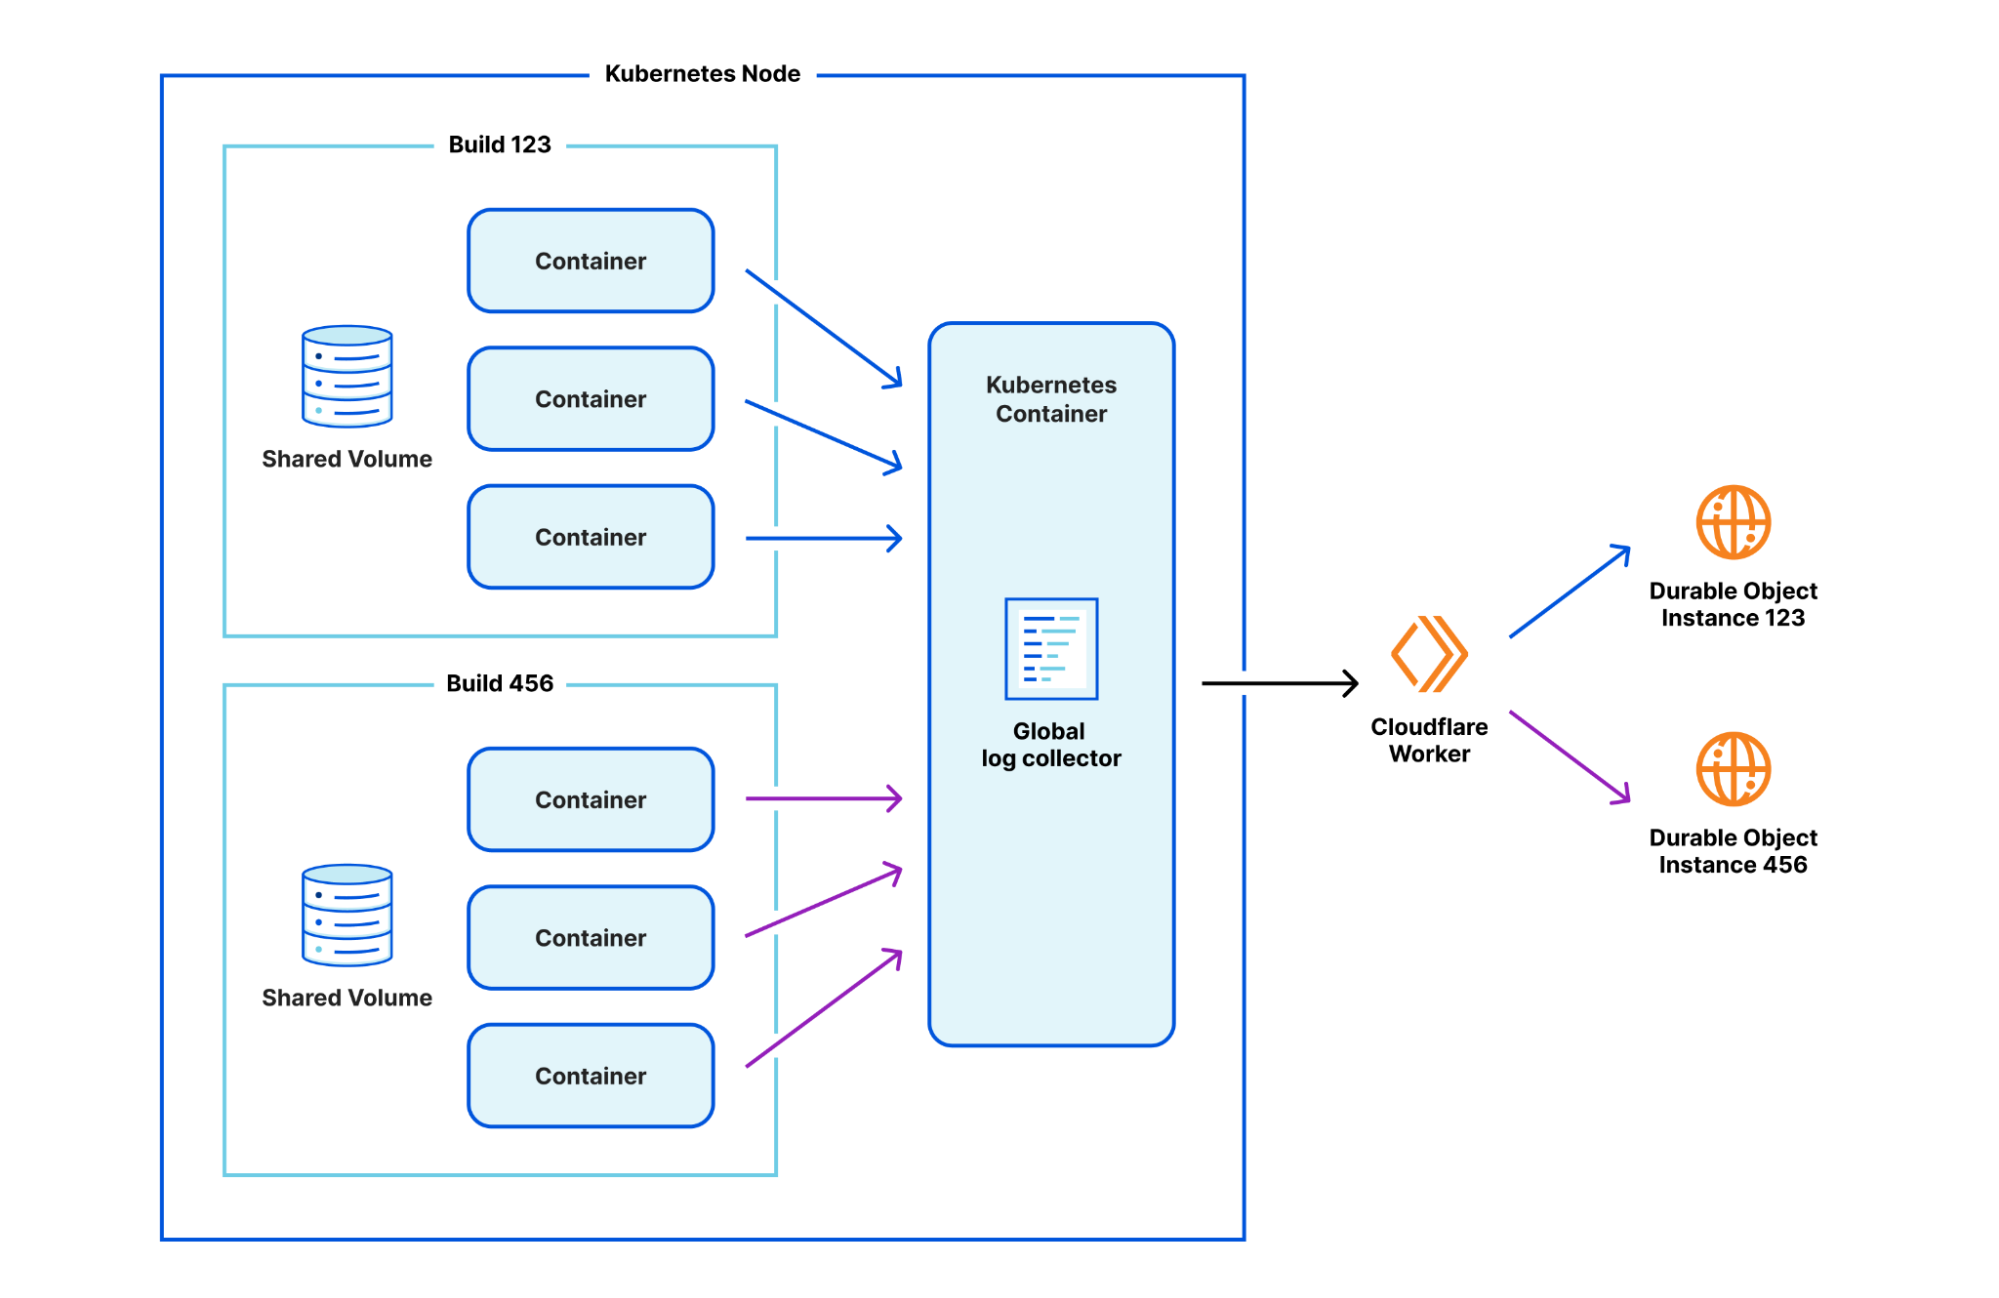
You might have noticed that we haven't yet talked about how we're continuing to stream build logs. Arguably, this was one of the most challenging pieces to work out. When everything ran in a single container, we were able to simply latch directly into the stdout of our various stages and pipe them through to a Durable Object which could communicate with the Cloudflare dashboard.

By introducing this new isolation between containers, we had to get a bit more inventive. After prototyping a number of approaches, we've found one that we like. We run a separate, global log collector container inside Kubernetes which is responsible for collating logs from a build, and passing them through to that same Durable Object infrastructure. The one caveat is that the logs now need to be annotated with which build they are coming from, since one global log collector container accepts logs from multiple builds. A Worker in front of the Durable Object is responsible for reading the annotation and delegating to the relevant build's Durable Object instance.

Modernizing the toolbox for Cloudflare Pages builds

Caching in

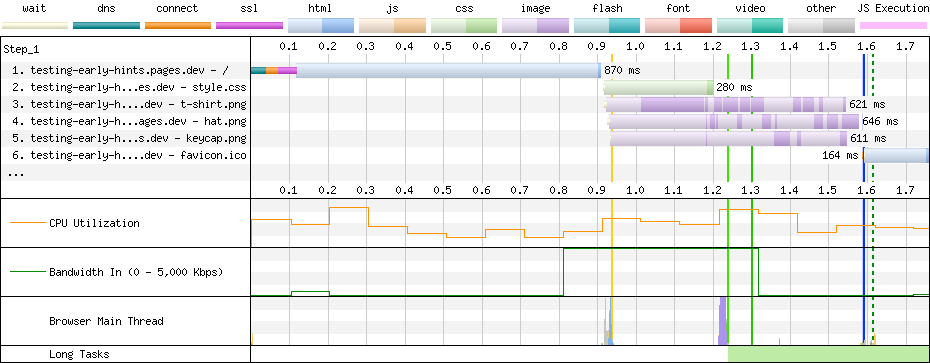
With this new modular architecture, we plan to integrate a feature we've been teasing for a while: build caching. Today, when you run a build in Cloudflare Pages, we start fresh every time. This works, but it's inefficient.

Very often, only small changes are actually made to your website between deployments: you might tweak some text on your homepage, or add a new blog post; but rarely does the core foundation of your site actually change between deployments. With build caching, we can reuse some of the work from earlier builds to speed up subsequent builds. We'll offer a best-effort storage mechanism that allows you to persist and restore files between builds. You'll soon be able to cache dependencies, as well as the build output itself if your framework supports it, resulting in considerably faster builds and a tighter feedback loop from push to deploy.

This is possible because our new modular design has clear divides between the stages where we'd want to restore and cache files.

Modernizing the toolbox for Cloudflare Pages builds

Start building

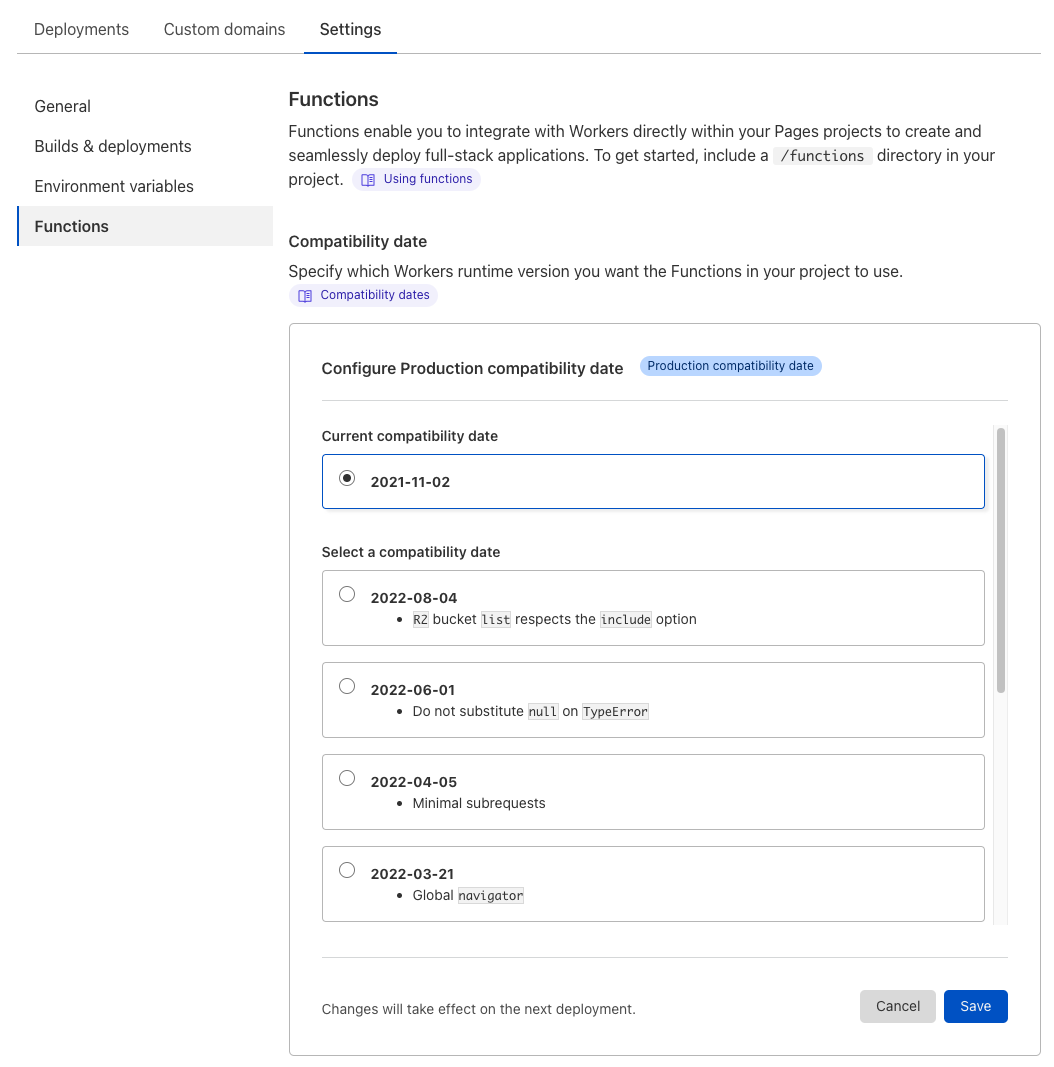
We're excited about the improvements that this new modular architecture will afford the Pages team, but we're even more excited for how this will result in faster and more scalable builds for our users. This architecture transition is rolling out behind-the-scenes, but the updated beta build system with new languages and tools is available to try today. Navigate to your Pages project settings in the Cloudflare Dashboard to opt-in.

Let us know if you have any feedback on the Discord server, and stay tuned for more information about build caching in upcoming posts on this blog. Later today (Wednesday 17th, 2023), the Pages team will be hosting a Q&A session to talk about this announcement on Discord at 17:30 UTC.

And here’s another one: the Next.js Edge Runtime becomes the fourth full-stack framework supported by Cloudflare Pages

Post Syndicated from Greg Brimble original https://blog.cloudflare.com/next-on-pages/

And here's another one: the Next.js Edge Runtime becomes the fourth full-stack framework supported by Cloudflare Pages

And here's another one: the Next.js Edge Runtime becomes the fourth full-stack framework supported by Cloudflare Pages

You can now deploy Next.js applications which opt in to the Edge Runtime on Cloudflare Pages. Next.js is the fourth full-stack web framework that the Pages platform officially supports, and it is one of the most popular in the ‘Jamstack-y’ space.

Cloudflare Pages started its journey as a platform for static websites, but with last year’s addition of Pages Functions powered by Cloudflare Workers, the platform has progressed to support an even more diverse range of use cases. Pages Functions allows developers to sprinkle in small pieces of server-side code with its simple file-based routing, or, as we’ve seen with the adoption from other frameworks (namely SvelteKit, Remix and Qwik), Pages Functions can be used to power your entire full-stack app. The folks behind Remix previously talked about the advantages of adopting open standards, and we’ve seen this again with Next.js’ Edge Runtime.

Next.js’ Edge Runtime

Next.js’ Edge Runtime is an experimental mode that developers can opt into which results in a different type of application being built. Previously, Next.js applications which relied on server-side rendering (SSR) functionality had to be deployed on a Node.js server. Running a Node.js server has significant overhead, and our Cloudflare Workers platform was fundamentally built on a different technology, V8.

However, when Next.js introduced the Edge Runtime mode in June 2022, we saw the opportunity to bring this widely used framework to our platform. We’re very excited that this is being developed in coordination with the WinterCG standards to ensure interoperability across the various web platforms and to ensure that developers have the choice on where they run their business, without fearing any significant vendor lock-in.

It’s important to note that some existing Next.js apps built for Node.js won’t immediately work on Pages. If your application relies on any Node.js built-ins or long-running processes, then Pages may not support your app with today’s announcement as we’re working on expanding our support for Node.js.

However, we see the migration to the Edge Runtime as an effort that’s worthy of investment, to run your applications, well, on the edge! These applications are cheaper to run, respond faster to users and have the latest features that full-stack frameworks offer. We’re seeing increased interest in third-party npm packages and libraries that support standardized runtimes, and in combination with Cloudflare’s data products (e.g. KV, Durable Objects and D1), we’re confident that the edge is going to be the first place that people will want to deploy applications going forward.

Deploy your Next.js app to Cloudflare Pages

Let’s walk through an example, creating a new Next.js application that opts into this Edge Runtime and deploying it to Cloudflare Pages.

npx create-next-app@latest my-app

This will create a new Next.js app in the my-app folder. The default template comes with a traditional Node.js powered API route, so let’s update that to instead use the Edge Runtime.

// pages/api/hello.js

// Next.js Edge API Routes: https://nextjs.org/docs/api-routes/edge-api-routes

export const config = {
  runtime: 'experimental-edge',
}

export default async function (req) {
  return new Response(
    JSON.stringify({ name: 'John Doe' }),
    {
      status: 200,
      headers: {
        'Content-Type': 'application/json'
      }
    }
  )
}

Thanks to the Edge Runtime adopting the Web API standards, if you’ve ever written a Cloudflare Worker before, this might look familiar.

Next, we can update the global next.config.js configuration file to use the Edge Runtime. This will enable us to use the getServerSideProps() API and server-side render (SSR) our webpages.

// next.config.js

/** @type {import('next').NextConfig} */
const nextConfig = {
  experimental: {
    runtime: 'experimental-edge',
  },
  reactStrictMode: true,
  swcMinify: true,
}
module.exports = nextConfig

Finally, we’re ready to deploy the project. Publish it to a GitHub or GitLab repository, create a new Pages project, and select “Next.js” from the list of framework presets. This will configure your project to use the @cloudflare/next-on-pages CLI which builds and transforms your project into something we can deploy on Pages. Navigate to the project settings and add an environment variable, NODE_VERSION set to 14 or greater, as well as the following compatibility flags: streams_enable_constructors and transformstream_enable_standard_constructor. You should now be able to deploy your Next.js application. If you want to read more, you can find a detailed guide in our documentation.

How it runs on Cloudflare Pages

Compatibility Dates and Compatibility Flags

Cloudflare Workers has solved the versioning problem by introducing compatibility dates and compatibility flags. While it has been in beta, Pages Functions has always defaulted to using the oldest version of the Workers runtime. We’ve now introduced controls to allow developers to set these dates and flags on their Pages projects environments.

And here's another one: the Next.js Edge Runtime becomes the fourth full-stack framework supported by Cloudflare Pages

By keeping this date recent, you are able to opt in to the latest features and bug fixes that the Cloudflare Workers runtime offers, but equally, you’re completely free to keep the date on whatever works for you today, and we’ll continue to support the functionality at that point in time, forever. We also allow you to set these dates for your production and preview environments independently which will let you test these changes out safely in a preview deployment before rolling it out in production.

We’ve been working on adding more support for the Streams API to the Workers Runtime, and some of this functionality is gated behind the flags we added to the project earlier. These flags are currently scheduled to graduate and become on-by-default on a future compatibility date, 2022-11-30.

The @cloudflare/next-on-pages CLI

Vercel introduced the Build Output API in July 2022 as a “zero configuration” directory structure which the Vercel platform inherently understands and can deploy. We’ve decided to hook into this same API as a way to build Next.js projects consistently that we can understand and deploy.

The open-source @cloudflare/next-on-pages CLI runs npx vercel build behind the scenes, which produces a .vercel/output directory. This directory conforms to the Build Output API, and of particular interest, contains a config.json, static folder and folder of functions. The @cloudflare/next-on-pages CLI then parses this config.json manifest, and combines all the functions into a single Pages Functions ‘advanced mode’ _worker.js.

At this point, the build is finished. Pages then automatically picks up this _worker.js and deploys it with Pages Functions atop the static directory.

Although currently just an implementation detail, we opted to use this Build Output API for a number of reasons. We’re also exploring other similar functionality natively on the Pages platform. We already have one “magical” directory, the functions directory which we use for the file-based routing of Pages Functions. It’s possible that we offer other fixed directory structures which would reduce the need for configuration of any projects using frameworks which adopt the API. Let us know in Discord if you have any thoughts or preferences on what you would like to see!

Additionally, if more full-stack frameworks do adopt Vercel’s Build Output API, we may have automatic support for them running on Pages with this CLI. We’ve only been experimenting with Next.js here so far (and SvelteKit, Remix and Qwik all have their own way of building their projects on Pages at the moment), but it’s possible that in the future we may converge on a standard approach which could be shared between frameworks and platforms. We’re excited to see how this might transpire. Again, let us know if you have thoughts!

Experimental webpack minification

As part of the compilation from .vercel/output/functions to an _worker.js, the @cloudflare/next-on-pages CLI can perform an experimental minification to give you more space for your application to run on Workers. Right now, most accounts are limited to a maximum script size of 1MB (although this can be raised in some circumstances—get in touch!). You can ordinarily fit quite a lot of code in this, but one thing notable about Next.js’ build process at the moment is that it creates webpack-compiled, fully-formed and fully-isolated functions scripts in each of the directories in .vercel/output/functions. This means that each function ends up looking something like this:

let _ENTRIES = {};
(() => {
  // webpackBootstrap
})();

(self["webpackChunk_N_E"] = self["webpackChunk_N_E"] || []).push([100], {

  123: (() => {
    // webpack chunk #123
  }),
  234: (() => {
    // webpack chunk #234
  }),
  345: (() => {
    // webpack chunk #345
  }),

  // …lots of webpack chunks…

}, () => {
  // webpackRuntimeModules
}]);

export default {
  async fetch(request, env, ctx) {
    return _ENTRIES['some_function'].default.call(request);
  }
}

The script contains everything that’s needed to deploy this function, and most of the logic exists in these webpack chunks, but that means that each function has a lot of code shared with its siblings. Quickly, you’ll reach the 1MB limit, if you naively deployed all these functions together.

Our @cloudflare/next-on-pages --experimental-minify CLI argument deals with this problem by analyzing webpack chunks which are re-used in multiple places in this .vercel/output/functions directory and extracts out that code to a common place. This allows our compiler (esbuild) to efficiently combine this code, without duplicating it in all of these places. This process is experimental for the time being, while we look to make this as efficient as possible, without introducing any bugs as a result. Please file an issue on GitHub if you notice any difference in behavior when using --experimental-minify.

What’s next?

Pages Functions has been in beta for almost a year, and we’re very excited to say that general availability is just around the corner. We’re polishing off the last of the remaining features which includes analytics, logging, and billing. In fact, for billing, we recently made the announcement of how you’ll be able to use the Workers Paid plan to remove the request limits of the Pages Functions beta from November 15.

Finally, we’re also looking at how we can bring Wasm support to Pages Functions which will unlock ever more use-cases for your full-stack applications. Stay tuned for more information on how we’ll be offering this soon.

Try creating a Next.js Edge Runtime application and deploying it to Cloudflare Pages with the example above or by following the guide in our documentation. Let us know if you have any questions or face any issues in Discord or on GitHub, and please report any quirks of the --experimental-minify argument. As always, we’re excited to see what you build!

Cloudflare Pages gets even faster with Early Hints

Post Syndicated from Greg Brimble original https://blog.cloudflare.com/early-hints-on-cloudflare-pages/

Cloudflare Pages gets even faster with Early Hints

Cloudflare Pages gets even faster with Early Hints

Last year, we demonstrated what we meant by “lightning fast”, showing Pages’ first-class performance in all parts of the world, and today, we’re thrilled to announce an integration that takes this commitment to speed even further – introducing Pages support for Early Hints! Early Hints allow you to unblock the loading of page critical resources, ahead of any slow-to-deliver HTML pages. Early Hints can be used to improve the loading experience for your visitors by significantly reducing key performance metrics such as the largest contentful paint (LCP).

What is Early Hints?

Early Hints is a new feature of the Internet which is supported in Chrome since version 103, and that Cloudflare made generally available for websites using our network. Early Hints supersedes Server Push as a mechanism to “hint” to a browser about critical resources on your page (e.g. fonts, CSS, and above-the-fold images). The browser can immediately start loading these resources before waiting for a full HTML response. This uses time that was otherwise previously wasted! Before Early Hints, no work could be started until the browser received the first byte of the response. Now, the browser can fill this time usefully when it was previously sat waiting. Early Hints can bring significant improvements to the performance of your website, particularly for metrics such as LCP.

How Early Hints works

Cloudflare caches any preload and preconnect type Link headers sent from your 200 OK response, and sends them early for any subsequent requests as a 103 Early Hints response.

In practical terms, an HTTP conversation now looks like this:

Request

GET /
Host: example.com

Early Hints Response

103 Early Hints
Link: </styles.css>; rel=preload; as=style

Response

200 OK
Content-Type: text/html; charset=utf-8
Link: </styles.css>; rel=preload; as=style

<html>
<!-- ... -->
</html>

Early Hints on Cloudflare Pages

Websites hosted on Cloudflare Pages can particularly benefit from Early Hints. If you’re using Pages Functions to generate dynamic server-side rendered (SSR) pages, there’s a good chance that Early Hints will make a significant improvement on your website.

Performance Testing

We created a simple demonstration e-commerce website in order to evaluate the performance of Early Hints.

Cloudflare Pages gets even faster with Early Hints

This landing page has the price of each item, as well as a remaining stock counter. The page itself is just hand-crafted HTML and CSS, but these pricing and inventory values are being templated in live for every request with Pages Functions. To simulate loading from an external data-source (possibly backed by KV, Durable Objects, D1, or even an external API like Shopify) we’ve added a fixed delay before this data resolves. We include preload links in our response to some critical resources:

  • an external CSS stylesheet,
  • the image of the t-shirt,
  • the image of the cap,
  • and the image of the keycap.

The very first request makes a waterfall like you might expect. The first request is held blocked for a considerable amount of time while we resolve this pricing and inventory data. Once loaded, the browser parses the HTML, pulls out the external resources, and makes subsequent requests for their contents. The CSS and images extend the loading time considerably given their large dimensions and high quality. The largest contentful paint (LCP) occurs when the t-shirt image loads, and the document finishes once all requests are fulfilled.

Cloudflare Pages gets even faster with Early Hints

Subsequent requests are where things get interesting! These preload links are cached on Cloudflare’s global network, and are sent ahead of the document in a 103 Early Hints response. Now, the waterfall looks much different. The initial request goes out the same, but now, requests for the CSS and images slide much further left since they can be started as soon as the 103 response is delivered. The browser starts fetching those resources while waiting for the original request to finish server-side rendering. The LCP again occurs once the t-shirt image has loaded, but this time, it’s brought forward by 530ms because it started loading 752ms faster, and the document is fully loaded 562ms faster, again because the external resources could all start loading faster.

Cloudflare Pages gets even faster with Early Hints

The final four requests (highlighted in yellow) come back as 304 Not Modified responses using a If-None-Match header. By default, Cloudflare Pages requires the browser to confirm that all assets are fresh, and so, on the off chance that they were updated between the Early Hints response and when they come to being used, the browser is checking if they have changed. Since they haven’t, there’s no contentful body to download, and the response completes quickly. This can be avoided by setting a custom Cache-Control header on these assets using a _headers file. For example, you could cache these images for one minute with a rule like:

# _headers

/*.png
  Cache-Control: max-age=60

We could take this performance audit further by exploring other features that Cloudflare offers, such as automatic CSS minification, Cloudflare Images, and Image Resizing.

We already serve Cloudflare Pages from one of the fastest networks in the world — Early Hints simply allows developers to take advantage of our global network even further.

Using Early Hints and Cloudflare Pages

The Early Hints feature on Cloudflare is currently restricted to caching Link headers in a webpage’s response. Typically, this would mean that Cloudflare Pages users would either need to use the _headers file, or Pages Functions to apply these headers. However, for your convenience, we’ve also added support to transform any <link> HTML elements you include in your body into Link headers. This allows you to directly control the Early Hints you send, straight from the same document where you reference these resources – no need to come out of HTML to take advantage of Early Hints.

For example, for the following HTML document, will generate an Early Hints response:

HTML Document

<!DOCTYPE html>
<html>
  <head>
    <link rel="preload" as="style" href="/styles.css" />
  </head>
  <body>
    <!-- ... -->
  </body>
</html>

Early Hints Response

103 Early Hints
Link: </styles.css>; rel=preload; as=style

As previously mentioned, Link headers can also be set with a _headers file if you prefer:

# _headers

/
  Link: </styles.css>; rel=preload; as=style

Early Hints (and the automatic HTML <link> parsing) has already been enabled automatically for all pages.dev domains. If you have any custom domains configured on your Pages project, make sure to enable Early Hints on that domain in the Cloudflare dashboard under the “Speed” tab. More information can be found in our documentation.

Additionally, in the future, we hope to support the Smart Early Hints features. Smart Early Hints will enable Cloudflare to automatically generate Early Hints, even when no Link header or <link> elements exist, by analyzing website traffic and inferring which resources are important for a given page. We’ll be sharing more about Smart Early Hints soon.

In the meantime, try out Early Hints on Pages today! Let us know how much of a loading improvement you see in our Discord server.

Supporting Remix with full stack Cloudflare Pages

Post Syndicated from Greg Brimble original https://blog.cloudflare.com/remix-on-cloudflare-pages/

Supporting Remix with full stack Cloudflare Pages

Supporting Remix with full stack Cloudflare Pages

We announced the open beta of full stack Cloudflare Pages in November and have since seen widespread uptake from developers looking to add dynamic functionality to their applications. Today, we’re excited to announce Pages’ support for Remix applications, powered by our full stack platform.

The new kid on the block: Remix

Remix is a new framework that is focused on fully utilizing the power of the web. Like Cloudflare Workers, it uses modern JavaScript APIs, and it places emphasis on web fundamentals such as meaningful HTTP status codes, caching and optimizing for both usability and performance. One of the biggest features of Remix is its transportability: Remix provides a platform-agnostic interface and adapters allowing it to be deployed to a growing number of providers. Cloudflare Workers was available at Remix’s launch, but what makes Workers different in this case, is the native compatibility that Workers can offer.

One of the main inspirations for Remix was the way Cloudflare Workers uses native web APIs for handling HTTP requests and responses. It’s a brilliant decision because developers are able to reuse knowledge on the server that they gained building apps in the browser! Remix runs natively on Cloudflare Workers, and the results we’ve seen so far are fantastic. We are incredibly excited about the potential that Cloudflare Workers and Pages unlocks for building apps that run at the edge!
Michael Jackson, CEO at Remix

This native compatibility means that as you learn how to write applications in Remix, you’re also learning how to write Cloudflare Workers (and vice versa). But it also means better performance! Rather than having a Node.js process running on a server — which could be far away from your users, could be overwhelmed in the case of high traffic, and has to map between Node.js’ runtime and the modern Fetch API — you can deploy to Cloudflare’s network and requests will be routed to any one of our 250+ locations. This means better performance for your users, with 95% of the entire Internet-connected world lying within 50ms of a Cloudflare presence, and 80% of the Internet-connected world within 20ms.

Integrating with Cloudflare

More often than not, full stack applications need some place to store data. Cloudflare offers three all-encompassing options here:

  • KV, our high performance and globally replicated key-value datastore.
  • Durable Objects, our strongly consistent coordination primitive which can be restricted to a given jurisdiction.
  • R2 (coming soon!), our fast and reliable object storage.

Remix already tightly integrates with KV for session storage, and a Durable Objects integration is in progress. Additionally, Cloudflare’s other features, such as geolocating incoming requests, HTMLRewriter and our Cache API, are all available from within your Remix application.

Deploying to Cloudflare Pages

Cloudflare Pages was already capable of serving static assets from the Cloudflare edge, but now with November’s release of serverless functions powered by Cloudflare Workers, it has evolved into an entire platform perfectly suited for hosting full stack applications.

To get started with Remix and Cloudflare Pages today, run the following in your terminal, and select “Cloudflare Pages” when asked “Where do you want to deploy?”:

npx create-remix@latest

Then create a repository on GitHub or GitLab, git commit, and git push the newly created folder. Finally, navigate to Cloudflare Pages, select your repository, and select “Remix” from the dropdown of framework presets. Your new application will be available on your pages.dev subdomain, or you can connect it to any of your custom domains.

Your folder will have a functions/[[path]].ts file. This is the functions integration where we serve your Remix application on all paths of your website. The app folder is where the bulk of your Remix application’s logic is. With Pages’ support for rollbacks and preview deployments, you can safely test any changes to your application, and, with the wrangler 2.0 beta, testing locally is just a simple case of npm run dev.

The future of frameworks on Cloudflare Pages

Remix is the second framework to integrate natively with full stack Cloudflare Pages, following SvelteKit, which was available at launch. But this is just the beginning! We have a lot more in store for our integration with Remix and other frameworks. Stay tuned for improvements on  Pages’ build times and other areas of the developer experience, as well as new features to the platform.

Join our community!

If you are new to the Cloudflare Pages and Workers world, join our Discord server and show us what you’re building. Whether it’s a new full stack application on Remix or even a simple static site, we’d love to hear from you.

Building a full stack application with Cloudflare Pages

Post Syndicated from Greg Brimble original https://blog.cloudflare.com/building-full-stack-with-pages/

Building a full stack application with Cloudflare Pages

Building a full stack application with Cloudflare Pages

We were so excited to announce support for full stack applications in Cloudflare Pages that we knew we had to show it off in a big way. We’ve built a sample image-sharing platform to demonstrate how you can add serverless functions right from within Pages with help from Cloudflare Workers. With just one new file to your project, you can add dynamic rendering, interact with other APIs, and persist data with KV and Durable Objects. The possibilities for full-stack applications, in combination with Pages’ quick development cycles and unlimited preview environments, gives you the power to create almost any application.

Today, we’re walking through our example image-sharing platform. We want to be able to share pictures with friends while still also keeping some images private. We’ll build a JSON API with Functions (storing data on KV and Durable Objects), integrate with Cloudflare Images and Cloudflare Access, and use React for our front end.

If you’re wanting to dive right into the good stuff, our demo instance is published here, and the code is on GitHub, but stick around for a more gentle approach.

Building a full stack application with Cloudflare Pages

Building serverless functions with Cloudflare Pages

File-based routing

If you’re not already familiar, Cloudflare Pages connects with your git provider (GitHub and GitLab), and automates the deployment of your static site to Cloudflare’s network. Functions lets you enhance these apps by sprinkling in dynamic data. If you haven’t already, you can sign up here.

In our project, let’s create a new function:

// ./functions/time.js


export const onRequest = () => {
  return new Response(new Date().toISOString())
}

git commit-ing and pushing this file should trigger a build and deployment of your first Pages function. Any requests for /time will be served by this function, and all other requests will fall-back to the static assets of your project. Placing Functions files in directories works as you’d expect: ./functions/api/time.js would be available at /api/time and ./functions/some_directory/index.js would be available at /some_directory.

We also support TypeScript (./functions/time.ts would work just the same), as well as parameterized files:

  • ./functions/todos/[id].js with single square brackets will match all requests like /todos/123;
  • and ./functions/todos/[[path]].js with double square brackets, will match requests for any number of path segments (e.g. /todos/123/subtasks).

We declare a PagesFunction type in the @cloudflare/workers-types library which you can use to type-check your Functions.

Dynamic data

So, returning to our image-sharing app, let’s assume we already have some images uploaded, and we want to display them on the homepage. We’ll need an endpoint which will return a list of these images, which the front-end can call:

// ./functions/api/images.ts

export const jsonResponse = (value: any, init: ResponseInit = {}) =>
  new Response(JSON.stringify(value), {
    headers: { "Content-Type": "application/json", ...init.headers },
    ...init,
  });

const generatePreviewURL = ({
  previewURLBase,
  imagesKey,
  isPrivate,
}: {
  previewURLBase: string;
  imagesKey: string;
  isPrivate: boolean;
}) => {
  // If isPrivate, generates a signed URL for the 'preview' variant
  // Else, returns the 'blurred' variant URL which never requires signed URLs
  // https://developers.cloudflare.com/images/cloudflare-images/serve-images/serve-private-images-using-signed-url-tokens

  return "SIGNED_URL";
};

export const onRequestGet: PagesFunction<{
  IMAGES: KVNamespace;
}> = async ({ env }) => {
  const { imagesKey } = (await env.IMAGES.get("setup", "json")) as Setup;

  const kvImagesList = await env.IMAGES.list<ImageMetadata>({
    prefix: `image:uploaded:`,
  });

  const images = kvImagesList.keys
    .map((kvImage) => {
      try {
        const { id, previewURLBase, name, alt, uploaded, isPrivate } =
          kvImage.metadata as ImageMetadata;

        const previewURL = generatePreviewURL({
          previewURLBase,
          imagesKey,
          isPrivate,
        });

        return {
          id,
          previewURL,
          name,
          alt,
          uploaded,
          isPrivate,
        };
      } catch {
        return undefined;
      }
    })
    .filter((image) => image !== undefined);

  return jsonResponse({ images });
};

Eagle-eyed readers will notice we’re exporting onRequestGet which lets us only respond to GET requests.

We’re also using a KV namespace (accessed with env.IMAGES) to store information about images that have been uploaded. To create a binding in your Pages project, navigate to the “Settings” tab.

Building a full stack application with Cloudflare Pages

Interfacing with other APIs

Cloudflare Images is an inexpensive, high-performance, and featureful service for hosting and transforming images. You can create multiple variants to render your images in different ways and control access with signed URLs. We’ll add a function to interface with this service’s API and upload incoming files to Cloudflare Images:

// ./functions/api/admin/upload.ts

export const onRequestPost: PagesFunction<{
  IMAGES: KVNamespace;
}> = async ({ request, env }) => {
  const { apiToken, accountId } = (await env.IMAGES.get(
    "setup",
    "json"
  )) as Setup;

  // Prepare the Cloudflare Images API request body
  const formData = await request.formData();
  formData.set("requireSignedURLs", "true");
  const alt = formData.get("alt") as string;
  formData.delete("alt");
  const isPrivate = formData.get("isPrivate") === "on";
  formData.delete("isPrivate");

  // Upload the image to Cloudflare Images
  const response = await fetch(
    `https://api.cloudflare.com/client/v4/accounts/${accountId}/images/v1`,
    {
      method: "POST",
      body: formData,
      headers: {
        Authorization: `Bearer ${apiToken}`,
      },
    }
  );

  // Store the image metadata in KV
  const {
    result: {
      id,
      filename: name,
      uploaded,
      variants: [url],
    },
  } = await response.json<{
    result: {
      id: string;
      filename: string;
      uploaded: string;
      requireSignedURLs: boolean;
      variants: string[];
    };
  }>();

  const metadata: ImageMetadata = {
    id,
    previewURLBase: url.split("/").slice(0, -1).join("/"),
    name,
    alt,
    uploaded,
    isPrivate,
  };

  await env.IMAGES.put(
    `image:uploaded:${uploaded}`,
    "Values stored in metadata.",
    { metadata }
  );
  await env.IMAGES.put(`image:${id}`, JSON.stringify(metadata));

  return jsonResponse(true);
};

Persisting data

We’re already using KV to store information that is read often but rarely written to. What about features that require a bit more synchronicity?

Let’s add a download counter to each of our images. We can create a highres variant in Cloudflare Images, and increment the counter every time a user requests a link. This requires a bit more setup, but unlocking the power of Durable Objects in your projects is absolutely worth it.

We’ll need to create and publish the Durable Object class capable of maintaining this download count:

// ./durable_objects/downloadCounter.js
ts#example---counter

export class DownloadCounter {
  constructor(state) {
    this.state = state;
    // `blockConcurrencyWhile()` ensures no requests are delivered until initialization completes.
    this.state.blockConcurrencyWhile(async () => {
      let stored = await this.state.storage.get("value");
      this.value = stored || 0;
    });
  }

  async fetch(request) {
    const url = new URL(request.url);
    let currentValue = this.value;

    if (url.pathname === "/increment") {
      currentValue = ++this.value;
      await this.state.storage.put("value", currentValue);
    }

    return jsonResponse(currentValue);
  }
}

Middleware

If you need to execute some code (such as authentication or logging) before you run your function, Pages offers easy-to-use middleware which can be applied at any level in your file-based routing. By creating a _middleware.ts file in a directory, we know to first run this file, and then execute your function when next() is called.

In our application, we want to prevent unauthorized users from uploading images (/api/admin/upload) or deleting images (/api/admin/delete). Cloudflare Access lets us apply role-based access control to all or part of our application, and you only need a single file to integrate it into our serverless functions. We create  ./functions/api/admin/_middleware.ts which will apply to all incoming requests at /api/admin/*:

// ./functions/api/admin/_middleware.ts

const validateJWT = async (jwtAssertion: string | null, aud: string) => {
  // If the JWT is valid, return the JWT payload
  // Else, return false
  // https://developers.cloudflare.com/cloudflare-one/identity/users/validating-json

  return jwtPayload;
};

const cloudflareAccessMiddleware: PagesFunction<{ IMAGES: KVNamespace }> =
  async ({ request, env, next, data }) => {
    const { aud } = (await env.IMAGES.get("setup", "json")) as Setup;

    const jwtPayload = await validateJWT(
      request.headers.get("CF-Access-JWT-Assertion"),
      aud
    );

    if (jwtPayload === false)
      return new Response("Access denied.", { status: 403 });

    // We could also use the data object to pass information between middlewares
    data.user = jwtPayload.email;

    return await next();
  };

export const onRequest = [cloudflareAccessMiddleware];

Middleware is a powerful tool at your disposal allowing you to easily protect parts of your application with Cloudflare Access, or quickly integrate with observability and error logging platforms such as Honeycomb and Sentry.

Integrating as Jamstack

The “Jam” of “Jamstack” stands for JavaScript, API and Markup. Cloudflare Pages previously provided the ‘J’ and ‘M’, and with Workers in the middle, you can truly go full-stack Jamstack.

We’ve built the front end of this image sharing platform with Create React App as an approachable example, but Cloudflare Pages natively integrates with an ever-growing number of frameworks (currently 23), and you can always configure your own entirely custom build command.

Your front end simply needs to make a call to the Functions we’ve already configured, and render out that data. We’re using SWR to simplify things, but you could do this with entirely vanilla JavaScript fetch-es, if that’s your preference.

// ./src/components/ImageGrid.tsx

export const ImageGrid = () => {
  const { data, error } = useSWR<{ images: Image[] }>("/api/images");

  if (error || data === undefined) {
    return <div>An unexpected error has occurred when fetching the list of images. Please try again.</div>;
  }


  return (
    <div>
      {data.images.map((image) => (
        <ImageCard image={image} key={image.id} />
      ))}
    </div>
  );

}

Local development

No matter how fast it is, iterating on a project like this can be painful if you have to push up every change in order to test how it works. We’ve released a first-class integration with wrangler for local development of Pages projects, including full support for Functions, Workers, secrets, environment variables and KV. Durable Objects support is coming soon.

Install from npm:

npm install wrangler@beta

and either serve a folder of static assets, or proxy your existing tooling:

# Serve a directory
npx wrangler pages dev ./public

# or integrate with your other tools
npx wrangler pages dev -- npx react-scripts start

Go forth, and build!

If you like puppies, we’ve deployed our image-sharing application here, and if you like code, that’s over on GitHub. Feel free to fork and deploy it yourself! There’s a five-minute setup wizard, and you’ll need Cloudflare Images, Access, Workers, and Durable Objects.

We are so excited about the future of the Pages platform, and we want to hear what you’re building! Show off your full-stack applications in the #what-i-built channel, or get assistance in the #pages-help channel on our Discord server.

Building a full stack application with Cloudflare Pages

Optimizing images on the web

Post Syndicated from Greg Brimble original https://blog.cloudflare.com/optimizing-images/

Optimizing images on the web

Optimizing images on the web

Images are a massive part of the Internet. On the median web page, images account for 51% of the bytes loaded, so any improvement made to their speed or their size has a significant impact on performance.

Today, we are excited to announce Cloudflare’s Image Optimization Testing Tool. Simply enter your website’s URL, and we’ll run a series of automated tests to determine if there are any possible improvements you could make in delivering optimal images to visitors.

Optimizing images on the web

How users experience speed

Everyone who has ever browsed the web has experienced a website that was slow to load. Often, this is a result of poorly optimized images on that webpage that are either too large for purpose or that were embedded on the page with insufficient information.

Images on a page might take painfully long to load as pixels agonizingly fill in from top-to-bottom; or worse still, they might cause massive shifts of the page layout as the browser learns about their dimensions. These problems are a serious annoyance to users and as of August 2021, search engines punish pages accordingly.

Understandably, slow page loads have an adverse effect on a page’s “bounce rate” which is the percentage of visitors which quickly move off of the page. On e-commerce sites in particular, the bounce rate typically has a direct monetary impact and pages are usually very image-heavy. It is critically important to optimize all the images on your webpages to reduce load on and egress from your origin, to improve your performance in search engine rankings and, ultimately, to provide a great experience for your users.

Measuring speed

Since the end of August 2021, Google has used the Core Web Vitals to quantify page performance when considering search results rankings. These metrics are three numbers: Largest Contentful Paint (LCP), First Input Delay (FID), and Cumulative Layout Shift (CLS). They approximate the experience of loading, interactivity and visual stability respectively.

CLS and LCP are the two metrics we can improve by optimizing images. When CLS is high, this indicates that large amounts of the page layout is shifting as it loads. LCP measures the time it takes for the single largest image or text block in the viewport to render.

These can both be measured “in the field” with Real User Monitoring (RUM) analytics such as Cloudflare’s Web Analytics, or in a “lab environment” using Cloudflare’s Image Optimization Testing Tool.

How to optimize for speed

Dimensions

One of the most impactful performance improvements a website author can make is ensuring they deliver images with appropriate dimensions. Images taken on a modern camera can be truly massive, and some recent flagship phones have gigantic sensors. The Samsung Galaxy S21 Ultra, for example, has a 108 MP sensor which captures a 12,000 by 9,000 pixel image. That same phone has a screen width of only 1440 pixels. It is physically impossible to show every pixel of the photo on that device: for a landscape photo, only 12% of pixel columns can be displayed.

Embedding this image on a webpage presents the same problem, but this time, that image and all of its unused pixels are sent over the Internet. Ultimately, this creates unnecessary load on the server, higher egress costs, and longer loading times for visitors.. This is exacerbated even further for visitors on mobile since they are often using a slower connection and have limits on their data usage. On a fast 3G connection, that 108 MP photo might consume 26 MB of both the visitor’s data plan and the website’s egress bandwidth, and take more than two minutes to load!

It might be tempting to always deliver images with the highest possible resolution to avoid “blocky” or pixelated images, but when resizing is done correctly, this is not a problem. “Blocky” artifacts typically occur when an image is processed multiple times (for example, an image is repeatedly uploaded and downloaded by users on a platform which compresses that image). Pixelated images occur when an image has been shrunk to a size smaller than the screen it is rendered on.

So, how can website authors avoid these pitfalls and ensure a correctly sized image is delivered to visitors’ devices? There are two main approaches:

  • Media conditions with srcset and sizes

When embedding an image on a webpage, traditionally the author would simply pass a src attribute on an img tag:

<img src="hello_world_12000.jpg" alt="Hello, world!" />

Since 2017, all modern browsers have supported the more dynamic srcset attribute. This allows authors to set multiple image sources, depending on the matching media condition of the visitor’s browser:

<img srcset="hello_world_1500.jpg 1500w,
             hello_world_2000.jpg 2000w,
             hello_world_12000.jpg 12000w"
     sizes="(max-width: 1500px) 1500px,
            (max-width: 2000px) 2000px,
            12000px"
     src="hello_world_12000.jpg"
     alt="Hello, world!" />

Here, with the srcset attribute, we’re informing the browser that there are three variants of the image, each with a different intrinsic width: 1,500 pixels, 2,000 pixels and the original 12,000 pixels. The browser then evaluates the media conditions in the sizes attribute ( (max-width: 1500px) and (max-width: 2000px)) in order to select the appropriate image variant from the srcset attribute. If the browser’s viewport width is less than 1500px, the hello_world_1500.jpg image variant will be loaded; if the browser’s viewport width is between 1500px and 2000px, the hello_world_2000.jpg image variant will be loaded; and finally, if the browser’s viewport width is larger than 2000px, the browser will fallback to loading the hello_world_12000.jpg image variant.

Similar behavior is also possible with a picture element, using the source child element which supports a variety of other selectors.

  • Client Hints

Client Hints are a standard that some browsers are choosing to implement, and some not. They are a set of HTTP request headers which tell the server about the client’s device. For example, the browser can attach a Viewport-Width header when requesting an image which informs the server of the width of that particular browser’s viewport (note this header is currently in the process of being renamed to Sec-CH-Viewport-Width).

This simplifies the markup in the previous example greatly — in fact, no changes are required from the original simple HTML:

<img src="hello_world_12000.jpg" alt="Hello, world!" />

If Client Hints are supported, when the browser makes a request for hello_world_12000.jpg, it might attach the following header:

Viewport-Width: 1440

The server could then automatically serve a smaller image variant (e.g. hello_world_1500.jpg), despite the request originally asking for hello_world_12000.jpg image.

By enabling browsers to request an image with appropriate dimensions, we save bandwidth and time for both your server and for your visitors.

Format

JPEG, PNG, GIF, WebP, and now, AVIF. AVIF is the latest image format with widespread industry support, and it often outperforms its preceding formats. AVIF supports transparency with an alpha channel, it supports animations, and it is typically 50% smaller than comparable JPEGs (vs. WebP’s reduction of only 30%).

We added the AVIF format to Cloudflare’s Image Resizing product last year as soon as Google Chrome added support. Firefox 93 (scheduled for release on October 5, 2021) will be Firefox’s first stable release, and with both Microsoft and Apple as members of AVIF’s Alliance for Open Media, we hope to see support in Edge and Safari soon. Before these modern formats, we also saw innovative approaches to improving how an image loads on a webpage. BlurHash is a technique of embedding a very small representation of the image inside the HTML markup which can be immediately rendered and acts as a placeholder until the final image loads. This small representation (hash) produced a blurry mix of colors similar to that of the final image and so eased the loading experience for users.

Progressive JPEGs are similar in effect, but are a built-in feature of the image format itself. Instead of encoding the image bytes from top-to-bottom, bytes are ordered in increasing levels of image detail. This again produces a more subtle loading experience, where the user first sees a low quality image which progressively “enhances” as more bytes are loaded.

Optimizing images on the web

Quality

The newer image formats (WebP and AVIF) support lossless compression, unlike their predecessor, JPEG. For some uses, lossless compression might be appropriate, but for the majority of websites, speed is prioritized and this minor loss in quality is worth the time and bytes saved.

Optimizing where to set the quality is a balancing act: too aggressive and artifacts become visible on your image; too little and the image is unnecessarily large. Butteraugli and SSIM are examples of algorithms which approximate our perception of image quality, but this is currently difficult to automate and is therefore best set manually. In general, however, we find that around 85% in most compression libraries is a sensible default.

Markup

All of the previous techniques reduce the number of bytes an image uses. This is great for improving the loading speed of those images and the Largest Contentful Paint (LCP) metric. However, to improve the Cumulative Layout Shift (CLS) metric, we must minimize changes to the page layout. This can be done by informing the browser of the image size ahead of time.

On a poorly optimized webpage, images will be embedded without their dimensions in the markup. The browser fetches those images, and only once it has received the header bytes of the image can it know about the dimensions of that image. The effect is that the browser first renders the page where the image takes up zero pixels, and then suddenly redraws with the dimensions of that image before actually loading the image pixels themselves. This is jarring to users and has a serious impact on usability.

It is important to include dimensions of the image inside HTML markup to allow the browser to allocate space for that image before it even begins loading. This prevents unnecessary redraws and reduces layout shift. It is even possible to set dimensions when dynamically loading responsive images: by informing the browser of the height and width of the original image, assuming the aspect ratio is constant, it will automatically calculate the correct height, even when using a width selector.

<img height="9000"
     width="12000"
     srcset="hello_world_1500.jpg 1500w,
             hello_world_2000.jpg 2000w,
             hello_world_12000.jpg 12000w"
     sizes="(max-width: 1500px) 1500px,
            (max-width: 2000px) 2000px,
            12000px"
     src="hello_world_12000.jpg"
     alt="Hello, world!" />

Finally, lazy-loading is a technique which reduces the work that the browser has to perform right at the onset of page loading. By deferring image loads to only just before they’re needed, the browser can prioritize more critical assets such as fonts, styles and JavaScript. By setting the loading property on an image to lazy, you instruct the browser to only load the image as it enters the viewport. For example, on an e-commerce site which renders a grid of products, this would mean that the page loads faster for visitors, and seamlessly fetches images below the fold, as a user scrolls down. This is supported by all major browsers except Safari which currently has this feature hidden behind an experimental flag.

<img loading="lazy" … />

Hosting

Finally, you can improve image loading by hosting all of a page’s images together on the same first-party domain. If each image was hosted on a different domain, the browser would have to perform a DNS lookup, create a TCP connection and perform the TLS handshake for every single image. When they are all co-located on a single domain (especially so if that is the same domain as the page itself), the browser can re-use the connection which improves the speed it can load those images.

Test your website

Today, we’re excited to announce the launch of Cloudflare’s Image Optimization Testing Tool. Simply enter your website URL, and we’ll run a series of automated tests to determine if there are any possible improvements you could make in delivering optimal images to visitors.

We use WebPageTest and Lighthouse to calculate the Core Web Vitals on two versions of your page: one as the original, and one with Cloudflare’s best-effort automatic optimizations. These optimizations are performed using a Cloudflare Worker in combination with our Image Resizing product, and will transform an image’s format, quality, and dimensions.

We report key summary metrics about your webpage’s performance, including the aforementioned Cumulative Layout Shift (CLS) and Largest Contentful Page (LCP), as well as a detailed breakdown of each image on your page and the optimizations that can be made.

Cloudflare Images

Cloudflare Images can help you to solve a number of the problems outlined in this post. By storing your images with Cloudflare and configuring a set of variants, we can deliver optimized images from our edge to your website or app. We automatically set the optimal image format and allow you to customize the dimensions and fit for your use-cases.

We’re excited to see what you build with Cloudflare Images, and you can expect additional features and integrations in the near future. Get started with Images today from $6/month.