AWS CloudFormation helps you model and provision cloud infrastructure as code using JSON or YAML templates, or through tools like the AWS Cloud Development Kit (CDK). Whether you create stacks directly, use change sets for preview, or deploy through CI/CD pipelines and AI agents, the speed of your deployment cycle directly impacts how fast you can iterate.
In March 2024, we published How we sped up AWS CloudFormation deployments with optimistic stabilization, where we explained how CloudFormation provisions resources and what happens during stabilization. That post introduced the CONFIGURATION_COMPLETE event and the optimistic stabilization strategy that reduced deployment times by up to 40%. Today, CloudFormation express mode takes this further.
Express mode is recommended for development workflows where you iterate frequently. It makes your deployments complete faster so you can get immediate feedback. For production deployments where you need resources ready to serve traffic before proceeding, the default behavior remains the right choice. Combined with pre-deployment validation, which catches template errors before provisioning begins, Express mode completes the iterate-faster picture: validate in seconds, deploy in seconds. To understand what express mode gives you, you first need to understand what CloudFormation has always done during deployment.
What CloudFormation does during deployment
When you add an AWS::SQS::Queue to your template and deploy, the queue is created. But can it receive messages yet? Often, no. There’s a window between “resource created” and “resource can serve traffic.” This is true across AWS services. An EC2 instance is “launched” before it can respond to HTTP requests. A CloudFront distribution is “created” before it propagates to edge locations worldwide. An ECS service is “active” before its containers pass health checks and reach desired capacity. And a Lambda function deletion isn’t complete until its network interfaces are cleaned up.
Figure 1: Single resource lifecycle phases
This process is called stabilization. Stabilization means that when a stack operation reports CREATE_COMPLETE, the resources can serve traffic. This is useful for production pipelines where “stack complete” should mean “ready to shift traffic.” Now, with express mode, you have a second option.
Express mode gives you control over when you want CloudFormation to report completion. With express mode, CloudFormation completes the stack operation as soon as resource configuration is applied. Resources continue becoming ready to serve traffic in the background. Regardless of mode, CloudFormation still:
Respects resource dependencies within the stack – if a resource references another resource’s ID or attribute, the referenced resource’s configuration is confirmed first. Resources with no dependencies on each other proceed in parallel.
Creates, updates, or deletes each resource the same way
Retries dependent resources that encounter transient failures during the operation
Here’s what that looks like for a deployment:
Figure 3: Express mode timeline
The resource takes the same time to become ready to serve traffic in both cases. Express mode makes your iteration cycle faster by not blocking you on the stabilization wait.
When this matters
Development iteration
You’re building a VPC with subnets, a security group, and an ALB. You need the ALB’s DNS name and the security group ID to configure the next layer of your application. You don’t need to send traffic to the ALB right now. You just need to know it exists and get its attributes. With Express mode, you get the ARN, the DNS name, and the security group bindings in seconds. You proceed to your next iteration.
AI agent workflows
An AI agent iterating on infrastructure needs a tight feedback loop: deploy, observe the result, adjust, deploy again. The agent doesn’t need the CloudFront distribution to propagate globally before deciding whether the template is correct. It needs confirmation that the configuration was accepted.
Express mode turns a 5-10 minute CloudFront deployment into a sub-minute confirmation. The agent can validate, refine, and redeploy multiple times in the window a single default deployment would have taken.
Dependent stack deployments
When you deploy multiple stacks in sequence, each stack operation completes faster with Express mode. Whether dependencies exist within a stack or across stacks via import/export, Express mode handles retries and waits to make sure dependent resources can still be provisioned. It moves faster without breaking your dependency chain
Getting started
Enable Express mode per operation with a single parameter:
Express mode disables rollback by default for faster iteration. If a resource fails to configure, the stack stays in place and you can fix and retry immediately. To re-enable rollback:
Use the --express flag with sam deploy or sam sync:
sam deploy --express

sam sync --express
To persist the setting, add --save-params and Express mode is saved to your samconfig.toml:
sam deploy --express --save-params
The --disable-rollback flag works alongside --express to control rollback behavior within the deployment configuration.
No template changes. No new resource types. The same template deploys the same resources. You’re choosing when to receive the “done” signal.
Additional considerations
Change sets: Express mode is supported with change sets. Specify --deployment-config at create-change-set time, and the configuration is stored with the change set and applied when executed.
Nested stacks: When you enable Express mode on a parent stack, it propagates to all nested stacks in the hierarchy. All resources across the hierarchy complete when configuration is applied.
Express mode gives you immediate confirmation that your infrastructure configuration is applied, so you can move to your next iteration without waiting for stabilization. It separates “is my configuration correct” from “are my resources serving traffic” and lets you decide which question you need answered right now.
For development iteration, AI agent workflows, and dependent stack deployments where you need resource identifiers rather than traffic readiness, Express mode delivers that answer much more quickly. For production deployments where “stack complete” should mean “ready to serve traffic,” the default behavior remains the right choice.
AWS CloudFormation helps you model and provision cloud infrastructure as code using JSON or YAML templates, or through tools like the AWS Cloud Development Kit (CDK). Whether you create stacks directly, use change sets for preview, or deploy through CI/CD pipelines and AI agents, fast feedback on template errors is critical to development velocity.
Previously, CloudFormation introduced pre-deployment validation during change set creation, catching property syntax errors, resource name conflicts, and S3 bucket emptiness constraints before execution.
Today, we are announcing that pre-deployment validation now runs automatically on every CreateStack and UpdateStack operation, so every deployment path benefits from pre-deployment checks with no configuration required. We are also introducing three new validation checks (Service Quotas limit exceeded, AWS Config Recorder conflicts, and ECR repository delete readiness), a new DisableValidation parameter for operation-level control, and the cdk validate command that leverages CloudFormation pre-deployment validation as part of the CDK developer experience.
In this blog post, we will walk you through how these capabilities work in practice. You will learn how to:
Catch property syntax errors and resource name conflicts on CreateStack and UpdateStack before any resources are provisioned
Review new WARN-mode validations (service quotas, Config Recorder, ECR delete readiness) during change set creation
Use cdk validate to get a validation report with construct-level source tracing
Control validation behavior with the DisableValidation parameter when you need to skip checks
Key Capabilities
Pre-deployment validation on all stack operations: Property syntax validation and resource name conflict detection (Resource Already Exists) now run in hard-fail mode on CreateStack and UpdateStack, in addition to CreateChangeSet. Errors are caught before any resources are provisioned.
Three new validation types: Service Quota validation, AWS Config Recorder conflict detection, and ECR Repository delete readiness checks are now available as warnings during change set creation.
CDK validate command: The cdk validate command leverages CloudFormation pre-deployment validation and provides a report with construct-level source tracing that maps errors back to your CDK code.
DisableValidation parameter: Operation-level control to skip pre-deployment validation when you need to prioritize deployment speed or bypass a known issue.
How It Works
Understanding Validation Modes
CloudFormation pre-deployment validation operates in two modes that determine how validation failures are handled:
FAIL mode stops the stack operation when validation detects errors, ensuring problematic templates cannot proceed to deployment. This applies to property syntax errors and resource name conflicts on CreateStack, UpdateStack, and CreateChangeSet operations.
WARN mode allows the operation to proceed despite validation findings, providing warnings that you can review and address before execution. This applies to service quota limits, AWS Config Recorder conflicts, and ECR repository delete readiness checks on CreateChangeSet.
What happens when validation fails:
CreateStack: Operation stops before any resources are provisioned.
UpdateStack: Operation stops, stack remains in its current state with no resources modified.
CreateChangeSet: Change set is not executable. Change set status shows FAILED.
The following scenarios demonstrate how pre-deployment validation works across different stack operations.
Scenario 1: Property Validation on CreateStack
CloudFormation evaluates each resource property definition before provisioning begins. The following template contains several common resource property errors:
The stack creation stopped before any resources were provisioned. Each validation error includes the logical resource ID, resource type, and a precise status reason describing the property issue.
In the CloudFormation console, navigate to your stack’s Events tab and click the operation ID (or the link in the banner or status reason column) to open the Operation view page. The page will open directly on the Deployment validations tab to see the validation results table:
Resource name conflict detection (RAE) identifies when your template specifies a resource name that already exists in your account. This validation now runs on CreateStack and UpdateStack operations in addition to CreateChangeSet.
Template (update-bucket.yaml)
AWSTemplateFormatVersion: "2010-09-09"
Description: Update stack adding a bucket with a conflicting name

Resources:
  ExistingFunction:
    Type: "AWS::Lambda::Function"
    Properties:
      FunctionName: "my-existing-function"
      Runtime: "python3.12"
      Handler: "index.handler"
      Role: !Sub "arn:aws:iam::${AWS::AccountId}:role/lambda-role"
      Code:
        ZipFile: |
          def handler(event, context):
              return {"statusCode": 200}

  ConflictingBucket:
    Type: "AWS::S3::Bucket"
    Properties:
      BucketName: "production-data-bucket"   # Already exists in the account
The update stops before any resources are modified. You can either rename the resource in your template or remove the existing resource that causes the conflict.
The deployment validation view below provide moe detail about the error, include status reason and path to the resource.
Figure 3: Resource Name Conflict on UpdateStack
Scenario 3: Service Quota Warning on CreateChangeSet
Service Quota validation is one of three new warning-mode validations available during change set creation. It checks whether creating or updating resources would exceed your AWS service quotas.
Because this validation operates in WARN mode, the change set is created successfully. You can review the warning, request a quota increase through the Service Quotas console, and then proceed with execution. The two other new warning validations (AWS Config Recorder conflict detection and ECR Repository delete readiness) follow the same pattern.
Figure 4: Service Quota Warning on CreateChangeSet
Scenario 4: CDK Validate Experience
The cdk validate command provides a unified validation experience that combines multiple validation sources into a single report with construct-level source tracing. Under the hood, cdk validate synthesizes your CDK app, creates a change set to invoke server-side pre-deployment validation, collects the results via DescribeEvents, and produces a report that maps errors back to your CDK source code with construct-level tracing.
Each error traces back to the specific construct and source file location in your CDK code, not just the CloudFormation logical resource ID. This construct-level tracing is what makes cdk validate uniquely valuable: you see the exact line in your code that needs to change.
Scenario 5: Controlling Validation with DisableValidation
Pre-deployment validation is enabled by default on all stack operations. If you need to skip validation for a specific operation, use the DisableValidation parameter.
When to disable validation:
When you have already validated your template through other means (cdk validate, cfn-lint, CI/CD checks)
When you need to minimize operation latency for time-sensitive deployments
Important: Disabling validation means common errors will not be caught until resource provisioning is attempted. Use this option only when you understand the trade-off between deployment speed and early error detection.
AI Agents and Automated Workflows
Pre-deployment validation gives AI agents and automation tools the fast feedback loop they need to self-correct. When an agent provisions infrastructure and the template has an error, validation returns a structured error in seconds rather than waiting minutes for a full provision-and-rollback cycle to complete. The agent can parse the error, fix the template, and retry immediately.
With cdk validate, agents get construct-level source tracing that maps errors directly to the line of CDK code that needs to change, enabling fully automated fix-and-retry loops without human intervention.
To get started with the agent experience, install the CloudFormation agent skill from the AWS Agent Toolkit. This skill gives AI agents the ability to create stacks, validate templates, and iterate on errors using pre-deployment validation feedback.
Getting Started
Pre-deployment validation runs automatically on all CreateStack, UpdateStack, and CreateChangeSet operations with no configuration required. To start benefiting:
Create or update a stack as you normally would. Validation runs automatically.
Review validation results using the DescribeEvents API, the CloudFormation Console Events tab (click the operation ID, then the Deployment validations tab), or the cdk validate command.
Fix identified issues in your template and retry the operation.
Optionally disable validation using --disable-validation for specific operations
Required IAM permissions for validation checks
Validation on CreateStack and UpdateStack (property syntax validation and resource name conflict detection) requires no additional IAM permissions beyond what is needed for the stack operation itself. For the new validation checks available during change set creation, your IAM role needs the following additional permissions:
Service Quota Check:
cloudwatch:GetMetricData
lambda:GetAccountSettings
servicequotas:GetServiceQuota
ec2:DescribeSecurityGroups
iam:GetAccountSummary
Config Recorder Check:
config:ListConfigurationRecorders
S3 Bucket Empty Check:
s3:ListBucketV2
ECR Repository Delete Readiness Check:
ecr:ListImages
If these permissions are not granted, the corresponding validation checks will be skipped without blocking the operation.
For CDK users:
# Run unified validation before deploying
cdk validate
Best Practices
Use cdk validate as your primary pre-deployment check. It leverages CloudFormation pre-deployment validation in a single command, giving you comprehensive coverage before any deployment is attempted.
Place CreateChangeSet as the first pipeline stage. For pipelines that use change sets, this ensures pre-deployment validation fires at the pipeline entry point. CDK Pipelines integrates this by default.
Let validation run by default. The few seconds of validation time pay for themselves by preventing full provision-and-rollback cycles that take minutes or longer.
Use DisableValidation intentionally. Reserve it for cases where you have already validated through other means or need to bypass a known false positive. Do not disable validation globally.
Integrate validation into PR/CI workflows. Run cdk validate or cfn-lint as part of your pull request checks to catch errors before code is merged, preventing invalid templates from reaching deployment pipelines.
Monitor validation warnings. WARN-mode validations (service quota, Config Recorder, ECR delete readiness) indicate potential issues that may cause failures at execution time. Address them proactively.
Conclusion
Pre-deployment validation on all stack operations represents a significant step forward in CloudFormation’s shift-left validation strategy. By catching common deployment errors in seconds before any resources are provisioned, this capability eliminates unnecessary rollback cycles and accelerates development workflows across the board.
Combined with the cdk validate command, which provides a unified validation experience with construct-level tracing, and the DisableValidation parameter for operation-level control, teams now have a complete toolkit for managing the trade-off between validation coverage and deployment speed. AI agents and automated pipelines benefit from structured, machine-readable feedback that enables immediate self-correction, turning what were once multi-minute debugging cycles into second-level iteration loops.
Pre-deployment validation is available in all AWS Regions where CloudFormation is supported. No configuration or opt-in is required. To learn more, visit the Validate stack deployments User Guide.
AWS CloudFormation makes it easy to model and provision your cloud application infrastructure as code. CloudFormation templates can be written directly in JSON or YAML, or they can be generated by tools like the AWS Cloud Development Kit (CDK). Resources are created and managed by CloudFormation as units called Stacks.
Managing infrastructure across multiple AWS accounts and Regions is a common pattern for organizations adopting AWS best practices like multi-account strategies. However, sharing infrastructure values, such as VPC IDs, subnet configurations, or database endpoints, between stacks in different accounts or Regions has historically required multiple manual steps. Today, we’re excited to announce Fn::GetStackOutput, a new CloudFormation intrinsic function that lets you reference stack outputs across accounts and Regions directly in your CloudFormation templates and AWS CDK applications.
In this post, we walk through how Fn::GetStackOutput works in both CloudFormation and CDK, compare it with the existing Fn::ImportValue approach, and show you how to get started with practical examples.
The challenge: sharing values across accounts and Regions
When building multi-account AWS environments, teams frequently need to share infrastructure values across organizational boundaries. For example:
A networking team maintains a shared VPC in a central account, and application teams in other accounts need to reference the VPC ID.
A security team deploys shared security groups, and workload accounts need to consume them.
A platform team provisions foundational resources in one Region, and teams deploying in other Regions need those values.
Previously, you had two options:
Fn::ImportValue with exports worked well within the same account and Region but did not support cross-account or cross-Region references.
Manual approaches such as copying values between templates, passing parameters through CI/CD pipelines, or maintaining custom automation to keep values in sync.
Both approaches added operational overhead and increased the risk of configuration drift when values changed.
Introducing Fn::GetStackOutput
Fn::GetStackOutput is a new CloudFormation intrinsic function that resolves stack output references at deployment time. It provides two key advantages over the existing export/import model:
Cross-account and cross-Region support. You can reference outputs from stacks in any account and Region (within the same partition).
No exports required. You can reference any stack output directly, without the producing stack needing to declare an Export.
How it works
When CloudFormation processes a template containing Fn::GetStackOutput, it:
Identifies the referenced stack and output.
If a RoleArn is specified, assumes that role to access the target account.
Calls DescribeStacks to retrieve the output value from the specified stack and Region.
Resolves the value and continues template processing.
The function accepts four parameters:
StackName (required): The name of the stack that contains the output you want to reference.
OutputName (required): The logical ID of the output to reference. This is the key defined in the Outputs section of the referenced stack’s template, not an export name.
Region (optional): The AWS Region where the referenced stack is deployed. Defaults to the Region of the stack being created or updated.
RoleArn (optional): The ARN of an IAM role with cloudformation:DescribeStacks permissions on the referenced stack. Use this parameter when referencing a stack in a different AWS accoun
Walkthrough: four scenarios
Let’s walk through a practical example. Suppose you have a networking stack that creates a VPC:
For a more restrictive policy, scope the Resource to the specific stack ARN you want to reference.
The IAM role should be assumable by your consumer stack’s execution role. For this example, we’ll grant generic access to account 222222222222 in the trust policy:
If you’re already using Fn::ImportValue, you may be wondering when to use which. Here’s a comparison:
Fn::ImportValue:
Same account, same Region: Supported
Cross-account: Not supported
Cross-Region: Not supported
Requires explicit Export: Yes
Reference type: Strong — blocks deletion of the exporting stack
Referential integrity: Yes
Fn::GetStackOutput:
Same account, same Region: Supported
Cross-account: Supported
Cross-Region: Supported
Requires explicit Export: No
Reference type: Weak — resolved at stack create or update time
Referential integrity: No
Use Fn::ImportValue when you need strong referential integrity within the same account and Region. CloudFormation prevents you from deleting a stack that exports values consumed by other stacks.
Use Fn::GetStackOutput when you need cross-account or cross-Region references, or when you want to avoid managing explicit exports.
Understanding weak references
An important difference to understand: Fn::GetStackOutput creates weak references. This means:
The referenced stack doesn’t know it’s being referenced. Unlike exports, there is no dependency tracking between the producer and consumer stacks.
Deleting the producer stack is not blocked. If you delete the producer stack or remove the referenced output, CloudFormation does not prevent you. However, the next time the consumer stack is created or updated, the operation will fail because the reference can no longer be resolved. Because of this, deleting the producer stack may cause impact in the consumer stack.
Changes are not automatically propagated. If the output value changes in the producer stack, the consumer stack is not automatically updated. You need to run an update on the consumer stack to pick up the new value.
Best practices for weak references
Enable deletion protection on producer stacks that other stacks depend on.
Use stack policies to prevent accidental modifications to critical outputs.
Document dependencies between stacks so teams are aware of cross-stack relationships.
Scope IAM roles narrowly by restricting DescribeStacks permissions to specific stack ARNs when possible.
Using Fn::GetStackOutput with AWS CDK
CDK now uses Fn::GetStackOutput to automatically resolve cross-region and cross-account references in the same app. Previously, this required opting in through the crossRegionReferences Stack parameter.
Here’s an example of how cross-account references work in CDK:
class Provider extends Stack {
  public readonly vpc: ec2.Vpc;

  constructor(scope: Construct, id: string, props: StackProps) {
    super(scope, id, props);
    this.vpc = new ec2.Vpc(this, 'MyVpc', { maxAzs: 2 });
  }
}

interface ConsumerProps extends StackProps {
  readonly vpc: ec2.IVpc;
}

class Consumer extends Stack {
  constructor(scope: Construct, id: string, props: ConsumerProps) {
    super(scope, id, props);
    new ec2.SecurityGroup(this, 'MySG', {
      vpc: props.vpc,
      description: 'SG in Consumer using VPC from Provider',
    });
  }
}

const app = new App({
  context: {
    // choice between 'strong', 'weak', or 'both'
    '@aws-cdk/core:defaultCrossStackReferences': 'weak',
  },
});

const provider = new Provider(app, 'Provider', {
  env: { account: '111111111', region: 'us-west-2' },
});

new Consumer(app, 'Consumer', {
  env: { account: '111111111', region: 'us-west-2' },
  vpc: provider.vpc,
});
The CDK synthesizes this into a template using Fn::GetStackOutput with no additional configuration required from the user. Since this is a cross-account reference, CDK will also generate a new IAM role that can be assumed by the consumer stack.
In case of same account, cross-region, or same account and region, you can tell the CDK whether to generate strong or weak references, using the @aws-cdk/core:defaultCrossStackReferences context key. Here is how it works:
Flag=strong (default when unset):
Same account and Region: generates a Fn::ImportValue reference
Same account, cross-Region: generates an ExportWriter/ExportReader pair (legacy custom resources)
Cross-account: not possible, falls back to weak
Flag=both:
Same account and Region: generates a Fn::GetStackOutput reference and an Export, but not Fn::ImportValue
Same account, cross-Region: generates a Fn::GetStackOutput reference and an ExportWriter, but not the ExportReader
Cross-account: generates a Fn::GetStackOutput reference and a cross-account IAM role
Flag=weak:
Same account and Region: generates a Fn::GetStackOutput reference
Same account, cross-Region: generates a Fn::GetStackOutput reference
Cross-account: generates a Fn::GetStackOutput reference and a cross-account IAM role
You can also resolve cross-region or cross-account references between stacks in different CDK Applications explicitly using the Fn.getStackOutput() method. For more information, see the CDK documentation.
For cross-account references, create an IAM role in the producer account with cloudformation:DescribeStacks permissions.
Add the function to your template. Use the Fn::GetStackOutput syntax with the appropriate parameters.
Deploy your stack. CloudFormation resolves the reference during the create or update operation.
Conclusion
Fn::GetStackOutput simplifies multi-account and multi-Region infrastructure management by enabling direct references between stacks without requiring explicit exports or custom workarounds. Whether you’re using CloudFormation templates directly or building with the AWS CDK, this new capability reduces operational overhead and the risk of configuration drift across your organization.
This feature is available in all AWS Regions where CloudFormation is supported. To learn more, visit the Fn::GetStackOutput documentation in the CloudFormation Template Reference Guide.
AWS CloudFormation enables you to model and provision your cloud application infrastructure as code-base templates. Whether you prefer writing templates directly in JSON or YAML, or using programming languages like Python, Java, and TypeScript with the AWS Cloud Development Kit (CDK), CloudFormation and CDK provide the flexibility you need. For organizations adopting multi-account strategies, CloudFormation StackSets offers a powerful capability to deploy resources across multiple regions and accounts in parallel.
In 2025, we delivered a comprehensive set of major enhancements focused on three core areas: reducing dev-test cycle through early validation, improving deployment safety with improved configuration drift management, and integrating IaC context to AI-powered development tools.
These launches address common pain points in infrastructure development workflows, from catching deployment errors before resource provisioning to managing configuration drift systematically. The features span the entire development lifecycle, from template authoring in your IDE to multi-account deployments at scale.
This blog provides an overview of the key capabilities we launched in 2025 and how they improve your infrastructure development workflow.
Accelerating Development Cycles
Early Validation & Enhanced Troubleshooting: Pre-Deployment Error Detection
CloudFormation now validates your templates during change set (preview of infrastructure changes before deployment) creation, catching common deployment errors before resource provisioning begins. The validation checks for invalid property syntax, resource name conflicts with existing resources in your account, and S3 bucket emptiness constraints on delete operations.
Figure 1: Pre-deployment validations view
When validation fails, the change set status shows ‘FAILED’ with detailed information about each issue, including the property path where problems occur. This early feedback helps you fix issues faster rather than waiting for deployment failures.
Figure 2: Validation of Invalid ENUM value for nested property
Improved Deployment troubleshooting
For runtime errors that occur during deployment, every stack operation now receives a unique operation ID. You can filter stack events by operation ID to quickly identify root causes, reducing troubleshooting time from minutes to seconds. The new describe-events API provides grouped access to events. You can query events for a specific operation, filter to FAILED status events, and extract the root cause without parsing through the entire stack event history.
CloudFormation IDE Experience: Language Server Protocol Integration
We launched the AWS CloudFormation Language Server, bringing end-to-end infrastructure development directly into your IDE. Available through the AWS Toolkit for Visual Studio Code, Kiro, and other compatible IDEs, this capability transforms how you author CloudFormation templates.
Figure 1: Initializing a CloudFormation project with environment configuration
The Language Server provides context-aware auto-completion that understands CloudFormation semantics. When you define resources, it suggests only required properties automatically, while optional properties appear on hover. Built-in validation catches issues before deployment integrating early validation capabilities, flagging invalid resource properties, missing IAM permissions, and security policy violations using CloudFormation Guard.
Figure 2: Hover information displaying optional properties and their documentation
The drift-aware deployment view highlights differences between your template and deployed infrastructure, helping you spot configuration changes made outside CloudFormation. The Language Server also provides semantic navigation features, go-to-definition for logical IDs, find-all-references for resource dependencies, and hover documentation that pulls from the CloudFormation resource specification. These features work across intrinsic functions like !Ref, !GetAtt, and !Sub, understanding the CloudFormation template structure. By integrating validation and real-time feedback directly into your authoring experience, the Language Server keeps you in flow state, reducing context switching between your IDE, AWS Console, and documentation.
Figure 3: Type-aware completions for intrinsic functions like !GetAtt & !Ref
Stack Refactoring: Adapt your infrastructure to your organization evolution
Stack Refactoring enables you to reorganize your CloudFormation and CDK infrastructure without disrupting deployed resources. You can move resources between stacks, rename logical IDs, and decompose monolithic stacks into focused components while maintaining resource stability and operational state.
Whether you’re modernizing legacy stacks, aligning infrastructure with evolving architectural patterns, or improving long-term maintainability, Stack Refactoring adapts your CloudFormation and CDK organization to changing requirements. The console and CDK experience, launched this year, extends the earlier CLI capability, making refactoring accessible through your preferred interface.
Configuration drift occurs when infrastructure managed by CloudFormation is modified through the AWS Console, SDK, or CLI. Drift-aware change sets address this challenge by providing a three-way comparison between your new template, last-deployed template, and actual infrastructure state.
Figure 4: Examine the drift-aware change set to see the dangerous memory reduction that would occur
This capability helps you prevent unexpected overwrites of drift. If your change set preview shows unintended changes, you can update your template values and recreate the change set before deployment. During execution, CloudFormation matches resource properties with template values and recreates resources deleted outside of CloudFormation.
Drift-aware change sets enable you to systematically revert drift and keep infrastructure in sync with templates, strengthening reproducibility for testing and disaster recovery while maintaining your security posture.
AWS CloudFormation Hooks now supports managed proactive controls, enabling customers to validate resource configurations against AWS best practices without writing custom Hooks logic. Customers can select controls from the AWS Control Tower Controls Catalog and apply them during CloudFormation operations. When using CloudFormation, customers can configure these controls to run in warn mode, allowing teams to test controls without blocking deployments and giving them the flexibility to evaluate control behavior before enforcing policies in production. This significantly reduces setup time, eliminates manual errors, and ensures comprehensive governance coverage across your infrastructure.
AWS also introduced a new Hooks Invocation Summary page in the CloudFormation console. This centralized view provides a complete historical record of Hooks activity, showing which controls were invoked, their execution details, and outcomes such as pass, warn, or fail. This simplifies compliance reporting issues faster.
With this launch, customers can now leverage AWS-managed controls as part of their provisioning workflows, eliminating the overhead of writing and maintaining custom logic. These controls are curated by AWS and aligned with industry best practices, helping teams enforce consistent policies across all environments. The new summary page delivers essential visibility into Hook invocation history, enabling faster issue resolution and streamlined compliance reporting.
CloudFormation StackSets now supports deployment ordering for auto-deployment mode, enabling you to define the sequence in which stack instances automatically deploy across accounts and regions. This capability coordinates complex multi-stack deployments where foundational infrastructure must be provisioned before dependent application components.
When creating or updating a StackSet, you can specify up to 10 dependencies per stack instance using the DependsOn parameter in the AutoDeployment configuration. StackSets automatically orchestrates deployments based on your defined relationships. For example, you can ensure networking and security stack instances complete deployment before application stack instances begin, preventing deployment failures due to missing dependencies.
StackSets includes built-in cycle detection to prevent circular dependencies and provides error messages to help resolve configuration issues. This feature is available at no additional cost in all AWS Regions where CloudFormation StackSets is available.
We introduced the AWS Infrastructure-as-Code (IaC) MCP Server, bridging AI assistants with your AWS infrastructure development workflow. Built on the Model Context Protocol (MCP), this server enables AI assistants like Kiro CLI, Claude, or Cursor to help you search CloudFormation and CDK documentation, validate templates, troubleshoot deployments, and follow best practices, all while maintaining the security of local execution.
Figure 1: Kiro-CLI with AWS IaC MCP server
The IaC MCP Server provides nine specialized tools organized into two categories. Remote documentation search tools connect to AWS knowledge bases to retrieve up-to-date information about CloudFormation resources, CDK APIs, and implementation guidance. Local validation and troubleshooting tools run entirely on your machine, performing syntax validation with cfn-lint, security checks with CloudFormation Guard, and deployment failure analysis with integrated CloudTrail events.
Figure 4: Validate my CloudFormation template with AWS IaC MCP Server
Key Use Cases
Intelligent Documentation Assistant
Instead of manually searching through documentation, ask your AI assistant natural language questions:
“How do I create an S3 bucket with encryption enabled in CDK?”
The server searches CDK best practice and samples, returning relevant code examples and explanations.
2. Proactive Template Validation
Before deploying infrastructure changes:
User: “Validate my CloudFormation template and check for security issues”
AI Agent: [Uses validate_cloudformation_template and check_cloudformation_template_compliance]
“Found 2 issues: Missing encryption on EBS volumes,
and S3 bucket lacks public access block configuration”
3. Rapid Deployment Troubleshooting
When a stack deployment fails:
User: “My stack ‘stack_03’ in us-east-1 failed to deploy. What happened?”
AI Agent: [Uses troubleshoot_stack_deployment with CloudTrail integration]
“The deployment failed due to insufficient IAM permissions.
CloudTrail shows AccessDenied for ec2:CreateVpc.
You need to add VPC permissions to your deployment role.”
4. Learning and Exploration
New to AWS CDK? The server helps you discover constructs and patterns:
User: “Show me how to build a serverless API”
AI Agent: [Searches CDK constructs and samples]
“Here are three approaches using API Gateway + Lambda…”
As we begin 2026, our focus remains on making infrastructure deployment faster, safer, and more manageable. The launches in 2025 reflect our commitment to solving real customer challenges and improving the CloudFormation developer experience. From intelligent IDE integrations to AI-powered assistance, these capabilities help you build infrastructure with greater confidence and efficiency.
We encourage you to try these features and share your feedback. For detailed information about any of these launches, visit our documentation or check out the AWS DevOps Blog.
Streamline your AWS infrastructure development with AI-powered documentation search, validation, and troubleshooting
Introduction
Today, we’re excited to introduce the AWS Infrastructure-as-Code (IaC) MCP Server, a new tool that bridges the gap between AI assistants and your AWS infrastructure development workflow. Built on the Model Context Protocol (MCP), this server enables AI assistants like Kiro CLI, Claude or Cursor to help you search AWS CloudFormation and Cloud Development Kit (CDK) documentation, validate templates, troubleshoot deployments, and follow best practices – all while maintaining the security of local execution.
Whether you’re writing AWS CloudFormation templates or AWS Cloud Development Kit (CDK) code, the IaC MCP Server acts as an intelligent companion that understands your infrastructure needs and provides contextual assistance throughout your development lifecycle.
The Model Context Protocol (MCP) is an open standard that enables AI assistants to securely connect to external data sources and tools. Think of it as a universal adapter that lets AI models interact with your development tools while keeping sensitive operations local and under your control.
The IaC MCP Server provides nine specialized tools organized into two categories:
Remote Documentation Search Tools
These tools connect to the AWS Knowledge MCP backend to retrieve relevant, up-to-date information:
search_cdk_documentation Search the AWS CDK knowledge base for APIs, concepts, and implementation guidance.
search_cdk_samples_and_constructs Discover pre-built AWS CDK constructs and patterns from the AWS Construct Library.
search_cloudformation_documentation Query CloudFormation documentation for resource types, properties, and intrinsic functions.
read_cdk_documentation_page Retrieve and read full documentation pages returned from searches or provided URLs.
Local Validation and Troubleshooting Tools
These tools run entirely on your machine
cdk_best_practices Access a curated collection of AWS CDK best practices and design principles.
validate_cloudformation_template Perform syntax and schema validation using cfn-lint to catch errors before deployment.
check_cloudformation_template_compliance Run security and compliance checks against your templates using AWS Guard rules and cfn-guard.
troubleshoot_cloudformation_deployment Analyze CloudFormation stack deployment failures with integrated CloudTrail event analysis. This tool will use your AWS credentials to analyze your stack status.
get_cloudformation_pre_deploy_validation_instructions Returns instructions for CloudFormation’s pre-deployment validation feature, which validates templates during change set creation.
Key Use Cases
Intelligent Documentation Assistant
Instead of manually searching through documentation, ask your AI assistant natural language questions:
“How do I create an S3 bucket with encryption enabled in CDK?”
The server searches CDK best practic and samples, returning relevant code examples and explanations.
2. Proactive Template Validation
Before deploying infrastructure changes:
User: “Validate my CloudFormation template and check for security issues”
AI Agent: [Uses validate_cloudformation_template and check_cloudformation_template_compliance]
“Found 2 issues: Missing encryption on EBS volumes,
and S3 bucket lacks public access block configuration”
3. Rapid Deployment Troubleshooting
When a stack deployment fails:
User: “My stack ‘stack_03’ in us-east-1 failed to deploy. What happened?”
AI Agent: [Uses troubleshoot_stack_deployment with CloudTrail integration]
“The deployment failed due to insufficient IAM permissions.
CloudTrail shows AccessDenied for ec2:CreateVpc.
You need to add VPC permissions to your deployment role.”
4. Learning and Exploration
New to AWS CDK? The server helps you discover constructs and patterns:
User: “Show me how to build a serverless API”
AI Agent: [Searches CDK constructs and samples]
“Here are three approaches using API Gateway + Lambda…”
Architecture and Security
Security Design
Local Execution: The MCP server runs entirely on your local machine using uv (the fast Python package manager). No code or templates are sent to external services except for documentation searches.
AWS Credentials: The server uses your existing AWS credentials (from ~/.aws/credentials, environment variables, or IAM roles) to access CloudFormation and CloudTrail APIs. This follows the same security model as the AWS CLI.
stdio Communication: The server communicates with AI assistants over standard input/output (stdio), with no network ports opened.
Minimal Permissions: For full functionality, the server requires read-only access to CloudFormation stacks and CloudTrail events—no write permissions needed for validation and troubleshooting workflows.
Getting Started
Prerequisites
Python 3.10 or later uv package manager AWS credentials configured locally MCP-compatible AI client (e.g., Kiro CLI, Claude Desktop)
Configuration
Configure the MCP server in your MCP client configuration. For this blog we will focus on Kiro CLI. Edit .kiro/settings/mcp.json):
Privacy Notice: This MCP server executes AWS API calls using your credentials and shares the response data with your third-party AI model provider (e.g., Amazon Q, Claude Desktop, Cursor, VS Code). Users are responsible for understanding your AI provider’s data handling practices and ensuring compliance with your organization’s security and privacy requirements when using this tool with AWS resources.
IAM Permissions
The MCP server requires the following AWS permissions:
For Template Validation and Compliance:
No AWS permissions required (local validation only)
For Deployment Troubleshooting:
cloudformation:DescribeStacks
cloudformation:DescribeStackEvents
cloudformation:DescribeStackResources
cloudtrail:LookupEvents (for CloudTrail deep links)
IMPORTANT: Ensure you have satisfied all prerequisites before attempting these commands.
1. With the mcp.json file correctly set, try to run a sample prompt. In your terminal, run kiro-cli chat to start using Kiro-cli in the CLI.
Figure 1: Kiro-CLI with AWS IaC MCP server
Scenarios:
“What are the CDK best practices for Lambda functions?”
Figure 2: Search the CDK best practices for Lambda functions
“Search for CDK samples that use DynamoDB with Lambda”
Figure 3: Search for CDK samples that use DynamoDB with Lambda
“Validate my CloudFormation template at ./template.yaml”
Figure 4: Validate my CloudFormation template with AWS IaC MCP Server
“Check if my template complies with security best practices”
Figure 5: Check if my template complies with security best practices with AWS IaC MCP Server
Best Practices
Start with Documentation Search: Before writing code, search for existing constructs and patterns
Validate Early and Often: Run validation tools before attempting deployment
Check Compliance: Use check_template_compliance to catch security issues during development
Leverage CloudTrail: When troubleshooting, the CloudTrail integration provides detailed failure context
Follow CDK Best Practices: Use the cdk_best_practices tool to align with AWS recommendations
What’s Next?
The IAC MCP Server represents a new paradigm in the AI agentic workflow infrastructure development – one where AI assistants understand your tools, help you navigate complex documentation, and provide intelligent assistance throughout the development lifecycle.
Feedback: We welcome issues and pull requests! Or respond to our IaC survey here.
Ready to supercharge your infrastructure as code development? Install the IaC MCP Server today and experience AI-powered assistance for your AWS CDK and CloudFormation workflows.
Have questions or feedback? Reach out to the blog authors on the AWS Developer Forums.
AWS CloudFormation makes it easy to model and provision your cloud application infrastructure as code. CloudFormation templates can be written directly in JSON or YAML, or they can be generated by tools like the AWS Cloud Development Kit (CDK). Resources are created and managed by CloudFormation as units called Stacks. Additionally, change set enable you to preview the stack changes before deployment.
CloudFormation now offers powerful new features that transform how you develop and troubleshoot infrastructure as code, pre-deployment validation that catches errors in seconds, enhanced operation tracking, and simplified failure debugging. These capabilities shift-left infrastructure code validation, helping you prevent infrastructure deployment failures that impacts development velocity.
In this blog post, we’ll explore how these new features accelerate development cycles by catching common errors during change set creation and providing precise troubleshooting through operation tracking and failure filtering. Whether you’re a platform engineer managing complex multi-service deployments or a developer iterating on infrastructure templates, we’ll show you how to:
Validate resource properties and detect naming conflicts before deployment
Prevent deployment failures by checking S3 bucket emptiness before deletion operations
Track operations with unique IDs for focused troubleshooting
Quickly identify root causes using the new describe-events API
This comprehensive guide will walk through real-world scenarios demonstrating how these capabilities can reduce infrastructure deployment failures from hours of debugging to seconds of validation, helping you deliver cloud infrastructure faster and more reliably.
Key Capabilities
Pre-deployment Validation: Catch template errors instantly instead of discovering them after resource provisioning attempts. These include pre-deployment validation for resource property syntax errors, resource naming conflicts for existing resources in your account, and S3 bucket emptiness constraint violations on delete operations.
Operation Tracking: Say goodbye to long debugging sessions. Each stack action now comes with a unique Operation ID, transforming the “needle in haystack” troubleshooting experience into precise, targeted problem-solving.
Streamlined Events API for simplified Debugging: Use the new describe-events API and FailedEvents=true filter to instantly pinpoint issues. One command tells you exactly what went wrong, eliminating the need to scroll through endless logs.
Immediate Feedback: Transform your CI/CD pipeline from a potential bottleneck into a rapid iteration engine. Get immediate feedback on common deployment issues, allowing your team to fix and deploy faster than ever before.
How It works
Pre-deployment Validation
The following scenarios show how you can leverage CloudFormation pre-deployment validation to detect property syntax errors, resource naming conflicts, and constraint violations during change set creation.
Understanding Validation Modes CloudFormation pre-deployment validation operates in two modes that determine how validation failures are handled.
FAIL mode prevents change set execution when validation detects errors, ensuring problematic templates cannot proceed to deployment. This applies to property syntax errors and resource naming conflicts.
WARN mode allows change set creation to succeed despite validation failures, providing warnings that developers can review and address before execution. This applies to constraint violations like S3 bucket emptiness that may be resolvable through manual intervention.
Understanding these modes helps you anticipate whether validation issues will block your deployment workflow or simply require attention before execution.
Let’s walk you through practical scenarios:
Scenario 1: Validate Resource Property Syntax
CloudFormation evaluates each resource property definition or value before provisioning begins. The following example illustrates several common resource property errors:
The “AWS::Lambda::Function” Role property requires an ARN pattern.
The “AWS::Lambda::Function” Timeout property expects an integer instead of a string.
The “AWS::Lambda::Function” TracingConfig.Mode nested property ENUM value is invalid.
The “AWS::Lambda::Alias” Name property is required but not defined.
The “AWS::Lambda::Alias” the extra property Description in a nested path RoutingConfig.AdditionalVersionWeights.0 is not supported.
Prior to this launch, these resource configuration errors would be detected at the resource provisioning time only. However, with the pre-deployment validations feature, these errors can be identified ahead of the deployment phase, streamlining the development-test lifecycle efficiency and minimizing rollbacks during deployments.
You can see the status of the change set is failed with a detailed status reason. You can now proceed to review the change set validation results.
Step 3: Review validation results
Console
With the console, you can review multiple validation errors in a single interface. When you click on a validation, CloudFormation pinpoints the location of the invalid property error in your template.
Figure 3: Pre-deployment validations view
Use Case: Invalid ENUM value for nested property Catching invalid configuration values before deployment. This demonstrates validation of nested properties like TracingConfig.Mode. The tool helpfully shows the supported values “Active” & “Pass through” as well as the provided invalid value “DISABLED”.
Figure 4: Validation of Invalid ENUM value for nested property
Use Case: Lambda Function Timeout property type mismatch Preventing type-related deployment failures. Shows how validation catches string values (“30s”) where integers are required, saving developers from runtime errors.
Figure 5: Validation of Lambda Function Timeout property type mismatch
Use Case: Lambda Function Role property pattern mismatch Validating ARN format requirements. Demonstrates pattern validation ensuring Role properties match required ARN format.
Figure 6: Lambda Function Role property pattern mismatch
Use Case: Undefined required Lambda Alias Name property Catching missing required properties. Shows validation detecting absent mandatory fields, preventing incomplete resource definitions from reaching deployment.
Figure 7: Validation of undefined required Lambda Alias Name property
Notice how the validation Path field (e.g., “/Resources/MyLambdaFunction/Properties/TracingConfig/Mode”) pinpoints the exact template location of each error. This eliminates manual searching through hundreds of lines of infrastructure code – a common time sink that can take minutes in complex templates.
Use case: Unsupported property Shows how CloudFormation validation catches unsupported properties. In this example, the AWS::Lambda::Alias resource had an unsupported extra property Description in a nested path RoutingConfig.AdditionalVersionWeights.0.
Figure 8: CloudFormation validation of unsupported resource property
CLI command You can also use the new describe-events API to review the validation responses.
Scenario 2: Resource Name Conflict Validation Resource name conflict validation makes sure that new resources added to a template are not already present in your AWS account or globally (e.g: Amazon S3, Amazon Route 53 DNS), preventing deployment errors caused due to resource name conflicts
After reviewing the property validation exceptions, let’s assume that you resolved all the issues and successfully deployed the stack. Next, the you have decided to include a S3 bucket resource in the template. You name the bucket “dev-thumbnails” but didn’t verify if the bucket with this name already exists. If a bucket with this name already exists, the CreateChangeSet operation will fail, reporting to the developer that the bucket already exists.
Step 2: Review Deployment Validations Use CloudFormation change set console to review validations response or use the new DescribeEvents API in the CLi.
Scenario 3: S3 bucket not empty Since AWS S3 service does not allow customers to delete S3 Buckets when there are objects in them, the new pre-deployment validations will warn you if you try to delete a bucket that is not empty.
Resuming our journey, let’s assume that you fix the name conflict issue by renaming the bucket to “dev-test-tumbnails”, and then updates the stack. After testing the lambda function’s integration with S3, the dev-cycle generated a few thumbnail objects in the S3 bucket.
Later, you decide to fix the bucket name because you notice a typo: “dev-test-tumbnails” should be “dev-test-thumbnails” (missing “h”). When you update the template to use the corrected name, CloudFormation will need to create the new bucket then delete the old one during the clean-up phase.
{
  "OperationEvents": [
    {
      "EventId": "24920e0f-1941-45a5-9177-786bc805b724",
      "StackId": "arn:aws:cloudformation:us-west-2:123456789012:stack/dev-lambda-stack/2d2c3240-bb59-11f0-b080-0613dc96740d",
      "OperationId": "8fef2b60-b411-4d0e-920e-7ec7c7aa39f2",
      "OperationType": "CREATE_CHANGESET",
      "OperationStatus": "SUCCEEDED",
      "EventType": "STACK_EVENT",
      "Timestamp": "2025-11-06T22:52:26.355000+00:00",
      "StartTime": "2025-11-06T22:52:21.071000+00:00",
      "EndTime": "2025-11-06T22:52:26.355000+00:00"
    },
    {
      "EventId": "c117e02d-a652-4755-9586-6d4ccb0f6504",
      "StackId": "arn:aws:cloudformation:us-west-2:123456789012:stack/dev-lambda-stack/2d2c3240-bb59-11f0-b080-0613dc96740d",
      "OperationId": "8fef2b60-b411-4d0e-920e-7ec7c7aa39f2",
      "OperationType": "CREATE_CHANGESET",
      "EventType": "VALIDATION_ERROR",
      "LogicalResourceId": "MyDevThumbnailsBucket",
      "PhysicalResourceId": "",
      "ResourceType": "AWS::S3::Bucket",
      "Timestamp": "2025-11-06T22:52:25.960000+00:00",
      "ValidationFailureMode": "WARN", "ValidationName": "BUCKET_EMPTINESS_VALIDATION", "ValidationStatus": "FAILED", "ValidationStatusReason": "The bucket 'dev-tumbnails' is not empty. You must either delete all objects and versions or use the deletion policy to retain it, otherwise the delete operation will fail.", "ValidationPath": "/Resources/MyDevThumbnailsBucket"
    },
    {
      "EventId": "6c66ff53-6751-4b4c-96b8-d1a33fc43b4f",
      "StackId": "arn:aws:cloudformation:us-west-2:123456789012:stack/dev-lambda-stack/2d2c3240-bb59-11f0-b080-0613dc96740d",
      "OperationId": "8fef2b60-b411-4d0e-920e-7ec7c7aa39f2",
      "OperationType": "CREATE_CHANGESET",
      "OperationStatus": "IN_PROGRESS",
      "EventType": "STACK_EVENT",
      "Timestamp": "2025-11-06T22:52:21.071000+00:00",
      "StartTime": "2025-11-06T22:52:21.071000+00:00"
    }
  ]
}
Bucket emptiness validation uses WARN mode, which allows change set creation to succeed even when the validation check fails. This gives you time to review and empty the bucket before execution. However, if you execute the change set without emptying the bucket, the delete operation will fail.
Notice in the output above:
ValidationStatus: "FAILED" – The emptiness check detected objects in the bucket
ValidationFailureMode: "WARN" – This is a warning, not a blocking error
OperationStatus: "SUCCEEDED" – Change set creation completed successfully despite the warning
This design allows you to review the warning, take corrective action (such as emptying the bucket), and then proceed with execution.
Beyond catching errors early, these capabilities also transform how you troubleshoot failed deployments with enhanced operation tracking and filtering.
New DescribeEvents API with Operation IDs and root cause filtering
The new DescribeEvents API retrieves CloudFormation events based on flexible query criteria. It groups stack operations by operation ID, enabling you to focus specifically on individual stack operations involved during your stack deployment.
Operation: An operation is any action performed on a stack, including stack lifecycle actions (Create, Update, Delete, Rollback), change set creation, nested stack creation, and automatic rollbacks triggered by failures. Each operation has a unique identifier and represents a discrete change attempt on the stack.
Figure 11: Stack Events grouped by Operation Id
Scenario When an update operation on an existing stack fails and results in a rollback, and you want to understand the reason behind the update stack failure. Using the operation ID obtained from the update stack response or from the describe stacks response, you can call describe events to get details on the failure.
The stack description available via describe-stacks API now includes LastOperations information showing recent operation IDs and their types. This enables you to quickly identify which operations occurred and their current status without parsing through event logs.
Figure 11: CloudFormation Stack Info page showing new operation IDs
Step 3: Review operation status with describe events API and operation id Using the operation ID from the previous step, you can now query specific operation events to understand exactly what happened during that operation. This targeted approach eliminates the need to search through all stack events to find relevant information.
Figure 12: New CloudFormation stack operation page
Step 4: Identify failure root cause(s) with FailedEvents filter The new failure root cause filter instantly surfaces only the events that caused the operation to fail. This eliminates the need to manually scan through progress events to identify the root cause of deployment failures.
The FailedEvents=true filter transforms troubleshooting from parsing dozens of progress events to instantly seeing only what matters. This can make diagnosis of issues during an incident much easier..
Real-World Impact These features improve your Infrastructure development experience with CloudFormation:
Template syntax errors: Previously discovered after minutes of provisioning, now caught in seconds
Resource conflicts: No more failed deployments due to existing resources
Debugging complexity: Transform troubleshooting sessions into faster targeted fixes
CI/CD reliability: Reduce pipeline failures and improve deployment confidence
Getting Started
These capabilities are available today in all AWS Regions where CloudFormation is supported. Pre-deployment validation is automatically enabled for all change set operations, no configuration required.
Try it now:
Create any change set from the CloudFormation console or via SDK or CLI with aws cloudformation create-change-set
Use `aws cloudformation describe-events –change-set-name <your-changeset-arn>` to see validation results
Filter failure root causes instantly: via console or CLI with aws cloudformation describe-events –operation-id <id> –filter FailedEvents=true
Best Practices
Always use change sets: Even for simple updates, change sets now provide validation feedback
Leverage Operation IDs: Use the unique identifiers for focused troubleshooting
Filter events strategically: Use –filters FailedEvents=true to focus on problems
Automate validation: Integrate the describe-events API into your CI/CD pipelines
Use Console: CloudFormation console provides a visual experience with error source mapping to the specific line on your template.
Conclusion
Start using these features today in your development workflow. Whether you’re building new infrastructure or maintaining existing stacks, early validation and enhanced troubleshooting will accelerate your deployment cycles and make it easier to manage infrastructure.
Ready to experience faster CloudFormation development? Create your first change set and see validation in action.
As organizations adopt multi-account strategies for improved security features and governance, AWS CloudFormation StackSets enables organizations to deploy infrastructure across multiple accounts and regions. However, monitoring and tracking these distributed deployments across multiple accounts presents operational challenges. When a critical security baseline deployed across 50 accounts suddenly starts failing, teams face the daunting task of logging into each account individually to understand what went wrong and which accounts were affected.
This operational overhead scales exponentially with organization growth, requiring platform teams to spend countless hours switching between accounts and manually correlating deployment events. The lack of centralized visibility slows incident response and makes it difficult to identify patterns or implement proactive monitoring. In this blog post, we’ll explore a solution that centralizes AWS CloudFormation logs from multiple accounts into a single management account, making it easier to monitor and troubleshoot StackSets deployments.
Solution Architecture
Our solution creates a centralized logging system that collects AWS CloudFormation events from all target accounts and forwards them to a central management account. This approach provides a single pane of glass for monitoring and troubleshooting AWS CloudFormation deployments across your entire organization.
Figure 1. Architecture diagram showing event flow from member accounts to management account through EventBridge and CloudWatch Logs.
The architecture consists of four main components:
Management Account Setup: Creates a central event bus, log group, and necessary permissions in the organization’s management account.
Target Account Configuration: Deployed via StackSets to configure event rules that forward AWS CloudFormation events to the management account.
Resource Deployment: Uses StackSets to deploy common resources across target accounts, generating the events we want to monitor.
Monitoring and Visualization: Provides dashboards and queries for operational insights.
Event Capture:Amazon EventBridge rules in each target account capture these AWS CloudFormation events based on defined patterns.
Cross-Account Forwarding: Events are forwarded to a custom event bus in the management account using cross-account permissions.
Centralized Logging: The central event bus routes all events to a Amazon CloudWatch Log Group with structured logging.
Monitoring and Alerting: Administrators can view consolidated logs, create custom queries, and set up alerts from a single location.
Prerequisites
Before implementing this solution, ensure you have the following prerequisites in place:
AWS account: Ensure you have valid AWS account.
AWS Organizations: You must have an AWS Organization structure set up with a primary management account and several member accounts under the management account.
Appropriate Permissions: You must have access to the management account or be configured as a delegated administrator to create and manage StackSets. For detailed information about permissions and security considerations when using StackSets with AWS Organizations, please review the Prerequisites in the AWS CloudFormation StackSets documentation.
Implementation Deep Dive
The solution is implemented using two AWS CloudFormation templates that work together to create a comprehensive monitoring system:
This template establishes the central logging infrastructure in the management account by creating a custom Amazon EventBridge event bus with cross-account access policies and an encrypted Amazon CloudWatch Log Group using a customer-managed AWS Key Management Service (AWS KMS) key. A key feature is the included stack set resource that automatically deploys the target account configuration to all member accounts, eliminating manual setup and ensuring consistent configuration across the entire organization.
This template creates a service-managed stack set that deploys common resources to all accounts in specified organizational units. The StackSet is configured with auto-deployment enabled to automatically provision new accounts added to the organization and includes operation preferences for parallel regional deployment with fault tolerance settings.
On the Stacks page, choose Create stack at top right, and then choose With new resources (standard).
On the Create stack page, Upload a template file, choose Choose File to choose a template file from your local computer.
Choose Next to continue and to validate the template.
On the Specify stack details page, type a stack name in the Stack name box.
In the Parameters section, specify values for the parameters that were defined in the template.
Choose Next to continue creating the stack.
Acknowledge capabilities and transforms.
Choose Next to continue.
Choose Submit to launch your stack.
This creates a stack set that deploys Amazon Simple Storage Service (Amazon S3) infrastructure to all target accounts, generating AWS CloudFormation events that will be captured by your centralized logging system.
Figure 3: Screenshot showing successful deployment of common-resources-stackset.yaml template for target accounts
Step 4: Validation and Testing
Confirm event flow and monitoring functionality by viewing the log streams in the ‘central-cloudformation-logs’ log group.
Monitoring and Visualization
The centralized logging solution provides advanced monitoring capabilities through Amazon CloudWatch Logs Insights and custom dashboards.
You can customize your queries to get:
Recent AWS CloudFormation events across all accounts.
Failed stack operations for quick troubleshooting.
Successful deployments for verification.
Event distribution by account and region.
Status breakdown of all AWS CloudFormation operations.
The following query helps you analyze CloudFormation events across your organization by showing:
You can customize your queries to filter for specific conditions such as failed deployment status, particular resource types, or specific accounts to quickly identify and troubleshoot issues across your organization’s AWS CloudFormation deployments.
Cost Implications
When implementing this centralized monitoring solution, you should consider the following cost components:
Amazon EventBridge pricing – Costs associated with events being published across accounts to the central event bus
Amazon CloudWatch pricing – Storage costs for the centralized log group storing CloudFormation events from all accounts. Query costs when analyzing the centralized logs
To clean up the resources created in this solution, follow these steps:
First, delete the common resources stack set (common-resources-stackset) from the AWS CloudFormation console in your management account. This will remove all the resources deployed across your member accounts.
After the stack set operations are complete, delete the management account logging setup stack (log-setup-management) to remove the centralized logging infrastructure, including the event bus, log groups, and associated IAM roles.
Note: Make sure all stack set operations are complete before deleting the management account logging setup to ensure proper cleanup of all resources.
Conclusion
Managing infrastructure across multiple AWS accounts doesn’t have to be complex. By centralizing AWS CloudFormation logs, you can gain visibility into your multi-account deployments, troubleshoot issues more efficiently, and help achieve consistent resource deployment across your organization.
This solution demonstrates how AWS services like AWS CloudFormation StackSets, Amazon EventBridge, and Amazon CloudWatch Logs can be combined to create a powerful monitoring system for your infrastructure as code deployments.
Get started today by implementing this solution in your AWS Organization to gain immediate visibility into your multi-account deployments. Download the templates from our GitHub repository and follow the step-by-step guide to enhance your cloud operations.
AWS CloudFormation enables you to model and provision your cloud application infrastructure as code-base templates. Whether you prefer writing templates directly in JSON or YAML, or using programming languages like Python, Java, and TypeScript with the AWS Cloud Development Kit (CDK), CloudFormation and CDK provide the flexibility you need. For organizations adopting multi-account strategies, CloudFormation StackSets offers a powerful capability to deploy resources across multiple regions and accounts in parallel.
Last year, we delivered broad set of enhancements that accelerated the development cycle, simplified troubleshooting, and introduced new deployment safety and configuration governance capabilities. Let’s dive into the key launches that shaped CloudFormation in 2024.
Development cycle improvements
Deploy stacks up to 40% faster with optimistic stabilization and configuration complete
In March, we introduced optimistic stabilization with the new CONFIGURATION_COMPLETE event, delivering up to 40% faster stack creation times. This new event signals that CloudFormation has created the resource and applied the configuration as defined in the stack template, allowing us to begin parallel creation of dependent resources. For example, if your stack contains resource B that depends on resource A, CloudFormation will now start provisioning resource B when resource A reaches the CONFIGURATION_COMPLETE state, rather than waiting for full stabilization. Read How we sped up AWS CloudFormation deployments with optimistic stabilization to learn more.
Figure 1: CloudFormation’s old and new deployment strategy
Catch template errors before deployment with early validation
In March, we launched early resource properties validation checks. This feature validates your stack operation upfront for invalid resource property errors, helping you fail fast and minimize the steps required for a successful deployment. Previously, you had to wait until CloudFormation attempted to provision a resource before discovering property-related errors. Now, we validate your template before deploying the first resource and provide clear error messages upfront.
Figure 2: CloudFormation’s early template properties validation feature
Safely clean up failed stacks with enhanced deletion controls
In May, we enhanced the DeleteStack API with a new DeletionMode parameter, allowing you to safely delete stacks that are in DELETE_FAILED state. By passing the FORCE_DELETE_STACK value to this parameter, you can now resolve stuck stacks more efficiently during your development and testing cycles.
Accelerate feedback loops with CloudFormation custom resource timeout controls
In June, we introduced the ServiceTimeout property for custom resources. This new capability allows you to set custom timeout values for your custom resource logic execution. Previously, custom resources had a fixed one-hour timeout, which could lead to long wait times when debugging custom resource logic. Now, you can set appropriate timeout values to accelerate your development feedback loops. Refer to the custom resourcesdocumentation to learn more about the ServiceTimeout property.
Figure 3: CloudFormation’s ServiceTimeout property for Custom resource
Streamlined Troubleshooting Experience
Resolve deployment issues faster with one-click CloudTrail access
In May, we launched integration with AWS CloudTrail in the Events tab of the CloudFormation console. Troubleshooting some failed stack operations can be time-consuming, so we have streamlined this process by providing direct links from stack operation events to relevant CloudTrail events. When you click ‘Detect Root Cause’ in the CloudFormation Console, you’ll now see a pre-configured CloudTrail deep-link to the API events generated by your stack operation, eliminating multiple manual steps from the troubleshooting process.
Figure 4: CloudFormation troubleshooting with CloudTrail integration
Visualize your entire deployment process with timeline view
In November, we launched deployment timeline view. It gives you unprecedented visibility into your stack operations. This visual tool shows the sequence of actions CloudFormation takes during a deployment, helping you understand resource dependencies and provisioning duration. You can see which resources are being created in parallel, track their status through color-coding, and quickly identify bottlenecks in your deployments.
Get instant troubleshooting help with Amazon Q Developer
We integrated Amazon Q Developer to provide AI-powered assistance for troubleshooting. When you encounter a failed stack operation, you can now click “Diagnose with Q” to receive a clear, human-readable analysis of the error. Need more help? The “Help me resolve” button provides actionable steps tailored to your specific scenario.
Figure 6: CloudFormation troubleshooting with Q feature
We’ve also improved how change sets handle references. When referenced values are available before deployment, Change sets can now resolve them to their expected values, giving you a more accurate preview of your planned changes.
Figure 7: CloudFormation’s change sets feature
Easy onboarding to Infrastructure-as-Code (IaC)
Eliminate weeks of manual effort with IaC Generator
In February, we launched the CloudFormation IaC Generator, a capability addressing one of our customers’ biggest challenges: onboarding existing cloud resources to CloudFormation. This feature makes it easier to generate CloudFormation templates for existing AWS resources. You can now onboard workloads to IaC in minutes instead of spending weeks writing templates manually.
The IaC generator supports over 600 AWS resource types and provides recommendations for related resources. For instance, when you select an S3 bucket, it automatically suggests including associated bucket policies. You can use the generated templates to import resources into CloudFormation, download them for deployment.
Figure 8: CloudFormation’s IaC Generator
In August, we enhanced the IaC Generator with two improvements. First, we added a graphical summary view that helps you quickly find resources after the account scan completes. Second, we integrated with AWS Infrastructure Composer to visualize your application architecture, making it easier to understand resource relationships and configurations.
Figure 9: IaC generator resource scan
Proactive Control Improvements
In November, we launched major enhancements to CloudFormation Hooks, giving you easier ways to author proactive configuration controls and more points to enforce them with your cloud infrastructure provisioning.
CloudFormation Hooks for stack and change set target invocation points
First, we introduced stack and change set target invocation points for CloudFormation Hooks. This extends Hooks beyond individual resource validation, allowing you to run validation checks against entire templates and examine resource relationships. For example, you can now create hooks that validate architectural patterns across multiple resources or enforce team-specific deployment standards. With the change set invocation point, you can automate your change set reviews and reduce the time needed to resolve compliance issues. Refer to the Hooks developer guide to learn more.
Figure 10: CloudFormation’s Hooks for stack and change set target invocation points
Managed hooks for the CloudFormation Guard domain specific language
We introduced the managed hooks to author configuration controls using CloudFormation Guard domain-specific language. This simplifies the hook creation process—you can now write hooks by providing your Guard rule set stored as an S3 object. This is particularly valuable if you’re already using Guard for static template validation, as you can extend these rules to dynamic checks before deployments. To learn more about the Guard hook, check out the AWS DevOps Blog or refer to the Guard Hook User Guide.
Figure 11: CloudFormation Hooks’ Guard language feature
Figure 12: CloudFormation Hooks’ Lambda function feature
CloudFormation Hooks for AWS Cloud Control API target invocation points
Lastly, we extended Hooks to support AWS Cloud Control API (CCAPI) resource configurations. This means your existing resource Hooks can now evaluate configurations from CCAPI create and update operations, allowing you to standardize your proactive control evaluation regardless your IaC tool. If you’re already using pre-built Lambda or Guard hooks, you simply need to specify “Cloud_Control” as a target in your hooks’ configuration to extend their coverage. Learn the detail of this feature from this AWS DevOps Blog. Figure 13: CloudFormation Hooks for AWS Cloud Control API target invocation point
Additional Platform Improvements
StackSets ListStackSetAutoDeploymentTargets API
In March, we enhanced StackSets with the ListStackSetAutoDeploymentTargets API. This new capability gives you better visibility into your auto-deployment configurations by allowing you to list existing target Organizational Units (OUs) and AWS Regions for a given stack set. Instead of logging into individual accounts to understand your deployment scope, you can now get this information in a single API call.
CloudFormation Git sync with request review support
In September, we improved CloudFormation Git sync with pull request workflow support. When you create or update a pull request in a linked repository, CloudFormation automatically posts change set information as PR comments. This integration provides a clear overview of proposed changes within your familiar Git workflow, allowing team members to review infrastructure changes alongside code changes. Visit our user guide and launch blog to learn more.
Figure 14: CloudFormation Git sync with request review support feature
Early 2025 improvements
Reshape your AWS CloudFormation stacks seamlessly with stack refactoring
In February 2025, CloudFormation introduced a new capability called stack refactoring that makes it easy to reorganize cloud resources across your CloudFormation stacks. Stack refactoring enables you to move resources from one stack to another, split monolithic stacks into smaller components, and rename the logical name of resources within a stack. This enables you to adapt your stacks to meet architectural patterns, operational needs, or business requirements. To explore an example scenario, read Introducing AWS CloudFormation Stack Refactoring.
Learn more
Here are some resources to help you get started learning and using CloudFormation to manage your cloud infrastructure:
As we are starting 2025, our focus remains on making infrastructure deployment faster, safer, and more manageable. These enhancements reflect our commitment to solving real customer challenges and improving the CloudFormation experience. We are excited about the roadmap ahead and look forward to bringing you more innovations in 2025.
We encourage you to try these new features and share your feedback. For more detailed information about any of these launches, visit our documentation or check out the AWS DevOps Blog.
AWS CloudFormation makes it easy to model and provision your cloud application infrastructure as code. CloudFormation templates can be written directly in JSON or YAML, or they can be generated by tools like the AWS Cloud Development Kit (CDK). These templates are submitted to the CloudFormation service and the resources are deployed together as stacks, in dependency order. Stack events can be viewed in a tabular format in the console, which provides fine-grained details about each event. And now there is a new feature that offers a more visually intuitive view of the events called the deployment timeline view, which provides a visualization of the sequence of actions CloudFormation took in a stack operation. This visual timeline shows you the exact order in which resources are provisioned, dependencies between resources, provisioning times, and likely root causes for any deployment failures. It complements the existing tabular stack events view by giving you additional context and visibility into what happens behind the scenes during deployments.
To use the new deployment timeline view, simply initiate a stack create, update, or delete operation. In the AWS CloudFormation Console, choose the Events tab, then click the Timeline view tab next to Table View. As CloudFormation begins provisioning the resources defined in your template, you’ll see each resource operation appear as a bar in the timeline view. The resources are organized in a vertical stack, chronologically ordered with the most recent resource operation at the top. Each resource action is visualized horizontally, segmented by different color bars for each resource action:
In dark mode, in-progress rollback and completed rollback switch colors.
You can hover over any bar to see additional details like the full resource name and the start/end times of the resource action. If a deployment fails, CloudFormation will highlight the resource operation that was the likely root cause node in a red-and-white striped bar, which you can hover over to see the specific failure reason.
Creating a simple stack
Create a simple stack using CloudFormation Console. You will initiate a deployment and then explore the visual timeline view.
1. From the CloudFormation console, click Create stack and then choose with new resources.
2. In the Create stack wizard, click Choose an existing template and then choose Upload a template file. Click Choose file to select and upload the template file of the stack to deploy. In this blog you will use the template available here. Download the template or you can use your own template. If you decide to use your own template, it will result in a different deployment timeline view.
3. Once the template is uploaded to S3, click Next, then provide a stack name and parameters if needed. Complete the remaining stack deployment configuration steps, then initiate the stack creation operation.
4. On the stack events page, click the Deployment timeline tab next to Events.
You should now see the deployment timeline view rendering in real-time as CloudFormation provisions the VPC networking resources first, followed by the security group, subnet, and lastly, the EC2 instance.
The above timeline shows, from the bottom to the top, bars representing each resource CloudFormation provisioned, with virtual vertical dependency lines showing the orders in which each resource operation occurred. The bars change colors as operations progress from blue (in-progress), to yellow consistency check, green (success) or red (failed).
Hover over any bar to see details like the start/end time of each deployment phase and the full resource name. The detailed information in the graph’s popover shows that CloudFormation created the InternetGateway resource in two seconds, then waited for 15-seconds to check if the resource was fully operational before marking as complete. This phase is called the resource consistency check phase, also known as the resource stabilization phase. It allows CloudFormation and other Infrastructure as Code (IaC) tools to ensure resilient deployments. To learn more, read this post about CloudFormation optimistic stabilization strategy.
Stack in a rollback complete state
When a stack deployment fails, CloudFormation rolls your stack back to its initial stable state before the current stack operation. The deployment timeline view below shows a failed stack operation in a complete rollback state. You can see the likely root cause resource highlighted in a red-and-white striped color so you can instantly identify it and start troubleshooting.
Figure 8: Deployment timeline view of a stack in rollback complete
Conclusion
The new CloudFormation deployment timeline view provides visibility into the orchestration flow and dependencies involved when CloudFormation provisions resources defined in your infrastructure-as-code templates. With this visual timeline view, you can quickly identify the root cause of deployment failures before operations complete and better understand the provisioning process. This feature is available now in all AWS regions where CloudFormation is supported. Visit the CloudFormation console to start using deployment timeline view.
About the authors:
The collective thoughts of the interwebz
Manage Consent
To provide the best experiences, we use technologies like cookies to store and/or access device information. Consenting to these technologies will allow us to process data such as browsing behavior or unique IDs on this site. Not consenting or withdrawing consent, may adversely affect certain features and functions.
Functional
Always active
The technical storage or access is strictly necessary for the legitimate purpose of enabling the use of a specific service explicitly requested by the subscriber or user, or for the sole purpose of carrying out the transmission of a communication over an electronic communications network.
Preferences
The technical storage or access is necessary for the legitimate purpose of storing preferences that are not requested by the subscriber or user.
Statistics
The technical storage or access that is used exclusively for statistical purposes.The technical storage or access that is used exclusively for anonymous statistical purposes. Without a subpoena, voluntary compliance on the part of your Internet Service Provider, or additional records from a third party, information stored or retrieved for this purpose alone cannot usually be used to identify you.
Marketing
The technical storage or access is required to create user profiles to send advertising, or to track the user on a website or across several websites for similar marketing purposes.
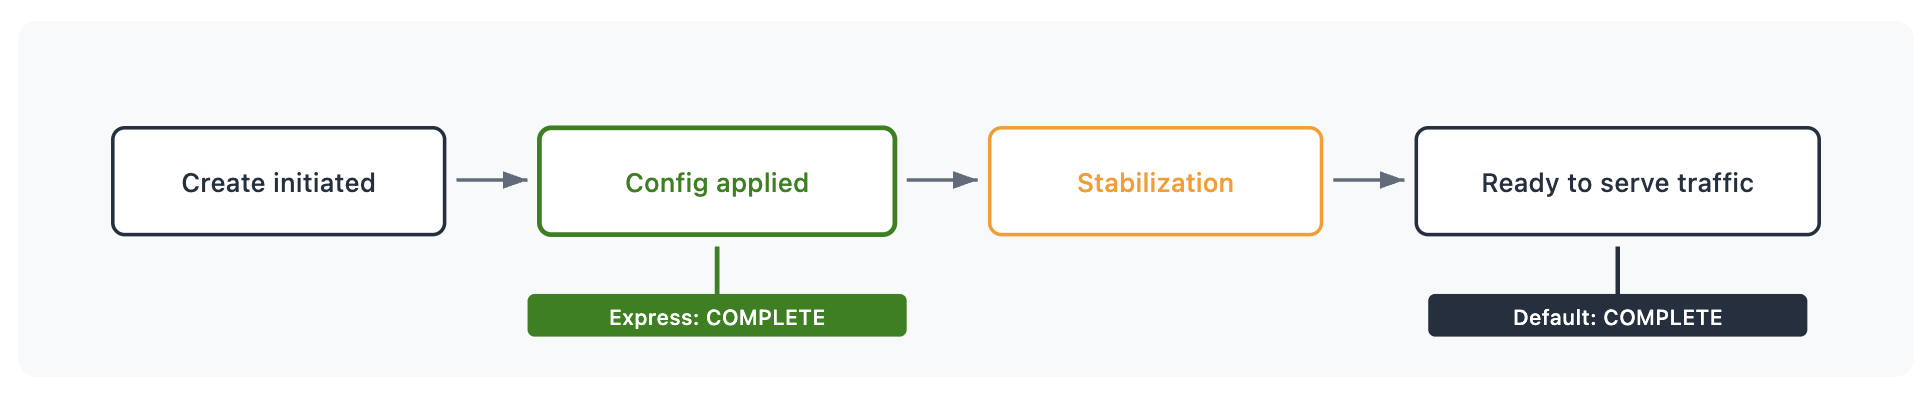

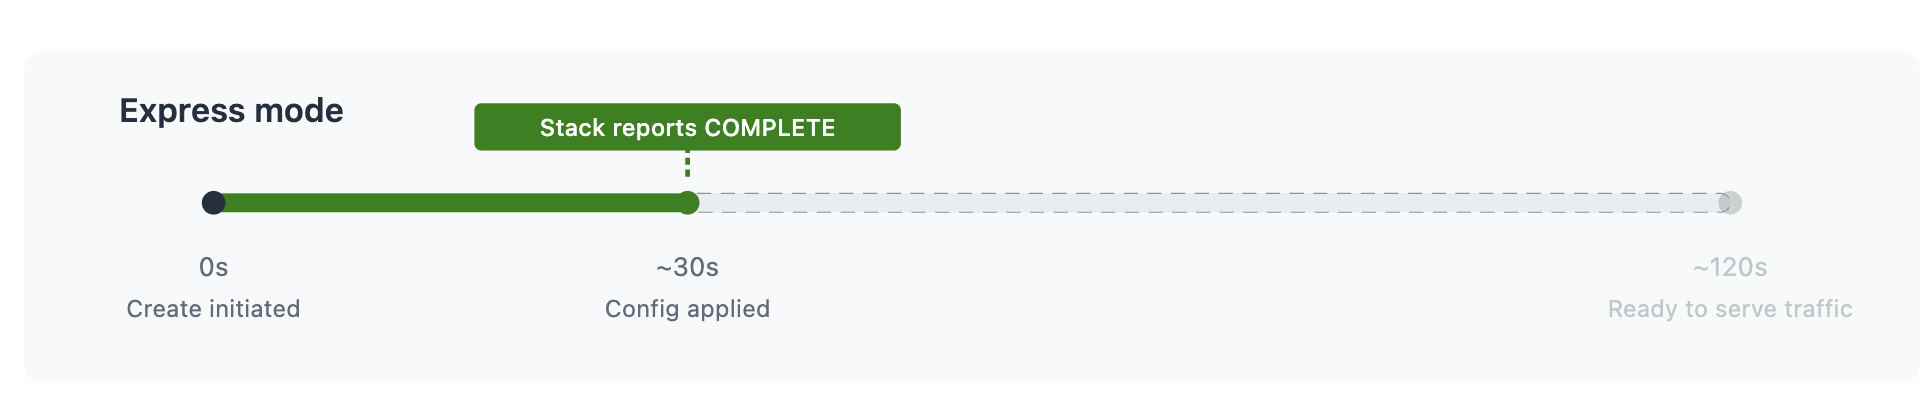
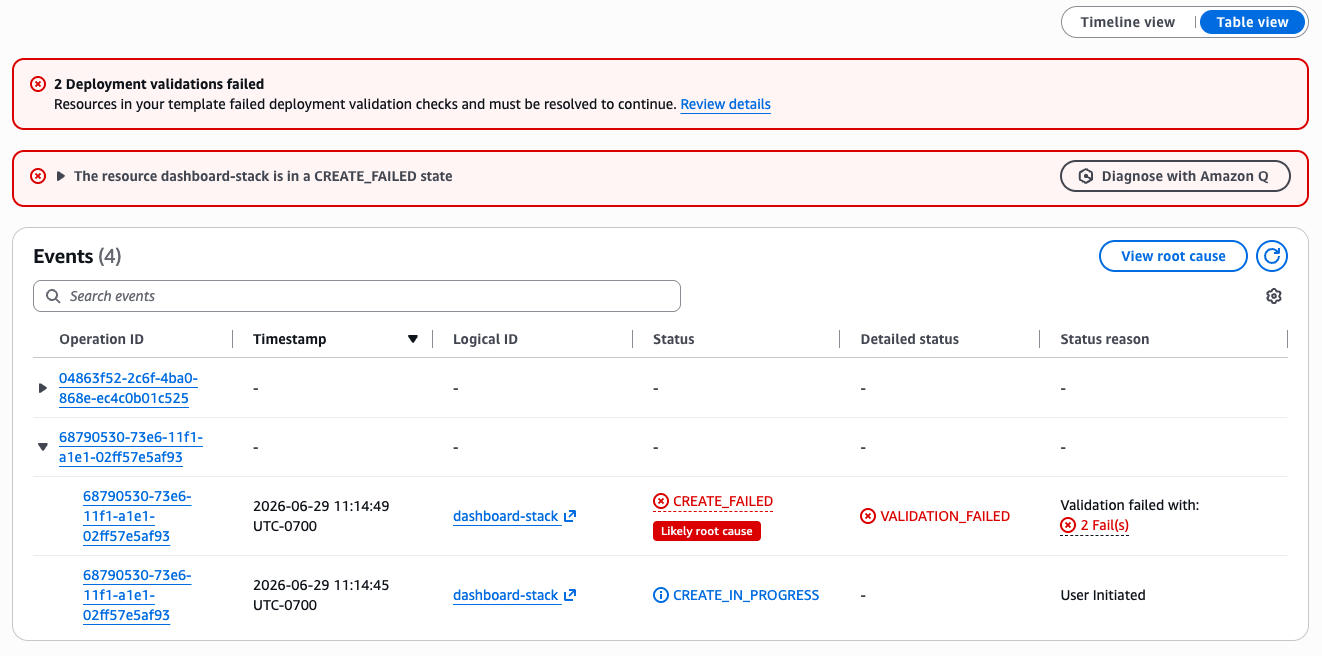
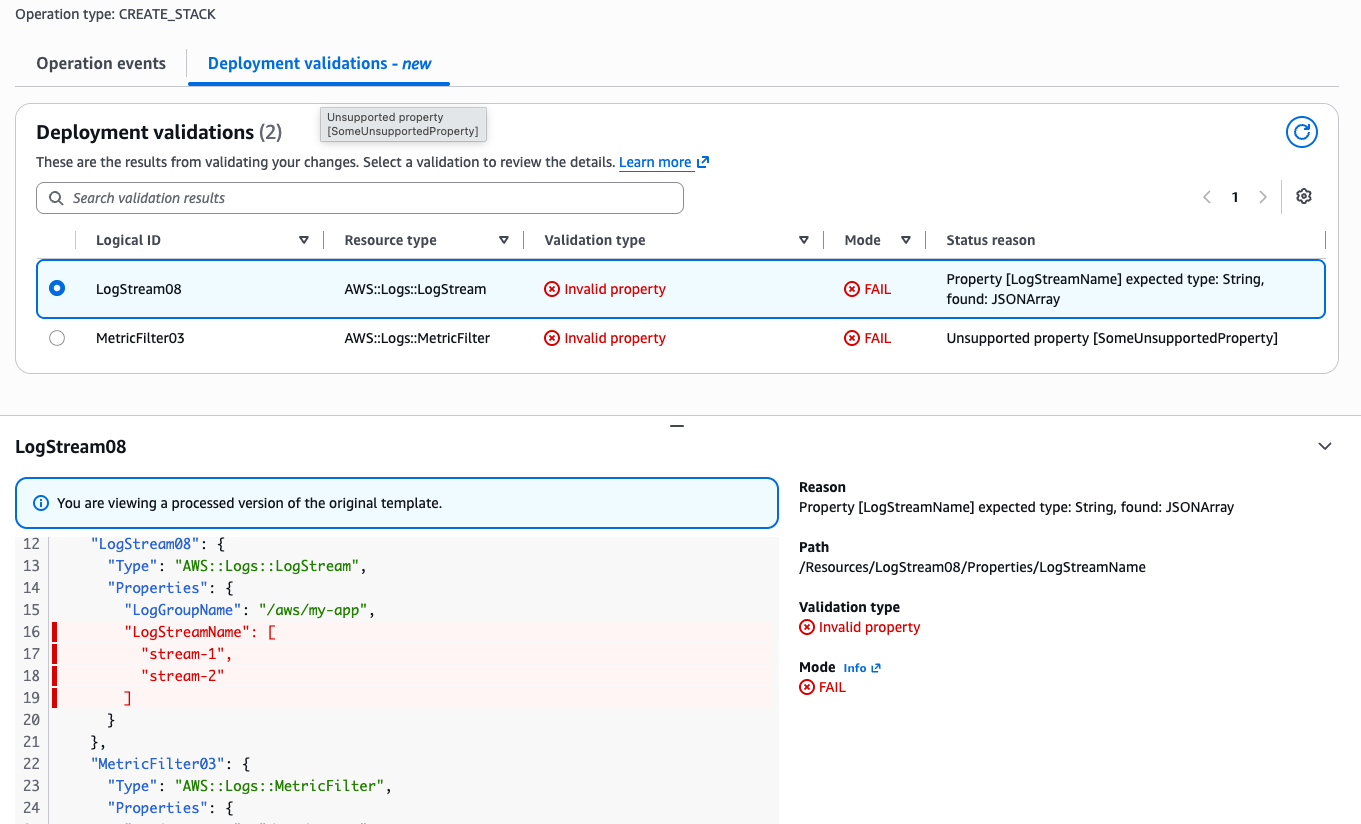
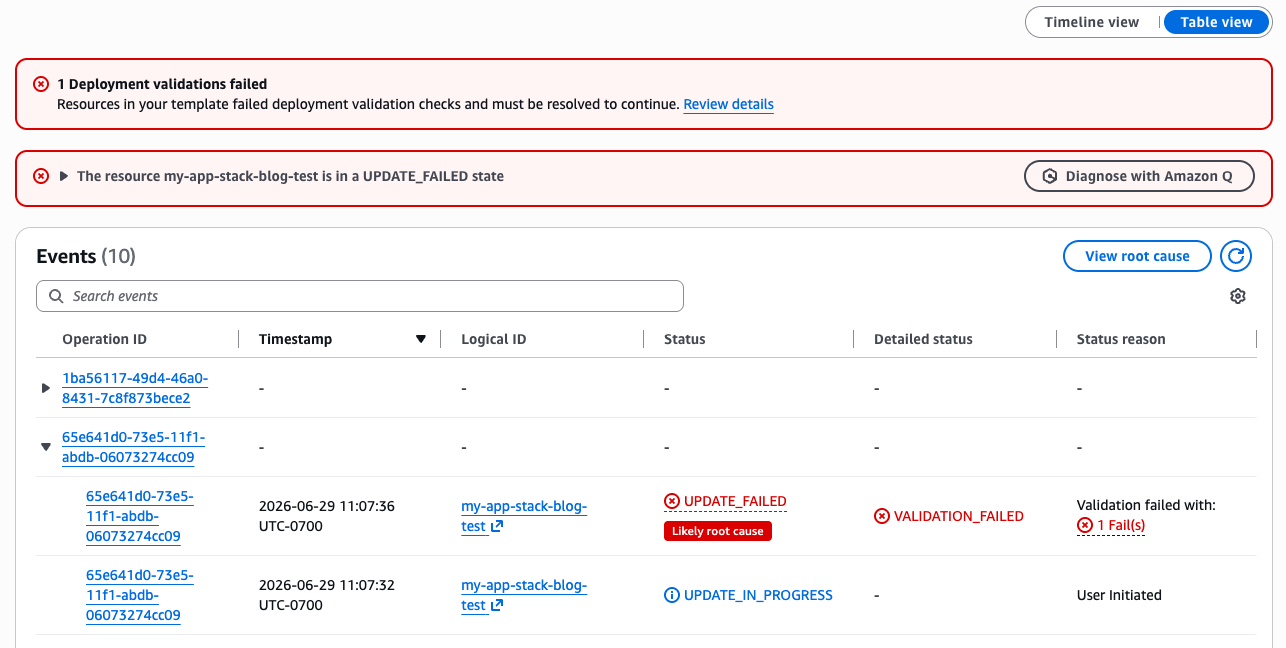
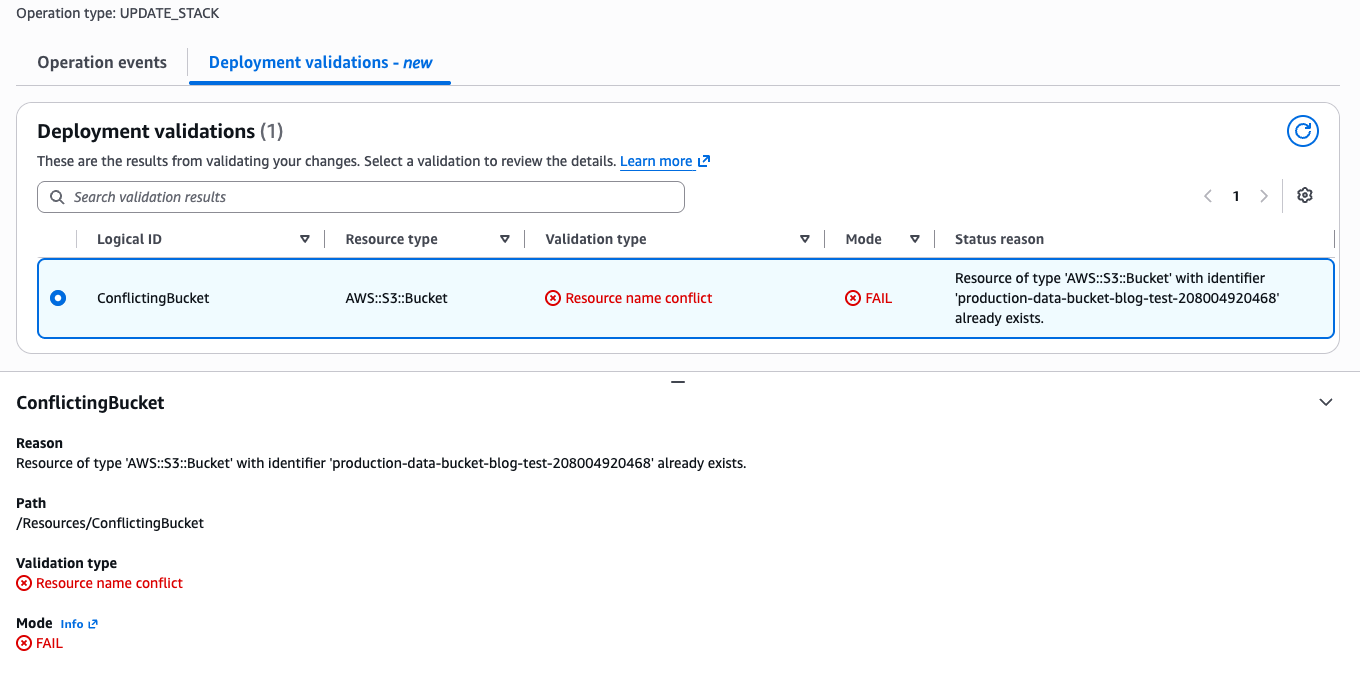
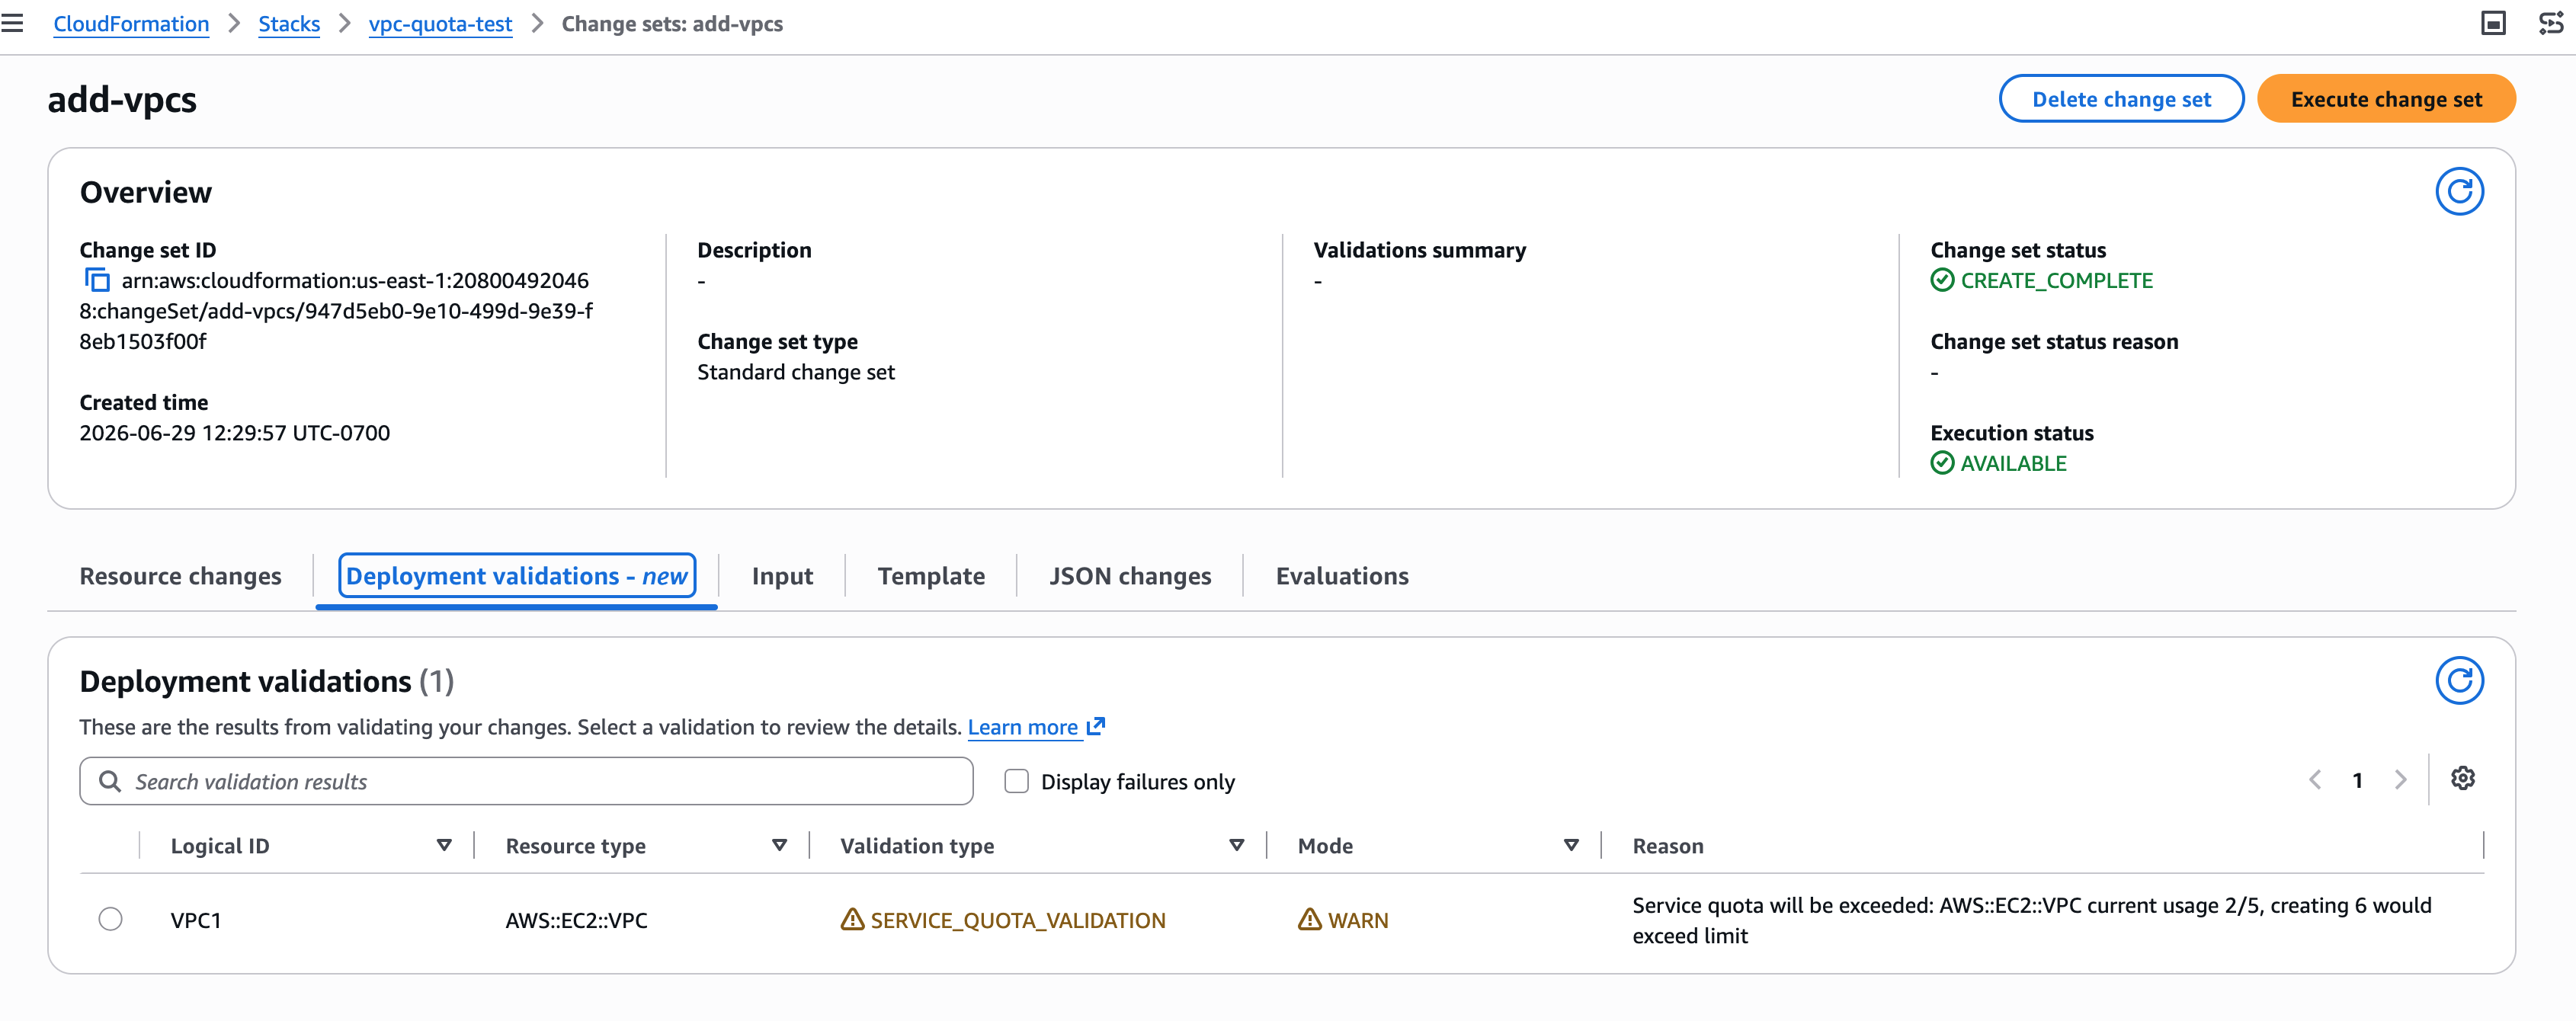
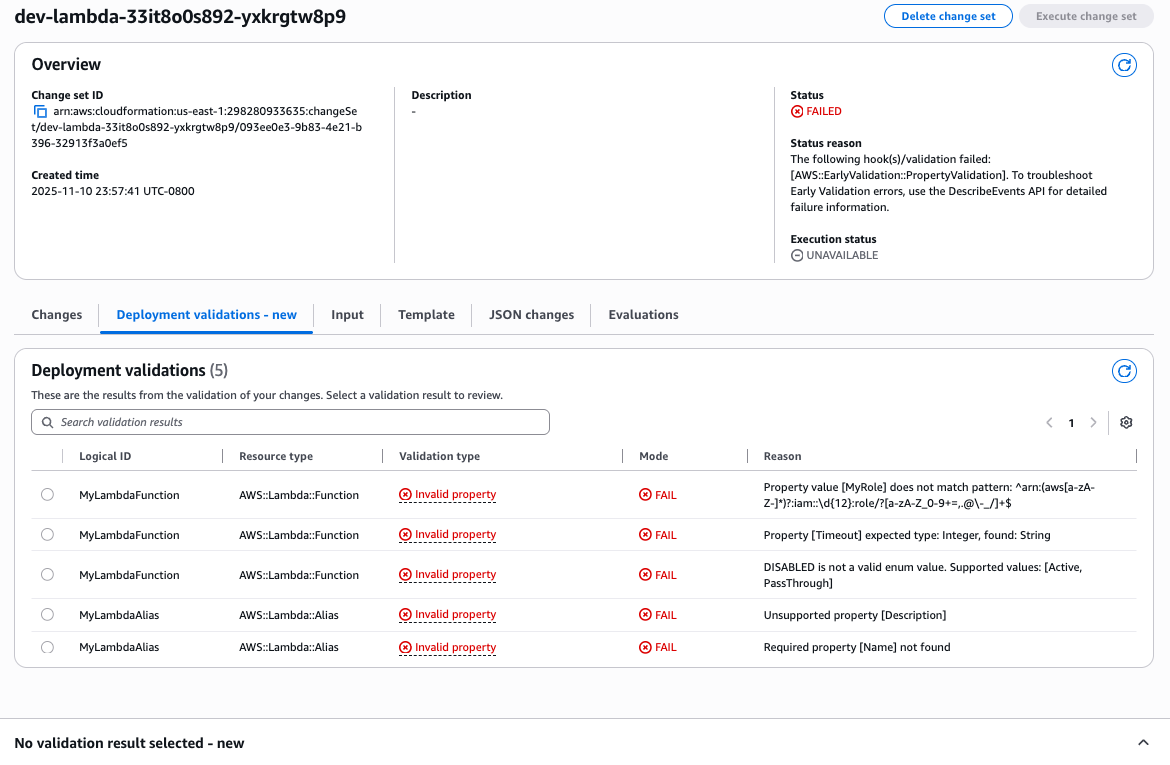
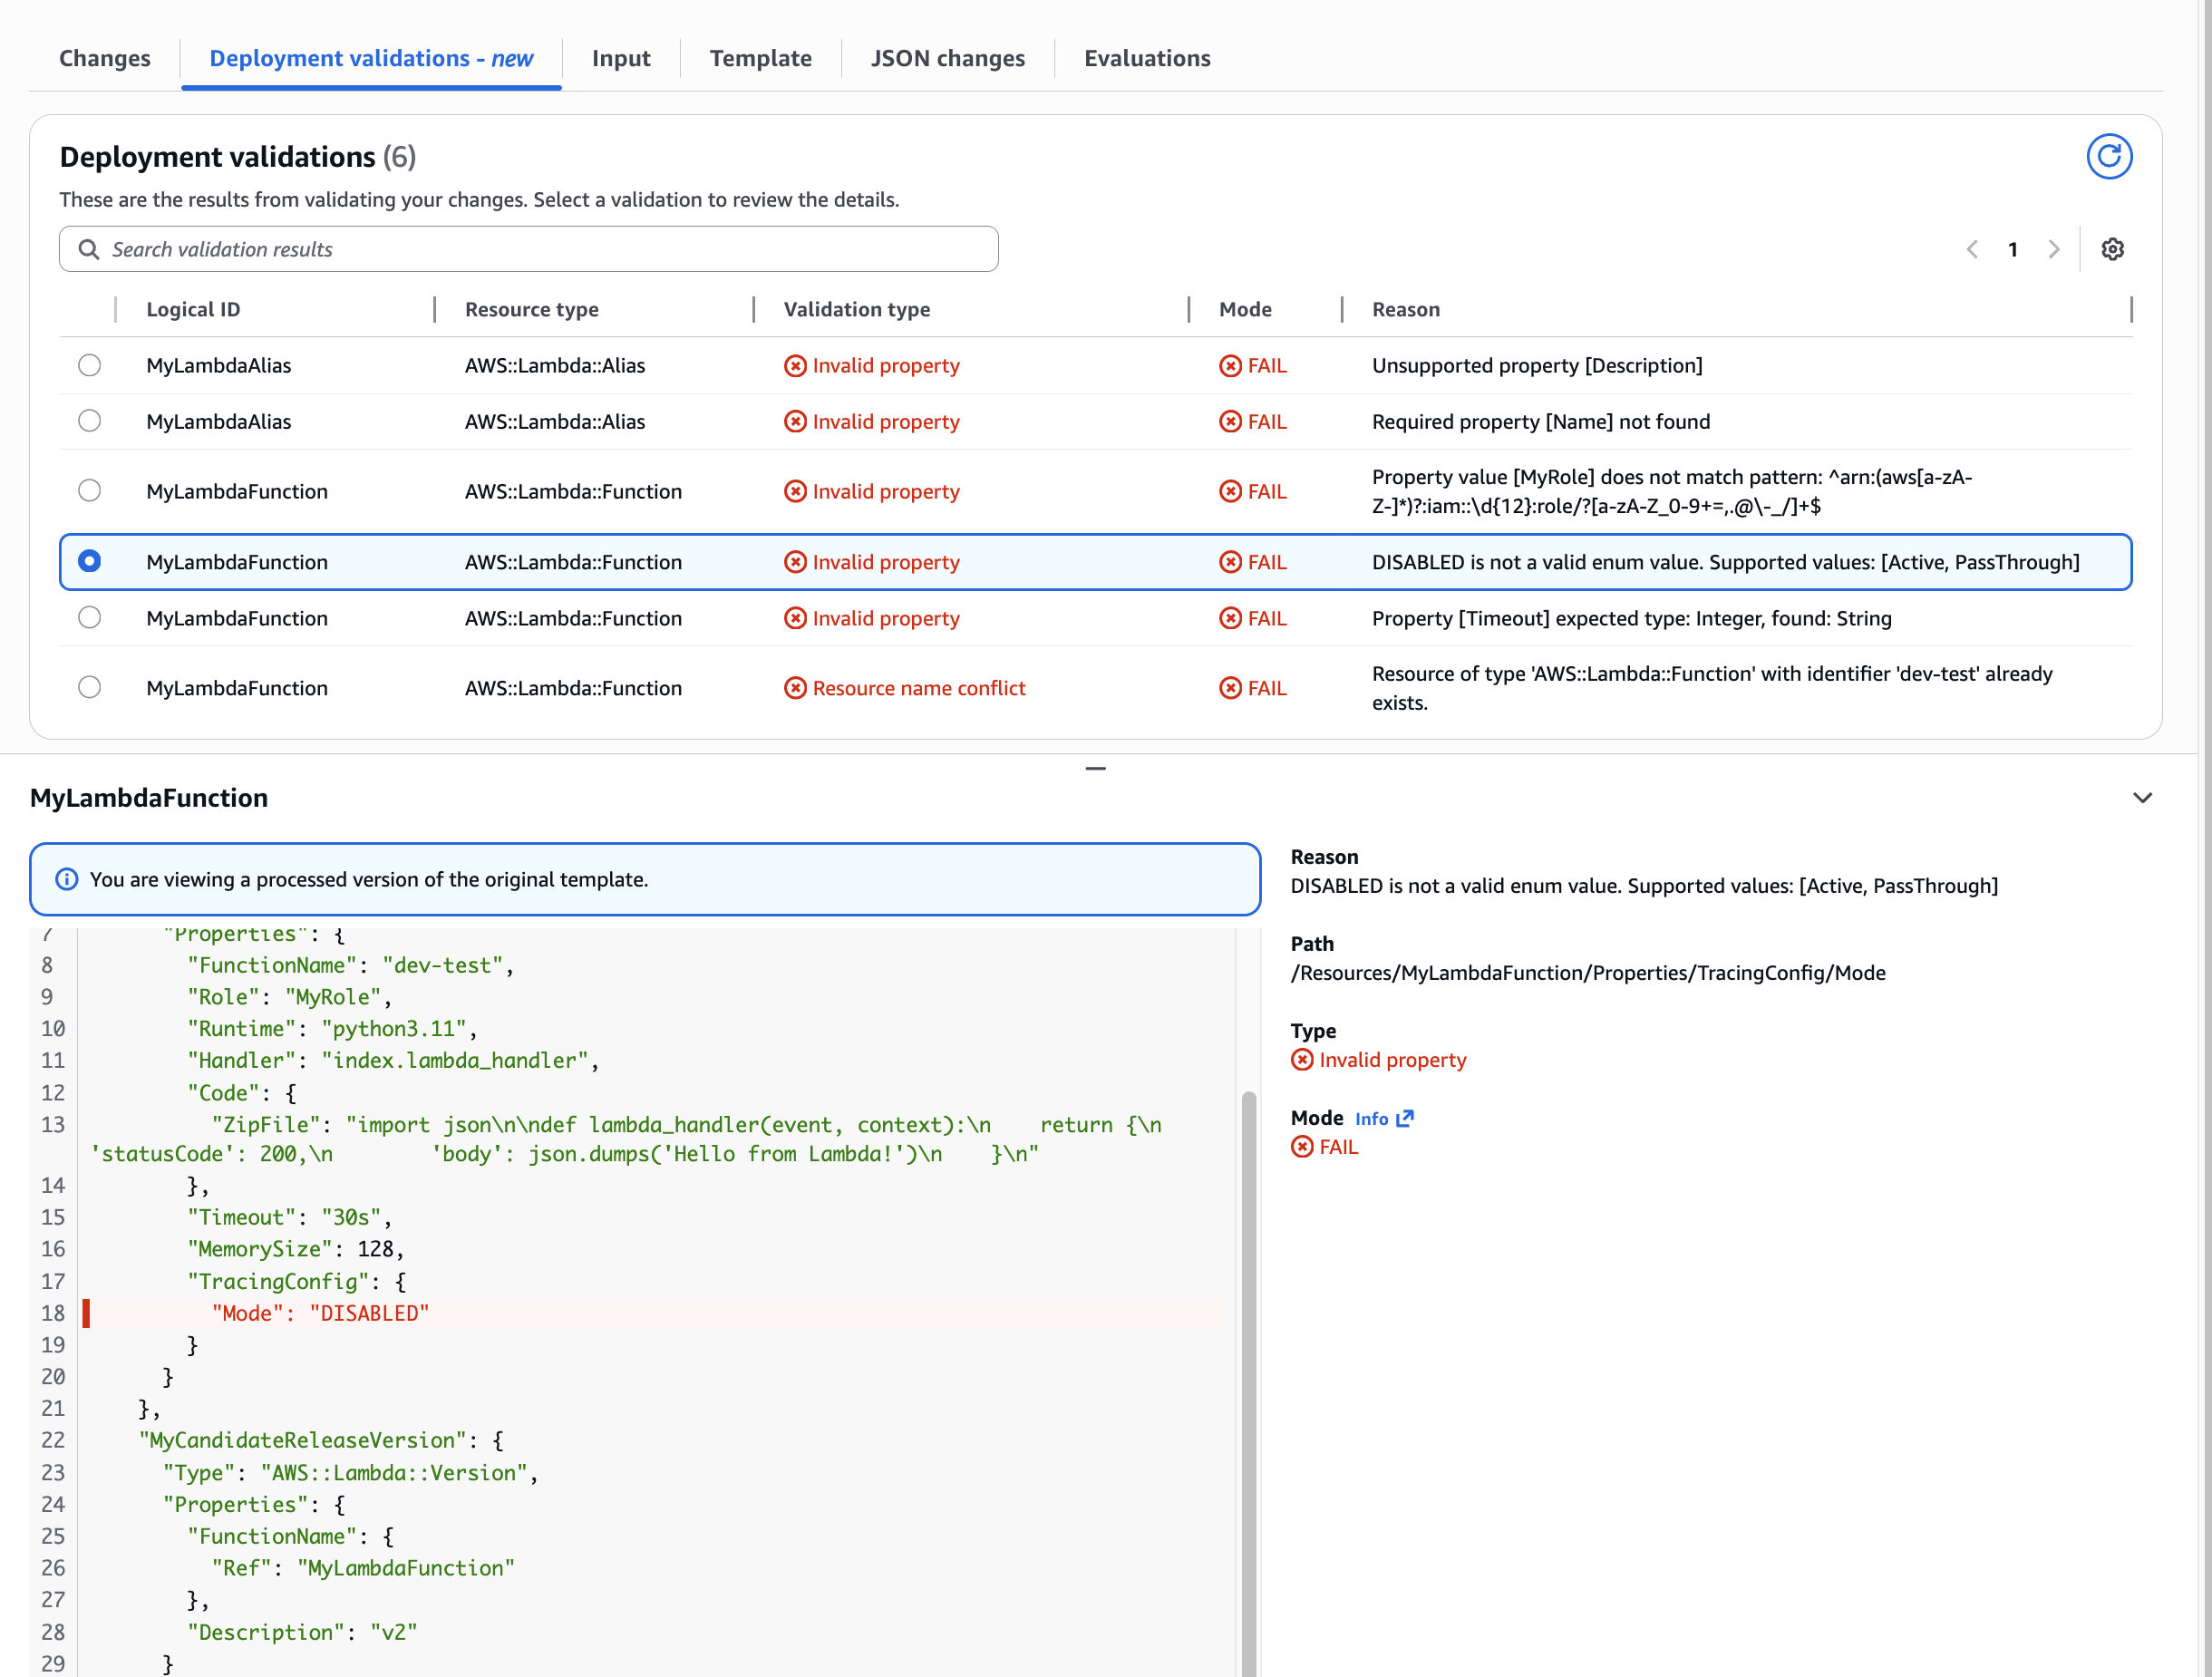
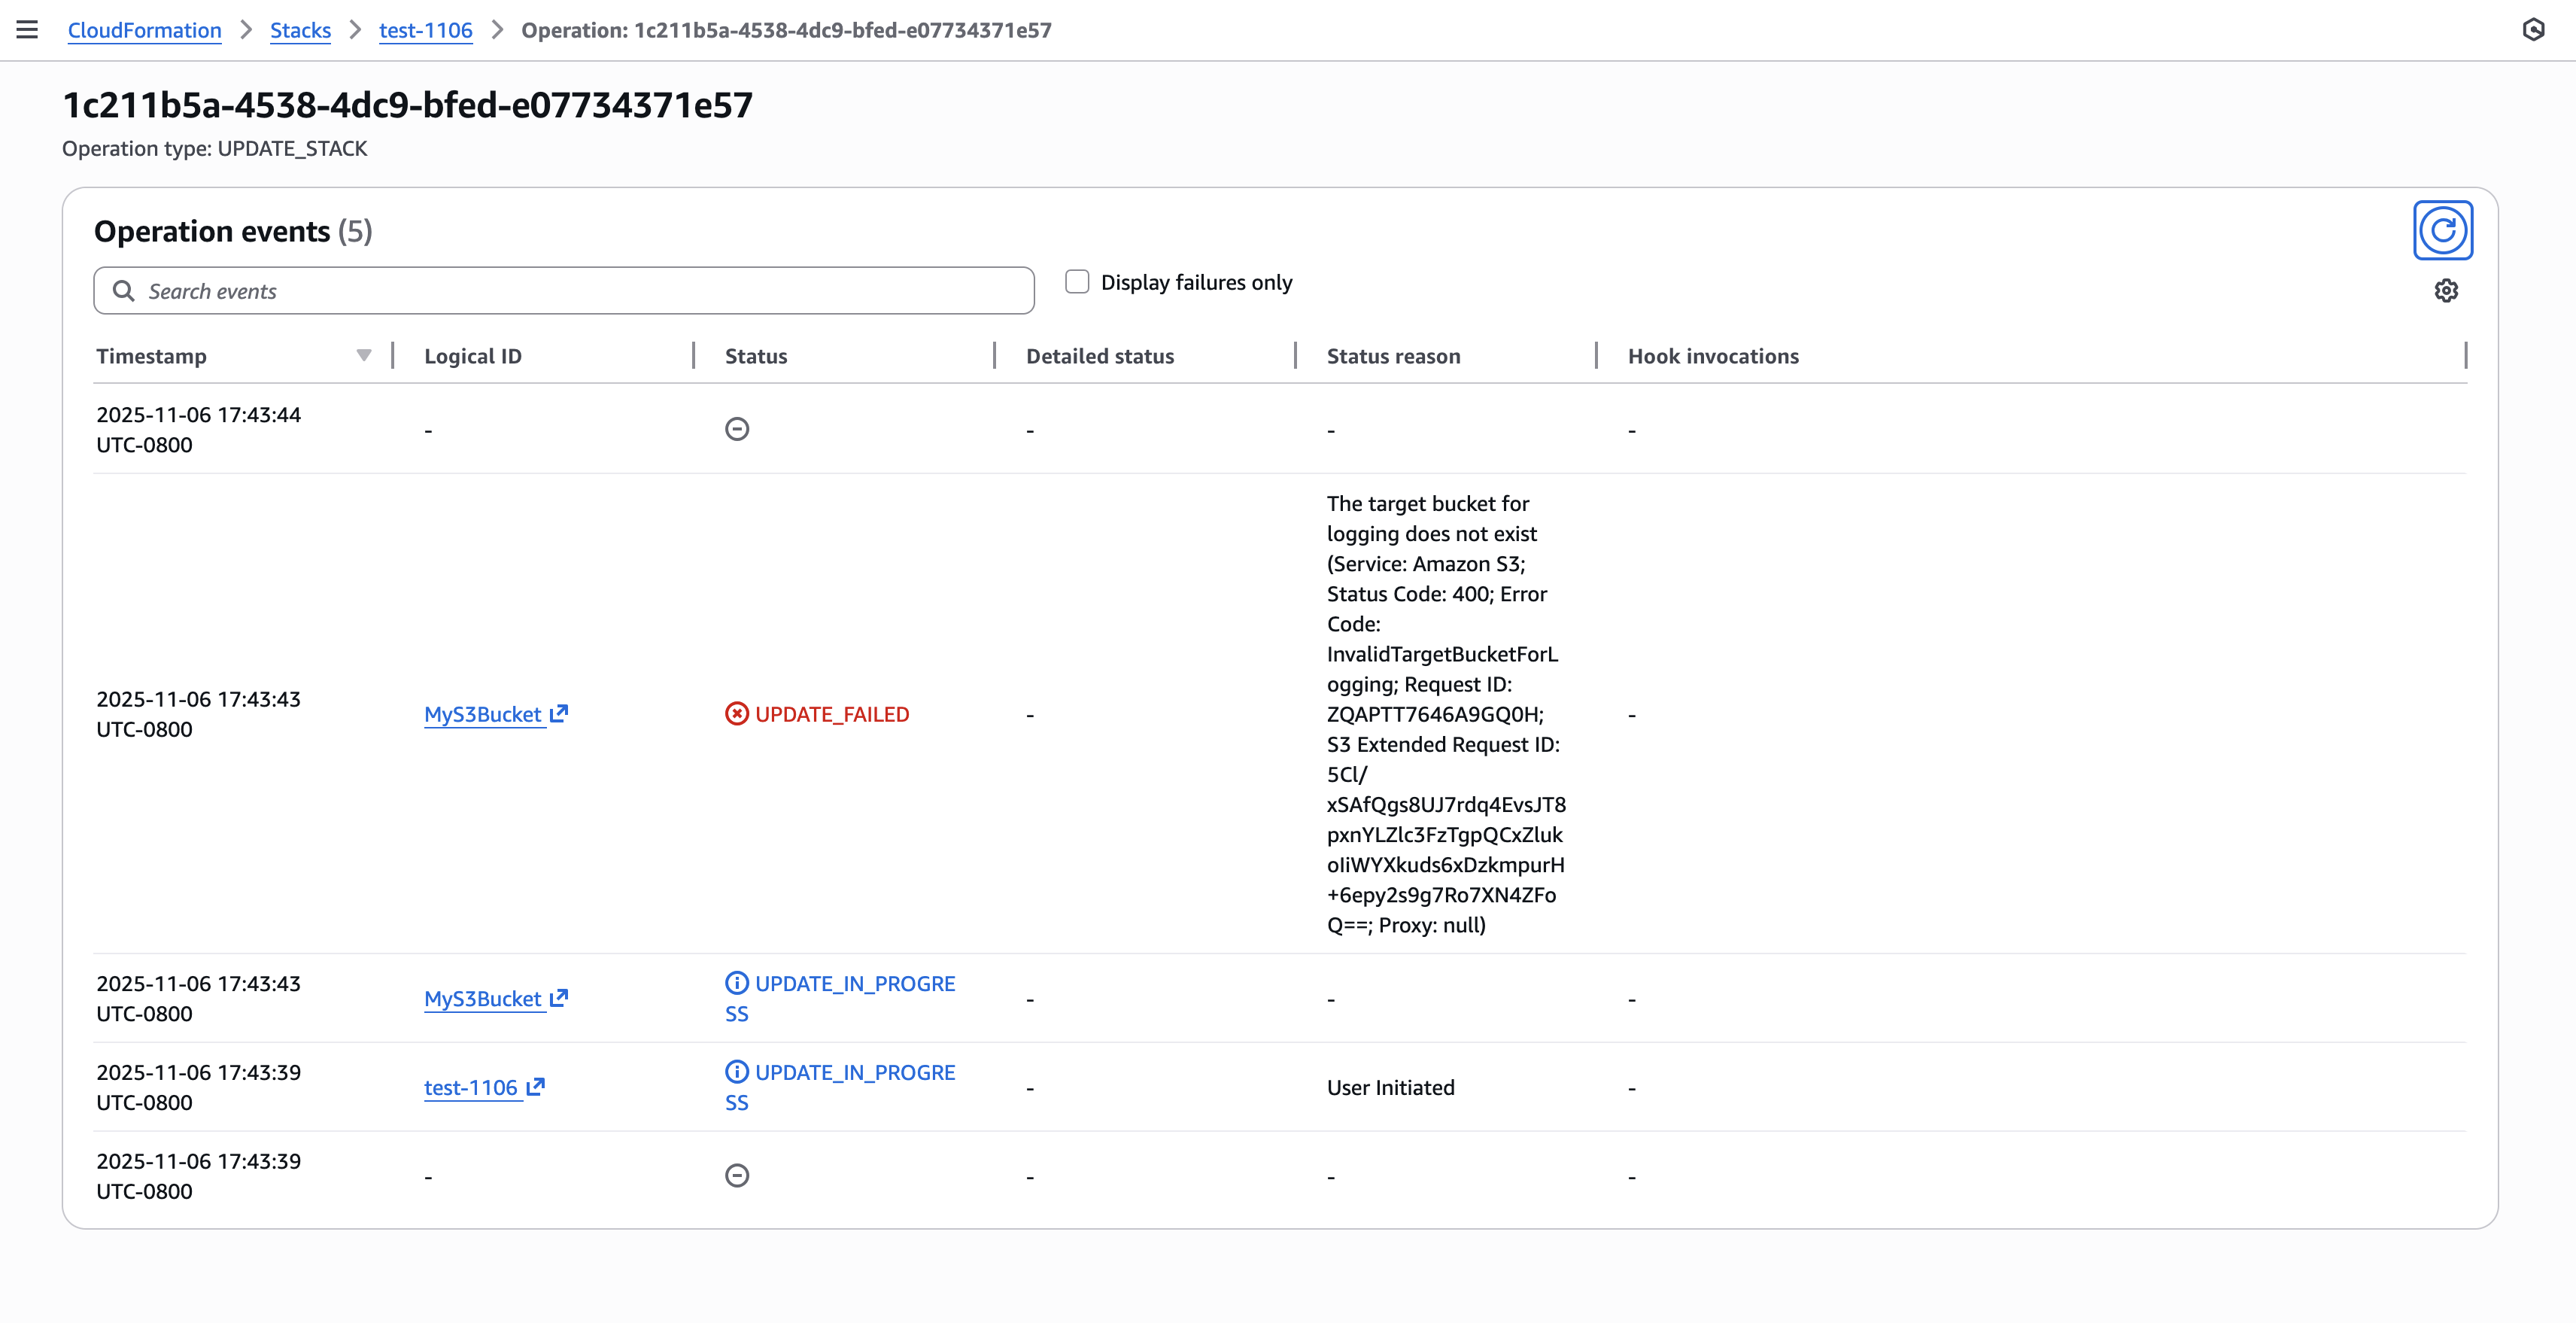 Figure 3: New CloudFormation stack operation page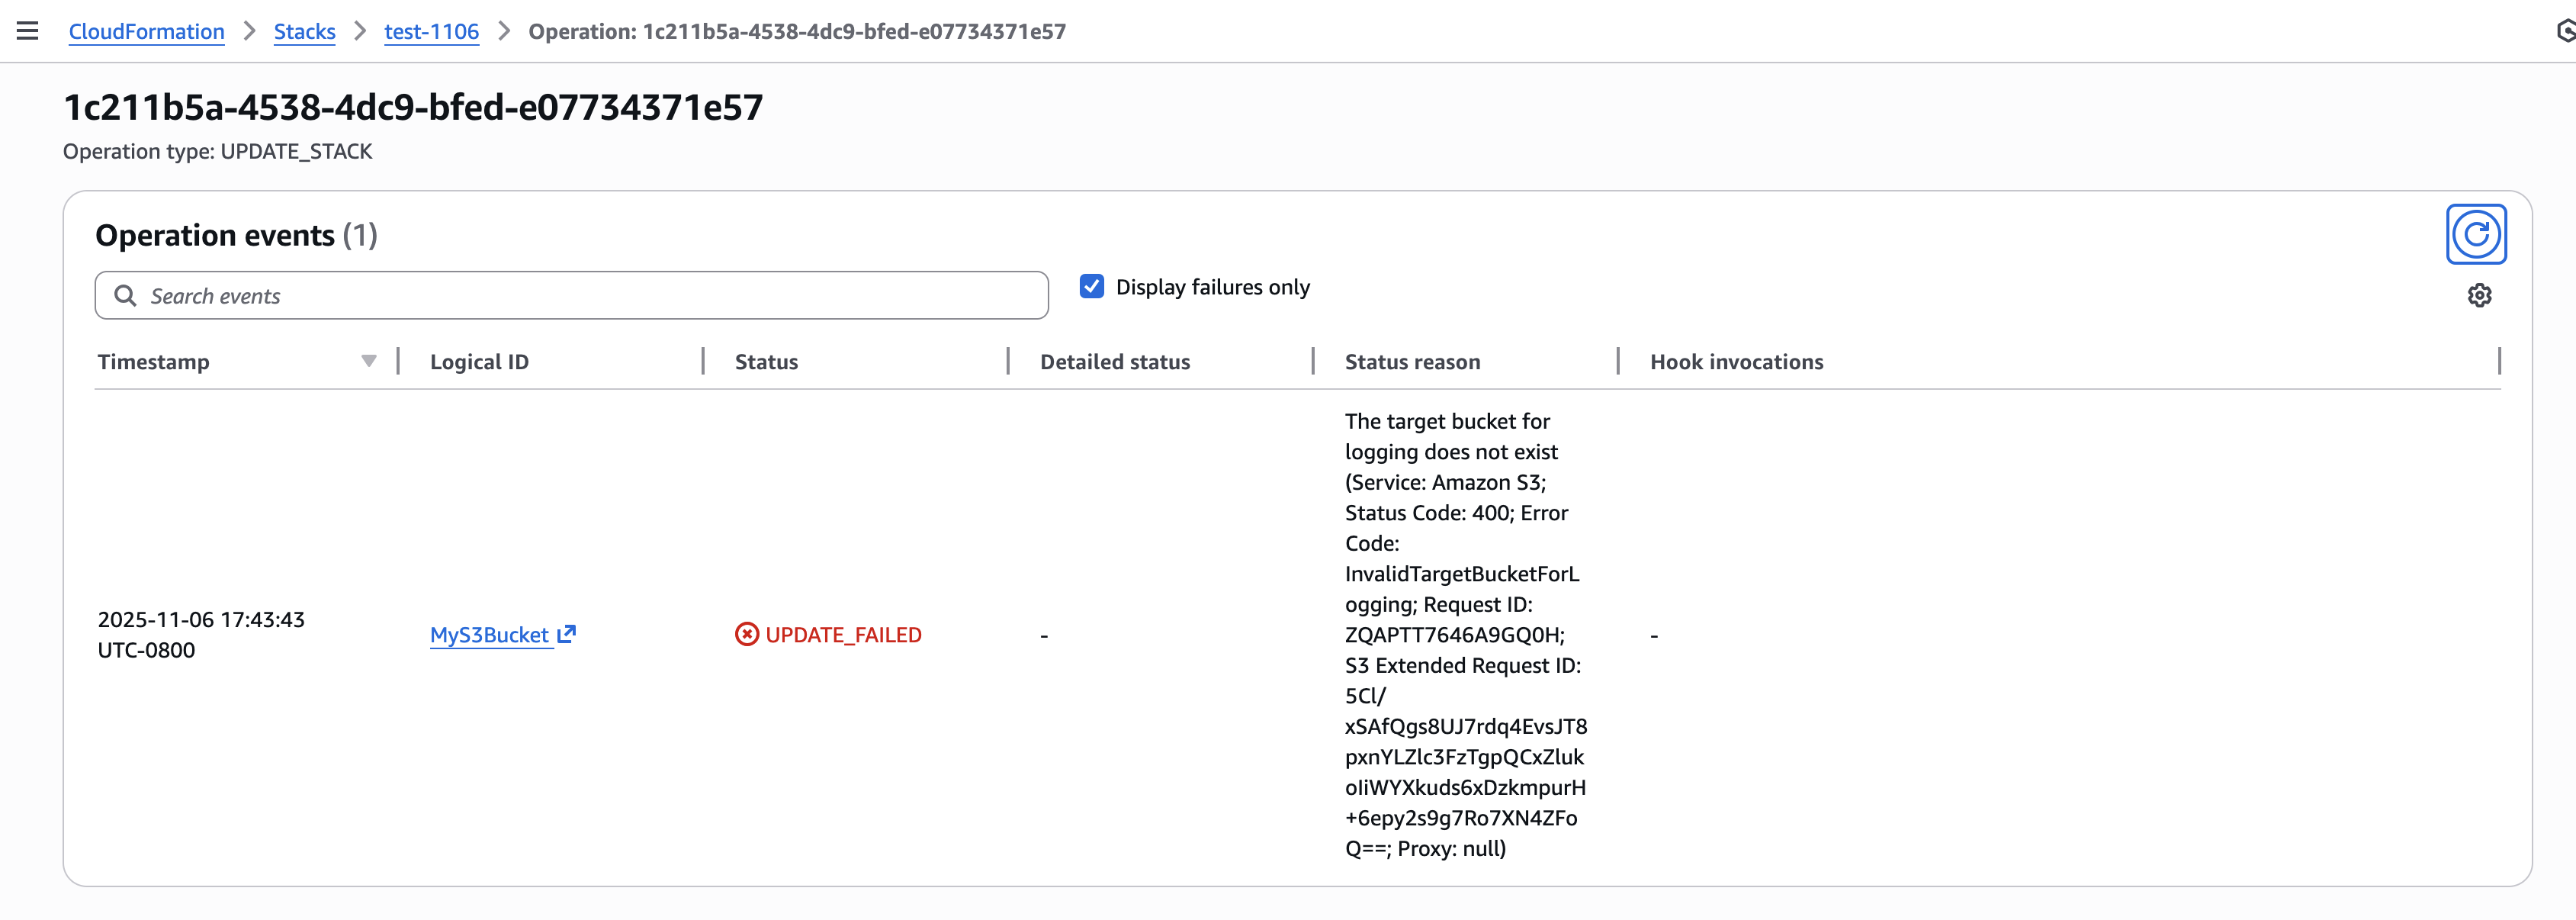
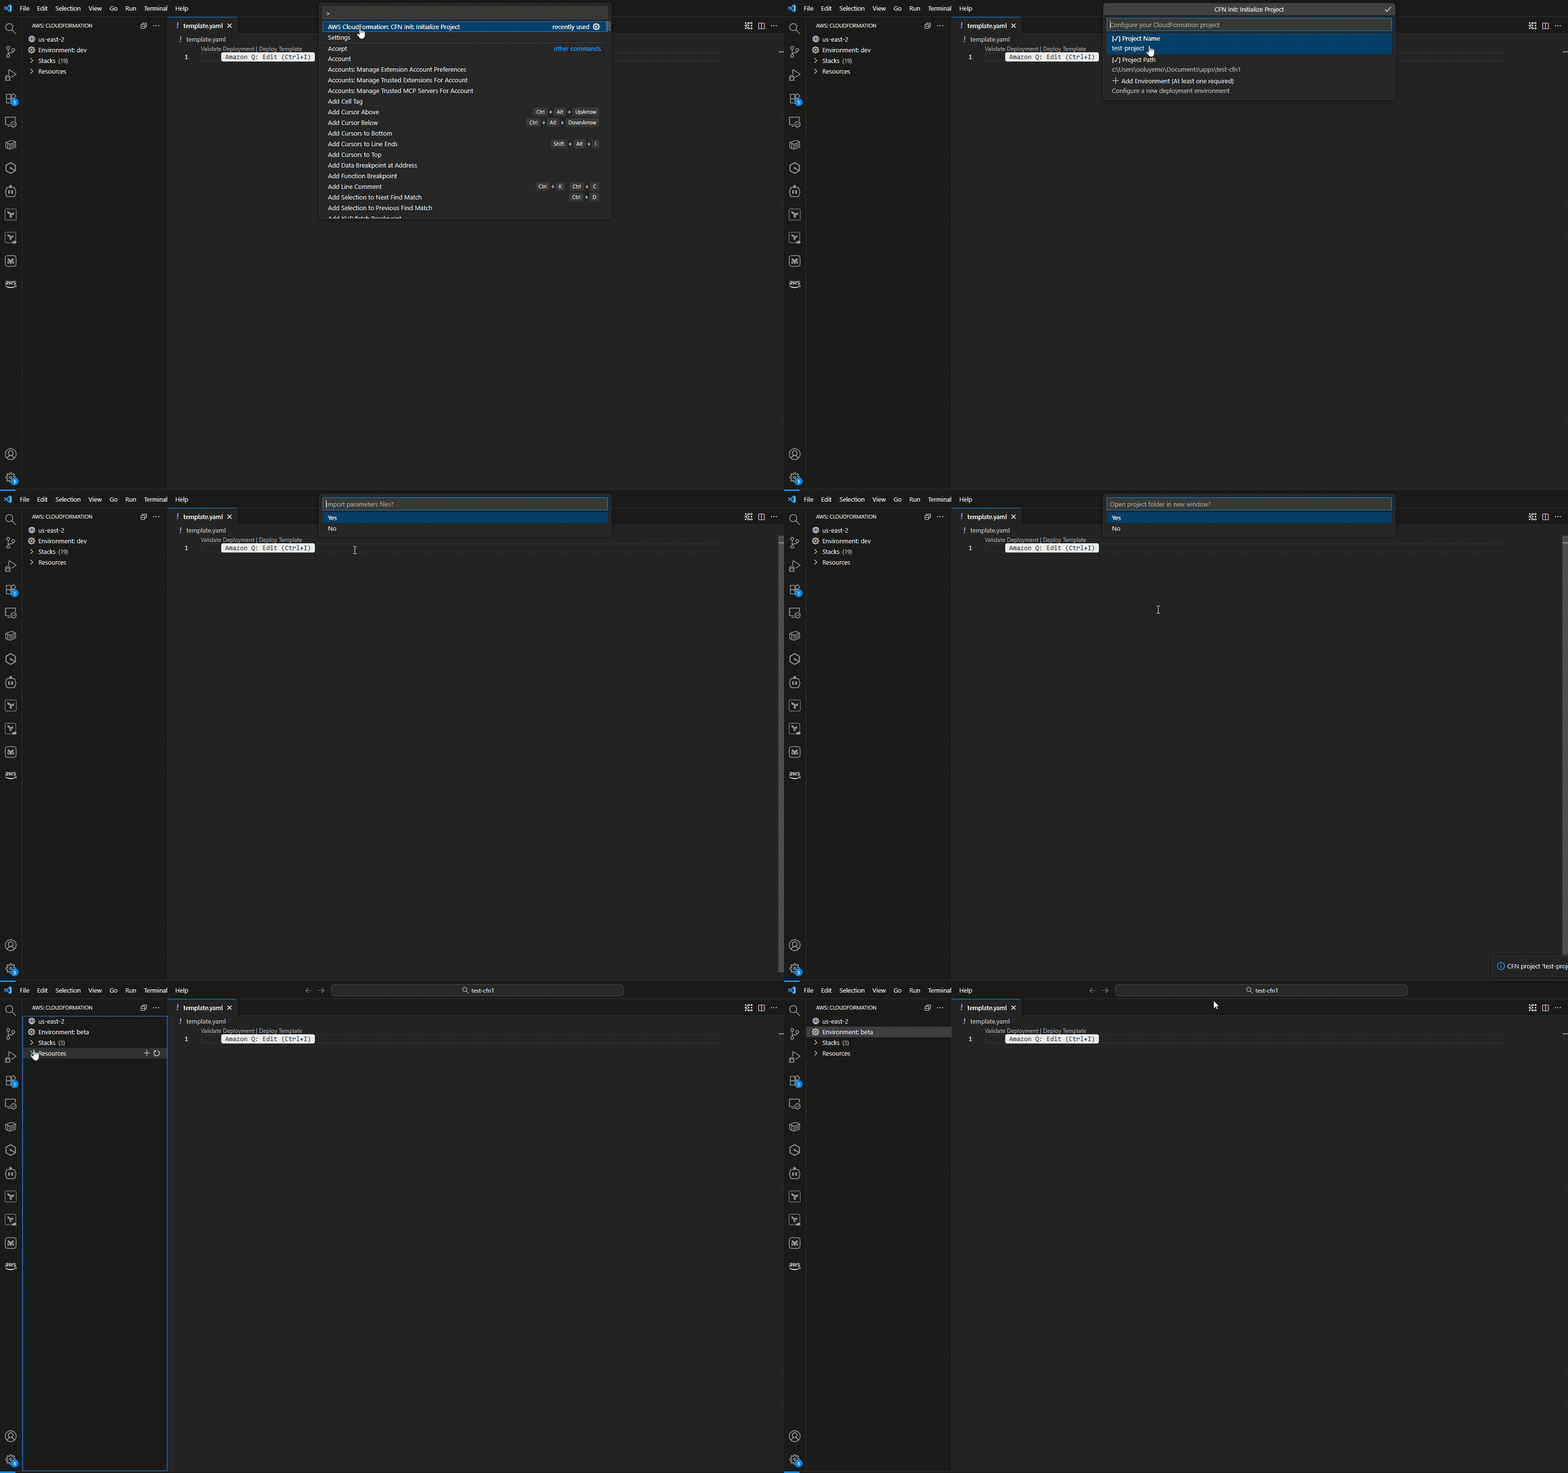
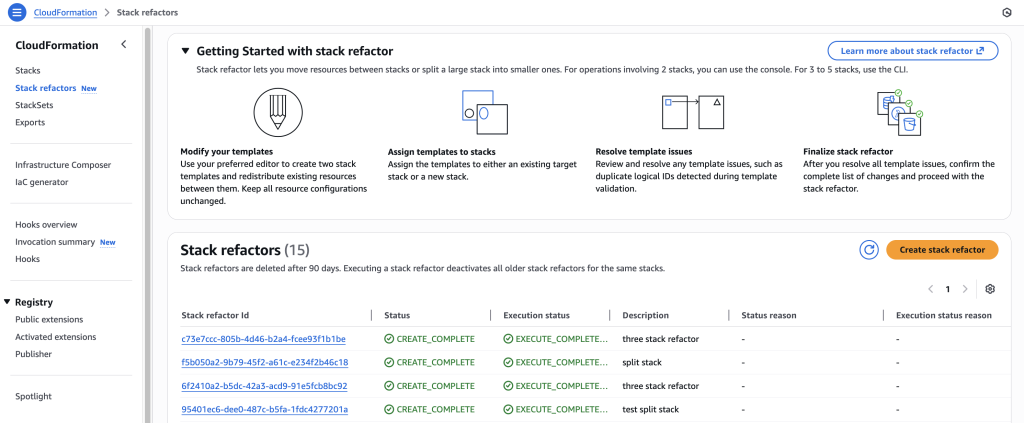
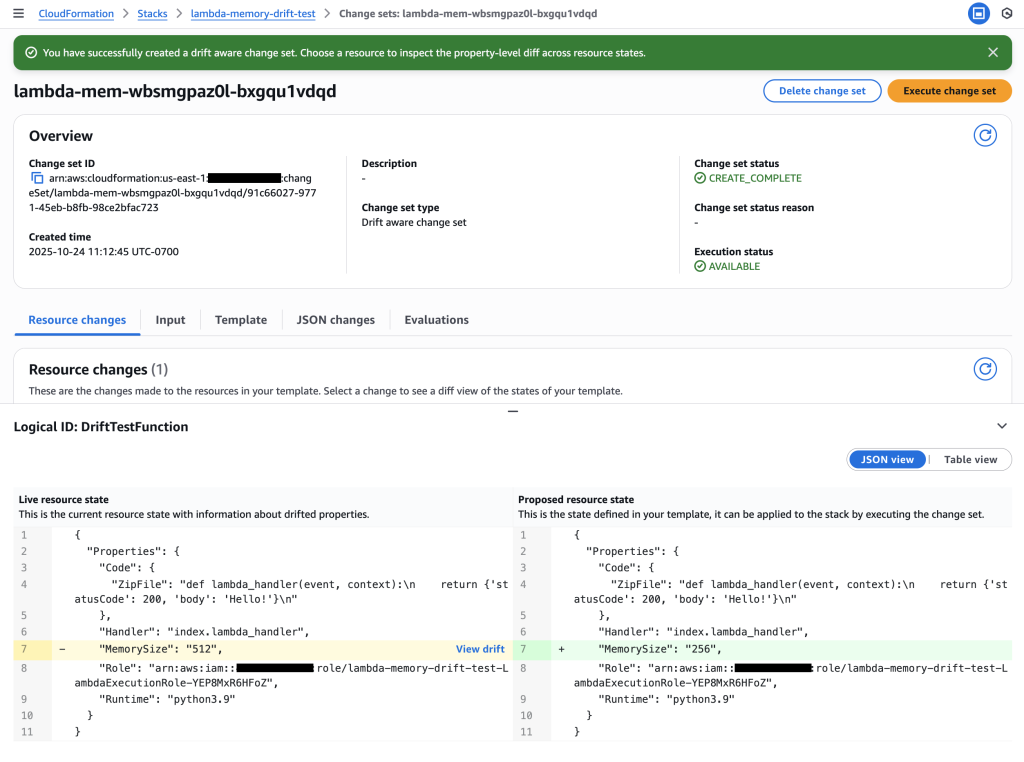
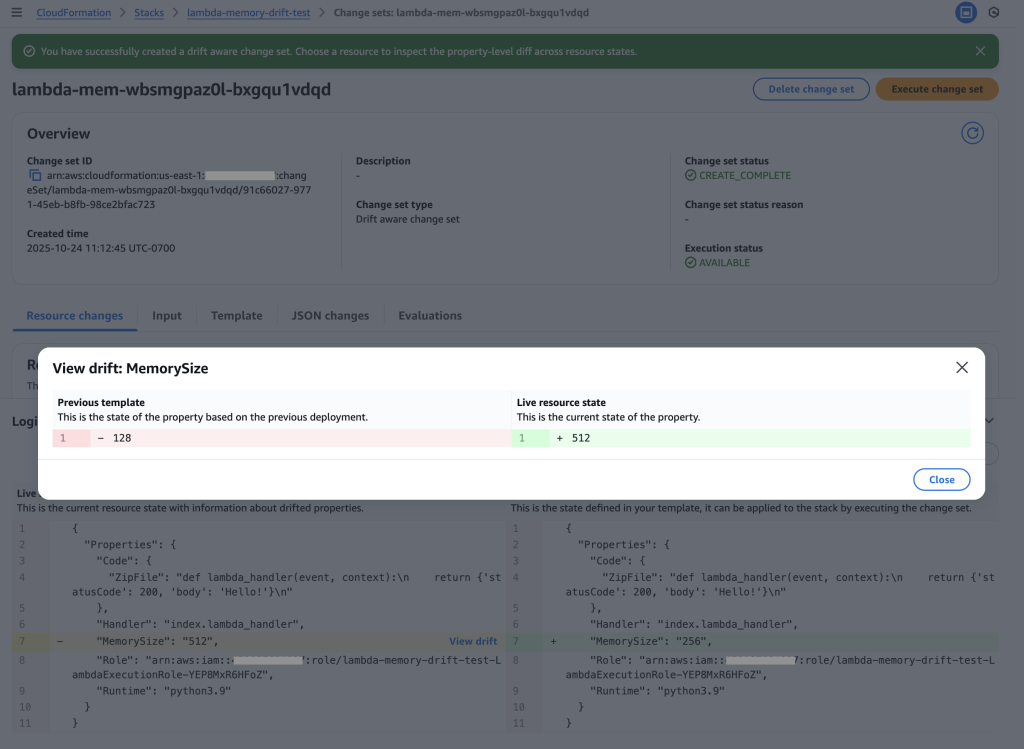
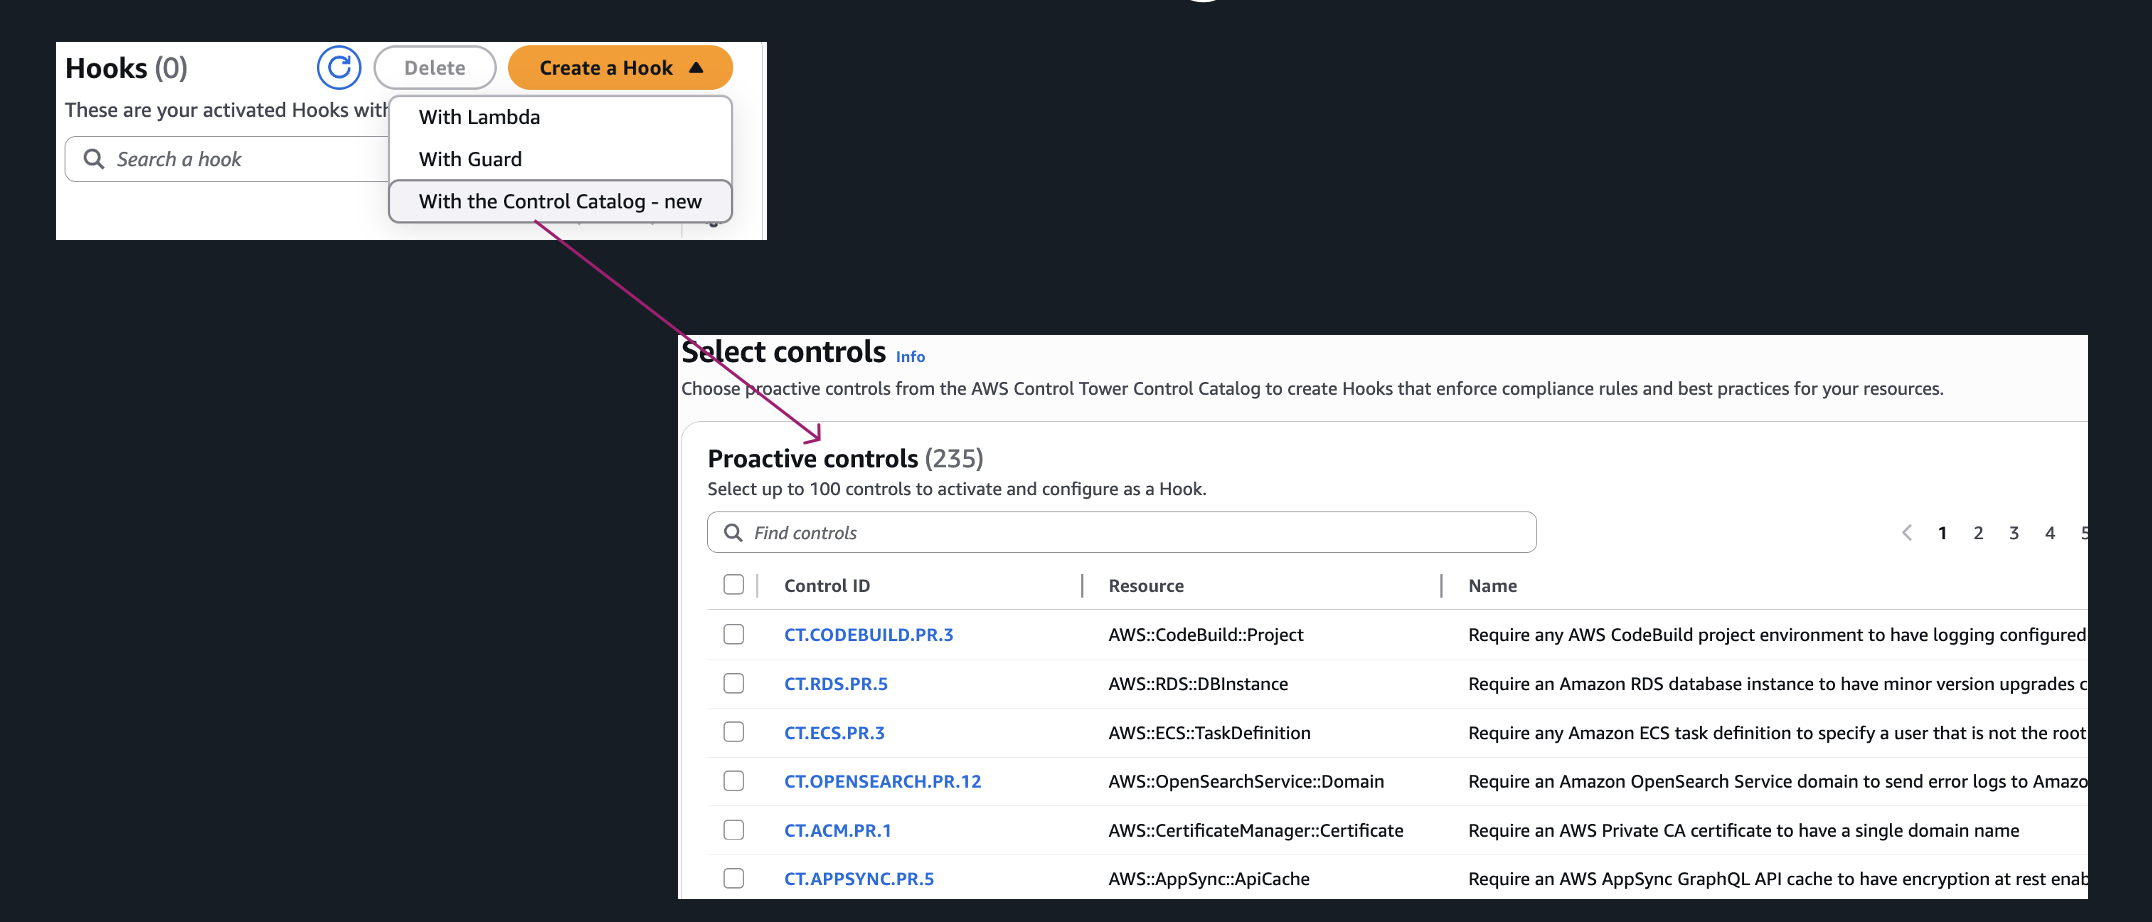
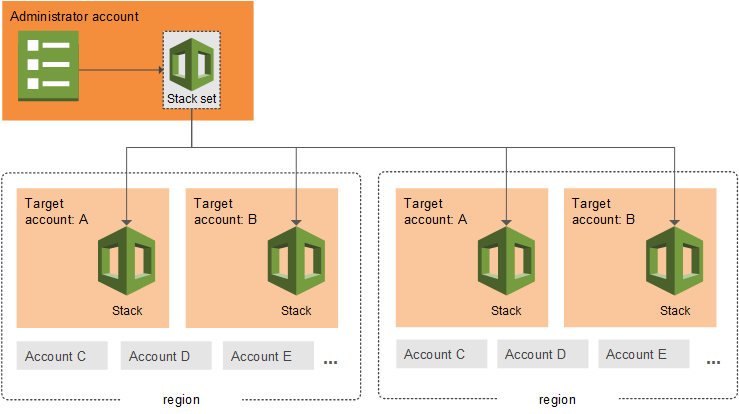
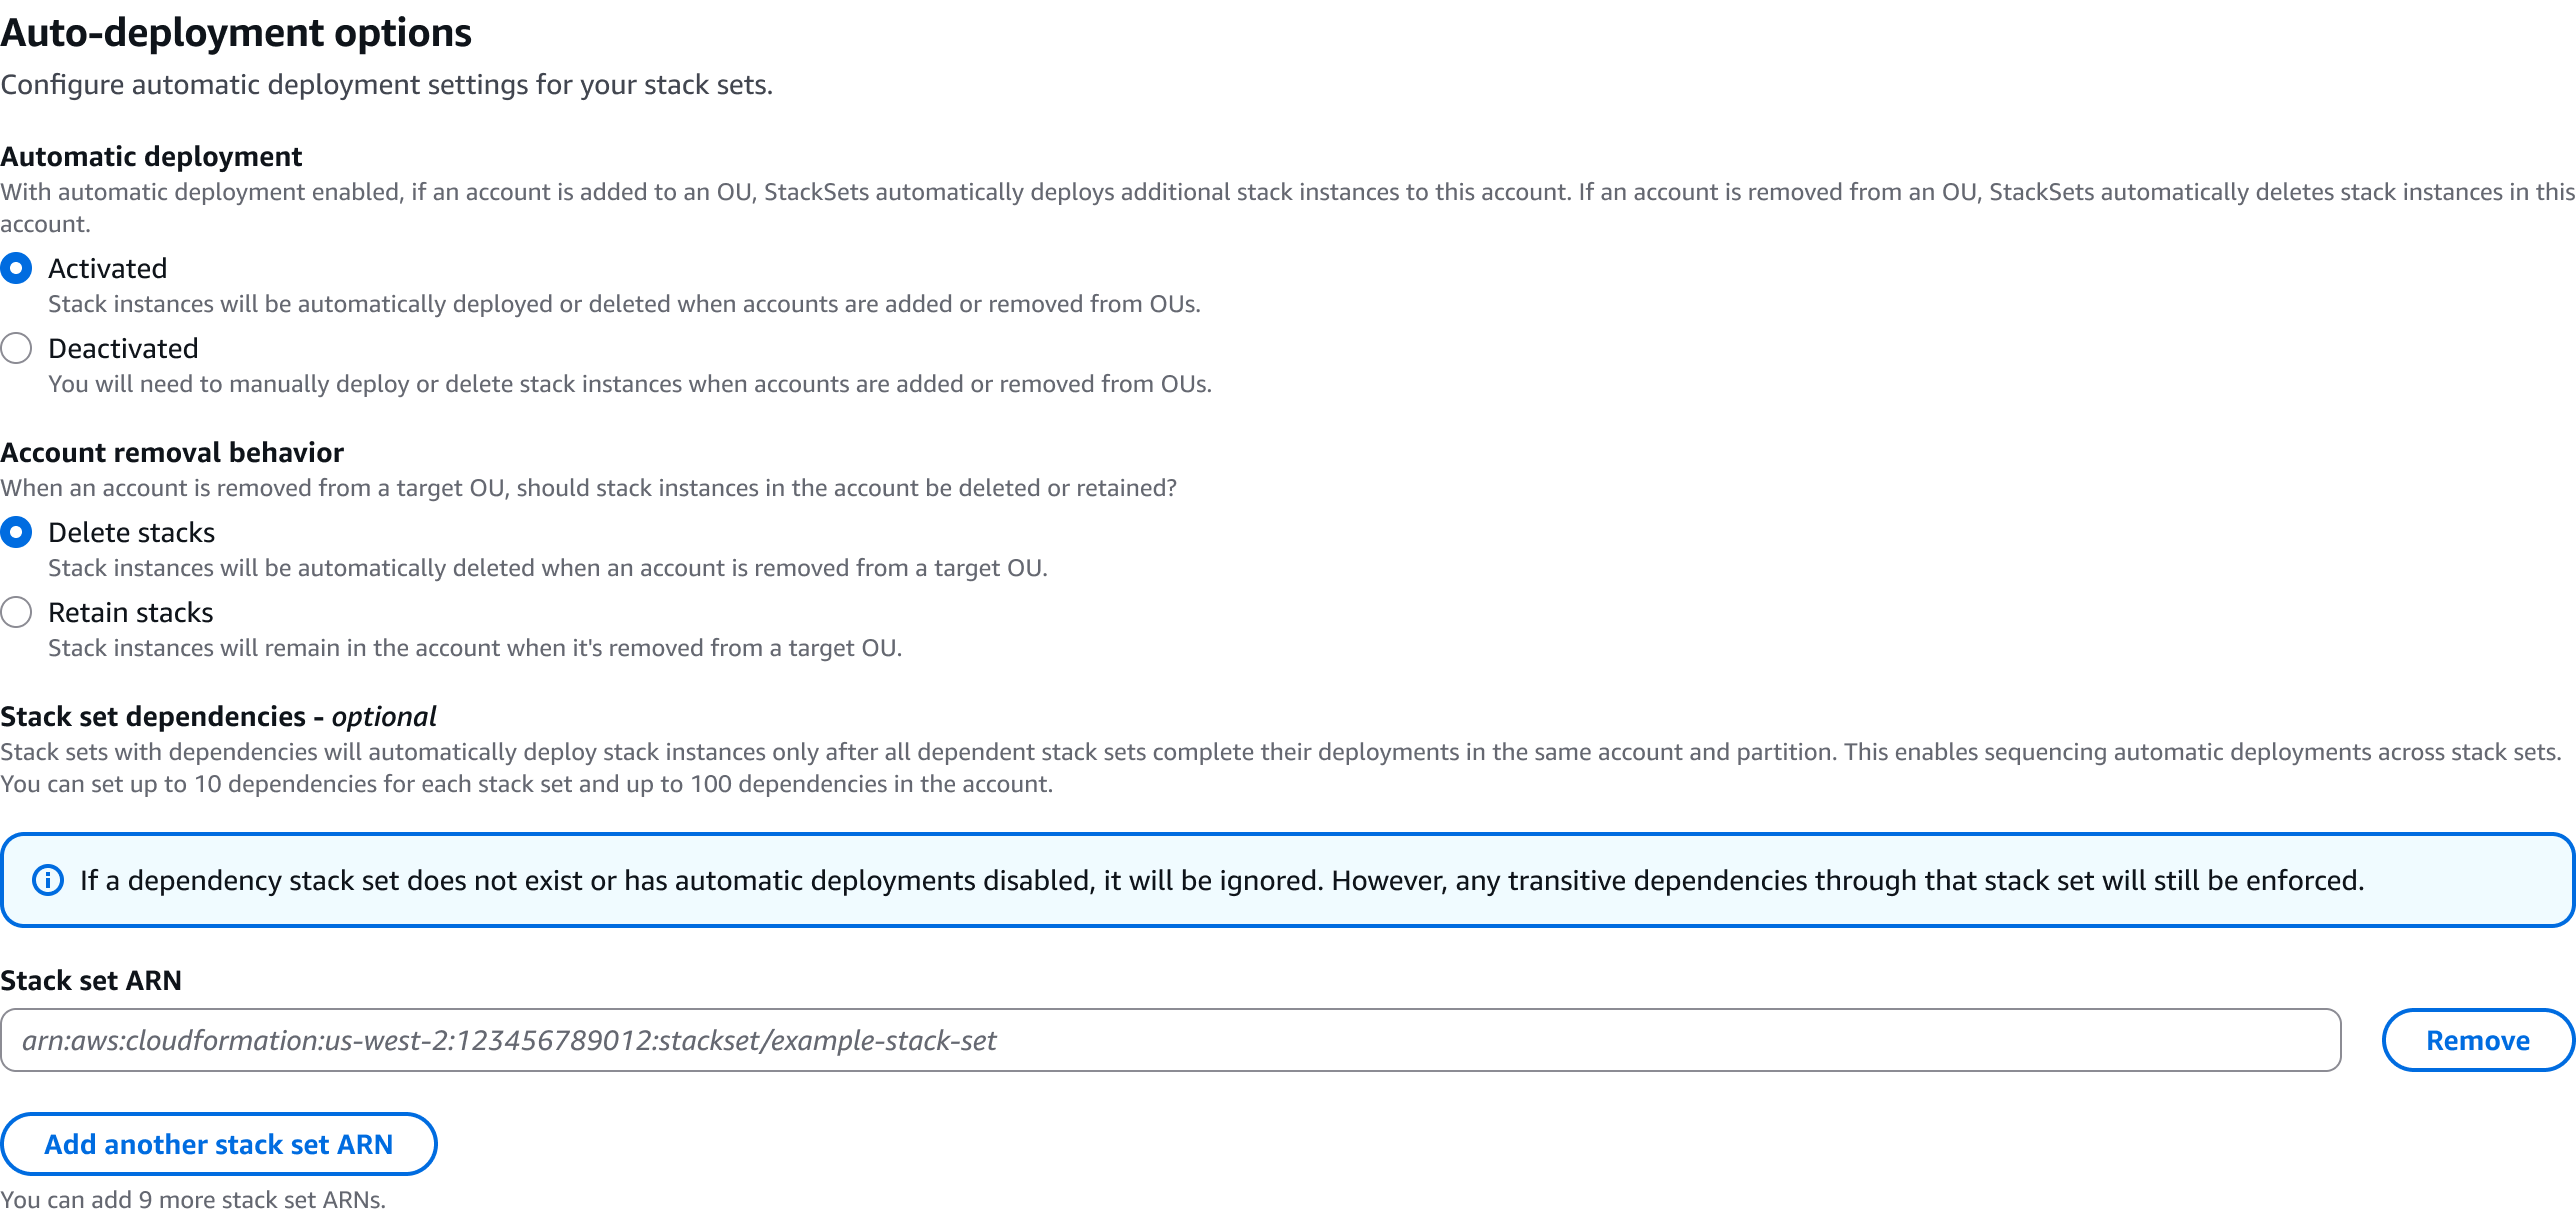
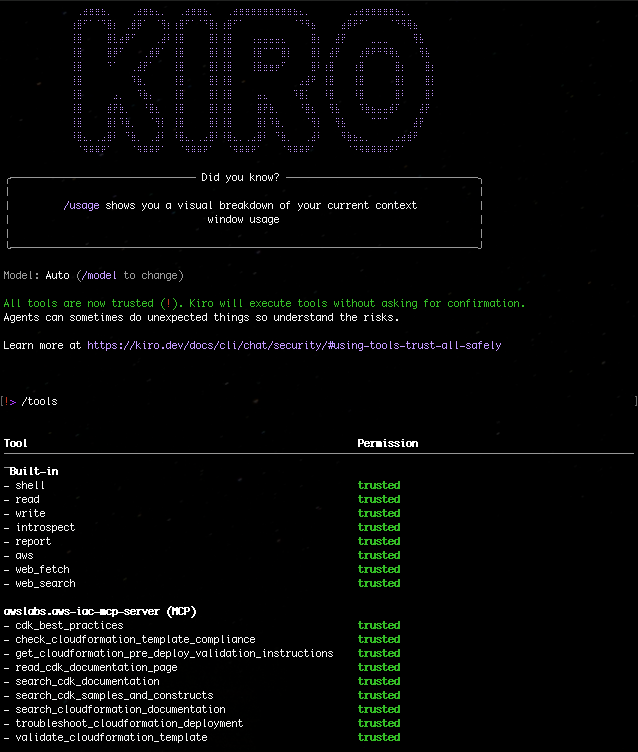
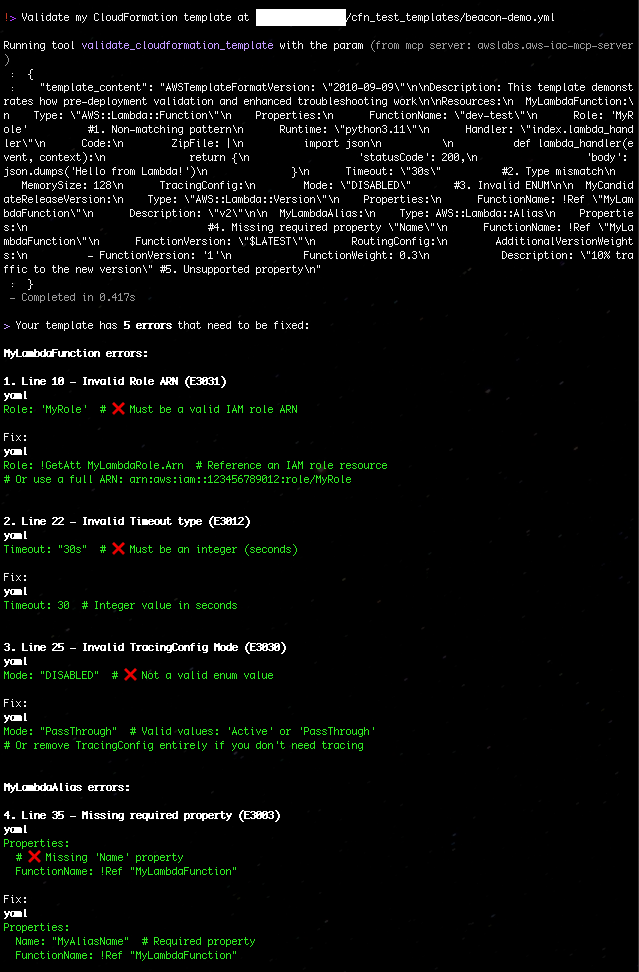
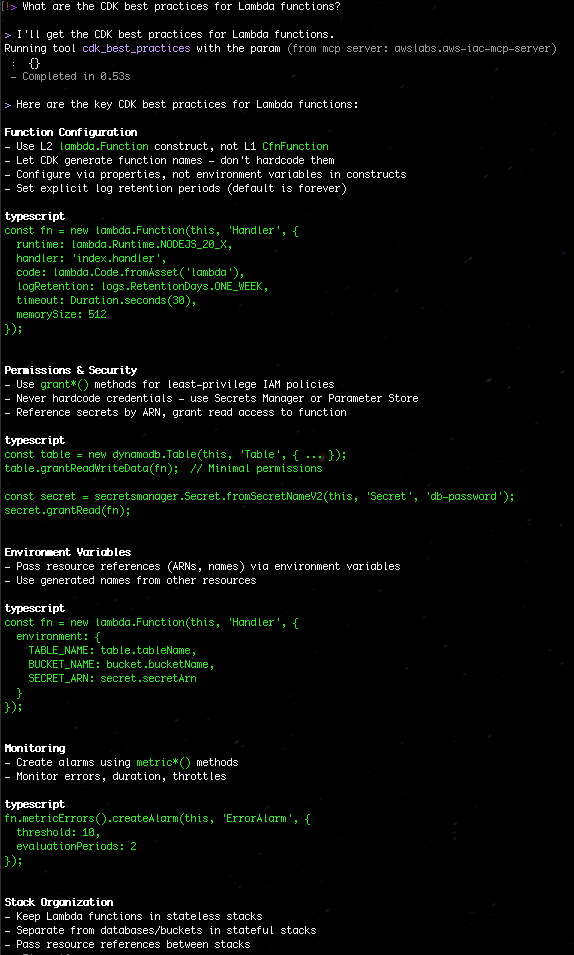
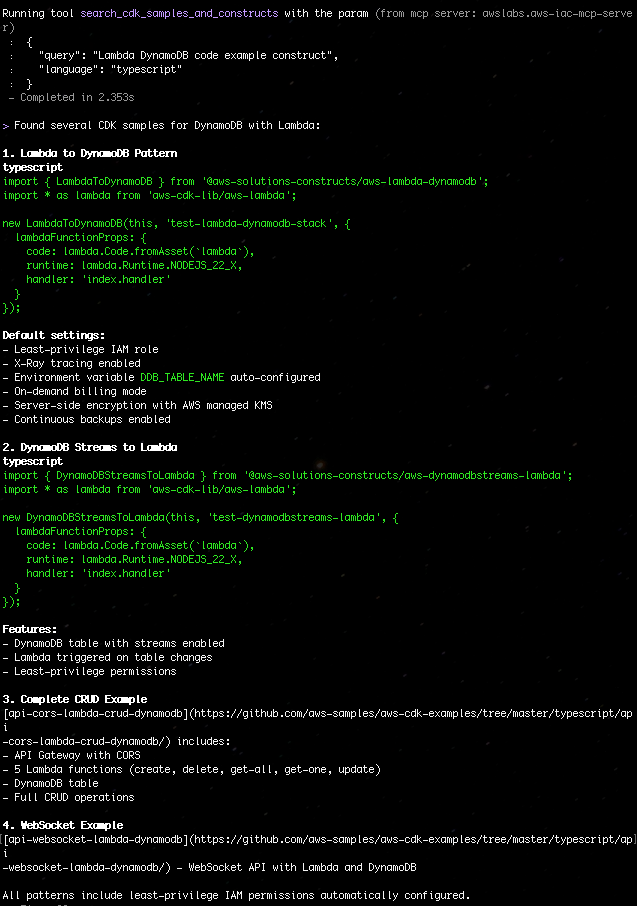
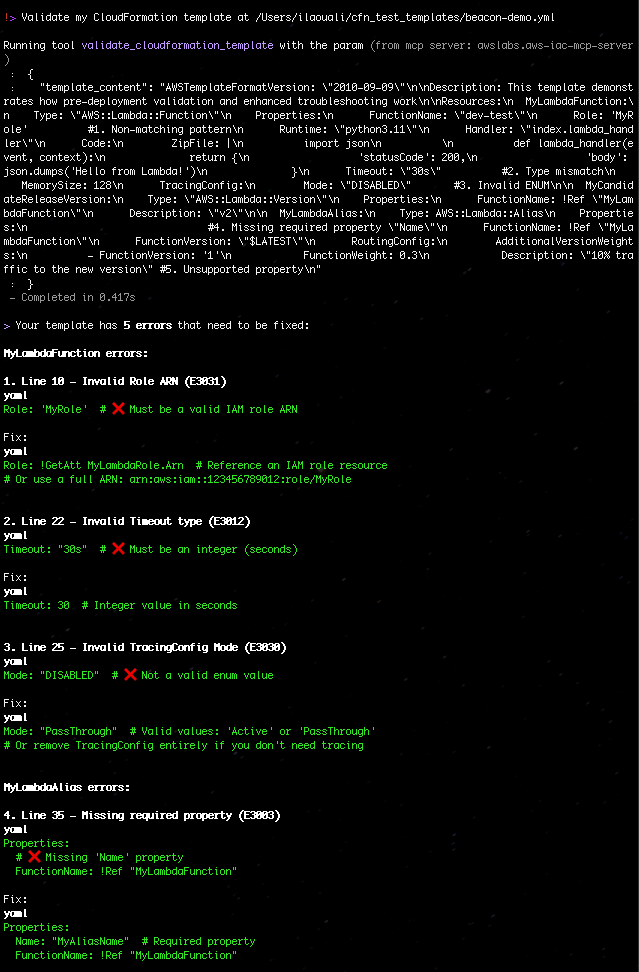
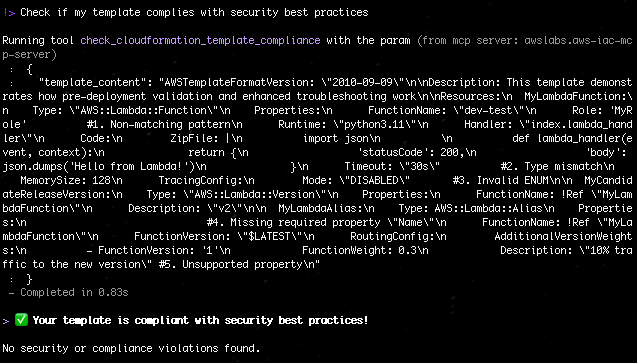
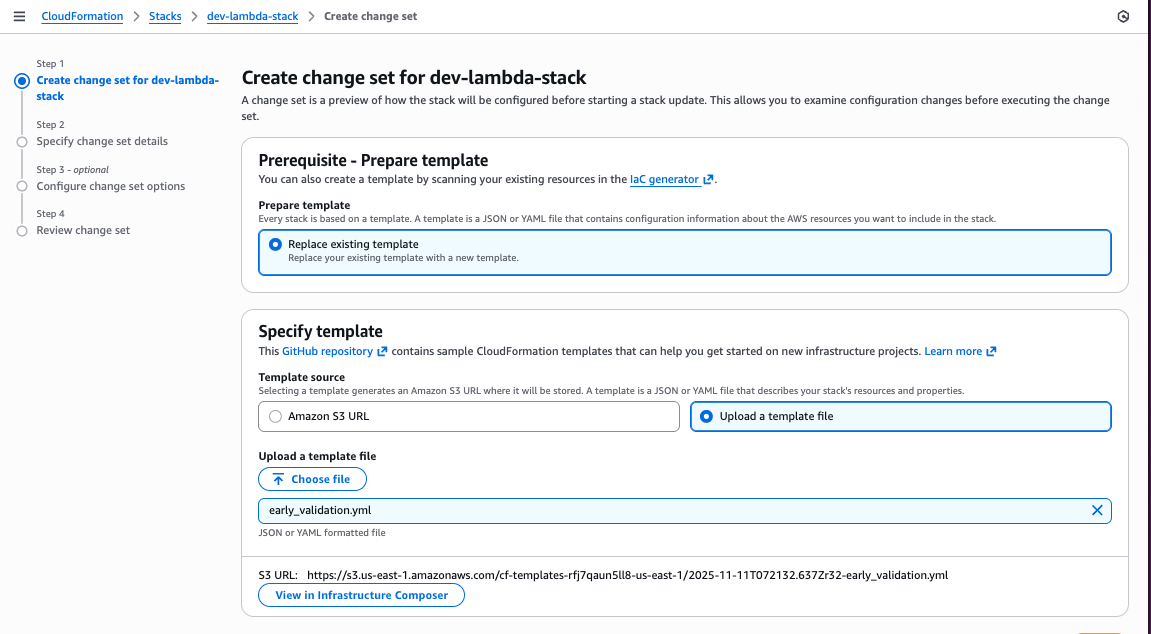
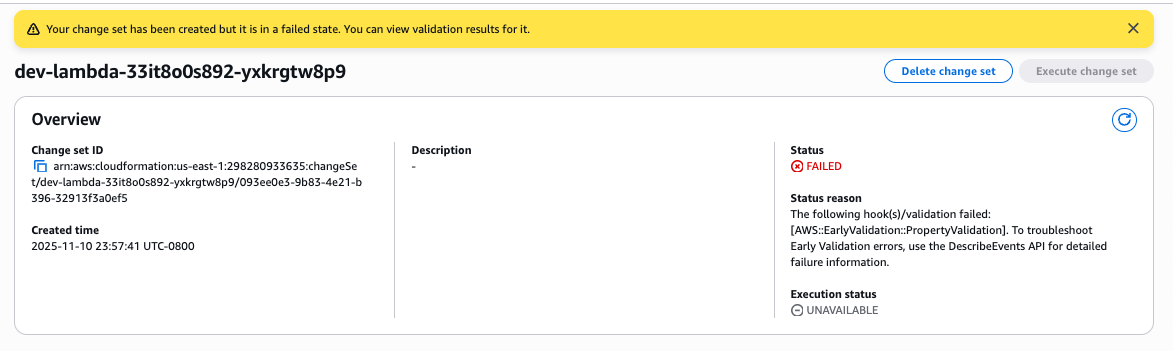
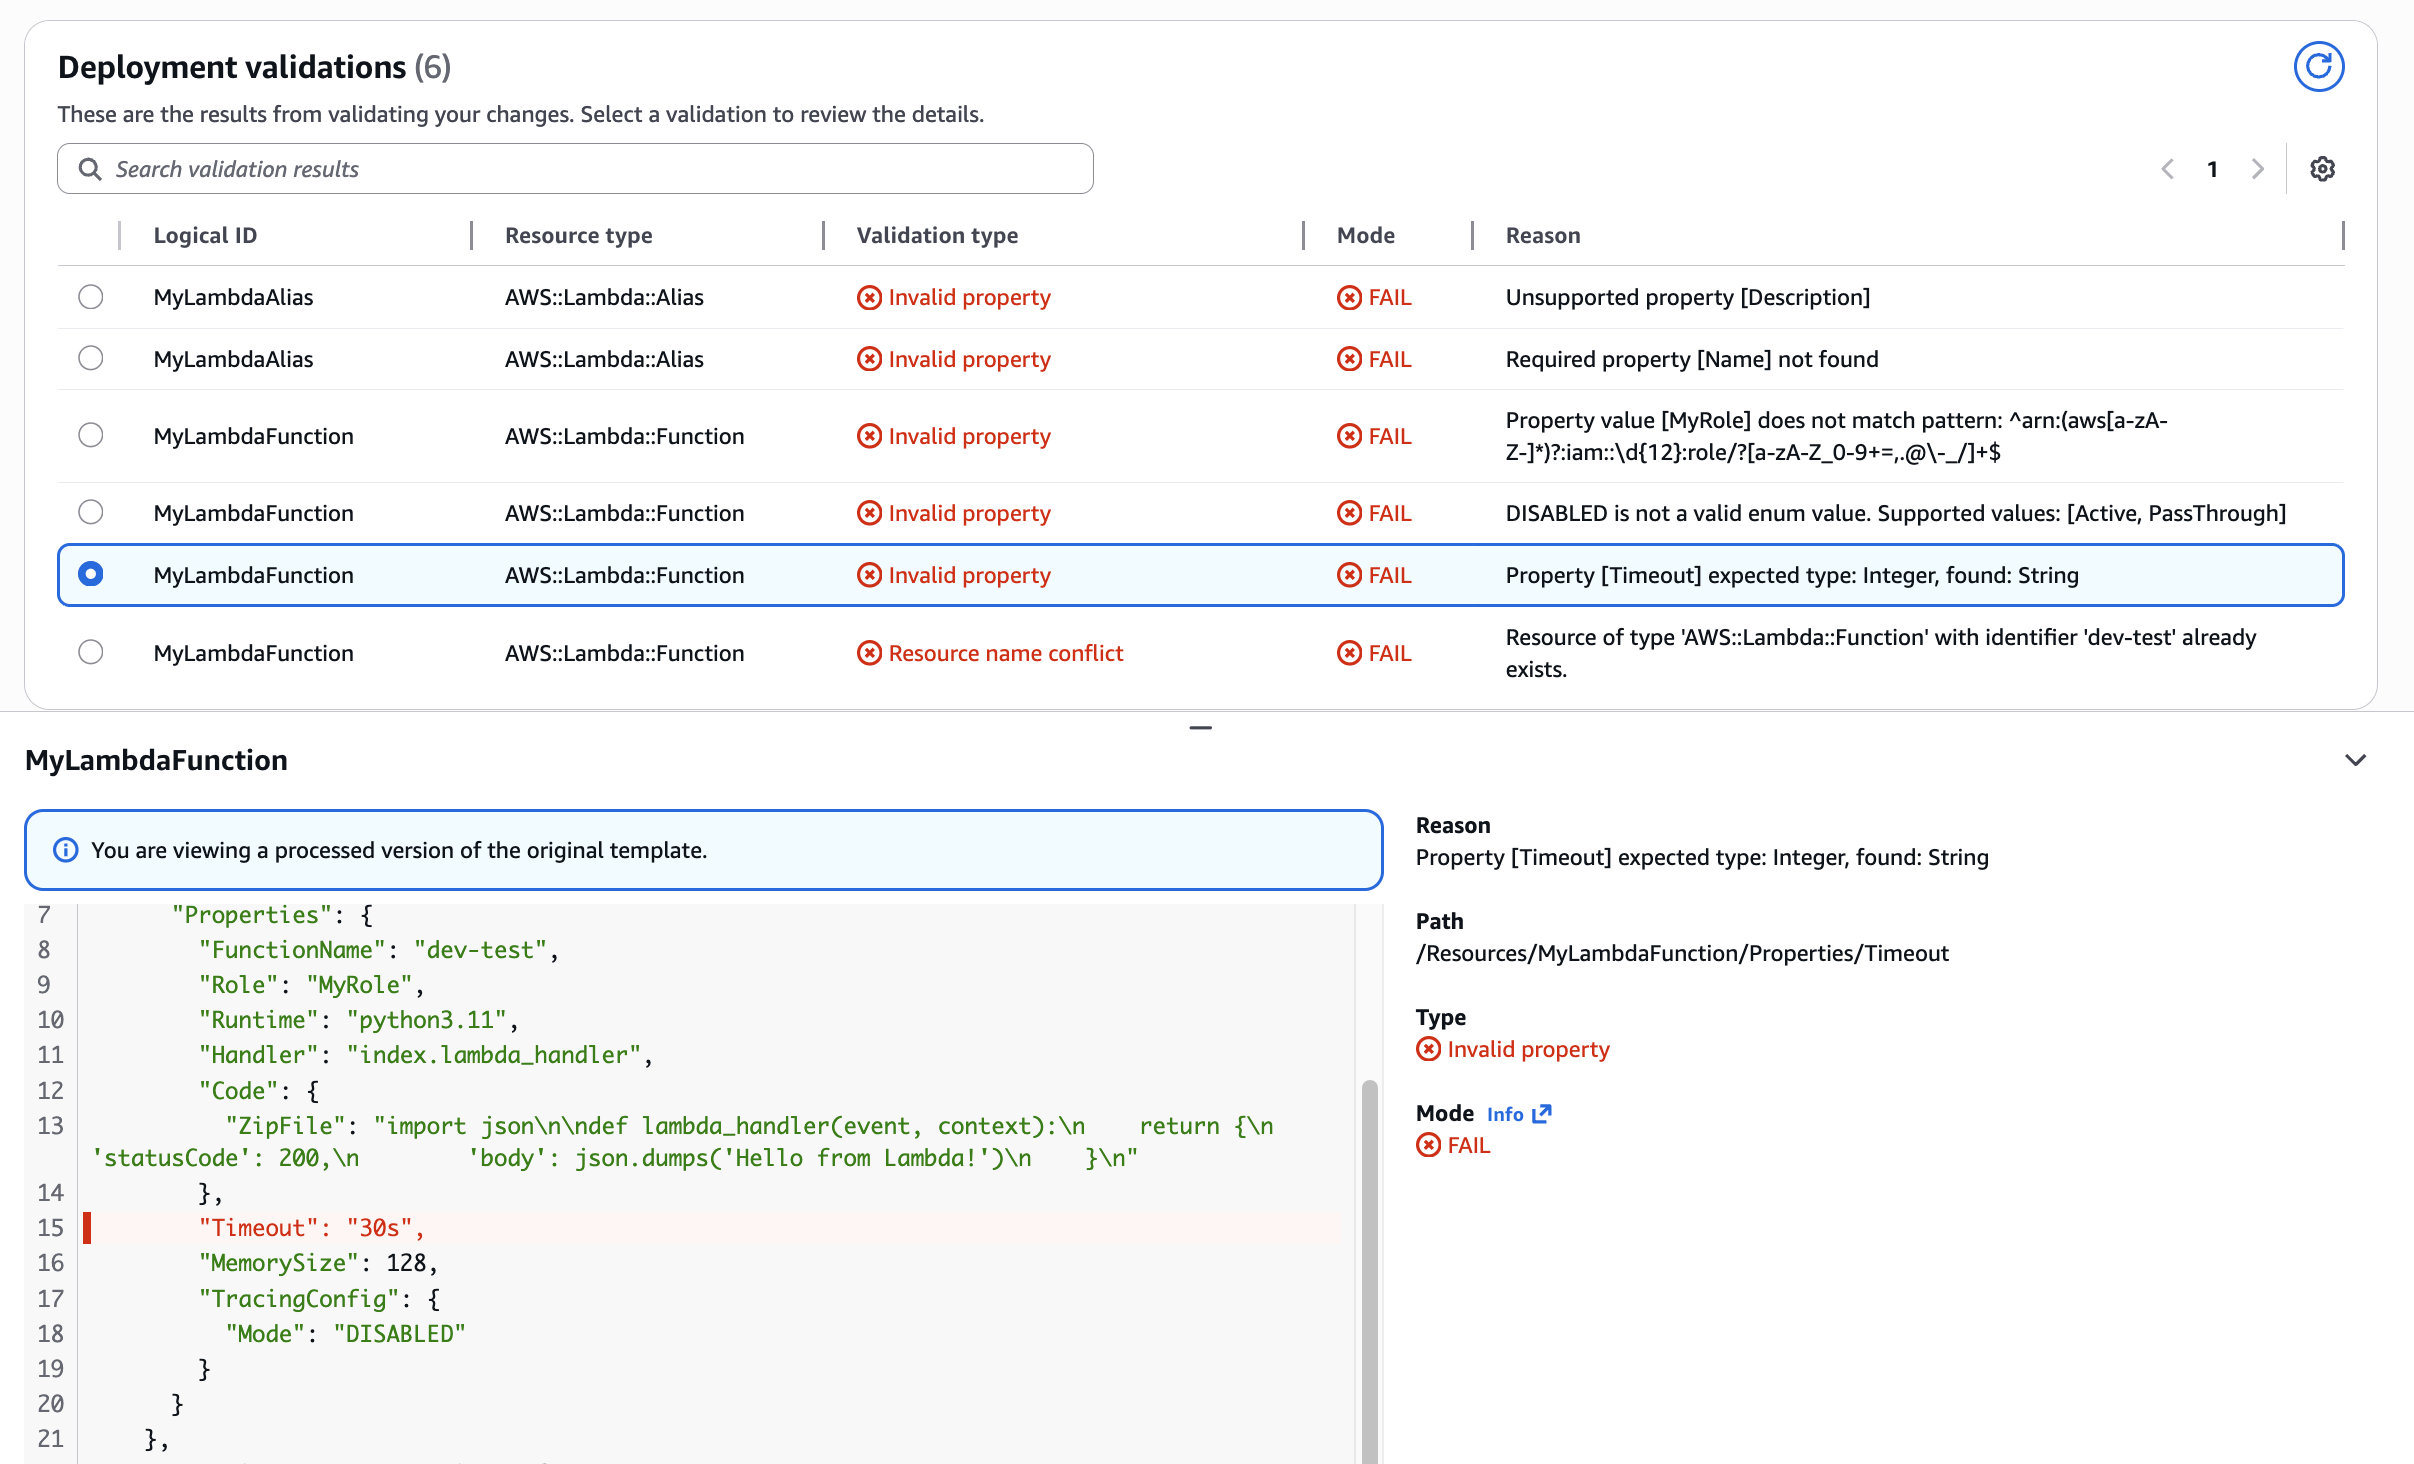
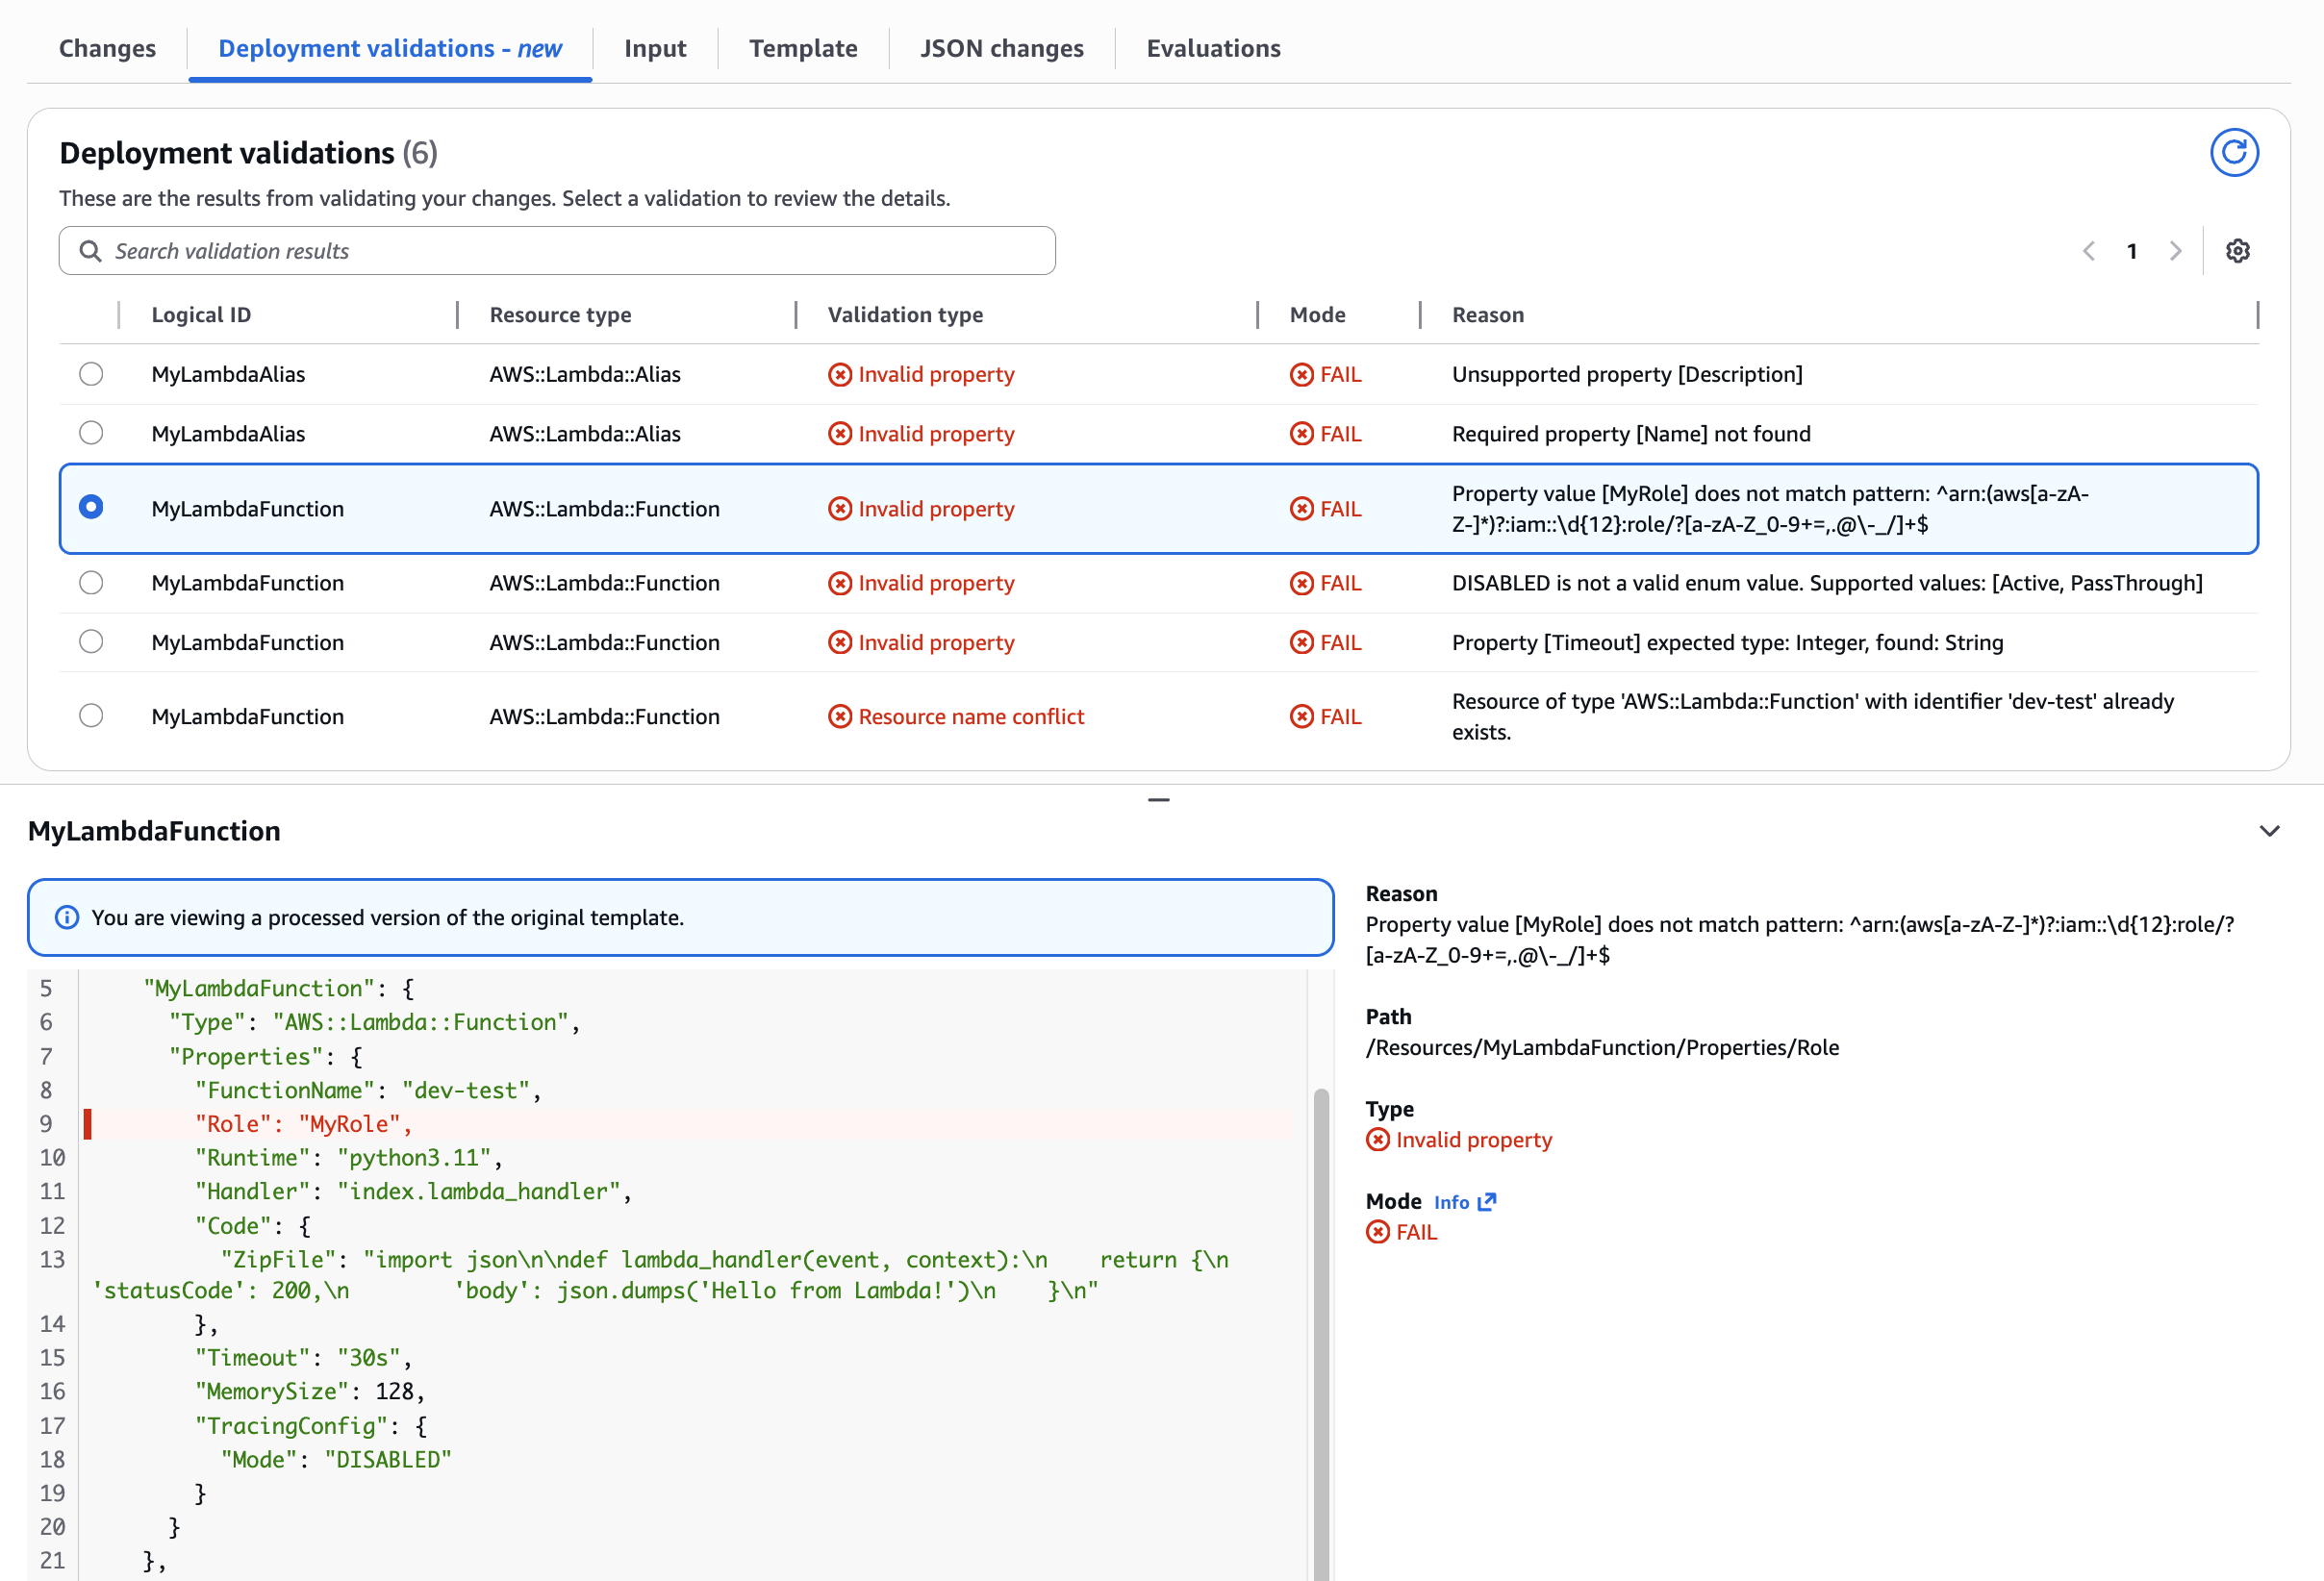
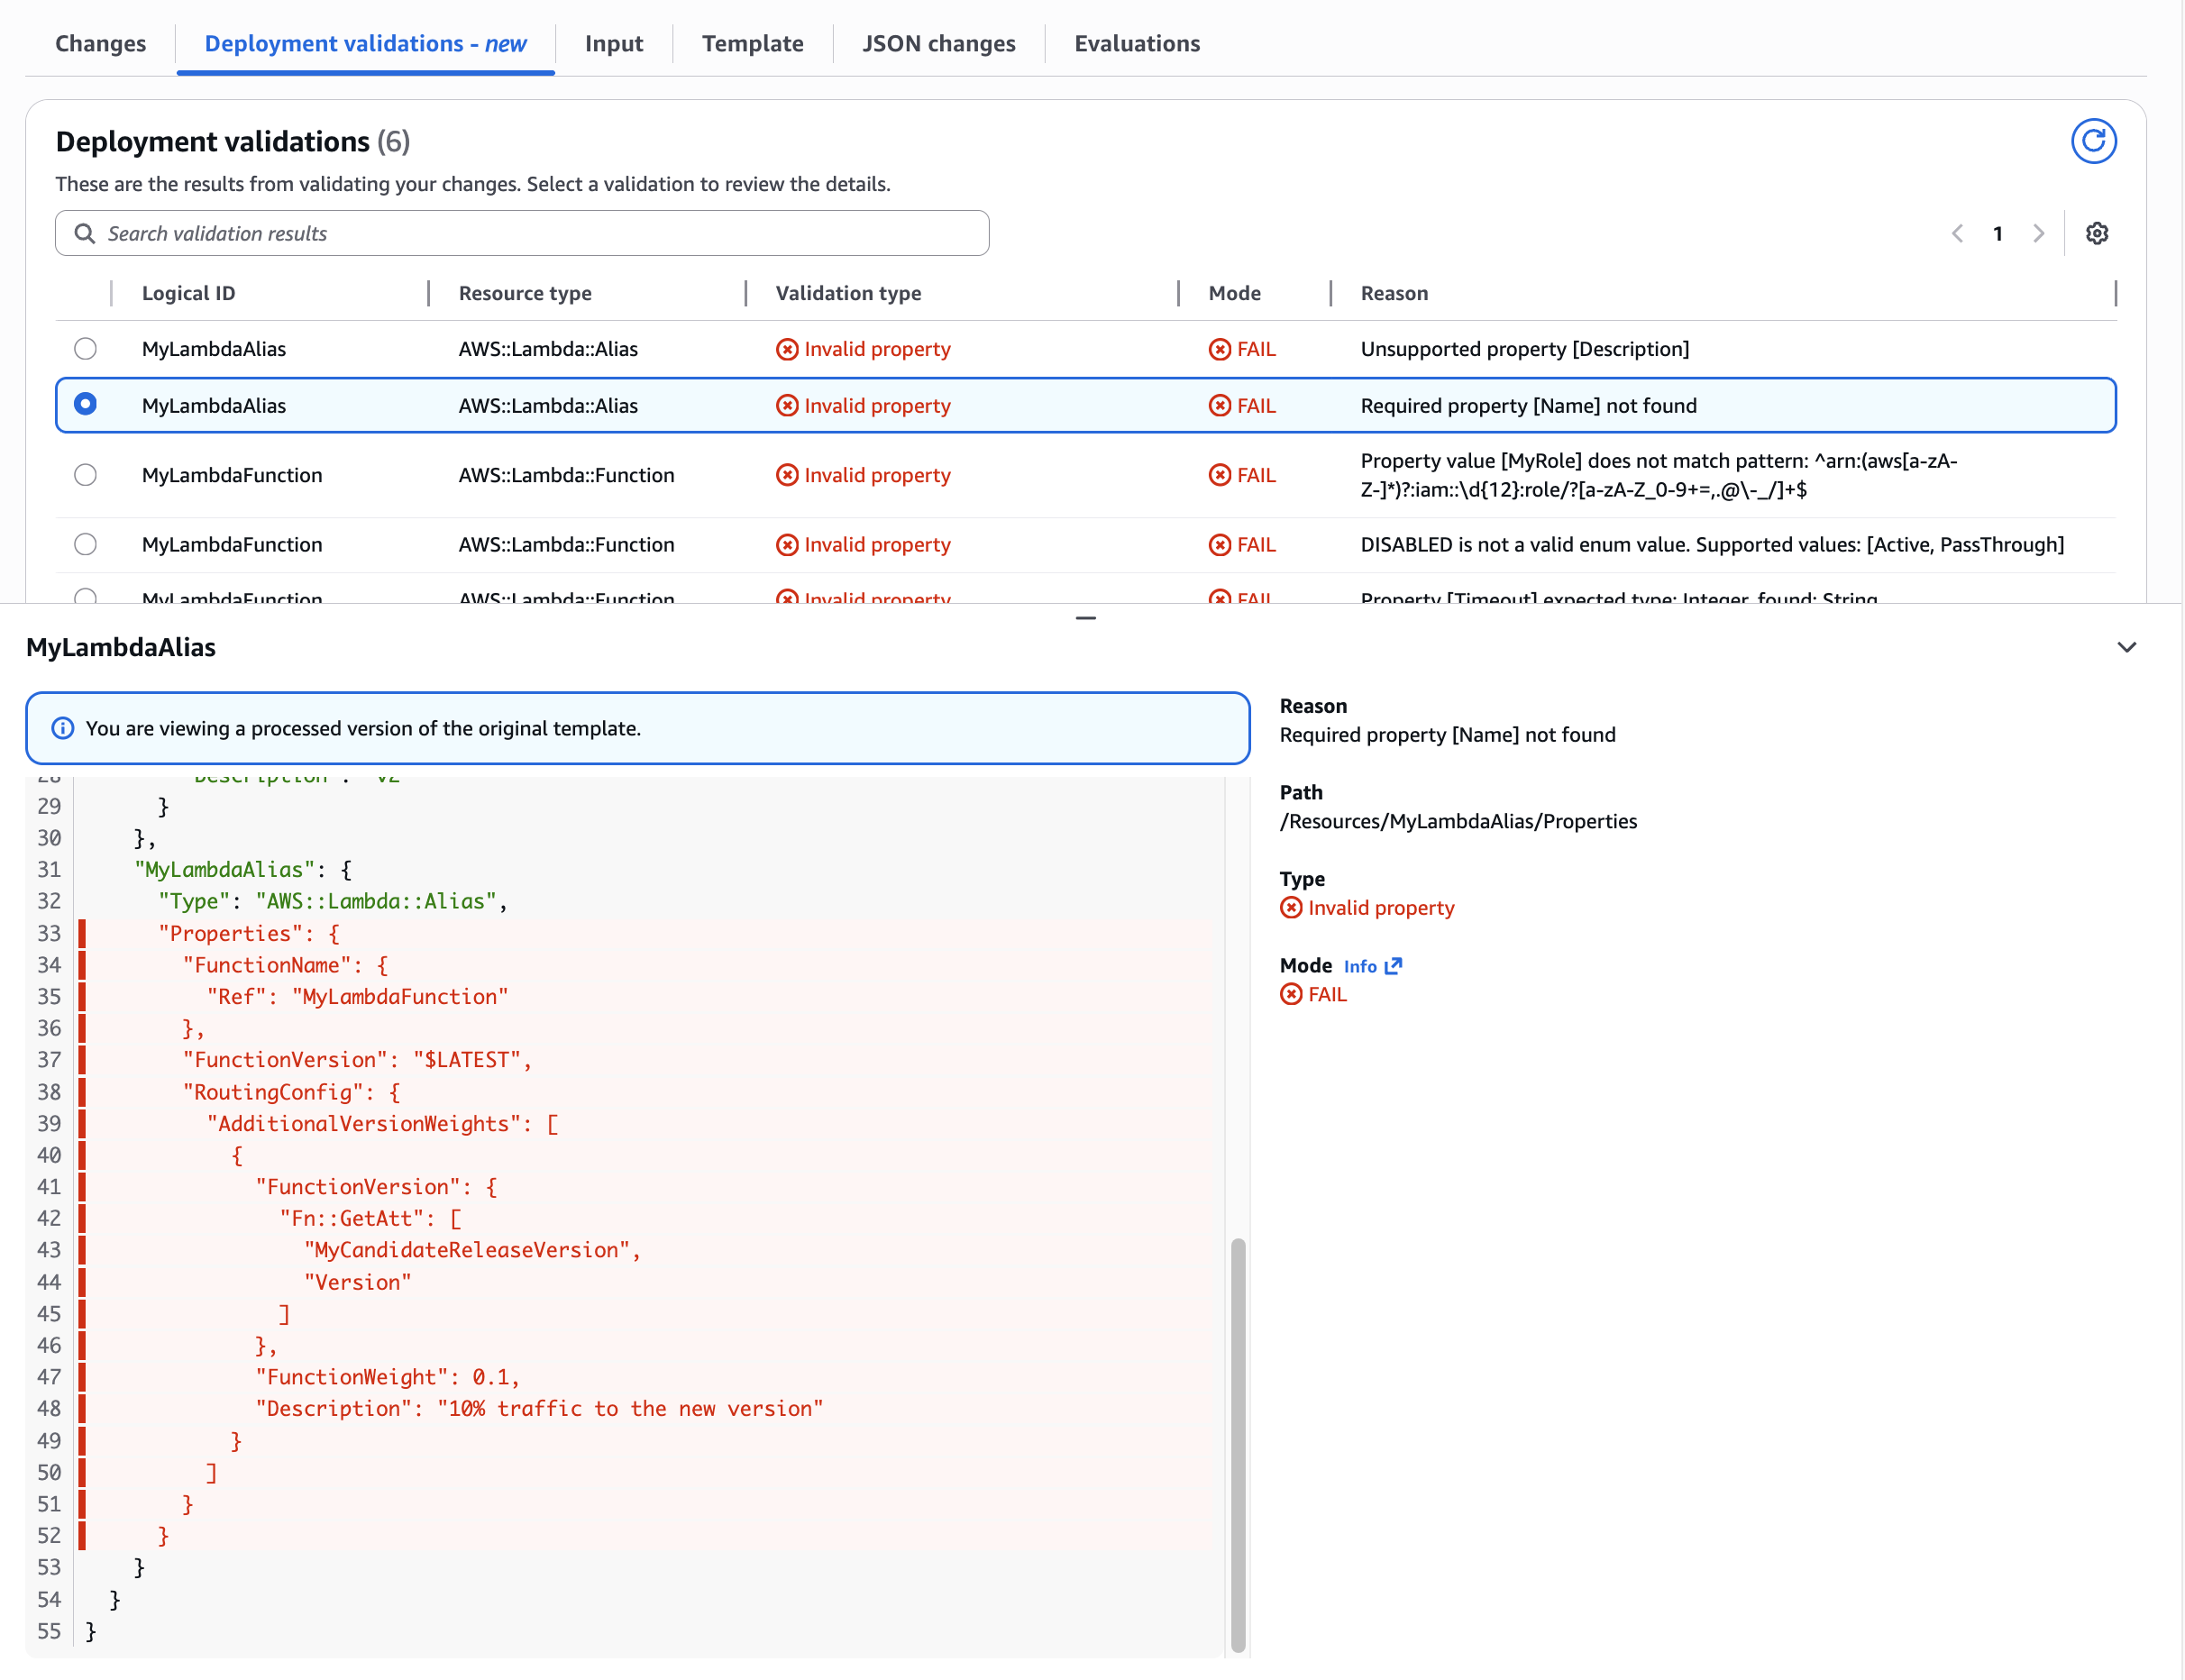
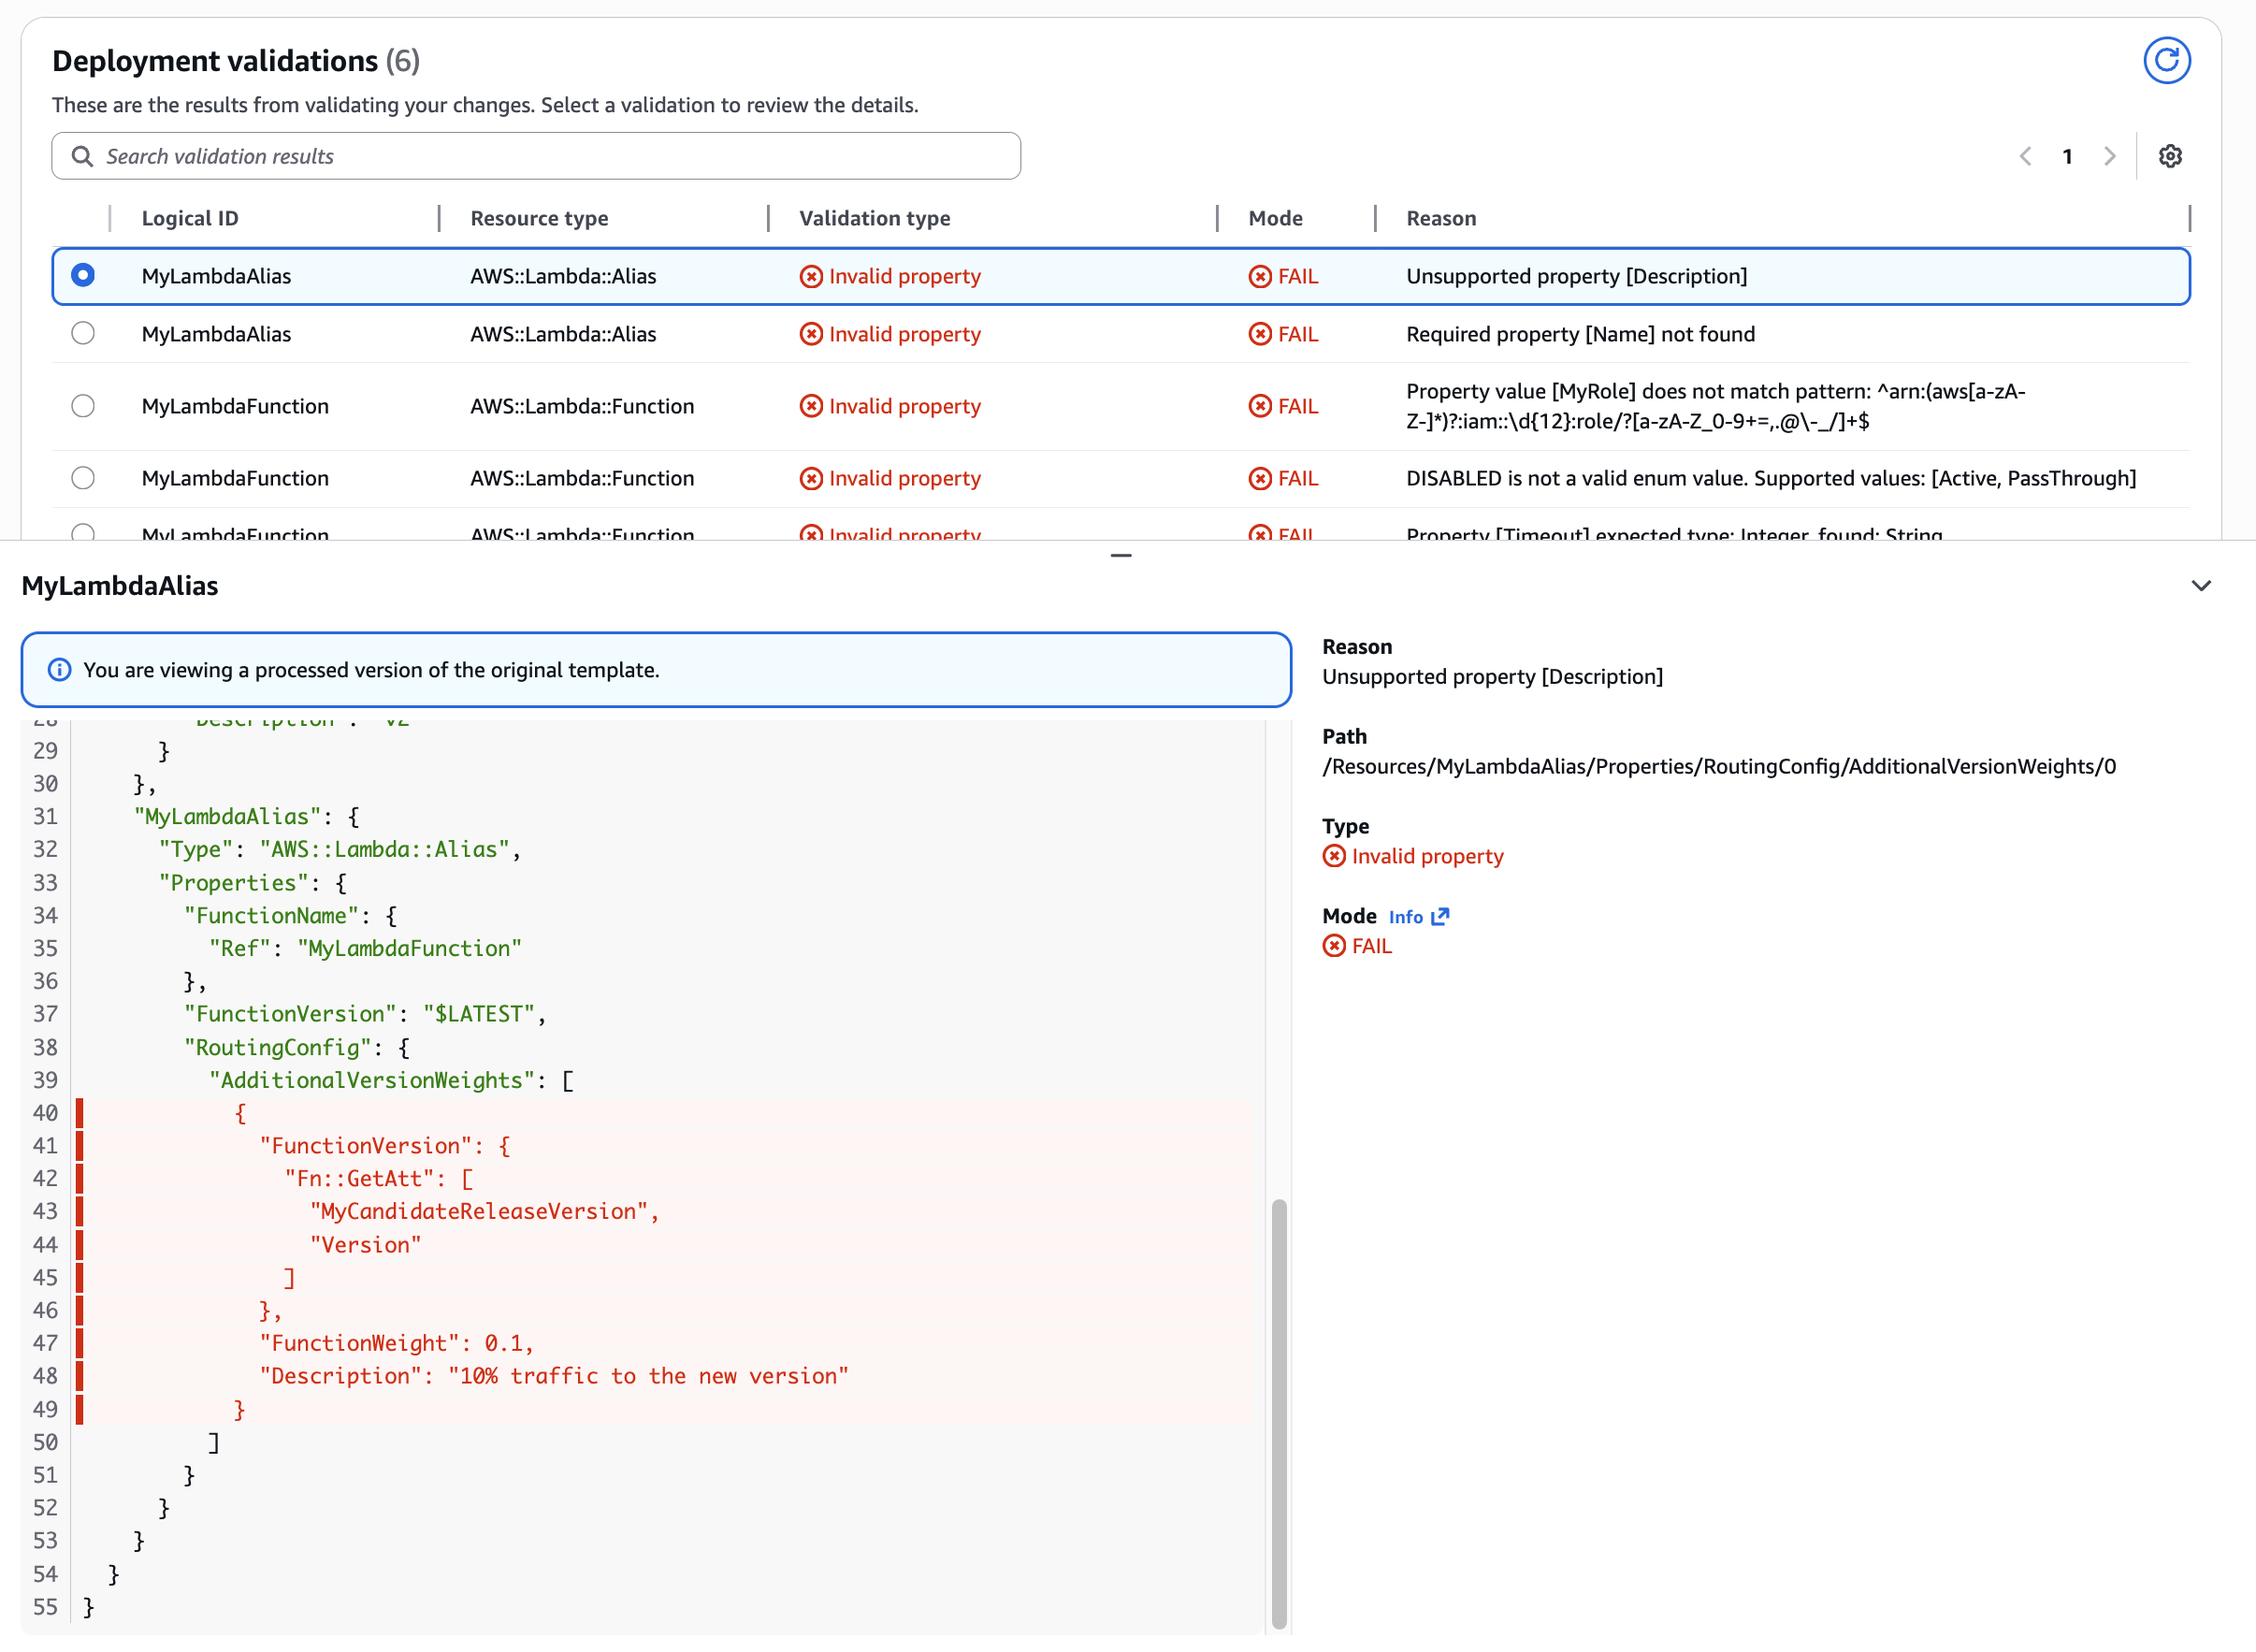
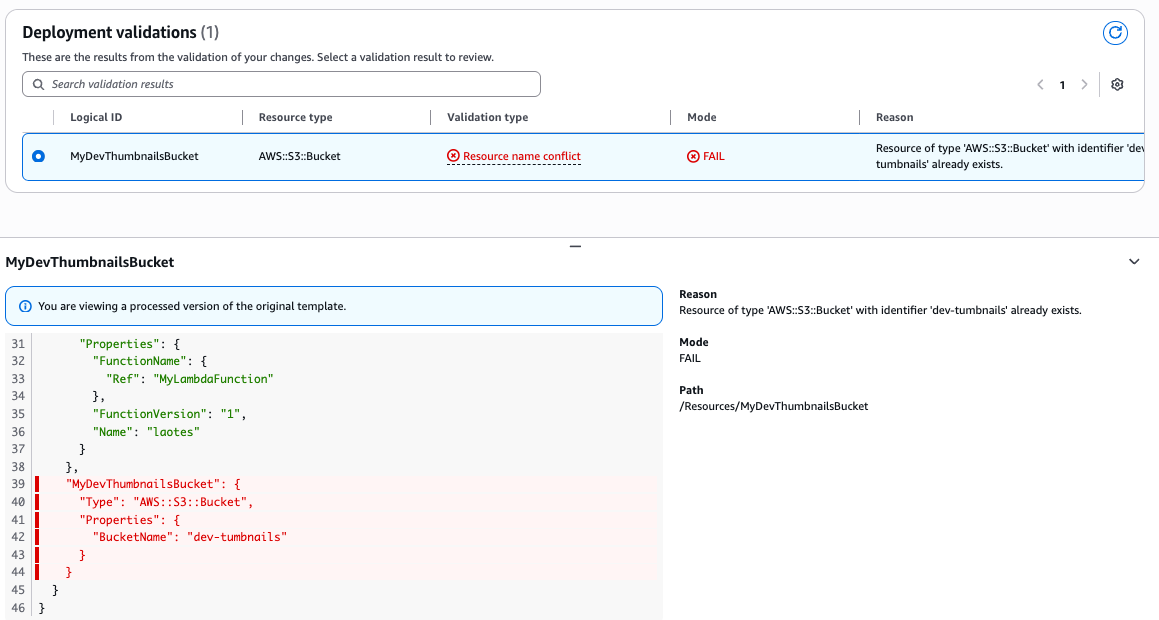
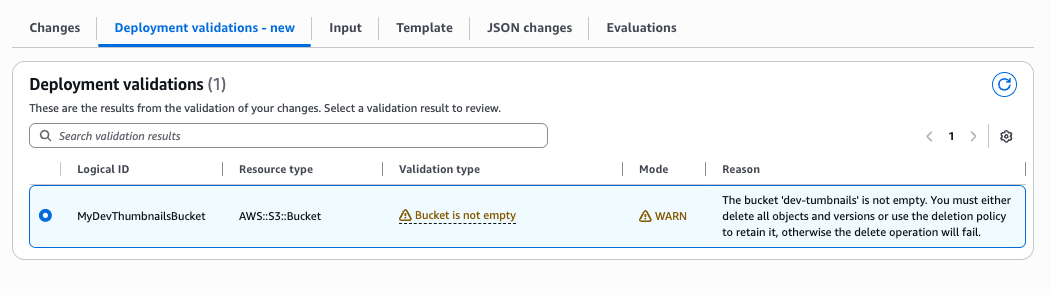
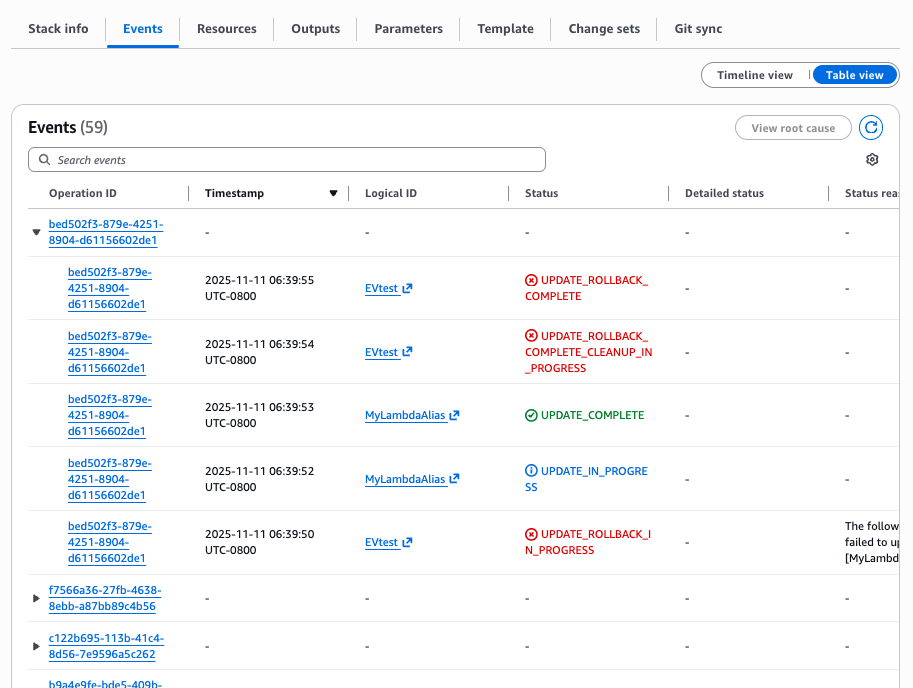
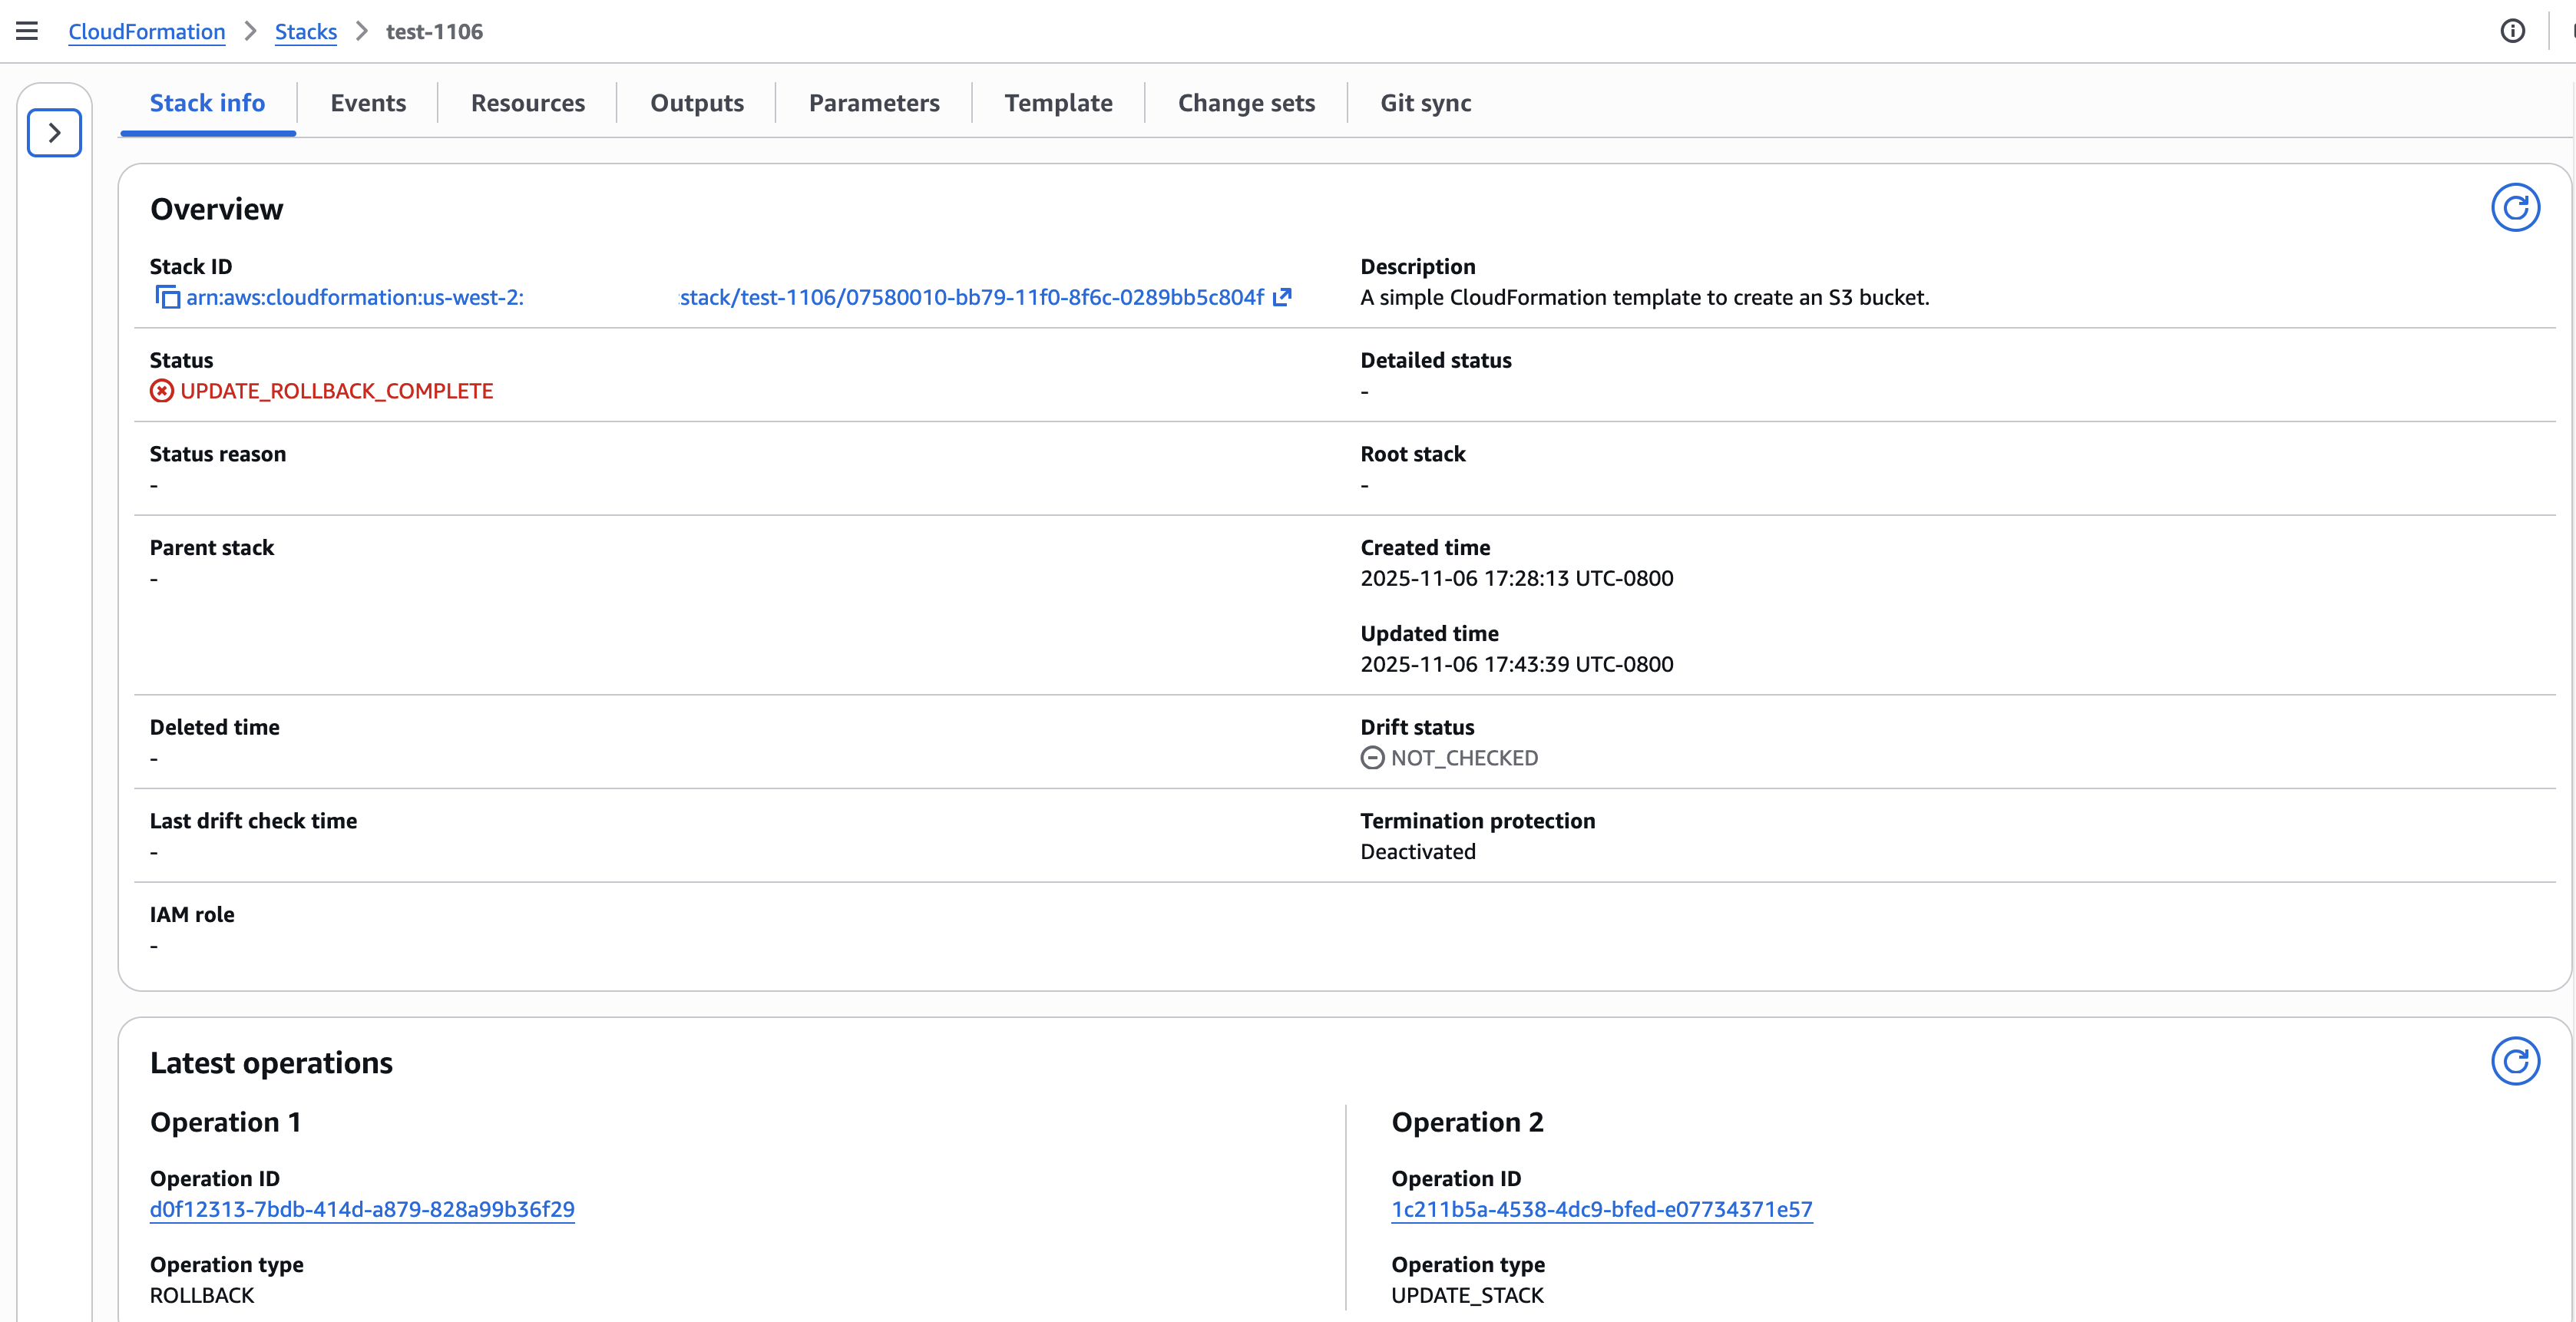
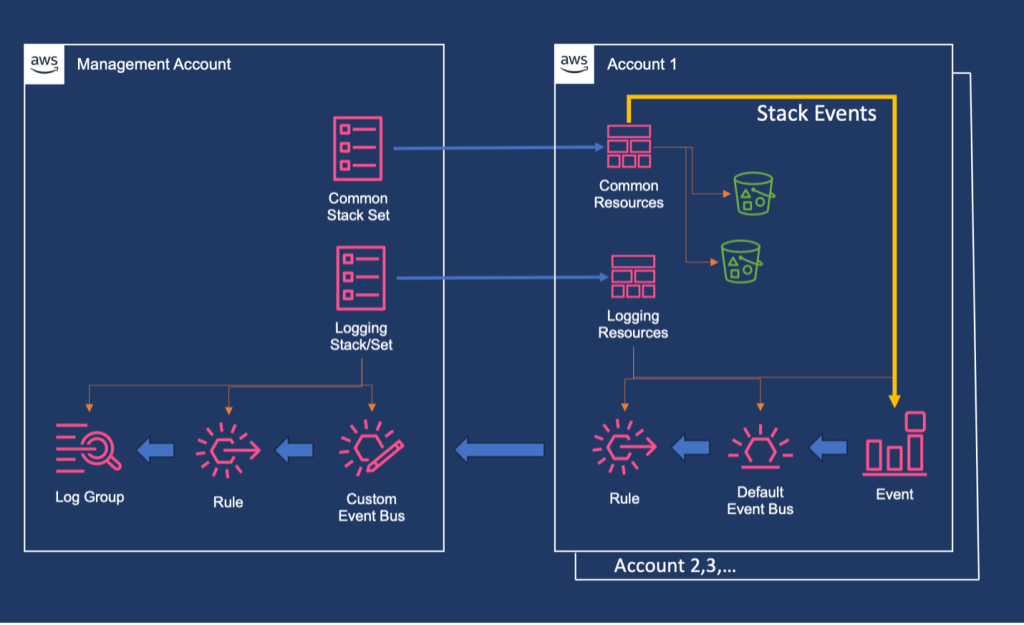
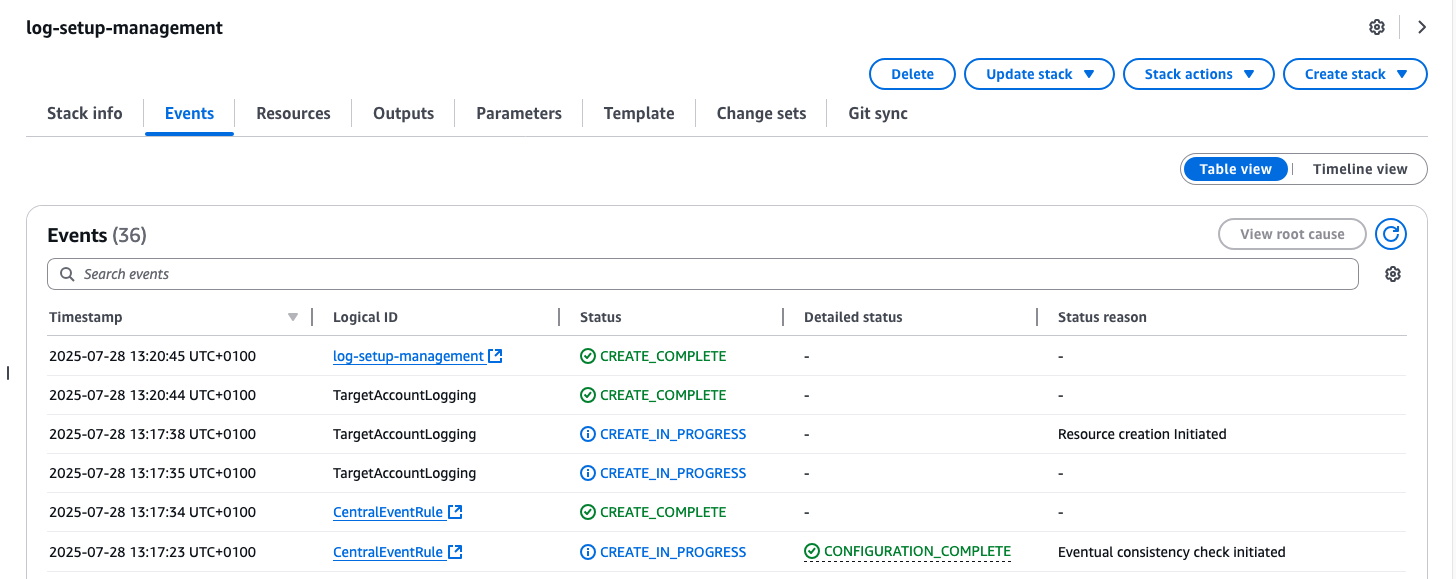
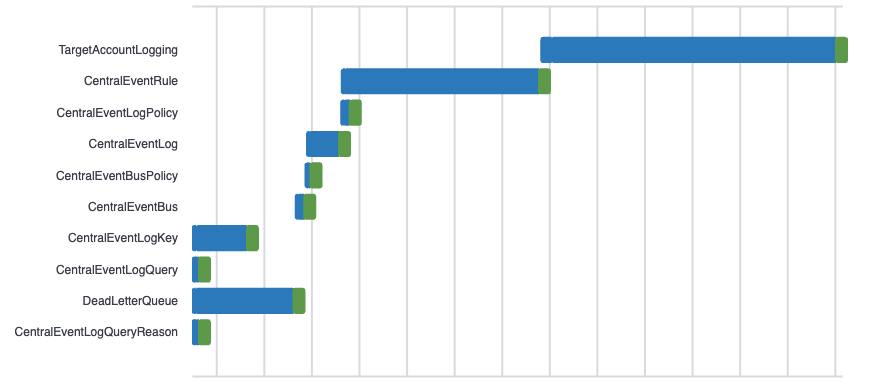
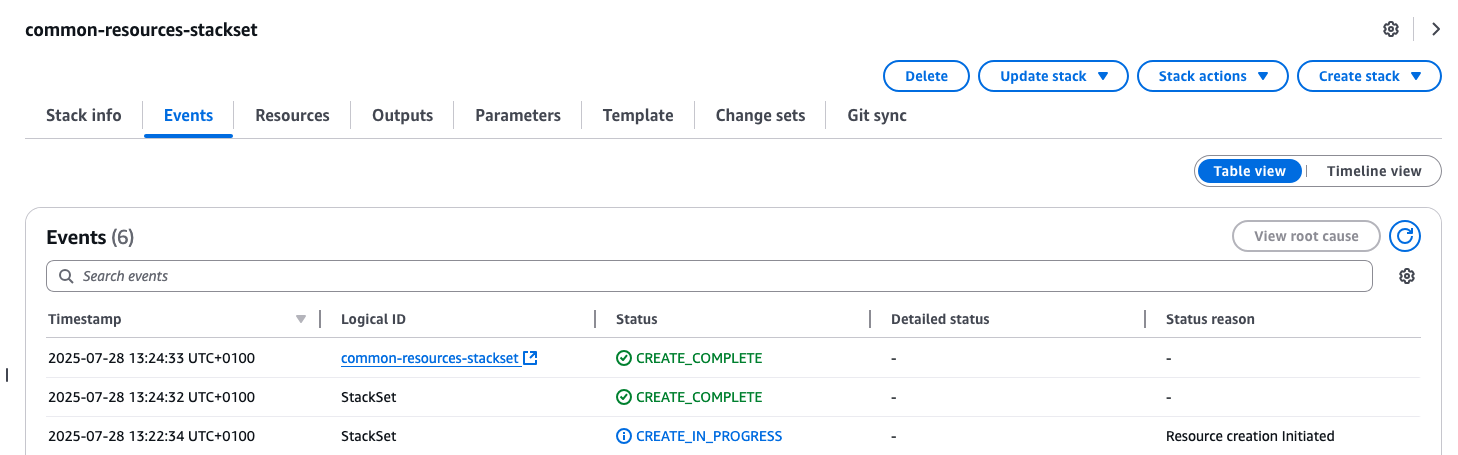
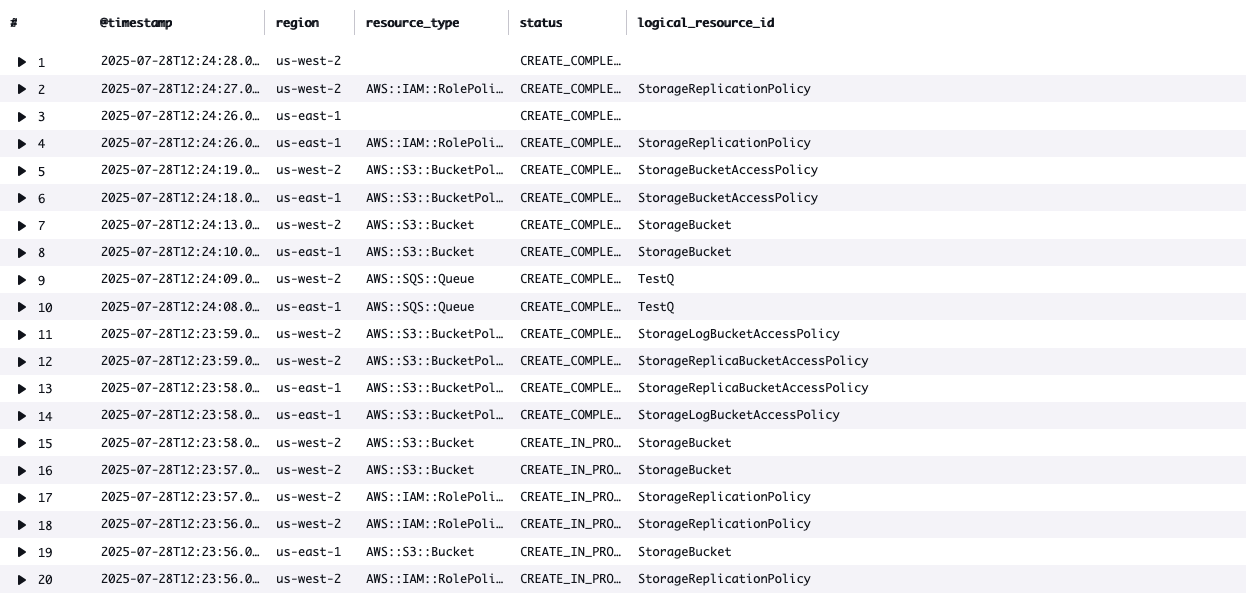


 Figure 4: CloudFormation troubleshooting with CloudTrail integration
 Figure 6: CloudFormation troubleshooting with Q feature

 Figure 9: IaC generator resource scan

 Figure 12: CloudFormation Hooks’ Lambda function feature
 Figure 14: CloudFormation Git sync with request review support feature


 Figure 3: CloudFormation’s create stack console wizard
 Figure 4: Real-time CloudFormation in-progress deployment timeline view
 Figure 6: CloudFormation completed deployment timeline view
  Figure 7: CloudFormation deployment timeline view – resource detail popover
