Post Syndicated from Brian Terry original https://aws.amazon.com/blogs/devops/introducing-aws-cloudformation-stack-refactoring-reorganize-your-infrastructure-without-disruption/
AWS CloudFormation models and provisions cloud infrastructure as code, letting you manage entire lifecycle operations through declarative templates. Stack Refactoring console experience, announced today, extends the AWS CLI experience launched earlier. Now, you move resources between stacks, rename logical IDs, and decompose monolithic templates into focused components without touching the underlying infrastructure using the CloudFormation console. Your resources maintain stability and operational state throughout the reorganization. Whether you’re modernizing legacy stacks, aligning infrastructure with evolving architectural patterns, or improving long-term maintainability, Stack Refactoring adapts your CloudFormation stacks organization to changing requirements without forcing disruptive workarounds.
Stack Refactoring enables you to move resources between stacks, rename logical resource IDs, and split monolithic stacks into smaller, more manageable components—all while maintaining resource stability and preserving your infrastructure’s operational state. If you’re modernizing legacy infrastructure, aligning stack organization with evolving architectural patterns, or improving maintainability across your cloud resources, Stack Refactoring provides the flexibility you need to adapt your CloudFormation organization to changing
How It Works
Stack Refactoring operates through a controlled, multi-phase process designed around resource safety. When you initiate a refactor operation, CloudFormation analyzes both source and destination templates, constructs a detailed execution plan, then orchestrates resource movement without disrupting running infrastructure. Resource mappings define how assets transfer between stacks and how logical IDs should change. CloudFormation handles the orchestration complexity automatically – moving resources from source stacks, updating or creating destination stacks, and preserving all dependency relationships through exports and imports.
Each refactor operation receives a unique Stack Refactor ID for tracking progress, reviewing planned actions before execution, and monitoring the operation from initiation through completion. This preview-then-execute model gives you confidence in complex refactoring scenarios where dependencies span multiple stacks or templates.
Compared to the CLI, the console experience provides an easier way to view refactor actions, get automatic resource mapping, and easily rename logical IDs.
Example Scenario
Scenario 1: Splitting a Monolithic Stack
In this scenario, you have an Amazon Simple Notification Service (SNS) and AWS Lambda Function subscribed to it. As usage patterns evolve, you want to separate the subscriptions into a different stack for better organizational boundaries. You can also rename a resource’s logical ID to improve template clarity or align with naming conventions. Stack Refactoring handles this without recreating the underlying resource.
- Create a new template MySNS.yaml using the following :
# Original stack: MySns AWSTemplateFormatVersion: "2010-09-09" Resources: Topic: Type: AWS::SNS::Topic MyFunction: Type: AWS::Lambda::Function Properties: FunctionName: my-function Handler: index.handler Runtime: python3.12 Code: ZipFile: | import json def handler(event, context): print(json.dumps(event)) return event Role: !GetAtt FunctionRole.Arn Timeout: 30 Subscription: Type: AWS::SNS::Subscription Properties: Endpoint: !GetAtt MyFunction.Arn Protocol: lambda TopicArn: !Ref Topic FunctionInvokePermission: Type: AWS::Lambda::Permission Properties: Action: lambda:InvokeFunction Principal: sns.amazonaws.com FunctionName: !GetAtt MyFunction.Arn SourceArn: !Ref Topic FunctionRole: Type: AWS::IAM::Role Properties: AssumeRolePolicyDocument: Version: "2012-10-17" Statement: - Action: - sts:AssumeRole Effect: Allow Principal: Service: - lambda.amazonaws.com Condition: StringEquals: aws:SourceAccount: !Ref AWS::AccountId ArnLike: aws:SourceArn: !Sub "arn:${AWS::Partition}:lambda:${AWS::Region}:${AWS::AccountId}:function:my-function" Policies: - PolicyName: LambdaPolicy PolicyDocument: Version: "2012-10-17" Statement: - Action: - logs:CreateLogGroup - logs:CreateLogStream - logs:PutLogEvents Resource: - arn:aws:logs:*:*:* Effect: Allow - Create a new stack using this MySNS.yaml template:
aws cloudformation create-stack --stack-name MySns --template-body file://MySNS.yaml --capabilities CAPABILITY_IAM - Create a new template called
afterSns.yamlwith the content below. This template has your SNS topic in it and has a new export in it that will export the SNS topic ARN. This export will be used by your other templates to get the required SNS topic ARN.# afterSns.yaml - Focused SNS stack Resources: Topic: Type: AWS::SNS::Topic Outputs: TopicArn: Value: !Ref Topic Export: Name: TopicArn - Create a new template afterLambda.yaml with the following content. This template includes all the resources to create a Lambda subscription to your SNS topic. This template switched the
!Ref Topicto use the exported valued by using!ImportValue TopicArn. We are also updating the Logical Resource Id of Lambda function fromMyFunctiontoFunction
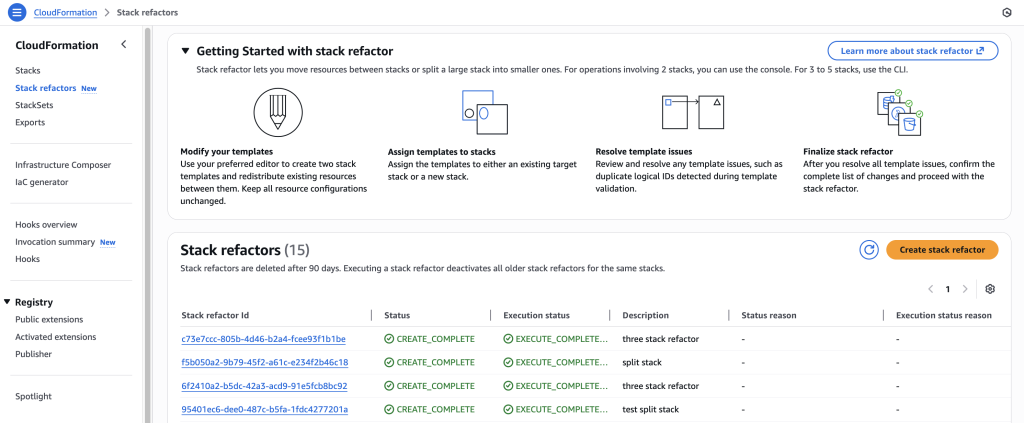
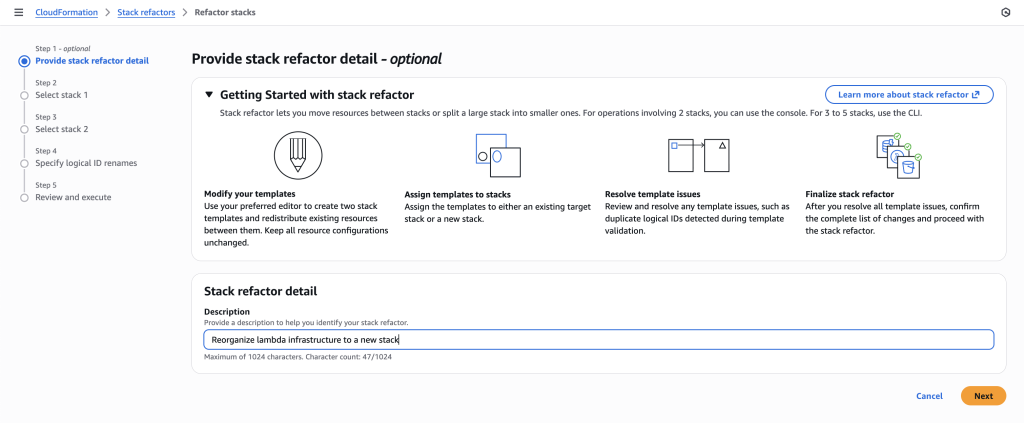
AWSTemplateFormatVersion: "2010-09-09" Resources: Function: Type: AWS::Lambda::Function Properties: FunctionName: my-function Handler: index.handler Runtime: python3.12 Code: ZipFile: | import json def handler(event, context): print(json.dumps(event)) return event Role: !GetAtt FunctionRole.Arn Timeout: 30 Subscription: Type: AWS::SNS::Subscription Properties: Endpoint: !GetAtt Function.Arn Protocol: lambda TopicArn: !ImportValue TopicArn FunctionInvokePermission: Type: AWS::Lambda::Permission Properties: Action: lambda:InvokeFunction Principal: sns.amazonaws.com FunctionName: !GetAtt Function.Arn SourceArn: !ImportValue TopicArn FunctionRole: Type: AWS::IAM::Role Properties: AssumeRolePolicyDocument: Version: "2012-10-17" Statement: - Action: - sts:AssumeRole Effect: Allow Principal: Service: - lambda.amazonaws.com Condition: StringEquals: aws:SourceAccount: !Ref AWS::AccountId ArnLike: aws:SourceArn: !Sub "arn:${AWS::Partition}:lambda:${AWS::Region}:${AWS::AccountId}:function:my-function" Policies: - PolicyName: LambdaPolicy PolicyDocument: Version: "2012-10-17" Statement: - Action: - logs:CreateLogGroup - logs:CreateLogStream - logs:PutLogEvents Resource: - arn:aws:logs:*:*:* Effect: Allow - Go to stack refactor home page, click on ‘create stack refactor’

- Provide a description to help you identify your stack refactor.
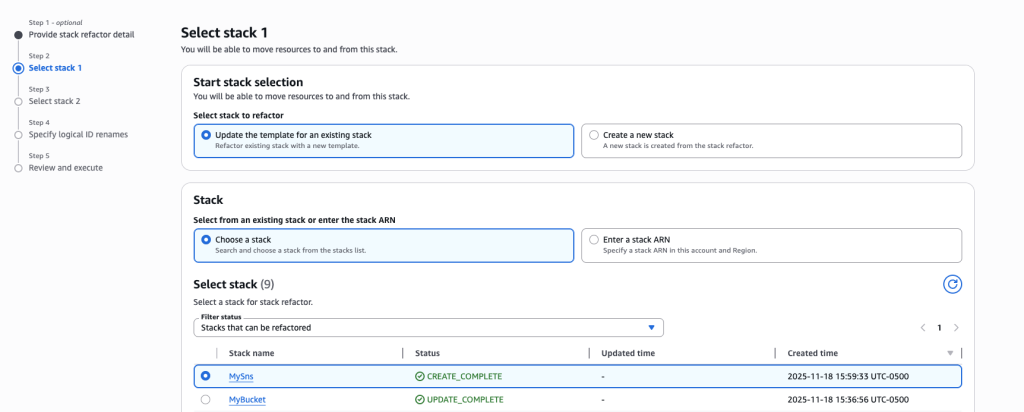
- For this scenario, we are splitting a monolithic stack so select ‘Update the template for an existing stack’ and ‘Choose a stack’ options.
- Search and choose the stack MySns that was created in Step 1.

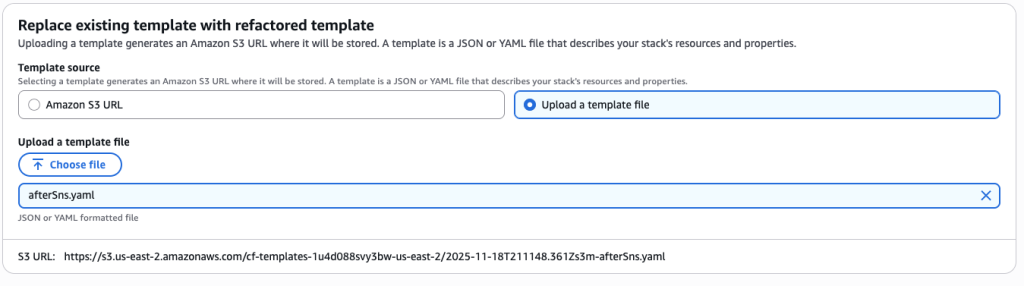
- Upload the afterSns.yaml file

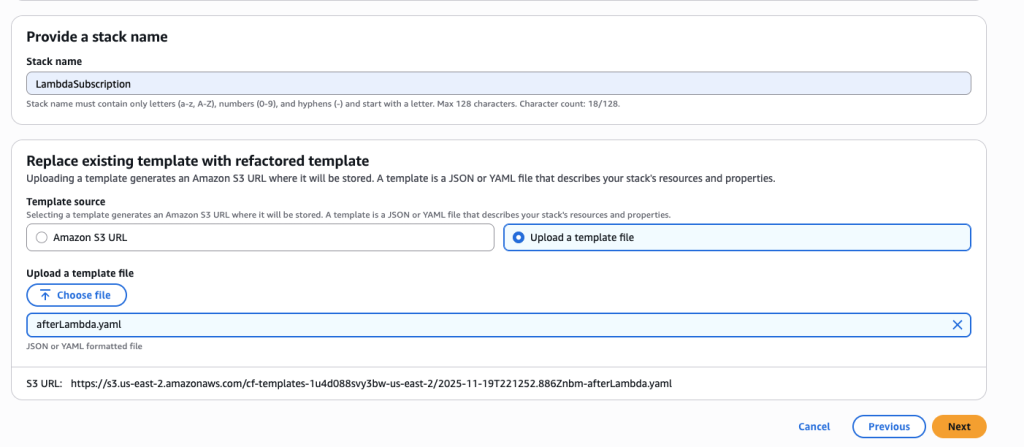
- You want to create a new stack to manage the Lambda function and SNS subscription resources. Choose ‘Create a new stack’ and name it ‘LambdaSubscription’.
- Upload afterLambda.yaml template file
 In some scenarios, CloudFormation console can automatically detect logical resource ID renames and pre-fill the mapping for you. The resource mapping is required when there are logical resource ID changes between the original stack and refactored template. Ensure that the mappings are correct before proceeding to the next step.

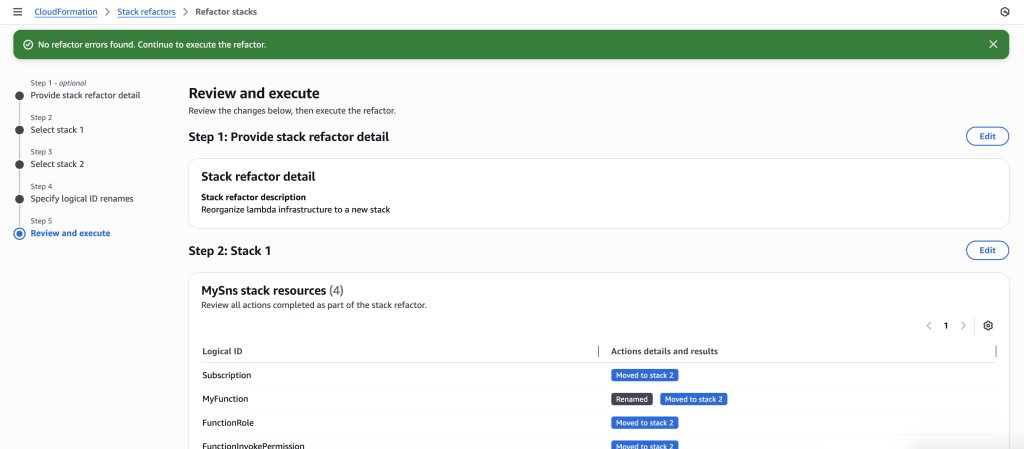
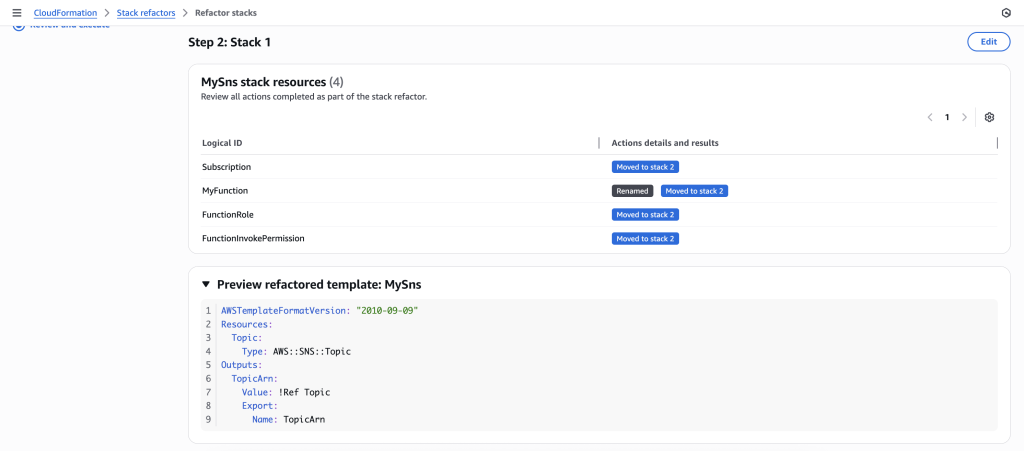
- The stack refactor preview will start generating. Wait for the preview to complete. You can verify actions under Stack 1 and Stack 2. It will show you the action for each resource.

- You can also preview the new Stack refactored templates

- Once you verify the details, go ahead and Execute Refactor. You should be redirected to the stack refactor details.
- Once the Stack refactor execution is complete you can view the actions and templates for each of the stacks in your stack refactor.

 In some scenarios, CloudFormation console can automatically detect logical resource ID renames and pre-fill the mapping for you. The resource mapping is required when there are logical resource ID changes between the original stack and refactored template. Ensure that the mappings are correct before proceeding to the next step.

Scenario 2: Move resources across multiple stacks.
This scenario demonstrates how to refactor resources across three stacks using the AWS CLI, then review and execute the operation in the CloudFormation console.
- Create a new template many-stacks-original.yaml and create a new stack named ‘RefactorManyStacks’ using AWS CLI. This template contains SNS topic (IngestTopic),Lambda function(IngestFunction) and SNS subscription.
AWSTemplateFormatVersion: "2010-09-09" Resources: IngestTopic: Type: AWS::SNS::Topic IngestFunction: Type: AWS::Lambda::Function Properties: FunctionName: many-stack-my-function Handler: index.handler Runtime: python3.12 Code: ZipFile: | import json def handler(event, context): print(json.dumps(event)) return event Role: !GetAtt IngestFunctionRole.Arn Timeout: 30 IngestSubscription: Type: AWS::SNS::Subscription Properties: Endpoint: !GetAtt IngestFunction.Arn Protocol: lambda TopicArn: !Ref IngestTopic IngestFunctionInvokePermission: Type: AWS::Lambda::Permission Properties: Action: lambda:InvokeFunction Principal: sns.amazonaws.com FunctionName: !GetAtt IngestFunction.Arn SourceArn: !Ref IngestTopic IngestFunctionRole: Type: AWS::IAM::Role Properties: AssumeRolePolicyDocument: Version: "2012-10-17" Statement: - Action: - sts:AssumeRole Effect: Allow Principal: Service: - lambda.amazonaws.com Condition: StringEquals: aws:SourceAccount: !Ref AWS::AccountId ArnLike: aws:SourceArn: !Sub "arn:${AWS::Partition}:lambda:${AWS::Region}:${AWS::AccountId}:function:many-stack-my-function" Policies: - PolicyName: LambdaPolicy PolicyDocument: Version: "2012-10-17" Statement: - Action: - logs:CreateLogGroup - logs:CreateLogStream - logs:PutLogEvents Resource: - arn:aws:logs:*:*:* Effect: Allow - Create another template many-stacks-original-1.yaml and run the AWS CLI command to create a new stack ‘RefactorManyStacks1’. This template creates another SNS topic (UserTopic), Lambda function (UserFunction) and SNS subscription.
aws cloudformation create-stack --stack-name RefactorManyStacks --template-body file://many-stacks-original.yaml --capabilities CAPABILITY_IAM - Create a new template many-stacks-original-2.yaml and run the AWS CLI command to create the stack RefactorManyStacks2. This template will also create SNS topic (ConsumerTopic), Lambda function (ConsumerFunction) and SNS subscription to lambda function.
AWSTemplateFormatVersion: "2010-09-09"

Resources:
  ConsumerTopic:
    Type: AWS::SNS::Topic

  ConsumerFunction:
    Type: AWS::Lambda::Function
    Properties:
      FunctionName: many-stack-my-function-2
      Handler: index.handler
      Runtime: python3.12
      Code:
        ZipFile: |
          import json
          def handler(event, context):
            print(json.dumps(event))
            return event
      Role: !GetAtt ConsumerFunctionRole.Arn
      Timeout: 30

  ConsumerSubscription:
    Type: AWS::SNS::Subscription
    Properties:
      Endpoint: !GetAtt ConsumerFunction.Arn
      Protocol: lambda
      TopicArn: !Ref ConsumerTopic

  ConsumerFunctionInvokePermission:
    Type: AWS::Lambda::Permission
    Properties:
      Action: lambda:InvokeFunction
      Principal: sns.amazonaws.com
      FunctionName: !GetAtt ConsumerFunction.Arn
      SourceArn: !Ref ConsumerTopic

  ConsumerFunctionRole:
    Type: AWS::IAM::Role
    Properties:
      AssumeRolePolicyDocument:
        Version: "2012-10-17"
        Statement:
          - Action:
              - sts:AssumeRole
            Effect: Allow
            Principal:
              Service:
                - lambda.amazonaws.com
            Condition:
              StringEquals:
                aws:SourceAccount: !Ref AWS::AccountId
              ArnLike:
                aws:SourceArn: !Sub "arn:${AWS::Partition}:lambda:${AWS::Region}:${AWS::AccountId}:function:many-stack-my-function-2"
      Policies:
        - PolicyName: LambdaPolicy
          PolicyDocument:
            Version: "2012-10-17"
            Statement:
              - Action:
                  - logs:CreateLogGroup
                  - logs:CreateLogStream
                  - logs:PutLogEvents
                Resource:
                  - arn:aws:logs:*:*:*
                Effect: Allow
aws cloudformation create-stack --stack-name RefactorManyStacks2 --template-body file://many-stacks-original-2.yaml --capabilities CAPABILITY_IAM
Once all 3 stacks have been created successfully. Create refactored templates.
- Create new template many-stacks-refactored.yaml This refactored template only contains SNS topic named IngestTopic and has a new export in it that will export the SNS topic ARN. This export will be used by your other templates to get the required SNS topic ARN.
AWSTemplateFormatVersion: "2010-09-09" Resources: IngestTopic: Type: AWS::SNS::Topic Outputs: IngestTopicArn: Value: !Ref IngestTopic Export: Name: IngestTopicArn - Create another template many-stacks-refactored-1.yaml. This template **** has the SNS topic UserTopic and contains the IngestFunction and IngestSubscription and required IAM resources from ‘RefactorManyStacks’. This template switched the
!Ref IngestTopicto use the exported valued by using!ImportValue IngestTopicArn. This refactored template also a new export in it that will export the UserTopic ARN.AWSTemplateFormatVersion: "2010-09-09" Resources: UserTopic: Type: AWS::SNS::Topic IngestFunction: Type: AWS::Lambda::Function Properties: FunctionName: many-stack-my-function Handler: index.handler Runtime: python3.12 Code: ZipFile: | import json def handler(event, context): print(json.dumps(event)) return event Role: !GetAtt IngestFunctionRole.Arn Timeout: 30 IngestSubscription: Type: AWS::SNS::Subscription Properties: Endpoint: !GetAtt IngestFunction.Arn Protocol: lambda TopicArn: !ImportValue IngestTopicArn IngestFunctionInvokePermission: Type: AWS::Lambda::Permission Properties: Action: lambda:InvokeFunction Principal: sns.amazonaws.com FunctionName: !GetAtt IngestFunction.Arn SourceArn: !ImportValue IngestTopicArn IngestFunctionRole: Type: AWS::IAM::Role Properties: AssumeRolePolicyDocument: Version: "2012-10-17" Statement: - Action: - sts:AssumeRole Effect: Allow Principal: Service: - lambda.amazonaws.com Condition: StringEquals: aws:SourceAccount: !Ref AWS::AccountId ArnLike: aws:SourceArn: !Sub "arn:${AWS::Partition}:lambda:${AWS::Region}:${AWS::AccountId}:function:many-stack-my-function" Policies: - PolicyName: LambdaPolicy PolicyDocument: Version: "2012-10-17" Statement: - Action: - logs:CreateLogGroup - logs:CreateLogStream - logs:PutLogEvents Resource: - arn:aws:logs:*:*:* Effect: Allow Outputs: UserTopicArn: Value: !Ref UserTopic Export: Name: UserTopicArn - Create another template many-stacks-refactored-2.yaml. This template has the Consumer* resources along with Lambda function (UserFunction) and SNS subscription (UserSubscription). The template is using exported value from many-stacks-refactored-1.yaml by using
!ImportValue UserTopicArn
AWSTemplateFormatVersion: "2010-09-09" Resources: ConsumerTopic: Type: AWS::SNS::Topic ConsumerFunction: Type: AWS::Lambda::Function Properties: FunctionName: many-stack-my-function-2 Handler: index.handler Runtime: python3.12 Code: ZipFile: | import json def handler(event, context): print(json.dumps(event)) return event Role: !GetAtt ConsumerFunctionRole.Arn Timeout: 30 ConsumerSubscription: Type: AWS::SNS::Subscription Properties: Endpoint: !GetAtt ConsumerFunction.Arn Protocol: lambda TopicArn: !Ref ConsumerTopic ConsumerFunctionInvokePermission: Type: AWS::Lambda::Permission Properties: Action: lambda:InvokeFunction Principal: sns.amazonaws.com FunctionName: !GetAtt ConsumerFunction.Arn SourceArn: !Ref ConsumerTopic ConsumerFunctionRole: Type: AWS::IAM::Role Properties: AssumeRolePolicyDocument: Version: "2012-10-17" Statement: - Action: - sts:AssumeRole Effect: Allow Principal: Service: - lambda.amazonaws.com Condition: StringEquals: aws:SourceAccount: !Ref AWS::AccountId ArnLike: aws:SourceArn: !Sub "arn:${AWS::Partition}:lambda:${AWS::Region}:${AWS::AccountId}:function:many-stack-my-function-2" Policies: - PolicyName: LambdaPolicy PolicyDocument: Version: "2012-10-17" Statement: - Action: - logs:CreateLogGroup - logs:CreateLogStream - logs:PutLogEvents Resource: - arn:aws:logs:*:*:* Effect: Allow UserFunction: Type: AWS::Lambda::Function Properties: FunctionName: many-stack-my-function-1 Handler: index.handler Runtime: python3.12 Code: ZipFile: | import json def handler(event, context): print(json.dumps(event)) return event Role: !GetAtt UserFunctionRole.Arn Timeout: 30 UserSubscription: Type: AWS::SNS::Subscription Properties: Endpoint: !GetAtt UserFunction.Arn Protocol: lambda TopicArn: !ImportValue UserTopicArn UserFunctionInvokePermission: Type: AWS::Lambda::Permission Properties: Action: lambda:InvokeFunction Principal: sns.amazonaws.com FunctionName: !GetAtt UserFunction.Arn SourceArn: !ImportValue UserTopicArn UserFunctionRole: Type: AWS::IAM::Role Properties: AssumeRolePolicyDocument: Version: "2012-10-17" Statement: - Action: - sts:AssumeRole Effect: Allow Principal: Service: - lambda.amazonaws.com Condition: StringEquals: aws:SourceAccount: !Ref AWS::AccountId ArnLike: aws:SourceArn: !Sub "arn:${AWS::Partition}:lambda:${AWS::Region}:${AWS::AccountId}:function:many-stack-my-function-1" Policies: - PolicyName: LambdaPolicy PolicyDocument: Version: "2012-10-17" Statement: - Action: - logs:CreateLogGroup - logs:CreateLogStream - logs:PutLogEvents Resource: - arn:aws:logs:*:*:* Effect: Allow - Start the stack refactor using AWS CLI.
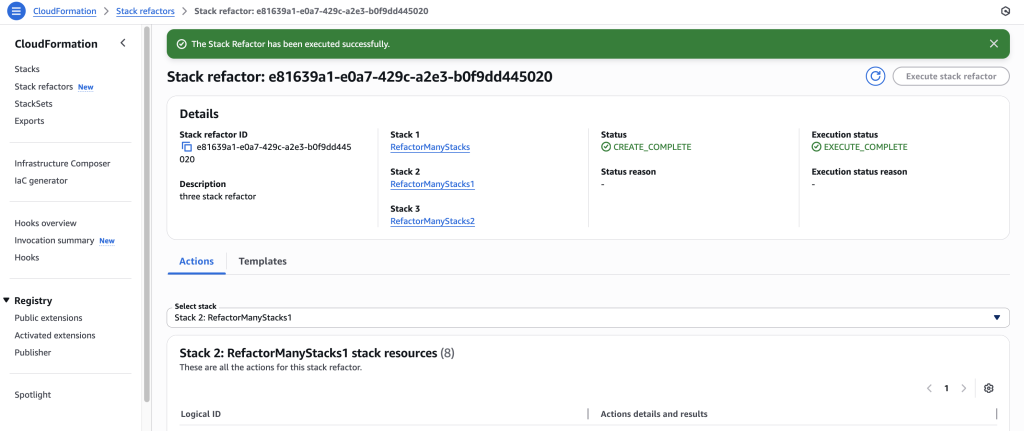
aws cloudformation create-stack-refactor --stack-definitions StackName=RefactorManyStacks,TemplateBody@=file://many-stacks-refactored.yaml StackName=RefactorManyStacks1,TemplateBody@=file://many-stacks-refactored-1.yaml StackName=RefactorManyStacks2,TemplateBody@=file://many-stacks-refactored-2.yaml --description "three stack refactor" - Go to stack CloudFormation console and go to ‘Stack refactor’ homepage, click on the stack refactor you just created.

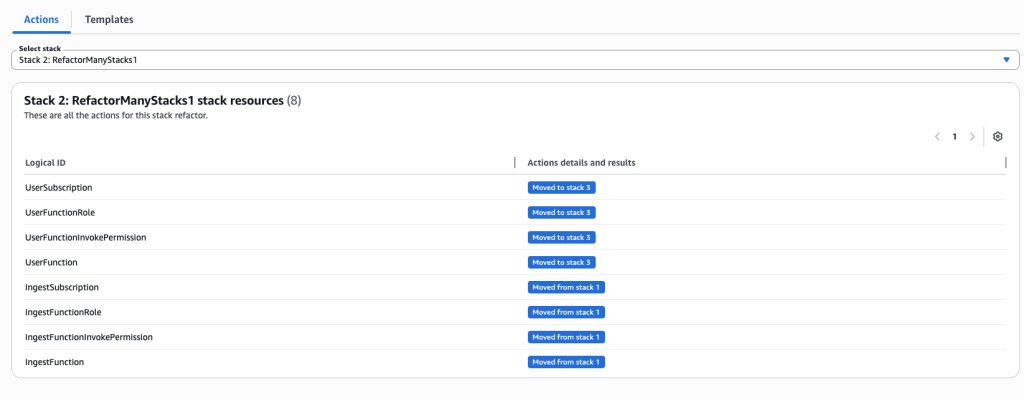
- Review actions for each resource and each stack. You can choose individual stacks from drop down.

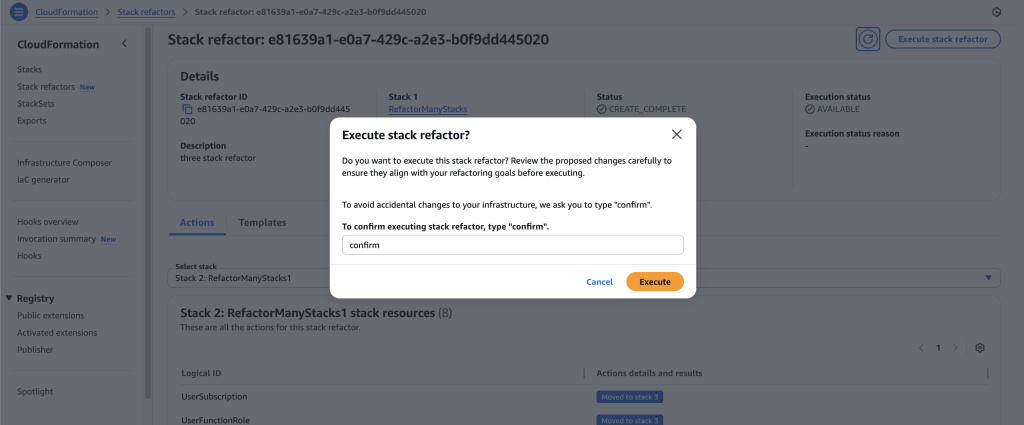
- Once you’re ready to execute the stack refactor, click on ‘Execute stack refactor’ and input the confirmation text.

- Wait for stack refactor execution to finish.

- Click on the stack in the details to navigate to the stack details. You can verify the refactor changes here.


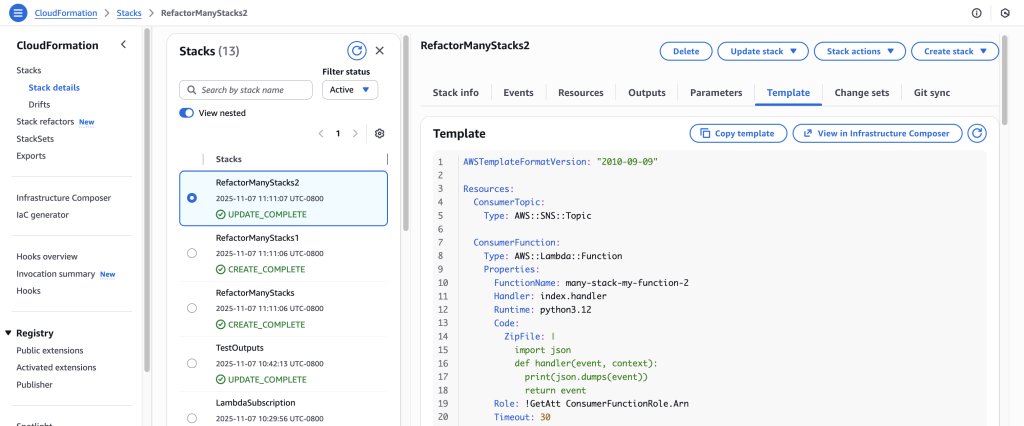
Scenario 3: Move stacks between 2 nested child stacks stacks
This scenario demonstrates how to move resources between child stacks in a nested stack architecture. Upload child stack templates toAmazon Simple Storage Service (Amazon S3), create a parent stack that references them, then use Stack Refactoring to move resources (like a security group) from one child stack to another. The key is to work directly with the child stack names (which CloudFormation auto-generates based on parent stack name and logical IDs) rather than the parent stack itself. After refactoring, update the parent stack to reference the new child template versions in S3.
This approach lets you reorganize nested stack architectures while maintaining the parent-child relationship structure.
- Create first child stack template vpc.yaml. This template creates a new Virtual Private Cloud(VPC). Upload this new template file to S3 bucket
AWSTemplateFormatVersion: '2010-09-09' Description: 'VPC Stack - Contains only VPC' Resources: MyVPC: Type: AWS::EC2::VPC Properties: CidrBlock: 10.0.0.0/16 Outputs: VPCId: Value: !Ref MyVPC - Create second child stack template resource.yaml . This template will create S3 bucket and EC2 Security Group. Once you create this template file, upload it to an S3 bucket
AWSTemplateFormatVersion: '2010-09-09' Description: ' Contains security group and S3 bucket' Resources: MySecurityGroup: Type: AWS::EC2::SecurityGroup Properties: GroupDescription: Security group for testing SecurityGroupIngress: - IpProtocol: tcp FromPort: 80 ToPort: 80 CidrIp: 0.0.0.0/0 MyS3Bucket: Type: AWS::S3::Bucket Outputs: SecurityGroupId: Value: !Ref MySecurityGroup S3BucketName: Value: !Ref MyS3Bucket - Create parent stack template file parent.yaml. Make sure to edit the TemplateURL with your S3 Object URL
AWSTemplateFormatVersion: '2010-09-09' Description: 'Parent stack for test' Resources: VPCStack: Type: AWS::CloudFormation::Stack Properties: TemplateURL: https://s3.amazonaws.com/<Bucket-Name>/vpc.yaml ResourceStack: Type: AWS::CloudFormation::Stack Properties: TemplateURL: https://s3.amazonaws.com/<Bucket-Name>/resource.yaml Outputs: VPCStackName: Value: !Ref VPCStack ResourceStackName: Value: !Ref ResourceStack - Create this new Parent stack using AWS CLI :
aws cloudformation create-stack --stack-name ParentStack --template-body file://parent.yaml --capabilities CAPABILITY_IAM - We will use stack refactor to move EC2 Security group from ResourceStack to VPCStack.
- Create new template file VPCStackAfter.yaml. This template now has VPC and EC2 Security group resources. Upload this template to S3 bucket
AWSTemplateFormatVersion: '2010-09-09' Description: ' VPC Stack AFTER - Contains VPC and security group' Resources: MyVPC: Type: AWS::EC2::VPC Properties: CidrBlock: 10.0.0.0/16 MySecurityGroup: Type: AWS::EC2::SecurityGroup Properties: GroupDescription: Security group for testing SecurityGroupIngress: - IpProtocol: tcp FromPort: 80 ToPort: 80 CidrIp: 0.0.0.0/0 Outputs: VPCId: Value: !Ref MyVPC SecurityGroupId: Value: !Ref MySecurityGroup - Create ResourceStackAfter.yaml The resource stack will only contain s3 bucket resource. Upload this template to S3 bucket
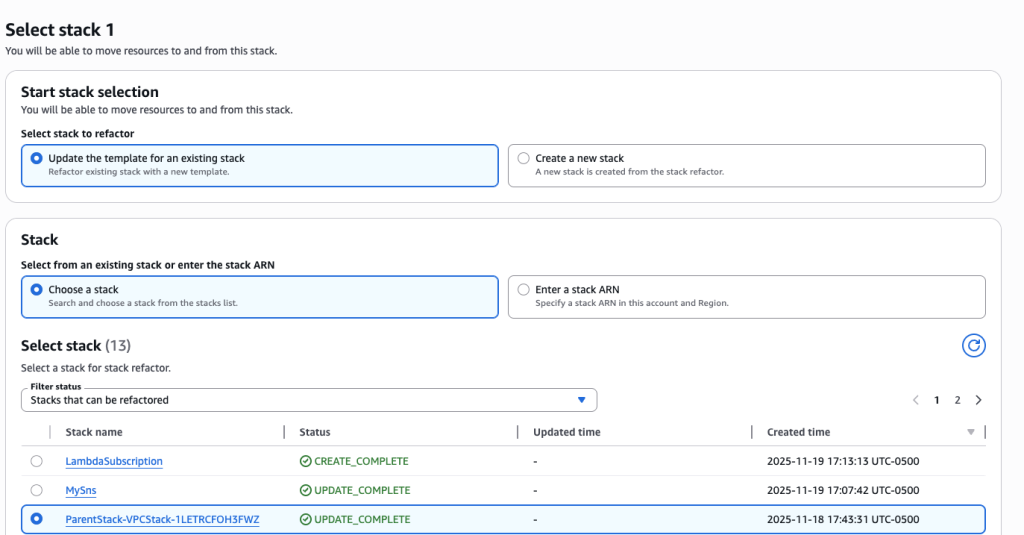
AWSTemplateFormatVersion: '2010-09-09' Description: 'Resource Stack AFTER - Contains only S3 bucket' Resources: MyS3Bucket: Type: AWS::S3::Bucket Outputs: S3BucketName: Value: !Ref MyS3Bucket - Navigate to CloudFormation Console and select Start stack refactor
- Add a description for Stack refactor:

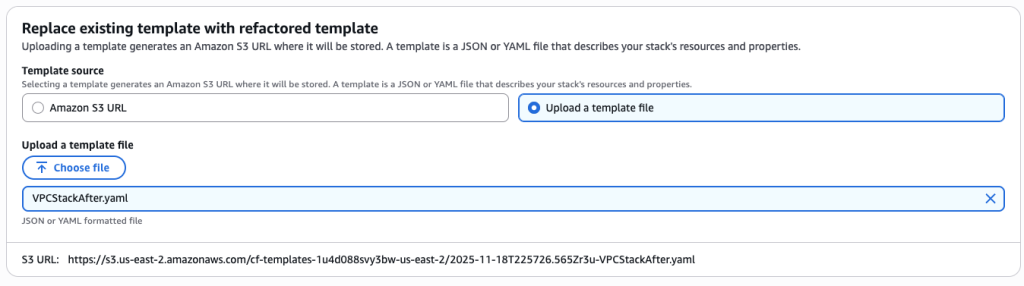
- Choose “Update the template for an existing stack” and select child stack “ParentStack-VPCStack-12345”. Make sure to choose the child stack and not the Root/Parent stack.

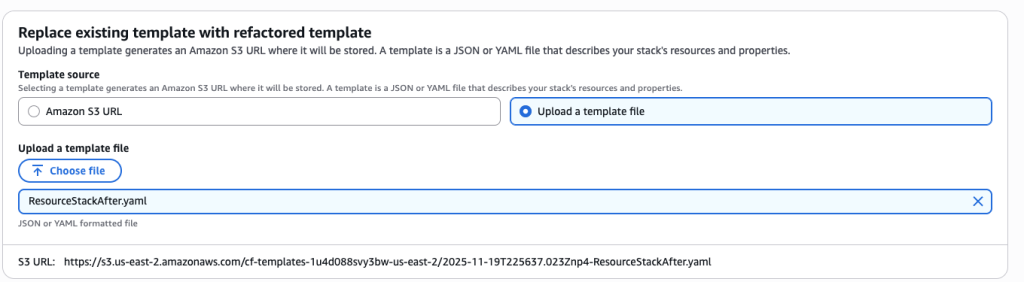
- Upload the new template VPCStackAfter.yaml
- For Stack2, again select ‘Update the template for an existing stack’ and select to 2nd child stack “ParentStack-ResourceStack-12345”
- Upload the template
ResourceStackAfter.yaml

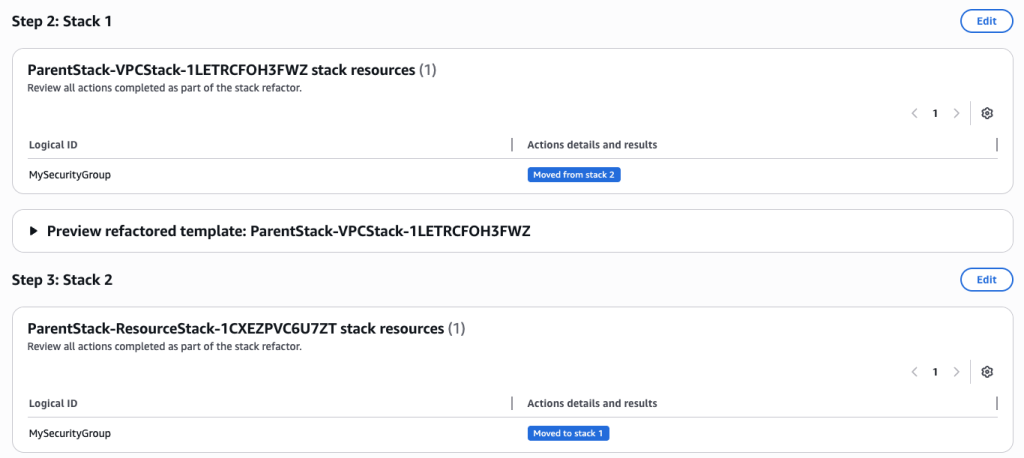
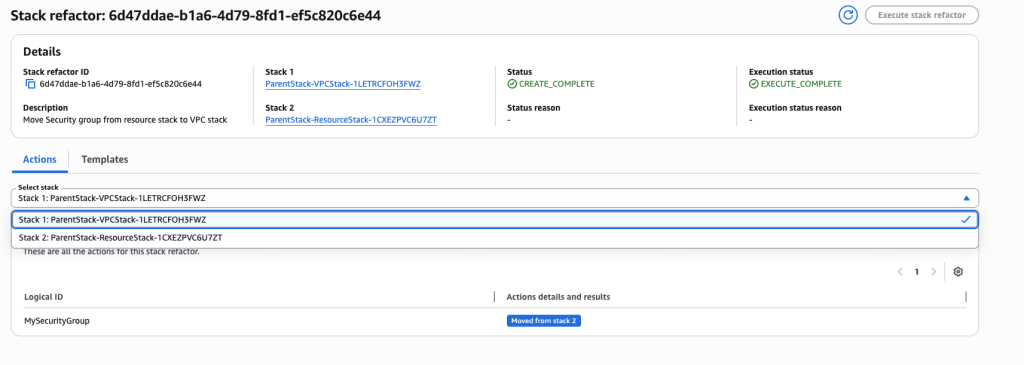
- Review the Stack refactor. Once you have verified all the actions and details choose ‘Execute Refactor’

- You can verify the refactor templates.

- Lastly, update your ParentStack.yaml to reference the new child template versions in S3 bucket.
AWSTemplateFormatVersion: '2010-09-09'
Description: 'Parent stack for test'

Resources:
  VPCStack:
    Type: AWS::CloudFormation::Stack
    Properties:
      TemplateURL: https://s3.amazonaws.com/<Bucket-Name>/VPCStackAfter.yaml

  ResourceStack:
    Type: AWS::CloudFormation::Stack
    Properties:
      TemplateURL: https://s3.amazonaws.com/<Bucket-Name>/ResourceStackAfter.yaml

Outputs:
  VPCStackName:
    Value: !Ref VPCStack
  ResourceStackName:
    Value: !Ref ResourceStack

Best Practices
Stack Refactoring offers powerful flexibility, but a few strategic considerations will help ensure smooth operations. Test your refactoring plans in non-production environments first, particularly when working with complex dependency chains or resources that have strict ordering requirements. The preview phase becomes your primary safety mechanism—treat it as a thorough code review, examining each planned action before execution. When moving resources between stacks, pay close attention to cross-stack references. Converting direct references to export/import patterns maintains loose coupling and prevents circular dependencies. CloudFormation will automatically manage these conversions during refactoring, but understanding the resulting architecture helps you avoid introducing fragility into your infrastructure.
For scenarios where you’re emptying a source stack entirely, remember that CloudFormation requires at least one resource per stack. This makes placeholder resources like AWS::CloudFormation::WaitConditionHandle a useful temporary measure—they consume no actual AWS resources and can be safely deleted along with the stack once the refactoring completes.
Document your refactoring decisions alongside the templates themselves. Future maintainers (including yourself in six months) will appreciate understanding why resources were organized in particular ways. Include comments in your templates explaining the reasoning behind stack boundaries and resource groupings.
Consider the operational impact of your refactoring. While resources themselves remain stable, monitoring dashboards, automation scripts, or other tooling that references stack names or logical IDs may need updates. Plan these ancillary changes as part of your refactoring workflow rather than discovering them afterward.
Finally, leverage refactoring as an opportunity to improve template quality more broadly. If you’re already reorganizing resources, consider also updating documentation, standardizing naming conventions, or adding tags for better resource management.
Conclusion
CloudFormation Stack Refactoring transforms how you organize and maintain infrastructure as code, enabling stack architecture to evolve alongside applications and organizational needs. This capability provides the flexibility to restructure without the risk and complexity of traditional resource recreation approaches. Whether you’re breaking apart monolithic stacks, consolidating fragmented infrastructure, or simply renaming resources to match current conventions, Stack Refactoring lets you adapt CloudFormation organization to changing requirements without operational disruption.
To get started, visit the CloudFormation console or explore the AWS CloudFormation API reference for programmatic access patterns. Stack Refactoring is available today in all commercial AWS regions.


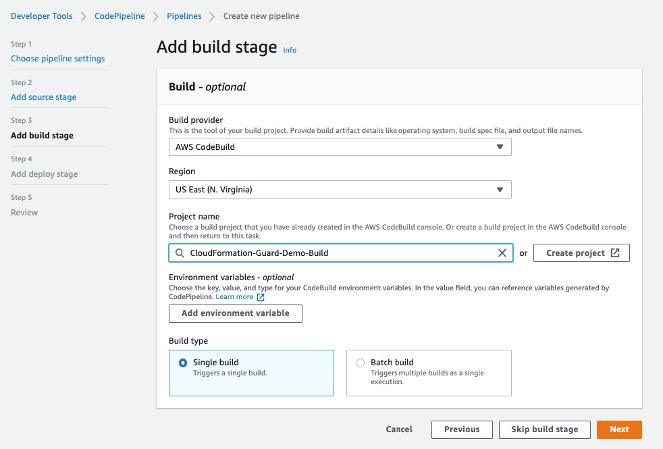
 Figure 3: CloudFormation’s create stack console wizard
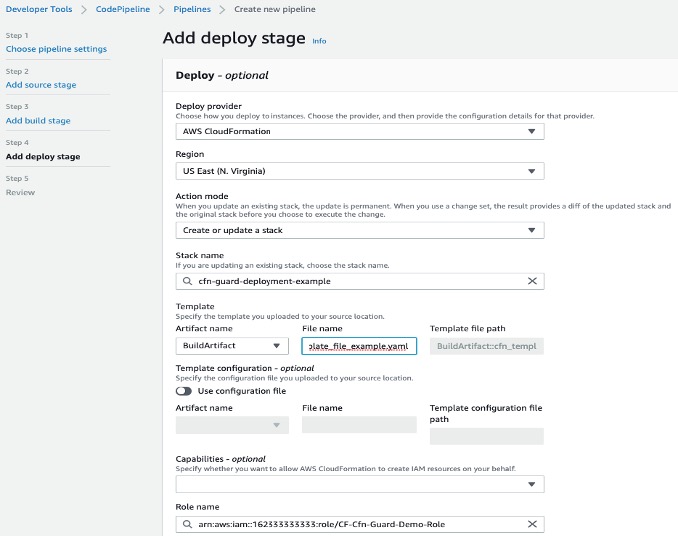
 Figure 4: Real-time CloudFormation in-progress deployment timeline view
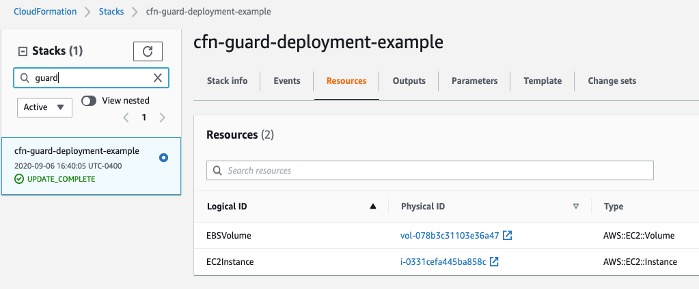
 Figure 6: CloudFormation completed deployment timeline view
  Figure 7: CloudFormation deployment timeline view – resource detail popover


![A VPC selected in the scanned resources list]](https://d2908q01vomqb2.cloudfront.net/7719a1c782a1ba91c031a682a0a2f8658209adbf/2024/01/11/add-resources-to-template.png)


 Mike is a Principal Solutions Architect with the Startup Team at Amazon Web Services. He is a former founder, current mentor, and enjoys helping startups live their best cloud life.
 Sean is a Senior Startup Solutions Architect at AWS. Before AWS, he was Director of Scientific Computing at the Howard Hughes Medical Institute.