Post Syndicated from J.D. Bean original https://aws.amazon.com/blogs/security/combining-encryption-and-signing-with-aws-asymmetric-keys/
In this post, I discuss how to use AWS Key Management Service (KMS) to combine asymmetric digital signature and asymmetric encryption of the same data.
The addition of support for asymmetric keys in AWS KMS has exciting use cases for customers. The ability to create, manage, and use public and private key pairs with KMS enables you to perform digital signing operations using RSA and Elliptic Curve Cryptography (ECC) keys. AWS KMS asymmetric keys can also be used to perform digital encryption operations using RSA keys. You can use these features together to digitally sign and encrypt the same data.
Another notable property of AWS KMS asymmetric keys is that they enable disconnected use cases. For example AWS KMS asymmetric keys can be used to cryptographically verify a digital signature client-side without the need for a network connection. AWS KMS asymmetric keys also enable scenarios where customers can use KMS to securely manage decryption of data that has been encrypted by a partner’s system that does not integrate with AWS APIs or have access to AWS account credentials. For the sake of simplicity, however, the example that I discuss in this post describes a connected use case where all cryptographic actions are performed server-side in AWS KMS using AWS credentials. The use of AWS KMS asymmetric keys throughout this post allows the overall approach to be adapted to disconnected and/or non-AWS-integrated use cases.
Overview
This post contains three basic steps.
- Create and configure AWS asymmetric customer master keys (CMK), AWS Identity and Access Management (IAM) roles, and key policies.
- Use your asymmetric CMKs to encrypt and sign a sample message in the role of a sender.
- Use AWS KMS to decrypt and verify the message signature of the sample message archive you generated in the previous procedure using your asymmetric CMKs in the role of a receiver.
Prerequisites
The commands I use in this tutorial were tested using AWS Command Line Interface (AWS CLI) version 2.50 on Amazon Linux 2. In order to run these commands in your in your own local environment ensure that you have first installed and updated the AWS CLI.
I assume you have at least one administrator identity available to you that has broad rights for creating roles, assuming roles, as well as creating, managing and using KMS keys. This can be a federated identity (for example, from your corporate identity provider or from a social identity), or it can be an AWS IAM user. Where no AWS identity is mentioned, I assume that you will be accessing the AWS Management Console or the AWS CLI using this administrator identity.
For simplicity, I create the KMS keys in the same region as each other. You must specify an AWS Region when using the AWS CLI, either explicitly or by setting a default Region. Before beginning, you should select an AWS Region to work in such as US East (N. Virginia). If you have not configured the AWS CLI in your environment please review the Configuration basics section of the AWS Command Line Interface User Guide for instructions. You may revert this configuration once you have finished if you do not wish to continue using a default Region with your AWS CLI. Take note of your selected region. When working in the AWS Console, if you do not see resources, such as AWS KMS keys, that you expect you may want to confirm that you are viewing resources in your chosen Region. For more information on selecting your Region in the AWS Console see Choosing a Region in AWS Management Console Getting Started Guide.
Create and configure resources
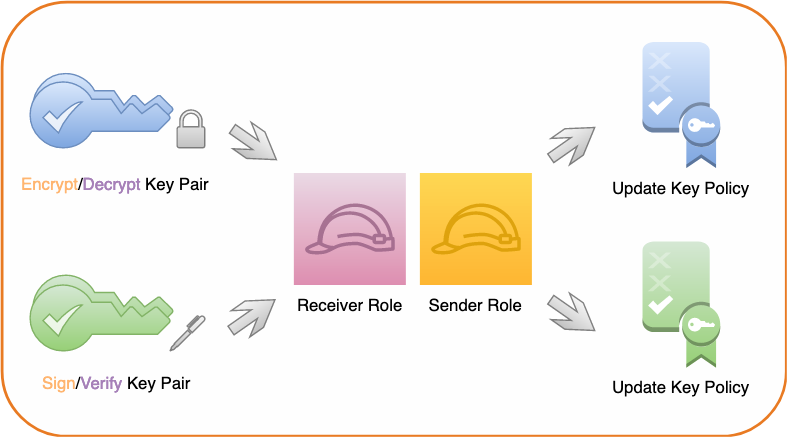
In the first phase of this tutorial you create and configure two asymmetric AWS KMS CMKs, two AWS IAM roles, and configure the key policies for both of your KMS CMKs to grant permissions to the roles. Shown in the following figure.

Figure 1: Create keys, roles, and key policies
Create asymmetric signing and encryption key pairs
In the first step, you create two asymmetric master keys (CMK). One is configured for signing and verifying digital signatures while the other is configured for encrypting and decrypting data.
Note: The CMKs configured for this post are examples. RSA and Elliptic curve CMKs key specs can differ in a variety of dimensions. The RSA or elliptic curve key spec that you choose might be determined by your security standards or the requirements of your task. Different CMK key specs are priced differently and are subject to different request quotas because they each have different performance profiles. In general, use RSA or ECC keys with the highest security level that is practical and affordable for your task. For more information on CMK configuration options, please review the How to choose your CMK configuration section of the KMS Developer Guide.
To create a CMK for encryption and decryption
- Use the KMS CreateKey API. Pass RSA_4096 for the CustomerMasterKeySpec parameter and ENCRYPT_DECRYPT for the KeyUsage parameter in the AWS CLI example command below in order to generate a RSA 4096 key pair for signature creation and verification using AWS KMS.
aws kms create-key --customer-master-key-spec RSA_4096 \
    --key-usage ENCRYPT_DECRYPT \
    --description "Sample Digital Encryption Key Pair"
Note: If successful, this command returns a KeyMetadata object. Take note of the KeyID value in this object.
- As a best practice, assign an alias for your key. Use the following command to assign an alias of sample-encrypt-decrypt-key to your newly created CMK (replace the target-key-id value of 1234abcd-12ab-34cd-56ef-1234567890ab with your KeyID). Mapping a human-readable alias to the KeyID will make it easier to identify, use, and manage.
aws kms create-alias \
    --alias-name alias/sample-encrypt-decrypt-key \
    --target-key-id 1234abcd-12ab-34cd-56ef-1234567890ab
To create a CMK for signature and verification
- Use the KMS CreateKey API. Pass ECC_NIST_P521 for the CustomerMasterKeySpec parameter and SIGN_VERIFY for the KeyUsage parameter in the AWS CLI example command below in order to generate an elliptic curve (ECC) key pair for signature creation and verification using AWS KMS.
aws kms create-key --customer-master-key-spec \
    ECC_NIST_P521  \
    --key-usage SIGN_VERIFY \
    --description "Sample Digital Signature Key Pair"
Note: If successful, this command returns a KeyMetadata object. Take note of the KeyID value.
- Use the following command to assign an alias of sample-sign-verify-key to your newly created CMK (replace the target-key-id value of 1234abcd-12ab-34cd-56ef-1234567890ab with your KeyID).
aws kms create-alias \
    --alias-name alias/sample-sign-verify-key \
    --target-key-id 1234abcd-12ab-34cd-56ef-1234567890ab
Create sender and receiver roles
For the next step of this tutorial, you create two AWS principals. Use the steps that follow to create two roles—a sender principal and a receiver principal. Later, you will grant permissions to perform private key operations (sign and decrypt) and public key operations (verify and encrypt) to these roles.
To create and configure the roles
- Navigate to the AWS Identity and Access Management (IAM) Create role console dialogue that allows entities in a specified account to assume the role. Enter your Account ID and choose Next, as shown in the following figure.
Note: If you don’t know you AWS account ID, please read Finding you AWS account ID in the AWS IAM User Guide for guidance on how to obtain this information.

Figure 2: Enter your account ID to begin creating a role in AWS IAM
- Select Next through the next two screens.
Note: By clicking next through these dialogues you do not attach an IAM permissions policy or a tag to this new role.
- On the final screen, enter a Role name of SenderRole and a Role description of your choice, as shown in the following figure.

Figure 3: Create the sender role
- Choose Create role to finish creating the sender role.
- To create the receiver role, repeat the preceding role creation process. However, in step 3, substitute the name ReceiverRole for SenderRole.
Configure key policy permissions
Best practice is to adhere to the principle of least privilege and provide each AWS principal with the minimal permissions necessary to perform its tasks. The sender and receiver roles that you created in the previous step currently have no permissions in your account. For this scenario, the receiver principal must be granted permission to verify digital signatures and decrypt data in AWS KMS using your asymmetric CMKs and the sender principal must be granted permission to create digital signatures and encrypt data in KMS using your asymmetric CMKs.
To provide access control permissions for AWS KMS actions to your AWS principals, attach a key policy to each of your CMKs.
Modify the CMK key policy
For the sample-encrypt-decrypt-key CMK, grant the IAM role for the sender principal (SenderRole) kms:Encrypt permissions and the IAM role for the receiver principal (ReceiverRole) kms:Decrypt permissions in the CMK key policy.
To modify the CMK key policy (console)
- Navigate to the AWS KMS page in the AWS Console and select customer-managed keys.
- Select your sample-encrypt-decrypt-key CMK.
- In the key policy section, choose edit.
- To allow your receiver principal to use the CMK to decrypt data encrypted under that CMK, append the following statement to the key policy (replace the account ID value of 111122223333 with your own).
{
    "Sid": "Allow use of the CMK for decryption",
    "Effect": "Allow",
    "Principal": {"AWS":"arn:aws:iam::111122223333:role/ReceiverRole"},
    "Action": "kms:Decrypt",
    "Resource": "*"
}
- To allow your sender principal to use the CMK to encrypt data, append the following statement to the key policy (replace the account ID value of 111122223333 with your own):
{
    "Sid": "Allow use of the CMK for encryption",
    "Effect": "Allow",
    "Principal": {"AWS":"arn:aws:iam::111122223333:role/SenderRole"},
    "Action": "kms:Encrypt",
    "Resource": "*"
}
- Choose Save changes.
Note: The kms:Encrypt permission is sufficient to permit the sender principal to encrypt small amounts of arbitrary data using your CMK directly.
Grant sign and verify permissions to the CMK key policy
For the sample-sign-verify-key CMK, grant the IAM role for the sender principal (SenderRole) kms:Sign permissions in the CMK key policy and the IAM role for the receiver principal (ReceiverRole) kms:Verify permissions in the CMK key policy.
To grant sign and verify permissions
- Using the same process as above, navigate to the key policy edit dialog for the sample-sign-verify-key CMK in the AWS console.
- To allow your sender principal to use the CMK to create digital signatures, append the following statement to the key policy (replace the account ID value of 111122223333 with your own).
{
    "Sid": "Allow use of the CMK for digital signing",
    "Effect": "Allow",
    "Principal": {"AWS":"arn:aws:iam::111122223333:role/SenderRole"},
    "Action": "kms:Sign",
    "Resource": "*"
}
- To allow your receiver principal to use the CMK to verify signatures created by that CMK, append the following statement to the key policy (replace the account ID value of 111122223333 with your own):
{
    "Sid": "Allow use of the CMK for digital signature verification",
    "Effect": "Allow",
    "Principal": {"AWS":"arn:aws:iam::111122223333:role/ReceiverRole"},
    "Action": "kms:Verify",
    "Resource": "*"
}
- Choose Save changes.
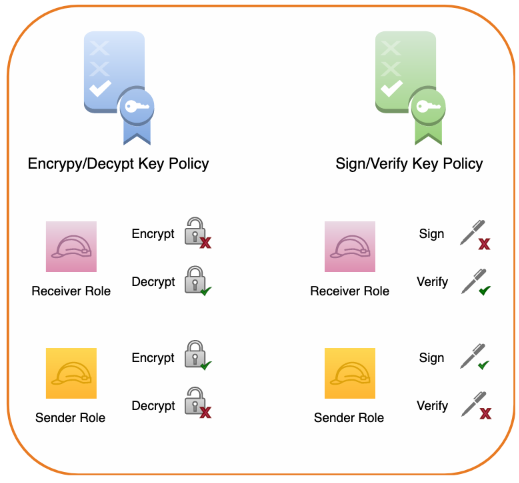
Key permissions summary
When these key policy edits have been completed the sender principal:
- Will have permissions to encrypt data using the sample-encrypt-decrypt-key CMK and generate digital signatures using the sample-sign-verify-key CMK.
- Will not have permissions to decrypt or to verify signatures using the CMKs.
The receiver principal:
- Will have permissions to decrypt data which has been encrypted using the sample-encrypt-decrypt-key CMK and to verify signatures created using the sample-sign-verify-key CMK.
- Will not have permissions to encrypt or to generate signatures using the CMKs.

Figure 4: Summary of key policy permissions
Signing and encrypting a sample message
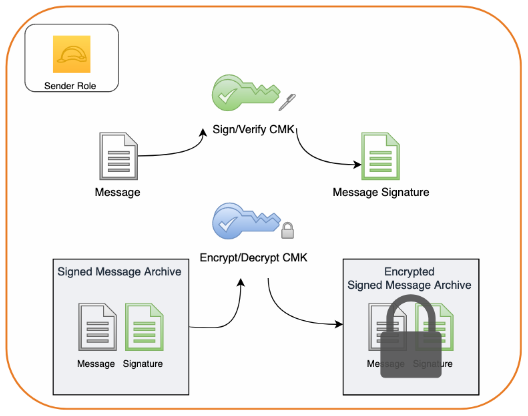
So far, you’ve created two asymmetric CMKs, created a set of sender and receiver roles, and configured permissions for those roles in each of your CMK key policies. In the second phase of this tutorial, you assume the role of sender and use your asymmetric signature and verification CMK to sign a sample message. You then bundle the sample message and its corresponding digital signature together into an archive and use your encryption and decryption asymmetric CMK to encrypt the archive.

Figure 5: Creating a message signature and encrypting the message along with its signature
Note: The order of operations in this process is that the message is first signed and then the signature and the message are encrypted together. This order is intentional. When a message is signed and then encrypted, neither the contents nor the identity of the sender will be available to unauthorized 3rd parties. If the order of operations were reversed, however, and a message was first encrypted and then signed it could leak information about the sender’s identity to unauthorized 3rd parties. Moreover, when a message is encrypted and then signed, an unauthorized 3rd party with access to the files could discard the authentic signature created by the sender and replace it with a valid signature created by their own key. This creates the potential for a 3rd party to deceptively create the appearance that they are the legitimate sender of the message and exploit that misperception further.
Assume the sender role
Start by assuming the sender role. In order to successfully assume a role you must authenticate as an IAM principal which has permission to perform sts:AssumeRole. If the principal you are authenticated as lacks this permission you will not able to assume the sender role.
To assume the sender role
- Run the following command, but be sure to replace the account ID value of 111122223333 with your account ID:
aws sts assume-role \
    --role-arn arn:aws:iam::111122223333::role/SenderRole \
    --role-session-name AWSCLI-Session
- The return value for this command provides an access key ID, secret key, and session token. Substitute them into their respective places in the following commands and execute:
export AWS_ACCESS_KEY_ID=ExampleAccessKeyID1
export AWS_SECRET_ACCESS_KEY=ExampleSecretKey1
export AWS_SESSION_TOKEN=ExampleSessionToken1
- Confirm that you’ve successfully assumed the sender role by issuing:
aws sts get-caller-identity
Note: If the output of this command contains the text assumed-role/SenderRole, then you’ve successfully assumed the sender role.
Create a message
Now, create a sample message file called message.json.
To create a message
Run the following command to create a message with the following content:
echo "
{
    "message": "The Magic Words are Squeamish Ossifrage",
    "sender": "Sender Principal"
}
" > ./message.json
Create a digital signature
Creating and verifying a digital signature for the message provides confidence that the message contents haven’t been altered after being sent. This characteristic is known as integrity. Furthermore, when access to a signing key is scoped to a particular principal, creating and verifying a digital signature for the message provides confidence in the sender’s identity. This characteristic is known as authenticity. Finally, a high degree of confidence in both the integrity and authenticity of a message limits the plausible ability of a sender to fraudulently deny having signed a message. This characteristic is known a non-repudiation.
To create a digital signature
Run the following command to create a digital signature for message.json:
aws kms sign \
    --key-id alias/sample-sign-verify-key \
    --message-type RAW \
    --signing-algorithm ECDSA_SHA_512 \
    --message fileb://message.json \
    --output text \
    --query Signature | base64 --decode > message.sig
This generates an independent digital signature file, message.sig, for message.json. Any modification to the contents of message.json, such as changing the sender or message fields, will now cause signature validation of message.sig to fail for message.json.
Encrypt the message and signature
Even with the benefits of a digital signature, the message could still be viewed by any party with access to the file. In order to provide confidence that the message contents aren’t exposed to unauthorized parties, you can encrypt the message. This characteristic is known as confidentiality. In order to retain the benefits of your digital signature you can encrypt the message and corresponding signature together in a single package.
To encrypt the message and signature
- Combine your message and signature into an archive. For example, with the GNU Tar utility you can issue the following:
tar -czvf message.tar.gz message.sig message.json
This will create a new archive file named message.tar.gz containing both your message and message signature.
- Encrypt the archive using AWS KMS. To do so, issue the following command:
aws kms encrypt \
    --key-id alias/sample-encrypt-decrypt-key \
    --encryption-algorithm RSAES_OAEP_SHA_256 \
    --plaintext fileb://message.tar.gz \
    --output text \
    --query CiphertextBlob | base64 --decode > message.enc
This will output a message.enc file containing an encrypted copy of the message.tar.gz archive.
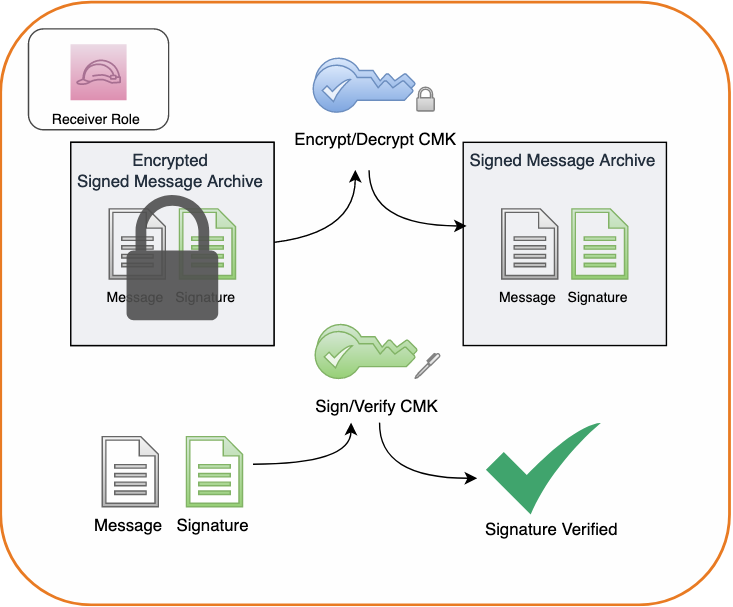
Decrypting and verifying a sample message
Now that you’ve created, signed, and encrypted a message, let’s change gears and see what working with this message.enc file is like from the perspective of a receiving party. In the final phase of this tutorial you assume the role of receiver and use your asymmetric CMKs to decrypt the encrypted message archive and verify the digital signature that you created. Finally, you will view your message. The process is shown in the following figure.

Figure 6: Decrypting a message archive and verifying the message signature
Assume the receiver role
Assume the receiver role so that you can simulate receiving a signed and encrypted message. As before, in order to assume the receiver role you must authenticate as an IAM principal which has permission to perform sts:AssumeRole. If the principal you are authenticated as lacks this permission you will not able to assume the receiver role.
To assume the receiver role
- Copy the message.enc file to a new directory to create a clean working space and navigate there in a terminal session.
- Assume your receiver role. To do so, execute the following command, replacing the account ID value of 111122223333 with your own:
aws sts assume-role \
	--role-arn arn:aws:iam::111122223333::role/ReceiverRole \
	--role-session-name AWSCLI-Session
- The return value for this command provides an access key ID, secret key, and session token. Substitute them into their respective places in the following commands and execute:
export AWS_ACCESS_KEY_ID=ExampleAccessKeyID1
export AWS_SECRET_ACCESS_KEY=ExampleSecretKey1
export AWS_SESSION_TOKEN=ExampleSessionToken1
- Confirm that you have successfully assumed the receiver role by issuing:
aws sts get-caller-identity
If the output of this command contains the text assumed-role/ReceiverRole then you have successfully assumed the receiver role.
Decrypt the encrypted message archive in AWS KMS
Decrypt the encrypted message archive to access the plaintext of the message and message signature files.
To decrypt the encrypted message archive
- Issue the following command:
aws kms decrypt \
    --key-id alias/sample-encrypt-decrypt-key \
    --ciphertext-blob fileb://EncryptedMessage \
    --encryption-algorithm RSAES_OAEP_SHA_256 \
    --output text \
    --query Plaintext | base64 --decode > message.tar.gz
- This will create an unencrypted message.tar.gz file that you can unpack with:
This, in turn, will expand the archive contents message.sig and message.json in your working directory.
Verify the message signature
To verify the signature on the message issue the following command:
aws kms verify \
    --key-id alias/sample-sign-verify-key \
    --message-type RAW \
    --message fileb://message.json \
    --signing-algorithm ECDSA_SHA_512 \
    --signature fileb://message.sig
In the response you should see that SignatureValid is marked true indicating that the signature has been verified using the specified sample-sign-verify-key that you granted the sender principal permission to generate signatures with.
View the message
Finally, open message.json and view the file’s contents by issuing the following command:
You will see that the contents of the file have not been modified and still read:
{
    "message": "The Magic Words are Squeamish Ossifrage",
    "sender": "Sender Principal"
}
Note: Be careful to avoid making any changes to the contents of this file. Even a minor modification of the message contents will compromise the integrity of the message and cause future attempts at signature validation using your message.sig file to fail.
Summary
In this tutorial, you signed and encrypted data using two AWS KMS asymmetric CMKs and later decrypted and verified your signature using those CMKs.
You first created two asymmetric CMKs in AWS KMS, one for creating and verifying digital signatures and the other for encrypting and decrypting data. You then configured key policy permissions for your sender and receiver principals. Acting as your sender principal, you digitally signed a message in AWS KMS, added the message and signature to an archive and then encrypted that archive in AWS KMS. Next you assumed your receiver role and decrypted the archive in AWS KMS, viewed your message, and verified its signature in AWS KMS.
To learn more about the asymmetric keys feature of AWS KMS, please read the AWS KMS Developer Guide. If you have questions about the asymmetric keys feature, please start a new thread on the AWS KMS forum. If you have feedback about this post, submit comments in the Comments section below.
Want more AWS Security how-to content, news, and feature announcements? Follow us on Twitter.