Tag Archives: AWS Nitro Enclaves

Validating attestation documents produced by AWS Nitro Enclaves

Post Syndicated from maceneff original https://aws.amazon.com/blogs/compute/validating-attestation-documents-produced-by-aws-nitro-enclaves/

This blog post is written by Paco Gonzalez Senior EMEA IoT Specialist SA.

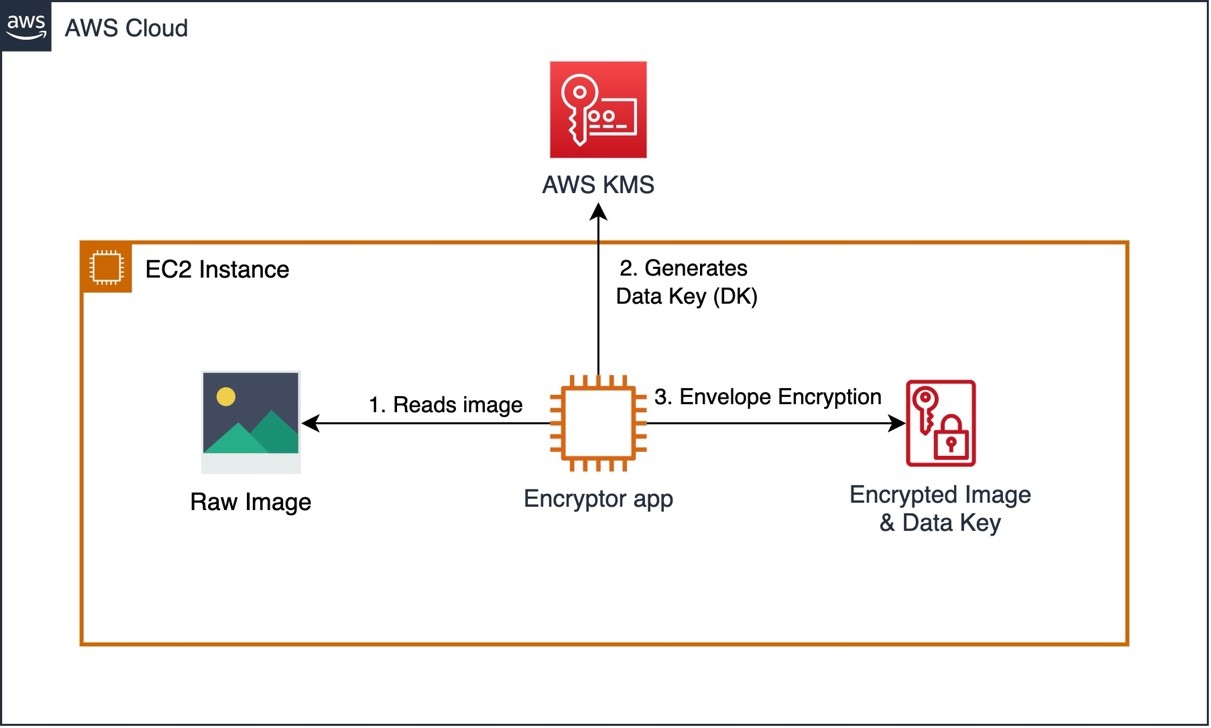
AWS Nitro Enclaves offers an isolated, hardened, and highly constrained environment to host security-critical applications. Think of AWS Nitro Enclaves as regular Amazon Elastic Compute Cloud (Amazon EC2) virtual machines (VMs) but with the added benefit of the environment being highly constrained.

A great benefit of using AWS Nitro Enclaves is that you can run your software as if it was a regular EC2 instance, but with no persistent storage and limited access to external systems. The only way to communicate with AWS Nitro Enclaves is using a VSOCK socket. This special type of communication mechanism acts as an isolated communication channel between the parent EC2 instance and AWS Nitro Enclaves.Diagram that shows how Nitro Enclaves uses the proven isolation of the Nitro Hypervisor to further isolate the CPU and memory of the Nitro Enclaves from users, applications, and libraries on the parent instance.

 Fig 1 – AWS Nitro Enclaves uses the proven isolation of the Nitro Hypervisor to further isolate the CPU and memory of the Nitro Enclaves from users, applications, and libraries on the parent instance.

AWS Nitro Enclaves comes with a custom Linux device called the Nitro Security Module (NSM), which is accessible via /dev/nsm. This device provides attestation capability to the Nitro Enclaves. The attestation comes in the form of an attestation document. The attestation document makes it easy and safe to build trust between systems that interact with the Nitro Enclaves. The external system must have a mechanism to process the attestation document to determine the validity of the attestation document.

In this post, I go through the anatomy of an attestation document produced by the NSM API. I then show you an example of how to perform different validations that help determine the accuracy of an attestation document produced by the AWS Nitro Enclaves Security Module. I use syntactic and semantic validations to check for the attestation document’s correctness before proceeding with a cryptographic validation of the contents of the document’s payload. The examples used in this post use the C language. Look at the companion repository available in GitHub for access to the all source code used in this post.

Anatomy of an attestation document produced by AWS Nitro Enclaves

The attestation document uses the Concise Binary Object Representation (CBOR) format to encode the data. The CBOR object is wrapped using the CBOR Object Signing and Encryption (COSE) protocol. The COSE format used is a single-signer data structure called “COSE_Sign1”. The object is comprised of headers, the payload, and a signature.

For more information about COSE, see RFC 8152: CBOR Object Signing and Encryption (COSE). For more information about CBOR, see RFC 8949 Concise Binary Object Representation (CBOR).

We published a library to make it easy to interact with the NSM. The library contains helpers which your application, running on the Nitro Enclaves, can use to communicate with the NSM device.

Here is the minimum code needed to generate an attestation document:

#include <stdlib.h>
#include <stdio.h>
#include <nsm.h>

#define NSM_MAX_ATTESTATION_DOC_SIZE (16 * 1024)

int main(void) {

    /// NSM library initialization function.  
    /// *Returns*: A descriptor for the opened device file.

    int nsm_fd = nsm_lib_init();
    if (nsm_fd < 0) {
        exit(1);
    }

    /// NSM `GetAttestationDoc` operation for non-Rust callers.  
    /// *Argument 1 (input)*: The descriptor to the NSM device file.  
    /// *Argument 2 (input)*: User data.  
    /// *Argument 3 (input)*: The size of the user data buffer.  
    /// *Argument 4 (input)*: Nonce data.  
    /// *Argument 5 (input)*: The size of the nonce data buffer.  
    /// *Argument 6 (input)*: Public key data.  
    /// *Argument 7 (input)*: The size of the public key data buffer.  
    /// *Argument 8 (output)*: The obtained attestation document.  
    /// *Argument 9 (input / output)*: The document buffer capacity (as input)
    /// and the size of the received document (as output).  
    /// *Returns*: The status of the operation.

    int status;
    uint8_t att_doc_buff[NSM_MAX_ATTESTATION_DOC_SIZE];
    uint32_t att_doc_cap_and_size = NSM_MAX_ATTESTATION_DOC_SIZE;

    status = nsm_get_attestation_doc(nsm_fd, NULL, 0, NULL, 0, NULL, 0, att_doc_buff, 
                                    &att_doc_cap_and_size);
    if (status != ERROR_CODE_SUCCESS) {
        printf("[Error] Request::Attestation got invalid response: %s\n",status);
        exit(1);
    }

    printf("########## attestation_document_buff ##########\r\n");
    for(int i=0; i<att_doc_cap_and_size; i++)
        fprintf(stdout, "%02X", att_doc_buff[i]);

    exit(0);
}

To produce a sample attestation document, initialize the device, call the function ‘nsm_get_attestation_doc’ inside the AWS Nitro Enclaves, and dump the contents. The library is written using Rust, but it contains
bindings for C. You can read more about the library and some of the other relevant capabilities
here.

The COSE headers contain a protected and an un-protected data section. The cryptographic algorithm used for the signature is specified inside the protected area. AWS Nitro Enclaves use a 384-bit elliptic curve algorithm (P-384) to sign attestation documents. AWS Nitro Enclaves do not use the unprotected data field so it is always left blank.

The payload contains fixed parameters that include the following: information about the issuing NSM, a timestamp of the issuing event, a map of all the locked Platform Configuration Registers (PCRs) at the moment the attestation document was generated, the hashing algorithm used to produce the digest that was used to calculate the PCR values – AWS Nitro Enclaves use a 384 bit secure hashing algorithm (SHA384), a x509 certificate signed by AWS Nitro Enclaves’ Private Public Key Infrastructure (PKI). An AWS Nitro Enclaves certificate expires three hours after it has been issued. The common name (CN) contains information about the issuing NSM – and finally the issuing Certificate Authority (CA) bundle. The payload also contains optional parameters that a third-party application can use to create custom authentication and authorization workflows. The optional parameters are: a public key, a cryptographic nonce, and additional arbitrary data.

Finally, the signature is the result of a signing operation using the private key related to the public key contained inside the certificate that is part of the payload.

Diagram that illustrates the components of a attestation document produced by a Nitro Enclave

Fig 2. An attestation document is generated and signed by the Nitro Hypervisor. It contains information about the Nitro Enclaves and it can be used by an external service to verify the identity of Nitro Enclaves and to establish trust. You can use the attestation document to build your own cryptographic attestation mechanisms.

Syntactical validation

Early validation of the attestation document format makes sure that only documents that conform to the expected structure are processed in subsequent steps.

I start by attempting to decode the CBOR object and testing to see if it corresponds to a COSE object signed with one signer or ‘COSE_Sign1’ structure. This can be easily done by looking at the most significant first three bits (MSB) of the first byte – I am expecting a stream of CBOR bytes (decimal 6). Then, I take the least significant (LSB) remaining five bits of the first byte – I am expecting a tag that tells me it is a COSE_Sign1 object (decimal 18).

assert(att_doc_buff[0*] == 6 <<5 | 18); // 0xD2

* Note that the time of writing, the NSM does not include the COSE tag and thus this validation cannot be made and is mentioned in this post for informational purposes only. However, it is important to keep this in mind, as the tag is part of the standard, and the NSM device or library could include it in the future.*

The next step is to parse the actual CBOR object. A COSE_Sign1 object is an array of size 4 (protected headers, un protected headers, payload, and signature). Therefore, I must check that the next three MSB correspond to Type 4 (array) and that the size is exactly 4.

assert(att_doc_buff[0] == 4 <<5 | 4); // 0x84

The next byte determines what the first CBOR item of the array looks like. I am expecting the protected COSE header as the first item of the array. The CBOR field should indicate that the contents of the item are of a Type 2 (raw bytes) and the size should be exactly 4.

assert(att_doc_buff[1] == 2 <<5 | 4); // 0x44

The next four bytes represent the protected header. The contents of this item is a regular CBOR object. The object should contain a Type 5 (map) with a single item (1). The item first key is expected to be the number 1. The first three MSB of the first byte should be a Type 1 (negative integer). The remaining five LSB should indicate that the value is an 8-bit number (decimal 24). The last byte should be negative 35 as it maps to the P-384 curve that Nitro Enclaves use. Note that CBOR negative numbers are stored minus 1.

assert(att_doc_buff[2] == 5 <<5 | 1); // 0xA1
assert(att_doc_buff[3] == 0x01); // 0x01
assert(att_doc_buff[4] == 1 <<5 | 24); // 0x38
assert(att_doc_buff[4] == 35-1); // 0x22

The next byte corresponds to the unprotected header. AWS Nitro Enclaves do not use unprotected headers. Therefore, the expected is a Type 5 (map) with zero items.

assert(att_doc_buff[6] == 5 <<5 | 0); // 0xA0

Now that I am done inspecting the headers, I can move onto the payload. The CBOR object used for the payload is Type 2 (raw bytes). This time we are expecting a large steam of bytes. The remaining five LSB are used to indicate the data type used to indicate the size of the byte stream (i.e. 8-bit, 16-bit). AWS Nitro Enclaves attestation documents are about 5 KiB without using any of the three optional parameters. The optional parameters have a size limit of 1 KiB each. This means that it would be highly unlikely for the buffer to be larger than a 16-bit number (CBOR short count: 25).

assert(att_doc_buff[8] == 2 <<5 | 25); // 0x59

The next two bytes represent the size of the payload which I am going to skip those for now, as the contents of the payload are validated in subsequent steps. I’ll move onto the final portion of the attestation document: the signature. The signature has to be a Type 2 (raw bytes) of exactly 96 bytes.

    uint16_t payload_size = att_doc_buff[8] << 8 | att_doc_buff[9];
    assert(att_doc_buff[9+payload_size+1] == (2<<5 | 24));   // 0x58
    assert(att_doc_buff[9+payload_size+1+1] == 96);         // 0x60

At this point, I have validated that the data produced by the NSM looks the way it should. My application is ready to start looking into the contents of the attestation document.

I want to make sure that the document contains all mandatory fields and I can check that the fields have the right structure and their sizes are within the expected boundaries. I have evidence that the data looks the way it should, so I am ready to use an off-the-shelf CBOR library to make the validation process easier instead of doing it by hand.

Here is an example of how to load a CBOR object using libcbor and standard C libraries to check the contents. I am showing just one example to illustrate the process. Refer to the section ‘Verifying the root of trust’ in the AWS Nitro Enclaves User Guide for a detailed description of each parameter and the validations that your application should perform to make sure that the document is valid.

#include <stdlib.h>
#include <stdio.h>
#include <string.h>
#include <assert.h>

#include <cbor.h>
#include <openssl/ssl.h>

#define APP_X509_BUFF_LEN                   (1024*2)
#define APP_ATTDOC_BUFF_LEN                 (1024*10)

void output_handler(char * msg){
    fprintf(stdout, "\r\n%s\r\n", msg);
}

void output_handler_bytes(uint8_t * buffer, int buffer_size){    
    for(int i=0; i<buffer_size; i++)
        fprintf(stdout, "%02X", buffer[i]);
    fprintf(stdout, "\r\n");
}

int read_file( unsigned char * file, char * file_name, size_t elements) {
    FILE * fp; size_t file_len = 0;
    fp = fopen(file_name, "r");
    file_len = fread(file, sizeof(char), elements, fp);
    if (ferror(fp) != 0 ) {
        fputs("Error reading file", stderr);
    } 
    fclose(fp);
    return file_len; 
}  

int main(int argc, char* argv[]) {

    // STEP 0 - LOAD ATTESTATION DOCUMENT

    // Check inputs, expect two
    if (argc != 3) { 
        fprintf(stderr, "%s\r\n", "ERROR: usage: ./main {att_doc_sample.bin} {AWS_NitroEnclaves_Root-G1.pem}"); exit(1);
    }

    // Load file into buffer, use 1st argument
    unsigned char * att_doc_buff = malloc(APP_ATTDOC_BUFF_LEN);
    int att_doc_len = read_file(att_doc_buff, argv[1], APP_ATTDOC_BUFF_LEN );

    // STEP 1 - SYTANCTIC VALIDATON

    // Check COSE TAG (skipping - not currently implemented by AWS Nitro Enclaves)
    // assert(att_doc_buff[0] == 6 <<5 | 18); // 0xD2
    // Check if this is an array of exactly 4 items
    assert(att_doc_buff[0] == (4<<5 | 4));      // 0x84
    // Check if next item is a byte stream of 4 bytes
    assert(att_doc_buff[1] == (2<<5 | 4));      // 0x44
    // Check is fist item if byte stream is a map with 1 item
    assert(att_doc_buff[2] == (5<<5 | 1));      // 0xA1
    // Check that the first key of the map is 0x01
    assert(att_doc_buff[3] == 0x01);            // 0x01
    // Check that value of the the first key of the map is -35 (P-384 curve)
    assert(att_doc_buff[4] == (1 <<5 | 24));    // 0x38
    assert(att_doc_buff[5] == 35-1);            // 0x22
    // Check that next item is a map of 0 items
    assert(att_doc_buff[6] == (5<<5 | 0));      // 0xA0
    // Check that the next item is a byte stream and the size is a 16-bit number (dec. 25)
    assert(att_doc_buff[7] == (2<<5 | 25));     // 0x59
    // Cast the 16-bit number
    uint16_t payload_size = att_doc_buff[8] << 8 | att_doc_buff[9];
    // Check that the item after the payload is a byte stream and the size is 8-bit number (dec. 24)
    assert(att_doc_buff[9+payload_size+1] == (2<<5 | 24));   // 0x58
    // Check that the size of the signature is exactly 96 bytes
    assert(att_doc_buff[9+payload_size+1+1] == 96);         // 0x60

    // Parse buffer using library
    struct cbor_load_result ad_result;
    cbor_item_t * ad_item = cbor_load(att_doc_buff, att_doc_len, &ad_result);
    free(att_doc_buff); // not needed anymore

    // Parse protected header -> item 0 
    cbor_item_t * ad_pheader = cbor_array_get(ad_item, 0); 
    size_t ad_pheader_len = cbor_bytestring_length(ad_pheader);

    // Parse signed bytes -> item 2 (skip un-protected headers as they are always empty)
    cbor_item_t * ad_signed = cbor_array_get(ad_item, 2);
    size_t ad_signed_len = cbor_bytestring_length(ad_signed);

    // Load signed bytes as a new CBOR object
    unsigned char * ad_signed_d = cbor_bytestring_handle(ad_signed);
    struct cbor_load_result ad_signed_result;
    cbor_item_t * ad_signed_item = cbor_load(ad_signed_d, ad_signed_len, &ad_signed_result);

    // Create the pair structure
    struct cbor_pair * ad_signed_item_pairs = cbor_map_handle(ad_signed_item);

    // Parse signature -> item 3
    cbor_item_t * ad_sig = cbor_array_get(ad_item, 3); 
    size_t ad_sig_len = cbor_bytestring_length(ad_sig);
    unsigned char * ad_sig_d = cbor_bytestring_handle(ad_sig);

    // Example 01: Check that the first item's key is the string "module_id" and that is not empty
    size_t module_k_len = cbor_string_length(ad_signed_item_pairs[0].key);
    unsigned char * module_k_str = realloc(cbor_string_handle(ad_signed_item_pairs[0].key), module_k_len+1); //null char
    module_k_str[module_k_len] = '\0';
    size_t module_v_len = cbor_string_length(ad_signed_item_pairs[0].value);
    unsigned char * module_v_str = realloc(cbor_string_handle(ad_signed_item_pairs[0].value), module_v_len+1); //null char
    module_v_str[module_v_len] = '\0';
    assert(module_k_len != 0);
    assert(module_v_len != 0);

    // Example 02: Check that the module id key is actually the string "module_id"
    assert(!strcmp("module_id",(const char *)module_k_str));

    // Example 03: Check that the signature is exactly 96 bytes long
    assert(ad_sig_len == 96);

    // Example 04: Check that the protected header is exactly 4 bytes long
    assert(ad_pheader_len == 4);

Semantic validation

The next step is to look at the data contained in the attestation document and check if it conforms to pre-defined business rules. The attestation document contains a certificate that was signed by the AWS Nitro Enclaves’ PKI. This validation it is important, as it proves that the document was signed by the AWS Nitro Enclaves’ PKI.

The signature of an x509 certificate is based on the certificate’s payload digest. Validating this signature means that I trust the information contained within the certificate, including the public key which I can later use to validate the attestation document itself. Furthermore, the information in the document contains details about the NSM module and a timestamp. Passing this check provides the assurances I need to trust that the document originated from my software running on AWS Nitro Enclaves at a specific time.

Diagram that illustrates the components of a x.509 certificate, part of the payload of a attestation document produced by AWS Nitro Enclaves.

Fig 3. The attestation document contains a x.509 certificate that was signed by the AWS Nitro Enclaves’ PKI.

Here is an example of how I use the AWS Nitro Enclaves’ Private PKI root certificate from an external file. Then, use the CA bundle contained in the attestation document to validate the authenticity of the certificate contained in the document. In this example, I am using the OpenSSL library.

// STEP 2 -  SEMANTIC VALIDATION

    // Load AWS Nitro Enclave's Private PKI root certificate
    unsigned char * x509_root_ca = malloc(APP_X509_BUFF_LEN);
    int x509_root_ca_len = read_file(x509_root_ca, argv[2], APP_X509_BUFF_LEN );
    BIO * bio = BIO_new_mem_buf((void*)x509_root_ca, x509_root_ca_len);
    X509 * caX509 = PEM_read_bio_X509(bio, NULL, NULL, NULL);
    if (caX509 == NULL) {
        fprintf(stderr, "%s\r\n", "ERROR: PEM_read_bio_X509 failed"); exit(1);
    }
    free(x509_root_ca); free(bio);
    // Create CA_STORE
    X509_STORE * ca_store = NULL;
    ca_store = X509_STORE_new();
    /* ADD X509_V_FLAG_NO_CHECK_TIME FOR TESTING! TODO REMOVE */
    X509_STORE_set_flags (ca_store, X509_V_FLAG_NO_CHECK_TIME);
    if (X509_STORE_add_cert(ca_store, caX509) != 1) {
        fprintf(stderr, "%s\r\n", "ERROR: X509_STORE_add_cert failed"); exit(1);
    }
    // Add certificates to CA_STORE from cabundle
    // Skip the first one [0] as that is the Root CA and we want to read it from an external source
    for (int i = 1; i < cbor_array_size(ad_signed_item_pairs[5].value); ++i){ 
        cbor_item_t * ad_cabundle = cbor_array_get(ad_signed_item_pairs[5].value, i); 
        size_t ad_cabundle_len = cbor_bytestring_length(ad_cabundle);
        unsigned char * ad_cabundle_d = cbor_bytestring_handle(ad_cabundle);
        X509 * cabnX509 = X509_new();
        cabnX509 = d2i_X509(&cabnX509, (const unsigned char **)&ad_cabundle_d, ad_cabundle_len);
        if (cabnX509 == NULL) {
            fprintf(stderr, "%s\r\n", "ERROR: d2i_X509 failed"); exit(1);
        }
        if (X509_STORE_add_cert(ca_store, cabnX509) != 1) {
            fprintf(stderr, "%s\r\n", "ERROR: X509_STORE_add_cert failed"); exit(1);
        }
    }

    // Load certificate from attestation dcoument - this a certificate that we don't trust (yet)
    size_t ad_signed_cert_len = cbor_bytestring_length(ad_signed_item_pairs[4].value);
    unsigned char * ad_signed_cert_d = realloc(cbor_bytestring_handle(ad_signed_item_pairs[4].value), ad_signed_cert_len);
    X509 * pX509 = X509_new();
    pX509 = d2i_X509(&pX509, (const unsigned char **)&ad_signed_cert_d, ad_signed_cert_len);
    if (pX509 == NULL) {
        fprintf(stderr, "%s\r\n", "ERROR: d2i_X509 failed"); exit(1);
    }
    // Initialize X509 store context and veryfy untrusted certificate
    STACK_OF(X509) * ca_stack = NULL;
    X509_STORE_CTX * store_ctx = X509_STORE_CTX_new();
    if (X509_STORE_CTX_init(store_ctx, ca_store, pX509, ca_stack) != 1) {
        fprintf(stderr, "%s\r\n", "ERROR: X509_STORE_CTX_init failed"); exit(1);
    }
    if (X509_verify_cert(store_ctx) != 1) {
        fprintf(stderr, "%s\r\n", "ERROR: X509_verify_cert failed"); exit(1);
    }
    fprintf(stdout, "%s\r\n", "OK: ########## Root of Trust Verified! ##########");

Having proof that the certificate was signed by the expected CA is just the beginning. I also want to make sure that the contents of the certificate are correct. This involves checking that the certificate has not expired, as well as making sure that the critical extensions contain correct information to name a few.

Cryptographic validation

The syntactic validation helped me determine that the attestation document has the right shape, and the sematic validation helped me determine if the document meets my business rules. However, I still don’t know for sure if the document is valid.

The attestation document contains critical information, such as PCRs and the AWS Identity Access and Management (IAM) role among other details. I can safely use these two values in my authentication or authorization workflows if I can prove that they are trustworthy.

The attestation document was signed using a private key that is never exposed. However, the corresponding public key is contained within the certificate that was issued and stored within the attestation document. I know I can trust the contents of this certificate because I have proof that the certificate was signed by an entity that I trust.

Here is an example where I cryptographically prove that all the protected contents of the attestation document are related to the public key contained in the certificate. To validate the COSE signature, I must first recreate the original message that was used during the signature operation – COSE uses a specific format. Then, I use OpenSSL to check if there is a match between the message, signature, and public key. If the signature checks, then I can trust the contents of the already semantically-verified payload.

 // STEP 3 - CRYPTOGRAPHIC VALIDATION

    #define SIG_STRUCTURE_BUFFER_S (1024*10)
    // Create new empty key
    EVP_PKEY * pkey = EVP_PKEY_new();
    // Create a new eliptic curve object using P-384 curve
    EC_KEY * ec_key = EC_KEY_new_by_curve_name(NID_secp384r1);
    // Reference the public key stucture and eliptic curve object with each other
    EVP_PKEY_assign_EC_KEY(pkey, ec_key);
    // Load the public key from the attestation document (we trust it now)
    pkey = X509_get_pubkey(pX509);
    if (pkey == NULL) {
        fprintf(stderr, "%s\r\n", "ERROR: X509_get_pubkey failed"); exit(1);
    }
    // Allocate, initialize and return a digest context
    EVP_MD_CTX * ctx = EVP_MD_CTX_create();
    // Set up verification context
    if (EVP_DigestVerifyInit(ctx, NULL, EVP_sha384(), NULL, pkey) <= 0) {
        fprintf(stderr, "%s\r\n", "ERROR: EVP_DigestVerifyInit failed"); exit(1);
    }
    // Recreate COSE_Sign1 structure, and serilise it into a buffer
    cbor_item_t * cose_sig_arr = cbor_new_definite_array(4);
    cbor_item_t * cose_sig_arr_0_sig1 = cbor_build_string("Signature1"); 
    cbor_item_t * cose_sig_arr_2_empty = cbor_build_bytestring(NULL, 0);

    assert(cbor_array_push(cose_sig_arr, cose_sig_arr_0_sig1));
    assert(cbor_array_push(cose_sig_arr, ad_pheader));
    assert(cbor_array_push(cose_sig_arr, cose_sig_arr_2_empty));
    assert(cbor_array_push(cose_sig_arr, ad_signed));

    unsigned char sig_struct_buffer[SIG_STRUCTURE_BUFFER_S];
    size_t sig_struct_buffer_len = cbor_serialize(cose_sig_arr, sig_struct_buffer, SIG_STRUCTURE_BUFFER_S);
    // Hash message and load it into the verificaiton context
    if (EVP_DigestVerifyUpdate(ctx, sig_struct_buffer, sig_struct_buffer_len) <= 0) {
        fprintf(stderr, "%s\r\n", "ERROR: nEVP_DigestVerifyUpdate failed"); exit(1);
    }
    // Create R and V BIGNUM structures
    BIGNUM * sig_r = BN_new(); BIGNUM * sig_v = BN_new();
    BN_bin2bn(ad_sig_d, 48, sig_r); BN_bin2bn(ad_sig_d + 48, 48, sig_v);
    // Allocate an empty ECDSA_SIG structure
    ECDSA_SIG * ec_sig = ECDSA_SIG_new();
    // Set R and V values
    ECDSA_SIG_set0(ec_sig, sig_r, sig_v);
    // Convert R and V values into DER format
    int sig_size = i2d_ECDSA_SIG(ec_sig, NULL);
    unsigned char * sig_bytes = malloc(sig_size); unsigned char * p;
    memset_s(sig_bytes,sig_size,0xFF, sig_size);
    p = sig_bytes;
    sig_size = i2d_ECDSA_SIG(ec_sig, &p);
    // Verify the data in the context against the signature and get final result
    if (EVP_DigestVerifyFinal(ctx, sig_bytes, sig_size) != 1) {
        fprintf(stderr, "%s\r\n", "ERROR: EVP_DigestVerifyFinal failed"); exit(1);
    } else {
        fprintf(stdout, "%s\r\n", "OK: ########## Message Verified! ##########"); 
        free(sig_bytes);
        exit(0);
    }
    //#endif

    exit(1);

}

Conclusion

In this post, I went through a detailed examination of attestation documents produced by the AWS Nitro Enclaves. Then, I went over different types of validations (syntactic, semantic, and cryptographic) that safely help determine if an attestation document should be trusted. I’ve also included access to a public repository that contains the source code used in this post. New AWS Nitro Enclaves users can use it as a starting point when looking to integrate their applications with AWS Nitro Enclaves and build highly secure and confidential solutions.

Introducing the Security Design of the AWS Nitro System whitepaper

Post Syndicated from J.D. Bean original https://aws.amazon.com/blogs/security/introducing-the-security-design-of-the-aws-nitro-system-whitepaper/

AWS recently released a whitepaper on the Security Design of the AWS Nitro System. The Nitro System is a combination of purpose-built server designs, data processors, system management components, and specialized firmware that serves as the underlying virtualization technology that powers all Amazon Elastic Compute Cloud (Amazon EC2) instances launched since early 2018. With the Nitro System, AWS undertook an effort to reimagine the architecture of virtualization to deliver security, isolation, performance, cost savings, and a pace of innovation that our customers require.

This whitepaper is a detailed design document on the inner workings of the AWS Nitro System, and how we use it to help secure your most critical workloads. This is the first time that AWS has provided such a detailed design document on the Nitro System and how it offers a no-operator access design and strong tenant isolation. The whitepaper describes the security design of the Nitro System in detail to help you evaluate Amazon EC2 for your sensitive workloads.

Three key components of the Nitro System are used to implement this design:

  • Purpose-built Nitro Cards – Hardware devices designed by AWS that provide overall system control and I/O virtualization that is independent of the main system board with its CPUs and memory.
  • Nitro Security Chip – Enables a secure boot process for the overall system based on a hardware root of trust, the ability to offer bare metal instances, and defense-in-depth that offers protection to the server from unauthorized modification of system firmware.
  • Nitro Hypervisor – A deliberately minimized and firmware-like hypervisor designed to provide strong resource isolation, and performance that is nearly indistinguishable from a bare metal server.

The whitepaper describes the fundamental architectural change introduced by the Nitro System compared to previous approaches to virtualization. It discusses the three key components of the Nitro System, and provides a demonstration of how these components work together by walking through what happens when a new Amazon Elastic Block Store (Amazon EBS) volume is added to a running EC2 instance. The whitepaper also discusses how the Nitro System is designed to eliminate the possibility of administrator access to an EC2 server, the overall passive communications design of the Nitro System, and the Nitro System change management process. Finally, the paper surveys important aspects of the EC2 system design that provide mitigations against potential side-channel issues that can arise in compute environments.

The whitepaper dives deep into each of these considerations, offering a detailed picture of the Nitro System security design. For more information about cloud security at AWS, contact us.

If you have feedback about this post, submit comments in the Comments section below. If you have questions about this post, contact AWS Support.

Want more AWS Security news? Follow us on Twitter.

J.D. Bean

J.D. is a Principal Security Architect for Amazon EC2 based out of New York City. His interests include security, privacy, and compliance. He is passionate about his work enabling AWS customers’ successful cloud journeys. J.D. holds a Bachelor of Arts from The George Washington University and a Juris Doctor from New York University School of Law.

Running AI-ML Object Detection Model to Process Confidential Data using Nitro Enclaves

Post Syndicated from Sheila Busser original https://aws.amazon.com/blogs/compute/running-ai-ml-object-detection-model-to-process-confidential-data-using-nitro-enclaves/

This blog post was written by, Antoine Awad, Solutions Architect, Kevin Taylor, Senior Solutions Architect and Joel Desaulniers, Senior Solutions Architect.

Machine Learning (ML) models are used for inferencing of highly sensitive data in many industries such as government, healthcare, financial, and pharmaceutical. These industries require tools and services that protect their data in transit, at rest, and isolate data while in use. During processing, threats may originate from the technology stack such as the operating system or programs installed on the host which we need to protect against. Having a process that enforces the separation of roles and responsibilities within an organization minimizes the ability of personnel to access sensitive data. In this post, we walk you through how to run ML inference inside AWS Nitro Enclaves to illustrate how your sensitive data is protected during processing.

We are using a Nitro Enclave to run ML inference on sensitive data which helps reduce the attack surface area when the data is decrypted for processing. Nitro Enclaves enable you to create isolated compute environments within Amazon EC2 instances to protect and securely process highly sensitive data. Enclaves have no persistent storage, no interactive access, and no external networking. Communication between your instance and your enclave is done using a secure local channel called a vsock. By default, even an admin or root user on the parent instance will not be able to access the enclave.

Overview

Our example use-case demonstrates how to deploy an AI/ML workload and run inferencing inside Nitro Enclaves to securely process sensitive data. We use an image to demonstrate the process of how data can be encrypted, stored, transferred, decrypted and processed when necessary, to minimize the risk to your sensitive data. The workload uses an open-source AI/ML model to detect objects in an image, representing the sensitive data, and returns a summary of the type of objects detected. The image below is used for illustration purposes to provide clarity on the inference that occurs inside the Nitro Enclave. It was generated by adding bounding boxes to the original image based on the coordinates returned by the AI/ML model.

Image of airplanes with bounding boxes

Figure 1 – Image of airplanes with bounding boxes

To encrypt this image, we are using a Python script (Encryptor app – see Figure 2) which runs on an EC2 instance, in a real-world scenario this step would be performed in a secure environment like a Nitro Enclave or a secured workstation before transferring the encrypted data. The Encryptor app uses AWS KMS envelope encryption with a symmetrical Customer Master Key (CMK) to encrypt the data.

Image Encryption with AWS KMS using Envelope Encryption

Figure 2 – Image Encryption with AWS KMS using Envelope Encryption

Note, it’s also possible to use asymmetrical keys to perform the encryption/decryption.

Now that the image is encrypted, let’s look at each component and its role in the solution architecture, see Figure 3 below for reference.

  1. The Client app reads the encrypted image file and sends it to the Server app over the vsock (secure local communication channel).
  2. The Server app, running inside a Nitro Enclave, extracts the encrypted data key and sends it to AWS KMS for decryption. Once the data key is decrypted, the Server app uses it to decrypt the image and run inference on it to detect the objects in the image. Once the inference is complete, the results are returned to the Client app without exposing the original image or sensitive data.
  3. To allow the Nitro Enclave to communicate with AWS KMS, we use the KMS Enclave Tool which uses the vsock to connect to AWS KMS and decrypt the encrypted key.
  4. The vsock-proxy (packaged with the Nitro CLI) routes incoming traffic from the KMS Tool to AWS KMS provided that the AWS KMS endpoint is included on the vsock-proxy allowlist. The response from AWS KMS is then sent back to the KMS Enclave Tool over the vsock.

As part of the request to AWS KMS, the KMS Enclave Tool extracts and sends a signed attestation document to AWS KMS containing the enclave’s measurements to prove its identity. AWS KMS will validate the attestation document before decrypting the data key. Once validated, the data key is decrypted and securely returned to the KMS Tool which securely transfers it to the Server app to decrypt the image.

Solution architecture diagram for this blog post

Figure 3 – Solution architecture diagram for this blog post

Environment Setup

Prerequisites

Before we get started, you will need the following prequisites to deploy the solution:

  1. AWS account
  2. AWS Identity and Access Management (IAM) role with appropriate access

AWS CloudFormation Template

We are going to use AWS CloudFormation to provision our infrastructure.

  1. Download the CloudFormation (CFN) template nitro-enclave-demo.yaml. This template orchestrates an EC2 instance with the required networking components such as a VPC, Subnet and NAT Gateway.
  2. Log in to the AWS Management Console and select the AWS Region where you’d like to deploy this stack. In the example, we select Canada (Central).
  3. Open the AWS CloudFormation console at: https://console.aws.amazon.com/cloudformation/
  4. Choose Create Stack, Template is ready, Upload a template file. Choose File to select nitro-enclave-demo.yaml that you saved locally.
  5. Choose Next, enter a stack name such as NitroEnclaveStack, choose Next.
  6. On the subsequent screens, leave the defaults, and continue to select Next until you arrive at the Review step
  7. At the Review step, scroll to the bottom and place a checkmark in “I acknowledge that AWS CloudFormation might create IAM resources with custom names.” and click “Create stack”
  8. The stack status is initially CREATE_IN_PROGRESS. It will take around 5 minutes to complete. Click the Refresh button periodically to refresh the status. Upon completion, the status changes to CREATE_COMPLETE.
  9. Once completed, click on “Resources” tab and search for “NitroEnclaveInstance”, click on its “Physical ID” to navigate to the EC2 instance
  10. On the Amazon EC2 page, select the instance and click “Connect”
  11. Choose “Session Manager” and click “Connect”

EC2 Instance Configuration

Now that the EC2 instance has been provisioned and you are connected to it, follow these steps to configure it:

  1. Install the Nitro Enclaves CLI which will allow you to build and run a Nitro Enclave application:
    sudo amazon-linux-extras install aws-nitro-enclaves-cli -y
    sudo yum install aws-nitro-enclaves-cli-devel -y
    
  2. Verify that the Nitro Enclaves CLI was installed successfully by running the following command:
    nitro-cli --version

    Nitro Enclaves CLI

  3. To download the application from GitHub and build a docker image, you need to first install Docker and Git by executing the following commands:
    sudo yum install git -y
    sudo usermod -aG ne ssm-user
    sudo usermod -aG docker ssm-user
    sudo systemctl start docker && sudo systemctl enable docker
    

Nitro Enclave Configuration

A Nitro Enclave is an isolated environment which runs within the EC2 instance, hence we need to specify the resources (CPU & Memory) that the Nitro Enclaves allocator service dedicates to the enclave.

  1. Enter the following commands to set the CPU and Memory available for the Nitro Enclave allocator service to allocate to your enclave container:
    ALLOCATOR_YAML=/etc/nitro_enclaves/allocator.yaml
    MEM_KEY=memory_mib
    DEFAULT_MEM=20480
    sudo sed -r "s/^(\s*${MEM_KEY}\s*:\s*).*/\1${DEFAULT_MEM}/" -i "${ALLOCATOR_YAML}"
    sudo systemctl start nitro-enclaves-allocator.service && sudo systemctl enable nitro-enclaves-allocator.service
    
  2. To verify the configuration has been applied, run the following command and note the values for memory_mib and cpu_count:
    cat /etc/nitro_enclaves/allocator.yaml

    Enclave Configuration File

Creating a Nitro Enclave Image

Download the Project and Build the Enclave Base Image

Now that the EC2 instance is configured, download the workload code and build the enclave base Docker image. This image contains the Nitro Enclaves Software Development Kit (SDK) which allows an enclave to request a cryptographically signed attestation document from the Nitro Hypervisor. The attestation document includes unique measurements (SHA384 hashes) that are used to prove the enclave’s identity to services such as AWS KMS.

  1. Clone the Github Project
    cd ~/ && git clone https://github.com/aws-samples/aws-nitro-enclaves-ai-ml-object-detection.git
  2. Navigate to the cloned project’s folder and build the “enclave_base” image:
    cd ~/aws-nitro-enclaves-ai-ml-object-detection/enclave-base-image
    sudo docker build ./ -t enclave_base

    Note: The above step will take approximately 8-10 minutes to complete.

Build and Run The Nitro Enclave Image

To build the Nitro Enclave image of the workload, build a docker image of your application and then use the Nitro CLI to build the Nitro Enclave image:

  1. Download TensorFlow pre-trained model:
    cd ~/aws-nitro-enclaves-ai-ml-object-detection/src
    mkdir -p models/faster_rcnn_openimages_v4_inception_resnet_v2_1 && cd models/
    wget -O tensorflow-model.tar.gz https://tfhub.dev/google/faster_rcnn/openimages_v4/inception_resnet_v2/1?tf-hub-format=compressed
    tar -xvf tensorflow-model.tar.gz -C faster_rcnn_openimages_v4_inception_resnet_v2_1
  2. Navigate to the use-case folder and build the docker image for the application:
    cd ~/aws-nitro-enclaves-ai-ml-object-detection/src
    sudo docker build ./ -t nitro-enclave-container-ai-ml:latest
  3. Use the Nitro CLI to build an Enclave Image File (.eif) using the docker image you built in the previous step:
    sudo nitro-cli build-enclave --docker-uri nitro-enclave-container-ai-ml:latest --output-file nitro-enclave-container-ai-ml.eif
  4. The output of the previous step produces the Platform configuration registers or PCR hashes and a nitro enclave image file (.eif). Take note of the PCR0 value, which is a hash of the enclave image file.Example PCR0:
    {
        "Measurements": {
            "PCR0": "7968aee86dc343ace7d35fa1a504f955ee4e53f0d7ad23310e7df535a187364a0e6218b135a8c2f8fe205d39d9321923"
            ...
        }
    }
  5. Launch the Nitro Enclave container using the Enclave Image File (.eif) generated in the previous step and allocate resources to it. You should allocate at least 4 times the EIF file size for enclave memory. This is necessary because the tmpfs filesystem uses half of the memory and the remainder of the memory is used to uncompress the initial initramfs where the application executable resides. For CPU allocation, you should allocate CPU in full cores i.e. 2x vCPU for x86 hyper-threaded instances.
    In our case, we are going to allocate 14GB or 14,366 MB for the enclave:

    sudo nitro-cli run-enclave --cpu-count 2 --memory 14336 --eif-path nitro-enclave-container-ai-ml.eif

    Note: Allow a few seconds for the server to boot up prior to running the Client app in the below section “Object Detection using Nitro Enclaves”.

Update the KMS Key Policy to Include the PCR0 Hash

Now that you have the PCR0 value for your enclave image, update the KMS key policy to only allow your Nitro Enclave container access to the KMS key.

  1. Navigate to AWS KMS in your AWS Console and make sure you are in the same region where your CloudFormation template was deployed
  2. Select “Customer managed keys”
  3. Search for a key with alias “EnclaveKMSKey” and click on it
  4. Click “Edit” on the “Key Policy”
  5. Scroll to the bottom of the key policy and replace the value of “EXAMPLETOBEUPDATED” for the “kms:RecipientAttestation:PCR0” key with the PCR0 hash you noted in the previous section and click “Save changes”

AI/ML Object Detection using a Nitro Enclave

Now that you have an enclave image file, run the components of the solution.

Requirements Installation for Client App

  1. Install the python requirements using the following command:
    cd ~/aws-nitro-enclaves-ai-ml-object-detection/src
    pip3 install -r requirements.txt
  2. Set the region that your CloudFormation stack is deployed in. In our case we selected Canada (Centra)
    CFN_REGION=ca-central-1
  3. Run the following command to encrypt the image using the AWS KMS key “EnclaveKMSKey”, make sure to replace “ca-central-1” with the region where you deployed your CloudFormation template:
    python3 ./envelope-encryption/encryptor.py --filePath ./images/air-show.jpg --cmkId alias/EnclaveKMSkey --region $CFN_REGION
  4. Verify that the output contains: file encrypted? True
    Note: The previous command generates two files: an encrypted image file and an encrypted data key file. The data key file is generated so we can demonstrate an attempt from the parent instance at decrypting the data key.

Launching VSock Proxy

Launch the VSock Proxy which proxies requests from the Nitro Enclave to an external endpoint, in this case, to AWS KMS. Note the file vsock-proxy-config.yaml contains a list of endpoints which allow-lists the endpoints that an enclave can communicate with.

cd ~/aws-nitro-enclaves-ai-ml-object-detection/src
vsock-proxy 8001 "kms.$CFN_REGION.amazonaws.com" 443 --config vsock-proxy-config.yaml &

Object Detection using Nitro Enclaves

Send the encrypted image to the enclave to decrypt the image and use the AI/ML model to detect objects and return a summary of the objects detected:

cd ~/aws-nitro-enclaves-ai-ml-object-detection/src
python3 client.py --filePath ./images/air-show.jpg.encrypted | jq -C '.'

The previous step takes around a minute to complete when first called. Inside the enclave, the server application decrypts the image, runs it through the AI/ML model to generate a list of objects detected and returns that list to the client application.

Parent Instance Credentials

Attempt to Decrypt Data Key using Parent Instance Credentials

To prove that the parent instance is not able to decrypt the content, attempt to decrypt the image using the parent’s credentials:

cd ~/aws-nitro-enclaves-ai-ml-object-detection/src
aws kms decrypt --ciphertext-blob fileb://images/air-show.jpg.data_key.encrypted --region $CFN_REGION

Note: The command is expected to fail with AccessDeniedException, since the parent instance is not allowed to decrypt the data key.

Cleaning up

  1. Open the AWS CloudFormation console at: https://console.aws.amazon.com/cloudformation/.
  2. Select the stack you created earlier, such as NitroEnclaveStack.
  3. Choose Delete, then choose Delete Stack.
  4. The stack status is initially DELETE_IN_PROGRESS. Click the Refresh button periodically to refresh its status. The status changes to DELETE_COMPLETE after it’s finished and the stack name no longer appears in your list of active stacks.

Conclusion

In this post, we showcase how to process sensitive data with Nitro Enclaves using an AI/ML model deployed on Amazon EC2, as well as how to integrate an enclave with AWS KMS to restrict access to an AWS KMS CMK so that only the Nitro Enclave is allowed to use the key and decrypt the image.

We encrypt the sample data with envelope encryption to illustrate how to protect, transfer and securely process highly sensitive data. This process would be similar for any kind of sensitive information such as personally identifiable information (PII), healthcare or intellectual property (IP) which could also be the AI/ML model.

Dig deeper by exploring how to further restrict your AWS KMS CMK using additional PCR hashes such as PCR1 (hash of the Linux kernel and bootstrap), PCR2 (Hash of the application), and other hashes available to you.

Also, try our comprehensive Nitro Enclave workshop which includes use-cases at different complexity levels.

Use AWS Nitro Enclaves to perform computation of multiple sensitive datasets

Post Syndicated from Sheila Busser original https://aws.amazon.com/blogs/compute/leveraging-aws-nitro-enclaves-to-perform-computation-of-multiple-sensitive-datasets/

This blog post is written by, Jeff Wisman, Principal Solutions Architect and Andrew Lee, Solutions Architect.

Introduction

Many organizations have sensitive datasets that they do not want to share with others because of stringent security and compliance requirements. However, they would still like to use each other’s data to perform processing and aggregation. For example, B2B (business to business) companies often want to augment their customer information dataset with additional demographic or psychographic signals. This enrichment of data is often done by one party sending customer information to be matched against another party’s data universe. Naturally, privacy and the revealing of business-critical customer information to an external entity is a major concern here. In this blog, we present a solution where multiple parties can choose to give an isolated compute environment access to their encrypted data to be decrypted and processed in a secure way using AWS Nitro Enclaves.

Designing and building your own secure private computing solution can be challenging, with few out-of-the-box solutions. Our sample application uses Nitro Enclaves, which support the creation of an isolated execution environment called an enclave and a cryptographic attestation process for generating and validating the enclave’s identity. The attestation process makes it possible to ensure only authorized code is running, as well as integration with the AWS Key Management Service (AWS KMS), so that only enclaves that you choose can access sensitive data. Nitro Enlaves enables customers to focus more on their application instead of worrying about integration with external services. While many enterprise use cases involve complex datasets, we’ll use a hypothetical scenario to learn the fundamentals of how this works. The example proof of concept (POC) application will be centered around a third-party bidding service for real estate transactions. Buyers will submit encrypted bids to the application. Once all the bids have been entered, the application will decrypt the bids, determine the highest bidder, and return a result without disclosing the actual bid amounts to any party.

How it works

The POC will be deployed across three AWS accounts, one each for buyer-1, buyer-2, and the bidding service. The bidding service will be run in an enclave on the bidding service’s account.

  1. The bidding service will generate a set of measurements called platform configuration registers (PCRs) from the application code that uses the attestation process. PCRs are cryptographic measurements that are unique to an enclave. An attestation document can be used to verify the identity of the enclave and establish trust.
  2. The buyers will each generate their own AWS KMS key and use AWS KMS to authorize cryptographic requests from the bidding service enclave based on PCR values in the attestation document.
  3. The buyers will place their bids into a file, encrypt the file using AWS KMS, and store them in their own Amazon Simple Storage Service (Amazon S3)
  4. The bidding service will run the application, which will retrieve the encrypted bids from each buyer’s S3 bucket, decrypt the bids, calculate the highest bidder, and store the result in an S3 bucket.

Overall workflow of POC

Implementation

Let’s take a deeper dive into the steps involved in implementing this POC. To deploy the POC to your environment, follow the instructions in the AWS Nitro Enclaves Bidding Service GitHub project.

Enclave image generation

The first step is for the bidding service to launch the parent instance that will host the enclave. Refer to Launch the parent instance for more information about this process. The two real estate buyers, which we will call buyer-1 and buyer-2, will need to review the application code of the enclave application and agree that their data will not be exposed outside the enclave. Once they agree on the code, the bidding service generates the enclave image and a set of measurements as part of the attestation process. The buyers should also perform this process to ensure that the enclave image was generated and its measurements are from the agreed-upon application code. During the generation process, a unique set of measurements is taken of the application, which will make up its identity. When the enclave makes a request to decrypt data with AWS KMS, those measurements will be included in an attestation document to prove the enclave’s identity. Access policies in AWS KMS can then grant access to that identity. An example of a set of measurements is shown here:

Enclave Image successfully created.
{ "Measurements": { "HashAlgorithm": "Sha384 { ... }",
"PCR0":"287b24930a9f0fe14b01a71ecdc00d8be8fad90f9834d547158854b8279c74095c43f8d7f047714e98deb7903f20e3dd",
"PCR1":"aca6e62ffbf5f7deccac452d7f8cee1b94048faf62afc16c8ab68c9fed8c38010c73a669f9a36e596032f0b973d21895",
"PCR2":"0315f483ae1220b5e023d8c80ff1e135edcca277e70860c31f3003b36e3b2aaec5d043c9ce3a679e3bbd5b3b93b61d6f"
} }

Preparing encrypted data

Each buyer will create an AWS KMS key and use that key to encrypt their bids. The encrypted bids will be stored in their respective S3 buckets. Because AWS KMS integrates with Nitro Enclaves to provide built-in attestation support, each buyer can add the PCR values generated earlier as a condition to their respective AWS KMS key policies. This will ensure that only the enclave application code agreed upon by both buyers will have access to utilize the keys for decryption. The following is an example of a KMS key policy with PCR values as a condition:

{
  "Version": "2012-10-17",
  "Id": "key-default-1",
  "Statement": [{
    "Sid": "Enable decrypt from enclave",
    "Effect": "Allow",
    "Principal": < PARENT INSTANCE ROLE ARN > ,
    "Action": "kms:Decrypt",
    "Resource": "",
    "Condition": {
      "StringEqualsIgnoreCase": {
        "kms:RecipientAttestation:ImageSha384": "<PCR0 VALUE FROM BUILDING ENCLAVE IMAGE>",
        "kms:RecipientAttestation:PCR1":"<PCR1 VALUE FROM BUILDING ENCLAVE IMAGE>",
        "kms:RecipientAttestation:PCR2":"<PCR2 VALUE FROM BUILDING ENCLAVE IMAGE>"
      }
    }
  }]
}

The previous example only shows a key policy that uses PCR0, PCR1, and PCR2. You can further scope down the permissions by adding additional PCR values, for instance, role, parent instance ID, and a signing certificate for the enclave image. Refer to the AWS Nitro Enclaves User Guide for more details about PCR values.

Running the POC

The bidding service will run the enclave image generated earlier on the parent instance. The application runs as two parts, one part on the parent instance and another in the enclave. Communication between the parent and the enclave is done through a vsock connection. An AWS KMS proxy is also used on the parent to allow communication between the enclave and AWS KMS for decrypting data. The parent application will retrieve the encrypted bids from each buyer’s S3 bucket and send them to the enclave. The enclave will decrypt the data using both buyers’ AWS KMS keys and present attestation documents signed by the Nitro Hypervisor. AWS KMS will validate that the PCR values in the attestation documents match the key policy before performing the decryption. The decryption event will be logged in AWS CloudTrail for auditing purposes. Once the encrypted bids are decrypted, the values are compared, and the winning buyer is recorded in the result. The unencrypted result is then returned to the parent and written to an S3 bucket in the bidding service’s account. A diagram of this process is shown in Figure 2.

Cleanup

Be sure you delete all the resources that were created when following the included Github project:

  • Bidding service EC2 instance EC2 instance IAM role and policy
  • AWS KMS Customer managed keys
  • S3 Buckets for storing encrypted files

Conclusion

In this blog post, we introduced a sample POC utilizing Nitro Enclaves to allow a bidding service to process two parties’ encrypted data without revealing their data to any party. We did this by ensuring access to sensitive data is only allowed from an application running within an enclave. With the straightforward integration of AWS KMS and the attestation process, customers can quickly develop applications on Nitro Enclaves that can enable computing on encrypted datasets from multiple accounts. For more information on AWS Nitro Enclaves, see the official product documentation or the introductory videos on YouTube.

AWS Security Profiles: J.D. Bean, Sr. Security Solutions Architect

Post Syndicated from Maddie Bacon original https://aws.amazon.com/blogs/security/aws-security-profiles-j-d-bean-sr-security-solutions-architect/

JD Bean AWS Security Profile
In the week leading up to AWS re:Invent 2021, we’ll share conversations we’ve had with people at AWS who will be presenting, and get a sneak peek at their work.


How long have you been at AWS, and what do you do in your current role?

I’m coming up on my three-year anniversary at AWS. Which, as I say it out loud, is hard to believe. It feels as if the time has passed in the blink of an eye. I’m a Solutions Architect with a specialty in security. I work primarily with AWS Strategic Accounts, a set of companies at the forefront of innovation. I partner with my customers to help them design, build, and deploy secure and compliant cloud workloads.

How did you get started in security?

Security began as a hobby for me, and I found it came quite naturally. Perhaps it’s just the way my brain is wired, but I often found security was a topic that consistently drew me in. I leaned into security professionally, and I really enjoy it. AWS makes security its top priority, which is really exciting as a security professional. I’m the kind of person who loves to understand how all the pieces of a system fit together, and AWS Security has been an incredible opportunity, letting me carry my depth of expertise to all sorts of interesting new technical areas such as IoT, HPC, and AI/ML.

How do you explain your job to non-tech friends?

I often say that I work as an AWS Solutions Architect, which means I work with AWS customers to help design their cloud environments and projects, and that I specifically focus on security. If they’re interested in hearing more, I tell them AWS offers a wide array of services customers can configure and combine in all sorts of different ways to fit their needs. If they’re anything like me, I use the analogy of my own experience at hardware stores. In a way, part of what I do is to act like that helpful person at the hardware store who understands what all the tools and equipment do, how to use them correctly, and how they interact with one another. I partner with AWS customers to learn about their project requirements and help them work backwards from those requirements to determine the best approach for achieving their goals.

What are you currently working on that you’re excited about?

I’m working with my customers on a bunch of exciting projects for establishing security, governance, and compliance at scale. I’ve also been returning to my roots and spending more time focusing on open-source software, which is a big passion area for me both personally and professionally.

You’re presenting at AWS re:Invent this year—can you give readers a sneak peek at what you’re covering?

I’m presenting two sessions this year. The first session is a builder session called Grant least privilege temporary access securely at scale (WPS304). We’ll use AWS Secrets Manager, AWS Identity and Access Management (IAM), and the isolated compute functionality provided by AWS Nitro Enclaves to allow system administrators to request and retrieve narrowly scoped and limited-time access.

My second session is the Using AWS Nitro Enclaves to process highly sensitive data workshop (SEC304). AWS Nitro Enclaves allow customers to create an isolated, hardened, and highly constrained environment to host security-critical applications. A lot of work has gone in to building this workshop over the past few months, and I’m excited to share it at re:Invent.

The workshop gives attendees an opportunity to get hands-on, practical experience with AWS Nitro Enclaves. Attendees will get experience launching enclave applications, using the Nitro Enclaves secure local channel for communication. Attendees will also work with Nitro Enclaves’ included cryptographic attestation features and integration with AWS Key Management Services. After putting all these elements together, attendees will be able to see how you can be sure that only your authorized code in your Nitro Enclave is able to access sensitive material.

For those who won’t be able to join the re:Invent workshop session in person, the AWS Nitro Enclaves Workshop is available online and can be completed in your own account at any time.

What are you hoping the audience will take away from the session(s)?

I hope attendees will come away from the session with a sense of how approachable and flexible AWS Nitro Enclaves are, and start to formulate ideas for how they can use Nitro Enclaves in their own workloads.

From your perspective, what’s the biggest thing happening in confidential computing right now?

Over the last year I’ve seen a big increase in interest from customers around confidential computing. This is how we’ve been approaching the design of the AWS Nitro System for many years now. The Nitro System, the underlying platform for all modern Amazon EC2 instances, already provides confidential computing protections by default.

More recently, AWS Nitro Enclaves has offered a new capability for customers to divide their own workloads into more-trusted and less-trusted components. The isolation of workload components in AWS Nitro Enclaves is powered by the specialized hardware and associated firmware of the Nitro System.

What’s your favorite Leadership Principle at Amazon and why?

My favorite Amazon Leadership principle is Learn and Be Curious. I think I’m at my best when I’m learning, growing, and pushing outward at the edges. AWS is such an incredible place to work for people who love to learn. AWS is constantly innovating and inventing for our customers, and learning is central to the culture here.

What’s the best career advice you’ve ever received?

One piece of advice I’ve held close from an early age is just how important it is to be comfortable saying “I don’t know”—ideally followed by “but I’d like to find out.” This has served me well in life, both professionally and personally.

Another is “lead with trust.” Being willing to be vulnerable and assume the best of others goes a long way. At Amazon, one of our leadership principles is Earn Trust. I’ve found how important it is to set an example of offering trust to others. Most people tend to rise to a challenge. If you enter new interactions with a default expectation of trusting others, more often than not, your trust ends up being well-placed.

If you had to pick any other job, what would you want to do?

It’s funny you ask that. I still think of my current role as the “other job” I daydream about. I began my professional life in the legal field. Admittedly, my work was primarily focused around open-source software, so it wasn’t entirely unrelated to what I do now, but I really do feel like being a Solutions Architect is a second phase in my career. I’m enjoying this new chapter too much to give doing anything else much thought.

If you were to really press me, I’d say that my wife, who’s a psychologist, tells me I missed my calling as a therapist. I take that as a real compliment.

Author

J. D. Bean

J.D. is a senior security specialist Solutions Architect for AWS Strategic Accounts based out of New York City. His interests include security, privacy, and compliance. He is passionate about his work enabling AWS customers’ successful cloud journeys. J.D. holds a Bachelor of Arts from The George Washington University and a Juris Doctor from New York University School of Law.

Author

Maddie Bacon

Maddie (she/her) is a technical writer for AWS Security with a passion for creating meaningful content. She previously worked as a security reporter and editor at TechTarget and has a BA in Mathematics. In her spare time, she enjoys reading, traveling, and all things Harry Potter.