As outlined in the AWS post-quantum cryptography migration plan, establishing quantum-resistant roots of trust is critical for systems that need to maintain security for extended periods of time. ML-DSA, a signature scheme standardized in FIPS 204, provides quantum resistance while maintaining the performance characteristics needed for deployments at scale.
Previously, we shared how to use AWS Private CA and AWS KMS for code signing. In this post, we show you how to combine the post-quantum signing capability provided by AWS KMS with post-quantum code-signing PKI from AWS Private CA. Consumers of signed code that have been pre-provisioned with the post-quantum PKI roots can rest assured that the software could not have been forged by an adversary with a cryptographically relevant quantum computer (CRQC). For demonstration purposes, we use the diy-code-signing-kms-private-ca sample program, which uses the AWS SDK for Java. This code creates a PKI infrastructure, generates a code-signing certificate, signs binary code, and verifies the signature. Although we break down the steps to demonstrate the functionality in this post, you can run the Runner as-is to see it in action with commands found in the README file.
This post uses the Cryptographic Message Syntax (CMS) standard for encapsulating the signatures generated for input binary data. It stores the signature, X.509 certificate, and chain used to establish trust. The signature, known as a detached signature, doesn’t contain the original data. The detached signature can be used together with the original file, which was signed with standard tools such as OpenSSL natively to validate the authenticity of the file.
Create a post-quantum PKI hierarchy
For this post, we will use AWS Private CA to introduce a code-signing PKI. It will consist of a root CA to sign a subordinate CA, and a code-signing certificate signed by the subordinate CA. The whole chain will consist of quantum-resistant ML-DSA certificates.
CA hierarchy creation
First, the post-quantum CA hierarchy must be created with ML-DSA. In this example, we use the ML-DSA-65 variant of the post-quantum signature algorithm. You can do this with the AWS Java SDK as shown in the Runner.java file:
For code signing, you need an asymmetric key pair and a code-signing certificate. The asymmetric ML-DSA key pair is generated in AWS KMS and the code-signing certificate is issued by AWS Private CA.
Create an ML-DSA key pair in AWS KMS
First, you must create an asymmetric key pair for code signing operations. Similar to the creation of the hierarchy, the AWS Java SDK can be used to create that AWS KMS key (key pair). Signing will be taking place with the key pair’s private key in AWS KMS. The corresponding public key will be in the code-signing leaf certificate signed by the subordinate CA. These calls are performed as part of the main method within the Runner.java file:
Creating a certificate signing request (CSR) using AWS Private CA is a two-step process. First, you must create a CSR that contains both an identity (Subject) and the previously created AWS KMS public key. The following code snippet in Runner.java accomplishes this:
You can see that the CSR contains an ML-DSA-65 public key. Its corresponding private key will be used to sign code.
The CSR is used by the subordinate CA to issue the code-signing certificate. Note that the code-signing template is used in the templateArn of the IssueCertificate request in the relevant PrivateCA.java file. The inclusion of this template helps ensure that AWS Private CA will issue a certificate with the correct Key Usage (KU) and Extended Key Usage (EKU) extension values, regardless of the values presented in the CSR.
The response includes the ML-DSA-65 code-signing certificate. You can use OpenSSL 3.5 or later to inspect the contents of the certificate after you save it to a file named code-signing-cert.pem:
You can see that the certificate includes the ML-DSA-65 public key of the code-signing key pair and the ML-DSA-65 signature from the subordinate CA. You also see the KU and the EKU values, which represent a code-signing certificate from the AWS Private CA template.
Sign code
At this point, you have set up the code-signing PKI, have a code-signing certificate issued by AWS Private CA and a corresponding ML-DSA key pair residing in KMS.
The Java SDK can be used to generate a CMS signature for a code binary file. In the background, this is accomplished by calling the AWS KMS Sign API with the ML-DSA key pair as shown in Runner.java. The following is part of the Java code. This first snippet involves building a certificate chain and then using it along with the code-signing AWS KMS key, the signer’s certificate, and <DATA_TO_SIGN>, the byte array representation of the code file, to generate the detached signature in a CMS structure.
The CMS signature object directly encapsulates both the code-signing certificate and the subordinate CA certificate. It’s expected that the root certificate will reside in a customer-managed trust store. In addition to these certificates, the CMS object also contains the digest of the input data within the signedAttrs of the signerInfos in the ASN.1 structure. The digest algorithm is SHAKE256 and the OCTET STRING represents the binary digest itself. The use of ML-DSA in CMS is specified in RFC9882.
Note: Although this example uses one ML-DSA signature, some use cases might include dual signatures, a traditional and a quantum-resistant one. Such signed artifacts can be backwards compatible with legacy verifiers that support and can only verify the traditional signature. Upgraded verifiers can verify both signatures.
Verify signed code
Before loading a signed code artifact, its signature needs to be verified. That includes verifying the signature of the code and validating the certificate chain to the trusted root CA. The following code snippet from the main method within the file Runner.java is used for the certificate chain validation and the signature in the code object:
The preceding code retrieves the ML-DSA public key from the code-signing certificate; AWS access or credentials aren’t needed to validate the signature. Entities that have the root CA certificate loaded in their trust store can verify it without needing access to the AWS KMS verify API.
Note: The Runner.java implementation doesn’t use a certificate trust store that’s either part of a browser or part of a file system within the resident operating system of a device or a server. The trust store is placed in an instance of a Java class object for the purpose of this post. If you’re planning to use this code-signing example in a production system, you must change the implementation to use a trust store on the host. To do so, you can build and distribute a secure trust store that includes the root CA certificate.
Alternatively, OpenSSL 3.5 or later can be used to validate the detached signature of the provided input data file with root-ca-MLDSA65.pem, the provided root CA certificate from AWS Private CA.
Note: Although this post focused on code-signing, AWS Private CA can enable post-quantum ML-DSA authentication for other private PKI use cases. In one scenario, applications outside of AWS can access AWS resources by temporarily using certificate-based authentication and swapping it with AWS credentials with AWS IAM Roles Anywhere. AWS IAM Roles Anywhere now supports ML-DSA PKIs like the one created in this post. In another scenario, an mTLS client or IKEv2/IPsec peer could use an ML-DSA certificate issued by AWS Private CA to be authenticated by a server or peer respectively who has been pre-provisioned with the post-quantum PKI root certificate.
Conclusion
This announcement marks an important milestone for post-quantum authentication. With the introduction of ML-DSA X.509 certificates in AWS Private CA, customers can bring quantum resistance to their private PKI use cases. These use cases include client authentication for mTLS or IKEv2/IPsec tunnels, IAM Roles Anywhere, or applications that use private PKI authentication. ML-DSA certificates with AWS Private CA and signing with AWS KMS also enable post-quantum code-singing and establishing post-quantum long-lived roots of trust for devices designed to operate for a long time even after CRQCs became available. Learn more about post-quantum cryptography in general and the overall AWS plan to migrate to post-quantum cryptography.
If you have feedback about this post, submit comments in the Comments section below. If you have questions about this post, start a new thread on the AWS Security, Identity, & Compliance re:Post or contact AWS Support. For more details regarding AWS PQC efforts, refer to our PQC page.
At AWS, we’ve designed our global infrastructure with isolated AWS Regions to help you achieve high fault tolerance and stability for your applications. These AWS Regions are organized into partitions, each with distinct network and security boundaries.
As your business evolves, you might need to migrate workloads between AWS Regions. Perhaps you’re looking to reduce latency for users in new geographic areas, meet Region-specific compliance requirements, or you’re an ISV expanding your product’s availability. Whatever your motivation, cross-Region migration needs careful planning, especially when dealing with encrypted resources.
When migrating Amazon Elastic Compute Cloud (Amazon EC2) instances with encrypted Amazon Elastic Block Storage (Amazon EBS) volumes across AWS Regions with in the same account or a different account, you face a particular challenge: AWS Key Management Service (AWS KMS) keys are AWS Region-specific and cannot be shared across AWS Regions. This post provides a step-by-step approach to successfully migrate your encrypted EC2 instances without compromising your security posture by sharing your KMS keys.
Solution overview
The following diagram and steps are an overview of how an EC2 instance can be migrated to a different Region in a different account without sharing the KMS keys.
Figure 1:Design to migrate EC2 between two accounts
Prerequisites
The following prerequisites are necessary to complete this solution:
Create an S3 bucket in both the source and target Region.
Check the availability of the AMI under the EC2 section in the target. You should find a new AMI ID along with the source Region information.
Figure 9: AMI created in the target account
Launch the instance using the migrated AMI in the target Region.
Figure 10: Launched EC2 instance in the target account
Limitations
Following are the limitations with this process:
To store an AMI, your AWS account must either own the AMI and its snapshots, or the AMI and its snapshots must be shared directly with your account. You can’t store an AMI if it is only publicly shared.
Only Amazon EBS-backed AMIs can be stored using these APIs.
Paravirtual (PV) AMIs are not supported.
The size of an AMI (before compression) that can be stored is limited to 5,000 GB.
Quota on store image requests: 1,200 GB of storage work (snapshot data) in progress.
Quota on restore image requests: 600 GB of restore work (snapshot data) in progress.
For the duration of the store task, the snapshots must not be deleted and the AWS Identity and Access Management (IAM) principal doing the store must have access to the snapshots, otherwise the store process fails.
You can’t create multiple copies of an AMI in the same S3 bucket.
An AMI that is stored in an S3 bucket can’t be restored with its original AMI ID. You can mitigate this by using AMI aliasing.
Currently the store and restore APIs are only supported by using the AWS Command Line Interface (AWS CLI),AWS SDKs, and Amazon EC2 API. You can’t store and restore an AMI using the Amazon EC2 console.
Clean up resources
When you have successfully deployed the server in the target Region you can delete the S3 buckets that were created for this migration. You can also terminate EC2 and delete associated EBS volumes and snapshots if you do not need them to avoid additional cost.
Conclusion
In this post, we showed you how to migrate an Amazon EC2 instances into another Region in a different account without sharing any AWS KMS keys in a secured manner.
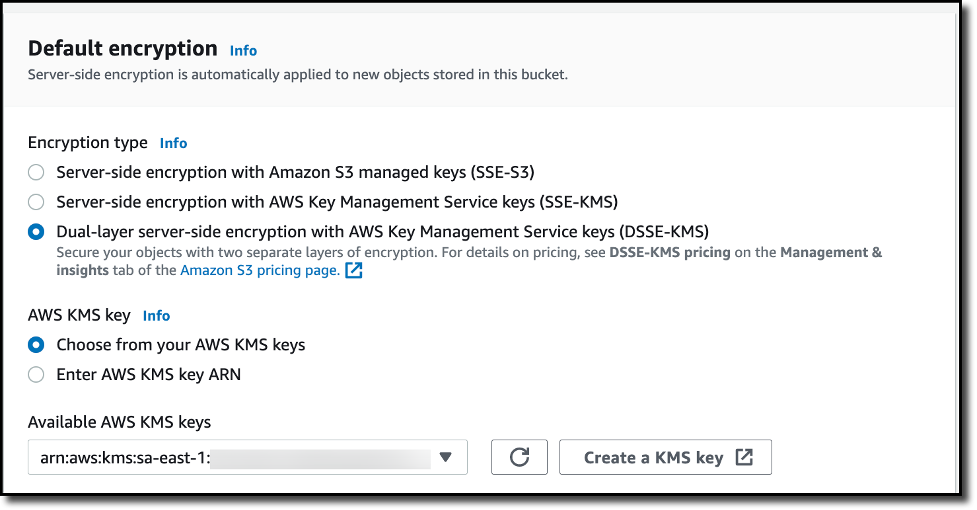
Many organizations operating in regulated industries need complete control over encryption key management. While Identity Center already encrypts data at rest using AWS-owned keys, some customers require the ability to manage their own encryption keys for audit and compliance purposes.
With this launch, you can now use customer-managed KMS keys (CMKs) to encrypt Identity Center identity data at rest. CMKs provide you with full control over the key lifecycle, including creation, rotation, and deletion. You can configure granular access controls to keys with AWS Key Management Service (AWS KMS) key policies and IAM policies, helping to ensure that only authorized principals can access your encrypted data. At launch time, the CMK must reside in the same AWS account and Region as your IAM Identity Center instance. The integration between Identity Center and KMS provides detailed AWS CloudTrail logs for auditing key usage and helps meet regulatory compliance requirements.
Identity Center supports both single-Region and multi-Region keys to match your deployment needs. While Identity Center instances can currently only be deployed in a single Region, we recommend using multi-Region AWS KMS keys unless your company policies restrict you to single-Region keys. Multi-Region keys provide consistent key material across Regions while maintaining independent key infrastructure in each Region. This gives you more flexibility in your encryption strategy and helps future-proof your deployment.
Let’s get started Let’s imagine I want to use a CMK to encrypt the identity data of my Identity Center organization instance. My organization uses Identity Center to give employees access to AWS managed applications, such as Amazon Q Business or Amazon Athena.
As of today, some AWS managed applications cannot be used with Identity Center configured with a customer managed KMS key. See AWS managed applications that you can use with Identity Center to keep you updated with the ever evolving list of compatible applications.
The high-level process requires first to create a symmetric customer managed key (CMK) in AWS KMS. The key must be configured for encrypt and decrypt operations. Next, I configure the key policies to grant access to Identity Center, AWS managed applications, administrators, and other principals who need access the Identity Center and IAM Identity Center service APIs. Depending on your usage of Identity Center, you’ll have to define different policies for the key and IAM policies for IAM principals. The service documentation has more details to help you cover the most common use cases.
This demo is in three parts. I first create a customer managed key in AWS KMS and configure it with permissions that will authorize Identity Center and AWS managed applications to use it. Second, I update the IAM policies for the principals that will use the key from another AWS account, such as AWS applications administrators. Finally, I configure Identity Center to use the key.
Part 1: Create the key and define permissions
First, let’s create a new CMK in AWS KMS.
The key must be in the same AWS Region and AWS account as the Identity Center instance. You must create the Identity Center instance and the key in the management account of your organization within AWS Organization.
I navigate to the AWS Key Management Service (AWS KMS) console in the same Region as my Identity Center instance, then I choose Create a key. This launches me into the key creation wizard.
Under Step 1–Configure key, I select the key type–either Symmetric (a single key used for both encryption and decryption) or Asymmetric (a public-private key pair for encryption/decryption and signing/verification). Identity Center requires symmetric keys for encryption at rest. I select Symmetric.
For key usage, I select Encrypt and decrypt which allows the key to be used only for encrypting and decrypting data.
Under Advanced options, I select KMS – recommended for Key material origin, so AWS KMS creates and manages the key material.
For Regionality, I choose between Single-Region or Multi-Region key. I select Multi-Region key to allow key administrators to replicate the key to other Regions. As explained already, Identity Center doesn’t require this today but it helps to future-proof your configuration. Remember that you can not transform a single-Region key to a multi-Region one after its creation (but you can change the key used by Identity Center).
Then, I choose Next to proceed with additional configuration steps, such as adding labels, defining administrative permissions, setting usage permissions, and reviewing the final configuration before creating the key.
Under Step 2–Add Labels, I enter an Alias name for my key and select Next.
In this demo, I am editing the key policy by adding policy statements using templates provided in the documentation. I skip Step 3 and Step 4 and navigate to Step 5–Edit key policy.
Identity Center requires, at the minimum, permissions allowing Identity Center and its administrators to use the key. Therefore, I add three policy statements, the first and second authorize the administrators of the service, the third one to authorize the Identity Center service itself.
I also have to add additional policy statements to allow my use case: the use of AWS managed applications. I add these two policy statements to authorize AWS managed applications and their administrators to use the KMS key. The document lists additional use cases and their respective policies.
To help protect against IAM role name changes when permission sets are recreated, use the approach described in the Custom trust policy example.
Part 2: Update IAM policies to allow use of the KMS key from another AWS account
Any IAM principal that uses the Identity Center service APIs from another AWS account, such as Identity Center delegated administrators and AWS application administrators, need an IAM policy statement that allows use of the KMS key via these APIs.
I grant permissions to access the key by creating a new policy and attaching the policy to the IAM role relevant for my use case. You can also add these statements to the existing identity-based policies of the IAM role.
Part 3: Configure IAM Identity Center to use the key
I can configure a CMK either during the enablement of an Identity Center organization instance or on an existing instance, and I can change the encryption configuration at any time by switching between CMKs or reverting to AWS-owned keys.
Please note that an incorrect configuration of KMS key permissions can disrupt Identity Center operations and access to AWS managed applications and accounts through Identity Center. Proceed carefully to this final step and ensure you have read and understood the documentation.
After I have created and configured my CMK, I can select it under Advanced configuration when enabling Identity Center.
To configure a CMK on an existing Identity Center instance using the AWS Management Console, I start by navigating to the Identity Center section of the AWS Management Console. From there, I select Settings from the navigation pane, then I select the Management tab, and select Manage encryption in the Key for encrypting IAM Identity Center data at rest section.
At any time, I can select another CMK from the same AWS Account, or switch back to an AWS-managed key.
After choosing Save, the key change process takes a few seconds to complete. All service functionalities continue uninterrupted during the transition. If, for whatever reasons, Identity Center can not access the new key, an error message will be returned and Identity Center will continue to use the current key, keeping your identity data encrypted with the mechanism it is already encrypted with.
Things to keep in mind The encryption key you create becomes a crucial component of your Identity Center. When you choose to use your own managed key to encrypt identity attributes at rest, you have to verify the following points.
Have you configured the necessary permissions to use the KMS key? Without proper permissions, enabling the CMK may fail or disrupt IAM Identity Center administration and AWS managed applications.
Have you verified that your AWS managed applications are compatible with CMK keys? For a list of compatible applications, see AWS managed applications that you can use with IAM Identity Center. Enabling CMK for Identity Center that is used by AWS managed applications incompatible with CMK will result in operational disruption for those applications. If you have incompatible applications, do not proceed.
Is your organization using AWS managed applications that require additional IAM role configuration to use the Identity Center and Identity Store APIs? For each such AWS managed application that’s already deployed, check the managed application’s User Guide for updated KMS key permissions for IAM Identity Centre usage and update them as instructed to prevent application disruption.
Pricing and availability Standard AWS KMS charges apply for key storage and API usage. Identity Center remains available at no additional cost.
This capability is now available in all AWS commercial Regions, AWS GovCloud (US), and AWS China Regions. To learn more, visit the IAM Identity Center User Guide.
We look forward to learning how you use this new capability to meet your security and compliance requirements.
Organizations face diverse challenges when it comes to managing encryption keys. While some scenarios demand strict separation, there are compelling use cases where a centralized approach can streamline operations and reduce complexity. In this post, our focus is on a software-as-a-service (SaaS) provider scenario, but the principles we discuss can be adopted by large organization facing similar key management challenges.
Managing encryption across a multi-tenant, multi-service architecture presents a significant challenge. Many organizations find themselves struggling with the complexity and costs associated with provisioning separate AWS Key Management Service (AWS KMS) customer managed keys for each tenant and service. This approach, while secure, often leads to growing operational overhead and increased AWS KMS usage costs over time.
But what if there was a more efficient way?
In this post, we unveil a strategy that uses a single customer managed key (symmetric) per tenant across services. By the end of this post, you’ll learn:
How to implement a scalable, secure, and cost-effective encryption model
Techniques for using one customer managed key per tenant across multiple services and environments
Methods for encrypting tenant data in Amazon DynamoDB and other storage types while maintaining tenant isolation
Multi-tenant encryption requirements for SaaS providers
Data isolation is fundamental to multi-tenant SaaS architectures, serving both compliance requirements and customer confidence. Many SaaS providers need to encrypt sensitive information—from API keys and credentials to personal data—across storage solutions such as DynamoDB and Amazon Simple Storage Service (Amazon S3).
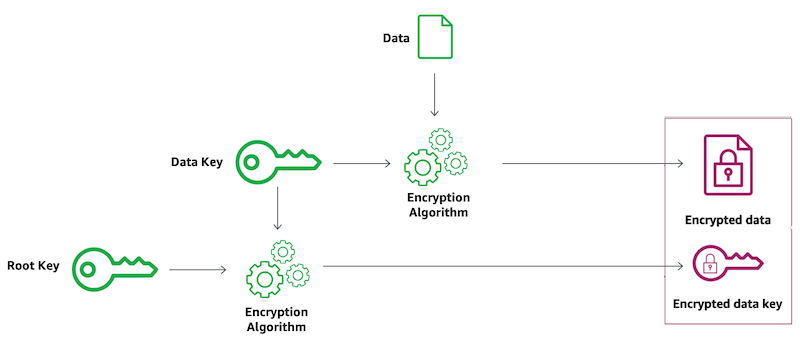
While these storage services provide default encryption at rest, they typically use a single shared key across data items. Consider DynamoDB in a shared pool model, where one table contains data from multiple tenants. In this setup, the tenant data is encrypted using the same AWS KMS Key, regardless of ownership.
KMS key represents a container for top-level key material and is uniquely defined within the KMS, for more information on the different keys involved when encrypting or decrypting data using KMS, see AWS KMS key hierarchy.
This shared-key approach often proves insufficient for SaaS providers operating under strict security and compliance frameworks. Some customers require:
Bring your own key (BYOK) capabilities
Logical isolation of their data through dedicated encryption keys
To meet these requirements, providers can implement customer-specific AWS KMS managed keys, helping to ensure that each customer’s sensitive data remains isolated and inaccessible to other tenants.
Alternatively, providers might consider a silo model with separate tables for each customer. However, this approach introduces its own challenges—as the tenant base grows, managing numerous individual tables becomes increasingly complex and service quota limits might become a constraint.
Managing growth: KMS key management at scale
When scaling a SaaS platform, empowering teams to develop services independently is crucial. A quick way to scale is to have each team develop independently using a dedicated account. This often leads to a decentralized approach where each service manages its own KMS keys per customer. However, this autonomy comes with hidden costs as your customer base and service portfolio expand.
The challenge of key proliferation
As the company grows, the number of keys multiplies with each new customer and service addition. This proliferation creates several organizational challenges:
Cost impact: A single AWS KMS key costs $1 monthly, increasing to a maximum of $3 per month with two or more key rotations.
Operational complexity: Managing many KMS keys across environments and accounts is error-prone and hard to scale.
Organizational waste: Duplicate efforts across teams because each develops and maintains their own code for managing customer key lifecycles.
Governance overhead: It becomes difficult to enforce consistent policies or track KMS key usage across multiple AWS accounts.
A streamlined approach
The solution lies in implementing a centralized key management strategy. One KMS key per tenant, maintained in a central AWS account. This approach effectively addresses the cost, operational, and governance challenges while maintaining security.
In the following sections, we explore how to implement this centralized approach and securely share KMS keys across various services and AWS accounts.
At the heart of our solution lies a centralized tenant key management service (shown as Service A in the following figure). This service handles every aspect of customer KMS key lifecycle—from creation during tenant onboarding to managing aliases, access policies and deletion.
The service achieves secure, scalable key usage across the organization through cross-account AWS Identity and Access Management (IAM) access. It grants other services (for example, the customer-facing service in Account B in the following figure) a permission to perform specific encryption operations using tenant-specific KMS keys through role delegation. This implementation follows AWS best practices for cross-account access, utilizing IAM and AWS Security Token Service (AWS STS) role assumption as described in the AWS documentation and this blog post.
Centralized key management in practice: Encrypting customer data
Let’s examine how this works in practice with a common scenario:
Service A: Our centralized tenant key management service in Account A
Service B: A customer-facing workload running in Account B
When a customer interacts with Service B, it needs to store sensitive information securely, whether that’s secrets, API keys, or license information in a DynamoDB table. Instead of relying on shared KMS keys or default encryption, Service B encrypts data using the customer’s dedicated KMS key managed by Service A. The process works through AWS Identity and Access Management (IAM) role delegation. Service B temporarily assumes a role (ServiceARole) in Account A, receiving fine-grained, scoped down permissions for the specific tenant’s KMS key. With these temporary credentials, Service B can perform client-side encryption operations on sensitive information using the AWS SDK or the AWS Encryption SDK.
In this blog post, we used Boto3. For more advanced use-cases requiring data key caching or keyrings, use the AWS Encryption SDK.
Solution walkthrough
Let’s expand the technical aspects of the solution depicted above. Assumptions and definitions:
Incoming requests include an authentication header with a JSON Web Token (JWT) that includes data identifying the current tenant’s ID. These tokens are signed by an identity provider, making sure that the JWT cannot be modified, and the tenant identity can be trusted.
Account A: Centralized key management service.
Account B: Business service that serves customer requests.
alias/customer-<tenant-id> is the format of the aliases in account A. Each alias points to the KMS key of the corresponding customer identified by value of <tenant-id>. Service A creates these aliases during tenant onboarding and deletes them during tenant offboarding.
ServiceARole: A role in Account A that can encrypt and decrypt a KMS key that has an alias prefixed with alias/customer-*. The permissions are scoped down further using session policies when ServiceBRole assumes ServiceARole.
ServiceBRole: A role in Account B that can assume ServiceARole in Account A to gain access to the customer’s KMS key. This will be the AWS Lambda function’s execution role.
Note that Service B’s compute layer in this case is a Lambda function, but the solution works for other compute architectures. Let’s go over the flow in more detail:
Use service with JWT
A customer who belongs to a tenant signs in to the SaaS solution and is given a JWT that identifies its tenants with a tenant ID (<tenant-id>). The customer makes an action in ServiceB and sends sensitive information.
ServiceB handles the request (in a Lambda function), verifies the JWT token and wants to:
Encrypt the customer’s sensitive data
Save the encrypted data along with other data in the DynamoDB table
To encrypt tenant secrets securely and at scale, we grant application roles cross-account access to KMS keys—but only through their alias, which maps to a tenant identifier present in their JWT authentication token, enforcing strong isolation.
Depending on your environment, you can add additional conditions to this trust policy to further reduce the scope of who can assume this role. For more information, see IAM and AWS STS condition context keys.
Then, each KMS customer managed key will have the following policy. For example, a KMS key for a customer with <tenant-id>: 123 will have a policy that restricts access to the key using the specific customer alias and only through ServiceRoleA.
The following is a Python code example demonstrating how Service B dynamically assumes a role in Account A to encrypt data for a specific tenant using a session-scoped IAM policy that allows access only to that tenant’s KMS key alias.
This pattern follows the same principles outlined in Isolating SaaS Tenants with Dynamically Generated IAM Policies. The idea is to generate and attach a tenant-specific IAM policy at runtime, granting the minimum required permissions to operate on tenant-owned resources—in this case, a KMS key alias. The credentials will allow the Lambda function to use only the KMS key that belongs to a customer (identified by tenant_id).
We will call the assume_role_for_tenant for every tenant.
The condition of "StringEquals" - "kms:RequestAlias": alias is the magical AWS STS sauce, it restricts ServiceB to use the current tenant’s alias in its encryption SDK calls and relies on alias authorization
import boto3
def assume_role_for_tenant(tenant_id: str):
    alias = f"alias/customer-{tenant_id}"
    # Session policy scoped to only the specific alias
    session_policy = {
        "Version": "2012-10-17",
        "Statement": [
            {
                "Effect": "Allow",
                "Action": [
                    "kms:Encrypt",
                    "kms:Decrypt",
                    "kms:GenerateDataKey*"
                ],
                "Resource": "*",
                "Condition": {
                    "StringEquals": {
                        "kms:RequestAlias": alias
                    }
                }
            }
        ]
    }
    # Assume ServiceARole in Account A with inline session policy
    sts = boto3.client("sts")
    assumed = sts.assume_role(
        RoleArn="arn:aws:iam::<ACCOUNT_A_ID>:role/ServiceARole",
        RoleSessionName=f"Tenant{tenant_id}Session",
        Policy=json.dumps(session_policy)
    )
    return assumed["Credentials"]
Encrypt data and save in DynamoDB
Now, what remains to do is use the assumed role credentials and use AWS SDK to encrypt the sensitive customer data and store it in the DynamoDB table.
# Use temporary credentials to create a KMS client
    creds = assume_role_for_tenant(tenant_id, plaintext)
    kms = boto3.client(
        "kms",
        region_name="us-east-1",
        aws_access_key_id=creds["AccessKeyId"],
        aws_secret_access_key=creds["SecretAccessKey"],
        aws_session_token=creds["SessionToken"]
    )
    # Encrypt using the alias
    response = kms.encrypt(
        KeyId= f"alias/customer-{tenant_id}"
        Plaintext=plaintext
    )
    # store response["CiphertextBlob"] in DynamoDB table
This post doesn’t address isolation between different services, only between tenants. If such service isolation is required, you can use encryption context, an optional set of non-secret key/value pairs that can contain additional contextual information about the data, for example the service identifier. This helps ensure that services can only encrypt or decrypt data using the relevant service encryption context.
Benefits of centralized key management
Let’s examine how this solution addresses our earlier challenges.
Tenant isolation by design
Despite reducing the total number of KMS keys, we maintain strict tenant isolation. Each customer’s sensitive data remains encrypted with their dedicated key, identified by a unique alias (alias/customer-<tenant-id>). Access control to the tenant key is tightly managed through IAM role delegation, following least privilege principles:
Service A exclusively controls the management of the tenants’ KMS keys.
Service B can only assume a role that grants restricted encrypt, decrypt, and GenerateDataKey access for the customer managed key designated by the alias: alias/customer-<tenant-id>.
Optimized cost management
Our approach significantly reduces costs by moving from multiple service-specific KMS keys per tenant to a single KMS key per tenant that is shared securely across services and environments. This behavior introduces a new centralized account (Account A) that provides access to encryption keys under the right circumstances. It is important to understand AWS STS limits, specifically for AssumeRole calls and consider temporary IAM credentials caching mechanisms if those limits become a bottleneck. Additionally, if KMS limits are a bottleneck, consider using data key caching by using the AWS Encryption SDK.
Streamlined operations and governance
By centralizing key management in Service A, you can achieve:
Consistent KMS key lifecycle management across the organization
Improved audit capabilities using AWS CloudTrail to better understand key access patterns by service
Reduced operational overhead
Simplified compliance monitoring
The only additional complexity is the initial cross-account role delegation setup between Service A and other services. After being established, this framework can be scaled to accommodate new tenants and services.
It’s best to encapsulate the assume-role logic, policy generation, and AWS SDK client initialization within a shared organization-wide SDK. This abstraction reduces cognitive load for developers and minimizes the risk of misconfigurations. You can take it a step further by exposing high-level utility functions such as encrypt_tenant_data() and decrypt_tenant_data(), hiding the underlying complexity while promoting secure and consistent usage patterns across teams.
Conclusion
In this post, we explored an efficient approach to managing encryption keys in a multi-tenant SaaS environment through centralization. We examined common challenges faced by growing SaaS providers, including key proliferation, rising costs, and operational complexity across multiple AWS accounts and services. The solution, centralizing key management, uses AWS best practices for IAM role delegation and cross-account access, enabling organizations to maintain security and compliance while reducing operational overhead. By implementing this approach, SaaS providers or large organizations facing similar challenges can effectively manage their encryption infrastructure as they scale, without compromising on security or increasing complexity.
As the capabilities of quantum computing evolve, AWS is committed to helping our customers stay ahead of emerging threats to public-key cryptography. Today, we’re announcing the integration of FIPS 204: Module-Lattice-Based Digital Signature Standard (ML-DSA) into AWS Key Management Service (AWS KMS). Customers can now create and use ML-DSA keys through the same familiar AWS KMS APIs they use today for digital signatures, including CreateKey, Sign, and Verify operations. This new feature is generally available and you can use ML-DSA in the following AWS Regions: US West (N. California), and Europe (Milan) with the remaining commercial Regions to follow in the coming days. This launch is part of our broader AWS post-quantum cryptography migration plan, which we covered in our recent blog post. In this post, we guide you through creating ML-DSA keys and post-quantum signatures with AWS KMS.
Many organizations use AWS KMS to cryptographically sign firmware, operating systems, applications, or other artifacts. With ML-DSA support in AWS KMS, you can now generate and use post-quantum keys for signing operations within FIPS-140-3 Level 3 certified HSMs. By implementing ML-DSA signatures now, you can help make sure that your systems remain secure throughout their operational lifetime, even if cryptographically relevant quantum computers become available. This is especially important for manufacturers who install long-lived roots of trust during production—whether embedded directly in hardware or in devices that might remain offline for extended periods. In both cases, cryptographic signatures cannot be easily updated after deployment, making post-quantum readiness critical for the entire operational lifetime of these systems.
What’s new
AWS KMS offers three new AWS KMS key specs: ML_DSA_44, ML_DSA_65, and ML_DSA_87, which you can use with the new post-quantum SigningAlgorithmML_DSA_SHAKE_256. Like our other signing algorithms, this name includes the hash function that’s used within the signature scheme to digest messages before signing or verification. In this case, the hash function used is SHAKE256—part of the SHA-3 family of hash functions standardized by NIST in FIPS 202.
Table 1 shows the details for each key spec, including their NIST security categories and corresponding key sizes in bytes. Each ML-DSA key spec represents a balance between security strength and resource requirements. ML-DSA-44 is suitable for applications requiring security comparable to classical 128-bit encryption, while ML-DSA-65 and ML-DSA-87 provide progressively stronger security levels equivalent to classical 192-bit and 256-bit encryption, respectively. As you move up in security levels, you’ll notice corresponding increases in key and signature sizes, enabling you to choose the key spec that best matches your security needs and engineering constraints.
Key spec
NIST security Level
Public key (B)
Private key (B)
Signature (B)
ML_DSA_44
1 (equivalent to 128-bit security)
1312
2560
2420
ML_DSA_65
3 (equivalent to 192-bit security)
1952
4032
3309
ML_DSA_87
5 (equivalent to 256-bit security)
2592
4896
4627
When using the AWS KMS Sign API with a RAW MessageType, the message to be signed is limited to 4096 bytes. For messages larger than 4096 bytes, pre-processing the message outside of AWS KMS to create what’s known as µ (mu) is required to generate a smaller-sized message input to the KMS Sign API. This external mu process pre-digests the message using the public key of the ML-DSA signing key pair to create a message size of 64 bytes. To support this launch, we’ve added a new message type in the KMS Sign API—EXTERNAL_MU—that can be used with ML-DSA signing or verification calls to indicate when a message has been pre-processed using µ (mu) before submitted to AWS KMS.
In the following sections, we include more information about constructing external mu and demonstrate basic AWS KMS operations with ML-DSA. We cover key creation, signature generation and verification, and both RAW and EXTERNAL_MU signing modes. Note that the produced RAW or EXTERNAL_MU ML-DSA signatures are identical when the same message and signing key are used.
Make note of the KeyId or Arn value from the response; you’ll need this to reference your key in subsequent signing operations. The response confirms that the creation of an ML_DSA_65 key configured for SIGN_VERIFY operations, which will use the ML_DSA_SHAKE_256 signing algorithm for signature operations.
Signing
In this section, we include some examples of ML-DSA signing and verifying a JSON Web Token (JWT) commonly used to transfer claims between parties for web authorization. In 2021, we described how to sign and verify JWTs with Elliptic Curve Digital Signature Algorithm (ECDSA), a classic asymmetric cryptographic algorithm (see How to verify AWS KMS signatures in decoupled architectures at scale). In the following examples, the token is instead signed with an ML-DSA private key managed by AWS KMS and verified either within AWS KMS or externally using OpenSSL.
The JWT content to be signed is from section 3.1 of RFC7519. More specifically, the JWT header is:
Note that the following examples output the ML-DSA signature produced on the message by using the ML-DSA private key managed by AWS KMS in a binary format. You need to convert them to Base64URL to use them in JWT, but various data encryption and signing formats can use these signatures. These include Cryptographic Message Syntax (CMS), CBOR Object Signing and Encryption (COSE), or image signing encodings for UEFI and Open Titan. While converting between binary and these formats is straightforward, support for the new algorithms might not be available in common cryptographic implementations of these signing formats at the time of this writing.
RAW ML-DSA signing (no external mu)
To sign a message of less than 4096 bytes in AWS KMS with ML-DSA, you can use the AWS CLI:aws kms sign \
Make sure to replace the target-key-id value of <1234abcd-12ab-34cd-56ef-1234567890ab> with your KeyId. This command will produce a signature and write it to disk as ExampleSignature.bin.
After producing the signature, you can create the complete JWT (consisting of header, payload, and signature) with a single command:
This command will output a ready-to-use JWT in the format required by RFC 7519 and signed using AWS KMS:
eyJ0eXAiOiJKV1QiLA0KICJhbGciOiJNTC1EU0EtNjUifQ.eyJpc3MiOiJqb2UiLA0KICJleHAiOjE3NDg5NTIwMDAsDQogImh0dHA6Ly9leGFtcGxlLmNvbS9pc19yb290Ijp0cnVlfQ.<base64url of the signature as per RFC7519>
External mu ML-DSA signing
Note that AWS KMS imposes a 4096-byte limit on the size of the raw message when using the Sign API to minimize the latency of the response. In cases where the message to be signed is larger than 4096 bytes or if pre-digesting the external mu has performance advantages you need, you must use the EXTERNAL_MU message type instead of RAW in AWS KMS.
Before using the EXTERNAL_MU message type with the AWS KMS Sign API, you must locally perform a pre-hash calculation on your message. So, first, retrieve the public key from AWS KMS, and convert it to DER format using the following command (replace the example key ID with a valid key ID from your AWS account):
In this example, set the domain separator value and context length as zero; this sets the context used in the signature as the empty string, which is the default.
Hash the public key then prepend it to the message prefix: (SHAKE256(pk) || M’).
Hash to produce a 64-byte mu: Mu = SHAKE256(SHAKE256(pk) || M’)
You can use a single OpenSSL 3.5 command to construct the digest:
Now you can call AWS KMS to sign the 64-byte digest to produce the ML-DSA signature in file ExampleSignature.bin, making sure to set the MessageType to EXTERNAL_MU:
The final signed JWT token is identical to the one produced previously in RAW mode.
Signature verification using AWS KMS
In this section, we show you how to verify ML-DSA signatures using AWS KMS or locally in your own environment. We assume that you have an ML-DSA signature in ExampleSignature.bin, produced on the JWT content with the private key in AWS KMS and identified with KEY_ARN.
Note that, although the following examples demonstrate signature verification using public keys directly from AWS KMS, these same principles extend to certificate-based systems, such as a private PKI, in which public keys are embedded in end-entity certificates (of the signer). In such scenarios, verifiers would first verify the identity of the signer by validating the certificate chain ties to a trusted root, then use the public key of the end-entity certificate to verify the ML-DSA signature of the content. The IETF is standardizing ML-DSA for use in X.509 certificates through RFC draft draft-ietf-lamps-dilithium-certificates.
RAW ML-DSA verification
To verify the signature using AWS KMS, you can call the following command, replacing the example key-id with the same one you used to sign.
The verification result is stored in the SignatureValid field.
External mu ML-DSA verification
If you have the external mu digest of the JWT content in mu.bin along with the signature and the corresponding keypair in AWS KMS, you can use the digest without having access to the entire message or calculating the digest again.
If you want to reduce AWS KMS API consumption costs and better control the use of API quotas while keeping the security of AWS KMS-generated and stored keys for ML-DSA signature generation, you can verify ML-DSA signatures locally, outside of AWS KMS.
In this example, you use OpenSSL 3.5 to verify the signature in ExampleSignature.bin. You first must fetch the DER-encoded public key from AWS KMS in file public_key.der as shown in the External mu ML DSA signing section. OpenSSL 3.5 can then verify the signature on the message by using the public key.
Today’s launch of ML-DSA support in AWS KMS marks an important milestone in our commitment to post-quantum cryptography. With three different security levels of ML-DSA in both raw and external digest modes, you have flexible options to meet your security requirements while preparing for the quantum computing era. The seamless integration with existing AWS KMS APIs makes it straightforward to incorporate quantum-resistant signatures into your applications today. This implementation is particularly valuable if you need to:
Meet FIPS 140-3 compliance requirements when using post-quantum cryptography.
Sign code, artifacts, documents or other data that need to remain trusted and verifiable for many years into the future, including the period after cryptographically relevant quantum computers exist.
Start post-quantum cryptography testing as part of your application development process using a cryptographic service such as AWS KMS that has previously been approved for use.
Today, we’re announcing support for on-demand rotation of symmetric encryption AWS Key Management Service (AWS KMS) keys with imported key material (EXTERNAL origin). This new capability enables you to rotate the cryptographic key material of these keys without changing the key identifier (key ID or Amazon Resource Name (ARN)). Rotating keys helps you meet compliance requirements and security best practices that mandate periodic key rotation.
AWS KMS has long supported automatic key rotation for AWS KMS keys whose key material is generated by AWS KMS (AWS_KMS origin). Until now, AWS KMS customers who imported their own key material could not rotate that material without creating a new KMS key. This process called manual rotation required updating references to the older key identifiers. With today’s launch, the key ID of the imported key remains unchanged after rotation, so existing workloads are not disrupted. In this post, we tell you how the new capability works, look at key material expiry and deletion features unique to imported keys, and review pricing for this new feature.
How it works
When you create an AWS KMS key with EXTERNAL origin, AWS KMS assigns a fixed identifier to the key called the key ID. However, AWS KMS doesn’t generate key material for the cryptographic operations. You must import your own key material using the ImportKeyMaterial operation.
When you import key material, AWS KMS computes a unique key material identifier based on the key ID and the key material. Even if you import the same key material in different keys, AWS KMS will assign distinct key material identifiers. This computation uses a cryptographic hash so the key material identifier doesn’t reveal information about the key material itself. AWS KMS embeds this key material identifier in the ciphertext blob produced by symmetric encryption.
Until now, after you imported key material into an AWS KMS key, you could not import additional key material into that key to rotate the key. With this new feature launch, you can associate multiple imported key materials with a single, symmetric-encryption key. You can use the RotateKeyOnDemand operation to make the most recently imported key material the current key material. AWS KMS uses the current key material to generate new ciphertext. Unless deleted or expired, the other key materials remain available for decryption. When you present ciphertext for decryption, AWS KMS automatically selects the correct key material using the key material identifier embedded in the ciphertext.
To help improve the auditability that keys have rotated, we’ve added new identifiers in KMS API responses for the specific key material used. The KeyMaterialId is a new field that AWS KMS will return in addition to the KeyId. Similarly, the DescribeKey response for these keys now displays the identifier of the current key material as CurrentKeyMaterialId. The inclusion of the KeyMaterialId and CurrentKeyMaterialId in API responses makes key rotation more transparent.
Before we dive into the details, the following is an outline of the overall process to rotate an imported key:
Create a symmetric encryption KMS key with EXTERNAL origin
Import key material into the key using GetParametersForImport and ImportKeyMaterial APIs. The first key material becomes usable immediately. This part is unchanged and maintains backwards compatibility with the current behavior of AWS KMS.
Use the key to create ciphertext and decrypt it. You’ll notice the key material ID matches the CurrentKeyMaterialId displayed in the DescribeKey response.
When you want to rotate this key, import a second key material into the key. The ImportKeyMaterial API now has a new ImportType input parameter which lets you inform AWS KMS whether you are associating new key material with a key (--import-type NEW_KEY_MATERIAL) or re-importing previously associated key material (--import-type EXISTING_KEY_MATERIAL).
Use ListKeyRotations with --include-key-material ALL_KEY_MATERIAL to view both key materials. The key material state of the second key material will be PENDING_ROTATION.
Use the RotateKeyOnDemand operation to initiate on-demand key rotation.
Optionally, you can use the GetKeyRotationStatus operation to monitor the in-progress rotation. The response will contain OnDemandRotationStartDate only while the rotation is in progress.
Use ListKeyRotations with --include-key-material ALL_KEY_MATERIAL after rotation completes to view key materials associated with this key. The KeyMaterialState of the new key material you imported will change from PENDING_ROTATION to CURRENT. The key material state of the first key material will change from CURRENT to NON_CURRENT.
Use the key to create ciphertext and decrypt it. You’ll notice the CurrentKeyMaterialId is used for creating ciphertext, but the key material used for decryption is automatically determined by AWS KMS.
Using the AWS CLI for rotating an imported key
The following is a sample sequence of AWS KMS commands to exercise the import key rotation functionality using the AWS Command Line Interface (AWS CLI). The specific commands that follow work in Linux or MacOS environments and might need to be modified for use in a Windows environment. This functionality can also be exercised through the AWS SDKs. These operations, except for wrapping a key material for import, generate-data-key, and decrypt can be initiated in the AWS Management Console.
Step 1: Create a key and import key material
This section should be familiar to anyone who has used the existing import key functionality in AWS KMS.
Create a symmetric encryption key with EXTERNAL origin and save the key ARN. The initial state of this key is PendingImport.
Generate a 256-bit (32-byte) key material to be imported. In the following command, we use OpenSSL to generate the imported key material.
openssl rand 32 > "KeyMaterial1.bin"
Use the get-parameters-for-import command to create the wrapping key and import token and save them to files. AWS KMS supports multiple wrapping algorithms; we use RSAES_OAEP_SHA_256 with a 4096-bit RSA key in the following example. The value of the ImportToken and PublicKey fields in the response has been trimmed for brevity.
Wrap the key material using the wrapping key. We use OpenSSL, a popular open source cryptographic library to illustrate this step. For a detailed explanation of this step, see the AWS KMS Developer Guide.
Import the key material. Optionally, you can assign a key material description. The description can be used to keep track of where the key material is durably maintained outside AWS KMS. This key material description is displayed alongside other information for this key material in the console and the ListKeyRotations API response. We also capture the key material ID from the response. In this example, the key material doesn’t expire. Optionally, you can set an expiration time.
The key is now be enabled for use in cryptographic operations and the CurrentKeyMaterialId in the DescribeKey response should match ${KEY_MATERIAL1_ID}
Use ListKeyRotations to view key materials associated with the key. There should only be one key material with the same ID as in ${KEY_MATERIAL1_ID} and with a key material state of CURRENT.
Step 2: Use the first key material to create and decrypt ciphertext
This step demonstrates how to verify the key material ID of your imported key in cryptographic operations.
Use the GenerateDataKey operation and capture the ciphertext. This operation returns a data key in both plaintext and ciphertext form. The KeyMaterialId in the response matches the identifier for the first key material.
Decrypt the ciphertext and compare it to the plaintext key. The KeyMaterialId in the response matches the identifier for the first key material. The plaintext in decrypt response matches the plaintext data key in the GenerateDataKey response.
Step 3: Import a second key material into the key for on-demand rotation
Import key rotations start with importing new key material into this key.
Generate a second key material (also 256 bits in length).
openssl rand 32 > "KeyMaterial2.bin"
Use the get-parameters-for-import command to create the wrapping key and import token for the second key material to be imported. The value of the ImportToken and PublicKey fields in the response has been trimmed for brevity.
Import the second key material. Optionally, you can assign a key material description. We also capture the key material ID from the response. In this example, the key material doesn’t expire. Optionally, you can set an expiration time.
Note: This call will fail if you omit the import-type parameter or set it to EXISTING_KEY_MATERIAL. Specifying import-type as NEW_KEY_MATERIAL allows the API caller to associate additional key material with the imported key.
Use ListKeyRotations to view key materials associated with the key. There should now be two key materials. The key material state of the second key material should be PENDING_ROTATION.
Step 4: Use on-demand rotation to update the current key material
This step moves the current key material for this key to the newly imported key material.
Use the RotateKeyOnDemand operation to initiate an on-demand key rotation. If the key material in PENDING_ROTATION state is deleted or expires before initiating on-demand rotation, this operation will fail.
AWS KMS uses a background worker to perform the rotation, so there’s a delay between initiating the on-demand key rotation and its completion. Use the GetKeyRotationStatus command to monitor the rotation status. Until the rotation is completed, the GetKeyRotationStatus response will include the OnDemandRotationStartDate field. When this field disappears, the on-demand key rotation is complete.
Rotation changes the current key material, which is reflected in the CurrentKeymaterialId field in the DescribeKey response. It should now match ${KEY_MATERIAL2_ID}.
Step 5: Use the second key material to create and decrypt ciphertext
Similar to Step 2, this step demonstrates how to verify that the key material ID of your imported key in cryptographic operations has been rotated.
Use the GenerateDataKey operation and capture the ciphertext. This operation returns a data key in both plaintext and ciphertext forms. Note that the KeyMaterialId returned in the response matches the identifier of the second key material.
Decrypt the ciphertext and compare it to the plaintext key. The KeyMaterialId returned in the response matches the identifier of the second key material. The plaintext in decrypt response matches the plaintext data key in the previous GenerateDataKey response.
AWS KMS automatically uses the correct key material based on the ciphertext. When you decrypt the ciphertext produced in Step 2, AWS KMS uses the first key material.
Step 6: Delete key material, make the key unusable
With the launch of this feature, the DeleteImportedKeyMaterial operation takes an optional KeyMaterialId parameter. If no KeyMaterialId is specified, AWS KMS deletes the current key material. This maintains backwards compatibility with existing behavior.
Delete the first imported key material by specifying its identifier.
Cryptographic operations fail with a KMSInvalidStateException when a key is in PendingImport state even though the key material required to decrypt the specific ciphertext blob is imported into AWS KMS.
aws kms decrypt --ciphertext-blob "${KEY1_CIPHERTEXT_BLOB2}"

An error occurred (KMSInvalidStateException) when calling the Decrypt operation: arn:aws:kms:us-east-1:111122223333:key/97c8e55d-5b04-45a1-8a01-1febde0dd041 is pending import.
Step 7: Reimport key material to enable the key
You need to re-import all expired or deleted key materials associated with a key for the key to become usable again.
Re-import the missing key material. For this example, we reused the wrapped key and import token we already have. This is an optimization. Optionally, you can get new parameters for wrapping and importing the key material.
AWS CloudTrail now includes the key material ID in the additionalEventData field for operations using symmetric-encryption keys (both AWS_KMS and EXTERNAL origin). The following is a sample CloudTrail event for the AWS KMS decrypt operation:
Key expiry and key deletion capabilities unique to imported keys
Unlike standard KMS keys that you create within AWS KMS, imported keys offer two unique capabilities for enhanced controls over key material within AWS.
When importing key material into a KMS key, you can optionally set an expiration date and time, up to 365 days from the import date. If you don’t specify an expiration, the key material doesn’t expire. When the expiration time is reached, AWS KMS immediately deletes the key material and the KMS key becomes unusable. This is in contrast to the 7–30 day waiting period required for KMS keys whose key material is generated by AWS KMS. To re-enable the key, you must reimport the key material. With key rotation, you can continue to set expiration periods for new key material that you import.
Unique to KMS imported keys, you can also delete specific key material without deleting the entire KMS key. Deleting the key material of a KMS imported key is temporary and reversible. To restore the key, reimport its key material.
Key expiry and import key material deletion can be useful if you need to demonstrate immediate key suspension in the cloud or when you want to temporarily seed AWS KMS with key material that can be inserted and repeatedly removed from cloud access (hydration and re-hydration of keys for improved digital sovereignty).
Special considerations
AWS KMS is designed to keep imported key material highly available. But AWS KMS doesn’t maintain the durability of imported key material at the same level as key material that AWS KMS generates. You must retain a copy of the imported key material outside of AWS KMS in a system that you control. We recommend that you store an exportable copy of the imported key material in a key management system, such as an HSM. As a best practice, you should store a reference to the KMS key ARN and key material description alongside the exportable copy of the key material.
The deletion or expiration of any key material associated with a KMS key makes that key unusable. You must re-import all the key materials associated with a key before it can be used for cryptographic operations.
The following types of KMS keys with imported key material do not support on-demand key rotation, but you can continue to use manual rotation with these keys.
Asymmetric keys
HMAC keys
Multi-AWS Region keys
Features and benefits
This new capability includes several important features:
Maintain key identifiers: Rotate key material while keeping the same AWS KMS key ID and ARN.
Flexible rotation: Rotate keys on-demand to meet your security requirements or use an external key manager to set a rotation schedule that can drive new key rotations into AWS KMS.
Audit trail: Track key material usage through CloudTrail logs.
Metadata management: Add unique descriptions to each key material version.
Retains support for key expiry and import key deletion (features unique to KMS imported keys)
Pricing
For AWS KMS keys that rotate automatically or on-demand, each key incurs a base cost, and the first two rotations add $1 per month (prorated hourly) in additional charges. The pricing is capped after the second rotation, meaning subsequent rotations beyond the second one aren’t billed. This simplified pricing provides you with more predictable costs while maintaining the flexibility to rotate keys frequently to meet your compliance and security audit requirements.
Getting started
You can start using this feature today in all AWS Regions where AWS KMS is available. To learn more, visit the AWS KMS Developer Guide.
We’re excited to see how you use this new capability to enhance your key management practices. Leave a comment below or on the AWS re:Post community forum to let us know what you think.
These three services were chosen because they are security-critical AWS services with the most urgent need for post-quantum confidentiality. These three AWS services have previously deployed support for CRYSTALS-Kyber, the predecessor of ML-KEM. Support for CRYSTALS-Kyber will continue through 2025, but will be removed across all AWS service endpoints in 2026 in favor of ML-KEM.
Our migration to post-quantum cryptography
AWS is committed to following our post-quantum cryptography migration plan. As part of this commitment, and part of the AWS post-quantum shared responsibility model, AWS plans to deploy support for ML-KEM to all AWS services with HTTPS endpoints over the coming years. AWS customers must update their TLS clients and SDKs to offer ML-KEM when connecting to AWS service HTTPS endpoints. This will protect against future harvest now, decrypt later threats posed by quantum computing advancements. Meanwhile, AWS service HTTPS endpoints will be responsible for selecting ML-KEM when offered by clients.
The effect of hybrid post-quantum ML-KEM on TLS performance
Migrating from an Elliptic Curve Diffie-Hellman (ECDH)-only key agreement to an ECDH+ML-KEM hybrid key agreement necessarily requires that the TLS handshake send more data and perform more cryptographic operations. Switching from a classical to a hybrid post-quantum key agreement will transfer approximately 1600 additional bytes during the TLS handshake and will require approximately 80–150 microseconds more compute time to perform ML-KEM cryptographic operations. This is a one-time TLS connection startup cost and is amortized over the lifetime of the TLS connection across the HTTP requests sent over that connection.
AWS is working to provide a smooth migration to hybrid post-quantum key agreement for TLS. This work includes performing benchmarks on example workloads to help customers understand the impact of enabling hybrid post-quantum key agreement with ML-KEM.
Using the AWS SDK for Java v2, AWS has measured the number of AWS KMS GenerateDataKey requests per second that a single thread can issue serially between an Amazon Elastic Compute Cloud (Amazon EC2) C6in.metal client and the public AWS KMS endpoint. Both the client and server were in the us-west-2 Region. Classical TLS connections to AWS KMS negotiated the P256 elliptic curve for key agreement, and hybrid post-quantum TLS connections negotiated the X25519 elliptic curve with ML-KEM-768 for their hybrid key agreement. Your own performance characteristics might differ and will depend on your environment, including your instance type, your workload profiles, the amount of parallelism and number of threads used, and your network location and capacity. The HTTP request transaction rates were measured with TLS connection reuse both enabled and disabled.
Figure 1 shows the number of requests per second issued at different percentiles when TLS 1.3 connection reuse is disabled. It shows that in the worst-case scenario—when the cost of a TLS handshake is never amortized and every HTTP request must perform a full TLS handshake—enabling hybrid post-quantum TLS decreases the transactions per second (TPS) by about 2.3 percent on average, from 108.7 TPS to 106.2 TPS.
Figure 1: AWS KMS GenerateDataKey requests per second without TLS connection reuse
Figure 2 shows the number of requests per second issued at different percentiles when TLS connection reuse is enabled. Reusing TLS connections and amortizing the cost of a TLS handshake over many HTTP requests is the default setting in the AWS SDK for Java v2. We show that enabling hybrid post-quantum TLS when using default SDK settings leaves the TPS rate almost unchanged, with only a 0.05 percent decrease on average, from 216.1 TPS to 216.0 TPS.
Figure 2: AWS KMS GenerateDataKey requests per second with TLS connection reuse
Our results show that the performance impact of enabling hybrid post-quantum TLS is negligible when using typical configuration settings in your SDK. Our measurements show that enabling hybrid post-quantum TLS for a default-case example workload only lowered maximum TPS rate by 0.05 percent. Our results also show that overriding SDK defaults to force the worst-case scenario of performing a new TLS handshake for every request only decreased maximum TPS rate by 2.3 percent.
The following table shows the benchmark data that we measured. Each benchmark performed 500 one-second TPS measurements for varying TLS key agreement settings and TLS connection reuse settings. The measurements used v2.30.22 of the AWS SDK for Java v2. The TLS key agreement was switched between classical and hybrid post-quantum by toggling the postQuantumTlsEnabled() configuration. TLS connection reuse was toggled by injecting a Connection: close HTTP header into each HTTP request. This header forces the TLS connection to be shut down after each HTTP request and requires that a new TLS connection be created for each HTTP request.
TLS key agreement
TLS conn resuse
Total HTTP requests
Average (TPS)
p01 (TPS)
p10 (TPS)
p25 (TPS)
p50 (TPS)
p75 (TPS)
p90 (TPS)
p99 (TPS)
Classical (P256)
No
54,367
108.7
78
86
96
102
129
137
145
Hybrid post-quantum (X25519MLKEM768)
No
53,106
106.2
76
85
93
100
126
134
141
Classical (P256)
Yes
108,052
216.1
181
194
200
216
233
240
245
Hybrid post-quantum (X25519MLKEM768)
Yes
107,994
216
177
194
200
216
233
239
245
Removing support for draft post-quantum standards
AWS service endpoints with support for CRYSTALS-Kyber, the predecessor of ML-KEM, will continue to support CRYSTALS-Kyber through 2025. We will slowly phase out support for the pre-standard CRYSTALS-Kyber implementations after customers have moved to the ML-KEM standard. Customers using previous versions of the AWS SDK for Java with CRYSTALS-Kyber support should upgrade to the latest SDK versions that have ML-KEM support. No code changes are necessary for customers using a generally available release of the AWS SDK for Java v2 to upgrade from CRYSTALS-Kyber to ML-KEM.
Customers currently negotiating CRYSTALS-Kyber who do not upgrade their AWS Java SDK v2 clients by 2026 will see their clients gracefully fall back to a classical key agreement once CRYSTALS-Kyber is removed from AWS service HTTPS endpoints.
How to use hybrid post-quantum key agreement
If using the AWS SDK for Rust, you can enable the hybrid post-quantum key agreement by adding the rustls package to your crate and enabling the prefer-post-quantum feature flag. See the rustls documentation for more information.
If using the AWS SDK for Java 2.x, you can enable hybrid post-quantum key agreement by calling .postQuantumTlsEnabled(true) when building your AWS Common Runtime HTTP client.
Step 1: Add the AWS Common Runtime HTTP client to your Java dependencies.
Add the AWS Common Runtime HTTP client to your Maven dependencies. We recommend using the latest available version. Use version 2.30.22 or greater to enable the use of ML-KEM.
Step 2: Enable post-quantum TLS in your Java SDK client configuration
When configuring your AWS service client, use the AwsCrtAsyncHttpClient configured with post-quantum TLS.
// Configure an AWS Common Runtime HTTP client with Post-Quantum TLS enabled
SdkAsyncHttpClient awsCrtHttpClient = AwsCrtAsyncHttpClient.builder()
          .postQuantumTlsEnabled(true)
          .build();

// Create an AWS service client that uses the AWS Common Runtime client
KmsAsyncClient kmsAsync = KmsAsyncClient.builder()
         .httpClient(awsCrtHttpClient)
         .build();

// Make a request over a TLS connection that uses post-quantum key agreement
ListKeysReponse keys = kmsAsync.listKeys().get();
Here are some ideas about how to use this post-quantum-enabled client:
Run load tests and benchmarks. The AwsCrtAsyncHttpClient is heavily optimized for performance and uses AWS Libcrypto on Linux-based environments. If you aren’t already using the AwsCrtAsyncHttpClient, try it today to see the performance benefits compared to the default SDK HTTP client. After using AwsCrtAsyncHttpClient, enable post-quantum TLS support. See if using AwsCrtAsyncHttpClient with post-quantum TLS is an overall performance gain to using the default SDK HTTP client without post-quantum TLS.
Try connecting from different network locations. Depending on the network path that your request takes, you might discover that intermediate hosts, proxies, or firewalls with deep packet inspection (DPI) block the request. If this is the case, you might need to work with your security team or IT administrators to update firewalls in your network to unblock these new TLS algorithms. We want to hear from you about how your infrastructure interacts with this new variant of TLS traffic.
Conclusion
Support for ML-KEM-based hybrid key agreement has been deployed to three security-critical AWS service endpoints. The performance impact of enabling hybrid post-quantum TLS is likely to be negligible when TLS connection reuse is enabled. Our measurements showed only a 0.05 percent decrease to maximum transactions per second when calling AWS KMS GenerateDataKey.
Starting with version 2.30.22, the AWS SDK for Java v2 now supports ML-KEM-based hybrid key agreement on Linux-based platforms when using the AWS Common Runtime HTTP client. Try enabling post quantum key agreement for TLS in your Java SDK client configuration today.
AWS plans to deploy support for ML-KEM-based hybrid post-quantum key agreement to every AWS service HTTPS endpoint over the coming years as part of our post-quantum cryptography migration plan. AWS customers will be responsible for updating their TLS clients and SDKs to help ensure that ML-KEM key agreement is offered when connecting to AWS service HTTPS endpoints. This will protect against future harvest now, decrypt later threats posed by quantum computing advancements.
For additional information, blog posts, and periodic updates on our post-quantum cryptography migration, keep watching the AWS Post-Quantum Cryptography page. To learn more about post-quantum cryptography with AWS, contact the post-quantum cryptography team.
AWS Key Management Service (AWS KMS) is pleased to launch key-level filtering for AWS KMS API usage in Amazon CloudWatch metrics, providing enhanced visibility to help customers improve their operational efficiency and aid in security and compliance risk management.
AWS KMS currently publishes account-level AWS KMS API usage metrics to Amazon CloudWatch, enabling you to monitor and manage your API usage. However, if you’re using numerous KMS keys, pinpointing the ones with the highest request rate quota usage or significant API costs becomes challenging. For example, if you have more than 10 active KMS keys in your account, prior to this launch you would have needed to build a custom CloudTrail and Amazon Athena based solution to locate which specific keys are driving the majority of API usage and costs. With the new CloudWatch metrics, which are available under the AWS/KMS namespace in CloudWatch, you can track, understand, and set alerts on detailed API usage at the individual KMS key level without building a costly customized solution.
This blog post explores several use cases to help you better take advantage of these newly introduced CloudWatch metrics to manage your AWS KMS API usage and costs. The use cases cover viewing and understanding your API usage at the key level, and creating CloudWatch alerts to detect unintentional runaway usage.
Overview of new CloudWatch metrics for KMS keys
With CloudWatch metrics for KMS keys, you can now do the following:
View the API usage for a specific KMS key, filtered by individual API operations (for example, Encrypt, Decrypt, or GenerateDataKey).
See the aggregated usage across cryptographic operations for a given KMS key.
Set up an alarm if a specific KMS key exceeds a specified threshold on a single API operation, or a set of API operations.
This streamlined approach allows you to quickly monitor, understand, and troubleshoot the API usage patterns of your KMS keys, without the overhead of the previous multi-step process. Let’s detail how these key-level API usage metrics can be used in two real-world examples.
Example 1: How to locate the KMS keys that consume the most API usage quota or contribute the most API charges
When you surpass your AWS KMS API request rate quotas, you can view your AWS KMS API utilization within the Service Quotas console. However, you might still find it cumbersome to identify the KMS keys that consume the largest amount of your request quota. When you receive the AWS KMS API charges that exceed your expectation, you can check the detailed billing usage in each AWS Region in Cost Explorer, but you cannot easily locate the KMS keys with the most API charges. This process becomes even more challenging when you manage a large number of KMS keys.
With the key-level API usage CloudWatch metrics, you can use the advanced metric query option to query CloudWatch Metrics Insights data with a user-friendly dialect of SQL to locate the KMS keys that consume the largest portion of the API usage quota or contribute the most API charges.
Walkthrough
To use Amazon CloudWatch Metrics Insights to identify the top 20 KMS keys that have the most cryptographic API usage up to the last 3 hours, complete the following steps:
In the navigation pane, choose Metrics, and then choose All metrics.
Choose the Multi source query tab.
For the data source, choose CloudWatch Metrics Insights.
You can enter the following example query in Editor view:
Note: In Builder view, the metric namespace, metric name, filter by, group by, order by, and limit options are shown. In Editor view, the same options as in Builder view are shown in query format.
	SELECT SUM(SuccessfulRequest)
	FROM SCHEMA("AWS/KMS", KeyArn, Operation)
	GROUP BY KeyArn
	ORDER BY MAX () DESC
	LIMIT 20
Choose Run in the Editor view or Graph query in the Builder view.
Example 2: How to set a new detailed alarm on unintentional runaway AWS KMS API usage
Running big data processing workflows that read Amazon Simple Storage Service (Amazon S3) files encrypted by KMS keys is a common scenario for analytics, business reporting, or machine learning projects. Typically, these workflows read a limited number of files from S3 on each invocation. However, misconfigured workflows could unintentionally read a large number of S3 files, which could result in exceeding your AWS KMS API request rate quotas or incurring undesirable charges due to spiky AWS KMS API usage. Historically, to address this issue, you would have had to build a customized alarm system by following these steps: 1) send AWS CloudTrail events generated by AWS KMS to Amazon CloudWatch Logs; 2) write queries in Amazon CloudWatch Logs Insights to track your API request usage; and 3) enable anomaly detection on the corresponding CloudWatch Log Insights math expression.
Now, with key-level API usage CloudWatch metrics, you can directly enable anomaly detection on these metrics to set up alarms for anomalous AWS KMS API usage patterns. This provides a more streamlined and efficient way to monitor and detect potential runaway workflows. By using these CloudWatch metrics and anomaly detection capabilities, you can proactively identify and address unintended increases in AWS KMS API usage, helping to avoid unexpected charges or service disruptions in your analytics, reporting, or machine learning pipelines.
Walkthrough
Consider a scenario where you have an analytics workflow that runs frequently, which uses the Decrypt AWS KMS API operation on a KMS key to decrypt and read data from S3. You would like to enable anomaly detection on the KMS key to trigger an alarm when the Decrypt call volume to the specific KMS key sees a discernible trend or pattern. To do so, complete the following steps:
In the navigation pane, choose Metrics, and then choose All metrics.
Choose KMS, and then choose KeyArn, Operation.
In the search bar, enter the Amazon Resource Name (ARN) of the key, and then choose Search. Select the CloudWatch metric you would like to enable anomaly detection for.
Navigate to Graphed metrics, and using the Statistic and Period drop-down lists, choose the statistic and period that you would like to monitor. Then you can enable anomaly detection by selecting the Pulse icon.
Figure 1: How to enable anomaly detection on a SuccessfulRequest metric
Figure 2: Anomaly detection is enabled on the SuccessfulRequest metric. The gray band illustrates the expected range of values and the anomaly is in red
Conclusion
This blog post highlighted the newly introduced key-level filtering capability for the AWS KMS API usage in CloudWatch. We showed two real-world use cases to demonstrate how you can use the new CloudWatch metrics. These use cases include improving operational visibility, setting up proactive alarms on anomalies in KMS API usage patterns, and potentially tracking detailed key usage for compliance purposes.
If you have feedback about this blog post, submit comments in the Comments section below. If you have questions about this blog post, start a new thread in the AWS Key Management Service re:Post.
February 12, 2025: This post was republished to include new services and features that have launched since the original publication date of June 11, 2020.
Encryption is a critical component of a defense-in-depth security strategy that uses multiple defensive mechanisms to protect workloads, data, and assets. As organizations look to innovate while building trust with customers, they need to meet critical compliance requirements and improve data security. Encryption, when used correctly, adds a layer of protection against unauthorized access that can help you strengthen data protection, adhere to regulations and standards, and enhance the security of communications.
How and why does encryption work?
Encryption works by using an algorithm with a key to convert data into unreadable data (ciphertext) that can only become readable again with the right key. For example, a simple phrase like “Hello World!” may look like “1c28df2b595b4e30b7b07500963dc7c” when encrypted. There are several different types of encryption algorithms, all using different types of keys. A strong encryption algorithm relies on mathematical properties to produce ciphertext that can’t be decrypted using any practically available amount of computing power without also having the necessary key. Therefore, protecting and managing the keys becomes a critical part of any encryption solution.
Encryption as part of your security strategy
An effective security strategy begins with stringent access control and continuous work to define the least privilege necessary for persons or systems accessing data. When using the AWS Cloud, you adopt the model of shared responsibility. You are responsible for managing your own access control policies. Encryption is a critical component of a defense-in-depth strategy because it can mitigate weaknesses in your primary access control mechanism. What if an access control mechanism fails and allows access to the raw data on disk or traveling along a network link? If the data is encrypted using a strong key, as long as the decryption key is not on the same system as your data, it is computationally infeasible for a bad actor to decrypt your data.
To show how infeasible this is, let’s consider the Advanced Encryption Standard (AES) with 256-bit keys (AES-256). It’s the strongest industry-adopted and government-approved algorithm for encrypting data. AES-256 is the technology we use to encrypt data in AWS, including Amazon Simple Storage Service (S3) server-side encryption. It would take at least a trillion years to break using current (and foreseeable future) computing technology. Current research suggests that even the future availability of quantum-based computing won’t sufficiently reduce the time it would take to break AES-256 encryption.
But what if you mistakenly create overly permissive access policies on your data? A well-designed encryption and key management system can also help prevent this from becoming an issue, because it separates access to the decryption key from access to your data.
Requirements for an encryption solution
To get the most from an encryption solution, you need to think about two things:
Protecting keys at rest: Are the systems using encryption keys secured so the keys can never be used outside the system? In addition, do these systems implement encryption algorithms correctly to produce strong ciphertexts that cannot be decrypted without access to the right keys?
Independent key management: Is the authorization to use encryption independent from how access to the underlying data is controlled?
There are third-party solutions that you can bring to AWS to help meet these requirements. However, these systems can be difficult and expensive to operate at scale. AWS offers a range of options to simplify encryption and key management.
Protecting keys at rest
When you use third-party key management solutions, it can be difficult to gauge the risk of your plaintext keys leaking and being used outside the solution. The keys have to be stored somewhere, and you can’t always know or audit all the ways those storage systems are secured from unauthorized access. The combination of technical complexity and the necessity of making the encryption usable without degrading performance or availability means that choosing and operating a key management solution can present difficult tradeoffs. The best practice to maximize key security is using a hardware security module (HSM). This is a specialized computing device that has several security controls built into it to help prevent encryption keys from leaving the device in a way that could allow an adversary to access and use those keys.
One such control in modern HSMs is tamper response, in which the device detects physical or logical attempts to access plaintext keys without authorization, and destroys the keys before the attack succeeds. Because you can’t install and operate your own hardware in AWS datacenters, AWS offers two services using HSMs with tamper response to protect customers’ keys: AWS Key Management Service (AWS KMS), which manages a fleet of HSMs on the customer’s behalf, and AWS CloudHSM, which gives customers the ability to manage their own HSMs. Each service can create keys on your behalf, or you can import keys from your on-premises systems to be used by each service.
The keys in AWS KMS or AWS CloudHSM can be used to encrypt data directly, or to protect other keys that are distributed to applications that directly encrypt data. The technique of encrypting encryption keys is called envelope encryption, and it enables encryption and decryption to happen on the computer where the plaintext customer data exists, rather than sending the data to the HSM each time. For very large data sets (e.g., a database), it’s not practical to move gigabytes of data between the data set and the HSM for every read/write operation. Instead, envelope encryption allows a data encryption key to be distributed to the application when it’s needed. The “master” keys in the HSM are used to encrypt a copy of the data key so the application can store the encrypted key alongside the data encrypted under that key. Once the application encrypts the data, the plaintext copy of data key can be deleted from its memory. The only way for the data to be decrypted is if the encrypted data key, which is only a few hundred bytes in size, is sent back to the HSM and decrypted.
The process of envelope encryption is used in AWS services in which data is encrypted on a customer’s behalf (which is known as server-side encryption) to minimize performance degradation. If you want to encrypt data in your own applications (client-side encryption), you’re encouraged to use envelope encryption with AWS KMS or AWS CloudHSM. Both services offer client libraries and SDKs to add encryption functionality to their application code and use the cryptographic functionality of each service. The AWS Encryption SDK is an example of a tool that can be used anywhere, not just in applications running in AWS. To make it easier for customers to encrypt data in databases like Amazon DynamoDB, we built the AWS Database Encryption SDK. The AWS Database Encryption SDK is a set of software libraries that enable you to use client-side encryption in your database design, including record-level encryption of database items. Today, the AWS Database Encryption SDK supports Amazon DynamoDB with attribute-level encryption.
Because implementing encryption algorithms and HSMs is critical to get right, all vendors of HSMs should have their products validated by a trusted third party. HSMs in both AWS KMS and AWS CloudHSM are validated under the National Institute of Standards and Technology’s FIPS 140 program, the standard for evaluating cryptographic modules. This validates the secure design and implementation of cryptographic modules, including functions related to ports and interfaces, authentication mechanisms, physical security and tamper response, operational environments, cryptographic key management, and electromagnetic interference/electromagnetic compatibility (EMI/EMC). Encryption using a FIPS 140 level 3 validated cryptographic module is often a requirement for other security-related compliance schemes like FedRamp and HIPAA-HITECH in the U.S., or the international payment card industry standard (PCI-DSS).
Independent key management
While AWS KMS and AWS CloudHSM can protect plaintext master keys on your behalf, you are still responsible for managing access controls to determine who can cause which encryption keys to be used under which conditions. One advantage of using AWS KMS is that the policy language you use to define access controls on keys is the same one you use to define access to all other AWS resources. Note that the language is the same, not the actual authorization controls. You need a mechanism for managing access to keys that is different from the one you use for managing access to your data. AWS KMS provides that mechanism by allowing you to assign one set of administrators who can only manage keys and a different set of administrators who can only manage access to the underlying encrypted data. Configuring your key management process in this way helps provide separation of duties you need to avoid accidentally escalating privilege to decrypt data to unauthorized users. For even further separation of control, AWS CloudHSM offers an independent policy mechanism to define access to keys.
In 2022, AWS KMS launched support for external key stores (XKS), a feature that allows you to store AWS KMS customer managed keys on an HSM that you operate on premises or at a location of your choice. At a high level, AWS KMS forwards requests for encryption and decryption to your HSM. Your key material never leaves your HSM. This can help you unblock use cases for a small portion of highly regulated workloads where encryption keys should be stored and used outside of an AWS data center. However, XKS forces a significant shift in the shared responsibility model—you now have responsibility for the durability, throughput, latency, and availability of your KMS key. If that key is lost or destroyed, you could permanently lose access to data, and if an XKS key becomes unavailable, all workloads in AWS that are dependent on that XKS key will be inaccessible.
Even with the ability to separate key management from data management, you can still verify that you have configured access to encryption keys correctly. AWS KMS is integrated with AWS CloudTrail so you can audit who used which keys, for which resources, and when. This provides granular vision into your encryption management processes, which is typically much more in-depth than on-premises audit mechanisms. Audit events from AWS CloudHSM can be sent to Amazon CloudWatch, the AWS service for monitoring and alarming third-party solutions you operate in AWS.
Encrypting data at rest and in transit
AWS services that handle customer data, encrypt data that is sent from one system to another—known as data in transit—provide options to encrypt data at rest. AWS services that offer encryption at rest using AWS KMS or AWS CloudHSM use AES-256. None of these services store plaintext encryption keys at rest—that’s a function that only AWS KMS and AWS CloudHSM may perform using their FIPS 140 level 3 validated HSMs. This architecture helps minimize the unauthorized use of keys.
When encrypting data in transit, AWS services use the Transport Layer Security (TLS) protocol to provide encryption between your application and the AWS service. Most commercial solutions use an open source project called OpenSSL for their TLS needs. OpenSSL has roughly 500,000 lines of code with at least 70,000 of those implementing TLS. The code base is large, complex, and difficult to audit. Moreover, when OpenSSL has bugs, the global developer community is challenged to not only fix and test the changes, but also to make sure that the resulting fixes themselves do not introduce new flaws.
AWS’s response to challenges with the TLS implementation in OpenSSL was to develop our own implementation of TLS, known as s2n, or signal to noise. We released s2n in June 2015, which we designed to be small and fast. The goal of s2n is to provide you with network encryption that is easier to understand and that is fully auditable. We released and licensed it under the Apache 2.0 license and hosted it on GitHub.
We also designed s2n to be analyzed using automated reasoning to test for safety and correctness using mathematical logic. Through this process, known as formal methods, we verify the correctness of the s2n code base every time we change the code. We also automated these mathematical proofs, which we regularly re-run to ensure the desired security properties are unchanged with new releases of the code. Automated mathematical proofs of correctness are an emerging trend in the security industry, and AWS uses this approach for a wide variety of our mission-critical software.
Similarly, in 2022, we released s2n-quic, an open-source Rust implementation of the QUIC protocol that was added to our set of AWS encryption open source libraries. QUIC is an encrypted transport protocol designed for performance and is the foundation of HTTP/3. It is specified in a set of IETF standards that were ratified in May 2021. Amazon CloudFront HTTP/3 support is built on top of s2n-quic, due to its emphasis on performance and efficiency. You can learn more about s2n-quic in this Security Blog post.
Implementing TLS requires using encryption keys and digital certificates that assert the ownership of those keys. AWS Certificate Manager and AWS Private Certificate Authority are two services that can simplify the issuance and rotation of digital certificates across your infrastructure that needs to offer TLS endpoints. Both services use a combination of AWS KMS and AWS CloudHSM to generate and/or protect the keys used in the digital certificates they issue.
Encrypting data in use
You might also have use cases for protecting data that is actively being used by federated learning models or other applications. Cryptographic computing—a set of technologies that allow computations to be performed on encrypted data, so that sensitive data is not exposed—is a methodology for protecting data in use.
Consider the example of an insurance company that works with other companies to develop machine learning models for insurance fraud detection. You might need to use sensitive data about your customers as training data for your models, but you don’t want to share your customer data in plaintext form with the other companies. Cryptographic computing gives organizations a way to train models collaboratively without exposing plaintext data about their customers to each other, or to a cloud provider like AWS. You can read more about cryptographic computing in this AWS Security Blog post.
Today, you can see cryptographic computing at work in AWS Clean Rooms, a service that helps companies and their partners more easily and securely analyze and collaborate on their collective datasets—all without sharing or copying one another’s underlying data. AWS Clean Rooms has a feature called Cryptographic Computing for AWS Clean Rooms (C3R) that cryptographically protects your data even while it is being processed by an AWS Clean Rooms collaboration.
The role of end-to-end encryption in secure communications
End-to-end encryption (E2EE) is a method of secure communication between two or more parties that combines encryption in transit and encryption at rest to protect data from unauthorized access, interception, or tampering. Decryption happens only on the parties you intend to communicate with, and no service providers in between. Every call, message, and file is encrypted with a unique private key and remains protected in transit. Unauthorized parties can’t access communication content, because they don’t have the private key required to decrypt the data.
AWS Wickr is an end-to-end encrypted messaging and collaboration service that protects one-to-one and group messaging, voice and video calling, file sharing, screen sharing, and location sharing with 256-bit encryption. With Wickr, each message gets a unique AES private encryption key and a unique Elliptic-curve Diffie–Hellman (ECDH) public key to negotiate the key exchange with recipients. Message content—including text, files, audio, or video—is encrypted on the sending device (your iPhone, for example) by using the message-specific AES key. This key is then exchanged by using the ECDH key exchange mechanism, so that only intended recipients can decrypt the message.
Quantum computing and post-quantum cryptography
Quantum computing is a field of technology that uses quantum mechanics to solve complex problems faster than on classical computers. Quantum computers are able to solve certain types of problems faster by taking advantage of quantum mechanical effects, such as superposition and quantum interference. For cryptography, this has implications that affect traditional encryption mechanisms such as asymmetric key encryption, which is often used for protecting data in transit (TLS) or creating hash-based signatures to verify the integrity and authenticity of a message or file. Quantum computers, if they are performant and stable enough, could theoretically compromise the security of asymmetric key algorithms like RSA, Elliptic Curve Cryptography (ECC), or Diffie-Hellman key agreement schemes. Based on current research, symmetric key algorithms like AES are not considered to be at risk from a quantum computer, because the key length of 256 bits is already sufficient to compensate for a decrease in cryptographic key strength posed by quantum algorithms.
AWS gives customers the option of evaluating post-quantum algorithms alongside traditional algorithms, using hybrid schemes that make use of both classic cryptography and newer post-quantum cryptographic (PQC) algorithms that are designed to be resistant to quantum computer threats. AWS has taken the first step in deploying PQC by implementing ML-KEM, a module lattice-based key encapsulation mechanism, within AWS-LC, our open source FIPS-140-3 validated cryptographic library. AWS-LC is the core cryptographic library used throughout AWS. Specifically, AWS-LC is used in s2n-tls, our open source TLS implementation used across AWS services with HTTPS-based endpoints.
AWS provides customers the ability to encrypt everything, everywhere. Customers can encrypt data at rest, in transit, and in memory, with a few clicks in the AWS Management Console, or an AWS API call. Services like Amazon Simple Storage Service (Amazon S3) encrypt new objects by default, and also support the use of customer managed AWS KMS keys to give customers more control over their encryption keys. Importantly, AWS KMS uses techniques like envelope encryption and highly scalable key management infrastructure to enable AWS services like Amazon S3 or Amazon Elastic Block Store (Amazon EBS) to encrypt data with minimal performance impact to customer applications.
AWS is also consistently working to improve the performance and security of our customers’ data as it moves between networks or devices. As of June 2024, all AWS API endpoints support TLS 1.3 and require at least TLS 1.2 or higher. By using TLS 1.3, you can decrease your connection time by removing one network round trip for every connection request, and can benefit from some of the most modern and secure cryptographic cipher suites available today.
Customers who require memory encryption can use AWS Graviton, our custom-built family of processors based on ARM. AWS Graviton2, AWS Graviton3, and AWS Graviton3E support always-on memory encryption. The encryption keys are securely generated within the host system, do not leave the host system, and are destroyed when the host is rebooted or powered down. Memory encryption is also supported for other instance types; see the EC2 documentation for more details.
As part of our AWS Digital Sovereignty Pledge, we commit to continue to innovate and invest in additional controls for encryption features so that our customers can encrypt everything, everywhere with encryption keys managed inside or outside the AWS Cloud.
Summary
At AWS, security is our top priority. We are committed to helping you control how your data is used, who has access to it, and how it is protected. By building and supporting encryption tools that work both on and off the cloud, we help you secure your data and enable compliance across your environment. We put security at the center of everything we do to make sure that you can protect your data using best-of-breed security technology in a cost-effective way.
If you have feedback about this post, submit comments in the Comments section below. If you have questions about this post, start a new thread on the AWS KMS forum or the AWS CloudHSM forum, or contact AWS Support.
Amazon S3 Express One Zone, a high-performance, single-Availability Zone (AZ) S3 storage class, now supports server-side encryption with AWS Key Management Service (KMS) keys (SSE-KMS). S3 Express One Zone already encrypts all objects stored in S3 directory buckets with Amazon S3 managed keys (SSE-S3) by default. Starting today, you can use AWS KMS customer managed keys to encrypt data at rest, with no impact on performance. This new encryption capability gives you an additional option to meet compliance and regulatory requirements when using S3 Express One Zone, which is designed to deliver consistent single-digit millisecond data access for your most frequently accessed data and latency-sensitive applications.
S3 directory buckets allow you to specify only one customer managed key per bucket for SSE-KMS encryption. Once the customer managed key is added, you cannot edit it to use a new key. On the other hand, with S3 general purpose buckets, you can use multiple KMS keys either by changing the default encryption configuration of the bucket or during S3 PUT requests. When using SSE-KMS with S3 Express One Zone, S3 Bucket Keys are always enabled. S3 Bucket Keys are free and reduce the number of requests to AWS KMS by up to 99%, optimizing both performance and costs.
Using SSE-KMS with Amazon S3 Express One Zone To show you this new capability in action, I first create an S3 directory bucket in the Amazon S3 console following the steps to create a S3 directory bucket and use apne1-az4 as the Availability Zone. In Base name, I enter s3express-kms and a suffix that includes the Availability Zone ID wich is automatically added to create the final name. Then, I select the checkbox to acknowledge that Data is stored in a single Availability Zone.
In the Default encryption section, I choose Server-side encryption with AWS Key Management Service keys (SSE-KMS). Under AWS KMS Key I can Choose from your AWS KMS keys, Enter AWS KMS key ARN, or Create a KMS key. For this example, I previously created an AWS KMS key, which I selected from the list, and then choose Create bucket.
Now, any new object I upload to this S3 directory bucket will be automatically encrypted using my AWS KMS key.
For this second test, I use a different IAM user with a policy that is not granted the necessary KMS key permissions to download the object. This attempt fails with an AccessDenied error, demonstrating that the SSE-KMS encryption is functioning as intended.
An error occurred (AccessDenied) when calling the CreateSession operation: Access Denied
This demonstration shows how SSE-KMS works seamlessly with S3 Express One Zone, providing an additional layer of security while maintaining ease of use for authorized users.
Things to know Getting started – You can enable SSE-KMS for S3 Express One Zone using the Amazon S3 console, AWS CLI, or AWS SDKs. Set the default encryption configuration of your S3 directory bucket to SSE-KMS and specify your AWS KMS key. Remember, you can only use one customer managed key per S3 directory bucket for its lifetime.
Performance – Using SSE-KMS with S3 Express One Zone does not impact request latency. You’ll continue to experience the same single-digit millisecond data access.
Pricing – You pay AWS KMS charges to generate and retrieve data keys used for encryption and decryption. Visit the AWS KMS pricing page for more details. In addition, when using SSE-KMS with S3 Express One Zone, S3 Bucket Keys are enabled by default for all data plane operations except for CopyObject and UploadPartCopy, and can’t be disabled. This reduces the number of requests to AWS KMS by up to 99%, optimizing both performance and costs.
AWS CloudTrail integration – You can audit SSE-KMS actions on S3 Express One Zone objects using AWS CloudTrail. Learn more about that in my previous blog post.
A mobile driver’s license (mDL) is a digital representation of a physical driver’s license that’s stored on a mobile device. An mDL is a significant improvement over physical credentials, which can be lost, stolen, counterfeited, damaged, or contain outdated information, and can expose unconsented personally identifiable information (PII). Organizations are working together to use mDLs across various situations, ranging from validating identity during airplane boarding to sharing information for age-restricted activities.
The trust in the mDL system is based on public-private key cryptography where mDLs are signed by issuing authorities using their private key and verified using the issuing authority’s public key. In this blog post, we show you how to build an mDL issuing authority in Amazon Web Services (AWS) using AWS Private Certificate Authority and AWS Key Management Service (AWS KMS) according to mDL specification ISO/IEC 18013-5:2021. These AWS services align with the cryptographic requirements placed on the issuing authorities by ISO/IEC 18013-5. While we have tailored this post to an mDL use case, the sign and verify mechanism using AWS Private CA and AWS KMS can be used for multiple kinds of digital identity verification.
Solution overview
AWS Private CA provides you with a highly available private certificate authority (CA) service without the initial investment and ongoing maintenance costs of operating your own private CA. CA administrators can use AWS Private CA to create a complete CA hierarchy, including online root and subordinate CAs, without needing external CAs. You can issue, rotate, and revoke certificates that are trusted within your organization using AWS Private CA.
AWS Private CA can issue certificates formatted as required by ISO/IEC 18013-5. You can build a certificate authority (CA) in AWS Private CA—referred to as the issuing authority certificate authority (IACA) in ISO/IEC 18013-5. We create an IACA self-signed root certificate and an mDL document signing certificate in AWS Private CA.
AWS KMS is a managed service that you can use to create and control the cryptographic keys that are used to protect your data. AWS KMS uses FIPS 140-2 Level 3 validated hardware security modules (HSMs) to protect AWS KMS keys, which is a requirement for building an issuing authority as described in ISO/IEC 18013-5. We create an asymmetric key pair in AWS KMS for signing and verification of the mDL document. We programmatically create a certificate signing request (CSR) that’s signed by the asymmetric key pair stored in AWS KMS. The CSR is sent to the AWS Private CA service for issuing the mDL document signing certificate that matches the certificate profile requirement specified for the document signing certificate in ISO/IEC 18013-5.
We sign an mDL document using the private key of the asymmetric key pair created in AWS KMS with a KeyUsage value of SIGN_VERIFY. The signed mDL document is delivered to a mobile device where it’s stored in a digital wallet and produced for verification by mDL readers. The mDL readers are configured with IACA certificates from various issuing authorities that allow them to verify the mDL documents signed by respective issuing authorities. An example of an issuing authority could be a state government agency that issues driver’s licenses.
Least privilege
The solution in this post uses AWS KMS and AWS Private CA services. Before you implement the process described in this post, ensure that the AWS Identity and Access Management (IAM) principal you choose follows the principle of least privilege and that permissions are scoped to the minimum required permissions required. See Security best practices in IAM to learn more.
Solution architecture
A sample solution architecture for building an mDL issuing authority in AWS is shown in Figure 1. The figure shows the step-by-step process starting from setting up a private CA and issuing an mDL document signing certificate to mDL issuance and verification. The infrastructure that’s built using this architecture includes a root certificate authority, which issues a document signer certificate. You can find the certificate requirements in section B.1 Certificate Profile of ISO/IEC 18013-5.
Figure 1: mDL issuing authority architecture and process flow in AWS
In this post, we use AWS Command Line Interface (AWS CLI) commands, but these can be replaced by AWS SDK API calls if needed. Along with the AWS CLI steps, a GitHub sample is provided that’s used to programmatically create and sign an mDL document signing CSR using AWS KMS.
See the AWS CLI commands documentation for AWS Private CA and AWS KMS for detailed information on the commands used in this solution.
Solution walkthrough
Use the following steps to create the infrastructure needed for mDL signing and verification.
Step 1: Create IACA CA in AWS Private CA
In this step, the root of trust IACA (issuing authority CA) will be created. The IACA root CA is the root of trust that will be used for verification of the mDL.
Create a local ca_config.txt file with the following content. The contents of this file are derived from the Certificate profiles section (Annex B) within ISO/IEC 18013-5. You can change the Country and CommonName values in the file as needed for your requirements.
The IACA root certificate will be paired with a certificate revocation list (CRL). See Planning a certificate revocation list (CRL) for information about configuring CRLs. Create a local file called revocation_config.txt with the following information to configure a CRL. The values for CustomCname and S3BucketName are examples, update them with the values that you have created within your AWS account. Update ExpirationInDays to fit your requirements. We recommend configuring encryption on the Amazon Simple Storage Service (Amazon S3) bucket containing your CRLs.
Invoke an AWS CLI command to create a private certificate authority. Replace the region parameter as needed. Update the file:// paths in the following command to the locations where you’ve stored the ca_config.txt and revocation_config.txt files.
The command should produce the following output. The output contains the Amazon Resource Name (ARN) of the created CA. You will need this ARN in subsequent steps.
Step 2: Retrieve the CSR for IACA root certificate
You’ll create an IACA root certificate, which starts with retrieving a CSR. This step retrieves the CSR for the IACA root certificate. The certificate-authority-arn parameter carries the CA ARN that was generated in Step 1.
This step issues the IACA root certificate. Create a file named extensions.txt using the following contents, which are derived from the Certificate profiles section of ISO/IEC 18013-5.
The KeyUsage extension with KeyCertSign and CRLSign should be set to true. A custom extension for the CRL distribution point is set and the validity of the certificate should be set to 9 years or 3285 days (set in the next step). Because the IACA root certificate is only used to issued mDLs, a maximum validity period of 9 years is sufficient, as indicated in Table B.1 of ISO/IEC 18013-5. Additionally, a CRL distribution point extension must be present. In the following example, the CRL URL encoded in the CDP extension is http://example.com/crl/0116z123-dv7a-59b1-x7be-1231v72571136.crl, aligning with both the CA CRL configuration applied to the CA at creation and to the CA ID. For base-64 encoding of the CDP extension, you can refer to this java sample.
Note that the IACA root CA created with AWS Private CA currently doesn’t have a CRL distribution point (CDP) extension by default. However, that is a mandatory extension according to the IACA root certificate profile in ISO/IEC 18013-5. To implement this, we use a custom extension passed in using API passthrough, which embeds the CDP extension. The distribution point specified in that extension must be based on the CA ID, which is 0116z123-dv7a-59b1-x7be-1231v7257113 derived from the CA ARN that was created in Step 1.
Step 4: Retrieve root certificate
This step retrieves the IACA root certificate in PEM format.
Use the following code to retrieve the IACA root certificate:
Copy the output and store it in a file named document-signing-kms.csr. You will use the file in Step 8 to create the mDL document signing certificate based on this CSR.
Step 8: Generate an mDL document signing certificate
Create a file named extensionSigner.txt with the following contents. The contents of this file are derived from the Certificate profiles section of ISO/IEC 18013-5. The JSON snippet that follows shows the extension structure containing the KeyUsage extension with DigitalSignature field set to true.
Store the output text in document_signing_cert.pem.
You now have the mDL document signing certificate for packaging later with the Concise Binary Object Representation (CBOR) structure required by ISO/IEC 18013-5.
An mDL reader can trust the mDL presented by a user after cryptographically verifying the mDL. This verification requires the reader to possess the mDL signing certificate chain of the issuing authority that issued the user the mDL. As required by the decentralized public key infrastructure (PKI) trust model specified in ISO/IEC 18013-5, the mDL reader will ingest the mDL signing certificate chain of the issuing authority.
Step 11: User makes an mDL signing request to the issuing authority
The user makes a request to the issuing authority to sign the mDL.
Step 12: Issuing authority issues signed mDL to the user
The issuing authority will authenticate the user’s identity and issue a signed mDL. The issuing authority provisions mDL data to the user’s device along with a CBOR encoded object known as a mobile security object (MSO). MSOs contain a digest algorithm, individual digests of mDL data elements, and a validity period. After this MSO has been generated and encoded as required by ISO/IEC 18013-5:2021 section 9.1.2.4, the MSO can be signed by the issuing authority. This signature can be generated in AWS KMS as shown in the following command. Generating the encoded MSO is out of scope for this post.
Use the following command to produce the SHA-256 digest of encoded MSO object using the sha256sum utility.
sha256sum < EncodedMSO > EncodedMSODigest
Sign the digest using the AWS KMS asymmetric key created in Step 6.
This signature will be combined with the issuing authority certificate and the MSO to form a CBOR Object Signing and Encryption (COSE) signed message and will be presented with the mDL data elements to readers. Readers can validate this signature to confirm the integrity of the MSO.
Step 13: User presents their mDL to an mDL reader
The user presents their mDL to the mDL reader for identity verification, such as at an airport. This process is called mDL Initialization in ISO/IEC 18013-5:2021 section 6.3.2.2. The mDL is activated during this initialization step.
Step 14: An mDL reader requests mDL data from a user’s mobile device
The mDL reader issues an mDL retrieval request to the user’s mobile device. A key feature of mDLs is that they allow mDL holders to present a subset of their PII. An mDL reader will request specific attributes such as name and date of birth, requiring the mDL holder to consent to the release of this information. The mDL reader’s request contains the list of PII data element identifiers that it is requesting the mDL holder to share.
Step 15: User consents to share their mDL data
The user receives a prompt notifying them of mDL sharing request. This prompt shows the user the list of PII data elements that are being requested. The user consents to the request and the mDL data that includes the MSO is shared with the reader.
Step 16: Reader validates mDL integrity
The reader receives the mDL data and validates it for integrity. The inclusion of the MSO with the mDL data elements provides mDL readers with a mechanism for validating the integrity of the data they’ve received. The mDL reader can then hash and verify individual mDL data elements presented by the device. If all data elements match their corresponding entries in the MSO, the mDL device reader can attest that the data hasn’t been tampered with.
As an example, assume that the mDL contains the following data elements:
The MSO’s integrity would first confirm that the validity period of the MSO (not shown) has not expired. It can then verify the signature (not shown) with the issuing authority’s public key. After this has been established, both data elements need to be verified. The CBOR representation of each element (digestID, random, elementIdentifier, and elementValue) is encoded as bytes and then hashed using SHA-256. For example, the following should equal D6AA81E454036313A9A681809151DDDBDF702289094F18286DDC591C41C6434E.
If all data elements pass this hash verification check, then the presented mDL contents can be trusted by the mDL reader.
Summary
As you saw in this solution, mobile driver’s licenses (mDLs) provide increased security and flexible consent management to preserve privacy for individuals. The principles of cryptographic signing and verification aren’t new and both AWS KMS and AWS Private CA are well suited for supporting digital identity applications, whether it’s a driver’s license or some other kind of identification. To learn more about AWS KMS asymmetric keys and AWS Private CA, see Digital signing with the new asymmetric keys feature of AWS KMS and How to host and manage an entire private certificate infrastructure in AWS.
When using cryptography to protect data, protocol designers often prefer symmetric keys and algorithms for their speed and efficiency. However, when data is exchanged across an untrusted network such as the internet, it becomes difficult to ensure that only the exchanging parties can know the same key. Asymmetric key pairs and algorithms help to solve this problem by allowing a public key to be shared over an untrusted network. And by using a key agreement scheme, two parties can use each other’s public key in combination with their own private key to each derive the same shared secret.
In this blog post we provide an overview of the new API action and explain how it can help you establish secure communications by exchanging only public keys to obtain a derived shared secret. We then show example commands to demonstrate how AWS KMS and OpenSSL can be used by two parties to derive a shared secret.
With this new DeriveSharedSecret API action, customers can take an external party’s public key and, in combination with a private key that resides within AWS KMS, derive a shared secret which can be used to derive a symmetric encryption key with a key derivation function (KDF). Customers can then use this symmetric encryption key to encrypt data locally within their application.
The same external party can combine their own related private key with the customer’s corresponding public key from AWS KMS to derive the same shared secret.
Now that both parties have the same shared secret, they can generate a symmetric encryption key that can be used to encrypt and decrypt the data they exchange.
DeriveSharedSecret offers a simple and secure way for customers to use their private key from within their application, enabling new asymmetric cryptography use cases for keys protected by AWS KMS, such as elliptic curve integrated encryption scheme (ECIES) or end-to-end encryption (E2EE) schemes.
AWS KMS DeriveSharedSecret overview
The AWS KMS API Reference documentation covers the DeriveSharedSecret API action in more detail than we include in this post. We broadly describe how to interact with the API action, using the following steps:
Create an elliptic curve (ECC) KMS key, selecting that the key be used for KEY_AGREEMENT and choosing one of the supported key specs. You will not be able to modify existing ECC keys to be used for key agreement.
Have another party create an elliptic curve key that matches the key spec you defined for your KMS key.
Retrieve the public key associated with your KMS key by using the existing GetPublicKey API action.
Exchange public keys through a trusted means of exchange with the other party. Note that DeriveSharedSecret expects a base64-encoded DER-formatted public key.
Use the other party’s public key as an input, along with your specified KEY_AGREEMENT key. The only key agreement algorithm supported by AWS KMS at launch is ECDH.
The other party should use the public key retrieved from AWS KMS and the private key associated with their generated ECC key pair to derive a shared secret.
The result of the preceding steps is that both parties have the same output without exchanging secret information. Only public keys were exchanged between the two parties. The output of DeriveSharedSecret is the raw shared secret. This shared secret is the multiplication of points on the elliptic curves and can result in many more bytes than are needed for an encryption key. We recommend that customers use a KDF, following the National Institute of Standards and Technology (NIST) SP800-56A Rev. 3 section 5.8 guidance, to derive encryption keys from this shared secret.
For the purposes of this post, we will demonstrate the steps by using the AWS CLI and OpenSSL command line. AWS has incorporated best practices for customers within the AWS Encryption SDK. You can find more details at AWS KMS ECDH keyrings.
Example use case
An example use case where you might wish to use ECDH key agreement is for end-to-end encryption. Although protocols exist that provide a secure framework for secure communications (for example, within AWS Wickr), we will highlight the simplified high-level steps behind some of these protocols. In our example use case, Alice and Bob are both part of a messaging network. This network is managed by a centralized service, and this service must not be able to access Alice or Bob’s unencrypted messages.
Figure 1: High-level architecture for the service described in the example use case
As shown in Figure 1, Alice and Bob each have an ECC key pair and participate in the secret derivation by using ECDH, through the following steps:
Alice registers her public key in the centralized key storage service. A detailed discussion of the key storage service is beyond the scope of this post.
Bob, an AWS KMS user, calls the AWS KMS GetPublicKey action to obtain the public key for the ECC KMS key pair.
Bob registers his public key in the same centralized key storage service.
Alice, who wants to exchange encrypted messages with Bob, retrieves Bob’s public key from the centralized key storage service.
Bob gets a notification that Alice wants to communicate with him, and he retrieves Alice’s public key from the centralized key storage service.
Using Bob’s public key and her private key, Alice derives a shared secret by using her cryptography provider.
Using Alice’s public key and his private key, Bob derives a shared secret by using DeriveSharedSecret.
Alice and Bob now have an identical shared secret. From this shared secret, she can create a symmetric encryption key by using a suitable KDF. The symmetric encryption key can be used to create ciphertext that can be sent to Bob.
Example use case walkthrough
You can use the following steps to create a KMS key for ECDH use and derive a shared secret by using AWS KMS. For our demonstration purposes, the user Alice (from our example use case) is using OpenSSL as the cryptography tool. We will show how the AWS KMS user Bob and OpenSSL user Alice can derive a shared secret by using each other’s public key.
General prerequisites
You must have the following prerequisites in place in order to implement the solution:
AWS CLI — The latest version is recommended. The example here uses aws-cli/2.15.40 and aws-cli/1.32.110.
Both parties (Alice and Bob, from our example use case) have an ECC key on the same curve. The steps in the next section, Key creation prerequisite, explain how these keys can be created.
Key creation prerequisite
Alice and Bob must use the same ECC curve during key creation. The DeriveSharedSecret API action supports curves ECC_NIST_P256, ECC_NIST_P384, and ECC_NIST_P521, which map to P-256, P-384, and P-521 respectively in OpenSSL. The curves that AWS KMS supports are the curves approved by the U.S. National Institute of Standards and Technology (NIST). Additionally, AWS KMS supports the SM2 key spec only in Amazon Web Services China Regions.
Bob creates an asymmetric KMS key for key agreement purposes
Bob creates a key pair in AWS KMS by using the CreateKey API action. In the following example, Bob creates an ECC key pair with ECC_NIST_P256 for the KeySpec parameter and KEY_AGREEMENT for the KeyUsage parameter.
You can follow the Creating asymmetric KMS keys documentation to see how to use the AWS Management Console to create a KMS key pair with the same properties as shown here. This example creates a KMS key with a default KMS key policy. You should review and configure your key policy according to the principle of least privilege, as appropriate for your environment.
Note: When a KMS key is created, it will be logged by AWS CloudTrail, a service that monitors and records activity within your account. API calls to the AWS KMS service are logged in CloudTrail, which you can use to audit access to KMS keys.
To allow your KMS key to be identified by a human-readable string rather than by the KeyId value, you can create an alias for the KMS key (replace the target-key-id value of a1b2c3d4-5678-90ab-cdef-EXAMPLE11111 with your KeyId value). This makes it easier to use and manage your KMS keys.
Bob creates an alias for his KMS key by using the CLI with the following command:
The following sections outline the steps that Alice and Bob will follow to share their public keys, retrieve one another’s public key, and then derive the same shared secret using AWS KMS and OpenSSL. The shared secrets derived by Alice and Bob respectively are then compared to show that they both derived the same shared secret.
Step 1: Alice generates and registers her OpenSSL public key with a central service
AWS KMS expects the public key in DER format. Therefore, in this example Alice creates a DER-format public key by using her ECC private key. Alice runs the following command to produce a DER-format file that contains her public key:
The file openssl_ecc_public_key.bin.der will have the public key in DER format, which Alice can store in the centralized key storage service (or send to anyone she would like to communicate with). Details about the centralized key storage service are beyond the scope of this post.
Step 2: Bob obtains the public key for his ECC KMS Key
To retrieve a copy of the public key for his ECC KMS key, Bob uses the GetPublicKey API action. Bob calls this API by using the AWS CLI command get-public-key, as follows:
The returned PublicKey value is a DER-encoded X.509 public key. Because the AWS CLI is being used, the public key output is base64-encoded for readability purposes. This base64-encoded value is decoded by using the base64 command, and the decoded value is stored in the output file. The file kms_ecdh_public_key.der contains the DER-encoded public key.
Note: If you call this API by using one of the AWS SDKs, such as Boto3, then the returned PublicKey value is not base64-encoded.
In our example use case, Alice is using OpenSSL, which expects the public key in PEM format. Bob converts his DER-format public key into PEM format by using the following command:
The file kms_ecdh_public_key.pem contains the public key in PEM format.
Step 3: Bob registers his public key with the centralized key storage service
Bob saves his public key in PEM format, obtained in Step 2, in the centralized key storage service.
Step 4: Alice retrieves Bob’s public key to derive a shared secret
To perform ECDH key agreement, the two parties involved (Alice and Bob, in our example use case) need to exchange their public key with each other. Alice, who wants to send encrypted messages to Bob, retrieves Bob’s public key from the centralized key storage service.
Bob’s public key, kms_ecdh_public_key.pem, is already in PEM format as expected by OpenSSL.
Step 5: Bob retrieves Alice’s public key to derive a shared secret
To perform ECDH key agreement, the two parties involved, Alice and Bob, need to exchange their public key with each other. Bob gets a notification that Alice wants to communicate with him, and he retrieves Alice’s public key from the centralized key storage service.
Alice’s public key, openssl_ecc_public_key.bin.der, is already in DER format as expected by AWS KMS.
Step 6: Alice uses OpenSSL to derive the shared secret
Alice, using her private key and Bob’s public key, can derive the shared secret by using OpenSSL. Alice derives the shared secret by using the OpenSSL pkeyutl command with the derive option, as follows:
The file openssl.ss will have the shared secret in binary format.
Step 7: Bob uses AWS KMS to derive the shared secret
Bob, using his private key (which remains securely within AWS KMS) and Alice’s public key, can derive the shared secret by using AWS KMS. The following example shows how Bob uses the DeriveSharedSecret API action with the AWS CLI command derive-shared-secret. At launch, the only supported key agreement algorithm is ECDH. Bob passes Alice’s public key for the PublicKey parameter.
Because the AWS CLI is being used, the returned SharedSecret value is base64-encoded for readability purposes. Using the base64 --decode command, the decoded binary format is stored to the file.
Note: If you call this API by using one of the AWS SDKs, such as Boto3, then the returned SharedSecret value is not base64-encoded.
The file kms.ss will have the shared secret in binary format.
Step 8: Using the shared secret and a suitable KDF, Alice derives an encryption key to encrypt her communication to Bob
You can use the following command to compare the two files containing the derived shared secrets that were obtained in Steps 6 and 7 and verify that they are identical:
diff -qs openssl.ss kms.ss
Because these files are identical, we can see that the same secret was derived using both AWS KMS and OpenSSL.
Using the shared secret, Alice should then derive a symmetric encryption key by using a suitable KDF. She can use this symmetric encryption key to encrypt data and send the ciphertext to Bob.
This blog post does not cover the steps to derive that symmetric encryption key, because that can be a complex topic depending on your use case. However, we note that you should not use the raw shared secret as an encryption key because it is not uniform. In other words, the shared secret has a lot of entropy, but the byte string itself is not random.
NIST recommends that you use a KDF function over the raw shared secret (value Z as described in section 5.8 of NIST SP800-56A Rev. 3). The KDFs that are recommended are described in more detail in NIST SP800-56C Rev. 2. One such example is OpenSSL Single Step KDF (SSKDF) EVP_KDF-SS, but using this KDF involves choosing the other values, such as FixedInfo, carefully.
To help customers make the right choice for the resulting KDF to use on the shared secret, the AWS Encryption SDK now includes AWS KMS ECDH keyrings. The keyring is a construct within the AWS Encryption SDK that you implement within your code. The keyring handles the management of encryption keys while applying best practices to protect your data. You can use the keyring to reference your KMS keys for key agreement, and then call a function to encrypt data. Data will be encrypted by using a derived shared wrapping key following NIST recommendations, and the Encryption SDK applies key commitment to the ciphertext.
Summary
In this blog post, we highlighted how you can use the recently launched DeriveSharedSecret API action to securely derive a shared secret. You’ve seen how ECDH can be used between two parties without having to share secret information across untrusted networks. We explained how you can audit your AWS KMS key usage through AWS CloudTrail logs. We highlighted that you would need to use a KDF to generate a symmetric encryption key from the shared secret. We strongly recommend that you use the AWS Encryption SDK to encrypt your data, which helps make sure that the recommended NIST key derivation functions are used for generating symmetric encryption keys.
If you have feedback about this post, submit comments in the Comments section below. If you have questions about this post, contact AWS Support.
This post is written by Dhiraj Mahapatro, AWS Principal Specialist SA, Serverless.
AWS Step Functions provides enhanced security with a customer-managed AWS KMS key. This allows organizations to maintain complete control over the encryption keys used to protect their data in Step Functions, ensuring that only allowed principals (IAM role, user, or a group) have access to the sensitive information that is processed in a state machine. This post explores the details of this feature and the new console experience of executing Step Functions workflows when a customer-managed KMS key is used.
Step Functions is a serverless orchestration service that enables you to coordinate multiple AWS services, microservices, and third-party integrations into business-critical applications. Step Functions is widely used for orchestrating complex workflows, such as loan processing, fraud detection, risk management, and compliance processes. By breaking down these processes into a series of steps, Step Functions provides a clear overview and control of the entire workflow. This ensures that it executes each stage correctly and in the right order. One of the critical aspects of using Step Functions in regulated industries is the importance of security and data protection. Step Functions manages sensitive customer data, including PII and financial records, and require protection against unauthorized access and data breaches. Enabling a customer-managed KMS key further strengthens the data security in a state machine.
Using customer-managed AWS KMS keys
With this launch, Step Functions enable encryption of the state machine definition and execution details, including event history using customer-managed symmetric KMS keys. As part of this feature, you also have the option to encrypt Step Functions activities using customer-managed key.
This post uses a sample application to show the implementation details of this new feature. See user guide for a detailed explanation of this feature.
The sample application shows a basic stock trading example where the state machine buys or sells a stock if the price of the stock is above or below 50 and finally saves the transaction.
Within EncryptionConfiguration, you specify the KmsKeyId and the Type. This sample application uses a CUSTOMER_MANAGED_KMS_KEY key type. The Type is a required field and it will be AWS_OWNED_KEY if it is not a customer managed key. The state machine also allows to specify the KmsDataKeyReusePeriodSeconds property to a value between 60 and 900 seconds (default: 300), which signifies the maximum duration for which the state machine reuses the data keys. When the period expires, Step Functions will call GenerateDataKey API on AWS KMS. Therefore, besides kms:Decrypt, Step Functions needs access to kms:GenerateDataKey action.
Within an AWS Organization setup, the best practices guidance is to have a dedicated security organizational unit responsible for managing and enforcing security standards, including ownership of KMS keys. The security account provides cross-account access for the key usage. You grant admin access only to the root of the security account, while external or member accounts can access it for various purposes like decryption, encryption, description, and data key generation. This can be done through an IAM Role, User, or Group in the member account. The standard approach for cross-account access involves combining KMS key policies in the security account and IAM policies to the identity that gives permission for the service in the member account.
Cross account access
For Step Functions, you can go a step further to restrict access to the caller’s role in the member account and provide a condition. The condition forces Step Functions service to only use the key. For example, with a security account (id: 1111111111) and a member account (id: 1234567890), the KMS key policy can use a kms:ViaService condition to restrict access to Step Functions state machines present in us-east-1 region only:
Constantly updating the key policy for every new Step Functions workflow in member accounts is cumbersome. Therefore, a combination of KMS key policy and IAM roles grants fine-grained and least-privilege access to key actions. For organizations that do not have a security account or security organizational unit, the member account owns the KMS key, as shown below. The key policy must be more restrictive to the Step Functions execution role and the Step Functions ARN that will use the key.
Member account ownership
For example, a member account with an account id 1234567890 sets the Step Functions execution role sfn-execution-role as the Principal and restricts the key usage to a specific Step Functions ARN in the same account by using kms:EncryptionContext:aws:states:stateMachineArn condition as shown in the following:
Clone the git repository. To build and deploy your application for the first time, run the following in your shell from the repository home directory:
sam build && sam deploy –guided
You can find the State Machine’s ARN in the output values displayed after deployment.
Once deployed, run the application using the AWS CLI. Run the following command after replacing the state machine ARN from the output of the deployment and the region where you have the state machine:
You get a successful response in the CLI. You can also see a corresponding execution listed in the AWS Console as RUNNING:
Running workflow
However, opening the execution details will show an “Access Denied” error as expected:
Access denied error
You get the same error while visualizing the Step Functions definition or editing the state machine. The sample application restricts the decryption by the KMS key to only the Step Functions workflow’s execution role. Therefore, any other entity cannot decrypt the state machine’s workflow execution details and the state machine’s definition. This secures the exposure of information, including the payload passed to Step Functions or the payload passed in between state transitions to external entities. This new feature will securely allow personally identifiable information (PII), credit card information (PCI), and other similar sensitive information in Step Functions. Existing sensitive workloads are now unlocked for Step Functions, therefore easing, making them AWS cloud native.
You can integrate Amazon CloudWatch Logs with Step Functions for logging and monitoring capabilities. To send logs, you must provide access for log delivery to decrypt your logs. In your State Machine customer-managed key policy, you must grant kms:decrypt permission to the principal delivery.logs.amazonaws.com. Logging a workflow will not work without above grant. You encrypted data is sent to CloudWatch logs with the same or different customer managed KMS key. See CloudWatch logs documentation to learn how to set permissions on the KMS key for your log group.
Cleanup
To delete the sample application, use the latest version of the AWS SAM CLI and run:
sam delete
Conclusion
Customer-managed AWS KMS keys in Step Functions allows for access control sensitive data. KMS key policy and IAM identity policies determine who decrypts and access various aspects of the state machine, including the definition, execution details, and input/output payload transitions for each task. This is an essential feature for highly regulated industries like financial services. Apply these security guardrails using customer-managed AWS KMS keys at the organizational unit, business unit, or at the individual account level.
The sample application shows a way of using the customer managed KMS key in Step Functions resource in CloudFormation. The user guide provides additional details. Support for this feature is available in AWS CDK now while Terraform support will fast follow. Dive deeper into additional details from the Step Functions user guide.
For more serverless learning resources, visit Serverless Land.
As Amazon CTO Werner Vogels said, “Encryption is the tool we have to make sure that nobody else has access to your data. Amazon Web Services (AWS) built encryption into nearly all of its 165 cloud services. Make use of it. Dance like nobody is watching. Encrypt like everyone is.”
Security is the top priority at AWS, underpinning everything we do. With AWS Fargate, every Amazon Elastic Container Service (Amazon ECS) task is launched on to a new single use, single tenant unit of compute. The ephemeral storage for this compute is always encrypted, and the AWS Key Management Service (AWS KMS) encryption key used for this encryption is managed by AWS Fargate.
Today, AWS is announcing that you can bring your own customer managed keys (CMKs). Once added to AWS KMS, you can use these to encrypt the underlying ephemeral storage of an Amazon ECS task on AWS Fargate. With this new capability, customers operating in heavily regulated environments can now have more control and visibility into their task’s ephemeral storage encryption.
This post dives into AWS Fargate task ephemeral storage and shows how the new customer managed key (CMK) feature can be enabled and audited.
Overview
AWS Fargate is a serverless compute engine for containerized workloads running on Amazon ECS and Amazon Elastic Kubernetes Service (Amazon EKS). Each time a new piece of work is scheduled on to AWS Fargate, as an Amazon ECS task or an Amazon EKS Pod, this workload is placed on a single use, single-tenant instance of compute.
For Amazon ECS tasks, that unit of compute has 20GiBs of ephemeral storage attached. This can be increased up to 200GiB by specifying the ephemeralStorage parameter in your task definition. This ephemeral storage is bound to the lifecycle of the Amazon ECS task, and once the Amazon ECS task has stopped, along with the underlying compute, this ephemeral storage is deleted.
If you are using AWS Fargate platform version 1.4.0 or higher, this ephemeral storage volume is encrypted by default. It is encrypted using an AWS Key Management Service (KMS) key with the AES-256 encryption algorithm. The key, and its lifecycle, is owned by the AWS Fargate service. You can learn more about Fargate-managed ephemeral storage encryption in the AWS Fargate Security Whitepaper.
With today’s launch, as an alternative to the Fargate-managed encryption, you can choose to encrypt the ephemeral storage with customer managed keys (CMKs). This helps regulation-sensitive customers meet their internal security policies and regulatory requirements.
Customers can import their own existing keys into AWS KMS or create a new CMK to encrypt the ephemeral storage. CMKs used by AWS Fargate can be managed through the normal AWS KMS lifecycle actions such as being rotated, disabled, and deleted. See the Amazon ECS documentation for more details on managing the KMS key. Additionally, all access from AWS Fargate to the KMS key can be audited in AWS CloudTrail Logs.
In January 2024, AWS announced that additional Amazon Elastic Block Store (Amazon EBS) volumes can now be attached to Amazon ECS tasks running on AWS Fargate. These EBS volumes unlock additional use cases for AWS Fargate customers, using higher capacity and high-performance volumes for use in their tasks alongside the ephemeral storage. These additional EBS volumes are managed differently to the ephemeral storage, and these volumes can already be encrypted with customer managed KMS keys (CMKs).
AWS Fargate falls under the scope of the following compliance programs regarding AWS’s side of the shared responsibility model. The compliance programs covered by AWS Fargate include:
You can download third-party audit reports using AWS Artifact. For more information, see Downloading Reports in AWS Artifact. Many of these compliance programs require customers to encrypt their data at rest within their Amazon ECS on AWS Fargate resources.
Customers also have additional internal risk management policies for key handling, where they must generate their own keys, have backups for these keys off-cloud, and manage the lifecycle of these keys. Until today, these customers could not use AWS Fargate’s default encryption solution for the workloads subject to their internal security policies.
Enabling CMK for ephemeral storage on an Amazon ECS Cluster
Following today’s launch a single KMS key can now be attached to a new or existing Amazon ECS Cluster. Once a key has been attached, all new tasks launched on to AWS Fargate use this KMS key. If you have existing tasks running in the Amazon ECS cluster, they must be redeployed to use the new encryption key. If these tasks are part of an Amazon ECS service, passing the –force-new-deployment flag to an amazon ecs update-service command forces all tasks to be redeployed with the new KMS key (while respecting the minimumHealthyPercent of the service).
To attach a KMS key to a new or existing cluster, specify the KeyId to the new managedStorageConfiguration field:
Aside from auditing CloudTrail Logs for encryption events, you can also verify that an ECS task is using the KMS key by using the DescribeTask API on an existing task:
Encryption events are logged in AWS CloudTrail. The following is an example of a CloudTrail event that includes the volume ID, cluster name, and AWS Account ID of the operation. You can find more details about the type of events that are logged in Managing AWS KMS keys for Fargate ephemeral storage.
With the use of AWS KMS customer managed keys, you can now meet your security requirements for your data inside your Amazon ECS workloads running on AWS Fargate.
AWS Summits continue to rock the world, with events taking place in various locations around the globe. AWS Summit London (April 24) is the last one in April, and there are nine more in May, including AWS Summit Berlin (May 15–16), AWS Summit Los Angeles (May 22), and AWS Summit Dubai (May 29). Join us to connect, collaborate, and learn about AWS!
While you decide which summit to attend, let’s look at the last week’s new announcements.
Last week’s launches Last week was another busy one in the world of artificial intelligence (AI). Here are some launches that got my attention.
Anthropic’s Claude 3 Opus now available in Amazon Bedrock – After Claude 3 Sonnet and Claude 3 Haiku, two of the three state-of-the-art models of Anthropic’s Claude 3, Opus is now available in Amazon Bedrock. Cluade 3 Opus is at the forefront of generative AI, demonstrating comprehension and fluency on complicated tasks at nearly human levels. Like the rest of the Claude 3 family, Opus can process images and return text outputs. Claude 3 Opus shows an estimated twofold gain in accuracy over Claude 2.1 on difficult open-ended questions, reducing the likelihood of faulty responses.
Meta Llama 3 now available in Amazon SageMaker JumpStart – Meta Llama 3 is now available in Amazon SageMaker JumpStart, a machine learning (ML) hub that can help you accelerate your ML journey. You can deploy and use Llama 3 foundation models (FMs) with a few steps in Amazon SageMaker Studio or programmatically through the Amazon SageMaker Python SDK. Llama is available in two parameter sizes, 8B and 70B, and can be used to support a broad range of use cases, with improvements in reasoning, code generation, and instruction following. The model will be deployed in an AWS secure environment under your VPC controls, helping ensure data security.
AWS Split Cost Allocation Data for Amazon EKS – You can now receive granular cost visibility for Amazon Elastic Kubernetes Service (Amazon EKS) in the AWS Cost and Usage Reports (CUR) to analyze, optimize, and chargeback cost and usage for your Kubernetes applications. You can allocate application costs to individual business units and teams based on how Kubernetes applications consume shared Amazon EC2 CPU and memory resources. You can aggregate these costs by cluster, namespace, and other Kubernetes primitives to allocate costs to individual business units or teams. These cost details will be accessible in the CUR 24 hours after opt-in. You can use the Containers Cost Allocation dashboard to visualize the costs in Amazon QuickSight and the CUR query library to query the costs using Amazon Athena.
AWS KMS automatic key rotation enhancements – AWS Key Management Service (AWS KMS) introduces faster options for automatic symmetric key rotation. You can now customize rotation frequency between 90 days to 7 years, invoke key rotation on demand for customer-managed AWS KMS keys, and view the rotation history for any rotated AWS KMS key. There is a nice post on the Security Blog you can visit to learn more about this feature, including a little bit of history about cryptography.
Amazon Personalize automatic solution training – Amazon Personalize now offers automatic training for solutions. With automatic training, you can set a cadence for your Amazon Personalize solutions to automatically retrain using the latest data from your dataset group. This process creates a newly trained machine learning (ML) model, also known as a solution version, and maintains the relevance of Amazon Personalize recommendations for end users. Automatic training mitigates model drift and makes sure recommendations align with users’ evolving behaviors and preferences. With Amazon Personalize, you can personalize your website, app, ads, emails, and more, using the same machine learning technology used by Amazon, without requiring any prior ML experience. To get started with Amazon Personalize, visit our documentation.
Amazon Cognito is now available in Europe (Spain) Region. Amazon Cognito makes it easy to add authentication, authorization, and user management to your web and mobile apps supporting sign-in with social identity providers such as Apple, Facebook, Google, and Amazon, and enterprise identity providers through standards such as SAML 2.0 and OpenID Connect.
Other AWS news Here are some additional news that you might find interesting:
The PartyRock Generative AI Hackathon winners – The PartyRock Generative AI Hackathon concluded with over 7,650 registrants submitting 1,200 projects across four challenge categories, featuring top winners like Parable Rhythm – The Interactive Crime Thriller, Faith – Manga Creation Tools, and Arghhhh! Zombie. Participants showed remarkable creativity and technical prowess, with prizes totaling $60,000 in AWS credits.
I tried the Faith – Manga Creation Tools app using my daughter Arya’s made-up stories and ideas and the result was quite impressive.
Visit Jeff Barr’s post to learn more about how to try the apps for yourself.
AWS open source news and updates – My colleague Ricardo writes about open source projects, tools, and events from the AWS Community. Check out Ricardo’s page for the latest updates.
Upcoming AWS events Check your calendars and sign up for upcoming AWS events:
AWS Summits – Join free online and in-person events that bring the cloud computing community together to connect, collaborate, and learn about AWS. Register in your nearest city: Singapore (May 7), Seoul (May 16–17), Hong Kong (May 22), Milan (May 23), Stockholm (June 4), and Madrid (June 5).
AWS re:Inforce – Explore cloud security in the age of generative AI at AWS re:Inforce, June 10–12 in Pennsylvania for 2.5 days of immersive cloud security learning designed to help drive your business initiatives.
AWS Community Days – Join community-led conferences that feature technical discussions, workshops, and hands-on labs led by expert AWS users and industry leaders from around the world: Turkey (May 18), Midwest | Columbus (June 13), Sri Lanka (June 27), Cameroon (July 13), Nigeria (August 24), and New York (August 28).
Today, AWS Key Management Service (AWS KMS) is introducing faster options for automatic symmetric key rotation. We’re also introducing rotate on-demand, rotation visibility improvements, and a new limit on the price of all symmetric keys that have had two or more rotations (including existing keys). In this post, I discuss all those capabilities and changes. I also present a broader overview of how symmetric cryptographic key rotation came to be, and cover our recommendations on when you might need rotation and how often to rotate your keys. If you’ve ever been curious about AWS KMS automatic key rotation—why it exists, when to enable it, and when to use it on-demand—read on.
How we got here
There are longstanding reasons for cryptographic key rotation. If you were Caesar in Roman times and you needed to send messages with sensitive information to your regional commanders, you might use keys and ciphers to encrypt and protect your communications. There are well-documented examples of using cryptography to protect communications during this time, so much so that the standard substitution cipher, where you swap each letter for a different letter that is a set number of letters away in the alphabet, is referred to as Caesar’s cipher. The cipher is the substitution mechanism, and the key is the number of letters away from the intended letter you go to find the substituted letter for the ciphertext.
The challenge for Caesar in relying on this kind of symmetric key cipher is that both sides (Caesar and his field generals) needed to share keys and keep those keys safe from prying eyes. What happens to Caesar’s secret invasion plans if the key used to encipher his attack plan was secretly intercepted in transmission down the Appian Way? Caesar had no way to know. But if he rotated keys, he could limit the scope of which messages could be read, thus limiting his risk. Messages sent under a key created in the year 52 BCE wouldn’t automatically work for messages sent the following year, provided that Caesar rotated his keys yearly and the newer keys weren’t accessible to the adversary. Key rotation can reduce the scope of data exposure (what a threat actor can see) when some but not all keys are compromised. Of course, every time the key changed, Caesar had to send messengers to his field generals to communicate the new key. Those messengers had to ensure that no enemies intercepted the new keys without their knowledge – a daunting task.
Figure 1: The state of the art for secure key rotation and key distribution in 52 BC.
Fast forward to the 1970s–2000s
In modern times, cryptographic algorithms designed for digital computer systems mean that keys no longer travel down the Appian Way. Instead, they move around digital systems, are stored in unprotected memory, and sometimes are printed for convenience. The risk of key leakage still exists, therefore there is a need for key rotation. During this period, more significant security protections were developed that use both software and hardware technology to protect digital cryptographic keys and reduce the need for rotation. The highest-level protections offered by these techniques can limit keys to specific devices where they can never leave as plaintext. In fact, the US National Institute of Standards and Technologies (NIST) has published a specific security standard, FIPS 140, that addresses the security requirements for these cryptographic modules.
Modern cryptography also has the risk of cryptographic key wear-out
Besides addressing risks from key leakage, key rotation has a second important benefit that becomes more pronounced in the digital era of modern cryptography—cryptographic key wear-out. A key can become weaker, or “wear out,” over time just by being used too many times. If you encrypt enough data under one symmetric key, and if a threat actor acquires enough of the resulting ciphertext, they can perform analysis against your ciphertext that will leak information about the key. Current cryptographic recommendations to protect against key wear-out can vary depending on how you’re encrypting data, the cipher used, and the size of your key. However, even a well-designed AES-GCM implementation with robust initialization vectors (IVs) and large key size (256 bits) should be limited to encrypting no more than 4.3 billion messages (232), where each message is limited to about 64 GiB under a single key.
Figure 2: Used enough times, keys can wear out.
During the early 2000s, to help federal agencies and commercial enterprises navigate key rotation best practices, NIST formalized several of the best practices for cryptographic key rotation in the NIST SP 800-57 Recommendation for Key Management standard. It’s an excellent read overall and I encourage you to examine Section 5.3 in particular, which outlines ways to determine the appropriate length of time (the cryptoperiod) that a specific key should be relied on for the protection of data in various environments. According to the guidelines, the following are some of the benefits of setting cryptoperiods (and rotating keys within these periods):
5.3 Cryptoperiods
A cryptoperiod is the time span during which a specific key is authorized for use by legitimate entities or the keys for a given system will remain in effect. A suitably defined cryptoperiod:
Limits the amount of information that is available for cryptanalysis to reveal the key (e.g. the number of plaintext and ciphertext pairs encrypted with the key);
Limits the amount of exposure if a single key is compromised;
Limits the use of a particular algorithm (e.g., to its estimated effective lifetime);
Limits the time available for attempts to penetrate physical, procedural, and logical access mechanisms that protect a key from unauthorized disclosure;
Limits the period within which information may be compromised by inadvertent disclosure of a cryptographic key to unauthorized entities; and
Limits the time available for computationally intensive cryptanalysis.
Sometimes, cryptoperiods are defined by an arbitrary time period or maximum amount of data protected by the key. However, trade-offs associated with the determination of cryptoperiods involve the risk and consequences of exposure, which should be carefully considered when selecting the cryptoperiod (see Section 5.6.4).
One of the challenges in applying this guidance to your own use of cryptographic keys is that you need to understand the likelihood of each risk occurring in your key management system. This can be even harder to evaluate when you’re using a managed service to protect and use your keys.
Fast forward to the 2010s: Envisioning a key management system where you might not need automatic key rotation
When we set out to build a managed service in AWS in 2014 for cryptographic key management and help customers protect their AWS encryption workloads, we were mindful that our keys needed to be as hardened, resilient, and protected against external and internal threat actors as possible. We were also mindful that our keys needed to have long-term viability and use built-in protections to prevent key wear-out. These two design constructs—that our keys are strongly protected to minimize the risk of leakage and that our keys are safe from wear out—are the primary reasons we recommend you limit key rotation or consider disabling rotation if you don’t have compliance requirements to do so. Scheduled key rotation in AWS KMS offers limited security benefits to your workloads.
Specific to key leakage, AWS KMS keys in their unencrypted, plaintext form cannot be accessed by anyone, even AWS operators. Unlike Caesar’s keys, or even cryptographic keys in modern software applications, keys generated by AWS KMS never exist in plaintext outside of the NIST FIPS 140-2 Security Level 3 fleet of hardware security modules (HSMs) in which they are used. See the related post AWS KMS is now FIPS 140-2 Security Level 3. What does this mean for you? for more information about how AWS KMS HSMs help you prevent unauthorized use of your keys. Unlike many commercial HSM solutions, AWS KMS doesn’t even allow keys to be exported from the service in encrypted form. Why? Because an external actor with the proper decryption key could then expose the KMS key in plaintext outside the service.
This hardened protection of your key material is salient to the principal security reason customers want key rotation. Customers typically envision rotation as a way to mitigate a key leaking outside the system in which it was intended to be used. However, since KMS keys can be used only in our HSMs and cannot be exported, the possibility of key exposure becomes harder to envision. This means that rotating a key as protection against key exposure is of limited security value. The HSMs are still the boundary that protects your keys from unauthorized access, no matter how many times the keys are rotated.
If we decide the risk of plaintext keys leaking from AWS KMS is sufficiently low, don’t we still need to be concerned with key wear-out? AWS KMS mitigates the risk of key wear-out by using a key derivation function (KDF) that generates a unique, derived AES 256-bit key for each individual request to encrypt or decrypt under a 256-bit symmetric KMS key. Those derived encryption keys are different every time, even if you make an identical call for encrypt with the same message data under the same KMS key. The cryptographic details for our key derivation method are provided in the AWS KMS Cryptographic Details documentation, and KDF operations use the KDF in counter mode, using HMAC with SHA256. These KDF operations make cryptographic wear-out substantially different for KMS keys than for keys you would call and use directly for encrypt operations. A detailed analysis of KMS key protections for cryptographic wear-out is provided in the Key Management at the Cloud Scale whitepaper, but the important take-away is that a single KMS key can be used for more than a quadrillion (250) encryption requests without wear-out risk.
In fact, within the NIST 800-57 guidelines is consideration that when the KMS key (key-wrapping key in NIST language) is used with unique data keys, KMS keys can have longer cryptoperiods:
“In the case of these very short-term key-wrapping keys, an appropriate cryptoperiod (i.e., which includes both the originator and recipient-usage periods) is a single communication session. It is assumed that the wrapped keys will not be retained in their wrapped form, so the originator-usage period and recipient-usage period of a key-wrapping key is the same. In other cases, a key-wrapping key may be retained so that the files or messages encrypted by the wrapped keys may be recovered later. In such cases, the recipient-usage period may be significantly longer than the originator-usage period of the key-wrapping key, and cryptoperiods lasting for years may be employed.”
Source: NIST 800-57 Recommendations for Key Management, section 5.3.6.7.
So why did we build key rotation in AWS KMS in the first place?
Although we advise that key rotation for KMS keys is generally not necessary to improve the security of your keys, you must consider that guidance in the context of your own unique circumstances. You might be required by internal auditors, external compliance assessors, or even your own customers to provide evidence of regular rotation of all keys. A short list of regulatory and standards groups that recommend key rotation includes the aforementioned NIST 800-57, Center for Internet Security (CIS) benchmarks, ISO 27001, System and Organization Controls (SOC) 2, the Payment Card Industry Data Security Standard (PCI DSS), COBIT 5, HIPAA, and the Federal Financial Institutions Examination Council (FFIEC) Handbook, just to name a few.
Customers in regulated industries must consider the entirety of all the cryptographic systems used across their organizations. Taking inventory of which systems incorporate HSM protections, which systems do or don’t provide additional security against cryptographic wear-out, or which programs implement encryption in a robust and reliable way can be difficult for any organization. If a customer doesn’t have sufficient cryptographic expertise in the design and operation of each system, it becomes a safer choice to mandate a uniform scheduled key rotation.
That is why we offer an automatic, convenient method to rotate symmetric KMS keys. Rotation allows customers to demonstrate this key management best practice to their stakeholders instead of having to explain why they chose not to.
Figure 3 details how KMS appends new key material within an existing KMS key during each key rotation.
Figure 3: KMS key rotation process
We designed the rotation of symmetric KMS keys to have low operational impact to both key administrators and builders using those keys. As shown in Figure 3, a keyID configured to rotate will append new key material on each rotation while still retaining and keeping the existing key material of previous versions. This append method achieves rotation without having to decrypt and re-encrypt existing data that used a previous version of a key. New encryption requests under a given keyID will use the latest key version, while decrypt requests under that keyID will use the appropriate version. Callers don’t have to name the version of the key they want to use for encrypt/decrypt, AWS KMS manages this transparently.
Some customers assume that a key rotation event should forcibly re-encrypt any data that was ever encrypted under the previous key version. This is not necessary when AWS KMS automatically rotates to use a new key version for encrypt operations. The previous versions of keys required for decrypt operations are still safe within the service.
We’ve offered the ability to automatically schedule an annual key rotation event for many years now. Lately, we’ve heard from some of our customers that they need to rotate keys more frequently than the fixed period of one year. We will address our newly launched capabilities to help meet these needs in the final section of this blog post.
More options for key rotation in AWS KMS (with a price reduction)
After learning how we think about key rotation in AWS KMS, let’s get to the new options we’ve launched in this space:
Configurable rotation periods: Previously, when using automatic key rotation, your only option was a fixed annual rotation period. You can now set a rotation period from 90 days to 2,560 days (just over seven years). You can adjust this period at any point to reset the time in the future when rotation will take effect. Existing keys set for rotation will continue to rotate every year.
On-demand rotation for KMS keys: In addition to more flexible automatic key rotation, you can now invoke on-demand rotation through the AWS Management Console for AWS KMS, the AWS Command Line Interface (AWS CLI), or the AWS KMS API using the new RotateKeyOnDemand API. You might occasionally need to use on-demand rotation to test workloads, or to verify and prove key rotation events to internal or external stakeholders. Invoking an on-demand rotation won’t affect the timeline of any upcoming rotation scheduled for this key.
Note: We’ve set a default quota of 10 on-demand rotations for a KMS key. Although the need for on-demand key rotation should be infrequent, you can ask to have this quota raised. If you have a repeated need for testing or validating instant key rotation, consider deleting the test keys and repeating this operation for RotateKeyOnDemand on new keys.
Improved visibility: You can now use the AWS KMS console or the new ListKeyRotations API to view previous key rotation events. One of the challenges in the past is that it’s been hard to validate that your KMS keys have rotated. Now, every previous rotation for a KMS key that has had a scheduled or on-demand rotation is listed in the console and available via API.
Figure 4: Key rotation history showing date and type of rotation
Price cap for keys with more than two rotations: We’re also introducing a price cap for automatic key rotation. Previously, each annual rotation of a KMS key added $1 per month to the price of the key. Now, for KMS keys that you rotate automatically or on-demand, the first and second rotation of the key adds $1 per month in cost (prorated hourly), but this price increase is capped at the second rotation. Rotations after your second rotation aren’t billed. Existing customers that have keys with three or more annual rotations will see a price reduction for those keys to $3 per month (prorated) per key starting in the month of May, 2024.
Summary
In this post, I highlighted the more flexible options that are now available for key rotation in AWS KMS and took a broader look into why key rotation exists. We know that many customers have compliance needs to demonstrate key rotation everywhere, and increasingly, to demonstrate faster or immediate key rotation. With the new reduced pricing and more convenient ways to verify key rotation events, we hope these new capabilities make your job easier.
Flexible key rotation capabilities are now available in all AWS Regions, including the AWS GovCloud (US) Regions. To learn more about this new capability, see the Rotating AWS KMS keys topic in the AWS KMS Developer Guide.
If you have feedback about this post, submit comments in the Comments section below. If you have questions about this post, contact AWS Support.
In this blog post, we delve into using Amazon Web Services (AWS) data protection services such as Amazon Secrets Manager,AWS Key Management Service (AWS KMS), and AWS Certificate Manager (ACM) to help fortify both the security of the pipeline and security in the pipeline. We explore how these services contribute to the overall security of the DevOps pipeline infrastructure while enabling seamless integration of data protection measures. We also provide practical insights by demonstrating the implementation of these services within a DevOps pipeline for a three-tier WordPress web application deployed using Amazon Elastic Kubernetes Service (Amazon EKS).
DevOps pipelines involve the continuous integration, delivery, and deployment of cloud infrastructure and applications, which can store and process sensitive data. The increasing adoption of DevOps pipelines for cloud infrastructure and application deployments has made the protection of sensitive data a critical priority for organizations.
Some examples of the types of sensitive data that must be protected in DevOps pipelines are:
Credentials: Usernames and passwords used to access cloud resources, databases, and applications.
Configuration files: Files that contain settings and configuration data for applications, databases, and other systems.
Certificates: TLS certificates used to encrypt communication between systems.
Secrets: Any other sensitive data used to access or authenticate with cloud resources, such as private keys, security tokens, or passwords for third-party services.
Unintended access or data disclosure can have serious consequences such as loss of productivity, legal liabilities, financial losses, and reputational damage. It’s crucial to prioritize data protection to help mitigate these risks effectively.
The concept of security of the pipeline encompasses implementing security measures to protect the entire DevOps pipeline—the infrastructure, tools, and processes—from potential security issues. While the concept of security in the pipeline focuses on incorporating security practices and controls directly into the development and deployment processes within the pipeline.
By using Secrets Manager, AWS KMS, and ACM, you can strengthen the security of your DevOps pipelines, safeguard sensitive data, and facilitate secure and compliant application deployments. Our goal is to equip you with the knowledge and tools to establish a secure DevOps environment, providing the integrity of your pipeline infrastructure and protecting your organization’s sensitive data throughout the software delivery process.
Sample application architecture overview
WordPress was chosen as the use case for this DevOps pipeline implementation due to its popularity, open source nature, containerization support, and integration with AWS services. The sample architecture for the WordPress application in the AWS cloud uses the following services:
Amazon Route 53: A DNS web service that routes traffic to the correct AWS resource.
Amazon CloudFront: A global content delivery network (CDN) service that securely delivers data and videos to users with low latency and high transfer speeds.
AWS WAF: A web application firewall that protects web applications from common web exploits.
AWS Key Management Service (AWS KMS): A key management service that allows you to create and manage the encryption keys used to protect your data at rest.
AWS Secrets Manager: A service that provides the ability to rotate, manage, and retrieve database credentials.
AWS CodePipeline: A fully managed continuous delivery service that helps to automate release pipelines for fast and reliable application and infrastructure updates.
AWS CodeBuild: A fully managed continuous integration service that compiles source code, runs tests, and produces ready-to-deploy software packages.
AWS CodeCommit: A secure, highly scalable, fully managed source-control service that hosts private Git repositories.
Before we explore the specifics of the sample application architecture in Figure 1, it’s important to clarify a few aspects of the diagram. While it displays only a single Availability Zone (AZ), please note that the application and infrastructure can be developed to be highly available across multiple AZs to improve fault tolerance. This means that even if one AZ is unavailable, the application remains operational in other AZs, providing uninterrupted service to users.
Figure 1: Sample application architecture
The flow of the data protection services in the post and depicted in Figure 1 can be summarized as follows:
First, we discuss securing your pipeline. You can use Secrets Manager to securely store sensitive information such as Amazon RDS credentials. We show you how to retrieve these secrets from Secrets Manager in your DevOps pipeline to access the database. By using Secrets Manager, you can protect critical credentials and help prevent unauthorized access, strengthening the security of your pipeline.
Next, we cover data encryption. With AWS KMS, you can encrypt sensitive data at rest. We explain how to encrypt data stored in Amazon RDS using AWS KMS encryption, making sure that it remains secure and protected from unauthorized access. By implementing KMS encryption, you add an extra layer of protection to your data and bolster the overall security of your pipeline.
Lastly, we discuss securing connections (data in transit) in your WordPress application. ACM is used to manage SSL/TLS certificates. We show you how to provision and manage SSL/TLS certificates using ACM and configure your Amazon EKS cluster to use these certificates for secure communication between users and the WordPress application. By using ACM, you can establish secure communication channels, providing data privacy and enhancing the security of your pipeline.
Note: The code samples in this post are only to demonstrate the key concepts. The actual code can be found on GitHub.
Securing sensitive data with Secrets Manager
In this sample application architecture, Secrets Manager is used to store and manage sensitive data. The AWS CloudFormation template provided sets up an Amazon RDS for MySQL instance and securely sets the master user password by retrieving it from Secrets Manager using KMS encryption.
Here’s how Secrets Manager is implemented in this sample application architecture:
Creating a Secrets Manager secret.
Create a Secrets Manager secret that includes the Amazon RDS database credentials using CloudFormation.
The secret is encrypted using an AWS KMS customer managed key.
The ManageMasterUserPassword: true line in the CloudFormation template indicates that the stack will manage the master user password for the Amazon RDS instance. To securely retrieve the password for the master user, the CloudFormation template uses the MasterUserSecret parameter, which retrieves the password from Secrets Manager. The KmsKeyId: !Ref RDSMySqlSecretEncryption line specifies the KMS key ID that will be used to encrypt the secret in Secrets Manager.
By setting the MasterUserSecret parameter to retrieve the password from Secrets Manager, the CloudFormation stack can securely retrieve and set the master user password for the Amazon RDS MySQL instance without exposing it in plain text. Additionally, specifying the KMS key ID for encryption adds another layer of security to the secret stored in Secrets Manager.
Retrieving secrets from Secrets Manager.
The secrets store CSI driver is a Kubernetes-native driver that provides a common interface for Secrets Store integration with Amazon EKS. The secrets-store-csi-driver-provider-aws is a specific provider that provides integration with the Secrets Manager.
To set up Amazon EKS, the first step is to create a SecretProviderClass, which specifies the secret ID of the Amazon RDS database. This SecretProviderClass is then used in the Kubernetes deployment object to deploy the WordPress application and dynamically retrieve the secrets from the secret manager during deployment. This process is entirely dynamic and verifies that no secrets are recorded anywhere. The SecretProviderClass is created on a specific app namespace, such as the wp namespace.
When using Secrets manager, be aware of the following best practices for managing and securing Secrets Manager secrets:
Use AWS Identity and Access Management (IAM) identity policies to define who can perform specific actions on Secrets Manager secrets, such as reading, writing, or deleting them.
Secrets Manager resource policies can be used to manage access to secrets at a more granular level. This includes defining who has access to specific secrets based on attributes such as IP address, time of day, or authentication status.
Encrypt the Secrets Manager secret using an AWS KMS key.
Using CloudFormation templates to automate the creation and management of Secrets Manager secrets including rotation.
Use AWS CloudTrail to monitor access and changes to Secrets Manager secrets.
Use CloudFormation hooks to validate the Secrets Manager secret before and after deployment. If the secret fails validation, the deployment is rolled back.
Encrypting data with AWS KMS
Data encryption involves converting sensitive information into a coded form that can only be accessed with the appropriate decryption key. By implementing encryption measures throughout your pipeline, you make sure that even if unauthorized individuals gain access to the data, they won’t be able to understand its contents.
Here’s how data at rest encryption using AWS KMS is implemented in this sample application architecture:
Amazon RDS secret encryption
Encrypting secrets: An AWS KMS customer managed key is used to encrypt the secrets stored in Secrets Manager to ensure their confidentiality during the DevOps build process.
Enable encryption for an Amazon RDS instance using CloudFormation. Specify the KMS key ARN in the CloudFormation stack and RDS will use the specified KMS key to encrypt data at rest.
Sample code:
RDSMySQL:
Type: AWS::RDS::DBInstanceProperties:
KmsKeyId: !Ref RDSMySqlDataEncryptionStorageEncrypted: trueRDSMySqlDataEncryption:Type: "AWS::KMS::Key"Properties:KeyPolicy:Id: rds-mysql-data-encryptionStatement:- Sid: Allow administration of the keyEffect: Allow"Action": ["kms:Create*","kms:Describe*","kms:Enable*","kms:List*","kms:Put*",...]- Sid: Allow use of the keyEffect: Allow"Action": ["kms:Decrypt","kms:GenerateDataKey","kms:DescribeKey"]
Kubernetes Pods storage
Use encrypted Amazon Elastic Block Store (Amazon EBS) volumes to store configuration data. Create a managed encrypted Amazon EBS volume using the following code snippet, and then deploy a Kubernetes pod with the persistent volume claim (PVC) mounted as a volume.
Create a KMS key for Amazon ECR and use that key to encrypt the data at rest.
Automate the creation of encrypted ECR repositories and enable encryption at rest using a DevOps pipeline, use CodePipeline to automate the deployment of the CloudFormation stack.
Define the creation of encrypted Amazon ECR repositories as part of the pipeline.
AWS best practices for managing encryption keys in an AWS environment
To effectively manage encryption keys and verify the security of data at rest in an AWS environment, we recommend the following best practices:
Use separate AWS KMS customer managed KMS keys for data classifications to provide better control and management of keys.
Enforce separation of duties by assigning different roles and responsibilities for key management tasks, such as creating and rotating keys, setting key policies, or granting permissions. By segregating key management duties, you can reduce the risk of accidental or intentional key compromise and improve overall security.
Use CloudTrail to monitor AWS KMS API activity and detect potential security incidents.
Rotate KMS keys as required by your regulatory requirements.
Use CloudFormation hooks to validate KMS key policies to verify that they align with organizational and regulatory requirements.
Following these best practices and implementing encryption at rest for different services such as Amazon RDS, Kubernetes Pods storage, and Amazon ECR, will help ensure that data is encrypted at rest.
Securing communication with ACM
Secure communication is a critical requirement for modern environments and implementing it in a DevOps pipeline is crucial for verifying that the infrastructure is secure, consistent, and repeatable across different environments. In this WordPress application running on Amazon EKS, ACM is used to secure communication end-to-end. Here’s how to achieve this:
Provision TLS certificates with ACM using a DevOps pipeline
To provision TLS certificates with ACM in a DevOps pipeline, automate the creation and deployment of TLS certificates using ACM. Use AWS CloudFormation templates to create the certificates and deploy them as part of infrastructure as code. This verifies that the certificates are created and deployed consistently and securely across multiple environments.
Provisioning of ALB and integration of TLS certificate using AWS ALB Ingress Controller for Kubernetes
Use a DevOps pipeline to create and configure the TLS certificates and ALB. This verifies that the infrastructure is created consistently and securely across multiple environments.
To secure communication between CloudFront and the ALB, verify that the traffic from the client to CloudFront and from CloudFront to the ALB is encrypted using the TLS certificate.
To secure communication between the ALB and the Kubernetes Pods, use the Kubernetes ingress resource to terminate SSL/TLS connections at the ALB. The ALB sends the PROTO metadata http connection header to the WordPress web server. The web server checks the incoming traffic type (http or https) and enables the HTTPS connection only hereafter. This verifies that pod responses are sent back to ALB only over HTTPS.
Additionally, using the X-Forwarded-Proto header can help pass the original protocol information and help avoid issues with the $_SERVER[‘HTTPS’] variable in WordPress.
To secure communication between the Kubernetes Pods in Amazon EKS and the Amazon RDS database, use SSL/TLS encryption on the database connection.
Configure an Amazon RDS MySQL instance with enhanced security settings to verify that only TLS-encrypted connections are allowed to the database. This is achieved by creating a DB parameter group with a parameter called require_secure_transport set to ‘1‘. The WordPress configuration file is also updated to enable SSL/TLS communication with the MySQL database. Then enable the TLS flag on the MySQL client and the Amazon RDS public certificate is passed to ensure that the connection is encrypted using the TLS_AES_256_GCM_SHA384 protocol. The sample code that follows focuses on enhancing the security of the RDS MySQL instance by enforcing encrypted connections and configuring WordPress to use SSL/TLS for communication with the database.
Sample code:
RDSDBParameterGroup:
Type: 'AWS::RDS::DBParameterGroup'Properties:
DBParameterGroupName: 'rds-tls-custom-mysql'Parameters:
require_secure_transport: '1'RDSMySQL:
Type: AWS::RDS::DBInstanceProperties:
DBName: 'wordpress'DBParameterGroupName: !Ref RDSDBParameterGroupwp-config-docker.php:
// Enable SSL/TLS between WordPress and MYSQL databasedefine('MYSQL_CLIENT_FLAGS', MYSQLI_CLIENT_SSL);//This activates SSL modedefine('MYSQL_SSL_CA', '/usr/src/wordpress/amazon-global-bundle-rds.pem');
In this architecture, AWS WAF is enabled at CloudFront to protect the WordPress application from common web exploits. AWS WAF for CloudFront is recommended and use AWS managed WAF rules to verify that web applications are protected from common and the latest threats.
Here are some AWS best practices for securing communication with ACM:
Use SSL/TLS certificates: Encrypt data in transit between clients and servers. ACM makes it simple to create, manage, and deploy SSL/TLS certificates across your infrastructure.
Use ACM-issued certificates: This verifies that your certificates are trusted by major browsers and that they are regularly renewed and replaced as needed.
Implement certificate revocation: Implement certificate revocation for SSL/TLS certificates that have been compromised or are no longer in use.
Implement strict transport security (HSTS): This helps protect against protocol downgrade attacks and verifies that SSL/TLS is used consistently across sessions.
Configure proper cipher suites: Configure your SSL/TLS connections to use only the strongest and most secure cipher suites.
Monitoring and auditing with CloudTrail
In this section, we discuss the significance of monitoring and auditing actions in your AWS account using CloudTrail. CloudTrail is a logging and tracking service that records the API activity in your AWS account, which is crucial for troubleshooting, compliance, and security purposes. Enabling CloudTrail in your AWS account and securely storing the logs in a durable location such as Amazon Simple Storage Service (Amazon S3) with encryption is highly recommended to help prevent unauthorized access. Monitoring and analyzing CloudTrail logs in real-time using CloudWatch Logs can help you quickly detect and respond to security incidents.
In a DevOps pipeline, you can use infrastructure-as-code tools such as CloudFormation, CodePipeline, and CodeBuild to create and manage CloudTrail consistently across different environments. You can create a CloudFormation stack with the CloudTrail configuration and use CodePipeline and CodeBuild to build and deploy the stack to different environments. CloudFormation hooks can validate the CloudTrail configuration to verify it aligns with your security requirements and policies.
It’s worth noting that the aspects discussed in the preceding paragraph might not apply if you’re using AWS Organizations and the CloudTrail Organization Trail feature. When using those services, the management of CloudTrail configurations across multiple accounts and environments is streamlined. This centralized approach simplifies the process of enforcing security policies and standards uniformly throughout the organization.
By following these best practices, you can effectively audit actions in your AWS environment, troubleshoot issues, and detect and respond to security incidents proactively.
Complete code for sample architecture for deployment
The complete code repository for the sample WordPress application architecture demonstrates how to implement data protection in a DevOps pipeline using various AWS services. The repository includes both infrastructure code and application code that covers all aspects of the sample architecture and implementation steps.
The infrastructure code consists of a set of CloudFormation templates that define the resources required to deploy the WordPress application in an AWS environment. This includes the Amazon Virtual Private Cloud (Amazon VPC), subnets, security groups, Amazon EKS cluster, Amazon RDS instance, AWS KMS key, and Secrets Manager secret. It also defines the necessary security configurations such as encryption at rest for the RDS instance and encryption in transit for the EKS cluster.
The application code is a sample WordPress application that is containerized using Docker and deployed to the Amazon EKS cluster. It shows how to use the Application Load Balancer (ALB) to route traffic to the appropriate container in the EKS cluster, and how to use the Amazon RDS instance to store the application data. The code also demonstrates how to use AWS KMS to encrypt and decrypt data in the application, and how to use Secrets Manager to store and retrieve secrets. Additionally, the code showcases the use of ACM to provision SSL/TLS certificates for secure communication between the CloudFront and the ALB, thereby ensuring data in transit is encrypted, which is critical for data protection in a DevOps pipeline.
Conclusion
Strengthening the security and compliance of your application in the cloud environment requires automating data protection measures in your DevOps pipeline. This involves using AWS services such as Secrets Manager, AWS KMS, ACM, and AWS CloudFormation, along with following best practices.
By automating data protection mechanisms with AWS CloudFormation, you can efficiently create a secure pipeline that is reproducible, controlled, and audited. This helps maintain a consistent and reliable infrastructure.
Monitoring and auditing your DevOps pipeline with AWS CloudTrail is crucial for maintaining compliance and security. It allows you to track and analyze API activity, detect any potential security incidents, and respond promptly.
By implementing these best practices and using data protection mechanisms, you can establish a secure pipeline in the AWS cloud environment. This enhances the overall security and compliance of your application, providing a reliable and protected environment for your deployments.
If you have feedback about this post, submit comments in the Comments section below. If you have questions about this post, contact AWS Support.
Want more AWS Security news? Follow us on Twitter.
AWS Key Management Service (AWS KMS) recently announced that its hardware security modules (HSMs) were given Federal Information Processing Standards (FIPS) 140-2 Security Level 3 certification from the U.S. National Institute of Standards and Technology (NIST). For organizations that rely on AWS cryptographic services, this higher security level validation has several benefits, including simpler set up and operation. In this post, we will share more details about the recent change in FIPS validation status for AWS KMS and explain the benefits to customers using AWS cryptographic services as a result of this change.
Background on NIST FIPS 140
The FIPS 140 framework provides guidelines and requirements for cryptographic modules that protect sensitive information. FIPS 140 is the industry standard in the US and Canada and is recognized around the world as providing authoritative certification and validation for the way that cryptographic modules are designed, implemented, and tested against NIST cryptographic security guidelines.
Organizations follow FIPS 140 to help ensure that their cryptographic security is aligned with government standards. FIPS 140 validation is also required in certain fields such as manufacturing, healthcare, and finance and is included in several industry and regulatory compliance frameworks, such as the Payment Card Industry Data Security Standard (PCI DSS), the Federal Risk and Authorization Management Program (FedRAMP), and the Health Information Trust Alliance (HITRUST) framework. FIPS 140 validation is recognized in many jurisdictions around the world, so organizations that operate globally can use FIPS 140 certification internationally.
What FIPS 140-2 Security Level 3 means for AWS KMS and you
Until recently, AWS KMS had been validated at Security Level 2 overall and at Security Level 3 in the following four sub-categories:
Cryptographic module specification
Roles, services, and authentication
Physical security
Design assurance
The latest certification from NIST means that AWS KMS is now validated at Security Level 3 overall in each sub-category. As a result, AWS assumes more of the shared responsibility model, which will benefit customers for certain use cases. Security Level 3 certification can assist organizations seeking compliance with several industry and regulatory standards. Even though FIPS 140 validation is not expressly required in a number of regulatory regimes, maintaining stronger, easier-to-use encryption can be a powerful tool for complying with FedRAMP, U.S. Department of Defense (DOD) Approved Product List (APL), HIPAA, PCI, the European Union’s General Data Protection Regulation (GDPR), and the ISO 27001 standard for security management best practices and comprehensive security controls.
Customers who previously needed to meet compliance requirements for FIPS 140-2 Level 3 on AWS were required to use AWS CloudHSM, a single-tenant HSM solution that provides dedicated HSMs instead of managed service HSMs. Now, customers who were using CloudHSM to help meet their compliance obligations for Level 3 validation can use AWS KMS by itself for key generation and usage. Compared to CloudHSM, AWS KMS is typically lower cost and easier to set up and operate as a managed service, and using AWS KMS shifts the responsibility for creating and controlling encryption keys and operating HSMs from the customer to AWS. This allows you to focus resources on your core business instead of on undifferentiated HSM infrastructure management tasks.
AWS KMS uses FIPS 140-2 Level 3 validated HSMs to help protect your keys when you request the service to create keys on your behalf or when you import them. The HSMs in AWS KMS are designed so that no one, not even AWS employees, can retrieve your plaintext keys. Your plaintext keys are never written to disk and are only used in volatile memory of the HSMs while performing your requested cryptographic operation.
The FIPS 140-2 Level 3 certified HSMs in AWS KMS are deployed in all AWS Regions, including the AWS GovCloud (US) Regions. The China (Beijing) and China (Ningxia) Regions do not support the FIPS 140-2 Cryptographic Module Validation Program. AWS KMS uses Office of the State Commercial Cryptography Administration (OSCCA) certified HSMs to protect KMS keys in China Regions. The certificate for the AWS KMS FIPS 140-2 Security Level 3 validation is available on the NIST Cryptographic Module Validation Program website.
As with many industry and regulatory frameworks, FIPS 140 is evolving. NIST approved and published a new updated version of the 140 standard, FIPS 140-3, which supersedes FIPS 140-2. The U.S. government has begun transitioning to the FIPS 140-3 cryptography standard, with NIST announcing that they will retire all FIPS 140-2 certificates on September 22, 2026. NIST recently validated AWS-LC under FIPS 140-3 and is currently in the process of evaluating AWS KMS and certain instance types of AWS CloudHSM under the FIPS 140-3 standard. To check the status of these evaluations, see the NIST Modules In Process List.
This document is provided for the purposes of information only; it is not legal advice, and should not be relied on as legal advice. Customers are responsible for making their own independent assessment of the information in this document. This document: (a) is for informational purposes only, (b) represents current AWS product offerings and practices, which are subject to change without notice, and (c) does not create any commitments or assurances from AWS and its affiliates, suppliers or licensors. AWS products or services are provided “as is” without warranties, representations, or conditions of any kind, whether express or implied. The responsibilities and liabilities of AWS to its customers are controlled by AWS agreements, and this document is not part of, nor does it modify, any agreement between AWS and its customers.
AWS encourages its customers to obtain appropriate advice on their implementation of privacy and data protection environments, and more generally, applicable laws and other obligations relevant to their business.
AWS encourages its customers to obtain appropriate advice on their implementation of privacy and data protection environments, and more generally, applicable laws and other obligations relevant to their business.
If you have feedback about this post, submit comments in the Comments section below. If you have questions about this post, contact AWS Support.
Want more AWS Security news? Follow us on Twitter.
Today, we are launching Amazon S3 dual-layer server-side encryption with keys stored in AWS Key Management Service (DSSE-KMS), a new encryption option in Amazon S3 that applies two layers of encryption to objects when they are uploaded to an Amazon Simple Storage Service (Amazon S3) bucket. DSSE-KMS is designed to meet National Security Agency CNSSP 15 for FIPS compliance and Data-at-Rest Capability Package (DAR CP) Version 5.0 guidance for two layers of CNSA encryption. Using DSSE-KMS, you can fulfill regulatory requirements to apply multiple layers of encryption to your data.
Amazon S3 is the only cloud object storage service where customers can apply two layers of encryption at the object level and control the data keys used for both layers. DSSE-KMS makes it easier for highly regulated customers to fulfill rigorous security standards, such as US Department of Defense (DoD) customers.
With DSSE-KMS, you can specify dual-layer server-side encryption (DSSE) in the PUT or COPY request for an object or configure your S3 bucket to apply DSSE to all new objects by default. You can also enforce DSSE-KMS using IAM and bucket policies. Each layer of encryption uses a separate cryptographic implementation library with individual data encryption keys. DSSE-KMS helps protect sensitive data against the low probability of a vulnerability in a single layer of cryptographic implementation.
DSSE-KMS simplifies the process of applying two layers of encryption to your data, without having to invest in infrastructure required for client-side encryption. Each layer of encryption uses a different implementation of the 256-bit Advanced Encryption Standard with Galois Counter Mode (AES-GCM) algorithm. DSSE-KMS uses the AWS Key Management Service (AWS KMS) to generate data keys, allowing you to control your customer managed keys by setting permissions per key and specifying key rotation schedules. With DSSE-KMS, you can now query and analyze your dual-encrypted data with AWS services such as Amazon Athena, Amazon SageMaker, and more.
With this launch, Amazon S3 now offers four options for server-side encryption:
Server-side encryption with Amazon S3 managed keys (SSE-S3)
Server-side encryption with AWS KMS (SSE-KMS)
Server-side encryption with customer-provided encryption keys (SSE-C)
Dual-layer server-side encryption with keys stored in KMS (DSSE-KMS)
Let’s see how DSSE-KMS works in practice.
Create an S3 Bucket and Turn on DSSE-KMS To create a new bucket in the Amazon S3 console, I choose Buckets in the navigation pane. I choose Create bucket, and I select a unique and meaningful name for the bucket. Under Default encryption section, I choose DSSE-KMS as the encryption option. From the available AWS KMS keys, I select a key for my requirements. Finally, I choose Create bucket to complete the creation of the S3 bucket, encrypted by DSSE-KMS encryption settings.
Upload an Object to the DSSE-SSE enabled S3 Bucket In the Buckets list, I choose the name of the bucket that I want to upload an object to. On the Objects tab for the bucket, I choose Upload. Under Files and folders, I choose Add files. I then choose a file to upload, and then choose Open. Under Server-side encryption, I choose Do not specify an encryption key. I then choose Upload.
Once the object is uploaded to the S3 bucket, I notice that the uploaded object inherits the Server-side encryptionsettings from the bucket.
Download a DSSE-KMS Encrypted Object from an S3 Bucket I select the object that I previously uploaded and choose Download or choose Download as from the Object actions menu. Once the object is downloaded, I open it locally, and the object is decrypted automatically, requiring no change to client applications.
Now Available Amazon S3 dual-layer server-side encryption with keys stored in AWS KMS (DSSE-KMS) is available today in all AWS Regions. You can get started with DSSE-KMS via the AWS CLI or AWS Management Console. To learn more about all available encryption options on Amazon S3, visit the Amazon S3 User Guide. For pricing information on DSSE-KMS, visit the Amazon S3 pricing page (Storage tab) and the AWS KMS pricing page.
I am excited to announce the availability of AWS Key Management Service (AWS KMS)External Key Store. Customers who have a regulatory need to store and use their encryption keys on premises or outside of the AWS Cloud can now do so. This new capability allows you to store AWS KMS customer managed keys on a hardware security module (HSM) that you operate on premises or at any location of your choice.
At a high level, AWS KMS forwards API calls to securely communicate with your HSM. Your key material never leaves your HSM. This solution allows you to encrypt data with external keys for the vast majority of AWS services that support AWS KMS customer managed keys, such as Amazon EBS, AWS Lambda, Amazon S3, Amazon DynamoDB, and over 100 more services. There is no change required to your existing AWS services’ configuration parameters or code.
This helps you unblock use cases for a small portion of regulated workloads where encryption keys should be stored and used outside of an AWS data center. But this is a major change in the way you operate cloud-based infrastructure and a significant shift in the shared responsibility model. We expect only a small percentage of our customers to enable this capability. The additional operational burden and greater risks to availability, performance, and low latency operations on protected data will exceed—for most cases—the perceived security benefits from AWS KMS External Key Store.
Let me dive into the details.
A Brief Recap on Key Management and Encryption When an AWS service is configured to encrypt data at rest, the service requests a unique encryption key from AWS KMS. We call this the data encryption key. To protect data encryption keys, the service also requests that AWS KMS encrypts that key with a specific KMS customer managed key, also known as a root key. Once encrypted, data keys can be safely stored alongside the data they protect. This pattern is called envelope encryption. Imagine an envelope that contains both the encrypted data and the encrypted key that was used to encrypt these data.
But how do we protect the root key? Protecting the root key is essential as it allows the decryption of all data keys it encrypted.
The root key material is securely generated and stored in a hardware security module, a piece of hardware designed to store secrets. It is tamper-resistant and designed so that the key material never leaves the secured hardware in plain text. AWS KMS uses HSMs that are certified under the NIST 140-2 Cryptographic Module certification program.
You can choose to create root keys tied to data classification, or create unique root keys to protect different AWS services, or by project tag, or associated to each data owner, and each root key is unique to each AWS Region.
The XKS Proxy Solution When configuring AWS KMS External Key Store (XKS), you are replacing the KMS key hierarchy with a new, external root of trust. The root keys are now all generated and stored inside an HSM you provide and operate. When AWS KMS needs to encrypt or decrypt a data key, it forwards the request to your vendor-specific HSM.
All AWS KMS interactions with the external HSM are mediated by an external key store proxy (XKS proxy), a proxy that you provide, and you manage. The proxy translates generic AWS KMS requests into a format that the vendor-specific HSMs can understand.
The HSMs that XKS communicates with are not located in AWS data centers.
To provide customers with a broad range of external key manager options, AWS KMS developed the XKS specification with feedback from several HSM, key management, and integration service providers, including Atos, Entrust, Fortanix, HashiCorp, Salesforce, Thales, and T-Systems. For information about availability, pricing, and how to use XKS with solutions from these vendors, consult the vendor directly.
In addition, we will provide a reference implementation of an XKS proxy that can be used with SoftHSM or any HSM that supports a PKCS #11 interface. This reference implementation XKS proxy can be run as a container, is built in Rust, and will be available via GitHub in the coming weeks.
Once you have completed the setup of your XKS proxy and HSM, you can create a corresponding external key store resource in KMS. You create keys in your HSM and map these keys to the external key store resource in KMS. Then you can use these keys with AWS services that support customer keys or your own applications to encrypt your data.
Each request from AWS KMS to the XKS proxy includes meta-data such as the AWS principal that called the KMS API and the KMS key ARN. This allows you to create an additional layer of authorization controls at the XKS proxy level, beyond those already provided by IAM policies in your AWS accounts.
The XKS proxy is effectively a kill switch you control. When you turn off the XKS proxy, all new encrypt and decrypt operations using XKS keys will cease to function. AWS services that have already provisioned a data key into memory for one of your resources will continue to work until either you deactivate the resource or the service key cache expires. For example, Amazon S3 caches data keys for a few minutes when bucket keys are enabled.
The Shift in Shared Responsibility Under standard cloud operating procedures, AWS is responsible for maintaining the cloud infrastructure in operational condition. This includes, but is not limited to, patching the systems, monitoring the network, designing systems for high availability, and more.
When you elect to use XKS, there is a fundamental shift in the shared responsibility model. Under this model, you are responsible for maintaining the XKS proxy and your HSM in operational condition. Not only do they have to be secured and highly available, but also sized to sustain the expected number of AWS KMS requests. This applies to all components involved: the physical facilities, the power supplies, the cooling system, the network, the server, the operating system, and more.
Depending on your workload, AWS KMS operations may be critical to operating services that require encryption for your data at rest in the cloud. Typical services relying on AWS KMS for normal operation include Amazon Elastic Block Store (Amazon EBS), Lambda, Amazon S3, Amazon RDS, DynamoDB, and more. In other words, it means that when the part of the infrastructure under your responsibility is not available or has high latencies (typically over 250 ms), AWS KMS will not be able to operate, cascading the failure to requests that you make to other AWS services. You will not be able to start an EC2 instance, invoke a Lambda function, store or retrieve objects from S3, connect to your RDS or DynamoDB databases, or any other service that relies on AWS KMS XKS keys stored in the infrastructure you manage.
As one of the product managers involved in XKS told me while preparing this blog post, “you are running your own tunnel to oxygen through a very fragile path.”
We recommend only using this capability if you have a regulatory or compliance need that requires you to maintain your encryption keys outside of an AWS data center. Only enable XKS for the root keys that support your most critical workloads. Not all your data classification categories will require external storage of root keys. Keep the data set protected by XKS to the minimum to meet your regulatory requirements, and continue to use AWS KMS customer managed keys—fully under your control—for the rest.
Some customers for which external key storage is not a compliance requirement have also asked for this feature in the past, but they all ended up accepting one of the existing AWS KMS options for cloud-based key storage and usage once they realized that the perceived security benefits of an XKS-like solution didn’t outweigh the operational cost.
What Changes and What Stays the Same? I tried to summarize the changes for you.
The way to protect access and monitor access from the AWS side is unchanged. XKS uses the same IAM policies and the same key policies. API calls are logged in AWS CloudTrail, and AWS CloudWatch has the usage metrics.
The pricing is the same as other AWS KMS keys and API operations.
XKS does not support asymmetric or HMAC keys managed in the HSM you provide.
You now own the concerns of availability, durability, performance, and latency boundaries of your encryption key operations.
You can implement another layer of authorization, auditing, and monitoring at XKS proxy level. XKS resides in your network.
While the KMS price stays the same, your expenses are likely to go up substantially to procure an HSM and maintain your side of the XKS-related infrastructure in operational condition.
An Open Specification For those strictly regulated workloads, we are developing XKS as an open interoperability specification. Not only have we collaborated with the major vendors I mentioned already, but we also opened a GitHub repository with the following materials:
The XKS proxy API specification. This describes the format of the generic requests KMS sends to an XKS proxy and the responses it expects. Any HSM vendor can use the specification to create an XKS proxy for their HSM.
A reference implementation of an XKS proxy that implements the specification. This code can be adapted by HSM vendors to create a proxy for their HSM.
An XKS proxy test client that can be used to check if an XKS proxy complies with the requirements of the XKS proxy API specification.
Other vendors, such as SalesForce, announced their own XKS solution allowing their customers to choose their own key management solution and plug it into their solution of choice, including SalesForce.
Pricing and Availability External Key Store is provided at no additional cost on top of AWS KMS. AWS KMS charges $1 per root key per month, no matter where the key material is stored, on KMS, on CloudHSM, or on your own on-premises HSM.
For a full list of Regions where AWS KMS XKS is currently available, visit our technical documentation.
If you think XKS will help you to meet your regulatory requirements, have a look at the technical documentation and the XKS FAQ.
To provide the best experiences, we use technologies like cookies to store and/or access device information. Consenting to these technologies will allow us to process data such as browsing behavior or unique IDs on this site. Not consenting or withdrawing consent, may adversely affect certain features and functions.
Functional
Always active
The technical storage or access is strictly necessary for the legitimate purpose of enabling the use of a specific service explicitly requested by the subscriber or user, or for the sole purpose of carrying out the transmission of a communication over an electronic communications network.
Preferences
The technical storage or access is necessary for the legitimate purpose of storing preferences that are not requested by the subscriber or user.
Statistics
The technical storage or access that is used exclusively for statistical purposes.The technical storage or access that is used exclusively for anonymous statistical purposes. Without a subpoena, voluntary compliance on the part of your Internet Service Provider, or additional records from a third party, information stored or retrieved for this purpose alone cannot usually be used to identify you.
Marketing
The technical storage or access is required to create user profiles to send advertising, or to track the user on a website or across several websites for similar marketing purposes.
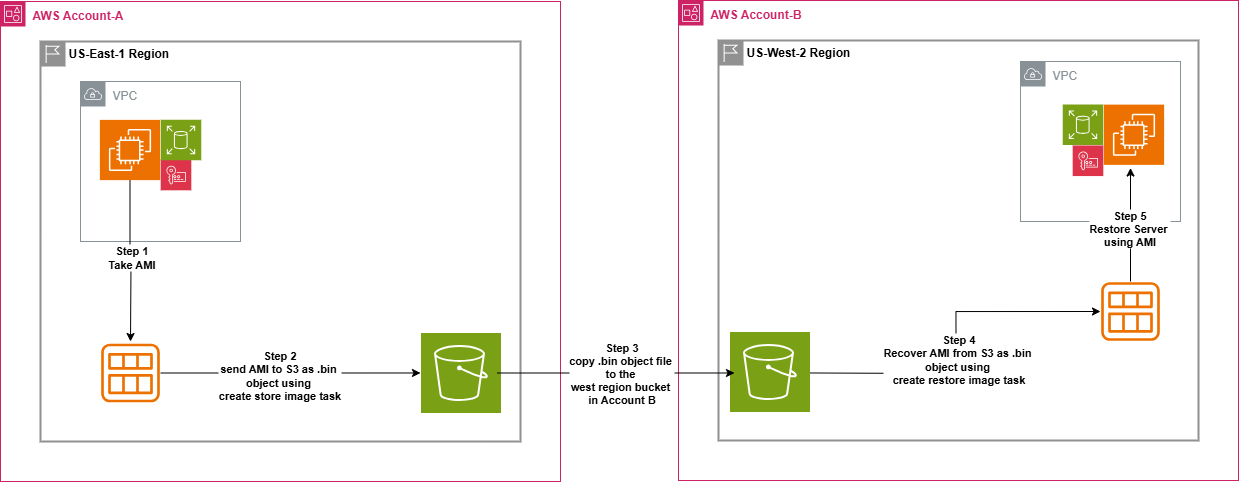
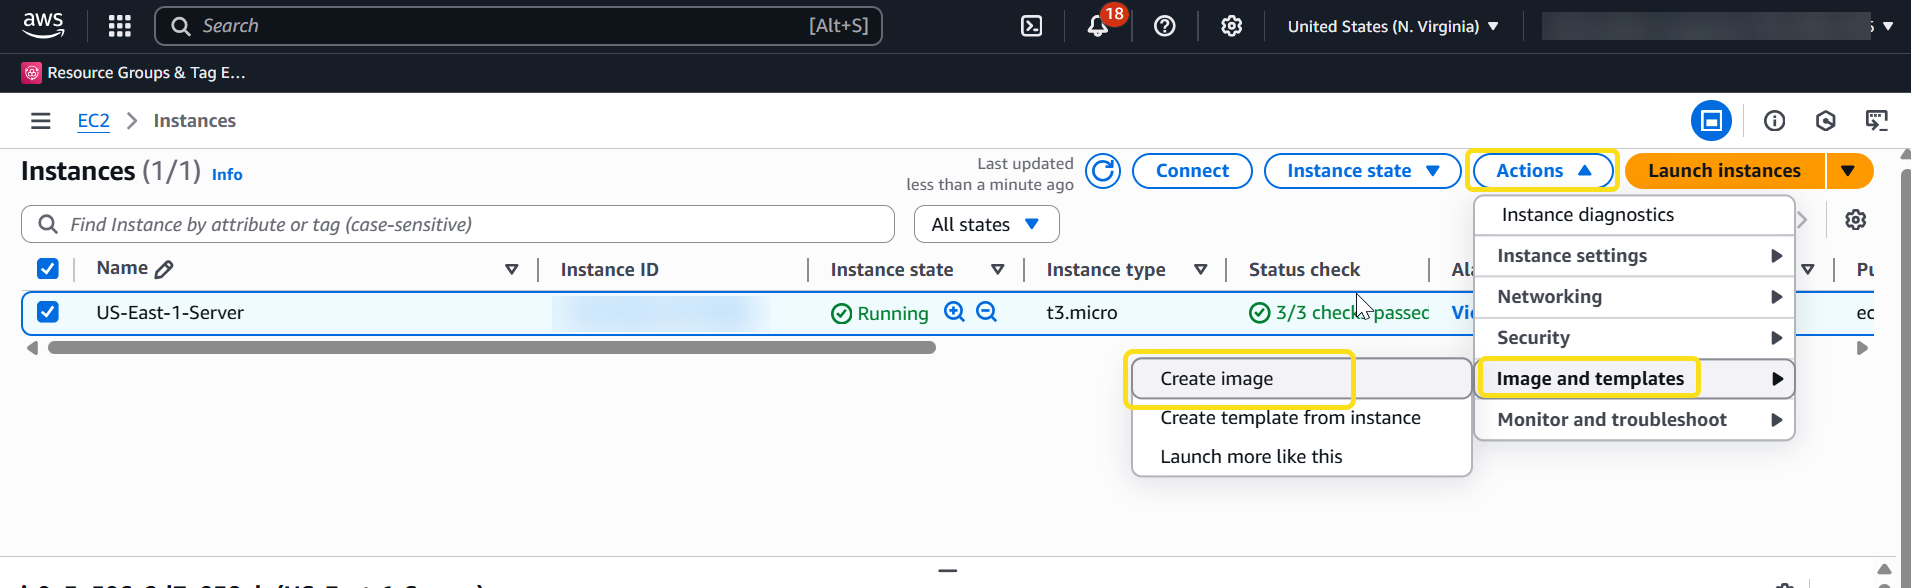
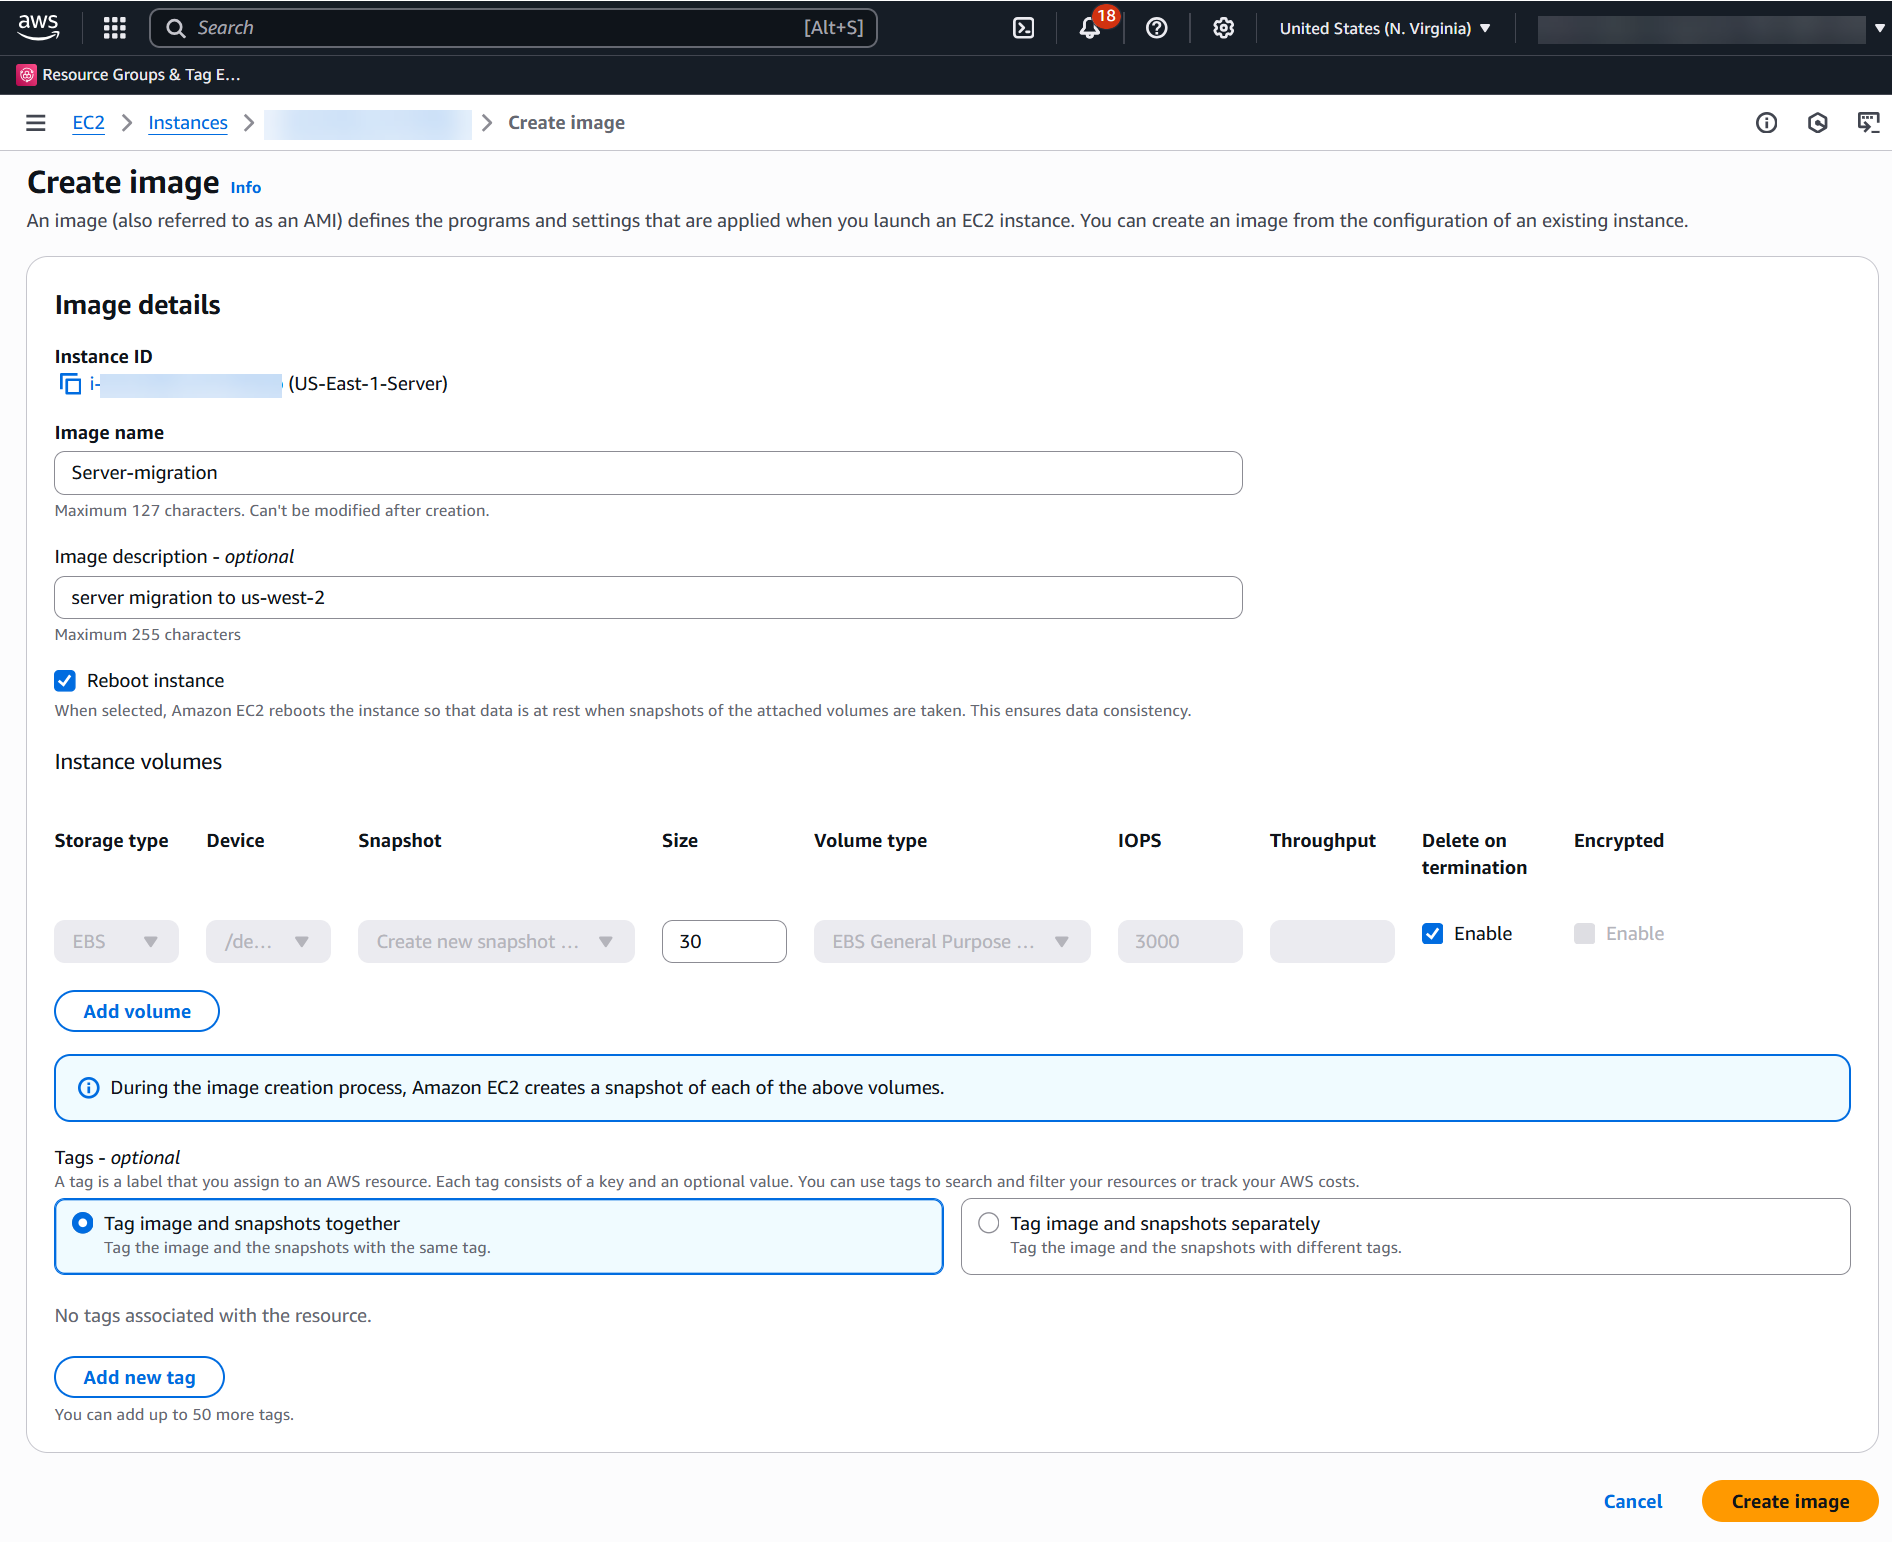
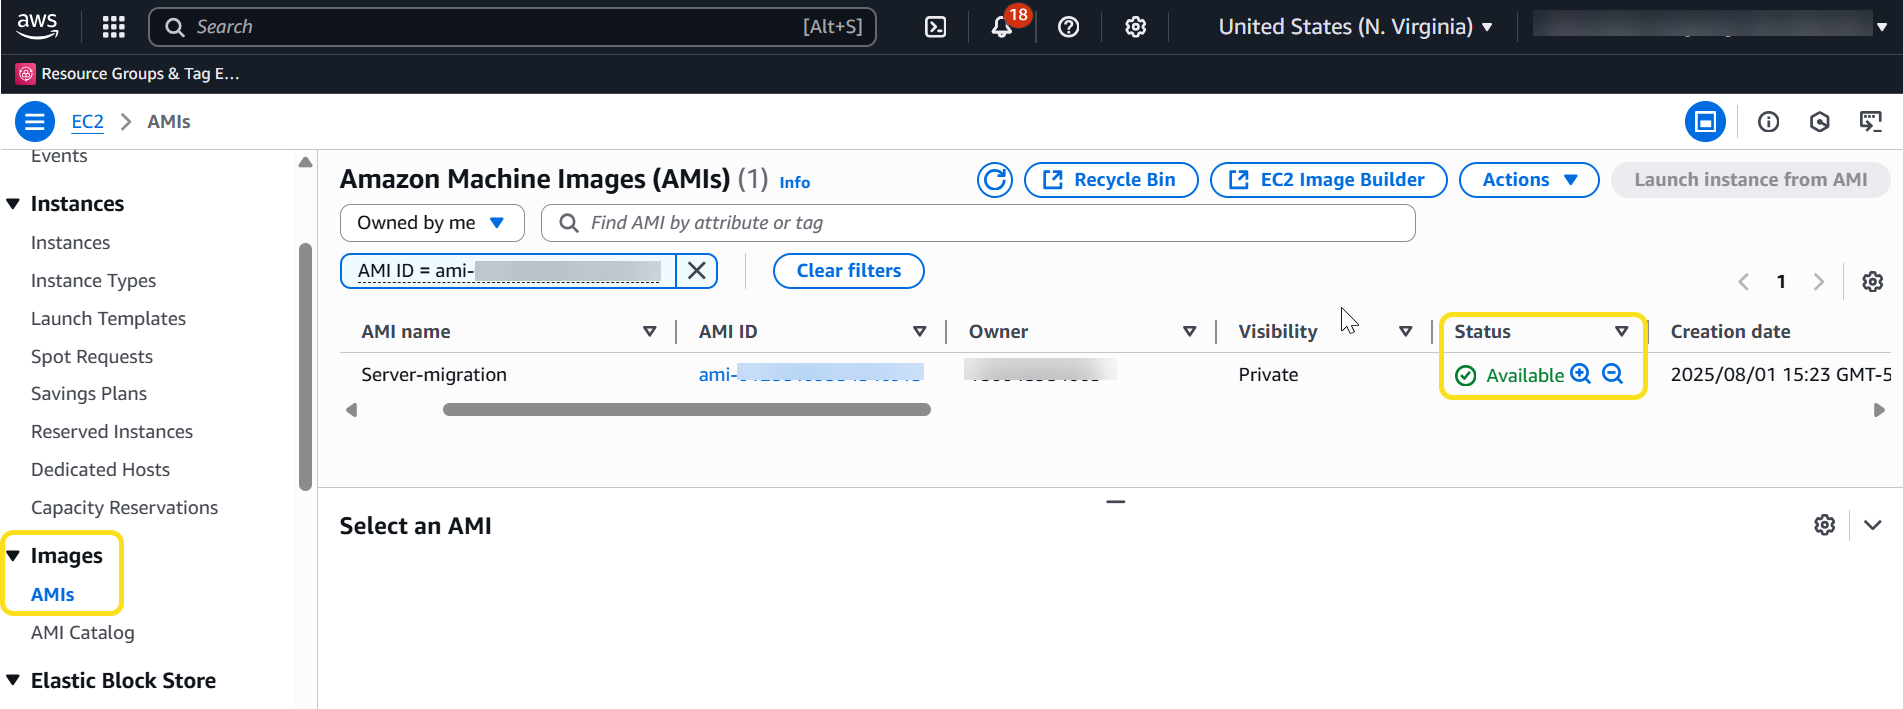
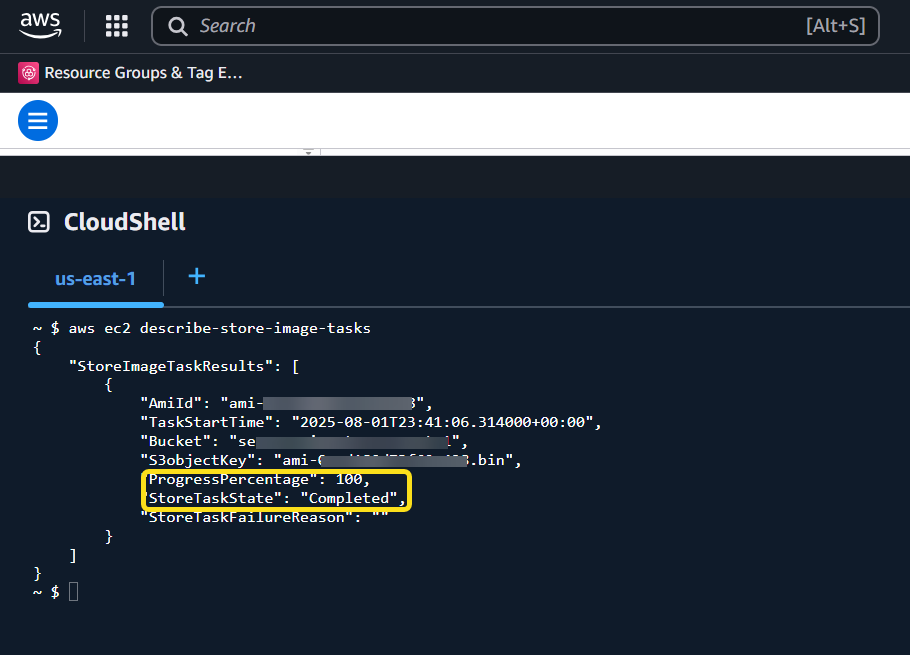
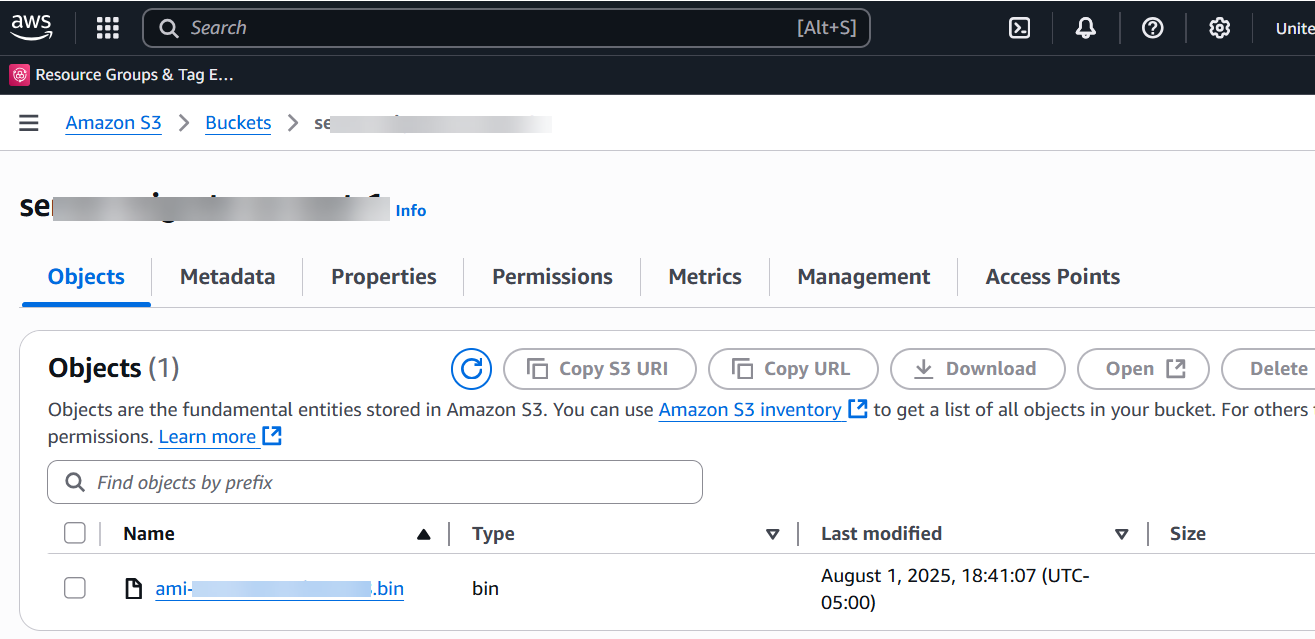
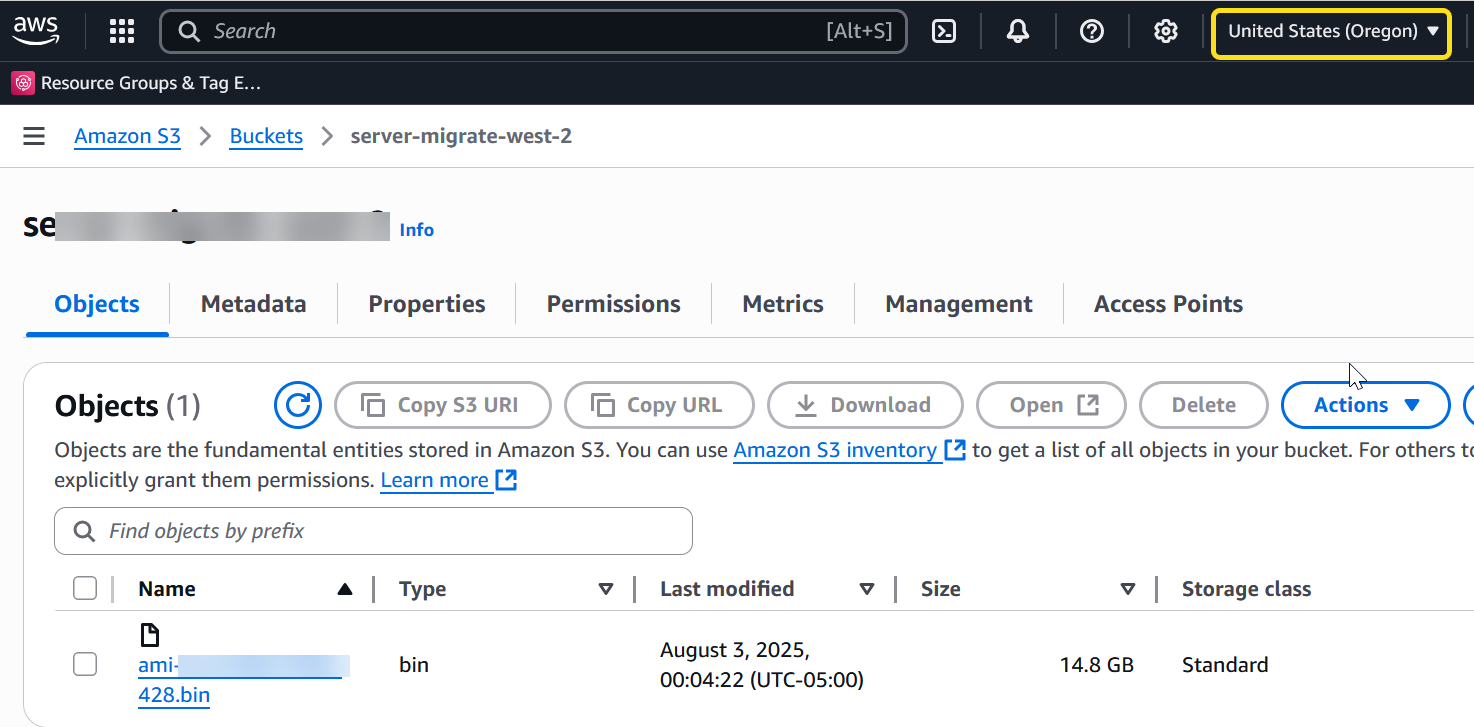
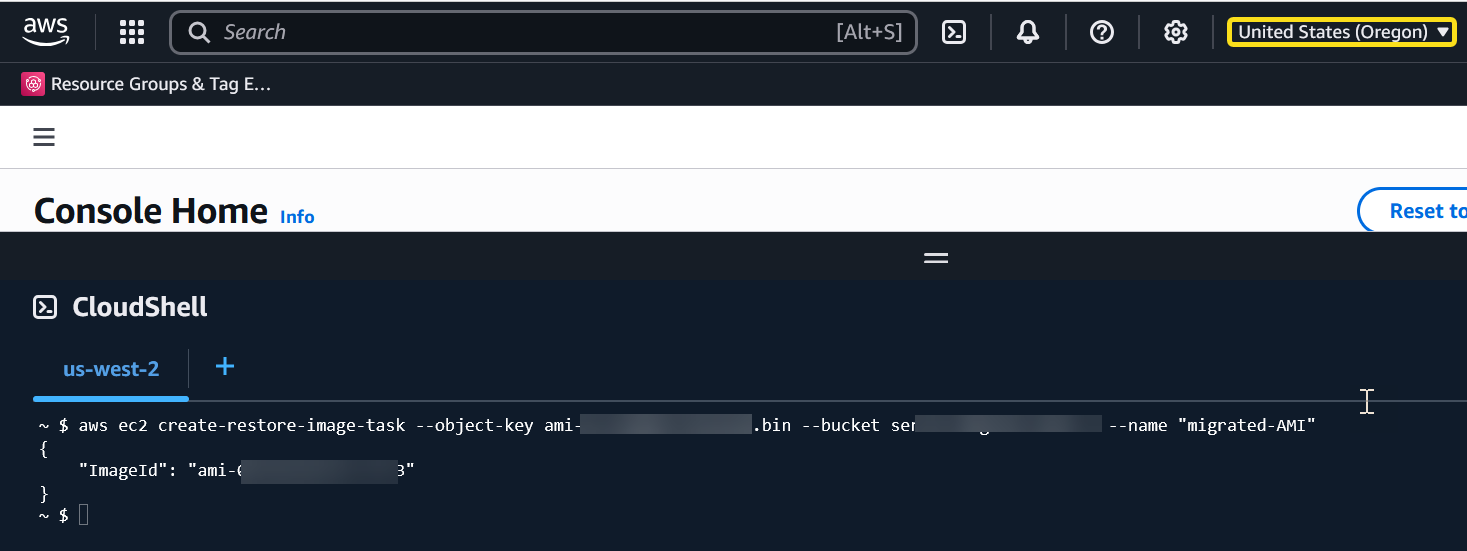
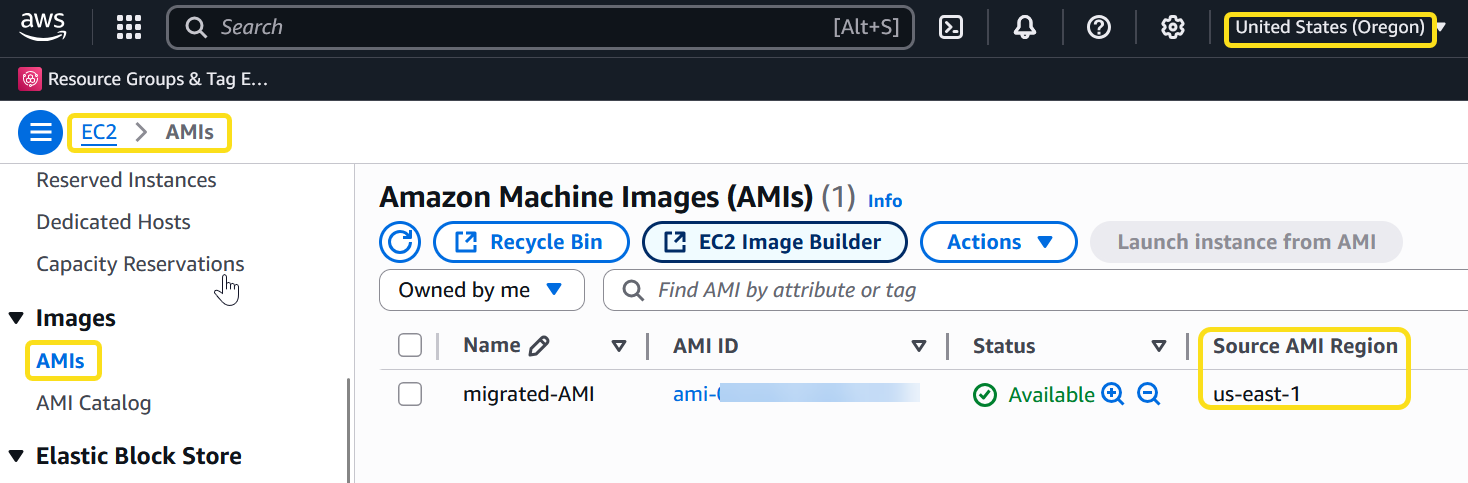
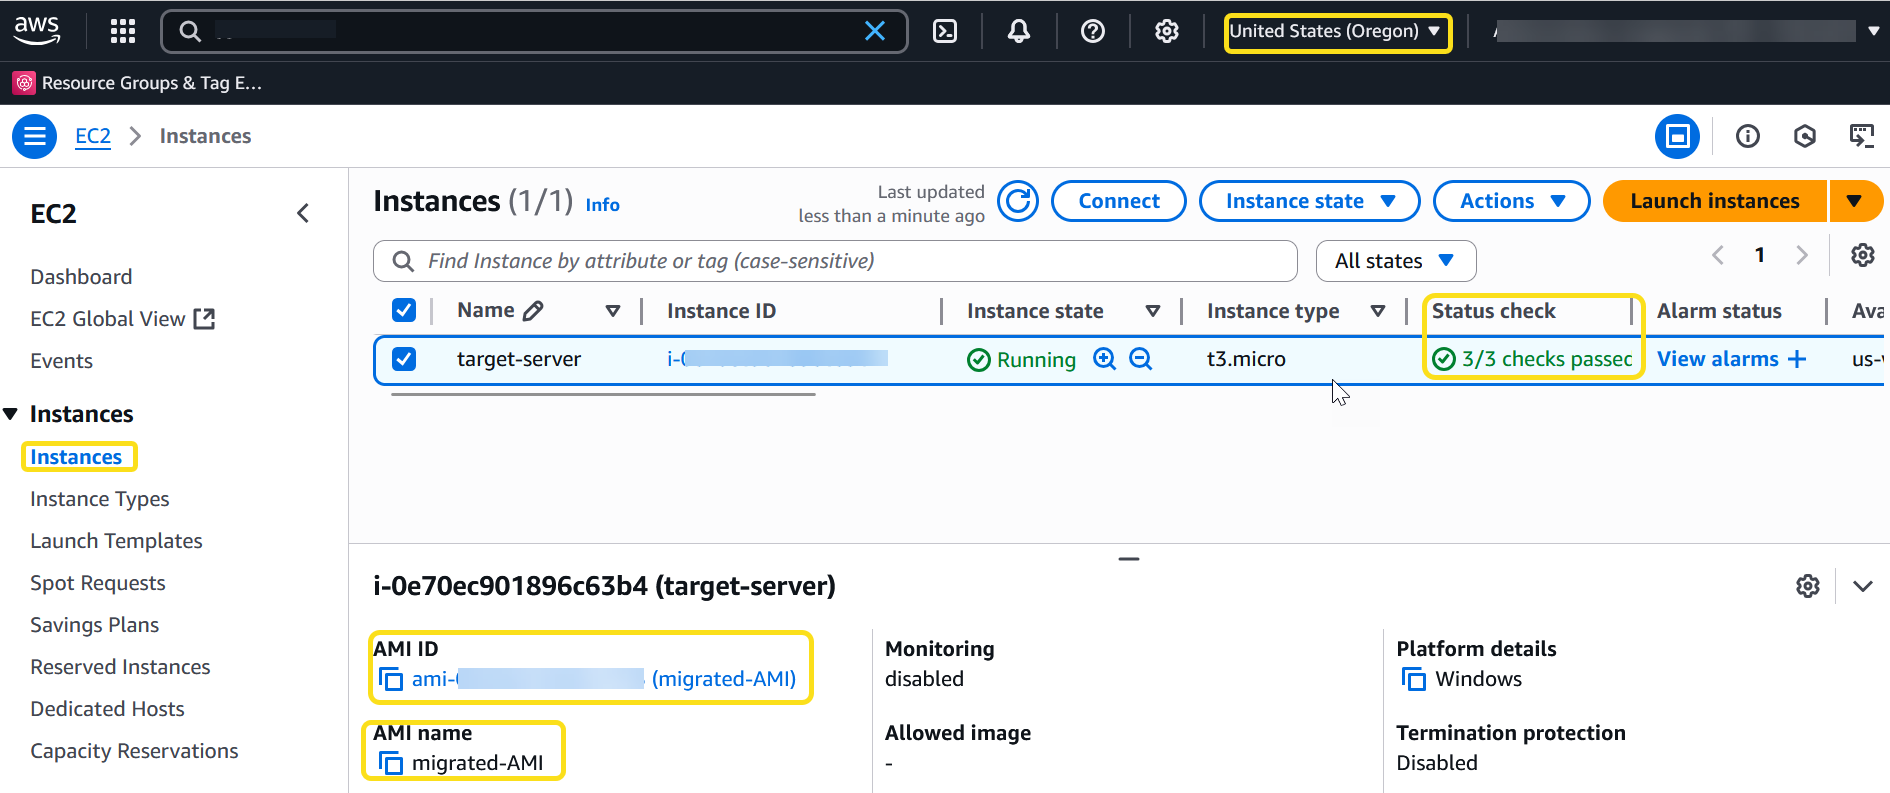
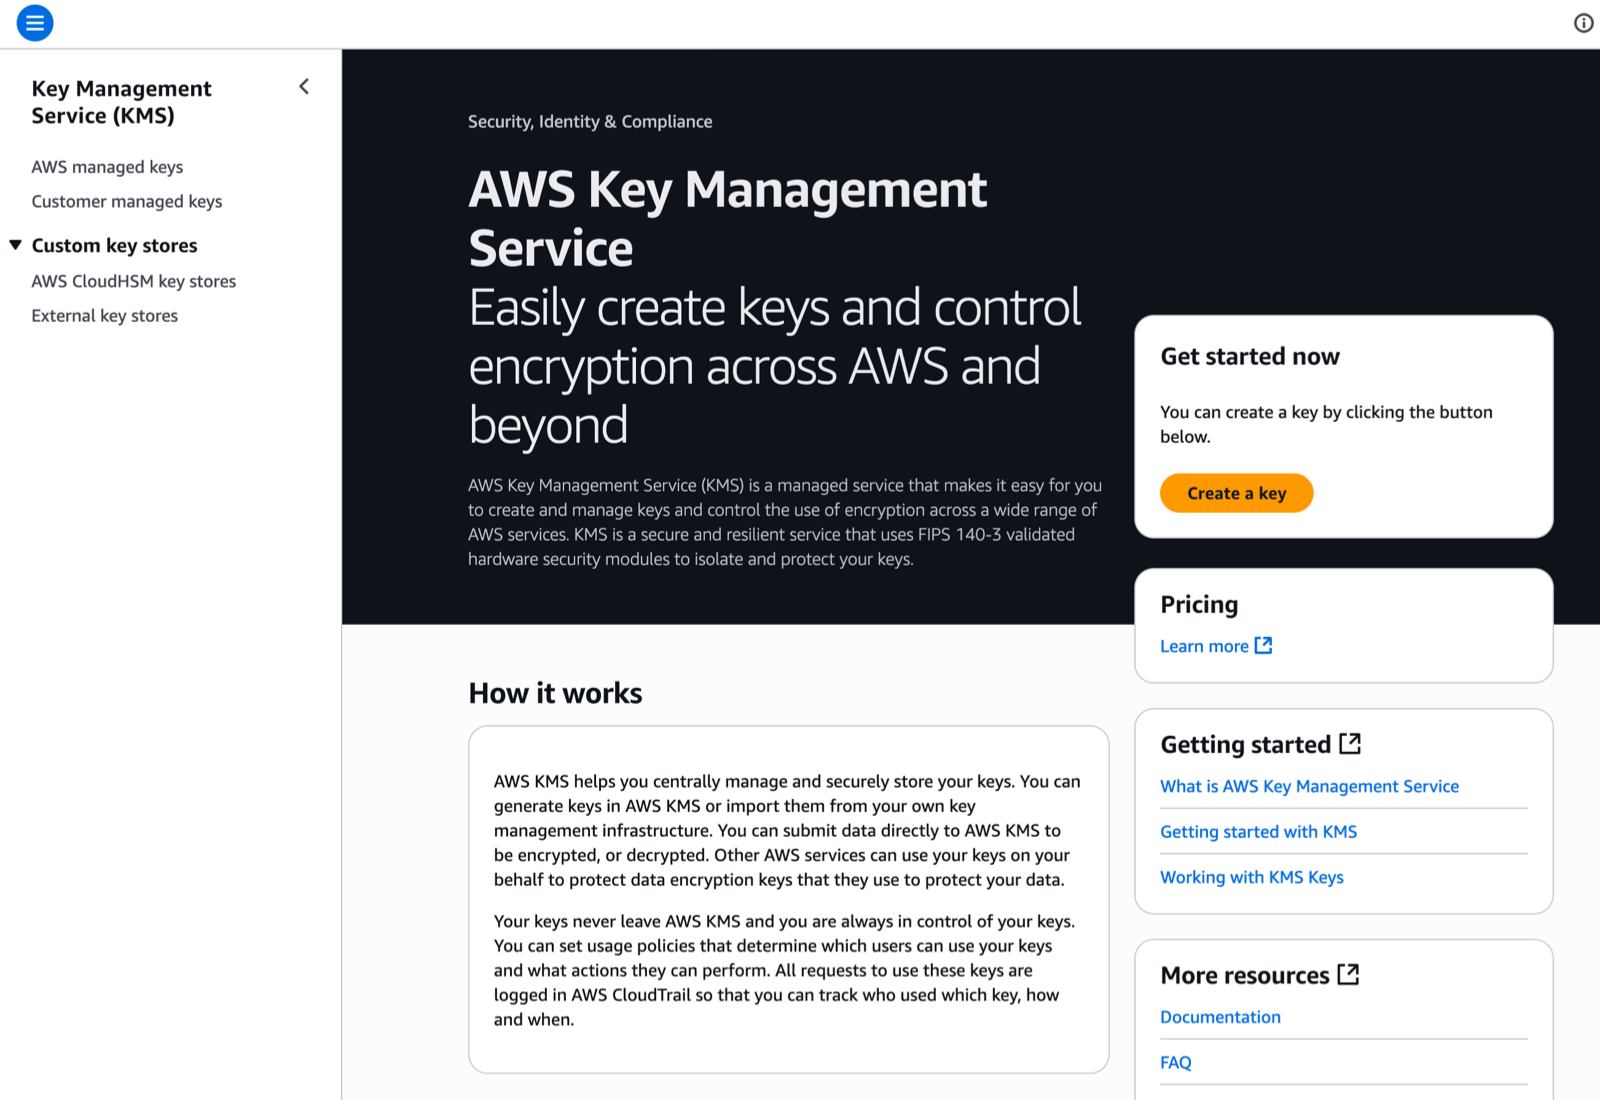
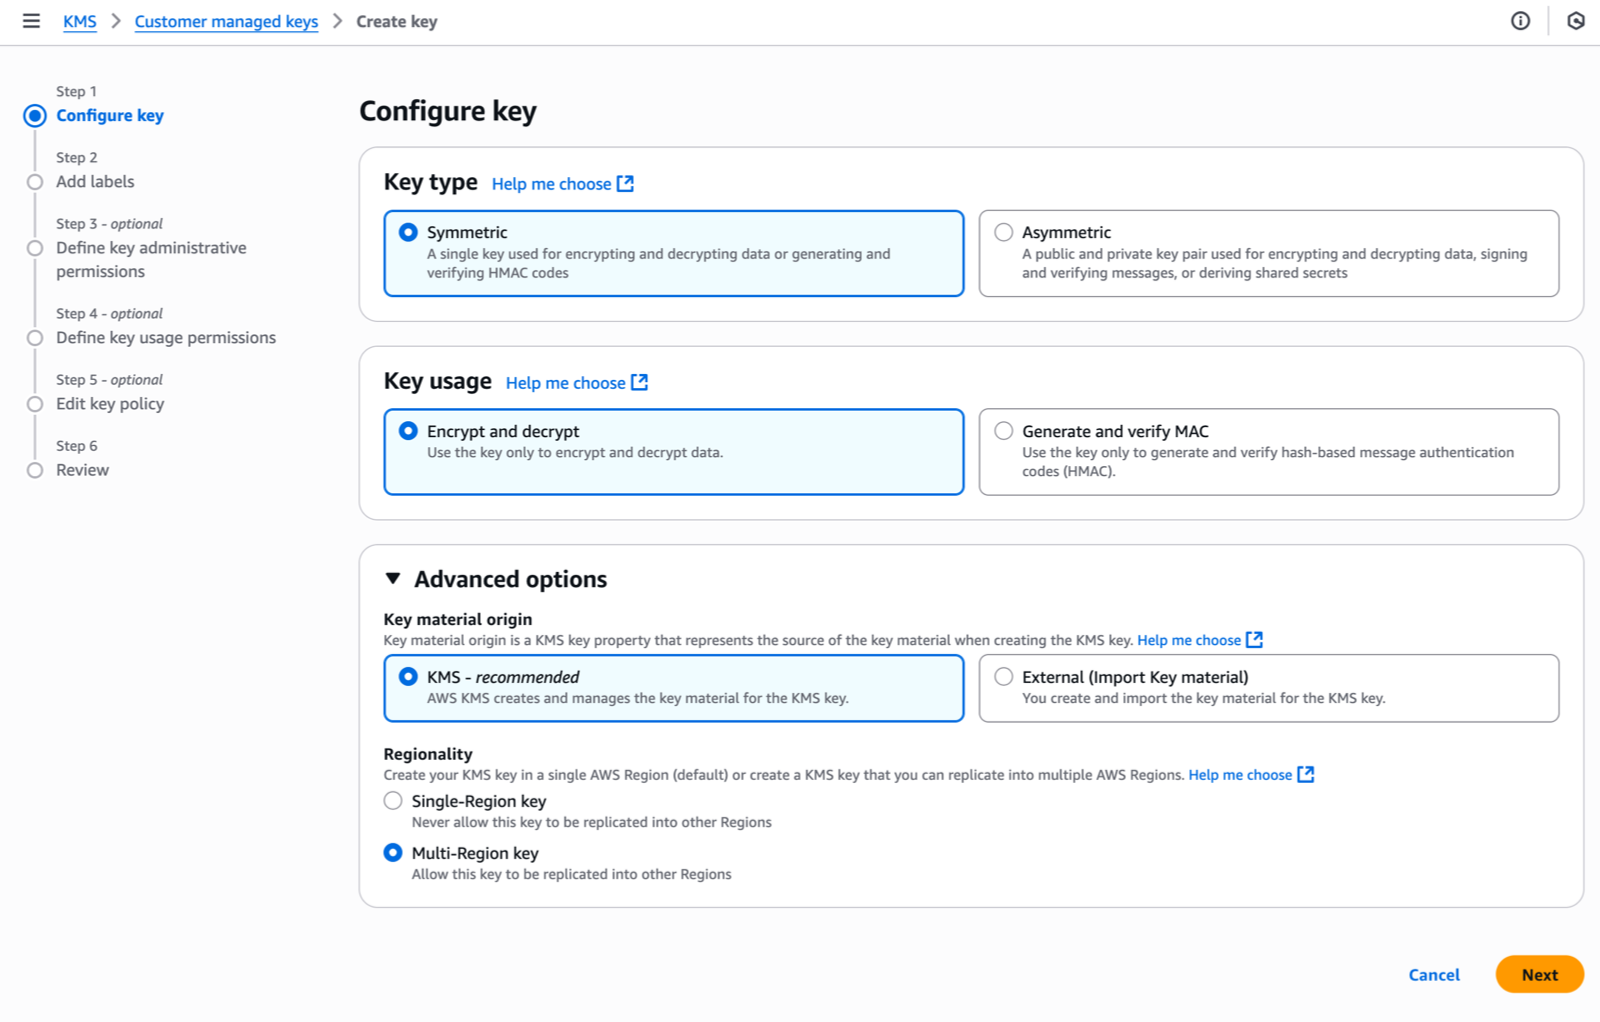
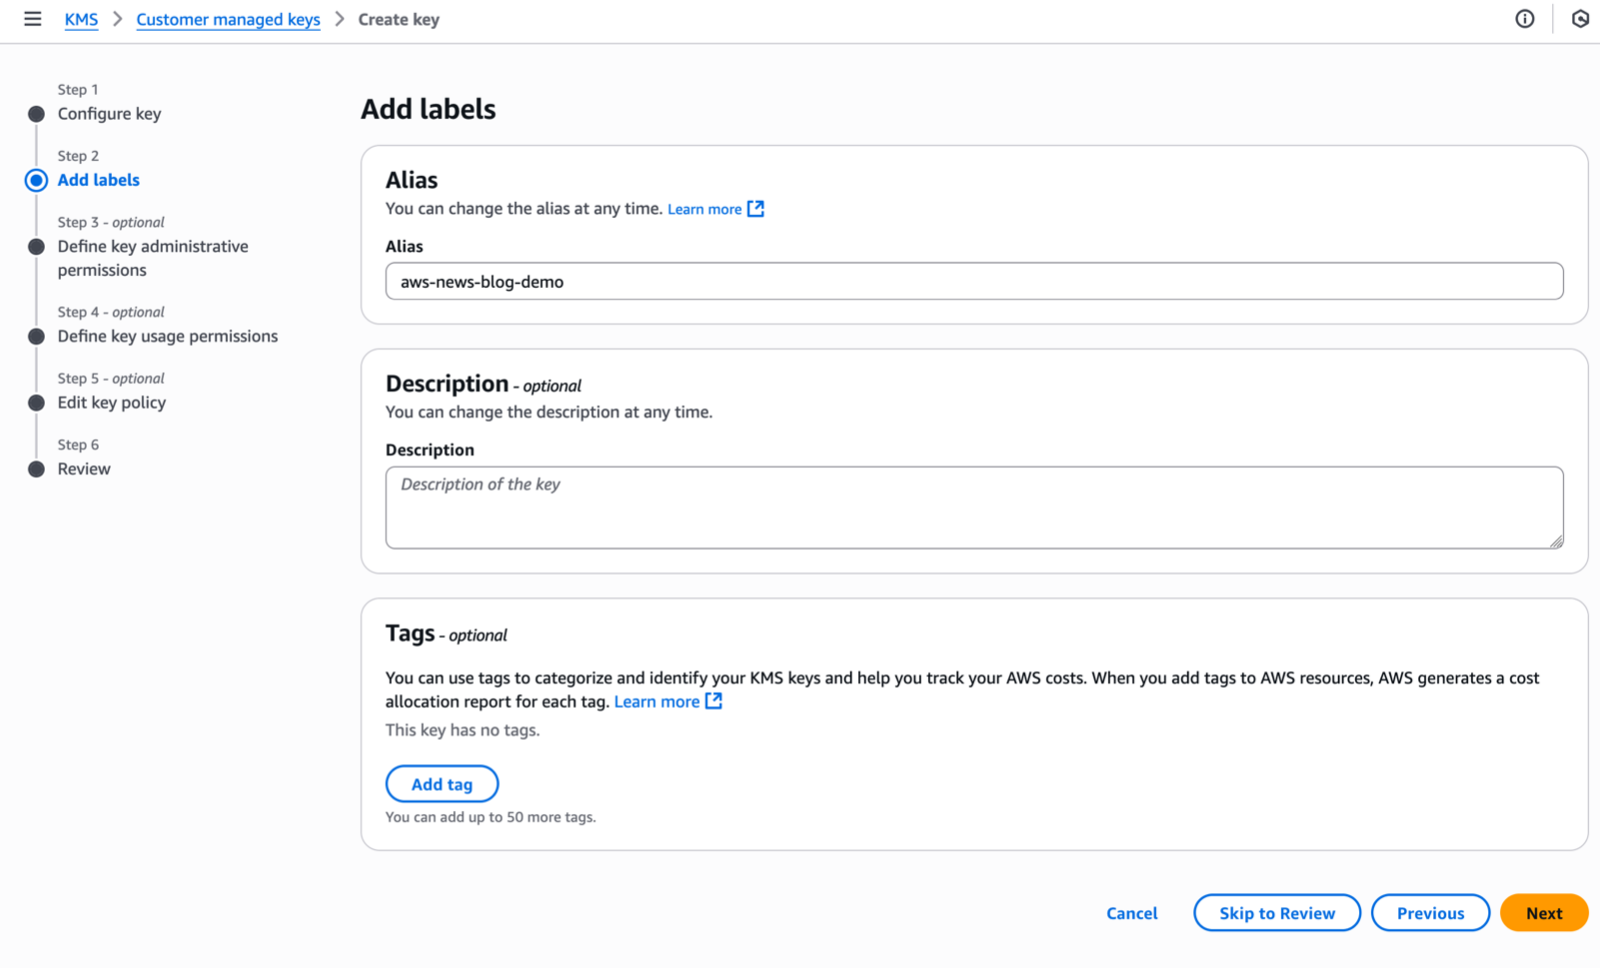
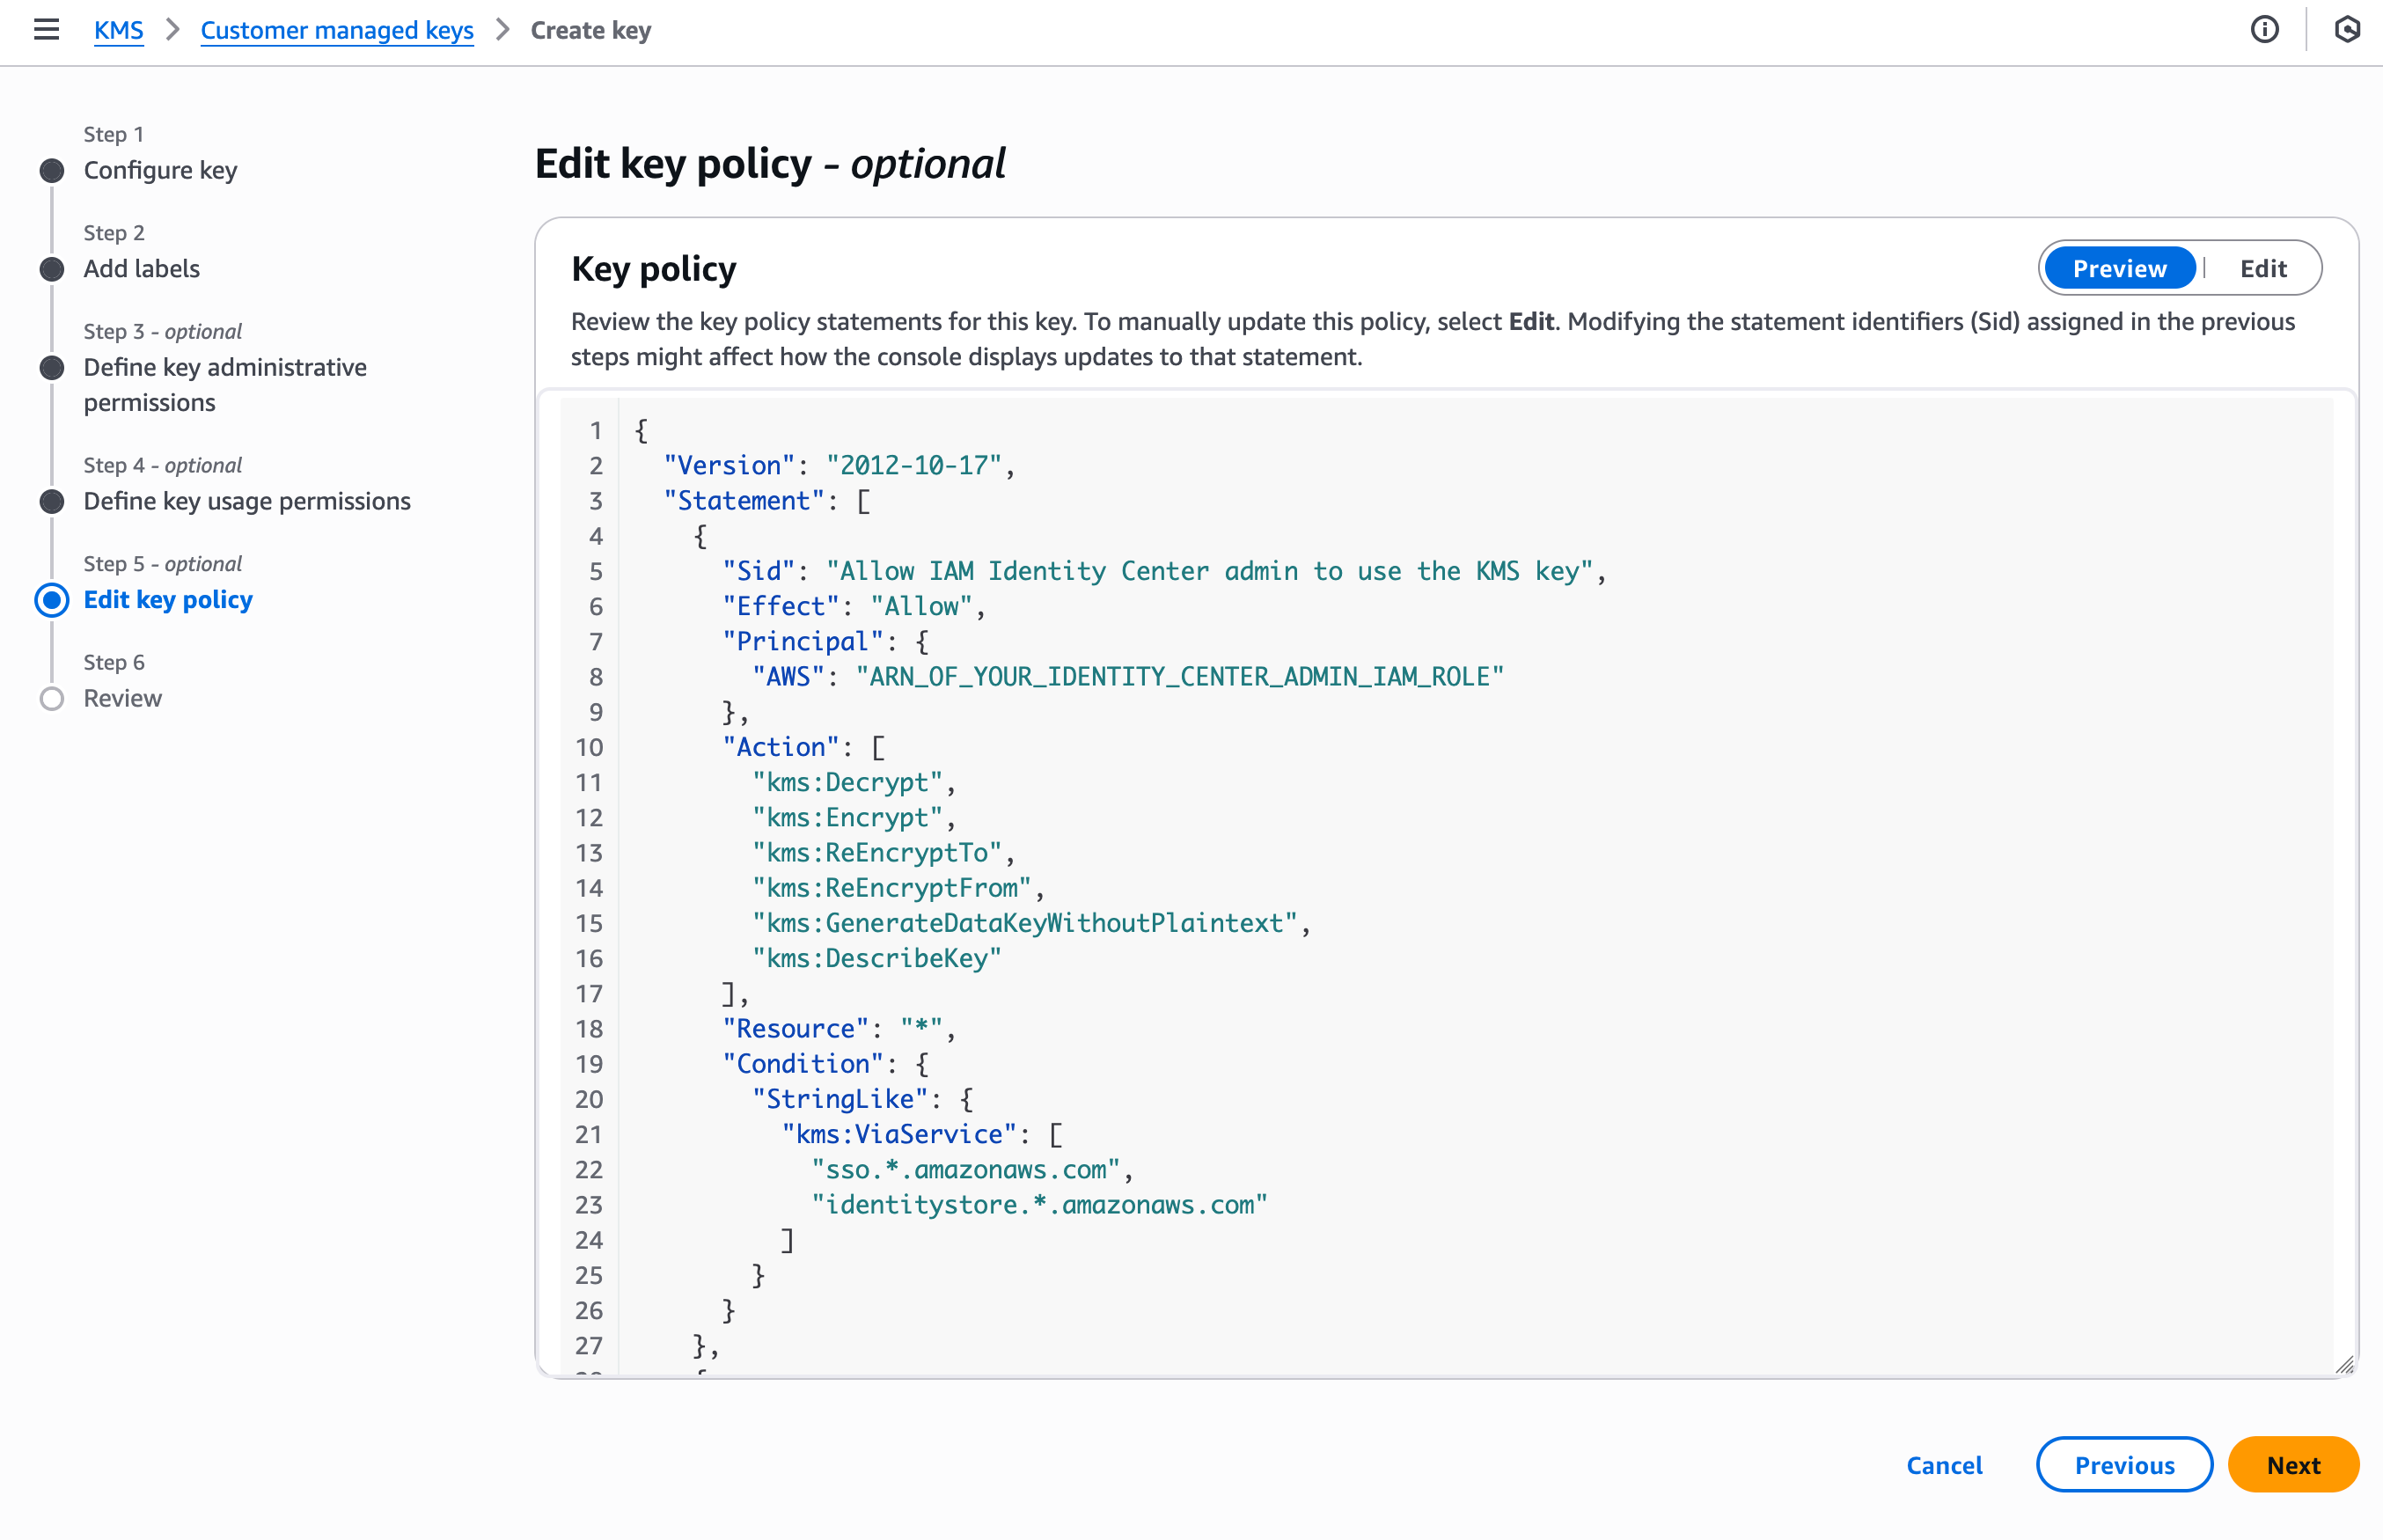
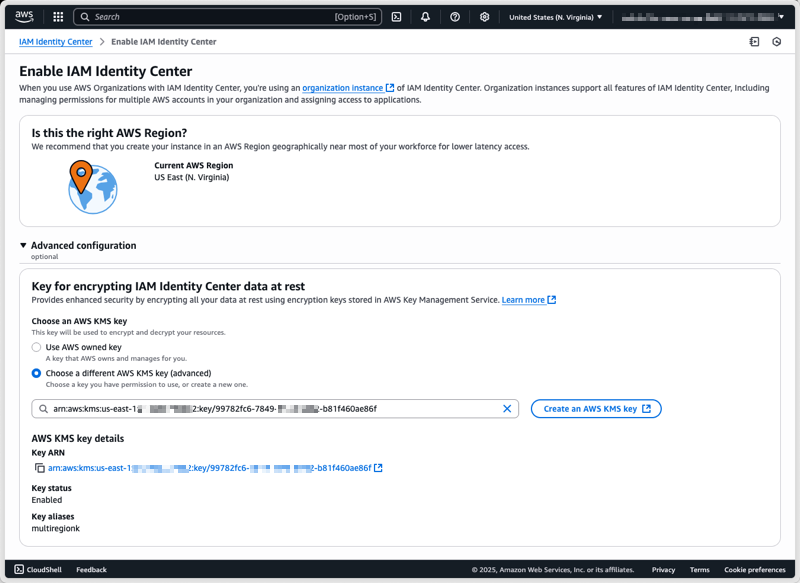
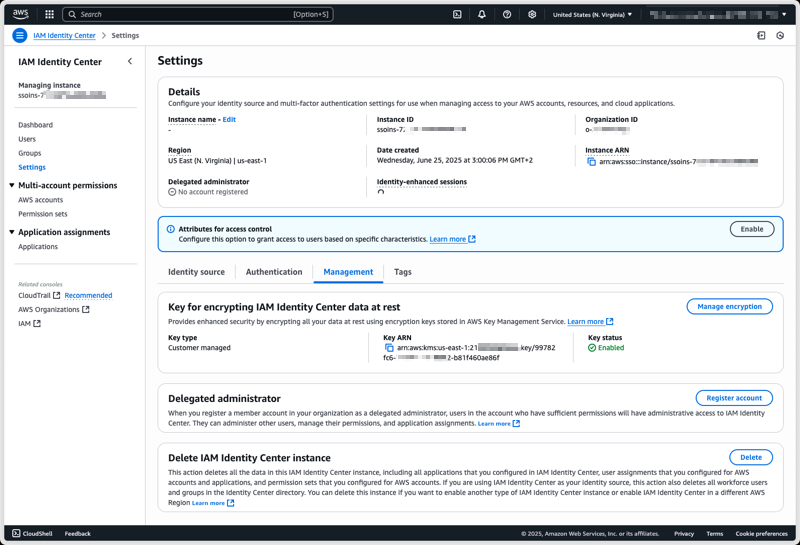
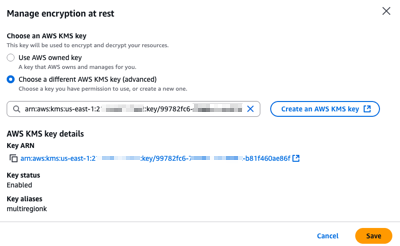
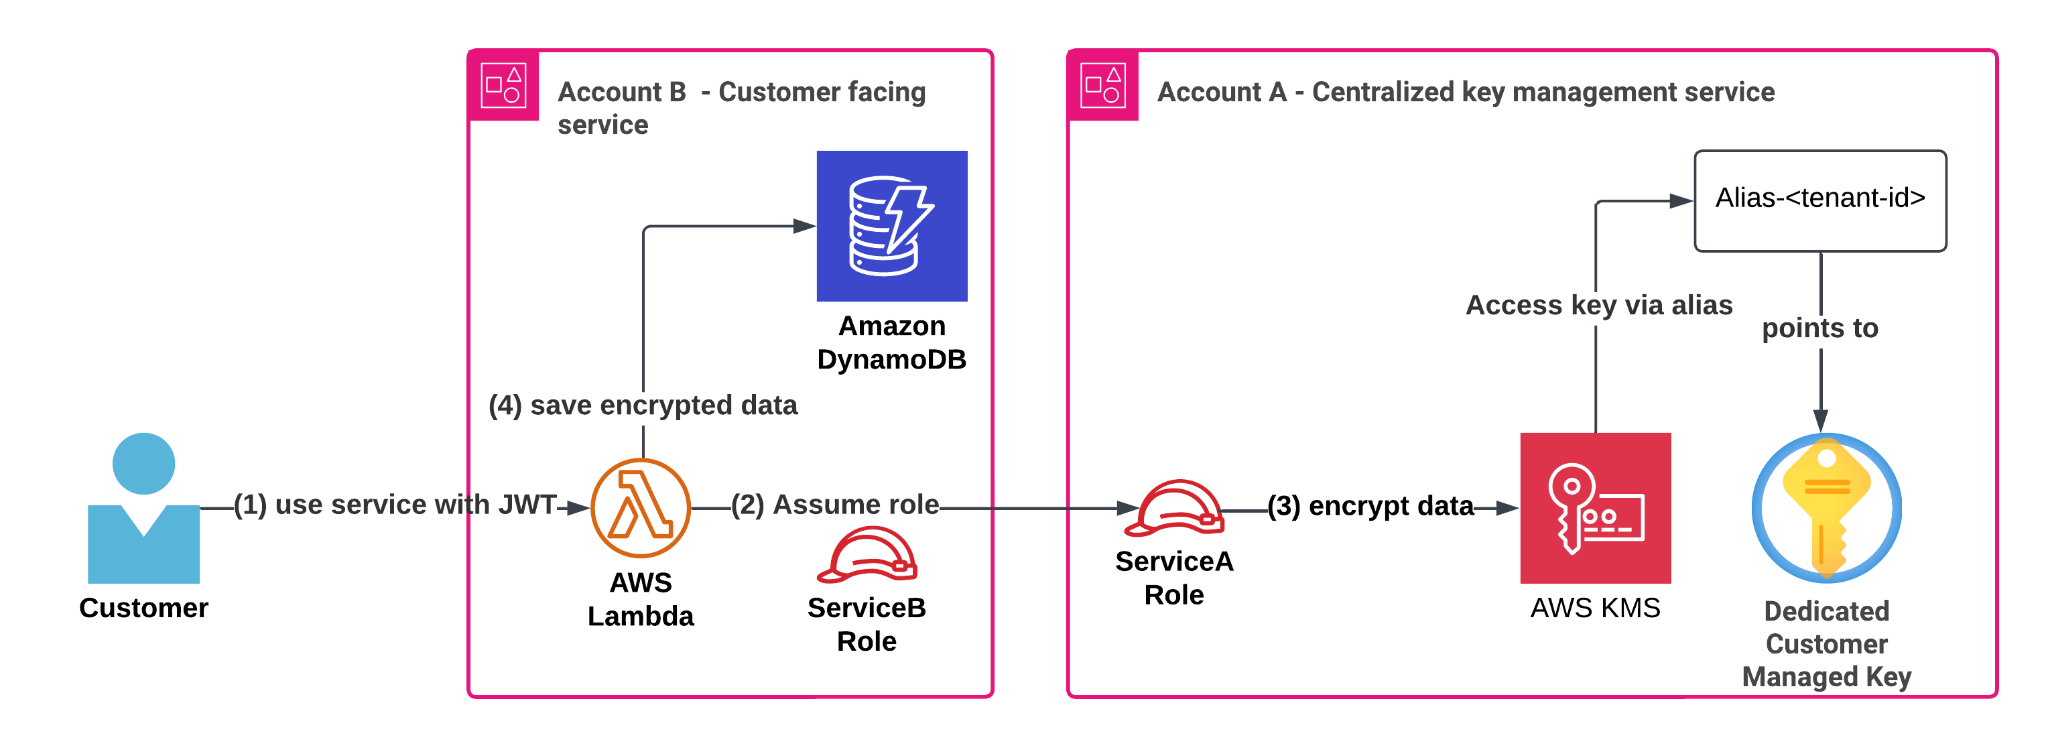
 Figure 1: AWS KMS GenerateDataKey requests per second without TLS connection reuse
 Figure 2: AWS KMS GenerateDataKey requests per second with TLS connection reuse