Радев е прав за символите на антифашизма, но бърка, че са паметници от бетон

Post Syndicated from Боян Юруков original https://yurukov.net/blog/2026/antifacist/

Радев е прав. Символите на антифашизма и борбата срещу политическата, националистическа и религиозна радикализация ерозират.

Това, което изначално бърка е, че тези символи никога не са били статуи. Особено не на чужди войски, които някога са окупирали България и държавниците от потретите в кабинета му яростно са пъдили от страната. Не и на същата, която сега заплашва България с ядрени удари.

Символите на тази борба са в ежедневното поведение на политици и общественици. Това, което приемаме за допустимо в ефира, трибуната на парламента и обществения диалог. Това, от което искаме децата ни да се учат и вдъхва доверие, а не страх в самите нас и близките ни. Тези символи ерозират всеки път, когато се затворят очи за паравоенни организации, преиначат случаи на банди с тийнове биещи по паркове и неудобни за властта протести, обърне гръб на изнасилвания, домашно насилие, убийства на жени и различни и активно се подкрепят и хвалят елементи подклаждащи омаза и водещи до подобни убийства.

Символите на тази борба са обществени, а не инфраструктура. Те са с личен пример, а не от камък. Радев е в политиката отдавна и поведението му през годините, както и това на съветниците и хората около него сега, не може да се нарече обществено или за пример. Това включва както залитанията към радикални идеологии и обслужване на чужди военни интереси, така и тъпкането на религия в гърлото на светското образование и децата ни.

Паметникът е нещо, зад което можеш да се скриеш физически и в преносен смисъл. Повечето се вдигат именно с тази цел. Пред постъпките си всеки следва да стои гордо изправен, а не да отклонява вниманието и да сочи към купчина бетон или другите.

За политическите поуки и политическата злоупотреба при травмиращи обществото инциденти

Post Syndicated from Bozho original https://blog.bozho.net/blog/4616

Убийството в Пловдив, при което човек беше пребит от група тийнейджъри и впоследствие умря от раните си, причинени по особено жесток начин, е поредната трамва за българското общество. Такива травмиращи моменти не бива да стават повод за политически престрелки и затова няма да видите сочене с пръст от страна на политическата сила, която представлявам. Освен за едно – за политическата злоупотреба с трагедии.

За съжаление, премиерът Радев подходи политически безотговорно и нападна опозицията, на практика обвинявайки я за убийствата – точно обратното на това, което трябва да направи един държавник в такъв момент.

В същото време идеологическите крепители на правителството му от няколко дни опитват да омаловажат случая и да го представят като битов инцидент – не, това не е битов инцидент или едни инициали, споменати между другото в криминалните хроники. Това е същият “идеен кръг”, който пригласяше при превръщането на предходния травматичен случай с убийства и самоубийства в политическо оръжие (случая “Петрохан”).

Разбира се, от никой случай не бива да се правят генерални заключения за държавата и обществото, но от всеки такъв случай трябва да се извадят поуки, да се научат уроци и да се вземат мерки.

Фундаментално заболяване, от което страда нашето общество, е недоверието към институциите – и то, за съжаление, е напълно основателно, предвид всеизвестното използване на тези институции за лични цели. Когато е широкоизвестно, че МВР пази наркодилъри, службите покровителстват радикални групи, а прокуратурата пази корумпирани политици, когато много публични политики са проформа, а дори тези, които не са, рядко постигат резултати, когато “за милиони няма закони, за кокошка няма прошка” е национален слоган, няма как да се култивира такова доверие.

Но общото говорене за “недоверие в институциите” не върши работа. При убийството в Пловдив се преплитат поне 5 конкретни сюжета от неработещата държава и недоверието към нея.

1. Вземането на правосъдието в свои ръце – когато държавните органи не си вършат добре работата по преследване на определени престъпления – в случая сексуални посегателства срещу малолетни и непълнолетни – това отваря вратата за “ловци на педофили”. Но ловците не постигат правосъдие – освен очевидно грешният подход за улично правосъдие, в наказателният кодекс няма престъпление, при което някой се представя за лице под 16 години. Т.е. дори някой “ловец” да хване и да предаде някого на полицията, тя няма много какво да направи. Но това не означава, че няма цяло движение, което се занимава с тази тема – има издадена книга, телевизионни репортажи. Сега вече всички вижда защо това е неправилно, а някои бързат да трият статии и статуси, но фактът, че определени говорители промотират вземането на правосъдието в свои ръце (без значение с какви евфемизми е облечено то), е компонент от случилото се.

2. Превръщането на чувствителни теми в остри и разделящи политически позиции – популистки партии като Възраждане и ИТН, вземат на въоръжение инструментариума за политическо разделение от други държави – и от Русия, и от запада, и го прилагат пряко в България. Чуждестранни агенти, “пропаганда” в училище и какво ли още не. Всеки, който заеме нюансирана позиция, бива обявен за защитник на сексуални престъпници, за чуждестранен агент, а броячът на лайковете на очернящите статуси срещу него расте като брояч на такси-копърка. Това се пренася и на парламентарната трибуна – аз и мои колеги сме наричани какво ли не. И в поляризираната политическа среда и при непрестанните избори, човек става много внимателен да не вземе някой да извади две изречение от контекст и да бъде нарочен, че защитава насилници на деца.

Примери могат да бъдат дадени много, но ето един: моят опит да направя ефективна уредба за превенция на това осъдени (или дори обвинени) за сексуални посегателства да не могат да заемат длъжности, свързани с работа с деца, беше изкривен на 180 градуса и превърнат в заглавие “иска да премахне регистъра на педофилите”. Затова и в момента няма адекватна уредба, но никой няма да каже “Възраждане са виновни за това, че се наемат осъдени за сексуални посегателства да работят с деца”. А прословутият регистър е много недомислен, поради което и не върши работа, но това може да бъде оправено само ако имаш мнозинство. Ако нямаш, всяко предложение става жертва на изостреното говорене срещу “морално-деградиралия” опонент.

Отговорността на публични говорители и политици да не радикализират общественото мнение не е осъзната в българското публично пространство. А тази радикализация на говоренето води и до радикализация в действията. Не директно и не веднага, но рано или късно ефектът е такъв.

3. Радикализацията – службите за сигурност трябва да проучват затворени групи, да установяват радикални елементи, да противодействат на паравоенни организации. Да изследват проникването на опасни и противозаконни идеологии, като нацизма, фашизма, неонацизма и да предприемат действия по тяхното пресичане. В случая с Пловдив става дума за последователи на руски неонацист. В други случаи произходът на лошия пример може да е друг. Но общото е неефективната работа на службите за сигурност срещу идеологии и течения, свързани с политическо и идеологическо насилие.

Вместо да пресичат такива опасни течения, службите за сигурност правят едно от две неща: или бездействат, или си отглеждат такива радикални групички, за “когато потрябват”. Бездействието е поради лиса на фокус и разбиране за значението на тези течения. Но дори когато има сигнали или инциденти, най-често службите (и МВР) започват да покровителстват такива групи, вкл. чрез вербуване на секретни сътрудници. За когато потрябват – ако трябва да се подготви някой компромат срещу публична личност, ако трябва да се хвърлят пиротехнически изделия по полицията по време на протести, ако трябва да се нагнети напрежение в определен момент. Само че понякога това излиза извън контрол. По този начин радикализацията или се проспива, или се покровителства.

Но трябва да имаме предвид и друго – заради гореописаното недоверие, ако ДАНС започне по-активно да следи какво се случва в социалните мрежи, ще има сериозно и оправдано недоволство – как така ДАНС ще следи какво пишем. Защото когато една служба е ползвана дълги години с политически цели, за компромати, за задкулисни игри, обществото ѝ няма доверие, че с няма да има злоупотреби. И така службите си самовръзват ръцете заради собствената си завладяност.

4. Образователната система е в колапс – ако има нещо, което може да противодейства дългосрочно и ефективно на всяка пропаганда, на всяко радикализиращо течение и не всеки популист, това е образователната система. Само че нашата е в пълна невъзможност да го направи, а дори напротив – вместо критично мислене, произвежда функционална неграмотност. И фатално се проваля в създаването на умения за идентифициране и отсяване на пропаганда и логически заблуди – нещо, с което например Финландия се справя много добре, поради дългосрочни целенасочени усилия. Няма да правя анализ на какви структурни предпоставки се дължи този ефект, но той е лесно установим и количествено, и качествено.

Има и редица въпроси към образователната система – можело ли е при работещи образователни институции това да бъде предотвратено? Имало ли е знаци и сигнали, че тази група ученици е склонна към агресия и каква е била реакцията? Вероятно част от тези въпроси ще получат незадоволителни отговори в следващите дни и седмици.

5. Социалните мрежи – мегафонът на крайностите. Алгоритмичното усилване на скандала, на радикалното, на разделящото, е фундаментален проблем на съвременните общества. Този ефект е изследван отдавна, и отричан от социалните мрежи, които търгуват вниманието ни за парите на рекламодателите. Със социалните мрежи има множество под-проблеми: използването на алгоритмичното усилване за разпространение на пропаганда. Руската федерация е особено добра в това, прилагайки старите учебници на КГБ в 21-ви век, чрез тролски ферми и мрежи от свързани сайтове, групи и страници, да насажда – дълго и методично – наративите за упадъчния запад, за великата Русия, но по-лошото: да дълбае в съществуващи разделения в европейските общества, като поляризира дебата.

Но ще бъде грешка, ако за всяка несгода обвиним руската пропаганда. Тя работи, ако има почва за това, ако има съществуващи разделения, и местни безотговорни играчи, които да се възползват. Тя усилва и разкрасява реалните усещанията на хората за съвременни проблеми, които държавите (в т.ч. България) не успява да реши. И да, в случая руски неонацист – инфлуенсър, в комбинация с български такъв, са създали в главата на обвиняемите за убийството фалшива реалност, която ги е превърнала в чудовища.

Извън усилването на крайности и среда за пропаганда, социалните мрежи са пристрастяващи и увреждащи неизградените психики на подрастващите. Затова в цяла Европа (и не само) е активен дебатът за забрана на социалните мрежи за деца. Ако нямаха достъп до социални мрежи, щяха ли да имат стимул да правят видеа на побоя и да ги качват за няколко лайка? Ако нямаха достъп до социални мрежи, щяха ли да паднат в заешката дупка на неонацистки течения? Много хора си задават тези въпроси и отговорът изглежда примамливо лесен. Той технологично и правно е много по-сложен, но след такива травмиращи обществото случаи, нюансите се чуват още по-малко.

Индивидуалната наказателна и морална отговорност за убийството безспорно е на извършителите, но комбинацията от (поне) тези пет структурни проблема няма как рано или късно да не доведе до това, което се случи в Пловдив. И затова дискусията е толкова хаотична и разнопосочна – защото се преплитат твърде много проблеми, които отдавана имат нужда от решения, но никога не са на фокус.

Ако имахме същата мотивация като нашите опоненти, ако бяхме толкова безотговорни и безочливи, колкото тях, и ако имахме същия медиен инструментариум, вероятно този случай можеше да се превърне в “консервативния” Петрохан – политически експлоатиран срещу тези, които насъскваха срещу различните, които дехуманизираха опонентите си, които създадоха абсолютно измислени идеологически разкази и политизираха до червено трагедията с шест трупа от началото на годината.

Но ние нямаме ни най-малко намерение да правим така, както биха те – всеки ден, през платени говорители и тролски ферми (каквито нямаме), да свързваме родители с нашите опоненти и да чертаем сценарии за ценностния упадък – единият баща бил избирател на Възраждане, другият баща бил съдружник на човека на Пеевски и коалиционен партньор на Борисов в Пловдив, едната майка била отявлен русофил, кандидат-депутатът на Прогресивна България от сдружение РОД промотирал ловеца на педофили (и след убийството изтрил статията), под ръководството на любимия на Радев шеф на ДАНС не е свършено нищо за ограничаване на радикализацията, а сигнал срещу един от убийците е имало преди месец, но убийството не е предотвратено. Няма да доукрасим тази фактология и да я навържем в конспиративен разказ за това, че една или друга партия е виновна за убийството.

Не просто от желание за по-висок политически стандарт, а защото това само би задълбочило проблема, разделенията и недоверието. Но няма и да валидираме желанието на идеологически защитници на властта всички дружно да махнем с ръка и да кажем, че това е просто битов инцидент. Няма и да мълчим, когато премиерът Радев безотговорно създава поредното противопоставяне, хвърляйки вината върху опозицията с абсурдни аргументи за паметници (нищо, че убийството е станало под зоркия поглед на Альоша).

Случаят в Пловдив трябва да има политическа реакция. Но не негативна, деструктивна и безотговорна, като тази на премиера, който за пореден път с подпъхнати думи от свои идеологически съветници разделя обществото, а осъзната и насочена към решаване на проблеми.

По горните 5 точки трябва да се вземат политически и законодателни решения. И те ще бъдат трудни.

По въпроса с преследването на сексуални посегателства срещу малолетни и непълнолетни трябва да бъде обсъдена уредба (в Наказателния кодекс), така че ако служители под прикритие се представя онлайн за лице под 16 г, да може осъществяващите контакти със сексуални цели да бъдат осъдени (ако не е налице провокация пък престъпление). А по по-широкия въпрос с ефективното правосъдие, има още много, много работа, която започва от предстоящия избор на ВСС.

По въпроса с острите и разделящи политически позиции по чувствителни теми ще трябва бавно да бъде изграден консенсус, че когато когато си политик, публичен говорител, журналист, нямаш право да радикализираш хората и дебата, да дехуманизираш, да сочиш с пръст. За щастие ИТН и Възраждане получиха своето електорално наказание на тези избори, но опасявам се, че не е само заради безотгвоорното им поведение. А Прогресивна България под ръководството на Радев и съветите на Иво Христов започва да заема тяхното място.

По въпроса с радикализацията ще е нужна сериозна реформа в службите за сигурност, в института за доброволните (секретни) сътрудници на ДАНС и МВР (и контрола върху злоупотребата с тях), и фундаментално премахване на ченгеджийския маниер на цялата ни правоохранителна система, която приоритизира създаването на компромати и зависимости пред справедливостта и сигурността.

По въпроса с образованието ще са нужни съществени промени в разбирането за това какви са целите на средното образование и как те се постигат – и добавянето на един час по каквото и да било – по добродетели, религия, гражданско образование, дигитални умения и какво ли още не – само по себе си няма да реши тези проблеми. Ако не начертаем път към постигане на функционална грамотност, гражданска осъзнатост, инициативност и устойчивост на дезинформация и пропаганда, не правим нищо.

А по темата със социалните мрежи – дебатът за забраните на социалните мрежи ще продължи (и според мен такива мерки трябва да стъпят не на проверка на възрастта през електронна идентификация за всички потребители, а на приложенията за родителски контрол); ще трябва да се обсъдят мерки срещу координираното неавтентично поведение, използвано за усилване на пропагандни наративи, ще стигнем и до дебата за ограничаване на пристрастяващите елементи от дизайна.

Когато тези промени изискват законодателна инициатива, ние ще представим съответните законопроекти – няма да избягаме от своята отговорност да даваме предложения и идеи и с необходимата умереност за достигане до консенсус – не просто парламентарен консенсус, а обществен такъв.

А политческият урок е, че тези, които имаме повече видимост и мненията ни се чуват, трябва да подхождаме орговорно с тази привилегия. И да не я ползваме за насъскване и разделяне и за краткосрочни политически дивиденти, водещи до дългосрочни проблеми. Трябва всички, които с лекота се качваме на парламентарната трибуна или заставаме пред десетките микрофони, да достигнем до разбирането, че от думите ни има последствия. И да, този призив важи повече за нашите опоненти, но в никакъв случай не се изключваме от него.

Материалът За политическите поуки и политическата злоупотреба при травмиращи обществото инциденти е публикуван за пръв път на БЛОГодаря.

Reducing Text2SQL latency with parameterized query templates

Post Syndicated from Yury Brukau original https://aws.amazon.com/blogs/architecture/reducing-text2sql-latency-with-parameterized-query-templates/

If your Text2SQL system takes 25-30 seconds to respond, user engagement drops significantly. For teams scaling beyond pilot projects, this latency gap between a working demo and a production-ready tool is the biggest barrier to adoption. Without caching, every question triggers a Large Language Model (LLM) call to generate SQL, and those calls introduce challenges: unpredictable response times, throttling limits, and token costs that grow linearly with traffic. Parameterized query templates provide an intelligent caching layer that in our production deployment, reduced end-to-end latency by 80% and cut token consumption by over 50%, turning a slow prototype into a responsive production system. In this post, we walk through the architecture behind this approach, covering the implementation details, performance results, and lessons learned from running a Text2SQL system in production.

When you move AI applications from pilot to production, you need solutions that scale under real traffic and perform consistently. Traditional caching strategies, storing expensive computations once and serving them many times, don’t translate directly to generative AI. End users rarely phrase the same question the same way, context varies between sessions, and outputs depend on small input variations. Yet the underlying principle (caching) still holds value. Rather than abandoning caching entirely, the key is finding the right abstraction layer where similar requests can share cached results.

Solution overview

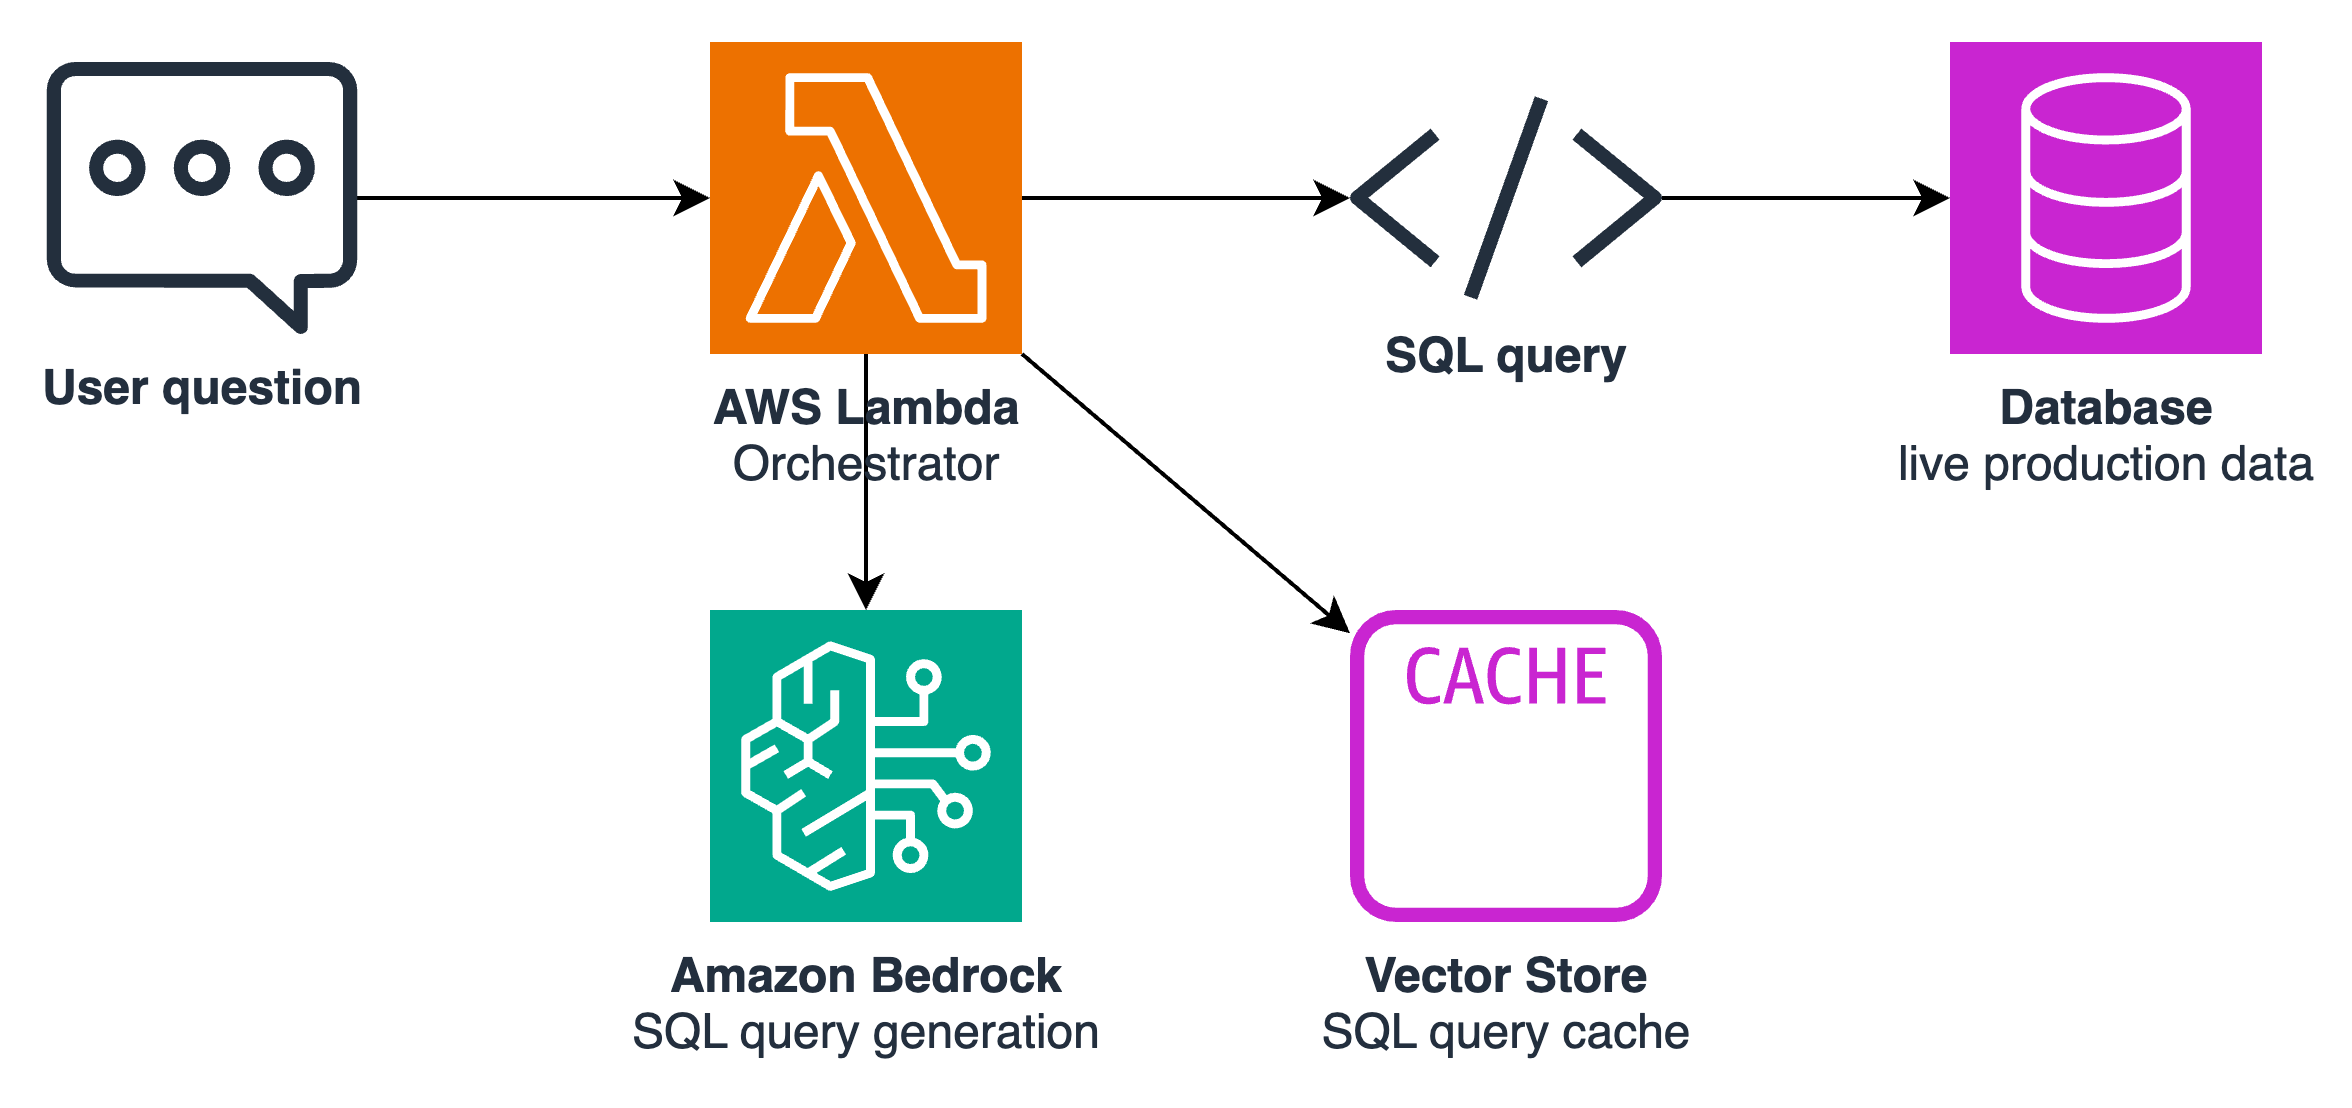
We applied the solution described in the following section to a system where business users query operational databases using natural language. You ask questions like “What were total sales in Q3?” or “Show me top performing products this month?” and the system generates SQL queries, executes them against the database, and returns results in conversational format. The system translates natural language to SQL using Amazon Bedrock foundation models, while AWS Lambda orchestrates the workflow. You can see a basic overview of used architectural components in Diagram 1.

Architecture diagram showing the Text2SQL system with Amazon Bedrock for SQL generation and AWS Lambda for workflow orchestration

Figure 1 — Solution overview architecture

During the initial implementation phase, the approach with generating and executing SQL queries for user questions on the fly worked well. Response quality was high, and users found the interface intuitive. After these positive results, we started looking into scaling the solution for production traffic. Preserving accuracy was the main priority. Experiments with smaller, faster models didn’t provide a good trade-off between query quality and latency reduction. The accuracy degradation wasn’t acceptable for our system.

This led us to explore alternative approaches, and caching naturally came to mind. Caching user question and answer pairs is the most straightforward option, but it has a fundamental limitation: underlying data changes constantly. An answer about Q3 sales cached today becomes incorrect as soon as new transactions are recorded. The cache would need constant invalidation, undermining its purpose.

Caching the SQL query instead solves this problem. A query like:

SELECT SUM(revenue) FROM sales WHERE quarter = 'Q3'

always fetches fresh data when executed, regardless of when it was cached. Structured Query Language (SQL) captures the user’s intent in a structured, deterministic form that remains valid even as data evolves. It also happens to target the most time and token consuming step in the pipeline, since generating SQL queries requires sending full schema context and examples to a frontier model.

Analyzing the generated queries revealed an opportunity to go further. Many queries follow the same structure, different only in their filter values. A question about Q3 sales produces:

SELECT SUM(revenue) FROM sales WHERE quarter = 'Q3'

while Q2 sales produce:

SELECT SUM(revenue) FROM sales WHERE quarter = 'Q2'

The same pattern appeared across product lookups, date ranges, and category filters. This led to the templating approach: instead of caching complete queries, we generalize them into templates with placeholders. A single template now covers an entire family of questions:

SELECT SUM(revenue) FROM sales WHERE quarter='{quarter}'

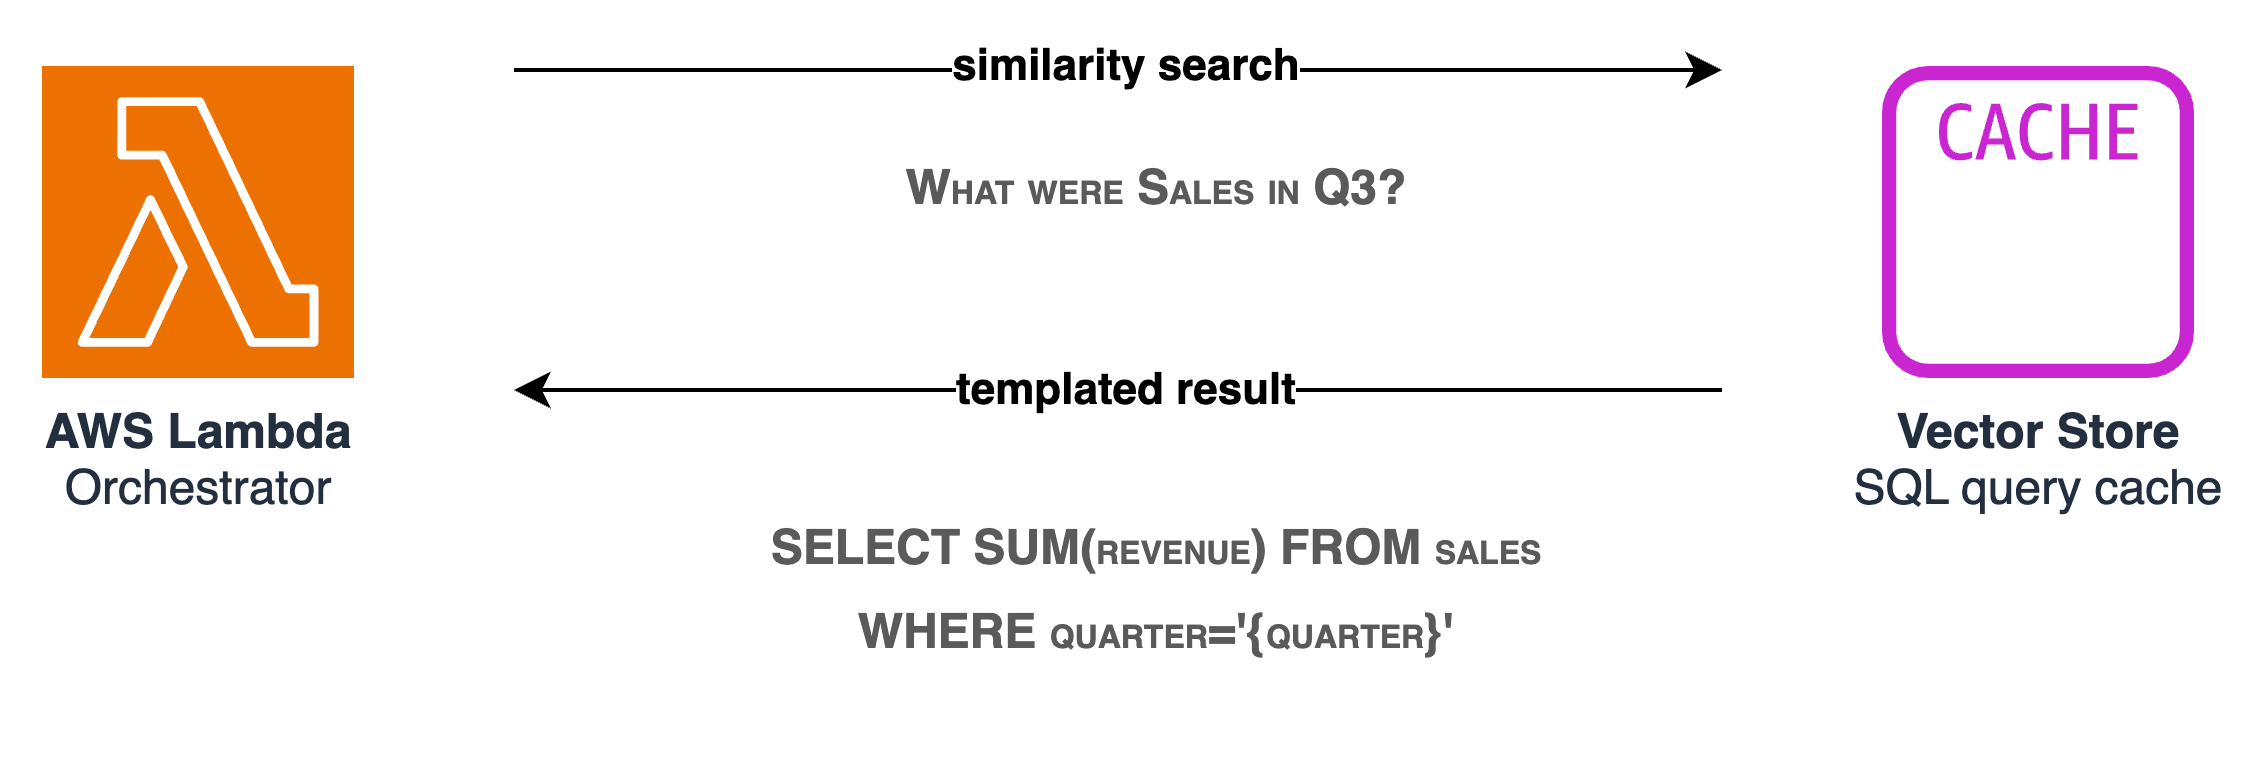
Flow diagram showing a cache hit path where a user question matches a stored template, fills placeholders with extracted entities, and executes the SQL query directly

Figure 2 — Templated SQL query cache hit

Templating solves the limited reusability of plain user question, but still leaves a challenge: how do you match an incoming question to the right template when users phrase things differently? “Show me Q3 sales” and “What were sales in Q3?” ask for the same data but share few words. Traditional string matching or keyword lookup would miss these connections. We address this by storing each template alongside a vector embedding of its original question. When a new question arrives, we compute its embedding and perform semantic similarity search against the cache. Because embeddings capture meaning rather than surface wording, both phrasings map to the same template with high confidence. If a match is found above a confidence threshold, we extract entities from the question using lightweight named entity recognition, fill the template placeholders, and execute the query directly, bypassing the LLM entirely. In Diagram 2, you can see the flow of a cache hit.

For questions without matching templates, the system falls back to full LLM generation. It then generalizes the newly generated query into a template, pairs it with the question’s embedding, and adds it to the cache. This creates a self-improving system where cache coverage grows organically as more query patterns are encountered.

Walkthrough – Text2SQL pipeline

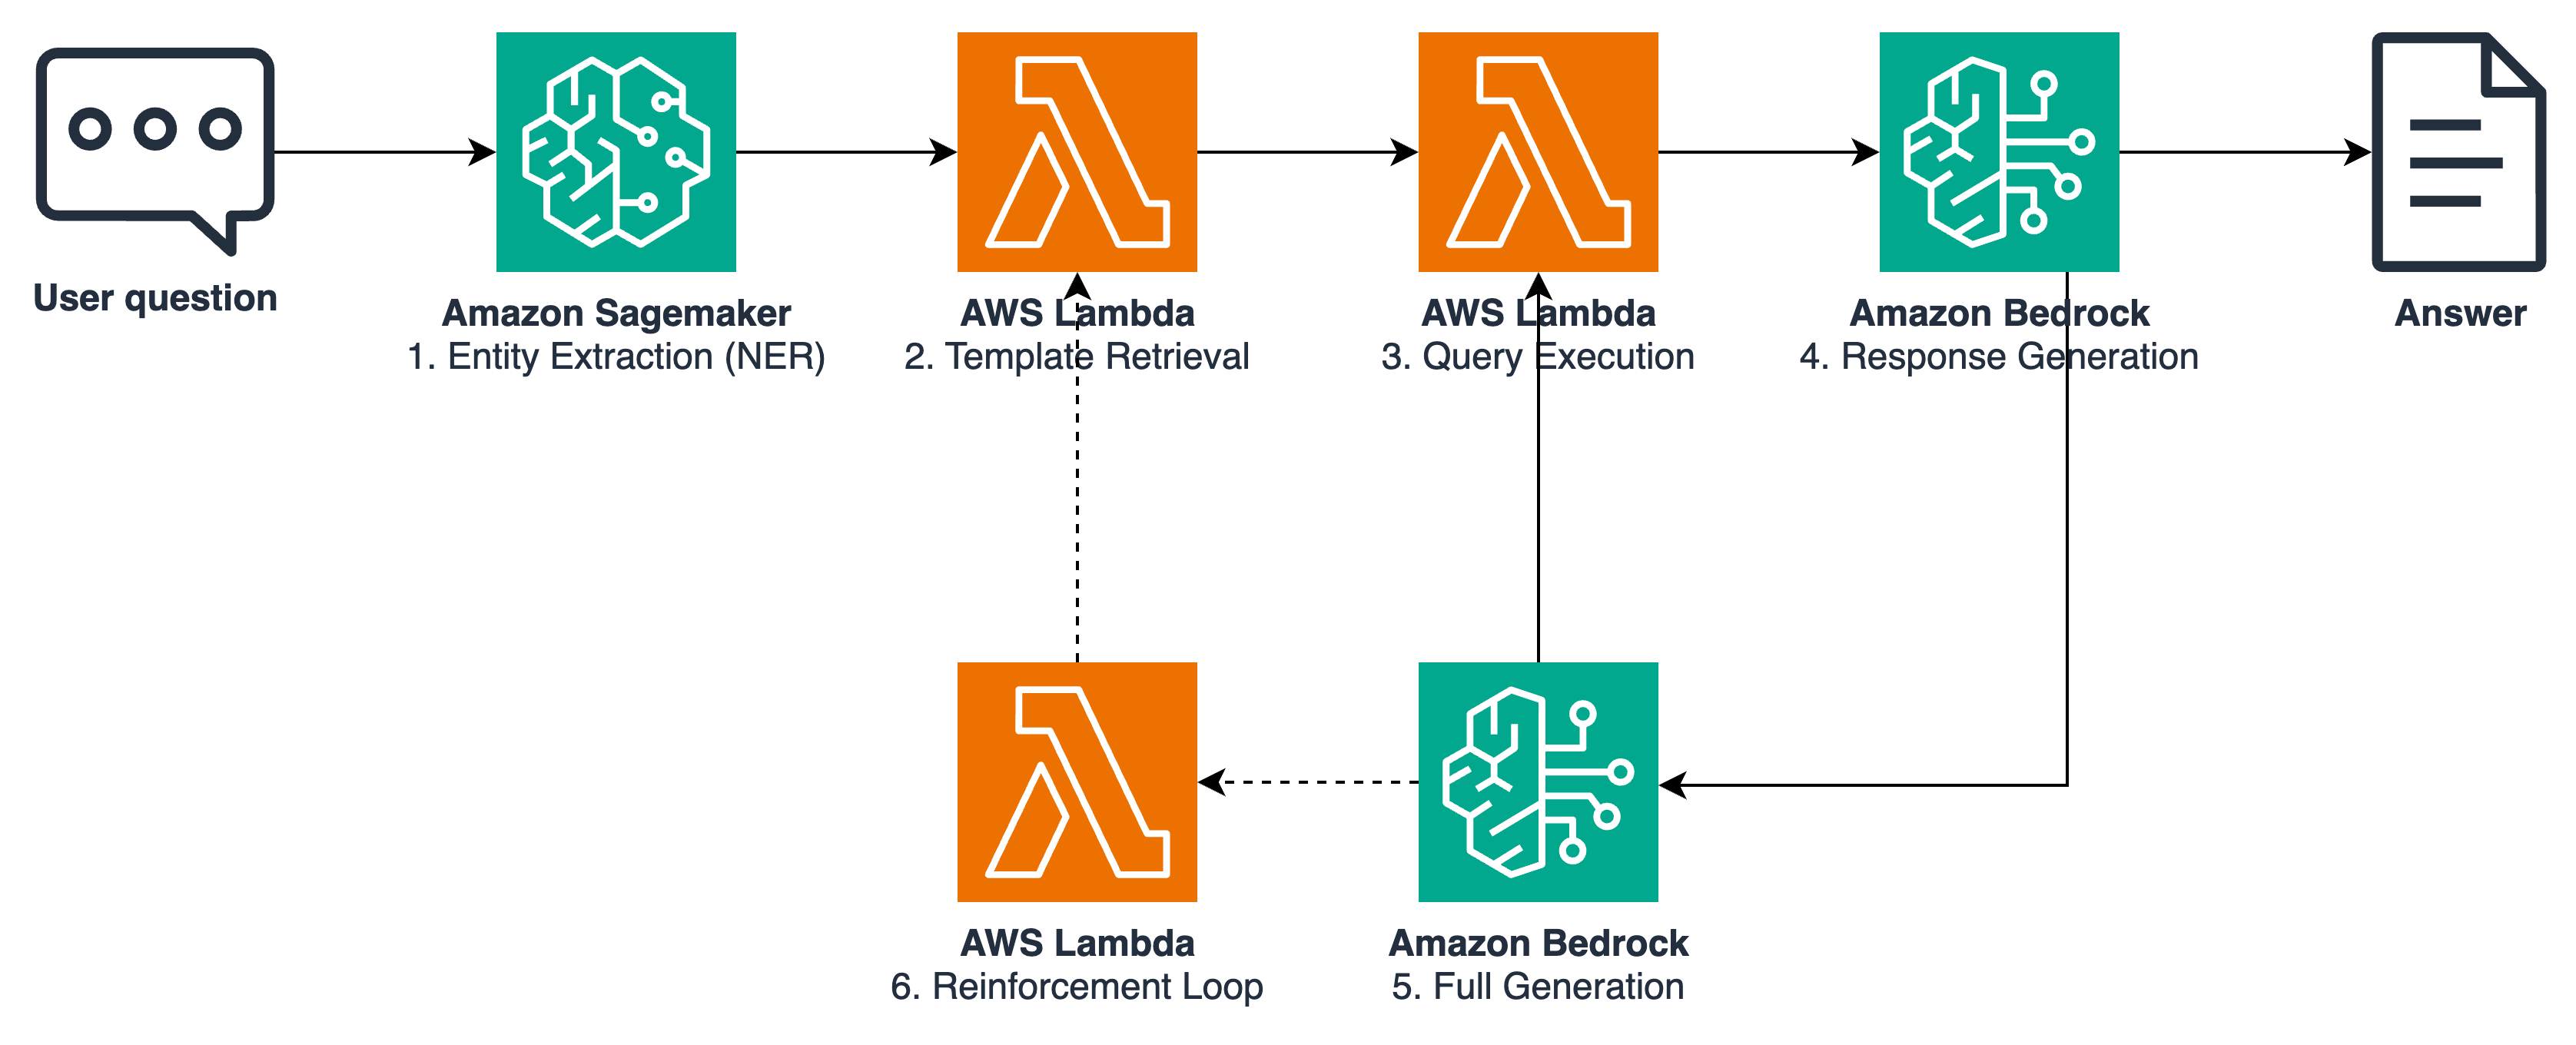
The following sections describe each step of the template caching pipeline. Each user’s question flows through entity extraction, template retrieval, and SQL query execution. Cache misses trigger full LLM generation, with new queries feeding back into the cache. The following diagram shows the complete flow of a user question through the newly introduced caching layer.

Complete pipeline flow showing entity extraction, template retrieval, template filling, response generation, and the reinforcement loop for cache growth

Figure 3 — Text2SQL pipeline with template caching layer

1. Entity extraction

After a user submits a question, the system performs entity recognition to extract named entities and values. This step considers not only the current question but also conversation history, current date, and user preferences. This context helps resolve ambiguous references like “last month” or “my region”. Using a lightweight model like Amazon Nova 2 Lite or a custom-trained named entity recognition (NER) model, we identify entities such as dates (“Q3 2024”), names (“Product X”), categories (“electronics”), and numeric values (“top 10”). The system stores these extracted entities separately and uses them later to fill out template placeholders.

The system converts the user’s question into an embedding vector using the same embedding model used during cache population. This vector queries the template cache through semantic similarity search, returning the closest matching templates above a confidence threshold. The search matches based on the question’s intent and structure rather than exact wording, so “What were Q3 sales?” and “Show me revenue for third quarter” both match the same template despite different phrasing.

It’s important to note that the confidence threshold governs the cache retrieval layer’s precision-recall trade-off. Set it too high and the system rejects valid, differently worded questions, forcing it to build SQL from scratch. Set it too low and loosely related templates slip through, risking confident answers built on the wrong query. The right value is domain-dependent: narrow, well-templated domains tolerate stricter thresholds, while broad or sparsely covered ones need looser ones.

Rather than relying on a single threshold, we suggest monitoring retrievals in production, logging matched templates and their similarity scores, so we can see when valid questions are being rejected or unrelated templates are slipping through. When embedding similarity alone doesn’t give enough precision, we added a lightweight reranking step: first we retrieve a broader set of candidate templates with a looser threshold, then re-score them with a small LLM or a specialized reranker model to select the best match. This improves precision without sacrificing recall and still costs far less than generating SQL from scratch.

3. Template filling and query execution

When a matching template is found, the system maps extracted entities to template placeholders. If the template contains `{quarter}` and entity recognition extracted “Q3”, the system replaces the placeholder with the actual value. The system validates the filled SQL query for syntax correctness, then executes it directly against the database. This path bypasses the time and token intensive LLM call that generates the SQL query.

This design helps the system to protect against SQL injection on two levels. First, it validates each extracted entity against the expected format for its placeholder: a `{quarter}` must match a known set of values, a `{date}` must parse as a valid date, a numeric threshold must be a number. The system rejects values that do not pass validation before they ever reach the query. Second, the system fills the placeholders using parameterized database queries (prepared statements) rather than string interpolation, so the parameterized query mechanism treats entity values as data rather than executable SQL. This approach also catches entity-extraction errors, improving answer reliability beyond the security benefit.

For richer responses, the system can retrieve multiple top-K similar templates and execute them in parallel. This provides additional context and related information beyond the primary query, for example returning both: quarterly sales totals and a breakdown by product category. The parallel execution adds minimal latency while delivering more comprehensive answers.

4. Response generation and validation

After executing the query, the system sends results to a response generation model. This model has two jobs, both handled in a single call: judge whether the results answer the question, and, if they do, summarize them into a conversational response.

The sufficiency check is driven by instructions in the prompt. The system instructs the model to confirm that the results are non-empty, that they contain the fields the question asked about, and that they cover every part of the question rather than only some of it. For example, if a user asks for “Q3 sales by region” but the matched template returns only a Q3 total, the results are incomplete, and the model is instructed to flag them as insufficient instead of answering with partial data. The model returns this judgment as a structured signal alongside its response, so the pipeline can branch on it deterministically. This step helps verify that users receive accurate answers rather than partial or misleading information from imperfect template matches.

This task is fundamentally simpler than SQL generation: instead of writing structured code from natural language, the model only needs to read tabular data and either summarize it or declare it insufficient. Because the task is simple, a smaller, faster model like Claude Haiku 4.5 can handle it effectively.

On a cache hit, there is only a single lightweight LLM call, which improves both latency and cost thanks to the smaller model. On a cache miss, the model flags the template results as insufficient and the system falls back to full SQL generation before producing the answer, for three calls in total: the sufficiency check, the SQL generation, and the response. That is one call more than the uncached pipeline, so misses carry extra latency. The trade-off is favorable because the added call is the cheap sufficiency check rather than another expensive generation, and because at a healthy hit rate the savings on hits outweigh the penalty on misses.

5. Fallback to full generation

If no template matches the confidence threshold, or if the validation step determines that cached results are insufficient, the system falls back to the standard Text2SQL pipeline. The question, along with the full context, goes to the foundation model for SQL generation. The generated query executes against the database, and results return to the user. Importantly, this newly generated query doesn’t disappear. It enters the reinforcement loop.

6. Reinforcement loop for cache growth

After a successful fallback generation, the system evaluates whether the new query should join the template cache. If the query executed successfully and returned valid results, it becomes a candidate for templating. The system generalizes the query by replacing specific values with placeholders and computes the original question’s embedding. It then adds this new template-question pair to the vector store, expanding cache coverage. Over time, the cache grows organically to cover query patterns specific to your users’ actual needs.

Results and performance gains

The figures in this section come from our production deployment but treat them as an illustrative model rather than a fixed benchmark. Exact token counts and latencies depend on your schema size, prompt design, model choice, and query mix. What generalizes is the direction of the improvement, not the specific numbers.

The dominant cost and latency in a Text2SQL request come from a single step: generating the SQL query. That call sends the user question, conversation history, the database schema, few-shot examples, and domain guidance to a powerful LLM such as Anthropic Claude Sonnet, which is needed to produce reliable queries. In our deployment this prompt runs on the order of 60K input tokens for a few hundred output tokens, and takes roughly 15-20 seconds. Every other step: embedding, vector search, template filling, and query execution, is minor by comparison. Entity recognition, runs on a dedicated NER model hosted on Amazon SageMaker AI rather than an LLM, adding negligible cost and latency next to SQL generation. Optimizing the pipeline is therefore mostly about avoiding that one expensive call.

On a cache hit, the system skips SQL generation entirely. What remains is response summarization, turning the query results into a conversational answer, which runs on a small model with a small prompt (on the order of a couple thousand input tokens). Because summarization is needed on both, the cached and uncached paths, a cache hit does not remove tokens completely, but it eliminates the 60K-token generation call, cutting token consumption by roughly 90% on that request.

This 90% is the saving on a single cache hit. Overall cost depends on the average across all requests, since cache misses still incur the full generation cost. At the roughly 60% hit rate we observed in production, the blended reduction across all traffic comes out above 50%. Latency follows the same pattern. An uncached request spends 15-20 seconds on the SQL call, retries and error handling included, then a few more seconds on summarization, putting a typical request in the 25-30 second range. On a cache hit, retrieval, template filling, and execution finish well under a second, and the remaining time is almost entirely the summarization call. That brings the end-to-end cache-hit path under 5 seconds, roughly an 80% reduction, or about 6x faster. It also pinpoints where the residual latency comes from: not the cache lookup, but the one LLM call that still has to run.

These per-request gains only matter if cache hits are common. In our production system the hit rate reached about 60% after roughly two weeks of active use, though the achievable rate depends heavily on the domain and how repetitive the queries are. Cache misses run the full pipeline plus the small sufficiency check, so they cost marginally more than a purely uncached request, which means the net gain comes entirely from hits. As the reinforcement loop keeps adding templates, the hit rate climbs and both the cost and latency benefits continue to compound.

Conclusion

Scaling AI applications to production often requires rethinking traditional optimization strategies. In this post, we demonstrated how template-based caching addresses the latency and cost challenges of Text2SQL systems without sacrificing accuracy. By caching SQL query structures rather than complete responses and using semantic similarity to match user questions to templates, the system can bypass expensive LLM inference calls. The reinforcement loop ensures cache coverage grows organically based on actual usage patterns.

In practice, this means: 6x faster response times on cache hits, inference costs decrease proportionally to your cache hit rate, and accuracy remains high because templates are generated by the most capable models. The patterns we covered, such as semantic matching, output generalization, entity extraction, and continuous improvement loops, extend beyond Text2SQL to any AI system where similar requests should produce structurally similar outputs.

Further reading

Generating value from enterprise data: Best practices for Text2SQL and generative AI

Enterprise-grade natural language to SQL generation using LLMs: Balancing accuracy, latency, and scale

Build a robust text-to-SQL solution generating complex queries, self-correcting, and querying diverse data sources

Text-to-SQL solution powered by Amazon Bedrock

Amazon S3 Vectors: First cloud storage with native vector support at scale

Amazon Nova 2 Lite

About the authors

[$] LWN.net Weekly Edition for August 13, 2026

Post Syndicated from jzb original https://lwn.net/Articles/1087432/

Inside this week’s LWN.net Weekly Edition:

  • Front: BPF and binfmt_misc; CrossPoint ebook firmware; KVM planes; BPF formal verification; shadow-utils; new storage-code testing features.
  • Briefs: Django releases; GNOME shell; LightDM 1.33.0; QEMU 11.1; uutils 0.10; Software Stewardship Lab; Quotes; …
  • Announcements: Newsletters, conferences, security updates, patches, and more.

Adobe Firefly: Simplified observability with Amazon Managed Prometheus

Post Syndicated from Dev Arora original https://aws.amazon.com/blogs/architecture/adobe-firefly-simplified-observability-with-amazon-managed-prometheus/

Adobe has used Amazon Web Services (AWS) since 2008. Adobe Firefly powers creative features across applications including Photoshop and Illustrator.

Adobe operates a GPU-based training infrastructure built on Amazon Elastic Kubernetes Service (Amazon EKS) to support Firefly. The infrastructure enables teams to run model training jobs across thousands of compute nodes and GPUs, designed to scale with growing demand.

The team initially relied on a self-hosted Prometheus infrastructure, sending data to a remote endpoint for long-term retention. As Firefly’s adoption increased and training jobs scaled, Adobe needed an observability solution that could deliver fast query performance over large metric volumes, remain highly available and scalable, and give infrastructure users self-service access to the infrastructure metrics they need to monitor and troubleshoot training jobs independently.

This post describes how Adobe evolved its observability architecture — from a self-managed Prometheus deployment for in-cluster metrics to Amazon Managed Service for Prometheus for critical metrics — and the measurable improvements in query performance, infrastructure reliability, and scale.

The challenge: GPU observability at scale

Monitoring GPU-based training infrastructure presents unique challenges that differ from traditional application monitoring. GPU training clusters generate high-cardinality telemetry across multiple dimensions like GPU health and performance metrics, compute and memory metrics and more.

Unlike CPU workloads where a single utilization metric may suffice, GPU training jobs require engineers to observe the interplay between compute, memory, and network layers to identify bottlenecks. For example, training jobs running across 2,000 nodes with 16,000 GPUs, scraped every 30 seconds, can generate over 1 billion data points in a single query window.

Self-hosted monitoring infrastructure was not meeting the performance requirements for queries at this cardinality and volume.

From self-managed Prometheus to Amazon Managed Service for Prometheus

Adobe’s observability evolution was not a single migration. It was an iterative process, with each phase addressing a specific set of limitations and informed by direct feedback from infrastructure users on what mattered most to them. As metric volumes grew, the team evaluated Amazon Managed Service for Prometheus as a fully managed alternative that could handle their horizontal scale requirements without the operational overhead of maintaining their own deployment.

Infrastructure users shaped the critical metric set iteratively through direct input on what they needed to see to run their training jobs effectively. The critical metrics were curated to support:

  • Job-level monitoring: GPU utilization, memory consumption, and network throughput per training job, enabling users to identify bottlenecks in distributed training.
  • Pod and node health: Kubernetes pod status, node readiness, and resource allocation metrics feeding into scheduler decisions.
  • GPU health: Metrics that determine whether a GPU is healthy or needs to be cordoned and replaced.

The team has already moved critical 2M time series metrics to Amazon Managed Service for Prometheus, targeting the specific problem of query performance at scale. Adobe used Amazon Managed Service for Prometheus collector (managed scrapers) to handle the collection of metrics from their Amazon EKS-based training clusters and forward them directly to Amazon Managed Service for Prometheus workspaces. Rather than replacing the self-managed Prometheus deployment entirely, the managed scrapers operated alongside it, taking over the scraping role for metrics destined for Amazon Managed Service for Prometheus while preserving Adobe’s existing Prometheus setup. This allowed the team to adopt Amazon Managed Service for Prometheus incrementally without disrupting their current monitoring workflows.

Why Amazon Managed Service for Prometheus

Amazon Managed Service for Prometheus provided the capabilities that addressed Adobe’s core requirements:

  • Query performance at scale: Purpose-built for fast queries over high-cardinality, high-volume time series data.
  • High availability: Built-in high availability without custom HA configurations, providing a reliable data source for downstream automated systems that depend on timely metric queries.
  • Migration ease: No agents required. The migration path uses remote write configuration with minimal changes to existing workflows.
  • Scalability: Each workspace supports up to 50 million active time series, providing headroom for growth as the infrastructure scales (up to 1 billion) [1].
  • AWS integration: Native integration with AWS services including Amazon EKS and Amazon Managed Grafana, simplifying metric collection and reducing configuration complexity.
  • Managed operations: Minimizes the operational burden of administering self-hosted monitoring infrastructure, freeing engineering resources for infrastructure development.

Note: Amazon Managed Service for Prometheus and Amazon Managed Grafana are billable services. Costs are based on metrics ingested, stored, and queried. Review the pricing pages for Amazon Managed Service for Prometheus and Amazon Managed Grafana to estimate costs for your workload before deployment.

Results

After migrating critical metrics to Amazon Managed Service for Prometheus, Adobe Firefly achieved the following measurable improvements.

Query performance: before and after

Time Range Amazon Managed Service for Prometheus vs Self-managed
4h 3.5x faster
12h 22.6x faster
24h 28.8x faster

Figure 1: Query performance comparison for GPU utilization metrics

Conclusion

Adobe Firefly evolved its observability architecture from a self-managed Prometheus deployment to Amazon Managed Service for Prometheus, using Amazon Managed Service for Prometheus collector to handle metric collection alongside their existing Prometheus infrastructure. This approach preserves current workflows while adding managed collection.

  • Query performance improvement of more than 28x: Queries that previously timed out at 60 seconds or returned partial results in 2 minutes now complete in approximately 10 seconds.
  • Extended observability windows for training jobs: Infrastructure users now view metrics across 24-hour windows, compared to the previous practical limit of 6 hours. This is particularly impactful for large, long-running training jobs spanning 256 or more nodes, where the ability to see the full lifecycle of a job helps identify when performance degraded, correlate issues with infrastructure events, and make informed decisions.
  • Reduced operational overhead: Amazon Managed Service for Prometheus requires no agents and no additional Prometheus-related configuration on your end. Both data and control components are fully managed, minimizing the burden of maintaining self-hosted Prometheus infrastructure.

To learn more about Amazon Managed Service for Prometheus, visit the Amazon Managed Service for Prometheus documentation. For guidance on implementing sharding strategies, see the Amazon Managed Service for Prometheus best practices guide.

Looking ahead

The performance improvements demonstrated with GPU utilization queries were consistent across other GPU metrics as well, including GPU memory usage, power consumption, and thermal monitoring. These results confirm that Amazon Managed Service for Prometheus benefits extend across the full breadth of GPU telemetry. Adobe and AWS are collaborating on the next phase of this observability architecture to extend managed Prometheus to the remaining metric tiers, enabling a multi-tenant, highly available observability stack that supports the full scale of telemetry at Adobe Firefly.


About the authors

How AWS IAM role manager rethinks the starting point for IAM roles

Post Syndicated from Zach Jiang original https://aws.amazon.com/blogs/security/how-aws-iam-role-manager-rethinks-the-starting-point-for-iam-roles/

When you build a new application or capability on Amazon Web Services (AWS), you want to focus on what you’re building. Getting a service running almost always begins with AWS Identity and Access Management (IAM). Many AWS services that act on your behalf need an IAM role, an identity the service assumes to access your resources with a defined set of permissions. You then author a trust policy so the service can assume the role, choose the permissions the workload needs, and attach it. Configuring roles and policies for common patterns is repeatable work that doesn’t need to be manual.

IAM role manager does that work for you. When role manager is enabled, AWS creates and configures the IAM roles as you build in supported service consoles, so you can start using a service and let AWS handle the role behind it. You create the resource you want, and role manager provisions and attaches the role you need as part of the same flow, so you can build now and refine permissions as your workload matures.

With that step automated, getting started takes minutes. You can create an AWS Lambda function and start running your code, with its execution role already created and attached, without switching context to set one up. Role creation becomes an automated part of building your application rather than a separate step.

Role manager is especially useful when you’re getting started: the moments when you want to stand up a service or get a proof of concept running and want to defer role configuration until later in your development process. You don’t need prior IAM experience to get started. You keep full control of what it creates, because the roles are ordinary IAM roles that you can view, edit, or delete like any role you author yourself. When you want to tighten a role, AWS IAM Access Analyzer reviews how it has been used and recommends a policy scoped to only the permissions it needs.

How to enable role manager

Role manager has two states, enabled and disabled. Enabling it for an account authorizes AWS to create roles in that account. In an organization, administrators can use a service control policy (SCP) to control whether member accounts can enable or use role manager. To enable it:

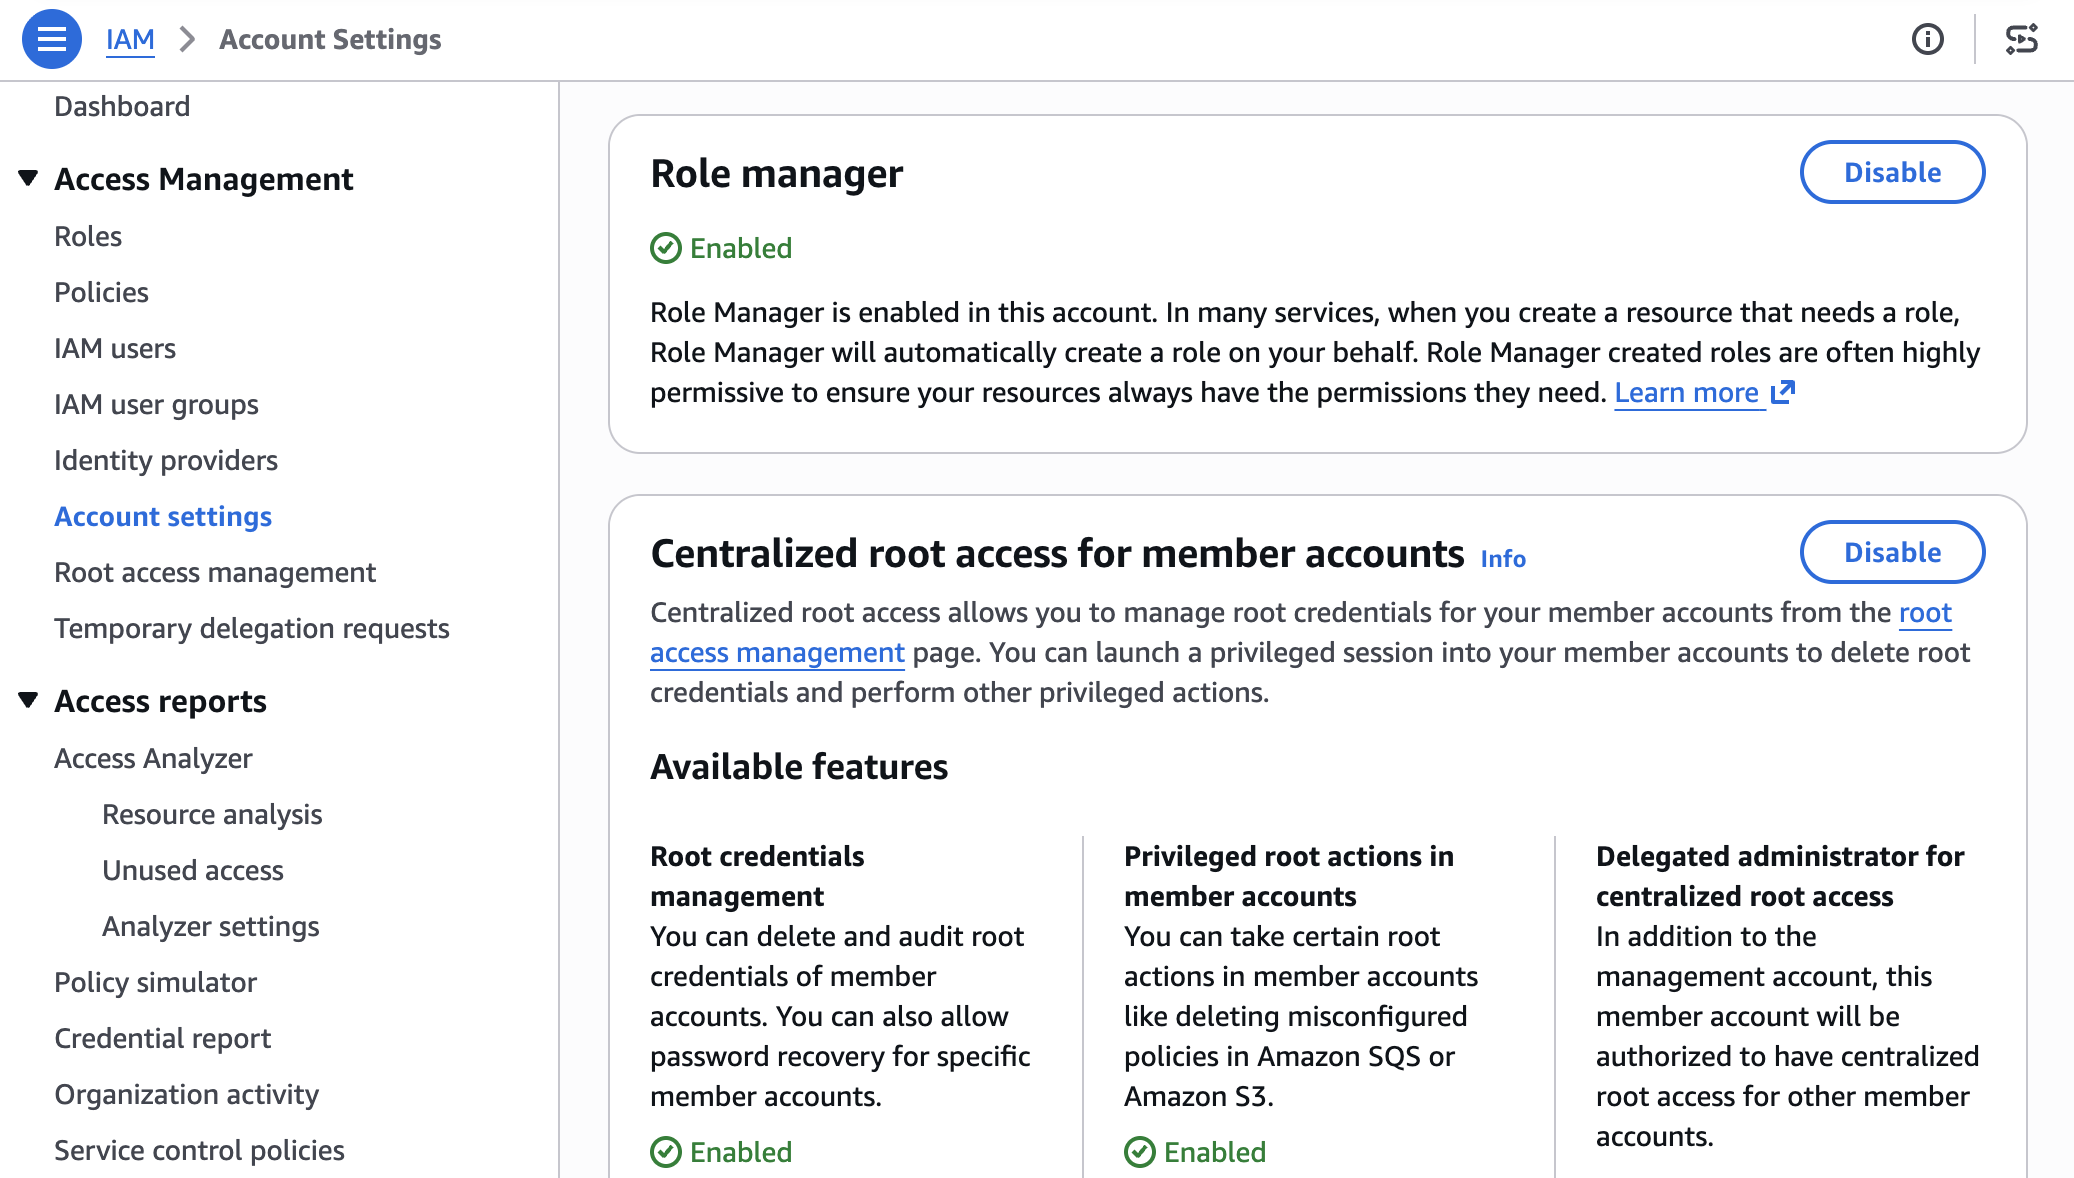
  1. Open the IAM console and choose Account settings.
  2. In the role manager section, choose Enable.
Figure 1: Enable Role Manager

Figure 1: Enable Role Manager

Some AWS services already create a role for you when you create a resource that needs one. Role manager doesn’t change that: those services keep creating roles automatically, and roles you already created keep working. What role manager adds is a single account-level control, and coverage for a case that built-in flows can’t handle: tasks whose permissions AWS can’t determine in advance, such as running your own code. For those tasks, role manager provisions a role that you can narrow later.

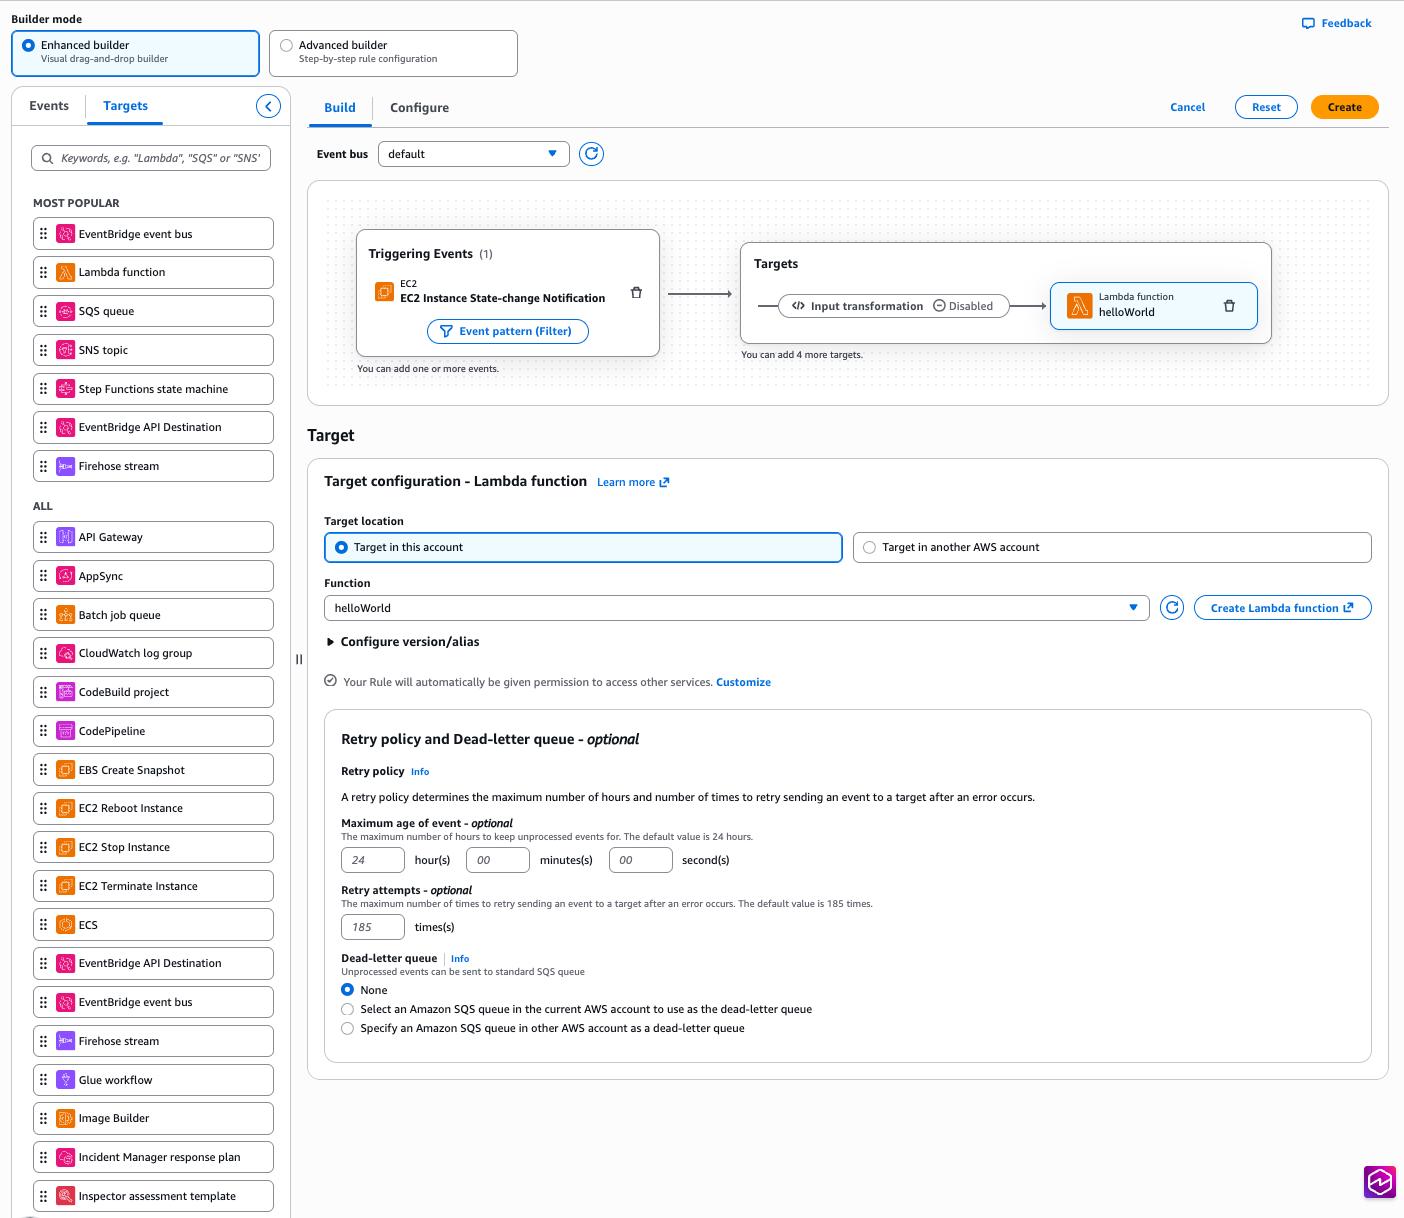
Example: Create an Amazon EventBridge rule

Start with a common task: an Amazon EventBridge rule that invokes a target, such as an Amazon Simple Queue Service (Amazon SQS) queue or an Amazon Simple Notification Service (Amazon SNS) topic. Without role manager, you would pause here to create a role that lets EventBridge invoke the target, write the role’s trust policy, attach the required permissions, and then return to finish the rule. With role manager enabled, you define the rule and its target, choose Create, and role manager provisions the role and attaches it for you. The EventBridge console shows the rule created and ready, and you never open the role-creation flow.

Figure 2: Creating an EventBridge rule with no manual role setup

Figure 2: Creating an EventBridge rule with no manual role setup

The role comes from an AWS managed role template: a definition AWS builds and maintains for a specific task, with the trust policy and permissions already worked out. The console calls a new IAM API, AcquireRole, which finds the matching template, provisions the role from it, and returns it to EventBridge. Depending on the service, AcquireRole either creates a new role or reuses one that already fits, so an account does not fill up with duplicate roles for the same task.

Role manager creates the role using your own IAM permissions, not a separate role-manager permission. To provision a new role, you need permission for the actions the template performs: at minimum, you need permissions to create and attach roles. When AcquireRole reuses an existing role instead of creating one, it needs only iam:GetRole and iam:GetRoleTemplateVersion. If you’re missing either of these permissions, the console tells you which one is needed rather than creating the role.

Run code that calls other AWS services

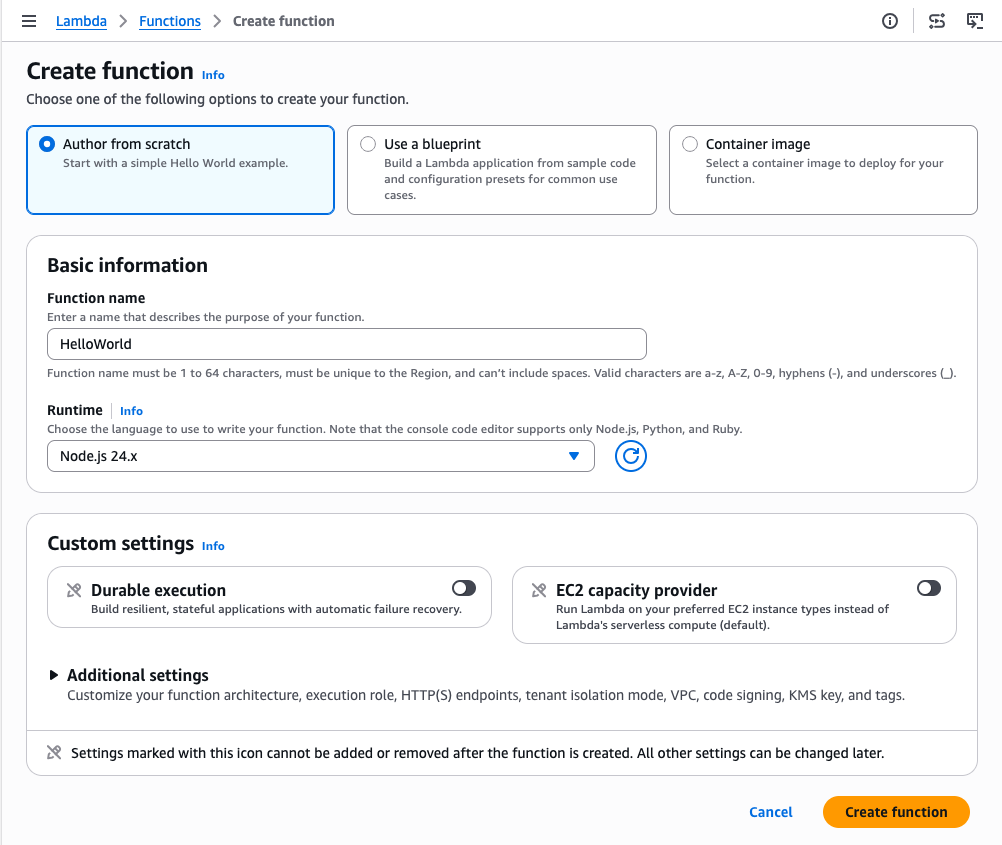
Not every task has a set of permissions AWS can define in advance. When a role runs your own code, such as a Lambda function, AWS has no way of knowing which services that code will call. Role manager covers this case too: create a Lambda function with role manager enabled, and it attaches an execution role that your code can use right away and that you can narrow once you know what the function calls.

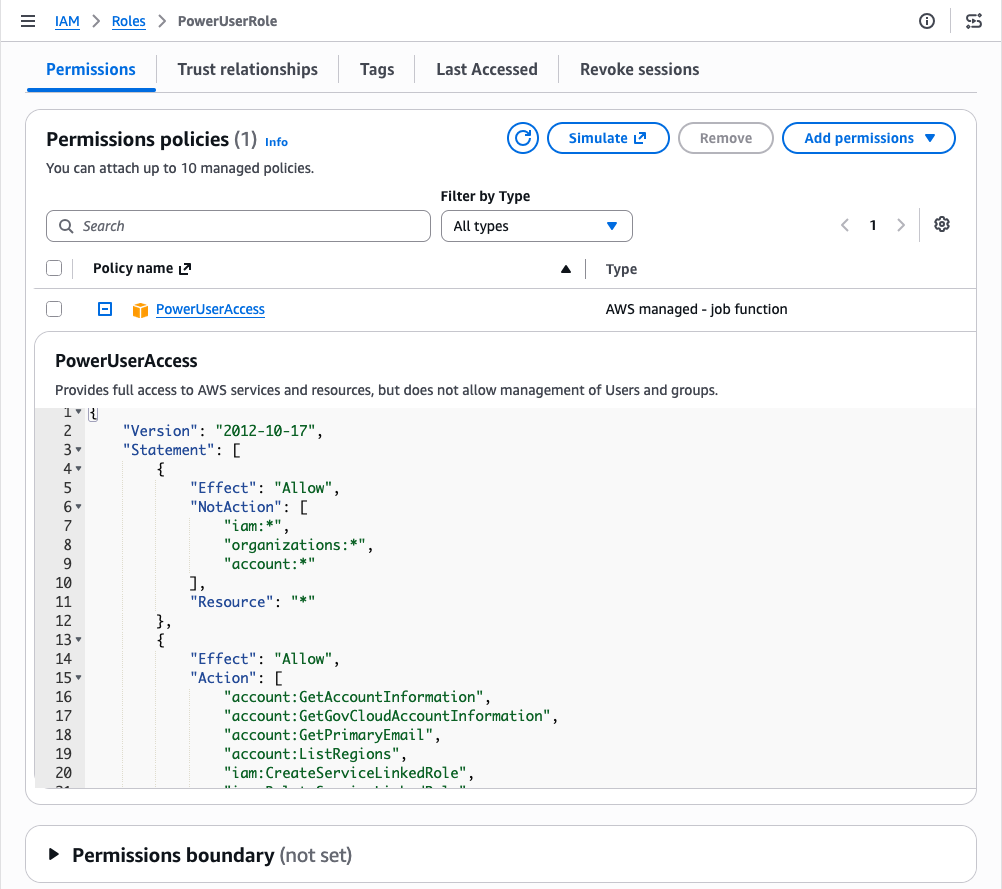
Because the permissions your code needs aren’t known up front, role manager attaches the AWS managed policy PowerUserAccess to the role. PowerUserAccess grants access to AWS services so your function can call what it needs. By design, it doesn’t grant permission to manage IAM, AWS Organizations, or account settings. The template also configures the role to trust only the Lambda service.

Figure 3: Create an AWS Lambda function with no manual role setup

Figure 3: Create an AWS Lambda function with no manual role setup

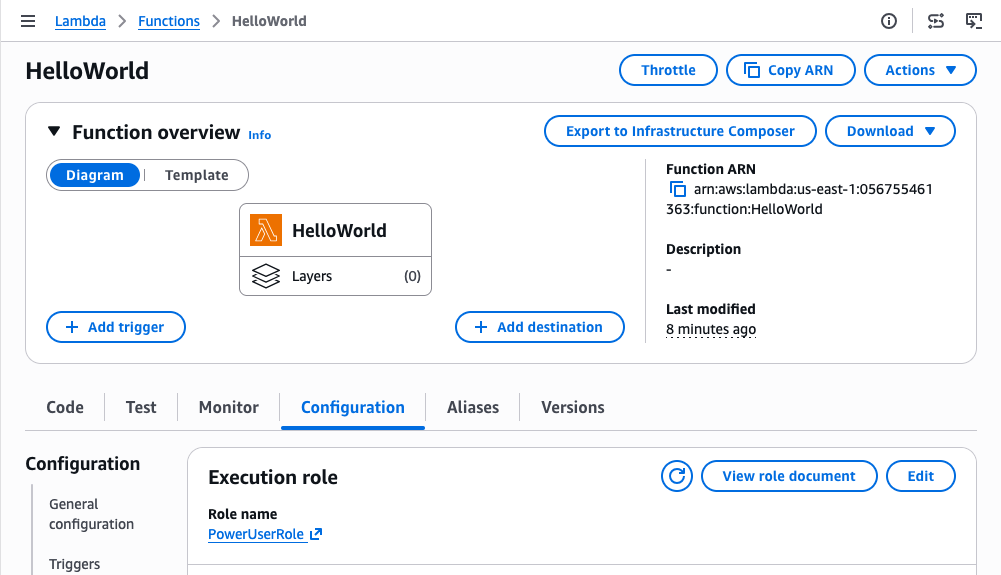
Role manager attaches an execution role, and your function is ready to run. Figure 4 shows the Execution role panel on the function’s Configuration tab, with the role that role manager attached.

Figure 4: Role manager provides a role automatically to an AWS Lambda function

Figure 4: Role manager provides a role automatically to an AWS Lambda function

You can open the role in the IAM console to review its permissions. Figure 5 shows the role’s Permissions tab with the PowerUserAccess policy attached.

Figure 5: Permissions of the role provided by role manager for an AWS Lambda function

Figure 5: Permissions of the role provided by role manager for an AWS Lambda function

You keep full visibility into what role manager creates. Every role it creates records the role template it came from, and both GetRole and ListRoles return that template reference. You can inspect any role in your account and tell which were created by role manager. You read a role’s trust policy and permissions the same way you would for a role you authored, and AWS CloudTrail records each role’s creation.

Refining roles as workloads mature

As your workloads mature, refine the roles that role manager created to follow least privilege. When you’re ready, you can disable role manager and get IAM Access Analyzer unused access analysis at no additional cost for 90 days. Access Analyzer looks at how each role has been used and recommends a policy you can apply that keeps only the permissions the role needs. Start with the roles attached to your most critical workloads and work outward.

Disabling role manager doesn’t disrupt anything already running: your resources keep the roles they have, those roles stay in your account until you change them, and from that point you author new roles yourself, the same as before. If you would rather narrow a single role than the whole account, editing that role removes it from role manager’s control and it becomes a standard customer-managed role, with your changes preserved. In sandbox or development accounts, keeping role manager enabled saves time. For production workloads, disable role manager and refine the roles it created to least privilege before going live.

Conclusion

Role manager automates IAM role setup so you can focus on building from the start. When you enable it, AWS creates and attaches the IAM roles your resources need as you build, so you can start in minutes without prior IAM experience. Because these are IAM roles that you fully control, you keep the same visibility and the same tools you already use. Keep role manager enabled while you build, and refine the roles it created as your workloads mature.

To get started, enable role manager in the IAM console and create a resource in a supported service. To learn more, see IAM role creation and the list of supported services in the IAM User Guide.

If you have feedback about this post, submit comments in the Comments section below.


Zach Jiang

Zach Jiang

Zach is a Senior Technical Product Manager at AWS, specializing in AWS Identity products. He focuses on making identity the easy part of building on AWS for customers. Outside of technology, Zach enjoys traveling and exploring new cultures and cuisines.

David Sing

David Sing

David is a Principal Product Manager at AWS, specializing in AWS IAM. He focuses on simplifying IAM for builders and AI agents, safe credential issuance for AI agents, and authorization policy governing agent access. Outside of technology, David enjoys economics and markets, fishing, and time outdoors with his family.

Punit Deotale

Punit Deotale

Punit is a Software Development Manager on the AWS IAM team. He leads work on making it easier for customers to create and manage IAM roles directly within AWS service workflows, so they can set up the right permissions without leaving what they are doing. His focus is reducing permission-setup friction across AWS while helping customers stay aligned with least privilege. Outside of work, Punit enjoys reading, building side projects, and being outdoors.

[$] Block-layer error injection

Post Syndicated from daroc original https://lwn.net/Articles/1086344/

Storage code has to cope with hardware that fails in inconvenient
ways, but coaxing a healthy disk into producing those failures on
demand, for testing, is usually not possible. The kernel
provides several ways to inject block-layer I/O errors, but none of those can select the
operation to fail, pick the status code to return, or target a disk
directly without employing a stacked device on top. Use of a stacked device means
the test runs against the mapper device, not the disk it was meant to
exercise. A patch
series
from Christoph Hellwig adds a configurable error-injection
interface that does all three things that the current error-injection code
lacks, controlled by a per-disk debugfs
file.

Burst to Region: Overflow AWS Outposts workloads to Amazon EC2

Post Syndicated from Diya . original https://aws.amazon.com/blogs/compute/burst-to-region-overflow-aws-outposts-workloads-to-amazon-ec2/

AWS Outposts brings AWS infrastructure into your data center, giving on-premises workloads the low latency and data locality they need. But unlike the AWS Region, an Outposts rack has a fixed amount of compute. When your workload needs more instances than the rack can provide, you have two options: drop requests, or overflow them somewhere with room to grow. This post shows you how to automate the second option. You build a Burst to Region pattern that detects capacity constraints on your Outpost, launches Amazon Elastic Compute Cloud (Amazon EC2) instances in the parent Region, gradually shifts traffic to them, and returns traffic to local instances once capacity recovers.

To implement this pattern you configure Amazon CloudWatch, Amazon Simple Notification Service (Amazon SNS), AWS Lambda, Amazon EC2 Auto Scaling, Elastic Load Balancing (Application Load Balancer), and Amazon EventBridge. You trade a moderate latency increase for continued availability during capacity events.

When to use this pattern

This pattern assumes your Outposts workload scales out through Amazon EC2 Auto Scaling. Burst to Region reacts to instance-capacity exhaustion on the rack. It engages when your workload tries to launch more instances than the available Outpost capacity supports. If your fleet is fixed size and degrades under load without scaling out, the capacity alarm never fires and overflow never triggers. For those workloads, monitor per-instance saturation (CPU, latency) separately.

Good candidates prefer local capacity but can tolerate Region latency under pressure. If your application runs on Outposts for proximity yet degrades gracefully when some traffic takes the longer path to the Region, it fits this pattern. Examples include:

  • Internal enterprise applications.
  • Stateless web frontends and API layers.
  • Pre-processing tiers where single-digit to tens-of-milliseconds additional round-trip latency during peaks is acceptable.

Poor candidates cannot absorb any added latency or must stay on the Outpost. Avoid this pattern for:

  • Applications with sub-millisecond requirements.
  • Workloads with strict data residency or sovereignty mandates that prevent traffic from leaving the on-premises environment.
  • Real-time control systems with hard timing constraints.
  • Applications tightly coupled to on-premises data stores with no Region replica.

The core tradeoff is explicit. During capacity events, you accept moderately higher latency to maintain availability. If your workload cannot tolerate any latency increase, keep it pinned to Outposts and reserve capacity through other means, such as Capacity Reservations.

Solution overview

Burst to Region works in three moves: detect capacity pressure on the Outpost, launch overflow compute in the parent Region, and shift traffic gradually until local capacity recovers. Six AWS services coordinate to make this automatic. The following diagram shows the reference architecture for the Burst to Region pattern, illustrating how the six AWS services interact during capacity detection, overflow scaling, traffic distribution, and recovery.

Reference architecture for Burst to Region on AWS Outposts showing capacity detection, overflow scaling, traffic distribution, and recovery

Figure 1: Reference architecture for Burst to Region on AWS Outposts

The pattern uses six AWS services working together:

  • Amazon CloudWatch monitors Outposts capacity utilization and raises alarms.
  • Amazon SNS provides event fan-out from alarm to orchestrator.
  • AWS Lambda orchestrates the burst logic (scale-out, weight adjustment, recovery)
  • Amazon EC2 Auto Scaling manages the overflow fleet lifecycle.
  • Application Load Balancer distributes traffic across both locations using weighted target groups.
  • Amazon EventBridge handles periodic recovery evaluation.

You must configure five phases for this pattern:

  1. Monitor. CloudWatch tracks Outposts capacity utilization metrics in the AWS/Outposts namespace.
  2. Detect. A CloudWatch alarm fires when utilization exceeds a threshold (for example, 80%).
  3. Overflow. The alarm triggers a Lambda function through Amazon SNS. Lambda scales out a Region-based Amazon EC2 Auto Scaling group and adjusts ALB target group weights.
  4. Distribute. The ALB splits traffic between Outposts instances and Region instances using weighted forwarding.
  5. Recover. An Amazon EventBridge scheduled rule periodically evaluates capacity. When Outposts recovers, Lambda scales down the overflow fleet and returns all traffic to local instances.

Design decisions

We chose Application Load Balancer with weighted forwarding over Amazon Route 53 weighted routing for traffic distribution. ALB provides health-aware routing to only healthy overflow instances and target group stickiness for session consistency. Weight changes take effect for new connections after calling the ModifyRule API. DNS-based shifting through Route 53 provides too coarse control for rapid weight adjustments, and TTL propagation delays make recovery slower.

The burst orchestrator runs as a Lambda function rather than a long-running service. It executes only during state transitions, so there is no steady-state compute cost. Lambda integrates natively with Amazon SNS and Amazon EventBridge for event-driven invocation without additional infrastructure.

You implement recovery with an Amazon EventBridge scheduled rule (every 5 minutes) rather than relying solely on the CloudWatch alarm to return to OK state. The alarm confirms capacity is available, but does not confirm that overflow instances have drained active connections. The scheduled rule provides gradual, safe scale-down.

Implementation

This section walks through the key components of the Burst to Region pattern. For the complete deployable AWS SAM template, see the GitHub repository.

Prerequisites

To deploy this pattern, you need:

  • An AWS account with a configured AWS Outposts rack.
  • An Amazon Virtual Private Cloud (Amazon VPC) with subnets associated with your Outposts and subnets in the parent AWS Region.
  • IAM permissions to create CloudWatch alarms, Lambda functions, Auto Scaling groups, and ALB resources.
  • AWS Serverless Application Model (AWS SAM) CLI installed and configured.
  • Existing Amazon EC2 Auto Scaling group running on your Outpost (these become your baseline fleet)
  • A custom domain name with a DNS record (Route 53 alias or CNAME) pointing to your Application Load Balancer, and an AWS Certificate Manager (ACM) certificate for that domain to enable HTTPS.

Capacity monitoring and alarm

The CloudWatch alarm monitors instance utilization on the Outpost and triggers the burst workflow when capacity is constrained.

The InstanceTypeCapacityUtilization metric reports the percentage of a given instance type’s capacity in use. Note that this metric includes capacity consumed by managed services such as Amazon Relational Database Service (Amazon RDS) or Application Load Balancer running on the Outpost — not only your application’s EC2 instances. Factor this into your threshold planning.

OutpostsCapacityAlarm:
  Type: AWS::CloudWatch::Alarm
  Properties:
    AlarmName: outposts-capacity-high
    Namespace: AWS/Outposts
    MetricName: InstanceTypeCapacityUtilization
    Dimensions:
      - Name: OutpostId
        Value: !Ref OutpostId
      - Name: InstanceType
        Value: !Ref OutpostInstanceType
    Statistic: Average
    Period: 300
    EvaluationPeriods: 2
    Threshold: !Ref CapacityThreshold
    ComparisonOperator: GreaterThanOrEqualToThreshold
    AlarmActions:
      - !Ref BurstSNSTopic
    TreatMissingData: notBreaching

Why these values matter:

  • Period: 300 and EvaluationPeriods: 2 require 10 minutes of sustained high utilization before triggering. This avoids false alarms from transient spikes.
  • Threshold: 80 (recommended starting point) leaves a 20% buffer. A threshold set too high (95%) risks launch failures before the overflow fleet is ready. A threshold set too low (50%) causes unnecessary bursts.
  • TreatMissingData: notBreaching prevents false alarms when data points are missing. Since this alarm is scoped to a single instance type, treating missing data as breaching could trigger unnecessary bursts when the instance type is simply not in use.
  • Separate scale-out from scale-in: This alarm triggers burst scale-out at 80%. Recovery is handled separately by the Amazon EventBridge scheduled rule, which uses a lower threshold (for example, 60%) before scaling in. This hysteresis gap prevents flapping where scaling down immediately pushes utilization back above the alarm threshold.

Burst orchestrator (Lambda)

The Lambda function handles two event paths: alarm-triggered scale-out and scheduled recovery evaluation. The following pseudocode shows the orchestration flow:

def handler(event, context):
    # Route based on event source
    if is_scheduled_recovery(event):
        return handle_recovery_check()

    alarm_state = parse_sns_alarm_state(event)

    if alarm_state == 'ALARM':
        # Scale out the overflow Auto Scaling group
        scale_out_overflow(desired=OVERFLOW_CAPACITY)
        # Don't shift traffic yet --- wait for healthy instances
        publish_burst_metric(active=True)


def handle_recovery_check():
    """Called every 5 minutes by EventBridge."""
    # Check if burst is active
    if not is_burst_active():
        return

    # If overflow instances are healthy and registered, shift traffic
    if overflow_targets_healthy():
        current_weights = get_current_alb_weights()
        if current_weights['region'] == 0:
            # First shift --- instances are now warm
            set_alb_weights(outposts=90, region=10)
        elif needs_more_overflow():
            step_up_region_weight()

    # If Outposts capacity has recovered, begin scale-down
    if outposts_capacity_recovered():
        step_down_region_weight()
        if get_current_alb_weights()['region'] == 0:
            # All traffic back to Outposts, drain and terminate overflow
            wait_for_connection_draining()
            scale_down_overflow(desired=0)
            publish_burst_metric(active=False)

The key actions the function performs:

  • scale_out_overflow — Sets the overflow Auto Scaling group desired capacity from 0 to your configured burst size.
  • set_alb_weights — Calls the ModifyListener API to adjust weighted forwarding between the Outposts and Region target groups.
  • publish_burst_metric — Writes a custom CloudWatch metric (BurstActive) for dashboard visibility.
  • handle_recovery_check — Called every 5 minutes by Amazon EventBridge. Confirms Outposts capacity has recovered, steps weights back gradually, waits for connection draining, then scales down the overflow fleet.

Important: The orchestrator does not shift ALB weights immediately upon scale-out. It waits for the next Amazon EventBridge invocation (up to 5 minutes) to confirm that overflow instances have passed health checks and are registered as healthy in the target group. This helps prevent routing traffic to instances that have not finished launching.

For the production-ready implementation with error handling, gradual weight stepping, and connection draining verification, see the GitHub repository.

Overflow Auto Scaling group

The overflow fleet starts at zero and scales only when the Lambda function sets desired capacity during a burst event:

OverflowASG:
  Type: AWS::AutoScaling::AutoScalingGroup
  Properties:
    AutoScalingGroupName: burst-overflow-fleet
    LaunchTemplate:
      LaunchTemplateId: !Ref OverflowLaunchTemplate
      Version: !GetAtt OverflowLaunchTemplate.LatestVersionNumber
    MinSize: 0
    MaxSize: !Ref MaxOverflowCapacity
    DesiredCapacity: 0
    VPCZoneIdentifier:
      - !Ref RegionSubnet1
      - !Ref RegionSubnet2
    TargetGroupARNs:
      - !Ref RegionTargetGroup
    HealthCheckType: ELB
    HealthCheckGracePeriod: 120
    MetricsCollection:
      - Granularity: 1Minute

The overflow fleet starts at zero capacity and incurs no cost at rest. During a burst event, the Lambda function calls the SetDesiredCapacity API to launch overflow instances. During recovery, it sets desired capacity back to zero.

The launch template mirrors your Outposts instance type to maintain consistent performance characteristics across both locations.

ALB weighted forwarding

The ALB listener uses weighted forwarding across two target groups. In steady state, all traffic goes to Outposts (weight 100/0). During burst, the Lambda function adjusts these weights dynamically using the ModifyListener API. Clients reach the ALB through a DNS record — either a Route 53 alias or a CNAME pointing to the ALB’s DNS name.

ALBListener:
  Type: AWS::ElasticLoadBalancingV2::Listener
  Properties:
    LoadBalancerArn: !Ref ApplicationLoadBalancer
    Port: 443
    Protocol: HTTPS
    SslPolicy: ELBSecurityPolicy-TLS13-1-2-2021-06
    Certificates:
      - CertificateArn: !Ref CertificateArn
    DefaultAction:
      Type: forward
      ForwardConfig:
        TargetGroups:
          - TargetGroupArn: !Ref OutpostsTargetGroup
            Weight: 100
          - TargetGroupArn: !Ref RegionTargetGroup
            Weight: 0
        TargetGroupStickinessConfig:
          Enabled: true
          DurationSeconds: 300

RegionTargetGroup:
  Type: AWS::ElasticLoadBalancingV2::TargetGroup
  Properties:
    Name: burst-region-targets
    Protocol: HTTP
    Port: 80
    VpcId: !Ref VpcId
    HealthCheckEnabled: true
    HealthCheckIntervalSeconds: 30
    HealthCheckPath: /health
    HealthyThresholdCount: 2
    UnhealthyThresholdCount: 3
    TargetGroupAttributes:
      - Key: deregistration_delay.timeout_seconds
        Value: "300"
      - Key: slow_start.duration_seconds
        Value: "120"

Note on stickiness: Target group stickiness keeps a client pinned to whichever target group served its first request for DurationSeconds. We set this to 300 seconds (5 minutes) to match the Amazon EventBridge evaluation interval. This balances session consistency for stateful workloads against the need for weight changes to take effect within a reasonable window. For purely stateless workloads, you can disable stickiness entirely to allow immediate weight convergence. For workloads requiring longer session affinity, increase the duration but understand that weight transitions will converge more slowly — existing sticky sessions continue going to the original target group until they expire.

Traffic weight progression

Use stepped transitions rather than abrupt weight changes. The following table shows the recommended progression:

Phase Outposts weight Region weight Condition to advance
Normal 100 0 Steady state
Burst step 1 90 10 Region target group has at least 1 healthy host
Burst step 2 70 30 Region target group healthy for 2 consecutive checks
Burst step 3 50 50 Only if Outposts capacity exceeds 95% used
Recovery step 1 80 20 Outposts capacity below 70%
Recovery step 2 100 0 Outposts capacity below 60% for 2 checks

Avoid jumping directly from 0% to 50% Region traffic. Cold overflow instances need time to warm caches and stabilize before absorbing significant load.

Best practices

Apply these best practices to get the most from this pattern while avoiding common pitfalls.

Traffic tiering

Classify your workloads into two tiers at the ALB listener level. Latency-critical paths use routing rules with the Outposts target group only. These never overflow regardless of capacity state. Overflow-eligible paths use the weighted forwarding rule. This separation helps make sure that your most latency-sensitive flows are not impacted by the burst mechanism.

Managing data gravity

For stateless workloads, Burst to Region requires no special data handling. For workloads with session state or shared data:

Anti-pattern: Do not burst workloads that write to Outposts-local storage and expect synchronous consistency. The latency and complexity of cross-location writes defeats the purpose of the pattern.

Cost optimization

The overflow fleet consumes On-Demand pricing by default since it starts at zero and scales only during peaks.

Burst profile Recommended pricing Rationale
Unpredictable spikes (minutes) On-Demand Maximum flexibility, no commitment waste
Predictable daily peaks (hours) Savings Plans (Compute) Covers overflow hours at discount
Frequent, long bursts Reserved capacity plus On-Demand Baseline discount plus burst flexibility

Monitor your BurstActive custom metric over time. If overflow is active more than 30% of the time, you likely need additional Outposts capacity rather than relying on Region overflow.

Security consistency

Maintain identical security posture across both environments:

  • Use the same security group rules for Outposts and Region instances.
  • Deploy with AWS CloudFormation StackSets to support consistency.
  • Share the same IAM instance profile. The overflow launch template references the same role as your Outposts instances.
  • Apply the same AWS Systems Manager patch baselines and compliance rules to both fleets.

Observability

Build a CloudWatch dashboard that provides visibility into burst state and performance. The SAM template in the repository deploys a pre-configured dashboard tracking:

  • Burst status: Custom BurstActive metric (1 = active, 0 = normal)
  • Capacity headroom: UsedInstanceType_Count compared to AvailableInstanceType_Count. Note that UsedInstanceType_Count includes instances consumed by managed services (Amazon RDS, ALB), so your available application capacity may be lower than the raw availability count suggests.
  • Overflow fleet size: Auto Scaling group GroupInServiceInstances.
  • Latency comparison: TargetResponseTime per target group (Outposts compared to Region)
  • Traffic distribution: RequestCount per target group.

Set a CloudWatch alarm on Region target group TargetResponseTime exceeding your acceptable threshold. This provides early warning if overflow latency degrades beyond your tolerance.

Because the ALB resides in the Region, all traffic to Outposts targets traverses the service link. Keep the following in mind:

Bandwidth planning: Steady-state traffic to Outposts targets flows over the service link. Verify that your connection meets the minimum 500 Mbps per compute rack recommended by AWS, with sufficient headroom for both application traffic and Outposts control plane communication. Monitor service link VIF throughput using IfTrafficIn and IfTrafficOut metrics (on service link VIFs) to detect saturation before it impacts performance.

Latency impact: The service link adds latency compared to a locally deployed load balancer. The exact impact depends on your service link connection type and distance to the parent Region (AWS specifies a maximum of 175 ms round-trip for service link). For internet-facing workloads, this is typically negligible relative to the client-to-Region round trip. For workloads serving on-premises users through the Local Gateway, consider Route 53 weighted routing between an ALB on Outposts and a separate ALB in the Region instead.

Connection draining: When scaling down the overflow fleet, allow sufficient time for in-flight requests to complete. The deregistration delay configured on the target group (default 300 seconds) and the Auto Scaling scale-in cool-down period work together to help provide graceful termination and minimize the risk of dropping active connections.

Failure modes: If the service link goes down, the ALB cannot reach Outposts targets. Health checks fail, and all traffic automatically shifts to Region targets. This provides an unintentional but useful failover behavior. However, note that the overflow fleet is sized for burst capacity, not for sustaining 100% of production traffic. Monitor the ConnectedStatus metric (under the AWS/Outposts namespace, dimension OutpostId) and alert on degradation. If you need full failover capability, architect a separate disaster recovery solution with appropriately sized Region capacity.

Limitations

Be aware of these constraints when implementing this pattern:

  • ALB requirement: The pattern requires an Application Load Balancer in the Region. Workloads that rely on direct IP access through the Local Gateway (without an ALB) cannot use this pattern without an architecture change.
  • Stateful workloads: Applications with local disk state or in-memory sessions require external session stores (ElastiCache, DynamoDB) before they can burst. Without this, overflow instances serve requests without session context.
  • Database coupling: If your application writes to a database running exclusively on the Outpost, overflow instances in the Region cannot reach it without a cross-location replica or proxy. Read-heavy workloads with a Region read replica are ideal candidates.
  • Service link as single path: All ALB-to-Outpost traffic shares the service link with AWS control plane operations. Under extreme load, bandwidth contention can degrade both application traffic and management operations.
  • ALB on Outposts: As of this writing, ALB on Outposts does not support weighted target groups spanning both locations. The ALB must reside in the Region for this pattern to work.

Testing the pattern

Validate the burst mechanism before relying on it in production:

Simulate capacity pressure:

aws cloudwatch set-alarm-state \
  --alarm-name outposts-capacity-high \
  --state-value ALARM \
  --state-reason "Testing burst mechanism"

Verify overflow fleet launched:

aws autoscaling describe-auto-scaling-groups \
  --auto-scaling-group-names burst-overflow-fleet \
  --query "AutoScalingGroups[0].DesiredCapacity"

Verify ALB weights shifted (after recovery check runs):

aws elbv2 describe-listeners \
  --listener-arns <your-listener-arn> \
  --query "Listeners[0].DefaultActions[0].ForwardConfig.TargetGroups[*].[TargetGroupArn,Weight]"

Trigger recovery:

aws cloudwatch set-alarm-state \
  --alarm-name outposts-capacity-high \
  --state-value OK \
  --state-reason "Testing recovery"

Confirm overflow fleet scales back to zero and all traffic returns to Outposts targets. Recovery is gradual — the Amazon EventBridge rule evaluates every 5 minutes and steps weights back before scaling down, so full recovery may take 10–15 minutes depending on your weight progression configuration.

Clean up

To avoid ongoing charges, verify that the overflow Auto Scaling group has scaled to zero, then delete the stack:

sam delete --stack-name burst-to-region-stack

This removes all resources created by the template, including the Lambda function, CloudWatch alarm, SNS topic, Amazon EventBridge rule, and the overflow Auto Scaling group.

Conclusion

This Burst to Region pattern extends AWS Outposts capacity into the parent Region during peak demand. You trade a moderate latency increase for continued availability when local capacity is exhausted.

The pattern works best when you clearly classify which workloads can overflow, implement gradual traffic transitions, and maintain security and observability parity across both environments.

For the complete deployable AWS SAM template including the Lambda orchestrator, CloudWatch dashboard, and all IAM roles, see the GitHub repository. To learn more about capacity planning for Outposts, see Managing your AWS Outposts capacity using Amazon CloudWatch and AWS Lambda and AWS Outposts monitoring and reporting: A comprehensive Amazon EventBridge solution.

For more information, see the AWS Outposts User Guide and the Amazon EC2 Auto Scaling User Guide.

AMD Instinct MI455X Deep Dive: CDNA 5 Marks The Next Era of Instinct

Post Syndicated from Ryan Smith original https://www.servethehome.com/amd-instinct-mi455x-deep-dive-cdna-5-marks-the-next-era-of-instinct/

We are taking a deep dive look into AMD’s Instinct MI455X accelerator and its CDNA 5 architecture, the backbone of AMD’s next-gen AI server offerings and their massive Helios rackscale system

The post AMD Instinct MI455X Deep Dive: CDNA 5 Marks The Next Era of Instinct appeared first on ServeTheHome.

[$] A look at CrossPoint e-reader firmware

Post Syndicated from jzb original https://lwn.net/Articles/1087635/

There are a number of small,
inexpensive, low-powered e-reader or e-paper devices
that have promise as
ebook readers with one minor problem: the firmware they ship with does not
realize their full potential. To solve that problem, the CrossPoint Reader project looks to
provide replacement firmware that offers necessary features, better performance,
and a more pleasant reading experience. On August 7, the project released version
1.5.0
, which opens large EPUBs more quickly, provides
offline dictionary lookups, and has reworked settings for changing layout and
font options. The release also improves support for right-to-left text as well
as Chinese, Japanese, and
Korean
(CJK) text rendering.

Build an AI email pipeline with Amazon Bedrock and SES Mail Manager

Post Syndicated from Zip Zieper original https://aws.amazon.com/blogs/messaging-and-targeting/build-an-ai-email-pipeline-with-amazon-bedrock-and-ses-mail-manager/

Processing inbound email attachments at scale involves extracting files, routing them by recipient, scanning for malware, and classifying content. This traditionally requires stitching together polling loops, event rules, and multiple integration points. Amazon Simple Email Service (Amazon SES) Mail Manager now provides two new rule actions that simplify this pattern. The Lambda action invokes AWS Lambda functions directly from rule sets, and the Bounce action returns rejection responses. Together, they let you build multi-step email processing pipelines with declarative configuration.

In this post, you learn how to build an attachment processing pipeline that automatically extracts email attachments and classifies them with Amazon Bedrock. The pipeline also rejects infected files with RFC-compliant bounce responses. The complete implementation is available as an AWS Cloud Development Kit (AWS CDK) deployment in the companion GitHub repository sample-amazon-ses-mail-manager-attachment-pipeline. You can deploy it manually using the steps in this post, or hand it off to an AI coding agent such as Kiro or Claude Code. The repository includes a machine-readable agentic deployment guide that walks an agent through every deployment step, from prerequisite checks to post-deploy verification.

Architecture of the inbound email pipeline: SES Mail Manager routes messages through a traffic policy and rule set to AWS Lambda, Amazon Simple Storage Service (Amazon S3), Amazon DynamoDB, and Amazon Bedrock

The problem: scaling document intake for a multi-tenant platform

Consider a fictitious SaaS platform from AnyCompany that lets customers submit documents by email. Each customer sends invoices, contracts, and supporting files to a dedicated address (for example, [email protected] or [email protected]). They expect those attachments to land in their isolated storage, classified and ready for downstream processing.

Without a purpose-built pipeline, the typical approach looks like this: an Amazon S3 event notification triggers a Lambda function that polls for new MIME objects, parses them, looks up the recipient in a routing table, and fans out extraction to another function. Worse, it relies on a separate virus-scanning step having run first. Orchestration lives in AWS Step Functions or Amazon EventBridge rules. Adding a new customer means updating routing configuration in multiple places. Adding classification means bolting on yet another Lambda in the chain.

The result is fragile. When volume spikes during month-end invoice runs or onboarding waves, the polling loop backs up and retries cascade. Infected files occasionally slip past the scanner because the scan and extraction steps are not transactionally linked.

This pipeline solves the problem declaratively. Mail Manager’s traffic policy rejects unauthorized senders and enforces size limits at the SMTP connection level. This filtering happens before any processing resources are consumed. The rule set handles virus scanning, bouncing, archiving, classification, and extraction in a single ordered sequence. Each step completes before the next begins. If an attachment is infected, the sender gets an immediate SMTP bounce. There are no silent failures and no orphaned files in downstream storage.

The result is a pipeline where:

  • Adding a customer means adding an email address to the Mail Manager address list and a row in Amazon DynamoDB. No changes to code.
  • Adding a classification category means editing a prompt string. No schema migration.
  • Infected files never reach storage because the bounce fires during the SMTP transaction, before any Lambda is invoked.

Pipeline architecture overview

Table 1: Architecture components and their roles in the email processing pipeline

Component Role
Amazon SES Mail Manager open Ingress Endpoint Email arrives via public internet at a Mail Manager open ingress point over SMTP.
Mail Manager traffic policy Filters spam using the Abusix (or Spamhaus) email add-on, then enforces a recipient allowlist at the connection level.
Mail Manager rule set Messages for allowed recipients are passed to the rule set, which sequentially evaluates each message against two rules.
Rule 1 Uses the Trend Micro email add-on to scan for infected attachments, then bounces any unsafe messages back to sender (using Amazon SES outbound).
Rule 2 Clean messages passed from Rule 1 are copied to a Mail Manager archive and written as raw Multipurpose Internet Mail Extensions (MIME) objects to a “landing-zone” Amazon S3 bucket.
AWS Lambda (AttachmentProcessor) Triggered by the arrival of objects in the S3 bucket, this function parses MIME email, extracts attachments, and routes them to per-recipient S3 buckets.
AWS Lambda (EmailCategorizer) Triggered by the arrival of objects in the landing-zone S3 bucket, this function classifies each email using Amazon Nova Micro via Amazon Bedrock and writes results to Amazon DynamoDB.
Amazon S3 (landing zone + per-recipient buckets) Stores raw MIME objects in a shared landing-zone bucket; stores extracted attachments in isolated per-recipient buckets keyed by local part (for example, invoices/ for [email protected]).
Amazon DynamoDB (RecipientBucketLookup) Maps recipient email addresses to their designated S3 bucket and key prefix.
Amazon DynamoDB (EmailCategories) Stores Amazon Bedrock classification results: category, urgency, and summary.
Amazon Bedrock (Amazon Nova Micro) Classifies each email into a category (invoice, contract, HR, unknown) and urgency level.
AWS IAM roles Mail Manager and Lambda execution permissions following the principle of least privilege.

How the Mail Manager traffic policy filters connections

The traffic policy (Receive-attachments) makes connection-level decisions before any message content is processed. It evaluates two statements in order:

  1. Deny spam — Connections from senders flagged by Abusix as spam sources are denied immediately.
  2. Allow approved recipients — Connections where the recipient is in the approved-recipients address list pass through to the rule set.

The policy uses a default action of DENY, so any connection that does not match an explicit ALLOW statement is rejected. The policy also enforces a 35 MB maximum message size. You can add additional statements to enforce SPF, DKIM, or DMARC authentication results. This is useful in regulated industries where sender verification is required before any processing occurs.

The PolicyStatements array defines the evaluation order (deny first, then allow):

PolicyStatements=[
    {   # Statement 1: Deny connections from known spam sources
        "Action": "DENY",
        "Conditions": [{"BooleanExpression": {
            "Evaluate": {"Analysis": {"Analyzer": "ABUSIX_ADDON_ARN", "ResultField": "isListed"}},
            "Operator": "IS_TRUE",
        }}],
    },
    {   # Statement 2: Allow only recipients in the approved list
        "Action": "ALLOW",
        "Conditions": [{"BooleanExpression": {
            "Evaluate": {"IsInAddressList": {"Attribute": "RECIPIENT", "AddressLists": ["ADDRESS_LIST_ARN"]}},
            "Operator": "IS_TRUE",
        }}],
    },
]

For the complete create_traffic_policy call with all parameters, see the companion repository.

API reference: CreateTrafficPolicy

Rule set: the processing pipeline

Messages that pass the traffic policy enter the rule set (attachment-pipeline-rules), which evaluates two rules in order.

Rule 1 — Virus scan and bounce

This rule checks the Trend Micro add-on result. If Trend Micro reports isPassed = FALSE (infected attachment detected) — note that Mail Manager has already accepted the message by this point — the rule fires a Bounce action, which generates a non-delivery report (NDR) back to the sender with SMTP 550 (permanent failure) and status 5.7.1 (security/policy reason). It then Drops the message. No further rules run.

This after-the-fact NDR prevents infected messages from entering your processing pipeline while still providing clear guidance to legitimate senders.

Rule 2 — Process clean email

This rule has no conditions, so it applies to every message that passed the virus scan. It runs four actions in sequence:

  1. Archive — Mail Manager stores a copy in the archive for compliance and electronic discovery (eDiscovery).
  2. WriteToS3 — Mail Manager writes the raw MIME object to the amzn-s3-demo-bucket-general-receiving S3 bucket, keyed by message ID.
  3. InvokeLambda (EmailCategorizer, REQUEST_RESPONSE) — Mail Manager invokes the categorizer, which classifies the email with Amazon Bedrock and writes results to Amazon DynamoDB.
  4. InvokeLambda (AttachmentProcessor, REQUEST_RESPONSE) — Mail Manager invokes the processor, which extracts attachments and routes them to per-recipient S3 locations.

The categorizer fires before the attachment processor by design: the attachment processor deletes the original MIME from Amazon S3 after successfully extracting attachments. By running first, the categorizer is guaranteed to find the MIME in Amazon S3.

Because the Bounce and Drop actions fire in Rule 1, the Lambda functions in Rule 2 are never invoked for infected messages. There is no risk of malicious content reaching your Amazon S3 buckets or Amazon Bedrock.

API reference: CreateRuleSet

How Amazon Bedrock classifies inbound email

The MailManager-EmailCategorizer function uses Amazon Nova Micro (amazon.nova-micro-v1:0) to classify each email. Amazon Nova Micro is a fast, lightweight text-only model optimized for classification and structured output tasks. Access to all Amazon Bedrock foundation models, including Amazon Nova Micro, is available by default in all commercial AWS Regions. No access request is needed.

The function performs the following steps:

  1. Parses the recipient, message ID, and subject from the Mail Manager event.
  2. Retrieves the raw MIME from the amzn-s3-demo-bucket-general-receiving S3 bucket.
  3. Extracts the plain-text or HTML body from the MIME structure.
  4. Sends the subject (capped at 500 characters) and body (capped at 4,000 characters) to Amazon Bedrock with a classification prompt.
  5. Writes the structured result to the EmailCategories DynamoDB table.

The classification prompt returns a structured JSON response:

{
    "category": "invoice | contract | hr | unknown",
    "urgency": "urgent | non-urgent",
    "summary": "<50-word summary>"
}

If Amazon Bedrock returns an error or malformed JSON, the function falls back to category: unknown, urgency: non-urgent and continues. It never blocks the attachment processor.

Choosing a classification model

To customize the classification categories for your use case, update the SYSTEM_PROMPT in the categorizer Lambda function. The prompt uses a structured instruction format that you can extend with additional categories, urgency levels, or routing rules. For example, an insurance carrier could add categories like claim_new, claim_status, document_submission, and complaint to automatically triage patient email. You can also update the COMPANY_NAME environment variable to inject your organization’s name into the classification prompt without modifying the function code.

To switch the model, update the BEDROCK_MODEL_ID environment variable. The following table compares supported options:

Model Model ID Best for Latency Relative cost
Amazon Nova Micro amazon.nova-micro-v1:0 Fast structured classification, low latency ~200ms Lowest
Amazon Nova Lite amazon.nova-lite-v1:0 Richer summaries, multi-label classification ~400ms Moderate
Anthropic Claude 3 Haiku anthropic.claude-3-haiku-20240307-v1:0 Complex reasoning, nuanced categorization ~600ms Higher

Attachment extraction and routing

The MailManager-AttachmentProcessor function handles MIME parsing, recipient-based routing, and cleanup. It performs the following steps:

  1. Parses the recipient email address and message ID from the Mail Manager event information.
  2. Retrieves the raw MIME message from the amzn-s3-demo-bucket-general-receiving S3 bucket using the message ID from the event as the S3 key.
  3. Looks up the recipient’s S3 destination in the RecipientBucketLookup DynamoDB table, or creates a new entry if this is the first email for that recipient.
  4. Extracts attachment parts from the MIME message, skipping plain-text and HTML body parts that have no file name.
  5. Copies each attachment to the recipient’s S3 bucket at the prefix {local_part}/ (for example, invoices/ for [email protected]).
  6. Deletes the original MIME object from the landing-zone bucket, but only if every attachment copy succeeded. If any copy failed, the MIME is retained for retry.
  7. Returns a response to Mail Manager indicating success or failure.

This synchronous invocation pattern allows the rule set to make routing decisions based on the Lambda function’s response. If attachment extraction fails, subsequent rules can bounce the message or route it to a quarantine location.

Attachment detection logic

The function detects attachments using three criteria:

  1. Content-Disposition containing attachment.
  2. Any MIME part with a file name (even if disposition is inline or missing).
  3. Non-text, non-multipart parts (such as application/pdf or image/*).

For parts without a file name, the function generates one from the content type (for example, attachment.pdf).

Input validation and security

The pipeline implements the following input validation to protect against malicious content and unexpected inputs:

  • messageId validation — the messageId from the Mail Manager event is validated against an alphanumeric-plus-hyphen pattern ([a-zA-Z0-9\-]+) before use as an S3 key. Unexpected formats raise a ValueError, which causes Mail Manager to apply the ActionFailurePolicy.
  • Attachment filename sanitization — filenames from MIME Content-Disposition headers are attacker-controlled. Before use as S3 key components, each filename is processed through os.path.basename() to strip directory components, leading-dot stripping to prevent hidden-file creation, and a character allowlist ([\w.\- ]). Filenames are also truncated to 255 characters.
  • Prompt size caps — the email body sent to Amazon Bedrock is capped at 4,000 characters. The subject line is capped at 500 characters, preventing oversized prompts and excessive token usage.

The following additional controls are recommended before adapting this pipeline for production:

  • Validate attachment file types against an approved allowlist (such as .pdf, .docx, .xlsx). Reject or quarantine messages with disallowed file types.
  • Implement per-attachment size limits in addition to the overall 35 MB message size limit.
  • Verify MIME structure integrity before parsing. Handle malformed MIME structures as error conditions.
  • Log validation failures to Amazon CloudWatch for security monitoring and audit purposes.

AWS CloudFormation and CDK support for Mail Manager rule actions

The InvokeLambda and Bounce rule actions are supported natively in AWS::SES::MailManagerRuleSet as of March 2026. The companion CDK stack uses CfnMailManagerRuleSet directly. No Custom Resource is required.

When using the Python CDK L1 bindings, note that typed property classes for Bounce and InvokeLambda are not yet exposed in the Python bindings. Pass these actions as plain dicts with camelCase keys matching the AWS CloudFormation property names. RuleActionProperty accepts Dict[str, Any] for each field:

ses.CfnMailManagerRuleSet.RuleActionProperty(
    bounce={
        "smtpReplyCode": "550",
        "statusCode": "5.7.1",
        "diagnosticMessage": "Your attachment was infected.",
        "sender": "[email protected]",
        "roleArn": role.role_arn,
        "actionFailurePolicy": "CONTINUE",
    }
)

API reference: AWS::SES::MailManagerRuleSet | AWS CDK API Reference

Prerequisites

This post and companion GitHub project assume familiarity with SMTP protocols, email infrastructure concepts, AWS Lambda, Amazon S3, Amazon DynamoDB, and AWS IAM.

Estimated time: 20–30 minutes to deploy and test.

Estimated cost: This pipeline uses a Mail Manager open ingress endpoint that costs $50/mo in addition to various AWS services that are charged based on actual usage. In a low-volume test environment (fewer than 1,000 email messages per day), costs should typically be under $60 USD per month driven primarily by Mail Manager archiving, S3 storage, Lambda invocations, and Amazon Bedrock token usage. Use the AWS Pricing Calculator to estimate costs for your expected volume.

AWS IAM permissions: The deploying user needs permissions to create and manage AWS CloudFormation stacks, Lambda functions, S3 buckets, DynamoDB tables, AWS IAM roles, and Amazon SES Mail Manager resources. For testing, AdministratorAccess is sufficient. For production, scope permissions to the specific actions required: cloudformation:CreateStack, lambda:CreateFunction, s3:CreateBucket, dynamodb:CreateTable, iam:CreateRole, iam:PassRole, ses:CreateTrafficPolicy, ses:CreateRuleSet, and ses:CreateAddressList. (Separately, the Lambda functions’ own execution roles, created by the stack, grant bedrock:InvokeModel at runtime; that permission is not needed by the person deploying the stack.)

To deploy this pipeline, you need the following:

  1. An active AWS account.
  2. AWS Command Line Interface (AWS CLI) version 2.x or later installed and configured with credentials and default region.
  3. AWS CDK version 2.x or later installed (npm install -g aws-cdk) and Python 3.12 or later.
  4. Amazon SES configured with production access in the target region with a verified Amazon SES identity for the bounce sender address.
  5. Ability to administer the DNS entries for the Amazon SES identity to add an MX record pointing to the Mail Manager ingress endpoint’s A record.

Deployment

Tip: Whichever path you choose, review the Prerequisites section first to make sure your AWS account has the necessary permissions and that you have a verified domain available in Amazon SES. The complete solution is available as an open-source reference implementation. To deploy it in your AWS account, clone the companion repository:

git clone https://github.com/aws-samples/sample-amazon-ses-mail-manager-attachment-pipeline.git
cd sample-amazon-ses-mail-manager-attachment-pipeline

From here, you have two paths to get up and running:

Option 1: Deploy manually

Follow the step-by-step instructions in the repository’s README.md. At a high level, you will:

  1. Install prerequisites (AWS CDK, Node.js, Python).
  2. Configure your environment variables (AWS account, region, verified domain).
  3. Bootstrap your CDK environment.
  4. Deploy the stack with cdk deploy.
  5. Complete post-deployment verification (confirm email receiving rules are active and test with a sample message).

Option 2: Deploy with a coding agent

If you use an AI-powered coding assistant (such as Amazon Q Developer CLI or Kiro), install the AWS MCP server and SES/Mail Manager skills to empower your AI assistants with deep context on Amazon SES and Mail Manager. These resources give your assistant live access to AWS APIs and CDK documentation, which significantly reduces trial-and-error during deployment. The repository’s AGENTS.md file contains machine-readable guidance, deployment failure recovery patterns, and region handling notes specifically for AI assistants. Simply point your AI assistant at the AGENTS.md file in the repository root. This file provides structured, machine-readable instructions that guide the agent through the full deployment, from prerequisite checks through stack deployment and validation, without manual intervention.

# Example: point your agent at the instructions
@agent follow AGENTS.md

Validating the deployment

Once your stack is deployed and the MX record is in place, send a test email with an attachment to one of your approved recipient addresses. Then confirm each stage of the pipeline executed successfully:

1. Check Lambda execution

Open Amazon CloudWatch Logs for both functions and confirm they completed without errors:

aws logs tail /aws/lambda/MailManager-EmailCategorizer --follow
aws logs tail /aws/lambda/MailManager-AttachmentProcessor --follow

You should see log entries showing the message ID being processed by each function in sequence: the categorizer first, then the attachment processor.

2. Confirm email classification

Query the EmailCategories DynamoDB table to verify Amazon Bedrock classified your test message:

aws dynamodb scan --table-name EmailCategories --max-items 1

A successful record includes category, urgency, and a short summary, all generated by Amazon Nova Micro from the email’s subject and body.

3. Verify attachment extraction

Look up your recipient’s S3 destination in the RecipientBucketLookup table, then list the bucket contents to confirm the attachment arrived:

aws dynamodb get-item --table-name RecipientBucketLookup \
  --key '{"recipient": {"S": "[email protected]"}}'

aws s3 ls s3://<bucket-name>/<prefix>/ --recursive

If all three checks pass, your pipeline is fully operational. Email messages are being scanned, classified, and routed to per-recipient storage without any external orchestration.

Troubleshooting

If your test email does not flow through the pipeline as expected, start with these common issues:

Symptom Likely cause Resolution
Bounce action fails silently — infected emails are dropped without notification The bounce_sender identity is not verified in the deployment region. Amazon SES identities are regional. Verify the domain in your target region: aws sesv2 create-email-identity --email-identity example.com --region <region>, add the DKIM CNAMEs to DNS, and wait for verification. No redeployment required.
Bounce action returns a validation error bounce_sender is set to a bare domain instead of an email address Use a full address like [email protected], not just example.com

For CDK deployment issues, stack rollback errors, and teardown conflicts, see the repository troubleshooting guide.

General debugging tip: Both Lambda functions log to /aws/lambda/MailManager-EmailCategorizer and /aws/lambda/MailManager-AttachmentProcessor in Amazon CloudWatch Logs. Start there for any runtime failures.

Clean up

To avoid ongoing charges, destroy the stack when you are done:

AWS_DEFAULT_REGION= cdk destroy

Note: If the destroy fails with a ConflictException, detach the ingress point from the traffic policy first. Amazon DynamoDB tables created with RETAIN policies may also need manual deletion. See the repository’s Common failure modes table for details.

Do not forget to remove the MX record from your domain’s DNS once the ingress point is deleted. After completing the clean up, verify on the AWS Management Console that the Mail Manager ingress endpoint, Amazon S3 buckets, Amazon DynamoDB tables, and Lambda functions no longer appear in your account.

Conclusion

The Lambda action and Bounce action in Amazon SES Mail Manager support multi-step inbound email processing without complex orchestration workarounds. This pipeline demonstrates how these capabilities work together in production: scanning attachments for malware, classifying email content with AI, extracting and routing files to per-recipient storage, and providing immediate RFC-compliant feedback to senders. The modular architecture supports extension: add new classification categories, integrate additional scanning engines, or chain Lambda functions for multi-stage processing. The synchronous invocation pattern means that every processing step completes before the next begins, giving you full control over the pipeline flow. Get started by cloning the sample-amazon-ses-mail-manager-attachment-pipeline repository and deploying to your account. For an overview of the four new Mail Manager capabilities used in this pipeline, see Four new Amazon SES Mail Manager capabilities, explained.

FAQ

Q: Can I use a different Amazon Bedrock model for email classification?

Yes. Update the BEDROCK_MODEL_ID environment variable on the MailManager-EmailCategorizer Lambda function. No changes to code are required. See the preceding model comparison table for supported options.

Q: Do I need to request access to Amazon Nova Micro?

No. In all commercial AWS Regions, access to Amazon Bedrock foundation models including Amazon Nova Micro is available by default. AWS GovCloud (US) regions require an explicit access request through the Amazon Bedrock console.

Q: What happens if the Lambda function times out or fails?

A REQUEST_RESPONSE invocation is time-bounded to approximately 30 seconds, or sooner if your function’s own configured timeout is shorter. In either case, Mail Manager applies the ActionFailurePolicy configured on the rule action. If set to CONTINUE, the pipeline moves to the next action. If set to DROP, the message is discarded. This pipeline uses CONTINUE, so a transient classification failure does not block attachment delivery.

Q: Can I add more classification categories?

Yes. Edit the SYSTEM_PROMPT in the categorizer Lambda function. The function writes whatever categories the model returns to Amazon DynamoDB. No schema changes are needed.

Q: How does the pipeline handle email messages with no attachments?

The AttachmentProcessor detects zero attachment parts, skips extraction, deletes the raw MIME from the landing-zone bucket, and returns success. The EmailCategorizer still classifies the message normally.

Q: What is the maximum attachment size supported?

The traffic policy enforces a 35 MB maximum message size (total MIME payload including all attachments and base64 encoding overhead). Individual attachments are not size-limited beyond this total cap.

Q: Can I deploy this with an AI coding agent?

Yes. The repository includes an AGENTS.md file with machine-readable deployment instructions. Point your AI assistant (Kiro, Claude Code, Amazon Q Developer CLI) at this file and it handles the full deployment without manual intervention.

Q: Is the Bounce action RFC-compliant?

Yes, with one clarification: it is not a live SMTP-transaction rejection. Mail Manager first accepts the message, then the rule set runs. If the Bounce action fires, it generates a non-delivery report (NDR) back to the sender with an RFC 5321-compliant SMTP reply code and an RFC 3463-compliant enhanced status code.


About the authors

Security updates for Wednesday

Post Syndicated from jzb original https://lwn.net/Articles/1088476/

Security updates have been issued by AlmaLinux (fence-agents, firefox, frr10, gstreamer1-plugins-good, iscsi-initiator-utils, isns-utils, kernel, kernel-rt, perl-DBI:1.641, postgresql, postgresql:12, and resource-agents), Debian (libgd2, openjdk-25, php7.4, php8.2, and postfix), Fedora (clamav, domoticz, and libidn), Red Hat (delve, edk2, firefox, go-fdo-client, go-fdo-server, grafana, host-metering, ignition, kernel, kernel package, kernel-rt, ldns, libarchive, mariadb10.11, mariadb:10.11, multiple packages, rhc, rhc-worker-playbook, rhc-worker-script, sssd, thunderbird, yggdrasil, and yggdrasil-worker-package-manager), Slackware (expat and openssh), and SUSE (avahi, chromedriver, erlang26, gawk, glib2, go-sendxmpp, google-guest-agent, google-osconfig-agent, gpg2, gstreamer-plugins-bad, gstreamer-plugins-base, helm, ignition, ImageMagick, java-11-openj9, java-17-openj9, java-1_8_0-openj9, java-21-openj9, java-25-openj9, libarchive, libkrun, libpcp-devel, libpng16, libssh, libssh2_org, multipath-tools, net-tools, nmap, openssl-1_1, openssl-3, pcp, perl, python-pip, python-pyasn1, python-urllib3, python3-pip, python313-Django5, runc, samba, snpguest, spice-vdagent, sssd, unbound, wget, wild, wpa_supplicant, xmlrpc-c, and zpaqfranz).

The collective thoughts of the interwebz