Post Syndicated from LastWeekTonight original https://www.youtube.com/shorts/lIHQoheG7TY
Migrate JMS applications to Amazon MQ for RabbitMQ with minimal changes
Post Syndicated from Vinodh Kannan Sadayamuthu original https://aws.amazon.com/blogs/big-data/migrate-jms-applications-to-amazon-mq-for-rabbitmq-with-minimal-changes/
Running JMS applications on on-premises brokers or Apache ActiveMQ requires manual patching cycles, capacity planning for peak loads, and maintaining high availability across multiple data centers. With Amazon MQ version 4 and above, you can migrate your existing JMS applications without rewriting your messaging layer, removing weeks of rewrite work.
This post shows you how to migrate your JMS applications and walks through a complete setup, from creating the broker to sending and receiving messages. You will also see a real-world scenario: migrating an existing Apache ActiveMQ workload to an Amazon MQ broker running RabbitMQ. The post covers configuration changes, monitoring with Amazon CloudWatch, and validation steps to make sure that your migration succeeds.
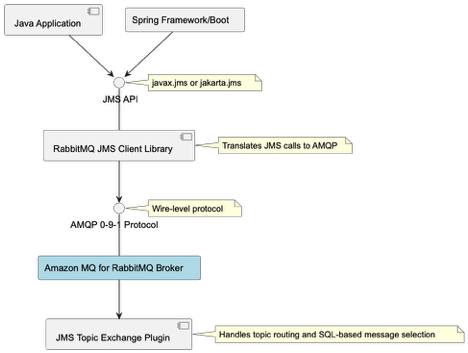
Amazon MQ version 4 and above includes built-in support for the RabbitMQ JMS Client and the JMS Topic Exchange plugin. The RabbitMQ JMS Client and JMS Topic Exchange plugin work together, allowing your existing JMS applications to connect using familiar JMS APIs. You update the connection factory configuration and broker endpoint. Your business logic, message producers, consumers, and listeners stay exactly as written.
Understanding JMS and AMQP
How the RabbitMQ JMS Client works
Use the RabbitMQ JMS Client to connect your Java application to Amazon MQ. The client translates your JMS API calls (javax.jms or jakarta.jms) into AMQP 0-9-1 messages that the broker understands.
Advanced Message Queuing Protocol (AMQP) defines how messages are formatted and transmitted across the network at the wire level. This means that non-Java services can consume the same messages using native AMQP clients, making the protocol language-agnostic
JMS version support
Migrate at the JMS version that your application already uses. The client supports JMS 1.1, 2.0, and 3.1 (Jakarta Messaging), so you don’t need to upgrade your application code before migrating brokers. The client integrates with Spring Framework and Spring Boot applications without requiring custom bean factories or application context configuration.
Because the JMS abstraction layer sits between your application and the broker, most migrations require only a connection factory change, not a logic rewrite.
RabbitMQ JMS Topic Exchange plugin
Your existing publish/subscribe patterns work without client-side routing logic. The JMS Topic Exchange plugin adds server-side support for JMS topic semantics, handling topic routing and SQL-based message selection directly in the broker.
The plugin handles SQL-based message selection (JMS selectors like OrderType = `Electronics` AND Priority > 5) and topic hierarchies with wildcard pattern matching (* for single level, # for multiple levels). Your application uses standard JMS topic APIs (createTopic(), setMessageSelector()) without additional filtering logic.
Getting started
This walkthrough shows you how to set up Amazon MQ and connect your existing JMS application. You will create a broker, configure the connection factory, and send and receive messages.
Prerequisites
You need an existing JMS application built on Apache ActiveMQ or another JMS provider to migrate. If you don’t have one, you can still follow Steps 1–5 to create a broker and test the connection pattern. Before you begin, confirm that you have the following in place:
- An active AWS account
- AWS Command Line Interface (AWS CLI) installed. For instructions, see Installing the AWS CLI.
- Java 11 or later installed on your local development environment.
- An AWS Identity and Access Management (IAM) principal (user or role) with the AmazonMQFullAccess managed policy attached.
- Maven or Gradle for dependency management.
Amazon MQ broker charges apply based on instance type and usage. Review the Amazon MQ pricing page before you start.
Step 1: Create an Amazon MQ for RabbitMQ broker
The following command creates a single-instance broker running RabbitMQ 4.2 on an mq.m7g.medium instance.
aws mq create-broker \
--broker-name my-rabbitmq-broker \
--engine-type rabbitmq \
--engine-version 4.2 \
--deployment-mode SINGLE_INSTANCE \
--host-instance-type mq.m7g.medium \
--auto-minor-version-upgrade \
--publicly-accessible \
--users "Username=admin,Password=[PASSWORD]" \
--region us-west-2
Replace <broker-name> with the name that you want to give to the broker. Replace <username> and <password> as described in the create-broker CLI documentation. After the command runs successfully, the command line displays the BrokerArn and BrokerId.
Note: This command creates a publicly accessible broker for demonstration purposes only. For production workloads, create brokers in private subnets within your VPC and restrict access using security groups. Don’t use the –publicly-accessible flag. For more information, see Security best practices for Amazon MQ.
The command returns output similar to:
{
    "BrokerArn": "arn:aws:mq:us-west-2:111122223333:broker:my-rabbitmq-broker:b-c8352341-ec91-4a78-ad9c-a57f23f235bb",
    "BrokerId": "b-c8352341-ec91-4a78-ad9c-a57f23f235bb"
}
Save the BrokerId value for the next step.
The broker takes approximately 15–20 minutes to reach the Running state. Run the following command every 2 minutes to check the status:
aws mq describe-broker --broker-id <BrokerId> --region us-west-2 --query 'BrokerState' Proceed to the next step after the broker state is RUNNING.
To get the broker endpoints, run:
aws mq describe-broker --broker-id <BrokerId> --region us-west-2 --query 'BrokerInstances'Note the ConsoleURL and Endpoints from the output. The command returns output similar to:
[{
    "ConsoleURL": "https:// b-c8352341-ec91-4a78-ad9c-a57f23f235bb.mq.us-west-2.on.aws",
    "Endpoints": ["amqps://b-c8352341-ec91-4a78-ad9c-a57f23f235bb.mq.us-west-2.on.aws:5671"]
}]Choose the dependency that matches your application’s current JMS version. If your imports reference javax.jms packages, use version 2.12.0. If your imports reference jakarta.jms packages (JMS 3.1 / Jakarta EE 9+), use version 3.4.0.
For JMS 1.1 and 2.0 (javax.jms):
<dependency>
<groupId>com.rabbitmq.jms</groupId>
<artifactId>rabbitmq-jms</artifactId>
<version>2.12.0</version>
</dependency><dependency>
<groupId>com.rabbitmq.jms</groupId>
<artifactId>rabbitmq-jms</artifactId>
<version>3.4.0</version>
</dependency>Step 3: Configure the connection factory
Store your broker credentials in AWS Secrets Manager before configuring the connection factory. This keeps credentials out of your source code and configuration files.
Create the secret:
aws secretsmanager create-secret \
--name dev-rabbitmq \
--description "Amazon MQ broker credentials" \
--secret-string '{"username":"admin","password":"[PASSWORD]"}' \
--region us-west-2
Add the AWS SDK for Secrets Manager to your pom.xml:
<dependency>
<groupId>software.amazon.awssdk</groupId>
<artifactId>secretsmanager</artifactId>
<version>2.20.0</version> </dependency>

<dependency>
<groupId>com.fasterxml.jackson.core</groupId>
<artifactId>jackson-databind</artifactId>
<version>2.15.0</version>
</dependency>
Replace your existing broker URL with the Amazon MQ endpoint. In most cases, this is the only change required in your application configuration:
import com.rabbitmq.jms.admin.RMQConnectionFactory;
import software.amazon.awssdk.services.secretsmanager.SecretsManagerClient;
import software.amazon.awssdk.services.secretsmanager.model.GetSecretValueRequest;
import software.amazon.awssdk.services.secretsmanager.model.GetSecretValueResponse;
import software.amazon.awssdk.regions.Region;
import com.fasterxml.jackson.core.type.TypeReference;
import com.fasterxml.jackson.databind.ObjectMapper;
import java.util.Map;
import javax.jms.*;

// Retrieve credentials from AWS Secrets Manager
Map<String, String> creds;
try (SecretsManagerClient secretsClient = SecretsManagerClient.builder().region(Region.US_WEST_2).build()) {
    GetSecretValueResponse response = secretsClient.getSecretValue(GetSecretValueRequest.builder().secretId("dev-rabbitmq").build());
    ObjectMapper objectMapper = new ObjectMapper();
    creds = objectMapper.readValue(response.secretString(),new TypeReference<Map<String, String>>() {});
    }

// Create and configure the connection factory
RMQConnectionFactory connectionFactory = new RMQConnectionFactory();
connectionFactory.setHost("b-c8352341-ec91-4a78-ad9c-a57f23f235bb.mq.us-west-2.on.aws");
connectionFactory.setPort(5671);connectionFactory.setVirtualHost("/");
connectionFactory.useSslProtocol();
connectionFactory.setUsername(creds.get("username"));
connectionFactory.setPassword(creds.get("password"));
Replace the host value with your broker endpoint from Step 1.
The connection factory requires four parameters:
- Host: Your broker endpoint from the describe-broker output
- Port: 5671 for AMQP over TLS (Amazon MQ requires encryption in transit)
- VirtualHost: “/” (the default RabbitMQ virtual host)
- UseSslProtocol: true (required by Amazon MQ)
Step 4: Send messages
The following examples show how to send messages to a queue and a topic using the JMS 2.0 simplified API.
Point-to-point (queue) for one-to-one delivery:
try (JMSContext context = connectionFactory.createContext()) {
Queue queue = context.createQueue("orders");
context.createProducer().setProperty("OrderType", "Electronics").send(queue, "Order #12345");
System.out.println("Sent message to queue: orders");
}
Publish/subscribe (topic) for one-to-many broadcast:
try (JMSContext context = connectionFactory.createContext()) {
	Topic topic = context.createTopic("orders.electronics");
	context.createProducer().setProperty("MessageType", "Broadcast").send(topic, "New electronics order received!");
	System.out.println("Published message to topic: orders.electronics");
}
Message properties(OrderType, MessageType) are JMS headers that consumers can use for filtering. These properties become AMQP message headers when transmitted to the broker.
Step 5: Receive messages asynchronously
To receive messages asynchronously, attach a MessageListener to a consumer. The listener fires each time a message arrives.
Queue consumer:
Asynchronous consumers process messages in a background thread without blocking your main application logic. The MessageListener callback fires each time a message arrives, allowing your application to handle messages as they’re delivered rather than polling with receive().
try (JMSContext context = connectionFactory.createContext()) {
	Queue queue = context.createQueue("orders");
	JMSConsumer consumer = context.createConsumer(queue);
	consumer.setMessageListener(message -> {
		if (message instanceof TextMessage) {
			try {
				System.out.println("Received: " + ((TextMessage) message).getText());
			} catch (JMSException e) {
				e.printStackTrace();
			}
		}
	});

	System.out.println("Listening for messages on queue: orders");

	// Keep the consumer active for 30 seconds
	Thread.sleep(30000);
}
Topic subscriber:
try (JMSContext context = connectionFactory.createContext()) {
	Topic topic = context.createTopic("orders.electronics");
	JMSConsumer consumer = context.createConsumer(topic);
	consumer.setMessageListener(message -> {
		if (message instanceof TextMessage) {
			try {
				System.out.println("Subscriber received: " + ((TextMessage) message).getText());
			} catch (JMSException e) {
				e.printStackTrace();
			}
		}
	});

	System.out.println("Subscribed to topic: orders.electronics");

	// Keep the consumer active for 30 seconds
	Thread.sleep(30000);}
The Thread.sleep(30000) call keeps the consumer active for 30 seconds.
Use case: Migrating an ActiveMQ Workload to Amazon MQ for RabbitMQ
Migrate your Apache ActiveMQ applications to Amazon MQ by updating four configuration points. Your business logic, message producers, consumers, and listeners stay exactly as written. This walkthrough uses a real JMS 1.1 application with a centralized broker configuration class to show precisely which lines change and which remain identical.
Apache ActiveMQ powers messaging infrastructure for thousands of Java applications worldwide. If you run JMS applications on ActiveMQ, you can migrate to Amazon MQ for RabbitMQ with minimal code changes. The following steps demonstrate a complete migration using an application that includes a centralized broker configuration class, a message producer, and a message consumer.
Step 1: Update the Maven dependency
Replace the ActiveMQ client dependencies with the RabbitMQ JMS client in your pom.xml. The rabbitmq-jms artifact includes the RabbitMQ AMQP client and JMS API as transitive dependencies, so a single entry replaces both ActiveMQ artifacts.
Before (ActiveMQ):
<dependency>
<groupId>org.apache.activemq</groupId>
<artifactId>activemq-client</artifactId>
<version>5.18.6</version>
</dependency>

<dependency>
<groupId>org.apache.activemq</groupId>
<artifactId>activemq-pool</artifactId>
<version>5.18.6</version>n>5.18.6</version>
</dependency>
After (Amazon MQ):
<dependency>
<groupId>com.rabbitmq.jms</groupId>
<artifactId>rabbitmq-jms</artifactId>
<version>2.12.0</version>
</dependency>
The rabbitmq-jms artifact pulls in the RabbitMQ AMQP client and the JMS API as transitive dependencies, so a single entry replaces both ActiveMQ artifacts.
Step 2: Update the broker configuration
If your application centralizes connection details in a shared configuration class, that class is the only file that needs to change. The queue name and everything else your application references remain the same.
Before (ActiveMQ):
// BrokerConfig.java - ActiveMQ version
public final class BrokerConfig {
	// OpenWire endpoint
	public static final String BROKER_URL = "tcp://localhost:61616";
	public static final String USERNAME = "[PASSWORD]";
	public static final String PASSWORD = "[PASSWORD]";
	public static final String QUEUE_NAME = "demo.queue";
	private BrokerConfig() {}}
After (Amazon MQ):
// BrokerConfig.java - Amazon MQ version

import com.fasterxml.jackson.core.type.TypeReference;import com.fasterxml.jackson.databind.ObjectMapper;
import software.amazon.awssdk.regions.Region;
import software.amazon.awssdk.services.secretsmanager.SecretsManagerClient;
import software.amazon.awssdk.services.secretsmanager.model.GetSecretValueRequest;
import software.amazon.awssdk.services.secretsmanager.model.GetSecretValueResponse;
import java.util.Map;

public final class BrokerConfig {
	// AMQPS endpoint (TLS required by Amazon MQ)
	public static final String BROKER_URL = "amqps://b-c8352341-ec91-4a78-ad9c-a57f23f235bb.mq.us-west-2.on.aws:5671";

	// Queue name carries over unchanged
	public static final String QUEUE_NAME = "demo.queue";

	// Secret name in AWS Secrets Manager
	private static final String SECRET_ID = "dev-rabbitmq";
	private static final Map<String, String> CREDENTIALS = loadCredentials();
	public static String getUsername() {return CREDENTIALS.get("username");}
	public static String getPassword() {return CREDENTIALS.get("password");}
	private static Map<String, String> loadCredentials() {
		try (SecretsManagerClient client = SecretsManagerClient.builder().region(Region.US_WEST_2).build()) {
			GetSecretValueResponse response = client.getSecretValue(GetSecretValueRequest.builder().secretId(SECRET_ID).build());
			ObjectMapper mapper = new ObjectMapper();
			return mapper.readValue(response.secretString(), new TypeReference<Map<String, String>>() {});
		} catch (Exception e) {
			throw new RuntimeException("Failed to load broker credentials from Secrets Manager", e);
		}
	}
	private BrokerConfig() {}}
Two things changed in this file compared to the ActiveMQ version: the protocol prefix (tcp:// to amqps://) and the host and port (OpenWire on 61616 to AMQP over TLS on 5671). The queue name is identical. Credentials are no longer stored as static string constants. Instead, loadCredentials() retrieves them from AWS Secrets Manager at startup, and getUsername() and getPassword() expose them to the rest of the application. This follows AWS security best practices and streamlines credential rotation.
Step 3: Update the message producer
The producer requires two changes: the import statement and the factory instantiation. Every JMS API call after the factory (createConnection, createSession, createProducer, send) is identical to the ActiveMQ version.
Before (ActiveMQ):
import org.apache.activemq.ActiveMQConnectionFactory;
import javax.jms.*;

public class MessageProducer {
	public static void main(String[] args) {
		Connection connection = null;
		try {
			ActiveMQConnectionFactory factory = new ActiveMQConnectionFactory(BrokerConfig.USERNAME,BrokerConfig.PASSWORD,BrokerConfig.BROKER_URL);
			connection = factory.createConnection();
			connection.start();
			Session session = connection.createSession(false, Session.AUTO_ACKNOWLEDGE);
			Destination destination = session.createQueue(BrokerConfig.QUEUE_NAME);
			javax.jms.MessageProducer producer = session.createProducer(destination);
			producer.setDeliveryMode(DeliveryMode.PERSISTENT);
			for (int i = 1; i <= 5; i++) {
				TextMessage message = session.createTextMessage("Hello from ActiveMQ - message #" + i);
				producer.send(message);
				System.out.println("Sent: " + message.getText());
			}
			producer.close();
			session.close();
		} catch (JMSException e) {
			e.printStackTrace();
		} finally {
			if (connection != null) {
				try {
					connection.close();
				} catch (JMSException ignored) {}}
			}
		}
	}
After (Amazon MQ):
import com.rabbitmq.jms.admin.RMQConnectionFactory;
import javax.jms.*;

public class MessageProducer {

	public static void main(String[] args) {
		Connection connection = null;
		try {
			RMQConnectionFactory factory = new RMQConnectionFactory();
			factory.setUri(BrokerConfig.BROKER_URL);
			factory.setUsername(BrokerConfig.getUsername());
			factory.setPassword(BrokerConfig.getPassword());

			// Everything below this line is identical to the ActiveMQ version
			connection = factory.createConnection();
			connection.start();
			Session session = connection.createSession(false, Session.AUTO_ACKNOWLEDGE);
			Destination destination = session.createQueue(BrokerConfig.QUEUE_NAME);
			javax.jms.MessageProducer producer = session.createProducer(destination);
			producer.setDeliveryMode(DeliveryMode.PERSISTENT);
			for (int i = 1; i <= 5; i++) {
				TextMessage message = session.createTextMessage("Hello from Amazon MQ - message #" + i);
				producer.send(message);
				System.out.println("Sent: " + message.getText());
			}
			producer.close();
			session.close();
		} catch (JMSException e) {
			e.printStackTrace();
		} finally {
			if (connection != null) {
				try {
					connection.close();
				} catch (JMSException ignored) {}
			}
		}
	}
}
The import changes from org.apache.activemq.ActiveMQConnectionFactory to com.rabbitmq.jms.admin.RMQConnectionFactory. The factory construction switches from a constructor that accepts credentials and URL to a no-arg constructor with explicit setter calls. Credentials are now retrieved from AWS Secrets Manager through BrokerConfig.getUsername() and BrokerConfig.getPassword(). That is the complete change set for the producer.
Step 4: Update the message consumer
The consumer follows the same pattern as the producer. Swap the factory class and import, update the credential calls, and keep everything else.
Before (ActiveMQ):
import org.apache.activemq.ActiveMQConnectionFactory;
import javax.jms.*;
public class MessageConsumer {
	public static void main(String[] args) {
		Connection connection = null;
		try {
			ActiveMQConnectionFactory factory = new ActiveMQConnectionFactory(BrokerConfig.USERNAME, BrokerConfig.PASSWORD, BrokerConfig.BROKER_URL);
			connection = factory.createConnection();
			connection.start();
			Session session = connection.createSession(false, Session.AUTO_ACKNOWLEDGE);
			Destination destination = session.createQueue(BrokerConfig.QUEUE_NAME);
			javax.jms.MessageConsumer consumer = session.createConsumer(destination);
			System.out.println("Waiting for messages on queue: " + BrokerConfig.QUEUE_NAME);
			Message message;
			while ((message = consumer.receive(10000)) != null) {
				if (message instanceof TextMessage) {
					TextMessage textMessage = (TextMessage) message;
					System.out.println("Received: " + textMessage.getText());
				}
			}
			consumer.close();
			session.close();
		} catch (JMSException e) {
			e.printStackTrace();
		} finally {
			if (connection != null) {
				try {
					connection.close();
				} catch (JMSException ignored) {}
			}
		}
	}
}
After (Amazon MQ):
import com.rabbitmq.jms.admin.RMQConnectionFactory;
import javax.jms.*;

public class MessageConsumer {
	public static void main(String[] args) {
		Connection connection = null;
		try {
			RMQConnectionFactory factory = new RMQConnectionFactory();
			factory.setUri(BrokerConfig.BROKER_URL);
			factory.setUsername(BrokerConfig.getUsername());
			factory.setPassword(BrokerConfig.getPassword());

			// Everything below this line is identical to the ActiveMQ version
			connection = factory.createConnection();
			connection.start();
			Session session = connection.createSession(false, Session.AUTO_ACKNOWLEDGE);
			Destination destination = session.createQueue(BrokerConfig.QUEUE_NAME);
			javax.jms.MessageConsumer consumer = session.createConsumer(destination);
			System.out.println("Waiting for messages on queue: " + BrokerConfig.QUEUE_NAME);
			Message message;
			while ((message = consumer.receive(10000)) != null) {
				if (message instanceof TextMessage) {
					TextMessage textMessage = (TextMessage) message;
					System.out.println("Received: " + textMessage.getText());
				}
			}
			consumer.close();
			session.close();
		} catch (JMSException e) {
			e.printStackTrace();
		} finally {
			if (connection != null) {
				try {
					connection.close();
				} catch (JMSException ignored) {}
			}
		}
	}
}
The import changes from org.apache.activemq.ActiveMQConnectionFactory to com.rabbitmq.jms.admin.RMQConnectionFactory. The factory construction switches to a no-arg constructor with explicit setter calls, and BrokerConfig.USERNAME / BrokerConfig.PASSWORD are replaced with BrokerConfig.getUsername() / BrokerConfig.getPassword(). The session creation, queue lookup, consumer setup, and message processing loop are identical to the ActiveMQ version.
Configuration
The following table summarizes the changes required when migrating from Apache ActiveMQ.
| ActiveMQ | Amazon MQ for RabbitMQ | |
| Maven dependency | activemq-client 5.18.6 | rabbitmq-jms 2.12.0 |
| Connection factory class | ActiveMQConnectionFactory | RMQConnectionFactory |
| Import package | org.apache.activemq | com.rabbitmq.jms.admin |
| Broker URL format | tcp://host:61616 | amqps://broker-id.mq.region.on.aws:5671 |
| Protocol | OpenWire | AMQP 0-9-1 |
| Port | 61616 (OpenWire) | 5671 (AMQP over TLS) |
| TLS | Optional | Required |
| Credentials | Plain text / JNDI | AWS Secrets Manager (recommended) |
| Virtual host | N/A | / (default) |
| JMS version support | JMS 1.1 | JMS 1.1, 2.0, 3.1 (Jakarta) |
| Queue/Topic names | demo.queue | demo.queue (no change) |
| JMS API calls | Standard JMS 1.1 | Standard JMS 1.1 (no change) |
Validating the migration
Run your application against Amazon MQ for RabbitMQ in a staging environment before directing production traffic to the new broker. Verify that messages flow correctly, consumers process as expected, and no data loss occurs during cutover.
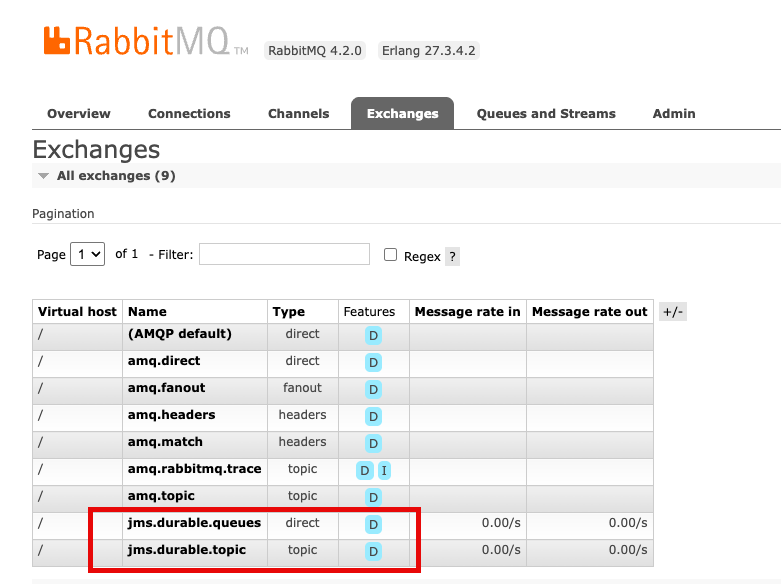
The RabbitMQ management console provides real-time visibility into broker operations. Access it through the ConsoleURL from your broker details. The console shows queue depths, consumer counts, and message rates. Use it during testing to identify routing or throughput issues before production deployment
The console displays jms.durable.queues and jms.durable.topic exchanges. The JMS client creates these automatically when your application creates queues and topics, so no manual exchange configuration is required.
Monitoring with Amazon CloudWatch
Amazon MQ publishes broker metrics to Amazon CloudWatch with no additional configuration needed. This gives you persistent monitoring and alerting that works alongside the rest of your AWS observability setup, beyond what the RabbitMQ management console provides in real time.
After your JMS messages reach the Amazon MQ for RabbitMQ broker, they’re transported as AMQP messages, which means standard RabbitMQ operational best practices apply. Keep queue depth low to avoid memory pressure and consumer lag. Follow message durability and reliability guidelines to prevent message loss during broker restarts. For connection management, review broker setup and connection best practices to avoid connection churn.
Set Amazon CloudWatch alarms on MessageCount and ConnectionCount first. A rising queue depth with a stable or dropping consumer count is an early signal of a processing bottleneck. A sudden drop in connections can indicate a client configuration issue that’s more straightforward to catch before it affects production traffic.
Clean up
To avoid ongoing charges after testing, delete the Amazon MQ broker and Secrets Manager secret using the AWS CLI.
Delete the broker:
aws mq delete-broker --broker-id <your-broker-id> --region us-west-2Delete the Secrets Manager secret:
aaws secretsmanager delete-secret \
--secret-id dev-rabbitmq \
--force-delete-without-recovery \
--region us-west-2
Broker deletion is permanent and can’t be undone. Amazon MQ removes all messages, configurations, and user credentials. Leaving the broker running incurs hourly charges based on the instance type, plus storage costs for message data retained on the broker.
Conclusion
In this post, we walked you through how to migrate your JMS applications. We also walked through a complete setup, from creating the broker to sending and receiving messages. Migrating the broker is the straightforward part. The more significant question is what you do next. After your JMS application is running on Amazon MQ for RabbitMQ, you have access to native AMQP clients, which means non-Java services can start consuming the same messages without a JMS layer. A Java-centric messaging system becomes a shared event backbone that service can participate in. The migration is a starting point, not just a lift-and-shift.
Next Steps
To get started with your migration, create your first Amazon MQ for RabbitMQ broker. For detailed technical guidance, see the Amazon MQ Developer Guide and explore the RabbitMQ JMS Client documentation.
About the authors
[$] An update on fanotify
Post Syndicated from jake original https://lwn.net/Articles/1075829/
In a filesystem-track session at the 2026 Linux Storage,
Filesystem, Memory Management, and BPF Summit, Amir Goldstein updated
attendees on the fanotify
filesystem-event monitoring
subsystem. He wanted to describe changes that had come in the last year or
so, as well as upcoming features and some remaining challenges in his
efforts to use fanotify for hierarchical
storage management (HSM). Fanotify is the user-space API for monitoring
files, directories, and filesystems for events of various sorts
(e.g. opening or deleting a file).
rsync 3.4.4 released with regression fixes
Post Syndicated from jzb original https://lwn.net/Articles/1076989/
Andrew Tridgell has announced
the release of rsync 3.4.4 with
fixes for the regressions introduced in the 3.4.3 release. He also
notes there will be an rsync 3.5.0 soon, with many more security
updates:
As part of the 3.5.0 release update I have created a
[email protected] mailing list for anyone who is willing
to do testing of the 3.5.0 release. The idea is to try to reduce the
chance of more regressions by expanding the set of testers of this
release. I have seeded it with people who were involved in past rsync
security issues. If you want to join this list then the easiest way
would be for you to be vouched for by someone on the
[email protected] list or someone else I already trust.My apologies for the regressions in the 3.4.3 release and I hope future
security updates for rsync will have less issues. The greatly expanded test
suite in rsync 3.5 combined with the rsync-security mailing list should
help.
Security updates for Monday
Post Syndicated from jzb original https://lwn.net/Articles/1076983/
Security updates have been issued by AlmaLinux (bind, bind9.16, frr, kernel, kernel-rt, libexif, mysql, php, and unbound), Debian (apache2, chromium, glibc, gsasl, jackson-core, libxml2, nginx, request-tracker4, request-tracker5, tomcat10, tomcat11, and tomcat9), Fedora (chromium, firefox, haveged, keylime, libinput, libssh2, nasm, perl-CryptX, rust, thunderbird, and webkitgtk), Mageia (cockpit, golang-x-crypto, golang-x-sys-devel, kernel, kmod-virtualbox, kmod-xtables-addons, kernel-linus, perl-DBIx-Class-EncodedColumn, perl-Crypt-URandom-Token, xdg-dbus-proxy, and xmlrpc-c), Slackware (samba), and SUSE (7zip, amazon-ssm-agent, ansible-13, ansible-core, assimp-devel, bind, cacti, chromium, dpkg, epiphany, erlang27, evince, ffmpeg-4, freerdp, frr, git-bug, google-guest-agent, grafana, hauler, ignition, jq, kanidm, kernel, keybase-client, libjxl, libmariadbd-devel, libmozjs-115-0, libopenbabel8, libsoup2, mariadb, mcphost, networkmanager, openssh, perl-HTTP-Daemon, perl-HTTP-Tiny, perl-IO-Compress, perl-Sereal-Decoder, perl-xml-libxml, postgresql18, python-pyopenssl, python311-pip, tomcat, tomcat10, tomcat11, tor, trivy, unbound, uriparser, vifm, weblate, xorg-x11-server, and yq).
Turning Cloudflare’s threat indicators into real-time WAF rules
Post Syndicated from Alexandra Moraru original https://blog.cloudflare.com/realtime-threat-intel-waf-rules/
Cloudflare’s Threat Events provides security analysts with a window into the global threat landscape. The platform offers a peek into the immense traffic that Cloudflare processes every day, so you can see in real time which IPs are attacking specific industries or which threat actors are trending globally. However, translating that visibility into active mitigation has often been a manual, reactive process.
Security teams have faced a recurring frustration: knowing that certain IP addresses were associated with specific threat actors (like Tycoon 2FA or RaccoonO365) or had been seen targeting their specific industry in other regions, but they couldn’t easily automate the blocking of these high-risk IPs within their own WAF unless they manually configured the rules.
We are excited to announce a new integration that brings Cloudflare’s vast threat intelligence directly into your WAF engine: you can now write proactive rules using live intelligence data. This means you can add more intelligence context to protect your application against known bad actors — before they even attempt to touch your infrastructure.
By populating specialized fields during the early stages of a request, the WAF can now screen traffic based on:
-
Who is attacking by matching specific threat actor names
-
Who they are targeting via the industry or country filters to see who the IP has targeted in the past
-
What type of attack using enriched threat context, filtering by attack type (DDoS, WAF, cybercrime, etc.) and the timeframe it was last seen
This new capability is built on the same always-on detection framework we recently introduced for Attack Signature Detection, a system that identifies common attack patterns in real time without requiring pre-configured rules. By separating detection from mitigation, we ensure that threat intelligence is constantly running in the background, enriching your HTTP request analytics with insightful threat metadata before you even decide to take an action.
The primary advantage of an “always-on” model is the elimination of the traditional “log vs. block” trade-off: visibility in log mode, or protection in block mode. That’s because when a rule blocks a request, you lose visibility into how other signatures would have assessed it — insight that could have helped you strengthen your defenses.
If you have a Cloudforce One subscription, these insights appear in your analytics automatically. You can see which threat actors are hitting your site and which industries those IPs usually target, allowing you to verify traffic patterns before “flipping the switch” to block.
These detections execute with negligible latency, ensuring your performance remains lightning-fast while providing the high-confidence data needed to build robust security policies. While this initial release focuses on IP-based matching, we are already looking toward extending these capabilities to JA3 fingerprints and domain-based matching. This will allow you to block malicious traffic even when attackers rotate IPs, by identifying the unique software signatures or malicious destination links they use in their payloads.
To make this possible, we’ve exposed the following specific signals directly to the WAF engine:
|
Field |
Description |
|
cf.intel.ip.attacker_names |
Names of known threat groups (e.g., |
|
cf.intel.ip.target_industries |
Industries targeted by this IP (e.g., |
|
cf.intel.ip.attacker_countries |
The source country of the threat event. |
|
cf.intel.ip.target_countries |
The countries targeted by the threat event. |
|
cf.intel.ip.datasets |
The source feed providing the data (e.g., |
Because a single IP address could be associated with multiple threat actors or targeted industries simultaneously, these fields are represented as arrays. We use the any() function and [*] wildcard to check whether any value within that threat profile matches your criteria:
-
Block known DDoS participants targeting your region:
any(cf.intel.ip.target_countries[*] == "FR") and any(cf.intel.ip.datasets[*] == "ddos") -
Protect against specific threat actors targeting the Finance sector:
any(cf.intel.ip.target_industries[*] == "Banking & Financial Services") and any(cf.intel.ip.attacker_names[*] == "BLACKBASTA") -
Broad protection against specific high-risk origin countries:
any(cf.intel.ip.attacker_countries[*] == "IR")
Whether you prefer a UI-driven approach or Infrastructure as Code, these fields are integrated into your existing workflows.
For teams that prefer Infrastructure as Code, the new cf.intel fields are fully integrated into the WAF rule builder for WAF custom rules and rate limiting. You can write complex expressions using the same syntax you use today. Because these are standard WAF fields, they are fully supported via the Cloudflare API and Terraform, allowing you to automate threat blocking across your selected domains or even on your whole account.

New fields added to the WAF rule builder to allow users to choose the relevant configuration based on the Threat Events indicators.
Deployment is only half the battle. All matches triggered by these threat intelligence fields are logged in Security Analytics. You can drill down into your traffic to see exactly which rule was triggered and which specific indicator matched. These enriched logs allow for faster auditing and postmortem analysis when a rule triggers.

Threat event matches surface in Security Analytics, with full context and a one-click option to create a custom security rule.
If you are already using the Threat Intelligence Dashboard to investigate trends, you don’t have to copy and paste IP lists. You can create Saved Views based on your specific filters, such as “IPs seen attacking the Financial sector in the last seven days.” With a single click, you can export these filters directly into a WAF rule.

Saved Views now allow users to easily create WAF rules to match the saved view configuration.
Visibility and ease of use are only possible if the underlying engine is fast. How do we handle millions of threat indicators without slowing down your traffic?
These threat intelligence datasets are compressed into a high-performance format and distributed to every single Cloudflare data center globally. When a request hits our network, the Cloudflare WAF performs an O(1) constant-time lookup against these local datasets. This ensures that whether we are checking against ten indicators or ten million, the latency overhead remains effectively zero (measured in microseconds).
Because an IP can be associated with multiple threat vectors, our engine doesn’t stop at the first match. It evaluates the set of all signals associated with that IP simultaneously. This ensures that a rule looking for “Attacker = RU” AND “Target Industry = Banking” will trigger correctly by evaluating the intersection of these attributes in a single pass, providing maximum coverage against multi-vector actors without increasing computational complexity.
This feature is available today for customers with any active Cloudforce One subscription:
-
Cloudforce One Essentials allows customers to access the default datasets in Threat Events, search for indicators, and conduct threat-hunting investigations
-
Cloudforce One Advantage allows customers to access our Threat Intelligence Analyst custom insights via requests for information
-
Cloudforce One Elite — our most complete package — includes brand protection, a high number of requests for information, and access to all Threat Events datasets
Ready to turn global insights into local defense? Head over to Threat Events or the WAF section of your Cloudflare Dashboard to start building your first Threat Intel rule, or contact your account team to learn more about subscribing to Cloudforce One.
Best of The History Guy: D-Day
Post Syndicated from The History Guy: History Deserves to Be Remembered original https://www.youtube.com/watch?v=li6z_1Lprys
Anthropic’s Project Glasswing Update
Post Syndicated from Bruce Schneier original https://www.schneier.com/blog/archives/2026/06/anthropics-project-glasswing-update.html
In April, Anthropic initated Project Glasswing. The idea was to let companies use their new model to find and fix vulnerabilities in their own software. It was a fantastic PR move, and so many press outlets have uncritically parroted Anthropic’s claims that it’s now common wisdom that Mythos is better at finding software vulnerabilities than other models. Which is just not true.
In any case, Anthropic has published a Project Glasswing status report. It’s finding a lot of vulnerabilities in software—yay! Some of them are even dangerous. But almost none of them has been patched. It’s weird. There’s something fishy about the data that I don’t understand. That Anthropic refuses to release details—that it just says “trust us”—is a big problem here.
New College of Florida: Last Week Tonight with John Oliver (HBO)
Post Syndicated from LastWeekTonight original https://www.youtube.com/watch?v=jFMc07F1UUU
S13 E14: Primaries & New College of Florida: 6/7/26: Last Week Tonight with John Oliver
Post Syndicated from LastWeekTonight original https://www.youtube.com/watch?v=n3SPA3_EoFE
Kernel prepatch 7.1-rc7
Post Syndicated from corbet original https://lwn.net/Articles/1076835/
The 7.1-rc7 kernel prepatch is out for
testing. Linus said: “Anyway, as things look now this is the last
“
rc. Something can obviously always come up and force us to change that, but
please give rc7 a whirl and keep testing for one more week.
Comic for 2026.06.08 – Pinocchio
Post Syndicated from Explosm.net original https://explosm.net/comics/pinocchio
New Cyanide and Happiness Comic
Nostalgia Content
Post Syndicated from xkcd.com original https://xkcd.com/3256/

CAMERA MAN RISING – Comic Con 2026
Post Syndicated from Matt Granger original https://www.youtube.com/shorts/N-uT0flXb5U
NXP Computex Keynote 2026 Coverage
Post Syndicated from Ryan Smith original https://www.servethehome.com/nxp-computex-keynote-2026-coverage/
The final keynote for Computex 2026 comes from NXP, where CEO Rafael Sotomayor is talking all about what it takes to deliver AI for edge devices and robotics in the real world, and how NXP is well-positioned to accomplish this
The post NXP Computex Keynote 2026 Coverage appeared first on ServeTheHome.
Comic for 2026.06.07 – Grateful
Post Syndicated from Explosm.net original https://explosm.net/comics/grateful
New Cyanide and Happiness Comic
Lolth
Post Syndicated from Oglaf! -- Comics. Often dirty. original https://www.oglaf.com/lolth/


A 40-Node 1U Cluster Gigabyte R1C7-K0A-AS1
Post Syndicated from Cliff Robinson original https://www.servethehome.com/a-40-node-1u-cluster-gigabyte-r1c7-k0a-as1/
At Computex 2026, we found the Gigabyte R1C7-K0A-AS1 which can put 40 nodes with 320 cores, 40 iGPUs and 80 SSDs in just 1U
The post A 40-Node 1U Cluster Gigabyte R1C7-K0A-AS1 appeared first on ServeTheHome.
Как да си извадим европейска здравна карта дистанционно?
Post Syndicated from Боян Юруков original https://yurukov.net/blog/2026/ezok-gid/
Преди три години описах как може да се поръча през интернет европейска здравноосигурителна карта или ЕЗОК и да ви я доставят с куриер. Година по-рано такъв процес не съществуваше, но с упорство и няколко месеца разговори с НЗОК все пак изпълниха Закона за електронно управление и ми изкараха карта поръчана през Системата за сигурно електронно връчване.
В края на 2024-та въведоха по-лесен начин за поръчване – с формуляр, който събира сам нужната информация и изпраща съобщение на районната каса. Описах процеса, обнових първата ми статия и доста хора се възползваха. Все пак, към средата на миналата година под 6% от всички извадили такава карта използваха електронния формуляр. Повечето все още предпочитат да чакат на опашка в банка по два пъти за това нещо. Тогава описах данните за изваждането на картите, защо един единствен кандидат от БСП все печели обществената поръчка за милиони и защо НЗОК са решили, че трябва да я обновяваме всяка година.
Дистанционно стъпка по стъпка
Една от причините хората да ходят на място, която беше коментирана под предишните ми статии, е грешките във формуляра. За съжаление, има още много какво да се желае от работата на Информационно обслужване по тези точки. Затова описвам тук подробно със снимки какво трябва да се направи и как да преодолеете основния проблем, за който им писах.
Първо, трябва да имате предвид тези неща:
- ЕЗОК важи за спешни случаи във всички държави на ЕС заедно с Великобритания, Исландия, Швейцария, Сърбия и Македония
- ЕЗОК не покрива медицински транспорт, лечение и други. За целта препоръчвам да си правите допълнителни здравни осигуровки за пътуване.
- Картите за деца важат до 5 години. За пенсионери – 10. За останалите трябва да се обновява всяка година
- Може да заявите обновяване на карта само в рамките на месец преди изтичането на срока. Ако искате по-рано, по някаква причина трябва да подадете отделна молба за заличаване на старата карта.
Повече за тези и други условия може да прочетете на страницата на НЗОК. Повече за самата електронна услуга ще намерите тук.
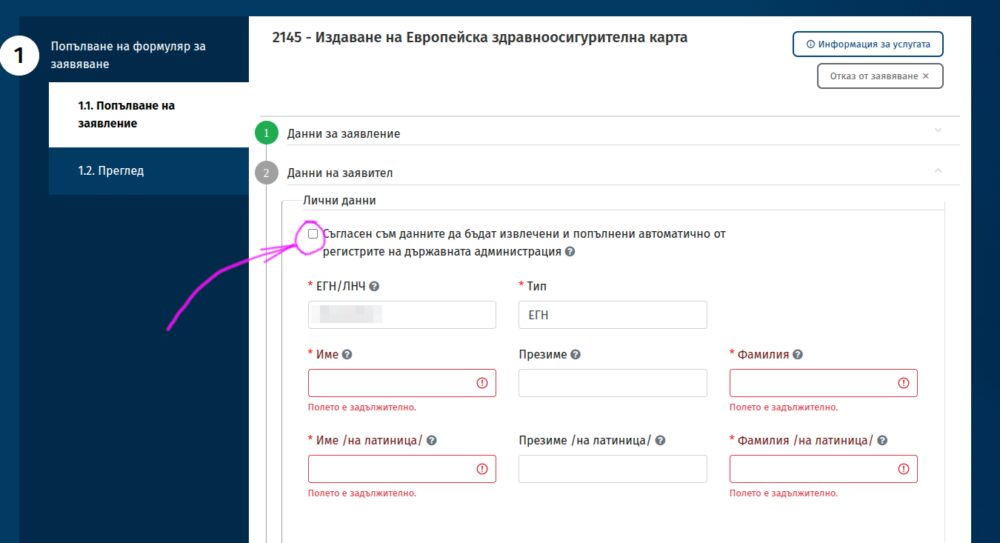
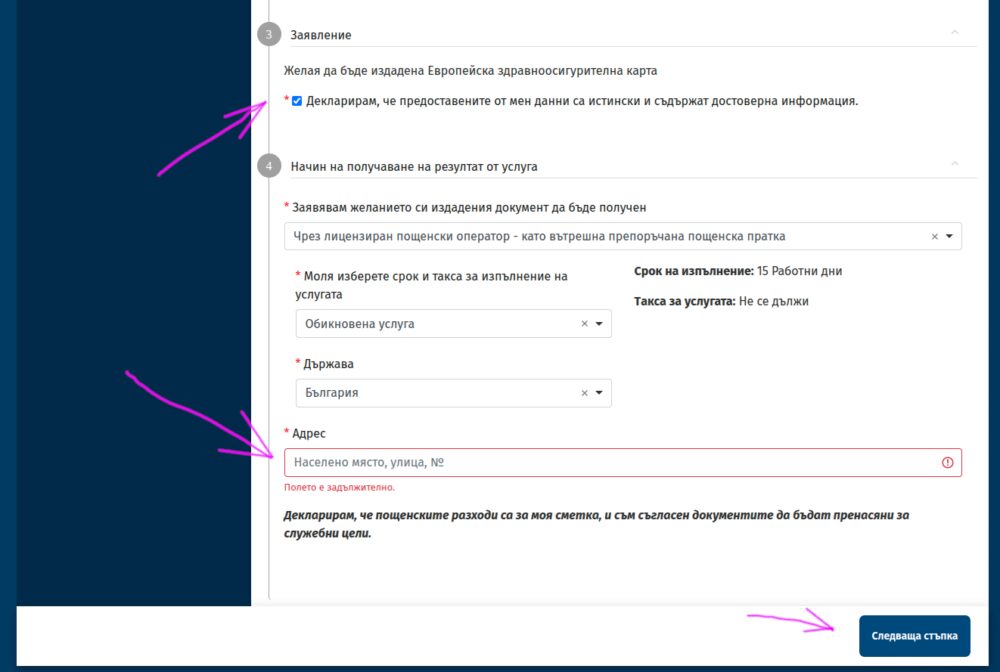
След като отворите формуляра ще иска да влезете в портала на egov. Най-удобно е това да стане с ПИН на НАП, но може и с някой от електронните подписи. За съжаление, електронната идентичност все още не е осъществена на държавно ниво, най-вече заради блокиране от страна на МВР и лобизъм. Ако за пръв път влизате, може да ви иска да си направите профил, но няма нужда да въвеждате нищо освен навярно мейл адрес.
След това минавате през тези екрани. Сменяйте снимките им със стрелката надясно в галерията.
-

Първо ще иска да изберете местното си РЗОК. -

Избирате „Следваща стъпка“ -

После изберете полето за зареждане автоматично на данните ви -

Ще ви иска телефон и като изберете изпращане с куриер ще иска адрес, където да го изпрати. -
Избирате „Следваща стъпка“ -

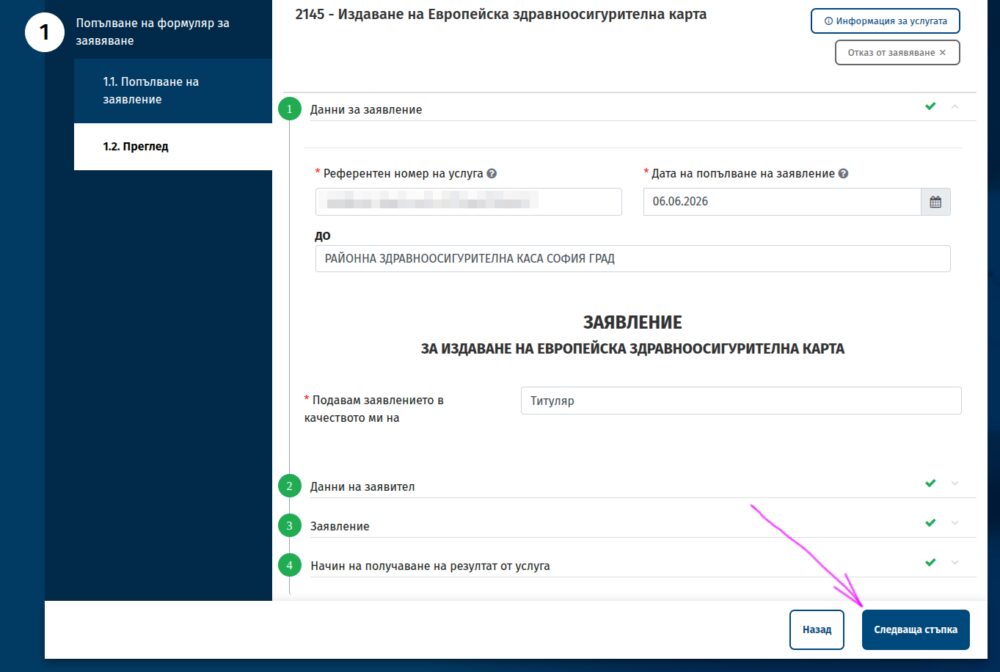
Тук чакате да зареди формуляра -

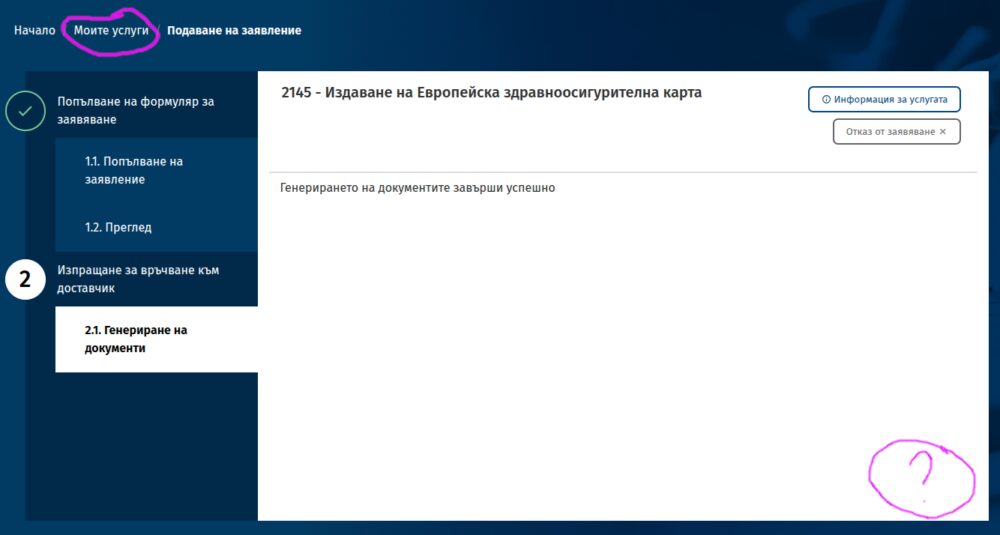
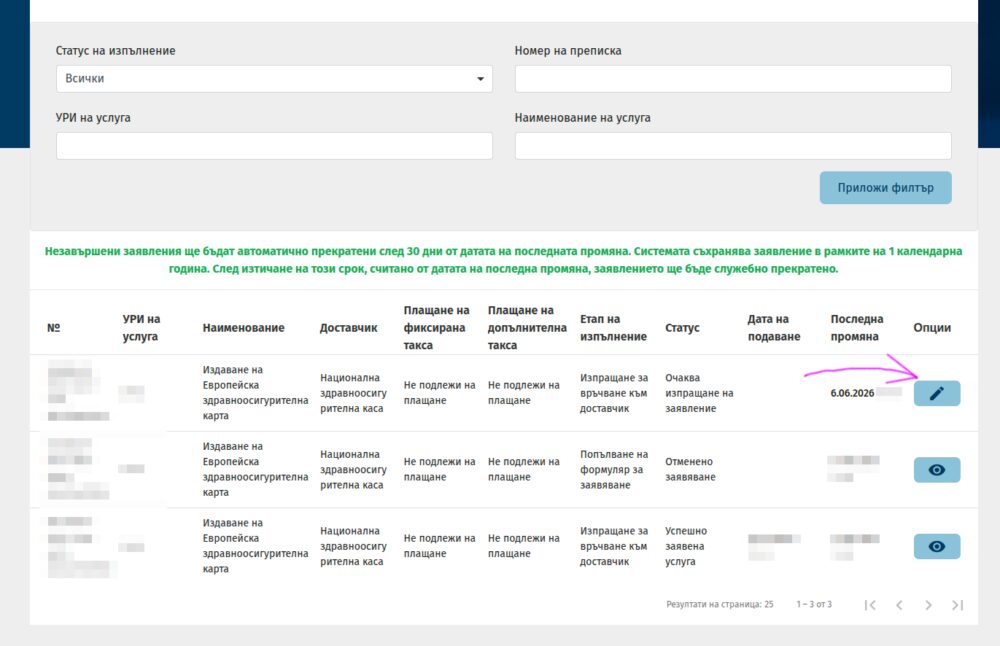
Когато е готов ще видите, че липсва бутон за изпращане. Намирате горе вляво „Моите услуги“ и го натискате. -

Избирате последния формуляр и натискате бутона с молива. -

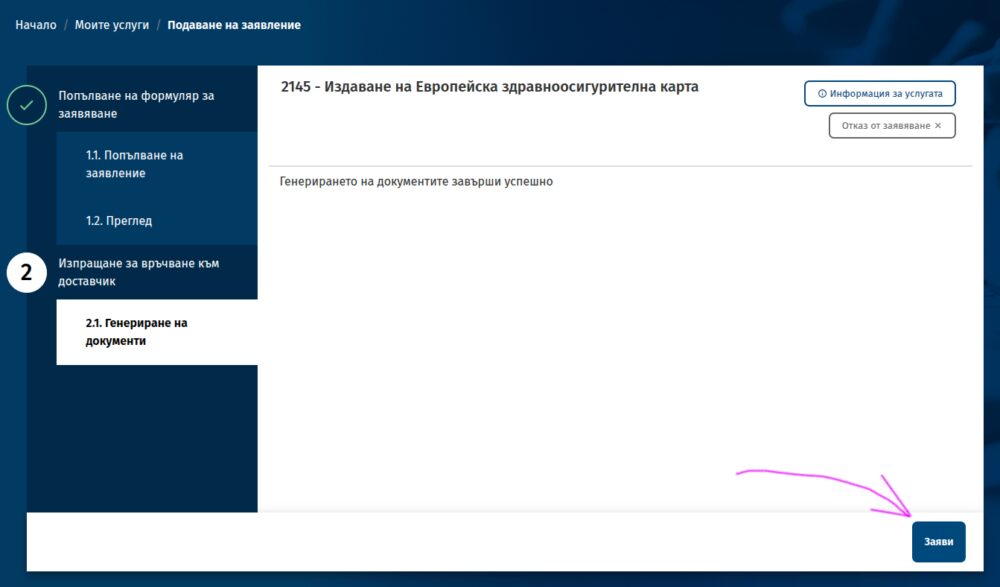
Тогава виждате бутон за изпращане.
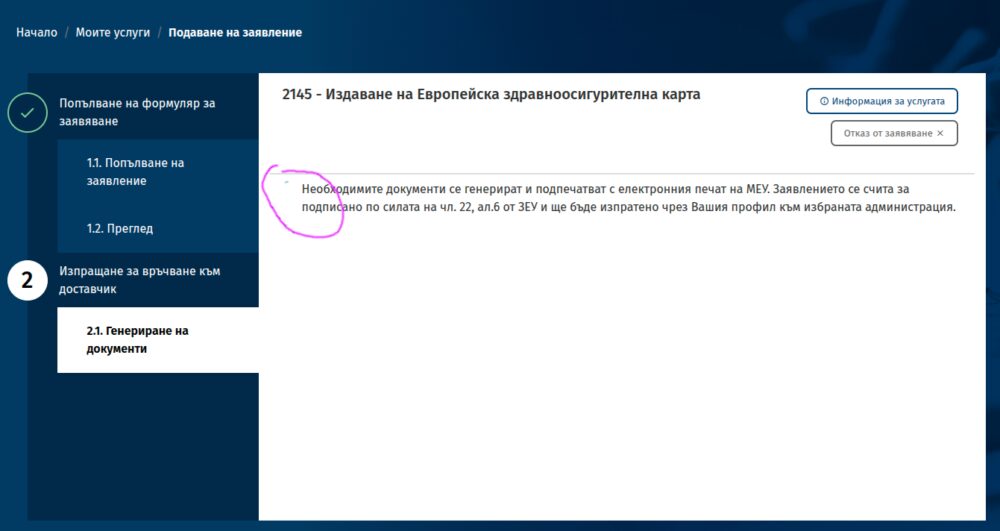
Проблемите с EGov
Най-честата грешка в работата на формуляра е, че не се появява бутонът за изпращане на генерирания документ. Тогава трябва да натиснете „Моите услуги“ както показвам горе, за да отворите списъка с вашите формуляри. Ще ви пита дали сте сигурни, защото сте щели да загубите въведеното – не е вярно, не се губи. Като натиснете бутона с молива на последния формуляр ще се отвори същата страница, но вече с бутон за изпращане. Натискате го.
Може да потвърдите, че формулярът е изпратен като отворите ССЕВ и намерите в изходящи попълнен документ към районната здравна каса.

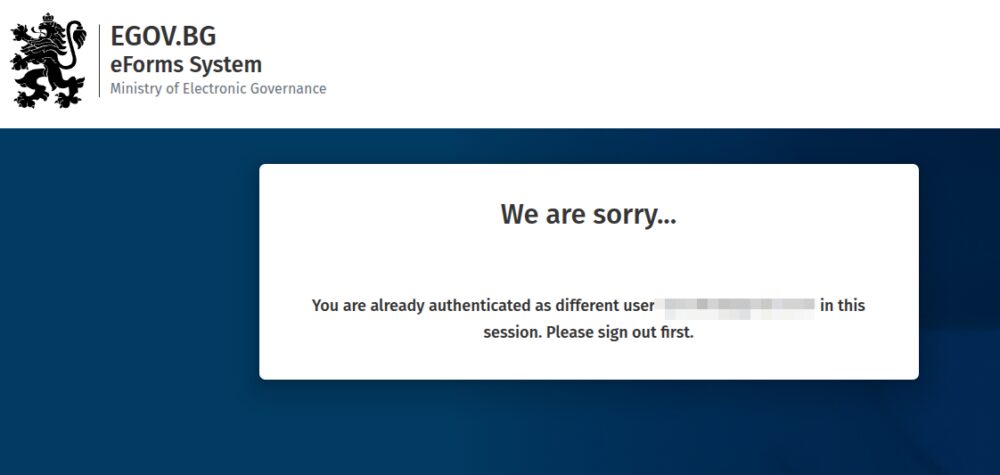
Друга честа грешка е, ако се опитате през няколко различни профила един след друг да подадете заявления. Няма значение дали сте излезли от стария профил, системата на EGov конкретно за формулярите може да ви покаже нещо като това олу. Оправя се като отворите формуляра в инкогнито прозорец. Ако се разровите в адресите в опит да се разлогнете отново, най-много да откриете, че Информационно обслужване си е забравило куп начални страници по подразбиране и линкове към админ панели, което никога не е добра идея.
Когато отворите формуляра, е възможно да видите съобщение в червено, че има проблем със ССЕВ. Вчера това се беше случило, независимо, че цял ден изпращах съобщения през същата система и нямаше проблем. Ако използвате ПИК на НАП и тази връзка пада понякога. Случва се и да не приема в някои дни електронни подписи.
Вероятността да хванете такива проблеми е малка, но не вдъхва особено доверие в усилията за дигитализация на държавата и работата на ИО в сегашния си формат (и ръководство), когато се случи точно на вас. Когато използвате почти всеки ден тези портали се сблъсквате с това поне веднъж седмично. Замислете се как нещата може да се случват по-добре и опитайте по-късно.
През октомври ще искам пак данните на извадилите ЕЗОК през годината и начина на подаване на заявлението. Ще е интересно дали и тази година ще видим увеличение, както миналата.
The White House Is the New Green Zone
Post Syndicated from The Atlantic original https://www.youtube.com/shorts/HPlAPDHXI4g