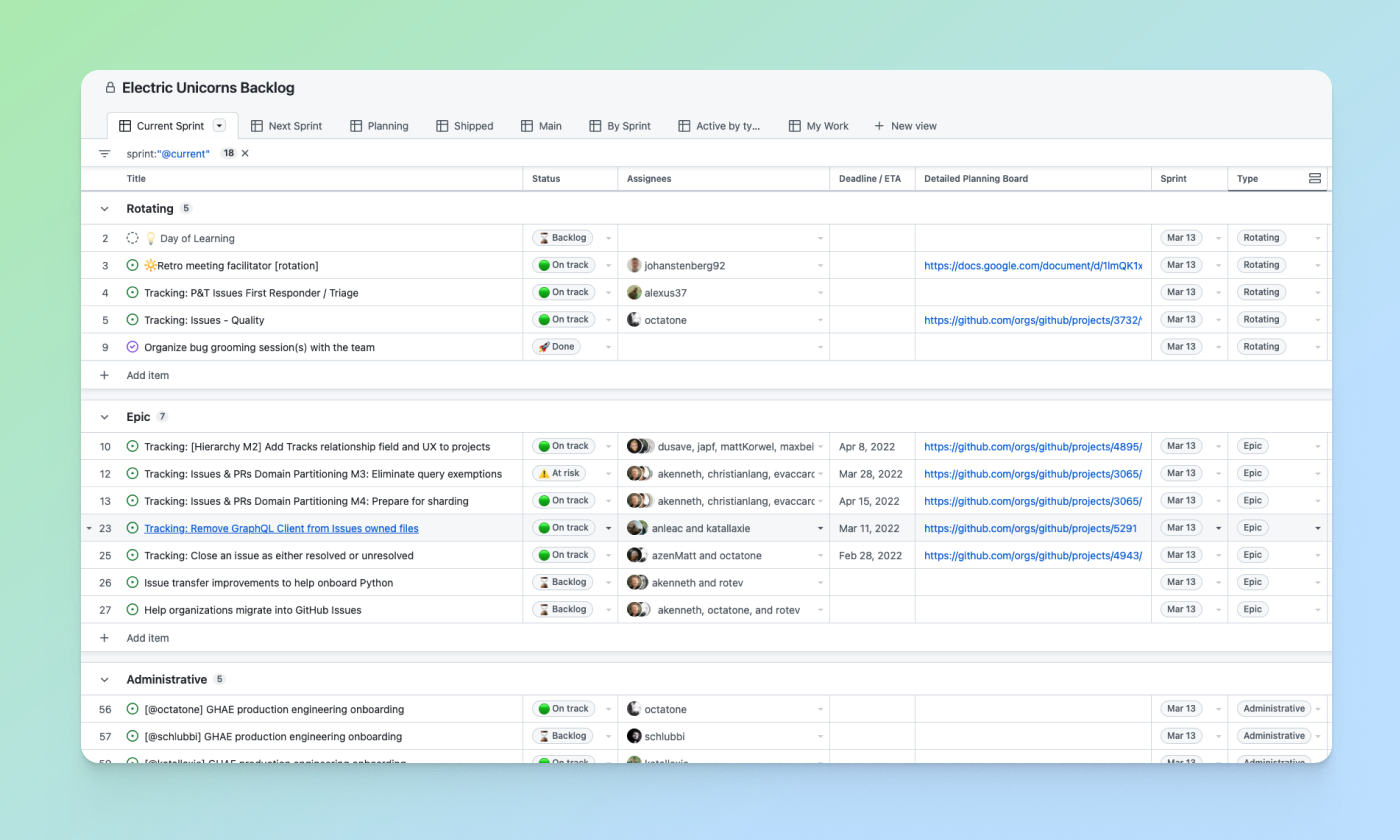
Originally, Issues search was limited by a simple, flat structure of queries. But with advanced search syntax, you can now construct searches using logical AND/OR operators and nested parentheses, pinpointing the exact set of issues you care about.
Building this feature presented significant challenges: ensuring backward compatibility with existing searches, maintaining performance under high query volume, and crafting a user-friendly experience for nested searches. We’re excited to take you behind the scenes to share how we took this long-requested feature from idea to production.
Here’s what you can do with the new syntax and how it works behind the scenes
Issues search now supports building queries with logical AND/OR operators across all fields, with the ability to nest query terms. For example is:issue state:open author:rileybroughten (type:Bug OR type:Epic) finds all issues that are open AND were authored by rileybroughten AND are either of type bug or epic.
How did we get here?
Previously, as mentioned, Issues search only supported a flat list of query fields and terms, which were implicitly joined by a logical AND. For example, the query assignee:@me label:support new-project translated to “give me all issues that are assigned to me AND have the label support ANDcontain the text new-project.”
But the developer community has been asking for more flexibility in issue search, repeatedly, for nearly a decade now. They wanted to be able to find all issues that had either the label support or the label question, using the query label:support OR label:question. So, we shipped an enhancement towards this request in 2021, when we enabled an OR style search using a comma-separated list of values.
From an architectural perspective, we swapped out the existing search module for Issues (IssuesQuery), with a new search module (ConditionalIssuesQuery), that was capable of handling nested queries while continuing to support existing query formats.
This involved rewriting IssueQuery, the search module that parsed query strings and mapped them into Elasticsearch queries.
To build a new search module, we first needed to understand the existing search module, and how a single search query flowed through the system. At a high level, when a user performs a search, there are three stages in its execution:
Parse: Breaking the user input string into a structure that is easier to process (like a list or a tree)
Query: Transforming the parsed structure into an Elasticsearch query document, and making a query against Elasticsearch.
Normalize: Mapping the results obtained from Elasticsearch (JSON) into Ruby objects for easy access and pruning the results to remove records that had since been removed from the database.
Each stage presented its own challenges, which we’ll explore in more detail below. The Normalize step remained unchanged during the re-write, so we won’t dive into that one.
Parse stage
The user input string (the search phrase) is first parsed into an intermediate structure. The search phrase could include:
Query terms: The relevant words the user is trying to find more information about (ex: “models”)
Search filters: These restrict the set of returned search documents based on some criteria (ex: “assignee:Deborah-Digges”)
Example search phrase:
Find all issues assigned to me that contain the word “codespaces”:
is:issue assignee:@me codespaces
Find all issues with the label documentation that are assigned to me:
assignee:@me label:documentation
The old parsing method: flat list
When only flat, simple queries were supported, it was sufficient to parse the user’s search string into a list of search terms and filters, which would then be passed along to the next stage of the search process.
The new parsing method: abstract syntax tree
As nested queries may be recursive, parsing the search string into a list was no longer sufficient. We changed this component to parse the user’s search string into an Abstract Syntax Tree (AST) using the parsing library parslet.
We defined a grammar (a PEG or Parsing Expression Grammar) to represent the structure of a search string. The grammar supports both the existing query syntax and the new nested query syntax, to allow for backward compatibility.
A simplified grammar for a boolean expression described by a PEG grammar for the parslet parser is shown below:
class Parser < Parslet::Parser
  rule(:space)  { match[" "].repeat(1) }
  rule(:space?) { space.maybe }

  rule(:lparen) { str("(") >> space? }
  rule(:rparen) { str(")") >> space? }

  rule(:and_operator) { str("and") >> space? }
  rule(:or_operator)  { str("or")  >> space? }

  rule(:var) { str("var") >> match["0-9"].repeat(1).as(:var) >> space? }

  # The primary rule deals with parentheses.
  rule(:primary) { lparen >> or_operation >> rparen | var }

  # Note that following rules are both right-recursive.
  rule(:and_operation) {
    (primary.as(:left) >> and_operator >>
      and_operation.as(:right)).as(:and) |
    primary }

  rule(:or_operation)  {
    (and_operation.as(:left) >> or_operator >>
      or_operation.as(:right)).as(:or) |
    and_operation }

  # We start at the lowest precedence rule.
  root(:or_operation)
end
For example, this user search string: is:issue AND (author:deborah-digges OR author:monalisa ) would be parsed into the following AST:
Once the query is parsed into an intermediate structure, the next steps are to:
Transform this intermediate structure into a query document that Elasticsearch understands
Execute the query against Elasticsearch to obtain results
Executing the query in step 2 remained the same between the old and new systems, so let’s only go over the differences in building the query document below.
The old query generation: linear mapping of filter terms using filter classes
Each filter term (Ex: label:documentation) has a class that knows how to convert it into a snippet of an Elasticsearch query document. During query document generation, the correct class for each filter term is invoked to construct the overall query document.
The new query generation: recursive AST traversal to generate Elasticsearch bool query
We recursively traversed the AST generated during parsing to build an equivalent Elasticsearch query document. The nested structure and boolean operators map nicely to Elasticsearch’s boolean query with the AND, OR, and NOT operators mapping to the must, should, and should_not clauses.
We re-used the building blocks for the smaller pieces of query generation to recursively construct a nested query document during the tree traversal.
Continuing from the example in the parsing stage, the AST would be transformed into a query document that looked like this:
With this new query document, we execute a search against Elasticsearch. This search now supports logical AND/OR operators and parentheses to search for issues in a more fine-grained manner.
Considerations
Issues is one of the oldest and most heavily -used features on GitHub. Changing core functionality like Issues search, a feature with an average of nearly 2000 queries per second (QPS)—that’s almost 160M queries a day!—presented a number of challenges to overcome.
Ensuring backward compatibility
Issue searches are often bookmarked, shared among users, and linked in documents, making them important artifacts for developers and teams. Therefore, we wanted to introduce this new capability for nested search queries without breaking existing queries for users.
We validated the new search system before it even reached users by:
Testing extensively: We ran our new search module against all unit and integration tests for the existing search module. To ensure that the GraphQL and REST API contracts remained unchanged, we ran the tests for the search endpoint both with the feature flag for the new search system enabled and disabled.
Validating correctness in production with dark-shipping: For 1% of issue searches, we ran the user’s search against both the existing and new search systems in a background job, and logged differences in responses. By analyzing these differences we were able to fix bugs and missed edge cases before they reached our users.
We weren’t sure at the outset how to define “differences,” but we settled on “number of results” for the first iteration. In general, it seemed that we could determine whether a user would be surprised by the results of their search against the new search capability if a search returned a different number of results when they were run within a second or less of each other.
Preventing performance degradation
We expected more complex nested queries to use more resources on the backend than simpler queries, so we needed to establish a realistic baseline for nested queries, while ensuring no regression in the performance of existing, simpler ones.
For 1% of Issue searches, we ran equivalent queries against both the existing and the new search systems. We used scientist, GitHub’s open source Ruby library, for carefully refactoring critical paths, to compare the performance of equivalent queries to ensure that there was no regression.
Preserving user experience
We didn’t want users to have a worse experience than before just because more complex searches were possible.
We collaborated closely with product and design teams to ensure usability didn’t decrease as we added this feature by:
Limiting the number of nested levels in a query to five. From customer interviews, we found this to be a sweet spot for both utility and usability.
Providing helpful UI/UX cues: We highlight the AND/OR keywords in search queries, and provide users with the same auto-complete feature for filter terms in the UI that they were accustomed to for simple flat queries.
Minimizing risk to existing users
For a feature that is used by millions of users a day, we needed to be intentional about rolling it out in a way that minimized risk to users.
We built confidence in our system by:
Limiting blast radius: To gradually build confidence, we only integrated the new system in the GraphQL API and the Issues tab for a repository in the UI to start. This gave us time to collect, respond to, and incorporate feedback without risking a degraded experience for all consumers. Once we were happy with its performance, we rolled it out to the Issues dashboard and the REST API.
Testing internally and with trusted partners: As with every feature we build at GitHub, we tested this feature internally for the entire period of its development by shipping it to our own team during the early days, and then gradually rolling it out to all GitHub employees. We then shipped it to trusted partners to gather initial user feedback.
And there you have it, that’s how we built, validated, and shipped the new and improved Issues search!
Feedback
Want to try out this exciting new functionality? Head to our docs to learn about how to use boolean operators and parentheses to search for the issues you care about!
If you have any feedback for this feature, please drop us a note on our community discussions.
Acknowledgements
Special thanks to AJ Schuster, Riley Broughten, Stephanie Goldstein, Eric Jorgensen Mike Melanson and Laura Lindeman for the feedback on several iterations of this blog post!
Recently we launched sub-issues, a feature designed to tackle complex issue management scenarios. This blog post delves into the journey of building sub-issues, what we learned along the way, how we implemented sub-issues, and the benefits of being able to use sub-issues to build itself.
What are sub-issues?
Sub-issues are a way to break a larger issue into smaller, more manageable tasks. With this feature, you can now create hierarchical lists within a single issue, making it easier to track progress and dependencies. By providing a clear structure, sub-issues help teams stay organized and focused on their goals.
For example, I often realize that a batch of work requires multiple steps, like implementing code in different repositories. Breaking this task into discrete sub-issues makes it easier to track progress and more clearly define the work I need to do. In practice we’ve noticed this helps keep linked PRs more concise and easier to review.
A brief history
Issues have long been at the heart of project management on GitHub. From tracking bugs to planning feature development, issues provide a flexible and collaborative way for teams to organize their work. Over time, we’ve enriched this foundation with tools like labels, milestones, and task lists, all to make project management even more intuitive and powerful.
One of the key challenges we set out to solve was how to better represent and manage hierarchical tasks within issues. As projects grow in complexity, breaking down work into smaller, actionable steps becomes essential. We want to empower users to seamlessly manage these nested relationships while maintaining the simplicity and clarity GitHub is known for.
Our journey toward sub-issues began with a fundamental goal: to create a system that integrates deeply into the GitHub Issues experience, enabling users to visually and functionally organize their work without adding unnecessary complexity. Achieving this required careful design and technical innovation.
Building sub-issues
To build sub-issues, we began by designing a new hierarchical structure for tasks rather than modifying the existing task list functionality. We introduced the ability to nest tasks within tasks, creating a hierarchical structure. This required updates to our data models and rendering logic to support nested sub-issues.
From a data modeling perspective, the sub-issues table stores the relationships between parent and child issues. For example, if Issue X is a parent of Issue Y, the sub-issues table would store this link, ensuring the hierarchical relationship is maintained.
In addition, we roll up sub-issue completion information into a sub-issue list table. This allows us to performantly get progress without having to traverse through a list of sub-issues. For instance, when Issue Y is completed, the system automatically updates the progress of Issue X, eliminating the need to manually check the status of all sub-issues.
We wanted a straightforward representation of sub-issues as relationships in MySQL. This approach provided several benefits, including easier support for sub-issues in environments like GitHub Enterprise Server and GitHub Enterprise Cloud with data residency.
We exposed sub-issues through GraphQL endpoints, which let us build upon the new Issues experience and leverage newly crafted list-view components. This approach provided some benefits, including more efficient data fetching and enhanced flexibility in how issue data is queried and displayed. Overall, we could move faster because we reused existing components and leveraged new components that would be used in multiple features. This was all made possible by building sub-issues in the React ecosystem.
We also focused on providing intuitive controls for creating, editing, and managing sub-issues. To this end, we worked closely with accessibility designers and GitHub’s shared components team that built the list view that powers sub-issues.
Our goal was to make it as easy as possible for users to break down their tasks without disrupting their workflow.
Using sub-issues in practice
Dogfooding is a best practice at GitHub and it’s how we build GitHub! We used sub-issues extensively within our own teams throughout the company to manage complex projects and track progress. Having a discrete area to manage our issue hierarchy resulted in a simpler, more performant experience. Through this hands-on experience, we identified areas for improvement and ensured that the feature met our high standards.
Our teams found that sub-Issues significantly improved their ability to manage large projects. By breaking down tasks into smaller, actionable items, they maintained better visibility and control over their work. The hierarchical structure also made it easier to identify dependencies and ensure nothing fell through the cracks.
Gathering early feedback
Building sub-issues was a team effort. Feedback from our beta testers was instrumental in shaping the final product and ensuring it met the needs of our community. For example, understanding how much metadata to display in the sub-issue list was crucial. We initially started with only issue titles, but eventually added the issue number and repository name, if the issue was from another repository.
Building features at GitHub makes it really easy to improve our own features as we go. It was really cool to start breaking down the sub-issues work using sub-issues. This allowed us to experience the feature firsthand and identify any pain points or areas for improvement. For example, the has:sub-issues-progress and has:parent-issue filters evolved from early discussions around filtering syntax. This hands-on approach ensured that we delivered a polished and user-friendly product.
These lessons have been invaluable in not only improving sub-issues, but also in shaping our approach to future feature development. By involving users early and actively using our own features, we can continue to build products that truly meet the needs of our community. These practices will be important to our development process going forward, ensuring that we deliver high-quality, user-centric solutions.
Call to action
Sub-issues are designed to help you break down complex tasks into manageable pieces, providing clarity and structure to your workflows. Whether you’re tracking dependencies, managing progress, or organizing cross-repository work, sub-issues offer a powerful way to stay on top of your projects.
We’d love for you to try sub-issues and see how they can improve your workflow. Your feedback is invaluable in helping us refine and enhance this feature. Join the conversation in our community discussion to share your thoughts, experiences, and suggestions.
Thank you for being an integral part of the GitHub community. Together, we’re shaping the future of collaborative development!
Software development is filled with repetitive tasks—managing issues, handling approvals, triggering CI/CD workflows, and more. But what if you could automate these types of tasks directly within GitHub Issues? That’s the promise of IssueOps, a methodology that turns GitHub Issues into a command center for automation.
Whether you’re a solo developer or part of an engineering team, IssueOps helps you streamline operations without ever leaving your repository.
In this article, I’ll explore the concept of IssueOps using state-machine terminology and strategies to help you work more efficiently on GitHub. After all, who doesn’t love automation?
What is IssueOps?
IssueOps is the practice of using GitHub Issues, GitHub Actions, and pull requests (PR) as an interface for automating workflows. Instead of switching between tools or manually triggering actions, you can use issue comments, labels, and state changes to kick off CI/CD pipelines, assign tasks, and even deploy applications.
Much like the various other *Ops paradigms (ChatOps, ClickOps, and so on), IssueOps is a collection of tools, workflows, and concepts that, when applied to GitHub Issues, can automate mundane, repetitive tasks. The flexibility and power of issues, along with their relationship to pull requests, create a near limitless number of possibilities, such as managing approvals and deployments. All of this can really help to simplify your workflows on GitHub. I’m speaking from personal experience here.
It’s important to note that IssueOps isn’t just a DevOps thing! Where DevOps offers a methodology to bring developers and operations into closer alignment, IssueOps is a workflow automation practice centered around GitHub Issues. IssueOps lets you run anything from complex CI/CD pipelines to a bed and breakfast reservation system. If you can interact with it via an API, there’s a good chance you can build it with IssueOps!
So, why use IssueOps?
There are lots of benefits to utilizing IssueOps. Here’s how it’s useful in practice:
It’s event driven, so you can automate the boring stuff: IssueOps lets you automate workflows directly from GitHub Issues and pull requests, turning everyday interactions—from kicking off a CI/CD pipeline and managing approvals to updating project boards—into powerful triggers for GitHub Actions.
It’s customizable, so you can tailor workflows to your needs: No two teams work the same way, and IssueOps is flexible enough to adapt. Whether you’re automating bug triage or triggering deployments, you can customize workflows based on event type and data provided.
It’s transparent, so you can keep a record: All actions taken on an issue are logged in its timeline, creating an easy-to-follow record of what happened and when.
It’s immutable, so you can audit whenever you need: Because IssueOps uses GitHub Issues and pull requests as a source of truth, every action leaves a record. No more chasing approvals in Slack or manually triggering workflows: IssueOps keeps everything structured, automated, and auditable right inside GitHub.
Defining IssueOps workflows and how they’re like finite-state machines
Most IssueOps workflows follow the same basic pattern:
A user opens an issue and provides information about a request
The issue is validated to ensure it contains the required information
The issue is submitted for processing
Approval is requested from an authorized user or team
The request is processed and the issue is closed
Suppose you’re an administrator of an organization and want to reduce the overhead of managing team members. In this instance, you could use IssueOps to build an automated membership request and approval process. Within a workflow like this, you’d have several core steps:
A user creates a request to be added to a team
The request is validated
The request is submitted for approval
An administrator approves or denies this request
The request is processed
If approved, the user is added to the team
If denied, the user is not added to the team
The user is notified of the outcome
When designing your own IssueOps workflows, it can be very helpful to think of them as a finite-state machine: a model for how objects move through a series of states in response to external events. Depending on certain rules defined within the state machine, a number of different actions can take place in response to state changes. If this is a little too complex, you can also think of it like a flow chart.
To apply this comparison to IssueOps, an issue is the object that is processed by a state machine. It changes state in response to events. As the object changes state, certain actions may be performed as part of a transition, provided any required conditions (guards) are met. Once an end state is reached, the issue can be closed.
This breaks down into a few key concepts:
State: A point in an object’s lifecycle that satisfies certain condition(s).
Event: An external occurrence that triggers a state change.
Transition: A link between two states that, when traversed by an object, will cause certain action(s) to be performed.
Action: An atomic task that is performed when a transition is taken.
Guard: A condition that is evaluated when a trigger event occurs. A transition is taken only if all associated guard condition(s) are met.
Here’s a simple state diagram for the example I discussed above.
Now, let’s dive into the state machine in more detail!
Key concepts behind state machines
The benefit of breaking your workflow down into these components is that you can look for edge cases, enforce conditions, and create a robust, reliable result.
States
Within a state machine, a state defines the current status of an object. As the object transitions through the state machine, it will change states in response to external events. When building IssueOps workflows, common states for issues include opened, submitted, approved, denied, and closed.
These should suffice as the core states to consider when building our workflows in our team membership example above.
Events
In a state machine, an event can be any form of interaction with the object and its current state. When building your own IssueOps, you should consider events from both the user and GitHub points of view.
In our team membership request example, there are several events that can trigger a change in state. The request can be created, submitted, approved, denied, or processed.
In this example, a user interacting with an issue—such as adding labels, commenting, or updating milestones—can also change its state. In GitHub Actions, there are many events that can trigger your workflows (see events that trigger workflows).
Here are a few interactions, or events, that would affect our example IssueOps workflow when it comes to managing team members:
Request
Event
State
Request is created
issues
opened
Request is approved
issue_comment
created
Request is denied
issue_comment
created
As you can see, the same GitHub workflow trigger can apply to multiple events in our state machine. Because of this, validation is key. Within your workflows, you should check both the type of event and the information provided by the user. In this case, we can conditionally trigger different workflow steps based on the content of the issue_comment event.
A transition is simply the change from one state to another. In our example, for instance, a transition occurs when someone opens an issue. When a request meets certain conditions, or guards, the change in state can take place. When the transition occurs, some actions or processing may take place, as well.
With our example workflow, you can think of the transitions themselves as the lines connecting different nodes in the state diagram. Or the lines connecting boxes in a flow chart.
Guards
Guards are conditions that must be verified before an event can trigger a transition to a different state. In our case, we know the following guards must be in place:
A request should not transition to an Approved state unless an administrator comments .approve on the issue.
A request should not transition to a Denied state unless an administrator comments .deny on the issue.
What about after the request is approved and the user is added to the team? This is referred to as an unguarded transition. There are no conditions that must be met, so the transition happens immediately!
Actions
Lastly, actions are specific tasks that are performed during a transition. They may affect the object itself, but this is not a requirement in our state machine. In our example, the following actions may take place at different times:
Administrators are notified that a request has been submitted
The user is added to the requested team
The user is notified of the outcome
A real-world example: Building a team membership workflow with IssueOps
Now that all of the explanation is out of the way, let’s dive into building our example! For reference, we’ll focus on the GitHub Actions workflows involved in building this automation. There are some additional repository and permissions settings involved that are discussed in more detail in these IssueOps docs.
Step 1: Issue form template
GitHub issue forms let you create standardized, formatted issues based on a set of form fields. Combined with the issue-ops/parser action, you can get reliable, machine-readable JSON from issue body Markdown. For our example, we are going to create a simple form that accepts a single input: the team where we want to add the user.
name: Team Membership Request
description: Submit a new membership request
title: New Team Membership Request
labels:
  - team-membership
body:
  - type: input
    id: team
    attributes:
      label: Team Name
      description: The team name you would like to join
      placeholder: my-team
    validations:
      required: true
When issues are created using this form, they will be parsed into JSON, which can then be passed to the rest of the IssueOps workflow.
{
  "team": "my-team"
}
Step 2: Issue validation
With a machine-readable issue body, we can run additional validation checks to ensure the information provided follows any rules we might have in place. For example, we can’t automatically add a user to a team if the team doesn’t exist yet! That is where the issue-ops/validator action comes into play. Using an issue form template and a custom validation script, we can confirm the existence of the team ahead of time.
module.exports = async (field) => {
  const { Octokit } = require('@octokit/rest')
  const core = require('@actions/core')

  const github = new Octokit({
    auth: core.getInput('github-token', { required: true })
  })

  try {
    // Check if the team exists
    core.info(`Checking if team '${field}' exists`)

    await github.rest.teams.getByName({
      org: process.env.GITHUB_REPOSITORY_OWNER ?? '',
      team_slug: field
    })

    core.info(`Team '${field}' exists`)
    return 'success'
  } catch (error) {
    if (error.status === 404) {
      // If the team does not exist, return an error message
      core.error(`Team '${field}' does not exist`)
      return `Team '${field}' does not exist`
    } else {
      // Otherwise, something else went wrong...
      throw error
    }
  }
}
When included in our IssueOps workflow, this adds any validation error(s) to the comment on the issue.
Step 3: Issue workflows
The main “entrypoint” of this workflow occurs when a user creates or edits their team membership request issue. This workflow should focus heavily on validating any user inputs! For example, what should happen if the user inputs a team that does not exist?
In our state machine, this workflow is responsible for handling everything up to the opened state. Any time an issue is created, edited, or updated, it will re-run validation to ensure the request is ready to be processed. In this case, an additional guard condition is introduced. Before the request can be submitted, the user must comment with .submit after validation has passed.
name: Process Issue Open/Edit

on:
  issues:
    types:
      - opened
      - edited
      - reopened

permissions:
  contents: read
  id-token: write
  issues: write

jobs:
  validate:
    name: Validate Request
    runs-on: ubuntu-latest

    # This job should only be run on issues with the `team-membership` label.
    if: ${{ contains(github.event.issue.labels.*.name, 'team-membership') }}

    steps:
      # This is required to ensure the issue form template and any validation
      # scripts are included in the workspace.
      - name: Checkout
        id: checkout
        uses: actions/checkout@v4

      # Since this workflow includes custom validation scripts, we need to
      # install Node.js and any dependencies.
      - name: Setup Node.js
        id: setup-node
        uses: actions/setup-node@v4

      # Install dependencies from `package.json`.
      - name: Install Dependencies
        id: install
        run: npm install

      # GitHub App authentication is required if you want to interact with any
      # resources outside the scope of the repository this workflow runs in.
      - name: Get GitHub App Token
        id: token
        uses: actions/create-github-app-token@v1
        with:
          app-id: ${{ vars.ISSUEOPS_APP_ID }}
          private-key: ${{ secrets.ISSUEOPS_APP_PRIVATE_KEY }}
          owner: ${{ github.repository_owner }}

      # Remove any labels and start fresh. This is important because the
      # issue may have been closed and reopened.
      - name: Remove Labels
        id: remove-label
        uses: issue-ops/labeler@v2
        with:
          action: remove
          github_token: ${{ steps.token.outputs.token }}
          labels: |
            validated
            approved
            denied
          issue_number: ${{ github.event.issue.number }}
          repository: ${{ github.repository }}

      # Parse the issue body into machine-readable JSON, so that it can be
      # processed by the rest of the workflow.
      - name: Parse Issue Body
        id: parse
        uses: issue-ops/parser@v4
        with:
          body: ${{ github.event.issue.body }}
          issue-form-template: team-membership.yml
          workspace: ${{ github.workspace }}

      # Validate early and often! Validation should be run any time an issue is
      # interacted with, to ensure that any changes to the issue body are valid.
      - name: Validate Request
        id: validate
        uses: issue-ops/validator@v3
        with:
          add-comment: true
          github-token: ${{ steps.token.outputs.token }}
          issue-form-template: team-membership.yml
          issue-number: ${{ github.event.issue.number }}
          parsed-issue-body: ${{ steps.parse.outputs.json }}
          workspace: ${{ github.workspace }}

      # If validation passes, add the validated label to the issue.
      - if: ${{ steps.validate.outputs.result == 'success' }}
        name: Add Validated Label
        id: add-label
        uses: issue-ops/labeler@v2
        with:
          action: add
          github_token: ${{ steps.token.outputs.token }}
          labels: |
            validated
          issue_number: ${{ github.event.issue.number }}
          repository: ${{ github.repository }}

      # The `issue-ops/validator` action will automatically notify the user that
      # the request was validated. However, you can optionally add instruction
      # on what to do next.
      - if: ${{ steps.validate.outputs.result == 'success' }}
        name: Notify User (Success)
        id: notify-success
        uses: peter-evans/create-or-update-comment@v4
        with:
          issue-number: ${{ github.event.issue.number }}
          body: |
            Hello! Your request has been validated successfully!

            Please comment with `.submit` to submit this request.
Step 4: Issue comment workflows
Once the issue is created, any further processing is triggered using issue comments—and this can be done with one workflow. However, to make things a bit easier to follow, we’ll break this into a few separate workflows.
Submit workflow
The first workflow handles the user submitting the request. The main task it performs is validating the issue body against the form template to ensure it hasn’t been modified.
name: Process Submit Comment

on:
  issue_comment:
    types:
      - created

permissions:
  contents: read
  id-token: write
  issues: write

jobs:
  submit:
    name: Submit Request
    runs-on: ubuntu-latest

    # This job should only be run when the following conditions are true:
    #
    # - A user comments `.submit` on the issue.
    # - The issue has the `team-membership` label.
    # - The issue has the `validated` label.
    # - The issue does not have the `approved` or `denied` labels.
    # - The issue is open.
    if: |
      startsWith(github.event.comment.body, '.submit') &&
      contains(github.event.issue.labels.*.name, 'team-membership') == true &&
      contains(github.event.issue.labels.*.name, 'approved') == false &&
      contains(github.event.issue.labels.*.name, 'denied') == false &&
      github.event.issue.state == 'open'

    steps:
      # First, we are going to re-run validation. This is important because
      # the issue body may have changed since the last time it was validated.

      # This is required to ensure the issue form template and any validation
      # scripts are included in the workspace.
      - name: Checkout
        id: checkout
        uses: actions/checkout@v4

      # Since this workflow includes custom validation scripts, we need to
      # install Node.js and any dependencies.
      - name: Setup Node.js
        id: setup-node
        uses: actions/setup-node@v4

      # Install dependencies from `package.json`.
      - name: Install Dependencies
        id: install
        run: npm install

      # GitHub App authentication is required if you want to interact with any
      # resources outside the scope of the repository this workflow runs in.
      - name: Get GitHub App Token
        id: token
        uses: actions/create-github-app-token@v1
        with:
          app-id: ${{ vars.ISSUEOPS_APP_ID }}
          private-key: ${{ secrets.ISSUEOPS_APP_PRIVATE_KEY }}
          owner: ${{ github.repository_owner }}

      # Remove the validated label. This will be re-added if validation passes.
      - name: Remove Validated Label
        id: remove-label
        uses: issue-ops/labeler@v2
        with:
          action: remove
          github_token: ${{ steps.token.outputs.token }}
          labels: |
            validated
          issue_number: ${{ github.event.issue.number }}
          repository: ${{ github.repository }}

      # Parse the issue body into machine-readable JSON, so that it can be
      # processed by the rest of the workflow.
      - name: Parse Issue Body
        id: parse
        uses: issue-ops/parser@v4
        with:
          body: ${{ github.event.issue.body }}
          issue-form-template: team-membership.yml
          workspace: ${{ github.workspace }}

      # Validate early and often! Validation should be run any time an issue is
      # interacted with, to ensure that any changes to the issue body are valid.
      - name: Validate Request
        id: validate
        uses: issue-ops/validator@v3
        with:
          add-comment: false # Don't add another validation comment.
          github-token: ${{ steps.token.outputs.token }}
          issue-form-template: team-membership.yml
          issue-number: ${{ github.event.issue.number }}
          parsed-issue-body: ${{ steps.parse.outputs.json }}
          workspace: ${{ github.workspace }}

      # If validation passed, add the validated and submitted labels to the issue.
      - if: ${{ steps.validate.outputs.result == 'success' }}
        name: Add Validated Label
        id: add-label
        uses: issue-ops/labeler@v2
        with:
          action: add
          github_token: ${{ steps.token.outputs.token }}
          labels: |
            validated
            submitted
          issue_number: ${{ github.event.issue.number }}
          repository: ${{ github.repository }}

      # If validation succeeded, alert the administrator team so they can
      # approve or deny the request.
      - if: ${{ steps.validate.outputs.result == 'success' }}
        name: Notify Admin (Success)
        id: notify-success
        uses: peter-evans/create-or-update-comment@v4
        with:
          issue-number: ${{ github.event.issue.number }}
          body: |
            👋 @issue-ops/admins! The request has been validated and is
            ready for your review. Please comment with `.approve` or `.deny`
            to approve or deny this request.
Deny workflow
If the request is denied, the user should be notified and the issue should close.
name: Process Denial Comment

on:
  issue_comment:
    types:
      - created

permissions:
  contents: read
  id-token: write
  issues: write

jobs:
  submit:
    name: Deny Request
    runs-on: ubuntu-latest

    # This job should only be run when the following conditions are true:
    #
    # - A user comments `.deny` on the issue.
    # - The issue has the `team-membership` label.
    # - The issue has the `validated` label.
    # - The issue has the `submitted` label.
    # - The issue does not have the `approved` or `denied` labels.
    # - The issue is open.
    if: |
      startsWith(github.event.comment.body, '.deny') &&
      contains(github.event.issue.labels.*.name, 'team-membership') == true &&
      contains(github.event.issue.labels.*.name, 'submitted') == true &&
      contains(github.event.issue.labels.*.name, 'validated') == true &&
      contains(github.event.issue.labels.*.name, 'approved') == false &&
      contains(github.event.issue.labels.*.name, 'denied') == false &&
      github.event.issue.state == 'open'

    steps:
      # This time, we do not need to re-run validation because the request is
      # being denied. It can just be closed.

      # However, we do need to confirm that the user who commented `.deny` is
      # a member of the administrator team.
      # GitHub App authentication is required if you want to interact with any
      # resources outside the scope of the repository this workflow runs in.
      - name: Get GitHub App Token
        id: token
        uses: actions/create-github-app-token@v1
        with:
          app-id: ${{ vars.ISSUEOPS_APP_ID }}
          private-key: ${{ secrets.ISSUEOPS_APP_PRIVATE_KEY }}
          owner: ${{ github.repository_owner }}

      # Check if the user who commented `.deny` is a member of the
      # administrator team.
      - name: Check Admin Membership
        id: check-admin
        uses: actions/github-script@v7
        with:
          github-token: ${{ steps.token.outputs.token }}
          script: |
            try {
              await github.rest.teams.getMembershipForUserInOrg({
                org: context.repo.owner,
                team_slug: 'admins',
                username: context.actor,
              })
              core.setOutput('member', 'true')
            } catch (error) {
              if (error.status === 404) {
                core.setOutput('member', 'false')
              }
              throw error
            }

      # If the user is not a member of the administrator team, exit the
      # workflow.
      - if: ${{ steps.check-admin.outputs.member == 'false' }}
        name: Exit
        run: exit 0

      # If the user is a member of the administrator team, add the denied label.
      - name: Add Denied Label
        id: add-label
        uses: issue-ops/labeler@v2
        with:
          action: add
          github_token: ${{ steps.token.outputs.token }}
          labels: |
            denied
          issue_number: ${{ github.event.issue.number }}
          repository: ${{ github.repository }}

      # Notify the user that the request was denied.
      - name: Notify User
        id: notify
        uses: peter-evans/create-or-update-comment@v4
        with:
          issue-number: ${{ github.event.issue.number }}
          body: |
            This request has been denied and will be closed.

      # Close the issue as not planned.
      - name: Close Issue
        id: close
        uses: actions/github-script@v7
        with:
          script: |
            await github.rest.issues.update({
              issue_number: ${{ github.event.issue.number }},
              owner: context.repo.owner,
              repo: context.repo.repo,
              state: 'closed',
              state_reason: 'not_planned'
            })
Approve workflow
Finally, we need to handle request approval. In this case, we need to add the user to the team, notify them, and close the issue.
name: Process Approval Comment

on:
  issue_comment:
    types:
      - created

permissions:
  contents: read
  id-token: write
  issues: write

jobs:
  submit:
    name: Approve Request
    runs-on: ubuntu-latest

    # This job should only be run when the following conditions are true:
    #
    # - A user comments `.approve` on the issue.
    # - The issue has the `team-membership` label.
    # - The issue has the `validated` label.
    # - The issue has the `submitted` label.
    # - The issue does not have the `approved` or `denied` labels.
    # - The issue is open.
    if: |
      startsWith(github.event.comment.body, '.approve') &&
      contains(github.event.issue.labels.*.name, 'team-membership') == true &&
      contains(github.event.issue.labels.*.name, 'submitted') == true &&
      contains(github.event.issue.labels.*.name, 'validated') == true &&
      contains(github.event.issue.labels.*.name, 'approved') == false &&
      contains(github.event.issue.labels.*.name, 'denied') == false &&
      github.event.issue.state == 'open'

    steps:
      # This time, we do not need to re-run validation because the request is
      # being approved. It can just be processed.

      # This is required to ensure the issue form template is included in the
      # workspace.
      - name: Checkout
        id: checkout
        uses: actions/checkout@v4

      # We do need to confirm that the user who commented `.approve` is a member
      # of the administrator team. GitHub App authentication is required if you
      # want to interact with any resources outside the scope of the repository
      # this workflow runs in.
      - name: Get GitHub App Token
        id: token
        uses: actions/create-github-app-token@v1
        with:
          app-id: ${{ vars.ISSUEOPS_APP_ID }}
          private-key: ${{ secrets.ISSUEOPS_APP_PRIVATE_KEY }}
          owner: ${{ github.repository_owner }}

      # Check if the user who commented `.approve` is a member of the
      # administrator team.
      - name: Check Admin Membership
        id: check-admin
        uses: actions/github-script@v7
        with:
          github-token: ${{ steps.token.outputs.token }}
          script: |
            try {
              await github.rest.teams.getMembershipForUserInOrg({
                org: context.repo.owner,
                team_slug: 'admins',
                username: context.actor,
              })
              core.setOutput('member', 'true')
            } catch (error) {
              if (error.status === 404) {
                core.setOutput('member', 'false')
              }
              throw error
            }

      # If the user is not a member of the administrator team, exit the
      # workflow.
      - if: ${{ steps.check-admin.outputs.member == 'false' }}
        name: Exit
        run: exit 0

      # Parse the issue body into machine-readable JSON, so that it can be
      # processed by the rest of the workflow.
      - name: Parse Issue body
        id: parse
        uses: issue-ops/parser@v4
        with:
          body: ${{ github.event.issue.body }}
          issue-form-template: team-membership.yml
          workspace: ${{ github.workspace }}

      - name: Add to Team
        id: add
        uses: actions/github-script@v7
        with:
          github-token: ${{ steps.token.outputs.token }}
          script: |
            const parsedIssue = JSON.parse('${{ steps.parse.outputs.json }}')

            await github.rest.teams.addOrUpdateMembershipForUserInOrg({
              org: context.repo.owner,
              team_slug: parsedIssue.team,
              username: '${{ github.event.issue.user.login }}',
              role: 'member'
            })

      - name: Notify User
        id: notify
        uses: peter-evans/create-or-update-comment@v4
        with:
          issue-number: ${{ github.event.issue.number }}
          body: |
            This request has been processed successfully!

      - name: Close Issue
        id: close
        uses: actions/github-script@v7
        with:
          script: |
            await github.rest.issues.update({
              issue_number: ${{ github.event.issue.number }},
              owner: context.repo.owner,
              repo: context.repo.repo,
              state: 'closed',
              state_reason: 'completed'
            })
Take this with you
And there you have it! With a handful of standardized workflows, you have an end-to-end, issue-driven process in place to manage team membership. This can be extended as far as you want, including support for removing users, auditing access, and more. With IssueOps, the sky is the limit!
Here’s the best thing about IssueOps: It brings another level of automation to a surface I’m constantly using—and that’s GitHub. By using issues and pull requests as control centers for workflows, teams can reduce friction, improve efficiency, and keep everything transparent. Whether you want to automate deployments, approvals, or bug triage, IssueOps makes it all possible, without ever leaving your repo.
In my experience, it’s always best to start small and experiment with what works best for you. With just a bit of time, you’ll see your workflows get smoother with every commit (I know I have). Happy coding! ✨
One of GitHub’s core values is Diverse and Inclusive. It is a guiding thought for how we operate, reminding us that GitHub serves a developer community that spans a wide range of geography and ability.
Putting diversity and inclusivity into practice means incorporating a wide range of perspectives into our work. To that point, disability and accessibility are an integral part of our efforts.
This consideration has been instrumental in crafting resilient, accessible components at GitHub. These components, in turn, help to guarantee that our experiences work regardless how they are interacted with.
Using GitHub should be efficient and intuitive, regardless of your device, circumstance, or ability. To that point, we have been working on improving the accessibility of our lists of issues and pull requests, as well as our information tables.
Our list of issues and pull requests are some of the most high-traffic experiences we have on GitHub. For many, it is the “homepage” of their open source projects, a jumping off point for conducting and managing work.
Our tables help to communicate, and facilitate taking action with confidence on complicated information relationships. These experiences are workhorses, helping to communicate information about branches, repositories, secrets, attestations, configurations, internal documentation, etc.
Nothing about us without us
Before we discuss the particulars of these updates, I would like to call attention to the most important aspect of the work: direct participation of, and input from daily assistive technology users.
Disabled people’s direct involvement in the inception, design, and development stages is indispensable. It’s crucial for us to go beyond compliance and weave these practices into the core of our organization. Only by doing so can we create genuinely inclusive experiences.
With this context established, we can now talk about how this process manifests in component work.
Improvements we’re making to lists of issues and pull requests
Lists of issues and pull requests will continue to support methods of navigation via assistive technology that you may already be familiar with—making experiences consistent and predictable is a huge and often overlooked aspect of the work.
In addition, these lists will soon be updated to also have:
A dedicated subheading for quickly navigating to the list itself.
Primer-derived tables help provide consistency and predictability. This is important for expected table navigation, but also applies for other table-related experiences, such as loading content, sorting and pagination requests, and bulk and row-level actions.
At the time of this blog post’s publishing, there are 75 bespoke tables that have been replaced with the Primer component, spread across all of GitHub.
The reason for this quiet success has been due entirely to close collaboration with both our disabled partners and our design system experts. This collaboration helped to ensure:
The new table experiences were seamlessly integrated.
Doing so, improved and enhanced the underlying assistive technology experience.
Progress over perfection
Meryl K. Evans’ Progress Over Perfection philosophy heavily influenced how we approached this work.
Accessibility is never done. Part of our dedication to this work is understanding that it will grow and change to meet the needs of the people who rely on it. This means making positive, iterative change based on feedback from the community GitHub serves.
More to come
Tables will continue to be updated, and the lists should be released publicly soon. Beyond that, we’re excited about the changes we’re making to improve GitHub’s accessibility. This includes both our services and also our internal culture.
We hope that these components, and the process that led to their creation, help you as both part of our developer community and as people who build the world’s software.
GitHub Projects has been adopted by program managers, OSS maintainers, enterprises, and individual developers alike for its user-friendly design and efficiency. We all know that managing issues and pull requests in our repositories can be challenging.
To help you optimize your usage of GitHub Projects to plan and track your work from start to finish, I’ll be sharing 10 things you can do with GitHub Projects to make it easier to keep track of your issues and pull requests.
1. Manage your projects with the CLI
If you prefer to work from your terminals, we’ve made it more convenient for you to manage and automate your project workflows with the GitHub CLIproject command. This essentially allows you to work more collaboratively with your team to keep your projects updated with your existing toolkit.
For example, if I wanted to add a draft issue to my project “Learning Ruby,” I would do this by first ensuring that I have the CLI installed and I’m authenticated with the project scope. Once authenticated, I need to find the number of the project I want to manage with the CLI. You can find the project number by looking at the project URL. For example, https://github.com/orgs/That-Lady-Dev/projects/4 the project number here is “4.” Now that we have the project number, we can use it to add a draft issue to the project! The command will look like this:
gh project item-create 4 --owner That-Lady-Dev --title "Test Adding Draft" --body "I added this draft issue with GitHub CLI"
When we run this, a new draft issue is added to the project:
You can do a lot more with the GitHub CLI and GitHub projects. Check out our documentation to see all the possibilities of interacting with your projects from the terminal.
2. Export your projects to TSV
If you ever need your project data, you can export your project view to a file, which can then be imported into Figjam, Google Sheets, Excel, or any other platform that supports TSV files.
Go to any view of your project and click the arrow next to the view name, then select Export view data. This will give you a TSV file that you can use.
Though TSV offers much better formatting than a CSV file, you can ask GitHub Copilot Chat how to convert a TSV file to a CSV file, copy the code, run it, and get your new CSV document, if CSV is your jam.
Here’s a quick gist of how I converted a TSV to a CSV with GitHub Copilot Chat!
3. Create reusable project templates
If you often find yourself recreating projects with similar content and structure, you can set a project as a template so you and others can use it as a base when creating new projects.
To set your project as a template, navigate to the project “Settings” page, and under the “Templates” section toggle on Make template.
This will turn the project into a template that can be used with the green Use this template button at the top of your project, or when creating a new project. Building a library of templates that can be reused across your organization can help you and your teams share best practices and inspiration when getting started with a project!
4. Make a copy of a project
In addition to making your project a template that can be reused, you can also make a one-time copy of an existing project that will contain the fields, views, any configured workflows, insights, and draft items from the original project!
To copy a project, navigate to the project you want to copy, click the three dots to open the menu, and select Make a copy. This will open up a dialog where you can set the Owner, name the project, and click whether you want draft issues copied over or not. Once that’s all set, your new project is ready to be used!
You can also do this with the CLI. The command will look like this:
If you want an issue to be automatically added to a project or if you want to set the status of an issue to “completed” when it is closed, you can do this automatically with built-in project workflows!
Go to the menu and click “Workflows.” This will show you a list of default workflows you can enable on your projects. To automatically add an issue to your project from a repository, you can enable the “Auto-add to project” workflow. To automatically set the status of a closed issue to “complete,” you can enable the “item closed” workflow.
Custom fields help you organize and categorize items in your projects, with flexible field types including text, number, date, single select, and iteration. If you want to add a splash of color to your project or more details about a specific field, you can add colors and descriptions to your single select fields!
To add a color and a description to a new single select field, navigate to the project settings, and add a new field. From there, you can add options to the field where you can select colors and add a description so everyone on your team knows what those options in the field mean and how they can be used.
You can also update field descriptions and colors directly from the project view by selecting Edit details from the group or column menus.
7. Add Issues from any organization
If you’re an open source maintainer, or a developer with multiple clients, you may be working across multiple organizations at a time. This means you have multiple issues to keep track of and need a way to combine these issues in one cohesive manner.
This is where GitHub Projects come in! You can collate issues from any organization onto a single project.
For example, I’m a part of the That-Lady-Dev and the Demos-and-Donuts organizations. I have the issues I want to track on my project board from That-Lady-Dev, but I also want to add the issues I have from the other organization to the same board. I can do this in one of two ways—I can either copy the issue link from the Demos-and-Donuts organization and paste it into the project, or I can search for the Demos-and-Donuts organization and repository from the project using # and select the issues I want to add.
This is a lot to take in—take a look at the gif below.
You can also add an issue or pull request to a project with the CLI. The command will look like this:
Rather than spending time manually updating individual items, you can edit multiple items in one go with our bulk editing feature on GitHub Projects.
Let’s say you wanted to assign multiple issues to yourself. On the table layout, assign one issue and with the cell highlighted, and copy the contents of the cell. Select all the remaining items you want to be assigned and paste the copied contents. You just assigned yourself to multiple issues at once, and this can be undone at the click of a button or using keyboard commands as well.
This is demonstrated in the gif below.
You can also drag and drop multiple items on a project board to different columns.
9. Reorder fields
With a growing list of fields in your project, you’ll want to make sure your fields are organized and you see the most important ones up top. To change the order in how they appear on the side panel and on the issues page, you can rearrange the order of the fields from the project settings by dragging and dropping them in the “Custom fields” list.
10. See what you want to see with slice by
If you find yourself with multiple views and filters to see how items are spread among various teams, labels, or assignees, you can configure a slice field to break down and quickly toggle through your items. You can choose a Slice by field that will pull the field values into a panel on the left of your view, and clicking each value will adjust the items in the project view on the right. See the gif below for how this works.
Try out slicing by different fields to unlock a new way to organize your items!
Bonus tip: Deep linking
Let’s say you want to send a specific issue from your project to a teammate. You can use the Copy link to project button to send them a direct link to that particular issue in the project without having them sift through to find the issue you mentioned. See what I mean in this gif.
Wrap-up
And there you have it—10 things you didn’t know you could do with GitHub Projects. The team is continuing to work on more amazing features to make tracking your issues with pull requests as seamless and painless as possible. GitHub Projects is a powerful, flexible, and efficient way to keep track of your items while staying on top of your work.
Do let me know if you have any questions about GitHub Projects; I’m happy to jump in and assist.
Effective planning and tracking is essential for developer teams of all shapes and sizes. Last year, we announced the general availability of GitHub Projects, connecting your planning directly to the work your teams are doing in GitHub. Today, we’re making GitHub Projects faster and more powerful. The projectcommand for the gh CLI is now generally available!
In this blog, we’ll take a look at how to get started with the new command, share some examples you can try on the command line and in GitHub Actions, and list the steps to upgrade from the archived gh-projects extension. Let’s take a look at how you can conveniently manage and collaborate on GitHub Projects from the command line.
The components of GitHub Projects
Let’s start by familiarizing ourselves with the key components of GitHub Projects. A project is made up of three components—the Project, Project field(s), and Project item(s).
A Project belongs to an owner (which can be either a user or an organization), and is identified by a project number. As an example, the GitHub public roadmap project is number 4247 in the github organization. We’ll use this project in some of our examples later on.
Project fields belong to a Project and have a type such as Status, Assignee, or Number, while field values are set on an item. See understanding fields for more details.
Project items are one of type draft issue, issue, or pull request. An item of type draft issue belongs to a single Project, while items of type issue and pull request can be added to multiple projects.
These three components make up the subcommands of gh project, for example:
Project subcommands include: create, copy, list, and view.
Project field subcommands include: field-create, field-list , and field-delete.
Project item subcommands include: item-add, item-edit, item-archive, and item-list.
For the full list of project commands, check out the manual.
Permissions check
In order to get started with the new command, you’ll need to ensure you have the right permissions. The project command requires the project auth scope, which isn’t part of the default scopes of the gh auth token.
In your terminal, you can check your current scopes with this command:
$ gh auth status
github.com
✓ Logged in to github.com as mntlty (keyring)
✓ Git operations for github.com configured to use https protocol.
✓ Token: gho_************************************
✓ Token scopes: gist, read:org, repo, workflow
If you don’t see project in the list of token scopes, you can add it by following the interactive prompts from this command:
$ gh auth refresh -s project
In GitHub Actions, you must choose one of the options from the documentation to make a token with the project scope available.
Running project commands
Now that you have the permissions you need, let’s look at some examples of running project commands using my user and the GitHub public roadmap project, which you can adapt to your team’s use cases.
List the projects owned by the current user (note that no --owner flag is set):
$ gh project list
NUMBER TITLE STATE ID
1 my first project open PVT_kwxxx
2 @mntlty's second project open PVT_kwxxx
$ gh project view --owner github 4247

Title

GitHub public roadmap

## Description

--

## Visibility

Public

## URL

<https://github.com/orgs/github/projects/4247>

## Item count

208

## Readme

--

## Field Name (Field Type)

Title (ProjectV2Field)

Assignees (ProjectV2Field)

Status (ProjectV2SingleSelectField)

Labels (ProjectV2Field)

Repository (ProjectV2Field)

Milestone (ProjectV2Field)

Linked pull requests (ProjectV2Field)

Reviewers (ProjectV2Field)

Tracks (ProjectV2Field)

Tracked by (ProjectV2Field)
List the items in the GitHub public roadmap project:
$ gh project item-list --owner github 4247

TYPE TITLE NUMBER REPOSITORY ID
Issue Kotlin security analysis support in CodeQL code scanning
(public beta) 207 github/roadmap
PVTI_lADNJr_NE13OAALQgw
Issue Swift security analysis support in CodeQL code scanning
(beta) 206 github/roadmap
PVTI_lADNJr_NE13OAALQhA
Issue Fine-grained PATs (v2 PATs) - [Public Beta]
184 github/roadmap PVTI_lADNJr_NE13OAALQmw
Copy the GitHub public roadmap project structure to a new project owned by mntlty:
Note that if you are using a TTY and do not pass a --owner flag or the project number argument to a command which requires those values, an interactive prompt will be shown from which you can select those values.
JSON format
Now, let’s look at how to format the command output in JSON, which displays more information for use in scripting, automation, and piping into other commands. Every project subcommand supports outputting to JSON format by setting the --format=json flag:
Combining JSON formatted output with a tool such as jq enables you to unlock even more capabilities. For example, you can create a list of the URLs from all of the Issues on the GitHub public roadmap project that have status “Future”:
You can also level up your team’s usage of GitHub Projects with project commands in your GitHub Actions workflows to enhance automation, generate on demand reports, and react to events such as when a project item is modified. For example, you can create a workflow which is triggered by a workflow_dispatch event and will close all projects that are owned by mntlty and which have no items:
The latest version of gh is automatically available in the GitHub Actions environment. For more information on using GitHub Actions, see https://docs.github.com/en/actions.
Upgrading from the gh-projects extension
Now that the project command is officially part of the CLI, the gh-projectsextension repository has been archived. If you’re currently using the extension, you don’t need to change anything. You can continue installing and using the gh-projects extension; however, it won’t receive any future enhancements. Fortunately, it’s very simple to make the transition from the gh-project extension to the project command:
Upgrade to the latest version of gh.
Replace flags for --user and --org with --owner in project commands. owner is the login of the project owner, which is either a user or an organization.
Replace gh projects with gh project.
To avoid confusion, I also recommend removing the extension by running the following command:
$ gh ext remove gh-projects
Thank you to the community, @mislav, @samcoe, and @vilmibm for providing invaluable feedback and support on gh-projects!
Get started with GitHub CLI project command today
If you’re interested in learning more or giving us feedback, check out these links:
At GitHub you’ve heard us talk about how we are using GitHub Projects and GitHub Actions to plan and track our work and now we’ve asked one of our customers, Grafana Labs, to share how their teams are approaching work in a new way. Whether they are managing open source requests, operational tasks, or escalations, the Grafana Labs Alerting team uses GitHub Projects to manage all these issues efficiently.
Let’s hear more from Armand Grillet, Senior Engineering Manager at Grafana Labs, including how his teams use tasklists to break work into manageable tasks, use a common set of labels to filter tasks, create multiple views on a single project to meet the needs of different teams and stakeholders, and use automation to enable engineers to stay focused on the code.
Grafana is a leading open source platform for monitoring and observability, which is why the Grafana Labs GitHub organization is the center of our engineering efforts with nearly 1,000 repositories, including eight having more than 2,000 stars. In addition to this open source work, Grafana Labs engineers also work on the Grafana Cloud observability platform and its customers’ escalations.
As the manager of the Grafana Alerting and service-level objectives (SLOs) backend teams at Grafana Labs it was essential to have one project board that benefited our multiple stakeholders: team members, other employees, as well as the open source community. Our GitHub Project has offered us the opportunity to do just that. You can even make a copy of our board and adapt it for your own project needs, using the ‘make a copy’ functionality.
One view for each team, assembled around task lists
Our four teams each have a view in the Grafana Alerting project: “Backend”,”Front-end”,”UX”,and “Docs”.
Grafana Alerting has contributors working across four teams: backend, front-end, UX, and docs. Each of these contributor types has their own view in our project. The field options (thus the columns) are the same for each of these views:
Inbox—not reviewed yet
Waiting for input—open source issues that need more details
Backlog—reviewed, priority depending on the milestone set
In progress
In review
Done
These columns (custom fields) are intentionally generic. They can work for all teams, no matter whether the issue has been written by someone in the community or by someone internally. We use project filters based on labels, such as “area/frontend” to allow issues to be automatically added to the correct views once they are added to our project.
Big issues that we work on over a quarter use tasklists to breakdown the main pieces of work.
Note: Tasklists are currently in private beta; you can sign your organization up for access on the GitHub Feature Preview portal
For bigger issues, we make use of the GitHub tasklist feature to break down the work into tasks. We use labels to filter the tasks to be included in the relevant team’s view. This creates views that provide two different, but useful, kinds of information. For example, for the docs team:
Smaller issues with only the label “type/docs” are items the docs team needs to work on.
Bigger issues containing task lists with the label “type/docs” along with labels for additional areas (for example, “area/frontend”) are issues with a dependency on the docs team, but the item is not owned by “docs.” For these bigger issues, if the status is “in progress” someone in the docs team should start checking how they can help.
As a manager of the backend team and project lead for Grafana Alerting, this workflow gives me peace of mind. Even if our docs team members miss some meetings, the Docs view in our project is always accurate, because engineers maintain the status of issues.
The four team views, combined with our “Epics” view (the first view in our board) that lists our big issues for an entire quarter, allow everyone to see our progress on Grafana Alerting. GitHub users who are part of the Grafana Labs organization can see all issues, whereas Github users within our community can only see issues in public repositories. As most of our issues live in the Grafana public repository this allows us to be transparent by default.
Whilst we use a private repository for issues relating to our operational work, we use the same labels in all our alerting-related repositories so that we can use project filters easily. Having common labels in many repositories creates an incentive to have the same labels in other repositories, especially new ones, even if they do not relate to alerting. This growing commonality makes searching for issues across multiple repositories easier, which is particularly useful for our product managers.
Custom fields to create tailored views
A valuable feature of GitHub Projects is the ability to have different columns (custom fields) per view. This allows us to view not only smaller issues but also larger issues covering an entire quarter. Our team also handles engineering escalations that are worked at a faster pace compared to normal issues.
As a team, our three custom fields are:
Status: the default field for all issues except escalations (as mentioned above).
Quarter: used for bigger issues that include tasklists.
Escalation: used to capture more granular status of each escalation.
With these custom fields, we can have custom views, such as our epic view, which gives us a birds-eye view of our quarterly goals, and our escalations view, which lets us review the state of escalations that need engineering work.
The escalations view uses the escalation status custom field with special values such as “Waiting for release.”
Thanks to the adaptability of GitHub Projects, we finally have one ‘source-of-truth’ to reference normal issues, big issues, and escalations.
Enhancing projects with GitHub Actions
For escalations, which are urgent to solve, we also use GitHub Actions to notify us on Slack or use Grafana OnCall if this is a high priority escalation.
Combining GitHub Projects and GitHub Actions offers endless possibilities. Actions like github/issue-labeler allow us to have repositories shared by different teams with issues labeled automatically depending on keywords used in an issue. These labels are then used by other actions to add the issue to the right view or to send notifications to external systems. Opening the project and seeing that new relevant issues have been added automatically, ready for triage, feels like magic.
An issue labeled “alerting” and “prio/3” has been created by support in “grafana/support-escalations.” This adds the issue to the right project and notifies the current on-call on Slack via GitHub Actions.
We often have escalations related to features requested by customers. Being able to link to an escalation in an open source issue allows engineers and product managers to prioritize together on one platform while keeping this information confidential from GitHub users outside our organization.
These automations have been important in terms of engineers’ motivation and our productivity. For example, the Grafana Alerting team receives around five issues from support regarding escalations per week. During the last quarter of 2022, at any given time, the team had on average only four open escalations due to the automation motivating engineers to prioritize this work. This is a significant reduction from the average of 20 open escalations at any given time prior to our shift to GitHub Projects and GitHub Actions.
Combining GitHub Projects and GitHub Actions allows us to route feedback from various sources through the most relevant repos and then onto a single project.
GitHub Projects at scale
Since we started using GitHub Projects, our team has been growing. An important moment for me in our scaling was the creation of a new project for the team working on SLOs. Originally, this team had no escalations and a small number of engineers. We were able to easily make a copy of the ‘Alerting’ project, changing the filters to accommodate the new team’s repositories, too. The important question was whether the workflows we had for a big team would be too much for such a new team. The answer was yes, there were too many views, creating unnecessary overhead, but it was very easy to reduce the number of views to adapt to the new team’s needs. Using the existing project as a starting point for the SLO team enabled us to get a new project up and running fast.
After a year of using GitHub Projects, we have seen its ability to handle our different types of issues and to adapt to the needs of our various teams at Grafana Labs. We find GitHub Projects to be a flexible planning and tracking solution that enables engineers to stay focussed on code and gives issues more visibility. GitHub Projects keeps the burden for contributors low whilst still providing the views managers need to understand and plan team efforts. GitHub Projects is the only tool the Grafana Alerting team needs to do project planning.
In this post, I’m going to share how we’ve been utilizing the new projects experience across our team (from an engineer like myself all the way to our VPs and team leads). We love working so closely with developers to ship requested features and updates (all of which roll up into the Changelogs you see), and using the new projects helps us stay consistent in our shipping cadence.
How we think about shipping
Our core team consists of members of the product, engineering, design, and user research teams. We recognize that good ideas can come from anywhere. Our process is designed to inspire, surface, and implement those ideas, whether they come from users, individual contributors, managers, directors, or VPs. To get the proper alignment for this group, we’ve agreed on a few guiding principles that drive what our roadmap will look like:
The pitch: When it comes to what we’re going to work on (outside of the big pieces of work on our roadmap) people within our team can pitch ideas in our team’s repository for upcoming cycles (which we define as 6-8 weeks of work, inclusive of planning, engineering work, and an unstructured passion project week); these can be features, fixes, or even maintenance work. Every pitch must clearly state the problem it’s solving and why it’s important for us to prioritize. Some features that have come from this process include live updates, burn up charts for insights, and more. Note: these are all the changes you see as a developer, but we also have a lot of pitches come in from my fellow engineers focused around the developer experience. For example, a couple successful pitches have included reducing our CI time to 10 minutes, and streamlining our release process by switching to a ring deployment model and adding ChatOps.
In addition to using issues to propose and converse on pitches from the team, we use the new projects experience to track and manage all the pitches from the team so we can see them in an all-up table or board view.
Keep it small: We knew for ourselves, and for developers, that we didn’t want to lock them into a specific planning methodology and over-complicate a team’s planning and tracking process. For us, we wanted to plan shorter cycles for our team to increase our tempo and focus, so we opted for six-week cycles to break up and build features. Check out how we recommend getting started with this approach in a recent blog post.
Ship to learn: Similar to how we ship a lot of our products, we knew developers and customers were going to be heavily intertwined with each and every ship, giving us immediate feedback in both the private and public beta. Their feedback both influenced what we built and then how we iterated and continued to better the experience once something did ship. While there are so many people to thank, we’re extremely grateful for all our customers along the way for being our partners in building GitHub Issues into the place for developers to project plan.
How we used projects to do it
We love that the product we’re building doesn’t tool a specific project management methodology, but equips users with powerful primitives that they can compose into their preferred experiences and workflows. This allows for many people (not just us engineers) involved in building and developing products at GitHub (team leads, marketing, design, sales, etc.) the ability to use the product in a way that makes sense for them.
With the above principles in mind, once a pitch has been agreed upon to move forward on building, that pitch issue becomes a tracking issue in a project table or board that we convert into pieces of work that fit into an upcoming cycle. A great example of this was when we updated the GitHub Issues icons to lessen confusion among developers. This came in as a pitch from a designer on the team, and was soon accepted and moved into epic planning in which the team responsible began to track the individual pieces of work needed to make this happen.
IC approach
Let’s start with how my fellow engineers, individual contributors and I use projects for day-to-day development within cycles. From our perspective on any given day, we’re hyper-focused on tackling what issues and pull requests are assigned to us (fun fact: we recently added the assignee:me filter to make this even easier) in a given cycle, so we work from more individually scoped project tables or boards that stem from the larger epic and iteration tracking. Because of this, we can easily zoom out from our individual tasks to see how our work fits into a given cycle, and then even zoom out more into how it fits into larger initiatives.
In addition to scoping more specifically a given table or board, engineers across our organization utilize a personal project table or board to track all the things specific to themselves like what issues are assigned to them—even work not connected to a given cycle, like open source work.
EM approach
If we pull back to engineering managers overseeing those smaller cycles, they’re focused on kicking off an accepted pitch’s work, breaking it first into cycles and then into smaller iterations in which they can assign out work. A given cycle’s table or board view allows the managers to have a whole look at all members of their team and look specifically at things that are important to them, like all the pull requests that are open and quickly seeing which engineers are assigned, what pull requests have been merged, deployed, etc.
Check out what this looks like in our team board.
Team lead approach
Now, if we put ourselves in the shoes of our team leads and Directors/VPs, we see that they’re using the new projects experience to primarily get the full picture of where product and feature development currently sit. They told me the main team roadmap and backlog is where they can get questions answered like:
Which projects do we have in flight in which product area right now?
Who’s the key decision maker for this project?
Which engineers are working on which projects?
Which projects are at risk and need help (progress/status)?
What’s great about this is that they can quickly glance at what’s in motion and then click into any cycles or status to get more context on open issues, pull requests, and how everything is connected.
Outside of being able to check in on what’s being worked on and where the organization’s current focus is, our leads have found additional use cases that may not be applicable for an engineer like me. They use private projects for more sensitive tasks, like managing our team’s hiring, tracking upcoming start dates, making sure they’re staying on top of career development, organizational change management, and more.
Wrap-up
This is how we as the planning and tracking team at GitHub are using the very product we’re building for you to build the new projects experience. There are many other teams across GitHub that utilize the new project tables and boards, but we hope this gives you a little bit of inspiration about how to think about project planning on GitHub and how to optimize for all the stakeholders involved in building and shipping products.
What’s great about project planning on GitHub is that our focus on powerful primitives approach to project management means that there is an unlimited amount of flexibility for you and your team to play around with, and likely many, many ways we haven’t even thought about how to use the product. So, please let us know how you’re using it and how we can improve the experience!
GitHub is the home for software development teams and is the place where they collaborate and build. For larger organizations, you might have a dedicated reporting team that wants to export this activity at a granular level, so it can be modified and presented for audits. GitHub provides a powerful API for accessing this data programmatically, but we know that may not be the perfect solution for the many people involved in a given organization. In fact, a common request we’ve seen is for the ability to download issues and other repository data as a CSV file. Sometimes, you just want a spreadsheet!
So, we built the GitHub Artifact Exporter to help reporting teams get the data they need without requiring them to know how to interact with the GitHub API.
What data can you export from GitHub?
GitHub Artifact Exporter provides a CLI and a simple GUI for exporting GitHub Issues and related comments based on a date range, and it supports GitHub’s full search syntax, allowing you to filter results based on your search parameters
The CLI also supports exporting:
Commits
Milestones, including associated Issues
Projects, including associated issues
Pull requests, including comments
Releases
Exporter format
Both the CLI and GUI support two formats for data exports, JSON and CSV.
JSON
Newline delimited JSON can be used to process each line.
CSV
CSV provides a comma-delimited export where each line represents an issue and a single comment.
Using the GUI
When you open the GUI, you’re greeted with the screen below. You’ll need to fill in a personal access token, the owner of the repository, and the name of the repository itself.
The owner of the repository will either be your personal account name or your organization name. The name of the repository will be the URL slug that you see in the URL bar. The GitHub Artifact Exporter’s Owner and Repository would be “github” and “github-artifact-exporter” respectively.
Next, input a search string to filter the issues in your repository, select whether you want CSV or JSON output, and hit export! You’ll be prompted with a dialogue allowing you to choose the location to save the file.
Using the CLI
The CLI can be used to generate the same JSON and CSV data as the GUI, in addition to implementing a handful of other search types. See the usage portion of the README for full details.
For example, to get all the pull requests in your repository, this command could be used: github-artifact-exporter.exe repo:pulls --owner github --repo github-artifact-exporter --token $GITHUB_TOKEN --format JSON.
Try it out!
We hope that this tool helps your team export your data in an easier fashion. To get started, check out the prerequisites then download the GitHub Artifact Exporter. We would love any suggestions or feedback in the repository.
The collective thoughts of the interwebz
Manage Consent
To provide the best experiences, we use technologies like cookies to store and/or access device information. Consenting to these technologies will allow us to process data such as browsing behavior or unique IDs on this site. Not consenting or withdrawing consent, may adversely affect certain features and functions.
Functional
Always active
The technical storage or access is strictly necessary for the legitimate purpose of enabling the use of a specific service explicitly requested by the subscriber or user, or for the sole purpose of carrying out the transmission of a communication over an electronic communications network.
Preferences
The technical storage or access is necessary for the legitimate purpose of storing preferences that are not requested by the subscriber or user.
Statistics
The technical storage or access that is used exclusively for statistical purposes.The technical storage or access that is used exclusively for anonymous statistical purposes. Without a subpoena, voluntary compliance on the part of your Internet Service Provider, or additional records from a third party, information stored or retrieved for this purpose alone cannot usually be used to identify you.
Marketing
The technical storage or access is required to create user profiles to send advertising, or to track the user on a website or across several websites for similar marketing purposes.

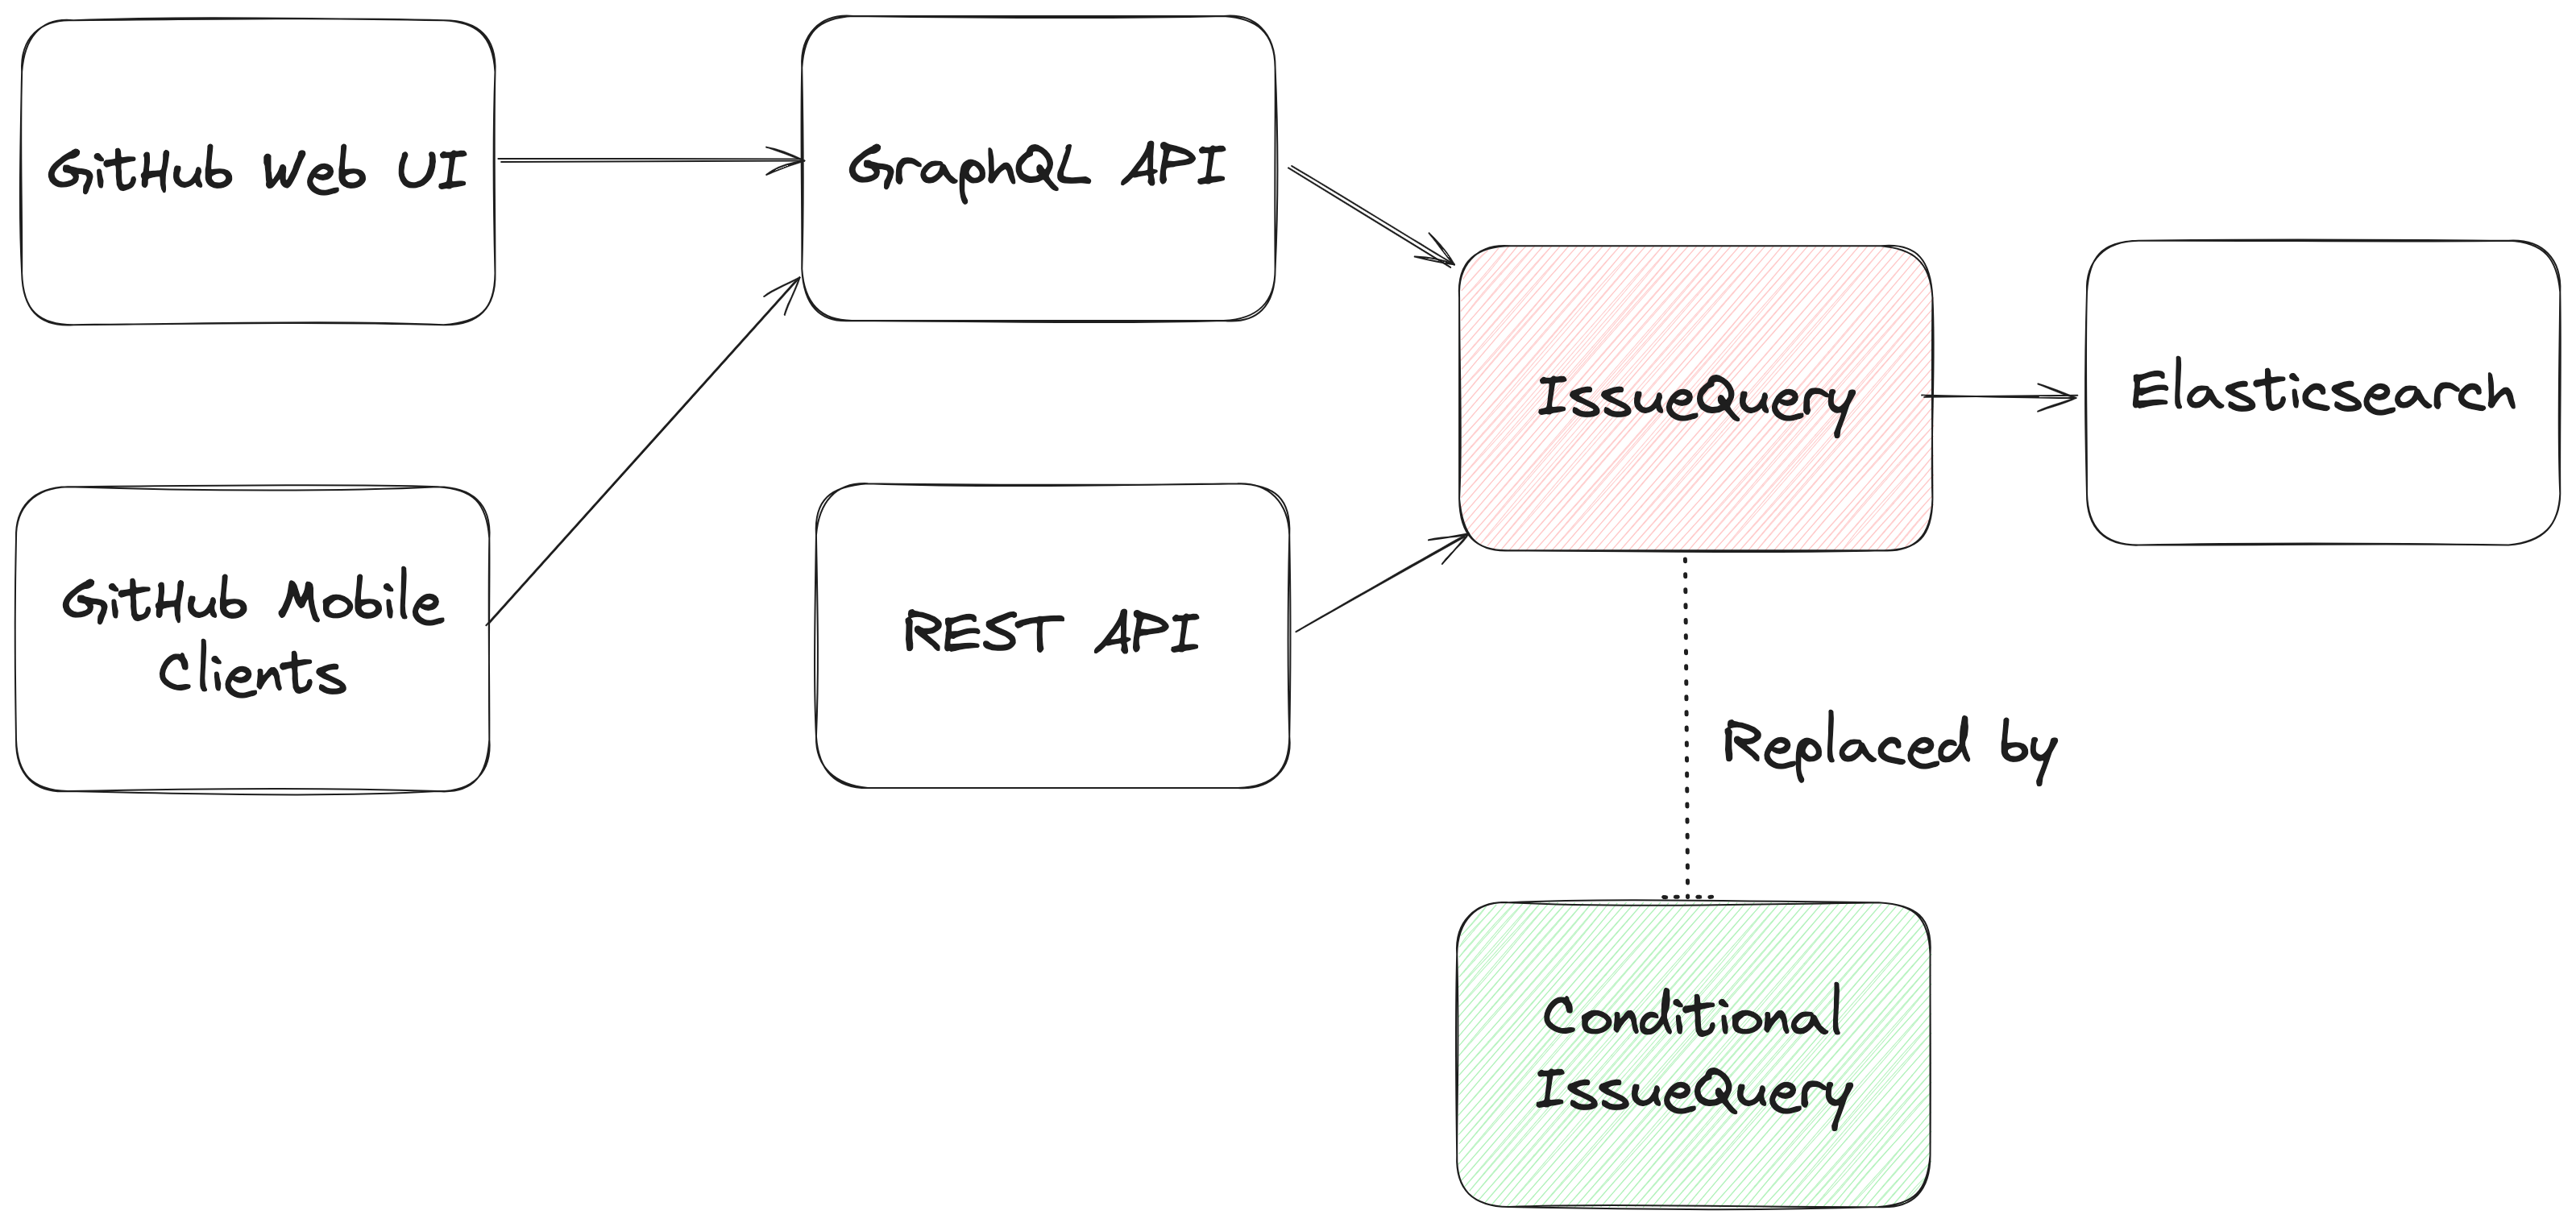


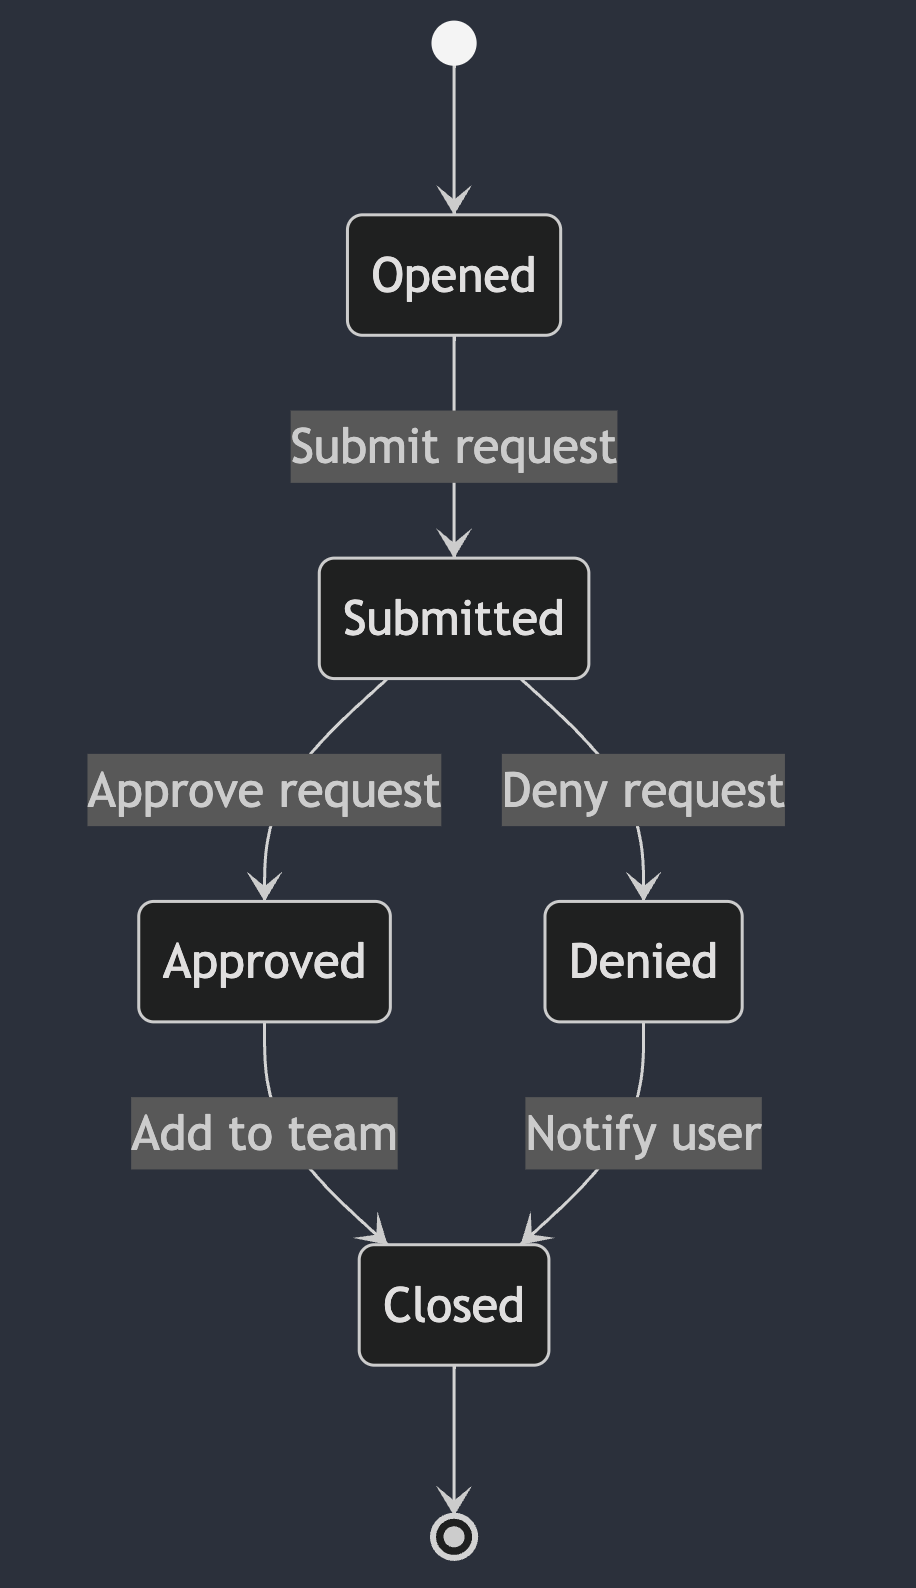
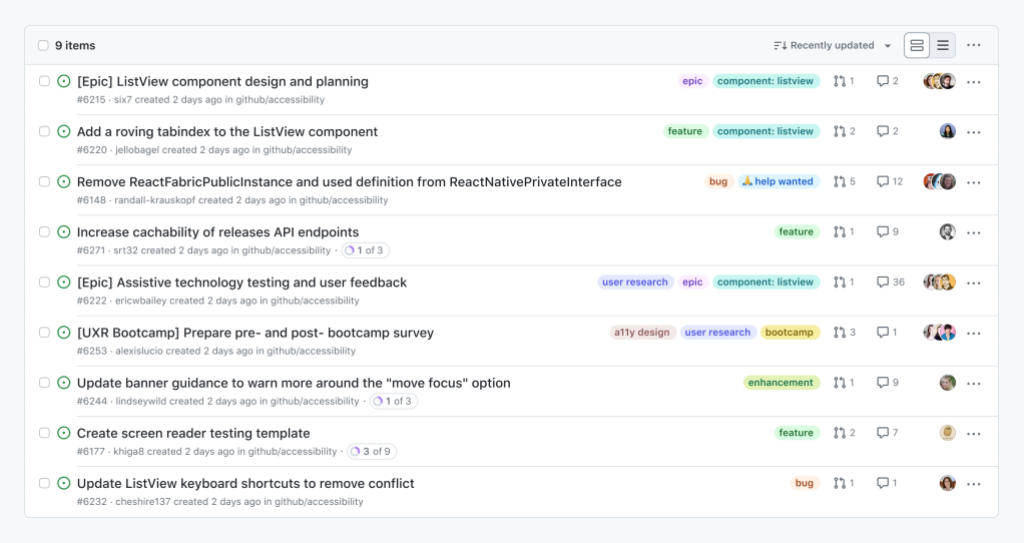
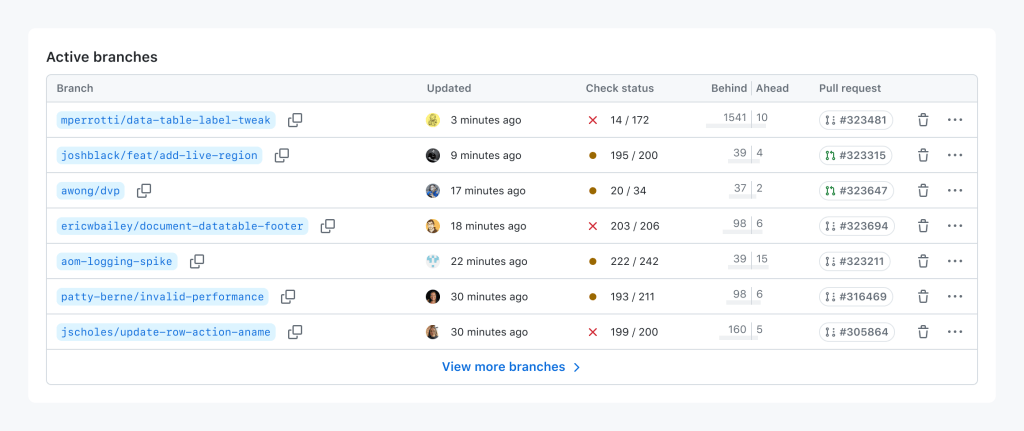
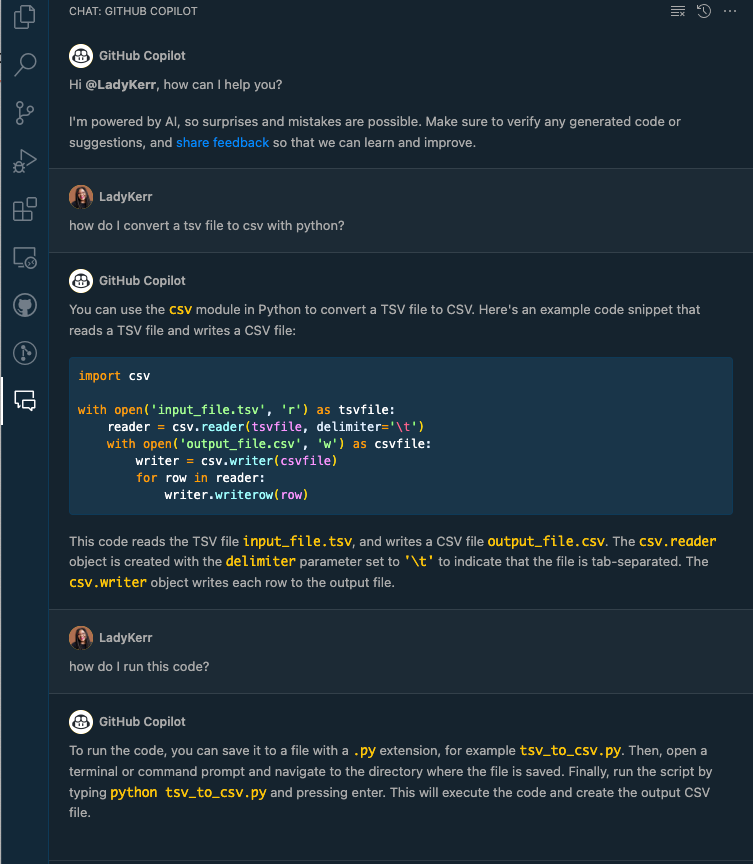


 Let’s hear more from
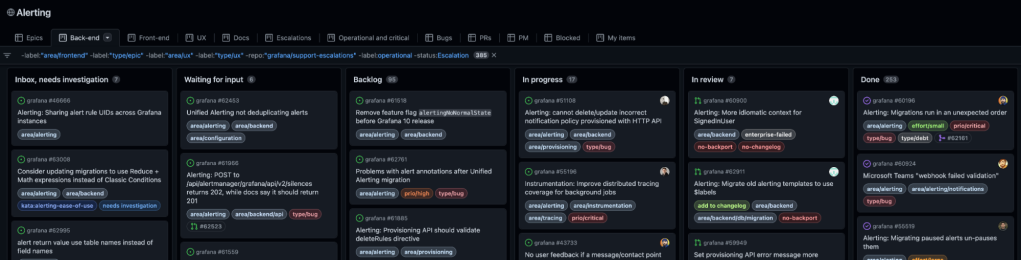
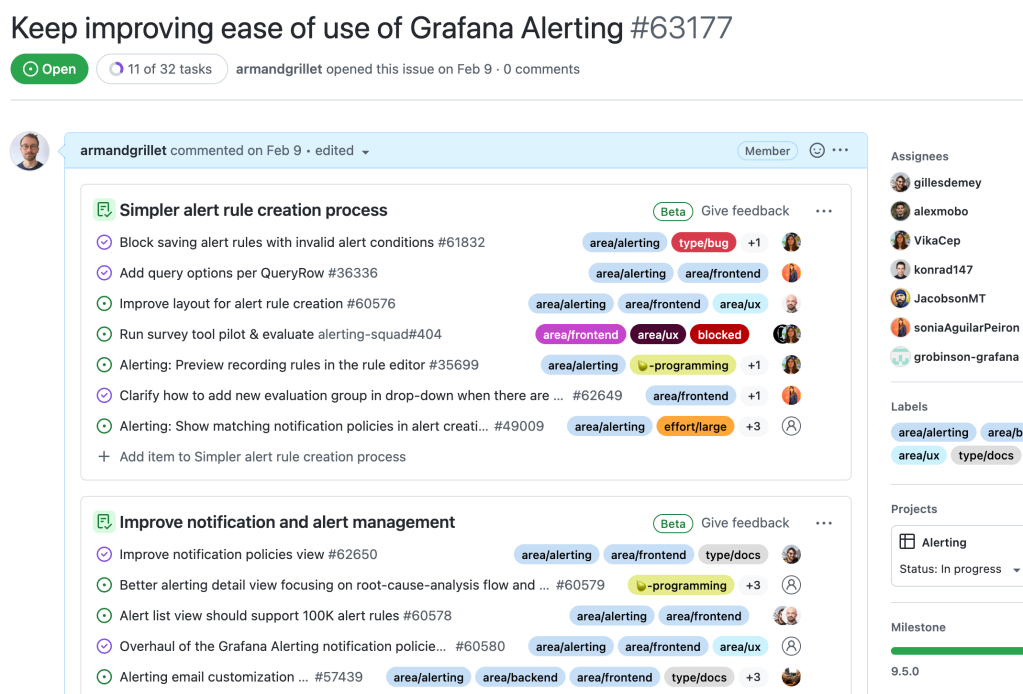


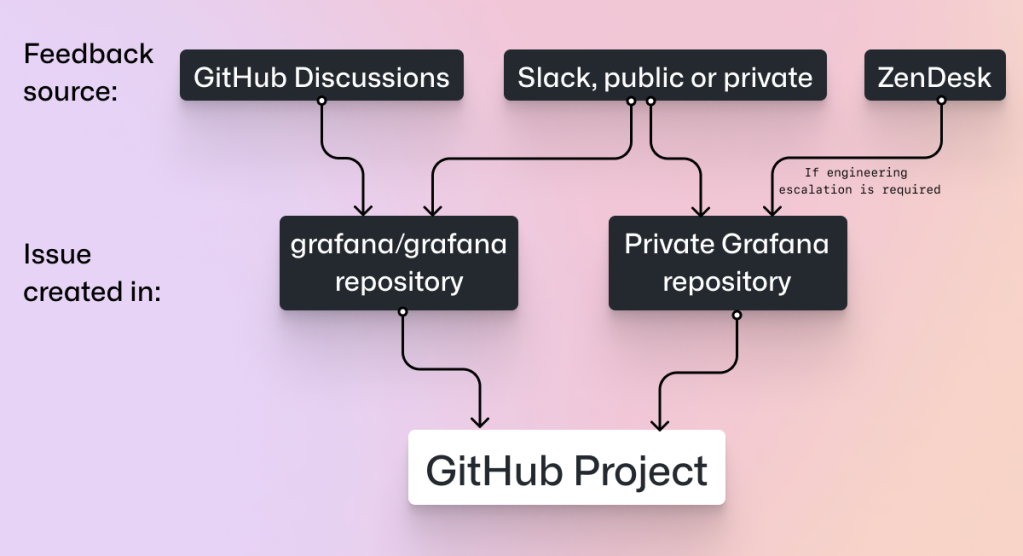
 The pitch: When it comes to what we’re going to work on (outside of the big pieces of work on
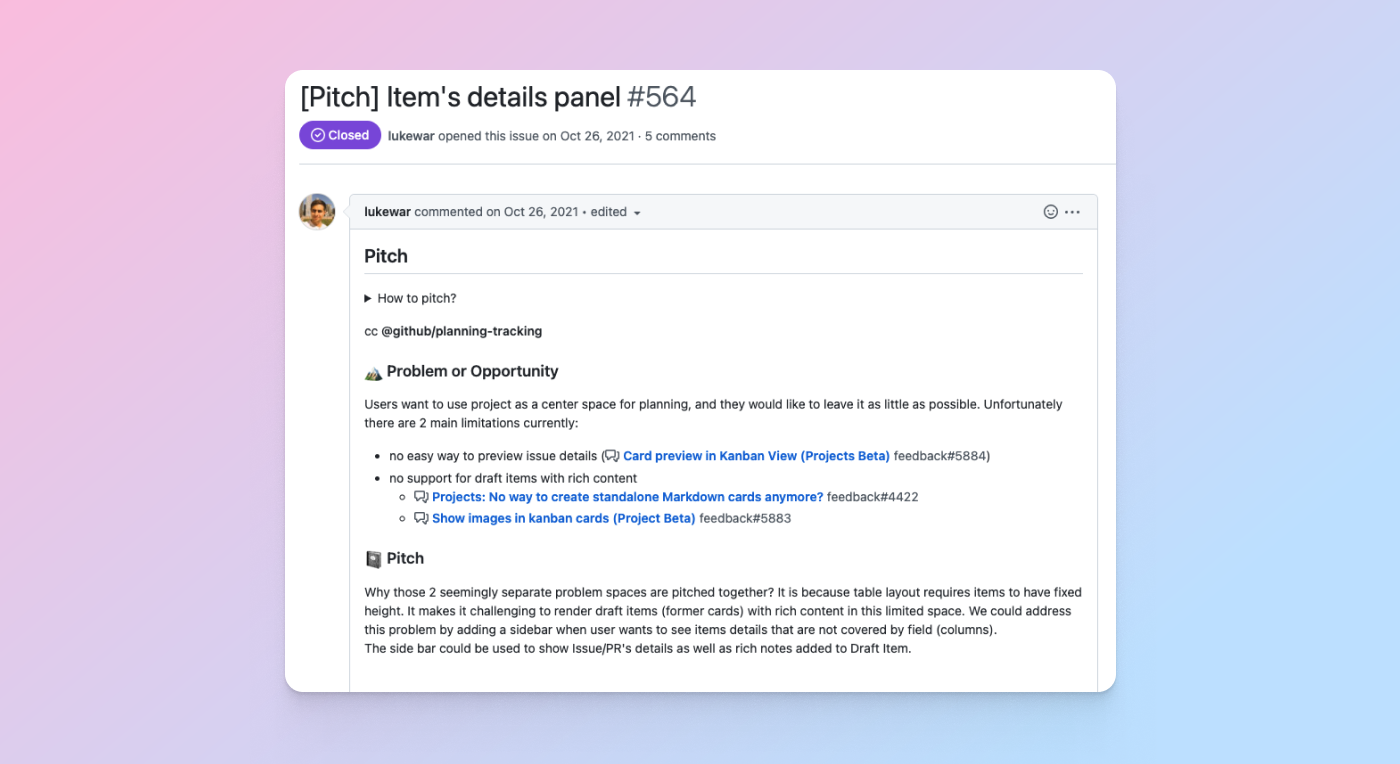
 In addition to using issues to propose and converse on pitches from the team, we use the new projects experience to track and manage all the pitches from the team so we can see them in an all-up table or board view.
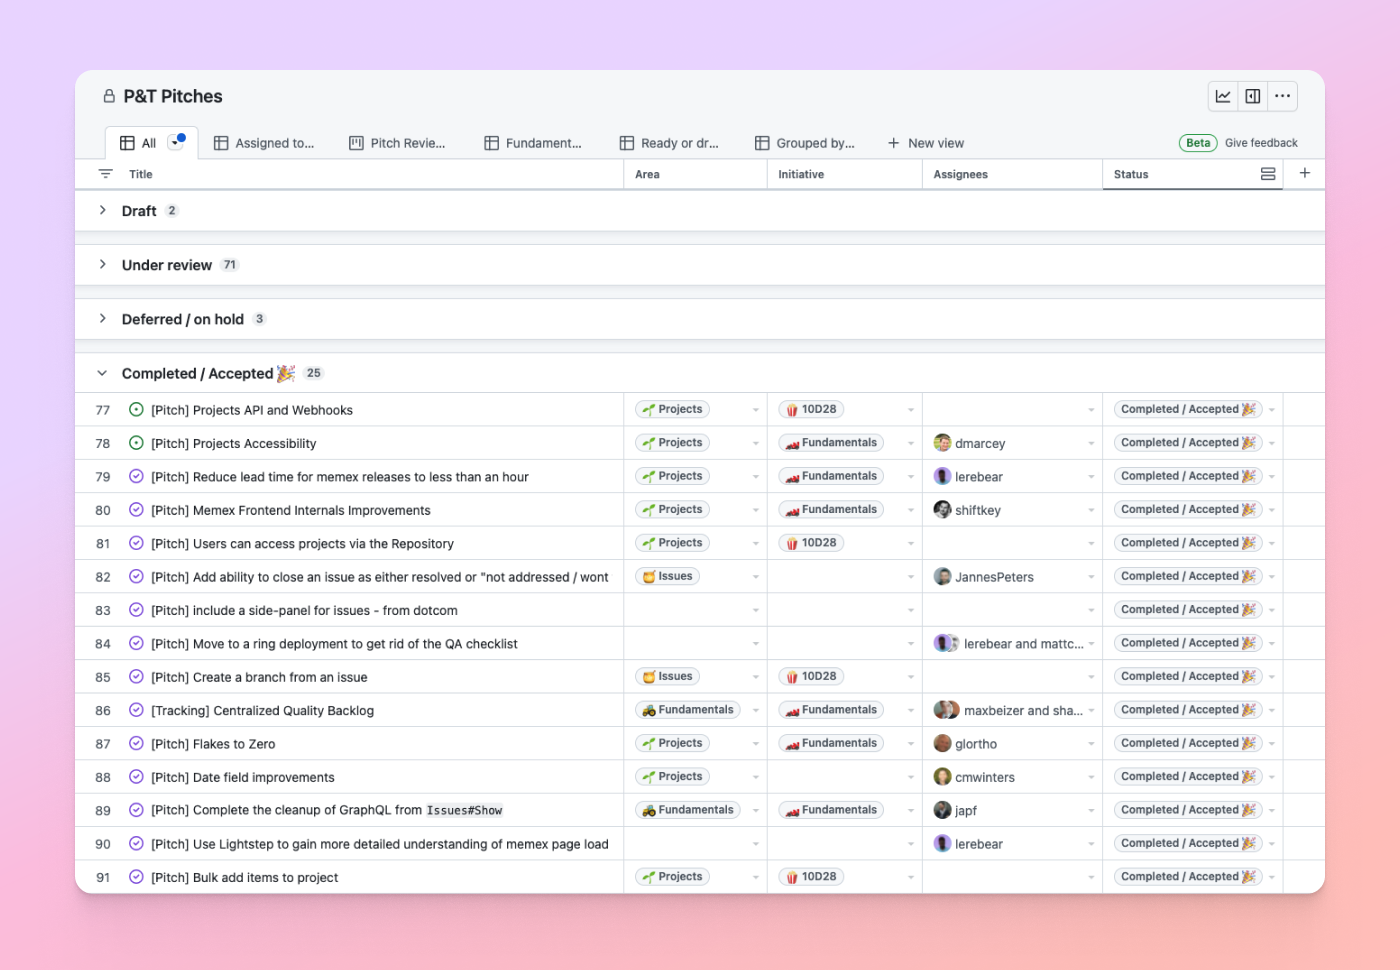
 Keep it small: We knew for ourselves, and for developers, that we didn’t want to lock them into a specific planning methodology and over-complicate a team’s planning and tracking process. For us, we wanted to plan shorter cycles for our team to increase our tempo and focus, so we opted for six-week cycles to break up and build features. Check out how we recommend getting started with this approach in a
  Ship to learn: Similar to how we ship a lot of our products, we knew developers and customers were going to be heavily intertwined with each and every ship, giving us immediate feedback in both the private and public beta. Their