Tag Archives: AWS Batch

Introducing retry strategies for AWS Batch

Post Syndicated from Emma White original https://aws.amazon.com/blogs/compute/introducing-retry-strategies-for-aws-batch/

This post is contributed by Christian Kniep, Sr. Developer Advocate, HPC and AWS Batch.

Scientists, researchers, and engineers are using AWS Batch to run workloads reliably at scale, and to offload the undifferentiated heavy lifting in their day-to-day work. But even with a slight chance of failure in the stack, the act of mitigating these failures reminds customers that infrastructure, middleware and software are not error proof.

Many customers use Amazon EC2 Spot Instances to save up to 90% on their computing cost by leveraging unused EC2 capacity. If unused EC2 capacity is unavailable, an EC2 Spot Instance can be reclaimed by EC2. While AWS Batch takes care of rescheduling the job on a different instance, this rescheduling should not be handled differently depending on whether it is an application failure or some infrastructure event interrupting the job.

Starting today, customers can define how many retries are performed in cases where a task does not finish correctly. AWS Batch now allows customers define custom retry conditions, so that failures like an interruption of an instance or an infrastructure agent are handled differently, and do not just exhaust the number of retries attempted.

In this blog, I show the benefits of custom retry with AWS Batch by using different error codes from a job to control whether it should be retried. I will also demonstrate how to handle infrastructure events like a failing container image download, or an EC2 Spot interruption.

Example setup

To showcase this new feature, I use the AWS Command Line Interface (AWS CLI) to set up the following:

  1. IAMroles, policies, and profiles to grant access and permissions
  2. A compute environment (CE) to provide the compute resources to run jobs
  3. A job queue, which supervises the job execution and schedules jobs on the CE
  4. Job definitions with different retry strategies,which use a simple job to demonstrate how the new configuration can be applied

Once those tasks are completed, I submit jobs to show how you can handle different scenarios, such as infrastructure failure, application handling via error code or a middleware event.

Prerequisite

To make things easier, I first set up a couple of environment variables to have the information available for later use. I use the following code to set up the environment variables:

# in case it is not already installed
sudo yum install -y jq 
export MD_URL=http://169.254.169.254/latest/meta-data
export IFACE=$(curl -s ${MD_URL}/network/interfaces/macs/)
export SUBNET_ID=$(curl -s ${MD_URL}/network/interfaces/macs/${IFACE}/subnet-id)
export VPC_ID=$(curl -s ${MD_URL}/network/interfaces/macs/${IFACE}/vpc-id)
export AWS_REGION=$(curl -s ${MD_URL}/placement/availability-zone | sed 's/[a-z]$//')
export AWS_ACCT_ID=$(curl -s ${MD_URL}/identity-credentials/ec2/info |jq -r .AccountId)
export AWS_SG_DEFAULT=$(aws ec2 describe-security-groups \
--filters Name=group-name,Values=default \
|jq -r '.SecurityGroups[0].GroupId')

IAM

When using the AWS Management Console, I must create IAM roles manually.

Trust policies

IAM roles are defined to be used by an individual service. In the simplest case, I want a role to be used by Amazon EC2 – the service that provides the compute capacity in the cloud. The definition of which entity is able to use an IAM role is called a Trust Policy. To set up a Trust Policy for an IAM role, I use the following code snippet:

cat > ec2-trust-policy.json << EOF
{
  "Version": "2012-10-17",
  "Statement": [{
    "Effect": "Allow",
    "Principal": {
      "Service": "ec2.amazonaws.com"
    },
    "Action": "sts:AssumeRole"
  }]
}
EOF

Instance role

With the IAM trust policy, I can now create an ecsInstanceRole and attach the pre-defined policy AmazonEC2ContainerServiceforEC2Role. This allows an instance to interact with Amazon ECS.

aws iam create-role --role-name ecsInstanceRole \
 --assume-role-policy-document file://ec2-trust-policy.json
aws iam create-instance-profile --instance-profile-name ecsInstanceProfile
aws iam add-role-to-instance-profile \
    --instance-profile-name ecsInstanceProfile \
    --role-name ecsInstanceRole
aws iam attach-role-policy --role-name ecsInstanceRole \
 --policy-arn arn:aws:iam::aws:policy/service-role/AmazonEC2ContainerServiceforEC2Role

Service role

The AWS Batch service uses a role to interact with different services. The trust relationship reflects that the AWS Batch service is going to assume this role. I can set up this role with the following logic:

cat > svc-trust-policy.json << EOF
{
  "Version": "2012-10-17",
  "Statement": [{
    "Effect": "Allow",
    "Principal": {
      "Service": "batch.amazonaws.com"
    },
    "Action": "sts:AssumeRole"
  }]
}
EOF
aws iam create-role --role-name AWSBatchServiceRole \
--assume-role-policy-document file://svc-trust-policy.json
aws iam attach-role-policy --role-name AWSBatchServiceRole \
--policy-arn arn:aws:iam::aws:policy/service-role/AWSBatchServiceRole

At this point, I have created the IAM roles and policies so that the instances and services are able to interact with the AWS API operations, including trust policies to define which services are meant to use them. EC2 for the ecsInstanceRole and the AWSBatchServiceRole for the AWS Batch service itself.

Compute environment

Now, I am going to create a CE, which will launch instances to run the example jobs.

cat > compute-environment.json << EOF
{
  "computeEnvironmentName": "compute-0",
  "type": "MANAGED",
  "state": "ENABLED",
  "computeResources": {
    "type": "SPOT",
    "allocationStrategy": "SPOT_CAPACITY_OPTIMIZED",
    "minvCpus": 2,
    "maxvCpus": 32,
    "desiredvCpus": 4,
    "instanceTypes": [ "m5.xlarge","m5.2xlarge","m4.xlarge","m4.2xlarge","m5a.xlarge","m5a.2xlarge"],
    "subnets": ["${SUBNET_ID}"],
    "securityGroupIds": ["${AWS_SG_DEFAULT}"],
    "instanceRole": "arn:aws:iam::${AWS_ACCT_ID}:instance-profile/ecsInstanceRole",
    "tags": {"Name": "aws-batch-instances"},
    "ec2KeyPair": "batch-ssh-key",
    "bidPercentage": 0
  },
  "serviceRole": "arn:aws:iam::${AWS_ACCT_ID}:role/AWSBatchServiceRole"
}
EOF
aws batch create-compute-environment --cli-input-json file:// compute-environment.json 

Once this is complete, my compute environment begins to launch instances. This takes a few minutes. I can use the following command to check on the status of the compute environment whenever I want:

aws batch describe-compute-environments |jq '.computeEnvironments[] |select(.computeEnvironmentName=="compute-0")'

The command uses jq to filter the output to only show the compute environment I just created.

Job queue

Now that I have my compute environment up and running, I can create a job queue, which accepts job submissions and schedules the jobs to the compute environment.

cat > job-queue.json << EOF
{
  "jobQueueName": "queue-0",
  "state": "ENABLED",
  "priority": 1,
  "computeEnvironmentOrder": [{
    "order": 0,
    "computeEnvironment": "compute-0"
  }]
}
EOF
aws batch create-job-queue --cli-input-json file://job-queue.json

Job definition

The job definition is used as a template for jobs. It is referenced in a job submission to specify the defaults of a job configuration, while some of the parameters can be overwritten when you submit.

Within the job definition, different retry strategies can be configured along with a maximum number of attempts for the job.
Three possible conditions can be used:

  • onExitCode will evaluate non-zero exit codes
  • onReason matched against middleware errors
  • onStatusReason can be used to react to infrastructure events such as an instance termination

Different conditions are assigned an action to either EXIT or RETRY the job. Important to note, that a job finishing with an exit code of zero will EXIT the job and not evaluate the retry condition. The default behavior for all non-zero exit code is the following:

{
  "onExitCode" : ""
  "onStatusReason" : ""
  "onReason" : "*"
  "action": retry
}

This condition retries every job that does not succeed (exit code 0) until the attempts are exhausted.

Spot Instance interruptions

AWS Batch works great with Spot Instances and customers are using this to reduce their compute cost. If Spot Instances become unavailable, instances are reclaimed by EC2, which can lead to one or more of my hosts being shut down. When this happens, the jobs running on those hosts are shut down due to an infrastructure event, not an application failure. Previously, separating these kinds of events from one another was only possible by catching the notification on the instance itself or through CloudWatch Events. Now with customer retry, you don’t have to rely on instance notifications or CloudWatch Events.

Using the job definition below, the job is restarted if the instance running the job gets shut down, which includes the termination due to a Spot Instance reclaim. The additional condition makes sure that the job exits whenever the exit code is not zero, otherwise the job would be rescheduled until the attempts are exhausted (see default behavior above).

cat > jdef-spot..json << EOF
{
    "jobDefinitionName": "spot",
    "type": "container",
    "containerProperties": {
        "image": "alpine:latest",
        "vcpus": 2,
        "memory": 256,
        "command":  ["sleep","600"],
        "readonlyRootFilesystem": false
    },
    "retryStrategy": { 
        "attempts": 5,
        "evaluateOnExit": 
        [{
            "onStatusReason" :"Host EC2*",
            "action": "RETRY"
        },{
  		  "onReason" : "*"
            "action": "EXIT"
        }]
    }
}
EOF
aws batch register-job-definition --cli-input-json file://jdef-spot.json

To simulate a Spot Instances reclaim, I submit a job, and manually shut down the host the job is running on. This triggers my condition to ask AWS Batch to make 5 attempts to finish the job before it marks the job a failure.

When I use the AWS CLI to describe my job, it displays the number of attempts to retry.
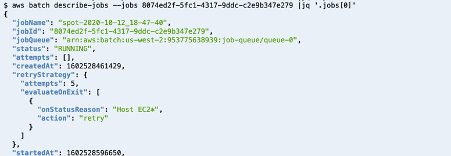
By shutting down my instance, the job returns to the status RUNNABLE and will be scheduled again until it succeeds or reaches the maximum attempts defined.

Exit code mitigation

I can also use the exit code to decide which mitigation I want to use based on the exit code of the job script or application itself.

To illustrate this, I can create a new job definition that uses a container image that exits on a random exit code between 0 and 3. Traditionally, an exit code of 0 means success, and won’t trigger this retry strategy. For all other (nonzero) exit codes the retry strategy is evaluated. In my example, 1 or 2 reflect situations where a retry is needed, but an exit code of 3 means that AWS Batch should let the job fail.

cat > jdef-randomEC.json << EOF
{
    "jobDefinitionName": "randomEC",
    "type": "container",
    "containerProperties": {
        "image": "qnib/random-ec:2020-10-13.3",
        "vcpus": 2,
        "memory": 256,
        "readonlyRootFilesystem": false
    },
    "retryStrategy": { 
        "attempts": 10,
        "evaluateOnExit": 
        [{
            "onExitCode": "1",
            "action": "RETRY"
        },{
            "onExitCode": "2",
            "action": "RETRY"
        },{
            "onExitCode": "3",
            "action": "EXIT"
        }]
    }
}
EOF
aws batch register-job-definition --cli-input-json file://jdef-randomEC.json

A submitted job retries until the exit code 0 is successful, 3 for a failure or the attempts are exhausted (in this case, 10 of them).

aws batch submit-job  --job-name randomEC-$(date +"%F_%H-%M-%S") --job-queue queue-0   --job-definition randomEC:1

The output of a job submission shows the job name and the job id.

In case the exit code is 1, and the job will be requeued.

Container image pull failure

The first example showed an error on the infrastructure layer and the second showed how to handle errors on the application layer. In this last example, I show how to handle errors that are introduced in the middleware layer, in this case: the container daemon.

It might happen if your Docker registry is down or having issues. To demonstrate this, I used an image name that is not present in the registry. In that case, the job should not get rescheduled to fail again immediately.

The following job definition again defines 10 attempts for a job, except when the container cannot be pulled. This leads to a direct failure of the job.

cat > jdef-noContainer.json << EOF
{
    "jobDefinitionName": "noContainer",
    "type": "container",
    "containerProperties": {
        "image": "no-container-image",
        "vcpus": 2,
        "memory": 256,
        "readonlyRootFilesystem": false
    },
    "retryStrategy": { 
        "attempts": 10,
        "evaluateOnExit": 
        [{
            "onReason": "CannotPullContainerError:*",
            "action": "EXIT"
        }]
    }
}
EOF
aws batch register-job-definition --cli-input-json file://jdef-noContainer.json

Note that the job defines an image name (“no-container-image”) which is not present in the registry. The job is set up to fail when trying to download the image, and will do so repeatedly, if AWS Batch keeps trying.

Even though the job definition has 10 attempts configured for this job, it fell straight through to FAILED as the retry strategy sets the action exit when a CannotPullContainerError occurs. Many of the error codes I can create conditions for are documented in the Amazon ECS user guide (e.g. task error codes / container pull error).

Conclusion

In this blog post, I showed three different scenarios that leverage the new custom retry features in AWS Batch to control when a job should exit or get rescheduled.

By defining retry strategies you can react to an infrastructure event (like an EC2 Spot interruption), an application signal (via the exit code), or an event within the middleware (like a container image not being available).

This new feature allows you to have fine grained control over how your jobs react to different error scenarios.

How to run 3D interactive applications with NICE DCV in AWS Batch

Post Syndicated from Ben Peven original https://aws.amazon.com/blogs/compute/how-to-run-3d-interactive-applications-with-nice-dcv-in-aws-batch/

This post is contributed by Alberto Falzone, Consultant, HPC and Roberto Meda, Senior Consultant, HPC.

High Performance Computing (HPC) workflows across industry verticals such as Design and Engineering, Oil and Gas, and Life Sciences often require GPU-based 3D/OpenGL rendering. Setting up drivers and applications for these types of workflows can require significant effort.

Similar GPU intensive workloads, such as AI/ML, are heavily using containers to package software stacks and reduce the complexity of installing and setting up the required binaries and scripts to download and run a simple container image. This approach is rarely used in the visualization of previously mentioned pre- and post-processing steps due to the complexity of using a graphical user interface within a container.

This post describes how to reduce the complexity of installing and configuring a GPU accelerated application while maintaining performance by using NICE DCV. NICE DCV is a high-performance remote display protocol that provides customers with a secure way to deliver remote desktops and application streaming from any cloud or data center to any device, over varying network conditions.

With remote server-side graphical rendering, and optimized streaming technology over network, huge volume data can be analyzed easily without moving or downloading on client, saving on data transfer costs.

Services and solution overview

This post provides a step-by-step guide on how to build a container able to run accelerated graphical applications using NICE DCV, and setup AWS Batch to run it. Finally, I will showcase how to submit an AWS Batch job that will provision the compute environment (CE) that contains a set of managed or unmanaged compute resources that are used to run jobs, launch the application in a container, and how to connect to the application with NICE DCV.

Services

Before reviewing the solution, below are the AWS services and products you will use to run your application:

  • AWS Batch (AWS Batch) plans, schedules, and runs batch workloads on Amazon Elastic Container Service (ECS), dynamically provisioning the defined CE with Amazon EC2
  • Amazon Elastic Container Registry (Amazon ECR) is a fully managed Docker container registry that simplifies how developers store, manage, and deploy Docker container images. In this example, you use it to register the Docker image with all the required software stack that will be used from AWS Batch to submit batch jobs.
  • NICE DCV (NICE DCV) is a high-performance remote display protocol that delivers remote desktops and application streaming from any cloud or data center to any device, over varying network conditions. With NICE DCV and Amazon EC2, customers can run graphics-intensive applications remotely on G3/G4 EC2 instances, and stream the results to client machines not provided with a GPU.
  • AWS Secrets Manager (AWS Secrets Manager) helps you to securely encrypt, store, and retrieve credentials for your databases and other services. Instead of hardcoding credentials in your apps, you can make calls to Secrets Manager to retrieve your credentials whenever needed.
  • AWS Systems Manager (AWS Systems Manager) gives you visibility and control of your infrastructure on AWS, and provides a unified user interface so you can view operational data from multiple AWS services. It also allows you to automate operational tasks across your AWS resources. Here it is used to retrieve a public parameter.
  • Amazon Simple Notification Service (Amazon SNS) enables applications, end-users, and devices to instantly send and receive notifications from the cloud. You can send notifications by email to the user who has created a valid and verified subscription.

Solution

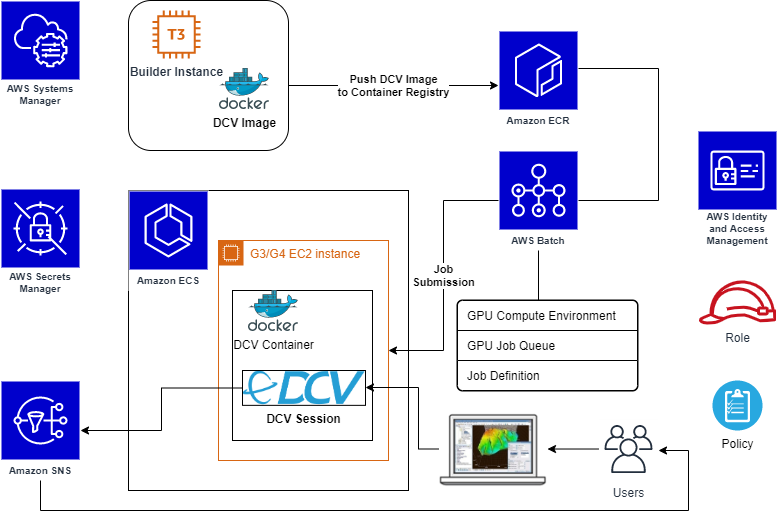
The goal of this solution is to run an interactive Linux desktop session in a single Amazon ECS container, with support for GPU rendering, and connect remotely through NICE DCV protocol. AWS Batch will dynamically provision EC2 instances, with or without GPU (e.g. G3/G4 instances).

Solution scheme

You will build and register the DCV Container image to be used for the DCV Desktop Sessions. In AWS Batch, we will set up a managed CE starting from the Amazon ECS GPU-optimized AMI, which comes with the NVIDIA drivers and Amazon ECS agent already installed. Also, you will use Amazon Secrets Manager to safely store user credentials and Amazon SNS to automatically notify the user that the interactive job is ready.

Tutorial

As a Computational Fluid Dynamics (CFD) visualization application example you will use Paraview.

This blog post goes through the following steps:

  1. Prepare required components
    • Launch temporary EC2 instance to build a DCV container image
    • Store user’s credentials and notification data
    • Create required roles
  2. Build DCV container image
  3. Create a repository on Amazon ECR
    • Push the DCV container image
  4. Configure AWS Batch
    • Create a managed CE
    • Create a related job queue
    • Create its Job Definition
  5. Submit a batch job
  6. Connect to the interactive desktop session using NICE DCV
    • Run the Paraview application to visualize results of a job simulation

Prerequisites

  • An Amazon Linux 2 instance as a Docker host, launched from the latest Amazon ECS GPU-optimized AMI
  • In order to connect to desktop sessions, inbound DCV port must be opened (by default DCV port is 8443)
  • AWS account credentials with the necessary access permissions
  • AWS Command Line Interface (CLI) installed and configured with the same AWS credentials
  • To easily install third-party/open source required software, assume that the Docker host has outbound internet access allowed

Step 1. Required components

In this step you’ll create a temporary EC2 instance dedicated to a Docker image, and create the IAM policies required for the next steps. Next create the secrets in AWS Secrets Manager service to store sensible data like credentials and SNS topic ARN, and apply and verify the required system settings.

1.1 Launch the temporary EC2 instance for Docker image building

Launch the EC2 instance that becomes your Docker host from the Amazon ECS GPU-optimized AMI. Retrieve its AMI ID. For cost saving, you can use one of t3* family instance type for this stage (e.g. t3.medium).

1.2 Store user credentials and notification data

As an example of avoiding hardcoded credentials or keys into scripts used in next stages, we’ll use AWS Secrets Manager to safely store final user’s OS credentials and other sensible data.

  • In the AWS Management Console select Secrets Manager, create a new secret, select type Other type of secrets, and specify key pair. Store the user login name as a key, e.g.: user001, and the password as value, then name the secret as Run_DCV_in_Batch, or alternatively you can use the commands. Note xxxxxxxxxx is your chosen password.

aws secretsmanager  create-secret --secret-id Run_DCV_in_Batch
aws secretsmanager put-secret-value --secret-id Run_DCV_in_Batch --secret-string '{"user001":"xxxxxxxxxx"}'

  • Create an SNS Topic to send email notifications to the user when a DCV session is ready for connection:
  • In the AWS Management Console select Secrets Manager service to create a new secret named DCV_Session_Ready_Notification, with type other type of secrets and key pair values. Store the string sns_topic_arn as a key and the SNS Topic ARN as value:

aws secretsmanager  create-secret --secret-id DCV_Session_Ready_Notification
aws secretsmanager put-secret-value --secret-id DCV_Session_Ready_Notification --secret-string '{"sns_topic_arn":"<put here your SNS Topic ARN>"}'

1.3 Create required role and policy

To simplify, define a single role named dcv-ecs-batch-role gathering all the necessary policies. This role will be associated to the EC2 instance that launches from an AWS Batch job submission, so it is included inside the CE definition later.

To allow DCV sessions, push images into Amazon ECR and AWS Batch operations, create the role and include the following AWS managed and custom policies:

  • AmazonEC2ContainerRegistryFullAccess
  • AmazonEC2ContainerServiceforEC2Role
  • SecretsManagerReadWrite
  • AmazonSNSFullAccess
  • AmazonECSTaskExecutionRolePolicy

To reach the NICE DCV licenses stored in Amazon S3 (see licensing the NICE DCV server for more details), define a custom policy named DCVLicensePolicy (the following policy is for eu-west-1 Region, you might also use us-east-1):

{
    "Version": "2012-10-17",
    "Statement": [
        {
            "Effect": "Allow",
            "Action": "s3:GetObject",
            "Resource": "arn:aws:s3:::dcv-license.eu-west-1/*"
        }
    ]
}

create role

Note: If needed, you can add additional policies to allow the copy data from/to S3 bucket.

Update the Trust relationships of the same role in order to allow the Amazon ECS tasks execution and use this role from the AWS Batch Job definition as well:

{
  "Version": "2012-10-17",
  "Statement": [
    {
      "Effect": "Allow",
      "Principal": {
        "Service": "ec2.amazonaws.com"
      },
      "Action": "sts:AssumeRole"
    },
    {
      "Effect": "Allow",
      "Principal": {
        "Service": "ecs-tasks.amazonaws.com"
      },
      "Action": "sts:AssumeRole"
    }
  ]
}

Trusted relationships and Trusted entities

1.4 Create required Security Group

In the AWS Management Console, access EC2, and create a Security Group, named dcv-sg, that is open to DCV sessions and DCV clients by enabling tcp port 8443 in Inbound.

Step 2. DCV container image

Now you will build a container that provides OpenGL acceleration via NICE DCV. You’ll write the Dockerfile starting from Amazon Linux 2 base image, and add DCV with its related requirements.

2.1 Define the Dockerfile

The base software packages in the Dockerfile will contain: NVIDIA libraries, X server and GNOME desktop and some external scripts to manage the DCV service startup and email notification for the user.

Starting from the base image just pulled, our Dockerfile does install all required (and optional) system tools and libraries, desktop manager packages, manage the Prerequisites for Linux NICE DCV Servers , Install the NICE DCV Server on Linux and Paraview application for 2D/3D data visualization.

The final contents of the Dockerfile is available here; in the same repository, you can also find scripts that manage the DCV service system script, the notification message sent to the User, the creation of local User at startup and the run script for the DCV container.

2.2 Build Dockerfile

Install required tools both to unpack archives and perform command on AWS:

sudo yum install -y unzip awscli

Download the Git archive within the EC2 instance, and unpack on a temporary directory:

curl -s -L -o - https://github.com/aws-samples/aws-batch-using-nice-dcv/archive/latest.tar.gz | tar zxvf -

From inside the folder containing aws-batch-using-nice-dcv.dockerfile, let’s build the Docker image:

docker build -t dcv -f aws-batch-using-nice-dcv.dockerfile .

The first time it takes a while since it has to download and install all the required packages and related dependencies. After the command completes, check it has been built and tagged correctly with the command:

docker images

Step 3. Amazon ECR configuration

In this step, you’ll push/archive our newly built DCV container AMI into Amazon ECR. Having this image in Amazon ECR allows you to use it inside Amazon ECS and AWS Batch.

3.1 Push DCV image into Amazon ECR repository

Set a desired name for your new repository, e.g. dcv, and push your latest dcv image into it. The push procedure is described in Amazon ECR by selecting your repository, and clicking on the top-right button View push commands.

Install the required tool to manage content in JSON format:

sudo yum install -y jq

Amazon ECR push commands to run include:

  • Login command to authenticate your Docker client to Amazon ECS registry. Using the AWS CLI:

AWS_REGION="$(curl -s http://169.254.169.254/latest/dynamic/instance-identity/document | jq -r .region)"
eval $(aws ecr get-login --no-include-email --region "${AWS_REGION}") Note: If you receive an “Unknown options: –no-include-email” error when using the AWS CLI, ensure that you have the latest version installed. Learn more.

  • Create the repository:

aws ecr create-repository --repository-name=dcv —region "${AWS_REGION}"DCV_REPOSITORY=$(aws ecr describe-repositories --repository-names=dcv --region "${AWS_REGION}"| jq -r '.repositories[0].repositoryUri')

  • Tag the image to push the image to the Amazon ECR repository:

docker build -t "${DCV_REPOSITORY}:$(date +%F)" -f aws-batch-using-nice-dcv.dockerfile .

  • Push command:

docker push "${DCV_REPOSITORY}:$(date +%F)"

Step 4. AWS Batch configuration

The final step is to set up AWS Batch to manage your DCV containers. The link to all previous steps is the use of our DCV container image inside the AWS Batch CE.

4.1 Compute environment

Create an AWS Batch CE using othe newly created AMI.

  • Log into the AWS Management Console, select AWS Batch, select ‘get started’, and skip the wizard on next page.
  • Choose Compute Environments on the left, and click on Create Environment.
  • Specify all your desired settings, e.g.:
      • Managed type
      • Name: DCV-GPU-CE
      • Service role: AWSBatchServiceRole
      • Instance role: dcv-ecs-batch-role
  • Since you want OpenGL acceleration, choose an instance type with GPU (e.g. g4dn.xlarge).
  • Choose an allocation strategy. In this example I choose BEST_FIT_PROGRESSIVE
  • Assign the security group dcv-sg, created previously at step 1.4 that keeps DCV port 8443 open.
  • Add a Nametag with the value e.g. “DCV-GPU-Batch-Instance”; to assign it to the EC2 instances started by AWS Batch automatically, so you can recognize it if needed.

4.2 Job Queue

Time to create a Job Queue for DCV with your preferred settings.

  • Select Job Queues from the left menu, then select Create queue (naming, for instance, e.g. DCV-GPU-Queue)
  • Specify a required Priority integer value.
  • Associate to this queue the CE you defined in the previous step (e.g. DCV-GPU-CE).

4.3 Job Definition

Now, we create a Job Definition by selecting the related item in the left menu, and select Create. 

We’ll use, listed per section:

  • Job Definition name (e.g. DCV-GPU-JD)
  • Execution timeout to 1h: 3600
  • Parameter section:
    • Add the Parameter named command with value: --network=host
      • Note: This parameter is required and equivalent to specify the same option to the docker run.Learn more.
  • Environment section:
    • Job role: dcv-ecs-batch-role
    • Container image: Use the ECR repository previously created, e.g. dkr.ecr.eu-west-1.amazonaws.com/dcv. If you don’t remember the Amazon ECR image URI, just return to Amazon ECR -> Repository -> Images.
    • vCPUs: 8
      • Note: Value equal to the vCPUs of the chosen instance type (in this example: gdn4.2xlarge), having one job per node to avoid conflicts on usage of TCP ports required by NICE DCV daemons.
    • Memory (MiB): 2048
  • Security section:
    • Check Privileged
    • Set user root (run as root)
  • Environment Variables section:
    • DISPLAY: 0
    • NVIDIA_VISIBLE_DEVICES: 0
    • NVIDIA_ALL_CAPABILITIES: all

Note: Amazon ECS provides a GPU-optimized AMI that comes ready with pre-configured NVIDIA kernel drivers and a Docker GPU runtime, learn more; the variables above make available the required graphic device(s) inside the container.

4.4 Create and submit a Job

We can finally, create an AWS Batch job, by selecting Batch → Jobs → Submit Job.
Let’s specify the job queue and job definition defined in the previous steps. Leave the command filed as pre-filled from job definition.

Running DCV job on AWS Batch

4.5 Connect to sessions

Once the job is in RUNNING state, go to the AWS Batch dashboard, you can get the IP address/DNS in several ways as noted in How do I get the ID or IP address of an Amazon EC2 instance for an AWS Batch job. For example, assuming the tag Name set on CE is DCV-GPU-Batch-Instance:

aws ec2 describe-instances --filters Name=instance-state-name,Values=running Name=tag:Name,Values="DCV-GPU-Batch-Instance" --query "Reservations[].Instances[].{id: InstanceId, tm: LaunchTime, ip: PublicIpAddress}" | jq -r 'sort_by(.tm) | reverse | .[0]' | jq -r .ip

Note: It could be required to add the EC2 policy to the list of instances in the IAM role. If the AWS SNS Topic is properly configured, as mentioned in subsection 1.2, you receive the notification email message with the URL link to connect to the interactive graphical DCV session.

Email from SNS

Finally, connect to it:

  • https://<ip address>:8443

Note: You might need to wait for the host to report as running on EC2 in AWS Management Console.

Below is a NICE DCV session running inside a container using the web browser, or equivalently the NICE DCV native client as well, running Paraview visualization application. It shows the basic elbow results coming from an external OpenFoam simulation, which data has been previously copied over from an S3 bucket; and the dcvgltest as well:

DCV Client connected to a running session

Cleanup

Once you’ve finished running the application, avoid incurring future charges by navigating to the AWS Batch console and terminate the job, set CE parameter Minimum vCPUs and Desired vCPUs equal to 0. Also, navigate to Amazon EC2 and stop the temporary EC2 instance used to build the Docker image.

For a full cleanup of all of the configurations and resources used, delete: the job definition, the job queue and the CE (AWS Batch), the Docker image and ECR Repository (Amazon ECR), the role dcv-ecs-batch-role (Amazon IAM), the security group dcv-sg (Amazon EC2), the Topic DCV_Session_Ready_Notification (AWS SNS), and the secret Run_DCV_in_Batch (Amazon Secrets Manager).

Conclusion

This blog post demonstrates how AWS Batch enables innovative approaches to run HPC workflows including not only batch jobs, but also pre-/post-analysis steps done through interactive graphical OpenGL/3D applications.

You are now ready to start interactive applications with AWS Batch and NICE DCV on G-series instance types with dedicated 3D hardware. This allows you to take advantage of graphical remote rendering on optimized infrastructure without moving data to save costs.

Custom logging with AWS Batch

Post Syndicated from Emma White original https://aws.amazon.com/blogs/compute/custom-logging-with-aws-batch/

This post was written by Christian Kniep, Senior Developer Advocate for HPC and AWS Batch. 

For HPC workloads, visibility into the logs of jobs is important to debug a job which failed, but also to have insights into a running job and track its trajectory to influence the configuration of the next job or terminate the job because it went off track.

With AWS Batch, customers are able to run batch workloads at scale, reliably and with ease as this managed serves takes out the undifferentiated heavy lifting. The customer can then focus on submitting jobs and getting work done. Customers told us that at a certain scale, the single logging driver available within AWS Batch made it hard to separate logs as they were all ending up in the same log group in Amazon CloudWatch.

With the new release of customer logging driver support, customers are now able to adjust how the job output is logged. Not only customize the Amazon CloudWatch setting, but enable the use of external logging frameworks such as splunk, fluentd, json-files, syslog, gelf, journald.

This allow AWS Batch jobs to use the existing systems they are accustom to, with fine-grained control of the log data for debugging and access control purposes.

In this blog, I show the benefits of custom logging with AWS Batch by adjusting the log targets for jobs. The first example will customize the Amazon CloudWatch log group, the second will log to Splunk, an external logging service.

Example setup

To showcase this new feature, I use the AWS Command Line Interface (CLI) to setup the following:

  1. IAM roles, policies, and profiles to grant access and permissions
  2. A compute environment to provide the compute resources to run jobs
  3. A job queue, which supervises the job execution and schedules jobs on a compute environment
  4. A job definition, which uses a simple job to demonstrate how the new configuration can be applied

Once those tasks are completed, I submit a job and send logs to a customized CloudWatch log-group and Splunk.

Prerequisite

To make things easier, I first set a couple of environment variables to have the information handy for later use. I use the following code to set up the environment variables.

# in case it is not already installed
sudo yum install -y jq 
export MD_URL=http://169.254.169.254/latest/meta-data
export IFACE=$(curl -s ${MD_URL}/network/interfaces/macs/)
export SUBNET_ID=$(curl -s ${MD_URL}/network/interfaces/macs/${IFACE}/subnet-id)
export VPC_ID=$(curl -s ${MD_URL}/network/interfaces/macs/${IFACE}/vpc-id)
export AWS_REGION=$(curl -s ${MD_URL}/placement/availability-zone | sed 's/[a-z]$//')
export AWS_ACCT_ID=$(curl -s ${MD_URL}/identity-credentials/ec2/info |jq -r .AccountId)
export AWS_SG_DEFAULT=$(aws ec2 describe-security-groups \
--filters Name=group-name,Values=default \
|jq -r '.SecurityGroups[0].GroupId')

IAM

When using the AWS Management Console, you must create IAM roles manually.

Trust Policies

IAM Roles are defined to be used by a certain service. In the simplest case, you want a role to be used by Amazon EC2 – the service that provides the compute capacity in the cloud. This defines which entity is able to use an IAM Role, called Trust Policy. To set up a trust policy for an IAM role, use the following code snippet.

cat > ec2-trust-policy.json << EOF
{
  "Version": "2012-10-17",
  "Statement": [{
    "Effect": "Allow",
    "Principal": {
      "Service": "ec2.amazonaws.com"
    },
    "Action": "sts:AssumeRole"
  }]
}
EOF

Instance role

With the IAM trust policy, I now create an ecsInstanceRole and attach the pre-defined policy AmazonEC2ContainerServiceforEC2Role. This allows an instance to interact with Amazon ECS.

aws iam create-role --role-name ecsInstanceRole \
 --assume-role-policy-document file://ec2-trust-policy.json
aws iam create-instance-profile --instance-profile-name ecsInstanceProfile
aws iam add-role-to-instance-profile \
    --instance-profile-name ecsInstanceProfile \
    --role-name ecsInstanceRole
aws iam attach-role-policy --role-name ecsInstanceRole \
 --policy-arn arn:aws:iam::aws:policy/service-role/AmazonEC2ContainerServiceforEC2Role

Service Role

The AWS Batch service uses a role to interact with different services. The trust relationship reflects that the AWS Batch service is going to assume this role.  You can set up this role with the following logic.

cat > svc-trust-policy.json << EOF
{
  "Version": "2012-10-17",
  "Statement": [{
    "Effect": "Allow",
    "Principal": {
      "Service": "batch.amazonaws.com"
    },
    "Action": "sts:AssumeRole"
  }]
}
EOF
aws iam create-role --role-name AWSBatchServiceRole \
--assume-role-policy-document file://svc-trust-policy.json
aws iam attach-role-policy --role-name AWSBatchServiceRole \
--policy-arn arn:aws:iam::aws:policy/service-role/AWSBatchServiceRole

In addition to dealing with Amazon ECS, the instance role can create and write to Amazon CloudWatch log groups, to control which log group names are used, a condition is attached.

While the compute environment is coming up, let us create and attach a policy to make a new log-group possible.

cat > policy.json << EOF
{
  "Version": "2012-10-17",
  "Statement": [{
    "Effect": "Allow",
    "Action": [
      "logs:CreateLogGroup"
    ],
    "Resource": "*",
    "Condition": {
      "StringEqualsIfExists": {
        "batch:LogDriver": ["awslogs"],
        "batch:AWSLogsGroup": ["/aws/batch/custom/*"]
      }
    }
  }]
}
EOF
aws iam create-policy --policy-name batch-awslog-policy \
    --policy-document file://policy.json
aws iam attach-role-policy --policy-arn arn:aws:iam::${AWS_ACCT_ID}:policy/batch-awslog-policy --role-name ecsInstanceRole

At this point, I created the IAM roles and policies so that the instance and service are able to interact with the AWS APIs, including trust-policies to define which services are meant to use them. EC2 for the ecsInstanceRole and the AWSBatchServiceRole for the AWS Batch service itself.

Compute environment

Now, I am going to create a compute environment, which is going to spin up an instance (one vCPU target) to run the example job in.

cat > compute-environment.json << EOF
{
  "computeEnvironmentName": "od-ce",
  "type": "MANAGED",
  "state": "ENABLED",
  "computeResources": {
    "type": "EC2",
    "allocationStrategy": "BEST_FIT_PROGRESSIVE",
    "minvCpus": 1,
    "maxvCpus": 8,
    "desiredvCpus": 1,
    "instanceTypes": ["m5.xlarge"],
    "subnets": ["${SUBNET_ID}"],
    "securityGroupIds": ["${AWS_SG_DEFAULT}"],
    "instanceRole": "arn:aws:iam::${AWS_ACCT_ID}:instance-profile/ecsInstanceRole",
    "tags": {"Name": "aws-batch-compute"},
    "bidPercentage": 0
  },
  "serviceRole": "arn:aws:iam::${AWS_ACCT_ID}:role/AWSBatchServiceRole"
}
EOF
aws batch create-compute-environment --cli-input-json file://compute-environment.json  

Once this section is complete, a compute environment is being spun up in the back. This will take a moment. You can use the following command to check on the status of the compute environment.

aws batch  describe-compute-environments

Once it is enabled and valid we can continue by setting up the job queue.

Job Queue

Now that I have a compute environment up and running, I will create a job queue which accepts job submissions and schedules the jobs on the compute environment.

cat > job-queue.json << EOF
{
  "jobQueueName": "jq",
  "state": "ENABLED",
  "priority": 1,
  "computeEnvironmentOrder": [{
    "order": 0,
    "computeEnvironment": "od-ce"
  }]
}
EOF
aws batch create-job-queue --cli-input-json file://job-queue.json

Job definition

The job definition is used as a template for jobs. This example runs a plain container and prints the environment variables. With the new release of AWS Batch, the logging driver awslogs now allows you to change the log group configuration within the job definition.

cat > job-definition.json << EOF
{
  "jobDefinitionName": "alpine-env",
  "type": "container",
  "containerProperties": {
  "image": "alpine",
  "vcpus": 1,
  "memory": 128,
  "command": ["env"],
  "readonlyRootFilesystem": true,
  "logConfiguration": {
    "logDriver": "awslogs",
    "options": { 
      "awslogs-region": "${AWS_REGION}", 
      "awslogs-group": "/aws/batch/custom/env-queue",
      "awslogs-create-group": "true"}
    }
  }
}
EOF
aws batch register-job-definition --cli-input-json file://job-definition.json

Job Submission

Using the above job definition, you can now submit a job.

aws batch submit-job \
  --job-name test-$(date +"%F_%H-%M-%S") \
  --job-queue arn:aws:batch:${AWS_REGION}:${AWS_ACCT_ID}:job-queue/jq \
  --job-definition arn:aws:batch:${AWS_REGION}:${AWS_ACCT_ID}:job-definition/alpine-env:1

Now, you can check the ‘Log Group’ in CloudWatch. Go to the CloudWatch console and find the ‘Log Group’ section on the left.

log groups in cloudwatch

Now, click on the log group defined above, and you should see the output of the job which allows for debugging if something within the container went wrong or processing logs and create alarms and reports.

cloudwatch log events

Splunk

Splunk is an established log engine for a broad set of customers. You can use the Docker container to set up a Splunk server quickly. More information can be found in the Splunk documentation. You need to configure the HTTP Event Collector, which provides you with a link and a token.

To send logs to Splunk, create an additional job-definition with the Splunk token and URL. Please adjust the splunk-url and splunk-token to match your Splunk setup.

{
  "jobDefinitionName": "alpine-splunk",
  "type": "container",
  "containerProperties": {
    "image": "alpine",
    "vcpus": 1,
    "memory": 128,
    "command": ["env"],
    "readonlyRootFilesystem": false,
    "logConfiguration": {
      "logDriver": "splunk",
      "options": {
        "splunk-url": "https://<splunk-url>",
        "splunk-token": "XXX-YYY-ZZZ"
      }
    }
  }
}

This forwards the logs to Splunk, as you can see in the following image.

forward to splunk

Conclusion

This blog post showed you how to apply custom logging to AWS Batch using the awslog and Splunk logging driver. While these are two important logging drivers, please head over to the documentation to find out about fluentd, syslog, json-file and other drivers to find the best driver to match your current logging infrastructure.