I am working from London, UK, this week to record sessions for the upcoming Innovate EMEA online conference—more about this in a future Week In Review. While I was crossing the channel, I took the time to review what happened on AWS last week.
Last Week’s Launches Here are some launches that got my attention:
Other AWS News Some other updates and news that you may have missed:
The Amazon Science blog published an article on the design of a pinch grasping robot. It is one of the many areas where we try to improve the efficiency of our fulfillment centers. A must-read if you’re into robotics or logistics.
The Public Sector blog has an article on how Satellogic and AWS are harnessing the power of space and cloud. Satellogic is creating a live catalog of Earth and delivering daily updates to create a complete picture of changes to our planet for decision-makers. Satellogic is generating massive volumes of data, with each of its satellites collecting an average of 50GB of data daily. They are using compute, storage, analytics, and ground station infrastructure in support of their growth.
HP Anyware (formerly Teradici CAS) is now available for Amazon EC2 Mac instances, from the AWS Marketplace. HP Anyware is a remote access solution that provides pixel-perfect rendering for your remote Mac Mini running in the AWS cloud. It uses PCoIP to securely and efficiently access the remote macOS machines. You can connect from anywhere, using a PCoIP client application or from thin terminals such as Thin Clients or Zero Clients workstations.
Upcoming AWS Events Check your calendars and sign up for these AWS events that are happening all over the world:
AWS Summits – Come together to connect, collaborate, and learn about AWS. Registration is open for the following in-person AWS Summits: Mexico City (September 21–22), Bogotá (October 4), and Singapore (October 6).
This post is written by Ballu Singh a Principal Solutions Architect at AWS, Neha Joshi a Senior Solutions Architect at AWS, and Naveen Jagathesan a Technical Account Manager at AWS.
Customers have asked how they can “create On-Demand Capacity Reservations (ODCRs) for their existing instances during events, such as the holiday season, Black Friday, marketing campaigns, or others?”
ODCRs let you reserve compute capacity for your your Amazon Elastic Compute Cloud (Amazon EC2) instances. ODCRs further make sure that you always have EC2 capacity access when required, and for as long as you need it. Customers who want to make sure that any instances that are stopped/started during the critical event and are available when needed should be covered by ODCRs.
ODCRs let you reserve compute capacity for your Amazon EC2 instances in a specific availability zone for any duration. This means that you can create and manage capacity reservations independently from the billing discounts offered by Savings Plans or Regional Reserved Instances. You can create ODCR at any time, without entering into a one-year or three-year term commitment, and the capacity is available immediately. Billing starts as soon as the ODCR enters the active state. When you no longer need it, cancel the ODCR to stop incurring charges.
At the time of this blog publication, if you need to create ODCR for existing running instances, you must manually identify your running instances configuration with matching attributes, such as instance type, platform, and Availability Zone. This is a time and resource consuming process.
In this post, we provide an automated way to manage ODCR operations. This includes creating, modifying, and cancelling ODCRs for the running instances across regions in an account, all without requiring any manual intervention of specifying instance configuration attributes. Additionally, it creates an Amazon CloudWatch Alarm for InstanceUtilization and an Amazon Simple Notification Service (Amazon SNS) topic with topic name ODCRAlarmNotificationTopic to notify when the threshold breaches.
Note: This will not create cluster placement group ODCRs. For details on capacity reservations in cluster placement groups, refer here.
Getting started
Before you create Capacity Reservations, note the limitations and restrictions here.
To get started, download the scripts for registering, modifying, and canceling ODCRs and associated requirements.txt, as well as AWS Identity and Access Management (IAM) policy from the GitHub link here.
Pre-requisites
To implement these scripts, you need the following prerequisites:
Access to AWS Management Console, AWS Command Line Interface (CLI),or AWS SDK for ODCR.
The following IAM role permissions for IAM users using the solution as provided in ODCR_IAM.json.
Amazon EC2 instance having supported platform for capacity reservation. Capacity Reservations support the following platforms listed here for Linux and Windows.
Refer to the above GitHub link for the code, and save the requirements.txt file in the same directory with other python scripts. You may want to run the requirements.txt file if you don’t have appropriate dependency to run the rest of the python scripts. You can run this using the following command:
pip3 install -r requirements.txt
Implementation Details
To create ODCR capacity reservation
The following instructions will guide you through creating a capacity reservation of running instances across all of the Regions within an AWS account. Input variables needed from users:
EndDateType (String) – Indicates how the Capacity Reservation ends. A Capacity Reservation can have one of the following end types:
unlimited – The Capacity Reservation remains active until you explicitly cancel it. Don’t provide an EndDate if the EndDateType is unlimited.
limited – The Capacity Reservation expires automatically at a specified date and time. You must provide an EndDate value if the EndDateType value is limited.
EndDate (datetime) – The date and time when the Capacity Reservation expires. When a Capacity Reservation expires, the reserved capacity is released and you can no longer launch instances into it. The Capacity Reservation’s state changes to expired when it reaches its end date and time.
You must provide EndDateType as ‘limited’ and the EndDate in standard UTC format to secure instances for a limited period. Command to execute register ODCR script with limited period:
You must provide EndDateType as ‘unlimited’ to secure instances for unlimited period. Command to execute register ODCR script with unlimited period:
This registerODCR.py script does following four things:
1. Describe instances cross-region in an account. It checks for the instance that has:
No Capacity reservation
State of the instance is running
Tenancy is default
InstanceLifecycle is None indicates whether this is a Spot Instance or a Scheduled Instance
Note: Describe instances API call is counted toward your account API limit. Therefore, it is advisable to run the script during non-peak hours or before the short-term scaling event begins. Work with AWS Support team if you run into API throttling.
2. Aggregates instances with similar attributes, such as InstanceType, AvailabilityZone, Tenancy, and Platform.
3. Describe reserved instances cross-region in an account. It checks for instance(s) that have Zonal Reservation Instances (ZRIs) and compares them with aggregated instances with similar attributes.
4. Finally,
Reserves ODCR(s) for existing running instances with matching attributes for which ZRIs do not exist.
Note: If you have one or more ZRIs in an account, then the script compares them with the existing instances with matching characteristics – Instance Type, AZ, and Platform – and does NOT create ODCR for the ZRIs to avoid incurring redundant charges. If there are more running instances than ZRIs, then the script creates an ODCR for just the delta.
Creates an SNS topic with the topic name – ODCRAlarmNotificationTopic in the region where you’re registering ODCR, if it doesn’t already exist.
Creates CloudWatch alarm for InstanceUtilization using the best practices, which can be found here.
Note: You must subscribe and confirm to the SNS topic, if you haven’t already, to receive notifications.
The CloudWatch alarm is also created on your behalf in the region for each ODCR. This alarm monitors your ODCR metric- InstanceUtilization. Whenever it breaches threshold (50% in this case), it enters the alarm state and sends an SNS notification using the topic that was created for you if you subscribed to it.
Note: You can change the alarm threshold based on your specific needs.
You will receive an email notification when CloudWatch Alarm State changes to Alarm with:
SNS Subject (Assuming CW alarms triggers in US East region).
ALARM: "ODCRAlarm-cr-009969c7abf4daxxx" in US East (N. Virginia)
SNS Body will have the details
CW alarm, region, link to view the alarm, alarm details, and state change actions.
With this, if your ODCR InstanceUtilization drops, then you will be notified in near-real time to help you optimize the capacity and stop unnecessary payments for unused capacity.
To modify ODCR capacity reservation
To modify the attributes of an active capacity reservation after you have created it, adhere to the following instructions.
Note: When modifying a Capacity Reservation, you can only increase or decrease the quantity and change how it is released. You can’t change the instance type, EBS optimization, instance store settings, platform, Availability Zone, or instance eligibility of a Capacity Reservation. If you must modify any of these attributes, then we recommend that you cancel the reservation, and then create a new one with the required attributes. You can’t modify a Capacity Reservation after it has expired or after you have explicitly canceled it.
Input variables needed from users:
CapacityReservationID – The ID of the Capacity Reservation that you want to modify.
InstanceCount (integer) – The number of instances for which to reserve capacity. The number of instances can’t be increased or decreased by more than 1000 in a single request.
EndDateType (String) – Indicates how the Capacity Reservation ends. A Capacity Reservation can have one of the following end types:
unlimited – The Capacity Reservation remains active until you explicitly cancel it. Don’t provide an EndDate if the EndDateType is unlimited.
limited – The Capacity Reservation expires automatically at a specified date and time. You must provide an EndDate value if the EndDateType value is limited.
EndDate (datetime) – The date and time of when the Capacity Reservation expires. When a Capacity Reservation expires, the reserved capacity is released, and you can no longer launch
instances into it. The Capacity Reservation’s state changes to expired when it reaches its end date and time. Example to run the modify ODCR script for ‘limited’ period:
You must provide EndDateType as ‘unlimited’ to modify instances for an unlimited period. Command to the run modify ODCR script with unlimited period:
To cancel the ODCR that are in the “Active” state, follow these instructions:
Note: Once the cancellation request succeeds, the reservation status will be marked as “cancelled”.
Input variables needed from users:
CapacityReservationID – The ID of the Capacity Reservation to cancel.
You must provide one parameter while executing the cancellation script.
Command to execute cancel ODCR script:
cancelODCR.py <CapacityReservationId>
Example to execute the cancel ODCR script:
Example - cancelODCR.py 'cr-05e6a94b99915xxxx'
Monitoring
CloudWatch metrics let you monitor the unused capacity in your Capacity Reservations to optimize the ODCR. ODCRs send metric data to CloudWatch every five minutes. Although Capacity Reservation usage metrics are UsedInstanceCount, AvailableInstanceCount, TotalInstanceCount, and InstanceUtilization, for this solution we will be using the InstanceUtilization metric. This shows the percentage of reserved capacity instances that are currently in use. This will be useful for monitoring and optimizing ODCR consumption.
For example, if your On-Demand Capacity Reservation is for four instances and with matching criteria only one EC2 instance is currently running, then the InstanceUtilization metric will be 25% for your respective capacity reservation.
Let’s look at the steps to create the CloudWatch monitoring dashboard for your On-Demand Capacity Reservation solution:
If necessary, change the Region. From the navigation bar, select the Region where your Capacity Reservation resides. For more information, see Regions and Endpoints.
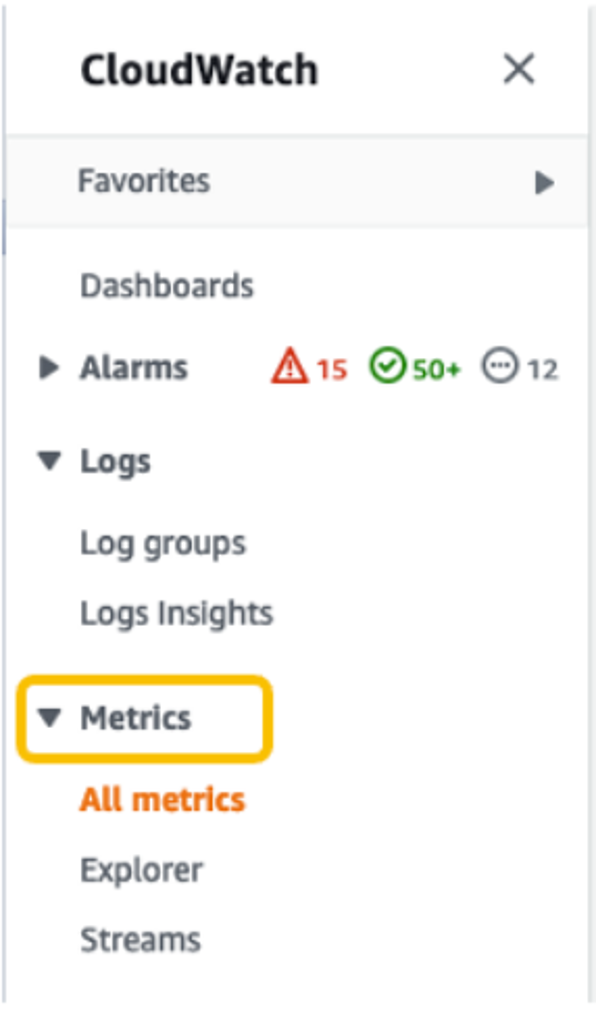
In the navigation pane, choose Metrics.
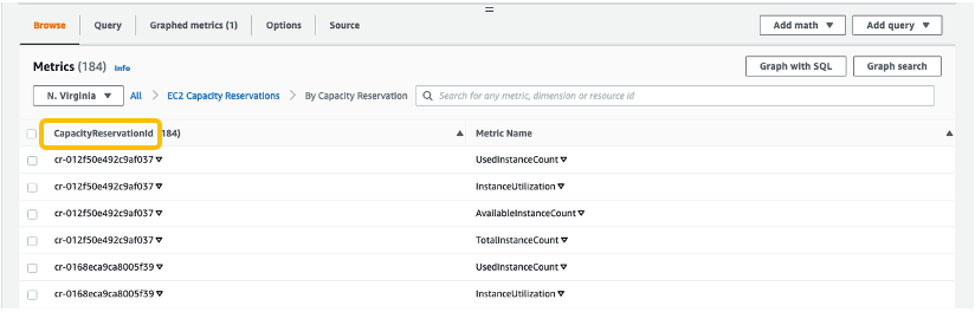
For All metrics, choose EC2 Capacity Reservations.
4. Choose the metric dimension By Capacity Reservation. Metrics will be grouped by
5. Select the dropdown arrow for InstanceUtilization, and select Search for this only.
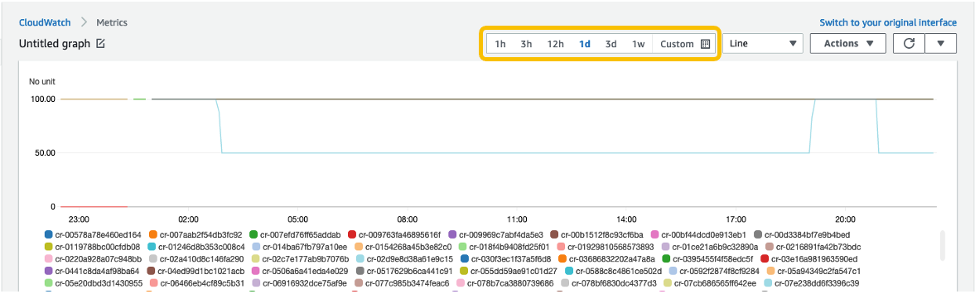
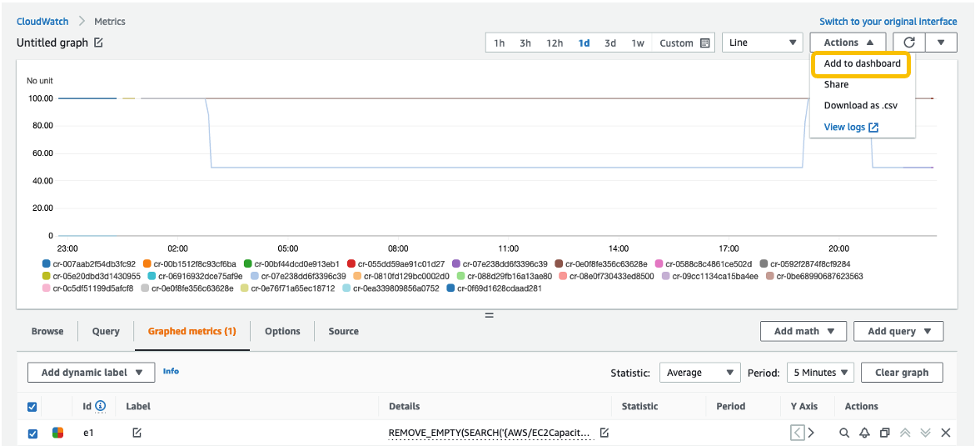
Once we see the InstanceUtilization metric in the filter list, select Graph Search.
This displays the InstanceUtilization metrics for the selected period.
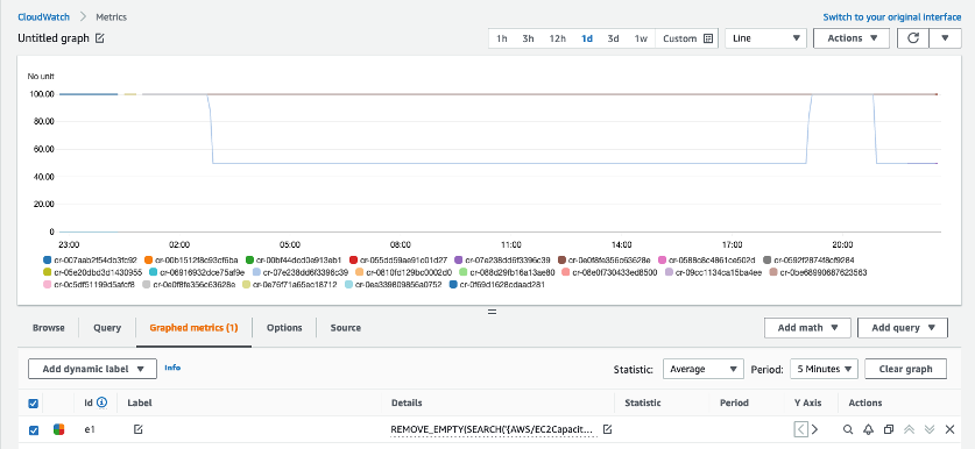
OPTIONAL: To display the Capacity Reservation IDs for active metrics only:
Navigate to Graphed metrics.
Under Details column, select Edit math expression.
Edit the math expression with the following, and select Apply:
This displays the Capacity Reservation IDs for active metrics only.
With this configuration, whenever new Capacity Reservations are created, the InstanceUtilization metric for respective Capacity Reservation IDs will be populated.
6. From the Actions drop-down menu, select Add to dashboard.
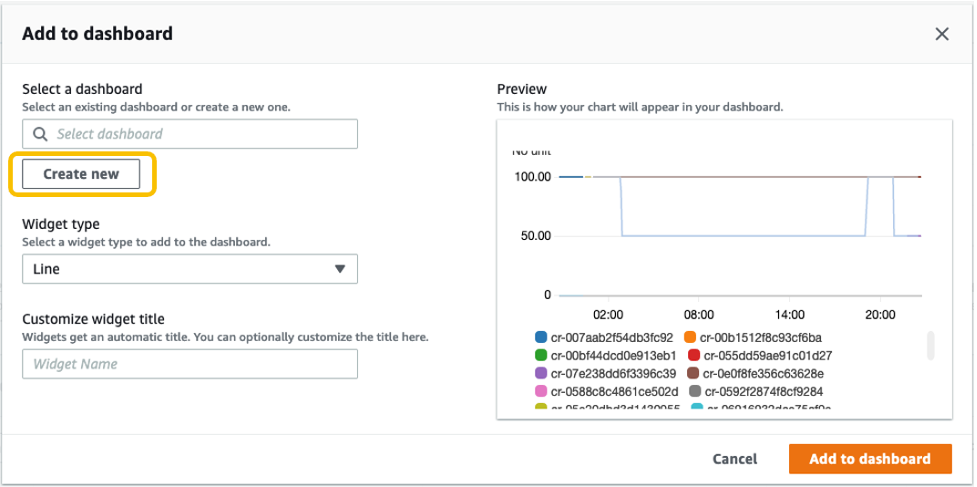
Select Create new to create a new dashboard for monitoring your ODCR metrics.
Specify the new dashboard name, and select Add to dashboard.
7. These configuration steps will navigate you to your newly created CloudWatch dashboard under Dashboards.
Once this is created, if you create new Capacity Reservations, or new instances get added to existing reservations, then those metrics will be automatically be added to your CloudWatch Dashboard.
Note: You may see a delay of approximately 5-10 minutes from the point when changes are made to your environment (ODCR operations or instances launch/termination activities) to those changes getting reflected on your CloudWatch Dashboard metrics.
Conclusion
In this post, we discussed a solution for automating ODCR operations for existing EC2 instances. This included creating capacity reservation, modifying capacity reservation, and cancelling capacity reservation operations that inherit your existing EC2 instances for attribute details. We also discussed monitoring aspects of ODCR metrics using CloudWatch. This solution allows you to automate some of the ODCR operations for existing instances, thereby optimizing and speeding up the entire process.
If you are reading this blog, there is a high chance you frequently use the AWS Management Console. I taught AWS classes for years. During classes, students’ first hands-on experience with the AWS Cloud happened on the console, and I bet yours did too.
Until today, the home page of the console showed your most recently used services and a set of static links organized in sections, such as Getting Started with AWS, Build a Solution, or Explore AWS with links to training courses. However, we learned from our data that their usage is very different depending on your profile. You also told us it is cumbersome and time-consuming to navigate to different parts of the console to get an overview of important information for you.
We listened to your feedback, and I’m happy to announce a redesigned home page for the AWS Management Console. This new home page experience includes dynamic content, can be customized, and includes data from multiple AWS Regions.
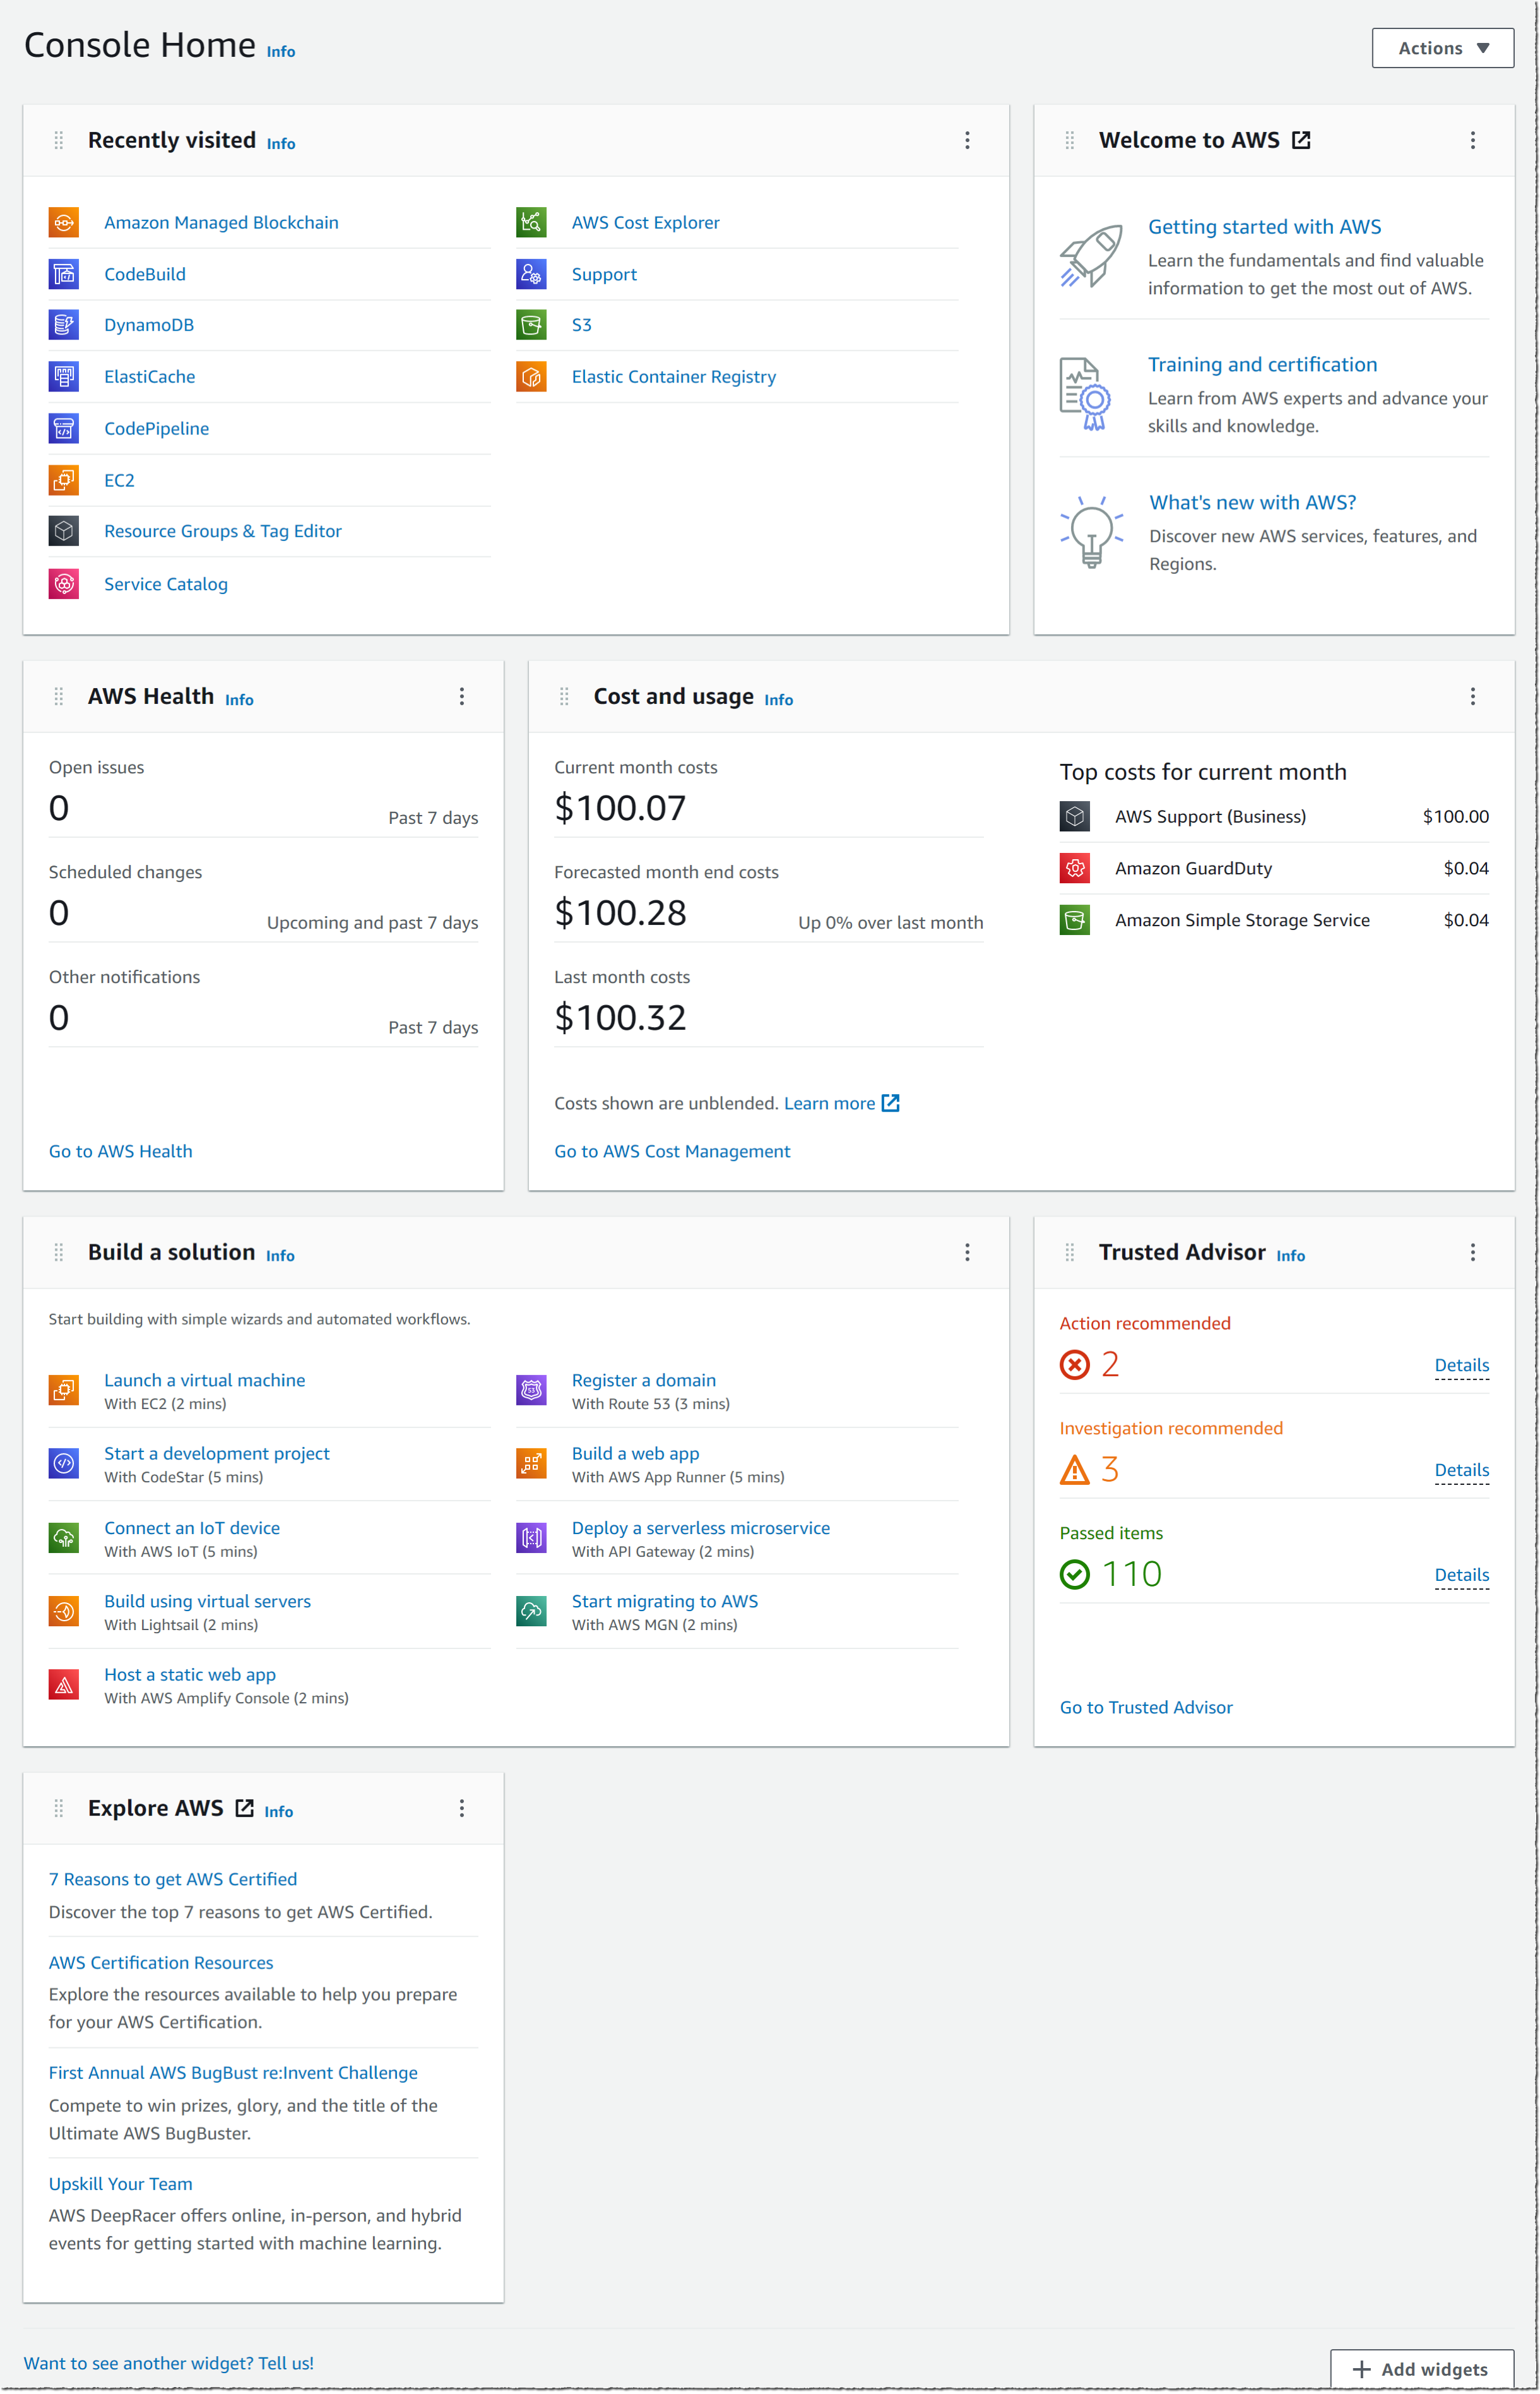
The screenshot below shows the default view of this new console home page:
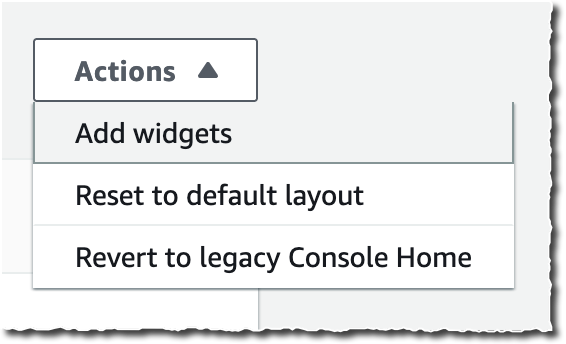
The new Console Home is made of widgets. I may choose which widget to display on the page and where to include it. I may use the actions in the Actions drop down to customize my home page.
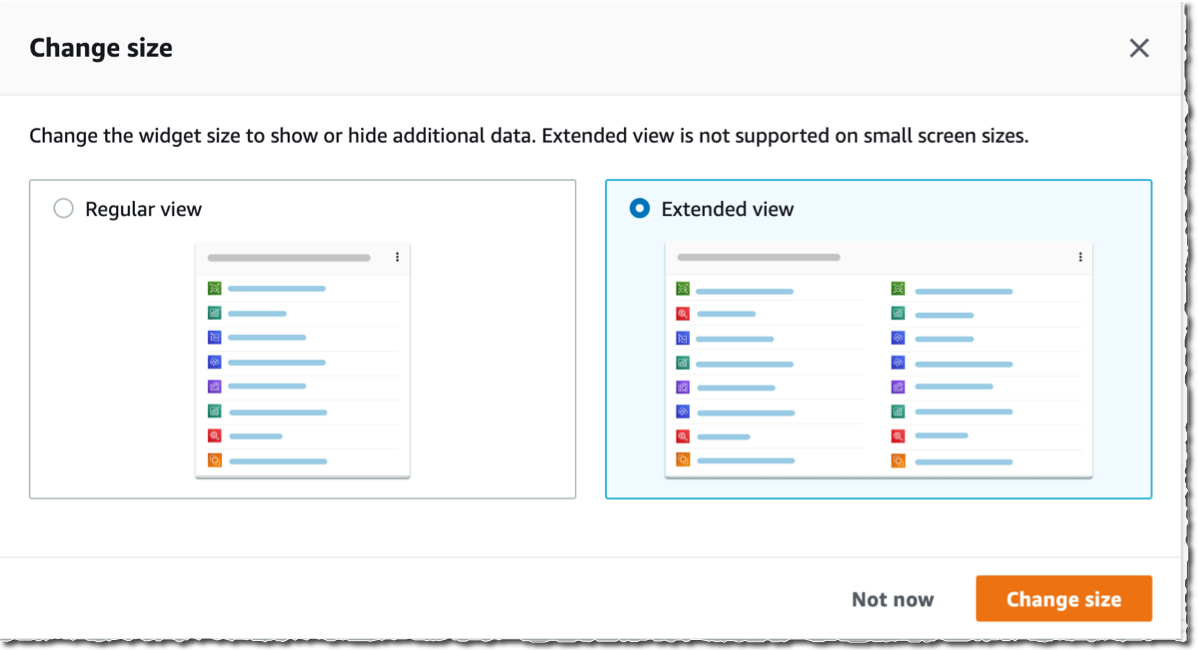
I may move and arrange widgets on the home page to organize the content as I want. When I click on the three little dots on the widget title bar, I may choose to remove the widget or resize it. I have the choice between Regular view and Extended view.
At launch, the console provides eight widgets, and we will add more over time. Three widgets provide me with static links to learn how to build a solution or to explore AWS (Welcome to AWS, Build a Solution and Explore AWS). The other five are dynamic; their content depends on the usage of AWS by my applications and infrastructure:
AWS Health: this widget provides information on important events and changes
Cost and usage: this widget provides an overview of service costs, with a break down per AWS service.
Favorites: this widget shows a list of services that I have bookmarked
Recently visited: this widget provides the list of top recently visited services
Trusted Advisor: this widget provides recommendations to follow AWS best practices
As usual, we pay attention to the importance of not disturbing existing workflows and habits. You can use the new Console Home after opt-in. You can revert back to the old console home with a simple click.
This new Console Home is the first step to bring you more relevant content on this very first page you see every day. Stay tuned for more.
In this post you’ll learn about temporary elevated access and how it can mitigate risks relating to human access to your AWS environment. You’ll also be able to download a minimal reference implementation and use it as a starting point to build a temporary elevated access solution tailored for your organization.
Introduction
While many modern cloud architectures aim to eliminate the need for human access, there often remain at least some cases where it is required. For example, unexpected issues might require human intervention to diagnose or fix, or you might deploy legacy technologies into your AWS environment that someone needs to configure manually.
AWS provides a rich set of tools and capabilities for managing access. Users can authenticate with multi-factor authentication (MFA), federate using an external identity provider, and obtain temporary credentials with limited permissions. AWS Identity and Access Management (IAM) provides fine-grained access control, and AWS Single Sign-On (AWS SSO) makes it easy to manage access across your entire organization using AWS Organizations.
For higher-risk human access scenarios, your organization can supplement your baseline access controls by implementing temporary elevated access.
What is temporary elevated access?
The goal of temporary elevated access is to ensure that each time a user invokes access, there is an appropriate business reason for doing so. For example, an appropriate business reason might be to fix a specific issue or deploy a planned change.
Traditional access control systems require users to be authenticated and authorized before they can access a protected resource. Becoming authorized is typically a one-time event, and a user’s authorization status is reviewed periodically—for example as part of an access recertification process.
With persistent access, also known as standing access, a user who is authenticated and authorized can invoke access at any time just by navigating to a protected resource. The process of invoking access does not consider the reason why they are invoking it on each occurrence. Today, persistent access is the model that AWS Single Sign-On supports, and is the most common model used for IAM users and federated users.
With temporary elevated access, also known as just-in-time access, users must be authenticated and authorized as before—but furthermore, each time a user invokes access an additional process takes place, whose purpose is to identify and record the business reason for invoking access on this specific occasion. The process might involve additional human actors or it might use automation. When the process completes, the user is only granted access if the business reason is appropriate, and the scope and duration of their access is aligned to the business reason.
Why use temporary elevated access?
You can use temporary elevated access to mitigate risks related to human access scenarios that your organization considers high risk. Access generally incurs risk when two elements come together: high levels of privilege, such as ability to change configuration, modify permissions, read data, or update data; and high-value resources, such as production environments, critical services, or sensitive data. You can use these factors to define a risk threshold, above which you enforce temporary elevated access, and below which you continue to allow persistent access.
Your motivation for implementing temporary elevated access might be internal, based on your organization’s risk appetite; or external, such as regulatory requirements applicable to your industry. If your organization has regulatory requirements, you are responsible for interpreting those requirements and determining whether a temporary elevated access solution is required, and how it should operate.
Regardless of the source of requirement, the overall goal is to reduce risk.
Important: While temporary elevated access can reduce risk, the preferred approach is always to automate your way out of needing human access in the first place. Aim to use temporary elevated access only for infrequent activities that cannot yet be automated. From a risk perspective, the best kind of human access is the kind that doesn’t happen at all.
How can temporary elevated access help reduce risk?
In scenarios that require human intervention, temporary elevated access can help manage the risks involved. It’s important to understand that temporary elevated access does not replace your standard access control and other security processes, such as access governance, strong authentication, session logging and monitoring, and anomaly detection and response. Temporary elevated access supplements the controls you already have in place.
The following are some of the ways that using temporary elevated access can help reduce risk:
1. Ensuring users only invoke elevated access when there is a valid business reason. Users are discouraged from invoking elevated access habitually, and service owners can avoid potentially disruptive operations during critical time periods.
2. Visibility of access to other people. With persistent access, user activity is logged—but no one is routinely informed when a user invokes access, unless their activity causes an incident or security alert. With temporary elevated access, every access invocation is typically visible to at least one other person. This can arise from their participation in approvals, notifications, or change and incident management processes which are multi-party by nature. With greater visibility to more people, inappropriate access by users is more likely to be noticed and acted upon.
3. A reminder to be vigilant. Temporary elevated access provides an overt reminder for users to be vigilant when they invoke high-risk access. This is analogous to the kind security measures you see in a physical security setting. Imagine entering a secure facility. You see barriers, fences, barbed wire, CCTV, lighting, guards, and signs saying “You are entering a restricted area.” Temporary elevated access has a similar effect. It reminds users there is a heightened level of control, their activity is being monitored, and they will be held accountable for any actions they perform.
4. Reporting, analytics, and continuous improvement. A temporary elevated access process records the reasons why users invoke access. This provides a rich source of data to analyze and derive insights. Management can see why users are invoking access, which systems need the most human access, and what kind of tasks they are performing. Your organization can use this data to decide where to invest in automation. You can measure the amount of human access and set targets to reduce it. The presence of temporary elevated access might also incentivize users to automate common tasks, or ask their engineering teams to do so.
Implementing temporary elevated access
Before you examine the reference implementation, first take a look at a logical architecture for temporary elevated access, so you can understand the process flow at a high level.
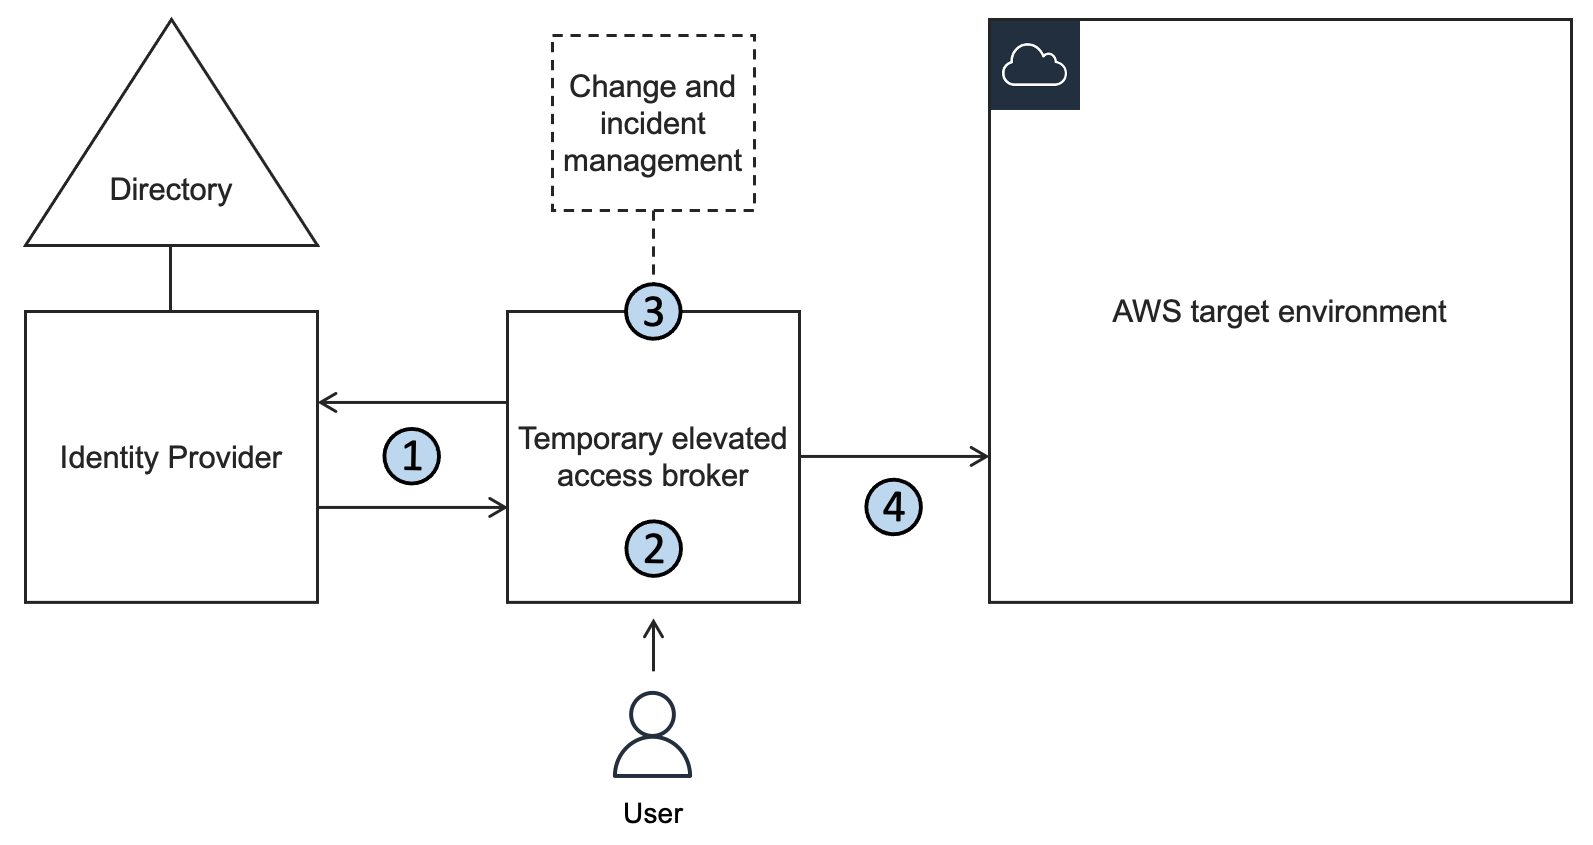
A typical temporary elevated access solution involves placing an additional component between your identity provider and the AWS environment that your users need to access. This is referred to as a temporary elevated access broker, shown in Figure 1.
Figure 1: A logical architecture for temporary elevated access
When a user needs to perform a task requiring temporary elevated access to your AWS environment, they will use the broker to invoke access. The broker performs the following steps:
1. Authenticate the user and determine eligibility. The broker integrates with your organization’s existing identity provider to authenticate the user with multi-factor authentication (MFA), and determine whether they are eligible for temporary elevated access.
Note: Eligibility is a key concept in temporary elevated access. You can think of it as pre-authorization to invoke access that is contingent upon additional conditions being met, described in step 3. A user typically becomes eligible by becoming a trusted member of a team of admins or operators, and the scope of their eligibility is based on the tasks they’re expected to perform as part of their job function. Granting and revoking eligibility is generally based on your organization’s standard access governance processes. Eligibility can be expressed as group memberships (if using role-based access control, or RBAC) or user attributes (if using attribute-based access control, or ABAC). Unlike regular authorization, eligibility is not sufficient to grant access on its own.
2. Initiate the process for temporary elevated access. The broker provides a way to start the process for gaining temporary elevated access. In most cases a user will submit a request on their own behalf—but some broker designs allow access to be initiated in other ways, such as an operations user inviting an engineer to assist them. The scope of a user’s requested access must be a subset of their eligibility. The broker might capture additional information about the context of the request in order to perform the next step.
3. Establish a business reason for invoking access. The broker tries to establish whether there is a valid business reason for invoking access with a given scope on this specific occasion. Why does this user need this access right now? The process of establishing a valid business reason varies widely between organizations. It might be a simple approval workflow, a quorum-based authorization, or a fully automated process. It might integrate with existing change and incident management systems to infer the business reason for access. A broker will often provide a way to expedite access in a time-critical emergency, which is a form of break-glass access. A typical broker implementation allows you to customize this step.
4. Grant time-bound access. If the business reason is valid, the broker grants time-bound access to the AWS target environment. The scope of access that is granted to the user must be a subset of their eligibility. Further, the scope and duration of access granted should be necessary and sufficient to fulfill the business reason identified in the previous step, based on the principle of least privilege.
A minimal reference implementation for temporary elevated access
To get started with temporary elevated access, you can deploy a minimal reference implementation accompanying this blog post. Information about deploying, running and extending the reference implementation is available in the Git repo README page.
Note: You can use this reference implementation to complement the persistent access that you manage for IAM users, federated users, or manage through AWS Single Sign-On. For example, you can use the multi-account access model of AWS SSO for persistent access management, and create separate roles for temporary elevated access using this reference implementation.
To establish a valid business reason for invoking access, the reference implementation uses a single-step approval workflow. You can adapt the reference implementation and replace this with a workflow or business logic of your choice.
To grant time-bound access, the reference implementation uses the identity broker pattern. In this pattern, the broker itself acts as an intermediate identity provider which conditionally federates the user into the AWS target environment granting a time-bound session with limited scope.
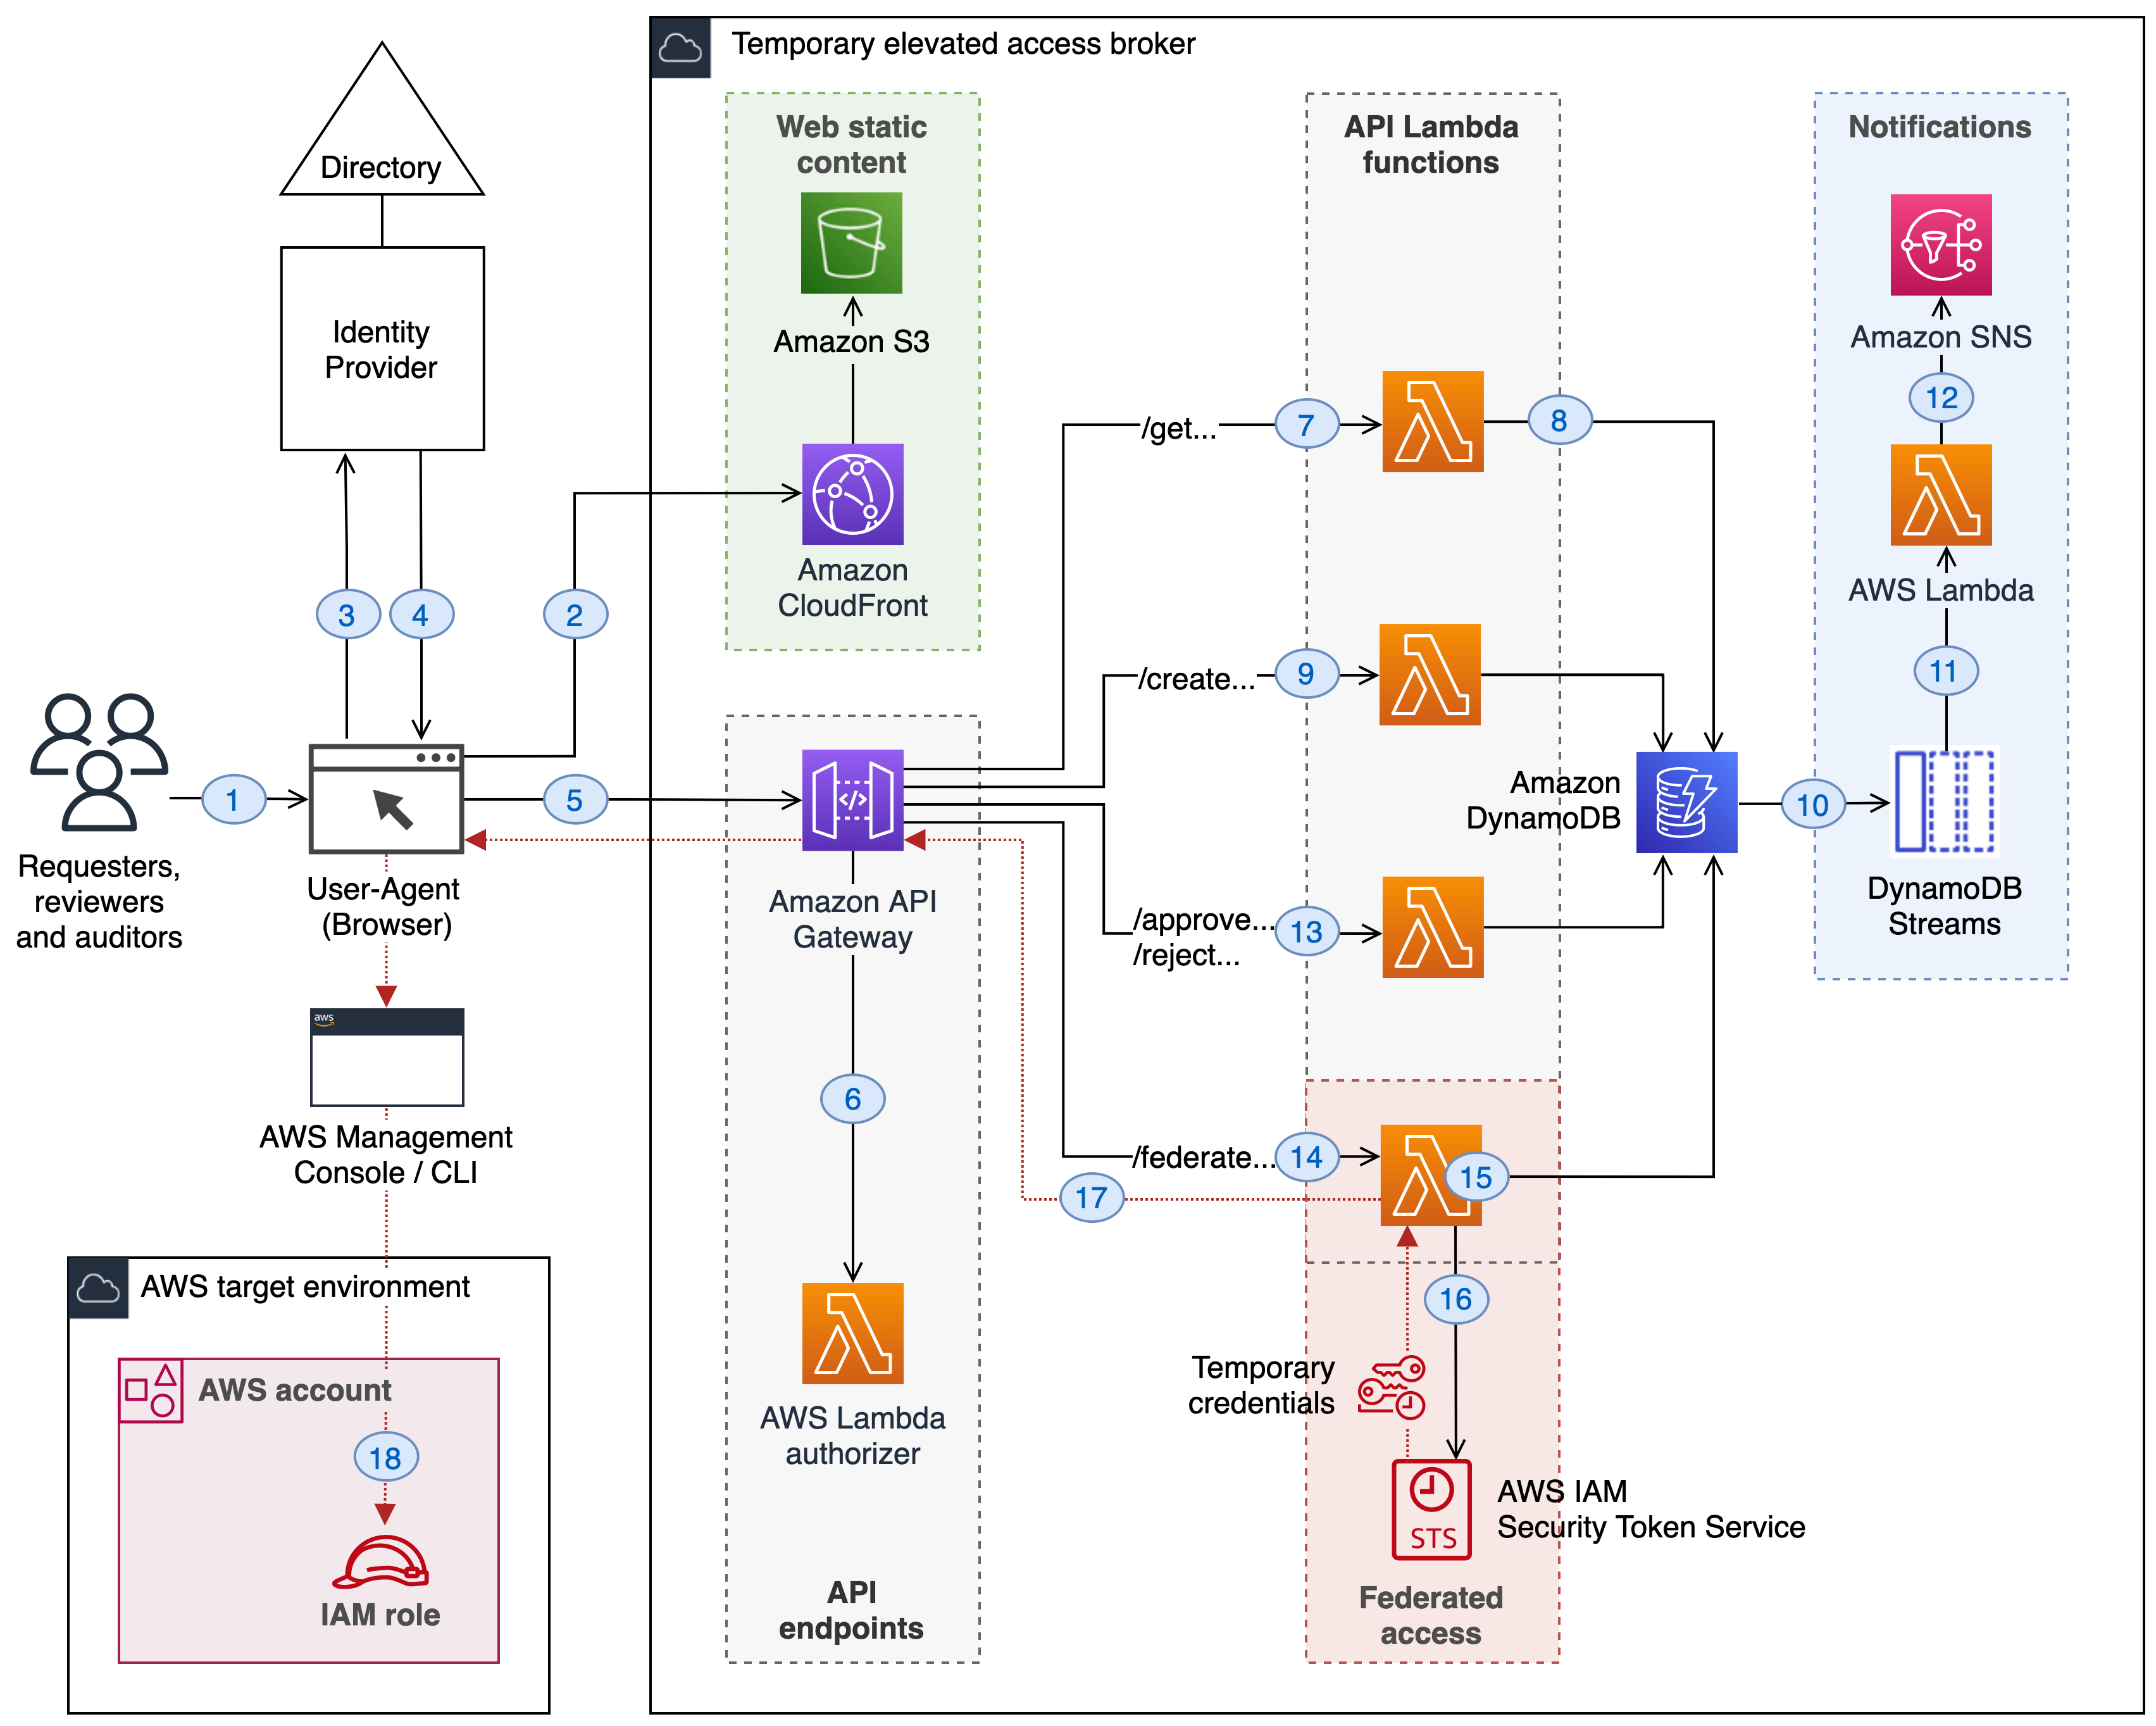
Figure 2 shows the architecture of the reference implementation.
Figure 2: Architecture of the reference implementation
To illustrate how the reference implementation works, the following steps walk you through a user’s experience end-to-end, using the numbers highlighted in the architecture diagram.
Starting the process
Consider a scenario where a user needs to perform a task that requires privileged access to a critical service running in your AWS environment, for which your security team has configured temporary elevated access.
Loading the application
The user first needs to access the temporary elevated access broker so that they can request the AWS access they need to perform their task.
The user navigates to the temporary elevated access broker in their browser.
The user’s browser loads a web application using web static content from an Amazon CloudFront distribution whose target is an Amazon S3 bucket.
The broker uses a web application that runs in the browser, known as a Single Page Application (SPA).
Note: CloudFront and S3 are only used for serving web static content. If you prefer, you can modify the solution to serve static content from a web server in your private network.
The user returns to the application as an authenticated user with an access token and ID token signed by the identity provider.
The access token grants delegated authority to the browser-based application to call server-side APIs on the user’s behalf. The ID token contains the user’s attributes and group memberships, and is used for authorization.
Calling protected APIs
The application calls APIs hosted by Amazon API Gateway and passes the access token and ID token with each request.
The Lambda authorizer checks whether the user’s access token and ID token are valid. It then uses the ID token to determine the user’s identity and their authorization based on their group memberships.
Displaying information
The application calls one of the /get… API endpoints to fetch data about previous temporary elevated access requests.
The /get… API endpoints invoke Lambda functions which fetch data from a table in Amazon DynamoDB.
The application displays information about previously-submitted temporary elevated access requests in a request dashboard, as shown in Figure 3.
Figure 3: The request dashboard
Submitting requests
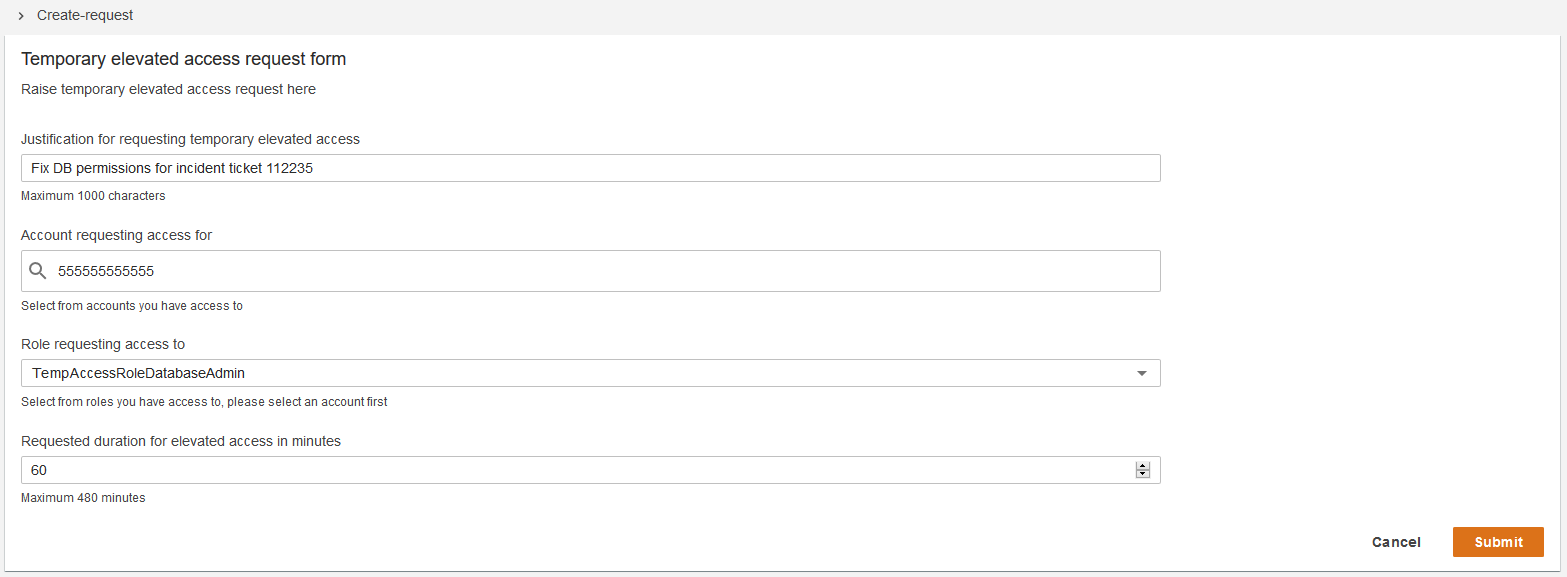
A user who is eligible for temporary elevated access can submit a new request in the request dashboard by choosing Create request. As shown in Figure 4, the application then displays a form with input fields for the IAM role name and AWS account ID the user wants to access, a justification for invoking access, and the duration of access required.
Figure 4: Submitting requests
The user can only request an IAM role and AWS account combination for which they are eligible, based on their group memberships.
Note: The duration specified here determines a time window during which the user can invoke sessions to access the AWS target environment if their request is approved. It does not affect the duration of each session. Session duration can be configured independently.
When a user submits a new request for temporary elevated access, the application calls the /create… API endpoint, which writes information about the new request to the DynamoDB table.
The user can submit multiple concurrent requests for different role and account combinations, as long as they are eligible.
Generating notifications
The broker generates notifications when temporary elevated access requests are created, approved, or rejected.
When a request is created, approved, or rejected, a DynamoDB stream record is created for notifications.
The stream record then invokes a Lambda function to handle notifications.
By default, when a user submits a new request for temporary elevated access, an email notification is sent to all authorized reviewers. When a reviewer approves or rejects a request, an email notification is sent to the original requester.
Reviewing requests
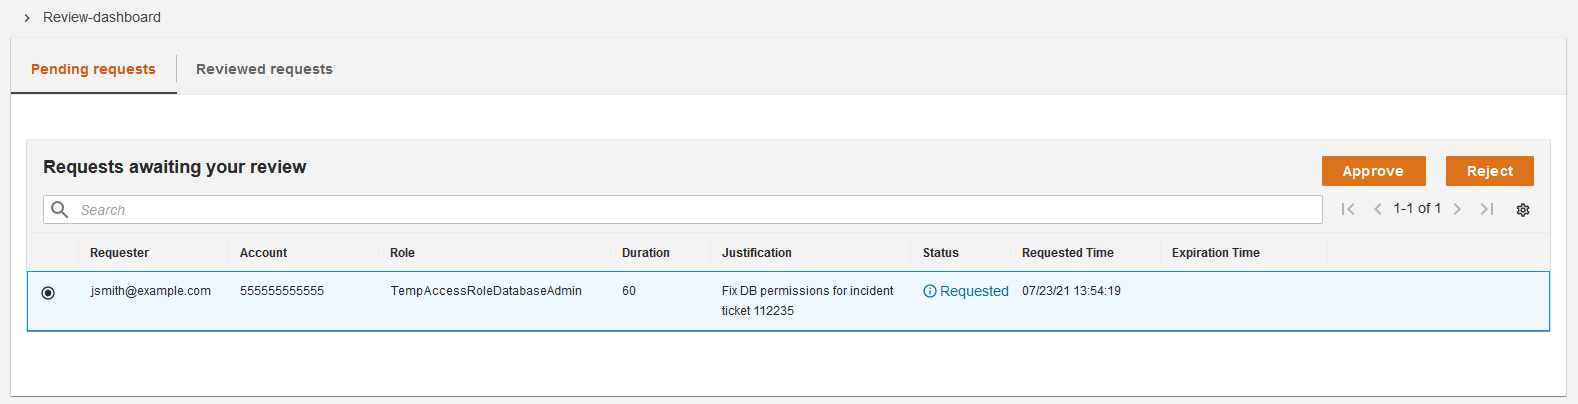
A user who is authorized to review requests can approve or reject requests submitted by other users in a review dashboard, as shown in Figure 5. For each request awaiting their review, the application displays information about the request, including the business justification provided by the requester.
Figure 5: The review dashboard
The reviewer can select a request, determine whether the request is appropriate, and choose either Approve or Reject.
When a reviewer approves or rejects a request, the application calls the /approve… or /reject… API endpoint, which updates the status of the request in the DynamoDB table and initiates a notification.
Invoking sessions
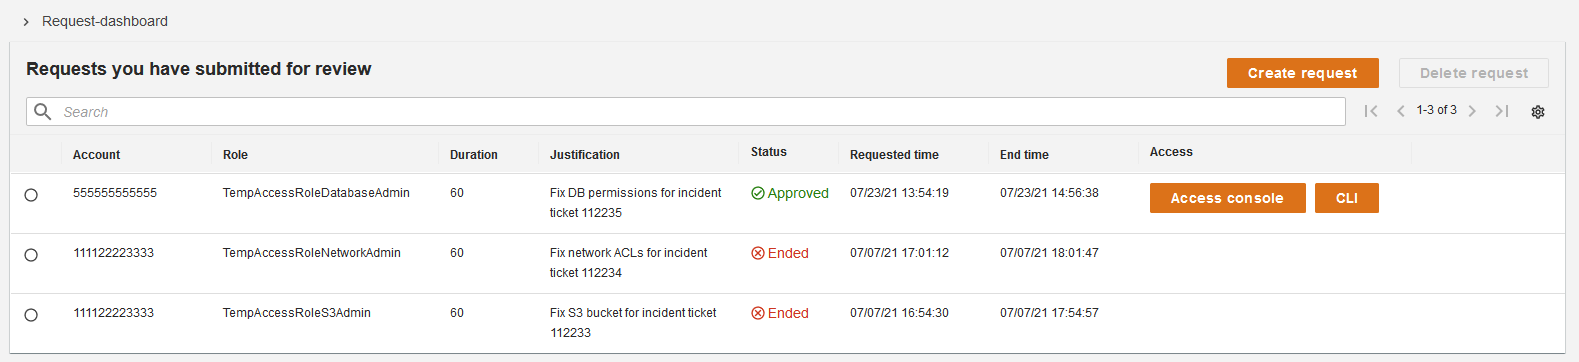
After a requester is notified that their request has been approved, they can log back into the application and see their approved requests, as shown in Figure 6. For each approved request, they can invoke sessions. There are two ways they can invoke a session, by choosing either Access console or CLI.
If the user chooses Access console, then the broker federates them into the AWS Management Console.
Both options grant the user a session in which they assume the IAM role in the AWS account specified in their request.
When a user invokes a session, the broker performs the following steps.
When the user chooses Access console or CLI, the application calls one of the /federate… API endpoints.
The /federate… API endpoint invokes a Lambda function, which performs the following three checks before proceeding:
Is the user authenticated? The Lambda function checks that the access and ID tokens are valid and uses the ID token to determine their identity.
Is the user eligible? The Lambda function inspects the user’s group memberships in their ID token to confirm they are eligible for the AWS role and account combination they are seeking to invoke.
Is the user elevated? The Lambda function confirms the user is in an elevated state by querying the DynamoDB table, and verifying whether there is an approved request for this user whose duration has not yet ended for the role and account combination they are seeking to invoke.
If all three checks succeed, the Lambda function calls sts:AssumeRole to fetch temporary credentials on behalf of the user for the IAM role and AWS account specified in the request.
The application returns the temporary credentials to the user.
The user obtains a session with temporary credentials for the IAM role in the AWS account specified in their request, either in the AWS Management Console or AWS CLI.
Once the user obtains a session, they can complete the task they need to perform in the AWS target environment using either the AWS Management Console or AWS CLI.
The IAM roles that users assume when they invoke temporary elevated access should be dedicated for this purpose. They must have a trust policy that allows the broker to assume them. The trusted principal is the Lambda execution role used by the broker’s /federate… API endpoints. This ensures that the only way to assume those roles is through the broker.
In this way, when the necessary conditions are met, the broker assumes the requested role in your AWS target environment on behalf of the user, and passes the resulting temporary credentials back to them. By default, the temporary credentials last for one hour. For the duration of a user’s elevated access they can invoke multiple sessions through the broker, if required.
Session expiry
When a user’s session expires in the AWS Management Console or AWS CLI, they can return to the broker and invoke new sessions, as long as their elevated status is still active.
Ending elevated access
A user’s elevated access ends when the requested duration elapses following the time when the request was approved.
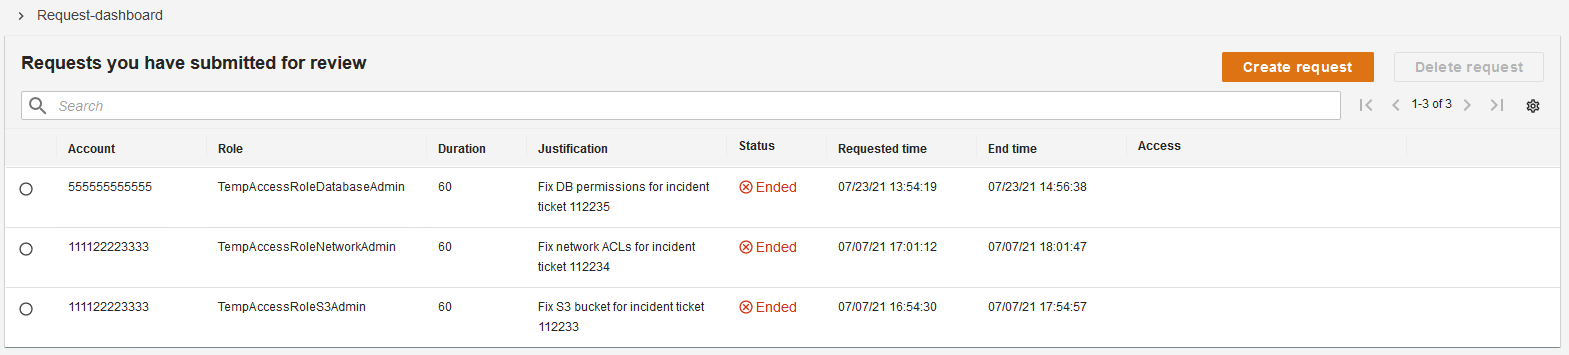
Figure 7: Ending elevated access
Once elevated access has ended for a particular request, the user can no longer invoke sessions for that request, as shown in Figure 7. If they need further access, they need to submit a new request.
Viewing historical activity
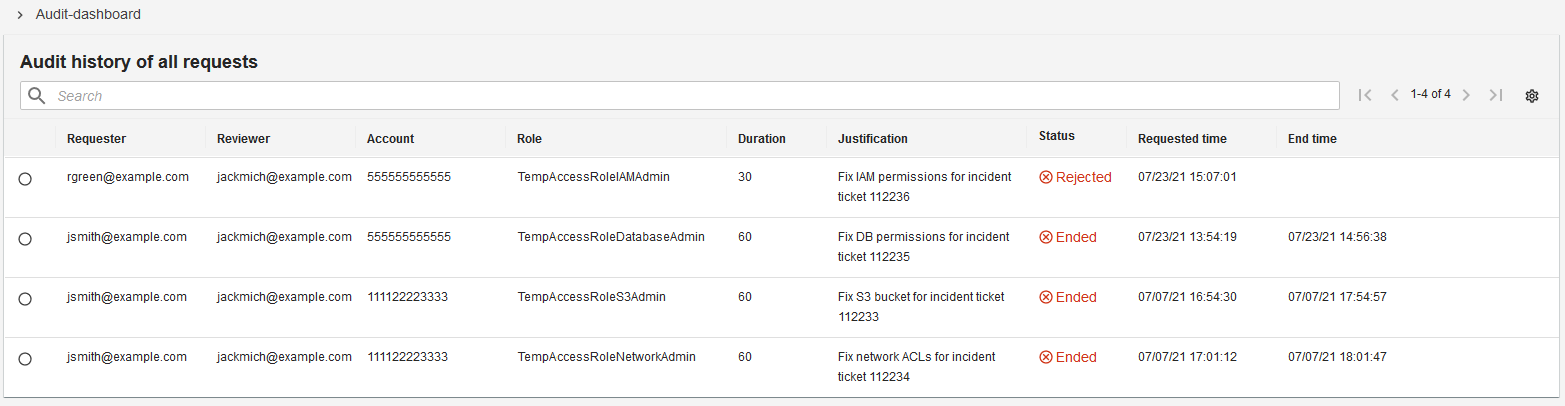
An audit dashboard, as shown in Figure 8, provides a read-only view of historical activity to authorized users.
Figure 8: The audit dashboard
Logging session activity
When a user invokes temporary elevated access, their session activity in the AWS control plane is logged to AWS CloudTrail. Each time they perform actions in the AWS control plane, the corresponding CloudTrail events contain the unique identifier of the user, which provides traceability back to the identity of the human user who performed the actions.
The following example shows the userIdentity element of a CloudTrail event for an action performed by user [email protected] using temporary elevated access.
The temporary elevated access broker controls access to your AWS environment, and must be treated with extreme care in order to prevent unauthorized access. It is also an inline dependency for accessing your AWS environment and must operate with sufficient resiliency.
The broker should be deployed in a dedicated AWS account with a minimum of dependencies on the AWS target environment for which you’ll manage access. It should use its own access control configuration following the principle of least privilege. Ideally the broker should be managed by a specialized team and use its own deployment pipeline, with a two-person rule for making changes—for example by requiring different users to check in code and approve deployments. Special care should be taken to protect the integrity of the broker’s code and configuration and the confidentiality of the temporary credentials it handles.
In this blog post you learned about temporary elevated access and how it can help reduce risk relating to human user access. You learned that you should aim to eliminate the need to use high-risk human access through the use of automation, and only use temporary elevated access for infrequent activities that cannot yet be automated. Finally, you studied a minimal reference implementation for temporary elevated access which you can download and customize to fit your organization’s needs.
If you have feedback about this post, submit comments in the Comments section below. If you have questions about this post, start a new thread on the AWS IAM forum or contact AWS Support.
Want more AWS Security how-to content, news, and feature announcements? Follow us on Twitter.
July 31, 2021 – Effective today, we will no longer ensure that new AWS Management Console features and web pages function properly on IE 11. We will fix bugs that are specific to IE 11 for existing features and pages.
Late 2021 – Later this year you will receive a pop-up notification (and a reminder to upgrade your browser) if you use IE 11 to access any of the services or pages listed above.
July 31, 2022 – One year from today we will discontinue our support for IE 11 and you will need to use a browser that we support.
To provide the best experiences, we use technologies like cookies to store and/or access device information. Consenting to these technologies will allow us to process data such as browsing behavior or unique IDs on this site. Not consenting or withdrawing consent, may adversely affect certain features and functions.
Functional
Always active
The technical storage or access is strictly necessary for the legitimate purpose of enabling the use of a specific service explicitly requested by the subscriber or user, or for the sole purpose of carrying out the transmission of a communication over an electronic communications network.
Preferences
The technical storage or access is necessary for the legitimate purpose of storing preferences that are not requested by the subscriber or user.
Statistics
The technical storage or access that is used exclusively for statistical purposes.The technical storage or access that is used exclusively for anonymous statistical purposes. Without a subpoena, voluntary compliance on the part of your Internet Service Provider, or additional records from a third party, information stored or retrieved for this purpose alone cannot usually be used to identify you.
Marketing
The technical storage or access is required to create user profiles to send advertising, or to track the user on a website or across several websites for similar marketing purposes.


 to securely and efficiently access the remote macOS machines. You can connect from anywhere, using a PCoIP client application or from thin terminals such as Thin Clients or Zero Clients workstations.