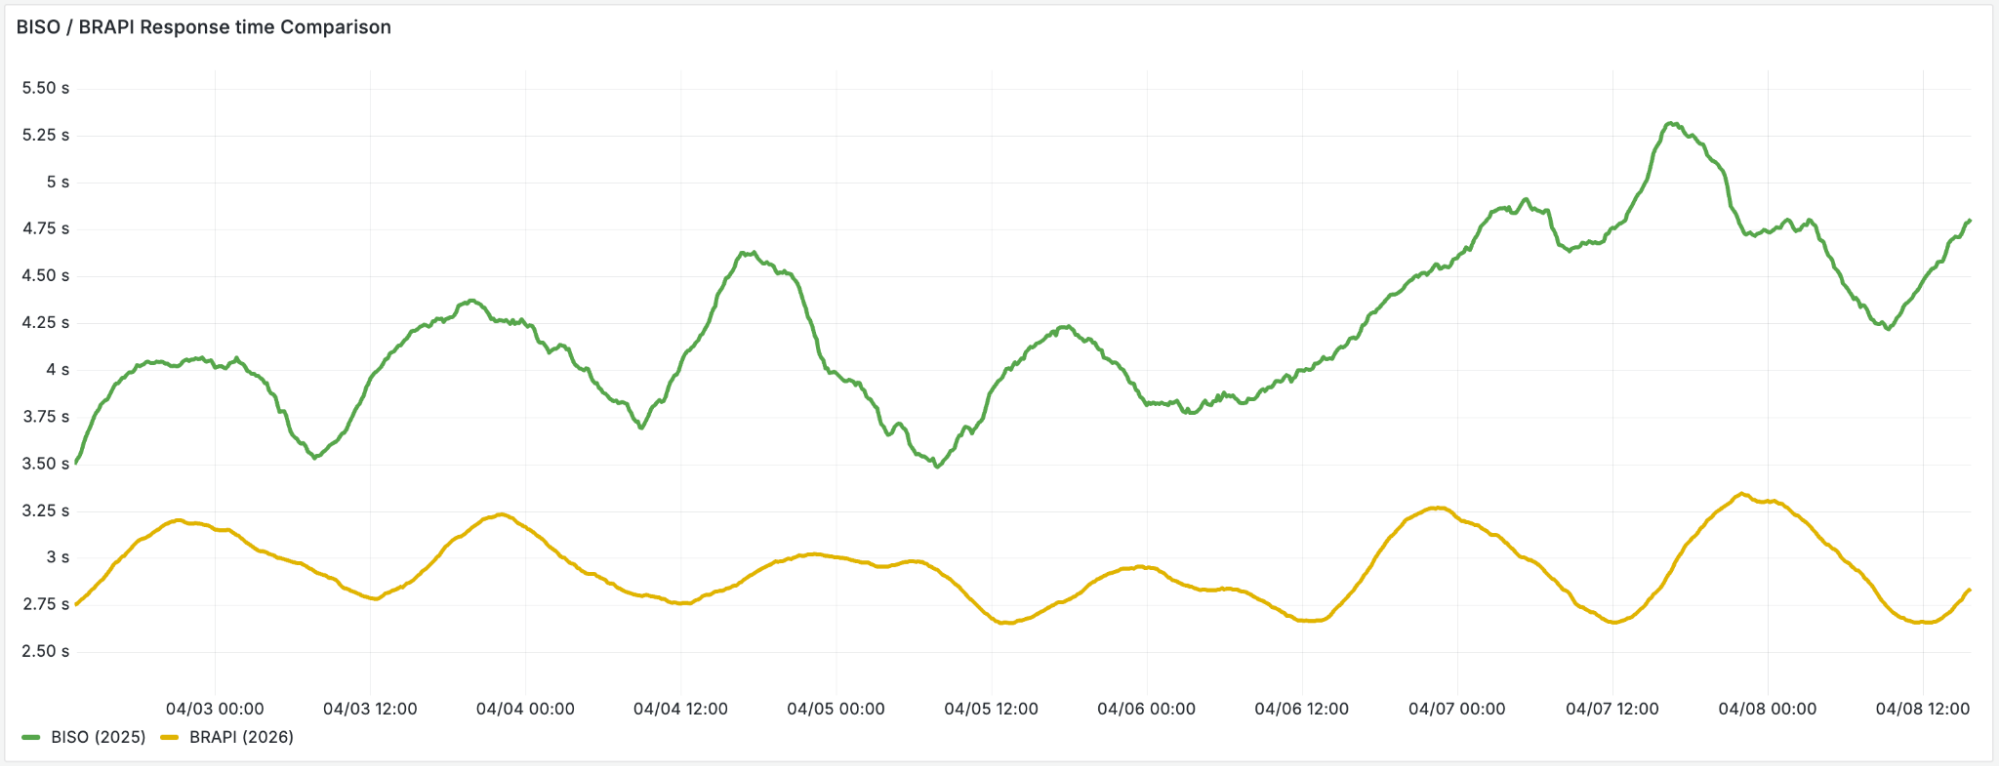
We’ve enabled higher usage limits, faster performance, and better reliability for Browser Run by rebuilding on top of Cloudflare’s Containers.
You can now spin up 60 browsers per minute via the Workers binding and run up to 120 concurrently — 4x the previous limit. Also, Quick Action response times dropped more than 50%. You don’t need to change anything: these improvements are live today. On top of that, we’re shipping fixes and new features faster than before. Read on to learn how we did it and see the data.
Remind me: what is Browser Run?
Browser Run enables developers to programmatically control and interact with headless browser instances running on Cloudflare’s global network. That’s useful for end-to-end testing of web applications, securely investigating suspicious URLs, and leveraging how browsers can easily render PDF documents, amongst other quick actions like capturing screenshots and extracting content. More recently, it’s become a critical enabler of AI agents to interact with the web. We’re building Browser Run to be the go-to platform to responsibly utilize automated browsers securely at massive scale.
Outgrowing our bunk bed
Before adopting Cloudflare Containers, we shared infrastructure with Browser Isolation (BISO). While technically similar, BISO’s larger container images slowed startup and development. Crucially, BISO browsers lacked optimal global distribution, compromising resiliency and latency. Additionally, typical BISO users’ long, steady sessions clashed with Browser Run’s short, spiky usage, creating scaling bottlenecks and availability delays.
Thankfully, after much internal development, Cloudflare released Durable Object (DO)-enabled Containers open beta last year, meaning we were ready for a tentative adoption that ultimately benefited both product platforms. Like most successful product platforms, we’re committed to building on our own platform wherever feasible so that we can feel and fix any pain points ahead of any external customers.
The migration: Containers
We started a gradual migration by inserting a Worker in our incoming request paths to provide some Container-powered browsers to a handful of users alongside those from BISO. This dual support during development was key: it allowed us to compare performance, isolate implementation bugs and ultimately gain confidence in the benefits of the Container-driven approach.
Ramping up adoption, we first used the Container browsers for all of our Quick Actions endpoints, then for connections via the Workers browser binding on free accounts, followed by pay-as-you-go accounts in order to validate stability before we rolled it out to all remaining contract customers, ensuring a transition that required no action or existing worker redeployments from our customers.
Challenges: performance and scale bottlenecks
On our end, though, we faced a fresh set of challenges getting familiar with a novel, unstable early-stage Containers platform interface that was light on documentation, light on observability, and light on colleagues in an overlapping timezone. However, our feedback to our own teams as Customer Zero meant that we could provide a tight feedback loop leading to substantial upgrades that benefit our external customers too. Nevertheless, there was a lot of friction to overcome initially, most of which were to be expected for a closed beta in active development. Other hurdles to overcome were intrinsic to the new technical environment.
For example, once our browsers could run globally, our architecture had to adapt. DO-enabled Containers create a Durable Object as close to the incoming request as possible, but the connected Container may spin up on the other side of the world. This works fine for one-shot messages like “start my app,” but when you’re establishing a WebSocket between them and exchanging dozens of messages for a screenshot request, those extra milliseconds crossing the globe start adding up.
Our solution? Create regional pools of pre-warmed DO-backed browser containers to constrain the max distance (and hence max latency) between DOs and containers. When a request comes in, we pick a DO-container pair closest to the user within that region. This keeps latency low on both hops: user to DO, and DO to container. It adds a few more moving parts to our overall architecture, but we figured that was worthwhile so long as we had observability into the global state of each browser so that we could allocate and re-allocate capacity according to changing demand. A perfect use case for Workers KV…to a point.
Demand for our headless browsers has been ramping up since the beginning of last year. In short, AI agent builders discovered Browser Run and quickly brought request volumes outpacing our existing capacity. We quickly hit the limits of how quickly we could adjust our pool capacity to serve this new demand with a scalable approach. KV’s eventual consistency of around 30 seconds was becoming a bottleneck on our critical request path. You might check KV, see a container as “available,” but by the time you route to it (30 seconds later), it’s already claimed. That lag creates race conditions and overallocation of browsers, severely limiting how fast we could scale to meet demand spikes.
Migrating from KV to D1 + Queues
We previously stored each container state in KV. This meant that we could keep getting a minute old state due to cache TTL (recently KV changed the minimum cache TTL to 30 seconds, but even so that value is still too high).
We decided to migrate the container state into D1 instances instead. D1’s transactional nature is a good fit here. Once we assign a browser to a user, it’s exclusively theirs. Browsers are not shared resources. SQLite transactions ensure atomic assignment and prevent race conditions where two requests might claim the same browser simultaneously.
Here’s a simplified version of our browser acquisition query:
WITH candidate_pool AS (
    -- candidate pool logic to pick based on latency and other rules
)
UPDATE containers
SET status = 'picked'
WHERE sessionId IN (
    SELECT sessionId
    FROM candidate_pool
    ORDER BY RANDOM()
    LIMIT ?5
)
RETURNING data
We keep D1 shards per location and given that we may have several thousand containers running, and that each container needs to update its state every 5 seconds, we kept running into a problem: we would overload the database. For instance, if each write takes 1ms we can only write at most 1,000 times, which at one row per write would mean that we could only have 5,000 containers before overloading the database.
However, if we batch those writes, we can get much higher values, because batch writes are not significantly longer than individual ones, so we can increase the throughput in orders of magnitude. In our case, we use 100 row batches, which means we can now update a maximum of 500,000 containers per location. This headroom means capacity planning is no longer a bottleneck.
Currently, our P95 for batch write is 0.1ms!
To batch writes, we use Queues: every 5 seconds, each container computes its own state and adds it to its location queue. We then configure a worker consumer with 100 batch size and 1 second batch timeout:
With this configuration, we achieve acceptable lag times well below 2 seconds. That said, queue backlogs can still cause stale state. When this happens, each region falls back to a designated backup region until the primary queue catches up.
Additional perks for quick actions
With dedicated infrastructure, we could now make upgrades to the browser container image without unwanted side effects or bloat for other products like BISO. This opened the door to optimize quick actions like screenshots and content extraction. Previously, our workers established a WebSocket to the remote browser and sent instructions one at a time: open a page, navigate to the URL, wait for it to load and take the screenshot. Each step had to be completed before the next could begin.
However, now we send all parameters in a single HTTP request directly to the container, and the entire flow executes internally without any back-and-forth between the worker and browser.
Results: massive performance boost and increased limits
We’ve seen a sharp decrease in average quick-action response time, as users are able to get what they need from a browser session in less time: less time waiting for browsers to be ready and faster processing of their DevTools Protocol messages.
Overcoming our real-time state management at this new scale meant we could spend more time in the playground, discovering and cooking up new features such as our recently launched /crawl endpoint.
Better browser flexibility
We also benefitted from another important perk by leaving behind shared Browser Isolation containers: faster upgrades.
When our browsers ran on shared product infrastructure, upgrading Chrome meant coordinating across multiple teams and products, each with their own roadmap and priorities. However, now that we run our own container image, we can upgrade at a faster tempo. For example, WebGL, a much-requested feature, is now available for browser-based rendering along with WebMCP (Model Context Protocol for the web) which enables new agentic interaction patterns. Both are made possible because we can control the browser version and flags without unwanted side effects in other Cloudflare products.
In a nutshell, we’re just getting started with unleashing the power of browsers at scale, especially for agentic development. We hope you’re diving in too — check out our docs.
Get started
Browser Run is available on all Workers plans. Start with the quick start guide, explore the Quick Actions, or try the /crawl endpoint to deeply extract data from any webpage, following links across the site.
Building AI agents? Check out our Agents SDK with built-in Browser Run support.
AI agents need to interact with the web. To do that, they need a browser. They need to navigate sites, read pages, fill forms, extract data, and take screenshots. They need to observe whether things are working as expected, with a way for their humans to step in if needed. And they need to do all of this at scale.
Today, we’re renaming Browser Rendering to Browser Run, and shipping key features that make it the browser for AI agents. The name Browser Rendering never fully captured what the product does. Browser Run lets you run full browser sessions on Cloudflare’s global network, drive them with code or AI, record and replay sessions, crawl pages for content, debug in real time, and let humans intervene when your agent needs help.
Here’s what’s new:
Live View: see what your agent sees and is doing, in real time. Know instantly if things are working, and when they’re not, see exactly why.
Human in the Loop: when your agent hits a snag like a login page or unexpected edge case, it can hand off to a human instead of failing. The human steps in, resolves, then hands back control.
Chrome DevTools Protocol (CDP) Endpoint: the Chrome DevTools Protocol is how agents control browsers. Browser Run now exposes it directly, so agents get maximum control over the browser and existing CDP scripts work on Cloudflare.
MCP Client Support: AI coding agents like Claude Desktop, Cursor, and OpenCode can now use Browser Run as their remote browser.
WebMCP Support: agents will outnumber humans using the web. WebMCP allows websites to declare what actions are available for agents to discover and call, making navigation more reliable.
Session Recordings: capture every browser session for debugging purposes. When something goes wrong, you have the full recording with DOM changes, user interactions, and page navigation.
Higher limits: run more tasks at once with 120 concurrent browsers, up from 30.
An AI agent searching Amazon for an orange lava lamp, comparing options, and handing off to a human when sign-in is required to complete the purchase
Everything an agent needs
Let’s think about what agents need when browsing the web and how each feature fits in:
What an agent needs
Browser Run (formerly Browser Rendering)
1) Browsers on-demand
Chrome browser on Cloudflare’s global network
2) A way to control the browser
Take actions like navigate, click, fill forms, screenshot, and more with Puppeteer, Playwright, CDP (new), MCP Client Support (new) and WebMCP (new)
3) Observability
Live View (new), Session Recordings (new), and Dashboard redesign (new)
4) Human intervention
Human in the Loop (new)
5) Scale
10 requests/second for Quick Actions, 120 concurrent browsers (4x increase)
1) Open a browser
First, an agent needs a browser. With Browser Run, agents can spin up a headless Chrome instance on Cloudflare’s global network, on demand. No infrastructure to manage, no Chrome versions to maintain. Browser sessions open near users for low latency, and scale up and down as needed. Pair Browser Run with the Agents SDK to build long-running agents that browse the web, remember everything, and act on their own.
2) Take actions
Once your agent has a browser, it needs ways to control it. Browser Run supports multiple approaches: new low-level protocol access with the Chrome DevTools Protocol (CDP) and WebMCP, in addition to existing higher-level automation using Puppeteer and Playwright, and Quick Actions for simple tasks. Let’s look at the details.
Chrome DevTools Protocol (CDP) endpoint
The Chrome DevTools Protocol (CDP) is the low-level protocol that powers browser automation. Exposing CDP directly means the growing ecosystem of agent tools and existing CDP automation scripts can use Browser Run. When you open Chrome DevTools and inspect a page, CDP is what’s running underneath. Puppeteer, Playwright, and most agent frameworks are built on top of it.
Every way that you have been using Browser Run has actually been through CDP already. What’s new is that we’re now exposing CDP directly as an endpoint. This matters for agents because CDP gives agents the most control possible over the browser. Agent frameworks already speak CDP natively, and can now connect to Browser Run directly. CDP also unlocks browser actions that aren’t available through Puppeteer or Playwright, like JavaScript debugging. And because you’re working with raw CDP messages instead of going through higher-level libraries, you can pass messages directly to models for more token-efficient browser control.
If you already have CDP automation scripts running against self-hosted Chrome, they work on Browser Run with a one-line config change. Point your WebSocket URL at Browser Run and stop managing your own browser infrastructure.
The CDP endpoint also makes Browser Run more accessible. You can now connect from any language, any environment, without needing to write a Cloudflare Worker. (If you’re already using Workers, nothing changes.)
Using Browser Run with MCP Clients
Now that Browser Run exposes the Chrome DevTools Protocol (CDP), MCP clients including Claude Desktop, Cursor, Codex, and OpenCode can use Browser Run as their remote browser. The chrome-devtools-mcp package from the Chrome DevTools team is an MCP server that gives your AI coding assistant access to the full power of Chrome DevTools for reliable automation, in-depth debugging, and performance analysis.
Here’s an example of how to configure Browser Run for Claude Desktop:
The Internet was built for humans, so navigating as an AI agent today is unreliable. We’re betting on a future where more agents use the web than humans. In that world, sites need to be agent-friendly.
That’s why we’re launching support for WebMCP, a new browser API from the Google Chrome team that landed in Chromium 146+. WebMCP lets websites expose tools directly to AI agents, declaring what actions are available for agents to discover and call on each page. This helps agents navigate the web more reliably. Instead of agents needing to figure out how to use a site, websites can expose their tools for agents to discover and call
Two APIs make this work:
navigator.modelContext allows websites to register their tools
navigator.modelContextTesting allows agents to discover and execute those tools
Today, an agent visiting a travel booking site has to figure out the UI by looking at it. With WebMCP, the site declares “here’s a search_flights tool that takes an origin, destination, and date.” The agent calls it directly, without having to loop through slow screenshot-analyze-click loops. This makes navigation more reliable regardless of potential changes to the UI.
Tools are discovered on the page rather than preloaded. This matters for the long tail of the web, where preloading an MCP server for every possible site is not feasible and would bloat the context window.
Using WebMCP to book a hotel through the Chrome DevTools console, discovering available tools with listTools()
We have an experimental pool with browser instances running Chrome beta so you can test emerging browser features before they reach stable Chrome. We also just shipped Wrangler browser commands that let you manage browser sessions directly from the CLI, letting you create, manage, and view browser sessions directly from your terminal. To access WebMCP-enabled browsers, use the following Wrangler command to create a session in the experimental pool:
npm i -g wrangler@latest
wrangler browser create --lab --keepAlive 300
We also recently shipped a /crawl endpoint that lets you crawl entire sites with a single API call. Give it a starting URL and pages are automatically discovered and scraped, then returned in your preferred format (HTML, Markdown, and structured JSON), with additional parameters to control crawl depth and scope, skip pages that haven’t changed, and specify certain paths to include or exclude.
We intentionally built /crawl to be a well-behaved crawler. That means it respects site owner’s preferences out of the box, is a signed agent with a distinct bot ID that is cryptographically signed using Web Bot Auth, a non-customizable User-Agent, and follows robots.txt and AI Crawl Control. It does not bypass Cloudflare’s bot protections or CAPTCHAs. Site owners choose whether their content is accessible and /crawl respects it.
Things don’t always go right the first try. We kept hearing from customers that when their automations failed, they had no idea why. That’s why we’ve added multiple ways to observe what’s happening, so you can see exactly what your agent sees, both live and after the fact.
Live View
Live View lets you watch your agent’s browser session in real time. Whether you’re debugging an agent or running a long automation script, you see exactly what’s happening as it happens. This includes the page itself, as well as the DOM, console, and network requests. When something goes wrong — the expected button isn’t there, the page needs authentication, or a CAPTCHA appears — you can catch it immediately.
There are two ways to access Live View. From code, obtain the session_id of the browser you want to inspect and open the devtoolsFrontendURL from the response in Chrome. Or from the Cloudflare dashboard, open the new Live Sessions tab in the Browser Run section and click into any active session.
Live View of an AI agent booking a hotel, showing real-time browser activity
Session Recordings
Live View is great when you’re available, but you can’t watch every session. Session Recordings captures DOM changes, mouse and keyboard events, and page navigation as structured JSON so you can replay any session after it ends.
Enable Session Recordings by passing recording:true when launching a browser. After the session closes, you can access the recording in the Cloudflare dashboard from the Runs tab or retrieve recordings via API and replay them with the rrweb-player. Next, we’re adding the ability to inspect DOM state and console output at any point during the recording.
Session recording replay of a browser automation browsing the Sentry Shop and adding a bomber jacket to the cart
Dashboard Redesign
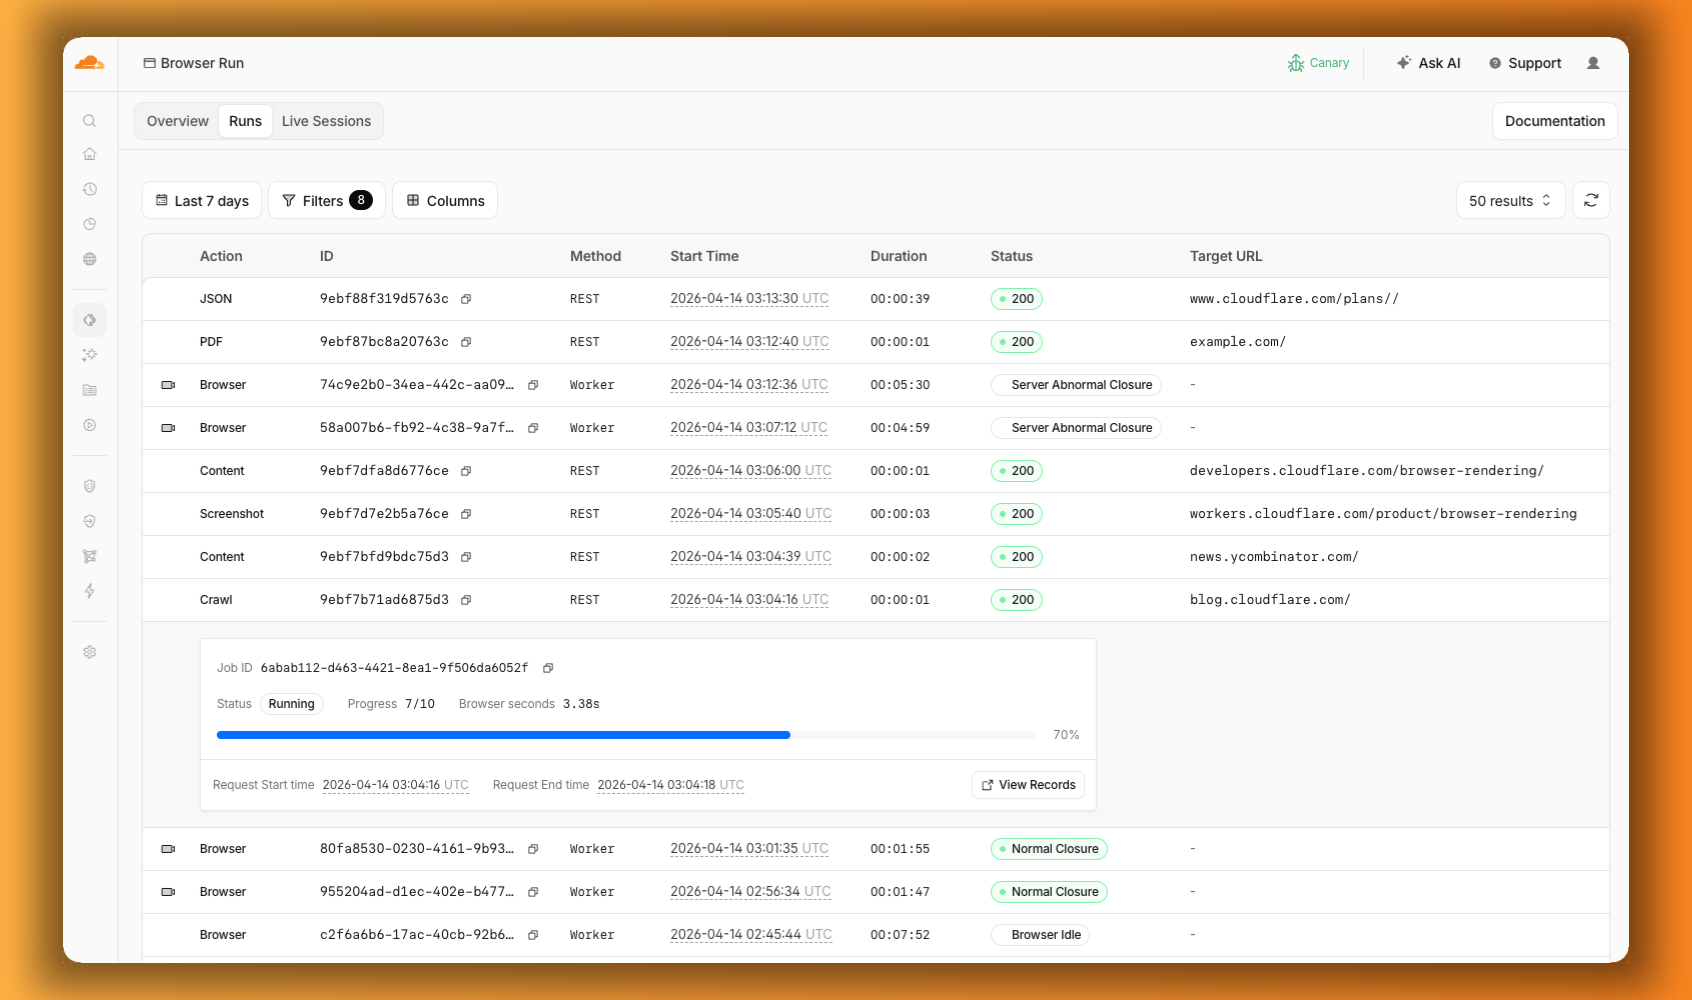
Previously, the Browser Run dashboard only showed logs from browser sessions. Requests for screenshots, PDFs, markdown, and crawls were not visible. The redesigned dashboard changes that. The new Runs tab shows every request. You can filter by endpoint and view details including target URLs, status, and duration.
The Browser Run dashboard Runs tab showing browser sessions and quick actions like PDF, Screenshot, and Crawl in a single view, with a crawl job expanded to show its progress
4) Intervene
Agents are good, but they’re not perfect. Sometimes they need their human to step in. Browser Run supports Human in the Loop workflows where a human can take control of a live browser session, handle what the automation cannot, then let the session continue.
Human in the Loop
When automation hits a wall, you don’t have to restart. With Human in the Loop, you can step in and interact with the page directly to click, type, navigate, enter credentials, or submit forms. This unlocks workflows that agents cannot handle.
Today, you can step in by opening the Live View URL for any active session. Next, we’re adding a handoff flow where the agent can signal that it needs help, notify a human to step in, then hand control back to the agent once the issue is resolved.
An AI agent searching Amazon for an orange lava lamp, comparing options, and handing off to a human when sign-in is required to complete the purchase
5) Scale
Customers have asked us to raise limits so that they can do more, faster.
Higher limits
We’ve quadrupled the default concurrent browser limit from 30 to 120. Every session gives you instant access to a browser from a global pool of warm instances, so there’s no cold start waiting for a browser to spin up. In March, we also increased limits for Quick Actions to 10 requests per second. If you need higher limits, they’re available by request.
What’s next
Human in the Loop Handoff: today you can intervene in a browser session through Live View. Soon, the agent will be able to signal when it needs help, so you can build in notifications to alert a human to step in.
Session Recordings Inspection: you can already scrub through the timeline and replay any session. Soon, you’ll be able to inspect DOM state and console output as well.
Traces and Browser Logs: access debugging information without instrumenting your code. Console logs, network requests, timing data. If something broke, you’ll know where.
Screenshot, PDF, and markdown directly from Workers: the same simple tasks available through the REST API are coming to Workers Bindings. env.BROWSER.screenshot() just works, with no API tokens needed.
Get started
Browser Run is available today on both the Workers Free and Workers Paid plans. Everything we shipped today — Live View, Human in the Loop, Session Recordings, and higher concurrency limits — is ready to use.
If you were already using Browser Rendering, everything works the same, just with a new name and more features.
The world is in a race to build its first quantum computer capable of solving practical problems not feasible on even the largest conventional supercomputers. While the quantum computing paradigm promises many benefits, it also threatens the security of the Internet by breaking much of the cryptography we have come to rely on.
To mitigate this threat, Cloudflare is helping to migrate the Internet to Post-Quantum (PQ) cryptography. Today, about 50% of traffic to Cloudflare’s edge network is protected against the most urgent threat: an attacker who can intercept and store encrypted traffic today and then decrypt it in the future with the help of a quantum computer. This is referred to as the harvest now, decrypt laterthreat.
However, this is just one of the threats we need to address. A quantum computer can also be used to crack a server’s TLS certificate, allowing an attacker to impersonate the server to unsuspecting clients. The good news is that we already have PQ algorithms we can use for quantum-safe authentication. The bad news is that adoption of these algorithms in TLS will require significant changes to one of the most complex and security-critical systems on the Internet: the Web Public-Key Infrastructure (WebPKI).
The central problem is the sheer size of these new algorithms: signatures for ML-DSA-44, one of the most performant PQ algorithms standardized by NIST, are 2,420 bytes long, compared to just 64 bytes for ECDSA-P256, the most popular non-PQ signature in use today; and its public keys are 1,312 bytes long, compared to just 64 bytes for ECDSA. That’s a roughly 20-fold increase in size. Worse yet, the average TLS handshake includes a number of public keys and signatures, adding up to 10s of kilobytes of overhead per handshake. This is enough to have a noticeable impact on the performance of TLS.
That makes drop-in PQ certificates a tough sell to enable today: they don’t bring any security benefit before Q-day — the day a cryptographically relevant quantum computer arrives — but they do degrade performance. We could sit and wait until Q-day is a year away, but that’s playing with fire. Migrations always take longer than expected, and by waiting we risk the security and privacy of the Internet, which is dear to us.
It’s clear that we must find a way to make post-quantum certificates cheap enough to deploy today by default for everyone — not just those that can afford it. In this post, we’ll introduce you to the plan we’ve brought together with industry partners to the IETF to redesign the WebPKI in order to allow a smooth transition to PQ authentication with no performance impact (and perhaps a performance improvement!). We’ll provide an overview of one concrete proposal, called Merkle Tree Certificates (MTCs), whose goal is to whittle down the number of public keys and signatures in the TLS handshake to the bare minimum required.
But talk is cheap. We knowfromexperience that, as with any change to the Internet, it’s crucial to test early and often. Today we’re announcing our intent to deploy MTCs on an experimental basis in collaboration with Chrome Security. In this post, we’ll describe the scope of this experiment, what we hope to learn from it, and how we’ll make sure it’s done safely.
The WebPKI today — an old system with many patches
Why does the TLS handshake have so many public keys and signatures?
Let’s start with Cryptography 101. When your browser connects to a website, it asks the server to authenticate itself to make sure it’s talking to the real server and not an impersonator. This is usually achieved with a cryptographic primitive known as a digital signature scheme (e.g., ECDSA or ML-DSA). In TLS, the server signs the messages exchanged between the client and server using its secret key, and the client verifies the signature using the server’s public key. In this way, the server confirms to the client that they’ve had the same conversation, since only the server could have produced a valid signature.
If the client already knows the server’s public key, then only 1 signature is required to authenticate the server. In practice, however, this is not really an option. The web today is made up of around a billion TLS servers, so it would be unrealistic to provision every client with the public key of every server. What’s more, the set of public keys will change over time as new servers come online and existing ones rotate their keys, so we would need some way of pushing these changes to clients.
This scaling problem is at the heart of the design of all PKIs.
Trust is transitive
Instead of expecting the client to know the server’s public key in advance, the server might just send its public key during the TLS handshake. But how does the client know that the public key actually belongs to the server? This is the job of a certificate.
A certificate binds a public key to the identity of the server — usually its DNS name, e.g., cloudflareresearch.com. The certificate is signed by a Certification Authority (CA) whose public key is known to the client. In addition to verifying the server’s handshake signature, the client verifies the signature of this certificate. This establishes a chain of trust: by accepting the certificate, the client is trusting that the CA verified that the public key actually belongs to the server with that identity.
Clients are typically configured to trust many CAs and must be provisioned with a public key for each. Things are much easier however, since there are only 100s of CAs instead of billions. In addition, new certificates can be created without having to update clients.
These efficiencies come at a relatively low cost: for those counting at home, that’s +1 signature and +1 public key, for a total of 2 signatures and 1 public key per TLS handshake.
That’s not the end of the story, however. As the WebPKI has evolved, so have these chains of trust grown a bit longer. These days it’s common for a chain to consist of two or more certificates rather than just one. This is because CAs sometimes need to rotatetheir keys, just as servers do. But before they can start using the new key, they must distribute the corresponding public key to clients. This takes time, since it requires billions of clients to update their trust stores. To bridge the gap, the CA will sometimes use the old key to issue a certificate for the new one and append this certificate to the end of the chain.
That’s +1 signature and +1 public key, which brings us to 3 signatures and 2 public keys. And we still have a little ways to go.
Trust but verify
The main job of a CA is to verify that a server has control over the domain for which it’s requesting a certificate. This process has evolved over the years from a high-touch, CA-specific process to a standardized, mostly automated process used for issuing most certificates on the web. (Not all CAs fully support automation, however.) This evolution is marked by a number of security incidents in which a certificate was mis-issued to a party other than the server, allowing that party to impersonate the server to any client that trusts the CA.
Automation helps, but attacks are still possible, and mistakes are almost inevitable. Earlier this year, several certificates for Cloudflare’s encrypted 1.1.1.1 resolver were issued without our involvement or authorization. This apparently occurred by accident, but it nonetheless put users of 1.1.1.1 at risk. (The mis-issued certificates have since been revoked.)
Ensuring mis-issuance is detectable is the job of the Certificate Transparency (CT) ecosystem. The basic idea is that each certificate issued by a CA gets added to a public log. Servers can audit these logs for certificates issued in their name. If ever a certificate is issued that they didn’t request itself, the server operator can prove the issuance happened, and the PKI ecosystem can take action to prevent the certificate from being trusted by clients.
Major browsers, including Firefox and Chrome and its derivatives, require certificates to be logged before they can be trusted. For example, Chrome, Safari, and Firefox will only accept the server’s certificate if it appears in at least two logs the browser is configured to trust. This policy is easy to state, but tricky to implement in practice:
Operating a CT log has historically been fairly expensive. Logs ingest billions of certificates over their lifetimes: when an incident happens, or even just under high load, it can take some time for a log to make a new entry available for auditors.
Clients can’t really audit logs themselves, since this would expose their browsing history (i.e., the servers they wanted to connect to) to the log operators.
The solution to both problems is to include a signature from the CT log along with the certificate. The signature is produced immediately in response to a request to log a certificate, and attests to the log’s intent to include the certificate in the log within 24 hours.
Per browser policy, certificate transparency adds +2 signatures to the TLS handshake, one for each log. This brings us to a total of 5 signatures and 2 public keys in a typical handshake on the public web.
The future WebPKI
The WebPKI is a living, breathing, and highly distributed system. We’ve had to patch it a number of times over the years to keep it going, but on balance it has served our needs quite well — until now.
Previously, whenever we needed to update something in the WebPKI, we would tack on another signature. This strategy has worked because conventional cryptography is so cheap. But 5 signatures and 2 public keys on average for each TLS handshake is simply too much to cope with for the larger PQ signatures that are coming.
The good news is that by moving what we already have around in clever ways, we can drastically reduce the number of signatures we need.
Crash course on Merkle Tree Certificates
Merkle Tree Certificates (MTCs) is a proposal for the next generation of the WebPKI that we are implementing and plan to deploy on an experimental basis. Its key features are as follows:
All the information a client needs to validate a Merkle Tree Certificate can be disseminated out-of-band. If the client is sufficiently up-to-date, then the TLS handshake needs just 1 signature, 1 public key, and 1 Merkle tree inclusion proof. This is quite small, even if we use post-quantum algorithms.
The MTC specification makes certificate transparency a first class feature of the PKI by having each CA run its own log of exactly the certificates they issue.
Let’s poke our head under the hood a little. Below we have an MTC generated by one of our internal tests. This would be transmitted from the server to the client in the TLS handshake:
Looks like your average PEM encoded certificate. Let’s decode it and look at the parameters:
$ openssl x509 -in merkle-tree-cert.pem -noout -text
Certificate:
    Data:
        Version: 3 (0x2)
        Serial Number: 531 (0x213)
        Signature Algorithm: 1.3.6.1.4.1.44363.47.0
        Issuer: 1.3.6.1.4.1.44363.47.1=44363.48.3
        Validity
            Not Before: Oct 21 15:33:26 2025 GMT
            Not After : Oct 28 15:33:26 2025 GMT
        Subject: CN=cloudflareresearch.com
        Subject Public Key Info:
            Public Key Algorithm: id-ecPublicKey
                Public-Key: (256 bit)
                pub:
                    04:70:ed:e1:96:87:b4:22:ef:fb:dc:a9:cd:9c:5c:
                    ef:1e:9e:ab:1b:6d:d7:11:74:7b:76:c8:3c:a1:5f:
                    94:37:45:99:d8:80:e3:5c:24:4f:28:46:b5:bf:84:
                    60:d8:fc:eb:82:5a:c4:4e:33:90:c7:b3:36:51:0c:
                    92:6d:bf:88:27
                ASN1 OID: prime256v1
                NIST CURVE: P-256
        X509v3 extensions:
            X509v3 Key Usage: critical
                Digital Signature
            X509v3 Extended Key Usage:
                TLS Web Server Authentication
            X509v3 Subject Alternative Name:
                DNS:cloudflareresearch.com, DNS:static-ct.cloudflareresearch.com
    Signature Algorithm: 1.3.6.1.4.1.44363.47.0
    Signature Value:
        00:00:00:00:00:00:02:00:00:00:00:00:00:00:02:58:00:e0:
        44:be:03:a5:bd:6a:b7:f2:9e:39:77:4c:16:4c:f8:06:e5:e1:
        55:c0:93:21:c6:79:83:3c:dd:5b:e6:57:89:c0:75:b3:4c:ec:
        75:8a:0b:53:a0:ca:1c:07:0c:1a:92:dd:c7:7c:a2:23:5d:83:
        0e:e4:23:43:38:af:43:20:a8:66:44:34:95:87:ea:2b:f0:0f:
        16:52:bb:ea:67:67:1e:89:36:4f:90:d4:05:55:89:46:f1:b7:
        b6:68:84:d3:57:31:ae:2b:c3:79:31:86:85:9d:24:ed:cf:25:
        a4:5c:fd:8f:f6:76:14:55:dd:67:2e:df:d6:8c:25:0d:52:48:
        c8:e3:fe:f9:7c:e6:a5:30:52:a5:b5:c7:3a:89:a5:c1:f6:4b:
        5b:95:ef:70:b8:91:fc:61:0f:6d:16:de:39:e9:a0:59:49:2b:
        34:71:7c:2a:16:da:c7:af:de:f7:01:94:10:c4:62:d1:f5:00:
        87:bd:e8:a2:f4:df:3b:35:79:27:0e:fc:cc:43:e7:60:5a:df:
        df:06:e8:d3:7e:eb:b3:bf:7b:25:43:0f:34:9a:26:c0:d3:6d:
        5d:0c:28:bc:87:58:58:15:00:00
While some of the parameters probably look familiar, others will look unusual. On the familiar side, the subject and public key are exactly what we might expect: the DNS name is cloudflareresearch.com and the public key is for a familiar signature algorithm, ECDSA-P256. This algorithm is not PQ, of course — in the future we would put ML-DSA-44 there instead.
On the unusual side, OpenSSL appears to not recognize the signature algorithm of the issuer and just prints the raw OID and bytes of the signature. There’s a good reason for this: the MTC does not have a signature in it at all! So what exactly are we looking at?
The trick to leave out signatures is that a Merkle Tree Certification Authority (MTCA) produces its signatureless certificates in batches rather than individually. In place of a signature, the certificate has an inclusion proof of the certificate in a batch of certificates signed by the MTCA.
To understand how inclusion proofs work, let’s think about a slightly simplified version of the MTC specification. To issue a batch, the MTCA arranges the unsigned certificates into a data structure called a Merkle tree that looks like this:
Each leaf of the tree corresponds to a certificate, and each inner node is equal to the hash of its children. To sign the batch, the MTCA uses its secret key to sign the head of the tree. The structure of the tree guarantees that each certificate in the batch was signed by the MTCA: if we tried to tweak the bits of any one of the certificates, the treehead would end up having a different value, which would cause the signature to fail.
An inclusion proof for a certificate consists of the hash of each sibling node along the path from the certificate to the treehead:
Given a validated treehead, this sequence of hashes is sufficient to prove inclusion of the certificate in the tree. This means that, in order to validate an MTC, the client also needs to obtain the signed treehead from the MTCA.
This is the key to MTC’s efficiency:
Signed treeheads can be disseminated to clients out-of-band and validated offline. Each validated treehead can then be used to validate any certificate in the corresponding batch, eliminating the need to obtain a signature for each server certificate.
During the TLS handshake, the client tells the server which treeheads it has. If the server has a signatureless certificate covered by one of those treeheads, then it can use that certificate to authenticate itself. That’s 1 signature,1 public key and 1 inclusion proof per handshake, both for the server being authenticated.
Now, that’s the simplified version. MTC proper has some more bells and whistles. To start, it doesn’t create a separate Merkle tree for each batch, but it grows a single large tree, which is used for better transparency. As this tree grows, periodically (sub)tree heads are selected to be shipped to browsers, which we call landmarks. In the common case browsers will be able to fetch the most recent landmarks, and servers can wait for batch issuance, but we need a fallback: MTC also supports certificates that can be issued immediately and don’t require landmarks to be validated, but these are not as small. A server would provision both types of Merkle tree certificates, so that the common case is fast, and the exceptional case is slow, but at least it’ll work.
Experimental deployment
Ever since early designs for MTCs emerged, we’ve been eager to experiment with the idea. In line with the IETF principle of “running code”, it often takes implementing a protocol to work out kinks in the design. At the same time, we cannot risk the security of users. In this section, we describe our approach to experimenting with aspects of the Merkle Tree Certificates design without changing any trust relationships.
Let’s start with what we hope to learn. We have lots of questions whose answers can help to either validate the approach, or uncover pitfalls that require reshaping the protocol — in fact, an implementation of an early MTC draft by Maximilian Pohl and Mia Celeste did exactly this. We’d like to know:
What breaks? Protocol ossification (the tendency of implementation bugs to make it harder to change a protocol) is an ever-present issue with deploying protocol changes. For TLS in particular, despite having built-in flexibility, time after time we’ve found that if that flexibility is not regularly used, there will be buggy implementations and middleboxes that break when they see things they don’t recognize. TLS 1.3 deployment took years longer than we hoped for this very reason. And more recently, the rollout of PQ key exchange in TLS caused the Client Hello to be split over multiple TCP packets, something that many middleboxes weren’t ready for.
What is the performance impact? In fact, we expect MTCs to reduce the size of the handshake, even compared to today’s non-PQ certificates. They will also reduce CPU cost: ML-DSA signature verification is about as fast as ECDSA, and there will be far fewer signatures to verify. We therefore expect to see a reduction in latency. We would like to see if there is a measurable performance improvement.
What fraction of clients will stay up to date? Getting the performance benefit of MTCs requires the clients and servers to be roughly in sync with one another. We expect MTCs to have fairly short lifetimes, a week or so. This means that if the client’s latest landmark is older than a week, the server would have to fallback to a larger certificate. Knowing how often this fallback happens will help us tune the parameters of the protocol to make fallbacks less likely.
In order to answer these questions, we are implementing MTC support in our TLS stack and in our certificate issuance infrastructure. For their part, Chrome is implementing MTC support in their own TLS stack and will stand up infrastructure to disseminate landmarks to their users.
As we’ve done in past experiments, we plan to enable MTCs for a subset of our free customers with enough traffic that we will be able to get useful measurements. Chrome will control the experimental rollout: they can ramp up slowly, measuring as they go and rolling back if and when bugs are found.
Which leaves us with one last question: who will run the Merkle Tree CA?
Bootstrapping trust from the existing WebPKI
Standing up a proper CA is no small task: it takes years to be trusted by major browsers. That’s why Cloudflare isn’t going to become a “real” CA for this experiment, and Chrome isn’t going to trust us directly.
Instead, to make progress on a reasonable timeframe, without sacrificing due diligence, we plan to “mock” the role of the MTCA. We will run an MTCA (on Workers based on our StaticCT logs), but for each MTC we issue, we also publish an existing certificate from a trusted CA that agrees with it. We call this the bootstrap certificate. When Chrome’s infrastructure pulls updates from our MTCA log, they will also pull these bootstrap certificates, and check whether they agree. Only if they do, they’ll proceed to push the corresponding landmarks to Chrome clients. In other words, Cloudflare is effectively just “re-encoding” an existing certificate (with domain validation performed by a trusted CA) as an MTC, and Chrome is using certificate transparency to keep us honest.
Conclusion
With almost 50% of our traffic already protected by post-quantum encryption, we’re halfway to a fully post-quantum secure Internet. The second part of our journey, post-quantum certificates, is the hardest yet though. A simple drop-in upgrade has a noticeable performance impact and no security benefit before Q-day. This means it’s a hard sell to enable today by default. But here we are playing with fire: migrations always take longer than expected. If we want to keep an ubiquitously private and secure Internet, we need a post-quantum solution that’s performant enough to be enabled by default today.
Merkle Tree Certificates (MTCs) solves this problem by reducing the number of signatures and public keys to the bare minimum while maintaining the WebPKI’s essential properties. We plan to roll out MTCs to a fraction of free accounts by early next year. This does not affect any visitors that are not part of the Chrome experiment. For those that are, thanks to the bootstrap certificates, there is no impact on security.
We’re excited to keep the Internet fast and secure, and will report back soon on the results of this experiment: watch this space! MTC is evolving as we speak, if you want to get involved, please join the IETF PLANTS mailing list.
On Thursday, Google said an anonymous source notified it of the vulnerability. The vulnerability carries a severity rating of 8.8 out of 10. In response, Google said, it would be releasing versions 124.0.6367.201/.202 for macOS and Windows and 124.0.6367.201 for Linux in subsequent days.
“Google is aware that an exploit for CVE-2024-4671 exists in the wild,” the company said.
Google didn’t provide any other details about the exploit, such as what platforms were targeted, who was behind the exploit, or what they were using it for.
Enabling anonymous access to the web with privacy-preserving cryptography
The challenge of telling humans and bots apart is almost as old as the web itself. From online ticket vendors to dating apps, to ecommerce and finance — there are many legitimate reasons why you’d want to know if it’s a person or a machine knocking on the front door of your website.
Unfortunately, the tools for the web have traditionally been clunky and sometimes involved a bad user experience. None more so than the CAPTCHA — an irksome solution that humanity wastes a staggering amount of time on. A more subtle but intrusive approach is IP tracking, which uses IP addresses to identify and take action on suspicious traffic, but that too can come with unforeseen consequences.
And yet, the problem of distinguishing legitimate human requests from automated bots remains as vital as ever. This is why for years Cloudflare has invested in the Privacy Pass protocol — a novel approach to establishing a user’s identity by relying on cryptography, rather than crude puzzles — all while providing a streamlined, privacy-preserving, and often frictionless experience to end users.
Cloudflare began supporting Privacy Pass in 2017, with the release of browser extensions for Chrome and Firefox. Web admins with their sites on Cloudflare would have Privacy Pass enabled in the Cloudflare Dash; users who installed the extension in their browsers would see fewer CAPTCHAs on websites they visited that had Privacy Pass enabled.
Since then, Cloudflare stopped issuing CAPTCHAs, and Privacy Pass has come a long way. Apple uses a version of Privacy Pass for its Private Access Tokens system which works in tandem with a device’s secure enclave to attest to a user’s humanity. And Cloudflare uses Privacy Pass as an important signal in our Web Application Firewall and Bot Management products — which means millions of websites natively offer Privacy Pass.
In this post, we explore the latest changes to Privacy Pass protocol. We are also excited to introduce a public implementation of the latest IETF draft of the Privacy Pass protocol — including a set of open-source templates that can be used to implement Privacy Pass Origins, Issuers, and Attesters. These are based on Cloudflare Workers, and are the easiest way to get started with a new deployment of Privacy Pass.
To complement the updated implementations, we are releasing a new version of our Privacy Pass browser extensions (Firefox, Chrome), which are rolling out with the name: Silk – Privacy Pass Client. Users of these extensions can expect to see fewer bot-checks around the web, and will be contributing to research about privacy preserving signals via a set of trusted attesters, which can be configured in the extension’s settings panel.
Finally, we will discuss how Privacy Pass can be used for an array of scenarios beyond differentiating bot from human traffic.
Notice to our users
If you use the Privacy Pass API that controls Privacy Pass configuration on Cloudflare, you can remove these calls. This API is no longer needed since Privacy Pass is now included by default in our Challenge Platform. Out of an abundance of caution for our customers, we are doing a four-month deprecation notice.
If you have the Privacy Pass extension installed, it should automatically update to Silk – Privacy Pass Client (Firefox, Chrome) over the next few days. We have renamed it to keep the distinction clear between the protocol itself and a client of the protocol.
Brief history
In the last decade, we’ve seen the rise of protocols with privacy at their core, including Oblivious HTTP (OHTTP), Distributed aggregation protocol (DAP), and MASQUE. These protocols improve privacy when browsing and interacting with services online. By protecting users’ privacy, these protocols also ask origins and website owners to revise their expectations around the data they can glean from user traffic. This might lead them to reconsider existing assumptions and mitigations around suspicious traffic, such as IP filtering, which often has unintended consequences.
In 2017, Cloudflare announced support for Privacy Pass. At launch, this meant improving content accessibility for web users who would see a lot of interstitial pages (such as CAPTCHAs) when browsing websites protected by Cloudflare. Privacy Pass tokens provide a signal about the user’s capabilities to website owners while protecting their privacy by ensuring each token redemption is unlinkable to its issuance context. Since then, the technology has turned into a fully fledged protocol used by millions thanks to academic and industry effort. The existing browser extension accounts for hundreds of thousands of downloads. During the same time, Cloudflare has dramatically evolved the way it allows customers to challenge their visitors, being more flexible about the signals it receives, and moving away from CAPTCHA as a binary legitimacy signal.
Deployments of this research have led to a broadening of use cases, opening the door to different kinds of attestation. An attestation is a cryptographically-signed data point supporting facts. This can include a signed token indicating that the user has successfully solved a CAPTCHA, having a user’s hardware attest it’s untampered, or a piece of data that an attester can verify against another data source.
For example, in 2022, Apple hardware devices began to offer Privacy Pass tokens to websites who wanted to reduce how often they show CAPTCHAs, by using the hardware itself as an attestation factor. Before showing images of buses and fire hydrants to users, CAPTCHA providers can request a Private Access Token (PAT). This native support does not require installing extensions, or any user action to benefit from a smoother and more private web browsing experience.
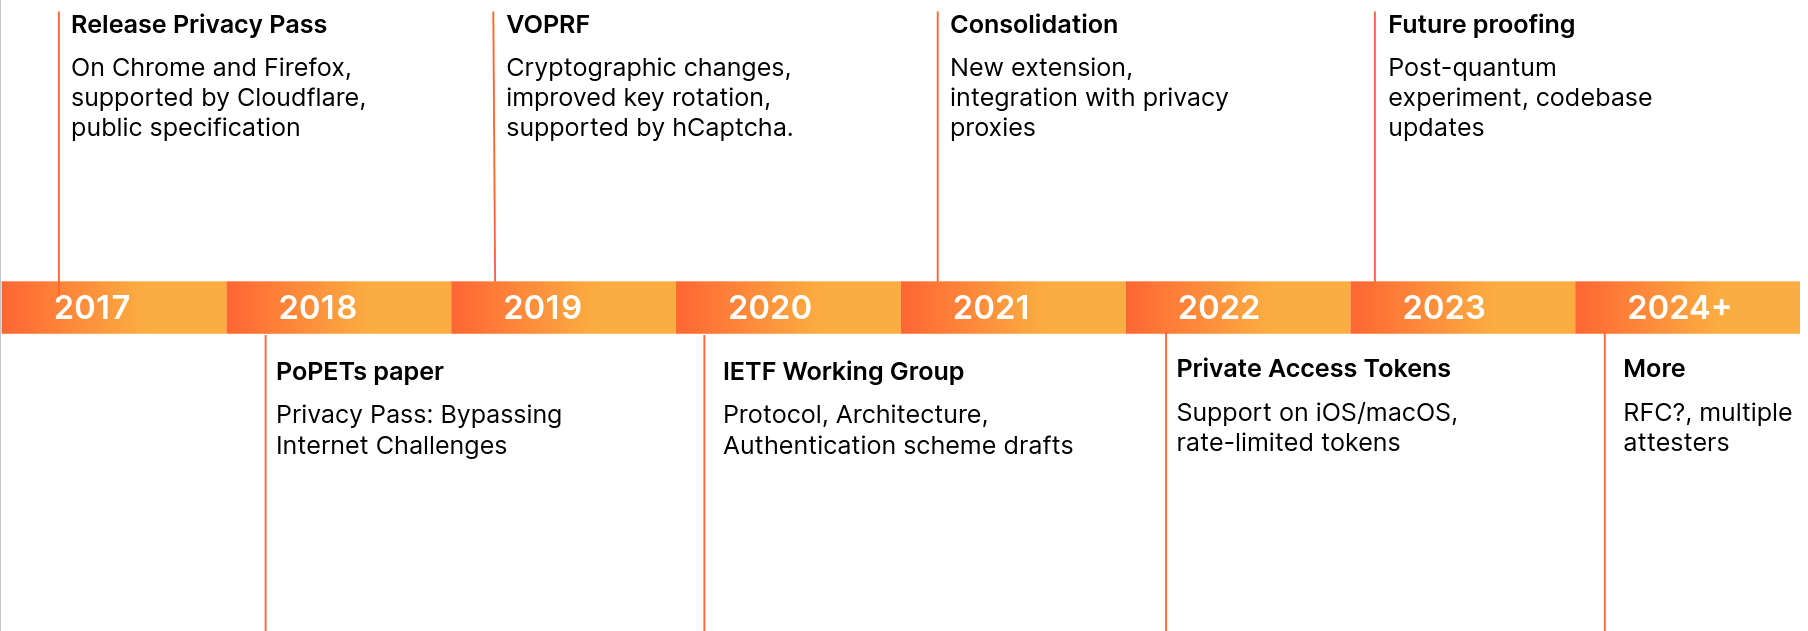
Below is a brief overview of changes to the protocol we participated in:
The timeline presents cryptographic changes, community inputs, and industry collaborations. These changes helped shape better standards for the web, such as VOPRF (RFC 9497), or RSA Blind Signatures (RFC 9474). In the next sections, we dive in the Privacy Pass protocol to understand its ins and outs.
Anonymous credentials in real life
Before explaining the protocol in more depth, let’s use an analogy. You are at a music festival. You bought your ticket online with a student discount. When you arrive at the gates, an agent scans your ticket, checks your student status, and gives you a yellow wristband and two drink tickets.
During the festival, you go in and out by showing your wristband. When a friend asks you to grab a drink, you pay with your tickets. One for your drink and one for your friend. You give your tickets to the bartender, they check the tickets, and give you a drink. The characteristics that make this interaction private is that the drinks tickets cannot be traced back to you or your payment method, but they can be verified as having been unused and valid for purchase of a drink.
In the web use case, the Internet is a festival. When you arrive at the gates of a website, an agent scans your request, and gives you a session cookie as well as two Privacy Pass tokens. They could have given you just one token, or more than two, but in our example ‘two tokens’ is the given website’s policy. You can use these tokens to attest your humanity, to authenticate on certain websites, or even to confirm the legitimacy of your hardware.
Now, you might wonder if this is a technique we have been using for years, why do we need fancy cryptography and standardization efforts? Well, unlike at a real-world music festival where most people don’t carry around photocopiers, on the Internet it is pretty easy to copy tokens. For instance, how do we stop people using a token twice? We could put a unique number on each token, and check it is not spent twice, but that would allow the gate attendant to tell the bartender which numbers were linked to which person. So, we need cryptography.
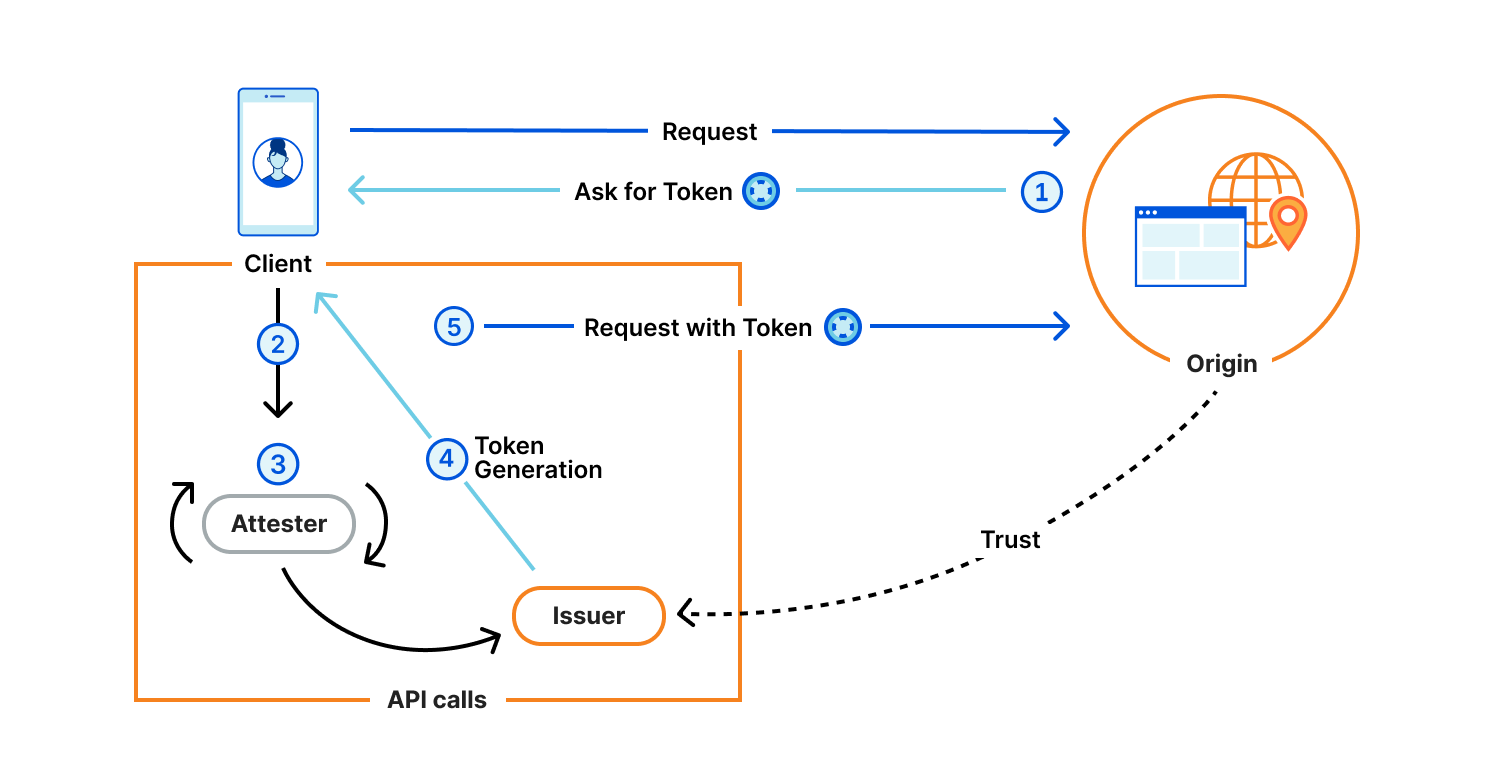
When another website presents a challenge to you, you provide your Privacy Pass token and are then allowed to view a gallery of beautiful cat pictures. The difference with the festival is this challenge might be interactive, which would be similar to the bartender giving you a numbered ticket which would have to be signed by the agent before getting a drink. The website owner can verify that the token is valid but has no way of tracing or connecting the user back to the action that provided them with the Privacy Pass tokens. With Privacy Pass terminology, you are a Client, the website is an Origin, the agent is an Attester, and the bar an Issuer. The next section goes through these in more detail.
Privacy Pass protocol
Privacy Pass specifies an extensible protocol for creating and redeeming anonymous and transferable tokens. In fact, Apple has their own implementation with Private Access Tokens (PAT), and later we will describe another implementation with the Silk browser extension. Given PAT was the first to implement the IETF defined protocol, Privacy Pass is sometimes referred to as PAT in the literature.
The protocol is generic, and defines four components:
Client: Web user agent with a Privacy Pass enabled browser. This could be your Apple device with PAT, or your web browser with the Silk extension installed. Typically, this is the actor who is requesting content and is asked to share some attribute of themselves.
Origin: Serves content requested by the Client. The Origin trusts one or more Issuers, and presents Privacy Pass challenges to the Client. For instance, Cloudflare Managed Challenge is a Privacy Pass origin serving two Privacy Pass challenges: one for Apple PAT Issuer, one for Cloudflare Research Issuer.
Issuer: Signs Privacy Pass tokens upon request from a trusted party, either an Attester or a Client depending on the deployment model. Different Issuers have their own set of trusted parties, depending on the security level they are looking for, as well as their privacy considerations. An Issuer validating device integrity should use different methods that vouch for this attribute to acknowledge the diversity of Client configurations.
Attester: Verifies an attribute of the Client and when satisfied requests a signed Privacy Pass token from the Issuer to pass back to the Client. Before vouching for the Client, an Attester may ask the Client to complete a specific task. This task could be a CAPTCHA, a location check, or age verification or some other check that will result in a single binary result. The Privacy Pass token will then share this one-bit of information in an unlinkable manner.
They interact as illustrated below.
Let’s dive into what’s really happening with an example. The User wants to access an Origin, say store.example.com. This website has suffered attacks or abuse in the past, and the site is using Privacy Pass to help avoid these going forward. To that end, the Origin returns an authentication request to the Client: WWW-Authenticate: PrivateToken challenge="A==",token-key="B==". In this way, the Origin signals that it accepts tokens from the Issuer with public key “B==” to satisfy the challenge. That Issuer in turn trusts reputable Attesters to vouch for the Client not being an attacker by means of the presence of a cookie, CAPTCHA, Turnstile, or CAP challenge for example. For accessibility reasons for our example, let us say that the Client likely prefers the Turnstile method. The User’s browser prompts them to solve a Turnstile challenge. On success, it contacts the Issuer “B==” with that solution, and then replays the initial requests to store.example.com, this time sending along the token header Authorization: PrivateToken token="C==", which the Origin accepts and returns your desired content to the Client. And that’s it.
We’ve described the Privacy Pass authentication protocol. While Basic authentication (RFC 7671) asks you for a username and a password, the PrivateToken authentication scheme allows the browser to be more flexible on the type of check, while retaining privacy. The Origin store.example.com does not know your attestation method, they just know you are reputable according to the token issuer. In the same spirit, the Issuer “B==” does not see your IP, nor the website you are visiting. This separation between issuance and redemption, also referred to as unlinkability, is what makes Privacy Pass private.
Demo time
To put the above in practice, let’s see how the protocol works with Silk, a browser extension providing Privacy Pass support. First, download the relevant Chrome or Firefox extension.
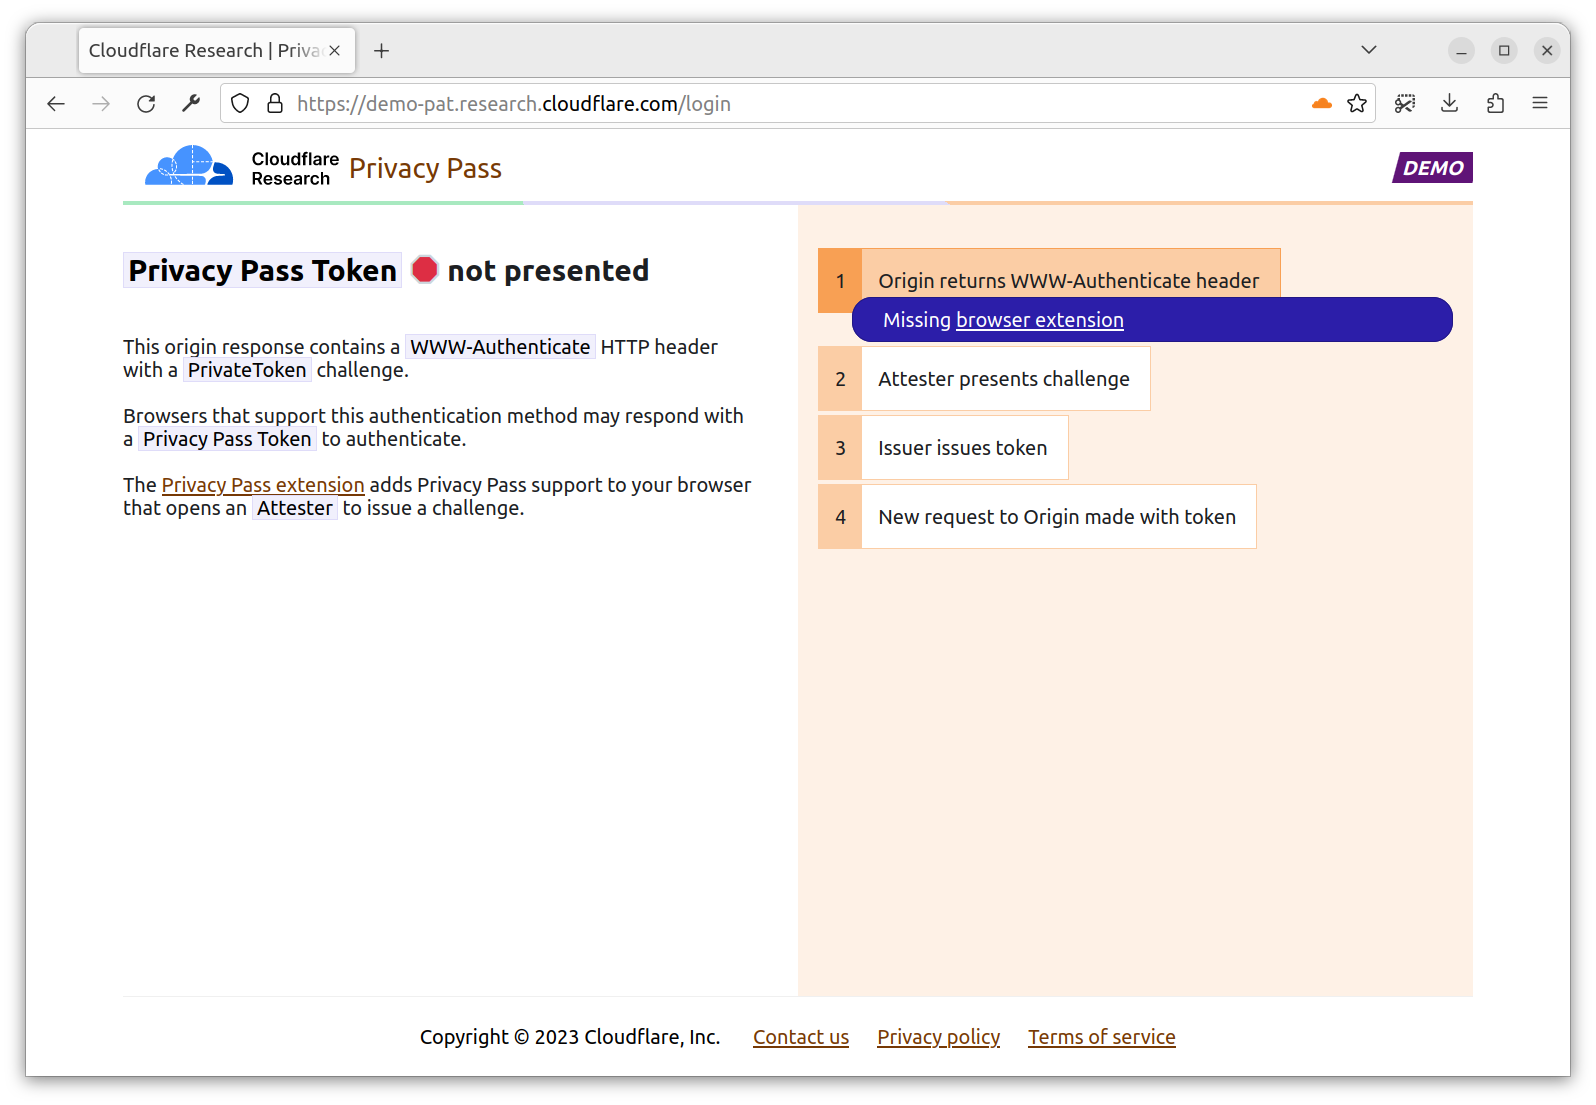
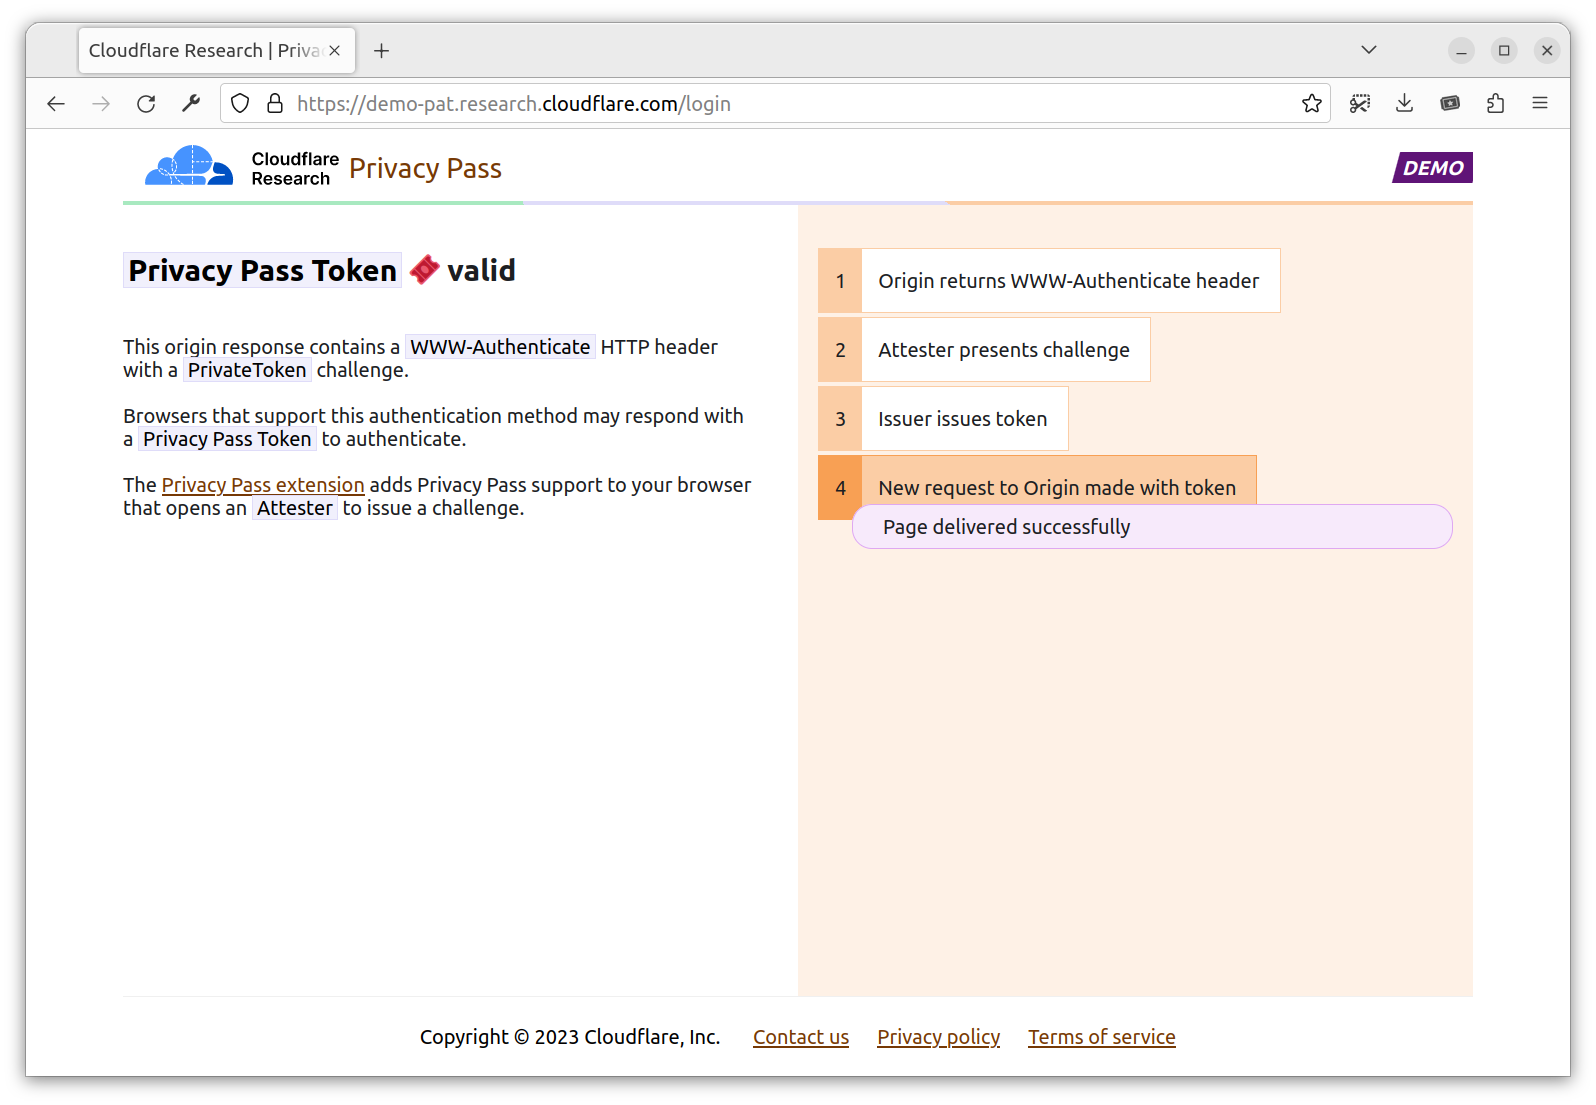
Then, head to https://demo-pat.research.cloudflare.com/login. The page returns a 401 Privacy Pass Token not presented. In fact, the origin expects you to perform a PrivateToken authentication. If you don’t have the extension installed, the flow stops here. If you have the extension installed, the extension is going to orchestrate the flow required to get you a token requested by the Origin.
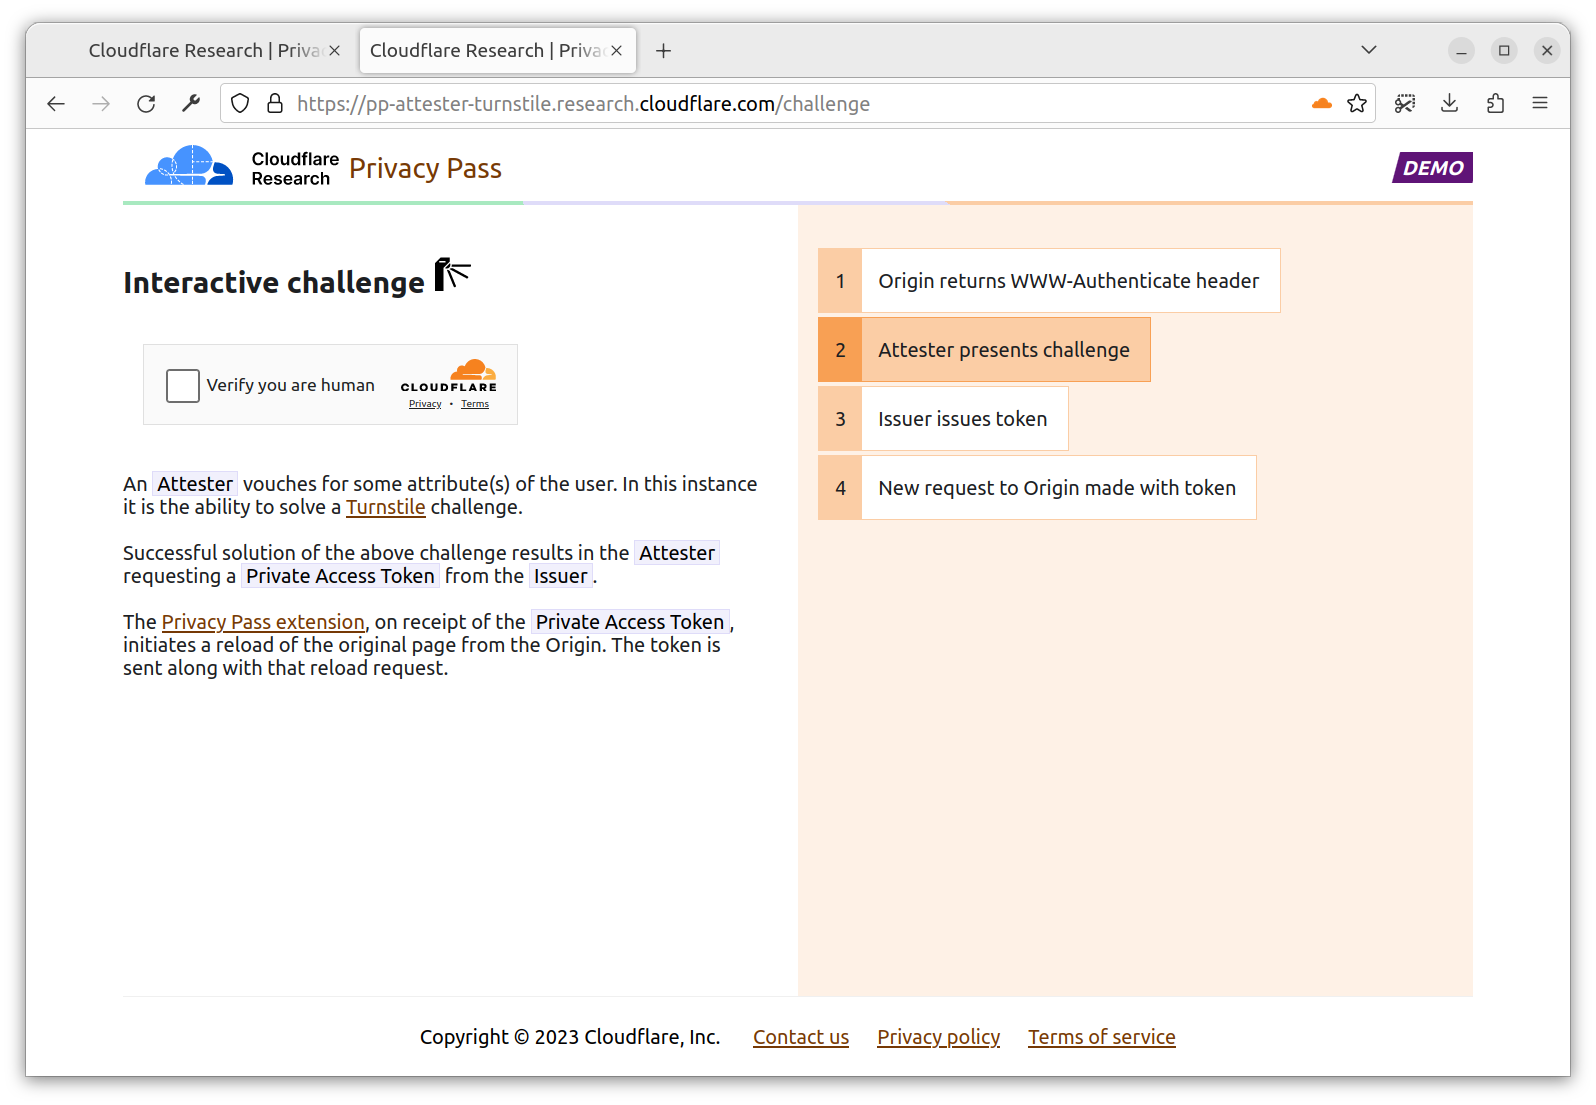
With the extension installed, you are directed to a new tab https://pp-attester-turnstile.research.cloudflare.com/challenge. This is a page provided by an Attester able to deliver you a token signed by the Issuer request by the Origin. In this case, the Attester checks you’re able to solve a Turnstile challenge.
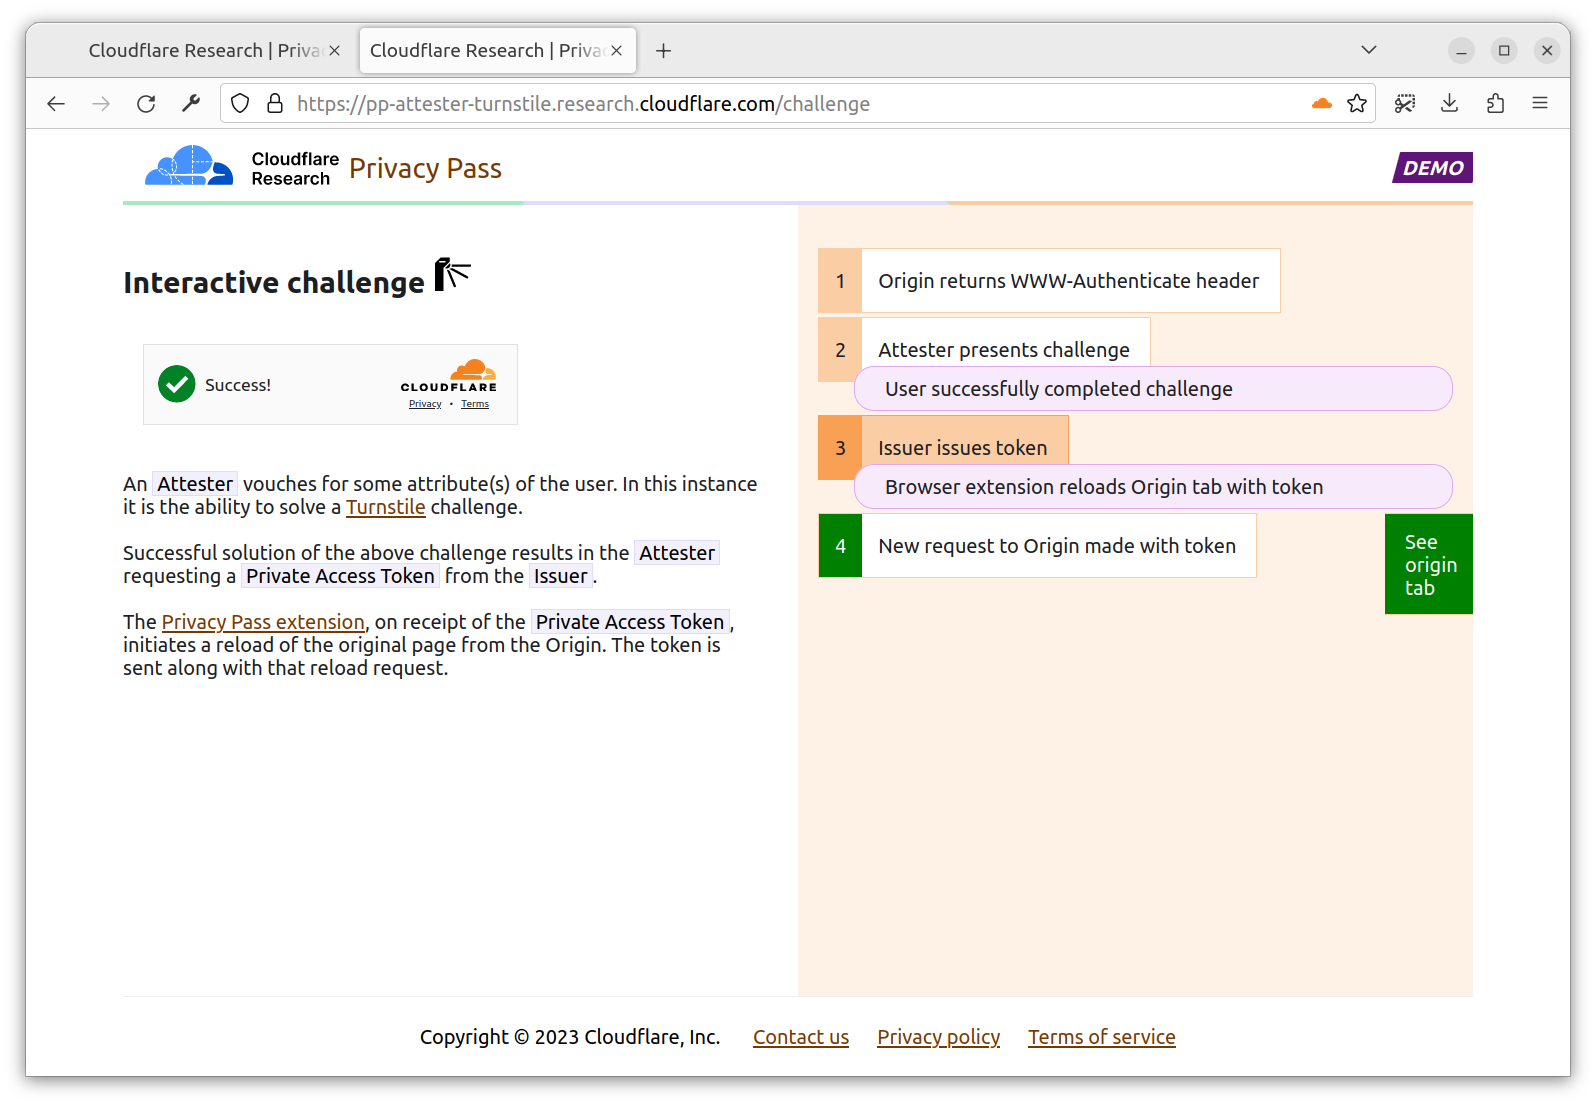
You click, and that’s it. The Turnstile challenge solution is sent to the Attester, which upon validation, sends back a token from the requested Issuer. This page appears for a very short time, as once the extension has the token, the challenge page is no longer needed.
The extension, now having a token requested by the Origin, sends your initial request for a second time, with an Authorization header containing a valid Issuer PrivateToken. Upon validation, the Origin allows you in with a 200 Privacy Pass Token valid!
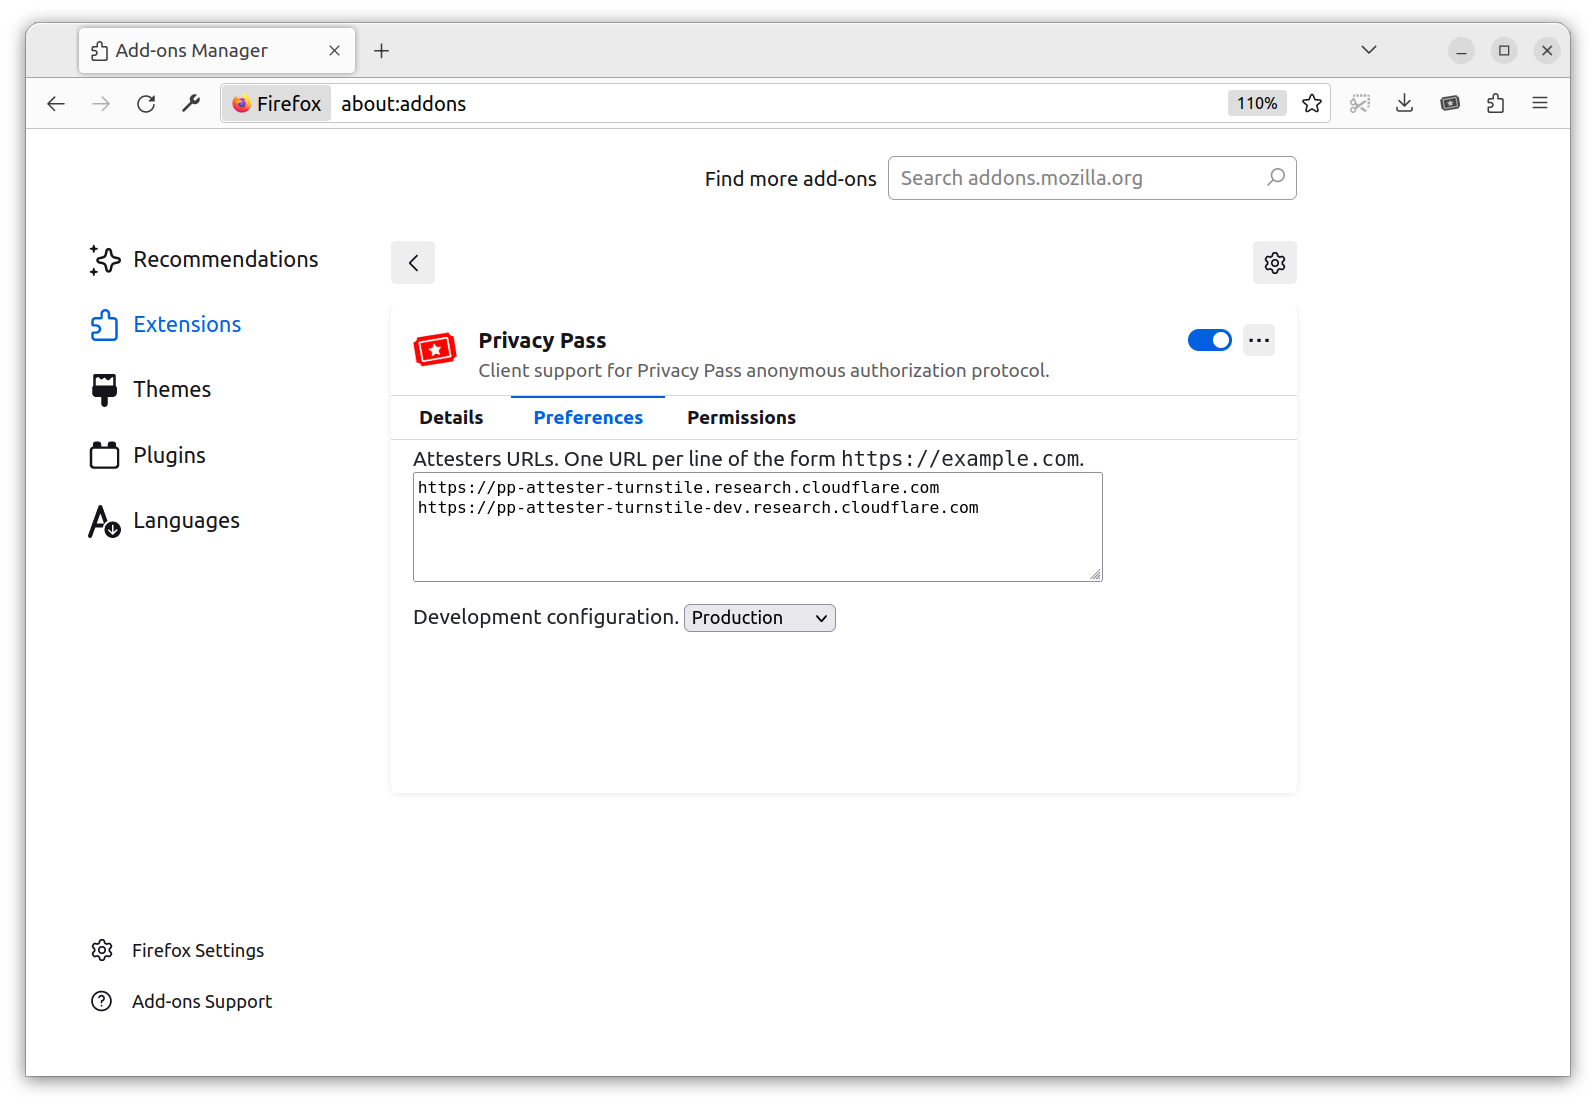
If you want to check behind the scenes, you can right-click on the extension logo and go to the preference/options page. It contains a list of attesters trusted by the extension, one per line. You can add your own attestation method (API described below). This allows the Client to decide on their preferred attestation methods.
Privacy Pass protocol — extended
The Privacy Pass protocol is new and not a standard yet, which implies that it’s not uniformly supported on all platforms. To improve flexibility beyond the existing standard proposal, we are introducing two mechanisms: an API for Attesters, and a replay API for web clients. The API for attesters allows developers to build new attestation methods, which only need to provide their URL to interface with the Silk browser extension. The replay API for web clients is a mechanism to enable websites to cooperate with the extension to make PrivateToken authentication work on browsers with Chrome user agents.
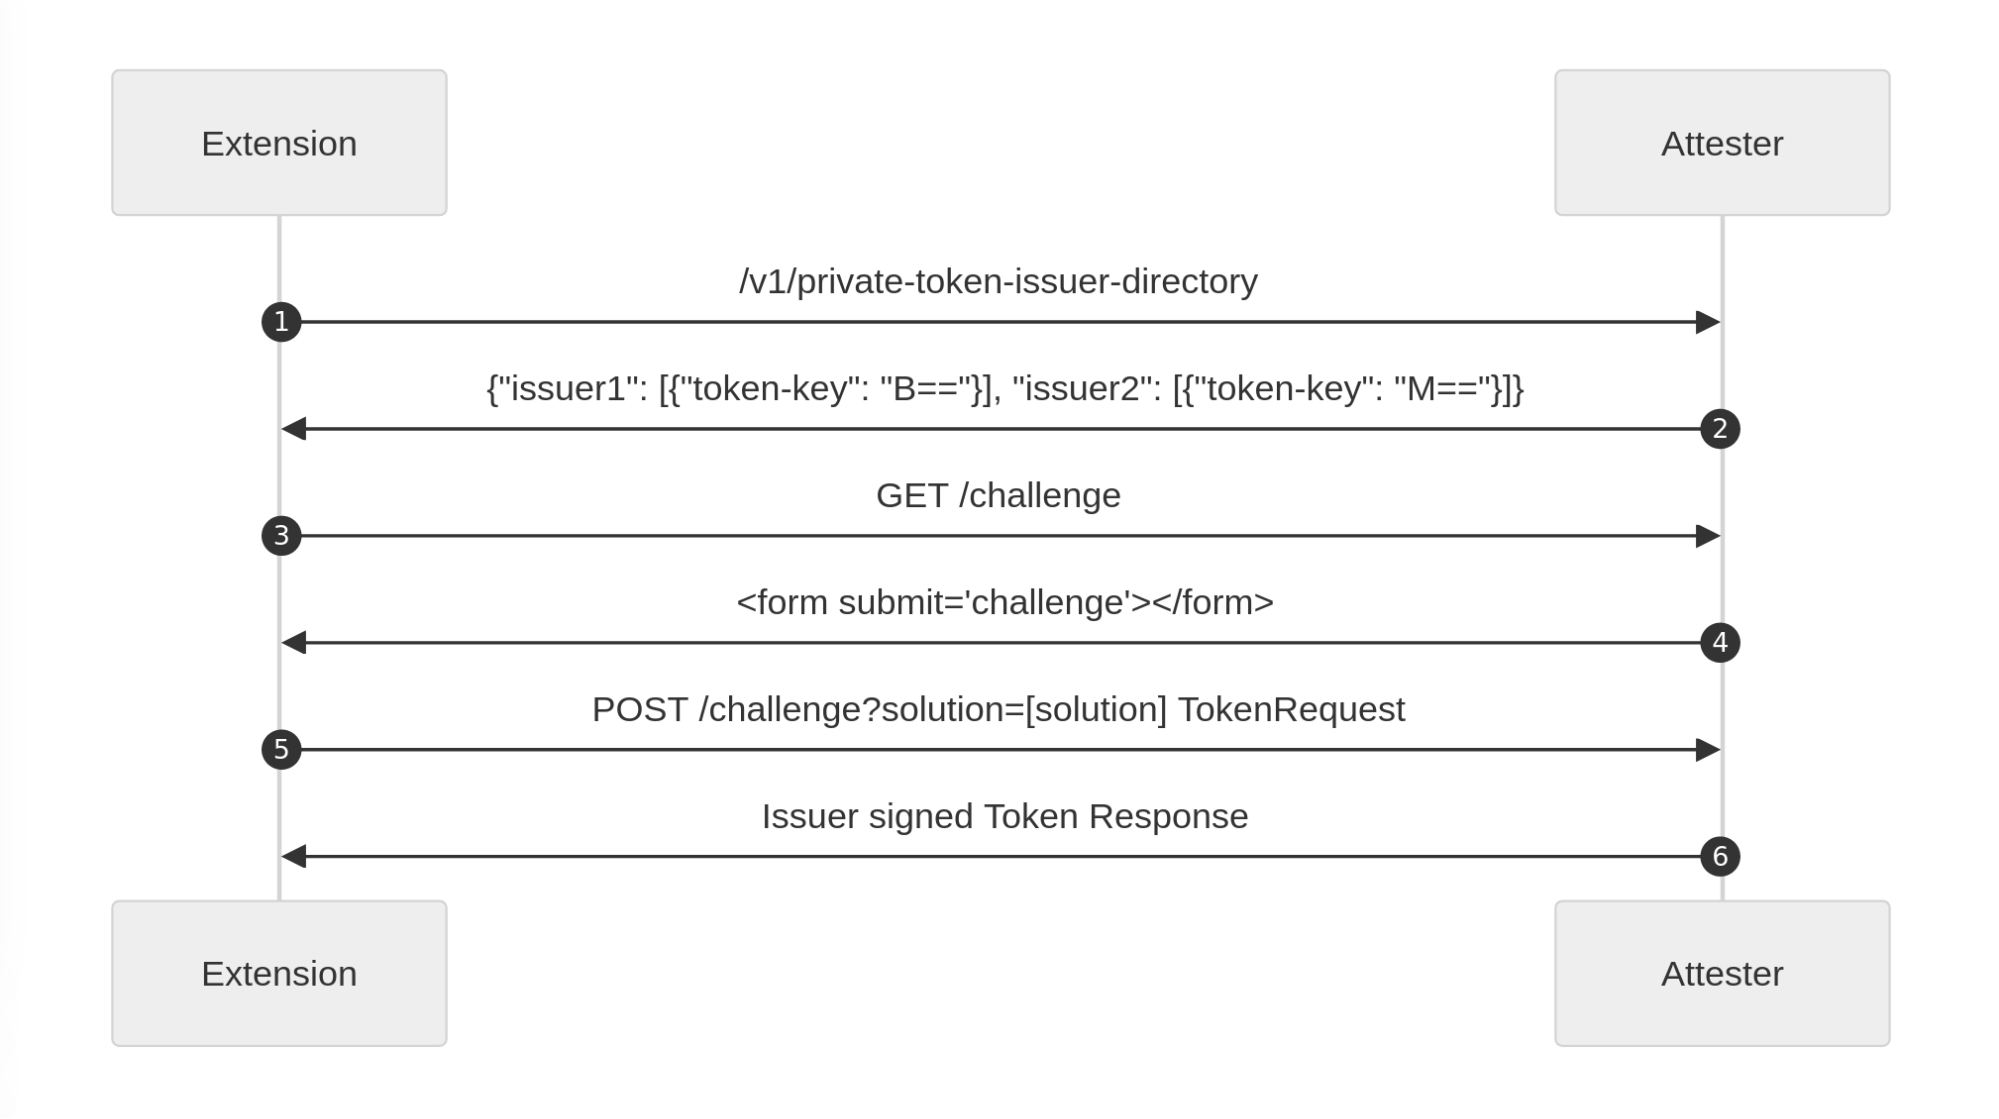
Because more than one Attester may be supported on your machine, your Client needs to understand which Attester to use depending on the requested Issuer. As mentioned before, you as the Client do not communicate directly with the Issuer because you don’t necessarily know their relation with the attester, so you cannot retrieve its public key. To this end, the Attester API exposes all Issuers reachable by the said Attester via an endpoint: /v1/private-token-issuer-directory. This way, your client selects an appropriate Attester – one in relation with an Issuer that the Origin trusts, before triggering a validation.
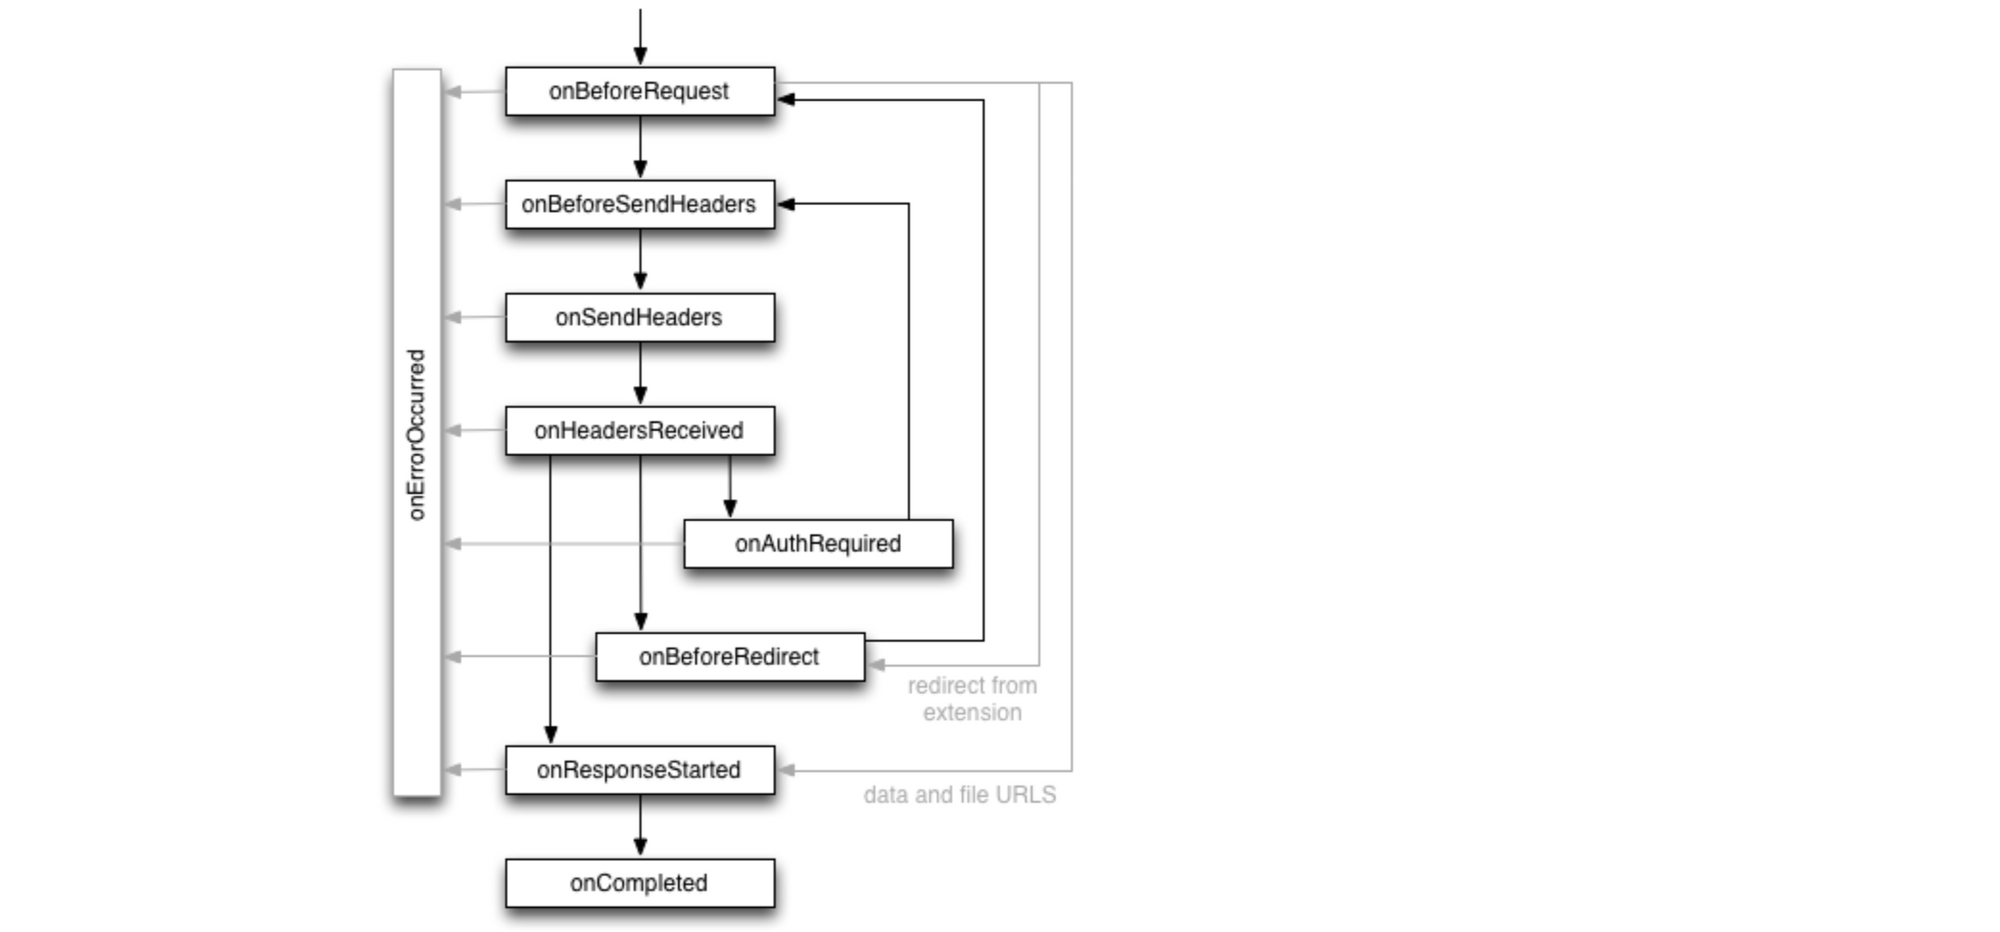
In addition, we propose a replay API. Its goal is to allow clients to fetch a resource a second time if the first response presented a Privacy pass challenge. Some platforms do this automatically, like Silk on Firefox, but some don’t. That’s the case with the Silk Chrome extension for instance, which in its support of manifest v3 cannot block requests and only supports Basic authentication in the onAuthRequired extension event. The Privacy Pass Authentication scheme proposes the request to be sent once to get a challenge, and then a second time to get the actual resource. Between these requests to the Origin, the platform orchestrates the issuance of a token. To keep clients informed about the state of this process, we introduce a private-token-client-replay: UUID header alongside WWW-Authenticate. Using a platform defined endpoint, this UUID informs web clients of the current state of authentication: pending, fulfilled, not-found.
To learn more about how you can use these today, and to deploy your own attestation method, read on.
Note: All examples below are designed in JavaScript and targeted at Cloudflare Workers. Privacy Pass is also implemented in other languages and can be deployed with a configuration that suits your needs.
As an Origin – website owners, service providers
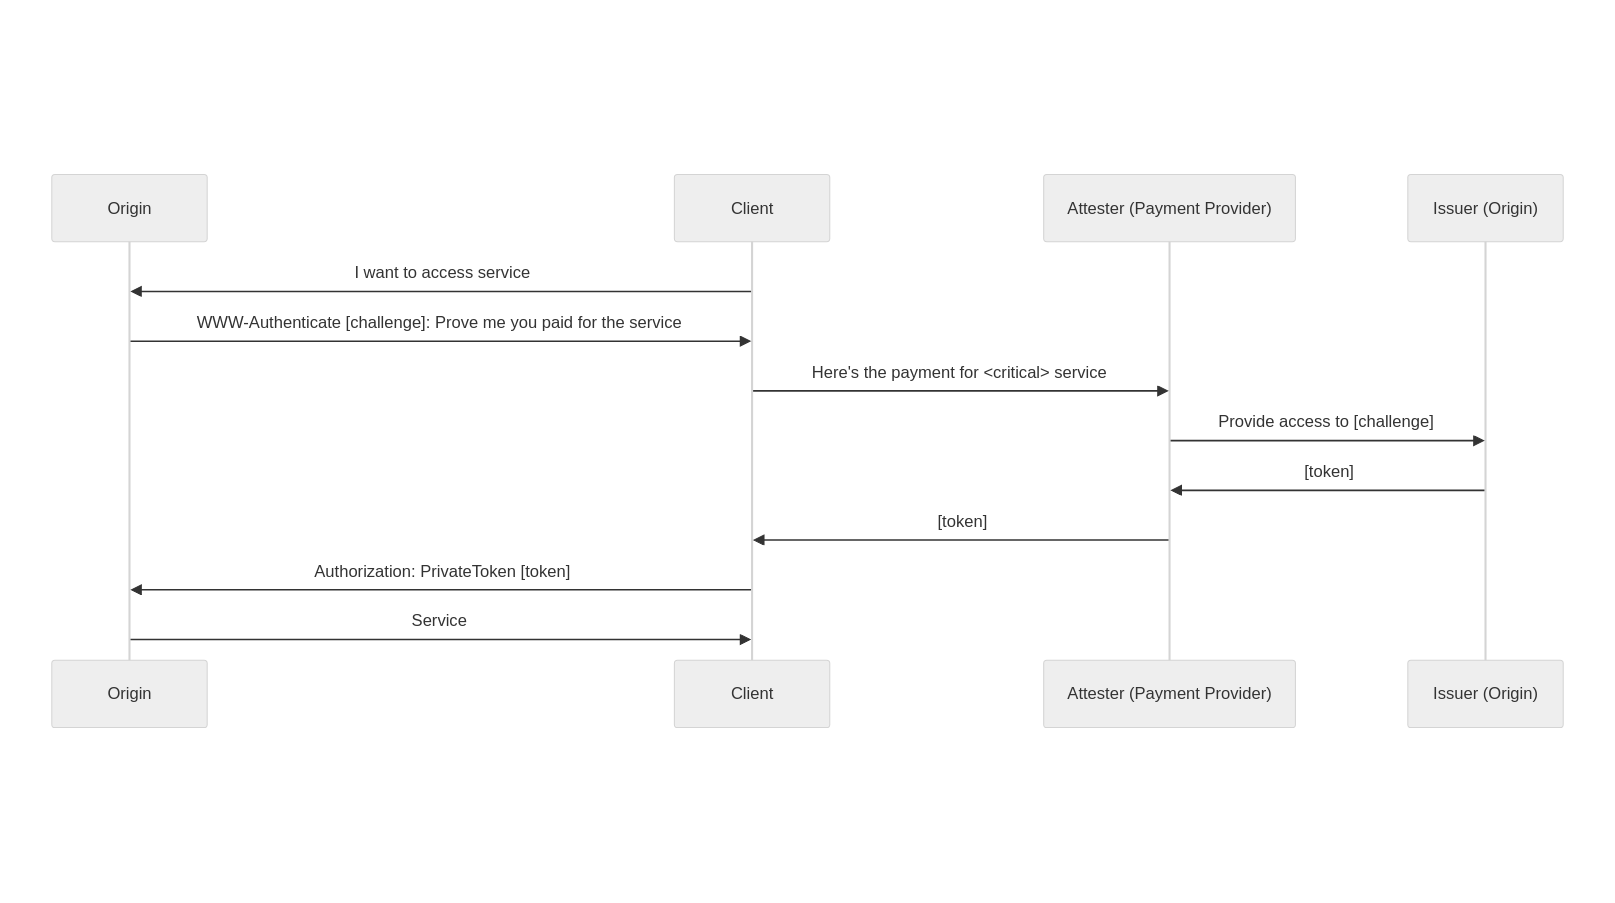
You are an online service that people critically rely upon (health or messaging for instance). You want to provide private payment options to users to maintain your users’ privacy. You only have one subscription tier at $10 per month. You have heard people are making privacy preserving apps, and want to use the latest version of Privacy Pass.
To access your service, users are required to prove they’ve paid for the service through a payment provider of their choosing (that you deem acceptable). This payment provider acknowledges the payment and requests a token for the user to access the service. As a sequence diagram, it looks as follows:
To implement it in Workers, we rely on the @cloudflare/privacypass-ts library, which can be installed by running:
npm i @cloudflare/privacypass-ts
This section is going to focus on the Origin work. We assume you have an Issuer up and running, which is described in a later section.
From the user’s perspective, the overhead is minimal. Their client (possibly the Silk browser extension) receives a WWW-Authenticate header with the information required for a token issuance. Then, depending on their client configuration, they are taken to the payment provider of their choice to validate their access to the service.
With a successful response to the PrivateToken challenge a session is established, and the traditional web service flow continues.
As an Attester – CAPTCHA providers, authentication provider
You are the author of a new attestation method, such as CAP, a new CAPTCHA mechanism, or a new way to validate cookie consent. You know that website owners already use Privacy Pass to trigger such challenges on the user side, and an Issuer is willing to trust your method because it guarantees a high security level. In addition, because of the Privacy Pass protocol you never see which website your attestation is being used for.
So you decide to expose your attestation method as a Privacy Pass Attester. An Issuer with public key B== trusts you, and that’s the Issuer you are going to request a token from. You can check that with the Yes/No Attester below, whose code is on Cloudflare Workers playground
const ISSUER_URL = 'https://pp-issuer-public.research.cloudflare.com/token-request'

const b64ToU8 = (b) =>  Uint8Array.from(atob(b), c => c.charCodeAt(0))

const handleGetChallenge = (req) => {
    return new Response(`
    <html>
    <head>
      <title>Challenge Response</title>
    </head>
    <body>
    	<button onclick="sendResponse('Yes')">Yes</button>
		<button onclick="sendResponse('No')">No</button>
	</body>
	<script>
	function sendResponse(choice) {
		fetch(location.href, { method: 'POST', headers: { 'private-token-attester-data': choice } })
	}
	</script>
	</html>
	`, { status: 401, headers: { 'content-type': 'text/html' } })
}

const handlePostChallenge = (req) => {
    const choice = req.headers.get('private-token-attester-data')
    if (choice !== 'Yes') {
        return new Response('Unauthorised', { status: 401 })
    }

    // hardcoded token request
    // debug here https://pepe-debug.research.cloudflare.com/?challenge=PrivateToken%20challenge=%22AAIAHnR1dG9yaWFsLmNsb3VkZmxhcmV3b3JrZXJzLmNvbSBE-oWKIYqMcyfiMXOZpcopzGBiYRvnFRP3uKknYPv1RQAicGVwZS1kZWJ1Zy5yZXNlYXJjaC5jbG91ZGZsYXJlLmNvbQ==%22,token-key=%22MIIBUjA9BgkqhkiG9w0BAQowMKANMAsGCWCGSAFlAwQCAqEaMBgGCSqGSIb3DQEBCDALBglghkgBZQMEAgKiAwIBMAOCAQ8AMIIBCgKCAQEApqzusqnywE_3PZieStkf6_jwWF-nG6Es1nn5MRGoFSb3aXJFDTTIX8ljBSBZ0qujbhRDPx3ikWwziYiWtvEHSLqjeSWq-M892f9Dfkgpb3kpIfP8eBHPnhRKWo4BX_zk9IGT4H2Kd1vucIW1OmVY0Z_1tybKqYzHS299mvaQspkEcCo1UpFlMlT20JcxB2g2MRI9IZ87sgfdSu632J2OEr8XSfsppNcClU1D32iL_ETMJ8p9KlMoXI1MwTsI-8Kyblft66c7cnBKz3_z8ACdGtZ-HI4AghgW-m-yLpAiCrkCMnmIrVpldJ341yR6lq5uyPej7S8cvpvkScpXBSuyKwIDAQAB%22
    const body = b64ToU8('AALoAYM+fDO53GVxBRuLbJhjFbwr0uZkl/m3NCNbiT6wal87GEuXuRw3iZUSZ3rSEqyHDhMlIqfyhAXHH8t8RP14ws3nQt1IBGE43Q9UinwglzrMY8e+k3Z9hQCEw7pBm/hVT/JNEPUKigBYSTN2IS59AUGHEB49fgZ0kA6ccu9BCdJBvIQcDyCcW5LCWCsNo57vYppIVzbV2r1R4v+zTk7IUDURTa4Mo7VYtg1krAWiFCoDxUOr+eTsc51bWqMtw2vKOyoM/20Wx2WJ0ox6JWdPvoBEsUVbENgBj11kB6/L9u2OW2APYyUR7dU9tGvExYkydXOfhRFJdKUypwKN70CiGw==')
    // You can perform some check here to confirm the body is a valid token request

    console.log('requesting token for tutorial.cloudflareworkers.com')
    return fetch(ISSUER_URL, {
      method: 'POST',
      headers: { 'content-type': 'application/private-token-request' },
      body: body,
    })
}

const handleIssuerDirectory = async () => {
    // These are fake issuers
    // Issuer data can be fetch at https://pp-issuer-public.research.cloudflare.com/.well-known/private-token-issuer-directory
    const TRUSTED_ISSUERS = {
        "issuer1": { "token-keys": [{ "token-type": 2, "token-key": "A==" }] },
        "issuer2": { "token-keys": [{ "token-type": 2, "token-key": "B==" }] },
    }
    return new Response(JSON.stringify(TRUSTED_ISSUERS), { headers: { "content-type": "application/json" } })
}

const handleRequest = (req) => {
    const pathname = new URL(req.url).pathname
    console.log(pathname, req.url)
    if (pathname === '/v1/challenge') {
        if (req.method === 'POST') {
            return handlePostChallenge(req)
        }
        return handleGetChallenge(req)
    }
    if (pathname === '/v1/private-token-issuer-directory') {
        return handleIssuerDirectory()
    }
    return new Response('Not found', { status: 404 })
}

addEventListener('fetch', event => {
    event.respondWith(handleRequest(event.request))
})
The validation method above is simply checking if the user selected yes. Your method might be more complex, the wrapping stays the same.
Screenshot of the Yes/No Attester example
Because users might have multiple Attesters configured for a given Issuer, we recommend your Attester implements one additional endpoint exposing the keys of the issuers you are in contact with. You can try this code on Cloudflare Workers playground.
Et voilà. You have an Attester that can be used directly with the Silk browser extension (Firefox, Chrome). As you progress through your deployment, it can also be directly integrated into your applications.
If you would like to have a more advanced Attester and deployment pipeline, look at cloudflare/pp-attester template.
As an Issuer – foundation, consortium
We’ve mentioned the Issuer multiple times already. The role of an Issuer is to select a set of Attesters it wants to operate with, and communicate its public key to Origins. The whole cryptographic behavior of an Issuer is specified by the IETF draft. In contrast to the Client and Attesters which have discretionary behavior, the Issuer is fully standardized. Their opportunity is to choose a signal that is strong enough for the Origin, while preserving privacy of Clients.
Cloudflare Research is operating a public Issuer for experimental purposes to use on https://pp-issuer-public.research.cloudflare.com. It is the simplest solution to start experimenting with Privacy Pass today. Once it matures, you can consider joining a production Issuer, or deploying your own.
To deploy your own, you should:
git clone github.com/cloudflare/pp-issuer
Update wrangler.toml with your Cloudflare Workers account id and zone id. The open source Issuer API works as follows:
/.well-known/private-token-issuer-directory returns the issuer configuration. Note it does not expose non-standard token-key-legacy
/token-request returns a token. This endpoint should be gated (by Cloudflare Access for instance) to only allow trusted attesters to call it
/admin/rotate to generate a new public key. This should only be accessible by your team, and be called prior to the issuer being available.
Then, wrangler publish, and you’re good to onboard Attesters.
Development of Silk extension
Just like the protocol, the browser technology on which Privacy Pass was proven viable has changed as well. For 5 years, the protocol got deployed along with a browser extension for Chrome and Firefox. In 2021, Chrome released a new version of extension configurations, usually referred to as Manifest version 3 (MV3). Chrome also started enforcing this new configuration for all newly released extensions.
Privacy Pass the extension is based on an agreed upon Privacy Pass authentication protocol. Briefly looking at Chrome’s API documentation, we should be able to use the onAuthRequired event. However, with PrivateToken authentication not yet being standard, there are no hooks provided by browsers for extensions to add logic to this event.
The approach we decided to use is to define a client side replay API. When a response comes with 401 WWW-Authenticate PrivateToken, the browser lets it through, but triggers the private token redemption flow. The original page is notified when a token has been retrieved, and replays the request. For this second request, the browser is able to attach an authorization token, and the request succeeds. This is an active replay performed by the client, rather than a transparent replay done by the platform. A specification is available on GitHub.
We are looking forward to the standard progressing, and simplifying this part of the project. This should improve diversity in attestation methods. As we see in the next section, this is key to identifying new signals that can be leveraged by origins.
A standard for anonymous credentials
IP remains as a key identifier in the anti abuse system. At the same time, IP fingerprinting techniques have become a bigger concern and platforms have started to remove some of these ways of tracking users. To enable anti abuse systems to not rely on IP, while ensuring user privacy, Privacy Pass offers a reasonable alternative to deal with potentially abusive or suspicious traffic. The attestation methods vary and can be chosen as needed for a particular deployment. For example, Apple decided to back their attestation with hardware when using Privacy Pass as the authorization technology for iCloud Private Relay. Another example is Cloudflare Research which decided to deploy a Turnstile attester to signal a successful solve for Cloudflare’s challenge platform.
In all these deployments, Privacy Pass-like technology has allowed for specific bits of information to be shared. Instead of sharing your location, past traffic, and possibly your name and phone number simply by connecting to a website, your device is able to prove specific information to a third party in a privacy preserving manner. Which user information and attestation methods are sufficient to prevent abuse is an open question. We are looking to empower researchers with the release of this software to help in the quest for finding these answers. This could be via new experiments such as testing out new attestation methods, or fostering other privacy protocols by providing a framework for specific information sharing.
Future recommendations
Just as we expect this latest version of Privacy Pass to lead to new applications and ideas we also expect further evolution of the standard and the clients that use it. Future development of Privacy Pass promises to cover topics like batch token issuance and rate limiting. From our work building and deploying this version of Privacy Pass we have encountered limitations that we expect to be resolved in the future as well.
The division of labor between Attesters and Issuers and the clear directions of trust relationships between the Origin and Issuer, and the Issuer and Attester make reasoning about the implications of a breach of trust clear. Issuers can trust more than one Attester, but since many current deployments of Privacy Pass do not identify the Attester that lead to issuance, a breach of trust in one Attester would render all tokens issued by any Issuer that trusts the Attester untrusted. This is because it would not be possible to tell which Attester was involved in the issuance process. Time will tell if this promotes a 1:1 correspondence between Attesters and Issuers.
The process of developing a browser extension supported by both Firefox and Chrome-based browsers can at times require quite baroque (and brittle) code paths. Privacy Pass the protocol seems a good fit for an extension of the webRequest.onAuthRequired browser event. Just as Privacy Pass appears as an alternate authentication message in the WWW-Authenticate HTTP header, browsers could fire the onAuthRequired event for Private Token authentication too and include and allow request blocking support within the onAuthRequired event. This seems a natural evolution of the use of this event which currently is limited to the now rather long-in-the-tooth Basic authentication.
Conclusion
Privacy Pass provides a solution to one of the longstanding challenges of the web: anonymous authentication. By leveraging cryptography, the protocol allows websites to get the information they need from users, and solely this information. It’s already used by millions to help distinguish human requests from automated bots in a manner that is privacy protective and often seamless. We are excited by the protocol’s broad and growing adoption, and by the novel use cases that are unlocked by this latest version.
Cloudflare’s Privacy Pass implementations are available on GitHub, and are compliant with the standard. We have open-sourced a set of templates that can be used to implement Privacy PassOrigins,Issuers, andAttesters, which leverage Cloudflare Workers to get up and running quickly.
For those looking to try Privacy Pass out for themselves right away, download the Silk – Privacy Pass Client browser extensions (Firefox, Chrome, GitHub) and start browsing a web with fewer bot checks today.
At Cloudflare, we're constantly vigilant when it comes to identifying vulnerabilities that could potentially affect the Internet ecosystem. Recently, on September 12, 2023, Google announced a security issue in Google Chrome, titled "Heap buffer overflow in WebP in Google Chrome," which caught our attention. Initially, it seemed like just another bug in the popular web browser. However, what we discovered was far more significant and had implications that extended well beyond Chrome.
Impact much wider than suggested
The vulnerability, tracked under CVE-2023-4863, was described as a heap buffer overflow in WebP within Google Chrome. While this description might lead one to believe that it's a problem confined solely to Chrome, the reality was quite different. It turned out to be a bug deeply rooted in the libwebp library, which is not only used by Chrome but by virtually every application that handles WebP images.
Digging deeper, this vulnerability was in fact first reported in an earlier CVE from Apple, CVE-2023-41064, although the connection was not immediately obvious. In early September, Citizen Lab, a research lab based out of the University of Toronto, reported on an apparent exploit that was being used to attempt to install spyware on the iPhone of "an individual employed by a Washington DC-based civil society organization." The advisory from Apple was also incomplete, stating that it was a “buffer overflow issue in ImageIO,” and that they were aware the issue may have been actively exploited. Only after Google released CVE-2023-4863 did it become clear that these two issues were linked, and there was a wider vulnerability in WebP.
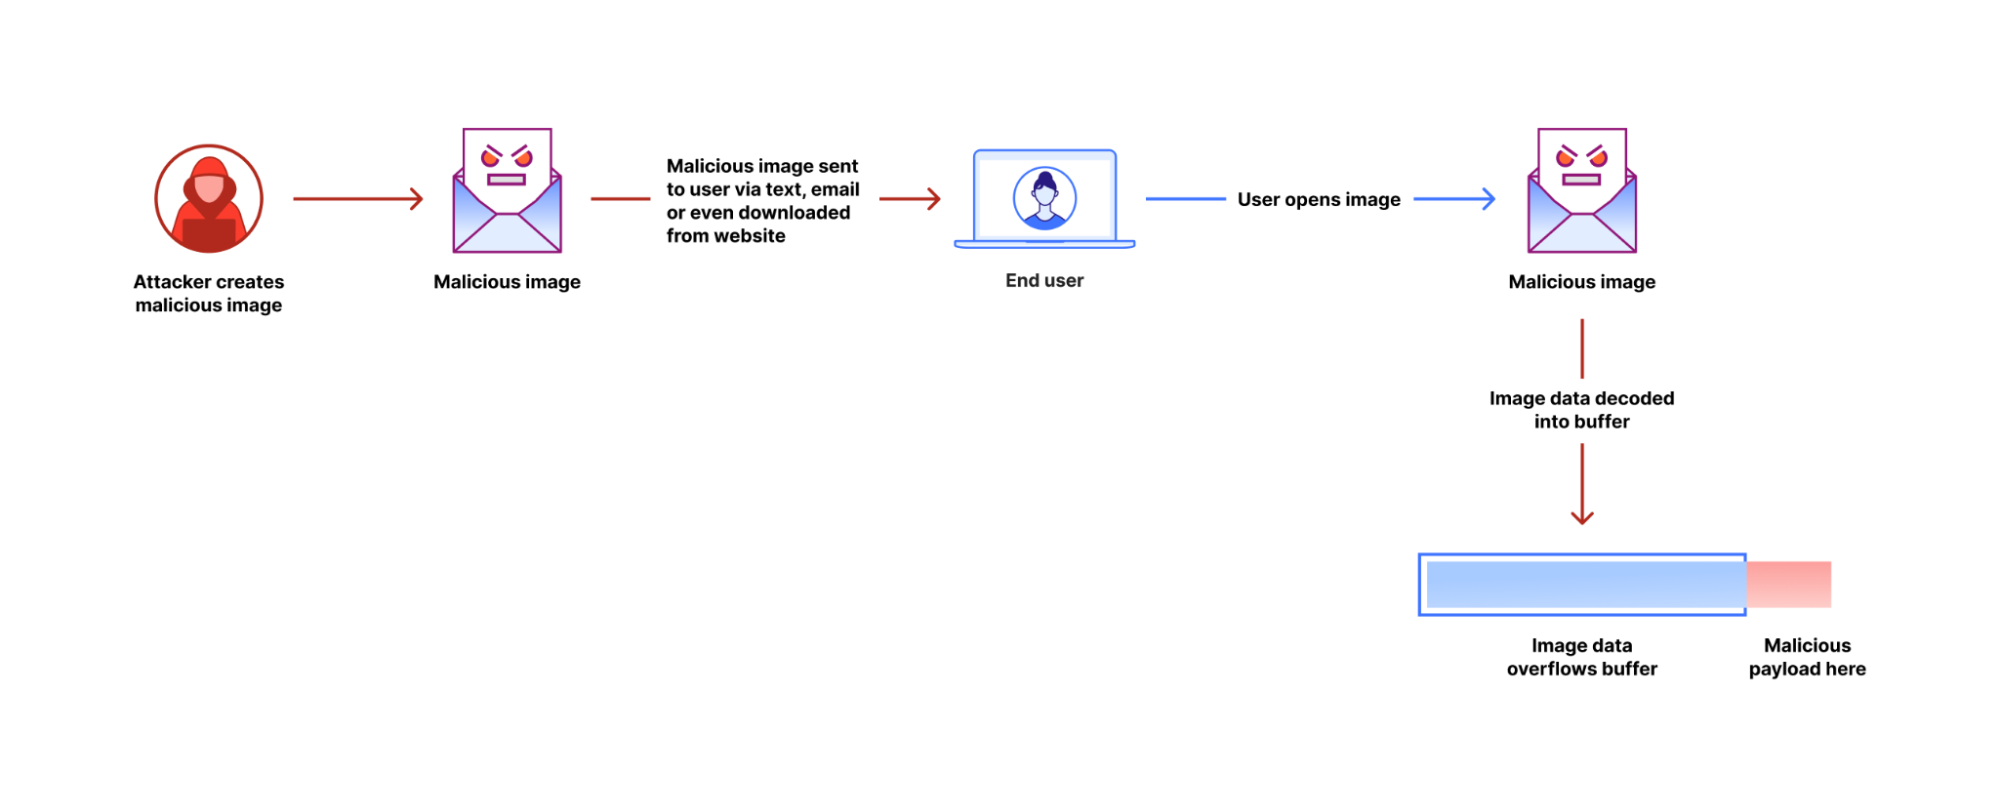
The vulnerability allows an attacker to create a malformed WebP image file that makes libwebp write data beyond the buffer memory allocated to the image decoder. By writing past the legal bounds of the buffer, it is possible to modify sensitive data in memory, eventually leading to execution of the attacker's code.
WebP, introduced over a decade ago, has gained widespread adoption in various applications, ranging from web browsers to email clients, chat apps, graphics programs, and even operating systems. This ubiquity meant that this vulnerability had far-reaching consequences, affecting a vast array of software and virtually all users of the WebP format.
How the WebP vulnerability is exploited
Understanding the technical details
So what exactly was the issue, how could it be exploited, and how was it shut down? We can get our best clues by looking at the patch that was made to libwebp. This patch fixes a potential out-of-buffer (OOB) error in part of the image decoder – the Huffman tables – with two changes: additional validation of the input data, and a modified dynamic memory allocation model. A deeper dive into libwebp and the WebP image format built on top of it reveals what this means.
WebP is a combination of two different image formats: a lossy format similar to JPEG using VP8 codec, and a lossless format using WebP's custom lossless codec. The bug was in the lossless codec's handling of Huffman coding.
The fundamental idea behind Huffman coding is that using a constant number of bits for every basic unit of information in a dataset – like a pixel color – is not the most efficient representation. We can use a variable number of bits, and assign shortest sequences to the most frequently occurring values, and longer ones to the least common values. The sequences of ones and zeros can be represented as a binary tree, with the shorter, more common codes near the root, and longer, less common codes deeper in the tree. Looking up values in the tree bit by bit is relatively slow. Practical implementations build lookup tables that allow matching many bits at a time.
Image files contain compact information about the shape of the Huffman tree, which the decoder uses to reconstruct the tree, and build lookup tables for the codes. The bug in libwebp was in the code building the lookup tables. A specially crafted WebP file can contain a very unbalanced Huffman tree that contains codes much longer than any normal WebP file would have, and this made the function generating lookup tables write data beyond the buffer allocated for the lookup tables. Libwebp had checks for validity of the Huffman tree, but it would write the invalid lookup tables before the consistency check.
The buffer for lookup tables is allocated on the heap. Heap is an area of memory where most of the data of the application is stored. Code that writes data past its buffer allows attackers to modify and corrupt data that happens to be adjacent in memory to the buffer. This can be exploited to make the application misbehave, and eventually start executing code supplied by the attacker.
The fixed version of libwebp ensures that the input data will always create a valid internal structure, and if so, allocates more memory if necessary to ensure the buffer is always big enough.
Libwebp is a mature library, maintained by seasoned professionals. But it's written in the C language, which has very few safeguards against programming errors, especially memory use. Despite the care taken in the library's development, a single erroneous assumption led to a critical vulnerability.
Swift action
On the same day that Google's announcement caught our attention, we filed an internal security ticket, to document and address the vulnerability.
Google was initially perplexed about the true source of the problem. They did not release a patched version of libwebp before announcing the vulnerability. We discovered the yet-unreleased patch for libwebp in its repository, and used it to update libwebp in our services. libwebp officially released the patch a day later.
Our image processing services are written in Rust. We've submitted patches to Rust packages that contained a copy of libwebp and filed RustSec advisories for them (RUSTSEC-2023-0061 and RUSTSEC-2023-0062). This ensured that the broader Rust ecosystem was informed and could take appropriate action.
In an interesting turn of events, GitHub's vulnerability scanner was quick to recognize our RustSec reports as the first case of CVE-2023-4863, even before the issue gained widespread attention. This highlights the importance of having robust security reporting mechanisms in place and the vital role that platforms like GitHub play in keeping the open-source community secure.
These quick actions demonstrate how seriously Cloudflare takes this kind of threat. We have a belt-and-suspenders approach to security that limits the binaries we run at our edge to those signed by us, and ensures that all vulnerabilities are identified and remedied as soon as possible. In this case, we have scrutinized our logs, and found no evidence that any attackers attempted to leverage this vulnerability against Cloudflare. We believe this exploit targeted individuals rather than the infrastructure of a company like Cloudflare, but we never take chances with our customers’ data, and so fixed this vulnerability as quickly as possible, before it became well known.
Conclusion
Google has now widened its description of this issue, correctly calling out that all uses of WebP are potentially affected. This widened description was originally filed as yet another new CVE – CVE-2023-5129 – but then that was flagged as a duplicate of the original CVE-2023-4863, and the description of the earlier filing updated. This incident serves as a reminder of the complex and interconnected nature of the internet ecosystem. What initially seemed like a Chrome-specific problem revealed a much deeper issue that touched nearly every corner of the digital world. The incident also showcased the importance of swift collaboration and the critical role that responsible disclosure plays in mitigating security risks.
For each and every user, it demonstrates the need to keep all browsers, apps and operating systems up to date, and to install recommended security patches. All applications supporting WebP images need to be updated. We've updated our services.
At Cloudflare, we remain committed to enhancing the security of the internet, and incidents like these drive us to continually refine our processes and strengthen our partnerships within the global developer community. By working together, we can make the Internet a safer place for everyone.
Both Apple and Google have recently reported critical vulnerabilities in their systems—iOS and Chrome, respectively—that are ultimately the result of the same vulnerability in the libwebp library:
On Thursday, researchers from security firm Rezillion published evidence that they said made it “highly likely” both indeed stemmed from the same bug, specifically in libwebp, the code library that apps, operating systems, and other code libraries incorporate to process WebP images.
Rather than Apple, Google, and Citizen Lab coordinating and accurately reporting the common origin of the vulnerability, they chose to use a separate CVE designation, the researchers said. The researchers concluded that “millions of different applications” would remain vulnerable until they, too, incorporated the libwebp fix. That, in turn, they said, was preventing automated systems that developers use to track known vulnerabilities in their offerings from detecting a critical vulnerability that’s under active exploitation.
North Korean hackers have been exploiting a zero-day in Chrome.
The flaw, tracked as CVE-2022-0609, was exploited by two separate North Korean hacking groups. Both groups deployed the same exploit kit on websites that either belonged to legitimate organizations and were hacked or were set up for the express purpose of serving attack code on unsuspecting visitors. One group was dubbed Operation Dream Job, and it targeted more than 250 people working for 10 different companies. The other group, known as AppleJeus, targeted 85 users.
The attackers made use of an exploit kit that contained multiple stages and components in order to exploit targeted users. The attackers placed links to the exploit kit within hidden iframes, which they embedded on both websites they owned as well as some websites they compromised.
The kit initially serves some heavily obfuscated javascript used to fingerprint the target system. This script collected all available client information such as the user-agent, resolution, etc. and then sent it back to the exploitation server. If a set of unknown requirements were met, the client would be served a Chrome RCE exploit and some additional javascript. If the RCE was successful, the javascript would request the next stage referenced within the script as “SBX”, a common acronym for Sandbox Escape. We unfortunately were unable to recover any of the stages that followed the initial RCE.
Careful to protect their exploits, the attackers deployed multiple safeguards to make it difficult for security teams to recover any of the stages. These safeguards included:
Only serving the iframe at specific times, presumably when they knew an intended target would be visiting the site.
On some email campaigns the targets received links with unique IDs. This was potentially used to enforce a one-time-click policy for each link and allow the exploit kit to only be served once.
The exploit kit would AES encrypt each stage, including the clients’ responses with a session-specific key.
Additional stages were not served if the previous stage failed.
Although we recovered a Chrome RCE, we also found evidence where the attackers specifically checked for visitors using Safari on MacOS or Firefox (on any OS), and directed them to specific links on known exploitation servers. We did not recover any responses from those URLs.
If you’re a Chrome user, patch your system now.
The collective thoughts of the interwebz
Manage Consent
To provide the best experiences, we use technologies like cookies to store and/or access device information. Consenting to these technologies will allow us to process data such as browsing behavior or unique IDs on this site. Not consenting or withdrawing consent, may adversely affect certain features and functions.
Functional
Always active
The technical storage or access is strictly necessary for the legitimate purpose of enabling the use of a specific service explicitly requested by the subscriber or user, or for the sole purpose of carrying out the transmission of a communication over an electronic communications network.
Preferences
The technical storage or access is necessary for the legitimate purpose of storing preferences that are not requested by the subscriber or user.
Statistics
The technical storage or access that is used exclusively for statistical purposes.The technical storage or access that is used exclusively for anonymous statistical purposes. Without a subpoena, voluntary compliance on the part of your Internet Service Provider, or additional records from a third party, information stored or retrieved for this purpose alone cannot usually be used to identify you.
Marketing
The technical storage or access is required to create user profiles to send advertising, or to track the user on a website or across several websites for similar marketing purposes.