Tag Archives: Featured

Storing and Querying Analytical Data in Backblaze B2

Post Syndicated from Greg Hamer original https://www.backblaze.com/blog/storing-and-querying-analytical-data-in-backblaze-b2/

Note: This blog is the result of a collaborative effort of the Backblaze Evangelism team members Andy Klein, Pat Patterson and Greg Hamer.

Have You Ever Used Backblaze B2 Cloud Storage for Your Data Analytics?

Backblaze customers find that Backblaze B2 Cloud Storage is optimal for a wide variety of use cases. However, one application that many teams might not yet have tried is using Backblaze B2 for data analytics. You may find that having a highly reliable pre-provisioned storage option like Backblaze B2 Cloud Storage for your data lakes can be a useful and very cost-effective alternative for your data analytic workloads.

This article is an introductory primer on getting started using Backblaze B2 for data analytics that uses our Drive Stats as the example of the data being analyzed. For readers new to data lakes, this article can help you get your own data lake up and going on Backblaze B2 Cloud Storage.

As you probably know, a commonly used technology for data analytics is SQL (Structured Query Language). Most people know SQL from databases. However, SQL can be used against collections of files stored outside of databases, now commonly referred to as data lakes. We will focus here on several options using SQL for analyzing Drive Stats data stored on Backblaze B2 Cloud Storage.

It should be noted that data lakes most frequently prove optimal for read-only or append-only datasets. Whereas databases often remain optimal for “hot” data with active insert, update and delete of individual rows, and especially updates of individual column values on individual rows.

We can only scratch the surface of storing, querying, and analyzing tabular data in a single blog post. So for this introductory article, we will:

  • Briefly explain the Drive Stats data.
  • Introduce open-source Trino as one option for executing SQL against the Drive Stats data.
  • Query Drive Stats data both in raw CSV format versus enhanced performance after transforming the data into the open-source Apache Parquet format.

The sections below take a step-by-step approach including details on the performance improvements realized when implementing recommended data engineering options. We start with a demonstration of analysis of raw data. Then progress through “data engineering” that transforms the data into formats that are optimal for accelerating repeated queries of the dataset. We conclude by highlighting our hosted, consolidated, complete Drive Stats dataset.

As mentioned earlier, this blog post is intended only as an introductory primer. In future blog posts, we will detail additional best practices and other common issues and opportunities with data analysis using Backblaze B2.

Backblaze Hard Drive Data and Stats (aka Drive Stats)

Drive Stats is an open-source data set of the daily metrics on the hard drives in Backblaze’s cloud storage infrastructure that Backblaze has open-sourced starting with April 2013. Currently, Drive Stats comprises nearly 300 million records, occupying over 90GB of disk space in raw comma-separated values (CSV) format, rising by over 200,000 records, or about 75MB of CSV data, per day. Drive Stats is an append-only dataset effectively logging daily statistics that once written are never updated or deleted.

The Drive Stats dataset is not quite “big data,” where datasets range from a few dozen terabytes to many zettabytes, but enough that physical data architecture starts to have a significant effect in both the amount of space that the data occupies and how the data can be accessed.

At the end of each quarter, Backblaze creates a CSV file for each day of data, ZIP those 90 or so files together, and make the compressed file available for download from a Backblaze B2 Bucket. While it’s easy to download and decompress a single file containing three months of data, this data architecture is not very flexible. With a little data engineering, though, it’s possible to make analytical data, such as the Drive Stats data set, available for modern data analysis tools to directly access from cloud storage, unlocking new opportunities for data analysis and data science.

Later, for comparison, we include a brief demonstration of performance of the data lake versus a traditional relational database. Architecturally, a difference between a data lake and a database is that databases integrate together both the query engine and the data storage. When data is either inserted or loaded into a database, the database has optimized internal storage structures it uses. Alternatively, with a data lake, the query engine and the data storage are separate. What we highlight below are basics for optimizing data storage in a data lake to enable the query engine to deliver the fastest query response times.

As with all data analysis, it is helpful to understand details of what the data represents. Before showing results, let’s take a deeper dive into the nature of the Drive Stats data. (For readers interested in first reviewing outcomes and improved query performance results, please skip ahead to the later sections “Compressed CSV” and “Enter Apache Parquet.”)

Navigating the Drive Stats Data

At Backblaze we collect a Drive Stats record from each hard drive, each day, containing the following data:

  • date: the date of collection.
  • serial_number: the unique serial number of the drive.
  • model: the manufacturer’s model number of the drive.
  • capacity_bytes: the drive’s capacity, in bytes.
  • failure: 1 if this was the last day that the drive was operational before failing, 0 if all is well.
  • A collection of SMART attributes. The number of attributes collected has risen over time; currently we store 87 SMART attributes in each record, each one in both raw and normalized form, with field names of the form smart_n_normalized and smart_n_raw, where n is between 1 and 255.

In total, each record currently comprises 179 fields of data describing the state of an individual hard drive on a given day (the number of SMART attributes collected has risen over time).

Comma-Separated Values, a Lingua Franca for Tabular Data

A CSV file is a delimited text file that, as its name implies, uses a comma to separate values. Typically, the first line of a CSV file is a header containing the field names for the data, separated by commas. The remaining lines in the file hold the data: one line per record, with each line containing the field values, again separated by commas.

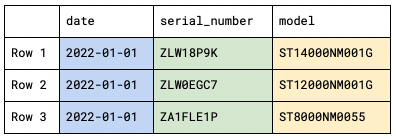
Here’s a subset of the Drive Stats data represented as CSV. We’ve omitted most of the SMART attributes to make the records more manageable.

date,serial_number,model,capacity_bytes,failure,
smart_1_normalized,smart_1_raw
2022-01-01,ZLW18P9K,ST14000NM001G,14000519643136,0,73,20467240
2022-01-01,ZLW0EGC7,ST12000NM001G,12000138625024,0,84,228715872
2022-01-01,ZA1FLE1P,ST8000NM0055,8001563222016,0,82,157857120
2022-01-01,ZA16NQJR,ST8000NM0055,8001563222016,0,84,234265456
2022-01-01,1050A084F97G,TOSHIBA MG07ACA14TA,14000519643136,0,100,0

Currently, we create a CSV file for each day’s data, comprising a record for each drive that was operational at the beginning of that day. The CSV files are each named with the appropriate date in year-month-day order, for example, 2022-06-28.csv. As mentioned above, we make each quarter’s data available as a ZIP file containing the CSV files.

At the beginning of the last Drive Stats quarter, Jan 1, 2022, we were spinning over 200,000 hard drives, so each daily file contained over 200,000 lines and occupied nearly 75MB of disk space. The ZIP file containing the Drive Stats data for the first quarter of 2022 compressed 90 files totaling 6.63GB of CSV data to a single 1.06GB file made available for download here.

Big Data Analytics in the Cloud with Trino

Zipped CSV files allow users to easily download, inspect, and analyze the data locally, but a new generation of tools allows us to explore and query data in situ on Backblaze B2 and other cloud storage platforms. One example is the open-source Trino query engine (formerly known as Presto SQL). Trino can natively query data in Backblaze B2, Cassandra, MySQL, and many other data sources without copying that data into its own dedicated store.

A powerful capability of Trino is that it is a distributed query engine and offers what is sometimes referred to as massively parallel processing (MPP). Thus, adding more nodes in your Trino compute cluster consistently delivers dramatically shorter query execution times. Faster results are always desirable. We achieved the results we report below running Trino on only a single node.

Note: If you are unfamiliar with Trino, the open-source project was previously known as Presto and leverages the Hadoop ecosystem.

In preparing this blog post, our team used Brian Olsen’s excellent Hive connector over MinIO file storage tutorial as a starting point for integrating Trino with Backblaze B2. The tutorial environment includes a preconfigured Docker Compose environment comprising the Trino Docker image and other required services for working with data in Backblaze B2. We brought up the environment in Docker Desktop; alternately on ThinkPads and MacBook Pros.

As a first step, we downloaded the data set for the most recent quarter, unzipped it to our local disks, and then finally reuploaded the unzipped CSV into Backblaze B2 buckets. As mentioned above, the uncompressed CSV data occupies 6.63GB of storage, so we confined our initial explorations to just a single day’s data: over 200,000 records, occupying 72.8MB.

A Word About Apache Hive

Trino accesses analytical data in Backblaze B2 and other cloud storage platforms via its Hive connector. Quoting from the Trino documentation:

The Hive connector allows querying data stored in an Apache Hive data warehouse. Hive is a combination of three components:

  • Data files in varying formats, that are typically stored in the Hadoop Distributed File System (HDFS) or in object storage systems such as Amazon S3.
  • Metadata about how the data files are mapped to schemas and tables. This metadata is stored in a database, such as MySQL, and is accessed via the Hive metastore service.
  • A query language called HiveQL. This query language is executed on a distributed computing framework such as MapReduce or Tez.

Trino only uses the first two components: the data and the metadata. It does not use HiveQL or any part of Hive’s execution environment.

The Hive connector tutorial includes Docker images for the Hive metastore service (HMS) and MariaDB, so it’s a convenient way to explore this functionality with Backblaze B2.

Configuring Trino for Backblaze B2

The tutorial uses MinIO, an open-source implementation of the Amazon S3 API, so it was straightforward to adapt the sample MinIO configuration to Backblaze B2’s S3 Compatible API by just replacing the endpoint and credentials. Here’s the b2.properties file we created:

connector.name=hive
hive.metastore.uri=thrift://hive-metastore:9083
hive.s3.path-style-access=true
hive.s3.endpoint=https://s3.us-west-004.backblazeb2.com
hive.s3.aws-access-key=
hive.s3.aws-secret-key=
hive.non-managed-table-writes-enabled=true
hive.s3select-pushdown.enabled=false
hive.storage-format=CSV
hive.allow-drop-table=true

Similarly, we edited the Hive configuration files, again replacing the MinIO configuration with the corresponding Backblaze B2 values. Here’s a sample core-site.xml:

<?xml version="1.0"?>
<configuration>

    <property>
        <name>fs.defaultFS</name>
        <value>s3a://b2-trino-getting-started</value>
    </property>


    <!-- B2 properties -->
    <property>
        <name>fs.s3a.connection.ssl.enabled</name>
        <value>true</value>
    </property>

    <property>
        <name>fs.s3a.endpoint</name>
        <value>https://s3.us-west-004.backblazeb2.com</value>
    </property>

    <property>
        <name>fs.s3a.access.key</name>
        <value><my b2 application key id></value>
    </property>

    <property>
        <name>fs.s3a.secret.key</name>
        <value><my b2 application key id></value>
    </property>

    <property>
        <name>fs.s3a.path.style.access</name>
        <value>true</value>
    </property>

    <property>
        <name>fs.s3a.impl</name>
        <value>org.apache.hadoop.fs.s3a.S3AFileSystem</value>
    </property>

</configuration>

We made a similar set of edits to metastore-site.xml and restarted the Docker instances so our changes took effect.

Uncompressed CSV

Our first test validated creating a table and running a query on a single-day CSV data set. Hive tables are configured with the directory containing the actual data files, so we uploaded 2020-01-01.csv from a local disk to data_20220101_csv/2020-01-01.csv in a Backblaze B2 bucket, opened the Trino CLI, and created a schema and a table:

CREATE SCHEMA b2.ds
WITH (location = 's3a://b2-trino-getting-started/');

USE b2.ds;

CREATE TABLE jan1_csv (
    date VARCHAR,
    serial_number VARCHAR,
    model VARCHAR,
    capacity_bytes VARCHAR,
    failure VARCHAR,
    smart_1_normalized VARCHAR,
    smart_1_raw VARCHAR,
    ...
    smart_255_normalized VARCHAR,
    smart_255_raw VARCHAR)
WITH (format = 'CSV',
    skip_header_line_count = 1,
    external_location = '
s3a://b2-trino-getting-started/data_20220101_csv');

Unfortunately, the Trino Hive connector only supports the VARCHAR data type when accessing CSV data, but, as we’ll see in a moment, we can use the CAST function in queries to convert character data to numeric and other types.

Now to run some queries! A good test is to check if all the data is there:

trino:ds> SELECT COUNT(*) FROM jan1_csv;
 _col0  
--------
 206954 
(1 row)

Query 20220629_162533_00024_qy4c6, FINISHED, 1 node
Splits: 8 total, 8 done (100.00%)
8.23 [207K rows, 69.4MB] [25.1K rows/s, 8.43MB/s]
Note: If you’re wondering about the discrepancy between the size of the CSV file–72.8MB–and the amount of data read by Trino–69.4MB–it’s accounted for in the different usage of the ‘MB’ abbreviation. For instance Mac interprets MB as a megabyte, 1,000,000 bytes, while Trino is reporting mebibytes, 1,048,576 bytes. Strictly speaking, Trino should use the abbreviation MiB. Pat opened an issue for this (with a goal of fixing it and submitting a pull request to the Trino project).

Now let’s see how many drives failed that day, grouped by the drive model:

trino:ds> SELECT model, COUNT(*) as failures 
       -> FROM jan1_csv 
       -> WHERE failure = 1 
       -> GROUP BY model 
       -> ORDER BY failures DESC;
       model        | failures 
--------------------+----------
 TOSHIBA MQ01ABF050 |        1 
 ST4000DM005        |        1 
 ST8000NM0055       |        1 
(3 rows)

Query 20220629_162609_00025_qy4c6, FINISHED, 1 node
Splits: 17 total, 17 done (100.00%)
8.23 [207K rows, 69.4MB] [25.1K rows/s, 8.43MB/s]

Notice that the query execution time is identical between the two queries. This makes sense–the time taken to run the query is dominated by the time required to download the data from Backblaze B2.

Finally, we can use the CAST function with SUM and ROUND to see how many exabytes of storage we were spinning on that day:

trino:ds> SELECT ROUND(SUM(CAST(capacity_bytes AS bigint))/1e+18, 2) FROM jan1_csv;
 _col0 
-------
  2.25 
(1 row)

Query 20220629_172703_00047_qy4c6, FINISHED, 1 node
Splits: 12 total, 12 done (100.00%)
7.83 [207K rows, 69.4MB] [26.4K rows/s, 8.86MB/s]

Although this performance may seem too long running, please note that this is against raw data. What we are highlighting here with Drive Stats data can also be used for querying data in log files. As new records are written on this append-only dataset they immediately appear as new rows in the query. This is very powerful for both real-time and near real-time analysis, and faster performance is easily achieved by scaling out the Trino cluster. Remember, Trino is a distributed query engine. For this demonstration, we have limited Trino to running on just a single node.

Compressed CSV

This is pretty neat, but not exactly fast. Extrapolating, we might expect it to take about 12 minutes to run a query against a whole quarter of Drive Stats data.

Can we improve performance? Absolutely–we simply need to reduce the amount of data that needs to be downloaded for each query!

Commonplace in the world of data analytics are data pipelines, often known as ETL for Extract, Transform, and Load. Where data is repeatedly queried, it is often advantageous to “transform” data from the raw form that it originates in into some format more optimized for the repeated queries that follow through the next stages of that data’s life cycle.

For our next test we will perform an elementary transformation of the data using a lossless compression of the CSV data with Hive’s preferred gzip format, resulting in an 11.7 MB file, 2020-01-01.csv.gz. After uploading the compressed file to data_20220101_csv_gz/2020-01-01.csv.gz, we created a second table, copying the schema from the first:

CREATE TABLE jan1_csv_gz (
	LIKE jan1_csv
)
WITH (FORMAT = 'CSV',
    EXTERNAL_LOCATION = 's3a://b2-trino-getting-started/data_20220101_csv_gz');

Trying the failure count query:

trino:ds> SELECT model, COUNT(*) as failures 
       -> FROM jan1_csv_gz 
       -> WHERE failure = 1 
       -> GROUP BY model 
       -> ORDER BY failures DESC;
       model        | failures 
--------------------+----------
 TOSHIBA MQ01ABF050 |        1 
 ST8000NM0055       |        1 
 ST4000DM005        |        1 
(3 rows)

Query 20220629_162713_00027_qy4c6, FINISHED, 1 node
Splits: 15 total, 15 done (100.00%)
2.71 [207K rows, 11.1MB] [76.4K rows/s, 4.1MB/s]

As you might expect, given that Trino has to download less than ⅙ as much data as previously, the query time fell dramatically–from just over 8 seconds to under 3 seconds. Can we do even better than this?

Enter Apache Parquet

The issue with running this kind of analytical query is that it often results in a “full table scan”–Trino has to read the model and failure fields from every record to execute the query. The row-oriented layout of CSV data means that Trino ends up reading the entire file. We can get around this by using a file format designed specifically for analytical workloads.

While CSV files comprise a line of text for each record, Parquet is a column-oriented, binary file format, storing the binary values for each column contiguously. Here’s a simple visualization of the difference between row and column orientation:

Table representation:

Row orientation:

Column Orientation:


Parquet also implements run-length encoding and other compression techniques. Where a series of records have the same value for a given field the Parquet file need only store the value and the number of repetitions:

The result is a compact file format well suited for analytical queries.

There are many tools to manipulate tabular data from one format to another. In this case, we wrote a very simple Python script that used the pyarrow library to do the job:

import pyarrow.csv as csv
import pyarrow.parquet as parquet

filename = '2022-01-01.csv'

parquet.write_table(csv.read_csv(filename), 
filename.replace('.csv', '.parquet'))

The resulting Parquet file occupies 12.8MB–only 1.1MB more than the gzip file. Again, we uploaded the resulting file and created a table in Trino.

CREATE TABLE jan1_parquet (
    date DATE,
    serial_number VARCHAR,
    model VARCHAR,
    capacity_bytes BIGINT,
    failure TINYINT,
    smart_1_normalized BIGINT,
    smart_1_raw BIGINT,
    ...
    smart_255_normalized BIGINT,
    smart_255_raw BIGINT)
WITH (FORMAT = 'PARQUET',
    EXTERNAL_LOCATION = 
's3a://b2-trino-getting-started/data_20220101_parquet);

Note that the conversion to Parquet automatically formatted the data using appropriate types, which we used in the table definition.

Let’s run a query and see how Parquet fares against compressed CSV:

trino:ds> SELECT model, COUNT(*) as failures 
       -> FROM jan1_parquet 
       -> WHERE failure = 1 
       -> GROUP BY model 
       -> ORDER BY failures DESC;
       model        | failures 
--------------------+----------
 TOSHIBA MQ01ABF050 |        1 
 ST4000DM005        |        1 
 ST8000NM0055       |        1 
(3 rows)

Query 20220629_163018_00031_qy4c6, FINISHED, 1 node
Splits: 15 total, 15 done (100.00%)
0.78 [207K rows, 334KB] [265K rows/s, 427KB/s]

The test query is executed in well under a second! Looking at the last line of output, we can see that the same number of rows were read, but only 334KB of data was retrieved. Trino was able to retrieve just the two columns it needed, out of the 179 columns in the file, to run the query.

Similar analytical queries execute just as efficiently. Calculating the total amount of storage in exabytes:

trino:ds> SELECT ROUND(SUM(capacity_bytes)/1e+18, 2) FROM jan1_parquet;
 _col0 
-------
  2.25 
(1 row)

Query 20220629_163058_00033_qy4c6, FINISHED, 1 node
Splits: 10 total, 10 done (100.00%)
0.83 [207K rows, 156KB] [251K rows/s, 189KB/s]

What was the capacity of the largest drive in terabytes?

trino:ds> SELECT max(capacity_bytes)/1e+12 FROM jan1_parquet;
      _col0      
-----------------
 18.000207937536 
(1 row)

Query 20220629_163139_00034_qy4c6, FINISHED, 1 node
Splits: 10 total, 10 done (100.00%)
0.80 [207K rows, 156KB] [259K rows/s, 195KB/s]

Parquet’s columnar layout excels with analytical workloads, but if we try a query more suited to an operational database, Trino has to read the entire file, as we would expect:

trino:ds> SELECT * FROM jan1_parquet WHERE serial_number = 'ZLW18P9K';
    date    | serial_number |     model     | capacity_bytes | failure
------------+---------------+---------------+----------------+--------
 2022-01-01 | ZLW18P9K      | ST14000NM001G | 14000519643136 |       0
(1 row)

Query 20220629_163206_00035_qy4c6, FINISHED, 1 node
Splits: 5 total, 5 done (100.00%)
2.05 [207K rows, 12.2MB] [101K rows/s, 5.95MB/s]

Scaling Up

After validating our Trino configuration with just a single day’s data, our next step up was to create a Parquet file containing an entire quarter. The file weighed in at 1.0GB, a little smaller than the zipped CSV.

Here’s the failed drives query for the entire quarter, limited to the top 10 results:

trino:ds> SELECT model, COUNT(*) as failures 
       -> FROM q1_2022_parquet 
       -> WHERE failure = 1 
       -> GROUP BY model 
       -> ORDER BY failures DESC 
       -> LIMIT 10;
        model         | failures 
----------------------+----------
 ST4000DM000          |      117 
 TOSHIBA MG07ACA14TA  |       88 
 ST8000NM0055         |       86 
 ST12000NM0008        |       73 
 ST8000DM002          |       38 
 ST16000NM001G        |       24 
 ST14000NM001G        |       24 
 HGST HMS5C4040ALE640 |       21 
 HGST HUH721212ALE604 |       21 
 ST12000NM001G        |       20 
(10 rows)

Query 20220629_183338_00050_qy4c6, FINISHED, 1 node
Splits: 43 total, 43 done (100.00%)
3.38 [18.8M rows, 15.8MB] [5.58M rows/s, 4.68MB/s]

Of course, those are absolute failure numbers; they don’t take account of how many of each drive model are in use. We can construct a more complex query that tells us the percentages of failed drives, by model:

trino:ds> SELECT drives.model AS model, drives.drives AS drives, 
       ->   failures.failures AS failures, 
       ->   ROUND((CAST(failures AS double)/drives)*100, 6) AS percentage
       -> FROM
       -> (
       ->   SELECT model, COUNT(*) as drives 
       ->   FROM q1_2022_parquet 
       ->   GROUP BY model
       -> ) AS drives
       -> RIGHT JOIN
       -> (
       ->   SELECT model, COUNT(*) as failures 
       ->   FROM q1_2022_parquet 
       ->   WHERE failure = 1 
       ->   GROUP BY model
       -> ) AS failures
       -> ON drives.model = failures.model
       -> ORDER BY percentage DESC
       -> LIMIT 10;
        model         | drives | failures | percentage 
----------------------+--------+----------+------------
 ST12000NM0117        |    873 |        1 |   0.114548 
 ST10000NM001G        |   1028 |        1 |   0.097276 
 HGST HUH728080ALE604 |   4504 |        3 |   0.066607 
 TOSHIBA MQ01ABF050M  |  26231 |       13 |    0.04956 
 TOSHIBA MQ01ABF050   |  24765 |       12 |   0.048455 
 ST4000DM005          |   3331 |        1 |   0.030021 
 WDC WDS250G2B0A      |   3338 |        1 |   0.029958 
 ST500LM012 HN        |  37447 |       11 |   0.029375 
 ST12000NM0007        | 118349 |       19 |   0.016054 
 ST14000NM0138        | 144333 |       17 |   0.011778 
(10 rows)

Query 20220629_191755_00010_tfuuz, FINISHED, 1 node
Splits: 82 total, 82 done (100.00%)
8.70 [37.7M rows, 31.6MB] [4.33M rows/s, 3.63MB/s]

This query took twice as long as the last one! Again, data transfer time is the limiting factor–Trino downloads the data for each subquery. A real-world deployment would take advantage of the Hive Connector’s storage caching feature to avoid repeatedly retrieving the same data.

Picking the Right Tool for the Job

You might be wondering how a relational database would stack up against the Trino/Parquet/Backblaze B2 combination. As a quick test, we installed PostgreSQL 14 on a MacBook Pro, loaded the same quarter’s data into a table, and ran the same set of queries:

Count Rows

sql_stmt=# \timing
Timing is on.
sql_stmt=# SELECT COUNT(*) FROM q1_2022;

  count   
----------
 18845260
(1 row)

Time: 1579.532 ms (00:01.580)

Absolute Number of Failures

sql_stmt=# SELECT model, COUNT(*) as failures                                                                                                          FROM q1_2022                                                                                                                                             WHERE failure = 't'                                                                                                                                      GROUP BY model                                                                                                                                           ORDER BY failures DESC                                                                                                                                   LIMIT 10;

        model         | failures 
----------------------+----------
 ST4000DM000          |      117
 TOSHIBA MG07ACA14TA  |       88
 ST8000NM0055         |       86
 ST12000NM0008        |       73
 ST8000DM002          |       38
 ST14000NM001G        |       24
 ST16000NM001G        |       24
 HGST HMS5C4040ALE640 |       21
 HGST HUH721212ALE604 |       21
 ST12000NM001G        |       20
(10 rows)

Time: 2052.019 ms (00:02.052)

Relative Number of Failures

sql_stmt=# SELECT drives.model AS model, drives.drives AS drives,                                                                                      failures.failures,                                                                                                                                       ROUND((CAST(failures AS numeric)/drives)*100, 6) AS percentage                                                                                           FROM                                                                                                                                                     (                                                                                                                                                        SELECT model, COUNT(*) as drives                                                                                                                         FROM q1_2022                                                                                                                                             GROUP BY model                                                                                                                                           ) AS drives                                                                                                                                              RIGHT JOIN                                                                                                                                               (                                                                                                                                                        SELECT model, COUNT(*) as failures                                                                                                                       FROM q1_2022                                                                                                                                             WHERE failure = 't'                                                                                                                                      GROUP BY model                                                                                                                                           ) AS failures                                                                                                                                            ON drives.model = failures.model                                                                                                                         ORDER BY percentage DESC                                                                                                                                 LIMIT 10;
        model         | drives | failures | percentage 
----------------------+--------+----------+------------
 ST12000NM0117        |    873 |        1 |   0.114548
 ST10000NM001G        |   1028 |        1 |   0.097276
 HGST HUH728080ALE604 |   4504 |        3 |   0.066607
 TOSHIBA MQ01ABF050M  |  26231 |       13 |   0.049560
 TOSHIBA MQ01ABF050   |  24765 |       12 |   0.048455
 ST4000DM005          |   3331 |        1 |   0.030021
 WDC WDS250G2B0A      |   3338 |        1 |   0.029958
 ST500LM012 HN        |  37447 |       11 |   0.029375
 ST12000NM0007        | 118349 |       19 |   0.016054
 ST14000NM0138        | 144333 |       17 |   0.011778
(10 rows)

Time: 3831.924 ms (00:03.832)

Retrieve a Single Record by Serial Number and Date

Modifying the query, since we have an entire quarter’s data:

sql_stmt=# SELECT * FROM q1_2022 WHERE serial_number = 'ZLW18P9K' AND date = '2022-01-01';
    date    | serial_number |     model     | capacity_bytes | failure
------------+---------------+---------------+----------------+-------- 
 2022-01-01 | ZLW18P9K      | ST14000NM001G | 14000519643136 | f       (1 row)

Time: 1690.091 ms (00:01.690)

For comparison, we tried to run the same query against the quarter’s data in Parquet format, but Trino crashed with an out of memory error after 58 seconds. Clearly some tuning of the default configuration is required!

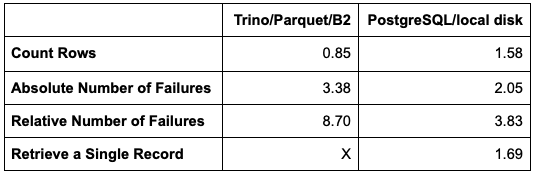
Bringing the numbers together for the quarterly data sets. All times are in seconds.

PostgreSQL is faster for most operations, but not by much, especially considering that its data is on the local SSD, rather than Backblaze B2!

It’s worth mentioning that there are yet more tuning optimizations that we have not demonstrated in this exercise. For instance, the Trino Hive connector supports storage caching. Implementing a cache yields further performance gains by avoiding repeatedly retrieving the same data from Backblaze B2. Further, Trino is a distributed query engine. Trino’s architecture is horizontally scalable. This means that Trino can also deliver shorter query run times by adding more nodes in your Trino compute cluster. We have limited all timings in this demonstration to Trino running on just a single node.

Partitioning Your Data Lake

Our final exercise was to create a single Drive Stats dataset containing all nine years of Drive Stats data. As stated above, at the time of writing the full Drive Stats dataset comprises nearly 300 million records, occupying over 90GB of disk space when in raw CSV format, rising by over 200,000 records per day, or about 75MB of CSV data.

As the dataset grows in size, an additional data engineering best practice is to include partitions.

In the introduction we mentioned that databases use optimized internal storage structures. Foremost among these are indexes. Data lakes have limited support for indexes. Data lakes do, however, support partitions. Data lake partitions are functionally similar to what databases alternately refer to as either a primary key index or index-organized tables. Regardless of the name, they effectively achieve faster data retrieval by having the data itself physically sorted. Since Drive Stats is append-only, when sorting on a date field, new records are appended to the dataset.

Having the data physically sorted greatly aids retrieval in cases that are known as range queries. To achieve fastest retrieval on a given query, it is important to only retrieve data that resolves true on the predicate in the WHERE clause. In the case of Drive Stats, for a query on only a single month or several consecutive months we get the fastest time to the result if we can read only the data for these months. Without partitioning Trino would need to do a full table scan, resulting in slower response due to the overhead of reading records for which the WHERE clause logic resolves to false. Organizing the Drive Stats data into partitions enables Trino to efficiently skip records that resolve the WHERE clause to false. Thus with partitions, many queries are far more efficient and incur the read cost only of those records whose WHERE clause logic resolves to true.

Our final transformation required a tweak to the Python script to iterate over all of the Drive Stats CSV files, writing Parquet files partitioned by year and month, so the files have prefixes of the form.

/drivestats/year={year}/month={month}/

For example:

/drivestats/year=2021/month=12/

The number of SMART attributes reported can change from one day to the next, and a single Parquet file can have only one schema, so there are one or more files with each prefix, named

{year}-{month}-{index}.parquet

For example:

2021-12-1.parquet

Again, we uploaded the resulting files and created a table in Trino.

CREATE TABLE drivestats (
    serial_number VARCHAR,
    model VARCHAR,
    capacity_bytes BIGINT,
    failure TINYINT,
    smart_1_normalized BIGINT,
    smart_1_raw BIGINT,
    ...
    smart_255_normalized BIGINT,
    smart_255_raw BIGINT,
    day SMALLINT,
    year SMALLINT,
    month SMALLINT
)
WITH (format = 'PARQUET',
 PARTITIONED_BY = ARRAY['year', 'month'],
      EXTERNAL_LOCATION = 's3a://b2-trino-getting-started/drivestats-parquet');

Note that the conversion to Parquet automatically formatted the data using appropriate types, which we used in the table definition.

This command tells Trino to scan for partition files.

CALL system.sync_partition_metadata('ds', 'drivestats', 'FULL');

Let’s run a query and see the performance against the full Drive Stats dataset in Parquet format, partitioned by month:

trino:ds> SELECT COUNT(*) FROM drivestats;
   _col0   
-----------
296413574 
(1 row)

Query 20220707_182743_00055_tshdf, FINISHED, 1 node
Splits: 412 total, 412 done (100.00%)
15.84 [296M rows, 5.63MB] [18.7M rows/s, 364KB/s]

It takes 16 seconds to count the total number of records, reading only 5.6MB of the 15.3GB total data.

Next, let’s run a query against just one month’s data:

trino:ds> SELECT COUNT(*) FROM drivestats WHERE year = 2022 AND month = 1;
  _col0  
---------
 6415842 
(1 row)

Query 20220707_184801_00059_tshdf, FINISHED, 1 node
Splits: 16 total, 16 done (100.00%)
0.85 [6.42M rows, 56KB] [7.54M rows/s, 65.7KB/s]

Counting the records for a given month takes less than a second, retrieving just 56KB of data–partitioning is working!

Now we have the entire Drive Stats data set loaded into Backblaze B2 in an efficient format and layout for running queries. Our next blog post will look at some of the queries we’ve run to clean up the data set and gain insight into nine years of hard drive metrics.

Conclusion

We hope that this article inspires you to try using Backblaze for your data analytics workloads if you’re not already doing so, and that it also serves as a useful primer to help you set up your own data lake using Backblaze B2 Cloud Storage. Our Drive Stats data is just one example of the type of data set that can be used for data analytics on Backblaze B2.

Hopefully, you too will find that Backblaze B2 Cloud Storage can be a useful, powerful, and very cost effective option for your data lake workloads.

If you’d like to get started working with analytical data in Backblaze B2, sign up here for 10 GB storage, free of charge, and get to work. If you’re already storing and querying analytical data in Backblaze B2, please let us know in the comments what tools you’re using and how it’s working out for you!

If you already work with Trino (or other data lake analytic engines), and would like connection credentials for our partitioned, Parquet, complete Drive Stats data set that is now hosted on Backblaze B2 Cloud Storage, please contact us at [email protected].
Future blog posts focused on Drive Stats and analytics will be using this complete Drive Stats dataset.

Similarly, please let us know if you would like to run a proof of concept hosting your own data in a Backblaze B2 data lake and would like the assistance of the Backblaze Developer Evangelism team.

And lastly, if you think this article may be of interest to your colleagues, we’d very much appreciate you sharing it with them.

The post Storing and Querying Analytical Data in Backblaze B2 appeared first on Backblaze Blog | Cloud Storage & Cloud Backup.
Backblaze Drive Stats for Q2 2022

Post Syndicated from original https://www.backblaze.com/blog/backblaze-drive-stats-for-q2-2022/

As of the end of Q2 2022, Backblaze was monitoring 219,444 hard drives and SSDs in our data centers around the world. Of that number, 4,020 are boot drives, with 2,558 being SSDs, and 1,462 being HDDs. Later this quarter, we’ll review our SSD collection. Today, we’ll focus on the 215,424 data drives under management as we review their quarterly and lifetime failure rates as of the end of Q2 2022. Along the way, we’ll share our observations and insights on the data presented and, as always, we look forward to you doing the same in the comments section at the end of the post.

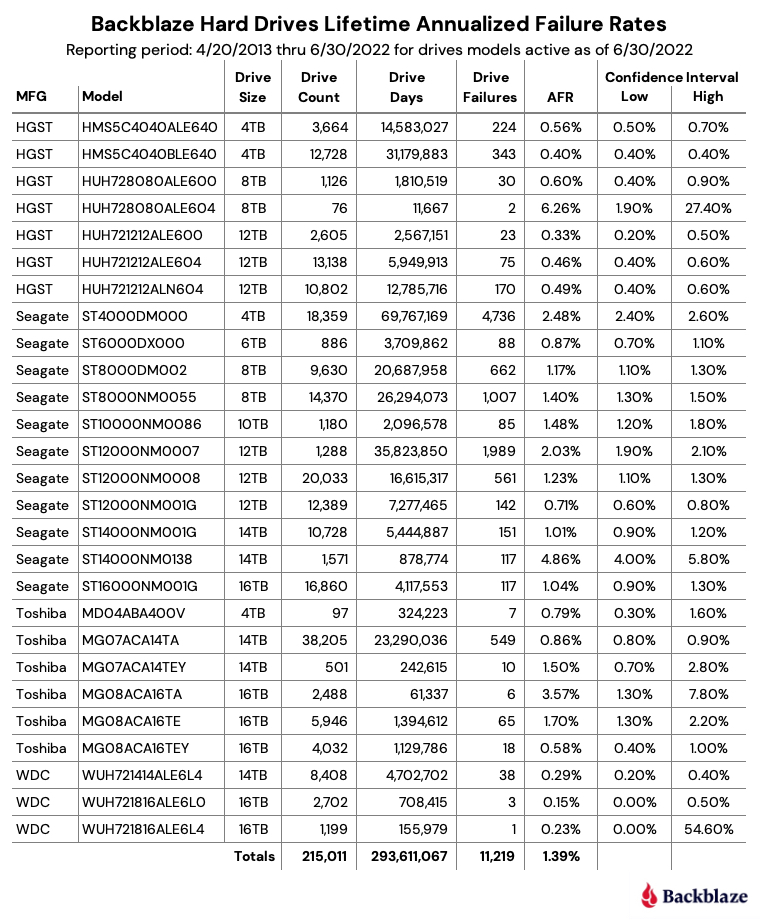
Lifetime Hard Drive Failure Rates

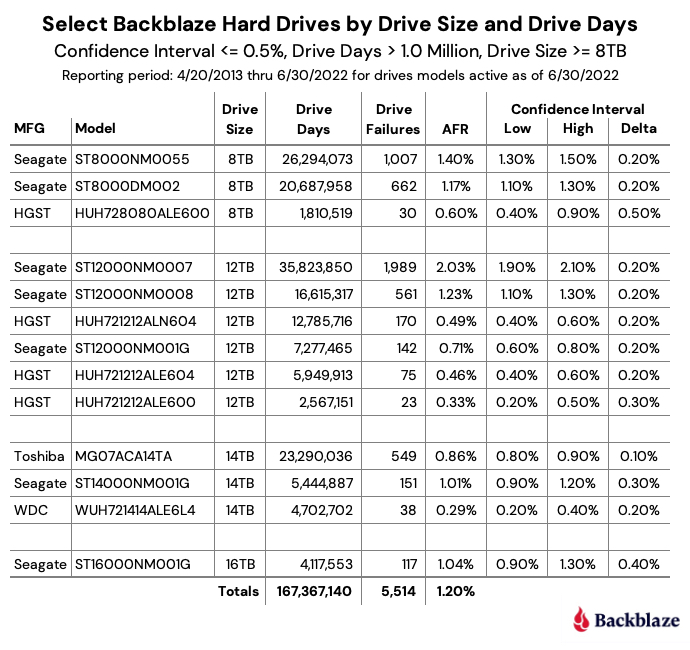
This report, we’ll change things up a bit and start with the lifetime failure rates. We’ll cover the Q2 data later on in this post. As of June 30, 2022, Backblaze was monitoring 215,424 hard drives used to store data. For our evaluation, we removed 413 drives from consideration as they were used for testing purposes or drive models which did not have at least 60 drives. This leaves us with 215,011 hard drives grouped into 27 different models to analyze for the lifetime report.

Notes and Observations About the Lifetime Stats

The lifetime annualized failure rate for all the drives listed above is 1.39%. That is the same as last quarter and down from 1.45% one year ago (6/30/2021).

A quick glance down the annualized failure rate (AFR) column identifies the three drives with the highest failure rates:

  • The 8TB HGST (model: HUH728080ALE604) at 6.26%.
  • The Seagate 14TB (model: ST14000NM0138) at 4.86%.
  • The Toshiba 16TB (model: MG08ACA16TA at 3.57%.

What’s common between these three models? The sample size, in our case drive days, is too small, and in these three cases leads to a wide range between the low and high confidence interval values. The wider the gap, the less confident we are about the AFR in the first place.

In the table above, we list all of the models for completeness, but it does make the chart more complex. We like to make things easy, so let’s remove those drive models that have wide confidence intervals and only include drive models that are generally available. We’ll set our parameters as follows: a 95% confidence interval gap of 0.5% or less, a minimum drive days value of one million to ensure we have a large enough sample size, and drive models that are 8TB or more in size. The simplified chart is below.

To summarize, in our environment, we are 95% confident that the AFR listed for each drive model is between the low and high confidence interval values.

Computing the Annualized Failure Rate

We use the term annualized failure rate, or AFR, throughout our Drive Stats reports. Let’s spend a minute to explain how we calculate the AFR value and why we do it the way we do. The formula for a given cohort of drives is:

AFR = ( drive_failures / ( drive_days / 365 )) * 100

Let’s define the terms used:

  • Cohort of drives: The selected set of drives (typically by model) for a given period of time (quarter, annual, lifetime).
  • AFR: Annualized failure rate, which is applied to the selected cohort of drives.
  • drive_failures: The number of failed drives for the selected cohort of drives.
  • drive_days: The number of days all of the drives in the selected cohort are operational during the defined period of time of the cohort (i.e., quarter, annual, lifetime).

For example, for the 16TB Seagate drive in the table above, we have calculated there were 117 drive failures and 4,117,553 drive days over the lifetime of this particular cohort of drives. The AFR is calculated as follows:

AFR = ( 117 / ( 4,117,553 / 365 )) * 100 = 1.04%

Why Don’t We Use Drive Count?

Our environment is very dynamic when it comes to drives entering and leaving the system; a 12TB HGST drive fails and is replaced by a 12TB Seagate, a new Backblaze Vault is added and 1,200 new 14TB Toshiba drives are added, a Backblaze Vault of 4TB drives is retired, and so on. Using drive count is problematic because it assumes a stable number of drives in the cohort over the observation period. Yes, we will concede that with enough math you can make this work, but rather than going back to college, we keep it simple and use drive days as it accounts for the potential change in the number of drives during the observation period and apportions each drive’s contribution accordingly.

For completeness, let’s calculate the AFR for the 16TB Seagate drive using a drive count-based formula given there were 16,860 drives and 117 failures.

Drive Count AFR = ( 117 / 16,860 ) * 100 = 0.69%

While the drive count AFR is much lower, the assumption that all 16,860 drives were present the entire observation period (lifetime) is wrong. Over the last quarter, we added 3,601 new drives, and over the last year, we added 12,003 new drives. Yet, all of these were counted as if they were installed on day one. In other words, using drive count AFR in our case would misrepresent drive failure rates in our environment.

How We Determine Drive Failure

Today, we classify drive failure into two categories: reactive and proactive. Reactive failures are where the drive has failed and won’t or can’t communicate with our system. Proactive failures are where failure is imminent based on errors the drive is reporting which are confirmed by examining the SMART stats of the drive. In this case, the drive is removed before it completely fails.

Over the last few years, data scientists have used the SMART stats data we’ve collected to see if they can predict drive failure using various statistical methodologies, and more recently, artificial intelligence and machine learning techniques. The ability to accurately predict drive failure, with minimal false positives, will optimize our operational capabilities as we scale our storage platform.

SMART Stats

SMART stands for Self-monitoring, Analysis, and Reporting Technology and is a monitoring system included in hard drives that reports on various attributes of the state of a given drive. Each day, Backblaze records and stores the SMART stats that are reported by the hard drives we have in our data centers. Check out this post to learn more about SMART stats and how we use them.

Q2 2022 Hard Drive Failure Rates

For the Q2 2022 quarterly report, we tracked 215,011 hard drives broken down by drive model into 27 different cohorts using only data from Q2. The table below lists the data for each of these drive models.

Notes and Observations on the Q2 2022 Stats

Breaking news, the OG stumbles: The 6TB Seagate drives (model: ST6000DX000) finally had a failure this quarter—actually, two failures. Given this is the oldest drive model in our fleet with an average age of 86.7 months of service, a failure or two is expected. Still, this was the first failure by this drive model since Q3 of last year. At some point in the future we can expect these drives will be cycled out, but with their lifetime AFR at just 0.87%, they are not first in line.

Another zero for the next OG: The next oldest drive cohort in our collection, the 4TB Toshiba drives (model: MD04ABA400V) at 85.3 months, had zero failures for Q2. The last failure was recorded a year ago in Q2 2021. Their lifetime AFR is just 0.79%, although their lifetime confidence interval gap is 1.3%, which as we’ve seen means we are lacking enough data to be truly confident of the AFR number. Still, at one failure per year, they could last another 97 years—probably not.

More zeroes for Q2: Three other drives had zero failures this quarter: the 8TB HGST (model: HUH728080ALE604), the 14TB Toshiba (model: MG07ACA14TEY), and the 16TB Toshiba (model: MG08ACA16TA). As with the 4TB Toshiba noted above, these drives have very wide confidence interval gaps driven by a limited number of data points. For example, the 16TB Toshiba had the most drive days—32,064—of any of these drive models. We would need to have at least 500,000 drive days in a quarter to get to a 95% confidence interval. Still, it is entirely possible that any or all of these drives will continue to post great numbers over the coming quarters, we’re just not 95% confident yet.

Running on fumes: The 4TB Seagate drives (model: ST4000DM000) are starting to show their age, 80.3 months on average. Their quarterly failure rate has increased each of the last four quarters to 3.42% this quarter. We have deployed our drive cloning program for these drives as part of our data durability program, and over the next several months, these drives will be cycled out. They have served us well, but it appears they are tired after nearly seven years of constant spinning.

The AFR increases, again: In Q2, the AFR increased to 1.46% for all drives models combined. This is up from 1.22% in Q1 2022 and up from 1.01% a year ago in Q2 2021. The aging 4TB Seagate drives are part of the increase, but the failure rates of both the Toshiba and HGST drives have increased as well over the last year. This appears to be related to the aging of the entire drive fleet and we would expect this number to go down as older drives are retired over the next year.

Four Thousand Storage Servers

In the opening paragraph, we noted there were 4,020 boot drives. What may not be obvious is that this equates to 4,020 storage servers. These are 4U servers with 45 or 60 drives in each with drives ranging in size from 4TB to 16TB. The smallest is 180TB of raw storage space (45 * 4TB drives) and the largest is 960TB of raw storage (60 * 16TB drives). These servers are a mix of Backblaze Storage Pods and third-party storage servers. It’s been a while since our last Storage Pod update, so look for something in late Q3 or early Q4.

Drive Stats at DEFCON

If you will be at DEFCON 30 in Las Vegas, I will be speaking live at the Data Duplication Village (DDV) at 1 p.m. on Friday, August 12th. The all-volunteer DDV is located in the lower level of the executive conference center of the Flamingo hotel. We’ll be talking about Drive Stats, SSDs, drive life expectancy, SMART stats, and more. I hope to see you there.

Never Miss the Drive Stats Report

Sign up for the Drive Stats Insiders newsletter and be the first to get Drive Stats data every quarter as well as the new Drive Stats SSD edition.

➔ Sign Up

The Hard Drive Stats Data

The complete data set used to create the information used in this review is available on our Hard Drive Test Data page. You can download and use this data for free for your own purpose. All we ask are three things: 1) you cite Backblaze as the source if you use the data, 2) you accept that you are solely responsible for how you use the data, and 3) you do not sell this data to anyone; it is free.

If you want the tables and charts used in this report, you can download the .zip file from Backblaze B2 Cloud Storage which contains the .jpg and/or .xlsx files as applicable.
Good luck and let us know if you find anything interesting.

Want More Drive Stats Insights?

Check out our 2021 Year-end Drive Stats Report.

Interested in the SSD Data?

Read our first SSD-based Drive Stats Report.

The post Backblaze Drive Stats for Q2 2022 appeared first on Backblaze Blog | Cloud Storage & Cloud Backup.
Get a Clear Picture of Your Data Spread With BackBlaze and DataIntell

Post Syndicated from Jennifer Newman original https://www.backblaze.com/blog/get-a-clear-picture-of-your-data-spread-with-backblaze-and-dataintell/

Do you know where your data is? It’s a question more and more businesses have to ask themselves, and if you don’t have a definitive answer, you’re not alone. The average company manages over 100TB of data. By 2025, it’s estimated that 463 exabytes of data will be created each day globally. That’s a massive amount of data to keep tabs on.

But understanding where your data lives is just one part of the equation. Your next question is probably, “How much is it costing me?” A new partnership between Backblaze and DataIntell can help you get answers to both questions.

What Is DataIntell?

DataIntell is an application designed to help you better understand your data and
storage utilization. This analytic tool helps identify old and unused files and gives better
insights into data changes, file duplication, and used space over time. It is designed to
help you manage large amounts of data growth. It provides detailed, user friendly, and accurate analytics of your data use, storage, and cost, allowing you to optimize your storage and monitor its usage no matter where it lives—on-premises or in the cloud.

How Does Backblaze Integrate With DataIntell?

Together, DataIntell and Backblaze provide you with the best of both worlds. DataIntell allows you to identify and understand the costs and security of your data today, while Backblaze provides you with a simple, scalable, and reliable cloud storage option for the future.

“DataIntell offers a unique storage analysis and data management software which facilitates decision making while reducing costs and increasing efficiency, either for on-prem, cloud, or archives. With Backblaze and DataIntell, organizations can now manage their data growth and optimize their storage cost with these two simple and easy-to-use solutions.
—Olivier Rivard, President/CTO, DataIntell

How Does This Partnership Benefit Joint Customers?

This partnership delivers value to joint customers in three key areas:

  • It allows you to make the most of your data wherever it lives, at speed, and with a 99.9% uptime SLA—no cold delays or speed premiums.
  • You can easily migrate on-premises data and data stored on tape to scalable, affordable cloud storage.
  • You can stretch your budget (further) with S3-compatible storage predictably priced at a fraction of the cost of other cloud providers.

“Unlike legacy providers, Backblaze offers always-hot storage in one tier, so there’s no juggling between tiers to stay within budget. By partnering with DataIntell, we can offer a cost-effective solution to joint customers looking to simplify their storage spend and data management efforts.”
—Nilay Patel, Vice President of Sales and Partnerships, Backblaze

Getting Started With Backblaze B2 and DataIntell

Are you looking for more insight into your data landscape? Contact our Sales team today to get started.

The post Get a Clear Picture of Your Data Spread With BackBlaze and DataIntell appeared first on Backblaze Blog | Cloud Storage & Cloud Backup.
What Is Extended Version History?

Post Syndicated from original https://www.backblaze.com/blog/what-is-extended-version-history/

Our recent Backup Awareness Survey showed that 61% of Americans who own a computer and back it up are not very confident that all of their data is being backed up. That just goes to show how complicated some backup solutions are.

And what good is a backup service if it’s hard to get your data back when you need it?

The Backblaze Computer Backup client is designed to stay out of the way and back up your data, while making restoring that data a walk in the park. One of the popular ways of enhancing our backup service is a feature called Extended Version History. But, we’ve found that some people still don’t quite understand what it does. With that in mind, I wanted to write an overview of the feature, how it works, and why it’s useful for anyone that uses our Computer Backup service, whether it’s for personal use or for their company or family group.

Extended Version History Explained

First, we need to define two key terms, “retention” and “version,” to help explain Extended Version History.

What Is Retention?

In simple terms, retention is how long something in your backup is kept backed up.

What Is a Version?

It seems simple enough, but it’s worth explaining what we mean by a “version.” Without getting in the weeds, whenever a file is added or created on your computer, that is a version. Whenever you change a file on your computer, whether you add more lines to a spreadsheet or edit your recent vacation photos, those changes also create another version of the file.

When you understand what retention is and what a version is, it’s easy to understand Extended Version History. It’s a feature that allows you to set a retention timeframe that specifies how long all the older versions—the version history—of your files should be kept as part of your backup.

How Long Is Backblaze’s Retention?

The standard Backblaze Computer Backup service comes with 30 days of Version History for the files that are backed up. This means that you can go back in time (using our roll back time feature) and access older versions of files for 30 days from the date they were last changed or deleted. After that 30-day mark, the version of the file that’s 30 days old will leave your backup, but any newer files will remain.

Note: If you last changed or added a file more than 30 days ago, but have not made any changes to it, it will remain in your backup as long as it remains on your computer (or is unchanged). If it gets removed or changed, that’s when the 30-day retention period starts.

What Does Extended Version History Do?

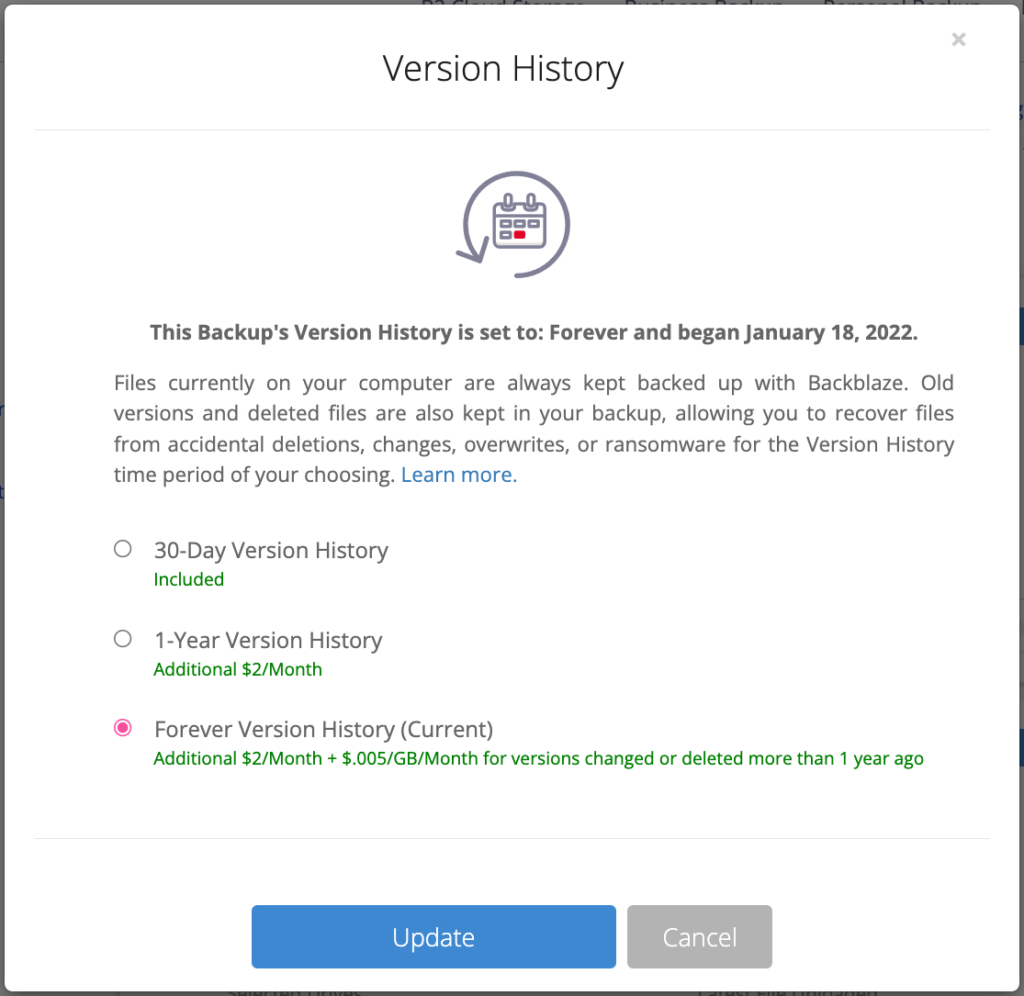
With Extended Version History, you can increase that 30-day period to one year or even forever. This essentially increases the duration for which you can roll back time when going to access your data.

A Very Simple Example (With Babies!)

As a new uncle, I have babies on the brain. Let’s say that a baby was born on July 1st and our family creates a spreadsheet to chart the growth of the baby. Every single day, we add a row to the spreadsheet to add in the baby’s weight, height, and maybe a cute note. The previous rows don’t get deleted, and so the spreadsheet grows by one row every single day.
On July 30th, our spreadsheet will have 30 rows (one per day). If that spreadsheet was being backed up by Backblaze, I could go back in time to July 1st and get a copy of that spreadsheet from the very first day, with just a single row of baby information. However, if I tried to do that on July 31, that original version would be gone, but I could go back and get a copy from July 2nd, the version with the first two rows of baby data. If I tried to go back on, say, August 30th, I could get a copy from August 1, which would have all of July’s rows of baby data.

To illustrate the point, here’s me as a Soviet baby.

With Extended Version History, using that same example, I have more time (a year or forever) to go back and retrieve that original copy of the spreadsheet created on July 1 with just the first row.

Why would you want the spreadsheet with just one row? Who knows, it’s an example!

Why Extended Version History? Because Mistakes Happen!

Our Backup Awareness Month survey found that 67% of respondents have reported accidentally deleting a file. 44% reported losing data, or access to data, because a shared or synced drive or folder was deleted. Having Extended Version History turned on for your Backblaze backup helps avoid data loss because of accidental deletions.

You may not always realize right away (or within 30 days) that you deleted a file accidentally. Or you may not regularly check that shared drive until it’s too late and your older versions are gone. With Extended Version History, you can go back in time up to a year later or forever later and get those files back.

How to Get Extended Version History?

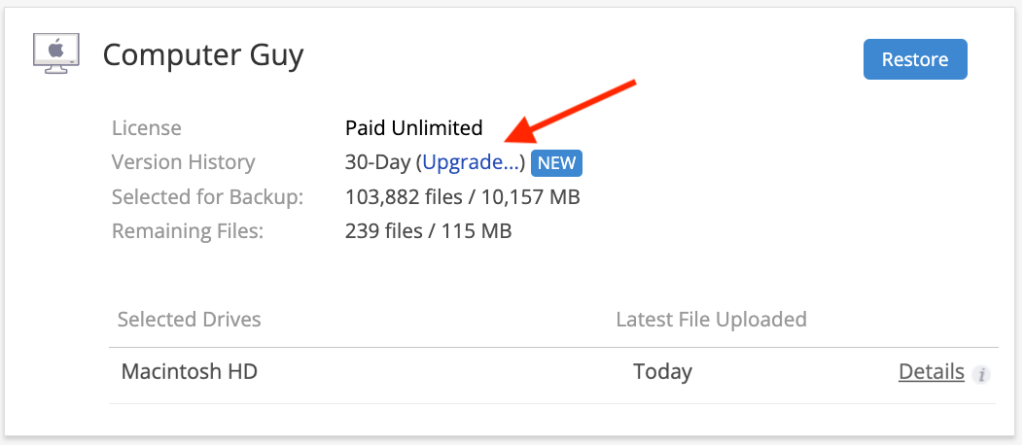
I encourage everyone I know to enable Extended Version History as soon as they install Backblaze on their computer.
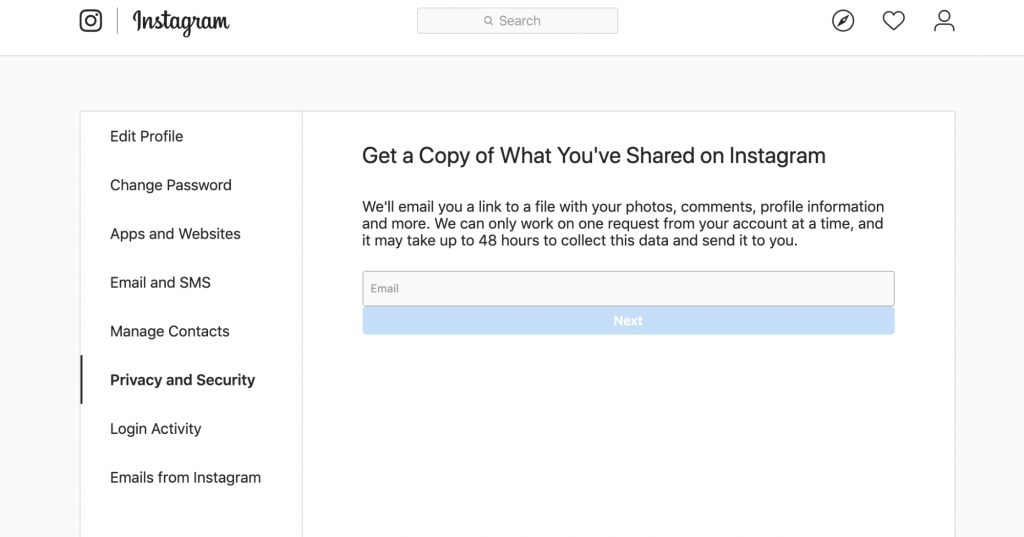
Step 1: Click “Upgrade.”

Step 2: Select how long you want to keep files—one year or forever.

One thing to keep in mind is that simply turning on Extended Version History won’t automatically extend the “life” of your files retroactively. For example, if you open your account on July 1 and enable Extended Version History on July 28, only the versions from July 28 onward will have Extended Version History, not the versions created between July 1 and July 28. Once enabled, any new or changed files will have their retention rate increased, which is why doing so when you first install Backblaze is the best policy.

Consider Extended Version History as getting additional “mistake insurance” for your data. If something happens, or you lose access to shared files and that goes unnoticed, we’ll have your back!

The post What Is Extended Version History? appeared first on Backblaze Blog | Cloud Storage & Cloud Backup.
Hard Drive Life Expectancy

Post Syndicated from original https://www.backblaze.com/blog/hard-drive-life-expectancy/

For the last several years, we have written about drive failure, or more specifically, the annualized failure rates for the hard drives and SSDs we use for our cloud storage platform. In this post, we’ll look at drive failure from a different angle: life expectancy.

By looking at life expectancy, we can answer the question, “How long is the drive I am buying today expected to last?” This line of thinking matches the way we buy many things. For example, knowing that a washing machine has an annualized failure rate of 4% is academically interesting, but what we really want to know is, “How long can I expect the washing machine to last before I need to replace it?”

Using the Drive Stats data we’ve collected since 2013, we have selected 10 drive models that have a sufficient number of both drives and drive days to produce Kaplan-Meier life expectancy curves we can use to easily visualize their life expectancy. Using these life expectancy curves we’ll compare drive models in cohorts of 4TB, 8TB, 12TB, and 14TB to see what we can find.

What Is a Kaplan-Meier Curve?

Kaplan-Meier curves are most often used in biological sciences to forecast life expectancy by measuring the fraction of subjects living for a certain amount of time after receiving treatment. That said, the application of the technique to other fields is not unusual.

Comparing 4TB Drives

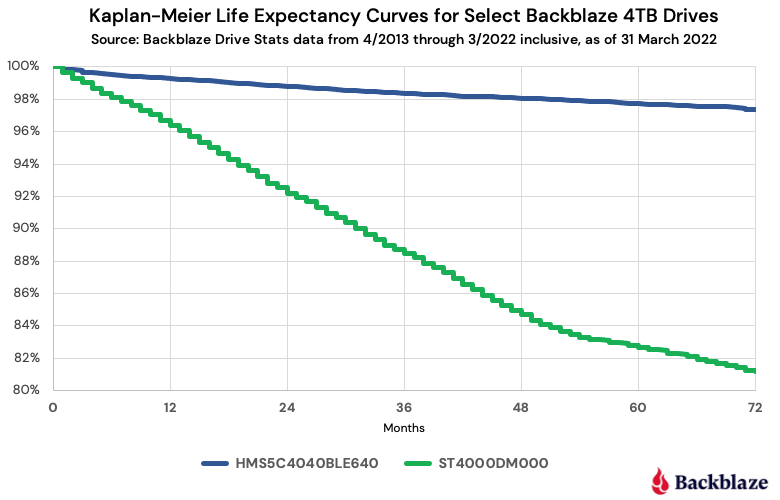
The two 4TB drive models we selected for comparison had the most 4TB drives in operation as of March 31, 2022. The Drive Stats for each drive model as of March 31, 2022 is shown below, followed by the Kaplan-Meier curve for each drive.

MFG Model Drives in Operation Lifetime Drive Failures Lifetime Drive Days Lifetime AFR
HGST HMS5C4040BLE640 12,728 343 30,025,871 0.40%
Seagate ST4000DM000 18,495 4,581 68,104,520 2.45%


What Is the Graph Telling Us?

  1. If you purchased an HGST drive at time zero, there is a 97% chance that drive would still be operational after six years (72 months).
  2. If you purchased a Seagate drive at time zero, there is an 81% chance that drive would still be operational after six years.

Case closed—we were stupid to buy any Seagate 4TB drives, right? Not so fast, there are other factors at work here: cost, availability, time, and maintenance, to name a few. For example, suppose I told you that the HGST drive you wanted was 1.2 to 1.5 times as expensive as the Seagate drive. In addition, the Seagate drive was readily available while the HGST drive was harder to get, and finally, at the time of purchase there was over an 80% chance that the Seagate drive would still be alive after six years. How does that change your perception?

In the case of buying one or two drives, you may find a single factor like, “how much do you have to spend” is the only thing that matters. In our case, these factors are intertwined. We explain some of the thinking behind our decision-making in our “How Backblaze Buys Hard Drives” post.

Was It Worth the Savings?

In the simple case, if the time and effort we spent replacing the failed Seagate drives was more than the savings, we failed. So, let’s do a little back-of-the-envelope math to see how we landed.

We replaced a little over 4,200 more Seagate drives over a six year period than HGST drives. That is 700 drives a year or about two Seagate drives per day we had to replace. That’s 30-40 minutes a day someone spent doing that task spread across multiple data centers. Yes, it’s work, but hardly something you would need to hire a person specifically to do.

Why Buy HGST Drives at All?

Fair question. At the time we were purchasing these Seagate and HGST drive models back in 2013 through 2015, there were no life expectancy curves and Drive Stats was just starting. We had anecdotal information that the HGST drives were better, but little else. In short, sometimes, the pricing and availability of the HGST was good enough so we bought them.

Comparing 8TB Drives

The two 8TB drives we’ve chosen to compare using life expectancy curves have done battle before. The 8TB Seagate model: ST8000DM002 is classified as a consumer drive, while the 8TB Seagate model: ST8000NM0055 is classified as an enterprise drive. Their lifetime annualized failure rates tell an interesting story. All data is as of March 31, 2022.

Type Model Drives in Operation Lifetime Drive Failures Lifetime Drive Days Lifetime AFR
Consumer ST8000DM002 9,678 628 19,815,919 1.13%
Enterprise ST8000NM0055 14,323 915 24,999,738 1.35%

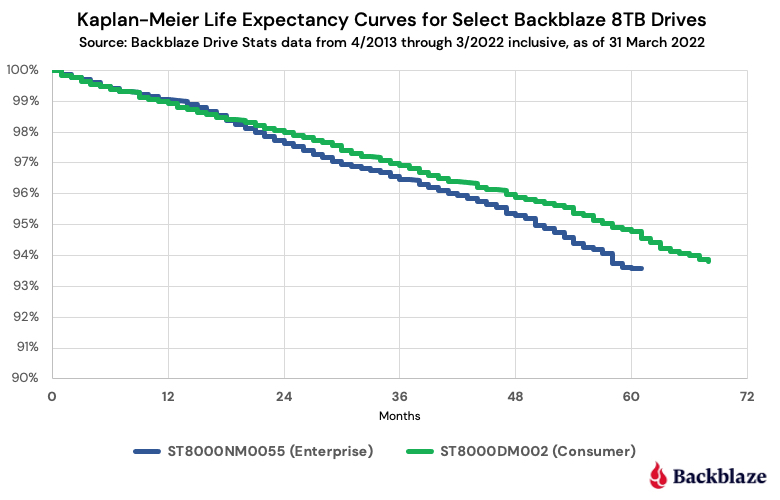
Let’s take a look at the life expectancy curves and see what else we can learn.

Observations

  • If you purchased either drive, the life expectancy is nearly the same for early on, but starts to separate at about two years and the difference increases over the next three years.
  • For the consumer model (ST8000DM002) you would expect nearly 95% of the drives to survive five years.
  • For the enterprise model (ST8000NM0055) you would expect 93.6% of the drives to survive five years.

These results seem at odds with the warranties for each model. Consumer drives typically have two-year warranties, while enterprise drives typically have five-year warranties. Yet at five years, the consumer drives, in this case, are more likely to survive, and the trend starts at two years—the end of the typical consumer drive warranty period. It’s almost like we got the data backwards. We didn’t.

Even with this odd difference, both drives performed well. If you wanted to buy an 8TB drive and the salesperson said there would be a 93.6% chance the drive would last five years, well, that’s pretty good. Regardless of the failure rate or life expectancy, there are other reasons to purchase an enterprise class drive, including the ability to tune the drive, tweak the firmware, or get a replacement via the warranty for three more years versus the consumer drive. All are good reasons and may be worth the premium you will pay for an enterprise class drive, but in this case at least, long live the consumer drive.

A Word About Drive Warranties

One of the advantages we get for buying drives in bulk from a manufacturer or one of their top tier resellers is that they will honor the warranty period ascribed to the drive. When you are buying from a retailer (typically an online retailer, but not always), you may find the warranty terms and conditions to be less straightforward. Here are three common situations:

  • The retailer purchases the drive or takes the drive on consignment from the manufacturer/distributor/reseller/etc., and that event triggers the start of the manufacturer warranty. When you buy the drive six months later, the warranty is no longer “X” years, but “X” years minus six months.
  • The retailer replaces the warranty with their own time period. While this is usually done for refurbished drives, we have seen this done by online retailers for new drives as well. In one case we saw, the original five-year warranty period was reduced to one year.
  • The retailer is only a storefront while the actual seller is different. At that point, determining the warranty period and who services the drive can be, shall we say, challenging. Of course, you can always buy the add-on warranty that’s offered—it’s always nice to pay for something that was supposed to be included.

As a drive model gets older, these types of shenanigans are more likely to happen. For example, a given drive model gathers dust awaiting shipment while new models are coming to market at competitive prices. The multiple players on the path from a drive’s manufacture to its eventual sale are looking for ways to “move” these aging drives along that path. One option is to lower or eliminate the warranty period to help reduce the cost of the drive. The warranty becomes a casualty of the supply chain and you, as the last buyer, are left with the results.

Comparing 12TB Drives

If you are serious about storing copious amounts of data, you’re probably looking at 12TB drives and higher. Your Plex media server or eight-bay NAS system demands nothing less. To that end, we selected three 12TB models for which we have at least two years worth of data to base our life expectancy curves upon. The Drive Stats data for these three drives is as of March 31, 2022.

MFR Model Drives in Operation Lifetime Drive Failures Lifetime Drive Days Lifetime AFR
HGST HUH721212ALN604 10,813 148 11,813,149 0.48%
Seagate ST12000NM001G 12,269 104 6,166,144 0.63%
Seagate ST12000NM0008 20,139 449 14,802,577 1.12%


Observations and Thoughts

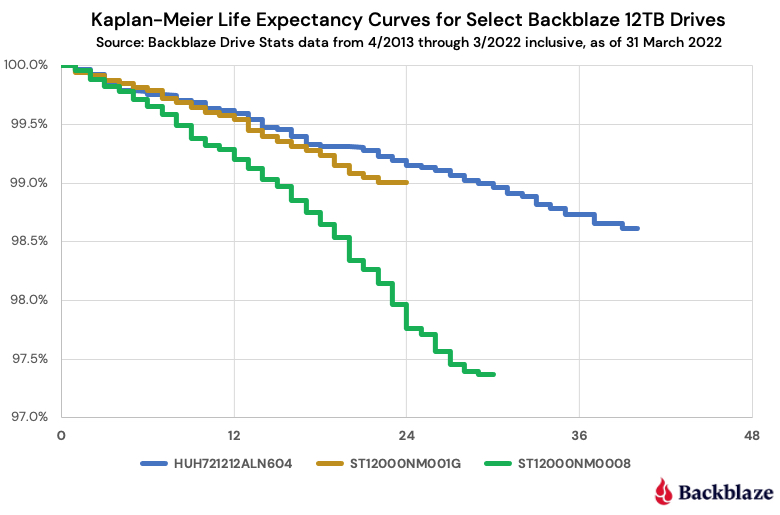
For any of the three models, at least 98% of the drives are expected to survive two years. I suspect that most of us would take that bet. While none of us wants to own the one or two drives out of 100 that will fail in that two years period, we know there are no 100% guarantees when it comes to hard drives.

That brings us to asking: What is the cost of each drive, and would that affect the buying decision? As we’ve noted previously, we buy in bulk and the price we pay is probably not reflective of the price you may pay in the consumer market. To that end, below are the current prices, via the Amazon website, for the three drive models. We’ve assumed that these are new drives and they have the same warranty coverage of five years.

  • HUH721212ALN604 – $413
  • ST12000NM001G – $249
  • ST12000NM0008 – $319

The Seagate model: ST12000NM001G and the HGST model: HUH721212ALN604 have about the same life expectancy after two years, but their price is significantly different. Which one do you buy today? If you are expecting the drive to last (i.e., survive) two years, you would select the Seagate drive and save yourself $164, plus tax. Some of you will disagree, and given we know nothing beyond the two-year point for the Seagate drive, you may be right. Time will tell.

One thing that may be perplexing here is why the Seagate model: ST12000NM0008 is more expensive than the Seagate model: ST12000NM001G even though the ST12000NM008 fails more often and has a lower life expectancy after two years? The reason is simple: Drive pricing is basically driven by supply and demand. We suspect that annualized failure rates and life expectancy curves are not part of the pricing math done by the various companies (manufacturers/distributors/resellers/etc.) along the supply chain.

By the way, if you purchase the 12TB HGST drive, it may say Western Digital (WDC) on the label. For the first couple of years when these drives were produced, they had HGST on the label, but that changed somewhere in the last couple of years. In either case, both “versions” report as HGST drives and have the same model number, HUH721212ALN604. The new Western Digital label is part of the continuing rebranding effort being done by WDC to update the HGST assets they purchased a few years back.

Comparing 14TB Drives

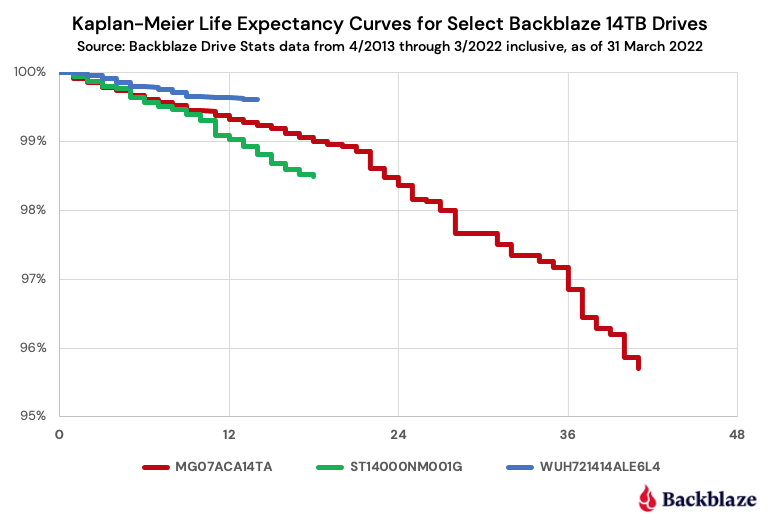
We will finish up our look at hard drive life expectancy curves with three models from our collection of 14TB drives. While the data ranges from 14 to 41 months depending on the drive model, this is the one cohort where we have comparable data on drives from all three of the major manufacturers: Seagate, Toshiba, and WDC. The Drive Stats data is below, followed by the life expectancy curves for the same models.

MFR Model Drives in Operation Lifetime Drive Failures Lifetime Drive Days Lifetime AFR
Toshiba MG07ACA14TA 38,210 454 19,834,886 0.83%
Seagate ST14000NM001G 10,734 123 4,474,417 1.00%
WDC WUH721414ALE6L4 8,268 35 3,941,427 0.33%


Observations and Thoughts

All three drives have a life expectancy of 99% or more after one year. Previously, we examined the bathtub curve for drive failure and made the observation that the early mortality rate for hard drives, those that failed during their first year in operation, was now nearly the same as the random failure rate. That seems to be the case for this collection of drives as the observed early mortality effect is nominal.

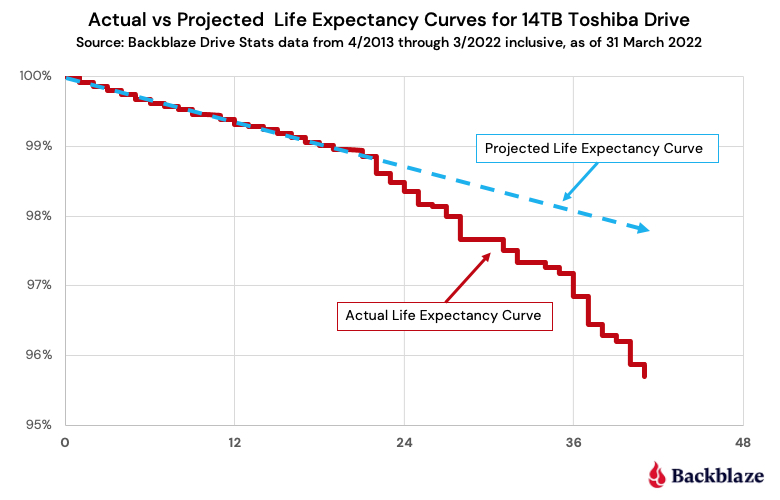
When considering the bathtub curve, the Toshiba model seems to be an outlier beginning at 22 months. At that point, the downward curvature in the line suggests an accelerating failure rate when the failure rate should be steady, as seen below.

The projected life expectancy curve line is derived by extending the random failure rate from the first 22 months. That said, 97% of the Toshiba drives survived for three years while the projected number was 98%, or simply put, the failure rate was one drive per hundred more over a three-year period.

Interested in More Drive Stats Insights?

Physical disk drives remain essential elements of business and personal tech. That’s why Backblaze publishes performance data and analysis on 200,000+ HDDs: to offer useful insights into how different drive models stack up in our data center. As SSDs increasingly become the norm in many computers and servers, Backblaze is now also sharing data for the thousands of SSDs we use as boot drives.

Methodology

The raw data comes from the Backblaze Drive Stats data and is based on the raw value of SMART attribute 9 (power on hours) for a defined cohort of drives. After removing outliers, we basically compared the number of drives which failed after a specific number of months versus the number of drives which managed to survive that many months. The math is absolutely more complex than that and I want to thank Dr. Charles Zaiontz, Ph.D. for providing an excellent tutorial on Kaplan-Meier curves and, more specifically, how to use Microsoft Excel to do the math.

Refresher: What Are SMART Stats?

SMART stands for Self-monitoring, Analysis, and Reporting Technology and is a monitoring system included in hard drives that reports on various attributes of the state of a given drive. Each day, Backblaze records the SMART stats that are reported by the hard drives we have in our data centers. Check out this post to learn more about SMART stats and how we use them.

Standing on the Shoulders

Using our Drive Stats data in combination with Kaplan-Meier curves has been done previously in various forms by others including Ross Lazarus, Simon Erni, and Tom Baldwin. We thank them for their collective efforts and for providing us with the inspiration to produce the current curves that enabled the comparisons we did in this post.

The post Hard Drive Life Expectancy appeared first on Backblaze Blog | Cloud Storage & Cloud Backup.
Server Backup 101: Disaster Recovery Planning

Post Syndicated from Kari Rivas original https://www.backblaze.com/blog/server-backup-101-disaster-recovery-planning/

In any business, time is money. What may shock you is how much money that time is actually worth. According to Gartner, the average cost of one hour of downtime for a business is roughly $300,000. That’s $5,600 a minute. Multiply that out by the amount of time it takes to recover from data theft, sabotage, or a natural disaster, and you could easily be looking at millions of dollars in lost revenue. That is, unless you’ve planned ahead with an effective disaster recovery plan.

Even one hour of lost time due to a cyberattack or natural disaster could adversely affect your business operations. Read on to learn how to develop an effective disaster recovery plan so you can quickly rebound no matter what happens, including:

  • Knowing what a disaster recovery plan is and why you need it.
  • Developing an effective strategy.
  • Identifying key roles.
  • Prioritizing business operations and objectives.
  • Deploying backups.

What Is a Disaster Recovery Plan?

A disaster recovery plan is made up of resources and processes that a business can use to restore apps, data, digital assets, equipment, and network operations in the event of any unplanned disruption.

Events such as natural disasters (floods, fires, earthquakes, etc.), theft, and cybercrime often interrupt business operations or restrict access to data. The goal of a disaster recovery plan is to get back up and running as quickly and smoothly as possible.

Some companies will choose to write their own disaster recovery plans, while others may contract with a managed service provider (MSP) specializing in disaster recovery as a service (DRaaS). Either way, crafting a disaster recovery plan that covers you for any contingency is crucial.

Why Do You Need a Disaster Recovery Plan?

A disaster recovery plan is not just a good idea, it is an essential component of your business. Cybercrime is on the rise, targeting small and medium-sized businesses just as often as large corporations. According to Cybersecurity Magazine, 43% of recent data breaches affected small and medium-sized businesses. Additionally, you could be cut off from your data by power outages, hardware failure, data corruption, and natural occurrences that restrict IT workflows. So, why do you need a disaster recovery plan? A few key benefits rise to the top:

  • Your disaster recovery plan will ensure business continuity in the case of a disaster. Imagine the confidence of knowing that no matter what happens, your business is prepared and can continue operations seamlessly.
  • An effective disaster recovery plan will help you get back up and running faster and more efficiently.
  • The plan also helps to communicate to your entire team, from top to bottom, what to do in the event of an emergency.

Writing a Disaster Recovery Plan: What Should Your Disaster Recovery Plan Include?

A solid disaster recovery plan should include five main elements, which we’ll detail below:

  1. An effective strategy.
  2. Key team members who can carry out the plan.
  3. Clear objectives and priorities.
  4. Solid backups.
  5. Testing protocols.

An Effective Strategy

One of the most critical aspects of your disaster recovery plan should be your strategy. Typically, the details of a disaster recovery plan include steps for prevention, preparation, mitigation, and recovery. Think about both the big picture and fine details when putting together the pieces.

Disaster Recovery Planning Case Study: Santa Cruz Skateboards

Santa Cruz Skateboards safeguarded decades worth of data with a disaster recovery plan and backups to prevent loss from the threat of tsunamis on the California coast. Read more about how they did it.

Some tips for creating an effective strategy include:

  • Identify possible disasters. Consider the types of disasters your business may encounter and design your plan around those. Every business is susceptible to cybercrime, which should be a significant component of your plan. If your business is located in a disaster prone location, let that dictate your plan objectives.
  • Plan for “minor” disasters. A “major” disaster like an earthquake could take out the entire office and on-premises infrastructure, but “minor” disasters can also be disruptive. Good employees make mistakes and delete things, and bad employees sometimes make worse mistakes. A disaster recovery plan protects you from those “minor” disasters as well.
  • Create multiple disaster recovery plans. You may need to create different versions of your disaster recovery plan based on specific scenarios and the severity of the disaster. For example, you may need a plan that responds to a cyberattack and restores data quickly, while another plan may deal with hardware destruction and replacement rather than data restoration.
  • Plan from your recovery backward. Think about what you need to accomplish with your disaster recovery and plan your backup routine to support it. Then, after your plan is written, go back and ensure that your backup routine follows the plan initiatives and accomplishes the goals in an acceptable time frame.
  • Develop KPIs. Include critical key performance indicators (KPIs) in the plan, such as a recovery time objective (RTO) and recovery point objective (RPO). RTO refers to how quickly you intend to restore your systems after a disaster, and RPO is the maximum amount of data loss you can safely incur.

Establish the Key Team Members and Their Roles and Hierarchy

Another crucial component of your disaster recovery plan is identifying key team members to carry out the instructions. You must clearly define roles and hierarchy for effectiveness. Consider the following when building your disaster recovery team:

  • Communicate roles and hierarchy. Ensure that each team member knows their role in the plan and understands where they land in the hierarchy. Build in redundancy if a major player is unavailable.
  • Develop a master contact list. Create a master list with updated contact information for each team member and update it regularly as things change. Be sure the list includes everyone’s cell phone and landline numbers (if applicable) and emergency contacts for each person. Don’t assume you will have working internet and consider alternative ways to reach critical team members in the middle of the night.
  • Plan on how to manage your team. Think about how you will stay organized and manage your team to function 24/7 until you resolve the disaster.

Prioritize Business Operations and Objectives

Another important aspect of your disaster recovery plan is prioritizing business operations and objectives and crafting your plan around those.

Identify the most critical aspects of the business that need to be restored first. Then, focus on those and leave the less essential things until later. Understand that it is not feasible to restore everything at once. Instead, you must prioritize the most critical business areas and get those up and running and then, other, less crucial parts of the system. Detail these priorities in your plan so that no one wastes time on nonessential operations.

Know How to Deploy Your Backups

Backups should be a routine function for your organization, and you should know them inside and out. Be sure to familiarize yourself with every aspect of the backup process, including where data is stored, how recent it is, and how to restore it at a moment’s notice.

Having a reliable backup plan could save your business. You don’t want to waste precious time figuring out where the latest backup is, where it’s stored (whether that’s locally or on the cloud), or how to access it. Off-site cloud storage is a safe, reliable way to store and retrieve your data, especially in the event of a disaster.

Practice restoring your backups regularly to test their viability. Document the process for restoring in case you are unavailable and someone else has to take over. Data restoration should be a central part of your disaster recovery plan. Remember, backups are not your entire disaster recovery plan but only a piece of the overall system.

Foolproof Your Plan With Disaster Recovery Testing

The best-laid plans don’t always work out. Therefore, it’s essential that you foolproof your disaster recovery plan by testing it regularly (once a year, or every six months, whatever works for you). You don’t have to experience a real catastrophe; you can simulate what a disaster would look like and run through the entire process to ensure everything works as expected. Some disaster recovery testing best practices include:

  • Planning for the worst-case scenario. Think about things like access to a car, how you will get to the office, and how you will access your backups if they are stored online and you don’t have internet? Prepare by having multiple alternate plans (A, B, C, etc.). Remember, disasters come in all shapes and sizes so, be prepared to think outside the box. When the COVID-19 pandemic started, businesses had to scramble to adjust. Prepare for anything, even minor disruptions or cut-offs from resources you rely on.
  • Securing resources in advance. If you need resources to make it work, such as budgetary funds, software, hardware, or services, get those approved now so you’re not stuck provisioning necessary resources in the middle of a disaster.
  • Regularly reviewing and updating your disaster recovery plan as things change. Team members come and go, so schedule routine updates every three to six months to ensure that everything is up to date and viable.
  • Distributing copies of your disaster recovery plan. All staff members, including executives, should have a copy of your plan, and you should clearly communicate how it works and what everyone’s responsibility is.
  • Conducting post mortems after training and simulations (or a real disaster) to determine what works and what doesn’t. Make changes to your plan accordingly.

Don’t wait until a disaster occurs before writing your disaster recovery plan. A disaster recovery plan is an ever-evolving process you must maintain as the business changes and grows so you can face anything that the future brings.

Disaster Recovery, Done.

Ready to check disaster recovery off your list? Check out our Instant Recovery in Any Cloud solution that you can use as part of your disaster recovery plan. You can run a single command to instantly see your servers, data, firewalls, and network storage. Get back up and running as soon as possible with minimal disruption and expense to your business.

The post Server Backup 101: Disaster Recovery Planning appeared first on Backblaze Blog | Cloud Storage & Cloud Backup.
Level Up Your Backup Game With Backblaze and Veritas

Post Syndicated from Jennifer Newman original https://www.backblaze.com/blog/level-up-your-backup-game-with-backblaze-and-veritas/

If you’re using Veritas’ Backup Exec, you’re already ahead of the game when it comes to your data backup and recovery approach. Now, you can power up your backup strength by adding Backblaze B2 Cloud Storage as a destination for your Backup Exec data.

The joint solution offers easy, affordable, S3-compatible object storage to customers who use Backup Exec to streamline their data backup and recovery approach. Read on to learn more about this partnership and how it can benefit your business.

Backblaze and Veritas: In Person at VMware Explore 2022

Want to learn more? Stop by booth 1501 at VMware Explore 2022, August 29–September 1. You can visit with our technical experts, see demos, and learn more about how Backblaze B2 Cloud Storage seamlessly integrates with Veritas Backup Exec. Or, schedule a meeting using this link to talk about solutions tailored to your business needs.

What Is Veritas Backup Exec?

The Veritas Backup Exec service helps businesses protect almost any data on any storage device—tape, servers, or in the cloud. By unifying backup management in one panel, it creates a simple, customizable approach to managing backups and orchestrating recovery that can benefit everyone from the local bakery, to a regional school district, to large government units.

How Does Backblaze Integrate With Backup Exec?

Customers have regularly asked for Backblaze to be accepted into the Veritas Technology Partner Program. Being able to seamlessly integrate Veritas with Backblaze B2 is a big win for these customers who’ve long been looking for an easy, affordable solution that helps them manage infrastructure costs.

Beginning today, any business or institution using Backup Exec can configure their data to back up to B2 Cloud Storage. IT teams can rest easy, knowing that remote offices, Linux and Unix workloads, virtual or Microsoft workloads, and more, are protected and immediately available if they need them—all configurable in a few clicks and at one-fifth the price of traditional storage vendors, with no data retention minimums or other lock-in fees.

“The Backup Exec service empowers small and medium-sized businesses to do more with less, and to minimize their daily lift around data management and protection. This aligns perfectly with our mission to make storing and using data astonishingly easy—especially for IT teams that already have a ton on their plate.”
—Nilay Patel, VP of Sales & Partnerships, Backblaze

How Does This Partnership Benefit Joint Customers?

The partnership delivers in three key value areas:

  • Simplification: Backup Exec provides a simple, unified user interface that removes complexity from data protection. Backblaze B2 is configurable in a few easy steps.
  • Hybrid-cloud adoption: The capital and personnel expense of purchasing and managing on-prem data storage can be challenging. Veritas and Backblaze put cloud adoption within reach—for backups, workloads, infrastructure, recovery, or everything together.
  • Cost reduction: Backup Exec makes configuring backups easy, which means that businesses can fine-tune their storage bill in line with their budgets. With B2 Cloud Storage priced at one-fifth of traditional cloud vendors—the combination offers a powerful tool to businesses that want to optimize their spend.

“Our goal with Backup Exec is to provide a simple, powerful solution that frees business owners from concerns about data loss. Backblaze is a natural partner in this effort and we’re excited to work with them to bring the value of cloud backup to a larger group of businesses and institutions.”
—Jason Von Eberstein, Senior Principal Product Manager of Veritas

Bonus Points: Veritas + Carahsoft + Backblaze = Public Sector Success

Backblaze recently announced a partnership with Carahsoft to help public sector CIOs optimize their cloud spend. Carahsoft is the Master Government Aggregator™ for the IT industry. The partnership—which was enabled by our recent launch of a capacity-based pricing bundle, Backblaze B2 Reserve—solves both the budgeting and procurement challenges public sector CIOs are facing. And Carahsoft is a strategic distributor for Veritas, so public sector customers can take advantage of the joint solution as well.

About Veritas

Veritas enables organizations to harness the power of their information, with solutions designed to serve the world’s largest and most complex heterogeneous environments. Veritas’s industry-leading solutions cover all platforms with backup and recovery, business continuity, software-defined storage, and information governance.

Getting Started With Backblaze B2 and Veritas

Ready to take your backup game to the next level? Click here to get started today and check out our Knowledge Base article for detailed instructions.

The post Level Up Your Backup Game With Backblaze and Veritas appeared first on Backblaze Blog | Cloud Storage & Cloud Backup.
How to Connect Your QNAP NAS to Backblaze B2 Cloud Storage

Post Syndicated from Troy Liljedahl original https://www.backblaze.com/blog/guide-qnap-backup-b2-cloud-storage/

Network attached storage (NAS) devices are a popular solution for data storage, sharing files for remote collaboration purposes, syncing files that are part of a workflow, and more. QNAP, one of the leading NAS manufacturers, makes it incredibly easy to backup and/or sync your business or personal data for these purposes with the inclusion of its application, Hybrid Backup Sync (HBS). HBS consolidates backup, restoration, and synchronization functions into a single application.

Protecting your data with a NAS is a great first step, but you shouldn’t stop there. NAS devices are still vulnerable to any kind of on-premises disaster like fires, floods, and tornados. They’re also not safe from ransomware attacks that might hit your network. To truly protect your data, it’s important to back up or sync to an off-site cloud storage destination like Backblaze B2 Cloud Storage. Backblaze B2 offers a geographically distanced location for your data for $5/TB per month, and you can also embed it into your NAS-based workflows to streamline access across multiple locations.

Read on for more information on whether you should use backup or sync for your purposes and how to connect your QNAP NAS to Backblaze B2 step-by-step. We’ve even provided videos that show you just how easy it is—it typically takes less than 15 minutes!

➔ Download Our Complete NAS Guide

Should I Back Up or Sync?

It’s easy to confuse backup and sync. They’re essentially both making a copy of your data, but they have different use cases. It’s important to understand the difference so you’re getting the right protection and accessibility for your data.

Check out the table below. You’ll see that backup is best for being able to recover from a data disaster, including the ability to access previous versions of data. However, if you’re just looking for a mirror copy of your data, sync functionality is all you need. Sync is also useful as part of remote workflows: you can sync your data between your QNAP and Backblaze B2, and then remote workers can pull down the most up-to-date files from the B2 cloud.

A table comparing Backup vs. Sync

A table comparing Backup vs. Sync.

Because Hybrid Backup Sync provides both functions in one application, you should first identify which feature you truly need. The setup process is similar, but you will need to take different steps to configure backup vs. sync in HBS.

How to Set Up Your Backblaze B2 Account

Now that you’ve determined whether you want to back up or sync your data, it’s time to create your Backblaze B2 Cloud Storage account to securely protect your on-premises data.

If you already have a B2 Cloud Storage account, feel free to skip ahead. Otherwise, you can sign up for an account and get started with 10GB of free storage to test it out.

Ready to get started? You can follow along with the directions in this blog or take a look at our video guides. Greg Hamer, Senior Technical Evangelist, demonstrates how to get your data into B2 Cloud Storage in under 15 minutes using HBS for either backup or sync.

Video: Back Up QNAP to Backblaze B2 Cloud Storage with QNAP Hybrid Backup Sync

Video: Sync QNAP to Backblaze B2 Cloud Storage with QNAP Hybrid Backup Sync

How to Set Up a Bucket, Application Key ID, and Application Key

Once you’ve signed up for a Backblaze B2 Account, you’ll need to create a bucket, Application Key ID, and Application Key. This may sound like a lot, but all you need are a few clicks, a couple names, and less than a minute!

  1. On the Buckets page of your account, click the Create a Bucket button.
  2. An screenshot of the B2 Cloud Storage Buckets page.

  3. Give your bucket a name and enable encryption for added security.
  4. An image showing the Create a Bucket page with security features to be enabled.

  5. Click the Create a Bucket button and you should see your new bucket on the Buckets page.
  6. An image showing a successfully created bucket.

  7. Navigate to the App Keys page of your account and click Add a New Application Key.
  8. Name your Application Key and click the Create New Key button. Make sure that your key has both read and write permissions (the default option).
  9. Your Application Key ID and Application Key will appear on your App Keys page. Important: Make sure to copy these somewhere secure as the Application Key will not appear again!

How to Set Up QNAP’s Hybrid Backup Sync to Work With B2 Cloud Storage

To set up your QNAP with Backblaze B2 sync support, you’ll need access to your B2 Cloud Storage account. You’ll also need your B2 Cloud Storage account ID, Application Key, and bucket name—all of which are available after you log in to your Backblaze account. Finally, you’ll need the Hybrid Backup Sync application installed in QTS. You’ll need QTS 4.3.3 or later and Hybrid Backup Sync v2.1.170615 or later.

To configure a backup or sync job, simply follow the rest of the steps in this integration guide or reference the videos posted above. Once you follow the rest of the configuration steps, you’ll have a set-it-and-forget-it solution in place.

What Can You Do With Backblaze B2 and QNAP Hybrid Backup Sync?

With QNAP’s Hybrid Backup Sync software, you can easily back up and sync data to the cloud. Here’s some more information on what you can do to make the most of your setup.

Hybrid Backup Sync 3.0

QNAP and Backblaze B2 users can take advantage of Hybrid Backup Sync, as explained above. Hybrid Backup Sync is a powerful tool that provides true backup capability with features like version control, client-side encryption, and block-level deduplication. QNAP’s operating system, QTS, continues to deliver innovation and add thrilling new features. The ability to preview backed up files using the QuDedup Extract Tool, a feature first released in QTS 4.4.1, allowed QNAP users to save on bandwidth costs.

You can download the latest QTS update here and Hybrid Backup Sync is available in the App Center on your QNAP device.

Hybrid Mount and VJBOD Cloud

The Hybrid Mount and VJBOD Cloud apps allow QNAP users to designate a drive in their system to function as a cache while accessing B2 Cloud Storage. This allows users to interact with Backblaze B2 just like you would a folder on your QNAP device while using Backblaze B2 as an active storage location.

Hybrid Mount and VJBOD Cloud are both included in the QTS 4.4.1 versions and higher, and function as a storage gateway on a file-based or block-based level, respectively. Hybrid Mount enables Backblaze B2 to be used as a file server and is ideal for online collaboration and file-level data analysis. VJBOD Cloud is ideal for a large number of small files or singular massively large files (think databases!) since it’s able to update and change files on a block-level basis. Both apps offer the ability to connect to B2 Cloud Storage via popular protocols to fit any environment, including server message block (SMB), Apple Filing Protocol (AFP), network file sharing (NFS), file transfer protocol (FTP), and WebDAV.

QuDedup

QuDedup introduces client-side deduplication to the QNAP ecosystem. This helps users at all levels save on space on their NAS by avoiding redundant copies in storage. Backblaze B2 users have something to look forward to as well since these savings carry over to cloud storage via the HBS 3.0 update.

Why Backblaze B2?

QNAP continues to innovate and unlock the potential of B2 Cloud Storage in the NAS ecosystem. If you haven’t given B2 Cloud Storage a try yet, now is the time. You can get started with Backblaze B2 and your QNAP NAS right now, and make sure your NAS is synced securely and automatically to the cloud.

The post How to Connect Your QNAP NAS to Backblaze B2 Cloud Storage appeared first on Backblaze Blog | Cloud Storage & Cloud Backup.
How to Connect Your Synology NAS to Backblaze B2 Cloud Storage

Post Syndicated from Troy Liljedahl original https://www.backblaze.com/blog/how-to-connect-your-synology-nas-to-backblaze-b2-cloud-storage/

You’ve added a Synology Network Attached Storage (NAS) Device to your tech stack, but you may be wondering how to protect your files from ransomware, natural disasters, or accidental deletion. Saving your data to cloud storage can help protect you from the painful consequences of data loss. But now you may be wondering whether to backup or sync your data to the cloud. The answer to that question will largely depend on your own individual needs. If you are looking to keep an additional copy of your regularly changing data at an off-premise location to maintain the 3-2-1 backup strategy, then backing up your data to the cloud is the way to go.

If, however, you need your files in a place where everyone in the organization can access them at any moment, where edits to any files can be shown across all devices in real time or you need up-to-the-minute versions of your files off-site, then syncing your files to the cloud will be sufficient.

Your Synology NAS has applications for either backup—Hyper Backup—or sync—Cloud Sync—which we will explain in greater detail below. Understanding the distinction between the two functions is an important part of setting your tech stack up for success. And setting your tech stack up to connect to Backblaze B2 Cloud Storage, gives you greater security, accessibility and off-site peace of mind at a fifth of the cost of other cloud providers.

Read on to learn the differences between backup and sync, how they work with your Synology NAS, and how to connect your NAS to Backblaze B2.

Backup vs. Sync

As mentioned before, understanding the difference between backup and sync is a crucial step in determining how you will pair your NAS with an offsite cloud storage solution like Backblaze B2. As such, it may help you to have a full understanding of the difference between the two.

A backup lets you create copies of files and other digital assets, which are then sent from a NAS to another device or an off-site storage location such as a public cloud. Allowing for either incremental or full backups of the contents of your NAS on a customized schedule, this method allows you to retain a copy of the most recent version of a file, while also being able to retain previous versions. This can also be an effective strategy to combat malware or ransomware, as you can simply delete infected files and restore from a clean backup. In addition, maintaining storage off-site protects your data from any natural disasters that might befall your immediate vicinity.

By contrast, a sync strategy consists of one or more devices working in unison, updating files in the same way across each device and/or a cloud storage location. The benefits of syncing files come from the ability to instantly see updates on files and provide easy access to changes in files to people across your organization. If you connect your NAS to Backblaze B2, you can easily access and download files anywhere you are through native applications or another Backblaze partner integration like Veeam, Iconik, and Cyberduck. The drawback of syncing is that it does not offer effective protections against accidental deletions, unauthorized access or malware.

There are essentially two different ways to sync your files: one-way or two-way. In a one-way sync, when a file from Location A changes, the same file at Location B is updated; however, if something on the file changes in Location B, the file in Location A will not be updated. On the other hand, in a two-way sync, regardless of where the file changes, the other location will automatically update to mirror the other. And in most cases, this means the entire file will be re-uploaded.

It is not uncommon for an organization to use both backup and sync strategies simultaneously, relying on one over the other as needs change. Thankfully, Synology has two relevant proprietary applications that serve the various needs of backing up and syncing data which can be seen in the table below.  Whether you plan to utilize the backup and sync features Synology offers via Hyper Backup and Cloud Sync, securing your files to the cloud will help you create an effective 3-2-1 Backup Strategy, protecting your digital assets. Now we’ll take a closer look at how you can connect your Synology NAS to Backblaze B2 Cloud Storage.

Setting Up Your B2 Cloud Storage Account

Regardless of whether you use Hyper Backup or Cloud Sync, you can get set up in minutes with B2 Cloud Storage. You can follow along with the directions in this blog or take a look at our video guides. Pat Patterson, Chief Technical Evangelist, demonstrates how to get your data into B2 Cloud Storage in under 10 minutes using either Hyper Backup or Cloud Sync.

Here’s a video tutorial for Hyper Backup:

And here’s one for Cloud Sync:

The first step is to create a Backblaze B2 Cloud Storage account so your data has a location to be securely stored. You can sign up for an account and get started with 10GB of storage for free.

We’ll continue to show the steps after you’ve signed up for a Backblaze B2 Account in order to access your new bucket, Application Key ID, and Application Key. This will only take a few clicks, a couple names, and less than a minute.

  1. On the Buckets page of your account, click the Create a Bucket button.
  2. Give your bucket a name and enable encryption for added security.
  3. Click the Create a Bucket button and you should see your new Bucket on the Buckets page.
  4. Navigate to the App Keys page of your account and click the Add a New Application Key button.
  5. Name your Application Key and click the Create New Key button—make sure that your key has both Read and Write permissions (the default option).
  6. Your Application Key ID and Application Key will appear on your App Keys page. Make sure to copy these somewhere secure as the Application Key will not appear again!

Backing Up or Syncing Your Synology to Backblaze B2

By now you have created the location for your data to be either backed up or synced to and obtained your Application Key.

If you want to backup your data, then follow this integration guide or the video mentioned above that takes you step-by-step on how you can use Hyper Backup to backup your data from your Synology to B2 Cloud Storage.

If syncing your data is what you need, then follow this integration guide or the video mentioned above that takes you through how you can use Cloud Sync to sync your data from your Synology to B2 Cloud Storage.

Once you have built the connection between your Synology to B2 Cloud Storage either through Hyper Backup or Cloud Sync (or both!), you can begin backing up or syncing your data for greater protection and accessibility no matter the location.

Summary

Creating and implementing an effective backup strategy, sync strategy or hybrid of the two can be an effective way to protect your data. A thorough understanding of the benefits, drawbacks and strategies involved, and the ways your Synology NAS can utilize both Hyper Backup and Cloud Sync, will hopefully get you on your way to securing your data.

At a fifth of the price of competitors, with setup that takes less than 10 minutes, Backblaze B2 Cloud Storage is a great complement to your Synology NAS.

The post How to Connect Your Synology NAS to Backblaze B2 Cloud Storage appeared first on Backblaze Blog | Cloud Storage & Cloud Backup.
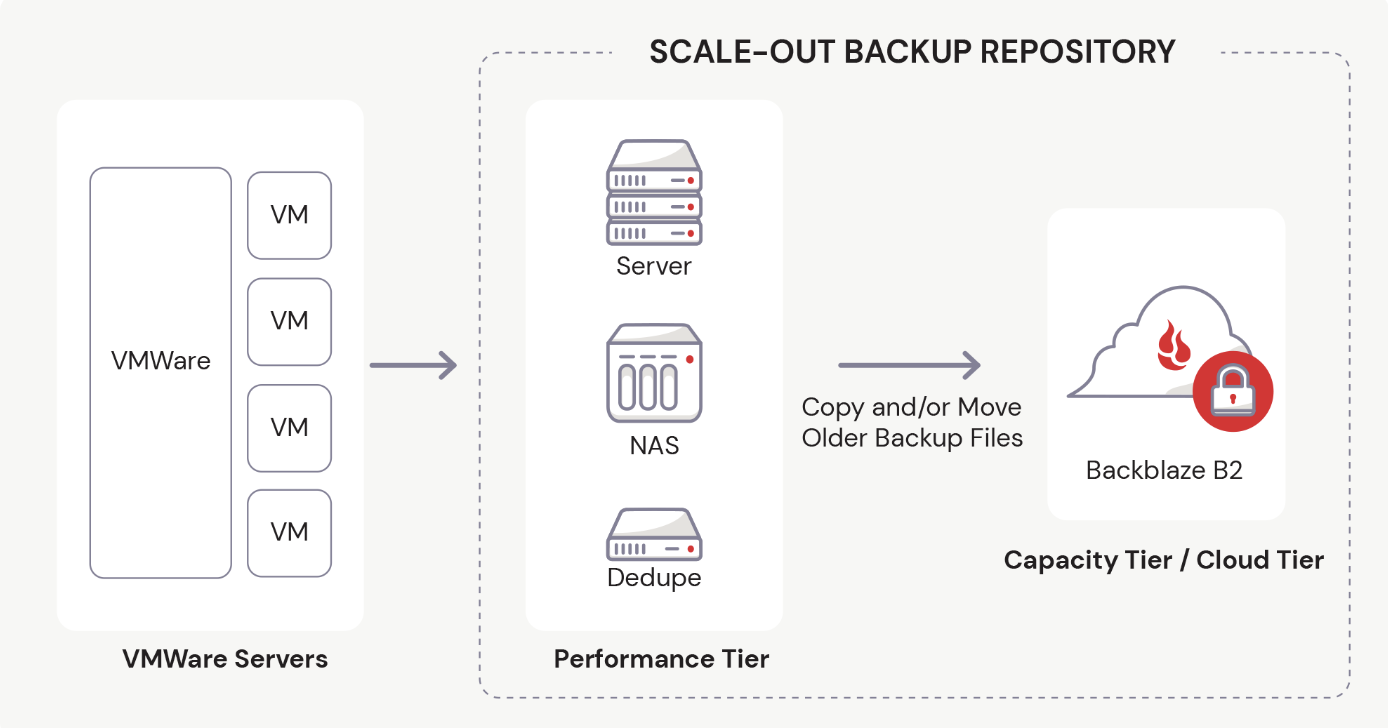
What Are Software Containers?

Post Syndicated from Molly Clancy original https://www.backblaze.com/blog/what-are-containers/

A decorative image showing shipping containers in a lightbox.

You’re probably familiar with containers if you’re even remotely involved in software development or systems administration. In their 2023 survey, the Cloud Native Computing Foundation found that over 90% organizations use containers in production. Additionally, more than 90% of organizations that rely on cloud native practices for most or all of their application development and deployment also depend on containers. 

But, whether orchestrating containers is a regular part of your day-to-day life, or you are just trying to understand what an operating system kernel is, it helps to have an understanding of some container basics.

Today, we’re explaining what containers are, how they’re used, and how cloud storage fits into the container picture—all in one neat and tidy containerized blog post package. (And, yes, the kernel is important, so we’ll get to that, too).

What are containers?

Containers are packaged units of software that contain all of the dependencies (e.g. binaries, libraries, programming language versions, etc.) they need to run no matter where they live—on a laptop, in the cloud, or in an on-premises data center. That’s a fairly technical definition, so you might be wondering, “OK, but what are they really?”

The generally accepted definition of the term applies almost exactly to what the technology does.

A container, generally = a receptacle for holding goods; a portable compartment in which freight is placed (as on a train or ship) for convenience of movement.

A container in software development = a figurative “receptacle” for holding software. The second part of the definition applies even better—shipping containers are often used as a metaphor to describe what containers do. In shipping, instead of stacking goods in a jumbled pile, goods are packed into standard-sized containers that fit on whatever is hauling them—a ship, a train, or a trailer.

Likewise, instead of “shipping” an unwieldy mess of code, including the required operating system, containers package software into lightweight units that share the same operating system (OS) kernel and can run anywhere—on a laptop, on a server, in the cloud, etc.

What’s an OS kernel?

As promised, here’s where the OS kernel becomes important. The kernel is the core programming at the center of the OS that controls all other parts of the OS. The term makes sense if you consider the definition of “kernel” as “the central or essential part” as in “a kernel of truth.” (It also begs the question, “Why didn’t they just call it a colonel?” especially because it’s in charge of so many things… But that’s neither here nor there.) And now you know what an OS kernel does.

Compared to older virtualization technology, namely virtual machines which are measured in gigabytes, containers are only megabytes in size. That means you can run quite a few of them on a given computer or server much like you can stack many containers onto a ship.

Indeed, the founders of Docker, the software that sparked widespread container adoption, looked to the port of Oakland, California for inspiration. Former Docker CEO, Ben Golub, explained in an interview with InfoWorld, “We could see all the container ships coming into the port of Oakland, and we were talking about the value of the container in the world of shipping. The fact it was easier to ship a car from one side of the world than to take an app from one server to another, that seemed like a problem ripe for solving.” In fact, it’s right there in their logo.

And that is exactly what containers, mainly via Docker’s popularity, did—they solved the problem of environment inconsistency for developers. Before containers became widely used, moving software between environments meant things broke, a lot. If a developer wrote an app on their laptop, then moved it into a testing environment on a server, for example, everything had to be the same—same versions of the programming language, same permissions, same database access, etc. If not, you had a very sad app.

Virtualization 101

Containers work their magic by way of virtualization. Virtualization is the process of creating a simulated computing environment that’s abstracted from the physical computing hardware—essentially a computer-generated computer, also referred to as a software-defined computer.

The first virtualization technology to really take off was the virtual machine (VM). A VM sits atop a hypervisor—a lightweight software layer that allows multiple operating systems to run in tandem on the same hardware. VMs allow developers and system administrators to make the most of computing hardware. Before VMs, each application had to run on its own server, and it probably didn’t use the server’s full capacity. After VMs, you could use the same server to run multiple applications, increasing efficiency and lowering costs.

Containers vs. virtual machines

While VMs increase hardware efficiency, each VM requires its own OS and a virtualized copy of the underlying hardware. Because of this, VMs can take up a lot of system resources, and they’re slow to start up.

Containers, on the other hand, do not virtualize the hardware. Instead, they share the host operating system’s kernel, making them much smaller and faster than VMs. Want to know more? Check out our deep dive into the differences between VMs and containers.

chart of how Containers stack on a server

The benefits of containers

Containers allow developers and system administrators to develop, test, and deploy software and applications faster and more efficiently than older virtualization technologies like VMs. The benefits of containers include:

  1. Portability: Containers include all of the dependencies they need to run in any environment, provided that environment includes the appropriate OS. This reduces the errors and bugs that arise when moving applications between different environments, increasing portability.
  2. Size: Containers share OS resources and don’t include their own OS image, making them lightweight—megabytes compared to VMs’ gigabytes. As such, one machine or server can support many containers.
  3. Speed: Again, because they share OS resources and don’t include their own OS image, containers can be spun up in seconds compared to VMs which can take minutes to spin up.
  4. Resource efficiency: Similar to VMs, containers allow developers to make the best use of hardware and software resources.
  5. Isolation: Also similar to VMs, with containers, different applications or even component parts of a singular application can be isolated such that issues like excessive load or bugs on one don’t impact others.

Container use cases

Containers are nothing if not versatile, so they can be used for a wide variety of use cases. However, there are a few instances where containers are especially useful:

  1. Enabling microservices architectures: Before containers, applications were typically built as all-in-one units or “monoliths.” With their portability and small size, containers changed that, ushering in the era of microservices architecture. Applications could be broken down into their component “services,” and each of those services could be built in its own container and run independently of the other parts of the application. For example, the code for your application’s search bar can be built separately from the code for your application’s shopping cart, then loosely coupled to work as one application.
  2. Supporting modern development practices: Containers and the microservices architectures they enable paved the way for modern software development practices. With the ability to split applications into their component parts, each part could be developed, tested, and deployed independently. Thus, developers can build and deploy applications using modern development approaches like DevOps, continuous integration/continuous deployment (CI/CD), and agile development.
  3. Facilitating hybrid cloud and multi-cloud approaches: Because of their portability, containers enable developers to utilize hybrid cloud and/or multi-cloud approaches. Containers allow applications to move easily between environments—from on-premises to the cloud or between different clouds.
  4. Accelerating cloud migration or cloud-native development: Existing applications can be refactored using containers to make them easier to migrate to modern cloud environments. Containers also enable cloud-native development and deployment.

The role of software containers in AI application development

In addition to enabling microservices architectures and supporting modern development practices, containers play a role in AI application development. Their ability to provide consistent, reproducible environments makes them ideal for AI, where managing complex dependencies and ensuring uniform performance across different platforms are essential. 

AI projects often rely on specific versions of libraries, drivers, and runtimes, which can lead to compatibility issues and errors. Containers solve this problem by encapsulating all necessary dependencies, libraries, and runtime environments to provide a consistent and reproducible platform for AI development. This encapsulation ensures that AI models and applications run the same way, regardless of the underlying infrastructure and provides consistency from development through production. 

The portability of containers also offers advantages for deploying AI workloads across diverse environments. They can be easily moved between local development machines, on-premises servers, and cloud platforms without requiring code or configuration changes. This flexibility supports easy scalability of AI applications to meet changing demands—such as increased user loads or the need for more intensive data processing. 

Additionally, containers enable organizations to leverage the most cost effective and powerful computing resources available, whether it’s local hardware for testing and development or cloud-based GPU clusters for training large-scale models. This ability moves workloads efficiently across different environments and also supports hybrid and multi-cloud strategies to provide organizations with greater agility, while reducing costs and avoiding vendor lock-in.

Container tools

The two most widely recognized container tools are Docker and Kubernetes. They’re not the only options out there, but in their 2023 developer survey, Stack Overflow found that nearly 52% out of 90,000+ respondents use Docker and 19% use Kubernetes. But what do they do?

1. What is Docker?

Container technology had been around for a while in the form of Linux containers or LXC, but the widespread adoption of containers happened only in the past decade with the introduction of Docker.

Docker was launched in 2013 as a project to build single-application LXC containers, introducing several changes to LXC that make containers more portable and flexible to use. It later morphed into its own container runtime environment. At a high level, Docker is a Linux utility that can efficiently create, ship, and run containers.

Docker introduced more standardization to containers than previous technologies and focused on developers, specifically, making it the de facto standard in the developer world for application development.

2. What is Kubernetes?

As containerization took off, many early adopters found themselves facing a new problem: how to manage a whole bunch of containers. Enter: Kubernetes. Kubernetes is an open-source container orchestrator. It was developed at Google (deploying billions of containers per week is no small task) as a “minimum viable product” version of their original cluster orchestrator, ominously named Borg. Today, it is managed by the Cloud Native Computing Foundation, and it helps automate management of containers including provisioning, load balancing, basic health checks, and scheduling.

Kubernetes allows developers to describe the desired state of a container deployment using YAML files (YAML stands for Yet Another Markup Language, which is yet another winning tech acronym.). The YAML file uses declarative language to tell Kubernetes “this is what this container deployment should look like” and Kubernetes does all the grunt work of creating and maintaining that state.

Containers + storage: What you need to know

Containers are inherently ephemeral or stateless. They get spun up, and they do their thing. When they get spun down, any data that was created while they were running is destroyed with them. But most applications are stateful, and need data to live on even after a given container goes away.

Object storage is inherently scalable. It enables the storage of massive amounts of unstructured data while still maintaining easy data accessibility. For containerized applications that depend on data scalability and accessibility, it’s an ideal solution for keeping stateful data stateful.

There are three essential use cases where object storage works hand in hand with containerized applications:

  1. Backup and disaster recovery: Tools like Docker and Kubernetes enable easy replication of containers, but replication doesn’t replace traditional backup and disaster recovery just as sync services aren’t a good replacement for backing up the data on your laptop, for example. With object storage, you can replicate your entire environment and back it up to the cloud. There’s just one catch: some object storage providers have retention minimums, sometimes up to 90 days. If you’re experimenting and iterating on your container architecture, or if you use CI/CD methods, your environment is constantly changing. With retention minimums, that means you might be paying for previous iterations much longer than you want to. (Shameless plug: Backblaze B2 Cloud Storage is calculated hourly, with no minimum retention requirement.)
  2. Primary storage: You can use a cloud object storage repository to store your container images, then when you want to deploy them, you can pull them into the compute service of your choice.
  3. Origin storage: If you’re serving out high volumes of media, or even if you’re just hosting a simple website, object storage can serve as your origin store coupled with a CDN for serving out content globally. For example, CloudSpot, a SaaS platform that serves professional photographers, moved to a Kubernetes cluster environment and connected it to their origin store in Backblaze B2, where they now keep 120+ million files readily accessible for their customers.

Need object storage for your containerized application?

Now that you have a handle on what containers are and what they can do, you can make decisions about how to build your applications or structure your internal systems. Whether you’re contemplating moving your application to the cloud, adopting a hybrid or multi-cloud approach, or going completely cloud native, containers can help you get there. And with object storage, you have a data repository that can keep up with your containerized workloads.

Ready to connect your application to scalable, S3-compatible object storage? You can get started today for free.

The post What Are Software Containers? appeared first on Backblaze Blog | Cloud Storage & Cloud Backup

What’s the Diff: SSD vs. NVMe vs. M.2 Drives

Post Syndicated from Lora Maslenitsyna original https://backblaze.com/blog/nvme-vs-m-2-drives/

What's the Diff? M.2 vs. NVMe vs. SSD

Storage technology has certainly changed over time, with new storage mediums taking aim at what’s become the industry standard: the hard disk drive (HDD). Of all the challengers, solid state drives (SSDs) are the most widely-adopted and likely to take the top spot—they’re fast, quiet, and retain information when they’re powered off (so you can just pop open your laptop and get back in the groove). 

Yes, they’re more expensive than traditional hard disk drives, but there’s value in their much faster read/write speeds, and they’re arguably more reliable depending on your use case in the long term. Even with those benefits, that’s not to say HDDs are obsolete, just that there is good reason to upgrade to SSDs in many cases. The decision from the judges: These two contenders get to share the spotlight, and you get to decide which drive works best for your needs. 

Once you’ve made the decision to invest in an SSD, you’ll have to choose the form factor  and possibly the interface. In this post we’ll cover some basics about SSDs that should help you choose which type of SSD is best for you, including:

  • What is an SSD?
  • What is a SATA SSD?
  • What is an M.2 SSD?
  • What is an MSATA SSD?
  • What is an U.2 SSD?
  • What is an NVMe SSD?
  • Which SSD is right for you?

A Brief Introduction to SSDs

SSDs are storage devices that use NAND-based flash memory to store data. They are now standard issue for most computers, as is the case across Apple’s line of Macs. Unlike traditional hard disk drives (HDDs), which store data on spinning disks, SSDs have no moving parts, which makes them faster, more reliable, and less prone to mechanical failures.

SSDs have become so common mainly because they are faster in terms of read/write speeds versus hard drives. This means that they can access and transfer data much more quickly. This makes them an ideal choice for use in high-performance computers, servers, and other devices that require fast data access and transfer speeds. They also use less power and are available at different form factors, such as 2.5” and M.2, so they can be used in a range of devices. You can read more about the difference between SSDs and HDDs in this post.

One downside of SSDs is that they tend to be more expensive than HDDs, especially when it comes to larger storage capacities. However, as the cost of flash memory continues to decrease, SSDs are becoming more affordable and accessible for everyday consumers. Comparatively speaking, they also have a more limited write cycle. While you usually don’t run into this limitation as a typical computer user, if you’re constantly saving large files like you would if you’re working with media files, for instance, it’s something to consider. 

Additionally, it can be harder to tell when an SSD is failing (no spinning disks to whir furiously at you), which means you’ll want to make sure you’re effectively monitoring your drives and backing up.  

What Is a SATA SSD?

A Serial Advanced Technology Attachment (SATA) is the standard storage interface used in many computers. A SATA SSD is an SSD equipped with a SATA interface to connect the storage device to a computer’s motherboard. The SATA SSD comes in the standard 2.5 inch form factor and has both power and data (SATA) connectors. If you buy an SSD external drive to connect to your PC, there will most likely be a SATA SSD inside. 

Generally, the SATA SSD is the least expensive type of SSD, all other factors being equal. This makes a great choice to get an instant performance boost out of your HDD-based computer, or add an external drive that can read and write data more quickly.

One thing to know about external SSD drives is that they should not be disconnected from your computer and stored away for long periods of time. Anything over a year is too long, and as the drive gets older it needs to be plugged in even more often. If you do want to use your SSD for long-term archival storage and have it disconnected from your main devices (air gap, anyone?), then it’s a good idea to either store them with about 50% charge, or power on the SSD every few months to refresh the charge. 

An image of a Western Digital 1TB SATA SSD.

What Is an NVMe?

Non-Volatile Memory Express (NVMe) is a storage protocol that offers high-speed and efficient communication between a computer’s CPU and SSDs. Drives that use NVMe were introduced in 2013 to attach to the Peripheral Component Interconnect Express (PCIe) slot directly on a motherboard instead of using the traditional SATA interface typically used by HDDs and older SSDs. Unlike SATA, which was originally designed for slower HDDs, NVMe takes advantage of the low-latency and high-speed capabilities of SSDs. NVMe drives can usually deliver a sustained read-write speed of 4.0 GB/s in contrast with SATA SSDs that limit at 600 MB/s. Since NVMe SSDs can reach higher speeds and handle multiple data transfers simultaneously, it makes them ideal for gaming, high-resolution video editing, and applications that require high-performance storage, such as enterprise databases, virtualization, and data analytics.

Their high speeds come at a high cost, however: NVMe drives are some of the more expensive drives on the market.

An image of a Kioxia NVMe SSD.

To sum up our analysis on storage protocols in SSDs, here’s a handy chart:

Feature SATA NVMe
Interface Serial Advancement Technology Attachment Non-Volatile Memory Express
Bus SATA bus PCIe bus
Data Transfer Speeds Slower (up to 600 MB/s) Faster (typically 3000 MB/s and up to 7,500 MB/s)
Latency Higher Lower
Scalability Limited Scalable

What Are M.2 Drives?

M.2 drives, also known as Next Generation Form Factor (NGFF) drives, are a type of SSD that uses the M.2 interface to connect directly into a computer’s motherboard without the need for cables. M.2 is a form factor, which refers to the standard size of a component. So, while we’re comparing NVMe to SATA in storage protocol above, a direct comparison for the M.2 SSD is a traditional, 2.5 inch SSD. 

M.2 SSDs are significantly smaller than traditional, 2.5 inch SSDs. Because they can use either SATA or NVMe to connect to the motherboard, they have the potential to be much faster when they’re utilizing the latter. They’re also more power-efficient than other types of SSDs, which improves battery life in portable devices. Because they take up less space while delivering all of the above, M.2 drives have become popular in gaming setups. (Game on, friends.)

Even at this smaller size, M.2 SSDs are able to hold as much data as other SSDs, ranging up to 8TB in storage size. But, while they can hold just as much data and are generally faster than other SSDs, they also come at a higher cost. As the old adage goes, you can only have two of the following things: cheap, fast, or good.

M.2 drives are easy to install, and they can be added to most modern motherboards that have an M.2 slot. If your motherboard does not have an M.2 slot, you may be able to use an M.2 drive by using an adapter card that fits into a PCIe slot. So, before you run out and buy an M.2 SSD, you’ll need to know which interface your computer will accept, M.2 SATA or M.2 PCIe.

A Samsung SATA M.2 SSD.

What Are mSATA Drives?

mSATA, or mini-SATA, is basically a smaller version of the full-size SATA SSD that is designed for smaller form factor systems where space is limited. The mSATA form factor is compact like M.2, but they are not interchangeable. Currently, mSATA drives only support the SATA interface.

A Rogob mSATA SSD.

What Are U.2 Drives?

U.2 drives look like a 2.5” drive but are a bit thicker, and they use a different connector that sends data through a PCIe interface. The U.2 SSD was developed to enable the newer and faster NVMe-based PCIe SSDs to plug into the same drive backplane as older SAS and SATA drives. This allows the drives to be hot-swappable, an especially useful feature in enterprise server and storage systems.

A Mircon U.2 SSD.

Which SSD Is Best to Use?

There are a few factors to consider in choosing which drive is best for you. As you compare the different components of your build, consider your technical constraints, budget, capacity needs, and speed priority.

Technical Constraints

Check the capability of your system before choosing a drive, as some older devices don’t have the components needed for NVMe connections. Also, check that you have enough PCIe connections to support multiple PCIe devices. Not enough lanes, or only specific lanes, means you may have to choose a different drive or that only one of your lanes will be able to connect to the NVMe drive at full speed.

The same advice holds if you’re adding an SSD to your NAS array. Most newer models will be compatible with adding an SSD, but you should always double check your NAS specs before you commit to a purchase. And remember: even though SSDs offer many benefits, especially when you’re looking to add caching or using your NAS for media workflows, there are several use cases where you’d see minimal advantage compared with an HDD, such as if you want a NAS to store large amounts of infrequently accessed files (i.e. in backup/archive scenarios).

Budget

If you plan to be making a lot of large file transfers or want to have the highest speeds for gaming, then an NVMe SSD is what you want. Until recently SATA SSDs were much more affordable options compared with NVMe drives, but that is changing rapidly. For example, at the time of publication, a Samsung 1TB SATA SSD (870 EVO) retails for $990 on Amazon, while a Samsung 1TB NVMe drive (970 EVO) is listed for $150only $98 on sale on Amazon. That said, those 8TB NVMe drives we talked about are running about $850+, depending on the manufacturer. 

Drive Capacity

SATA drives usually range from 500GB to 16TB in storage capacity. Most M.2 drives top out at 2TB, although some may be available at 4TB and 8TB models at much higher prices.

Drive Speed

When choosing the right drive for your setup, remember that SATA M.2 drives and 2.5 inch SSDs provide the same level of speed, so to gain a performance increase, you will have to opt for the NVMe-connected drives. While NVMe SSDs are going to be much faster than SATA drives, you may also need to upgrade your processor to keep up or you may experience worse performance. Finally, remember to check read and write speeds on a drive as some earlier generations of NVMe drives can have different speeds.

Whatever You Choose, Back It Up

Before choosing a new drive, remember to back up all of your data. Backing up is essential as every drive will eventually fail and need to be replaced. The basis of a solid backup plan requires three copies of your data: one on your device, one backup saved locally, and one stored off-site. Storing a copy of your data in the cloud ensures that you’re able to retrieve it if any data loss occurs on your device.

Interested in learning more about other drive types or best ways to optimize your setup? Let us know in the comments below.

FAQs about NVMe vs. M.2 drives

What is the difference between NVMe and M.2 drives?

NVMe and M.2 are often used interchangeably, but they refer to different aspects of storage technology. Non-Volatile Memory Express (NVMe) drives attach to the Peripheral Component Interconnect Express (PCIe) slot directly on a motherboard instead of using the traditional SATA interface, resulting in higher data transfer speeds. M.2, on the other hand, is a physical form factor or connector used for SSDs. M.2 drives can support various storage interfaces, including NVMe, SATA, and others, providing flexibility in terms of compatibility and speed.

Which is faster, NVMe or M.2 drives?

NVMe and M.2 drives are not directly comparable in terms of speed because they refer to different aspects of storage technology. NVMe (Non-Volatile Memory Express) is a storage protocol that provides high-speed communication between the computer’s CPU and SSDs. It is designed to take full advantage of the capabilities of SSDs and can offer significantly faster data transfer speeds compared to traditional interfaces like SATA.

M.2, on the other hand, refers to a physical form factor or connector used for storage devices, including SSDs. M.2 drives can support various interfaces, including NVMe, SATA, and others. The speed of an M.2 drive depends on the specific interface it uses. NVMe M.2 drives, which utilize the NVMe protocol, can provide faster speeds compared to M.2 drives that use the SATA interface.

In summary, NVMe is a storage protocol that can be implemented in various form factors, including M.2, and NVMe drives tend to offer faster speeds compared to M.2 drives that utilize the SATA interface.

Can NVMe be used in any M.2 slot?

NVMe drives can generally be used in M.2 slots, but it is important to ensure compatibility with the specific M.2 slot on your motherboard. M.2 slots can support different types of interfaces, including SATA and NVMe.

What are the advantages of NVMe in M.2 drives?

NVMe (Non-Volatile Memory Express) is a storage protocol that can be implemented through various form factors, one of which is M.2.

The main advantage of NVMe technology is its high-speed data transfer capabilities. Compared to traditional storage interfaces like SATA, NVMe provides significantly faster performance. It leverages the Peripheral Component Interconnect Express (PCIe) interface, allowing for direct communication between the CPU and the SSD. This results in reduced latency and improved overall system responsiveness.

M.2, on the other hand, is a physical form factor or connector that can support various interfaces, including SATA and NVMe. M.2 drives can accommodate NVMe SSDs, allowing them to take advantage of the faster speeds provided by the NVMe protocol. In addition to the ability to utilize a faster NVMe protocol, the advantages of an M.2 size are its small size and easy direct-to-motherboard installation.

Are NVMe drives more expensive than SATA drives?

Until recently SATA SSDs were much more affordable options compared with NVMe drives, but that is changing rapidly. For example, as of June 2023, a Samsung 1TB SATA SSD (870 EVO) retails for $90 on Amazon, while a Samsung 1TB NVMe drive (970 EVO) is listed for only $98 on sale on Amazon. Prices are now comparable.

The post What’s the Diff: SSD vs. NVMe vs. M.2 Drives appeared first on Backblaze Blog | Cloud Storage & Cloud Backup

The True Cost of Ransomware

Post Syndicated from Molly Clancy original https://www.backblaze.com/blog/the-true-cost-of-ransomware/

The True Cost of Ransomware - Backblaze

Editor’s Note

This article has been updated since it was originally published in 2021.

When we first published this article, a $70 million ransom demand was unprecedented. Today, demands have reached as high as $240 million, a sum that the Hive ransomware group opened negotiations with in an attack on MediaMarkt, Europe’s largest consumer electronics retailer. 

But then, as now, the ransoms themselves are just a portion, and often a small portion, of the overall cost of ransomware. Ransomware attacks are crimes of opportunity, and there’s a lot more opportunity in the mid-market, where the odd $1 million demand doesn’t make headlines and the victims are less likely to be adequately prepared to recover. And, the cost of those recoveries is what we’ll get into today.

In this post, we’re breaking down the true cost of ransomware and the drivers of those costs.  

Read More About Ransomware

This post is a part of our ongoing series on ransomware. Take a look at our other posts for more information on how businesses can defend themselves against a ransomware attack, important industry trends, and more.

Read About Ransomware ➔ 

Ransom Payments Are the First Line Item

The Sophos State of Ransomware 2023 report, a survey of 3,000 IT decision makers from mid-sized organizations in 14 countries, found the average ransom payment was $1.54 million. This is almost double the 2022 figure of $812,380, and almost 10 times the 2020 average of $170,404, when we last published this article. Coveware, a security consulting firm, found that the average ransom payment for Q2 2023 was $740,144, also representing a big spike over previous quarters. While the specific numbers vary depending on sampling, both reports point to ransoms going up and up.

A graph showing the rising trend in the cost of ransomware payments.
Source.

But, Ransoms Are Far From the Only Cost

Sophos found that the mean recovery cost excluding the ransom payment was $2.6 million when the targeted organization paid the ransom and got their data back. And, that cost was still $1.6 million when businesses used backups to restore data.

The cost of recovery comes from a wide range of factors, including:

  • Downtime.
  • People hours.
  • Investment in stronger cybersecurity protections.
  • Repeat attacks.
  • Higher insurance premiums.
  • Legal defense and settlements.
  • Lost reputation.
  • Lost business.

Downtime

When a company’s systems and data are compromised and operations come to a halt, the consequences are felt across the organization. Financially, downtime results in immediate revenue loss. And, productivity takes a significant hit as employees are unable to access critical resources, leading to missed deadlines and disrupted workflows. According to Coveware, the average downtime in Q2 2022 (the last quarter they collected data on downtime) amounted to over three weeks (24 days). And according to Sophos, 53% of survey respondents took more than one month to recover from the attack. This time should be factored in when calculating the true cost of ransomware.

People Hours

In the aftermath of a ransomware attack, a significant portion, if not all, of a company’s resources will be channeled towards the recovery process. The IT department will be at the forefront, working around the clock to restore systems to full functionality. The marketing and communications teams will shoulder the responsibility of managing crisis communications, while the finance team may find themselves in negotiations with the ransomware perpetrators. Meanwhile, human resources will be addressing employee inquiries and concerns stemming from the incident. Calculating the total hours spent on recovery may not be possible, but it’s a factor to consider in planning.

After recovery, the long term effects of a cybersecurity breach can still be felt in the workforce. In a study of the mental health impacts of cybersecurity on employees, Northwave found that physical and mental health symptoms were still existent up to a year after the cybersecurity attack, and affected both employee morale and business goals. 

Investment in Stronger Cybersecurity Protections

It is highly probable that a company will allocate a greater portion of its budget towards bolstering its cybersecurity measures after being attacked by ransomware, and rightfully so. It’s a prudent and necessary response. As attacks continue to increase in frequency, cyber insurance providers will continue to tighten requirements for coverage. In order to maintain coverage, companies will need to bring systems up to speed.

man working on a laptop with a ransomware demand message

Repeat Attacks

One of the cruel realities of being attacked by ransomware is that it makes businesses a target for repeat attacks. Unsurprisingly, cybercriminals don’t always keep their promises when companies pay ransoms. In fact, paying ransoms lets cybercriminals know you’re an easy future mark. They know you’re willing to pay.

Repeat attacks happen when the vulnerability that allowed cybercriminals access to systems remained susceptible to exploitation. Copycat ransomware operators can easily exploit vulnerabilities that go unaddressed even for a few days. 

Higher Insurance Premiums

As more and more companies file claims for ransomware attacks and recoveries and ransom demands continue to increase, insurers are upping their premiums. In essence, insurers have been confronted with the stark reality that the financial toll exacted by ransomware incidents far exceeds what was once anticipated. In response to this growing financial strain, insurance providers are left with little choice but to raise their premiums. This uptick in premiums reflects the increasing risk landscape of the digital age, where the ever-evolving tactics and sophistication of cybercriminals necessitate a recalibration of risk assessment models and pricing structures within the insurance industry. 

Legal Defense and Settlements

When attacks affect consumers or customers, victims can expect to hear from the lawyers. After a 2021 ransomware attack, payroll services provider UKG agreed to a $6 million settlement. And, big box stores like Target and Home Depot both paid settlements in the tens of millions of dollars following breaches. Even if your information security practices would hold up in court, for most companies, it’s cheaper to settle than to suffer a protracted legal battle.

Lost Reputation and Lost Business

When ransomware attacks make headlines and draw public attention, they can erode trust among customers, partners, and stakeholders. The perception that a company’s cybersecurity measures were insufficient to protect sensitive data and systems can lead to a loss of credibility. Customers may question the safety of their personal information. 

Rebuilding a damaged reputation is a challenging and time-consuming process, requiring transparent communication, proactive security improvements, and a commitment to regaining trust. Ultimately, the impact of reputation loss goes beyond financial losses, as it can significantly affect an organization’s long-term viability and competitiveness in the market.

lock over an image of a woman working on a computer

What You Can Do About It: Defending Against Ransomware

The business of ransomware is booming with no signs of slowing down, and the cost of recovery is enough to put some ill-prepared companies out of business. If it feels like the cost of a ransomware recovery is out of reach, that’s all the more reason to invest in harder security protocols and disaster recovery planning sooner rather than later.

For more information on the ransomware economy, the threat small to mid-sized businesses (SMBs) are facing, and steps you can take to protect your business, download The Complete Guide to Ransomware.

Download the Ransomware Guide ➔ 

Cost of Ransomware FAQs

1. What is the highest ransomware ransom ever demanded?

Today, ransom demands have reached as high as $240 million, a sum demanded by the Hive ransomware group in an attack on MediaMarkt, Europe’s largest consumer electronics retailer.

2. What is the average ransom payment in 2023?

Average ransom payments vary depending on how reporting entities sample data. Some estimates put the average ransom payment in 2023 in the hundreds of thousands of dollars up to over half a million dollars.

3. How much does ransomware recovery cost?

Ransomware recovery can easily cost in the multiple millions of dollars. The cost of recovery comes from a wide range of factors, including downtime, people hours, investment in stronger cybersecurity protections, repeat attacks, higher insurance premiums, legal defense, lost reputation, and lost business.

4. How long does ransomware recovery take?

When a company’s systems and data are compromised, and operations come to a halt, the consequences are felt across the organization. Ransomware recovery can take anywhere from a few days, if you’re well prepared, or up to six months or longer. 

The post The True Cost of Ransomware appeared first on Backblaze Blog | Cloud Storage & Cloud Backup.
Getting Rid of Your PC? Here’s How to Wipe a Windows SSD or Hard Drive

Post Syndicated from Molly Clancy original https://www.backblaze.com/blog/how-to-wipe-pc-ssd-or-hard-drive/

A decorative image showing a PC and a hard drive over a cloud.

Do you have an old PC lying around that you’d love to throw away or donate? Before you take it to the recycling center, you definitely want to scrub it of all your data. And there’s a bit more to it than just deleting your files and emptying the recycle bin. 

This guide will help you make sure all of your personal data is wiped from the machine so you can be confident it’s all gone before you give it away or recycle it. 

First things first: Back up your computer

Before you do anything, make sure your data is backed up. You want to be able to load it all on to a new computer, or at least keep it in an archive, so you can access it after you dispose of your old machine. The best plan for backing anything up is the 3-2-1 backup strategy where you keep three copies of your data on two types of media with one copy off-site. Your first copy is the one on your computer. Your second copy can be kept on an external hard drive or other external media. And, your third copy should be kept in an off-site location like the cloud. If you’re not backing up an off-site copy, now is a great time to get started.

You can easily create a backup using Windows Backup on Windows 7, 8, 8.1, 10, and 11. If you save that to an external hard drive, you can then move your files to a new computer or just keep it as a local backup. Once you’re backed up, you’re ready to wipe your PC’s internal hard drive.

How to completely wipe a PC

In most cases, wiping a PC involves simply reformatting the disk and reinstalling Windows using the Reset function. If you are recycling, donating, or selling your PC, the Reset function makes data recovery sufficiently difficult, especially if your data is encrypted (more on that later). This process is straightforward in Windows versions 8, 8.1, 10, and 11, and works for both hard disk drives (HDDs) and solid state drives (SSDs).

How to reset Windows 10 and 11

Follow these instructions for different versions of Windows to reset your PC:

  1. Go to SettingsSystem (In Windows 10: Update & Security) → Recovery.
  2. Under Reset this PC, click Reset PC. (In Windows 10: Click Get Started.)
  3. Choose Remove everything. If you’re not getting rid of your PC, you can use Keep my files to give your computer a good cleaning to improve performance.
  4. You will be prompted to choose to reinstall Windows via Cloud download or Local reinstall. If you’re feeling generous and want to give your PC’s next owner a fresh version of Windows, choose Cloud download. This will use internet data. If you’re planning to recycle your PC, Local reinstall works just fine.
  5. In Additional settings, click Change settings and toggle Clean data to on. This takes longer, but it’s the most secure option.
  6. Click Reset to start the process.

How to reset Windows 8 and 8.1

  1. Go to SettingsChange PC SettingsUpdate and RecoveryRecovery.
  2. Under Remove everything and reinstall Windows, click Get started, then click Next.
  3. Select Fully clean the drive. This takes longer, but it’s the most secure option.
  4. Click Reset to start the process.

Secure erase using third-party tools

If the reset option doesn’t totally put your mind at ease, or if you have a PC running Windows 7 or older, you have another option—third-party tools. There are a number of good third-party tools you can use to securely erase your disk, which we’ll get into below. These are different depending on whether you have an internal HDD or an SSD.

How do I find out I have an HDD or SSD in my Windows laptop?

Most desktops and laptops sold in the last few years will have an SSD, but you can easily check to be sure:

  1. Open Settings.
  2. Type “Defragment” in the search bar.
  3. Click on Defragment and Optimize Your Drives.
  4. Check the media type of your drive.

How to securely erase your Windows drive using third-party tools

Now that you know what kind of drive you have, here are your options for wiping your Windows drive:

Securely erase an HDD

The process for erasing an HDD involves overwriting the data, and there are many utilities out there to do it yourself:

  1. DBAN: Short for Darik’s Boot and Nuke, DBAN has been around for years and is a well-known and trusted drive wipe utility for HDDs. It does multiple pass rewrites (binary ones and zeros) on the disk. You’ll need to download it to a USB drive and run it from there.
  2. Disk Wipe: Disk Wipe is another free utility that does multiple rewrites of binary data. You can choose from a number of different methods for overwriting your disk. Disk Wipe is also portable, so you don’t need to install it to use it.
  3. Eraser: Eraser is also free to use. It gives you the most control over how you erase your disk. Like Disk Wipe, you can choose from different methods that include varying numbers of rewrites, or you can define your own.

Keep in mind, any disk erase utility that does multiple rewrites is going to take quite a while to complete.

If you’re using Windows 7 or older and you’re just looking to recycle your PC, you can stop here. If you intend to sell or donate your PC, you’ll need the original installation discs (yes, that’s discs with a “c”…remember? Those round shiny things?) to reinstall a fresh version of Windows.

Don’t worry. You can still make use of those discs.

Securely erase an SSD

You have a few options for securely erasing an SSD. These third-party tools will do the trick:

  1. Parted Magic: Parted Magic is the most regularly recommended third-party erase tool for SSDs, but it does cost $11. It’s a bootable tool like some of the HDD erase tools—you have to download it to a USB drive and run it from there.
  2. ATA Secure Erase: ATA Secure Erase is a command that basically shocks your SSD. It uses a voltage spike to flush stored electrons. While this sounds damaging (and it does cause some wear), it’s perfectly safe. It doesn’t overwrite the data like other secure erase tools, so there’s actually less damage done to the SSD.

Encrypting data on a Windows PC

Even if you’re not getting rid of your computer, encrypting your data is a good idea. If your laptop falls into the wrong hands, encryption makes it that much harder for criminals to access your personal information. But, if you have an SSD, encrypting your data is even more important, both before you get rid of it and just in general. Why? The way SSDs store and retrieve data is different from HDDs.

HDDs store data at specific physical locations on the drive platter. In contrast, SSDs use electronic circuits and memory cells, which are organized into pages and blocks, to store data. Constant writing and rewriting to the same blocks can wear out an SSD over time. To mitigate this, SSDs employ a technique called “wear leveling,” which distributes data across the entire drive, preventing it from being stored in just one physical location.

When you tell an SSD to erase data, it doesn’t overwrite the existing data. Instead, it writes new data to a different block. Consequently, some of your old data may remain on the SSD until the wear leveling process eventually overwrites those cells. So, it’s smart to encrypt your data before erasing it from an SSD. This ensures that any residual data is protected. If any data is left lurking, at least no one will be able to read it without an encryption key.

Encrypting your data first isn’t necessarily a requirement, but if Windows Reset is not enough for you and you’ve come this far, we figure it’s a step you’d want to take. The process isn’t complicated, but not every Windows machine is the same. First, check to see if your device is encrypted by default:

  1. Open the Start menu.
  2. Scroll to the Windows Administrative Tools dropdown menu.
  3. Select System Information. You can also search for “system information” in the taskbar.
  4. If the Device Encryption Support value is “Meets prerequisites,” you’re good to go—encryption is enabled on your device.

If not, your next step is to check if your device has BitLocker built in:

  1. Open Settings.
  2. Type “BitLocker” in the search bar.
  3. Click Manage BitLocker.
  4. Click Turn on BitLocker and follow the prompts.

If neither of those options are available, you can use third-party software to encrypt your internal SSD. VeraCrypt and AxCrypt are both good options. Just remember to record the encryption passcode somewhere and also the operating system (OS), OS version, and the encryption tool you used so you can recover the files later on if desired.

The nuclear option

Encrypting, resetting, and/or wiping your drive with a third-party tool should be more than enough to make sure your data is protected and your laptop or desktop is clean before you donate or recycle it. But maybe you’re still feeling wary about it. In that case, you always have the option to destroy the drive yourself.

When nothing less than total destruction will do, just make sure you do it safely. The safest and most secure way to destroy an HDD, and the only way we’d recommend physically destroying an SSD, is to shred it. Check with your local electronics recycling center to see if they have a shredder you can use. (And, you absolutely want to ask if you can watch as giant metal gears chomp down on your drive. Metal.) Shredding it should be a last resort though. Drives typically last five to 10 years, and millions get shredded every year before the end of their useful life. 

If you have a megabot ready to go, you should first crush, then shred your drives.

Still have questions about how to securely erase or destroy your hard drives? Let us know in the comments. And if you’re curious about how to erase a Mac HDD or SSD, read our guide here.

FAQs

How do I wipe a PC?

In most cases, wiping a PC involves simply reformatting the disk and reinstalling Windows using the Reset function. If you are recycling, donating, or selling your PC, the Reset function makes data recovery sufficiently difficult, especially if your data is encrypted. You can also use third-party tools to securely wipe a PC drive.

How do I encrypt data on a PC drive?

First, check to see if your device is encrypted by default. You can search “system information” in the search bar. If the Device Encryption Support value is “Meets prerequisites,” you’re good to go—encryption is enabled on your device. If not, your next step is to check if your device has BitLocker built in. Type “BitLocker” in the search bar, click Manage BitLocker, then click Turn on BitLocker and follow the prompts. If neither of those options are available, you can use third-party software to encrypt your internal SSD. VeraCrypt and AxCrypt are both good options.

How do I safely dispose of an SSD or HDD myself?

The safest and most secure way to destroy an HDD, and the only way we’d recommend physically destroying an SSD, is to shred it. Check with your local electronics recycling center to see if they have a shredder you can use (or if they’ll at least let you watch as giant metal gears chomp down on your drive). Shredding it should be a last resort though. Drives typically last five to 10 years, and millions get shredded every year before the end of their useful life. 

The post Getting Rid of Your PC? Here’s How to Wipe a Windows SSD or Hard Drive appeared first on Backblaze Blog | Cloud Storage & Cloud Backup

Backblaze Mobile Update: iOS and Android Bucket Management

Post Syndicated from Jeremy Milk original https://www.backblaze.com/blog/backblaze-mobile-update-ios-mobile-uploads/

This post was originally published on February 18, 2021 and has been updated to reflect the newest functionality releases for Backblaze Mobile users on both iOS and Android.

Ready to update now? Go to Google Play or the App Store to run updates or download the Backblaze app.

December 20, 2022: Mobile 6.0 Is Available

Today, we’re announcing the arrival of Backblaze Mobile 6.0 featuring an enhanced visual experience, authentication improvements, bug fixes, and many design updates. Check out the specifics below.

What’s New in Backblaze Mobile 6.0?

Backblaze Mobile 6.0 features an overhauled visual experience (so fresh, so clean!).

Before: Android login screen
After: Android login screen

The update also features authentication enhancements for both iOS and Android. We’ve made it easier to log in and opt to see your password in plain text as you enter it. We’ve also optimized the stability of our mobile login flow.

Before: iOS login screen
After: iOS login screen

iOS Updates

  • Design updates: Redesigned login and settings screens, updated icons, and improved upload/download progress animations.
  • Login updates: Email and password now appear on the same screen when logging in, and you can choose to see your password in plain text as you enter it. 
  • Viewing and previewing files: You can now view downloaded files in full-screen mode on iPhones as well as iPads.
  • SwiftUI is here: Much of the iOS code has been migrated to use SwiftUI and The Composable Architecture. 
  • Bug fixes and performance improvements: A lot has been tightened up under the hood, including fixing a file download timeout issue and progress messaging display issues. 
Before
After

Android Updates

  • Design updates: A fresh UI and navigation experience comes courtesy of updated material libraries.
  • Navigation and controls: We’ve also advanced the Android navigation bar, scrollable header and footers, and updated gesture controls for a better Android experience. You can now also see the file path for any file uploaded to Computer Backup or B2 Cloud Storage files.
  • Edit mode and selection capabilities: Navigation and maneuvering inside of edit mode for files, buckets, folders, and downloads has also been improved. We’ve also added multiselection capabilities and swipe-to-delete functionality.
Before
After
Before
After

Backblaze Mobile 6.0 Available Now: Download Today

To get the latest and greatest Backblaze Mobile experience, update your apps or download them today on Google Play or the App Store.

March 28, 2022: Added Folder Creation

Backblaze Mobile users on iOS and Android devices can now create folders directly on their devices with our latest app update. The update is generally available the week of March 27, 2022 for both iOS and Android platforms.

The functionality expands on previous releases to allow users to more easily work from their mobile devices. 

November 30, 2021: Added Bucket Creation and Bucket, Folder, and File Deletion

With this update, Backblaze Mobile users on iOS and Android devices can create buckets and delete buckets, folders, and files directly on their devices.

If you routinely work from your mobile device, this means you’ll be able to better manage your cloud storage while you’re away from your workstation. For media and entertainment pros who regularly shoot images and footage on powerful smart devices, for example, this functionality allows you to create buckets for new projects from the field. And if you need to delete a bucket, file, or folder, you can do that on the go, too. With this functionality at your fingertips, you can focus on shooting, producing, and doing more with ease rather than waiting until you’re back at your desktop or laptop to handle organizational tasks.

The update also included bug fixes and an upgrade to Android 11.

Older Releases

In case you missed the last few releases, Backblaze Mobile allows iOS and Android users to preview and download content through the app and upload files directly to Backblaze B2 Cloud Storage buckets.

The post Backblaze Mobile Update: iOS and Android Bucket Management appeared first on Backblaze Blog | Cloud Storage & Cloud Backup.
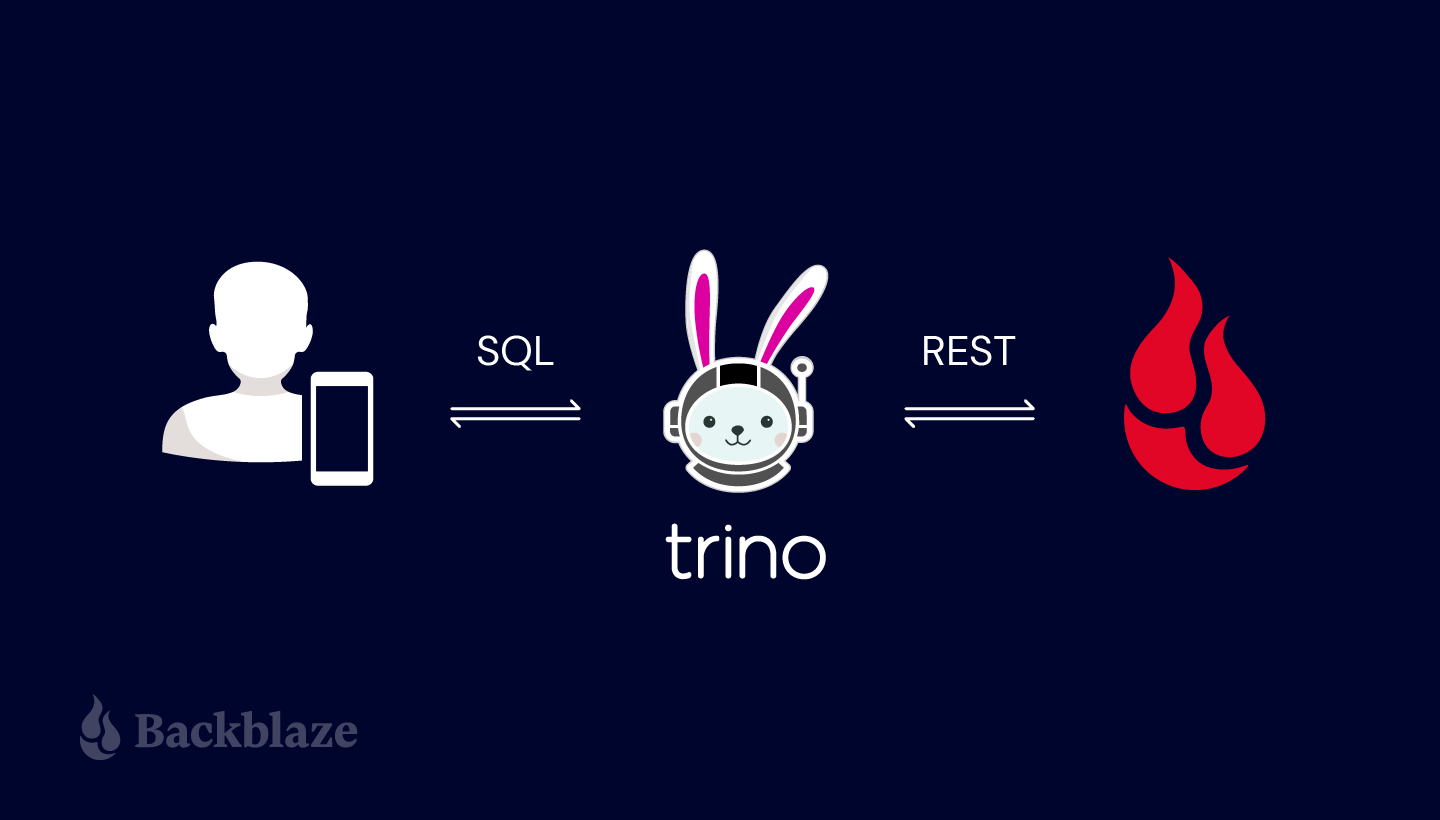
NAS 101: A Buyer’s Guide to the Features and Capacity You Need

Post Syndicated from Skip Levens original https://backblaze.com/blog/nas-101-a-buyers-guide-to-the-features-and-capacity-you-need/

A decorative image showing a stylized NAS device.

As network attached storage (NAS) devices have become more advanced, NAS have large storage capacities, include advanced features for virtualization and application hosting, and are one of the more scalable and cost-effective storage options for businesses of all sizes and in a variety of industries.
NAS devices are popular for many types of workflows, including media, enterprise, and backup and archive. Whether you’re a long-time user or first-time buyer, the number of choices and features NAS systems offer today are overwhelming, especially when you’re trying to buy something that will work now and in the future.

This post aims to make your process a little easier. The following content will help you:

  • Review the benefits of a NAS system.
  • Navigate the options you’ll need to choose from.
  • Understand the reason to pair your NAS with cloud storage.

How Can NAS Benefit Your Business?

There are multiple benefits that a NAS system can provide to users on your network, but we’ll recap a few of the key advantages here.

  • More Storage: It’s a tad obvious, but the primary benefit of a NAS system is that it will provide a significant addition to your storage capacity if you’re relying on workstations and hard drives. NAS systems create a single storage volume from several drives (often arranged in a RAID scheme).
  • Data Redundancy: Many NAS systems are equipped with RAID (Redundant Array of Independent Disks) configurations, which provide redundancy. This means that even if one or more hard drives fail, the data remains accessible and the system continues to function. While RAID provides protection against physical disk failures, it does not protect against the broader range of events that could result in data loss, including natural disasters, theft, or ransomware attacks. Learn more about RAID configurations in our NAS RAID guide.
  • Security and Speed: Beyond protection from drive failure, NAS also provides security for your data from outside actors as it is only accessible on your local office network and to user accounts which you can control. Not only that, but it generally works as fast as your local office network speeds. And, there are several ways to optimize NAS performance over time, which gives them a longer shelf life than other types of hardware.
  • Better Data Management Tools. Fully automated backups, deduplication, compression, and encryption are just a handful of the functions you can put to work on a NAS system—all of which make your data storage more efficient and secure. You can also configure sync workflows to ease collaboration for your team, enable services to manage your users and groups with directory services, and even add services like photo or media management.

If this all sounds useful for your business, read on to learn more about bringing these benefits in-house.

The Network Attached Storage (NAS) Buyer’s Guide

How do you evaluate the differences between different NAS vendors? Or even within a single company’s product line? We’re here to help. This tour of the major components of a NAS system will help you to develop a list for the sizing and features of a system that will fit your needs.

Choosing a NAS: The Components

How your NAS performs is dictated by the components that make up the system, and capability of future upgrades. Let’s walk through the different options.

NAS Storage Capacity: How Many Bays Do You Need?

One of the first ways to distinguish between different NAS systems is the number of drive bays a given system offers, as this determines how many disks the system can hold. Generally speaking, the larger the number of drive bays, the more storage you can provide to your users and the more flexibility you have around protecting your data from disk failure.

In a NAS system, storage is defined by the number of drives, the shared volume they create, and their striping scheme (e.g. RAID 0, 1, 5, 6, etc.). For example, a single drive gives no additional performance or protection. 

Two (or more) drives allow the option of simple mirroring. Mirroring is also referred to as RAID 1, when one volume is built from two drives, allowing for the failure of one of those drives without data loss. 

More than two drives also allow for striping—referred to as RAID 0—when one volume is “stretched” across two drives, making a single, larger drive that also gives some performance improvement, but increases risk because the loss of one drive means that the entire volume will be unavailable.

Refresher: How Does RAID Work Again?

A redundant array of independent disks, or RAID, combines multiple hard drives into one or more storage volumes. RAID distributes data and parity (drive recovery information) across the drives in different ways, and each layout provides different degrees of data protection. Learn more about different RAID levels and how to choose the right RAID level in our NAS RAID guide.

Three drives are the minimum for RAID 5, which can survive the loss of one drive, though four drives are a more common NAS system configuration. Five drives allow for RAID 6, which can survive the loss of two drives. Six to eight drives are very common NAS configurations that allow more storage, space, performance, and even drive sparing—the ability to designate a stand-by drive to immediately rebuild a failed drive.

Many believe that, if you’re in the market for a NAS system with multiple bays, you should opt for capacity that allows for RAID 6 if possible. RAID 6 can survive the loss of two drives, and delivers performance nearly equal to RAID 5 with better protection.

It’s understandable to think, “Why do I need to prepare in case two drives fail?” Well, when a drive fails and you replace it with a fresh drive, the rebuilding process to restore that drive’s data and parity information can take a long time. Though it’s rare, it’s possible to have another drive fail during the rebuilding process. In that scenario, if you have RAID 6, you’re likely going to be okay. On the other hand, if you have RAID 5, you may have just lost data.

NAS Drives: Should I Buy a NAS that Includes Drives?

Buyer’s Note: Some systems are sold without drives. Should you buy NAS with or without drives? That decision usually boils down to the size and type of drives you’d like to have.

When buying a NAS system with drives provided:

  • The drives are usually covered by the manufacturer’s warranty as part of the complete system.
  • The drives are typically bought directly from the manufacturer’s supply chain and shipped directly from the hard drive manufacturer.

If you choose to buy drives separately from your NAS:

  • The drives may be a mix of drive production runs, and have been in the supply chain longer. Match the drive capacities and models for the most predictable performance across the RAID volume.
  • Choose drives rated for NAS systems—NAS vendors publish lists of supported drive types. Here’s a list from QNAP, for example.
  • Check the warranty and return procedures, and if you are moving a collection of older drives into your NAS, you may also consider how much of the warranty has already run out.

Buyer Takeaway: Choose a system that can support RAID 5 or RAID 6 to allow a combination of more storage space, performance, and drive failure protection. But be sure to check whether the NAS system is sold with or without drives.

Choosing the Right Drive for Your NAS: Hard Disk Drives (HDD) vs. Solid State Drives (SSD)

While most default to using HDDs in NAS drive bays, as NAS have gotten more advanced and the prices of SSDs have dropped, many NAS are compatible with SSDs as well. Some models, like the Synology DiskStation DS923+ can even support both HDDs and SSDs in the same NAS device, giving you maximum flexibility to manage your data.

There are benefits to each drive type, and which one you’d choose depends on your standard workflows. Here’s a breakdown of when you’d choose an HDD vs. an SSD for your NAS device:

Feature HDD SSD
Cost per Gigabyte Lower Higher
Capacity Higher (up to 20TB+ per drive) Lower (typically up to 8TB per drive)
Speed Slower read/write speeds Faster read/write speeds
Durability (Moving Parts) Less durable due to spinning disks More durable from a hardware perspective; however, limited write cycles can decrease longevity
Noise Level Can generate noticeable noise due to spinning disks Silent operation
Power Consumption (Idle) 2–5 watts
(Active) 2–6 watts
(Idle) 0.5–1 watt
(Active) 2–3 watts
Ideal Use Cases – Bulk data storage (e.g., media, library, backups)
– Archival storage
– Applications with frequent data access
– Performance-critical applications (e.g., video editing, databases)
– Frequently accessed files
– Applications requiring fast loading times

For cost-effective bulk storage and archival needs, HDDs are the clear choice. Their high capacity per gigabyte makes them ideal for storing large media files, backups, and infrequently accessed data. On the other hand, if you prioritize speed and performance for applications like video editing, databases, or frequently accessed files, SSDs are a better option. They offer significantly faster read/write speeds, resulting in quicker loading times and a smoother overall user experience. 
And, you can always have your cake and eat it, too. A hybrid approach lets you leverage the strengths of both technologies: HDDs for bulk storage and SSDs for performance-critical tasks. As we mentioned above, some devices support both drive types, or you can create separate storage and processing pools within your storage architecture. 

Buyer takeaway: Ultimately, choosing the right option comes down to budget and use case.

Selecting Drive Capacity for NAS: What Size of Drives Should You Buy?

You can quickly estimate how much storage you’ll need by adding up the hard drives and external drives of all the systems you’ll be backing up in your office, adding the amount of shared storage you’ll want to provide to your users, and factor in any growing demand you project for shared storage.

If you have any historical data under management from previous years, you can calculate a simple growth rate. Generally, plan for systems that are two to four times your current data capacity. For example, if your total storage needs (including hard drives, external drives, and shared storage) amount to 20TB, double that to 40TB to account for growth. Then, divide by a common hard drive size, such as 10TB, indicating that you’ll need at least a four-bay NAS system. With that in mind, you can start shopping for four bay systems and larger.

Formula 1:

((Number of NAS Users x Hard Drive Size ) + Shared Storage) * Growth Factor = NAS Storage Needed

Example: There are six users in an office that will each be backing up their 2TB workstations and laptops. The team will want to use another 6TB of shared storage for documents, images, and videos for everyone to use. Multiplied times a growth factor of two, you’d start shopping for NAS systems that offer at least 36TB of storage.

((Six users * 2TB each) + 6TB shared storage ) * growth factor of 2 = 36TB

Formula 2:

((NAS Storage Needed / Hard Drive Size) + 2 Parity Drives) = Drive Bays Needed

Example: Continuing the example above, when looking for a new NAS system using 12TB drives, accounting for two additional drives for RAID 6, you’d look for NAS systems that can support five or more drive bays of 12TB hard drives.

(( 36TB / 12TB ) + 2 additional drives ) = 5 drive bays and up

If your budget allows, opting for larger drives and more drive bays will give you more storage overhead that you’ll surely grow into over time. Factor in, however, that if you go too big, you’re paying for unused storage space for a longer period of time. And if you use GAAP accounting, you’ll need to capitalize that investment over the same time window as a smaller NAS system which will hit your bottom line on an annual basis. This is the classic CapEx vs. Opex dilemma you can learn more about here.

If your cash budget is tight you can always purchase a NAS system with more bays but smaller drives, which will significantly reduce your upfront pricing. You can then replace those drives in the future with larger ones when you need them. Hard drive prices generally fall over time, so they will likely be less expensive in the future. You’ll end up purchasing two sets of drives over time, which will be less cash-intensive at the outset, but likely more expensive in the long run.

Similarly, you can partially fill the drive bays. If you want to get an eight bay system, but only have the budget for six drives, just add the other drives later. One of the best parts of NAS systems is the flexibility they allow you for right-sizing your shared storage approach.

Buyer Takeaway: Estimate how much storage you’ll need, add the amount of shared storage you’ll want to provide to your users, and factor in growing demand for shared storage—then balance long term growth potential against cash flow.

Processor, Controllers, and Memory: What Performance Levels Do You Require?

Is it better to have big onboard processors or controllers? Smaller, embedded chips common in smaller NAS systems provide basic functionality, but might bog down when serving many users or crunching through deduplication and encryption tasks, which are options with many backup solutions. Larger NAS systems typically stored in IT data center racks usually offer multiple storage controllers that can deliver the fastest performance and even failover capability.

  • Processor: Provides compute power for the system operation, services, and applications.
  • Controller: Manages the storage volume presentation and health.
  • Memory: Improves speed of applications and file serving performance.

ARM and Intel Atom chips are suitable for basic systems. For more demanding tasks such as encryption, deduplication, and running on-board applications, processors such as the Intel Corei3 and Corei5 remain reliable options. Additionally, the latest intel Corei7 and i9 processors offer even greater performance for these tasks.  Many rack-mounted NAS systems feature Intel Xeon or AMD EPYC server-class processors, providing robust capabilities for enterprise level storage solutions. 

So if you’re just looking for basic storage expansion, the entry-level systems with more modest, basic chips will likely suit you just fine. If deduplication, encryption, sync, and other functions many NAS systems offer as optional tools are part of your future workflow, this is one area where you shouldn’t cut corners.

If you have the option to expand the system memory, this can be an easy performance upgrade. Generally, the higher the ratio of memory to drives will benefit the performance of reading and writing to disk and the speed of on-board applications.

Buyer Takeaway: Entry-level NAS systems provide good basic functionality, but you should ensure your components are up to the challenge if you plan to make heavy use of deduplication, encryption, compression, and other functions.

Network and Connections: What Capacity for Speed Do You Need?

A basic NAS typically includes a Gigabit Ethernet connection (1GigE), which provides a throughput of 1 Gb/s, equivalent to 125 MB/s from your storage system. This bandwidth is usually sufficient for serving a few users. However, with increasing data demands, many modern NAS systems now come with built-in 2.5GigE or even 10GigE connections, offering higher throughput to support more users and faster data access. Additionally, most systems include expansion ports, allowing you to upgrade to 10GigE or higher network cards as your needs grow.

While modern NAS systems offer 2.5 Gb/s, 5 Gb/s, or even 10Gb/s  connections on their systems for significantly better performance than 1GigE connections, you’d require a compatible network switch, and possibly, USB adapters or expansion cards for every system that will connect to that NAS via the switch. If your office is already wired for 10GigE, make sure your NAS is also 10GigE. Otherwise, the more network ports in the back of the system, the better. If you aren’t ready to get a 10GigE capable system now, but you think you might be in the future, select a system that has expansion capability.

Some systems provide another option of Thunderbolt connections in addition to Ethernet connections. These allow laptops and workstations with Thunderbolt ports to directly connect to the NAS and offer much higher bandwidth—up to 40GigE (5 GB/s)—and are good for systems that need to edit large files directly on the NAS, such as is often the case in video editing. If you’ll be directly connecting systems that need the fastest possible speeds, select a system with Thunderbolt ports, one per Thunderbolt-connected user.

Buyer Takeaway: It’s best to have more network ports in the back of your system. Or, select a system with network expansion card capability.

Caching and Hybrid Drive Features: How Fast Do You Need to Serve Files?

Many of the higher-end NAS systems can complement standard 3.5” hard drives with higher performing, smaller form factor SSD or M.2 drives. These smaller, faster drives can dramatically improve the NAS file serving performance by caching files in most recent, or most frequently requested files. By combining these different types of drives, the NAS can deliver both improved file serving performance, and large capacity.

As the number of users you support in each office grows, these capabilities will become more important as a relatively simple way to boost performance. Like we mentioned earlier, you can purchase a system with these slots unpopulated and add them in later.

Buyer Takeaway: Combine different types of drives, like smaller form factor SSD or M.2 storage with 3.5” hard drives to gain improved file serving performance.

Operating System: What Kind of Management Features Do You Require?

The NAS operating systems of the major vendors generally provide the same services in an operating system (OS)-like interface delivered via an on-board web server. By simply typing in your NAS’s IP address, you can sign in and manage your system’s settings, create and manage the storage volumes, set up groups of users on your network who have access, configure and monitor backup and sync tasks, and more.

If there are specific user management features in your IT environment that you need, or want to test how the NAS OS works, you can test them by spinning up a demonstration virtual machine offered by some NAS vendors. You can test service configuration and get a feel for the interface and tools, but obviously as a virtual environment you won’t be able to manage hardware directly. Here are some options:

Buyer Takeaway: The on-board NAS OS looks similar to a Mac or PC OS to make it easy to navigate system setup and maintenance and allows you to manage settings, storage, and tasks.

Solutions: What Added Services Do You Require?

While the onboard processor and memory on your NAS are primarily for file service, backup, and sync tasks, you can also install other solutions directly onto it. For instance, QNAP and Synology—two popular NAS providers—have app stores accessible from their management software where you can select applications to download and install on your NAS. You might be interested in a backup and sync solution such as Archiware, or integrating with CMS solutions like Joomla or WordPress.

However, beyond backup solutions, you’d benefit from installing mission-critical apps onto a dedicated system rather than on your NAS. For a small number of users, running applications directly on the NAS can be a good temporary use or a pathway to testing something out. But if the application becomes very busy, it could impact the other services of the NAS. Big picture, native apps on your NAS can be useful, but don’t overdo it.
Buyer Takeaway: The main backup and sync apps from the major NAS vendors are excellent—give them a good test drive, but know that there are many excellent backup and sync solutions available as well.
Why Adding Cloud Storage to Your NAS Offers Additional Benefits

When you pair cloud storage with your NAS, you gain access to features that complement the security of your data and your ability to share files both locally and remotely.

To start with, cloud storage provides off-site backup protection. This aligns your NAS setup with the industry standard for data protection: a 3-2-1 backup strategy—which ensures that you have three copies of your data, the source data and two backups. One backup copy is stored on your NAS, and the second backup copy is stored off-site, such as in the cloud. And in the event of data loss, you can restore your systems directly from the cloud even if all the systems in your office are knocked out or destroyed.

While data sent to the cloud is encrypted in-flight via SSL, you can also encrypt your backups so that they are only openable with your team’s encryption key. The cloud can also give you advanced storage options for your backup files like WORM (Write Once, Read Many) or immutability—making your data immutable for a defined period of time—or set custom data lifecycle rules at the bucket level to help match your ideal backup workflow.

Additionally, cloud storage provides valuable access to your data and documents from your NAS through sync capabilities. In case anyone on your team needs to access a file when they are away from the office, or as is more common now, in case your entire team is working from home, they’ll be able to access the files that have been synced to the cloud through your NAS’s secure sync program. You can even sync across multiple locations using the cloud as a two-way sync to quickly replicate data across locations. For employees collaborating across great distances, this helps to ensure they’re not waiting on the internet to deliver critical files—they’re already on-site. The only caveat: It’s important to remember that sync is not backup and to incorporate that into your overall data management strategy.

Refresher: What’s the Difference Between Cloud Sync, Cloud Backup, and Cloud Storage?

Sync services allow multiple users across multiple devices to access the same file. Backup stores a copy of those files somewhere remote from your work environment, oftentimes in an off-site server like cloud storage. While they serve different purposes, they can work well together when properly coordinated. You can read more about the differences in this blog post.

Ready to Set Up Your NAS with Cloud Storage?

To summarize, here are a few things to remember when shopping for a NAS system:

  • Consider how much storage you’ll need for both local backup and for shared user storage.
  • Look for a system with three to five drive bays at minimum.
  • Check that the NAS system is sold with drives—if not, you’ll have to source enough of the same size drives.
  • Opt for a system that lets you upgrade the memory and network options.
  • Choose a system that meets your needs today; you can always upgrade in the future.

Coupled with cloud storage like Backblaze B2 Cloud Storage, which works with a wide range of NAS systems including  Synology, QNAP, TrueNAS, OWC Jellyfish, and more, you gain necessary backup protection and restoration from the cloud, as well as the capability to sync across locations.

Have more questions about NAS features or how to implement a NAS system in your environment? Ask away in the comments.

The post NAS 101: A Buyer’s Guide to the Features and Capacity You Need appeared first on Backblaze Blog | Cloud Storage & Cloud Backup