Tag Archives: fine-grained authorization

Building secure B2C applications with fine-grained access control using Amazon Cognito and Amazon Verified Permissions

Post Syndicated from Sowmya Vemuri original https://aws.amazon.com/blogs/security/building-secure-b2c-applications-with-fine-grained-access-control-using-amazon-cognito-and-amazon-verified-permissions/

Modern web applications require robust security controls to protect user data and application resources. Authentication and authorization are two fundamental pillars of application security that answer critical questions: Who are you? and What are you allowed to do? Implementing these controls correctly can be challenging for developers, especially when building data-intensive applications with frameworks like Streamlit (an open-source Python framework for building interactive web applications) or when requiring fine-grained access control. Key challenges include protecting access to application resources, implementing application identity with multi-factor authentication (MFA), and implementing usage-based controls.

In this post, you will learn how to build fine-grained access controls for a sample Streamlit application using Amazon Cognito for authentication and Amazon Verified Permissions with Cedar policies for authorization. This architecture provides enterprise-grade security with minimal development effort, so you can focus on your application’s core functionality. You will learn how to reduce development time for secure applications, implement enterprise-grade authentication, through proper access management, and scale security with growing user bases.

Security architecture overview

The reference architecture follows a layered security design with four key components; separating identity verification, authorization evaluation, application logic, and enforcement boundaries. By assigning clear responsibilities to each layer, the architecture limits blast radius and ensures that a failure in any single control does not compromise the overall system.

  • Authentication layer: Amazon Cognito handles user authentication with secure credential validation and JSON web tokens (JWTs). It provides built-in password policies, account lockout protection, and session management.
  • Authorization layer: Verified Permissions uses the Cedar policy engine to evaluate fine-grained access requests based on centrally stored policies.
  • Application layer: The Streamlit frontend integrates with both services, managing user sessions and enforcing access controls in the user interface.
  • Security boundaries: Multiple layers of security controls protect against unauthorized access, privilege escalation, authentication verification, authorization checks, and input validation.

This separation of concerns enables authentication and authorization to function as complementary security controls, following defense-in-depth principles. Figure 1 illustrates the end-to-end authentication and authorization workflow, showing how a user’s sign-in request flows through Amazon Cognito for identity verification, then through Verified Permissions for Cedar policy-based access decisions, before the application enforces the result.
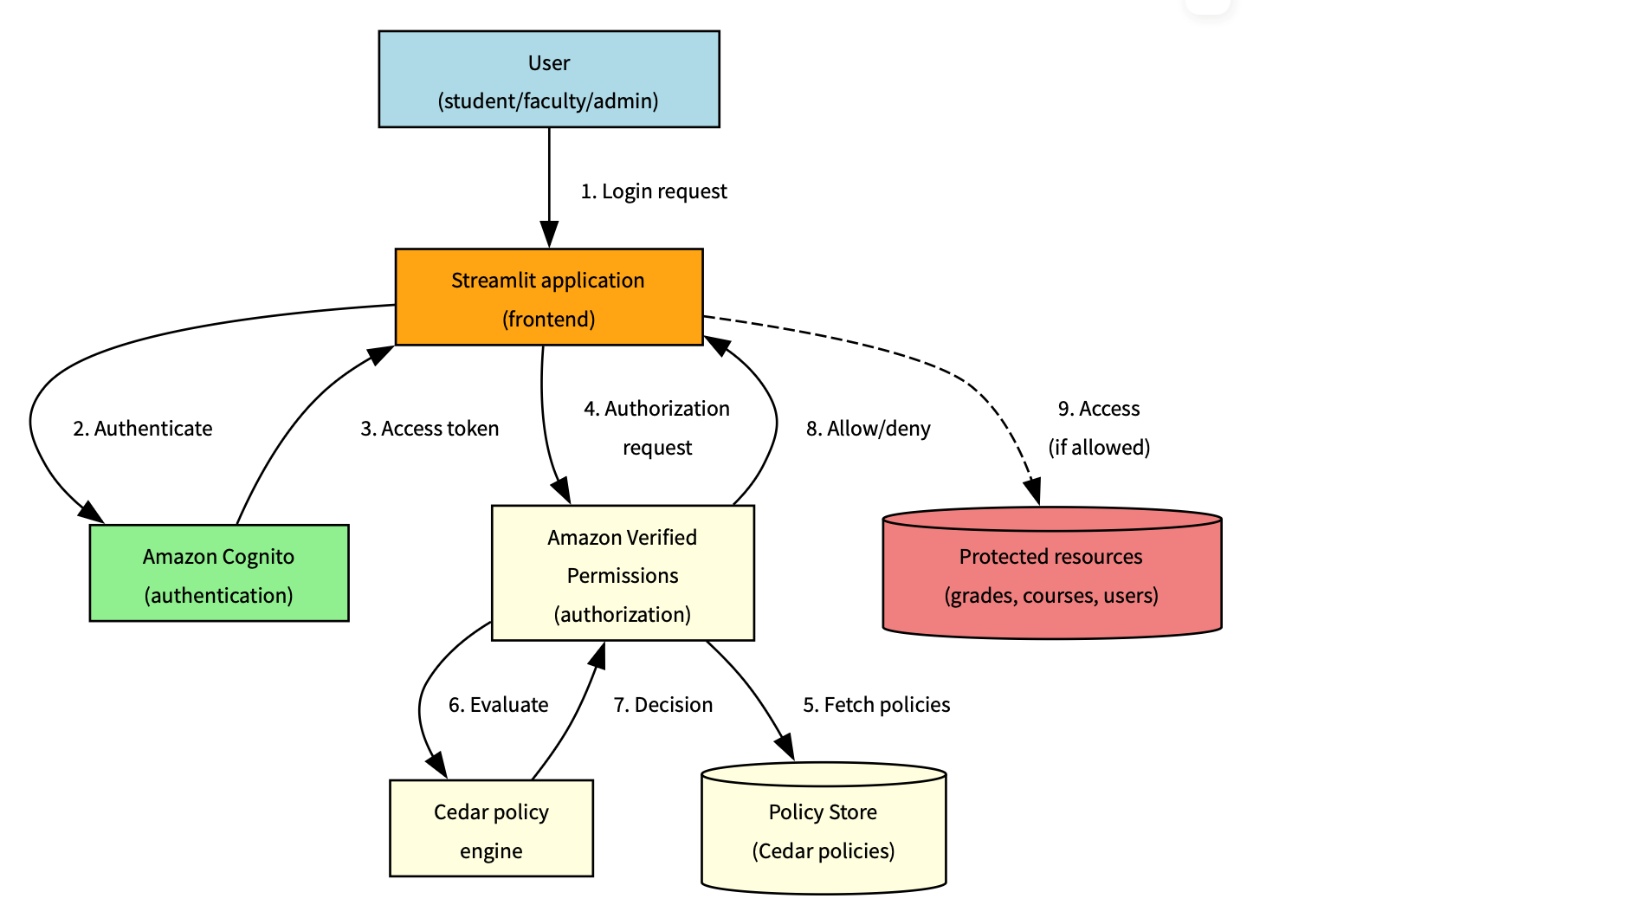
Figure 1: Solution architecture and workflow

Figure 1: Solution architecture and workflow

The following workflow demonstrates how the three architecture layers work together: the authentication layer (steps 1–3) handles identity verification using Amazon Cognito, the authorization layer (steps 4–6) evaluates Cedar policies using Verified Permissions, and the application layer (steps 7–8) enforces the decision in Streamlit.

  1. The user sends a sign-in request, which is submitted through Streamlit
  2. The request is authenticated by Amazon Cognito
  3. An access token is sent back to Streamlit
  4. An authorization request is sent to Verified Permissions
  5. The Cedar policy engine evaluates the request
  6. A decision is sent back by the policy engine
  7. The instruction to allow or deny is sent back to Streamlit
  8. If the instruction is to allow, access is provided

Understanding authorization with Cedar

While authentication establishes user identity, authorization determines what actions users can perform. Verified Permissions provides a scalable authorization service based on Cedar, a policy language specifically designed for fine-grained access control.

Cedar policies follow a structured format that defines who can perform which actions on what resources. Let’s examine the anatomy of a Cedar policy:

permit(
    principal == ?principal,
    action == application::Action::"ViewGrade",
    resource == ?resource
) when {
    principal has role == "Student" &&
    resource.student == principal.entityId
};

Policy components

  • Effectpermitor forbid determines whether the policy allows or denies access
  • Principal: The entity (user) making the request, represented by ?principal as a variable
  • Action: The operation being performed, scoped to your application namespace
  • Resource: The target of the action, also represented as a variable
  • Conditions: The when clause contains logical expressions that must evaluate to true

Advanced Cedar policy patterns

This section describes commonly used Cedar policy patterns for implementing fine-grained authorization with Amazon Verified Permissions. The examples illustrate how to model ownership, role-based access, hierarchical permissions, and administrative controls in real-world applications

Resource ownership control

This pattern helps ensure that users can only access resources they own:

permit(
    principal == ?principal,
    action == application::Action::"ViewGrade",
    resource == ?resource
) when {
    principal has role == "Student" &&
    resource.student == principal.entityId
};

What it does – This policy allows students to view only their own grades by:

  • Checking that the user has the Student role
  • Verifying that the grade resource’s student attribute matches the student’s entityId
  • Preventing students from accessing other students’ grades while allowing access to their own academic performance

Role-based access with resource type

This pattern grants access based on role and resource type:

permit(
    principal == ?principal,
    action == application::Action::"EditCourse",
    resource == ?resource
) when {
    principal has role == "Faculty" &&
    resource has resourceType == "Course" &&
    resource.instructor == principal.entityId
};

What it does – This policy allows faculty members to edit courses they teach by:

  • Verifying the user has the Faculty role
  • Confirming the resource is of type Course
  • Verifying that the course’s instructor attribute matches the faculty member’s entityId
  • Restricting faculty to modify only their own courses, not courses taught by other instructors

Hierarchical authorization

This pattern allows department heads to manage faculty in their department:

permit(
    principal == ?principal,
    action == application::Action::"ManageFaculty",
    resource == ?resource
) when {
    principal has role == "DepartmentHead" &&
    resource has role == "Faculty" &&
    resource.department == principal.department
};

What it does – This policy implements departmental hierarchy controls by:

  • Requiring the user to be a DepartmentHead
  • Verifying the resource is a faculty member
  • Matching the faculty member’s department with the department head’s department
  • Preventing department heads from managing faculty in other departments

Administrative override

This pattern provides emergency access with proper justification:

permit(
    principal == ?principal,
    action == ?action,
    resource == ?resource
) when {
    principal has role == "Administrator" &&
    context has emergencyAccess == true &&
    context has justification
};

What it does – This policy provides emergency access capabilities by:

  • Allowing administrators to perform any action on any resource
  • Requiring an emergency access flag to be set to true
  • Requiring a justification for emergency access
  • Supporting accountability through required documentation while enabling emergency operations

Cedar policy evaluation flow

Understanding how policies are evaluated helps design effective authorization systems. Figure 2 shows a common evaluation pattern for an academic scenario

Note: A policy match evaluates to the policy’s effect (permit or forbid). Forbid policies take precedence: if any forbid policy matches, access is denied regardless of permit policies.

Figure 2: Policy evaluation process

Figure 2: Policy evaluation process

The policy evaluation process follows these steps:

  1. User attempts to access a protected resource
  2. Application sends an authorization request to Verified Permissions
  3. Verified Permissions retrieves applicable Cedar policies from the policy store
  4. The Cedar policy engine evaluates each policy against the request
  5. If any forbid policy matches, access is denied immediately
  6. If any permit policy matches and no forbid policies match, access is allowed
  7. If no policies match, access is denied by default
  8. The evaluation result (ALLOW or DENY) is returned to the application
  9. Application enforces the authorization decision

Cedar policy language

Cedar is an Amazon open source policy language designed for fine-grained authorization. Every policy defines who (principal) can perform what action on which resource under what conditions, as shown in Figure 3.
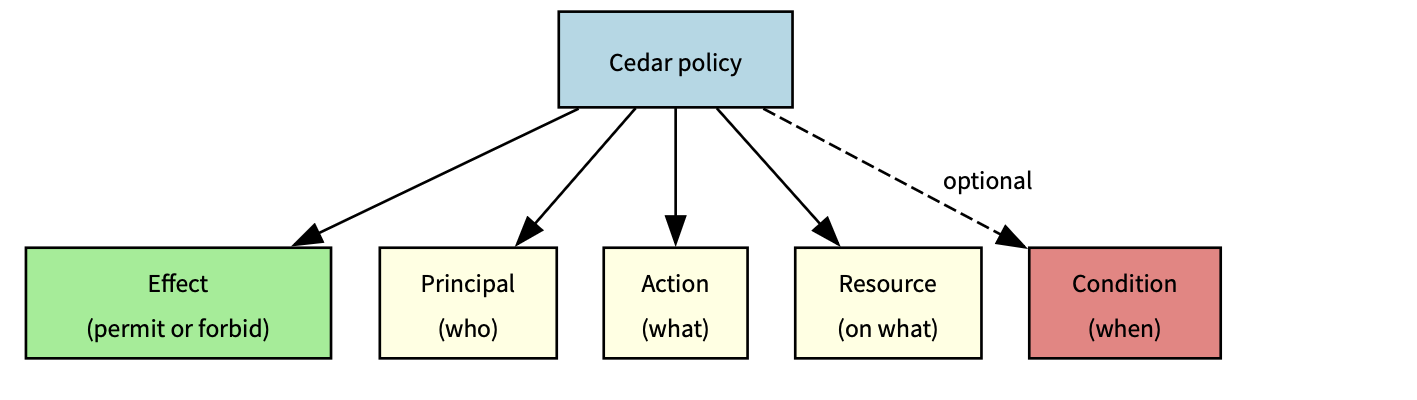
Figure 3: Cedar policy definitions

Figure 3: Cedar policy definitions

Policy interaction

The following table shows how different policies interact in complex scenarios where multiple policies could apply:

Scenario Student policy Faculty policy Department head policy Admin policy
Student accessing own grade Permit N/A N/A Override
Faculty editing course N/A Permit N/A Override
Department head managing faculty N/A N/A Permit Override
Emergency admin access N/A N/A N/A Permit

Legend:

  • Permit – Policy allows access
  • N/A – Policy doesn’t apply
  • Override – Emergency admin access

The preceding table shows how each role’s policy applies to different scenarios, with admin access having override capabilities across most situations except for emergency admin access where it’s the primary permit authority. The Override column specifically indicates that the administrator’s emergency access policy can supersede other role-specific policies, but only when the emergencyAccess context flag is explicitly set and a justification is provided. This is not an automatic override.

Policy optimization tips:

  • Order conditions by likelihood of success – Place the most frequently true conditions first in your when clause to enable short-circuit evaluation. For example, check role before resource ownership, because role mismatches are caught earlier. See Cedar best practices.
  • Use indexed attributes for faster lookups – Use entity attributes that Verified Permissions indexes natively (entityId, role, resource type) as primary conditions. Best practices for designing an authorization model
  • Cache policy evaluations when appropriate
  • Monitor evaluation metrics and performance

Real-world application: Academic system

Consider an academic system with different user roles and their corresponding permissions:

Student: View own grades

  • Policy helps ensure students can only access grade resources where they are listed as the student
  • The policy verifies the student’s role and matches the resource owner to the principal’s entity ID

Faculty: Edit course content, manage grades

  • Policy allows faculty to edit courses they teach
  • Faculty can view and modify grades for students in their courses

Teaching assistant (TA): Grade management and course support

  • Policy permits TAs to manage grades for courses they assist with
  • Access is limited to specific courses assigned to the TA

Department head: Manage faculty assignments

  • Policy allows department heads to manage faculty in their department
  • Access is scoped to the department hierarchy

Administrator: System-wide access

  • Policy provides emergency access with proper justification
  • Administrative actions are logged and audited

Prerequisites

To implement the preceding Academic system application, you need an active AWS account, Python 3.8 or later, basic Streamlit knowledge, and AWS Identity and Access Management (IAM) permissions for Amazon Cognito and Verified Permissions.

Run the sample and extend the solution

  1. Download the code base: Start by downloading the code base from the avp streamlit samples repository
  2. Set up your development environment: Install the AWS SDK for Python (boto3) and configure your AWS credentials.
    • Install the AWS SDK for Python:
      pip install boto3
      

    • Log in to your AWS account:
      aws login --region $REGION

    • Verify that your AWS Command Line Interface (AWS CLI), Python, and dependencies are correctly configured.
      ./verify-setup.sh

  3. Create your AWS resources: Use the AWS Management Console or infrastructure as code (IaC) tools to provision your Amazon Cognito user pool and Verified Permissions policy store.
    ./deploy-demo-environment.sh
    Do you want to start the demo now? (Y/N): Y

    This provisions an Amazon Cognito user pool, a Verified Permissions policy store, and any sample resources needed for the demo.

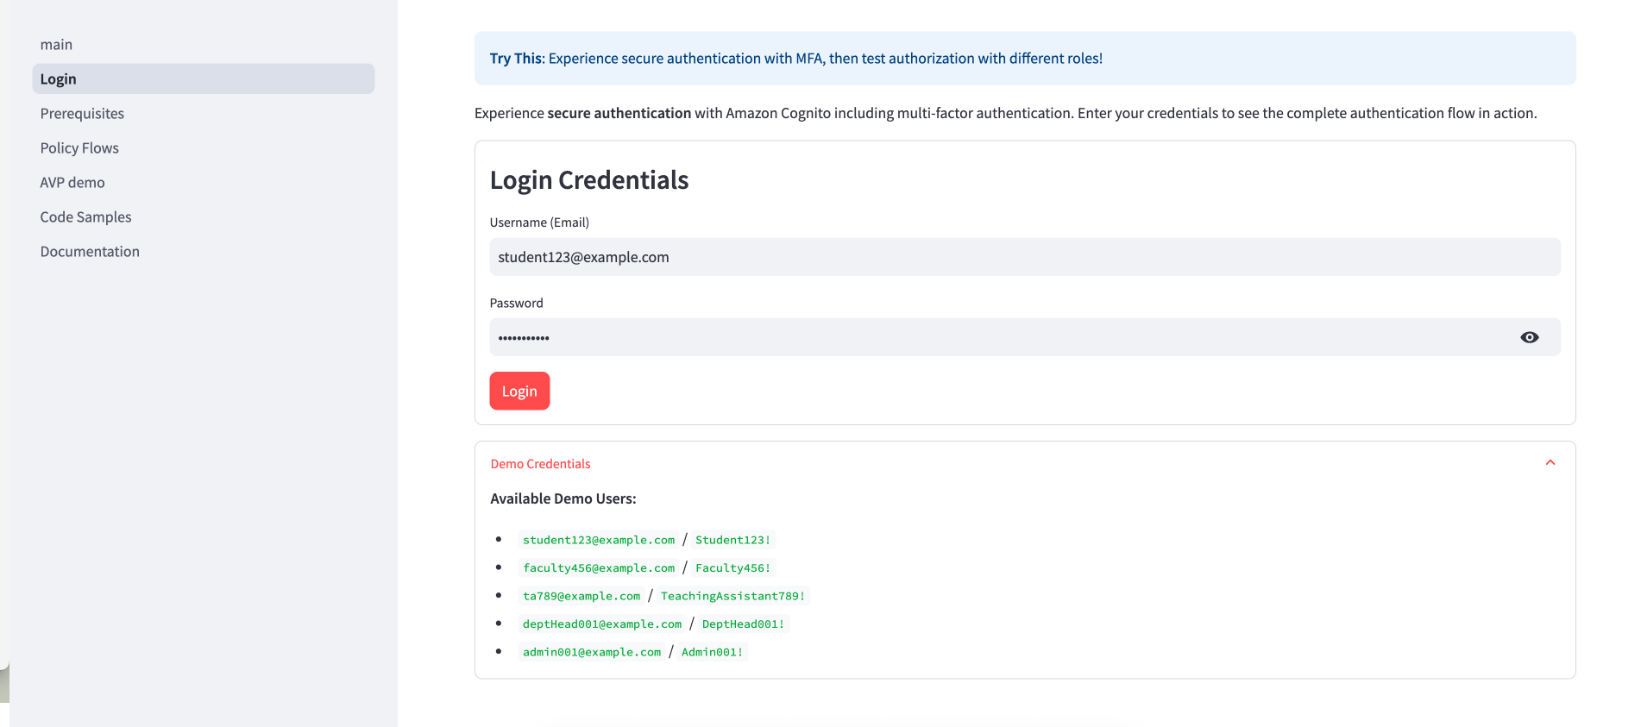
  4. Verify the login screen:
    Figure 4: Verify login credentials

    Figure 4: Verify login credentials

  5. Demo walkthrough and shut down: Interact with the demo and test the policies and features. When you’re ready to exit, press Ctrl+C to shut down and stop.
  6. Define your Cedar policies: Start with basic policies and gradually add complexity as you understand the evaluation model.
  7. Implement authentication: Integrate Amazon Cognito authentication into your application with proper error handling.
  8. Add authorization checks: Implement authorization checks at critical access points in your application. For authentication, implement proper error handling for expired tokens, failed MFA challenges, and account lockouts. Use the Amazon Cognito built-in token refresh flow. For authorization, place Verified Permissions checks at every API endpoint and UI component that accesses protected resources.
  9. Test thoroughly: Create test scenarios for each user role and permission combination.
  10. Monitor and iterate: Set up AWS CloudTrail logging and Amazon CloudWatch alarms to monitor your security controls and refine them based on real-world usage.
Security best practices

When implementing this architecture, follow these best practices to support security:

  • Layer your security controls: Use both authentication and authorization as complementary controls rather than relying on a single mechanism.
  • Follow least privilege principles: Grant only the permissions needed for specific user roles. Start with minimal permissions and add more as needed.
  • Implement proper session management: Set appropriate token expiration and refresh policies. Amazon Cognito handles much of this automatically, but you should configure timeouts based on your security requirements.
  • Validate all inputs: Sanitize user inputs to prevent injection attacks. Don’t rely on client-side validation alone.
  • Monitor authentication events: Set up logging and alerts for suspicious activities such as repeated failed login attempts or unusual access patterns.
  • Conduct regular security reviews: Periodically audit your policies and security configurations to verify they still meet your requirements and follow current best practices.
  • Implement secure error handling: Avoid information disclosure through error messages. Provide helpful feedback to users without revealing system details that could aid attackers.

Conclusion

Implementing proper authentication and authorization is critical for application security. By using Amazon Cognito and Amazon Verified Permissions, you can build robust security controls without complex custom code. Through this approach, you can implement enterprise-grade authentication with minimal effort, define and enforce fine-grained authorization policies, scale your security controls as your application grows, and centrally manage and audit security policies.

To get started with your implementation, create your AWS resources including an Amazon Cognito user pool and Verified Permissions policy store. Define your Cedar policies based on your application’s access requirements. Integrate authentication and authorization checks into your application flow. Test thoroughly with different user roles and access scenarios. Finally, monitor and refine your security controls based on usage patterns.

For additional resources, check out the Amazon Cognito documentation and Amazon Verified Permissions documentation.

If you have feedback about this post, submit comments in the Comments section below.


Sowmya Vemuri

Sowmya Vemuri

Sowmya is a Senior Technical Customer Solutions Manager at AWS, where she partners with AWS’s largest customers to drive agentic AI transformation, cloud security strategy, and compute modernization at scale. She has 14+ years of engineering, product, and technical leadership experience building and scaling distributed systems across the stack: bare-metal servers, data platforms, enterprise and consumer applications, and autonomous cloud architectures with zero human operator access.

Can I do that with policy? Understanding the AWS Service Authorization Reference

Post Syndicated from Anshu Bathla original https://aws.amazon.com/blogs/security/can-i-do-that-with-policy-understanding-the-aws-service-authorization-reference/

Understanding what AWS Identity and Access Management (IAM) policies can control helps you build better security controls and avoid spending time on approaches that won’t work. You’ve likely encountered questions like:

  • Can I use AWS Organizations service control policies (SCPs) to prevent the creation of security groups that allow traffic from 0.0.0.0/0?
  • Can I block uploads unless objects are encrypted?
  • Can I prevent functions with more than 512 MB of memory allocated?

Some of these are possible with IAM policies. Others are not. The difference is determined by a fundamental principle of AWS authorization: Policies make decisions based on information available in the authorization context at the time of the API call.

In this blog post, you learn how to use the AWS Service Authorization Reference to determine what’s achievable with IAM policies, recognize scenarios that need alternative solutions, and build more effective security controls in your AWS environment.

Understanding AWS authorization context

When you make an AWS API request through the AWS Management Console, AWS Command Line Interface (AWS CLI), or AWS SDK, the specific AWS service (such as Amazon S3 or Amazon EC2) receiving the request assembles a request context containing information about that request. This context is used for policy evaluation decisions. Request context is structured using the Principal, Action, Resource, Condition (PARC) model, which has four key components.

  • Principal: Identifies the requester and their attributes (tags, session context)
  • Action: Specifies the AWS API operation being requested (for example, s3:PutObject, ec2:RunInstances)
  • Resource: Defines the target AWS resource using Amazon Resource Names (ARNs)
  • Condition: Provides additional context available at request time, such as IP address, time, encryption parameters, MFA status, and service-specific attributes

The following example shows the typical request context for an Amazon S3 object upload:

  • Principal: AIDA123456789EXAMPLE
  • Action: s3:PutObject
  • Resource: arn:aws:s3:::my-bucket/documents/samplereport.pdf
  • Condition:
    • aws:PrincipalTag/Department=Finance
    • aws:RequestedRegion=us-east-1
    • aws:SourceIp=x.x.x.x
    • aws:MultiFactorAuthPresent=true
    • s3:x-amz-server-side-encryption=AES256
    • s3:x-amz-storage-class=STANDARD_IA

IAM policies can evaluate request metadata like encryption method and storage class being specified. However, it cannot evaluate the actual file contents, object size, or specific data patterns. Policy evaluation occurs at the time of the request, using the information present in the authorization context.

An essential resource: The Service Authorization Reference

The Service Authorization Reference is the authoritative documentation for understanding what policies can control. For every AWS service, it documents:

  • Actions: Every controllable operation
  • Resources: Resource types that can be targeted
  • Condition keys: The exact context information available for policy decisions

Condition keys are broadly divided into two categories. Global condition keys, which can be used across AWS services, and service-specific condition keys, which are defined for use with an individual AWS service. Use the Service Authorization Reference to find the global-condition keys or service-specific condition keys for each AWS service.

How to use the Service Authorization Reference

Follow these steps to determine if your requirement can be controlled with IAM policies:

  1. Navigate to your service: Go to the page for the specific AWS service you’re working with, such as Actions, resources, and condition keys for Amazon S3.
  2. Find the action you want: Find the API operation you want to control. Be precise, different actions have different available condition keys.
  3. Examine available condition keys: The Condition keys column shows what context information AWS makes available for that action.
  4. Make your feasibility determination: If the information you need isn’t listed as a condition key, you will not be able to control it with IAM policies alone.

Let’s take an example from the Amazon Elastic Compute Cloud (Amazon EC2) ec2:RunInstances action to see what you can and can’t control. In the Service Authorization Reference under the Amazon EC2 section, examine the RunInstances action and check the Resource types column. The RunInstances action affects multiple resource types, each with its own set of condition keys.

For the instance* resource type:

  • ec2:InstanceType: Can restrict instance types
  • ec2:EbsOptimized: Can require EBS optimization
  • aws:RequestTag/: Can enforce tagging requirements

For the network-interface* resource type:

  • ec2:Subnet: Can control subnet placement
  • ec2:Vpc: Can limit to specific virtual private clouds (VPCs)
  • ec2:AssociatePublicIpAddress: Can control public IP assignment

Note: These are a few examples from the many condition keys available for each resource type under the RunInstances action. The Service Authorization Reference lists dozens of condition keys across resource types (instance, network interface, security group, subnet, volume, and so on) that RunInstances affects. Consult the complete reference to see the available options for your specific use case.

Access the Service Authorization Reference programmatically

Beyond the human-readable documentation, AWS provides the Service Authorization Reference in machine-readable JSON format to streamline automation of policy management workflows. Use this programmatic access to incorporate authorization metadata into your development and security workflows.
For detailed information about the JSON structure and field definitions, see the Simplified AWS service information for programmatic access.
Developers can use tools like the IAM MCP Server for AWS IAM operations. This server provides AI assistants with the ability to manage IAM users, roles, policies, and permissions while following security best practices.

Using IAM policies to control specific scenarios

The following examples show how you can use IAM policies to control specific scenarios.

Example 1: Enforce AES256 server-side encryption on S3 objects

In the Amazon S3 Service Authorization Reference, under s3:PutObject action, the s3:x-amz-server-side-encryption condition key is available in the authorization context, which can be used to control the server-side encryption of S3 objects with AES-256. Here is the required policy.

Policy 1: Deny Amazon S3 object upload if the encryption doesn’t use AES-256

{
	"Version": "2012-10-17",
	"Statement": [
		{
			"Sid": "DenyUnencryptedObjectUploads",
			"Effect": "Deny",
			"Action": "s3:PutObject",
			"Resource": "arn:aws:s3:::my-bucket/*",
			"Condition": {
				"StringNotEquals": {
					"s3:x-amz-server-side-encryption": "AES256"
				}
			}
		}
	]
}

Policy 1 is a resource-based policy that can be applied on an S3 bucket to restrict object uploads. It denies a PutObject request when the server-side encryption isn’t using the AES-256 encryption algorithm.

Example 2: Allow different instance types based on the user’s cost center tag.

When checking the Amazon EC2 Service Authorization Reference for ec2:RunInstances, the ec2:InstanceType condition key, which is resource specific, is available. To restrict instance types based on who is launching them (rather than just what is being launched), you can either combine this with a global condition key or attach different policies to different principals. By using aws:PrincipalTag/tag-key alongside ec2:InstanceType, you can identify the user’s cost center from their IAM identity tags and then apply different instance type restrictions accordingly. This allows a single policy to dynamically enforce different permissions based on the requester’s identity.

Policy 2: Restricting EC2 instance types by cost center

{
	"Version": "2012-10-17",
	"Statement": [
		{
			"Sid": "AllowDevInstanceTypes",
			"Effect": "Allow",
			"Action": "ec2:RunInstances",
			"Resource": "arn:aws:ec2:*:*:instance/*",
			"Condition": {
				"StringEquals": {
					"aws:PrincipalTag/CostCenter": "Development"
				},
				"StringLike": {
					"ec2:InstanceType": "t3.*"
				}
			}
		},
		{
			"Sid": "AllowProdInstanceTypes",
			"Effect": "Allow",
			"Action": "ec2:RunInstances",
			"Resource": "arn:aws:ec2:*:*:instance/*",
			"Condition": {
				"StringEquals": {
					"aws:PrincipalTag/CostCenter": "Production"
				},
				"StringLike": {
					"ec2:InstanceType": [
						"m5.*",
						"c5.*",
						"r5.*"
					]
				}
			}
		}
	]
}

This is an identity-based policy that you can attach to IAM users, groups, or roles to control EC2 instance launches based on cost allocation. In the first statement, aws:PrincipalTag, which is a global condition key (tags attached to the IAM user or role), is used to determine which instance types are allowed. Users tagged with CostCenter=Development can only launch cost-effective T3 instance types (t3.micro, t3.small, t3.medium, and so on)with the service specific key ec2:InstanceType.

In the second statement, users tagged with CostCenter=Production can launch more powerful instance types from the M5 (general purpose), C5 (compute optimized), and R5 (memory optimized) families. This approach lets organizations enforce cost controls and allocate resources based on workload requirements. Each cost center maintains flexibility for its specific needs.

Note: Additional resources are required in the IAM policy to successfully launch EC2 instances. For the complete list, see Launch Instances.

Example 3: Users can only access and update DynamoDB items where the partition key matches their username.

You have identified that GetItem, PutItem,and UpdateItem actions are required. Corresponding to these actions, you can use the condition key to expose partition key values in the authorization context as described in the Amazon DynamoDB Service Authorization Reference

Policy 3: DynamoDB fine-grained access control

{
	"Version": "2012-10-17",
	"Statement": [
		{
			"Effect": "Allow",
			"Action": [
				"dynamodb:GetItem",
				"dynamodb:PutItem",
				"dynamodb:UpdateItem"
			],
			"Resource": "arn:aws:dynamodb:us-east-1:111122223333:table/UserProfiles",
			"Condition": {
				"ForAllValues:StringEquals": {
					"dynamodb:LeadingKeys": ["${aws:username}"]
				}
			}
		}
	]
}

The policy allows users to perform read and write actions (GetItem, PutItem, and UpdateItem) on the UserProfiles table, but only for items where the partition key value equals their own username (using the ${aws:username} policy variable). For example, if user alice attempts to access an item with partition key bob, the request will be denied.

Scenarios that need more than policies alone

Some requirements can’t be met using IAM policies. Here are three common scenarios that aren’t achievable with IAM policies alone.

Scenario 1: Block users from creating security group rules that allow traffic from 0.0.0.0/0 on TCP port 22

Upon checking the Amazon EC2 Service Authorization Reference, you will find that the ec2:AuthorizeSecurityGroupIngress action is required in an IAM policy to add an inbound access rules to a security group.

To verify this in the Service Authorization Reference, navigate to the Amazon EC2 Service Authorization Reference and search for the AuthorizeSecurityGroupIngress action, which is the action that creates security group rules. After you locate this action, review the Condition keys column and look for condition keys related to CIDR blocks, IP ranges, ports, or protocols. Available condition keys for ec2:AuthorizeSecurityGroupIngress include:

Notice there are no condition keys for CIDR blocks (such as 0.0.0.0/0), port numbers (such as 22), or protocols (such as TCP). The authorization context doesn’t include information about the specific CIDR blocks, ports, or protocols being added to the security group rule, so IAM policies can’t control these attributes.

Solution
Take a reactive approach using the AWS Config managed rule INCOMING_SSH_DISABLED to detect overly permissive rules. You can also use a combination of Amazon EventBridge and Lambda to either send a notification to your security team for the non-compliant configuration or to restrict the security group through an automation. For more information, see How to Automatically Revert and Receive Notifications About Changes to Your Amazon VPC Security Groups.

Scenario 2: Prevent creation of Lambda functions with more than 512 MB of memory allocated

Following the same verification methodology described in Scenario 1, navigate to the AWS Lambda Service Authorization Reference and examine the CreateFunction action’s condition keys for the function* resource type.

Available condition keys for lambda:CreateFunction with the function* resource type include:

  • lambda:CodeSigningConfigArn: Filters access by the ARN of the code signing
  • configuration-lambda:Layer: Filters access by the ARN of a version of an AWS Lambda layer
  • lambda:VpcIds: Filters access by the ID of the VPC configured for the Lambda function

There is no condition key for memory allocation (MemorySize parameter), timeout settings, storage configuration (EphemeralStorage), or runtime selection. Because memory allocation isn’t exposed in the authorization context, IAM policies can’t restrict this parameter.

Solution

Key takeaways

Keep these principles in mind when working with IAM policies:

  • Policies control what’s in the authorization context, not all elements you see in API documentation
  • The Service Authorization Reference is authoritative; if something isn’t listed as a condition key, you can’t control it with policies
  • Different actions have different available contexts even within the same service
  • Alternative approaches exist. AWS Config, EventBridge, and service-specific controls can be used to achieve your goals when policies alone can’t
  • Layered security is essential; combine preventive, detective, and responsive controls to help ensure that your data is secure

Conclusion

In this post, you learned how to use the AWS Service Authorization Reference to determine what’s achievable with IAM policies and recognize scenarios that require alternative solutions. By understanding that policies can only make decisions based on information available in the authorization context, you can build more effective security controls and avoid spending time on approaches that won’t work.

The Service Authorization Reference is your authoritative source for understanding policy capabilities. When you need to implement a control, start there to see if the required condition keys exist. If they don’t, you will need to layer in detective or responsive controls using services like AWS Config, Amazon EventBridge, or AWS Lambda.

Remember that effective AWS security isn’t about finding one perfect control, it’s about combining preventive, detective, and responsive measures to create defense in depth. IAM policies are powerful tools for prevention and work as part of a comprehensive security strategy.

Next steps:

If you have feedback about this post, submit comments in the Comments section below.


Author

Anshu Bathla

Anshu is a Senior Lead Consultant – SRC at AWS, based in Gurugram, India. He works with customers across diverse verticals to help strengthen their security infrastructure and achieve their security goals. Outside of work, Anshu enjoys reading books and gardening at his home garden.

Author

Prafful Gupta

Prafful is an Associate Delivery Consultant at AWS, based in Gurugram, India. Having started his professional journey with Amazon, he specializes in DevOps and Generative AI solutions, helping customers navigate their cloud transformation journeys. Beyond work, he enjoys networking with fellow professionals and spending quality time with family.

How to use Amazon Verified Permissions for authorization

Post Syndicated from Jeremy Ware original https://aws.amazon.com/blogs/security/how-to-use-amazon-verified-permissions-for-authorization/

Applications with multiple users and shared data require permissions management. The permissions describe what each user of an application is permitted to do. Permissions are defined as allow or deny decisions for resources in the application.

To manage permissions, developers often combine attribute-based access control (ABAC) and role-based access control (RBAC) models with custom code coupled with business logic. This requires a review of the code to understand the permissions, and changes to the code to modify the permissions. Auditing permissions within an application can require the same level of time and effort as a full application code review. This can cause delays to deliver and require additional time and resources to ascertain permissions across your application.

In this post, I will show you how to use Amazon Verified Permissions to define permissions within custom applications using the Cedar policy language. I’ll also show you how authorization requests are made.

Overview of Amazon Verified Permissions

Amazon Verified Permissions provides a prebuilt, flexible permissions system that you can use to build permissions based on both ABAC and RBAC in your applications. You define and manage fine-grained permissions using both permit policies, that grant permissions, and forbid policies, that restrict an action. This lets you focus on building or modernizing the application.

Amazon Verified Permissions maintains a centralized policy store, which helps you manage permissions throughout an application, authorize actions, and analyze permissions with automated reasoning. It also has an evaluation simulator tool to help you test your authorization decisions and author policies.

Policy creation

To author policies with Amazon Verified Permissions, use the purpose-built Cedar policy language to create specific permission policies that include traits of ABAC and RBAC. This allows you to apply granularity with least privilege in mind.

The following figure shows a permission policy for a document management application. In the figure, between the set of parentheses on lines 1-4 of the policy, RBAC is used, based on the principal’s UserGroup, to limit the permit action to registered users—and not guest or machine principals, for example. Between the brackets on lines 5–7 of the policy, ABAC is used, where resource.owner == principal limits access to the resource to only the owner.

Figure 1: Using the Cedar policy language to create permissions

Figure 1: Using the Cedar policy language to create permissions

Policies are developed in two ways:

  • Developers build out policies as part of the deployment of the application – Policy permissions that are defined as part of deployment are a great way for developers to set up guardrails on actions that should not cross set boundaries.
  • Policies are created through the use of the application by end users – Policy permissions that are configurable within the application provide the freedom for data to be shared between users.

We will walk you through these two approaches in the following sections.

Create policies as part of the deployment of the application

The following figure shows how a developer can configure a permit policy as part of the deployment of an application.

Figure 2: Creating policies as part of the deployment of the application

Figure 2: Creating policies as part of the deployment of the application

Policies configured by developers with pre-defined permissions that are deployed alongside the application is a familiar method for setting up guardrails in an application. Consider the document management application shown in Figure 3. There is a permit policy in place that allows users to view their own documents. Without a policy, the default result is a deny. You should also configure explicit forbid policies to act as guardrails to prevent overly permissive policies. In Figure 3, the policy restricts a user to only GET documents that they own or that are not tagged as private.

Figure 3: Example of a permit policy using Cedar

Figure 3: Example of a permit policy using Cedar

Create policies within the application by end users

The following figure shows how end users can apply policies within the application.

Figure 4: How permissions can be applied using policies for application end users

Figure 4: How permissions can be applied using policies for application end users

In a document sharing application, the application usually provides a simple end-user experience with a menu containing point-and-click actions that allow the user to select predefined permissions, such as read, write, or delete. Abstracted by the application, these permissions are transformed into Amazon Verified Permissions policy statements and stored in the designated policy location for the application. When an end user tries to take actions protected by these permissions, the application queries the Amazon Verified Permissions backend to determine if the principal in question has permissions to do so.

You can allow users of the application to create policies directly with respect to their given environments or current permissions. For example, if the application is targeted to system administrators or engineers who are technically proficient, you might choose not to hide the policy generation process behind a UI. The Amazon Verified Permissions policy grammar is designed for users comfortable with text-based query languages. Figure 5 shows an example policy that allows a user to GET or POST documents that they own.

Figure 5: Amazon Verified Permissions policy grammar written with Cedar to define permissions

Figure 5: Amazon Verified Permissions policy grammar written with Cedar to define permissions

Conclusion

Amazon Verified Permissions is a scalable, fine-grained permissions management and authorization service that helps you build and modernize applications without relying heavily on coding authorization within your applications. By using the Cedar policy language, you can define granular access controls that use both RBAC and ABAC and help end users create policies within the application. This allows for alignment of authorization standards across applications and provides clear visibility into existing permissions for review and audibility.

To learn more about ABAC and RBAC and how to design policy statements, see the blog post Get the best out of Amazon Verified Permissions by using fine-grained authorization methods.

 
If you have feedback about this post, submit comments in the Comments section below. If you have questions about this post, contact AWS Support.

Want more AWS Security news? Follow us on Twitter.

Jeremy Wave

Jeremy Ware

Jeremy is a Security Specialist Solutions Architect focused on Identity and Access Management. Jeremy and his team enable AWS customers to implement sophisticated, scalable, and secure IAM architecture and Authentication workflows to solve business challenges. With a background in Security Engineering, Jeremy has spent many years working to raise the Security Maturity gap at numerous global enterprises. Outside of work, Jeremy loves to explore the mountainous outdoors participate in sports such as Snowboarding, Wakeboarding, and Dirt bike riding.

Get the best out of Amazon Verified Permissions by using fine-grained authorization methods

Post Syndicated from Jeff Lombardo original https://aws.amazon.com/blogs/security/get-the-best-out-of-amazon-verified-permissions-by-using-fine-grained-authorization-methods/

With the release of Amazon Verified Permissions, developers of custom applications can implement access control logic based on caller and resource information; group membership, hierarchy, and relationship; and session context, such as device posture, location, time, or method of authentication. With Amazon Verified Permissions, you can focus on building simple authorization policies and your applications—instead of, for example, building an authorization engine for your multi-tenant consumer applications.

Amazon Verified Permissions uses the Cedar policy language, which simplifies the implementation, review, and maintenance of large and complex access control strategies.

Amazon Verified Permissions includes schema definitions, policy statement grammar, and automated reasoning that scales across millions of permissions, which enables you to enforce the principles of default deny and of least privilege. These features facilitate the deployment of an in-depth fine-grained authorization model to support your Zero-Trust objectives.

In this blog post, we’ll discuss how you can use Amazon Verified Permissions to create authorization policies that are an improvement over traditional access control models, and we provide some best practices for the use of this feature.

What is fine-grained authorization? Is it a role-based or an attribute-based access control mechanism?

Traditionally, customers deploy access control strategies based on roles or attributes.

Role-based access control (RBAC) is an approach of granting access to resources through group memberships instead of individual users. This approach, although it simplifies the definition of entitlements, can become very complex when you scale out groups’ memberships, hierarchies, and nestings.

Consider a photo sharing application that allows users to upload photos and share those photos with friends. We have a user Alice who uploads their vacation photos to a folder named Austin2022. Alice decides to share these photos with friends.

Alice provides a link to their vacation photos to a friend named Bob. Using the link, Bob is able to view photos in the folder Austin2022, because Bob is in the user group Alice/Friends. That is, Bob has the role of Alice/Friends. If Bob were removed as Alice’s friend, Bob would not be able to view Alice’s photos. This is an example of how role-based access control works.

Attribute-based access control (ABAC) deviates from the static nature of RBAC by introducing access rules based on the characteristics of the following: the requestor identity; the attributes of the resources targeted; or contextual elements such as the request time, where the request originated, or the device used to make the request.

Let’s consider who can delete photos in the example photo sharing application. We want to make sure that only Alice can delete their photos. That is, we make an authorization decision based on the attribute owner of the resource photo.

Fine-grained authorization (FGA) is a model that combines the advantages of both RBAC and ABAC, so that customers can find the right balance between each approach for their individual use case. Understanding the FGA approach is key to writing policy statements in Amazon Verified Permissions.

How does permissions policy statement language work?

To define a policy statement, Amazon Verified Permissions uses a policy language based on the PARC model, as AWS Identity and Access Management (IAM) does for IAM policies. PARC refers to the four objects in the policy language: principal, action, resource, and condition, and these are defined as follows:

  1. The principal is the entity taking the action. Often this will be a human user, but it could also be another service or a device.
  2. The action is the operation being performed, for which permission must be granted. Often the action will map to an API call.
  3. The resource is the target of the call.
  4. The condition limits when or where the principal can make the action on the resource.

Using this language, you can create a policy that allows user Alice (the principal) to call deletePhoto (the action) on VacationPhoto_1.jpg (the resource) when Alice is logged in by using multi-factor authentication (the condition). After the Amazon Verified Permissions policy is authored, you will store it in your Amazon Verified Permissions policy store instance.

Policy statements are divided into two sections:

  1. The policy head, which defines the targets of the policy (principal, action, resource) and whether the policy permits or forbids the action.
  2. The Conditions section, which allows you to place conditions that authorize API actions only when specified criteria are met.

You can use the structure of the policy statements to tell at a glance whether a policy follows an RBAC, an ABAC, or an FGA approach, as shown in the following three examples.

// This style of policy can be used to implement a RBAC approach
permit(
  principal in UserGroup::"Alice/Friends",
  action in [
    Action::"readFile", 
    Action::"writeFile"
  ],
  resource in Folder::"Playa del Sol 2021"
);
// This style of policy can be used to implement an ABAC approach
permit(principal, action, resource)
when {
  principal.permitted_access_level >= resource.access_level
};
// This style of policy can be used to implement a hybrid approach
permit(
  principal in UserGroup::"Alice/Friends",
  action in [
    Action::"readFile", 
    Action::"writeFile"
  ],
  resource in Folder::"Playa del Sol 2021"
)
when {
  principal.permitted_access_level >= resource.access_level
};

Let’s go back to our example of Alice and Bob. Now, Alice can define a policy that allows their friends to view photos in their folder Austin2022, as follows.

permit(
    principal in UserGroup::"Alice/Friends",
    action == Action::"viewPhoto",
    resource in Folder::"Austin2022"
);

The policy head says to permit the viewPhoto action to be performed on resources in the folder Austin2022 for principals in user group Alice/Friends. There is no condition section for this policy. With the preceding policy, Bob can access the photos in Alice’s Austin2022 album as long as Bob is a member of the group Alice/Friends.

We can go back to the photo deletion workflow for a more complex scenario. To delete photos, you want to ensure that the requestor owns the photo. Additionally, you might require the user to be logged in via multi-factor authentication (MFA). This policy can be written as follows.

permit(
    principal,
    action == Action::"deletePhoto",
    resource == File::"photo"
)
when {
    resource.owner == principal.name (http://principal.name/)
    && context.MFA == true
};

The policy head permits a user to call the action deletePhoto on photos. The condition section limits the policy to permit photo deletion only when the resource’s owner attribute is the same as the principal’s name attribute and the context object’s MFA attribute equals true.

Designing well-architected policy statements

In this section, we cover six best practices that help customers scale out efficiently.

Use immutable identifiers to reduce risk of collision

The policy statements in this blog post and in Amazon Verified Permissions documentation intentionally use human-readable values such as Bob for a Principal entity, or Alice/Friends for a Group entity. This is useful when discussing general concepts, but in production systems, customers should utilize unique and immutable values for entities. As an example, what would happen if Alice wants to change their user name?

Instead of creating a user named Alice, you should use an autogenerated and unique identifier such as a Universally Unique Identifier (UUID). Those are generally available from your user directory, JSON Web Token, or file system. That way, you can create a user object with the ID a1b2c3d4-5678-90ab-cdef-EXAMPLE11111 and the name attribute Alice. This would allow you to update Alice’s user name without needing to recreate the user object.

Reduce the number of policies that use entity grouping

Policy statements can only contain a single principal entity and a single resource entity. If you want the same policy to apply to multiple principals or resources, you can group common entities and use an in statement.

In this example, Bob’s user account could be stored as the following object.

{
    "EntityId": {
        "EntityType": "User",
        "EntityId": "Bob"
    },
    "Parents":[
        {
            "EntityType": "UserGroup",
            "EntityId": "Alice/Friends"
        }
    ],
    "Attributes": {
        "username": {
            "String": "Bob"
        },
        "email": {
            "String":"[email protected]"
           },
    }
}

And user group Alice/Friends could be stored as the following object.

{                 
  "EntityId": {                     
    "EntityType": "UserGroup",                     
    "EntityId": "Alice/Friends"
    }
}

The parent relationship defined in Bob’s user account object is what makes Bob a member of the group Alice/Friends.

Now you can define a policy that allows Bob to gain access to Alice’s vacation photos because he is in the group Alice/Friends, as follows.

permit(
    principal in UserGroup::"Alice/Friends",
    action == Action::"viewPhoto",
    resource in Folder::"Austin2022"
);

Use namespaces to remove ambiguity

You can use namespaces to remove ambiguity. Returning to our application, let’s say that you want to give users the ability to delete their photos. But your moderators also need the ability to delete inappropriate photos. How can you distinguish between the user action deletePhoto and the administrator action deletePhoto? Namespaces give you this flexibility.

When creating your entities, you can add namespaces in the EntityType field, as in the following example.

{
  "EntityId": {
    "EntityType": "Admin::Action",
    "EntityId": "\"deletePhoto\""    
  },
  "Parents" : []
  "Attributes": {
    "readOnly": {
      "String": "false",
      },
      "appliesTo": {
        "String": "\"Photo\""
      }
  }
}

You then use the namespace in your permit policy, as follows.

permit(
  principal,
  action == Admin::Action::"deletePhoto",
  resource == File::"Photo")
when {
  principal.role == Moderator
};

This policy requires a user to have the role Moderator to successfully use the administrator deletePhoto action.

Set permission guardrails with forbid statements

The Amazon Verified Permissions policy engine denies any action that is not explicitly allowed with a permit policy. But you might want to establish permission guardrails to ensure that an action will be never allowed. You can create forbid policies for this purpose.

Returning to our photo sharing application, suppose that you want to ensure that no user can delete a photo unless the user has been authenticated with MFA. You could use the following policy.

forbid(
  principal,
  action == Action::"deletePhoto",
  resource == File::"Photo"
)
unless {
  context.MFA == true
}

This permission guardrail will help prevent the accidental grant of overly permissive deletePhoto permissions.

Simplify statements with unless conditions

When you define complex conditions for a policy statement, you might face situations where a policy needs multiple negative conditions. Amazon Verified Permissions provides an alternative keyword for the conditional expression: unless. For example, you might deny moderators the ability to delete photos unless they have flagged the photo as inappropriate, are authenticated using MFA, and are on the company’s network, in order to simplify policy statements.

Unless behaves the same as when, except that using unless requires all conditions to evaluate as false. With this additional expression, you can create statement that are less complex to review and maintain. The following example shows how you can simplify a condition with multiple parameters by using the unless expression.

// Allow access unless a resource was deleted more than 7 days ago
permit(
  principal in Group::"Alice/Friends",
  action == Action::"readPhoto",
  resource in Folder::"Playa del Sol 2021"
)
when {
  !(resource.status == "deleted"
   && resource.deletion_date < (context.time.now - 604800)) //7 days ago
}

The following example shows how you can simplify the previous policy by using an unless expression.

// Allow access unless a resource was deleted more than 7 days ago
permit(
  principal in Group::"Alice/Friends",
  action == Action::"readPhoto",
  resource in Folder::"Playa del Sol 2021"
)
unless {
  (resource.status == "deleted"
   && resource.deletion_date < (context.time.now - 604800)) //7 days ago
}

Rationalize policies with a template

You might face a situation where you are repeatedly creating the same rule for different contexts. In the following example, we demonstrate a policy that permits Alice to describe the folder Alice’s Org. Then we replicate the same policy for Bob and the folder Bob’s Org.

permit(
    principal == "Alice",
    action == Action::"describeFolder",
    resource == Folder::"Alice's Org"
)
when {
    resource.owner == principal.username
};

permit(
    principal == "Bob",
    action == Action::"describeFolder",
    resource == Folder::"Bob's Org"
)
when {
    resource.owner == principal.username
};

In this case, we recommend that you use a policy template to simplify the evaluation, as in the following example.

permit(
    principal == ?principal,
    action == Action::"describeFolder",
    resource == ?resource
)
when {
    resource.owner == principal.username
};

With a policy template, the statement inherits from a placeholder (in this example, ?principal and ?resource) and will be evaluated dynamically for each policy evaluation request, based on context that the application will provide.

Conclusion: Start authorizing with Amazon Verified Permissions

With Amazon Verified Permissions, you can create permission policies with expressiveness, performance, and readability in mind.

Using the best practices described in this post, you are ready to author policies with Amazon Verified Permissions. When combined with services like Amazon Cognito, Amazon API Gateway, an AWS Lambda authorizer, or AWS AppSync, Amazon Verified Permissions allows you to unlock in-depth and explicit access control logic securely using native AWS services.

Over the next months, AWS will release more resources to support our customers in their implementation of Amazon Verified Permissions. Learn more about Amazon Verified Permissions. Stay tuned and happy building.

 
If you have feedback about this post, submit comments in the Comments section below. If you have questions about this post, contact AWS Support.

Want more AWS Security news? Follow us on Twitter.

Author

Jeff Lombardo

Jeff is a Solutions Architect expert in IAM, Application Security, and Data Protection. Through 17 years as a security consultant for enterprises of all sizes and business verticals, he delivered innovative solutions with respect to standards and governance frameworks. Today at AWS, he helps organizations enforce best practices and defense in depth for secure cloud adoption.

Brad Burnett

Brad Burnett

Brad is a Security Specialist Solutions Architect focused on Identity. Before AWS, he worked as a Linux Systems Administrator and Incident Responder. When he isn’t helping customers design robust and secure Identity solutions, Brad can be found sharpening his offensive security skills or playing card games.