Tag Archives: GitHub Copilot

Introducing code referencing for GitHub Copilot

Post Syndicated from Ryan J. Salva original https://github.blog/2023-08-03-introducing-code-referencing-for-github-copilot/

Make more informed decisions about the code you use. In the rare case where a GitHub Copilot suggestion matches public code, this update will show a list of repositories where that code appears and their licenses. Sign up for the private beta today.

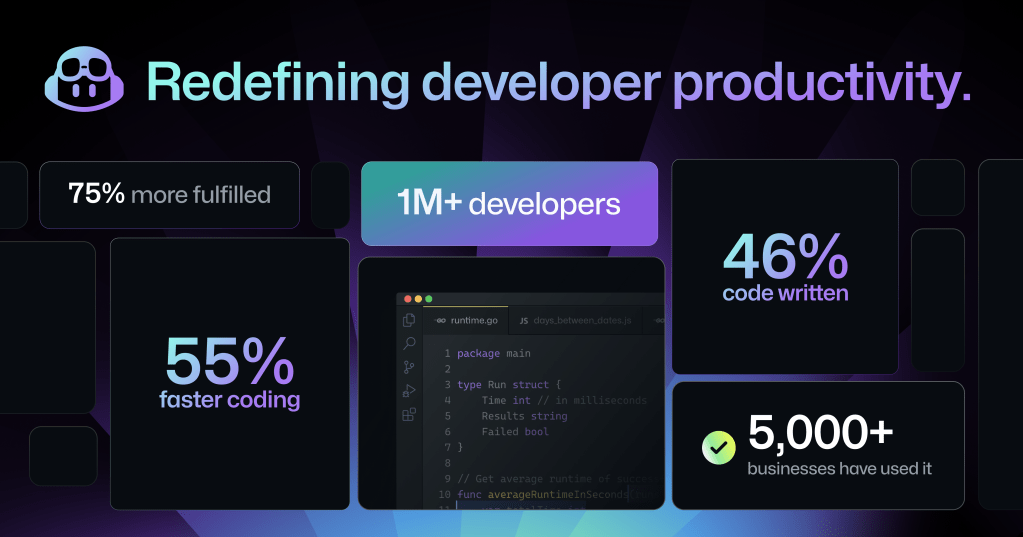
Over the course of the last year, GitHub Copilot, the world’s first at-scale AI pair programmer trained on billions of lines of public code, has attracted more than 1 million developers and helped over 27,000 organizations build faster and more productively. During that time, many developers told us they want to see when GitHub Copilot’s suggestions match public code.

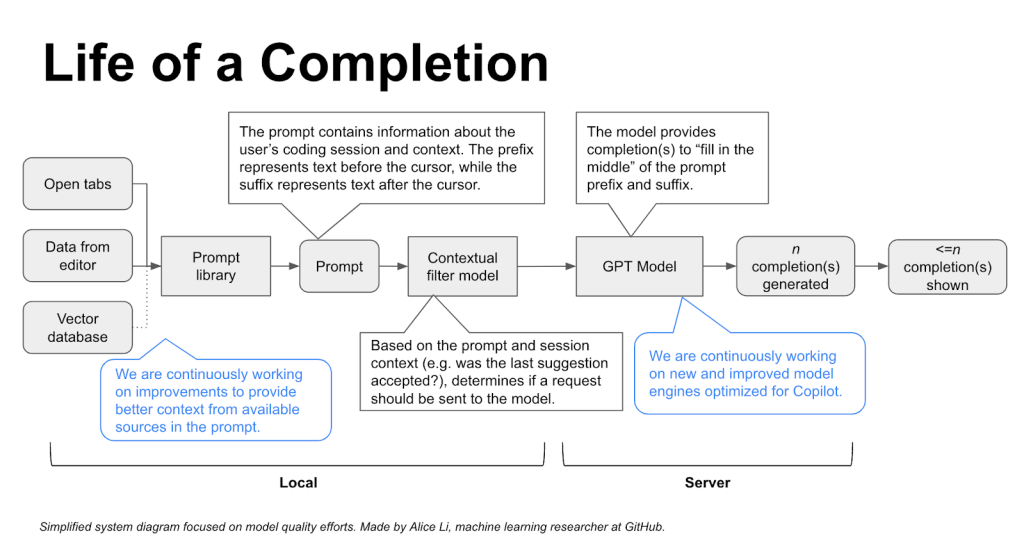
Today, we’re announcing a private beta of GitHub Copilot with code referencing that includes an updated filter which detects and shows context of code suggestions matching public code on GitHub. When the filter is enabled, GitHub Copilot checks code suggestions with surrounding code of about 150 characters and compares it against an index of all the public code on GitHub.com. Matches—along with information about every repository in which they appear—are displayed right in the editor. Developers can now choose whether to block suggestions containing matching code, or allow those suggestions with information about matches.

Why? Some want to learn from others’ work, others may want to take a dependency rather than introduce new app logic, and still others want to give or receive credit for similar work. Whatever the reason, it’s nice to know when similar code is out there.

Let’s see how it works.

How GitHub Copilot code referencing works

With billions of files to index and a latency budget of only 10-20ms, it’s a miracle of engineering that this is even possible. Still, if there’s a match, a notification appears in the editor showing: (1) the matching code, (2) the repositories where that code appears, and (3) the license governing each repository.

Why code referencing matters

In our journey to create a code referencing tool, we discovered a few interesting things:

First, our previous research suggests that matches occur in less than one percent of GitHub Copilot suggestions. But that one percent isn’t evenly distributed across all use cases. In the context of an existing application with surrounding code, we almost never see a match. But in an empty or nearly empty file, we see matches far more often.

Suggestions are heavily biased toward the prompt so GitHub Copilot can provide suggestions tailor-made for your current task. That means, in an existing app with lots of context, you’ll get a suggestion customized for your code. But in an empty, or nearly empty file, there’s little to no context. So, you’re more likely to get a suggestion that matches public code.

We’ve also found that when suggestions match public code, those matches frequently appear in dozens, if not hundreds of repositories. In some ways, this isn’t surprising because the models that power GitHub Copilot are akin to giant probability machines. A code fragment that appears in many repositories is more likely to be a “pattern” detected by the model—similar to the patterns we see elsewhere in public code.

For example, research on Java projects finds that up to 11% of repositories may contain code that resembles solutions posted to Stack Overflow, and the vast majority of those snippets appear without attribution. Another study on Python found that many matches are too generic to trace to an original usage. A smaller-scale study found that Stack Overflow answers contain code from Android applications.

Finally, the repositories with matching code are often governed by multiple, sometimes conflicting licenses, which makes attributing a match to its source more challenging. By consulting a list of references, developers can now:

  • Determine whether, what, and who to attribute rather than having matches simply blocked from the outset.
  • Learn from other developers by studying their approaches to similar problems.
  • Take a dependency on an open source library to avoid new business logic.
  • Evaluate the context of code before accepting a matching suggestion.
  • Discover new projects and contribute upstream.

Building a better developer experience and community

This is just the beginning. As GitHub continues to innovate, we will always strive to help developers stay in the flow, build creatively, and maintain a transparent connection to the community. We’re excited for you to try GitHub Copilot with code referencing.

Happy coding.

How to build a GPT-3 App with Nextjs, React, and GitHub Copilot

Post Syndicated from Kedasha Kerr original https://github.blog/2023-07-25-how-to-build-a-gpt-3-app-with-nextjs-react-and-github-copilot/

At the beginning of the year, I started working out with a trainer who wanted me to start tracking my food, but I’ve always been super against tracking my meals because it just doesn’t work for me. Instead of tracking my meals however, I decided to build an application that automagically tells me the nutritional information of any recipe. But to do that I needed some pretty complex natural language parsing capabilities so I figured this would be a great opportunity for me to play around with OpenAI and get to use GitHub Copilot a little bit more to help me build the app quickly.

GitHub Copilot is a great example of a product that takes advantage of Large Language Models (LLM) to solve problems for people and improve their productivity. In this blog,I’ll take you through how I created my own application that finds the nutritional information for any recipe using OpenAI’s GPT-3.5-turbo model, GitHub Copilot, Next.js, React, and Material UI.

Let’s dig right into the tutorial.

1. Create a repository and install dependencies

To get started, let’s create a new repository from the GitHub Codespaces Next.js template to get up and running quickly. Go to this repository, and make a copy. To do so, click on the green “Use this template” button then select “Create a new repository” and name your repository whatever you like. I called mine “mealmetrics-copilot.”

Now, clone the repository to your local machine, and open up the repository in your preferred code editor. I’m using VS Code.

Open up your terminal and cd into the project so we can install a few needed dependencies. In your terminal run the following command:

npm i express openai dotenv @material-ui/core @material-ui/icons

Then, install the following as a dev dependency:

npm i --save-dev nodemon

Once everything installs successfully, we’re ready to start building the server, but first, let’s grab our api key from OpenAI.

2. Getting your OpenAI API key

Go to OpenAI’s developer login page and create a new account or sign in if you already have one. Once you’ve logged in, click your name in the upper right hand corner and select “view API keys.” Click the “Create a new secret key” button. From there you can name your apikey, click the green button to generate the key and then copy the apikey and save it in a secure location (such as a password manager).

Save your apikey in a .env file in vscode at the root of the project and add .env to the gitignore file.

3. Install GitHub Copilot extension

We’ll be using GitHub Copilot as our assistant to build this application. If you’re not familiar with GitHub Copilot, read this blog post to learn more.

In your code editor of choice, go to your extensions panel and search for GitHub Copilot—I’m using VSCode and this is what that looks like.

Click the install button then click the login button to authenticate your access. Once that’s done, you’ll be ready to get started and follow along!

4. Building the server

Now that we have our apikey, have installed dependencies, and have GitHub Copilot in our code editor, let’s dig into building the application!

The first thing we’re going to do is build a simple server with Express.js (if you prefer to use Fastify, NestJS, Koa or something else, feel free to use them!).

In the pages folder, create a folder called api and then a file called server.js. This is where we’ll add our prompting information for GitHub Copilot. Let’s add our first prompt as a comment in the server.js file that says the following:

Create a server with the following specifications:

1. import express and dotenv node modules
3. create the server with express and name it app
4. use port 8080 as default port
5. enable body parser to accept json data
6. state which port the server is listening to and log it to the console

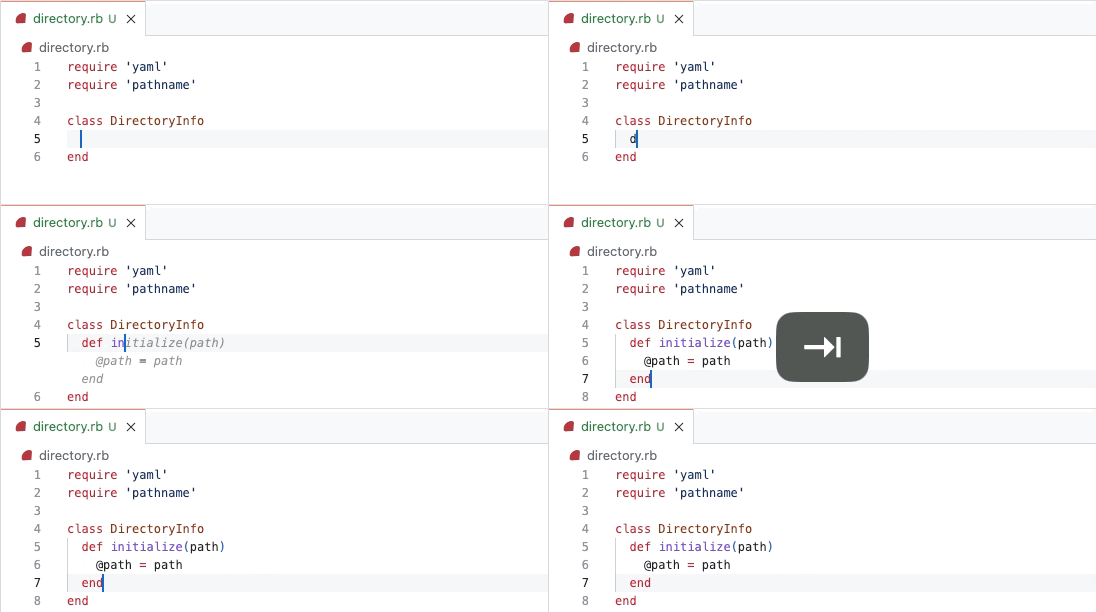
Hit the enter key and GitHub Copilot will start generating suggestions to build the server. To accept the suggestions, hit the tab key. Take a look at this video to see what accepting suggestions look like.

We can update the package.json file to include the script devserver: "nodemon pages/api/server.js then run the command in our terminal using npm run devserver. You’ll see that the server has started!

After we build the simple server, let’s move on to making this a bit more complex by building the controller for our app.

Let’s create a new file in the api folder called generateInfo.js and add the following comment in the file:

Create a controller with the following specifications:

1. import the Configuration class and the OpenAIApi class from the openai npm module
2. create a new configuration object that includes the api key and uses the Configuration class from the openai module
3. create a new instance of the OpenAIApi class and pass in the configuration object
4. create an async function called generateInfo that accepts a request and response object as parameters
5. use try to make a request to the OpenAI completetion api and return the response
6. use catch to catch any errors and return the error include a message to the user
7. export the generateInfo function as a module

As you’ll notice, I’m being very explicit in my instructions to GitHub Copilot. One thing to always remember when working with LLMs is that the magic is in the prompt—the clearer you are in your instructions, the better the results you’ll get.

Hit enter on your keyboard and then hit tab to accept the recommendations that GitHub Copilot provides. In the image below, you’ll notice that Copilot’s suggestions are gray.

Accept the suggestion by hitting tab on your keyboard and let’s do some cleaning up.

Remember, GitHub Copilot is our assistant, so we still need to ensure that the suggestions it provides meet our requirements.

Since we’re building a gpt-3 application, we’ll be using the completion API from OpenAI and the gpt-3.5-turbo model to generate nutritional information for us.

If you look at the suggestion above, we were provided with the davinci engine and parameters that are not needed for this project—we also need the messages parameter to send requests with the 3.5-turbo model.

We also want to add the recipe prompt, create a function called recipe that represents the recipe a user inputs and also update the completion object sent to OpenAI. The keys we’ll be using are max_tokens, prompt, model, temperature and n. Learn more about these parameters by reading OpenAI’s api docs.

Let’s also update the error message to include 401 just in case our api key is invalid. So, let’s make these updates.

1. Add recipe prompt

Create a new folder called data at the root of your project, then create a file called prompt.json. This will contain a part of the recipe prompt that we’ll send to OpenAI. Add the following script to the prompt.json file:

{
"recipePrompt": "I want you to act as a Nutrition Facts Generator. I will provide you with a recipe and your role is to generate nutrition facts for that recipe. You should use your knowledge of nutrition science, nutrition facts labels and other relevant information to generate nutritional information for the recipe. Add each nutrition fact to a new line. I want you to only reply with the nutrition fact. Do not provide any other information. My first request is: "
}

Then import the recipePrompt to the generateInfo.js file and update the main function to grab the recipe submitted by the user.

// add the prompt to the top of the file
const { recipePrompt } = require('../../data/recipe.json');

// update this function to include the recipe before the try
const generateInfo = async(req, res) => {
const { recipe } = req.body
}

2. Update the completion function and response

Now, let’s update the try to look a bit more like what we want.

model: "gpt-3.5-turbo",
messages: [{ role: "user", content: `${recipePrompt}${recipe}` }],
max_tokens: 200,
temperature: 0,
n: 1,

And let’s also update the response that we receive.

const response = completion.data.choices[0].message.content;

return res.status(200).json({
success: true,
data: response,
});

3. Update the error message

Finally, let’s update the catch to have more explicit error messages.

catch (error) {
if (error.response.status === 401) {
return res.status(401).json({
error: "Please provide a valid API key.",
});
}
return res.status(500).json({
error:
"An error occurred while generating recipe information. Please try again later.",
});
}

Once we’ve updated everything, our controller function should look like this:

const { Configuration, OpenAIApi } = require("openai");
const { recipePrompt } = require("../../data/recipe.json");

const config = new Configuration({
apiKey: process.env.OPENAI_API_KEY,
});

const openai = new OpenAIApi(config);

const generateInfo = async (req, res) => {
const { recipe } = req.body;

try {
const completion = await openai.createChatCompletion({
model: "gpt-3.5-turbo",
messages: [{ role: "user", content: `${recipePrompt}${recipe}` }],
max_tokens: 200,
temperature: 0,
n: 1,
});
const response = completion.data.choices[0].message.content;

return res.status(200).json({
success: true,
data: response,
});
} catch (error) {
console.log(error);
if (error.response.status === 401) {
return res.status(401).json({
error: "Please provide a valid API key.",
});
}
return res.status(500).json({
error:
"An error occurred while generating recipe information. Please try again later.",
});
}
};

module.exports = { generateInfo };

Now, let’s create the router and test this out in Postman. Create a new file called router.js and start typing to allow GitHub Copilot to assist you while typing.

As you can see, GitHub Copilot offered suggestions while I was typing and I hit the tab button to accept the suggestions. Add the newly created router to the server.js file and test the route in postman. Add the following to your server.js file.

app.use('/openai', require('./router'));

Now, let’s test the route in postman with a POST request—make sure your server is still running!

Go to the URL below and add any recipe to the body of the request:

URL: http://localhost:8080/openai/generateinfo

RECIPE:
{
"recipe": "1 cup of all purpose flour, sifted 1 1/2 teaspoon baking powder 1/4 teaspoon salt 2 Tablespoon granulated sugar 1/2 Tablespoon unsalted butter, room temperature Approximately 1/3 cup water"
}

You should receive a successful response that looks like this:

{
"success": true,
"data": "\n\nCalories: 112 \nTotal Fat: 2.3g \nSaturated Fat: 1.3g \nTrans Fat: 0g \nCholesterol: 5.4mg \nSodium: 175.8mg \nTotal Carbohydrates: 21.6g \nDietary Fiber: 0.8g \nSugars: 6.5g \nProtein: 2.6g"
}

Here is the data that we submitted to OpenAI that generated that successful response:

data: '{"model":"text-davinci-003","prompt":"I want you to act as a Nutrition Facts Generator. I will provide you with a recipe and your role is to generate nutrition facts for that recipe. You should use your knowledge of nutrition science, nutrition facts labels and other relevant information to generate nutritional information for the recipe. Add each nutrition fact to a new line. I want you to only reply with the nutrition fact. Do not provide any other information. My first request is: 1 cup of all purpose flour, sifted 1 1/2 teaspoon baking powder 1/4 teaspoon salt 2 Tablespoon granulated sugar 1/2 Tablespoon unsalted butter, room temperature Approximately 1/3 cup water","max_tokens":200,"temperature":0.5,"n":1}',

As you can see, both the prompt script and the recipe entered in the request body was sent to OpenAI, which generated the nutritional data for this Jamaican fried dumpling recipe.

Now, let’s create the frontend of the application to display the info on the web.

5. Building the frontend app

We’ll be using React for the frontend. Delete all the code in the index.js file that currently exists in the project. Then, in a comment, instruct GitHub Copilot to build a simple text area.

Create a text area with the following specifications:
1. a H1 with the text "Find Nutrition Facts for any recipe"
2. a text area for users to upload recipe
3. a button for users to submit the entered recipe
4. a section at the bottom to display nutrition facts
5. Get the data from this link: http://localhost:8080/openai/generateinfo
6. Name the component RecipeInfo

GitHub Copilot quickly generated the code for us.

Let’s hit tab to accept the suggestion and run npm run dev in your terminal to see the app on the web. When you go to localhost:3000, you’ll see the following displayed on the web.

Admittedly, it’s not the most beautiful thing, but we were able to spin this up very quickly.

In less than one minute we completed a functional frontend mvp of our application with GitHub Copilot.

Let’s enter the recipe we have into the text box and see the response that we get back.

And we have our first error—which is not surprising since we didn’t validate the code that was provided. Let’s look into the console and see if we have any additional details.

Seems it’s a CORS issue—classic. Let’s ask GitHub Copilot how to resolve this.

Add the following questions as a comment anywhere in your file:

q: how do I resolve the CORS error?
q: how do I add Access-Control-Allow-Origin to the header?

The question and response should look something like this:

We can also ask GitHub Copilot Chat how to resolve CORS errors and it gives us a seamless response.

Let’s install the cors middleware and add it to the server.js file.

const cors = require("cors");

// Allow cross-origin requests (CORS)
app.use(cors());

Then, let’s update our router.js file.

router.options("/generateInfo", (req, res) => {
res.setHeader("Access-Control-Allow-Origin", "*");
res.setHeader("Access-Control-Allow-Headers", "*");
res.setHeader("Access-Control-Allow-Methods", "*");
res.sendStatus(200);
});

Now, let’s try fetching nutritional data again and see what happens.

And we have another error. Progress!

This time there’s no need to debug with GitHub Copilot since we’re being told that the data being returned is an object with the keys success and data. Let’s change the name of the response function to recipeInfo and update the nutrition state to receive recipeInfo.data.

const recipeInfo = await response.json();
setNutrition(recipeInfo.data);

Let’s try sending the recipe again and hope for a successful response.

Success!

We just created a GPT-3 app in record time with GitHub Copilot, React, Next.js, and OpenAI. Now that we have the data that we need, let’s make the application more beautiful with Material UI.

6. Styling the app with Material UI

In this section, we’ll be using a GitHub Copilot X feature in technical preview for individuals and in public beta for organizationsCopilot Chat–to improve the appearance of our application. You must have GitHub Copilot access to be on the Copilot Chat’s waitlist which is currently open. Sign up today if you haven’t yet!

Let’s ask GitHub Copilot chat how we can implement material-ui into the application:

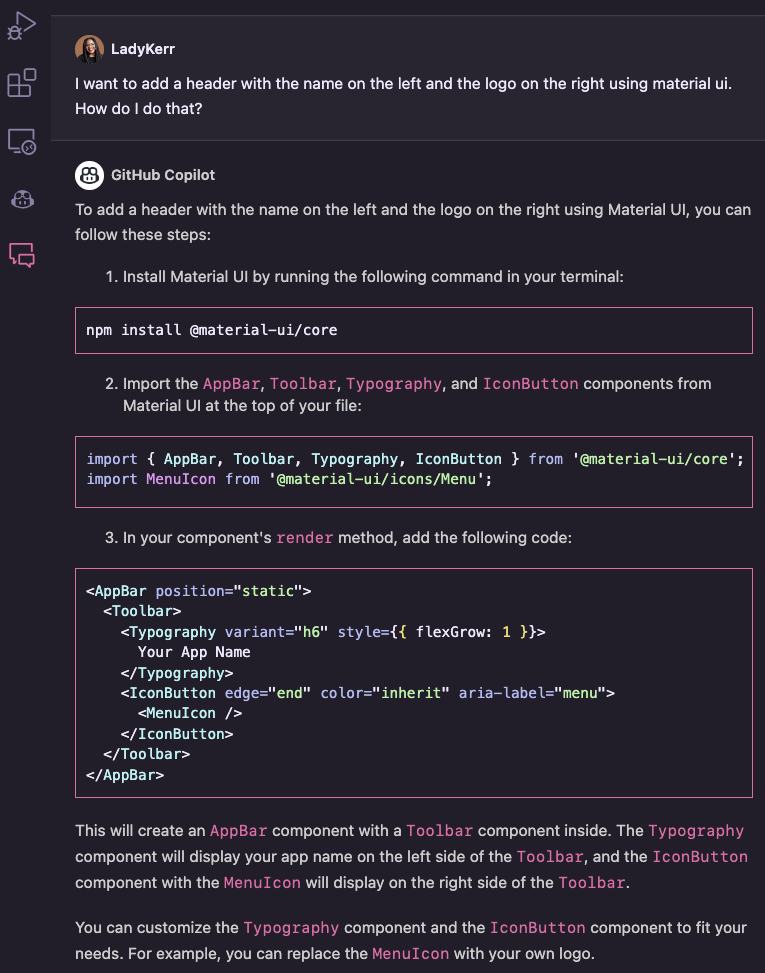
Let’s go ahead and implement the suggestions and see what happens, and also ask GitHub Copilot chat to implement a header for us.

After we implement the header, new text area and center the content, this is what the app is looking like.

Ok, we’re getting somewhere.

Let’s make a few more updates with the assistance of GitHub Copilot Chat. I’ve included the prompt/questions I asked:

  • Make the text area larger and implement Material UI
update the component to use material ui with the content centered and the buttoned positioned below the text area. use Grid from material ui and any other components needed.
  • Add the paper component from Material UI to elevate the look and feel of the app
add the Paper component from material ui to the text area highlighted
  • Add a second button that clears the text area + facts after a recipe is submitted
add a button to the app to clear the text in the textarea
  • Add a loader while waiting for the data to load
add a loader to the highlighted code that checks if the data is loading. If the data is loading, then display the text "Nutrition Facts" and loader, if there is an error, display the error message otherwise, display nothing
  • Add a theme with custom primary and secondary colors
how do I create a custom theme with material ui and where do I create the custom theme?
  • Prevent the text area from going over the paper component from Material UI
in the highlihghted code how do I prevent the text area line from going over the paper component?
  • Add a new component—footer
Create a footer component with the following specifications:
1. The footer must be fixed at the bottom of the page
2. Use the Paper component from Material UI
3. Use the Typography component from Material UI
3. The text must say "Made with ❤ by LadyKerr & GitHub Copilot" and "Powered by OpenAI"
4. The text "GitHub Copilot" must be a link to https://copilot.github.com/ that opens in a new tab with alt text " GitHub Copilot"
5. The text "OpenAI" must be a link to https://openai.com/ that opens in a new tab with alt text "openai api"

Ask GitHub Copilot chat to make the changes above and, once it’s done, your application should be looking and functioning like this:

Now, let’s create a new component that splits each nutrition fact onto a new line. Create a new file called NutritionFacts.js in the components folder, and write the following as a comment so GitHub Copilot can get to work.

Create a component with the following specifications:
1. the component must split the received string data at /n/n or /n and return a Typography component for each string
2. the component must set a unique key for each Typography component
3. the component must return a div with the Typography components
4. the component must return null if the data is not a string
5. Name the component NutritionFacts
6. Use the Paper Component from Material UI
7. Add text above the data that says "Here are the nutrition facts for your recipe:"

From this prompt, GitHub Copilot generated the following code.

import React from "react";
import { Typography, Paper } from "@material-ui/core";

const NutritionFacts = ({ data }) => {
if (typeof data !== "string") {
return null;
}
const nutritionFacts = data.split(/\n\n|\n/);
return (

Here are the nutrition facts for your recipe:

{nutritionFacts.map((fact, index) => (
{fact}
))}
);
};

export default NutritionFacts;

Brilliant! Let’s import this component into our main index.js file and test the application to see if each fact was split on to a new line as expected.

And it did. Our app is functioning as expected.

Now, let’s move the code for the header into a new file in the components folder called Header.js. Once everything is updated, the final application looks like this and returns the nutritional data for any recipe.

So, there we have it!

We just built an application using GitHub Copilot, OpenAI, React, Next.js, and GitHub Copilot Chat. The next step would be to deploy the application on GitHub Pages and deploy your server on a service like Azure.

You can see the full code here—feel free to clone or fork the project and make it your own. This was a fun little project to build and I hope you learned something new and feel inspired to create your own GPT-3 app!

Learn more about prompting GitHub Copilot by reading How to use GitHub Copilot: Prompts, tips and use cases and A Developer’s Guide to Prompt Engineering and LLMs.

Until next time, happy coding!

A developer’s guide to prompt engineering and LLMs

Post Syndicated from Albert Ziegler original https://github.blog/2023-07-17-prompt-engineering-guide-generative-ai-llms/


In a blog post authored back in 2011, Marc Andreessen warned that, “Software is eating the world.” Over a decade later, we are witnessing the emergence of a new type of technology that’s consuming the world with even greater voracity: generative artificial intelligence (AI). This innovative AI includes a unique class of large language models (LLM), derived from a decade of groundbreaking research, that are capable of out-performing humans at certain tasks. And you don’t have to have a PhD in machine learning to build with LLMs—developers are already building software with LLMs with basic HTTP requests and natural language prompts.

In this article, we’ll tell the story of GitHub’s work with LLMs to help other developers learn how to best make use of this technology. This post consists of two main sections: the first will describe at a high level how LLMs function and how to build LLM-based applications. The second will dig into an important example of an LLM-based application: GitHub Copilot code completions.

Others have done an impressive job of cataloging our work from the outside. Now, we’re excited to share some of the thought processes that have led to the ongoing success of GitHub Copilot.

Let’s jump in.

Everything you need to know about prompt engineering in 1600 tokens or less

You know when you’re tapping out a text message on your phone, and in the middle of the screen just above the keypad, there’s a button you can click to accept a suggested next word? That’s pretty much what an LLM is doing—but at scale.

A GIF show autocomplete functionalities in iOS.
An example of iMessage’s text prediction feature.

Instead of text on your phone, an LLM works to predict the next best group of letters, which are called “tokens.” And in the same way that you can keep tapping that middle button to complete your text message, the LLM completes a document by predicting the next word. It will continue to do that over and over, and it will only stop once it has reached a maximum threshold of tokens or once it has encountered a special token that signals “Stop! This is the end of the document.”

There’s an important difference, though. The language model in your phone is pretty simple—it’s basically saying, “Based only upon the last two words entered, what is the most likely next word?” In contrast, an LLM produces an output that’s more akin to being “based upon the full content of every document ever known to exist in the public domain, what is the most likely next token in your document?” By training such a large, well-architected model on an enormous dataset, an LLM can almost appear to have common sense such as understanding that a glass ball sitting on a table might roll off and shatter.

A screenshot of ChatGPT answering a question about the danger of setting a round glass ball on a small table.
Example of an LLM’s awareness or “common sense” due to its training.

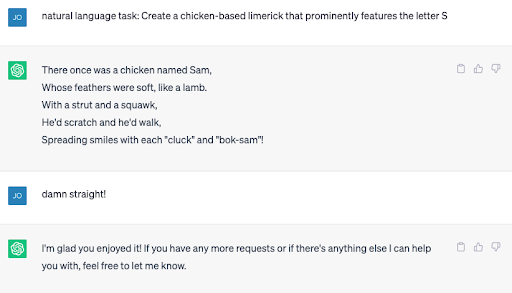
But be warned: LLMs will also sometimes confidently produce information that isn’t real or true, which are typically called “hallucinations” or “fabulations.” LLMs can also appear to learn how to do things they weren’t initially trained to do. Historically, natural language models have been created for one-off tasks, like classifying the sentiment of a tweet, extracting the business entities from an email, or identifying similar documents, but now you can ask AI tools like ChatGPT to perform a task that it was never trained to do.

A screenshot of ChatGPT answering a prompt to create a chicken-based limerick.
John conversing with ChatGPT about serious things.

Building applications using LLMs

A document completion engine is a far cry from the amazing proliferation of LLM applications that are springing up every day, running the gamut from conversational search, writing assistants, automated IT support, and code completion tools, like GitHub Copilot. But how is it possible that all of these tools can come from what is effectively a document completion tool? The secret is any application that uses an LLM is actually mapping between two domains: the user domain and the document domain.

A graphic showing how LLMs work and the processes behind them to determine context before giving an answer.
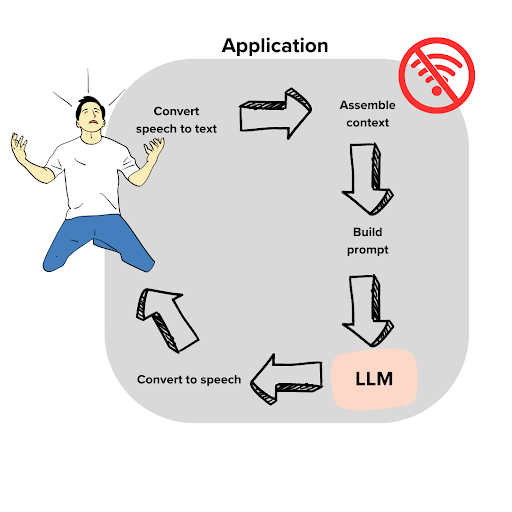
Diagram of the user flow when communicating with an LLM, in this case, Dave’s user flow.

On the left is the user. His name is Dave, and he has a problem. It’s the day of his big World Cup watch party, and the Wi-Fi is out. If they don’t get it fixed soon, he’ll be the butt of his friends’ jokes for years. Dave calls his internet provider and gets an automated assistant. Ugh! But imagine that we are implementing the automated assistant as an LLM application. Can we help him?

The key here is to figure out how to convert from user domain into document domain. For one thing, we will need to transcribe the user’s speech into text. As soon as the automated support agent says “Please state the nature of your cable-related emergency,” Dave blurts out:

Oh it’s awful! It’s the World Cup finals. My TV was connected to my Wi-Fi, but I bumped the counter and the Wi-Fi box fell off and broke! Now, we can’t watch the game.

At this point, we have text, but it’s not of much use. Maybe you would imagine that this was part of a story and continue it, “I guess, I’ll call up my brother and see if we can watch the game with him.” An LLM with no context will similarly create the continuation of Dave’s story. So, let’s give the LLM some context and establish what type of document this is:

### ISP IT Support Transcript:

The following is a recorded conversation between an ISP customer, Dave Anderson, and Julia Jones, IT support expert. This transcript serves as an example of the excellent support provided by Comcrash to its customers.

*Dave: Oh it's awful! This is the big game day. My TV was connected to my Wi-Fi, but I bumped the counter and the Wi-Fi box fell off and broke! Now we can't watch the game.
*Julia:

Now, if you found this pseudo document on the ground, how would you complete it? Based on the extra context, you would see that Julia is an IT support expert, and apparently a really good one. You would expect the next words to be sage advice to help Dave with his problem. It doesn’t matter that Julia doesn’t exist, and this wasn’t a recorded conversation—what matters is that these extra words offer more context for what a completion might look like. An LLM does the same exact thing. After reading this partial document, it will do its best to complete Julia’s dialogue in a helpful manner.

But there’s more we can do to make the best document for the LLM. The LLM doesn’t know a whole lot about cable TV troubleshooting. (Well, it has read every manual and IT document ever published online, but stay with me here). Let’s assume that its knowledge is lacking in this particular domain. One thing we can do is search for extra content that might help Dave and place it into the document. Let’s assume that we have a complaints search engine that allows us to find documentation that has been helpful in similar situations in the past. Now, all we have to do is weave this information into our pseudo document in a natural place.

Continuing from above:

*Julia:(rifles around in her briefcase and pulls out the perfect documentation for Dave's request)
Common internet connectivity problems ...
<...here we insert 1 page of text that comes from search results against our customer support history database...>
(After reading the document, Julia makes the following recommendation)
*Julia:

Now, given this full body of text, the LLM is conditioned to make use of the implanted documentation, and in the context of “a helpful IT expert,” the model will generate a response. This reply takes into account the documentation as well as Dave’s specific request.

The last step is to move from the document domain into the user’s problem domain. For this example, that means just converting text to voice. And since this is effectively a chat application, we would go back and forth several times between the user and the document domain, making the transcript longer each time.

This, at the core of the example, is prompt engineering. In the example, we crafted a prompt with enough context for the AI to produce the best possible output, which in this case was providing Dave with helpful information to get his Wi-Fi up and running again. In the next section, we’ll take a look at how we at GitHub have refined our prompt engineering techniques for GitHub Copilot.

The art and science of prompt engineering

Converting between the user domain and document domain is the realm of prompt engineering—and since we’ve been working on GitHub Copilot for over two years, we’ve started to identify some patterns in the process.

These patterns have helped us formalize a pipeline, and we think it is an applicable template to help others better approach prompt engineering for their own applications. Now, we’ll demonstrate how this pipeline works by examining it in the context of GitHub Copilot, our AI pair programmer.

The prompt engineering pipeline for GitHub Copilot

From the very beginning, GitHub Copilot’s LLMs have been built on AI models from OpenAI that have continued to get better and better. But what hasn’t changed is the answer to the central question of prompt engineering: what kind of document is the model trying to complete?

The OpenAI models we use have been trained to complete code files on GitHub. Ignoring some filtering and stratification steps that don’t really change the prompt engineering game, this distribution is pretty much that of individual file contents according to the most recent commit to main at data collection time.

The document completion problem the LLM solves is about code, and GitHub Copilot’s task is all about completing code. But the two are very different.

Here are some examples:

  • Most files committed to main are finished. For one, they usually compile. Most of the time the user is typing, the code does not compile because of incompletions that will be fixed before a commit is pushed.
  • The user might even write their code in hierarchical order, method signatures first, then bodies rather than line by line or in a mixed style.
  • Writing code means jumping around. In particular, people’s edits often require them to jump up in the document and make a change there, for example, adding a parameter to a function. Strictly speaking, if Codex suggests using a function that has not been imported yet, no matter how much sense it might make, that’s a mistake. But as a GitHub Copilot suggestion, it would be useful.

The issue is that merely predicting the most likely continuation based on the text in front of the cursor to make a GitHub Copilot suggestion would be a wasted opportunity. That’s because it ignores an incredible wealth of context. We can use that context to guide the suggestion, like metadata, the code below the cursor, the content of imports, the rest of the repository, or issues, and create a strong prompt for the AI assistant.

Software development is a deeply interconnected, multimodal challenge, and the more of that complexity we can tame and present to the model, the better your completions are going to be.

Step 1: Gathering context

GitHub Copilot lives in the context of an IDE such as Visual Studio Code (VS Code), and it can use whatever it can get the IDE to tell it—only if the IDE is quick about it though. In an interactive environment like GitHub Copilot, every millisecond matters. GitHub Copilot promises to take care of the common coding tasks, and if it wants to do that, it needs to display its solution to the developer before they have started to write more code in their IDE. Our rough heuristics say that for every additional 10 milliseconds we take to come up with a suggestion, the chance it’ll arrive in time decreases by one percent.

So, what can we say quickly? Well, here’s an example. Consider this suggestion to a simple piece of Python:

A developer prompting GitHub Copilot to write a simple function in Python to compute Fibonacci numbers.

Wrong! Turns out the user actually wanted to write Ruby, like this:

A developer using GitHub Copilot to write a simple function to compute Fibonacci numbers in Ruby.

The two languages have similar enough syntax so that only a couple of lines can be ambiguous, especially when it’s toward the beginning of the file where much of what we encounter are boilerplate comments. But modern IDEs such as VS Code typically know what language the user is writing in. That makes language mix ups especially annoying to the user because they break the implicit expectation that “the computer should know” (after all, most IDEs highlight language syntax).

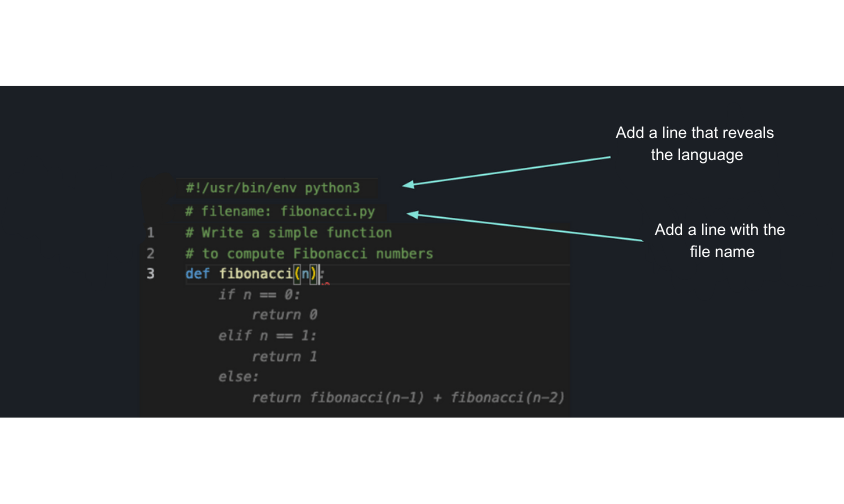
So, let’s put the language metadata into our pile of context we might want to include. In fact, let’s add the whole filename too. If it’s available, it usually implies the language through its extension, and additionally sets the tone for what to expect in that file—small, easy pieces of information that won’t turn the tide but are helpful to include.

On the other end of the spectrum, there’s the rest of the repository. Say you’ve got a file that defines an abstract class DataReader. And you have another that defines a subclass CsvReader. And you’re now writing a new file defining another subclass SqlReader. Chances are that to write the new file, you’ll want to check out both existing files as well because they communicate useful background into what you need to implement and how to do it. Typically, developers keep such files open in different tabs and switch to remind themselves of definitions, examples, similar patterns, or tests.

If the content of those two files is useful to you, chances are it would be useful to the AI as well. So, let’s add it as context! After all, the IDE knows what other files from the repository are open as tabs in the same window. The repository might have hundreds or even thousands of files, but only some will be open, and that is a strong hint that they might be useful to what they’re doing right now. Of course, “some” can mean a lot of things, so we don’t consider any more than the 20 most recent tabs.

Step 2: Snippeting

Irrelevant information in an LLM’s context decreases its accuracy. Additionally, source code tends to be long, so even a single file is not guaranteed to fit completely into an LLM’s context window (a problem that occurs roughly a fifth of the time). So, unless the user is very frugal about their tab usage, we simply cannot include all the tabs.

It’s important to be selective about what code to include from other files, so we cut files into (hopefully) natural, overlapping snippets that are no longer than 60 lines. Of course, we don’t want to actually include all overlapping snippets—that’s why we score them and take only the best. In this case, the “score” is meant to reflect relevance. To determine a snippet’s score, we use the Jaccard similarity, a stat that can be used to gauge the similarity or diversity of sample sets. (It’s also super fast to compute, which is great for reducing latency.)

Step 3: Dressing them up

Now we have some context we’d like to pass on to the model. But how? Codex and other models don’t offer an API where you can add other files, or where you can specify the document’s language and filename for that matter. They complete one single document. As mentioned above, you’ll need to inject your context into that document in a natural way.

The path and name might be easiest. Many files start with a preamble that gives some metadata, like author, project name, or filename. So, we’ll pretend this is happening here as well, and add a line at the very top that reads something like # filepath: foo/bar.py or // filepath: foo.bar.js, depending on comment syntax in the file’s language.

Sometimes the path isn’t known, like with new files that haven’t yet been saved. Even then, we could try to at least specify the language, provided the IDE is aware of it. For many languages, we have the opportunity to include shebang lines like #!/usr/bin/python or #!/usr/bin/node. That’s a neat trick that works pretty well at warding against mistaken language identity. But it’s also a bit dangerous since files with shebang lines are a biased subpopulation of all code. So, let’s do it for short files where the danger of mistaken language identity is high, and avoid it for larger or named files.

If comments work as a delivery system for tiny nuggets of information, like path or language, we can also make them work as delivery systems for the chunky deep dives that are 60 lines of related code.

Comments are versatile, and commented-out code exists all over GitHub. Let’s look at some of the most common examples:

  • Old code that doesn’t apply anymore
  • Deleted features
  • Earlier versions of current code
  • Example code specifically left there for documentation purposes
  • Code lifted from other parts of the codebase

Let’s take our inspiration from the last group of examples. Familiarity with groups (1) – (3) makes things a bit easier on the model, but our snippets aim to emulate groups (4) and (5):

# compare this snippet from utils/concatenate.py:

# def crazy_concat(a, b):

# return str(a) + str(b)[::-1]

Note that including the file name and path of the snippet source can be useful. And combined with the current file’s path, this might guide completions referencing imports.

Step 4: Prioritization

So far, we have grabbed many pieces of context from many sources: the text directly above the cursor, text below the cursor, text in other files, and metadata like language and file path.

In the vast majority of cases (around 95%), we have to make the tough choice of what we can or cannot include.

We make that choice by thinking of the items we might include as “wishes.” Each time we uncover a piece of context, like a commented out snippet from an open tab, we make a wish. Wishes come with some priority attached, for example, the shebang lines have rather low priorities. Snippets with a low similarity score are barely higher. In contrast, the lines directly above the cursor have maximum priority. Wishes also come with a desired position in the document. The shebang line needs to be the very first item, while the text directly above the cursor comes last—it should directly precede the LLM’s completion.

The fastest way of selecting which wishes to fill and which ones to discard is by sorting that wishlist by priority. Then, we can keep deleting the lowest priority wishes until what remains fits in the context window. We then sort again by the intended order in the document and paste everything together.

Step 5: The AI does its thing

Now that we’ve assembled an informative prompt, it’s time for the AI to come up with a useful completion. We have always faced a very delicate tradeoff here—GitHub Copilot needs to use a highly capable model because quality makes all the difference between a useful suggestion and a distraction. But at the same time, it needs to be a model capable of speed, because latency makes all the difference between a useful suggestion and not being able to provide a suggestion at all.

So, which AI should we choose to “do its thing” on the completion task: the fastest or the most accurate one? It’s hard to know in advance, so OpenAI developed a fleet of models in collaboration with GitHub. We put two different models in front of developers but found that people got the most mileage (in terms of accepted and retained completions) out of the much faster model. Since then, further optimizations have increased model speed significantly, so that the current version of GitHub Copilot is backed by an even more capable model.

Step 6: Now, over to you!

The generative AI produces a string, and if it’s not stopped, it keeps on producing and will keep going until it predicts the end of the file. That would waste time and compute resources, so you need to set up “stop” criteria.

The most common stop criterion is actually looking for the first line break. In many situations, it seems likely that a software developer wants the current line to be finished, but not more. But some of the most magical contributions by GitHub Copilot are when it suggests multiple lines of code all at once.

Multi-line completions feel natural when they’re about a single semantic unit, such as the body of a function, an if-branch, or a class. GitHub Copilot looks for cases where such a block is being started, either because the developer has just written the start, such as the header, if guard, or class declaration, or is currently writing the start. If the block body appears to be empty, it will attempt to make a suggestion for it, and only stop when the block appears to be done.

This is the point when the suggestion gets surfaced to the coder. And the rest, as they say, is ~~history~~ 10x development.

If you’re interested in learning more about prompt engineering in general and how you can refine your own techniques, check out our guide on getting started with GitHub Copilot.

How to use GitHub Copilot: Prompts, tips, and use cases

Post Syndicated from Rizel Scarlett original https://github.blog/2023-06-20-how-to-write-better-prompts-for-github-copilot/

Leia este artigo em português

As ferramentas de programação de IA generativa estão transformando a maneira como as pessoas desenvolvedoras abordam as tarefas diárias de programação. Desde a documentação de nossas bases de código até a geração de testes de unidade, essas ferramentas estão ajudando a acelerar nossos fluxos de trabalho. No entanto, assim como acontece com qualquer tecnologia emergente, sempre há uma curva de aprendizado. Como resultado, as pessoas desenvolvedoras — tanto iniciantes quanto experientes — às vezes se sentem frustradas quando os assistentes de programação baseados em IA não geram o resultado desejado. (Familiar com isso?)

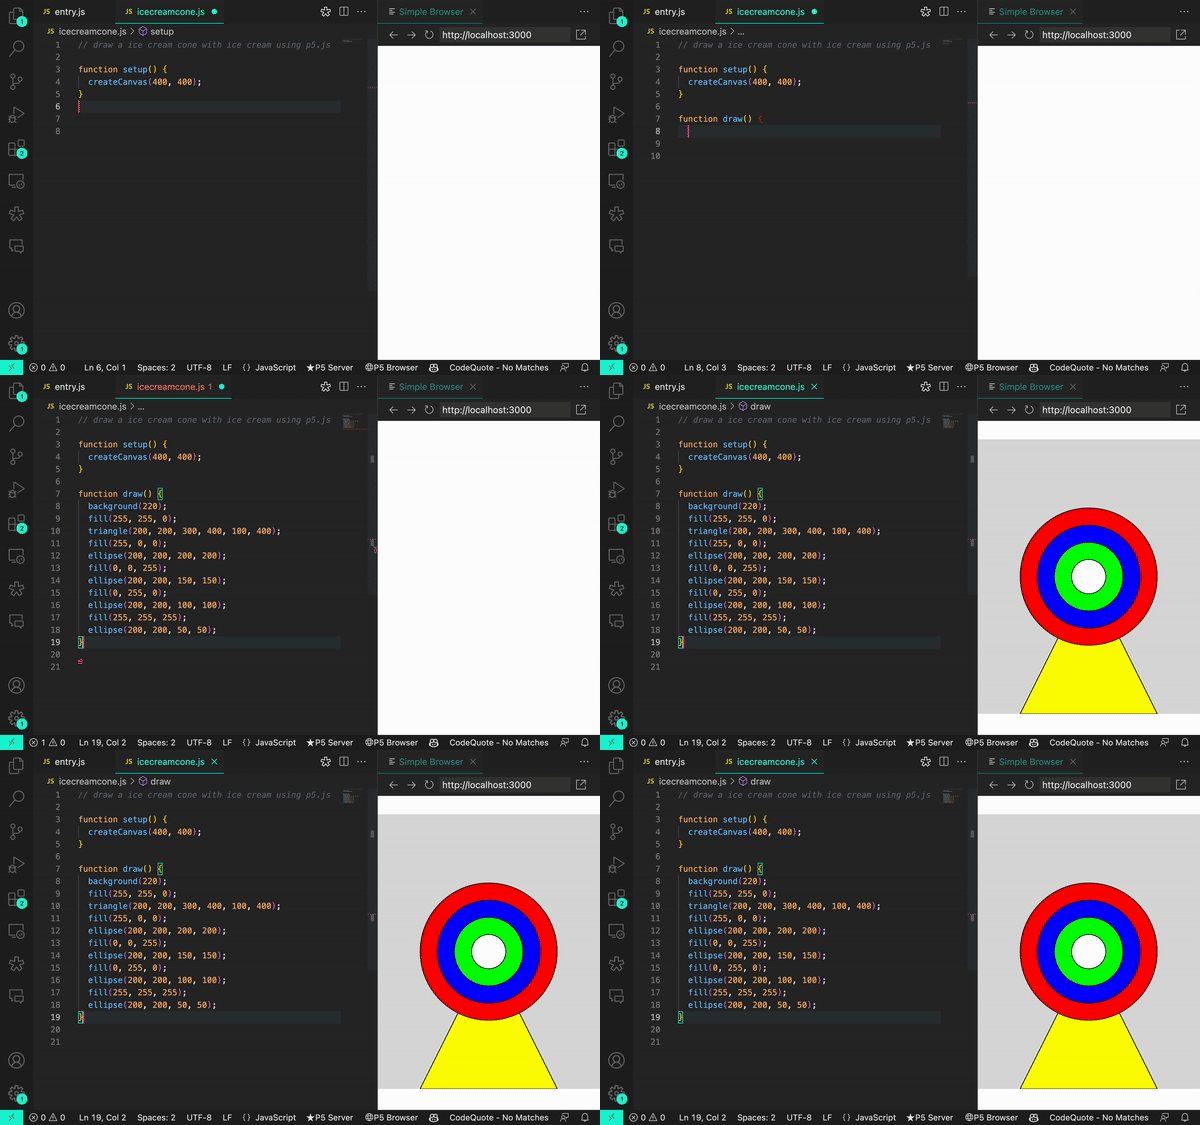
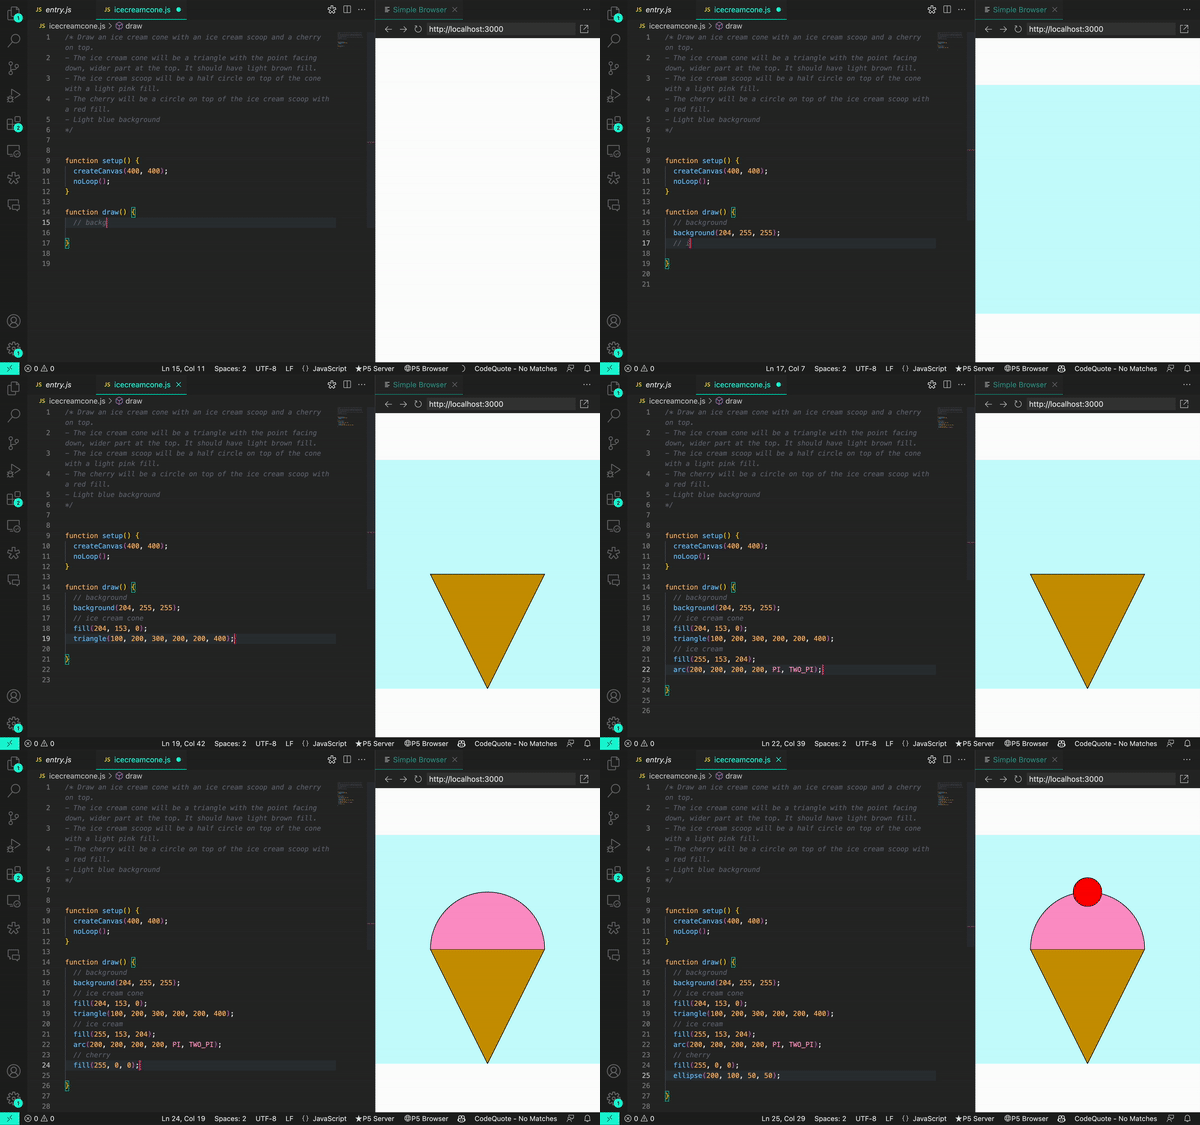
Por exemplo, ao pedir ao GitHub Copilot para desenhar uma casquinha de sorvete 🍦usando p5.js, uma biblioteca JavaScript para código criativo, continuamos recebendo sugestões irrelevantes ou, às vezes, nenhuma sugestão. Mas quando aprendemos mais sobre a maneira como o GitHub Copilot processa as informações, percebemos que precisávamos ajustar a maneira como nos comunicamos com elas.

Aqui está um exemplo do GitHub Copilot gerando uma solução irrelevante:

When we wrote this prompt to GitHub Copilot,

Quando ajustamos nosso prompt, conseguimos gerar resultados mais precisos:

When we wrote this prompt to GitHub Copilot,

Somos desenvolvedoras e entusiastas de IA. Eu, Rizel, usei o GitHub Copilot para criar uma extensão de navegador; jogo de pedra, papel e tesoura; e para enviar um Tweet. E eu, Michele, abri uma empresa de AI em 2021. Somos ambas Developer Advocates no GitHub e adoramos compartilhar nossas principais dicas para trabalhar com o GitHub Copilot.

Neste guia do GitHub Copilot, abordaremos:

  • O que exatamente é um prompt e o que é engenharia de prompt também (dica: depende se você está falando com uma pessoa desenvolvedora ou pesquisadora de machine learning)
  • Três práticas recomendadas e três dicas adicionais para criação imediata com o GitHub Copilot
  • Um exemplo em que você pode tentar solicitar ao GitHub Copilot para ajudá-lo a criar uma extensão de navegador

Progresso antes de perfeição

Mesmo com nossa experiência no uso de IA, reconhecemos que todes estão em uma fase de tentativa e erro com a tecnologia de IA generativa. Também conhecemos o desafio de fornecer dicas generalizadas de criação de prompts porque os modelos variam, assim como os problemas individuais nos quais as pessoas desenvolvedoras estão trabalhando. Este não é um guia definitivo. Em vez disso, estamos compartilhando o que aprendemos sobre criação de prompts para acelerar o aprendizado coletivo durante esta nova era de desenvolvimento de software.

O que é um prompt e o que é engenharia de prompt?

Depende de com quem você fala.

No contexto das ferramentas de programação de IA generativa, um prompt pode significar coisas diferentes, dependendo se você está perguntando a pessoas pesquisadoras de Machine Learning (ML) que estão construindo e ajustando essas ferramentas ou pessoas desenvolvedoras que as estão usando em seus IDEs.

Para este guia, definiremos os termos do ponto de vista de uma pessoa desenvolvedora que está usando uma ferramenta de programação AI generativa no IDE. Mas, para dar a você uma visão completa, também adicionamos as definições do pesquisador de ML abaixo em nosso gráfico.

Prompts Engenharia de Prompt Contexto
Pessoa Desenvolvedora Blocos de código, linhas individuais de código ou comentários em linguagem natural que uma pessoa desenvolvedora escreve para gerar uma sugestão específica do GitHub Copilot. Fornecer instruções ou comentários no IDE/strong> para gerar sugestões de código específicas. DDetalhes que são fornecidos por uma pessoa desenvolvedora para especificar a saída desejada de uma ferramenta de programação AI generativa.
Pessoa Pesquisadora de ML Compilação de código de IDE
e contexto
relevante (comentários IDE, código em arquivos abertos, etc.) que são continuamente gerados por algoritmos e enviados para o modelo de uma ferramenta de programação AI generativa
Criação de algoritmos que irão gerar prompts (compilações de código IDE e contexto) para um grande modelo de linguagem Detalhes (como dados de seus arquivos abertos e código que você escreveu antes e depois do cursor) que os algoritmos enviam para um modelo de linguagem grande (LLM) como informações adicionais sobre o código

3 melhores práticas para construção de prompt com GitHub Copilot

1. Defina o cenário com um objetivo de alto nível 🖼

Isso é mais útil se você tiver um arquivo em branco ou uma base de código vazia. Em outras palavras, se o GitHub Copilot não tiver contexto do que você deseja criar ou realizar, definir o cenário para a programação em par AI pode ser realmente útil. Isso ajuda a preparar o GitHub Copilot com uma descrição geral do que você deseja gerar – antes de entrar nos detalhes.

Ao solicitar o GitHub Copilot, pense no processo como uma conversa com alguém: como devo detalhar o problema para que possamos resolvê-lo juntes? Como eu abordaria a programação em par com essa pessoa?

Por exemplo, ao construir um editor de markdown em Next.jst, poderíamos escrever um comentário como este:


/*
Crie um editor de markdown básico em Next.jcom as seguintes habilidades:
- Use react hooks
- Crie um estado para markdown com texto default "digite markdown aqui"
- Uma área de texto onde pessoas usuárias podem escrever markdown a
- Mostre uma demostração ao vivo do markdown enquando a pessoas digitaS
- Suporte para sintaxe básica de markdown como cabeçalhos, negrito, itálico
- Use React markdown npm package 
- O texto markdown e resultado em HTML devem ser salvos no estado do componente e atualizado em tempo real 
*/

Isso solicitará que o GitHub Copilot gere o código a seguir e produza um editor de markdown muito simples, sem estilo, mas funcional, em menos de 30 segundos. Podemos usar o tempo restante para estilizar o componente:

We used this prompt to build a markdown editor in Next.jst using GitHub Copilot:
- Use react hooks
- Create state for markdown with default text

Observação: esse nível de detalhe ajuda a criar um resultado mais desejado, mas os resultados ainda podem ser não determinísticos. Por exemplo, no comentário, solicitamos ao GitHub Copilot que criasse um texto padrão que diz “digite markdown aqui”, mas, em vez disso, gerou “visualização de markdown” como as palavras padrão.

2. Faça sua pergunta simples e específica. Procure receber uma saída curta do GitHub Copilot.🗨

Depois de comunicar seu objetivo principal ao Copilot, articule a lógica e as etapas que ele precisa seguir para atingir esse objetivo. O GitHub Copilot entende melhor seu objetivo quando você detalha as coisas. (Imagine que você está escrevendo uma receita. Você dividiria o processo de cozimento em etapas discretas – não escreveria um parágrafo descrevendo o prato que deseja fazer.)

Deixe o GitHub Copilot gerar o código após cada etapa, em vez de pedir que ele gere vários códigos de uma só vez.

Aqui está um exemplo de nós fornecendo ao GitHub Copilot instruções passo a passo para reverter uma função:

We prompted GitHub Copilot to reverse a sentence by writing six prompts one at a time. This allowed GitHub Copilot to generate a suggestion for one prompt before moving onto the text. It also gave us the chance to tweak the suggested code before moving onto the next step. The six prompts we used were: First, let's make the first letter of the sentence lower case if it's not an 'I.' Next, let's split the sentence into an array of words. Then, let's take out the punctuation marks from the sentence. Now, let's remove the punctuation marks from the sentence. Let's reverse the sentence and join it back together. Finally, let's make the first letter of the sentence capital and add the punctuation marks.

3. De alguns exemplos para o GitHub Copilot. ✍

Aprender com exemplos não é útil apenas para humanos, mas também para seu programador Copilot. Por exemplo, queríamos extrair os nomes do array de dados abaixo e armazená-los em um novo array:


const data = [
  [
    { name: 'John', age: 25 },
    { name: 'Jane', age: 30 }
  ],
  [
    { name: 'Bob', age: 40 }
  ]
];

Quando você não mostra um exemplo para o GitHub Copilot …


// Map por um array de arrays de objetos para transformar dados
const data = [
  [
    { name: 'John', age: 25 },
    { name: 'Jane', age: 30 }
  ],
  [
    { name: 'Bob', age: 40 }
  ]
];

Isso gerou um uso incorreto do map:


const mappedData = data.map(x => [x.name](http://x.name/));

console.log(mappedData);

// Results: [undefined, undefined]

Em contraste, quando mostramos um exemplo …


// Map por um array de arrays de objetos
// Exemplo: Extraia nomes  array data
// Resultado desejado: ['John', 'Jane', 'Bob']
const data = [
  [{ name: 'John', age: 25 }, { name: 'Jane', age: 30 }],
  [{ name: 'Bob', age: 40 }]
];

Recebemos o resultado desejado.


const mappedData = data.flatMap(sublist => sublist.map(person => person.name));

console.log(mappedData);
// Results: ['John', 'Jane', 'Bob']

Leia mais sobre abordagens comuns para treinamento de IA, como aprendizado de disparo zero, disparo único e poucos disparos.

Três dicas adicionais para criação imediata com o GitHub Copilot

Aqui estão três dicas adicionais para ajudar a orientar sua conversa com o GitHub Copilot.

1. Experimente com seus prompts.

Assim como a conversa é mais uma arte do que uma ciência, o mesmo acontece com a criação imediata. Portanto, se você não receber o que deseja na primeira tentativa, reformule seu prompt seguindo as práticas recomendadas acima.

Por exemplo, o prompt abaixo é vago. Ele não fornece nenhum contexto ou limites para o GitHub Copilot gerar sugestões relevantes.


# Escreva algum código para grades.py

Repetimos o prompt para sermos mais específicos, mas ainda não obtivemos o resultado exato que procurávamos. Este é um bom lembrete de que adicionar especificidade ao seu prompt é mais difícil do que parece. É difícil saber, desde o início, quais detalhes você deve incluir sobre seu objetivo para gerar as sugestões mais úteis do GitHub Copilot. É por isso que encorajamos a experimentação.
A versão do prompt abaixo é mais específica que a anterior, mas não define claramente os requisitos de entrada e saída.


# Implemente uma função em grades.py para calcular a nota média

Experimentamos o prompt mais uma vez definindo limites e delineando o que queríamos que a função fizesse. Também reformulamos o comentário para que a função fosse mais clara (dando ao GitHub Copilot uma intenção clara de verificação).

Desta vez, obtivemos os resultados que procurávamos.


# Implemente a função calculate_average_grade em grades.py que recebe uma lista de notas como entrada e retorna a nota média como um número de ponto flutuante

2. Mantenha algumas abas abertas.

Não temos um número exato de abas que você deve manter abertas para ajudar o GitHub Copilot a contextualizar seu código, mas, com base em nossa experiência, descobrimos que uma ou duas são úteis.

O GitHub Copilot usa uma técnica chamada de abas vizinhas que permite que a ferramenta programadora em par AI contextualize seu código processando todos os arquivos abertos em seu IDE em vez de apenas um único arquivo em que você está trabalhando. No entanto, não é garantido que o GitHub Copilot considere todos os arquivos abertos como contexto necessário para o seu código.

3. Use boas práticas de programação.

Isso inclui fornecer nomes e funções de variáveis ​​descritivas e seguir estilos e padrões de codificação consistentes. Descobrimos que trabalhar com o GitHub Copilot nos encoraja a seguir boas práticas de programação que aprendemos ao longo de nossas carreiras.

Por exemplo, aqui usamos um nome de função descritivo e seguimos os padrões da base de código para alavancar casos de cobra.


def authenticate_user(username, password):

Como resultado, GitHub Copilot gera uma sugestão de código relevante:


def authenticate_user(username, password):
    # Code for authenticating the user
    if is_valid_user(username, password):
        generate_session_token(username)
        return True
    else:
        return False

Compare isso com o exemplo abaixo, onde introduzimos um estilo de programação inconsistente e nomeamos mal nossa função.


def rndpwd(l):

Em vez de sugerir código, o GitHub Copilot gerou um comentário que dizia: “O código vai aqui”.


def rndpwd(l):
    # Code goes here

Fique esperto

Os LLMs por trás das ferramentas de programação de IA generativas são projetados para encontrar e extrapolar padrões de seus dados de treinamento, aplicar esses padrões à linguagem existente e, em seguida, produzir código que siga esses padrões. Dada a escala desses modelos, eles podem gerar uma sequência de código que ainda nem existe. Assim como você revisaria o código de um colega, você deve sempre avaliar, analisar e validar o código gerado por IA.

Um exemplo de prática 👩🏽‍💻

Tente solicitar ao GitHub Copilot para criar uma extensão de navegador.

Para começar, você precisará ter o GitHub Copilot instalado e aberto em seu IDE. Também temos acesso a uma prévia do bate-papo do GitHub Copilot, que é o que usamos quando tiver dúvidas sobre o nosso código. Se você não tem bate-papo no GitHub Copilot, inscreva-se na lista de espera. Até então, você pode emparelhar o GitHub Copilot com o ChatGPT.

Guias de criação de IA mais generativos (em inglês)

<0l>

  • Um guia para iniciantes sobre engenharia de prompt com o GitHub Copilot
  • Engenharia de alerta para IA
  • Como o GitHub Copilot está melhorando a compreensão do seu código

  • Lee este articulo en español

    Las herramientas de codificación con IA generativa están transformando la forma en que los desarrolladores abordan las tareas de codificación diarias. Desde documentar nuestras bases de código hasta generar pruebas unitarias, estas herramientas están ayudando a acelerar nuestros flujos de trabajo. Sin embargo, como con cualquier tecnología emergente, siempre hay una curva de aprendizaje. Como resultado, los desarrolladores, tanto principiantes como experimentados, a veces se sienten frustrados cuando los asistentes de codificación impulsados por IA no generan el resultado que quieren. (¿Te suena familiar?)

    Por ejemplo, al pedirle a GitHub Copilot que dibuje un cono de helado 🍦 usando p5.js, una biblioteca de JavaScript para codificación creativa, seguimos recibiendo sugerencias irrelevantes, o a veces ninguna sugerencia en absoluto. Pero cuando aprendimos más sobre la forma en que GitHub Copilot procesa la información, nos dimos cuenta de que teníamos que ajustar la forma en que nos comunicábamos.

    Aquí hay un ejemplo de GitHub Copilot generando una solución irrelevante:

    When we wrote this prompt to GitHub Copilot,

    Cuando ajustamos nuestra instrucción, pudimos generar resultados más precisos:

    When we wrote this prompt to GitHub Copilot,

    Somos tanto desarrolladoras como entusiastas de la IA. Yo, Rizel, he utilizado GitHub Copilot para construir una extensión de navegador; un juego de piedra, papel o tijera; y para enviar un tweet. Y yo, Michelle, lancé una compañía de IA en 2016. Ambas somos DevRel en GitHub y nos encanta compartir nuestros mejores consejos para trabajar con GitHub Copilot.

    En esta guía para GitHub Copilot, cubriremos:

    • Qué es exactamente un “prompt” y qué es la ingeniería de prompts (pista: depende de si estás hablando con un desarrollador o con un investigador de aprendizaje automático)
    • Tres mejores prácticas y tres consejos adicionales para la creación de prompts con GitHub Copilot
    • Un ejemplo donde puedes probar a GitHub Copilot para que te ayude en la construcción de una extensión de navegador

    Progreso sobre perfección

    Incluso con nuestra experiencia usando IA, reconocemos que todos están en una fase de prueba y error con la tecnología de IA generativa. También conocemos el desafío de proporcionar consejos generales de elaboración de prompts porque los modelos varían, al igual que los problemas individuales en los que los desarrolladores están trabajando. Esta no es una guía definitiva. En su lugar, estamos compartiendo lo que hemos aprendido sobre la elaboración de prompts para acelerar el aprendizaje colectivo durante esta nueva era del desarrollo de software.

    ¿Qué es un “prompt” y qué es la ingeniería de prompt?

    Depende de con quién hables.

    En el contexto de las herramientas de codificación de IA generativa, un prompt puede significar diferentes cosas, dependiendo de si está preguntando a los investigadores de aprendizaje automático (ML) que están construyendo y ajustando estas herramientas, o a los desarrolladores que las están usando en sus IDE.

    Para esta guía, definiremos los términos desde el punto de vista de un desarrollador que utiliza una herramienta de codificación de IA generativa en el IDE. Pero para brindarle una imagen completa, también agregamos las definiciones de investigador de ML a continuación.

    Prompts Ingenieria de Prompt Contexto
    Desarrollador Bloques de código, líneas individuales de código, o comentarios en lenguaje natural que un desarrollador escribe para generar una sugerencia específica de GitHub Copilot. Proporcionar instrucciones o comentarios en el IDE para generar sugerencias de código específicas Detalles que proporciona un desarrollador para especificar la prompt deseada de una herramienta de codificación generativa de IA
    Investigador de ML Compilación de código de IDE y contexto relevante (comentarios de IDE, código en archivos abiertos, etc.) que se genera continuamente por algoritmos y se envíaal modelo de una herramienta de codificación generativa de IA Creación de algoritmos que generarán prompts (compilaciones de código de IDE y contexto) para un modelo de lenguaje de gran tamaño Detalles (como datos de tus archivos abiertos y código que has escrito antes y después del curso) que los algoritmos envían a un modelo de lenguaje de gran tamaño (LLM) como información adicional sobre el código

    3 mejores prácticas para la elaboración de prompts con GitHub Copilot

    1. Establecer el escenario con un objetivo de alto nivel. 🖼

    Esto es más útil si tienes un archivo en blanco o una base de código vacía. En otras palabras, si GitHub Copilot no tiene ningún contexto de lo que quieres construir o lograr, establecer el escenario para el programador par de IA puede ser realmente útil. Ayuda a preparar a GitHub Copilot con una descripción general de lo que quieres que genere, antes de que te sumerjas en los detalles.

    Al hacer prompts, GitHub Copilot, piensa en el proceso como si estuvieras teniendo una conversación con alguien: ¿Cómo debería desglosar el problema para que podamos resolverlo juntos? ¿Cómo abordaría la programación en pareja con esta persona?

    Por ejemplo, al construir un editor de markdown en Next.js, podríamos escribir un comentario como este:

    
    //
    Crea un editor de markdown básico en Next.js con las siguientes características:
    - Utiliza hooks de React
    - Crea un estado para markdown con texto predeterminado "escribe markdown aquí"
    - Un área de texto donde los usuarios pueden escribir markdown
    - Muestra una vista previa en vivo del texto de markdown mientras escribo
    - Soporte para la sintaxis básica de markdown como encabezados, negrita, cursiva
    - Utiliza el paquete npm de React markdown
    - El texto de markdown y el HTML resultante deben guardarse en el estado del componente y actualizarse en tiempo real 
    */
    

    Esto hará que GitHub Copilot genere el siguiente código y produzca un muy editor de rebajas simple, sin estilo pero funcional en menos de 30 segundos. Podemos usar el tiempo restante para diseñar el componente:

    We used this prompt to build a markdown editor in Next.jst using GitHub Copilot:
- Use react hooks
- Create state for markdown with default text

    Nota: Este nivel de detalle te ayuda a crear una prompt más deseada, pero los resultados aún pueden ser no deterministas. Por ejemplo, en el comentario, solicitamos a GitHub Copilot que cree un texto predeterminado que diga “escribe markdown aquí”, pero en cambio generó “vista previa de markdown” como las palabras predeterminadas.

    2. Haz tu solicitud simple y específica. Apunta a recibir una prompt corta de GitHub Copilot. 🗨

    Una vez que comunicas tu objetivo principal al programador par AI, articula la lógica y los pasos que debe seguir para alcanzar ese objetivo. GitHub Copilot comprende mejor tu objetivo cuando desglosas las cosas. (Imagina que estás escribiendo una receta. Desglosarías el proceso de cocción en pasos discretos, no escribirías un párrafo describiendo el plato que quieres hacer.)
    Deja que GitHub Copilot genere el código después de cada paso, en lugar de pedirle que genere un montón de código de una sola vez.
    Aquí tienes un ejemplo de cómo proporcionamos a GitHub Copilot instrucciones paso a paso para invertir una función:

    We prompted GitHub Copilot to reverse a sentence by writing six prompts one at a time. This allowed GitHub Copilot to generate a suggestion for one prompt before moving onto the text. It also gave us the chance to tweak the suggested code before moving onto the next step. The six prompts we used were: First, let's make the first letter of the sentence lower case if it's not an 'I.' Next, let's split the sentence into an array of words. Then, let's take out the punctuation marks from the sentence. Now, let's remove the punctuation marks from the sentence. Let's reverse the sentence and join it back together. Finally, let's make the first letter of the sentence capital and add the punctuation marks.

    3. Proporciona a GitHub Copilot uno o dos ejemplos. ✍

    Aprender de ejemplos no solo es útil para los humanos, sino también para tu programador par AI. Por ejemplo, queríamos extraer los nombres del siguiente arreglo de datos y almacenarlos en un nuevo arreglo:

    
    const data = [
      [
        { name: 'John', age: 25 },
        { name: 'Jane', age: 30 }
      ],
      [
        { name: 'Bob', age: 40 }
      ]
    ];
    

    Cuando no le mostramos un ejemplo a GitHub Copilot …

    
    // Mapee a través de una matriz de matrices de objetos para transformar datos
    const data = [
      [
        { name: 'John', age: 25 },
        { name: 'Jane', age: 30 }
      ],
      [
        { name: 'Bob', age: 40 }
      ]
    ];
    

    Generó un uso incorrecto del mapa:

    
    const mappedData = data.map(x => [x.name](http://x.name/));
    
    console.log(mappedData);
    
    // Results: [undefined, undefined]
    

    Por el contrario, cuando proporcionamos un ejemplo…

    
    // Recorrer un array de arrays de objetos
    // Ejemplo: Extraer los nombres del array de datos
    // Resultado deseado: ['John', 'Jane', 'Bob']
    const data = [
      [{ name: 'John', age: 25 }, { name: 'Jane', age: 30 }],
      [{ name: 'Bob', age: 40 }]
    ];
    

    Recibimos nuestro resultado deseado.

    
    const mappedData = data.flatMap(sublist => sublist.map(person => person.name));
    
    console.log(mappedData);
    // Results: ['John', 'Jane', 'Bob'] 
    

    Lee más acerca de los enfoques comunes para el entrenamiento de IA, como el aprendizaje de zero-shot, one-shot, and few-shot learning.

    Tres consejos adicionales para la elaboración de prompts con GitHub Copilot

    Aquí tienes tres consejos adicionales para ayudarte a guiar tu conversación con GitHub Copilot.

    1. Experimenta con tus prompts.

    Al igual que la conversación es más un arte que una ciencia, también lo es la elaboración de prompts. Así que, si no recibes lo que quieres en el primer intento, reformula tu prompts siguiendo las mejores prácticas mencionadas anteriormente.

    Por ejemplo, la prompts de abajo es vaga. No proporciona ningún contexto ni límites para que GitHub Copilot genere sugerencias relevantes.

    
    # Escribe algo de código para grades.py
    

    Iteramos en el prompt para ser más específicos, pero aún no obtuvimos el resultado exacto que estábamos buscando. Este es un buen recordatorio de que añadir especificidad a tu prompt es más difícil de lo que parece. Es difícil saber, desde el principio, qué detalles debes incluir sobre tu objetivo para generar las sugerencias más útiles de GitHub Copilot. Por eso animamos a la experimentación.

    La versión del promopt de abajo es más específica que la de arriba, pero no define claramente los requisitos de entrada y salida.

    
    # Implementar una función en grades.py para calcular la nota media
    

    Experimentamos una vez más con el promopt estableciendo límites y delineando lo que queríamos que hiciera la función. También reformulamos el comentario para que la función fuera más clara (dándole a GitHub Copilot una intención clara contra la que verificar).

    Esta vez, obtuvimos los resultados que estábamos buscando.

    
    # Implementa la función calculate_average_grade en grades.py que toma una lista de calificaciones como entrada y devuelve la calificación media como un número flotante.
    

    2. Mantén un par de pestañas relevantes abiertas.

    No tenemos un número exacto de pestañas que debas mantener abiertas para ayudar a GitHub Copilot a contextualizar tu código, pero en nuestra experiencia, hemos encontrado que una o dos es útil.

    GitHub Copilot utiliza una técnica llamada pestañas vecinas que permite al programador de pares de IA contextualizar su código procesando todos los archivos abiertos en su IDE en lugar de solo el archivo en el que está trabajando. Sin embargo, no se garantiza que GItHub Copilot considere todos los archivos abiertos como contexto necesario para su código.

    3. Utilice buenas prácticas de codificación.

    Eso incluye proporcionar nombres y funciones de variables descriptivas, y seguir estilos y patrones de codificación consistentes. Hemos descubierto que trabajar con GitHub Copilot nos anima a seguir las buenas prácticas de codificación que hemos aprendido a lo largo de nuestras carreras.

    Por ejemplo, aquí usamos un nombre de función descriptiva y seguimos los patrones de la base de código para aprovechar el caso de la serpiente.

    
    def authenticate_user(nombre de usuario, contraseña):
    

    Como resultado, GitHub Copilot generó una sugerencia de código relevante:

    
    def authenticate_user(nombre de usuario, contraseña):
        # Código para autenticar al usuario
        Si is_valid_user(nombre de usuario, contraseña):
            generate_session_token(nombre de usuario)
            return True
        más:
            return Falso
    

    Compare esto con el siguiente ejemplo, donde introdujimos un estilo de codificación inconsistente y mal nombramos nuestra función.

    
    def rndpwd(l):
    

    En lugar de sugerir código, GitHub Copilot generó un comentario que decía: “El código va aquí”.

    
    def rndpwd(l):
        # El código va aquí
    

    Mantente inteligente

    Los LLM detrás de las herramientas generativas de codificación de IA están diseñados para encontrar y extrapolar patrones de sus datos de entrenamiento, aplicar esos patrones al lenguaje existente y luego producir código que siga esos patrones. Dada la gran escala de estos modelos, podrían generar una secuencia de código que ni siquiera existe todavía. Al igual que revisaría el código de un colega, siempre debe evaluar, analizar y validar el código generado por IA.

    Un ejemplo 👩🏽 💻 de práctica

    Intenta pedirle a GitHub Copilot que cree una extensión del navegador.

    Para comenzar, deberás tener GitHub Copilot instalado y abierto en tu IDE. También tenemos acceso a una vista previa temprana del chat de GitHub Copilot, que es lo que hemos estado usando cuando tenemos preguntas sobre nuestro código. Si no tienes el chat de GitHub Copilot, regístrate en la lista de espera. Hasta entonces, puede emparejar GitHub Copilot con ChatGPT.

    Guías de elaboración de avisos de IA más generativas

  • Una guía para principiantes sobre ingeniería rápida con GitHub Copilot
  • Ingeniería rápida para IA
  • Cómo GitHub Copilot está mejorando en la comprensión de tu código


  • Generative AI coding tools are transforming the way developers approach daily coding tasks. From documenting our codebases to generating unit tests, these tools are helping to accelerate our workflows. However, just like with any emerging tech, there’s always a learning curve. As a result, developers—beginners and experienced alike— sometimes feel frustrated when AI-powered coding assistants don’t generate the output they want. (Feel familiar?)

    For example, when asking GitHub Copilot to draw an ice cream cone 🍦using p5.js, a JavaScript library for creative coding, we kept receiving irrelevant suggestions—or sometimes no suggestions at all. But when we learned more about the way that GitHub Copilot processes information, we realized that we had to adjust the way we communicated with it.

    Here’s an example of GitHub Copilot generating an irrelevant solution:

    When we wrote this prompt to GitHub Copilot,

    When we adjusted our prompt, we were able to generate more accurate results:

    When we wrote this prompt to GitHub Copilot,

    We’re both developers and AI enthusiasts ourselves. I, Rizel, have used GitHub Copilot to build a browser extension, rock, paper, scissors game, and to send a Tweet. And I, Michelle, launched an AI company in 2016. We’re both developer advocates at GitHub and love to share our top tips for working with GitHub Copilot.

    In this guide for GitHub Copilot, we’ll cover:

    Progress over perfection

    Even with our experience using AI, we recognize that everyone is in a trial and error phase with generative AI technology. We also know the challenge of providing generalized prompt-crafting tips because models vary, as do the individual problems that developers are working on. This isn’t an end-all, be-all guide. Instead, we’re sharing what we’ve learned about prompt crafting to accelerate collective learning during this new age of software development.

    What’s a prompt and what is prompt engineering?

    It depends on who you talk to.

    In the context of generative AI coding tools, a prompt can mean different things, depending on whether you’re asking machine learning (ML) researchers who are building and fine-tuning these tools, or developers who are using them in their IDEs.

    For this guide, we’ll define the terms from the point of view of a developer who’s using a generative AI coding tool in the IDE. But to give you the full picture, we also added the ML researcher definitions below in our chart.

    Prompts Prompt engineering Context
    Developer Code blocks, individual lines of code, or natural language comments a developer writes to generate a specific suggestion from GitHub Copilot Providing instructions or comments in the IDE to generate specific coding suggestions Details that are provided by a developer to specify the desired output from a generative AI coding tool
    ML researcher Compilation of IDE code and relevant context (IDE comments, code in open files, etc.) that is continuously generated by algorithms and sent to the model of a generative AI coding tool Creating algorithms that will generate prompts (compilations of IDE code and context) for a large language model Details (like data from your open files and code you’ve written before and after the cursor) that algorithms send to a large language model (LLM) as additional information about the code

    3 best practices for prompt crafting with GitHub Copilot

    1. Set the stage with a high-level goal. 🖼

    This is most helpful if you have a blank file or empty codebase. In other words, if GitHub Copilot has zero context of what you want to build or accomplish, setting the stage for the AI pair programmer can be really useful. It helps to prime GitHub Copilot with a big picture description of what you want it to generate—before you jump in with the details.

    When prompting GitHub Copilot, think of the process as having a conversation with someone: How should I break down the problem so we can solve it together? How would I approach pair programming with this person?

    For example, when building a markdown editor in Next.jst, we could write a comment like this

    /*
    Create a basic markdown editor in Next.js with the following features:
    - Use react hooks
    - Create state for markdown with default text "type markdown here"
    - A text area where users can write markdown 
    - Show a live preview of the markdown text as I type
    - Support for basic markdown syntax like headers, bold, italics 
    - Use React markdown npm package 
    - The markdown text and resulting HTML should be saved in the component's state and updated in real time 
    */
    

    This will prompt GitHub Copilot to generate the following code and produce a very simple, unstyled but functional markdown editor in less than 30 seconds. We can use the remaining time to style the component:

    We used this prompt to build a markdown editor in Next.jst using GitHub Copilot:
- Use react hooks
- Create state for markdown with default text

    Note: this level of detail helps you to create a more desired output, but the results may still be non-deterministic. For example, in the comment, we prompted GitHub Copilot to create default text that says “type markdown here” but instead it generated “markdown preview” as the default words.

    2. Make your ask simple and specific. Aim to receive a short output from GitHub Copilot. 🗨

    Once you communicate your main goal to the AI pair programmer, articulate the logic and steps it needs to follow for achieving that goal. GitHub Copilot better understands your goal when you break things down. (Imagine you’re writing a recipe. You’d break the cooking process down into discrete steps–not write a paragraph describing the dish you want to make.)

    Let GitHub Copilot generate the code after each step, rather than asking it to generate a bunch of code all at once.

    Here’s an example of us providing GitHub Copilot with step-by-step instructions for reversing a function:

    We prompted GitHub Copilot to reverse a sentence by writing six prompts one at a time. This allowed GitHub Copilot to generate a suggestion for one prompt before moving onto the text. It also gave us the chance to tweak the suggested code before moving onto the next step. The six prompts we used were: First, let's make the first letter of the sentence lower case if it's not an 'I.' Next, let's split the sentence into an array of words. Then, let's take out the punctuation marks from the sentence. Now, let's remove the punctuation marks from the sentence. Let's reverse the sentence and join it back together. Finally, let's make the first letter of the sentence capital and add the punctuation marks.

    3. Give GitHub Copilot an example or two. ✍

    Learning from examples is not only useful for humans, but also for your AI pair programmer. For instance, we wanted to extract the names from the array of data below and store it in a new array:

    const data = [
      [
        { name: 'John', age: 25 },
        { name: 'Jane', age: 30 }
      ],
      [
        { name: 'Bob', age: 40 }
      ]
    ];
    

    When we didn’t show GitHub Copilot an example …

    // Map through an array of arrays of objects to transform data
    const data = [
      [
        { name: 'John', age: 25 },
        { name: 'Jane', age: 30 }
      ],
      [
        { name: 'Bob', age: 40 }
      ]
    ];
    
    const mappedData = data.map(x => [x.name](http://x.name/));
    
    console.log(mappedData);
    
    // Results: [undefined, undefined]
    

    It generated an incorrect usage of map:

    const mappedData = data.map(x => [x.name](http://x.name/));
    
    console.log(mappedData);
    
    // Results: [undefined, undefined]
    

    By contrast, when we did provide an example …

    // Map through an array of arrays of objects
    // Example: Extract names from the data array
    // Desired outcome: ['John', 'Jane', 'Bob']
    const data = [
      [{ name: 'John', age: 25 }, { name: 'Jane', age: 30 }],
      [{ name: 'Bob', age: 40 }]
    ];
    
    
    const mappedData = data.flatMap(sublist => sublist.map(person => person.name));
    
    console.log(mappedData);
    

    We received our desired outcome.

    const mappedData = data.flatMap(sublist => sublist.map(person => person.name));
    
    console.log(mappedData);
    // Results: ['John', 'Jane', 'Bob']
    

    Read more about common approaches to AI training, such as zero-shot, one-shot, and few-shot learning.

    Three additional tips for prompt crafting with GitHub Copilot

    Here are three additional tips to help guide your conversation with GitHub Copilot.

    1. Experiment with your prompts.

    Just how conversation is more of an art than a science, so is prompt crafting. So, if you don’t receive what you want on the first try, recraft your prompt by following the best practices above.

    For example, the prompt below is vague. It doesn’t provide any context or boundaries for GitHub Copilot to generate relevant suggestions.

    # Write some code for grades.py  
    

    We iterated on the prompt to be more specific, but we still didn’t get the exact result we were looking for. This is a good reminder that adding specificity to your prompt is harder than it sounds. It’s difficult to know, from the start, which details you should include about your goal to generate the most useful suggestions from GitHub Copilot. That’s why we encourage experimentation.

    The version of the prompt below is more specific than the one above, but it doesn’t clearly define the input and output requirements.

    # Implement a function in grades.py to calculate the average grade
    

    We experimented with the prompt once more by setting boundaries and outlining what we wanted the function to do. We also rephrased the comment so the function was more clear (giving GitHub Copilot a clear intention to verify against).

    This time, we got the results we were looking for.

    # Implement the function calculate_average_grade in grades.py that takes a list of grades as input and returns the average grade as a floating-point number
    

    2. Keep a couple of relevant tabs open.

    We don’t have an exact number of tabs that you should keep open to help GitHub Copilot contextualize your code, but from our experience, we’ve found that one or two is helpful.

    GitHub Copilot uses a technique called neighboring tabs that allows the AI pair programmer to contextualize your code by processing all of the files open in your IDE instead of just the single file you’re working on. However, it’s not guaranteed that GItHub Copilot will deem all open files as necessary context for your code.

    3. Use good coding practices.

    That includes providing descriptive variable names and functions, and following consistent coding styles and patterns. We’ve found that working with GitHub Copilot encourages us to follow good coding practices we’ve learned throughout our careers.

    For example, here we used a descriptive function name and followed the codebase’s patterns of leveraging snake case.

    def authenticate_user(username, password):
    

    As a result, GitHub Copilot generated a relevant code suggestion:

    def authenticate_user(username, password):
        # Code for authenticating the user
        if is_valid_user(username, password):
            generate_session_token(username)
            return True
        else:
            return False
    

    Compare this to the example below, where we introduced an inconsistent coding style and poorly named our function.

    def rndpwd(l):
    

    Instead of suggesting code, GitHub Copilot generated a comment that said, “Code goes here.”

    def rndpwd(l):
        # Code goes here
    

    Stay smart

    The LLMs behind generative AI coding tools are designed to find and extrapolate patterns from their training data, apply those patterns to existing language, and then produce code that follows those patterns. Given the sheer scale of these models, they might generate a code sequence that doesn’t even exist yet. Just as you would review a colleague’s code, you should always assess, analyze, and validate AI-generated code.

    A practice example 👩🏽‍💻

    Try your hand at prompting GitHub Copilot to build a browser extension.

    To get started, you’ll need to have GitHub Copilot installed and open in your IDE. We also have access to an early preview of GitHub Copilot chat, which is what we’ve been using when we have questions about our code. If you don’t have GitHub Copilot chat, sign up for the waitlist. Until then you can pair GitHub Copilot with ChatGPT.

    More generative AI prompt crafting guides
    Inside GitHub: Working with the LLMs behind GitHub Copilot

    Post Syndicated from Sara Verdi original https://github.blog/2023-05-17-inside-github-working-with-the-llms-behind-github-copilot/

    The first time that engineers at GitHub worked with one of OpenAI’s large language models (LLM), they were equal parts excited and astonished. Alireza Goudarzi, a senior researcher of machine learning at GitHub recounts, “As a theoretical AI researcher, my job has been to take apart deep learning models to make sense of them and how they learn, but this was the first time that a model truly astonished me.” Though the emergent behavior of the model was somewhat surprising, it was obviously powerful. Powerful enough, in fact, to lead to the creation of GitHub Copilot.

    Due to the growing interest in LLMs and generative AI models, we decided to speak to the researchers and engineers at GitHub who helped build the early versions of GitHub Copilot and talk through what it was like to work with different LLMs from OpenAI, and how model improvements have helped evolve GitHub Copilot to where it is today—and beyond.

    A brief history of GitHub Copilot

    In June 2020, OpenAI released GPT-3, an LLM that sparked intrigue in developer communities and beyond. Over at GitHub, this got the wheels turning for a project our engineers had only talked about before: code generation.

    “Every six months or so, someone would ask in our meetings, ‘Should we think about general purpose code generation,’ but the answer was always ‘No, it’s too difficult, the current models just can’t do it,’” says Albert Ziegler, a principal machine learning engineer and member of the GitHub Next research and development team.

    But GPT-3 changed all that—suddenly the model was good enough to begin considering how a code generation tool might work.

    “OpenAI gave us the API to play around with,” Ziegler says. “We assessed it by giving it coding-like tasks and evaluated it in two different forms.”

    For the first form of evaluation, the GitHub Next team crowdsourced self-contained problems to help test the model. “The reason we don’t do this anymore is because the models just got too good,” Ziegler laughs.

    In the beginning, the model could solve about half of the problems it was posed with, but soon enough, it was solving upwards of 90 percent of the problems.

    This original testing method sparked the first ideas for how to harness the power of this model, and they began to conceptualize an AI-powered chatbot for developers to ask coding questions and receive immediate, runnable code snippets. “We built a prototype, but it turned out there was a better modality for this technology available,” Ziegler says. “We thought, ‘Let’s try to put this in the IDE.’”

    “The moment we did that and saw how well it worked, the whole static question-and-answer modality was forgotten,” he says. “This new approach was interactive and it was useful in almost every situation.”

    And with that, the development of GitHub Copilot began.

    Exploring model improvements

    To keep this project moving forward, GitHub returned to OpenAI to make sure that they could stay on track with the latest models. “The first model that OpenAI gave us was a Python-only model,” Ziegler remembers. “Next we were delivered a JavaScript model and a multilingual model, and it turned out that the Javascript model had particular problems that the multilingual model did not. It actually came as a surprise to us that the multilingual model could perform so well. But each time, the models were just getting better and better, which was really exciting for GitHub Copilot’s progress.”

    In 2021, OpenAI released the multilingual Codex model, which was built in partnership with GitHub. This model was an offshoot of GPT-3, so its original capability was generating natural language in response to text prompts. But what set the Codex model apart was that it was trained on billions of lines of public code—so that, in addition to natural language outputs, it also produced code suggestions.

    This model was open for use via an API that businesses could build on, and while this breakthrough was huge for GitHub Copilot, the team needed to work on internal model improvements to ensure that it was as accurate as possible for end users.

    As the GitHub Copilot product was prepared for launch as a technical preview, the team split off into further functional teams, and the Model Improvements team became responsible for monitoring and improving GitHub Copilot’s quality through communicating with the underlying LLM. This team also set out to work on improving completion for users. Completion refers to when users accept and keep GitHub Copilot suggestions in their code, and there are several different levers that the Model Improvements team works on to increase completion, including prompt crafting and fine tuning.

    An example of completion in action with GitHub Copilot
    An example of completion in action with GitHub Copilot.

    Prompt crafting

    When working with LLMs, you have to be very specific and intentional with your inputs to receive your desired output, and prompt crafting explores the art behind communicating these requests to get the optimal completion from the model.

    “In very simple terms, the LLM is, at its core, just a document completion model. For training it was given partial documents and it learned how to complete them one token at a time. Therefore, the art of prompt crafting is really all about creating a ‘pseudo-document’ that will lead the model to a completion that benefits the customer,” John Berryman, a senior researcher of machine learning on the Model Improvements team explains. Since LLMs are trained on partial document completion, then if the partial document is code, then this completion capability lends itself well to code completion, which is, in its base form, exactly what GitHub Copilot does.

    To better understand how the model could be applied to code completion, the team would provide the model with a file and evaluate the code completions it returned.

    “Sometimes the results are ok, sometimes they are quite good, and sometimes the results seem almost magical,” Berryman says. “The secret is that we don’t just have to provide the model with the original file that the GitHub Copilot user is currently editing; instead we look for additional pieces of context inside the IDE that can hint the model towards better completions.”

    He continues, “There have been several changes that helped get GitHub Copilot where it is today, but one of my favorite tricks was when we pulled similar texts in from the user’s neighboring editor tabs. That was a huge lift in our acceptance rate and characters retained.”

    Generative AI and LLMs are incredibly fascinating, but Berryman still seems to be most excited about the benefit that the users are seeing from the research and engineering efforts.

    “The idea here is to make sure that we make developers more productive, but the way we do that is where things start to get interesting: we can make the user more productive by incorporating the way they think about code into the algorithm itself,” Berryman says. “Where the developer might flip back and forth between tabs to reference code, we just can do that for them, and the completion is exactly what it would be if the user had taken all of the time to look that information up.”

    Fine-tuning

    Fine-tuning is a technique used in AI to adapt and improve a pre-trained model for a specific task or domain. The process involves taking a pre-trained model that has been trained on a large dataset and training it on a smaller, more specific dataset that is relevant to a particular use case. This enables the model to learn and adapt to the nuances of the new data, thus improving its performance on the specific task.

    These larger, more sophisticated LLMs can sometimes produce outputs that aren’t necessarily helpful because it’s hard to statistically define what constitutes a “good” response. It’s also incredibly difficult to train a model like Codex that contains upwards of 170 billion parameters.

    “Basically, we’re training the underlying Codex model on a user’s specific codebase to provide more focused, customized completions,” Goudarzi adds.

    “Our greatest challenge right now is to consider why the user rejects or accepts a suggestion,” Goudarzi adds. “We have to consider what context, or information, that we served to the model caused the model to output something that was either helpful or not helpful. There’s no way for us to really troubleshoot in the typical engineering way, but what we can do is figure out how to ask the right questions to get the output we desire.”

    Read more about how GitHub Copilot is getting better at understanding your code to provide a more customized coding experience here.

    GitHub Copilot—then and now

    As the models from OpenAI got stronger—and as we identified more areas to build on top of those LLMs in house—GitHub Copilot has improved and gained new capabilities with chat functionality, voice-assisted development, and more via GitHub Copilot X on the horizon.

    Johan Rosenkilde, a staff researcher on the GitHub Next team remembers, “When we received the latest model drops from OpenAI in the past, the improvements were good, but they couldn’t really be felt by the end user. When the third iteration of Codex dropped, you could feel it, especially when you were working with programming languages that are not one of the top five languages,” Rosenkilde says.

    He continues, “I happened to be working on a programming competition with some friends on the weekend that model version was released, and we were programming with F#. In the first 24 hours, we evidently had the old model for GitHub Copilot, but then BOOM! Magic happened,” he laughs. “There was an incredibly noticeable difference.”

    In the beginning, GitHub Copilot also had the tendency to suggest lines of code in a completely different programming language, which created a poor developer experience (for somewhat obvious reasons).

    “You could be working in a C# project, then all of the sudden at the top of a new file, it would suggest Python code,” Rosenkilde explains. So, the team added a headline to the prompt which listed the language you were working in. “Now this had no impact when you were deep down in the file because Copilot could understand which language you were in. But at the top of the file, there could be some ambiguity, and those early models just defaulted to the top popular languages.”

    About a month following that improvement, the team discovered that it was much more powerful to put the path of the file at the top of the document.

    A diagram of the file path improvement
    A diagram of the file path improvement.

    “The end of the file name would give away the language in most cases, and in fact the file name could provide crucial, additional information,” Rosenkilde says. “For example, the file might be named ‘connectiondatabase.py.’ Well that file is most likely about databases or connections, so you might want to import an SQL library, and that file was written in Python. So, that not only solved the language problem, but it also improved the quality and user experience by a surprising margin because GitHub Copilot could now suggest boilerplate code.”

    After a few more months of work, and several iterations, the team was able to create a component that lifted code from other files, which is a capability that had been talked about since the genesis of GitHub Copilot. Rosenkilde recalls, “this never really amounted to anything more than conversations or a draft pull request because it was so abstract. But then, Albert Ziegler built this component that looked at other files you have open in the IDE at that moment in time and scanned through those files for similar text to what’s in your current cursor. This was a huge boost in code acceptance because suddenly, GitHub Copilot knew about other files.”

    What’s next for GitHub Copilot

    After working with generative AI models and LLMs over the past three years, we’ve seen their transformative value up close. As the industry continues to find new uses for generative AI, we’re working to continue building new developer experiences. And in March 2023, GitHub announced the future of Copilot, GitHub Copilot X, our vision for an AI-powered developer experience. GitHub Copilot X aims to bring AI beyond the IDE to more components of the overall platform, such as docs and pull requests. LLMs are changing the ways that we interact with technology and how we work, and ideas like GitHub Copilot X are just an example of what these models, along with some dedicated training techniques, are capable of.

    How GitHub Copilot is getting better at understanding your code

    Post Syndicated from Johan Rosenkilde original https://github.blog/2023-05-17-how-github-copilot-is-getting-better-at-understanding-your-code/

    To make working with GitHub Copilot feel like a meeting of the minds between developers and the pair programmer, GitHub’s machine learning experts have been busy researching, developing, and testing new capabilities—and many are focused on improving the AI pair programmer’s contextual understanding. That’s because good communication is key to pair programming, and inferring context is critical to making good communication happen.

    To pull back the curtain, we asked GitHub’s researchers and engineers about the work they’re doing to help GitHub Copilot improve its contextual understanding. Here’s what we discovered.

    From OpenAI’s Codex model to GitHub Copilot

    When OpenAI released GPT-3 in June 2020, GitHub knew developers would benefit from a product that leveraged the model specifically for coding. So, we gave input to OpenAI as it built Codex, a descendant of GPT-3 and the LLM that would power GitHub Copilot. The pair programmer launched as a technical preview in June 2021 and became generally available in June 2022 as the world’s first at-scale generative AI coding tool.

    To ensure that the model has the best information to make the best predictions with speed, GitHub’s machine learning (ML) researchers have done a lot of work called prompt engineering (which we’ll explain in more detail below) so that the model provides contextually relevant responses with low latency.

    Though GitHub’s always experimenting with new models as they come out, Codex was the first really powerful generative AI model that was available, said David Slater, a ML engineer at GitHub. “The hands-on experience we gained from iterating on model and prompt improvements was invaluable.”

    All that experimentation resulted in a pair programmer that, ultimately, frees up a developer’s time to focus on more fulfilling work. The tool is often a huge help even for starting new projects or files from scratch because it scaffolds a starting point that developers can adapt and tweak as desired, said Alice Li, a ML researcher at GitHub.

    I still find myself impressed and even surprised by what GitHub Copilot can do, even after having worked on it for some time now.

    – Alice Li, ML researcher at GitHub

    Why context matters

    Developers use details from pull requests, a folder in a project, open issues, and more to contextualize their code. When it comes to a generative AI coding tool, we need to teach that tool what information to use to do the same.

    Transformer LLMs are good at connecting the dots and big-picture thinking. Generative AI coding tools are made possible by large language models (LLMs). These models are sets of algorithms trained on large amounts of code and human language. Today’s state-of-the-art LLMs are transformers, which makes them adept at making connections between text in a user’s input and the output that the model has already generated. This is why today’s generative AI tools are providing responses that are more contextually relevant than previous AI models.

    But they need to be told what information is relevant to your code. Right now, transformers that are fast enough to power GitHub Copilot can process about 6,000 characters at a time. While that’s been enough to advance and accelerate tasks like code completion and code change summarization, the limited amount of characters means that not all of a developer’s code can be used as context.

    So, our challenge is to figure out not only what data to feed the model, but also how to best order and enter it to get the best suggestions for the developer.

    Learn more about LLMs, generative AI coding tools, and how they’re changing the way developers work.

    How GitHub Copilot understands your code

    It all comes down to prompts, which are compilations of IDE code and relevant context that’s fed to the model. Prompts are generated by algorithms in the background, at any point in your coding. That’s why GitHub Copilot will generate coding suggestions whether you’re currently writing or just finished a comment, or in the middle of some gnarly code.

    • Here’s how a prompt is created: a series of algorithms first select relevant code snippets or comments from your current file and other sources (which we’ll dive into below). These snippets and comments are then prioritized, filtered, and assembled into the final prompt.

    GitHub Copilot’s contextual understanding has continuously matured over time. The first version was only able to consider the file you were working on in your IDE to be contextually relevant. But we knew context went beyond that. Now, just a year later, we’re experimenting with algorithms that will consider your entire codebase to generate customized suggestions.

    Let’s look at how we got here:

    • Prompt engineering is the delicate art of creating a prompt so that the model makes the most useful prediction for the user. The prompt tells LLMs, including GitHub Copilot, what data, and in what order, to process in order to contextualize your code. Most of this work takes place in what’s called a prompt library, which is where our in-house ML experts work with algorithms to extract and prioritize a variety of sources of information about the developer’s context, creating the prompt that’ll be processed by the GitHub Copilot model.

    • Neighboring tabs is what we call the technique that allows GitHub Copilot to process all of the files open in a developer’s IDE instead of just the single one the developer is working on. By opening all files relevant to their project, developers automatically invoke GitHub Copilot to comb through all of the data and find matching pieces of code between their open files and the code around their cursor—and add those matches to the prompt.

    When developing neighboring tabs, the GitHub Next team and in-house ML researchers did A/B tests to figure out the best parameters for identifying matches between code in your IDE and code in your open tabs. They found that setting a very low bar for when to include a match actually made for the best coding suggestions.

    By including every little bit of context, neighboring tabs helped to relatively increase user acceptance of GitHub Copilot’s suggestions by 5%**.

    Even if there was no perfect match—or even a very good one—picking the best match we found and including that as context for the model was better than including nothing at all.

    – Albert Ziegler, principal ML engineer at GitHub
    • The Fill-In-the-Middle (FIM) paradigm widened the context aperture even more. Prior to FIM, only the code before your cursor would be put into the prompt—ignoring the code after your cursor. (At GitHub, we refer to code before the cursor as the prefix and after the cursor as the suffix.) With FIM, we can tell the model which part of the prompt is the prefix, and which part is the suffix.

    Even if you’re creating something from scratch and have a skeleton of a file, we know that coding isn’t linear or sequential. So, while you bounce around your file, FIM helps GitHub Copilot offer better coding suggestions for the part in your file where your cursor is located, or the code that’s supposed to come between the prefix and suffix.

    Based on A/B testing, FIM gave a 10% relative boost in performance, meaning developers accepted 10% more of the completions that were shown to them. And thanks to optimal use of caching, neighboring tabs and FIM work in the background without any added latency.

    System diagram focused on model quality efforts. The diagram starts on the left with inputs from open tabs, data from editor, and vector database, which feed into a prompt library. (We are continuously working on improvements to provide better context from available sources in the prompt.) This then goes into the prompt, which is fed through a contextual filter model and a GPT model. (We are continuously working on new and improved model engines optimized for GitHub Copilot.) This model provides completions to fill in the middle of the prompt prefix and suffix. From the models, n completions are generated, and less than or equal to n completions are shown.

    Improving semantic understanding

    Today, we’re experimenting with vector databases that could create a customized coding experience for developers working in private repositories or with proprietary code. Generative AI coding tools use something called embeddings to retrieve information from a vector database.

    • What’s a vector database? It’s a database that indexes high-dimensional vectors.

    • What’s a high-dimensional vector? They’re mathematical representations of objects, and because these vectors can model objects in a number of dimensions, they can capture complexities of that object. When used properly to represent pieces of code, they may represent both the semantics and even intention of the code—not just the syntax.

    • What’s an embedding? In the context of coding and LLMs, an embedding is the representation of a piece of code as a high-dimensional vector. Because of the “knowledge” the LLM has of both programming and natural language, it’s able to capture both the syntax and semantics of the code in the vector.

    Here’s how they’d all work together:

    • Algorithms would create embeddings for all snippets in the repository (potentially billions of them), and keep them stored in the vector database.
    • Then, as you’re coding, algorithms would embed the snippets in your IDE.
    • Algorithms would then make approximate matches—also, in real time—between the embeddings that are created for your IDE snippets and the embeddings already stored in the vector database. The vector database is what allows algorithms to quickly search for approximate matches (not just exact ones) on the vectors it stores, even if it’s storing billions of embedded code snippets.

    Developers are familiar with retrieving data with hashcodes, which typically look for exact character by character matches, explained Alireza Goudarzi, senior ML researcher at GitHub. “But embeddings—because they arise from LLMs that were trained on a vast amount of data—develop a sense of semantic closeness between code snippets and natural language prompts.”

    Read the three sentences below and identify which two are the most semantically similar.

    • Sentence A: The king moved and captured the pawn.
    • Sentence B: The king was crowned in Westminster Abbey.
    • Sentence C: Both white rooks were still in the game.

    The answer is sentences A and C because both are about chess. While sentences A and B are syntactically, or structurally similar because both have a king as the subject, they’re semantically different because “king” is used in different contexts.

    Here’s how each of those statements could translate to Python. Note the syntactic similarity between snippets A and B despite their semantic difference, and the semantic similarity between snippets A and C despite their syntactic difference.

    Snippet A:

    if king.location() == pawn.location():
        board.captures_piece(king, pawn)
    

    Snippet B:

    if king.location() == "Westminster Abbey":
        king.crown()
    

    Snippet C:

    if len([ r for r in board.pieces("white") if r.type == "rook" ]) == 2:
        return True
    

    As mentioned above, we’re still experimenting with retrieval algorithms. We’re designing the feature with enterprise customers in mind, specifically those who are looking for a customized coding experience with private repositories and would explicitly opt in to use the feature.

    Take this with you

    Last year, we conducted quantitative research on GitHub Copilot and found that developers code up to 55% faster while using the pair programmer. This means developers feel more productive, complete repetitive tasks more quickly, and can focus more on satisfying work. But our work won’t stop there.

    The GitHub product and R&D teams, including GitHub Next, have been collaborating with Microsoft Azure AI-Platform to continue bringing improvements to GitHub Copilot’s contextual understanding. So much of the work that helps GitHub Copilot contextualize your code happens behind the scenes. While you write and edit your code, GitHub Copilot is responding to your writing and edits in real time by generating prompts–or, in other words, prioritizing and sending relevant information to the model based on your actions in your IDE—to keep giving you the best coding suggestions.


    Learn more

    How I used GitHub Copilot to build a browser extension

    Post Syndicated from Rizel Scarlett original https://github.blog/2023-05-12-how-i-used-github-copilot-to-build-a-browser-extension/

    For the first time ever, I built a browser extension and did it with the help of GitHub Copilot. Here’s how.

    I’ve built a rock, paper, scissors game with GitHub Copilot but never a browser extension. As a developer advocate at GitHub, I decided to put GitHub Copilot to the test, including its upcoming chat feature, and see if it could help me write an extension for Google Chrome to clear my cache.

    I’m going to be honest: it wasn’t as straightforward as I expected it to be. I had a lot of questions throughout the build and had to learn new information.

    But at the end of the day, I gained experience with learning an entirely new skill with a generative AI coding tool and pair programming with GitHub Copilot—and with other developers on Twitch 👥.

    I wanted to create steps that anyone—even those without developer experience—could easily replicate when building this extension, or any other extension. But I also wanted to share my new takeaways after a night of pair programming with GitHub Copilot and human developers.

    So, below you’ll find two sections:

    Let’s jump in.

    How to build a Chrome extension with GitHub Copilot

    To get started, you’ll need to have GitHub Copilot installed and open in your IDE. I also have access to an early preview of GitHub Copilot chat, which is what I used when I had a question. If you don’t have GitHub Copilot chat, sign up for the waitlist, and pair GitHub Copilot with ChatGPT for now.

    1. 🧑🏾‍💻 Using the chat window, I asked GitHub Copilot, “How do I create a Chrome extension? What should the file structure look like?”

    💻 GitHub Copilot gave me general steps for creating an extension—from designing the folder structure to running the project locally in Chrome.

    Screenshot of the char window where the user asked GitHub Copilot "How do I build a browser extension? What should the file structure look like?" GitHub Copilot provided some instructions in response."

    Then, it shared an example of a Chrome extension file structure.

    Copilot response showing an example structure for a simple Chrome extension.

    To save you some time, here’s a chart that briefly defines the purpose of these files:

    manifest.json 🧾 Metadata about your extension, like the name and version, and permissions. Manifest as a proper noun is the name of the Google Chrome API. The latest is V3.
    popup.js 🖼 When users click on your extension icon in their Chrome toolbar, a pop-up window will appear. This file is what determines the behavior of that pop-up and contains code for handling user interactions with the pop-up window.
    popup.html and style.css 🎨 These files make up the visual of your pop-up window. popup.html is the interface, including layout, structure, and content. style.css determines the way the HTML file should be displayed in the browser, including font, text color, background, etc.

    2. Create the manifest.json 🧾

    🧑🏾‍💻 Inside a folder in my IDE, I created a file called manifest.json. In manifest.json,

    I described my desired file:

    Manifest for Chrome extension that clears browser cache.
    manifest_version: 3
    Permissions for the extension are: storage, tabs, browsingData
    

    I pressed enter and invoked suggestions from GitHub Copilot by typing a curly brace.

    💻 Inside the curly brace, GitHub Copilot suggested the manifest. I deleted the lines describing my desired manifest.json, and the final file looked like this:

    {
       "name": "Clear Cache",
       "version": "1.0",
       "manifest_version": 3,
       "description": "Clears browser cache",
       "permissions": [
           "storage",
           "tabs",
           "browsingData"
       ],
       "action": {
           "default_popup": "popup.html"
       },
       "background": {
           "service_worker": "background.js"
       }
    }
    

    3. Create a service worker, which is a file called background.js 🔧

    This wasn’t a file that was recommended from my chat with GitHub Copilot. I learned that it was a necessary file from a developer who tuned into my livestream 👥. The background.js is what gives your extension the ability to run in the background, perform tasks, and respond to user events outside of the extension’s pop-up window (like network requests and data storage).

    🧑🏾‍💻 In my background.js file, I wrote a comment describing my desired service worker:

    Service Worker for Google Chrome Extension 
    Handles when extension is installed
    Handles when message is received
    

    Then, I wrote a comment for the first function, which prompted a suggestion from GitHub Copilot, and then wrote another comment to describe the second function.

    💻 The final file looked like this:

    /*
    Service Worker for Google Chrome Extension
    Handles when extension is installed
    Handles when message is received
    */
    
    // console.log when extension is installed
    chrome.runtime.onInstalled.addListener(function() {
       console.log("Extension installed");
    });
    
    // send response when message is received and console.log when message is received
    chrome.runtime.onMessage.addListener(function(request, sender, sendResponse) {
       console.log("Message received");
       sendResponse("Message received");
    });
    

    4. Create the popup.html file 🖼

    🧑🏾‍💻 In the popup.html file, I wrote a comment describing how I wanted my pop-up window to appear. This window is the one users will see when they click on the extension icon.

    <!--
       HTML for Chrome extension that clears browser cache.
       Connect to javascript file called popup.js and CSS file called style.css
       Will render the following buttons with id's:
       - "All History"
       - "Past Month"
       - "Past Week"
       - "Past Day"
       - "Past Hour"
       - "Past Minute"
    
    
       Will render an empty paragraph with id "lastCleared"
    -->
    

    💻 GitHub Copilot suggested the following:

    <!DOCTYPE html>
    <html>
       <head>
           <meta charset="utf-8">
           <title>Clear Cache</title>
           <link rel="stylesheet" href="style.css">
       </head>
       <body>
           <h1>Clear Cache</h1>
           <button id="allHistory">All History</button>
           <button id="pastMonth">Past Month</button>
           <button id="pastWeek">Past Week</button>
           <button id="pastDay">Past Day</button>
           <button id="pastHour">Past Hour</button>
           <button id="pastMinute">Past Minute</button>
           <p id="lastCleared"></p>
           <script src="popup.js"></script>
       </body>
    </html>
    

    5. Test the browser extension

    I decided to test the modifications before incorporating additional styles or interactivity. I prefer making incremental changes and conducting manual tests in between because it simplifies the debugging process.

    🧑🏾‍💻 Navigate to chrome://extensions/ in your Chrome browser. Turn on developer mode. Press “Load unpacked.” Upload the folder that holds your Chrome extension. Once loaded, you should be able to test your extension. Here’s what mine looked like:

    Screenshot of the Chrome extension offering options to "Clear Cache."

    6. Create a popup.js file to add interactivity

    🧑🏾‍💻 Inside this file, write a comment that will act as pseudocode for you but as a prompt for GitHub Copilot.

    Pseudocode isn’t code, but a method of conceptualizing and communicating ideas to plan and design programs before writing the actual code. Programmers can concentrate on algorithmic logic without worrying about syntactic details of a particular programming language—and communicate ideas to other developers regardless of coding experience.

    Here’s the pseudocode I used:

    /*
    This program is a Chrome Extension that clears browser cache.
    Handle on button click:
    - button with id "allHistory" that clears all cache history
    - button with id "pastMonth" that clears cache history from the past month
    - button with id "pastWeek" that clears cache history from the past week
    - button with id "pastDay" that clears cache history from the past day
    - button with id "pastHour" that clears cache history from the past hour
    - button with id "pastMinute" that clears cache history from the past minute
    
    
    Create function that
    - converts dates and times into human-readable format
    - adds "Successfully cleared cache" with date and time in a paragraph with id "lastCleared"
    */
    

    Then, write the series of comments below, but write them one at a time to allow GitHub Copilot to generate a code suggestion after each one. The final popup.js looked like this:

    /*
    This program is a Chrome Extension that clears browser cache.
    Handle on button click:
    - button with id "allHistory" that clears all cache history
    - button with id "pastMonth" that clears cache history from the past month
    - button with id "pastWeek" that clears cache history from the past week
    - button with id "pastDay" that clears cache history from the past day
    - button with id "pastHour" that clears cache history from the past hour
    - button with id "pastMinute" that clears cache history from the past minute
    
    Create function that
    - converts dates and times into human-readable format
    - adds "Successfully cleared cache" with date and time in a paragraph with id "lastCleared"
    */
    
    // convert date and time into human-readable format
    function convertDate(date) {
       let date = new Date(date);
       var options = { weekday: 'long', year: 'numeric', month: 'long', day: 'numeric' };
       return date.toLocaleDateString("en-US", options);
    }
    
    // add successfully cleared cache into paragraph with id "lastCleared"
    function addCleared() {
       var p = document.getElementById("lastCleared");
       let date = new Date();
       p.innerHTML = "Successfully cleared cache " + convertDate(date);
    }
    
    // clear all cache history
    document.getElementById("allHistory").addEventListener("click", function() {
       chrome.browsingData.removeCache({ "since": 0 }, function() {
           addCleared();
       });
    });
    
    // clear cache history from the past month
    document.getElementById("pastMonth").addEventListener("click", function() {
       let date = new Date();
       date.setMonth(date.getMonth() - 1);
       chrome.browsingData.removeCache({ "since": date.getTime() }, function() {
           addCleared();
       });
    });
    
    // clear cache history from the past week
    document.getElementById("pastWeek").addEventListener("click", function() {
       let date = new Date();
       date.setDate(date.getDate() - 7);
       chrome.browsingData.removeCache({ "since": date.getTime() }, function() {
           addCleared();
       });
    });
    
    // clear cache history from the past day
    document.getElementById("pastDay").addEventListener("click", function() {
       let date = new Date();
       date.setDate(date.getDate() - 1);
       chrome.browsingData.removeCache({ "since": date.getTime() }, function() {
           addCleared();
       });
    });
    
    // clear cache history from the past hour
    document.getElementById("pastHour").addEventListener("click", function() {
      let date = new Date();
       date.setHours(date.getHours() - 1);
       chrome.browsingData.removeCache({ "since": date.getTime() }, function() {
           addCleared();
       });
    });
    
    // clear cache history from the past minute
    document.getElementById("pastMinute").addEventListener("click", function() {
      let date = new Date();
       date.setMinutes(date.getMinutes() - 1);
       chrome.browsingData.removeCache({ "since": date.getTime() }, function() {
           addCleared();
       });
    });
    

    🧑🏾‍💻 GitHub Copilot actually generated the var keyword, which is outdated. So I changed that keyword to let.

    7. Create the last file in your folder: style.css

    🧑🏾‍💻 Write a comment that describes the style you want for your extension. Then, type “body” and continue tabbing until GitHub Copilot suggests all the styles.

    My final style.css looked like this:

    /* Style the Chrome extension's popup to be wider and taller
    Use accessible friendly colors and fonts
    Make h1 elements legible
    Highlight when buttons are hovered over
    Highlight when buttons are clicked
    Align buttons in a column and center them but space them out evenly
    Make paragraph bold and legible
    */
    
    body {
       background-color: #f1f1f1;
       font-family: Arial, Helvetica, sans-serif;
       font-size: 16px;
       color: #333;
       width: 400px;
       height: 400px;
    }
    
    h1 {
       font-size: 24px;
       color: #333;
       text-align: center;
    }
    
    button {
       background-color: #4CAF50;
       color: white;
       padding: 15px 32px;
       text-align: center;
       text-decoration: none;
       display: inline-block;
       font-size: 16px;
       margin: 4px 2px;
       cursor: pointer;
       border-radius: 8px;
    }
    
    button:hover {
       background-color: #45a049;
    }
    
    button:active {
       background-color: #3e8e41;
    }
    
    p {
       font-weight: bold;
       font-size: 18px;
       color: #333;
    }
    
    For detailed, step-by-step instructions, check out my Chrome extension with GitHub Copilot repo.

    Three important lessons about learning and pair programming in the age of AI

    1. Generative AI reduces the fear of making mistakes. It can be daunting to learn a new language or framework, or start a new project. The fear of not knowing where to start—or making a mistake that could take hours to debug—can be a significant barrier to getting started. I’ve been a developer for over three years, but streaming while coding makes me nervous. I sometimes focus more on people watching me code and forget the actual logic. When I conversed with GitHub Copilot, I gained reassurance that I was going in the right direction and that helped me to stay motivated and confident during the stream.

    2. Generative AI makes it easier to learn about new subjects, but it doesn’t replace the work of learning. GitHub Copilot didn’t magically write an entire Chrome extension for me. I had to experiment with different prompts, and ask questions to GitHub Copilot, ChatGPT, Google, and developers on my livestream. To put it in perspective, it took me about 1.5 hours to do steps 1 to 5 while streaming.

      But if I hadn’t used GitHub Copilot, I would’ve had to write all this code by scratch or look it up in piecemeal searches. With the AI-generated code suggestions, I was able to jump right into review and troubleshooting, so a lot of my time and energy was focused on understanding how the code worked. I still had to put in the effort to learn an entirely new skill, but I was analyzing and evaluating code more often than I was trying to learn and then remember it.

    3. Generative AI coding tools made it easier for me to collaborate with other developers. Developers who tuned into the livestream could understand my thought process because I had to tell GitHub Copilot what I wanted it to do. By clearly communicating my intentions with the AI pair programmer, I ended up communicating them more clearly with developers on my livestream, too. That made it easy for people tuning in to become my virtual pair programmers during my livestream.

    Overall, working with GitHub Copilot made my thought process and workflow more transparent. Like I said earlier, it was actually a developer on my livestream who recommended a service worker file after noticing that GitHub Copilot didn’t include it in its suggested file structure. Once I confirmed in a chat conversation with GitHub Copilot and a Google search that I needed a service worker, I used GitHub Copilot to help me write one.

    Take this with you

    GitHub Copilot made me more confident with learning something new and collaborating with other developers. As I said before, live coding can be nerve-wracking. (I even get nervous even when I’m just pair programming with a coworker!) But GitHub Copilot’s real-time code suggestions and corrections created a safety net, allowing me to code more confidently—and quickly— in front of a live audience. Also, because I had to clearly communicate my intentions with the AI pair programmer, I was also communicating clearly with the developers who tuned into my livestream. This made it easy to virtually collaborate with them.

    The real-time interaction with GitHub Copilot and the other developers helped with catching errors, learning coding suggestions, and reinforcing my own understanding and knowledge. The result was a high-quality codebase for a browser extension.

    This project is a testament to the collaborative power of human-AI interaction. The experience underscored how GitHub Copilot can be a powerful tool in boosting confidence, facilitating learning, and fostering collaboration among developers.


    More resources

    How companies are boosting productivity with generative AI

    Post Syndicated from Chris Reddington original https://github.blog/2023-05-09-how-companies-are-boosting-productivity-with-generative-ai/

    Is your company using generative AI yet?

    While it’s still in its infancy, generative AI coding tools are already changing the way developers and companies build software. Generative AI can boost developer and business productivity by automating tasks, improving communication and collaboration, and providing insights that can inform better decision-making.

    In this post, we’ll explore the full story of how companies are adopting generative AI to ship software faster, including:

    Want to explore the world of generative AI for developers? 🌎

    Check out our generative AI guide to learn what it is, how it works, and what it means for developers everywhere.

    Get the guide >

    What is generative AI?

    Generative AI refers to a class of artificial intelligence (AI) systems designed to create new content similar to what humans produce. These systems are trained on large datasets of content that include text, images, audio, music, or code.

    Generative AI is an extension of traditional machine learning, which trains models to predict or classify data based on existing patterns. But instead of simply predicting the outcome, generative AI models are designed to identify underlying patterns and structures of the data, and then use that knowledge to quickly generate new content. However, the main difference between the two is one of magnitude and the size of the prediction or generation. Machine learning typically predicts the next word. Generative AI can generate the next paragraph.

    AI-generated image from Shutterstack of a developer using a generative AI tool to code faster.
    AI-generated image from Shutterstack of a developer using a generative AI tool to code faster.

    Generative AI tools have attracted particular interest in the business world. From marketing to software development, organizational leaders are increasingly curious about the benefits of the new generative AI applications and products.

    “I do think that all companies will adopt generative AI tools in the near future, at least indirectly,” said Albert Ziegler, principal machine learning engineer at GitHub. “The bakery around the corner might have a logo that the designer made using a generative transformer. The neighbor selling knitted socks might have asked Bing where to buy a certain kind of wool. My taxi driver might do their taxes with a certain Excel plugin. This adoption will only increase over time.”

    What are some business uses of generative AI tools? 💡

    • Software development: generative AI tools can assist engineers with building, editing, and testing code.
    • Content creation: writers can use generative AI tools to help personalize product descriptions and write ad copy.
    • Design creation: from generating layouts to assisting with graphics, generative AI design tools can help designers create entirely new designs.
    • Video creation: generative AI tools can help videographers with building, editing, or enhancing videos and images.
    • Language translation: translators can use generative AI tools to create communications in different languages.
    • Personalization: generative AI tools can assist businesses with personalizing products and services to meet the needs of individual customers.
    • Operations: from supply chain management to pricing, generative AI tools can help operations professionals drive efficiency.

    How generative AI coding tools are changing the developer experience

    Generative AI has big implications for developers, as the tools can enable them to code and ship software faster.

    How is generative AI affecting software development?⚡

    Check out our guide to learn what generative AI coding tools are, what developers are using them for, and how they’re impacting the future of development.

    Get the guide >

    Similar to how spell check and other automation tools can help writers build content more efficiently, generative AI coding tools can help developers produce cleaner work—and the models powering these tools are getting better by the month. Tools such as GitHub Copilot, for instance, can be used in many parts of the software development lifecycle, including in IDEs, code reviews, and testing.

    The science backs this up. In 2022, we conducted research into how our generative AI tool, GitHub Copilot, helps developers. Here’s what we found:

    Source: Research: quantifying GitHub Copilot’s impact on developer productivity and happiness

    GitHub Copilot is only continuing to improve. When the tool was first launched for individuals in June 2022, more than 27% of developers’ code was generated by GitHub Copilot, on average. Today, that number is 46% across all programming languages—and in Java, that jumps to 61%.

    How can generative AI tools help you build software? 🚀

    These tools can help:

    • Write boilerplate code for various programming languages and frameworks.
    • Find information in documentation to understand what the code does.
    • Identify security vulnerabilities and implement fixes.
    • Streamline code reviews before merging new or edited code.

    Explore GitHub’s vision for embedding generative AI into every aspect of the developer workflow.

    Using generative AI responsibly 🙏

    Like all technologies, responsibility and ethics are important with generative AI.

    In February 2023, a group of 10 companies including OpenAI, Adobe, the BBC, and others agreed upon a new set of recommendations on how to use generative AI content in a responsible way.

    The recommendations were put together by the Partnership on AI (PAI), an AI research nonprofit, in consultation with more than 50 organizations. The guidelines call for creators and distributors of generative AI to be transparent about what the technology can and can’t do and disclose when users might be interacting with this type of content (by using watermarks, disclaimers, or traceable elements in an AI model’s training data).

    Is generative AI accurate? 🔑

    Businesses should be aware that while generative AI tools can speed up the creation of content, they should not be solely relied upon as a source of truth. A recent study suggests that people can identify whether AI-generated content is real or fake only 50% of the time. Here at GitHub, we named our generative AI tool “GitHub Copilot” to signify just this—the tool can help, but at the end of the day, it’s just a copilot. The developer needs to take responsibility for ensuring that the finished code is accurate and complete.

    How companies are using generative AI

    Even as generative AI models and tools continue to rapidly advance, businesses are already exploring how to incorporate these into their day-to-day operations.

    This is particularly true for software development teams.

    “Going forward, tech companies that don’t adopt generative AI tools will have a significant productivity disadvantage,” Ziegler said. “Given how much faster this technology can help developers build, organizations that don’t adopt these tools or create their own will have a harder time in the marketplace.”

    3 primary generative AI business models for organizations 📈

    Enterprises all over the world are using generative AI tools to transform how work gets done. Three of the business models organizations use include:

    • Model as a Service (MaaS): Companies access generative AI models through the cloud and use them to create new content. OpenAI employs this model, which licenses its GPT-3 AI model, the platform behind ChatGPT. This option offers low-risk, low-cost access to generative AI, with limited upfront investment and high flexibility.
    • Built-in apps: Companies build new—or existing—apps on top of generative AI models to create new experiences. GitHub Copilot uses this model, which relies on Codex to analyze the context of the code to provide intelligent suggestions on how to complete it. This option offers high customization and specialized solutions with scalability.
    • Vertical integration: Vertical integration leverages existing systems to enhance the offerings. For instance, companies may use generative AI models to analyze large amounts of data and make predictions about prices or improve the accuracy of their services.

    Duolingo, one of the largest language-learning apps in the world, is one company that recently adopted generative AI capabilities. They chose GitHub’s generative AI tool, GitHub Copilot, to help their developers write and ship code faster, while improving test coverage. Duolingo’s CTO Severin Hacker said GitHub Copilot delivered immediate benefits to the team, enabling them to code quickly and deliver their best work.

    ”[The tool] stops you from getting distracted when you’re doing deep work that requires a lot of your brain power,” Hacker noted. “You spend less time on routine work and more time on the hard stuff. With GitHub Copilot, our developers stay in the flow state and keep momentum instead of clawing through code libraries or documentation.”

    After adopting GitHub Copilot and the GitHub platform, Duolingo saw a:

    • 25% increase in developer speed for those who are new to working with a specific repository
    • 10% increase in developer speed for those who are familiar with the respective codebase
    • 67% decrease in median code review turnaround time

    “I don’t know of anything available today that’s remotely close to what we can get with GitHub Copilot,” Hacker said.

    Looking forward

    Generative AI is changing the world of software development. And it’s just getting started. The technology is quickly improving and more use cases are being identified across the software development lifecycle. With the announcement of GitHub Copilot X, our vision for the future of AI-powered software development, we’re committed to installing AI capabilities into every step of the developer workflow. There’s no better time to get started with generative AI at your company.

    Web Summit Rio 2023: Building an app in 18 minutes with GitHub Copilot X

    Post Syndicated from Thomas Dohmke original https://github.blog/2023-05-05-web-summit-rio-2023-building-an-app-in-18-minutes-with-github-copilot-x/

    Missed GitHub CEO Thomas Dohmke’s Web Summit Rio 2023 talk? Read his remarks and get caught up on everything GitHub Copilot X.

    Hello, Rio! I’m Thomas, and I’m a developer. I’ve been looking forward to this for some time, about a year. When I first planned this talk, I wanted to talk about the future of artificial intelligence and applications. But then I thought, why not show you the full power live on stage. Build something with code.

    I’ve been a developer my entire adult life. I’ve been coding since 1989. But as CEO, I haven’t been able to light up my contribution graph in a while. Like all of you, like every developer, my energy, my creativity every day is finite. And all the distractions of life—from the personal to the professional—from morning to night, gradually zaps my creative energy.

    When I wake up, I’m at my most creative and sometimes I have a big, light bulb idea. But as soon as the coffee is poured, the distractions start. Slack messages and emails flood in. I have to review a document before a customer presentation. And then I hear my kids yell as their football flew over the fence. And, of course, they want me to go over to our neighbors’ and get it.

    Then…I sit back down, I am in wall-to-wall meetings. And by the time the sun comes down, that idea I had in the morning—it’s gone! It’s midnight and I can’t even keep my eyes open. To be honest, in all this, I usually don’t even want to get started because the perception of having to do all the mundane tasks, all the boilerplate work that comes with coding, stops me in my tracks. And I know this is true for so many developers.

    The point is: boilerplate sucks! All busywork in life, but especially repetitive work is a barrier between us and what we want to achieve. Every day, building endless boilerplate prevents developers from creating a new idea that will change the world. But with AI, these barriers are about to be shattered.

    You’ve likely seen the memes about the 10x developer. It’s a common internet joke—people have claimed the 10x developer many times. With GitHub Copilot and now Copilot X, it’s time for us to redefine this! It isn’t that developers need to strive to be 10x, it’s that every developer deserves to be made 10 times more productive. With AI at every step, we will truly create without captivity. With AI at every step, we will realize the 10x developer.

    Imagine: 10 days of work, done in one day. 10 hours of work, done in one hour. 10 minutes of work, done with a single prompt command. This will allow us to amplify our truest self-expression. It will help a new generation of developers learn and build as fast as their minds. And because of this, we’ll emerge into a new spring of digital creativity, where every light bulb idea we have when we open our eyes for the day can be fully realized no matter what life throws at us.

    During my presentation, I built a snake game in 15 minutes.

    This morning I woke up, and I wanted to build something. I wanted to build my own snake game, originally created back in 1976. It’s a classic. So, 15 minutes are left on my timer. And I’m going to build this snake game. Let’s bring up Copilot X and get going!

    See how you can 10x your developer superpowers. Discover GitHub Copilot X.

    CLI tricks every developer should know

    Post Syndicated from Kedasha Kerr original https://github.blog/2023-04-26-cli-tricks-every-developer-should-know/

    The CLI is a critical component of a developer’s toolkit—it’s a trusty sidekick that offers flexibility and control. You can tell it what to do by simply typing in a specific command, and it will execute those commands like moving files, running programs, or even starting up a server, immediately. That being said, the CLI can be daunting to beginners, especially when you’re not sure which commands to run (and who hasn’t turned to Google to find a command they need?).

    In this blog, we’ve compiled some important tricks and commands that every developer should know from GitHub’s own engineers. By mastering these basic techniques, developers can become more efficient at working with the command line and gain a deeper understanding of how the underlying operating system and programs work.

    Components of the CLI

    The CLI has two main components: the shell and the command. The shell is the interface that allows the user to enter commands and commands are the instructions that tell the computer what to do. Shells also provide a way to customize and extend the behavior of the CLI. With a shell, users can create their own scripts and aliases to automate tasks or simplify complex commands, and they can customize the behavior of the shell itself using configuration files. For this blog post, all of the examples are for Bash since it’s the most widely used shell. And if you’re using Windows, Windows Subsystem for Linux (WSL) is available if you’d like to use a Bash terminal.

    To learn more about shells, you can check out our shell documentation here.

    Keyboard shortcuts in the CLI

    One of the easiest ways to improve your productivity on the command line is to learn some keyboard shortcuts. Below, you’ll find popular shortcuts that can save you time and effort on navigating and executing demands.

    CTRL + C: Cancel the current command

    CTRL + A: Move the cursor to the beginning of the line

    CTRL + E: Move the cursor to the end of the line

    CTRL + L: Clear the terminal screen

    CTRL + _: Undo the last edit

    CTRL-D: Exit shell session

    TAB:Auto-complete commands, file names, and paths

    CLI command history shortcuts

    The command history allows you to quickly access and reuse previously executed commands rather than retype or search for the whole command. Here are a few to try out for yourself:

    history n: Type this in the terminal to access the history

    !!: Execute the last command

    CTRL + R: Reverse search for a previously executed command

    CTRL + P: Move to the previous command in the history

    CTRL + N: Move to the next command in the history

    CTRL + G: Abort search

    Perform operations on multiple files with wildcards

    Wildcards are characters that take the place of one or more other characters, and they’re used to increase the efficiency and flexibility of searches. They come in handy when you want to perform an operation on multiple files or directories that have similar names or patterns, and can save you a lot of time and effort by allowing you to specify patterns rather than list each individual file. There are three types of command wildcards:

    ?: Matches a single character. For example, if you type d?g, it will match anything that begins with a “d” and ends with an “g.”

    *: Matches any number of characters. If you search s*n, it will match anything between “s” and “n” no matter how many characters are between the first and last letter.

    []: Matches only the characters enclosed within the square brackets.

    Combine commands with pipes

    A pipe (represented by the symbol |) connects the output of the command on the left side of the symbol to the input of the command on the right side. This allows users to create more complex and powerful commands by combining simpler commands together.

    Here’s an example of how it’s used in a command:

    ls -la | grep test | sort | uniq | wc -l: The final output of this command would be the number of files and directories in the current directory whose name contains the string “test.”

    When you pipe all of these commands together, you are essentially:

    • Listing all files and directories in the current directory in long format
    • Searching for all lines that contain the string “test”
    • Sorting those lines alphabetically
    • Removing any duplicate lines
    • Counting the number of remaining lines

    Note: grep is a useful CLI tool to search for matching patterns in a file. We’ll explore some more helpful CLI tools later on in this article.

    Command substitution

    Command substitution is a feature that allows you to execute a command with a different command. This helps you create more complex and dynamic commands by using the output of one command as an argument for another.

    There are two different syntaxes for command substitution:

    $(command) or `command`

    Here’s a simple example:

    $ echo "the date is $(date)": This will display the current date and time in a sentence.

    Learning the CLI commands and tricks that work for you takes time and practice. But you’ll soon find that using the command line becomes second nature, and you’ll be able to accomplish more complex tasks with ease.

    Now that we’ve covered some basics, you can begin to experiment with different options and parameters for your commands to see what they do. And stay curious! There are tons of great resources out there, like tldr or Explainshell, to help you learn new commands or shortcuts. And speaking of resources, let’s take a look at some helpful CLI tools to help you optimize the command line—and have some fun with it.

    CLI tools to know

    Command line tools are scripts, programs, or libraries created to solve problems that developers might encounter while coding. While these tools are largely focused on improving productivity, there are also CLI tools that can entertain you while you’re in the terminal (check out football-cli or spotify-tui for reference).

    Here are a few CLI tools that we recommend.

    grep or ack

    grep is a command-line utility that allows users to search for specific patterns in text files. Users can search for a specific word, phrase, or regular expression, and output the matching lines. ack is designed to be a faster alternative to the traditional grep command. Some prefer ack over grep because it can automatically exclude files that are not typically used for programming, such as binary files or backup files.

    jq

    jq is a lightweight and powerful command-line JSON processor that allows developers to parse, filter, and transform JSON data using a range of query and manipulation functions. With jq, developers can easily extract specific data from large JSON files, format JSON output, and even convert between JSON and other data formats.

    ImageMagick

    Though ImageMagick has been around since the ‘90s, this tool remains the gold standard for all things image-related. It supports a wide range of image formats and can help simplify resizing, cropping, rotating, and applying filters and effects. One of the most powerful features of ImageMagick is its ability to automate batch processing of images, which is particularly useful for web developers and designers who need to resize or convert large numbers of images at once.

    howdoi

    howdoi provides answers to your programming questions directly in the terminal. This command-line tool is particularly useful since you don’t have to leave the CLI or open your web browser to get immediate access to programming knowledge.

    Taskwarrior

    Taskwarrior manages your to-do list right from the command line. It also includes a variety of reports and filters that allow you to view your tasks in different ways, like by project, due date, or priority.

    GitHub CLI

    GitHub CLI provides a streamlined and efficient way to manage GitHub projects and workflows directly from the command line. You can perform a range of tasks, like managing pull requests, viewing and responding to issues and comments, and reviewing code changes. You can also use it to access GitHub Actions and other features on GitHub without exiting your terminal.

    The bottom line: ​​The CLI is a powerful tool for developers—especially if you prefer the keyboard over GUI interfaces. Learning how to use it and incorporating it into your daily workflow will help you become more productive and efficient, and getting familiar with these tips and tricks is a great way to start your CLI journey.

    Additional resources for CLI

    As you move further along in your developing journey, you’ll encounter different projects and pain points, which means that the commands and CLI tools you find useful might change and shift. There are so many diverse and useful CLI applications out there, and the repository awesome-cli-apps lists a bunch of excellent tools that are used and loved by developers around the world.

    What’s next for CLI

    We’ll be launching a technical preview of GitHub Copilot for CLI, which translates natural language prompts into terminal commands to help you find the exact command you need for the task at hand. Click here to get on the waitlist and try it out for yourself.

    3 benefits of migrating and consolidating your source code

    Post Syndicated from Mark Paulsen original https://github.blog/2023-04-14-3-benefits-of-migrating-and-consolidating-your-source-code/

    In a previous blog on consolidating your toolkit, we shared strategies to help you simplify your tech stack, which ultimately helps developers be more productive. In fact, developers are almost 60% more likely to feel equipped to do their job when they can easily find what they need.

    But there are other benefits of consolidating and simplifying your toolkit that may be surprising–especially when migrating your source code and collaboration history to GitHub.

    Today, we’ll explore three benefits that will support enterprises in a business climate where everyone is being asked to do more with less, as well as some resources to help get started on the migration journey.

    1. Enable developer self-service culture

    Some of the benefits enterprises can achieve with DevOps are improved productivity, security, and collaboration. Silos should be broken down and traditionally separated teams should be working in a cohesive and cloud native way.

    Another benefit that DevOps enables, which is a key part of the Platform Engineering technology approach, is the ability for development teams to self-service workflows, processes, and controls which traditionally have either been manual, or tightly-coupled with other teams. A great example of this was covered in a previous blog where we described how to build consistent and shared IaC workflows. IaC workflows can be created by operations teams, if your enterprise separation of duties governance policies require this, but self-serviced when needed by development teams.

    But this type of consistent, managed, and governable, self-service culture would not be possible if you have multiple source code management tools in your enterprise. If development teams have to spend time figuring out which tool has the source of truth for the workflow they need to execute, the benefits of DevOps and Platform Engineering quickly deteriorate.

    There is no better place to migrate the core of your self-service culture to than GitHub–which is the home to 100 million developers and counting. Your source code management tool should be an enabler for developer productivity and happiness or else they will be reluctant to use it. And if they don’t use it, you won’t have a self-service culture within your enterprise.

    2. Save time and money during audits

    The latest Forrester report on the economic impact of GitHub Enterprise Cloud and GitHub Advanced Security, determined a 75% improvement in time spent managing tools and code infrastructure. But one of the potentially surprising benefits is related to implementing DevOps and cloud native processes that would both help developers and auditors save time and money.

    If your tech stack includes multiple source code tools, and other development tools which may not be integrated our have overlapping capabilities, each time your security, compliance, and audit teams need to review the source of truth for your delivery artifacts, you will need to gather artifacts and setup walkthroughs for each of the tools. This can lead to days and even weeks of lost time and money on simply preparing and executing audits–taking your delivery teams away from creating business value.

    Working with GitHub customers, Forrester identified and quantified key benefits of investing in GitHub Enterprise Cloud and GitHub Advanced Security. The corresponding GitHub Ent ROI Estimate Calculator includes factors for time saving on IT Audit preparations related to the number of non-development security or audit staff involved in software development. This itself can lead to hundreds of thousands if not millions of dollars of time savings.

    What is not factored into the calculator is the potential time savings for development teams who have a single source of truth for their code and collaboration history. A simplified and centrally auditable tech stack with a single developer-friendly core source code management platform will enable consistent productivity even during traditionally time-consuming audit and compliance reviews–for both developers and non-developers.

    3. Keep up with innovation

    If you are using another source code platform besides GitHub, or if GitHub is one of several tools that are providing the overlapping functionality, some of your teams may be missing out on the amazing innovations that have been happening lately.

    Generative AI is enabling some amazing capabilities and GitHub is at the forefront with our AI pair-programmer, GitHub Copilot. The improvements to developer productivity are truly amazing and continue to improve.

    A graphic showing how many developers and companies have already used GitHub Copilot and how it's helping improve productivity and happiness.
    A graphic showing how many developers and companies have already used GitHub Copilot and how it’s helping improve productivity and happiness.

    GitHub continues to innovate with the news about GitHub Copilot X, which is not only adopting OpenAI’s new GPT-4 model, but introducing chat and voice for GitHub Copilot, and bringing GitHub Copilot to pull requests, the command line, and docs to answer questions on your projects.

    Innovations like this need to be rolled-out in a controlled and governable manner within many enterprises. But if your techstack is overly complex and you have several source code management tools, the roll-out may take a long time or may be stalled while security and compliance reviews take place.

    However, if your development core is GitHub, security and compliance reviews can happen once, on a centrally managed platform that is well understood and secure. And you’ll be front row for all of the amazing new innovations that GitHub will be releasing down the road.

    Get started today

    If you are planning on migrating your source code and collaboration history to GitHub and have questions, thankfully, many other enterprises have done this already with great success and there are resources to help you through the process.

    Visit our GitHub Enterprise Importer documentation for details on supported migration paths, guides for different migration sources, and more.

    If you want to learn more about how GitHub can benefit your business, while increasing developer velocity and collaboration, see how GitHub Enterprise can help.

    Generative AI-enabled compliance for software development

    Post Syndicated from Mark Paulsen original https://github.blog/2023-04-11-generative-ai-enabled-compliance-for-software-development/

    In our recent blog post announcing GitHub Copilot X, we mentioned that generative AI represents the future of software development. This amazing technology will enable developers to stay in the flow while helping enterprises meet their business goals.

    But as we have also mentioned in our blog series on compliance, generative AI may soon act as an enabler for developer-focused compliance programs that will drive optimization and keep your development, compliance and audit teams productive and happy.

    Today, we’ll explore the potential for generative AI to help enable teams to optimize and automate some of the foundational compliance components of separation of duties that many enterprises still often manage and review manually.

    Generative AI has been dominating the news lately—but what exactly is it? Here’s what you need to know, and what it means for developers.

    Separation of duties

    The concept of “separation of duties,” long used in the accounting world as a check and balance approach, is also adopted in other scenarios, including technology architecture and workflows. While helpful to address compliance, it can lead to additional manual steps that can slow down delivery and innovation.

    Fortunately, the PCI-DSS requirements guide provides a more DevOps, cloud native, and AI-enabled approach to separation of duties by focusing on functions and accounts, as opposed to people:

    “The purpose of this requirement is to separate the development and test functions from the production functions. For example, a developer can use an administrator-level account with elevated privileges in the development environment and have a separate account with user-level access to the production environment.”

    There are many parts of a software delivery workflow that need to have separation of duties in place—but one of the core components that is key for any compliance program is the code review. Having a separate set of objective eyes reviewing your code, whether it’s human or AI-powered, helps to ensure risks, tech debt, and security vulnerabilities are found and mitigated as early as possible.

    Code reviews also help enable the concept of separation of duties since it prohibits a single person or a single function, account, or process from moving code to the next part of your delivery workflow. Additionally, code reviews help enable separation of duties for Infrastructure as Code (IaC) workflows, Policy-as-Code configurations, and even Kubernetes declarative deployments.

    As we mentioned in our previous blog, GitHub makes code review easy, since pull requests are part of the existing workflow that millions of developers use daily. Having a foundational piece of compliance built-in to the platform that developers know and love keeps them in the flow, while keeping compliance and audit teams happy as well.

    Generative AI and pull requests

    Wouldn’t it be cool if one-day generative AI could be leveraged to enable more developer-friendly compliance programs which have traditionally been very labor and time intensive? Imagine if generative AI could help enable DevOps and cloud native approaches for separation of duties by automating tedious tasks and allowing humans to focus on key value-added tasks.

    Bringing this back to compliance and separation of duties, wouldn’t it be great if a generative AI helper was available to provide an objective set of eyes on your pull requests? This is what the GitHub Next team has been working towards with GitHub Copilot for Pull Requests.

    • Suggestions for your pull request descriptions. AI-powered tags are embedded into a pull request description and automatically filled out by GitHub Copilot based on the code which the developers changed. Going one step further, the GitHub Next team is also looking at the creation of descriptive sentences and paragraphs as developers create pull requests.
    • Code reviews with AI. Taking pull requests and code reviews one step further, the GitHub Next team is looking at AI to help review the code and provide suggestions for changes. This will help enable human interactions and optimize existing processes. The AI would automate the creation of the descriptions, based on the code changes, as well as suggestions for improvements. The code reviewer will have everything they need to quickly review the change and decide to either move forward or send the change back.

    When these capabilities are production ready, development teams and compliance programs will appreciate these features for a few reasons. First, the pull request and code review process would be driven by a conversation based on a neutral and independent description. Second, the description will be based on the actual code that was changed. Third, both development and compliance workflows will be optimized and allow humans to focus on value-added work.

    While these capabilities are still a work in progress, there are features available now that may help enable compliance, audit, and security teams with GitHub Copilot for Business. The ability for developers to complete tasks faster and stay in the flow are truly amazing. But the ability for GitHub Copilot to provide AI-based security vulnerability filtering nowis a great place for compliance and audit teams within enterprises to get started on their journey to embracing generative AI into their day-to-day practices.

    Next steps

    Generative AI will enable developers and enterprises to achieve success by reducing manual tasks and enabling developers to focus their creativity on business value–all while staying in the flow.

    I hope this blog will help drive positive discussions regarding this topic and has provided a forward looking view into what will be possible in the future. The future ability of generative AI to help enable teams by automating tedious tasks will help humans focus on more value-added work and could eventually be an important part of a robust and risk-based compliance posture.


    Explore GitHub Copilot X >

    What developers need to know about generative AI

    Post Syndicated from Damian Brady original https://github.blog/2023-04-07-what-developers-need-to-know-about-generative-ai/

    By now, you’ve heard of generative artificial intelligence (AI) tools like ChatGPT, DALL-E, and GitHub Copilot, among others. They’re gaining widespread interest thanks to the fact that they allow anyone to create content from email subject lines to code functions to artwork in a matter of moments.

    This potential to revolutionize content creation across various industries makes it important to understand what generative AI is, how it’s being used, and who it’s being used by. In this article, we’ll explore what generative AI is, how it works, some real-world applications, and how it’s already changing the way people (and developers) work.

    What is generative AI used for?

    You may have heard the buzz around new generative AI tools like ChatGPT or the new Bing, but there’s a lot more to generative AI than any one single framework, project, or application.

    Traditional AI systems are trained on large amounts of data to identify patterns, and they’re capable of performing specific tasks that can help people and organizations. But generative AI goes one step further by using complex systems and models to generate new, or novel, outputs in the form of an image, text, or audio based on natural language prompts.

    Generative AI models and applications can, for example, be used for:

    • Text generation. Text generation, as a field, with AI tools has been in development since the 1970s—but more recently, AI researchers have been able to train generative adversarial networks (GANs) to produce text that models human-like speech. A prime example is OpenAI’s application ChatGPT, which has been trained on thousands of texts, books, articles, and code repositories, and can respond with full answers to natural language prompts and questions.
    An example of text generation in ChatGPT
    An example of text generation in ChatGPT
    • Image generation. Generative AI models can be used to create new images with natural language prompts, which is one of the most popular techniques with current tools and applications. The goal with text-to-image generation is to create an image that accurately represents the content of a given prompt. For example, when we give the text prompt, “impressionist style oil painting of a Shiba Inu dog giving a tarot card reading,” to the popular AI image generator DALL-E 2 we get something that looks like this (and yes, it’s a gem):
    An AI-generated image from DALL-E 2 of a Shiba Inu dog giving a tarot card reading
    An AI-generated image from DALL-E 2 of a Shiba Inu dog giving a tarot card reading

    An example of a video created with a text prompt using diffusion models from [Imagen Video](https://imagen.research.google/).

    • Programming code generation. Rather than scouring the internet or developer community groups for help with code examples, generative AI models can be used to help generate new programming code with natural language prompts, complete partially written code with suggestions, or even translate code from one programming language to another. This is how, at a simple level, GitHub Copilot works: it uses OpenAI’sCodex model to offer code suggestions right from a developer’s editor. However, as you would with any software development tool, we encourage you to review generated code before merging into production.

    • Data generation. Creating new data—which is called synthetic data—and augmenting existing data sets is another common use case for generative AI. This involves generating new samples from an existing dataset to increase the dataset’s size and improve machine learning models trained on it, all while providing a layer of privacy since real user data is not being utilized to power models. Synthetic data generation provides a way to create useful, meaningful data for more than just ML training though—a number of self-driving car companies like Cruise and Waymo utilize AI-generated synthetic data for training perception systems to prepare vehicles for real-world situations while in operation.

    • Language translation. Natural-language understanding (NLU) models combined with generative AI have become increasingly popular to provide language translations on-the-fly. These types of tools help companies break language barriers and increase their scope of accessibility for customer bases by being able to provide things like support or documentation in their native language. Through complex, deep learning algorithms, generative AI is able to understand the context of a source text and linguistically construct those sentences in another language. This practice can also apply to coding languages, for example, translating a desired function from Python to Java.

    The bottom line: Even though generative AI is a relatively new technology, it’s already being used in consumer and business applications. The use cases, as well as the quantity of applications created with it, will continue evolving to meet more distinct and specific needs.

    How does generative AI work?

    Generative AI models work by using neural networks to identify patterns from large sets of data, then generate new and original data or content.

    But what are neural networks? In simple terms, they use interconnected nodes that are inspired by neurons in the human brain. These networks are the foundation of machine learning and deep learning models, which use a complex structure of algorithms to process large amounts of data such as text, code, or images. Training these neural networks involves adjusting the weights or parameters of the connections between neurons to minimize the difference between predicted and desired outputs, which allows the network to learn from mistakes and make more accurate predictions based on the data.

    Algorithms are a key component of machine learning and generative AI models. But beyond helping machines learn from data, algorithms are also used to optimize accuracy of outputs and make decisions, or recommendations, based on input data.

    While algorithms help automate these processes, building a generative AI model is incredibly complex due to the massive amounts of data and compute resources they require. People and organizations need large datasets to train these models, and generating high-quality data can be time-consuming and expensive.

    To restate the obvious, these models are complicated. Need proof? Here are some common generative AI models and how they work:

    • Large language models (LLM): LLMs are a type of machine learning model that process and generate natural language text. One of the most significant advancements in the development of large language models has been the availability of vast amounts of text data, such as books, websites, and social media posts. This data can be used to train models that are capable of predicting and generating natural language responses in a variety of contexts. As a result, large language models have multiple practical applications, such as virtual assistants, chatbots, or text generators, like ChatGPT.

    • Generative adversarial networks (GAN): GANs are one of the most used models for generative AI, and they employ two different neural networks. GANs consist of two different types of neural networks: a generator and a discriminator. The generator network generates new data, such as images or audio, from a random noise signal while the discriminator is trained to distinguish between real data from the training set and the data produced by the generator.

    During training, the generator tries to create data that can trick the discriminator network into thinking it’s real. This “adversarial” process will continue until the generator can produce data that is totally indistinguishable from real data in the training set. This process helps both networks improve at their respective tasks, which ultimately results in more realistic and higher-quality generated data.

    A diagram illustrating how a generative adversarial network works. Image [CC BY-SA 4.0](https://creativecommons.org/licenses/by-sa/4.0/deed.en) האדם-החושב on wikipedia
    A diagram illustrating how a generative adversarial network works. Image [CC BY-SA 4.0](https://creativecommons.org/licenses/by-sa/4.0/deed.en) האדם-החושב on wikipedia
    • Transformer-based models: A transformer-based model’s neural networks operate by learning context and meaning through tracking relationships of sequential data, which means these models are really good at natural language processing tasks like machine translation, language modeling, and answering questions. These models have been used in popular language models, such as GPT-4 (which stands for Generative Pre-trained Transformer 4), and have also been adapted for other such tasks that require the modeling of sequential data such as image recognition.
    • Variational autoencoder models (VAEs): These models are similar to GANs in that they work with two different neural networks: encoders and decoders. VAEs can take a large amount of data and compress it into a smaller representation, which can be used to create new data that is similar to the original data. VAEs are often used in image, video, and audio generation—and here’s a fun fact: you can train a VAE on datasets like CelebA, which contains over 200,000 images of celebrities, to create completely new portraits of people that don’t exist.
     The smile vector, a concept vector discovered by [Tom White](https://aiartists.org/tom-white) using VAEs trained on the CelebA dataset.
    The smile vector, a concept vector discovered by Tom White using VAEs trained on the CelebA dataset.

    The real-world applications of generative AI

    The impact of generative AI is quickly becoming apparent—but it’s still in its early days. Despite this, we’re already seeing a proliferation of applications, products, and open source projects that are using generative AI models to achieve specific outcomes for people and organizations (and yes, developers, too).

    Though generative AI is constantly evolving, it already has some solid real world applications. Here’s just a few of them:

    Coding

    New and seasoned developers alike can utilize generative AI to improve their coding processes. Generative AI coding tools can help automate some of the more repetitive tasks, like testing, as well as complete code or even generate brand new code. GitHub has its own AI-powered pair programmer, GitHub Copilot, which uses generative AI to provide developers with code suggestions. And GitHub also has announced GitHub Copilot X, which brings generative AI to more of the developer experience across the editor, pull requests, documentation, CLI, and more.

    Accessibility

    Generative AI has the potential to greatly impact and improve accessibility for folks with disabilities through a variety of modalities, such as speech-to-text transcription, text-to-speech audio generation, or assistive technologies. One of the most exciting facets of our GitHub Copilot tool is its voice-activated capabilities that allow developers with difficulties using a keyboard to code with their voice. By leveraging the power of generative AI, these types of tools are paving the way for a more inclusive and accessible future in technology.

    Gaming

    Generative AI can take gaming to the next level (get it? 😉) by generating new characters, storylines, design components, and more. Case in point: The developer behind the game, This Girl Does Not Exist, has said that every component of the game—from the storyline to the art and even the music—was generated entirely by AI. This use of generative AI can enable gaming studios to create new and exciting content for their users, all without increasing the developer workload, which frees them up to work on other aspects of the game, such as story development.

    Web design

    Designers can utilize generative AI tools to automate the design process and save significant time and resources, which allows for a more streamlined and efficient workflow. Additionally, incorporating these tools into the development process can lead to the creation of highly customized designs and logos, enhancing the overall user experience and engagement with the website or application. Generative AI tools can also be used to do some of the more tedious work, such as creating design layouts that are optimized and adaptable across devices. For example, designers can use tools like designs.ai to quickly generate logos, banners, or mockups for their websites.

    Microsoft and other industry players are increasingly utilizing generative AI models in search to create more personalized experiences. This includes query expansion, which generates relevant keywords to reduce the number of searches. So, rather than the search engine returning a list of links, generative AI can help these new and improved models return search results in the form of natural language responses. Bing now includes AI-powered features in partnership with OpenAI that provide answers to complex questions and allow users to ask follow-up questions in a chatbox for more refined responses.

    Healthcare

    Interest has emerged around the potential applications of generative AI in the healthcare field to improve disease detection and diagnosis, advance medical research, and accelerate progress in the pharmaceutical space. Potentially, generative AI could be used to analyze large amounts of data to simulate chemical structures and predict new compounds will be the most effective for new drug discoveries. NVIDIA Clara is one example of a generative AI model specifically designed for medical imaging and healthcare research. (Plus, Gartner suggests more than 30 percent of new pharmaceutical drugs and materials will be discovered via generative AI models by 2025.)

    Fun fact: Did you know that ChatGPT recently passed the US Medical Licensing exam without any intervention from clinicians?

    Marketing and advertising

    In marketing, content is king—and generative AI is making it easier than ever to quickly create large amounts of it. A number of companies, agencies, and creators are already turning to generative AI tools to create images for social posts or write captions, product descriptions, blog posts, email subject lines, and more. Generative AI can also help companies personalize ad experiences by creating custom, engaging content for individuals at speed. Writers, marketers, and creators can leverage tools like Jasper to generate copy, Surfer SEO to optimize organic search, or albert.ai to personalize digital advertising content.

    Art and design

    As we’ve seen above, the power of AI can be harnessed to create some incredible portraits in a matter of moments (re: the future-telling Shiba 🐕). Artists and designers alike are using these AI tools as a source of inspiration. For example, architects can quickly create 3D models of objects or environments and artists can breathe new life into their portraits by using AI to apply different styles, like adding a Cubist style to their original image. Need proof? Designers are already starting to use AI image generators, such as Midjourney and Microsoft Designer, to create high-quality images by simply typing out Discord commands.
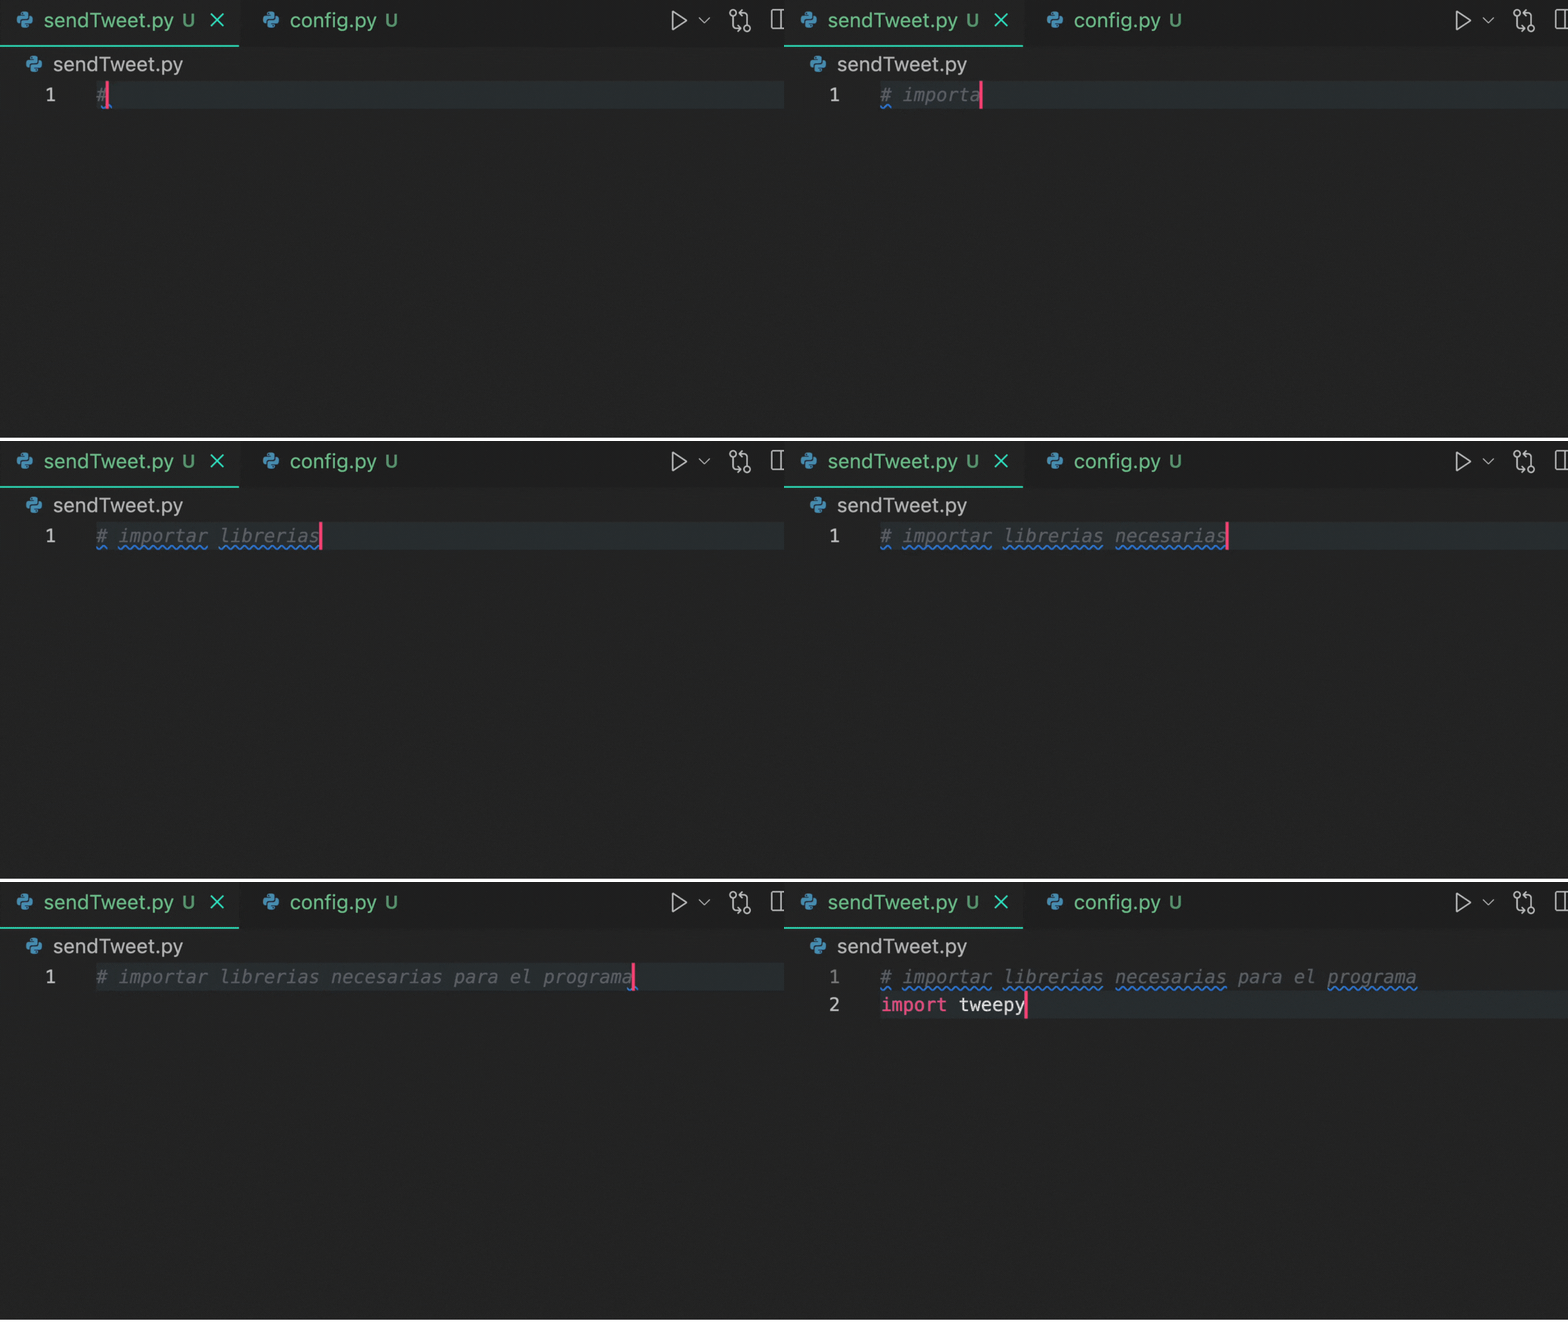
    Finance

    In a recent discussion about tech trends and how they’ll affect the finance sector, Michael Schrage, a research fellow at the MIT Sloan School Initiative on the Digital Economy, said, “I think, increasingly, we’re going to be seeing generative AI used for financial forecasts and scenario generation.” This is a likely path forward—generative AI can be used to analyze large amounts of data to detect fraud, manage risk, and inform decision making. And that has obvious applications in the financial services industry.

    Manufacturing

    Manufacturers are starting to turn to generative AI solutions to help with product design, quality control, and predictive maintenance. Generative AI can be used to analyze historical data to improve machine failure predictions and help manufacturers with maintenance planning. According to research conducted by Capgemini, more than half of European manufacturers are implementing some AI solutions (although so far, these aren’t generative AI solutions). This is largely because the sheer amount of manufacturing data is easier for machines to analyze at speed than humans.

    AI as a partner: Generative AI models and tools are narrow in focus, and work best at generating content, code, and images. In research at GitHub, we’ve found that GitHub Copilot helps developers code up to 55% faster, underscoring how generative AI models and tools can improve overall productivity and boost efficiency. Metrics like these show how generative AI tools are already changing how people and teams work—but they also underscore how these tools act as complement to human efforts.

    Take this with you

    Whether it’s creating visual assets for an ad campaign or augmenting medical images to help diagnose diseases, generative AI is helping us solve complex problems at speed. And the emergence of generative AI-based programming tools has revolutionized the way developers approach writing code.

    We know that developers want to design and write software quickly, and tools like GitHub Copilot are enabling them to access large datasets to write more efficient code and boost productivity. In fact, 96% of developers surveyed reported spending less time on repetitive tasks using GitHub Copilot, which in turn allowed 74% of them to focus on more rewarding work.

    While these models aren’t perfect yet, they’re getting better by the day—and that’s creating an exciting immediate future for developers and generative AI.

    8 things you didn’t know you could do with GitHub Copilot

    Post Syndicated from Rizel Scarlett original https://github.blog/2022-09-14-8-things-you-didnt-know-you-could-do-with-github-copilot/

    Similar to other AI pair programming tools, GitHub Copilot is changing the game of software development. GitHub Copilot is an AI pair programmer that helps you write code faster with less work. We use the terms “AI pair programmer” and “Copilot” to imply that this tool cannot work without you–the developer! It’s not magic. It cannot read minds, although it sometimes feels like it can. However, by sharing code completion suggestions based on my project’s context and style conventions, GitHub Copilot increased my velocity and confidence as a programmer.

    The best part is you can use GitHub Copilot to increase your velocity and confidence as you code, too! In June 2022, we made GitHub Copilot available to all individual developers. You can learn how to get started with GitHub Copilot here.

    If it’s not reading minds and it’s not magic, then how does it work?

    Open AI Codex, a machine learning model that translates natural language into code, powers GitHub Copilot to draw context from comments and code to suggest individual lines and whole functions as you type. Codex is a version of GPT-3 (Generative Pre-trained Transformer 3) fine-tuned for programming tasks. Some of your favorite applications, like Duolingo, use GPT-3 for grammar correction.

    For more information on how GitHub Copilot works and its effectiveness, check out the following resources:

    Unexpected yet valuable GitHub Copilot use cases

    Once installed, the extension will suggest code as you type, but what next? How can you optimally benefit from the GitHub Copilot extension?

    First, I recommend writing clear, understandable comments to help your AI pair programmer generate desired solutions, but if you’re interested in exploring how to use GitHub Copilot in ways you might not be thinking of, we compiled some fun and valuable use cases we’ve seen in talking with developers. I hope that the following examples inspire you!

    1. Assisting non-native English speakers

    GitHub Copilot can understand other languages beyond English! This is helpful for developers of all backgrounds because programming languages are based on American English. For example, the CSS property color is based on American English, so it is unfamiliar for native British-English or Canadian-English speakers who use the spelling ‘colour’. Forgetting the correct spelling and syntax can often result in typos, unexpected errors, and lost time.

    In the GIF below, I wrote a comment in Spanish that says, “importar,” which translates to “import.” GitHub Copilot quickly completed my comment in Spanish and imported the necessary libraries as the comment described.

    Demonstration of GitHub Copilot interpreting a comment in Spanish.

    Additionally, GitHub Copilot helps translate words from English to other languages. MilMikDev on Twitter used GitHub Copilot to translate an array of words ‘answer’, ‘question,’ and ‘date’ to various languages.

    Demonstration of using GitHub Copilot to translate an array of words ‘answer’, ‘question,’ and ‘date’ to various languages.

    2. Creating dictionaries with lookup data

    Martin Woodward, Vice President of Developer Relations at GitHub, shared this tip with us! GitHub Copilot is great at creating dictionaries of lookup data. Try it out by writing a comment instructing GitHub Copilot to create a dictionary of two-letter ISO country codes and their contributing country name. Writing a comment and the first few lines of code should help GitHub Copilot generated the desired results. See the GIF below for visual representation!

    Demonstration of using GitHub Copilot to create a dictionary of two-letter ISO country codes and their contributing country name.

    3. Testing your code

    Writing tests is a vital yet sometimes tedious step in the software development lifecycle. Because GitHub Copilot excels in pattern recognition and pattern completion, it can speed up the process of writing unit tests, visual regression tests, and more.

    Check out these resources to learn more about using GitHub Copilot for testing:

    4. Matching patterns with regular expressions

    With GitHub Copilot, you can spend less time fiddling in a Regex playground or combing through StackOverflow to match character combinations in strings. Instead, you can write a comment or a function name to trigger GitHub Copilot’s suggestions.

    I used Copilot to help me validate a phone number!

    Demonstration of using GitHub Copilot to validate a phone number.

    GitHub Copilot can help you remove white space from a string!

    Demonstration of using GitHub Copilot to remove white space from a string.

    5. Preparing for technical interviews

    While this may sound unorthodox, developers, including myself, use GitHub Copilot to study for interviews.

    Here’s the strategy:

    • First, I try to solve the problem without GitHub Copilot.
    • If I’m feeling extremely stuck and disheartened while solving the problem, I’ll activate GitHub Copilot and use it to generate ideas on how to solve the problem better.
    • Subsequently, I’ll delete the code GitHub Copilot generated, deactivate GitHub Copilot, and make another attempt at finding a solution with the new information in mind.

    By adopting this method, I maintain momentum when tempted to quit. Instead of giving up, I gain new perspectives even when I don’t have a mentor or peer to guide me. GitHub Copilot becomes my digital mentor. But, note, that I highly discourage activating GitHub Copilot during an interview (that’s cheating!).

    Interestingly, chess players take a similar approach when preparing for matches. It’s common for chess players to practice against AI engines to advance their skills. In the publication, Towards Data Science, Bharath K writes, “Artificial Intelligence has influenced the way in which chess games are played at the top level. Most of the Grandmasters and Super Grandmasters (rated at a FIDE above 2700) utilize these modern AI chess engines to analyze their games and the games of their competitors.” Learn more about the influence of AI chess engines here.

    If AI is helping chess players advance their skills, perhaps it can positively impact developers’ problem-solving skills by challenging them to think differently about solving a problem.

    You can learn more about leveraging GitHub Copilot to solve algorithmic problems here. In the example below, I wrote a comment that says, “write a binary search algorithm,” and the first line of my function. GitHub Copilot correctly completed the function.

    Screenshot of a code editor demonstrating that GitHub Copilot correctly completed a function based on the input of a comment and the first line of the function.

    6. Sending tweets

    Of course, you can simply use the Twitter application to send a Tweet, but it’s more fun to send a Tweet via your IDE! As a Developer Advocate, part of my job is to create demos. In a recent livestream, I had to demonstrate using Twitter API v2 with GitHub Copilot in Python, a language that I rarely use. GitHub Copilot saved the day and generated the code I needed after I wrote a few comments. Read my DEV post if you want to try sending a tweet with GitHub Copilot, too!

    Screenshot of a tweet from Rizel Scarlett that reads, "I wrote this tweet with Copilot and I'm in KCDC right now."

    7. Exiting Vim

    Developers who are new to Vim frequently wonder how to exit the editor. Struggling to exit vim is so common that it’s a meme on the internet! Since GitHub Copilot is available in Visual Studio Code, JetBrains, and Neovim, a forked version of Vim with additional features, you can exit NeoVim using GitHub Copilot. In the video below, Brian Douglas uses GitHub Copilot to exit NeoVim, by writing a comment that says, “How do I exit vim?”

    8. Navigating a new codebase with Copilot Labs

    GitHub Copilot Labs is a complementary extension that comes with GitHub Copilot access. The GitHub Next team developed GitHub Copilot Labs, an experimental sidebar, to help developers translate code from one programming language to another and get a step-by-step explanation of code snippets.

    There’s no easy method for building a mental model of a new codebase, but these two features within GitHub Copilot Labs can help. By translating code snippets to languages they’re more familiar with and using the ‘Explain’ feature to gain an understanding of the code, developers can better comprehend complex blocks of code.

    Demonstration of using Copilot's ‘Explain’ feature to gain an understanding of the code, developers can better comprehend complex blocks of code.

    Closeup look at the results of Copilot's 'Explain' feature being used.

    Wrap-up

    As you’ve seen in the examples above, GitHub Copilot can help you be more productive in so many ways day to day (a lot of which we’re still discovering!), and I want to kindly remind you that GitHub Copilot is an AI pair programmer, so just as you would with your coworkers’ code or even your own, review the generated code before pushing it to production! While GitHub Copilot is powerful, sometimes it makes mistakes or refers to an outdated version of an API. Nevertheless, the team at GitHub continues to work hard and learn from our users to develop a better experience and generate better results with GitHub Copilot. I’m excited to witness and experience the evolution of AI pair programming tools. If you’re just as eager as me, sign up for GitHub Copilot today!