Post Syndicated from Suleman Ahmad original https://blog.cloudflare.com/https-only-for-cloudflare-apis-shutting-the-door-on-cleartext-traffic/
Connections made over cleartext HTTP ports risk exposing sensitive information because the data is transmitted unencrypted and can be intercepted by network intermediaries, such as ISPs, Wi-Fi hotspot providers, or malicious actors on the same network. It’s common for servers to either redirect or return a 403 (Forbidden) response to close the HTTP connection and enforce the use of HTTPS by clients. However, by the time this occurs, it may be too late, because sensitive information, such as an API token, may have already been transmitted in cleartext in the initial client request. This data is exposed before the server has a chance to redirect the client or reject the connection.
A better approach is to refuse the underlying cleartext connection by closing the network ports used for plaintext HTTP, and that’s exactly what we’re going to do for our customers.
Today we’re announcing that we’re closing all of the HTTP ports on api.cloudflare.com. We’re also making changes so that api.cloudflare.com can change IP addresses dynamically, in line with on-going efforts to decouple names from IP addresses, and reliably managing addresses in our authoritative DNS. This will enhance the agility and flexibility of our API endpoint management. Customers relying on static IP addresses for our API endpoints will be notified in advance to prevent any potential availability issues.
In addition to taking this first step to secure Cloudflare API traffic, we’ll release the ability for customers to opt-in to safely disabling all HTTP port traffic for their websites on Cloudflare. We expect to make this free security feature available in the last quarter of 2025.
We have consistently advocated for strong encryption standards to safeguard users’ data and privacy online. As part of our ongoing commitment to enhancing Internet security, this blog post details our efforts to enforce HTTPS-only connections across our global network.
We already provide an “Always Use HTTPS” setting that can be used to redirect all visitor traffic on our customers’ domains (and subdomains) from HTTP (plaintext) to HTTPS (encrypted). For instance, when a user clicks on an HTTP version of the URL on the site (http://www.example.com), we issue an HTTP 3XX redirection status code to immediately redirect the request to the corresponding HTTPS version (https://www.example.com) of the page. While this works well for most scenarios, there’s a subtle but important risk factor: What happens if the initial plaintext HTTP request (before the redirection) contains sensitive user information?
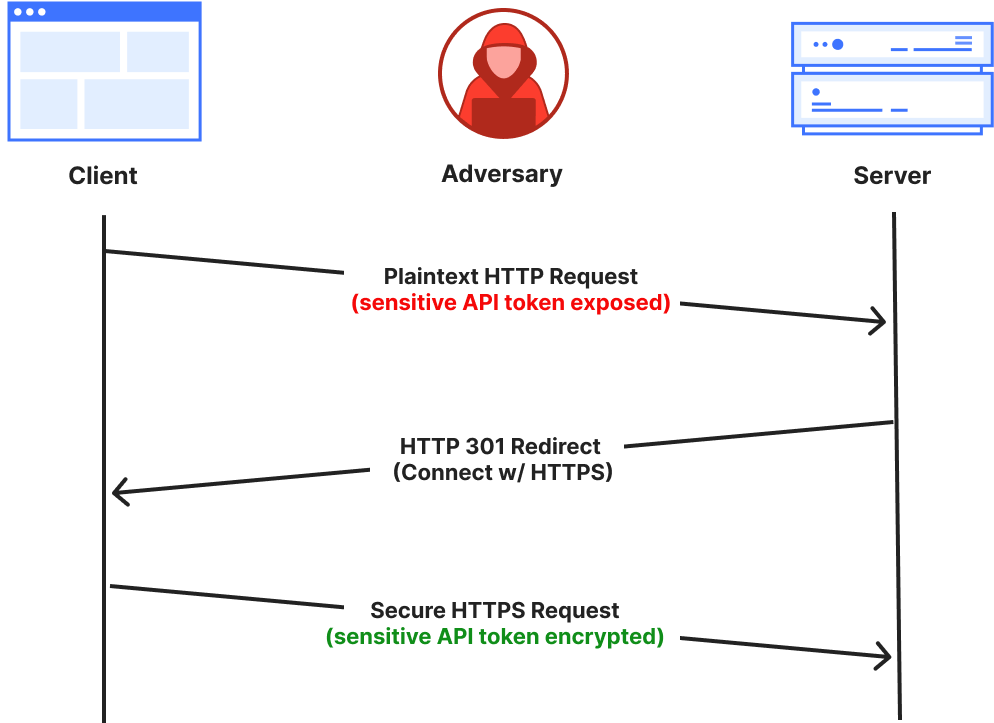
Initial plaintext HTTP request is exposed to the network before the server can redirect to the secure HTTPS connection.
Third parties or intermediaries on shared networks could intercept sensitive data from the first plaintext HTTP request, or even carry out a Monster-in-the-Middle (MITM) attack by impersonating the web server.
One may ask if HTTP Strict Transport Security (HSTS) would partially alleviate this concern by ensuring that, after the first request, visitors can only access the website over HTTPS without needing a redirect. While this does reduce the window of opportunity for an adversary, the first request still remains exposed. Additionally, HSTS is not applicable by default for most non-user-facing use cases, such as API traffic from stateless clients. Many API clients don’t retain browser-like state or remember HSTS headers they’ve encountered. It is quite common practice for API calls to be redirected from HTTP to HTTPS, and hence have their initial request exposed to the network.
Therefore, in line with our culture of dogfooding, we evaluated the accessibility of the Cloudflare API (api.cloudflare.com) over HTTP ports (80, and others). In that regard, imagine a client making an initial request to our API endpoint that includes their secret API key. While we outright reject all plaintext connections with a 403 Forbidden response instead of redirecting for API traffic — clearly indicating that “Cloudflare API is only accessible over TLS” — this rejection still happens at the application layer. By that point, the API key may have already been exposed over the network before we can even reject the request. We do have a notification mechanism in place to alert customers and rotate their API keys accordingly, but a stronger approach would be to eliminate the exposure entirely. We have an opportunity to improve!
Any API key or token exposed in plaintext on the public Internet should be considered compromised. We can either address exposure after it occurs or prevent it entirely. The reactive approach involves continuously tracking and revoking compromised credentials, requiring active management to rotate each one. For example, when a plaintext HTTP request is made to our API endpoints, we detect exposed tokens by scanning for ‘Authorization’ header values.
In contrast, a preventive approach is stronger and more effective, stopping exposure before it happens. Instead of relying on the API service application to react after receiving potentially sensitive cleartext data, we can preemptively refuse the underlying connection at the transport layer, before any HTTP or application-layer data is exchanged. The preventative approach can be achieved by closing all plaintext HTTP ports for API traffic on our global network. The added benefit is that this is operationally much simpler: by eliminating cleartext traffic, there’s no need for key rotation.
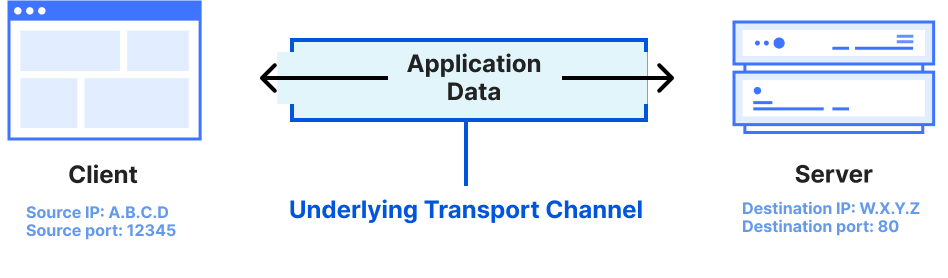
The transport layer carries the application layer data on top.
To explain why this works: an application-layer request requires an underlying transport connection, like TCP or QUIC, to be established first. The combination of a port number and an IP address serves as a transport layer identifier for creating the underlying transport channel. Ports direct network traffic to the correct application-layer process — for example, port 80 is designated for plaintext HTTP, while port 443 is used for encrypted HTTPS. By disabling the HTTP cleartext server-side port, we prevent that transport channel from being established during the initial “handshake” phase of the connection — before any application data, such as a secret API key, leaves the client’s machine.
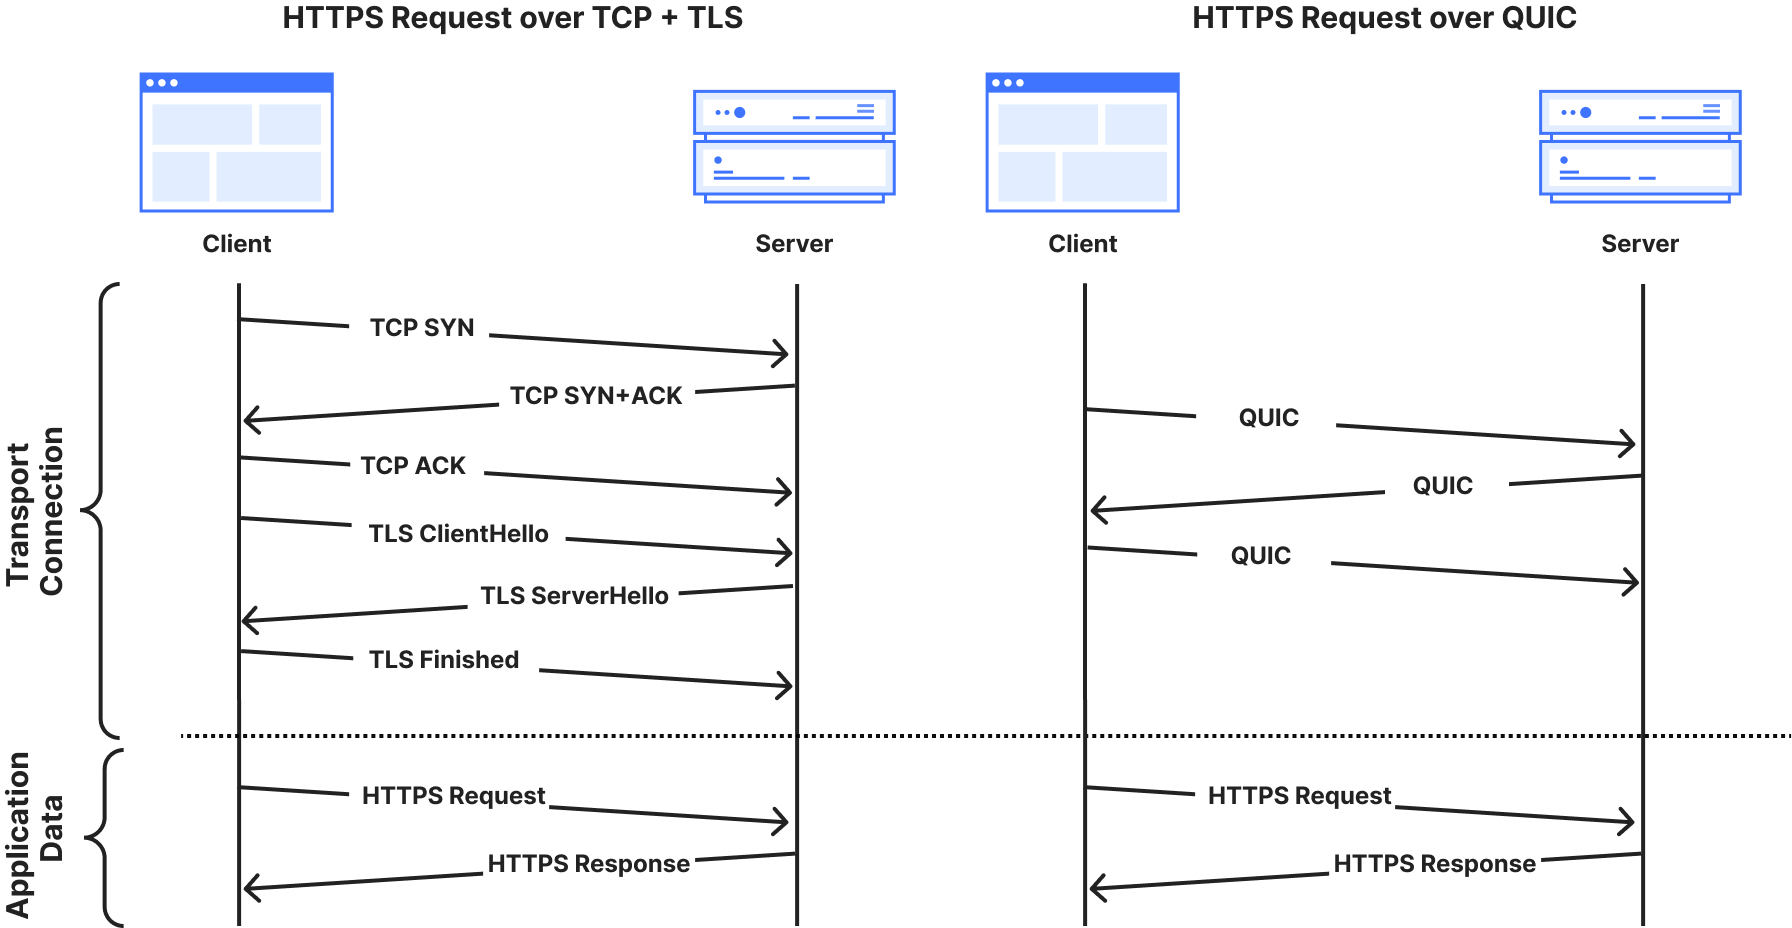
Both TCP and QUIC transport layer handshakes are a pre-requisite for HTTPS application data exchange on the web.
Therefore, closing the HTTP interface entirely for API traffic gives a strong and visible fast-failure signal to developers that might be mistakenly accessing http://… instead of https://… with their secret API keys in the first request — a simple one-letter omission, but one with serious implications.
In theory, this is a simple change, but at Cloudflare’s global scale, implementing it required careful planning and execution. We’d like to share the steps we took to make this transition.
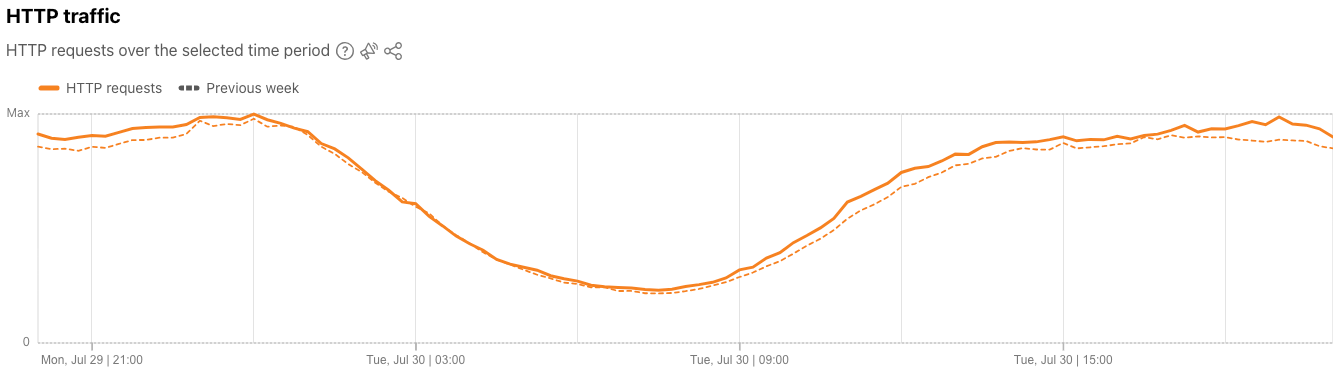
In an ideal scenario, we could simply close all cleartext HTTP ports on our network. However, two key challenges prevent this. First, as shown in the Cloudflare Radar figure below, about 2-3% of requests from “likely human” clients to our global network are over plaintext HTTP. While modern browsers prominently warn users about insecure HTTP connections and offer features to silently upgrade to HTTPS, this protection doesn’t extend to the broader ecosystem of connected devices. IoT devices with limited processing power, automated API clients, or legacy software stacks often lack such safeguards entirely. In fact, when filtering on plaintext HTTP traffic that is “likely automated”, the share rises to over 16%! We continue to see a wide variety of legacy clients accessing resources over plaintext connections. This trend is not confined to specific networks, but is observable globally.
Closing HTTP ports, like port 80, across our entire IP address space would block such clients entirely, causing a major disruption in services. While we plan to cautiously start by implementing the change on Cloudflare’s API IP addresses, it’s not enough. Therefore, our goal is to ensure all of our customers’ API traffic benefits from this change as well.
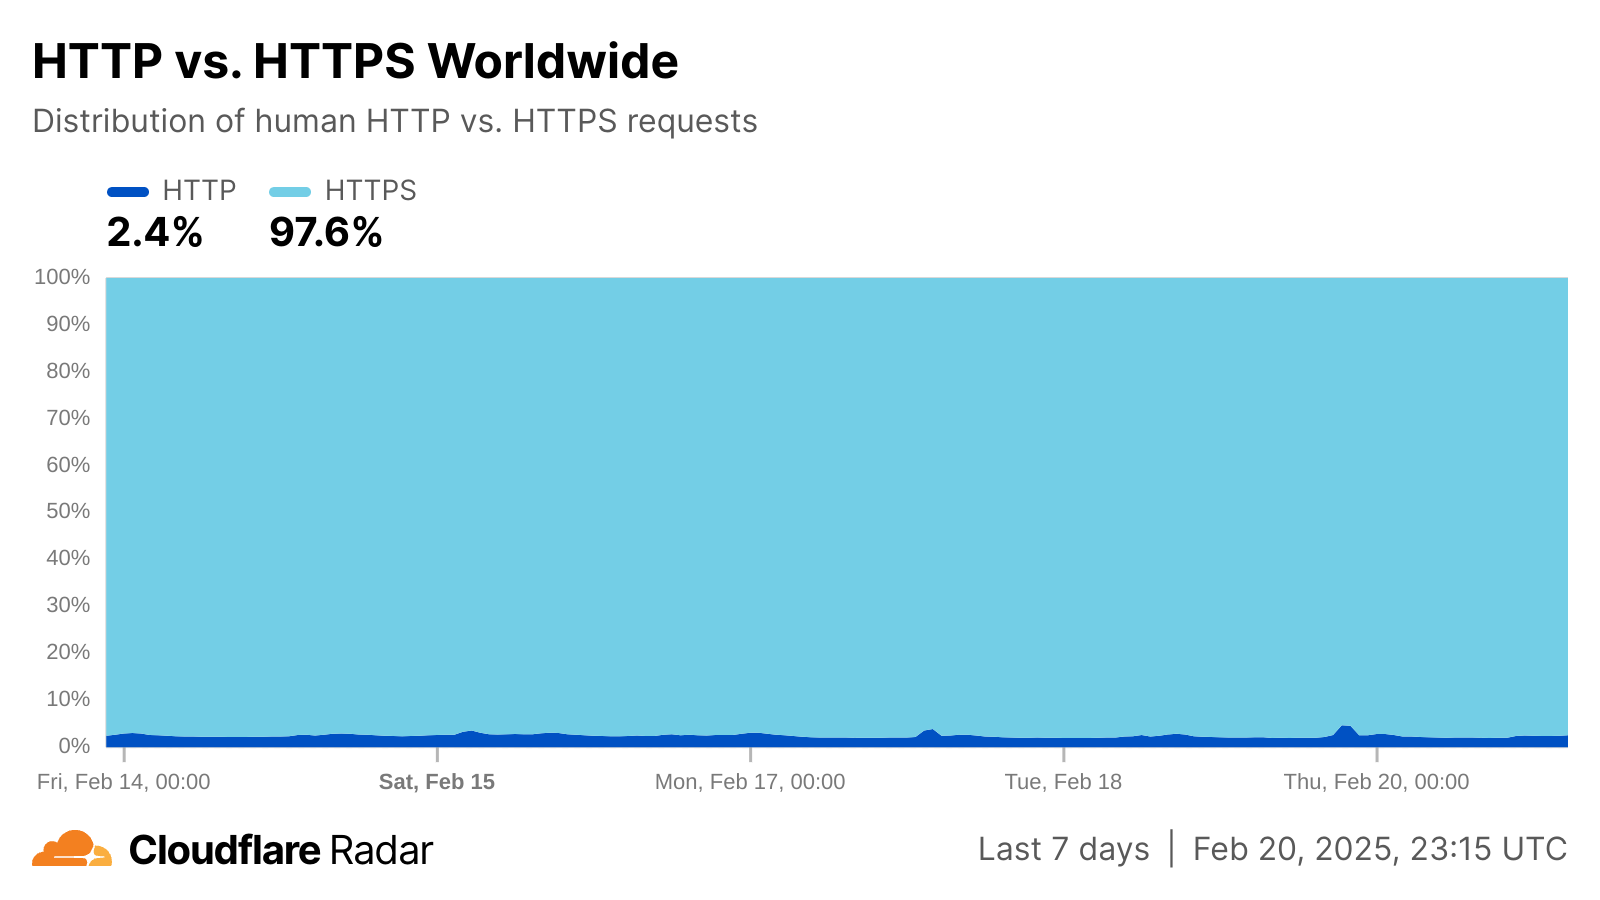
Breakdown of HTTP and HTTPS for ‘human’ connections
The second challenge relates to limitations posed by the longstanding BSD Sockets API at the server-side, which we have addressed using Tubular, a tool that inspects every connection terminated by a server and decides which application should receive it. Operators historically have faced a challenging dilemma: either listen to the same ports across many IP addresses using a single socket (scalable but inflexible), or maintain individual sockets for each IP address (flexible but unscalable). Luckily, Tubular has allowed us to resolve this using ‘bindings’, which decouples sockets from specific IP:port pairs. This creates efficient pathways for managing endpoints throughout our systems at scale, enabling us to handle both HTTP and HTTPS traffic intelligently without the traditional limitations of socket architecture.
Step 0, then, is about provisioning both IPv4 and IPv6 address space on our network that by default has all HTTP ports closed. Tubular enables us to configure and manage these IP addresses differently than others for our endpoints. Additionally, Addressing Agility and Topaz enable us to assign these addresses dynamically, and safely, for opted-in domains.
In the past, our legacy stack would have made this transition challenging, but today’s Cloudflare possesses the appropriate tools to deliver a scalable solution, rather than addressing it on a domain-by-domain basis.
Using Tubular, we were able to bind our new set of anycast IP prefixes to our TLS-terminating proxies across the globe. To ensure that no plaintext HTTP traffic is served on these IP addresses, we extended our global iptables firewall configuration to reject any inbound packets on HTTP ports.
iptables -A INPUT -p tcp -d <IP_ADDRESS_BLOCK> --dport <HTTP_PORT> -j REJECT
--reject-with tcp-reset

iptables -A INPUT -p udp -d <IP_ADDRESS_BLOCK> --dport <HTTP_PORT> -j REJECT
--reject-with icmp-port-unreachable
As a result, any connections to these IP addresses on HTTP ports are filtered and rejected at the transport layer, eliminating the need for state management at the application layer by our web proxies.
The next logical step is to update the DNS assignments so that API traffic is routed over the correct IP addresses. In our case, we encoded a new DNS policy for API traffic for the HTTPS-only interface as a declarative Topaz program in our authoritative DNS server:
- name: https_only
 exclusive: true
 config: |
    (config
      ([traffic_class "API"]
       [ipv4 (ipv4_address “192.0.2.1”)] # Example IPv4 address
       [ipv6 (ipv6_address “2001:DB8::1:1”)] # Example IPv6 address
       [t (ttl 300]))
  match: |
    (= query_domain_class traffic_class)
  response: |
    (response (list ipv4) (list ipv6) t)
The above policy encodes that for any DNS query targeting the ‘API traffic’ class, we return the respective HTTPS-only interface IP addresses. Topaz’s safety guarantees ensure exclusivity, preventing other DNS policies from inadvertently matching the same queries and misrouting plaintext HTTP expected domains to HTTPS-only IPs
api.cloudflare.com is the first domain to be added to our HTTPS-only API traffic class, with other applicable endpoints to follow.
As we said above, we’ve started with api.cloudflare.com and our internal API endpoints to thoroughly monitor any side effects on our own systems before extending this feature to customer domains. We have deployed these changes gradually across all data centers, leveraging Topaz’s flexibility to target subsets of traffic, minimizing disruptions, and ensuring a smooth transition.
To monitor unencrypted connections for your domains, before blocking access using the feature, you can review the relevant analytics on the Cloudflare dashboard. Log in, select your account and domain, and navigate to the “Analytics & Logs” section. There, under the “Traffic Served Over SSL” subsection, you will find a breakdown of encrypted and unencrypted traffic for your site. That data can help provide a baseline for assessing the volume of plaintext HTTP connections for your site that will be blocked when you opt in. After opting in, you would expect no traffic for your site will be served over plaintext HTTP, and therefore that number should go down to zero.
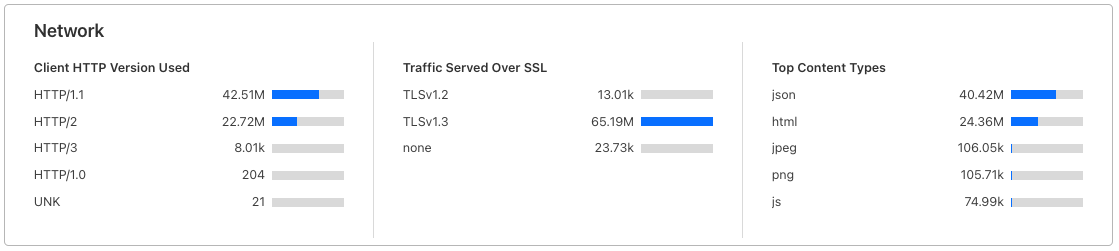
Snapshot of ‘Traffic Served Over SSL’ section on Cloudflare dashboard
Towards the last quarter of 2025, we will provide customers the ability to opt in their domains using the dashboard or API (similar to enabling the Always Use HTTPS feature). Stay tuned!
Starting today, any unencrypted connection to api.cloudflare.com will be completely rejected. Developers should not expect a 403 Forbidden response any longer for HTTP connections, as we will prevent the underlying connection to be established by closing the HTTP interface entirely. Only secure HTTPS connections will be allowed to be established.
We are also making updates to transition api.cloudflare.com away from its static IP addresses in the future. As part of that change, we will be discontinuing support for non-SNI legacy clients for Cloudflare API specifically — currently, an average of just 0.55% of TLS connections to the Cloudflare API do not include an SNI value. These non-SNI connections are initiated by a small number of accounts. We are committed to coordinating this transition and will work closely with the affected customers before implementing the change. This initiative aligns with our goal of enhancing the agility and reliability of our API endpoints.
Beyond the Cloudflare API use case, we’re also exploring other areas where it’s safe to close plaintext traffic ports. While the long tail of unencrypted traffic may persist for a while, it shouldn’t be forced on every site.
In the meantime, a small step like this can allow us to have a big impact in helping make a better Internet, and we are working hard to reliably bring this feature to your domains. We believe security should be free for all!