Post Syndicated from Liam Wadman original https://aws.amazon.com/blogs/security/planning-for-your-iam-roles-anywhere-deployment/
IAM Roles Anywhere is a feature of AWS Identity and Access Management (IAM) that enables you to use X.509 certificates from your public key infrastructure (PKI) to request temporary Amazon Web Services (AWS) security credentials. By using IAM Roles Anywhere, your workloads, applications, containers, or devices that run external to AWS can access AWS resources and perform tasks like backing up data to Amazon Simple Storage Service (Amazon S3), or use AWS Key Management Service (AWS KMS) and the AWS encryption SDK to encrypt your data.
Before you start using IAM Roles Anywhere, it’s important to plan how you’ll integrate it with your PKI and with your applications running outside of AWS. In this blog post, we share considerations and best practices for integrating IAM Roles Anywhere with your PKI and applications.
Placing your trust anchor within your PKI
The first step when you configure IAM Roles Anywhere is to create a trust anchor. A trust anchor is a resource that represents your certificate authority (CA). A trust anchor can be a root CA or an intermediate or issuing CA.
The choice of which CA to use as your trust anchor within your PKI has implications for which end-entity certificates can be used with IAM Roles Anywhere and the security of your IAM Roles Anywhere deployment. Any valid end-entity certificate issued by your trust anchor, or a valid end-entity certificate issued by a CA that is beneath your trust anchor in your PKI’s hierarchy, can be used with IAM Roles Anywhere.
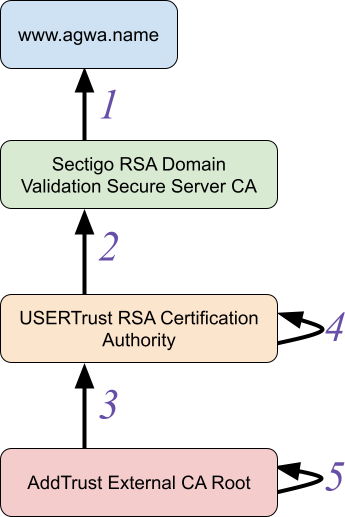
For example, in a three-level PKI where you select your root CA as your trust anchor, an end-entity certificate issued by your root, or an intermediate certificate authority below your root, can be used with this trust anchor for IAM Roles Anywhere, as shown in Figure 1.

Figure 1: The useable end-entity certificates if you select a root CA as a trust anchor
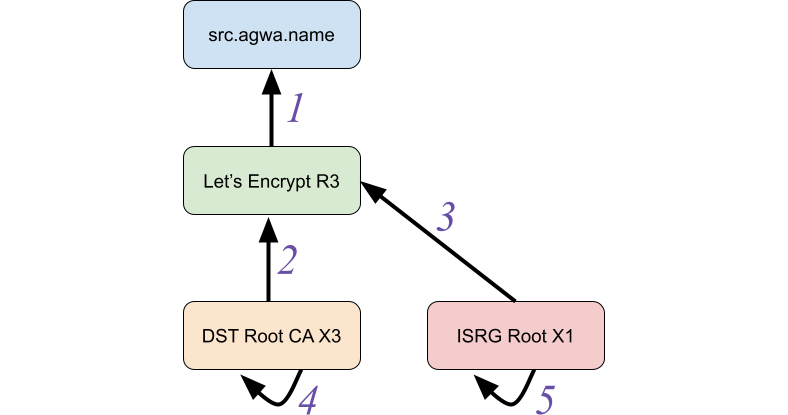
As shown in Figure 2, if you select Intermediate CA 2 (a CA two levels below the root) as your trust anchor for IAM Roles Anywhere, only end-entity certificates issued from Intermediate CA 2 could be used to get temporary AWS credentials with your IAM Roles Anywhere deployment.

Figure 2: The useable end entity certificates if you select a lower level or issuing certificate authority as a trust anchor
In Figure 2, we selected Intermediate CA as our trust anchor and only end-entity certificates issued by Intermediate CA 2 can be used with IAM Roles Anywhere.
Selecting a root or higher-level intermediate CA will give you more flexibility when it comes to rotation of lower-level CAs, but might allow for more certificates than you intend to be able to access your AWS resources. Using a lower-level issuing CA will not allow certificates issued by other CAs within your PKI to be able to use IAM Roles Anywhere, even if they have identical attributes.
Certificates used as trust anchors must meet the following constraints:
- The key usage MUST include
Certificate Sign. - Basic constraints MUST include
CA: true. - To use the certificate revocation list (CRL) functionality of IAM Roles Anywhere, the certificate used as a trust anchor MUST also contain the
CRL Signfor key usage. - The certificate must not be issued by a public CA, or be a public CA.
Choosing your trust anchor: AWS Private CA compared to a self-managed PKI
If you already have an existing PKI and the capability to distribute certificates to your workloads, it’s likely that your existing PKI (which you have experience managing) will be a good choice to use as your IAM Roles Anywhere trust anchor.
However, if you’re looking to establish a PKI without the investment and maintenance costs of operating an on-premises CA, consider using AWS Private Certificate Authority (AWS Private CA). When you use this service, AWS hosts your CAs and allows you to issue certificates by using AWS API requests.
Consider the following when deciding whether to use AWS Private CA for your PKI:
- Automatic rotation of your trust anchor: AWS Private CA is designed to integrate quickly with IAM Roles Anywhere, so you don’t need additional rotation of trust anchor certificates within IAM Roles Anywhere—this will be entirely managed in AWS Private CA.
- Cost: There’s a cost to using AWS Private CA, which can make reusing your existing PKI more cost effective, if you have one. However, there are benefits to using AWS Private CA, such as automatic rotation, scalability, and resiliency, which can offset the cost of the service.
- Scalability and availability: AWS Private CA is a highly scalable and available service across many AWS Regions. AWS Private CA also integrates with AWS Certificate Manager, so that you can conveniently manage certificate issuance and automate certificate renewals.
- Resiliency: You can configure an identical AWS Private CA setup in another supported Region.
- AWS API integration: You can use AWS Private CA to manage and issue certificates with AWS credentials, using IAM roles and temporary security credentials that are subject to the relevant AWS policies.
- Technology integrations: AWS Private CA can integrate with technologies such as third-party certificate management services.
- Certificate delivery: AWS Private CA hosts issuing certificates and issues certificates, but you’re responsible for getting certificates to your workloads. AWS Private CA can integrate with the cert-manager Kubernetes plugin, AWS Managed Microsoft AD, and Simple Certificate Enrollment Protocol (SCEP), in addition to other products and solutions.
For more information about implementing IAM Roles Anywhere with AWS Private CA, see this Security Blog post.
Working with end-entity certificates with IAM Roles Anywhere
In IAM Roles Anywhere, end-entity X.509 certificates are used to authenticate with the CreateSession API call. These end-entity certificates must meet the following constraints:
- The certificates MUST be X.509v3.
- Basic constraints MUST include
CA: false. - The key usage MUST include
Digital Signature. - The signing algorithm MUST include
SHA256or stronger.MD5andSHA1signing algorithms are rejected.
Most certificates issued today, such as those used to serve HTTPS requests or to perform mutual TLS (mTLS) authentication, meet these constraints. Those certificates could be used with IAM Roles Anywhere without changes.
Each end-entity’s certificate serial number doesn’t need to be unique, but it’s a best practice for each certificate issued by your certificate authority to have a unique serial number. The serial number of a certificate is used as the role session name of the IAM role session IAM Roles Anywhere creates, and this number can be used to associate events logged to AWS CloudTrail back to the end-entity certificate that was used to assume an IAM role.
IAM roles and workload identity
After you’ve planned for integration with your PKI, the next step when you set up IAM Roles Anywhere is to plan for how your workload identity will integrate with IAM Roles Anywhere and your PKI. The IAM role session that is created by calling CreateSession represents the identity and permissions of your external workloads within AWS.
To help you achieve least privilege, AWS recommends that you use a dedicated IAM role for each of your applications so that you can give each application only the permissions it requires to operate. For example, if you had two applications, Red and Blue, you would create a separate IAM role for each application and grant each role the IAM permissions it needs to do its job.
To make sure that the Red and Blue applications cannot access each other’s roles, you can restrict access by using X.509 attributes as tags in the trust policy for each IAM role. (See Certificate attribute mapping for more information on attributes.) For this example, we will use the Common Name (CN) attribute to restrict access for the Red application.
The following is a sample IAM role trust policy that lets the Red certificate from a trust anchor named ExampleCorpAnchor assume the role from IAM Roles Anywhere:
{
"Version": "2012-10-17",
    "Statement": [
      {
        "Effect": "Allow",
        "Principal": {
                    "Service": "rolesanywhere.amazonaws.com"
        },
        "Action": [
          "sts:AssumeRole",
          "sts:TagSession",
          "sts:SetSourceIdentity"
        ],
        "Condition": {
            "StringEquals": {
                "aws:PrincipalTag/x509Subject/CN": "Red"
          },
          "ArnEquals": {
                "aws:SourceArn": [
                    "arn:aws:rolesanywhere:us-east-1:111122223333:trust-anchor/ExampleCorpAnchor"
            ]
          }
        }
      }
    ]
  }
The role session created will have the SourceIdentity value in AWS set to be equal to the CN of the certificate. For example, the Red certificate would have a SourceIdentity value of CN=Red.
You can find a complete list of session tags and attributes used in IAM Roles Anywhere in the IAM Roles Anywhere documentation The session tags set on roles created with IAM Roles Anywhere are transitive and will be present on any further roles assumed by a role session that is created by IAM Roles Anywhere.
Rotating trust anchor certificates
When you’re using IAM Roles Anywhere with a self-hosted PKI for your trust anchor, you’re responsible for updating your trust anchor with the new CA certificate.
IAM Roles Anywhere supports up to two certificates configured within a trust anchor at a time. When it comes time to rotate the certificate authority used as your trust anchor, you can add your new certificate into the trust anchor so that certificates issued from either CA certificate can be used with IAM Roles Anywhere.
After you have both CA certificates in your trust anchor, you can migrate your workloads over to end-entity certificates issued by your new CA for a seamless migration without the need to update code or configurations on your workloads. After your workloads have migrated to your new certificate authority, you can remove the unused certificate from your trust anchor configuration.
IAM Roles Anywhere profiles and session policies
When you set up IAM Roles Anywhere, you create a profile to associate IAM roles with. A profile allows you to optionally apply a session policy.
Most customers deploy IAM Roles Anywhere by creating one profile for each IAM role that they configure. This gives you the flexibility to apply session policies to each application or IAM role in IAM Roles Anywhere without impacting other roles or applications. We recommend that customers use the one-profile-per-role approach to achieve more operational flexibility.
By using one profile across many different IAM roles, you can minimize configuration work and have a common session policy for the different IAM roles you have set up with IAM Roles Anywhere. This approach requires management of fewer AWS resources, but means that changes to the profile will impact a larger number of applications.
When you set a session policy on a profile, we recommend that you use a managed policy Amazon Resource Name (ARN), rather than the default in-line session policy ARN, because this allows you to have more IAM policy space. The most common use case we’ve seen for applying session policies with IAM Roles Anywhere profiles is restricting the IAM Roles Anywhere session to only expected IP address ranges, such as your on-premises data centers.
The role sessions created by IAM Roles Anywhere are subject to all relevant AWS policies, such as resource control policies (RCPs), service control policies (SCPs), resource policies, permissions boundaries, and VPC endpoint policies.
Working with distributed applications
If you have multiple deployments of an application, we recommend that, wherever possible, you use a unique certificate and key for each instance of that application. For example, this would apply if Blue is a distributed application, and each instance of the Blue application has a requirement to communicate with AWS resources. Sharing a key across distributed applications increases the risk a key could accidentally be made available to unauthorized parties when it’s copied and stored over a network.
By using a unique certificate and key for each instance, you can keep the private key on the server that is using IAM Roles Anywhere instead of needing to distribute the private key over the network, which is a best practice to help prevent exposure of a private key. IAM Roles Anywhere can use private keys and certificates that are stored in Trusted Platform Modules (TPMs), Windows and MacOS certificate stores, files on a file system, or in a hardware security module (HSM) that is accessible with the PKCS #11 protocol.
Because the certificates that are issued to each instance typically have different serial numbers, you can associate events in CloudTrail back to the actual instance of a workload that was issued a certificate. The IAM role session created by a certificate uses the certificate’s serial number as the role session name, which is visible in CloudTrail logs for actions taken by that role session.
Comparing short-lived and long-lived end entity certificates
X.509 certificates have an expiration date. The longer a credential is used, the greater the chance that it might come under the control of an unauthorized person.
We recommend that the certificates you issue to your workloads expire as quickly as your operational tolerances can withstand. For example, if you’re experienced in operating a PKI and can allow applications to request certificates through self-service, we recommend that the certificates issued have a relatively short expiration time so that new certificates must be requested frequently.
If your PKI certificates are issued or distributed manually, you might need to issue longer-lived certificates to ease your operational burden and give yourself longer periods of overlap in validity so that certificates can be rotated without disrupting your business.
It’s possible for multiple end-entity certificates to be valid at the same time with identical attributes. For example, if there were multiple non-expired, non-revoked CN=Red certificates, any of those CN=Red certificates can be used to access the CreateSessions API with IAM Roles Anywhere.
Certificate revocation
Traditionally, certificates are given a long validity period which helps reduce the operational burden for systems engineers who support certificates manually. However, sometimes you might need to revoke certificates for security reasons such as a compromised private key, a change in certificate fields, or a certificate that has been issued incorrectly. Certificate revocation helps maintain the trust and integrity of the PKI system.
A CRL is one of the primary mechanisms to help maintain the health of your PKI. The CRL contains information about the certificates that have been revoked due to security or other reasons.
IAM Roles Anywhere checks the validity of your certificates against your CRL. Using your PKI, after your certificate has been added to the CRL, you can import the CRL to IAM Roles Anywhere by using the using ImportCrl API operation or the import-crl CLI command. A copy of the CRL you import is hosted within IAM Roles Anywhere. After the CRL has been updated, IAM Roles Anywhere validates the certificate against your CRL before issuing credentials.
The fact that your CRL is hosted within IAM Roles Anywhere helps to mitigate a common scenario where the CRL is the target of a denial-of-service (DoS) attempt, causing applications to either deny all access because they’re unable to check the status of a cert against a CRL, or to let unauthorized users use revoked certificates to access services that are configured to ignore the CRL if it isn’t reachable.
Deployment patterns: centralized or decentralized
There are two approaches you can choose when deploying IAM Roles Anywhere: centralized or decentralized. We’ll look at the pros and cons of both.
Centralized trust anchor pattern
The following image describes how a centralized trust anchor would be deployed. First, a central trust anchor is deployed in a dedicated IAM account. Workloads then authenticate to IAM Roles Anywhere in a centralized account, and the workload performs role chaining to access the workload account.

Figure 3: Centralized trust anchor architecture pattern
In Figure 3, the workload running in the on-premises datacenter uses its certificate to get temporary AWS credentials from IAM Roles Anywhere in the IAM Roles Anywhere landing account. It then uses those credentials to assume a role into the workload account that hosts its AWS resources.
We recommend a centralized trust anchor pattern if you’re just getting started with IAM Roles Anywhere. This pattern simplifies the management and governance of IAM Roles Anywhere and allows you to scale with fewer resources to manage.
If you have more than one CA that you want to use with IAM Roles Anywhere, you can scale this pattern with multiple trust anchors in the same IAM Roles Anywhere landing account.
Pros of the centralized trust anchor pattern:
- A simplified setup and fewer IAM Roles Anywhere resources to manage: Administrators only need to configure IAM Roles Anywhere profiles, roles, and trust anchors in one AWS account per Region.
- Easier to manage CRLs: Because IAM Roles Anywhere is centralized, administrators only need to update the CRL in one account per Region.
- Minimal application setup: Applications will need to set up role chaining to access their workloads accounts. Later in this post, we show you how to set up role chaining with IAM Roles Anywhere and the various AWS SDKs using a configuration that allows you to access other accounts without writing custom code.
- Scaling: Based on the number of CAs you have, you can add additional trust anchors for additional CAs you want to use with IAM Roles Anywhere.
Cons of the centralized trust anchor pattern:
- Cross-account access: The account that you’re creating for IAM Roles Anywhere will have access to other AWS accounts hosting your workloads. This might not meet your isolation requirements because it introduces cross-account access. However, remember that you can use certificate attributes in a role-trust policy to limit which workloads can access which AWS accounts.
- Quotas: You might exceed your service quotas. For more information, see Quotas for AWS Identity and Access Management Roles Anywhere.
Considerations of the centralized trust anchor pattern:
- Multiple trust anchors: IAM Roles Anywhere supports two certificates per trust anchor, to help with rotation of certificates, so that you don’t have to update the ARNs during certificate rotation.
However, if there was a requirement to support multiple CAs, then it would be best to create separate trust anchors. For example, if you have a root CA and three issuing CAs, instead of creating a bundle of four certificates, you could create a trust anchor with a root CA, which would trust all certificates. Alternatively, you could create three different trust anchors per each issuing CA. So, it’s recommended to consider your PKI hierarchy during this process.
- Auditing: If you have multiple trust anchors for different CAs deployed into the IAM Roles Anywhere account, you might need to use the
aws:SourceARNcondition key in role-trust policies to specify that that only a specific trust anchor can be used to assume a role with IAM Roles Anywhere.
When you use the centralized trust anchor pattern, you can use the certificate attributes to segregate access based on workloads, as described in the IAM roles and workload identity section earlier in this post.
Distributed trust anchor pattern
If you have more advanced security and compliance requirements, you can achieve greater isolation and granular access control by using a distributed (multi-trust-anchor, multi-account) approach with IAM Roles Anywhere.
In Figure 4, you see a distributed pattern where multiple trust anchors have been deployed based on which workloads and applications need access. In this model, the on-premises resource would call the respective trust anchor that has been mapped to each application to gain access to the AWS resource.

Figure 4: Multiple trust anchor, multi-account architecture pattern
Based on your strategy, it’s possible to migrate from the centralized architecture to a distributed architecture as your organization grows or your operating model changes. Let’s looks at some of the considerations for this approach.
Pros of the distributed trust anchor pattern:
- Better isolation: This pattern doesn’t require cross-account roles to be set up, and therefore AWS accounts and workloads are better isolated.
- PKI flexibility: If you have different subordinate or issuing CAs that align with specific workloads or compliance requirements, you can have a distributed IAM Roles Anywhere setup for each workload in each AWS account.
Cons of the distributed trust anchor pattern:
- Additional setup and AWS resources to manage: Trust anchors, profiles, and CRLs need to be set up in each AWS account that you want to use with IAM Roles Anywhere.
- Additional configuration of applications: IAM Roles Anywhere ARNs will be different across accounts, and you will need to update the configuration of your applications that use IAM Roles Anywhere with the correct trust anchor and profile ARNs for each account.
Considerations of the distributed trust anchor pattern:
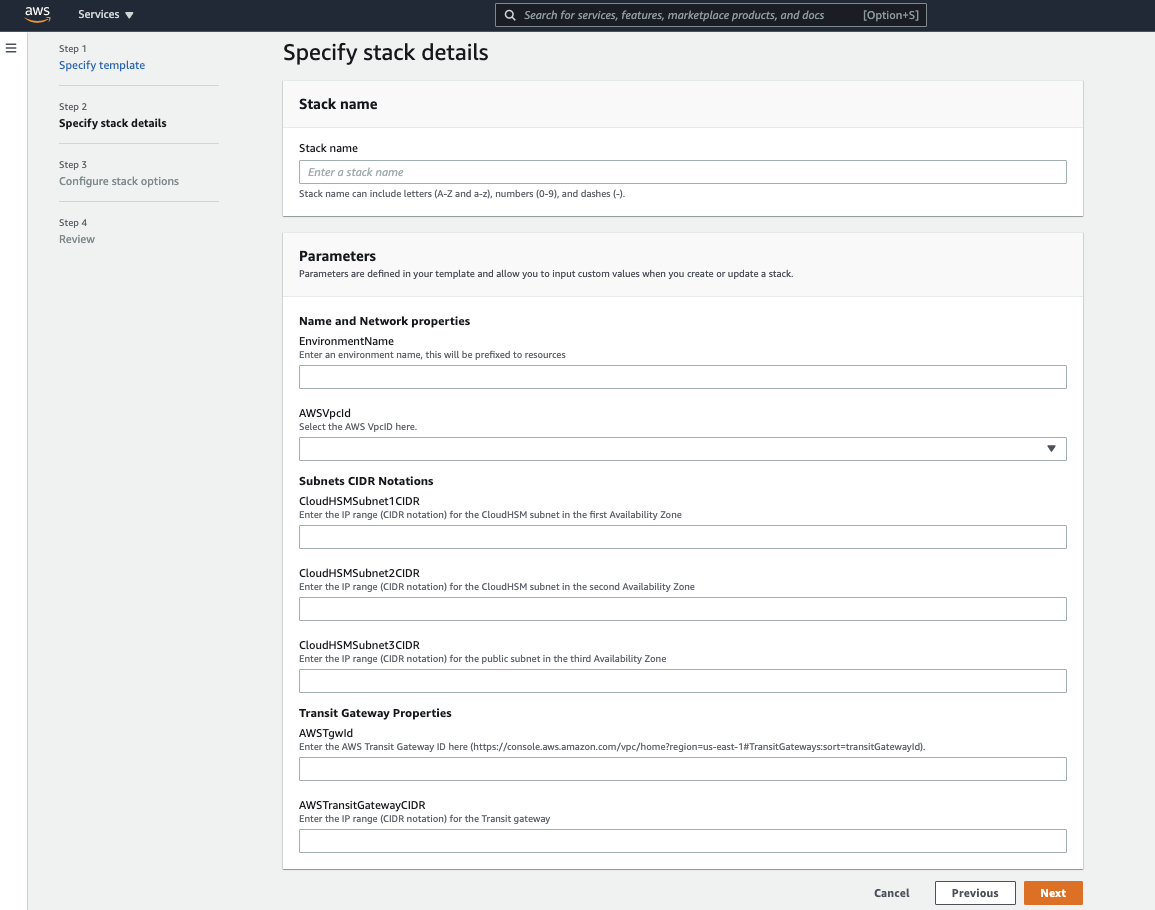
- Scale: Infrastructure as code, such as AWS CloudFormation StackSets, can be used to scale the distributed pattern. Administrators can use AWS CloudFormation StackSets as a convenient way to implement trust anchors and profiles across accounts.
Working with IAM Roles Anywhere in your applications
Your applications integrate with IAM Roles Anywhere by using the aws signing helper (also known as the credential helper) with the AWS SDK. The signing helper is a lightweight executable written in Go that uses your private keys and certificate to authenticate to the IAM Roles Anywhere API and request temporary AWS credentials, and then delivers the credentials to your application.
The signing helper uses Go’s cryptographic libraries and doesn’t need specific versions of cryptographic software to be deployed into the environment where it runs, which helps it to run seamlessly and without conflict to other applications. The signing helper can use certificates and keys from OS certificate stores, TPMs, or locations on the file system.
The signing helper can run using the credential_process setting, as an IMDSv2-compatible server on localhost, or as a process that updates an AWS credentials file.
In most cases, we recommend that customers use the signing helper with the credential_process setting because this allows you to use IAM Roles Anywhere without setting up environment variables and also allows you to configure role chaining seamlessly. The AWS SDK will automatically attempt to refresh credentials that are retrieved by the signing helper when the helper is used with the credential_process setting when the AWS credentials are nearing expiration.
If you set up the [default] profile in the AWS configuration file (~.aws/credentials on Linux and MacOS, C:\Users\ USERNAME \.aws\credentials on Windows), the AWS SDK default credentials provider chain will be used by IAM Roles Anywhere, provided that there are no other AWS credentials configured in that environment in a higher priority in the default credential providers chain.
Note: As described in the AWS SDK documentation, the default credential providers will vary slightly based on the language and AWS SDK used. However, many credential providers support using the
credential_processsetting in the default profile.
Here’s an example default profile that will use IAM Roles Anywhere:
You can also use a non-default profile and call that profile explicitly in your code when creating a credential providers or session object. How your application calls the AWS profile and IAM Roles Anywhere will vary depending on which AWS SDK you use, but we recommend checking the documentation for each SDK, and wherever possible, reuse clients, sessions, or credential providers to avoid unneeded calls to the IAM Roles Anywhere service to get new credentials. Otherwise, workloads may use up more CreateSession quota than expected or introduce unexpected latency to your application while making unnecessary calls to get AWS credentials when it already has some.
Note: AWS SDKs call the IAM Roles Anywhere
credential_processto get credentials each time a new credential provider, session, or client is created, depending on the SDK.
Many applications that are written using the AWS SDK use the default credentials providers chain, and might be compatible with IAM Roles Anywhere without additional configuration or code change when using the default profile.
As a best practice, if you have multiple different applications running on the same host and accessing AWS that have totally different security requirements, you should have them run as separate users on that host and avoid sharing configuration files.
Configuring role chaining with IAM Roles Anywhere
Role chaining means to use a role to assume a second role through the AWS Command Line Interface (AWS CLI) or API. For example, RoleA has permission to assume RoleB. You can enable User1 to assume RoleA by using User1’s long-term user credentials in the AssumeRole API operation. This returns RoleA short-term credentials. With role chaining, you can use RoleA’s short-term credentials to enable User1 to assume RoleB.
You can set up role chaining with IAM Roles Anywhere by using profiles in the AWS configuration file, without writing code to manage role chaining or sessions. In the following example, there is a default profile that references the rolesanywhere profile. Applications that use the default profile will automatically use the credentials from the rolesanywhere profile to assume the role specified by the role_arn value, without writing code to manage credentials.
The diagram in Figure 5 describes what happens when the AWS SDK performs role chaining with SDK configuration.

Figure 5: A work sequence diagram detailing the interactions that happen when the AWS SDK reads the preceding config file
The flow in Figure 5 is as follows:
- The AWS SDK reads the default profile and discovers it must get credentials from the specified
source_profile. - The AWS SDK reads the source profile and uses the configuration to request credentials from IAM Roles Anywhere.
- The AWS SDK then uses the credentials retrieved from the
source_profileto call STS AssumeRole on the roleworkload roledefined in the default profile. - The AWS SDK returned the temporary AWS credentials for
workload role, which can now be used to access AWS resources in the workload account.
Logging and monitoring
Teams and security analysts typically prefer to have visibility into all actions taken. To help with this goal, logging and monitoring is available across different notification channels for IAM Roles Anywhere.
For example, Amazon CloudWatch includes a list of service metrics:
- CA certificate expiry: Checks whether the certificate in the trust anchor is due for expiry.
- End entity certificate expiry: Checks whether the certificate used for vending temporary security credentials is due for expiry.
Using such information, you can set up alarms and email notifications to remind administrators or developers to rotate the certificates before they expire. It’s especially important to monitor the expiry of the certificates for the trust anchor so that workloads that use IAM Roles Anywhere can continue operations without business disruption.
Using notification events to help with certificate revocation, you can use automations to help with other certificate expiry events. Note that if you’re using AWS Certificate Manager, rotation is automatically handled for you. For more information, see Managed certificate renewal in AWS Certificate Manager.
Tip: IAM Roles Anywhere logs also include the field SourceIdentity, which can help when you’re trying to trace back which workloads are taking what actions in AWS. The
SourceIdentityfield is usually the common name (CN) of the certificate.
IAM Roles Anywhere and AWS Regions
IAM Roles Anywhere is a regional AWS service. Meaning that configurations for resources like profiles and trust anchors exist in the Region in which you configure them.
As a best practice, we recommend setting up IAM Roles Anywhere in the same Region as the resources you will be accessing (for example, if you’re using IAM Roles Anywhere to access AWS resources in the us-west-2 Region, you should configure IAMRA in the us-west-2 Region).
Credentials issued by IAM Roles Anywhere, like other AWS credentials, can be used to access resources in other Regions (for example, credentials acquired from IAM Roles Anywhere in the us-west-2 Region can be used to access resources in the ca-central-1 Region).
If required, you can have your application introduce logic to try to use IAM Roles Anywhere in different Regions by having different profiles defined for your IAM Roles Anywhere deployment in different Regions. The following Python example will attempt to get credentials from the profile rolesanywhere-uswest2 for IAM roles anywhere in the us-west-2 Region, and if that fails, it will then attempt to get credentials with the rolesanywhere-cacentral1 profile for the ca-central-1 Region.
import boto3

def get_session():
    try:
        #tries to create a session using the profile “rolesanywhere-uswest2”
        #add additional logic and logging, per your requirements
        return boto3.Session(profile_name='rolesanywhere-uswest2')
    except:
        #tries to create a session using the profile “rolesanywhere-cacentral1”
        #add additional logic and logging, per your requirements
        return boto3.Session(profile_name='rolesanywhere-cacentral1')

session = get_session()
sts_client = session.client('sts')
print(sts_client.get_caller_identity())
Conclusion
In this blog post, we showed you the considerations for selecting a CA to use as your trust anchor, considerations for mapping your workload identity to IAM roles, patterns for deploying IAM Roles Anywhere, and how to integrate IAM Roles Anywhere with your applications.
IAM Roles Anywhere is a great solution for companies that have a PKI and want to access AWS resources from outside AWS, without needing to use long-lived credentials for IAM users.
To learn more about IAM Roles Anywhere, see the feature’s documentation, this IAM Roles Anywhere workshop, or this re:Inforce presentation featuring Hertz.
If you have feedback about this post, submit comments in the Comments section below. If you have questions about this post, start a new thread on AWS Security, Identity, and Compliance re:Post or contact AWS Support.