Post Syndicated from Anuj Gupta original https://aws.amazon.com/blogs/architecture/journey-to-cloud-native-architecture-series-6-improve-cost-visibility-and-re-architect-for-cost-optimization/
After we improved our security posture in the 5th blog of the series, we discovered that operational costs are growing disproportionately higher than revenue. This is because the number of users grew more than 10 times on our e-commerce platform.
To address this, we created a plan to better understand our AWS spend and identify cost savings. In this post, Part 6, we’ll show you how we improved cost visibility, rearchitected for cost optimization, and applied cost control measures to encourage innovation while ensuring improved return on investment.
Identifying areas to improve costs with Cost Explorer
Using AWS Cost Explorer, we identified the following areas for improvement:
- Improve cost visibility and establish FinOps culture:
- Provide visibility and cost insights for untagged resources
- Provide cost visibility into shared AWS resources
- Better understand gross margin
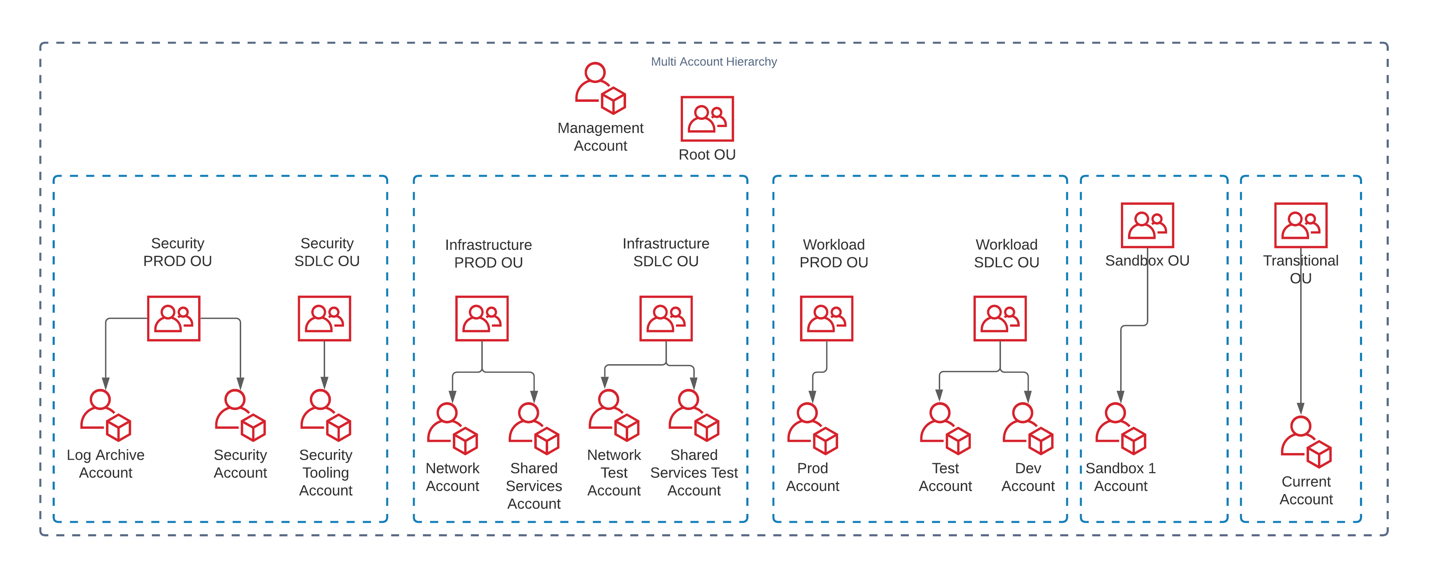
- Use Service Control Policies (SCPs) for cost control
- Optimize costs for data transfer
- Reduce storage costs:
- Update objects to use cost appropriate S3 storage class
- Adopt Amazon EBS gp3 volumes
- Optimize compute costs:
- Adjust idle resources and under-utilized resources
- Migrate to latest generation Graviton2 instances
The following sections provide more information on the methods we used to improve these areas.
Improve cost visibility and establish FinOps culture
Provide visibility and cost insights for untagged resources
To improve our organization’s FinOps culture and help teams better understand their costs, we needed a tool to provide visibility into untagged resources and enable engineering teams to take actions on cost optimization.
We used CloudZero to automate the categorization of our spend across all AWS accounts and provide our teams the ability to see cost insights. It imports metadata from AWS resources along with AWS tags, which makes it easier to allocate cost to different categories.
Provide cost visibility into shared AWS resources
We created Dimensions such as Development, Test, and Production in CloudZero to easily group cost by environment. We also defined rules in CostFormation to help us understand the cost of running a new feature by splitting cost using rules.
Understand gross margin
To better understand how our AWS bills going up is related to delivering more value for our customers, we used the guidance in Unit Metric – The Touchstone of your IT Planning and Evaluation to identify a demand driver (in our case, number of orders). By evaluating the number of orders against AWS spend, we gained valuable insights into cost KPIs, such as cost per order, which helped us better understand gross margin for our business.
Use Service Control Policies for cost control
Following the guidance in the Control developer account costs with AWS budgets blog post, we applied SCPs to control costs and control which AWS services, resources, and individual API actions users and roles in each member account of an OU can access.
As shown in Figure 1, we applied the following cost control SCPs:
- SCP-3 on Sandbox OU prevents modification of billing settings and limits the allowable EC2 instance types to only general purpose instances up to 4xl.
- SCP-2 on Workload SDLC OU denies access to EC2 instances larger than 4xl. AWS Budgets sends alerts to a Slack channel when spend reaches beyond a defined threshold.
- SCP-1 on Workload PROD OU denies access to any operations outside of the specified AWS Regions and prevents member accounts from leaving the organization.
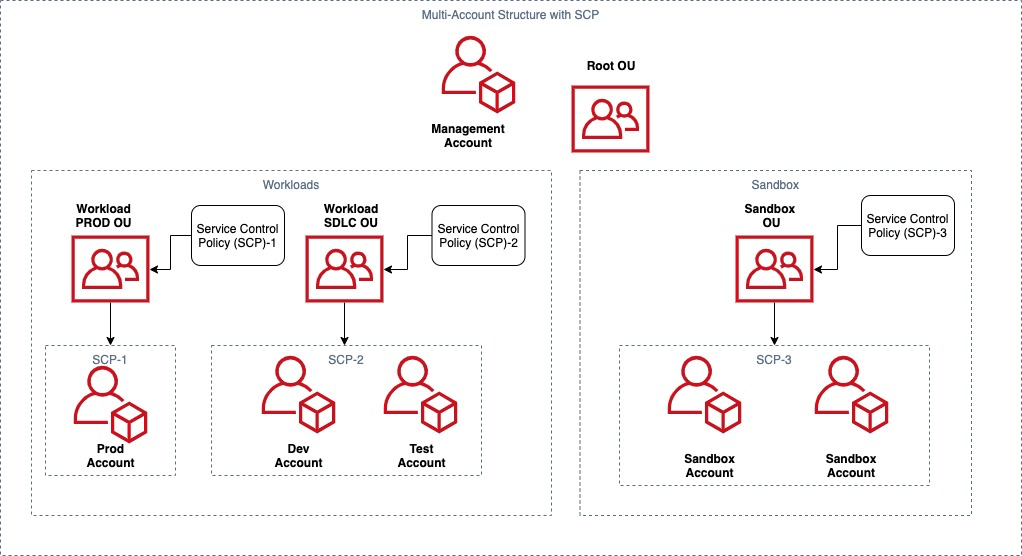
Figure 1. Applying SCPs on different environments for cost control
Optimize costs for data transfer
Data transfer represented one major category of overall AWS cost in our Cost Explorer report, so we used CloudZero’s Networking Sub-category Dimension to get insights into AWS outbound, Intra-Region (Availability Zone (AZ) to AZ), NAT gateway, and S3 outbound costs.
To get more insights, we also set up a temporary Data Transfer dashboard with Amazon QuickSight using the guidance in the AWS Well-Architected Cost Optimization lab. It showed us PublicIP charges for applications, NAT gateway charges for traffic between Amazon EC2 and Amazon S3 within the same Region, inter-AZ data transfer for Development and Test environments, and cross AZ data transfer for NAT gateway.
Figure 2 shows how we used Amazon S3 Gateway endpoints (continuous line) instead of an S3 public endpoint (dotted line) to reduce NAT gateway charges. For our Development and Test environments, we created application-database partitions to reduce inter-AZ data transfer.
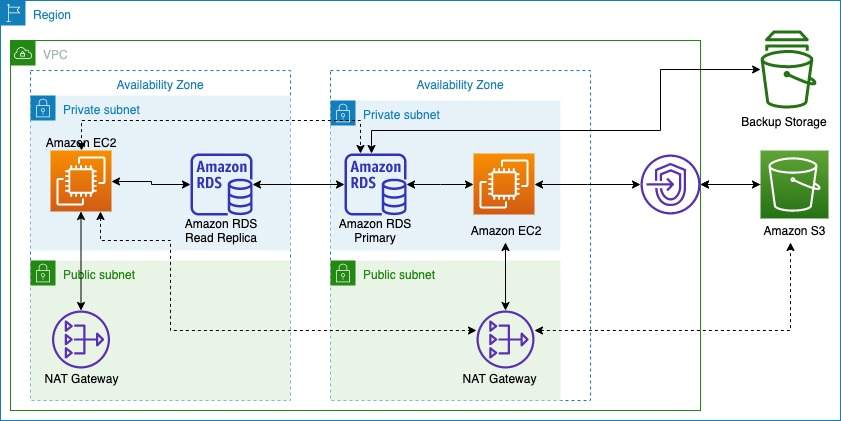
Figure 2. Data transfer charges across AZs and AWS services
Reduce storage costs
Update objects to use cost appropriate S3 storage class
In our review of the Cost Explorer report, we noticed that all objects were stored using the Standard storage class in Amazon S3. To update this, we used guidance from the Amazon S3 cost optimization for predictable and dynamic access patterns blog post to identify predictable data access patterns using Amazon S3 Storage Lens.
The number of GET requests, download bytes, and retrieval rate for Amazon S3 prefixes informed us how often datasets are accessed over a period of time and when a dataset is infrequently accessed. 40% of our objects on Amazon S3 have a dynamic data access pattern. Storing this data in S3 Standard-Infrequent Access could lead to unnecessary retrieval fees, so we transitioned dynamic data access pattern objects to Amazon S3 Intelligent-Tiering and updated applications to select S3 Intelligent-Tier when uploading such objects. For infrequently accessed objects, we created Amazon S3 lifecycle policies to automatically transition objects to Amazon S3 Standard-Infrequent Access, Amazon S3 One Zone-Infrequent Access, and/or Amazon S3 Glacier storage classes.
Adopt Amazon EBS gp3
Using guidance from a re:Invent talk on Optimizing resource efficiency with AWS Compute Optimizer, we identified EBS volumes that were over-provisioned by more than 30%. AWS Compute Optimizer automatically analyzed utilization patterns and metrics such as VolumeReadBytes VolumeWriteBytes, VolumeReadOps, and VolumeWriteOps for all EBS volumes in our AWS account to provide recommendations on migrating from gp2 to gp3 volumes.
The migrate your Amazon EBS volumes from gp2 to gp3 blog post helped us identify baseline throughput and IOPS requirements for our workload, calculate cost savings using the cost savings calculator, and provided steps to migrate to gp3.
Optimize compute costs
Adjust idle resources and under-utilized resources
Deploying Instance Scheduler on AWS helped us further cost optimize Amazon EC2 and Amazon Relational Database Service (Amazon RDS) resources in Development, Test, and Pre-production environments. This way, we only pay for the 40-60 hours per week instead of the full 168 hours in a week, providing 64-76% cost savings.
Migrate to latest generation Graviton2 instances
As user traffic grew, application throughput requirements changed significantly, which led to more compute cost. We migrated to the newest generation of Graviton2 instances with similar memory and CPU, achieving higher performance for reduced cost. We updated Amazon RDS on Graviton 2, Amazon ElasticCache to Graviton2, and Amazon OpenSearch on Graviton2 for low-effort cost savings. The following table shows the comparison in cost after we migrated to Graviton instances.
| Service | Previous Instance | Cost for on-demand (per hour) in us-east-1 | New Instance | Cost for on-demand (per hour) in us-east-1 | Cost Savings |
| Amazon RDS (PostgreSQL) | r5.4xlarge | 1.008 | r6g.4xlarge | 0.8064 | 20.00% |
| Amazon ElasticCache | cache.r5.2xlarge | 0.862 | cache.r6g.xlarge | 0.411 | 52.32% |
| Amazon OpenSearch (data nodes) | r5.xlarge.search | 0.372 | r6g.xlarge.search | 0.335 | 9.95% |
After that, we tested our Java-based applications to run on an arm64 processor using the guidance on the Graviton GitHub and AWS Graviton2 for Independent Software Vendors whitepaper. We conducted functional and non-functional tests on the application to ensure that it provides the same experience for users with improved performance.
Load testing for cost optimization
We included load testing in CI/CD pipeline to avoid over-provisioning and to identify resource bottlenecks before our application goes into production. To do this, we used Serverless Artillery workshop to set up a load testing environment in a separate AWS account. As a part of that load testing, we were able to simulate production traffic at required scale with much reduced cost than using EC2 instances.
Conclusion
In this blog post, we discussed how observations in Cost Explorer helped us identify improvements for cost management and optimization. We talked about how you get better cost visibility using CloudZero and apply cost control measures using SCPs. We also talked about how you can save data transfer cost, storage cost and compute cost with low effort.
Other blogs in this series
- Journey to Adopt Cloud-Native Architecture Series: #1 – Preparing your Applications for Hypergrowth
- Journey to Adopt Cloud-Native Architecture Series: #2 – Maximizing System Throughput
- Journey to Adopt Cloud-Native Architecture Series: #3 – Improved Resilience and Standardized Observability
- Journey to Adopt Cloud-Native Architecture Series: #4 – Governing Security at Scale and IAM Baselining
- Journey to Adopt Cloud-Native Architecture Series #5 – Enhancing Threat Detection, Data Protection, and Incident Response