Post Syndicated from Rafael Koike original https://aws.amazon.com/blogs/security/how-to-automate-aws-account-creation-with-sso-user-assignment/
Background
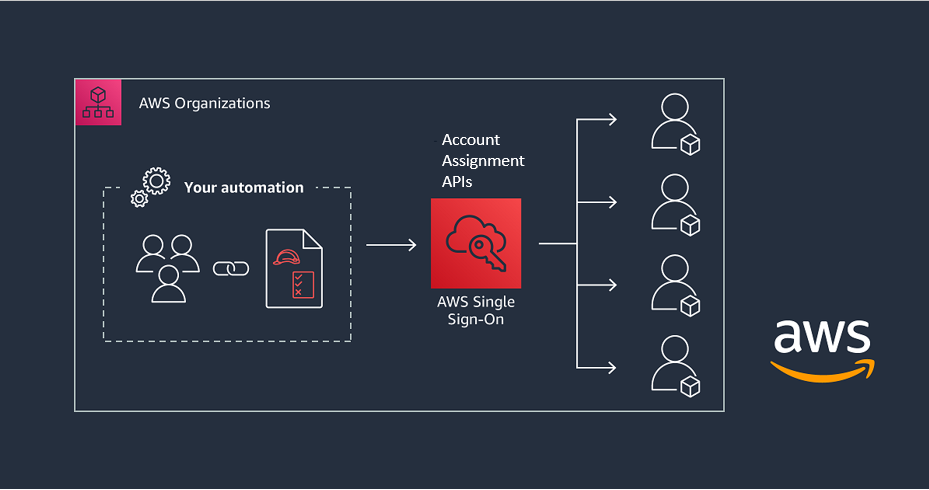
AWS Control Tower offers a straightforward way to set up and govern an Amazon Web Services (AWS) multi-account environment, following prescriptive best practices. AWS Control Tower orchestrates the capabilities of several other AWS services, including AWS Organizations, AWS Service Catalog, and AWS Single Sign-On (AWS SSO), to build a landing zone very quickly. AWS SSO is a cloud-based service that simplifies how you manage SSO access to AWS accounts and business applications using Security Assertion Markup Language (SAML) 2.0. You can use AWS Control Tower to create and provision new AWS accounts and use AWS SSO to assign user access to those newly-created accounts.
Some customers need to provision tens, if not hundreds, of new AWS accounts at one time and assign access to many users. If you are using AWS Control Tower, doing this requires that you provision an AWS account in AWS Control Tower, and then assign the user access to the AWS account in AWS SSO before moving to the next AWS account. This process adds complexity and time for administrators who manage the AWS environment while delaying users’ access to their AWS accounts.
In this blog post, we’ll show you how to automate creating multiple AWS accounts in AWS Control Tower, and how to automate assigning user access to the AWS accounts in AWS SSO, with the ability to repeat the process easily for subsequent batches of accounts. This solution simplifies the provisioning and assignment processes, while enabling automation for your AWS environment, and allows your builders to start using and experimenting on AWS more quickly.
Services used
This solution uses the following AWS services:
- AWS Control Tower
- AWS Service Catalog
- AWS SSO
- AWS CloudFormation
- Amazon DynamoDB
- AWS Lambda
- Amazon CloudWatch Events
- Simple Storage Service (Amazon S3)
- Amazon Simple Notification Service (Amazon SNS)
High level solution overview
Figure 1 shows the architecture and workflow of the batch AWS account creation and SSO assignment processes.

Figure 1: Batch AWS account creation and SSO assignment automation architecture and workflow
Before starting
This solution is configured to be deployed in the North Virginia Region (us-east-1). But you can change the CloudFormation template to run in any Region that supports all the services required in the solution.
AWS Control Tower Account Factory can take up to 25 minutes to create and provision a new account. During this time, you will be unable to use AWS Control Tower to perform actions such as creating an organizational unit (OU) or enabling a guardrail on an OU. As a recommendation, running this solution during a time period when you do not anticipate using AWS Control Tower’s features is best practice.
Collect needed information
Note: You must have already configured AWS Control Tower, AWS Organizations, and AWS SSO to use this solution.
Before deploying the solution, you need to first collect some information for AWS CloudFormation.
The required information you’ll need to gather in these steps is:
- AWS SSO instance ARN
- AWS SSO Identity Store ID
- Admin email address
- Amazon S3 bucket
- AWS SSO user group ARN
Prerequisite information: AWS SSO instance ARN
From the web console
You can find this information under Settings in the AWS SSO web console as shown in Figure 2.

Figure 2: AWS SSO instance ARN
From the CLI
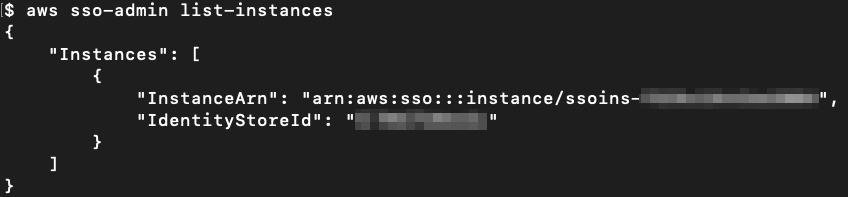
You can also get this information by running the following CLI command using AWS Command Line Interface (AWS CLI):
The output is similar to the following:
Make a note of the InstanceArn value from the output, as this will be used in the AWS SSO instance ARN.
Prerequisite information: AWS SSO Identity Store ID
This is available from either the web console or the CLI.
From the web console
You can find this information in the same screen as the AWS SSO Instance ARN, as shown in Figure 3.

Figure 3: AWS SSO identity store ID
From the CLI
To find this from the AWS CLI command aws sso-admin list-instances, use the IdentityStoreId from the second key-value pair returned.
Prerequisite information: Admin email address
The admin email address notified when a new AWS account is created.
This email address is used to receive notifications when a new AWS account is created.
Prerequisite information: S3 bucket
The name of the Amazon S3 bucket where the AWS account list CSV files will be uploaded to automate AWS account creation.
This globally unique bucket name will be used to create a new Amazon S3 Bucket, and the automation script will receive events from new objects uploaded to this bucket.
Prerequisite information: AWS SSO user group ARN
Go to AWS SSO > Groups and select the user group whose permission set you would like to assign to the new AWS account. Copy the Group ID from the selected user group. This can be a local AWS SSO user group, or a third-party identity provider-synced user group.
Note: For the AWS SSO user group, there is no AWS CLI equivalent; you need to use the AWS web console to collect this information.

Figure 4: AWS SSO user group ARN
Prerequisite information: AWS SSO permission set
The ARN of the AWS SSO permission set to be assigned to the user group.
From the web console
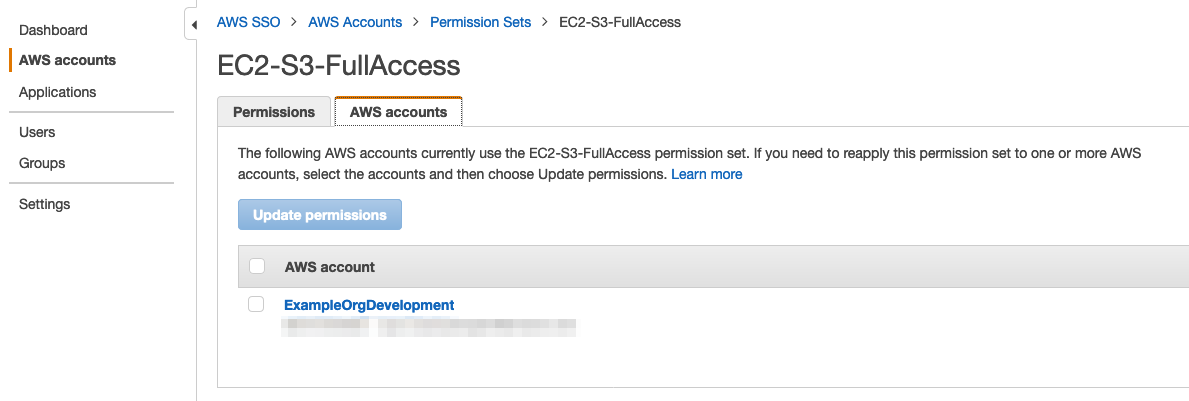
To view existing permission sets using the AWS SSO web console, go to AWS accounts > Permission sets. From there, you can see a list of permission sets and their respective ARNs.

Figure 5: AWS SSO permission sets list
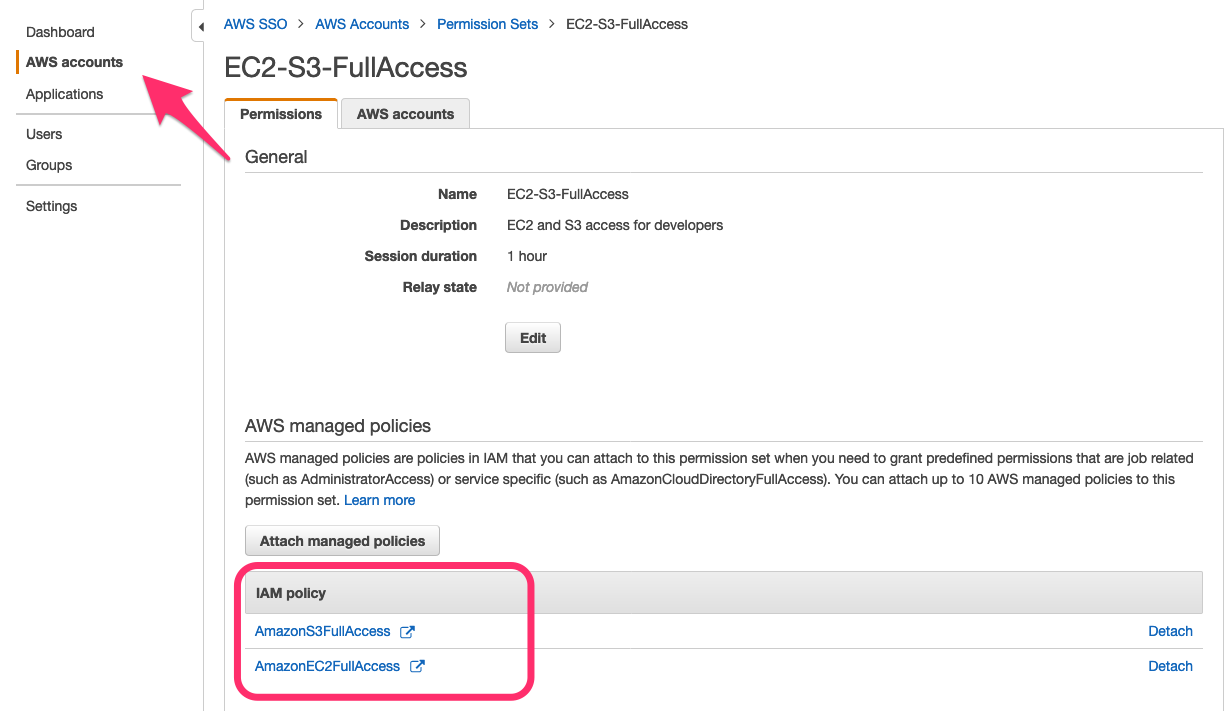
You can also select the permission set name and from the detailed permission set window, copy the ARN of the chosen permission set. Alternatively, create your own unique permission set to be assigned to the intended user group.

Figure 6: AWS SSO permission set ARN
From the CLI
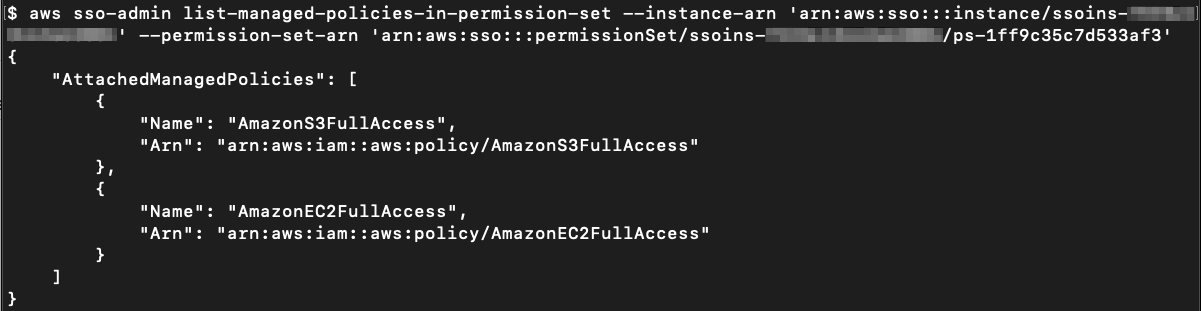
To get permission set information from the CLI, run the following AWS CLI command:
This command will return an output similar to this:
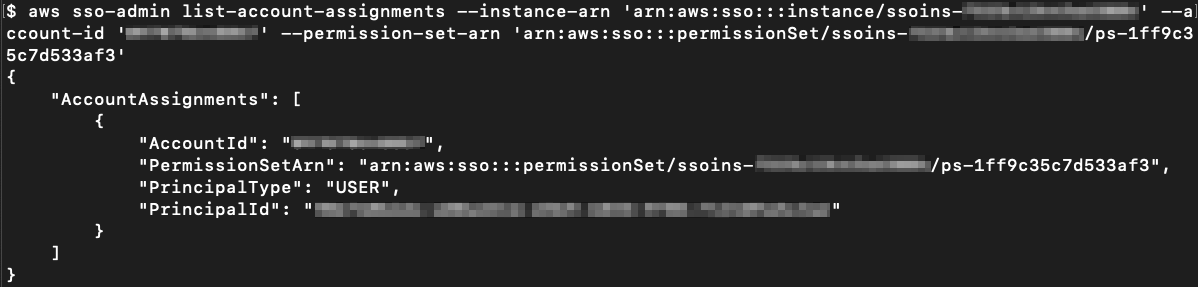
If you can’t determine the details for your permission set from the output of the CLI shown above, you can get the details of each permission set by running the following AWS CLI command:
The output will be similar to this:
The output above lists the name and description of each permission set, which can help you identify which permission set ARN you will use.
Solution initiation
The solution steps are in two parts: the initiation, and the batch account creation and SSO assignment processes.
To initiate the solution
- Log in to the management account as the AWS Control Tower administrator, and deploy the provided AWS CloudFormation stack with the required parameters filled out.
Note: To fill out the required parameters of the solution, refer to steps 1 to 6 of the To launch the AWS CloudFormation stack procedure below.
- When the stack is successfully deployed, it performs the following actions to set up the batch process. It creates:
- The S3 bucket where you will upload the AWS account list CSV file.
- A DynamoDB table. This table tracks the AWS account creation status.
- A Lambda function, NewAccountHandler.
- A Lambda function, CreateManagedAccount. This function is triggered by the entries in the Amazon DynamoDB table and initiates the batch account creation process.
- An Amazon CloudWatch Events rule to detect the AWS Control Tower CreateManagedAccount lifecycle event.
- Another Lambda function, CreateAccountAssignment. This function is triggered by AWS Control Tower Lifecycle Events via Amazon CloudWatch Events to assign the AWS SSO Permission Set to the specified User Group and AWS account
To create the AWS Account list CSV file
After you deploy the solution stack, you need to create a CSV file based on this sample.csv and upload it to the Amazon S3 bucket created in this solution. This CSV file will be used to automate the new account creation process.
CSV file format
The CSV file must follow the following format:
Where the first line is the column names, and each subsequent line contains the new AWS accounts that you want to create and automatically assign that SSO user group to the permission set.
CSV fields
| AccountName: | String between 1 and 50 characters [a-zA-Z0-9_-] |
| SSOUserEmail: | String with more than seven characters and be a valid email address for the primary AWS Administrator of the new AWS account |
| AccountEmail: | String with more than seven characters and be a valid email address not used by other AWS accounts |
| SSOUserFirstName: | String with the first name of the primary AWS Administrator of the new AWS account |
| SSOUserLastName: | String with the last name of the primary AWS Administrator of the new AWS account |
| OrgUnit: | String and must be an existing AWS Organizations OrgUnit |
| Status: | String, for future use |
| AccountId: | String, for future use |
| ErrorMsg: | String, for future use |
Figure 7 shows the details that are included in our example for the two new AWS accounts that will be created.

Figure 7: Sample AWS account list CSV
- The NewAccountHandler function is triggered from an object upload into the Amazon S3 bucket, validates the input file entries, and uploads the validated input file entries to the Amazon DynamoDB table.
- The CreateManagedAccount function queries the DynamoDB table to get the details of the next account to be created. If there is another account to be created, then the batch account creation process moves on to Step 4, otherwise it completes.
- The CreateManagedAccount function launches the AWS Control Tower Account Factory product in AWS Service Catalog to create and provision a new account.
- After Account Factory has completed the account creation workflow, it generates the CreateManagedAccount lifecycle event, and the event log states if the workflow SUCCEEDED or FAILED.
- The CloudWatch Events rule detects the CreateManagedAccount AWS Control Tower Lifecycle Event, and triggers the CreateManagedAccount and CreateAccountAssignment functions, and sends email notification to the administrator via AWS SNS.
- The CreateManagedAccount function updates the Amazon DynamoDB table with the results of the AWS account creation workflow. If the account was successfully created, it updates the input file entry in the Amazon DynamoDB table with the account ID; otherwise, it updates the entry in the table with the appropriate failure or error reason.
- The CreateAccountAssignment function assigns the AWS SSO Permission Set with the appropriate AWS IAM policies to the User Group specified in the Parameters when launching the AWS CloudFormation stack.
- When the Amazon DynamoDB table is updated, the Amazon DynamoDB stream triggers the CreateManagedAccount function for subsequent AWS accounts or when new AWS account list CSV files are updated, then steps 1-9 are repeated.
Upload the CSV file
Once the AWS account list CSV file has been created, upload it into the Amazon S3 bucket created by the stack.
Deploying the solution
To launch the AWS CloudFormation stack
Now that all the requirements and the specifications to run the solution are ready, you can launch the AWS CloudFormation stack:
- Open the AWS CloudFormation launch wizard in the console.
- In the Create stack page, choose Next.

Figure 8: Create stack in CloudFormation
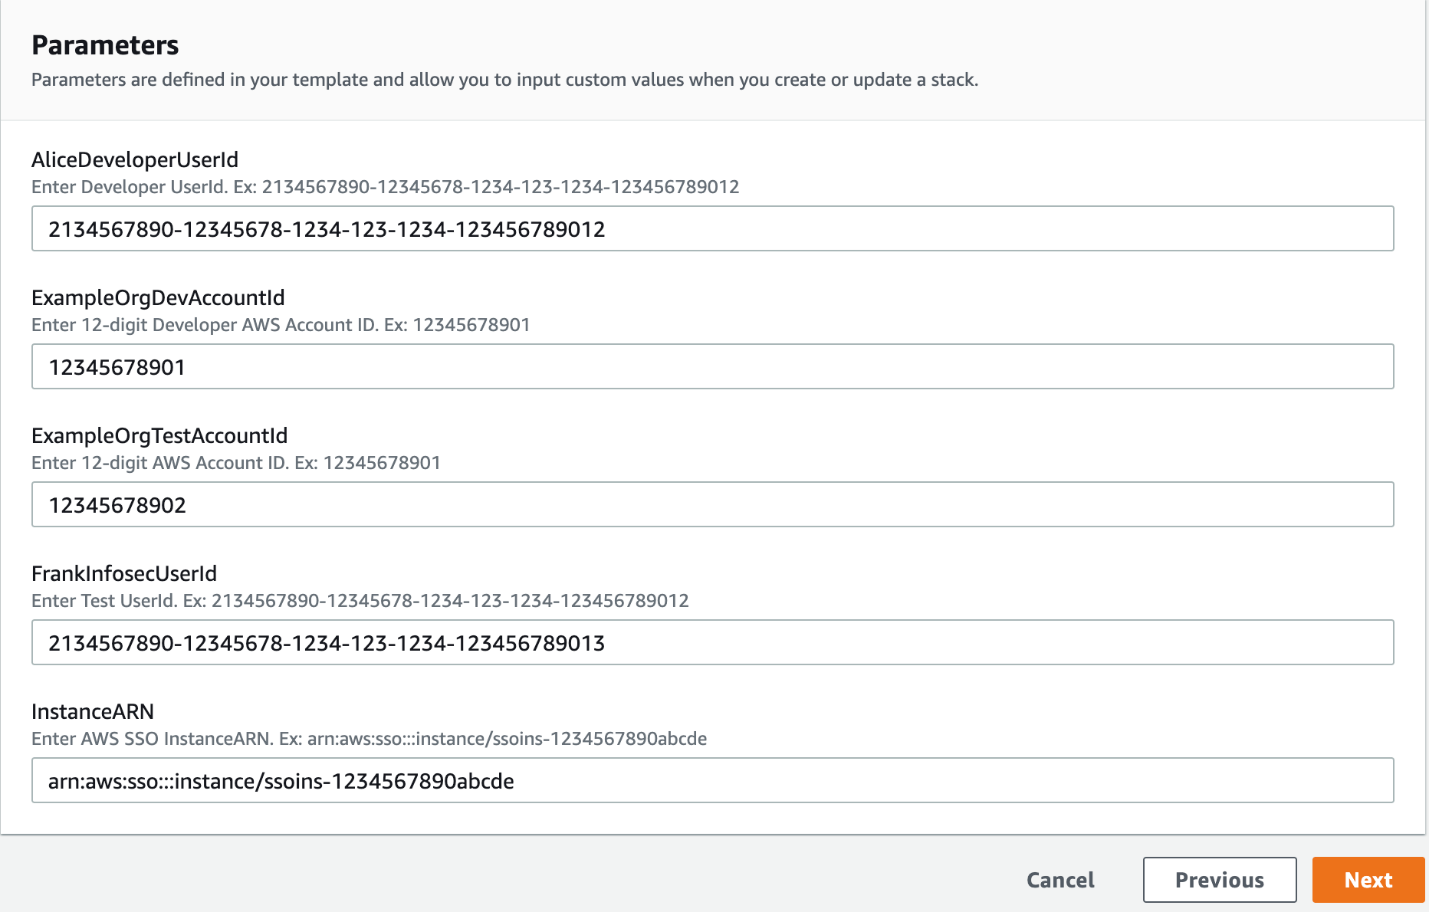
- On the Specify stack details page, update the default parameters to use the information you captured in the prerequisites as shown in Figure 9, and choose Next.
Figure 9: Input parameters into AWS CloudFormation
- On the Configure stack option page, choose Next.
- On the Review page, check the box “I acknowledge that AWS CloudFormation might create IAM resources.” and choose Create Stack.
- Once the AWS CloudFormation stack has completed, go to the Amazon S3 web console and select the Amazon S3 bucket that you defined in the AWS CloudFormation stack.
- Upload the AWS account list CSV file with the information to create new AWS accounts. See To create the AWS Account list CSV file above for details on creating the CSV file.


Workflow and solution details
When a new file is uploaded to the Amazon S3 bucket, the following actions occur:
- When you upload the AWS account list CSV file to the Amazon S3 bucket, the Amazon S3 service triggers an event for newly uploaded objects that invokes the Lambda function NewAccountHandler.
- This Lambda function executes the following steps:
- Checks whether the Lambda function was invoked by an Amazon S3 event, or the CloudFormation CREATE event.
- If the event is a new object uploaded from Amazon S3, read the object.
- Validate the content of the CSV file for the required columns and values.
- If the data has a valid format, insert a new item with the data into the Amazon DynamoDB table, as shown in Figure 10 below.
Figure 10: DynamoDB table items with AWS accounts details
- Amazon DynamoDB is configured to initiate the Lambda function CreateManagedAccount when insert, update, or delete items are initiated.
- The Lambda function CreateManagedAccount checks for update event type. When an item is updated in the table, this item is checked by the Lambda function, and if the AWS account is not created, the Lambda function invokes the AWS Control Tower Account Factory from the AWS Service Catalog to create a new AWS account with the details stored in the Amazon DynamoDB item.
- AWS Control Tower Account Factory starts the AWS account creation process. When the account creation process completes, the status of Account Factory will show as Available in Provisioned products, as shown in Figure 11.
Figure 11: AWS Service Catalog provisioned products for AWS account creation
- Based on the Control Tower lifecycle events, the CreateAccountAssignment Lambda function will be invoked when the CreateManagedAccount event is sent to CloudWatch Events. An AWS SNS topic is also triggered to send an email notification to the administrator email address as shown in Figure 12 below.
Figure 12: AWS email notification when account creation completes
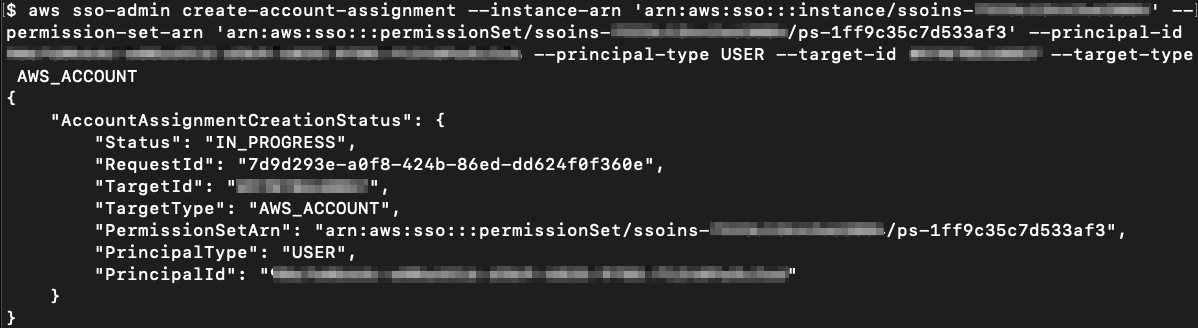
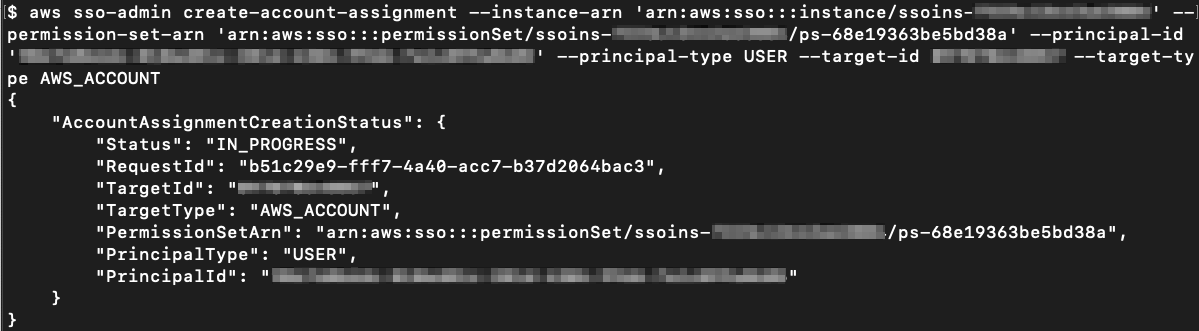
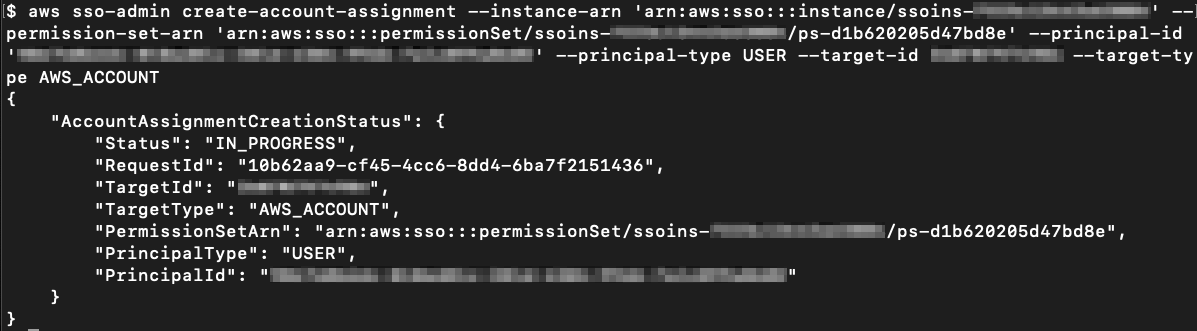
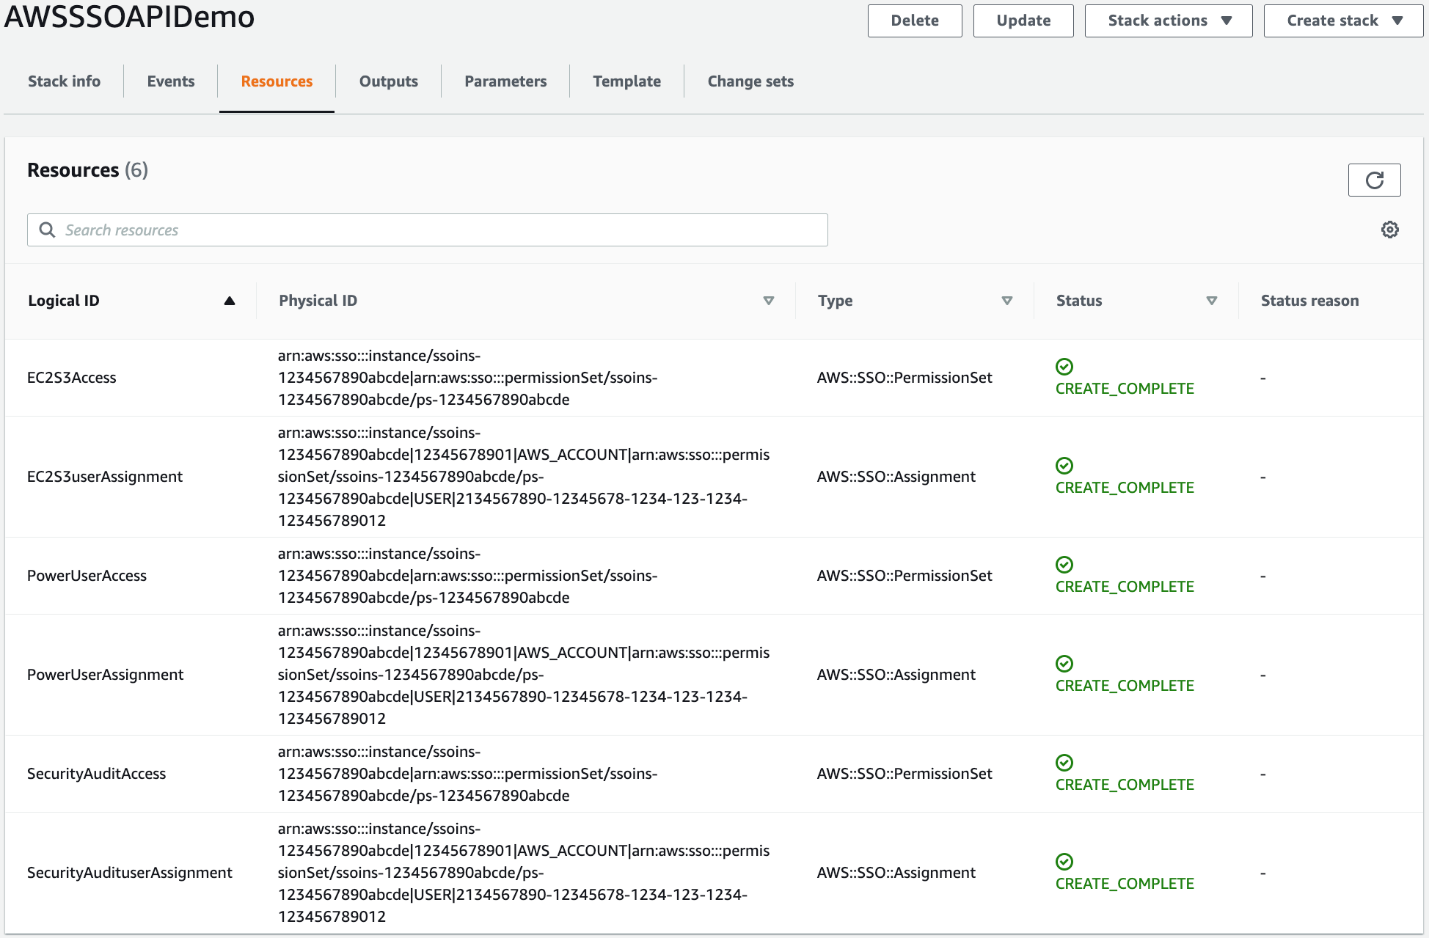
- When invoked, the Lambda function CreateAccountAssignment assigns the AWS SSO user group to the new AWS account with the permission set defined in the AWS CloudFormation stack.
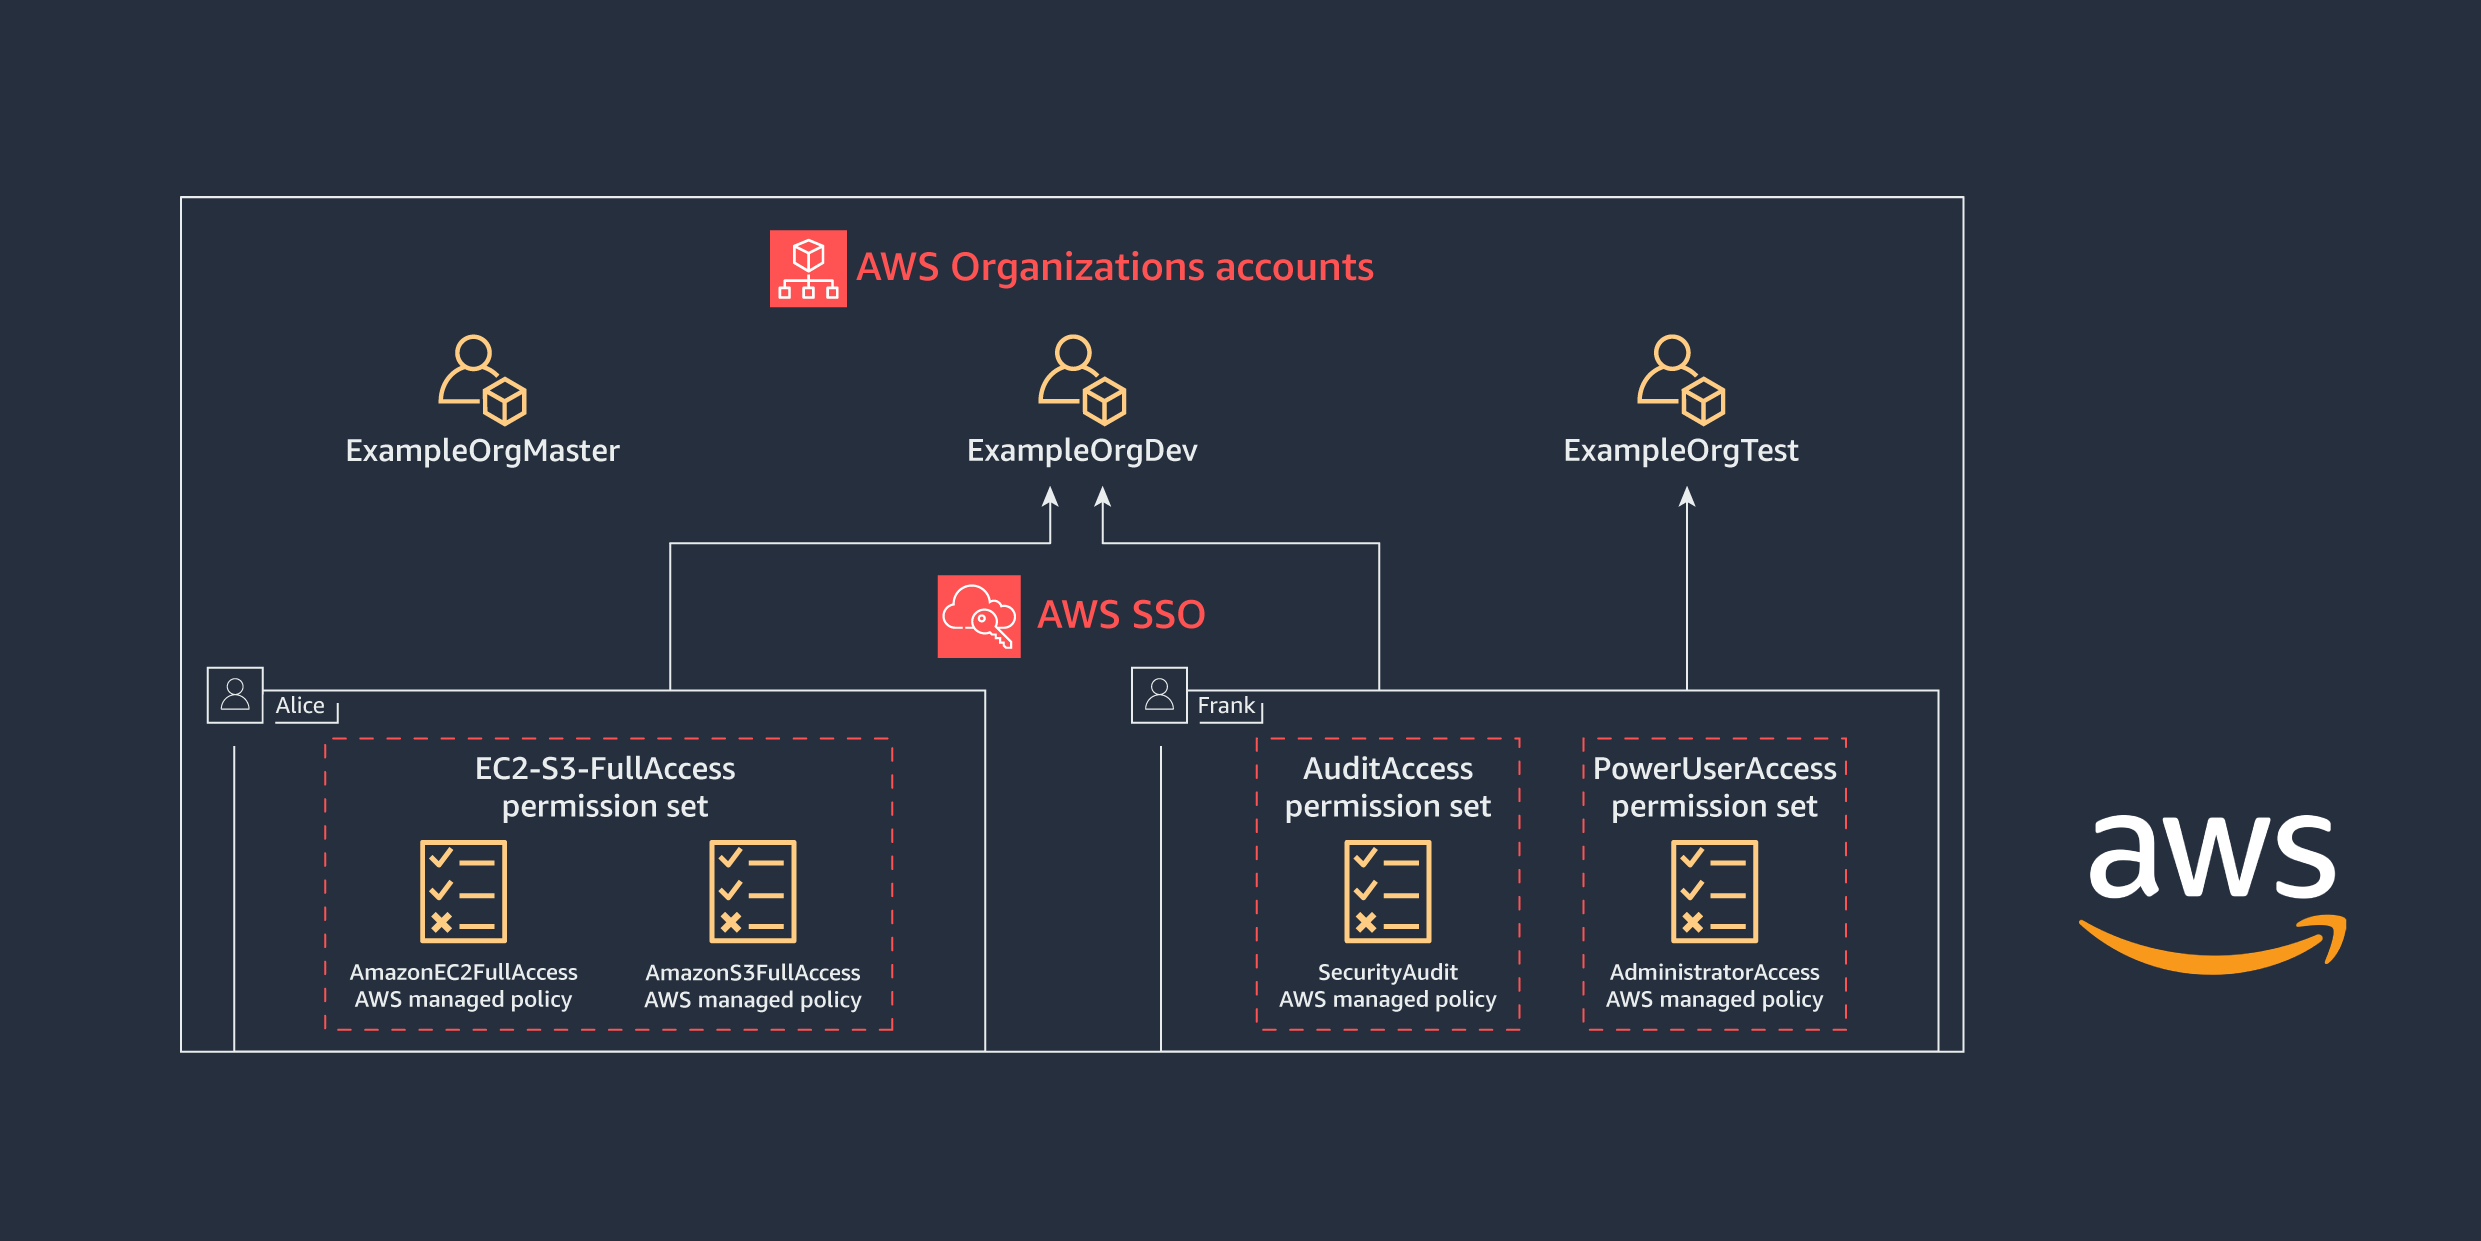
Figure 13: New AWS account showing user groups with permission sets assigned


Figure 13 above shows the new AWS account with the user groups and the assigned permission sets. This completes the automation process. The AWS SSO users that are part of the user group will automatically be allowed to access the new AWS account with the defined permission set.
Handling common sources of error
This solution connects multiple components to facilitate the new AWS account creation and AWS SSO permission set assignment. The correctness of the parameters in the AWS CloudFormation stack is important to make sure that when AWS Control Tower creates a new AWS account, it is accessible.
To verify that this solution works, make sure that the email address is a valid email address, you have access to that email, and it is not being used for any existing AWS account. After a new account is created, it is not possible to change its root account email address, so if you input an invalid or inaccessible email, you will need to create a new AWS account and remove the invalid account.
You can view common errors by going to AWS Service Catalog web console. Under Provisioned products, you can see all of your AWS Control Tower Account Factory-launched AWS accounts.

Figure 14: AWS Service Catalog provisioned product with error
Selecting Error under the Status column shows you the source of the error. Figure 15 below is an example of the source of the error:

Figure 15: AWS account creation error explanation
Conclusion
In this post, we’ve shown you how to automate batch creation of AWS accounts in AWS Control Tower and batch assignment of user access to AWS accounts in AWS SSO. When the batch AWS accounts creation and AWS SSO user access assignment processes are complete, the administrator will be notified by emails from AWS SNS. We’ve also explained how to handle some common sources of errors and how to avoid them.
As you automate the batch AWS account creation and user access assignment, you can reduce the time you spend on the undifferentiated heavy lifting work, and onboard your users in your organization much more quickly, so they can start using and experimenting on AWS right away.
To learn more about the best practices of setting up an AWS multi-account environment, check out this documentation for more information.
If you have feedback about this post, submit comments in the Comments section below.
Want more AWS Security news? Follow us on Twitter.