Tag Archives: retropie

Collection of Raspberry Pi retro tech projects

Post Syndicated from Ashley Whittaker original https://www.raspberrypi.org/blog/collection-of-raspberry-pi-retro-tech-projects/

During lockdown, Stuart (aka JamHamster) wanted to keep busy whilst between jobs, and ended up building a mini empire of rescued retro systems. Cassette tapes, Game Boys, and floppy disks were all among the treasures he reclaimed.

All up and running on my 'shelf of deceit' where nothing is what it seems
Stuart calls this the “shelf of deceit” – where nothing is what it appears to be

Cassette tape starter

Stuart got started by fitting a TZXDuino tape loader into a cassette tape shell. Remember those? This allows him to load software onto a ZX Spectrum by inserting a tape into the tape deck, just as Nature intended. He has since improved the design (check out V2 on YouTube) and carefully documented it on GitHub, so people can build their own.

Here’s how the cassette tape project went down

With that first project in the bag and getting attention on a Facebook group (Spectrum for Everyone), Stuart went forth and sourced more retro tech to revive with tiny pieces of new technology.

Twitter lit up for Stuart’s retrofit cassette tape

Enter Raspberry Pi

Then Stuart discovered our tiny computer and realised there was heaps of scope for hiding them inside older tech. Although we can’t quite officially endorse Stuart’s method of “carefully” removing a port on his Raspberry Pi – it’ll void your warranty – we will say that we like people who go about intentionally voiding their warranties. It’s a cool video.

Here's the collection so far and I'm really pleased with how they worked out
You can see all the modern devices labelled alongside the retro tech they’re encased in

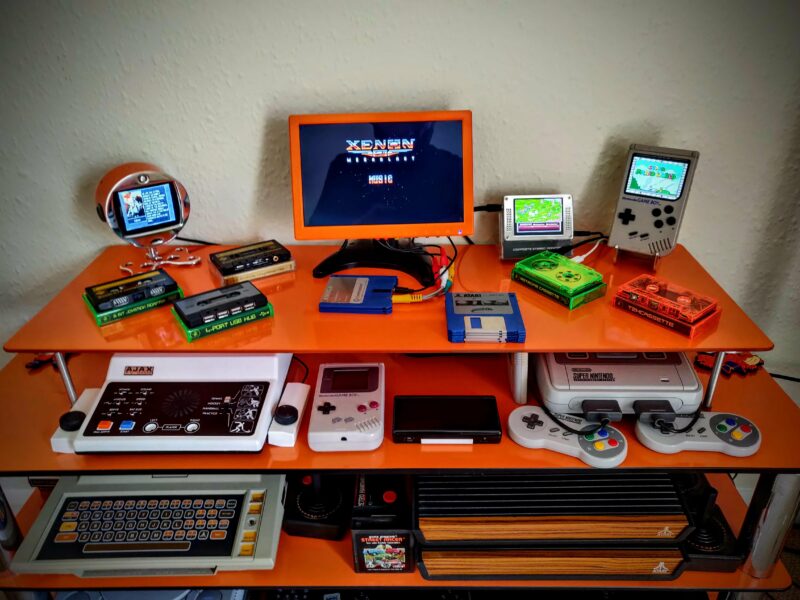
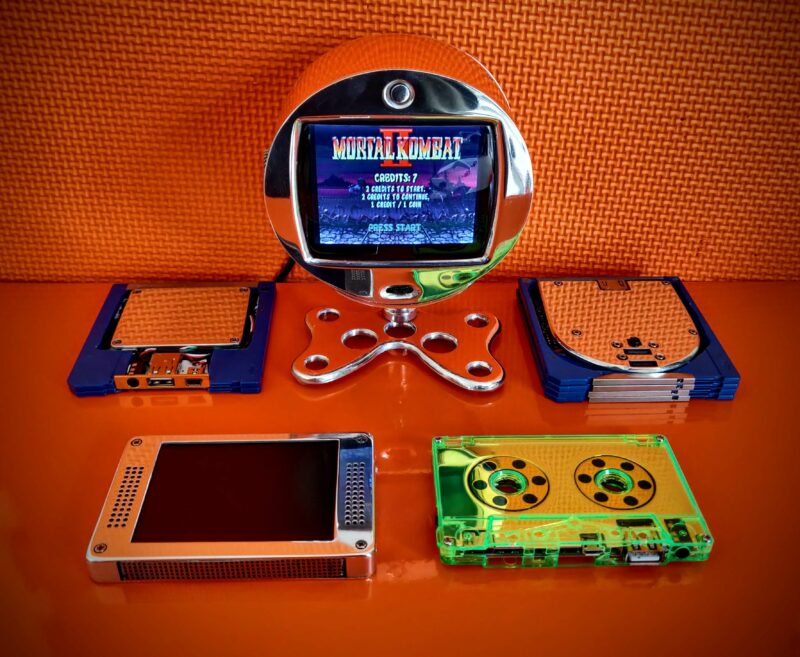
He has since created loads of retrofit projects with Raspberry Pi. Let’s take a quick look at a few of them.

Raspberry Pi 3 Game Boy build

Another gem of a build video from JamHamster on YouTube

First up is a Game Boy build with a Raspberry Pi 3 Model A+. Stuart built an aluminium chassis from scrap, and this sandwiches the Raspberry Pi to hold it in place inside the Game Boy enclosure, as well as acting as a heatsink. There’s a grille in the cartridge and he also added four rear buttons. The hardest part of this build, apparently, was soldering the custom HDMI cable.

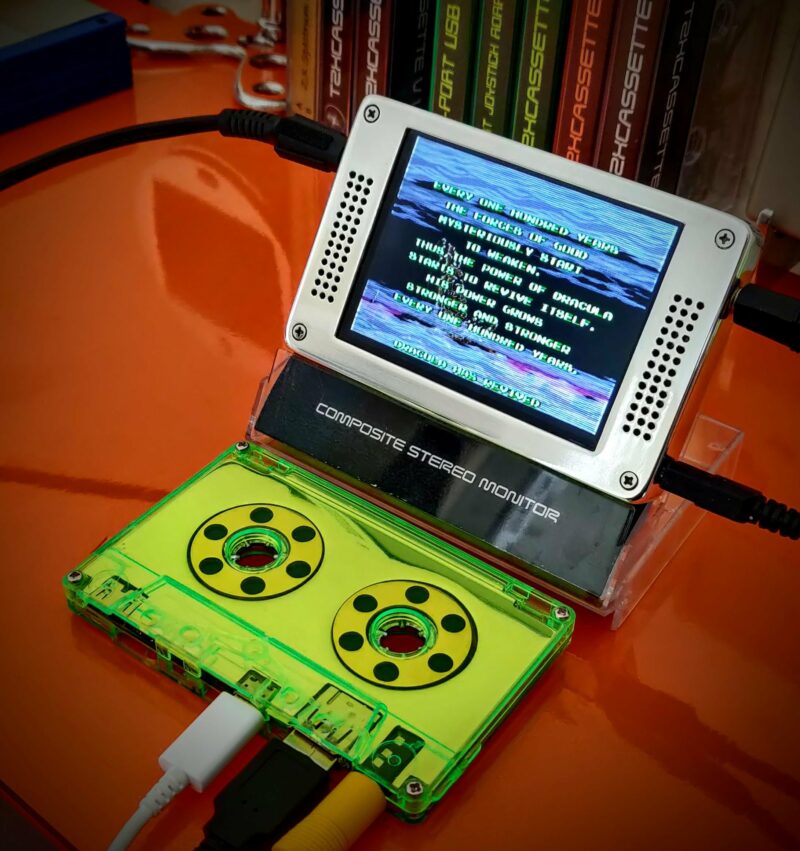
Better-than-real CRT screen

Stuart liked the look of an old-fashioned CRT (cathode-ray tube) screen for playing retro games on, but they chew through energy and aren’t that portable. So he had the idea to make a space-efficient LCD system that sits on a desktop and just looks like a retro TV.

Wait for the heroes in half-shells at the end

This project features a 3.5-inch screen of the type that’s usually found on a car dashboard to help the driver to reverse. Stuart converted it to 5V, and added a cut-down Raspberry Pi 3 and a custom-machined chassis. A custom-ground curved lens makes it look like a real CRT, and he added ports on the back for two Atari joysticks, as well as an external composite input and USB.

The Pi 'CRT' has two onboard Atari Joystick ports and plenty of connectors for other machines
This Raspberry Pi-powered “CRT” display has two onboard Atari joystick ports and plenty of connectors for other machines

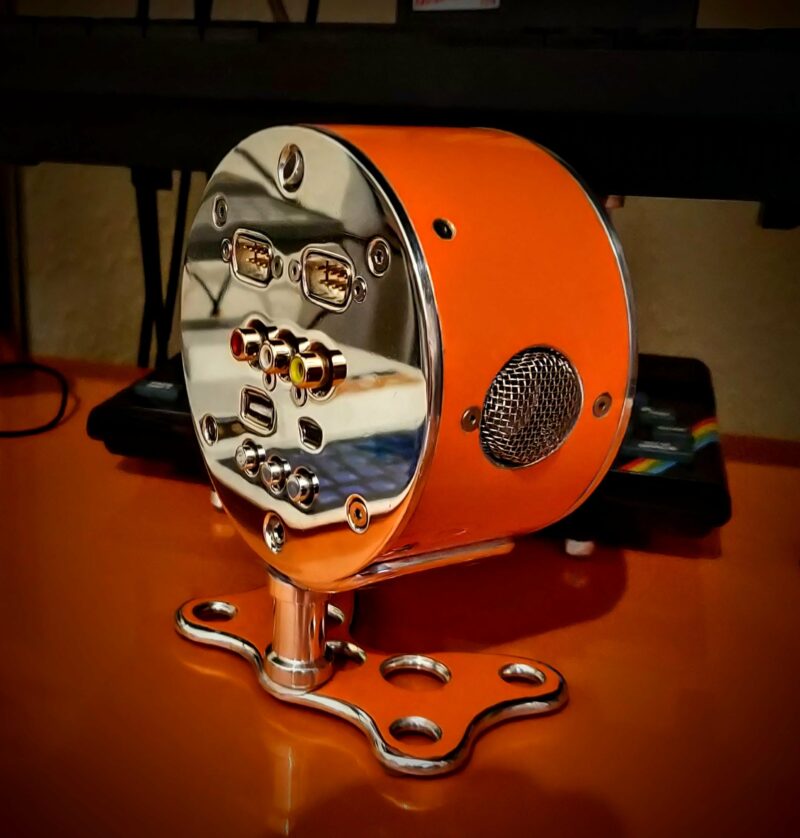
The build process for this project is also documented on Github. Here are some extra pictures.

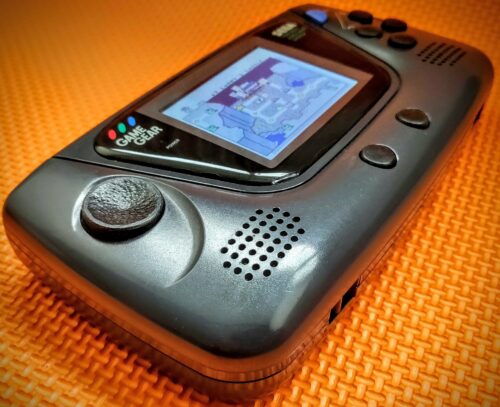
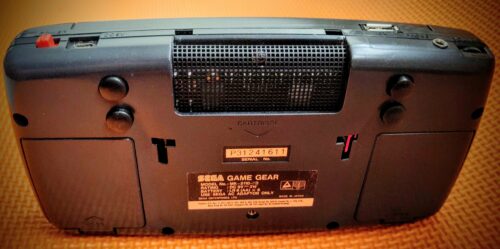
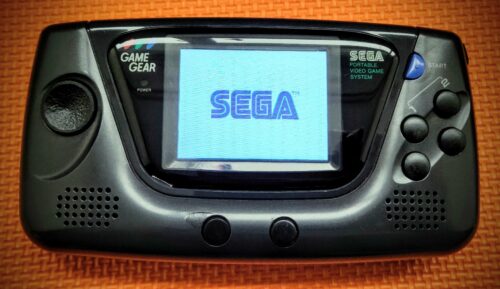
Sega Game Gear build

Stuart’s sister gave him her Game Gear to fix, but the batteries leaked and killed it so he converted it to a Raspberry Pi 3B portable gaming system. And because it was for his sister, he went all out, spending six weeks refining it.

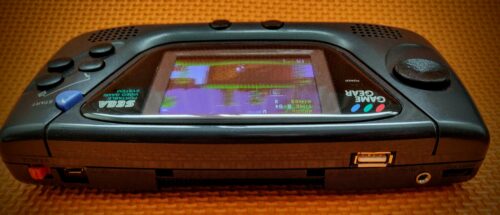
He also ended up rewriting elements of the Arduino Joystick library for responsiveness and ease of configuration. Here’s the Github link for those interested in that part of the build.
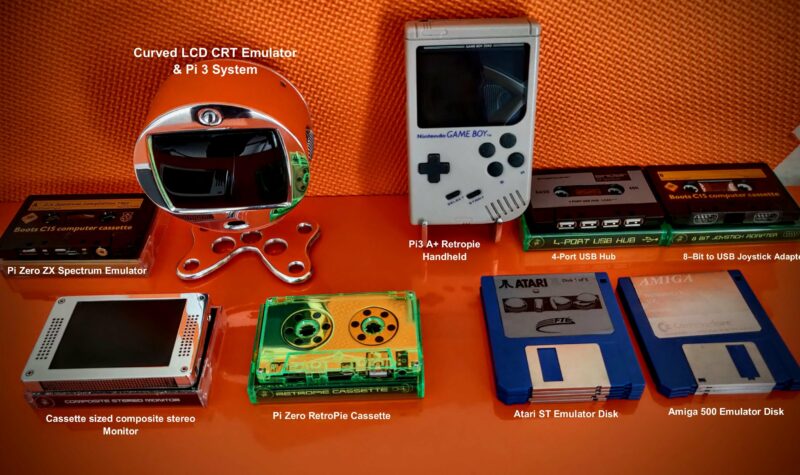
Check out the carnage that Stuart rescued with Raspberry Pi 3B

RetroPie cassette

Stuart’s latest cassette build features a Raspberry Pi Zero running RetroPie. He wanted to make one with a transparent case, so he encased the Raspberry Pi in a heatsink sandwich to hide the wiring. He added a full-size USB port and a 3.5 mm media connector for sound and visuals. Here are some shots of the inside.

I'm really pleased with the 80s green
I love the 80s green

Try new things, expect failure, enjoy the process

There were far too many cracking retro builds for us to list here, so follow Stuart on Twitter @RealJamHamster and subscribe to JamHamster on YouTube to properly check everything out.

They need hefty heatsinks but I like working with metal and had fun with some of the designs
They need hefty heatsinks, but Stuart likes working with metal and had fun with some of the designs

Makers, tinkerers, and crafters don’t always have a practical reason for embarking on projects, and Stuart is no different. Here’s what he had to say about why projects like this make him happy:

“I will be happy to admit that I have no clue what I’m doing most of the time, and I am by no means an expert, but I believe everyone should try new things as you never know what you’ll be good at. 9 out of 10 of my ideas don’t work but that tenth one is generally pretty good. I’ve been between roles during lockdown so I am building these out of scrap metal and whatever I have lying around, which is an extra challenge. My philosophy is to try new things, expect failure, learn to enjoy the process and that it’ll be done when it’s done.”

The post Collection of Raspberry Pi retro tech projects appeared first on Raspberry Pi.

RetroPie booze barrel

Post Syndicated from Ashley Whittaker original https://www.raspberrypi.org/blog/retropie-booze-barrel/

What do we want? Retro gaming, adult beverages, and our favourite Spotify playlist. When do we want them? All at the same time.

Luckily, u/breadtangle took to reddit to answer our rum-soaked prayers with this beautifully crafted beer barrel-cum-arcade machine-cum-drinks cabinet.

A beer barrel with drinks inside two opening doors cut into the front of the barrel and a retro arcade console serving as the lid of the barrel with joystick and buttons on a ledge in front
We approve of this drink selection

The addition of a sneaky hiding spot for your favourite tipple, plus a musical surprise, set this build apart from the popular barrel arcade projects we’ve seen before, like this one featured a few years back on the blog.

Retro gaming

A Raspberry Pi 3 Model B+ runs RetroPie, offering all sorts of classic games to entertain you while you sample from the grownup goodies hidden away in the drinks cabinet.

The maker’s top choice is Tetris Attack for the SNES.

A beer barrel with drinks inside two opening doors cut into the front of the barrel and a retro arcade console serving as the lid of the barrel with joystick and buttons on a ledge in front
Such a beautiful finish

Background music

What more could you want now you’ve got retro games and an elegantly hidden drinks cabinet at your fingertips? u/breadtangle‘s creation has another trick hidden inside its smooth wooden curves.

The Raspberry Pi computer used in this build also runs Raspotify, a Spotify Connect client for Raspberry Pi that allows you to stream your favourite tunes and playlists from your phone while you game.

You can set Raspotify to play via Bluetooth speakers, but if you’re using regular speakers and are after a quick install, whack this command in your Terminal:

curl -sL https://dtcooper.github.io/raspotify/install.sh | sh
Booze barrel joystick and buttons panel during the making process
Behind the scenes

u/breadtangle neatly tucked a pair of Logitech z506 speakers on the sides of the barrel, where they could be protected by the overhang of the glass screen cover.

Hardware

The build’s joysticks and buttons came from Amazon, and they’re set into an off-cut piece of kitchen countertop. The glass screen protector is another Amazon find and sits on a rubber car-door edge protector.

The screen itself is lovingly tilted towards the controls, to keep players’ necks comfortable, and u/breadtangle finished off the build’s look with a barstool to sit on while gaming.

We love it, but we have one very important question left…

Can we come round and play?

The post RetroPie booze barrel appeared first on Raspberry Pi.

Build an arcade cabinet | Hackspace 35

Post Syndicated from Ben Everard original https://www.raspberrypi.org/blog/build-an-arcade-cabinet-hackspace-35/

Games consoles might be fast and have great graphics, but they’re no match for the entertainment value of a proper arcade machine. In this month’s issue of Hackspace magazine, you’re invited to relive your misspent youth with this huge build project.

There’s something special about the comforting solidity of a coin-eating video game monolith, and nothing screams retro fun like a full-sized arcade cabinet sitting in the corner of the room. Classic arcade machines can be a serious investment. Costing thousands of pounds and weighing about the same as a giant panda, they’re out of reach for all but the serious collector. Thankfully, you can recreate that retro experience using modern components for a fraction of the price and weight.

An arcade cabinet is much easier to make than you might expect. It’s essentially a fancy cupboard that holds a monitor, speakers, a computer, a keyboard, and some buttons. You can make your own cabinet using not much more than a couple of sheets of MDF, some clear plastic, and a few cans of spray paint.

If you want a really authentic-looking cabinet, you can find plenty of plans and patterns online. However, most classic cabinets are a bit bigger than you might remember, occupying almost a square metre of floor space. If you scale that down to approximately 60 cm2, you can make an authentic-looking home arcade cabinet that won’t take over the entire room, and can be cut from just two pieces of 8 × 4 (2440 mm × 1220 mm) MDF. You can download our plans, but these are rough plans designed for you to tweak into your own creation. A sheet of 18 mm MDF is ideal for making the body of the cabinet, and 12 mm MDF works well to fill in the front and back panels. You can use thinner sheets of wood to make a lighter cabinet, but you might find it less sturdy and more difficult to screw into.

The sides of the machine should be cut from 18 mm MDF, and will be 6 feet high. The sides need to be as close to identical as possible, so mark out the pattern for the side on one piece of 18 mm MDF, and screw the boards together to hold them while you cut. You can avoid marking the sides by placing the screws through the waste areas of the MDF. Keep these offcuts to make internal supports or brackets. You can cut the rest of the pieces of MDF using the project plans as a guide. 

Why not add a coin machine for extra authenticity

Attach the side pieces to the base, so that the sides hang lower than the base by an inch or two. If you’re more accomplished at woodworking and want to make the strongest cabinet possible, you can use a router to joint and glue the pieces of wood together. This will make the cabinet very slightly narrower and will affect some measurements, but if you follow the old adage to measure twice and cut once, you should be fine. If you don’t want to do this, you can use large angle brackets and screws to hold everything together. The cabinet will still be strong, and you’ll have the added advantage that you can disassemble it in the future if necessary.

Keep attaching the 18 mm MDF pieces, starting with the top piece and the rear brace. Once you have these pieces attached, the cabinet should be sturdy enough to start adding the thinner panels. Insetting the panels by about an inch gives the cabinet that retro look, and also hides any design crimes you might have committed while cutting out the side panels.

The absolute sizing of the cabinet isn’t critical unless you’re trying to make an exact copy of an old machine, so don’t feel too constrained by measuring things down to the millimetre. As long as the cabinet is wide enough to accept your monitor, everything else is moveable and can be adjusted to suit your needs.

Make it shiny

You can move onto decoration once the cabinet woodwork is fitted together. This is mostly down to personal preference, although it’s wise to think about which parts of the case will be touched more often, and whether your colour choices will cause any problems with screen reflection. Matt black is a popular choice for arcade cabinets because it’s non-reflective and any surface imperfections are less noticeable with a matt paint finish.

Aluminium checker plate is a good way of protecting your cabinet from damage, and it can be cut and shaped easily.

Wallpaper or posters make a great choice for decorating the outside of the cabinet, and they are quick to apply. Just be sure to paste all the way up to the edge, and protect any areas that will be handled regularly with aluminium checker plate or plastic sheet. The edges of MDF sheets can be finished with iron-on worktop edging, or with the chrome detailing tape used on cars. You can buy detailing tape in 12 mm and 18 mm widths, which makes it great for finishing edges. The adhesive tape provided with the chrome edging isn’t always very good, so it’s worth investing in some high-strength, double-sided clear vinyl foam tape.

You’ve made your cabinet, but it’s empty at the moment. You’re going to add a Raspberry Pi, monitor, speakers, and a panel for buttons and joysticks. To find out how, you can read the full article in HackSpace magazine 35.  

Get HackSpace magazine 35 Out Now!

Each month, HackSpace magazine brings you the best projects, tips, tricks and tutorials from the makersphere. You can get it from the Raspberry Pi Press online store, The Raspberry Pi store in Cambridge, or your local newsagents.

Each issue is free to download from the HackSpace magazine website.

If you subscribe for 12 months, you get an Adafruit Circuit Playground Express , or can choose from one of our other subscription offers, including this amazing limited-time offer of three issues and a book for only £10!

The post Build an arcade cabinet | Hackspace 35 appeared first on Raspberry Pi.

Turn a watermelon into a RetroPie games console

Post Syndicated from Ashley Whittaker original https://www.raspberrypi.org/blog/turn-a-watermelon-into-a-retropie-games-console/

OK Cedrick, we don’t need to know why, but we have to know how you turned a watermelon into a games console.

This has got to be a world first. What started out as a regular RetroPie project has blown up reddit due to the unusual choice of casing for the games console: nearly 50,000 redditors upvoted this build within a week of Cedrick sharing it.

See, we’re not kidding

What’s inside?

  • Raspberry Pi 3
  • Jingo Dot power bank (that yellow thing you can see below)
  • Speakers
  • Buttons
  • Small 1.8″ screen
Cedric’s giggling really makes this video

Retropie

While this build looks epic, it isn’t too tricky to make. First, Cedrick flashed the RetroPie image onto an SD card, then he wired up a Raspberry Pi’s GPIO pins to the red console buttons, speakers, and the screen.

Cedrick achieved audio output by adding just a few lines of code to the config file, and he downloaded libraries for screen configuration and button input. That’s it! That’s all you need to get a games console up and running.

Cedrick just hanging on the train with his WaterBoy

Now for the messy bit

Cedrick had to gut an entire watermelon before he could start getting all the hardware in place. He power-drilled holes for the buttons to stick through, and a Stanley knife provided the precision he needed to get the right-sized gap for the screen.

A gutted watermelon with gaps cut to fit games console buttons and a screen

Rather than drill even more holes for the speakers, Cedrick stuck them in place inside the watermelon using toothpicks. He did try hot glue first but… yeah. Turns out fruit guts are impervious to glue.

Moisture was going to be a huge problem, so to protect all the hardware from the watermelon’s sticky insides, Cedric lined it with plastic clingfilm.

Infinite lives

And here’s how you can help: Cedrick is open to any tips as to how to preserve the perishable element of his project: the watermelon. Resin? Vaseline? Time machine? How can he keep the watermelon fresh?

Share your ideas on reddit or YouTube, and remember to subscribe to see more of Cedric’s maverick making in the wild.

The post Turn a watermelon into a RetroPie games console appeared first on Raspberry Pi.