Post Syndicated from Ketan Gupta original https://blog.cloudflare.com/we-shipped-finalizationregistry-in-workers-why-you-should-never-use-it/
We’ve recently added support for the FinalizationRegistry API in Cloudflare Workers. This API allows developers to request a callback when a JavaScript object is garbage-collected, a feature that can be particularly relevant for managing external resources, such as memory allocated by WebAssembly (Wasm). However, despite its availability, our general advice is: avoid using it directly in most scenarios.
Our decision to add FinalizationRegistry — while still cautioning against using it — opens up a bigger conversation: how memory management works when JavaScript and WebAssembly share the same runtime. This is becoming more common in high-performance web apps, and getting it wrong can lead to memory leaks, out-of-memory errors, and performance issues, especially in resource-constrained environments like Cloudflare Workers.
In this post, we’ll look at how JavaScript and Wasm handle memory differently, why that difference matters, and what FinalizationRegistry is actually useful for. We’ll also explain its limitations, particularly around timing and predictability, walk through why we decided to support it, and how we’ve made it safer to use. Finally, we’ll talk about how newer JavaScript language features offer a more reliable and structured approach to solving these problems.
JavaScript relies on automatic memory management through a process called garbage collection. This means developers do not need to worry about freeing allocated memory, or lifetimes. The garbage collector identifies and reclaims memory occupied by objects that are no longer needed by the program (that is, garbage). This helps prevent memory leaks and simplifies memory management for developers.
function greet() {
let name = "Alice"; // String is allocated in memory
console.log("Hello, " + name);
} // 'name' goes out of scope
greet();
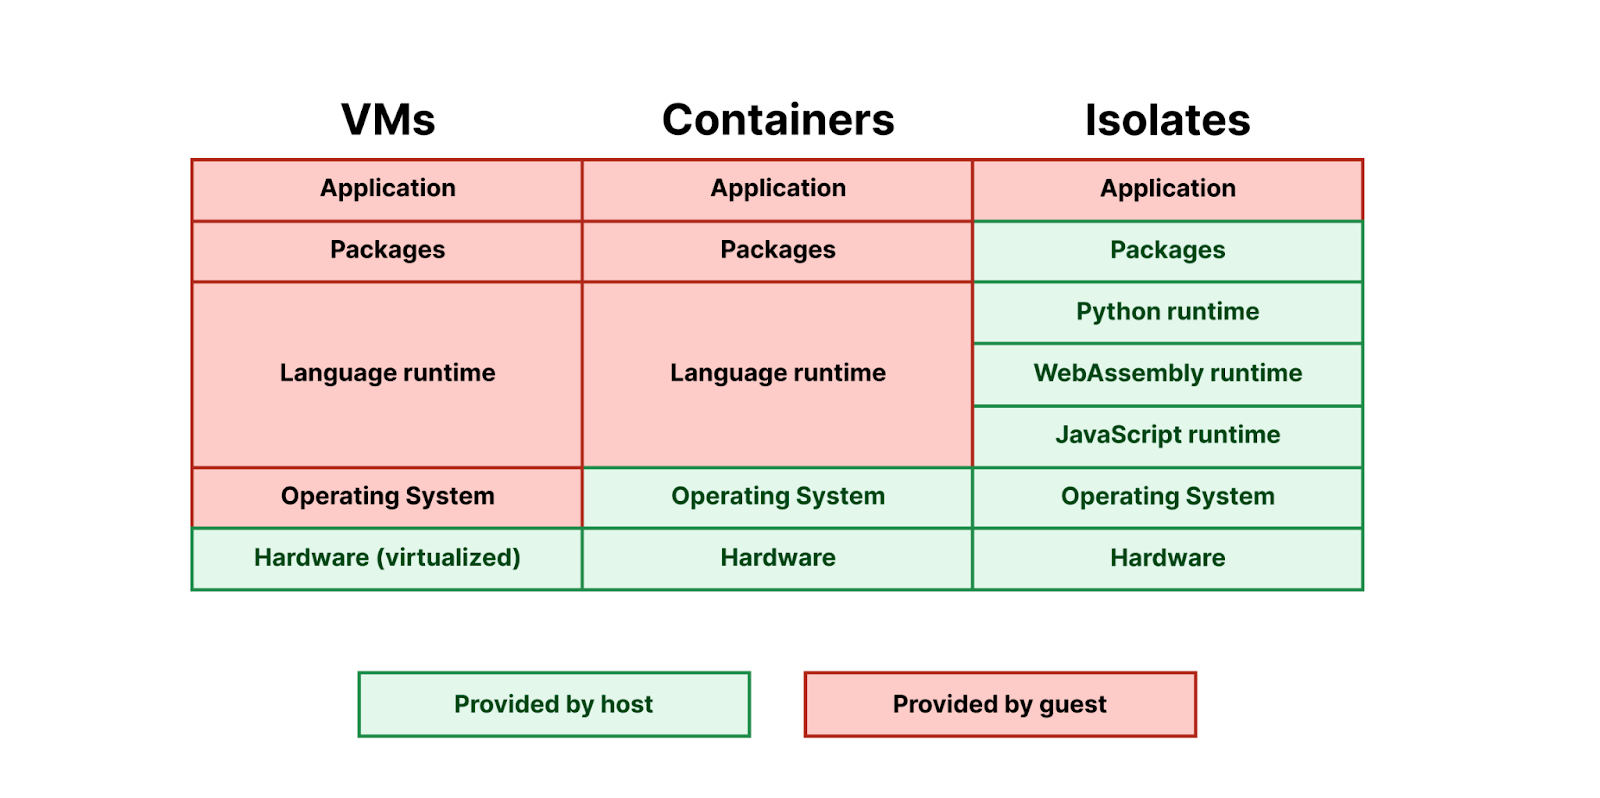
// JavaScript automatically frees allocated memory at some point in futureWebAssembly (Wasm) is an assembly-like instruction format designed to run high-performance applications on the web. While it initially gained prominence in web browsers, Wasm is also highly effective on the server side. At Cloudflare, we leverage Wasm to enable users to run code written in a variety of programming languages, such as Rust and Python, directly within our V8 isolates, offering both performance and versatility.
Wasm runtimes are designed to be simple stack machines, and lack built-in garbage collectors. This necessitates manual memory management (allocation and deallocation of memory used by Wasm code), making it an ideal compilation target for languages like Rust and C++ that handle their own memory.
Wasm modules operate on linear memory: a resizable block of raw bytes, which JavaScript views as an ArrayBuffer. This memory is organized in 64 KB pages, and its initial size is defined when the module is compiled or loaded. Wasm code interacts with this memory using 32-bit offsets — integer values functioning as direct pointers that specify a byte offset from the start of its linear memory. This direct memory access model is crucial for Wasm’s high performance. The host environment (which in Cloudflare Workers is JavaScript) also shares this ArrayBuffer, reading and writing (often via TypedArrays) to enable vital data exchange between Wasm and JavaScript.

A core Wasm design is its secure sandbox. This confines Wasm code strictly to its own linear memory and explicitly declared imports from the host, preventing unauthorized memory access or system calls. Direct interaction with JavaScript objects is blocked; communication occurs through numeric values, function references, or operations on the shared ArrayBuffer. This strong isolation is vital for security, ensuring Wasm modules don’t interfere with the host or other application components, which is especially important in multi-tenant environments like Cloudflare Workers.

Bridging WebAssembly memory with JavaScript often involves writing low-level “glue” code to convert raw byte arrays from Wasm into usable JavaScript types. Doing this manually for every function or data structure is both tedious and error-prone. Fortunately, tools like wasm-bindgen and Emscripten (Embind) handle this interop automatically, generating the binding code needed to pass data cleanly between the two environments. We use these same tools under the hood — wasm-bindgen for Rust-based workers-rs projects, and Emscripten for Python Workers — to simplify integration and let developers focus on application logic rather than memory translation.
High-performance web apps often use JavaScript for interactive UIs and data fetching, while WebAssembly handles demanding operations like media processing and complex calculations for significant performance gains, allowing developers to maximize efficiency. Given the difference in memory management models, developers need to be careful when using WebAssembly memory in JavaScript.
For this example, we’ll use Rust to compile a WebAssembly module manually. Rust is a popular choice for WebAssembly because it offers precise control over memory and easy Wasm compilation using standard toolchains.
Here we have two simple functions. make_buffer creates a string and returns a raw pointer back to JavaScript. The function intentionally “forgets” the memory allocated so that it doesn’t get cleaned up after the function returns. free_buffer, on the other hand, expects the initial string reference handed back and frees the memory.
// Allocate a fresh byte buffer and hand the raw pointer + length to JS.
// *We intentionally “forget” the Vec so Rust will not free it right away;
//   JS now owns it and must call `free_buffer` later.*
#[no_mangle]
pub extern "C" fn make_buffer(out_len: *mut usize) -> *mut u8 {
    let mut data = b"Hello from Rust".to_vec();
    let ptr = data.as_mut_ptr();
    let len  = data.len();

    unsafe { *out_len = len };

    std::mem::forget(data);
    return ptr;
}

/// Counterpart that **must** be called by JS to avoid a leak.
#[no_mangle]
pub unsafe extern "C" fn free_buffer(ptr: *mut u8, len: usize) {
    let _ = Vec::from_raw_parts(ptr, len, len);
}Back in JavaScript land, we’ll call these Wasm functions and output them using console.log. This is a common pattern in Wasm-based applications since WebAssembly doesn’t have direct access to Web APIs, and rely on a JavaScript “glue” to interface with the outer world in order to do anything useful.
const { instance } = await WebAssembly.instantiate(WasmBytes, {});

const { memory, make_buffer, free_buffer } = instance.exports;

//  Use the Rust functions
const lenPtr = 0;                 // scratch word in Wasm memory
const ptr = make_buffer(lenPtr);

const len = new DataView(memory.buffer).getUint32(lenPtr, true);
const data = new Uint8Array(memory.buffer, ptr, len);

console.log(new TextDecoder().decode(data)); // “Hello from Rust”

free_buffer(ptr, len); // free_buffer must be called to prevent memory leaks
You can find all code samples along with setup instructions here.
As you can see, working with Wasm memory from JavaScript requires care, as it introduces the risk of memory leaks if allocated memory isn’t properly released. JavaScript developers are often unfamiliar with manual memory management, and it’s easy to forget returning memory to WebAssembly after use. This can become especially tricky when Wasm-allocated data is passed into JavaScript libraries, making ownership and lifetime harder to track.
While occasional leaks may not cause immediate issues, over time they can lead to increased memory usage and degrade performance, particularly in memory-constrained environments like Cloudflare Workers.
FinalizationRegistry, introduced as part of the TC-39 WeakRef proposal, is a JavaScript API which lets you run “finalizers” (aka cleanup callbacks) when an object gets garbage-collected. Let’s look at a simple example to demonstrate the API:
const my_registry = new FinalizationRegistry((obj) => { console.log("Cleaned up: " + obj); });

{
  let temporary = { key: "value" };
  // Register this object in our FinalizationRegistry -- the second argument,
  // "temporary", will be passed to our callback as its obj parameter
  my_registry.register(temporary, "temporary");
}

// At some point in the future when temporary object gets garbage collected, we'll see "Cleaned up: temporary" in our logs.
Let’s see how we can use this API in our Wasm-based application:
const { instance } = await WebAssembly.instantiate(WasmBytes, {});

const { memory, make_buffer, free_buffer } = instance.exports;

// FinalizationRegistry would be responsible for returning memory back to Wasm
const cleanupFr = new FinalizationRegistry(({ ptr, len }) => {
  free_buffer(ptr, len);
});

//  Use the Rust functions
const lenPtr = 0;                 // scratch word in Wasm memory
const ptr = make_buffer(lenPtr);

const len = new DataView(memory.buffer).getUint32(lenPtr, true);
const data = new Uint8Array(memory.buffer, ptr, len);

// Register the data buffer in our FinalizationRegistry so that it gets cleaned up automatically
cleanupFr.register(data, { ptr, len });

console.log(new TextDecoder().decode(data));   // → “Hello from Rust”

// No need to manually call free_buffer, FinalizationRegistry will do this for us
We can use a FinalizationRegistry to manage any object borrowed from WebAssembly by registering it with a finalizer that calls the appropriate free function. This is the same approach used by wasm-bindgen. It shifts the burden of manual cleanup away from the JavaScript developer and delegates it to the JavaScript garbage collector. However, in practice, things aren’t quite that simple.
There is a fundamental issue with FinalizationRegistry: garbage collection is non-deterministic, and may clean up your unused memory at some arbitrary point in the future. In some cases, garbage collection might not even run and your “finalizers” will never be triggered.
This is part of its documentation as well:
“A conforming JavaScript implementation, even one that does garbage collection, is not required to call cleanup callbacks. When and whether it does so is entirely down to the implementation of the JavaScript engine. When a registered object is reclaimed, any cleanup callbacks for it may be called then, or some time later, or not at all.”
Even Emscripten mentions this in their documentation: “… finalizers are not guaranteed to be called, and even if they are, there are no guarantees about their timing or order of execution, which makes them unsuitable for general RAII-style resource management.”
Given their non-deterministic nature, developers seldom use finalizers for any essential program logic. Treat them as a last-ditch safety net, not as a primary cleanup mechanism — explicit, deterministic teardown logic is almost always safer, faster, and easier to reason about.
Given its non-deterministic nature and limited early adoption, we initially disabled the FinalizationRegistry API in our runtime. However, as usage of Wasm-based Workers grew — particularly among high-traffic customers — we began to see new demands emerge. One such customer was running an extremely high requests per second (RPS) workload using WebAssembly, and needed tight control over memory to sustain massive traffic spikes without degradation. This highlighted a gap in our memory management capabilities, especially in cases where manual cleanup wasn’t always feasible or reliable. As a result, we re-evaluated our stance and began exploring the challenges and trade-offs of enabling FinalizationRegistry within the Workers environment, despite its known limitations.
Because this API could be misused and cause unpredictable results for our customers, we’ve added a few safeguards. Most importantly, cleanup callbacks are run without an active async context, which means they cannot perform any I/O. This includes sending events to a tail Worker, logging metrics, or making fetch requests.
While this might sound limiting, it’s very intentional. Finalization callbacks are meant for cleanup — especially for releasing WebAssembly memory — not for triggering side effects. If we allowed I/O here, developers might (accidentally) rely on finalizers to perform critical logic that depends on when garbage collection happens. That timing is non-deterministic and outside your control, which could lead to flaky, hard-to-debug behavior.
We don’t have full control over when V8’s garbage collector performs cleanup, but V8 does let us nudge the timing of finalizer execution. Like Node and Deno, Workers queue FinalizationRegistry jobs only after the microtask queue has drained, so each cleanup batch slips into the quiet slots between I/O phases of the event loop.

The Cloudflare Workers runtime is specifically engineered to prevent side-channel attacks in a multi-tenant environment. Prior to enabling the FinalizationRegistry API, we did a thorough analysis to assess its impact on our security model and determine the necessity of additional safeguards. The non-deterministic nature of FinalizationRegistry raised concerns about potential information leaks leading to Spectre-like vulnerabilities, particularly regarding the possibility of exploiting the garbage collector (GC) as a confused deputy or using it to create a timer.
GC as confused deputy
One concern was whether the garbage collector (GC) could act as a confused deputy — a security antipattern where a privileged component is tricked into misusing its authority on behalf of untrusted code. In theory, a clever attacker could try to exploit the GC’s ability to access internal object lifetimes and memory behavior in order to infer or manipulate sensitive information across isolation boundaries.
However, our analysis indicated that the V8 GC is effectively contained and not exposed to confused deputy risks within the runtime. This is attributed to our existing threat models and security measures, such as the isolation of user code, where the V8 Isolate serves as the primary security boundary. Furthermore, even though FinalizationRegistry involves some internal GC mechanics, the callbacks themselves execute in the same isolate that registered them — never across isolates — ensuring isolation remains intact.
GC as timer
We also evaluated the possibility of using FinalizationRegistry as a high-resolution timing mechanism — a common vector in side-channel attacks like Spectre. The concern here is that an attacker could schedule object finalization in a way that indirectly leaks information via the timing of callbacks.
In practice, though, the resolution of such a “GC timer” is low and highly variable, offering poor reliability for side-channel attacks. Additionally, we control when finalizer callbacks are scheduled — delaying them until after the microtask queue has drained — giving us an extra layer of control to limit timing precision and reduce risk.
Following a review with our security research team, we determined that our existing security model is sufficient to support this API.
JavaScript’s Explicit Resource Management proposal introduces a deterministic approach to handle resources needing manual cleanup, such as file handles, network connections, or database sessions. Drawing inspiration from constructs like C#’s using and Python’s with, this proposal introduces the using and await using syntax. This new syntax guarantees that objects adhering to a specific cleanup protocol are automatically disposed of when they are no longer within their scope.
Let’s look at a simple example to understand it a bit better.
class MyResource {
  [Symbol.dispose]() {
    console.log("Resource cleaned up!");
  }

  use() {
    console.log("Using the resource...");
  }
}

{
  using res = new MyResource();
  res.use();
} // When this block ends, Symbol.dispose is called automatically (and deterministically).
The proposal also includes additional features that offer finer control over when dispose methods are called. But at a high level, it provides a much-needed, deterministic way to manage resource cleanup. Let’s now update our earlier WebAssembly-based example to take advantage of this new mechanism instead of relying on FinalizationRegistry:
const { instance } = await WebAssembly.instantiate(WasmBytes, {});
const { memory, make_buffer, free_buffer } = instance.exports;

class WasmBuffer {
  constructor(ptr, len) {
    this.ptr = ptr;
    this.len = len;
  }

  [Symbol.dispose]() {
    free_buffer(this.ptr, this.len);
  }
}

{
  const lenPtr = 0;
  const ptr = make_buffer(lenPtr);
  const len = new DataView(memory.buffer).getUint32(lenPtr, true);

  using buf = new WasmBuffer(ptr, len);

  const data = new Uint8Array(memory.buffer, ptr, len);
  console.log(new TextDecoder().decode(data));  // → “Hello from Rust”
} // Symbol.dispose or free_buffer gets called deterministically here
Explicit Resource Management provides a more dependable way to clean up resources than FinalizationRegistry, as it runs cleanup logic — such as calling free_buffer in WasmBuffer via [Symbol.dispose]() and the using syntax — deterministically, rather than relying on the garbage collector’s unpredictable timing. This makes it a more reliable choice for managing critical resources, especially memory.
Emscripten already makes use of Explicit Resource Management for handling Wasm memory, using FinalizationRegistry as a last resort, while wasm-bindgen supports it in experimental mode. The proposal has seen growing adoption across the ecosystem and was recently conditionally advanced to Stage 4 in the TC39 process, meaning it’ll soon officially be part of the JavaScript language standard. This reflects a broader shift toward more predictable and structured memory cleanup in WebAssembly applications.
We recently added support for this feature in Cloudflare Workers as well, enabling developers to take advantage of deterministic resource cleanup in edge environments. As support for the feature matures, it’s likely to become a standard practice for managing linear memory safely and reliably.
Explicit Resource Management brings much-needed structure and predictability to resource cleanup in WebAssembly and JavaScript interop applications, but it doesn’t make FinalizationRegistry obsolete. There are still important use cases, particularly when a Wasm-allocated object’s lifecycle is out of your hands or when explicit disposal isn’t practical. In scenarios involving third-party libraries, dynamic lifecycles, or integration layers that don’t follow using patterns, FinalizationRegistry remains a valuable fallback to prevent memory leaks.
Looking ahead, a hybrid approach will likely become the standard in Wasm-JavaScript applications. Developers can use ERM for deterministic cleanup of Wasm memory and other resources, while relying on FinalizationRegistry as a safety net when full control isn’t possible. Together, they offer a more reliable and flexible foundation for managing memory across the JavaScript and WebAssembly boundary.
Ready to try it yourself? Deploy a WebAssembly-powered Worker and experiment with memory management — start building with Cloudflare Workers today.