Tag Archives: wordpress

Speeding up your (WordPress) website is a few clicks away

Post Syndicated from Alex Krivit original http://blog.cloudflare.com/speeding-up-your-website-in-a-few-clicks/

Speeding up your (WordPress) website is a few clicks away

Speeding up your (WordPress) website is a few clicks away

Every day, website visitors spend far too much time waiting for websites to load in their browsers. This waiting is partially due to browsers not knowing which resources are critically important so they can prioritize them ahead of less-critical resources. In this blog we will outline how millions of websites across the Internet can improve their performance by specifying which critical content loads first with Cloudflare Workers and what Cloudflare will do to make this easier by default in the future.

Popular Content Management Systems (CMS) like WordPress have made attempts to influence website resource priority, for example through techniques like lazy loading images. When done correctly, the results are magical. Performance is optimized between the CMS and browser without needing to implement any changes or coding new prioritization strategies. However, we’ve seen that these default priorities have opportunities to improve greatly.

In this co-authored blog with Google’s Patrick Meenan we will explain where the opportunities exist to improve website performance, how to check if a specific site can improve performance, and provide a small JavaScript snippet which can be used with Cloudflare Workers to do this optimization for you.

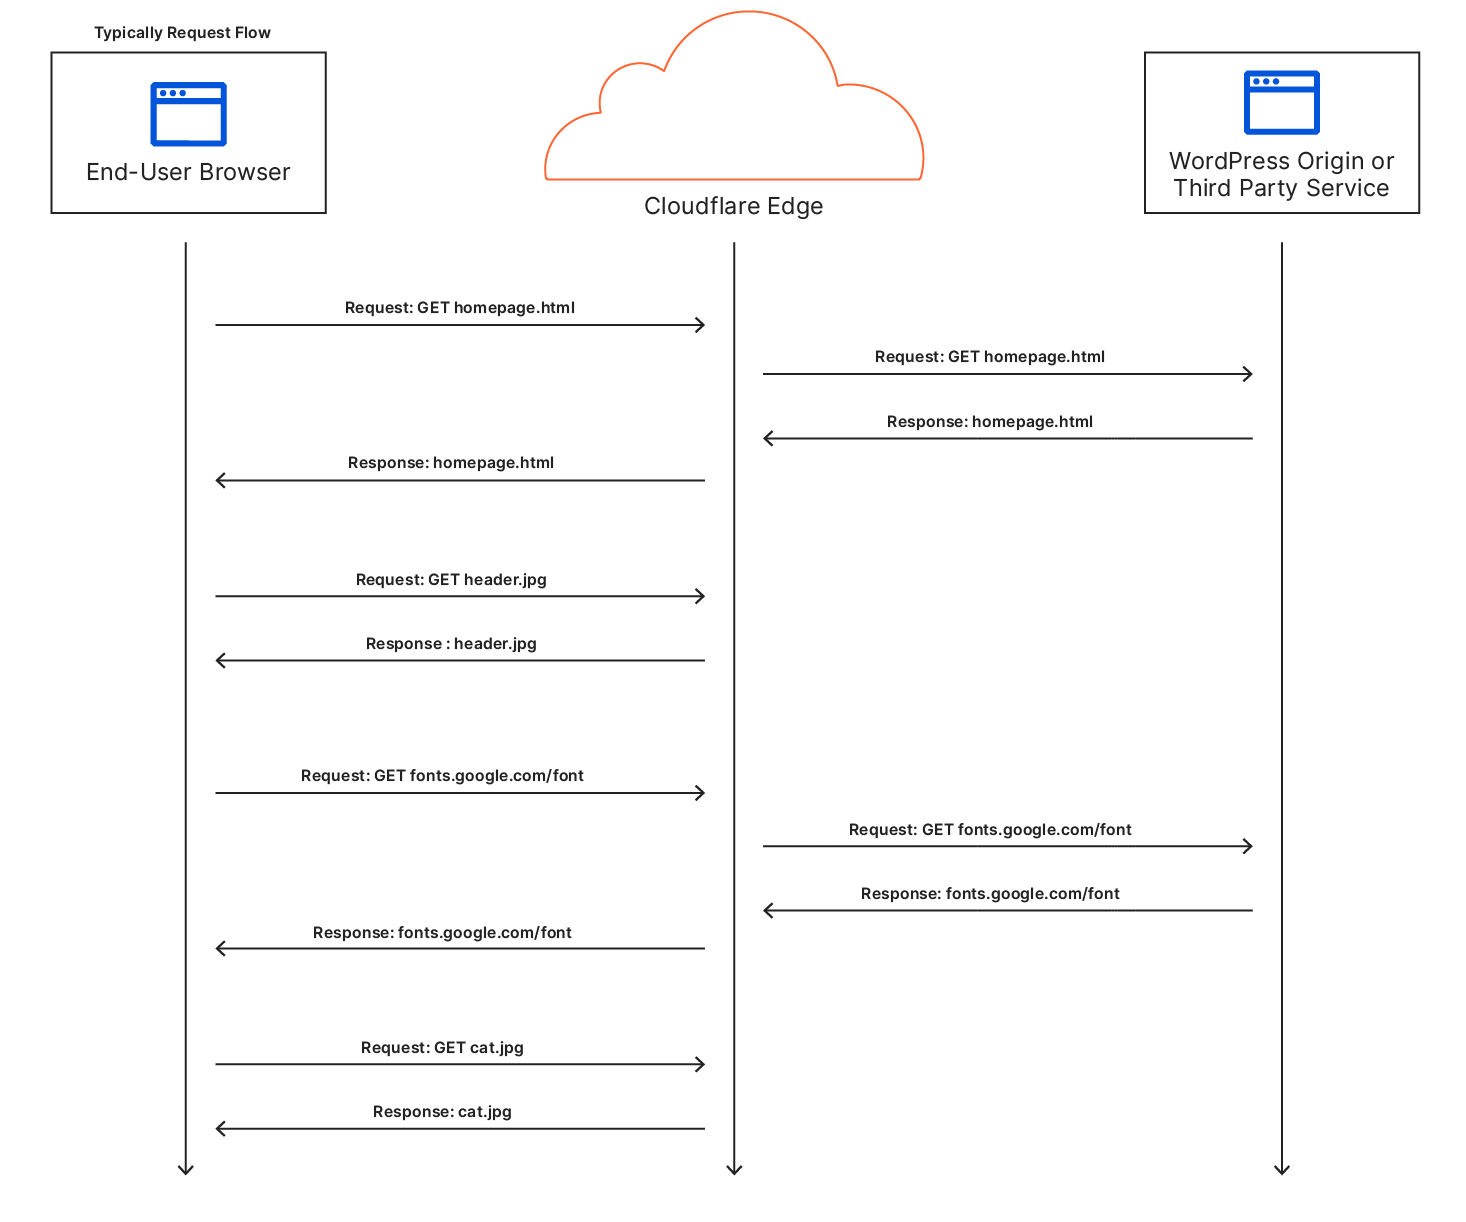
What happens when a browser receives the response?

Before we dive into where the opportunities are to improve website performance, let’s take a step back to understand how browsers load website assets by default.

After the browser sends a HTTP request to a server, it receives a HTTP response containing information like status codes, headers, and the requested content. The browser carefully analyzes the response's status code and response headers to ensure proper handling of the content.

Next, the browser processes the content itself. For HTML responses, the browser extracts important information from the <head> section of the HTML, such as the page title, stylesheets, and scripts. Once this information is parsed, the browser moves on to the response <body> which has the actual page content. During this stage, the browser begins to present the webpage to the visitor.

Speeding up your (WordPress) website is a few clicks away

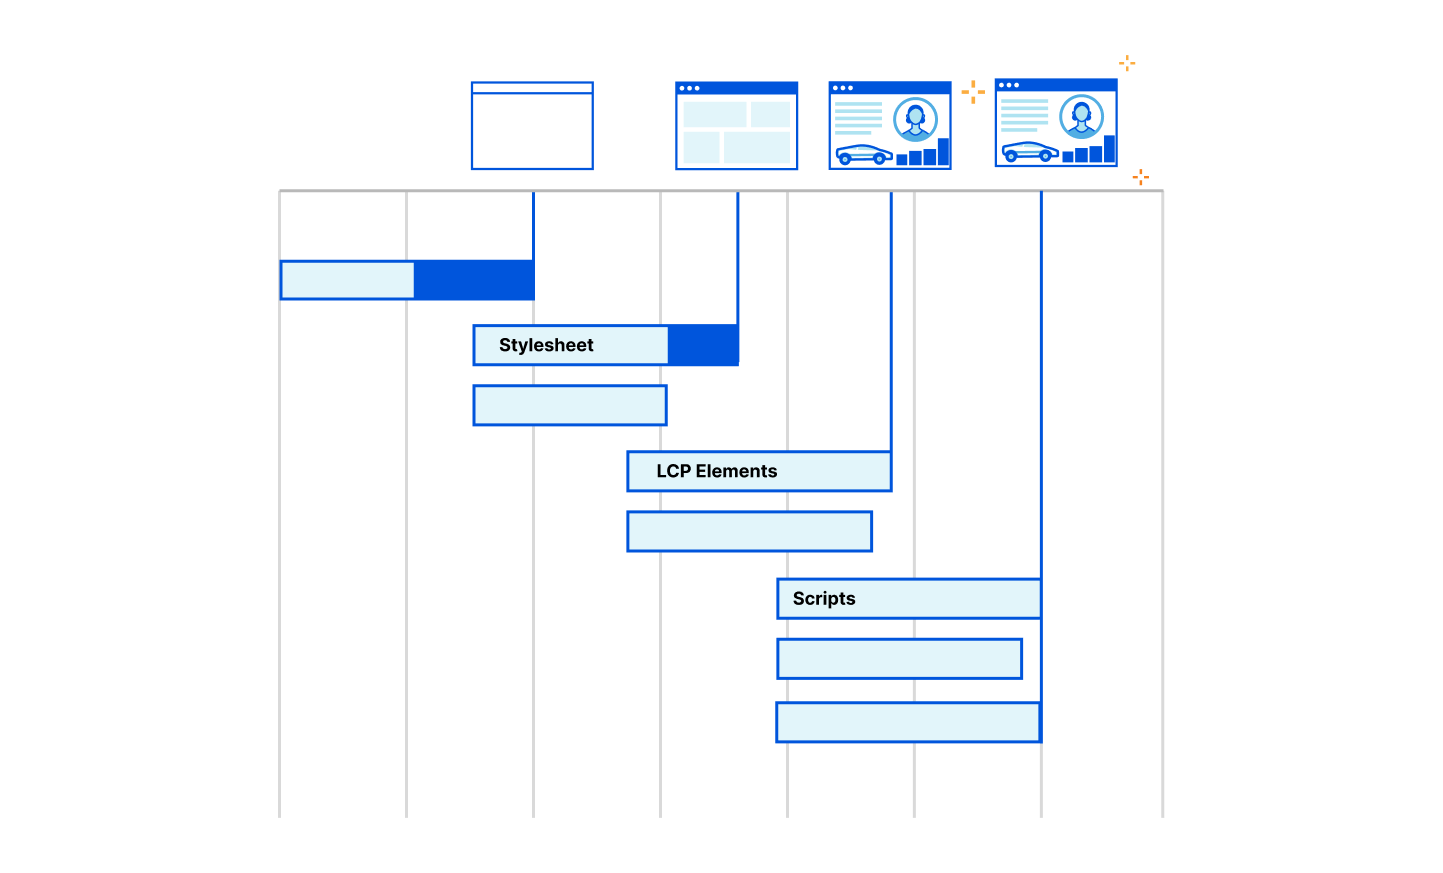
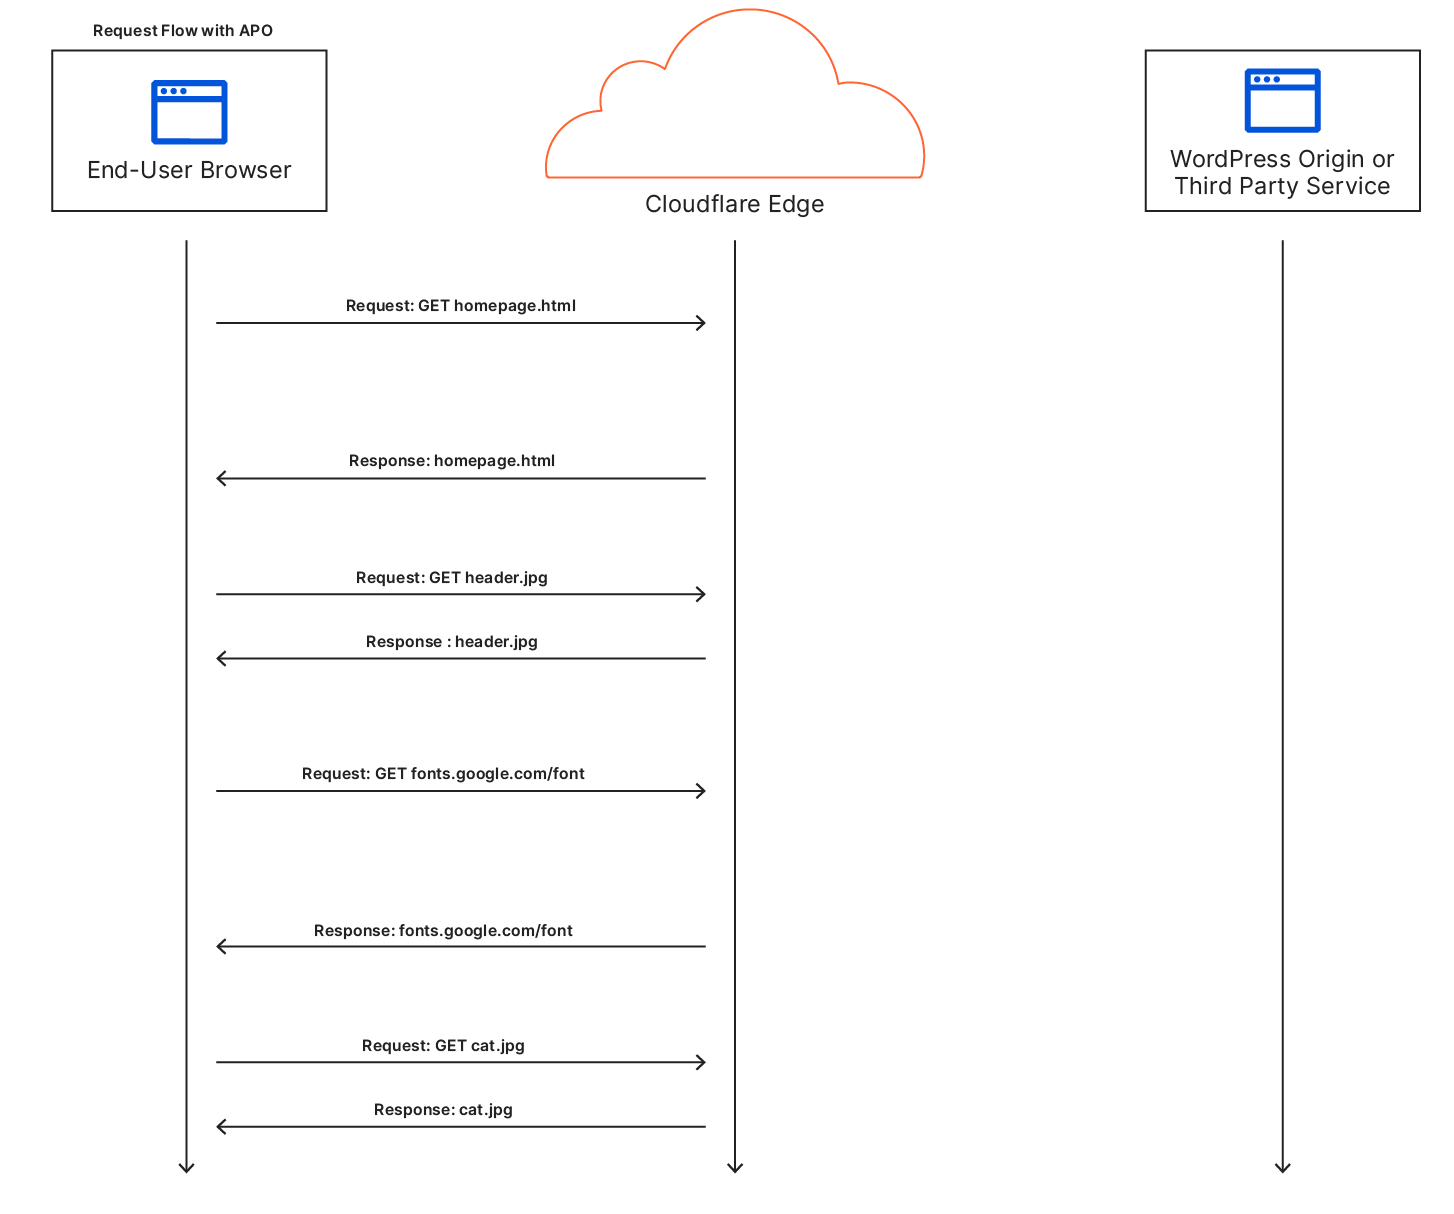
If the response includes additional 3rd party resources like CSS, JavaScript, or other content, the browser may need to fetch and integrate them into the webpage. Typically, browsers like Google Chrome delay loading images until after the resources in the HTML <head> have loaded. This is also known as “blocking” the render of the webpage. However, developers can override this blocking behavior using fetch priority or other methods to boost other content’s priority in the browser. By adjusting an important image's fetch priority, it can be loaded earlier, which can lead to significant improvements in crucial performance metrics like LCP (Largest Contentful Paint).

Images are so central to web pages that they have become an essential element in measuring website performance from Core Web Vitals. LCP measures the time it takes for the largest visible element, often an image, to be fully rendered on the screen. Optimizing the loading of critical images (like LCP images) can greatly enhance performance, improving the overall user experience and page performance.

But here's the challenge – a browser may not know which images are the most important for the visitor experience (like the LCP image) until rendering begins. If the developer can identify the LCP image or critical elements before it reaches the browser, its priority can be increased at the server to boost website performance instead of waiting for the browser to naturally discover the critical images.

In our Smart Hints blog, we describe how Cloudflare will soon be able to automatically prioritize content on behalf of website developers, but what happens if there’s a need to optimize the priority of the images right now? How do you know if a website is in a suboptimal state and what can you do to improve?

Using Cloudflare, developers should be able to improve image performance with heuristics that identify likely-important images before the browser parses them so these images can have increased priority and be loaded sooner.

Identifying Image Priority opportunities

Just increasing the fetch priority of all images won't help if they are lazy-loaded or not critical/LCP images. Lazy-loading is a method that developers use to generally improve the initial load of a webpage if it includes numerous out-of-view elements. For example, on Instagram, when you continually scroll down the application to see more images, it would only make sense to load those images when the user arrives at them otherwise the performance of the page load would be needlessly delayed by the browser eagerly loading these out-of-view images. Instead the highest priority should be given to the LCP image in the viewport to improve performance.

So developers are left in a situation where they need to know which images are on users' screens/viewports to increase their priority and which are off their screens to lazy-load them.

Recently, we’ve seen attempts to influence image priority on behalf of developers. For example, by default, in WordPress 5.5 all images with an IMG tag and aspect ratios were directed to be lazy-loaded. While there are plugins and other methods WordPress developers can use to boost the priority of LCP images, lazy-loading all images in a default manner and not knowing which are LCP images can cause artificial performance delays in website performance (they’re working on this though, and have partially resolved this for block themes).

So how do we identify the LCP image and other critical assets before they get to the browser?

To evaluate the opportunity to improve image performance, we turned to the HTTP Archive. Out of the approximately 22 million desktop pages tested in February 2023, 46% had an LCP element with an IMG tag. Meaning that for page load metrics, LCP had an image included about half the time. Though, among these desktop pages, 8.5 million had the image in the static HTML delivered with the page, indicating a total potential improvement opportunity of approximately 39% of the desktop pages within the dataset.

In the case of mobile pages, out of the ~28.5 million tested, 40% had an LCP element as an IMG tag. Among these mobile pages, 10.3 million had the image in the static HTML delivered with the page, suggesting a potential improvement opportunity in around 36% of the mobile pages within the dataset.

However, as previously discussed, prioritizing an image won't be effective if the image is lazy-loaded because the directives are contradictory. In the dataset,  approximately 1.8 million LCP desktop images and 2.4 million LCP mobile images were lazy-loaded.

Therefore, across the Internet, the opportunity to improve image performance would be about ~30% of pages that have an LCP image in the original HTML markup that weren’t lazy-loaded, but with a more advanced Cloudflare Worker, the additional 9% of lazy-loaded LCP images can also be improved improved by removing the lazy-load attribute.

If you’d like to determine which element on your website serves as the LCP element so you can increase the priority or remove any lazy-loading, you can use browser developer tools, or speed tests like Webpagetest or Cloudflare Observatory.

39% of desktop images seems like a lot of opportunity to improve image performance. So the next question is how can Cloudflare determine the LCP image across our network and automatically prioritize them?

Image Index

We thought that how soon the LCP image showed up in the HTML would serve as a useful indicator. So we analyzed the HTTP Archive dataset to see where the cumulative percentage of LCP images are discovered based on their position in the HTML, including lazy-loaded images.

We found that approximately 25% of the pages had the LCP image as the first image in the HTML (around 10% of all pages). Another 25% had the LCP image as the second image. WordPress seemed to arrive at a similar conclusion and recently released a development to remove the default lazy-load attribute from the first image on block themes, but there are opportunities to go further.

Our analysis revealed that implementing a straightforward rule like "do not lazy-load the first four images," either through the browser, a content management system (CMS), or a Cloudflare Worker could address approximately 75% of the issue of lazy-loading LCP images (example Worker below).

Ignoring small images

In trying to find other ways to identify likely LCP images we next turned to the size of the image. To increase the likelihood of getting the LCP image early in the HTML, we looked into ignoring “small” images as they are unlikely to be big enough to be a LCP element. We explored several sizes and 10,000 pixels (less than 100×100) was a pretty reliable threshold that didn’t skip many LCP images and avoided a good chunk of the non-LCP images.

By ignoring small images (<10,000px), we found that the first image became the LCP image in approximately 30-34% of cases. Adding the second image increased this percentage to 56-60% of pages.

Therefore, to improve image priority, a potential approach could involve assigning a higher priority to the first four "not-small" images.

Chrome 114 Image Prioritization Experiment

An experiment running in Chrome 114 does exactly what we described above. Within the browser there are a few different prioritization knobs to play with that aren’t web-exposed so we have the opportunity to assign a “medium” priority to images that we want to boost automatically (directly controlling priority with “fetch priority” lets you set high or low). This will let us move the images ahead of other images, async scripts and parser-blocking scripts late in the body but still keep the boosted image priority below any high-priority requests, particularly dynamically-injected blocking scripts.

We are experimenting with boosting the priority of varying numbers of images (2, 5 and 10) and with allowing one of those medium-priority images to load at a time during Chromes “tight” mode (when it is loading the render-blocking resources in the head) to increase the likelihood that the LCP image will be available when the first paint is done.

The data is still coming in and no “ship” decisions have been made yet but the early results are very promising, improving the LCP time across the entire web for all arms of the experiment (not by massive amounts but moving the metrics of the whole web is notoriously difficult).

How to use Cloudflare Workers to boost performance

Now that we’ve seen that there is a large opportunity across the Internet for helping prioritize images for performance and how to identify images on individual pages that are likely LCP images, the question becomes, what would the results be of implementing a network-wide rule that could boost image priority from this study?

We built a test worker and deployed it on some WordPress test sites with our friends at Rocket.net, a WordPress hosting platform focused on performance. This worker boosts the priority of the first four images while removing the lazy-load attribute, if present. When deployed we saw good performance results and the expected image prioritization.

export default {
  async fetch(request) {
    const response = await fetch(request);
 
    // Check if the response is HTML
    const contentType = response.headers.get('Content-Type');
    if (!contentType || !contentType.includes('text/html')) {
      return response;
    }
 
    const transformedResponse = transformResponse(response);
 
    // Return the transformed response with streaming enabled
    return transformedResponse;
  },
};
 
async function transformResponse(response) {
  // Create an HTMLRewriter instance and define the image transformation logic
  const rewriter = new HTMLRewriter()
    .on('img', new ImageElementHandler());
 
  const transformedBody = await rewriter.transform(response).text()
 
  const transformresponse = new Response(transformedBody, response)
 
  // Return the transformed response with streaming enabled
  return transformresponse
}
 
class ImageElementHandler {
  constructor() {
    this.imageCount = 0;
    this.processedImages = new Set();
  }
 
  element(element) {
    const imgSrc = element.getAttribute('src');
 
    // Check if the image is small based on Chrome's criteria
    if (imgSrc && this.imageCount < 4 && !this.processedImages.has(imgSrc) && !isImageSmall(element)) {
      element.removeAttribute('loading');
      element.setAttribute('fetchpriority', 'high');
      this.processedImages.add(imgSrc);
      this.imageCount++;
    }
  }
}
 
function isImageSmall(element) {
  // Check if the element has width and height attributes
  const width = element.getAttribute('width');
  const height = element.getAttribute('height');
 
  // If width or height is 0, or width * height < 10000, consider the image as small
  if ((width && parseInt(width, 10) === 0) || (height && parseInt(height, 10) === 0)) {
    return true;
  }
 
  if (width && height) {
    const area = parseInt(width, 10) * parseInt(height, 10);
    if (area < 10000) {
      return true;
    }
  }
 
  return false;
}

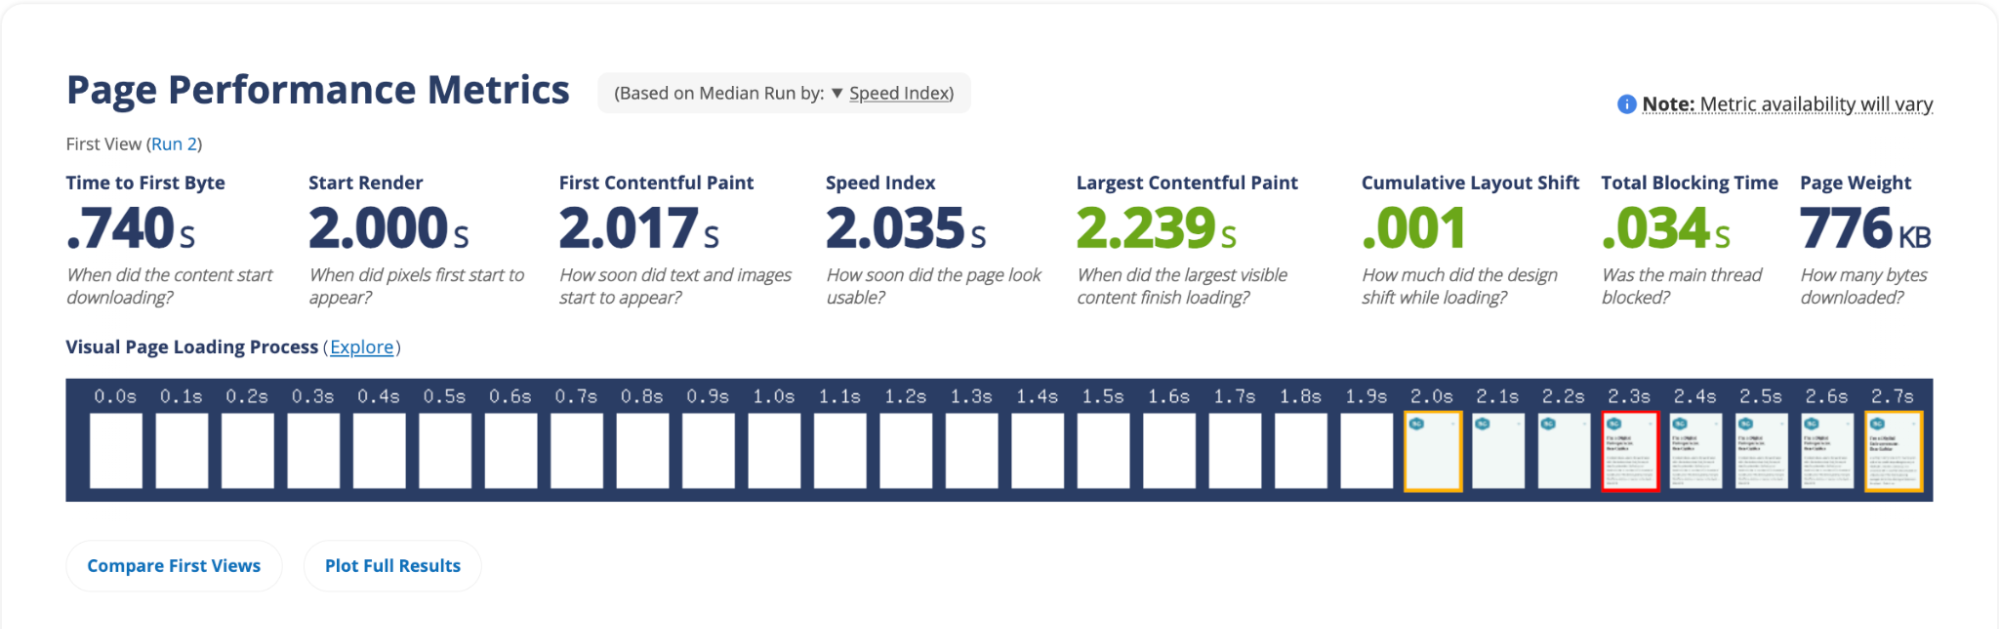
When testing the Worker, we saw that default image priority was boosted into “high” for the first four images and the fifth image remained “low.” This resulted in an LCP range of “good” from a speed test. While this initial test is not a dispositive indicator that the Worker will boost performance in every situation, the results are promising and we look forward to continuing to experiment with this idea.

Speeding up your (WordPress) website is a few clicks away

While we’ve experimented with WordPress sites to illustrate the issues and potential performance benefits, this issue is present across the Internet.

Website owners can help us experiment with the Worker above to improve the priority of images on their websites or edit it to be more specific by targeting likely LCP elements. Cloudflare will continue experimenting using a very similar process to understand how to safely implement a network-wide rule to ensure that images are correctly prioritized across the Internet and performance is boosted without the need to configure a specific Worker.

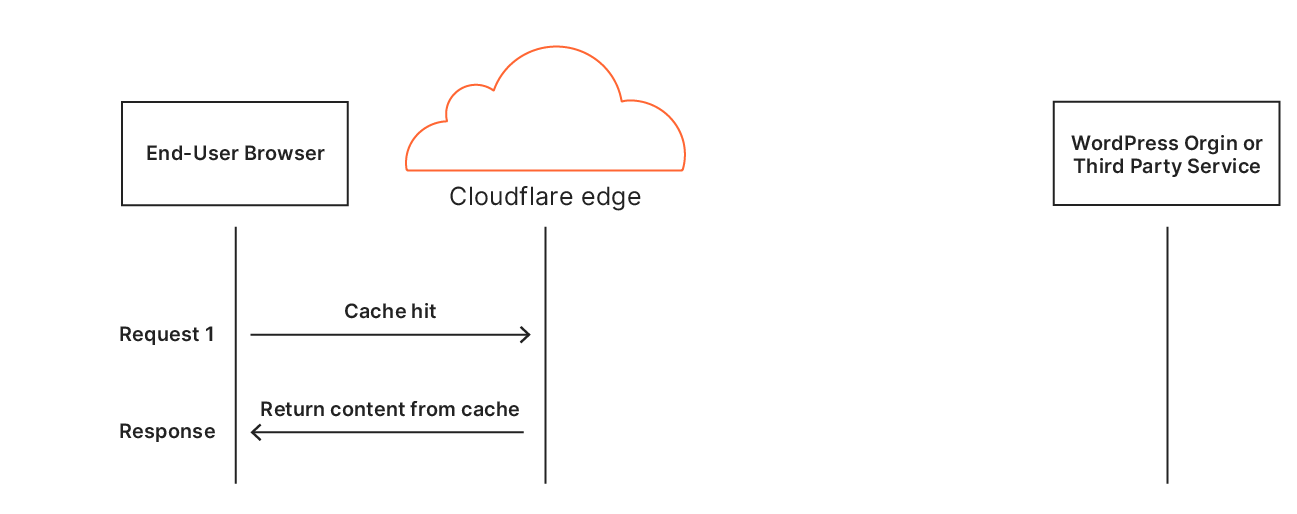
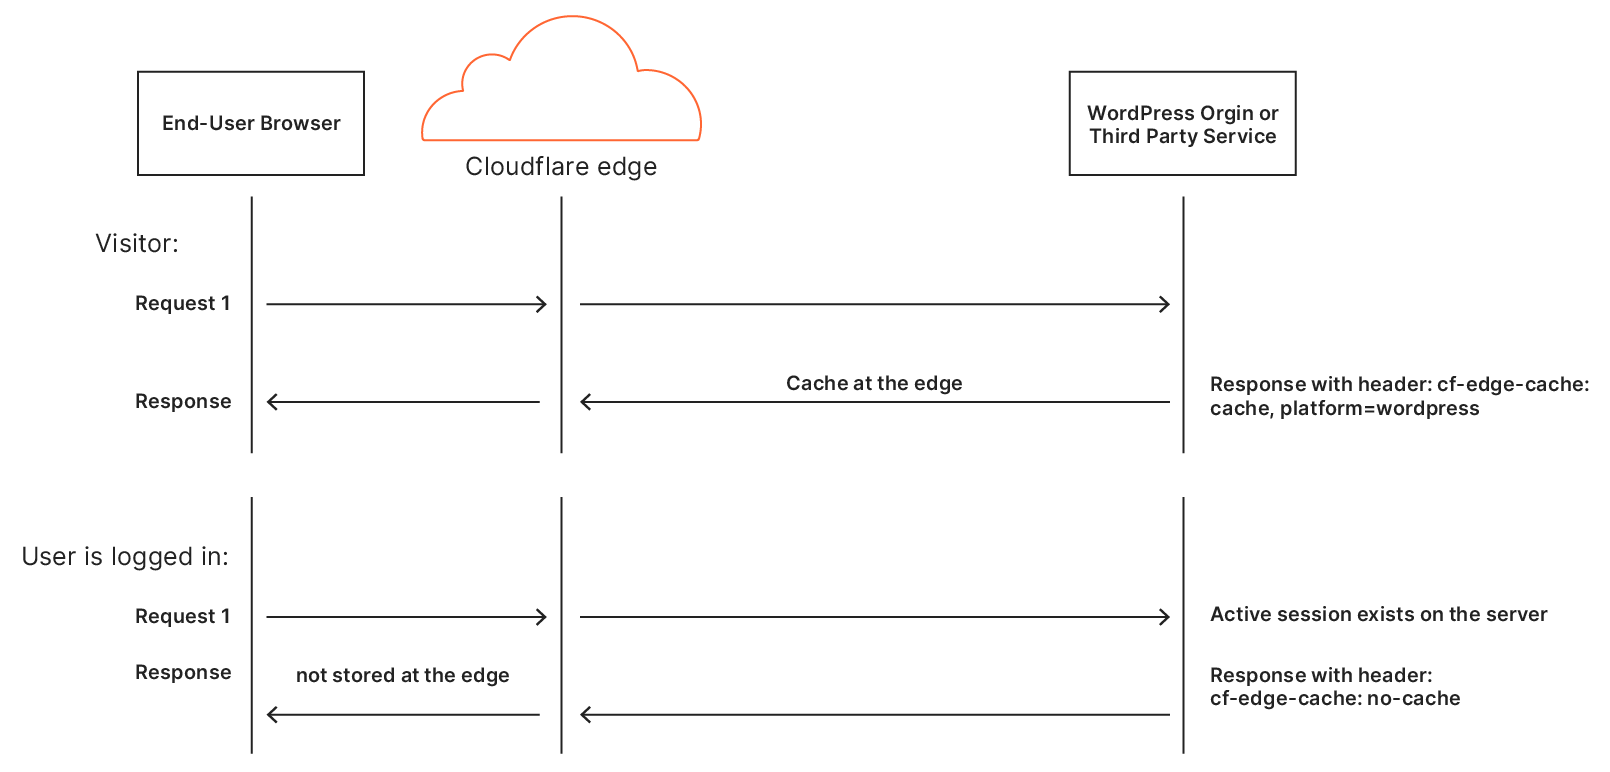
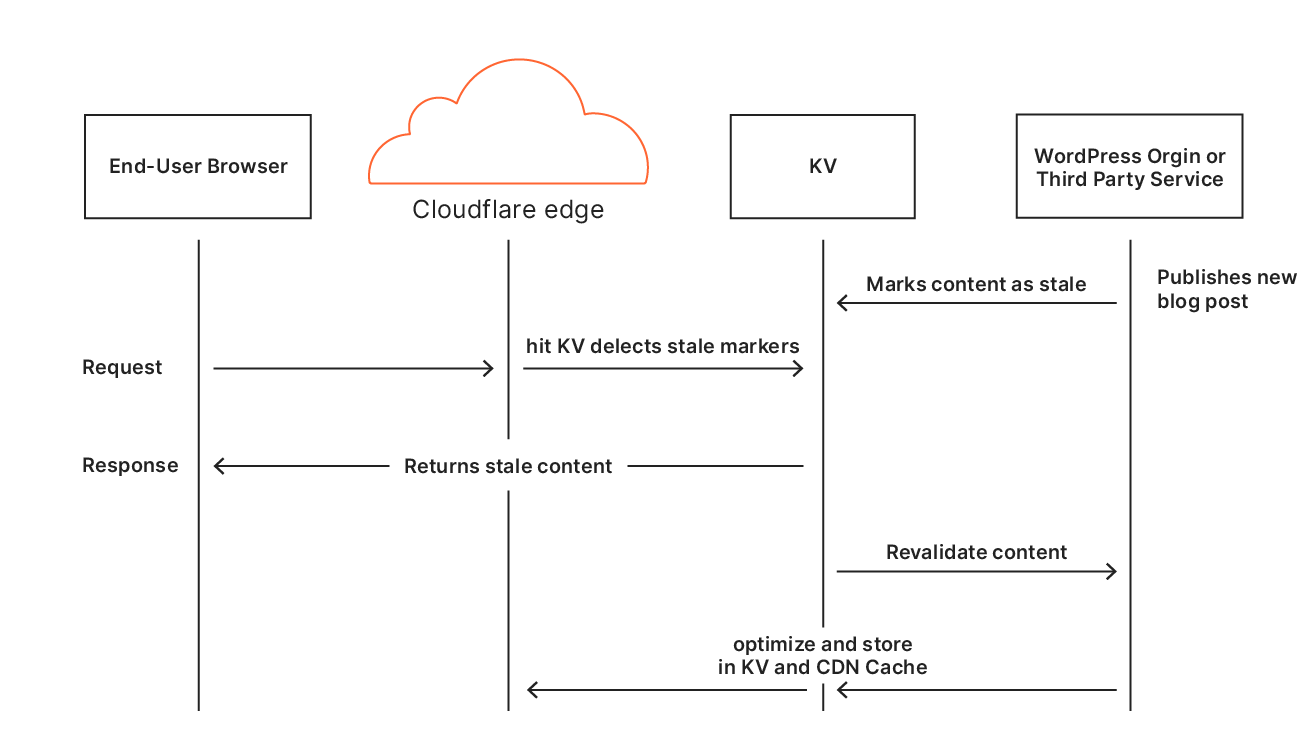
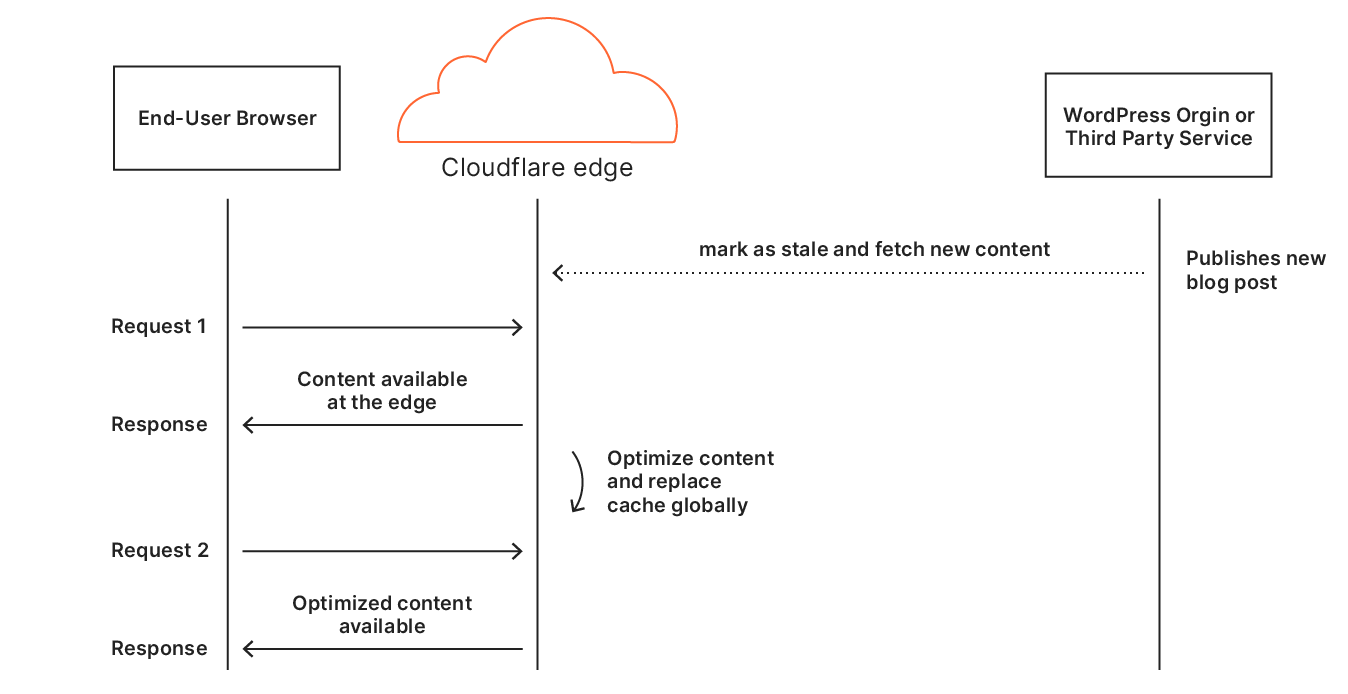
Automatic Platform OptimizationBut what about APO?

Cloudflare’s Automatic Platform Optimization (APO) is a plugin for WordPress which allows Cloudflare to deliver your entire WordPress site from our network ensuring consistent, fast performance for visitors. By serving cached sites, APO can improve performance metrics. APO does not currently have a way to prioritize images over other assets to improve browser render metrics or dynamically rewrite HTML, techniques we’ve discussed in this post. Although this presents a potential opportunity for future development, it requires thorough testing to ensure safe and reliable support.

In the future we’ll may look to include the techniques discussed today as part of APO, however in the meantime we recommend using Snippets (and Experiments) to test with the code example above to see the performance impact on your website.

Get in touch!

If you are interested in using the JavaScript above, we recommended testing with Workers or using Cloudflare Snippets. We’d love to hear from you on what your results were. Get in touch via social media and share your experiences.

How to Back Up WordPress

Post Syndicated from Stephanie Doyle original https://www.backblaze.com/blog/backing-up-wordpress/

If you’ve been considering building a website, you’ve probably at least thought about using WordPress. It’s a free, open-source content management system (CMS) with a seemingly endless library of templates and plugins that allow you to easily customize your website, even if you’re not a savvy web designer—and it’s responsible for powering millions of websites.

Today, we’re digging into how to back up WordPress, including what you should be backing up, how you should be backing up, and where you should be storing those backups.

Why Do You Need to Back Up WordPress?

WordPress is robust enough that you can scale on the platform. For example, you may build a website in WordPress when you’re just a little startup tech company with the dream of providing the best backup service out there, making storage pods and open sourcing your code, and then keep on using WordPress when you’ve evolved into a publicly-traded company that also offers the leading specialized storage cloud. (Yes, we use WordPress for the Backblaze blog.)

And, once you’ve gone through the trouble of building a website, all sorts of things can happen—accidental deletions, server errors, cyberattacks: the list goes on. No matter the size of your business or blog, you never want to be in the position where you lose data. Backups are an essential safeguard to protect one of your most important tools.

What’s the Diff: WordPress.org vs. WordPress.com

If you decide to build in WordPress, you might get confused by the fact that there are two related websites separated by a measly domain suffix. Once you jump into each website, you’ll even see that WordPress.com was created by a company with the same founder as WordPress.org. So, what gives? Which makes more sense for you to use?

This article will take you in-depth about all the differences between the two options, but here’s the short list of the most important info.

WordPress.org

  • Pro: Your site is more customizable, you can add your own analytics, and you can monetize your website.
  • Con: You’re responsible for your own hosting, backups, and, after you download WordPress, your own updates as well.

WordPress.com

  • Pro: It’s designed to be plug-and-play for less experienced users. You choose your pricing tier, and you don’t have to worry about backups and hosting.
  • Cons: You have far more limited options for customization (themes and plugins), and you can’t sell ads on your own site. You also can’t create e-commerce or membership sites.

Hosting and backups may sound intimidating, but they’re fairly easy to handle once you’ve got them set up—not to mention that many folks prefer not to outsource two things that are so central to website security concerns, continuity (you don’t want someone else to own your domain name!), and customer or community data, if you happen to store that. So, for the purposes of this article, when we say “WordPress,” we mean WordPress.org.

Now, let’s dive in to how to back up your site.

What to Back Up

There are two main components to your website: the files and the database.

  1. Files are WordPress core files, plugins, theme files, uploaded images and files, code files, and static web pages.
  2. The database contains everything else, like user information, posts, pages, links, comments, and other types of user-generated content.

Basically, the database contains your posts and lots of information created on your site, but it doesn’t include all the building blocks that create the look of your site or the backend information of your site. If you use restoring your computer as an analogy, your files are your photos, Word docs, etc., and your database includes things like your actual Word program, your login info, and so on.

You definitely want to back up both of these pieces. As is common with open-source communities, WordPress provides great resources in their Help Center, and that includes instructions on backing up your WordPress site.

Most of the services you use to host your website (like GoDaddy or Bluehost) will back up the entire server (read: both your files and your database), but it takes time to request a copy of your whole site. So, you’ll want to make sure you back up your data as well.

How to Back Up Your WordPress Files

Your hosting service may have programs or services you can use to back up, so make sure you check with them first. You’ll also want to make sure your site is syncing between your server and a second location, like a hard drive (HDD) or a network attached storage (NAS) device.

But, since syncing is not the same as back up, you’ll also want to periodically download and save your files. WordPress recommends using FTP Clients or UNIX Shell Skills to copy these files onto your computer. Unless you’re familiar with command line interface (CLI), you’ll probably find FTP Clients easier to deal with.

How to Back Up Your WordPress Database

The simplest way to backup your database is with phpMyAdmin. Once you find out how to access your site’s phpMyAdmin, just follow these steps to back up.

  1. Click on Databases in your phpMyAdmin panel. (Sometimes you won’t have to do this, depending on your version of phpMyAdmin.)
  2. You might have several databases, but click the database you created when you installed WordPress.
  3. In the structure view, you’ll see something like this:
  4. Click Export. You can choose Quick or Custom.

If you’re not familiar with SQL tables, select the Quick option. Then, choose SQL from the dropdown menu. (This is the default format used to import and export MySQL databases, and most systems support it.) Then, click Go.

If you want more control over the backup process, click Custom. Then, you’ll want to follow these steps:

  1. In the Output section, choose Save output to a file. Then, decide if you want to compress your files or not.
  2. Select SQL from the Format menu.
  3. Choose Add DROP TABLE, which is useful for overwriting an existing database.
  4. Choose IF NOT EXISTS, which prevents errors if the table is already in your back up or exported file.
  5. Click Go.

With that, the data will be stored on your computer.

That Was a Lot. Is There an Easier Way?

Sure is. One of the reasons that people love WordPress so much is that there are a ton of plugins you can choose to handle tasks just like backing up. You can find those plugins in the Plugin Browser on the WordPress Admin screens or through the WordPress Plugin Directory.

Often, those plugins also allow you to automate your back ups—which is important when you’re thinking about how often to back up, and creating a redundant backup strategy. Make sure you’re backing up regularly, and you’ll want to do this at a time when there’s minimal activity on your site.

We’ll get into more detail about choosing the correct tool for your site, as well as some plugin recommendations, a little later. But first, let’s talk about backup best practices.

The 3-2-1 Backup Strategy

When you’re thinking about when and how to back up, you need to consider a few things: what types of files you want to store, where you want to store them, and when you want to back up. We’ve already talked about what you need to back up for your WordPress site, so let’s jump into the other details.

We at Backblaze recommend a 3-2-1 backup strategy, and we’ve talked about the specifics of that strategy for both consumers and businesses. The basics of the strategy are this: Keep three copies of your data in two separate local destinations with one copy of your data offsite.

So, if you’re backing up your WordPress site, you’d want to have one copy of your files on your computer and the second on a NAS device or hard drive (for example). Then, you’d want to keep one copy elsewhere. In the old days, that meant moving LTO tapes or servers from location to location, but, of course, now we have cloud storage.

So, to answer the question of where you want to store your backups, the answer is: on multiple devices and in multiple locations. Having your off-site backup be in the cloud is valuable for a few reasons. First, there is a minimal chance of losing data due to theft, disaster, or accident. Second, cloud services are flexible, and easy to integrate with your existing tech. You can easily add or remove access to your backup data, and if you’re running a business, most include features for things like access controls.

Now that you have selected a place to store your backup data, let’s talk about when you want to back up and different tools you can use to do so.

Choosing the Right WordPress Backup Plugin

When you’re trying to decide which tool to use, you should look at a few things to make sure that the plugin fits your needs and will continue to do so long-term.

So, one of the things that you want to look at is how much customization you can do to your backups. The most important part of this is to make sure that you can schedule your backups. It’s important to set your backup time for periods of low traffic to your site. Otherwise, you run the risk of affecting how the site is working for your users (creating slowdowns), or having incomplete backups (because new information is being added at the same time you’re creating the backups).

To ensure you’re picking a tool that will be with you for the long run, it helps to look at:

  • The number of active installations: If there are many installations of the plugin, this would suggest that the backup plugin is popular and more likely to stay in business for the long term.
  • Last updated: There are lots of reasons that tools are updated, but some of the most common are to fix bugs in usage or security vulnerabilities. Cyberattacks are constantly evolving, as are programming languages and programs. If the tool hasn’t been updated in the last 12 months, it’s likely they’re not responding to those changes.
  • Storage support: What we mean by this is that you can choose where to save your files. That makes it easy to set different endpoints for your backups—for instance, if you want the file to save in your cloud storage provider, you’d be able to choose that.

No Time to Research? Here Are Some of Our Favorite Plugins

While many choices are available, we recommend UpdraftPlus and XCloner for WordPress backups. These plugins have an excellent track record and work well in many environments.

UpdraftPlus

With this plugin, you have several options for where to store your backups, which is always a plus. They have a free version as well as several different premium options with different prices (depending on if you need to manage more sites, want included cloud storage, etc.). That means you can pilot the tool and then upgrade if you need more capability. The premium version of UpdraftPlus supports scheduled backups, offers encryption for backup, and reporting so you can track each backup.

XCloner

This WordPress backup plugin lets you schedule backups, apply retention policies, and save storage space by using file compression. The best thing about XCloner? It’s free, and not just bare-bones free: they include many features you’d find in paid backup tools. And, just like UpdraftPlus, you can store your backups to the cloud.

What’s Next?

All that’s left, then, is for you to back up your site. Check out the Backblaze blog for more useful content on backup—we’ve covered backing up your site, but it’s only one piece of your overall backup strategy. If you’re a home user running your site solo, you may want to start with Backblaze Personal Backup. If you’re a business looking for backup, check out Backblaze Business Backup and Backblaze B2 Cloud Storage. And, as always, feel free to comment below with your thoughts and suggestions about what content you’d like to see.

The post How to Back Up WordPress appeared first on Backblaze Blog | Cloud Storage & Cloud Backup.

Introducing Automatic Platform Optimization, starting with WordPress

Post Syndicated from Garrett Galow original https://blog.cloudflare.com/automatic-platform-optimizations-starting-with-wordpress/

Introducing Automatic Platform Optimization, starting with WordPress

Introducing Automatic Platform Optimization, starting with WordPress

Today, we are announcing a new service to serve more than just the static content of your website with the Automatic Platform Optimization (APO) service. With this launch, we are supporting WordPress, the most popular website hosting solution serving 38% of all websites. Our testing, as detailed below, showed a 72% reduction in Time to First Byte (TTFB), 23% reduction to First Contentful Paint, and 13% reduction in Speed Index for desktop users at the 90th percentile, by serving nearly all of your website’s content from Cloudflare’s network. This means visitors to your website see not only the first content sooner but all content more quickly.

With Automatic Platform Optimization for WordPress, your customers won’t suffer any slowness caused by common issues like shared hosting congestion, slow database lookups, or misbehaving plugins. This service is now available for anyone using WordPress. It costs $5/month for customers on our Free plan and is included, at no additional cost, in our Professional, Business, and Enterprise plans. No usage fees, no surprises, just speed.

How to get started

The easiest way to get started with APO is from your WordPress admin console.

1. First, install the Cloudflare WordPress plugin on your WordPress website or update to the latest version (3.8.2 or higher).
2. Authenticate the plugin (steps here) to talk to Cloudflare if you have not already done that.
3. From the Home screen of the Cloudflare section, turn on Automatic Platform Optimization.

Free customers will first be directed to the Cloudflare Dashboard to purchase the service.

Why We Built This

At Cloudflare, we jump at the opportunity to make hard problems for our customers disappear with the click of a button. Running a consistently fast website is challenging. Many businesses don’t have the time nor money to spend on complicated and expensive performance solutions for their site. Even if they do, it can be extremely costly to pay for specialized attention to ensure you get the best performance possible. Having a fast website doesn’t have to be complicated, though. The closer your content is to your customers, the better your site will perform. Static content caching does this for files like images, CSS and JavaScript, but that is only part of the equation. Dynamic content is still fetched from the origin incurring costly round trips and additional processing time. For more info on dynamic versus static content, see our learning center.

WordPress is one of the most open platforms in the world, but that means you are always at risk of incurring performance penalties because of plugins or other sources that, while necessary, may be hard to pinpoint and resolve. With the Automatic Platform Optimization service, we put your website into our network that is within 10 milliseconds of 99% of the Internet-connected population in the developed world, all without having to change your existing hosting provider. This means that for most requests your customers won’t even need to go to your origin, reducing many costly round trips and server processing time. These optimizations run on our edge network, so they also will not impact render or interactivity since no additional JavaScript is run on the client.

How We Measure Web Performance

Evaluating performance of a website is difficult. There are many different metrics you can track and it is not always obvious which metrics most meaningfully represent a user’s experience. As discussed when we blogged about our new Speed page, we aim to simplify this for customers by automating tests using the infrastructure of webpagetest.org, and summarizing both the results visually and numerically in one place.

Introducing Automatic Platform Optimization, starting with WordPress

The visualization gives you a clear idea of what customers are going to see when they come to your site, and the Critical Loading Times provide the most important metrics to judge your performance. On top of seeing your site’s performance, we provide a list of recommendations for ways to even further increase your performance. If you are using WordPress, then we will test your site with Automatic Platform Optimizations to estimate the benefit you will get with the service.

The Benefits of Automatic Platform Optimization

We tested APO on over 500 Cloudflare customer websites that run on WordPress to understand what the performance improvements would be. The results speak for themselves:

Test Results

Metric Percentiles Baseline Cloudflare APO Enabled Improvement (%)
Time to First Byte (TTFB) 90th 1252 ms 351 ms 71.96%
10th 254 ms 261 ms -2.76%
First Contentful Paint
(FCP)
90th 2655 ms 2056 ms 22.55%
10th 894 ms 783 ms 12.46%
Speed Index
(SI)
90th 6428 5586 13.11%
10th 1301 1242 4.52%

Note: Results are based on test results of 505 randomly selected websites that are cached by Cloudflare. Tests were run using WebPageTest from South Carolina, USA and the following environment: Chrome, Cable connection speed.

Most importantly, with APO, a site’s TTFB is made both fast and consistent. Because we now serve the html from Cloudflare’s edge with 0 origin processing time, getting the first byte to the eyeball is consistently fast. Under heavy load, a WordPress origin can suffer delays in building the html and returning it to visitors. APO removes the variance due to load resulting in consistent TTFB <400 ms.

Additionally, between faster TTFB and additional caching of third party fonts, we see performance improvements in both FCP and SI for both the fastest and slowest of the sites we tested. Some of this comes naturally from reducing the TTFB, since every millisecond you shave off of TTFB is a potential millisecond gain for other metrics. Caching additional third party fonts allows us to reduce the time it takes to fetch that content. Given fonts can often block paints due to text rendering, this improves the rate at which the page paints, and improves the Speed Index.

We asked the folks at Kinsta to try out APO, given their expertise in WordPress, and tell us what they think. Brian Li, a Website Content Manager at Kinsta, ran a set of tests from around the world on a website hosted in Tokyo. I’ll let him explain what they did and the results:

At Kinsta, WordPress performance is something that’s near and dear to our hearts. So, when Cloudflare reached out about testing their new Automatic Platform Optimization (APO) service for WordPress, we were all ears.
 
This is what we did to test out the new service:

  1. We set up a test site in Tokyo, Japan – one of the 24 high-performance data center locations available for Kinsta customers.
  2. We ran several speed tests from six different locations around the world with and without Cloudflare’s APO.

 
The results were incredible!
 
By caching static HTML on Cloudflare’s edge network, we saw a 70-300% performance increase. As expected, the testing locations furthest away from Tokyo saw the biggest reduction in load time.
 
If your WordPress site uses a traditional CDN that only caches CSS, JS, and images, upgrading to Cloudflare’s WordPress APO is a no-brainer and will help you stay competitive with modern Jamstack and static sites that live on the edge by default.

Brian’s test results are summarized in this image:

Introducing Automatic Platform Optimization, starting with WordPress
Page Load Speeds for loading a website hosted in Tokyo from 6 locations worldwide – comparing Kinsta, Kinsta with KeyCDN, and Kinsta with Cloudflare APO.

One of the clear benefits, from Kinsta’s testing of APO, is the consistency of performance for serving your site no matter where your visitors are in the world. The consistent sub-second performance shown with APO versus two or three second load times in other setups makes it clear that if you have a global customer base, APO delivers an improved experience for all visitors.

How Automatic Platform Optimization Works

Automatic Platform Optimization is the result of being able to use the power of Cloudflare Workers to intelligently cache dynamic content. By caching dynamic content, we can serve the entire website from our edge network. Think ‘static site’ but without any of the work of having to build or maintain a static site. Customers can keep managing and updating content on their website in the same way and leave the hard work for performance to us. Serving both static and dynamic content from our network results, generally, in no origin requests or origin processing time. This means all the communication occurs between the user’s device and our edge. Reducing the multitude of round trips typically required from our edge to the origin for dynamic content is what makes this service so effective. Let’s first see what it normally looks like to load a WordPress site for a visitor.

Introducing Automatic Platform Optimization, starting with WordPress
A sequence diagram for a typical user visiting a site‌‌

In a regular request flow, Cloudflare is able to cache some of the content like images, CSS, or JS, while other requests go to either the origin or a third party service in order to fetch the content. Most importantly the first request to fetch the HTML for the site needs to go to the origin which is a typical cause of long TTFB, since no other requests get made until the client can receive the HTML and parse it to make subsequent requests.

Introducing Automatic Platform Optimization, starting with WordPress
The same site visit but with APO enabled.

Once APO is enabled, all those trips to the origin are removed. TTFB benefits greatly because the first hop starts and ends at Cloudflare’s network. This also means the browser starts working on fetching and painting the webpage sooner meaning each paint event occurs earlier. Last by caching third party fonts, we remove additional requests that would need to leave Cloudflare’s network and extend the time to display text to the user. Often, websites use fonts hosted on third-party domains. While this saves bandwidth costs that would be incurred from hosting it on the origin, depending on where those fonts are hosted, it can still be a costly operation to fetch them. By rehosting the fonts and serving them from our cache, we can reduce one of the remaining costly round trips.

With APO for WordPress, you can say bye bye to database congestion or unwieldy plugins slowing down your customers’ experience. These benefits are stacked on top of our already fast TLS connection times and industry leading protocol support like HTTP/2 that ensure we are using the most efficient and the fastest way to connect and deliver your website to your customers.

For customers with WordPress sites that support authenticated sessions, you do not have to worry about us caching content from authenticated users and serving it to others. We bypass the cache on standard WordPress and WooCommerce cookies for authenticated users. This ensures customized content for a specific user is only visible to that user. While this has been available to customers with our Business-level service, it is now available for any WordPress customer that enables APO.

You might be wondering: “This all sounds great, but what about when I change content on my site?” Because this service works in tandem with our WordPress plugin, we are able to understand when you make changes and ensure we quickly purge the content in Cloudflare’s edge and refresh it with the new content. With the plugin installed, we detect content changes and update our edge network worldwide with automatic cache purges. As part of this release, we have updated our WordPress plugin, so whether or not you use APO, you should upgrade to the latest version today. If you do not or cannot use our WordPress plugin, then APO will still provide the same performance benefits, but may serve stale content for up to 30 minutes and when the content is requested again.

This service was built on the prototype work originally blogged about here and here. For a more in depth look at the technical side of the service and how Cloudflare Workers allowed us to build the Automatic Platform Optimization service, see the accompanying blog post.

WordPress Today, Other Platforms Coming Soon

While today’s announcement is focused on supporting WordPress, this is just the start. We plan to bring these same capabilities to other popular platforms used for web hosting. If you operate a platform and are interested in how we may be able to work together to improve things for all your customers, please get in touch. If you are running a website, let us know what platform you want to see us bring Automatic Platform Optimization to next.

Building Automatic Platform Optimization for WordPress using Cloudflare Workers

Post Syndicated from Yevgen Safronov original https://blog.cloudflare.com/building-automatic-platform-optimization-for-wordpress-using-cloudflare-workers/

Building Automatic Platform Optimization for WordPress using Cloudflare Workers

This post explains how we implemented the Automatic Platform Optimization for WordPress. In doing so, we have defined a new place to run WordPress plugins, at the edge written with Cloudflare Workers. We provide the feature as a Cloudflare service but what’s exciting is that anyone could build this using the Workers platform.

The service is an evolution of the ideas explained in an earlier zero-config edge caching of HTML blog post. The post will explain how Automatic Platform Optimization combines the best qualities of the regular Cloudflare cache with Workers KV to improve cache cold starts globally.

The optimization will work both with and without the Cloudflare for WordPress plugin integration. Not only have we provided a zero config edge HTML caching solution but by using the Workers platform we were also able to improve the performance of Google font loading for all pages.

We are launching the feature first for WordPress specifically but the concept can be applied to any website and/or content management system (CMS).

A new place to run WordPress plugins?

There are many individual WordPress plugins for performance that use similar optimizations to existing Cloudflare services. Automatic Platform Optimization is bringing them all together into one easy to use solution, deployed at the edge.

Traditionally you have to maintain server plugins with your WordPress installation. This comes with maintenance costs and can require a deep understanding of how to fine tune performance and security for each and every plugin. Providing the optimizations on the client side can also lead to performance problems due to the costs of JavaScript execution. In contrast most of the optimizations could be built-in in Cloudflare’s edge rather than running on the server or the client. Automatic Platform Optimization will be always up to date with the latest performance and security best practices.

How to optimize for WordPress

By default Cloudflare CDN caches assets based on file extension and doesn’t cache HTML content. It is possible to configure HTML caching with a Cache Everything Page rule but it is a manual process and often requires additional features only available on the Business and Enterprise plans. So for the majority of the WordPress websites even with a CDN in front them, HTML content is not cached. Requests for a HTML document have to go all the way to the origin.

Building Automatic Platform Optimization for WordPress using Cloudflare Workers

Even if a CDN optimizes the connection between the closest edge and the website’s origin, the origin could be located far away and also be slow to respond, especially under load.

Move content closer to the user

One of the primary recommendations for speeding up websites is to move content closer to the end-user. This reduces the amount of time it takes for packets to travel between the end-user and the web server – the round-trip time (RTT). This improves the speed of establishing a connection as well as serving content from a closer location.

Building Automatic Platform Optimization for WordPress using Cloudflare Workers

We have previously blogged about the benefits of edge caching HTML. Caching and serving from HTML from the Cloudflare edge will greatly improve the time to first byte (TTFB) by optimizing DNS, connection setup, SSL negotiation, and removing the origin server response time.If your origin is slow in generating HTML and/or your user is far from the origin server then all your performance metrics will be affected.

Most HTML isn’t really dynamic. It needs to be able to change relatively quickly when the site is updated but for a huge portion of the web, the content is static for months or years at a time. There are special cases like when a user is logged-in (as the admin or otherwise) where the content needs to differ but the vast majority of visits are of anonymous users.

Zero config edge caching revisited

The goal is to make updating content to the edge happen automatically. The edge will cache and serve the previous version content until there is new content available. This is usually achieved by triggering a cache purge to remove existing content. In fact using a combination of our WordPress plugin and Cloudflare cache purge API, we already support Automatic Cache Purge on Website Updates. This feature has been in use for many years.

Building automatic HTML edge caching is more nuanced than caching traditional static content like images, styles or scripts. It requires defining rules on what to cache and when to update the content. To help with that task we introduced a custom header to communicate caching rules between Cloudflare edge and origin servers.

The Cloudflare Worker runs from every edge data center, the serverless platform will take care of scaling to our needs. Based on the request type it will return HTML content from Cloudflare Cache using Worker’s Cache API or serve a response directly from the origin. Specifically designed custom header provides information from the origin on how the script should handle the response. For example worker script will never cache responses for authenticated users.

HTML Caching rules

With or without Cloudflare for WordPress plugin, HTML edge caching requires all of the following conditions to be met:

  • Origin responds with 200 status
  • Origin responds with "text/html" content type
  • Request method is GET.
  • Request path doesn’t contain query strings
  • Request doesn’t contain any WordPress specific cookies: "wp-*", "wordpress*", "comment_*", "woocommerce_*" unless it’s "wordpress_eli" or "wordpress_test_cookie".
  • Request doesn’t contain any of the following headers:
    • "Cache-Control: no-cache"
    • "Cache-Control: private"
    • "Pragma:no-cache"
    • "Vary: *"

Note that the caching is bypassed if the devtools are open and the “Disable cache” option is active.

Edge caching with plugin

The preferred solution requires a configured Cloudflare for WordPress plugin. We provide the following features set when the plugin is activated:

  • HTML edge caching with 30 days TTL
  • 30 seconds or faster cache invalidation
  • Bypass HTML caching for logged in users
  • Bypass HTML caching based on presence of WordPress specific cookies
  • Decrease load on origin servers. If a request is fetched from Cloudflare CDN Cache we skip the request to the origin server.

How is this implemented?

When an eyeball requests a page from a website and Cloudflare doesn’t have a copy of the content it will be fetched from the origin. As the response is sent from the origin and goes through Cloudflare’s edge, Cloudflare for WordPress plugin adds a custom header: cf-edge-cache. It allows an origin to configure caching rules applied on responses.

Building Automatic Platform Optimization for WordPress using Cloudflare Workers

Based on the X-HTML-Edge-Cache proposal the plugin adds a cf-edge-cache header to every origin response. There are 2 possible values:

  • cf-edge-cache: no-cache

The page contains private information that shouldn’t be cached by the edge. For example, an active session exists on the server.

  • cf-edge-cache: cache, platform=wordpress

This combination of cache and platform will ensure that the HTML page is cached. In addition, we ran a number of checks against the presence of WordPress specific cookies to make sure we either bypass or allow caching on the Edge.

If the header isn’t present we assume that the Cloudflare for WordPress plugin is not installed or up-to-date. In this case the feature operates without a plugin support.

Edge caching without plugin

Using the Automatic Platform Optimization feature in combination with Cloudflare for WordPress plugin is our recommended solution. It provides the best feature set together with almost instant cache invalidation. Still, we wanted to provide performance improvements without the need for any installation on the origin server.

We provide the following features set when the plugin is not activated:

  • HTML edge caching with 30 days TTL
  • Cache invalidation may take up to 30 minutes. A manual cache purge could be triggered to speed up cache invalidation
  • Bypass HTML caching based on presence of WordPress specific cookies
  • No decreased load on origin servers. If a request is fetched from Cloudflare CDN Cache we still require an origin response to apply cache invalidation logic.

Without Cloudflare for WordPress plugin we still cache HTML on the edge and serve the content from the cache when possible. The logic of cache revalidation happens after serving the response to the eyeball. Worker’s waitUntil() callback allows the user to run code without affecting the response to the eyeball and is run in background.

We rely on the following headers to detect whether the content is stale and requires cache update:

  • ETag. If the cached version and origin response both include ETag and they are different we replace cached version with origin response. The behavior is the same for strong and weak ETag values.
  • Last-Modified. If the cached version and origin response both include Last-Modified and origin has a later Last-Modified date we replace cached version with origin response.
  • Date. If no ETag or Last-Modified header is available we compare cached version and origin response Date values. If there was more than a 30 minutes difference we replace cached version with origin response.

Getting content everywhere

Cloudflare Cache works great for the frequently requested content. Regular requests to the site make sure the content stays in cache. For a typical personal blog, it will be more common that the content stays in cache only in some parts of our vast edge network. With the Automatic Platform Optimization release we wanted to improve loading time for cache cold start from any location in the world. We explored different approaches and decided to use Workers KV to improve Edge Caching.

In addition to Cloudflare’s CDN cache we put the content into Workers KV. It only requires a single request to the page to cache it and within a minute it is made available to be read back from KV from any Cloudflare data center.

Updating content

After an update has been made to the WordPress website the plugin makes a request to Cloudflare’s API which both purges cache and marks content as stale in KV. The next request for the asset will trigger revalidation of the content. If the plugin is not enabled cache revalidation logic is triggered as detailed previously.

We serve the stale copy of the content still present in KV and asynchronously fetch new content from the origin, apply possible optimizations and then cache it (both regular local CDN cache and globally in KV).

Building Automatic Platform Optimization for WordPress using Cloudflare Workers

To store the content in KV we use a single namespace. It’s keyed with a combination of a zone identifier and the URL. For instance:

1:example.com/blog-post-1.html => "transformed & cached content"

For marking content as stale in KV we write a new key which will be read from the edge. If the key is present we will revalidate the content.

stale:1:example.com/blog-post-1.html => ""

Once the content was revalidated the stale marker key is deleted.

Moving optimizations to the edge

On top of caching HTML at the edge, we can pre-process and transform the HTML to make the loading of websites even faster for the user. Moving the development of this feature to our Cloudflare Workers environment makes it easy to add performance features such as improving Google Font loading. Using Google Fonts can cause significant performance issues as to load a font requires loading the HTML page; then loading a CSS file and finally loading the font. All of these steps are using different domains.

The solution is for the worker to inline the CSS and serve the font directly from the edge minimizing the number of connections required.

If you read through the previous blog post’s implementation it required a lot of manual work to provide streaming HTML processing support and character encodings. As the set of worker APIs have improved over time it is now much simpler to implement. Specifically the addition of a streaming HTML rewriter/parser with CSS-selector based API and the ability to suspend the parsing to asynchronously fetch a resource has reduced the code required to implement this from ~600 lines of source code to under 200.

export function transform(request, res) {
  return new HTMLRewriter()
    .on("link", {
      async element(e) {
        const src = e.getAttribute("href");
        const rel = e.getAttribute("rel");
        const isGoogleFont =
          src.startsWith("https://fonts.googleapis.com")

        if (isGoogleFont && rel === "stylesheet") {
          const media = e.getAttribute("media") || "all";
          const id = e.getAttribute("id") || "";
          try {
            const content = await fetchCSS(src, request);
            e.replace(styleTag({ media, id }, content), {
              html: true
            });
          } catch (e) {
            console.error(e);
          }
        }
      }
    })
    .transform(res);
}

The HTML transformation doesn’t block the response to the user. It’s running as a background task which when complete will update kv and replace the global cached version.

Building Automatic Platform Optimization for WordPress using Cloudflare Workers

Making edge publishing generic

We are launching the feature for WordPress specifically but the concept can be applied to any website and content management system (CMS).